Transcripts
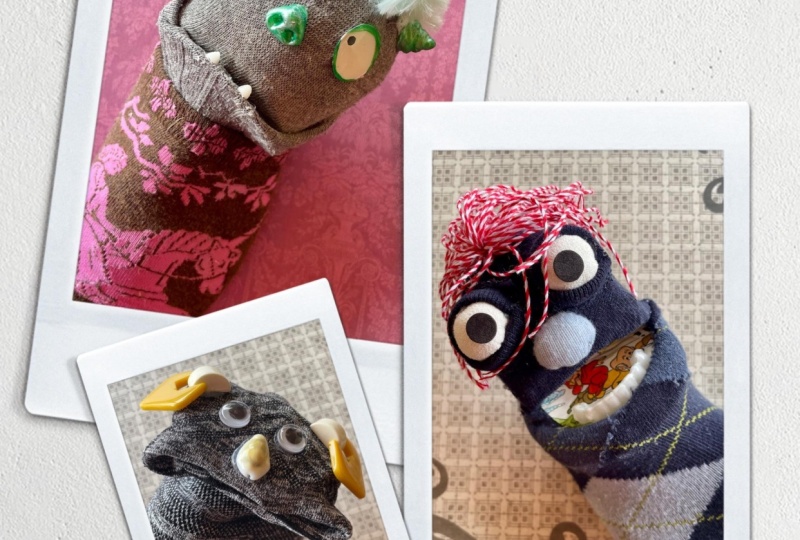
1. Intro: Puppets are full of
character and personality, and they're not even hard
to make when you start with basic materials
like a sock puppet. This class will show
you how to make sock puppets from the easiest of beginner puppets
to something a bit more challenging for the
more seasoned crafter. All while using commonly
available supplies, that will cost you
little to nothing. Hey, Filk, my name is Lucy, and I run a small business
called Boho Creations, where I design dolls, plushies, and puppets for sewing
and embroidery machines. I also have a degree in physics, and I worked as an
engineer for many years. So experimenting and
inventing new ways of doing things is,
well, it's fun for me. It's what I like to
do. We'll talk about many different materials
you can use for a sock puppet and where
to find them on a budget. Then we'll make three
different puppets at different skill levels. These can be made by kids or adults and make a great
party activity for all ages. At the end of the class, I'll
show you some examples of more sock puppets
you can make in case you want to take your
skills even further. You can check out
my website ballyhoo creations.com for
patterns and videos. And of course, I would love for you to share your puppet as a class project or post any questions in the class
discussion or comment section. Don't forget to leave
a class review. So scavenge up a
few materials at your house or make a quick
run to the Dollar Store, and let's have some
fun with sock puppets.
2. Project: Boom Our project for this
class will be a sock puppet. You saw that coming, didn't you? Make any puppet from a sock, and it qualifies as
your class project, snap a quick photo
of your project, and upload it to the
class project section so we can share with each other. Going to need at least one sock, new or old, but clean socks are preferred. No judging, no. If you have an old sock that
has a lot of lint on it, you can use a ln brush
or a ln shaver to remove the little pills and
that'll make it much cleaner. And you can use different
sizes of socks. You can use fuzzy socks or sweat socks or regular socks.
It doesn't really matter. Knee highs give you a lot
more sock to work with, but you can use cru socks
or ankle socks as well. They're just a
little more limited. You may have to stitch
things together, you know. You see what I'm
saying. You're also going to need something
stiff to make a mouth plate. You can use cardboard, chipboard from food
packaging like this, a thin plastic, like from a
margarine tub, a plastic bin. I like to use rubber
gasket material that you can find in the plumbing
section of hardware stores, but that's not necessary. Any old cereal box
will do for this, and plus a little bit of tape to hold the
two sides together. Glue is going to be needed
to attach the mouth plate, and you might want it for
many other things as well. I will be using a
fabric hot glue because when I'm teaching
video classes like this one, I need things to dry fast, so I'm using hot glue. But if you have the
time to let things dry, you can use a fabric
safe glue like faber tack or Fabri fix
or even tacky glue. You can also hand
stitch your puppet instead of using glue
in many instances. I just want you to know that when you see me using hot glue, that's for my own convenience. You can substitute any fabric
glue or hand stitching. Use whatever method
you're comfortable with. If you're working with kids, I would suggest something
like tacky glue. And then you'll need
to choose how to accessorize your
puppet with its eyes, its nose, its hair, maybe
some clothes, or arms. We're going to get into all of those options in the
lessons coming up. But the only real required
materials are a sock, some mouth plate material, and fabric safe glue
or needle and thread. It's really that easy.
3. Puppet Eye Options: A lot of a puppet's character
comes from their face, from their eyes, their
nose, their moving mouth. So let's take a little
bit of time to talk about different options that you have for the eyes
of your puppet. Of course, they are googly eyes. Those are the traditional
sock puppet eyes. You could also cut
out pieces of felt to make eyes or any
kind of fabric, especially non fray fabrics
like felt or fleece. These are called safety eyes, and you can purchase these in craft stores or buy them online. They basically have
a stem that has a attachment that you put this
on the top of the fabric, and you put this on
the bottom underneath and you lock those together and so the eye won't come out, and you can get them in a
lot of different types. There's just blue,
yellow, brown, green, these are like frog eyes, and then even just
a plain black. It's also available. So you got a lot of options
with safety eyes. If they're quick
and easy to use. You can also purchase
different kinds of glass eyes, and these are just a glass, it's called a glass cabacon, and then it has some piece
of paper vinyl on the back. Of course, you can also do a do it yourself version of this. These are different
versions of resin or glass eyes that you can
glue onto your puppet. You can either get
the glass cabachons in different sizes that you then glue over a
printed eyeball like this. You can also make
your own using resin. Here, I have a
silicone mold that has different circular little
globe shapes on it, and I use ultra violet
resin for mine, but there are other types of resin that don't
require the UV light. You just layer them on. I'm not going to get into detail on how resin eyes are made. But if you're already
into resin crafts, that's something that
you can consider. You can also use printed eyes, whether you make these
yourself like on a photoshop or you can buy sheets of these and print
them out yourself. Then there's a dome type of
resin that you can use to just coat over the top of it
to give it a clear glaze. That's another option,
and it will end up looking like these that you
purchase at the craft store. Then we get into ball eyes, and I'm going to show you how to make these particular ball eyes. This is actually a ball inside. You could use ping pong balls. That's more traditional for
a Muppet style of puppet. And these, I actually like to cut my
ping pong ball cut a hole, and then I like to
cover mine in fabric. But that's just my preference. I don't like the plastic
ping pong ball look, but covered in fabric, I can then stitch it on instead of gluing it on, so
that's an option. I'm going to show you how to make a smaller version of that. And then the little
felt circles here. If you don't feel
comfortable cutting out circles because
it's really hard to do, you could try to
use a die cutter, or you can even purchase
little felt circles that are made to go on the bottom of furniture to keep
it from scratching, and that can work too. If you're good with painting, you can look for what are
called little wooden coins. You can paint those, different however good you are
at painting eyes. You can do that and then
glue those onto a puppet. Embroidery is also an
option with puppet eye, you could either do machine embroidery or hand embroidery. There's just some examples
of some embroidered eyes. Buttons are also both a
traditional sock puppet eye and can be a more advanced eye depending on what you
do with your buttons. You can use fabric
covered buttons and then add a little pupil to
it with some paint. I used a fabric slick paint on these just to
make the pupils. You could add a little
highlight if you want to. You could use different sizes
of buttons and layer them. So like if I took
a white button, and then put a blue button and then put a tiny
little black button. And it's going to
be hard without stitching it on to
make it stay in place, but you see how you get a nice little colored
eye that way. So that's another
option for eyes. Then there are lots of
different options with beads. You can use wooden
beads like I have here. These are plastic beads. There's some glass beads if you want to do
little beady eyes. And then with everything here, you can always combine them. So you could combine a button with a bead to be the pupil, or you can take a bead like
this, big wooden bead, and then put a
little black bead to be the pupil or
something like that. You get what I'm saying. You
could use a piece of felt. Then use a bead to be the pupil or the iris or
something like that. Consider layering any or all of these materials together to
create your own unique eyes. I know that was a lot of
information just about eyes, but there are a lot
of options out there, and you should
play around with a few and see which ones you like. We talked about Google eyes. We talked about felt. We
talked about embroidery. We talked about
fabric covered balls, which you'll see
in a little bit. We talked about plastic
safety eyes that you can buy at the craft store,
beads or buttons. We talked about printed
or painted eyes, as well as resinan glass, and even some I
didn't show you like bottle caps or plastic spoons can be used for puppet eyes. Play around, see what you like.
4. Puppet Nose Options: Op. Another thing you can play around with on your
puppet's face is the nose. There's not quite as
many options as eyes, but there are a lot
of different ways that you can make a puppet nose. Let me show you some
of my favorites. Stuffed fabric noses are for
that classic puppet look. And these are just a circle
of fabric that you stitch around and gather it up with a piece of
stuffing in the middle, and you wind up with this
nice little ball shaped nose that sticks off of
the puppet's face. I'm going to be showing
you how we make these. You can also go a little
further and add some nostrils, and I've used a pencil
to just shade that in. Pompoms are a classic
sock puppet nose. You just glue them on
there, and of course, they come in different colors
and sizes and textures, and you can even make
your own pompoms. Safety noses are another option, and just like the safety eyes, they have a stem and a backing that you push together
to lock that in place, and they even come with
little textured animal. This actually looks like like a dog or a bear or
something's nose. Makeup sponges are a
new favorite of mine. These are for putting on makeup, you can buy them in any cosmetic
section or dollar store, something like that, and
they're very squishy. They come in different
shapes like this. I actually like to cut
them in half so that you have a lot bigger
gluing surface on the back. You can use paints on these. Here's some metallic
paints that I've used. These are the smaller
little mini makeup sponges, and it's very easy to just glue that onto the back on
the face of your puppet. You could always
use a jingle bell for a nose for a noisy puppet. You could even use fake flowers. This is actually a foam flower, but a fabric flower
would work too for some kind of themed puppt.
That's a nice idea. Clay is an option, but you don't want your
nose to be too heavy, but air clay or foam clay is
actually very lightweight, and here's one that I'm going
to show you how to sculpt. And this is just some
play dough air clay that you can pick up
at the Dollar Store, but you can also buy foam clay, that's a better
quality for like, cost play type of foam clay,
but either one will work. Once you've sculpted
a clay nose, you can you can cover
that in fabric, too, and then sew or glue
that onto your puppet. This is a bigger version
with foam clay inside. That was the puppet noses that I had examples of that
I could show you. We talked about how to
stuff a piece of fabric with fiber fill to make a
classic squishy puppet nose. We also showed some pompoms, you could use sponges, you could sculpt some
air dried foam clay. You could use a safety
nose from the craft store, little plastic like doggy nose. You could use a bell or a button or a flower
or whatever you want. You also have the option of not putting a nose
on your puppet.
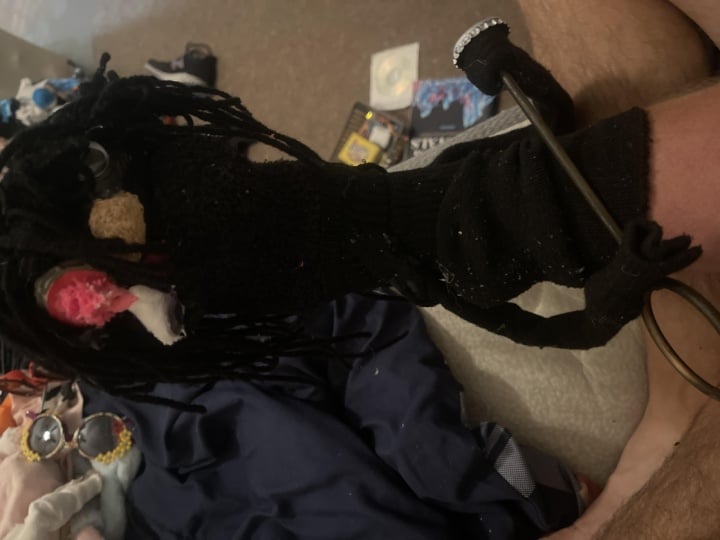
5. Basic Puppet: Boom boom boom boom. Let's get started
with making the most basic of sock puppets. This one is very simple with craft store materials or
even dollar store materials, and I'm going to show you
how to make this one. First, before we get
anything more advanced, you just need a
few cheap supplies and some glue to make
this little guy. This is just a ankle sock. There's the heel is here, the toe is here, and
there's no part of the leg. And for a lot of people
do sock puppets, where the toe is what
you're moving as the mouth. I'm going to show
you a different way. Next, where we use the heel as the mouth, but for this one, let's just do the
traditional old, stick your hand in the toe. And you push the
toe in like this, and now you've got a mouth. Okay, but we're going to give it a rigid mouth plate so that it's easier
to work that mouth. For the mouth plate, I've got a few different
options here, and you can any kind of
rigid like cardboard. This is chip board, think like cereal box, food packaging. This is a piece of gasket rubber that's nice and flexible. Even a plastic, this
is from a dish pan, and I just drew a circle. This is the bottom
of a dish pan. If you have a plastic tub, a margarine lid,
anything like that, then plastic like this, that's easy to cut with
scissors. That works too. Cardboard, like I
said, foam core, if you have balsa wood that you can work with any
of those things work. For these mouth plates,
what we're going to do is cut your circle in half. And you can either cut it directly like
straight in the middle. That's one option, or you
can cut it a little off to the side and give it either
an overbite or an underbite. So I'll show an example of that. You can also do it where it's more of an oval
instead of a circle. But let's just do a circle
to stay simple here. I'm going to cut
not in the center. And then we're going to glue
the two halves, not glue. Sorry. We're going to tape
the two halves back together, and that creates our
hinge for the mouth. I leave about a quarter
inch in between the two pieces and just smack
a piece of tape on there. And you can do both
sides if you want. I like it. Both sides, that's less likely
to come apart. And you can trim this around
the edge if you want to. I find that it's
not even necessary. Just press that tape down and
now we have a hinged mouth. And that should
hold pretty good. I'm using duct tape. You could use packaging tape
or some other kind of tape, but duct tape is
pretty strong. Okay. So there's a mouth plate there, I've got a cardboard
mouth plate here, and we've got a
couple to start with. What we're going to do is just
turn our sock inside out, and we need to get this seam as much into this corner as
we can when we're gluing. And make sure you
get all the way to the edge, but
not in the hinge. And then fill it in
it a little bit. You don't want too much
glue because it will seep through your fabric. I'm going to do one side first. Like I said, I really
want that to be flattened out and
then p like that. Press that down until it sticks. If you were using some kind of fabric glue that
takes time to dry, you could always use
a clothes pin or a little clamp or something
to hold the mouth closed, make sure that glue sticks. Hot glue, though, it should
set up pretty quickly for us. And see how I'm
getting the sock kind of flat up into that
hinge like that. Again, I'm gluing this
to the wrong side, so I turn my sock
inside out so that I could glue this
flop it on there, press it down and hold it
until your glue sets up. While I'm holding this down, let's talk about the size
of the circle to your sock. You want the circle to be around the same width or diameter
of how wide your sock is. This one's a little small. This one's a little bit closer. This one's going to be too
big. That's almost okay. Little hangs over.
So a little bit bigger or a little
bit smaller is fine, but you don't want to have
a really tiny circle. Here's my take measure. You don't want
something that size. In your puppet,
it's going to have a little tiny mouth. It's
going to be hard to work. I would say at least 3 "
for adults and children. You need this is a three
inch diameter circle. You can see what
I'm talking about. 3 ". Okay? Which would be? What is that? 7.5 centimeters? Or as much as 4 ", which is a 10 centimeters. Though anywhere 3-4
" is pretty good, you could make it longer. If you wanted to make it an
oval, you could do that, but you don't want it to be
too wide, because I mean, if you just look at the
width of your hand, you don't need it to be
too much bigger than that. Now, my hands are kind of small. If you had a bigger hand, maybe a little bit bigger, but again, I mean, socks aren't huge, so you don't need
it to be that big. This should be dry, and
we're going to flip them right side. Come on, dude. There you go. Okay. Okay. And that's
our mouth plate. Get my fingers in there. And you can see how there's a couple of
ways you can do this. You can either pull this
corner past the corner of the circle or you can also let the fabric come in forward and give it kind
of more of a smiley look. See that? Okay. That
is our mouth plate. And for all the puppets
that we're going to do, you use the same basic
technique for the mouth plate. You could put it at the toe of the sock or back at the heel, which we're going to
do on the next puppet. So we're ready to go ahead and make this an
actual character. And because this is just going to be my basic sock puppet, I am going to use down
and dirty Google eye. I mean, it doesn't get simpler
than Googly eyes, right? And then just a
little pom pom nose. And that will be our
first basic sock puppet that you can put together in
just a matter of minutes. It really doesn't take long. But I think I actually
want to step this up a bit because I've got
these giant pom poms that I haven't used in forever. I think I actually want to
add these onto my puppet, onto the head like this, and then attach the
eyeballs to that. And yeah, I did glue
it to the table. It happens, and it's very easy to clean it up,
but don't do that. That's not the intention,
but it is easy to fix. Once the glue is dry, I can just snip that off of
the back of the pump. Our first puppet is finished. And in this particular lesson, you learned how to
make the most basic of sock puppet
using Google eyes. I used some little pompoms. Actually, big pompoms, a
little pompom for the nose, and just a basic sock with aboard mouth
plate in this one. Anybody can make
this, you probably already have these
supplies at home or a quick trip to
some nearby store could probably get you
all of these supplies.
6. Better Puppet Head: Boom boom boom Let's try some more puppet
making skills by creating a different kind
of sock puppet head. The mouth plate on
this next puppet is done the same
as we did before, so I'll be speeding
through that part. But I used a piece
of gasket rubber for a more flexible mouth
instead of cardboard. And we'll put the mouth
at the heel of the sock instead of the toe to give it
more dimension to the head. We'll also talk about stuffing the head to give it some shape. Let's get this stuff
out of the way. And we'll start with gluing our mouth
plate into our sock. And this time, I am not going
to use the toe of the sock. I'm actually going
to use the heel of the sock as my mouth plate, and then I'm going
to have a little bit of head up on top of that. So we're going to do
quite a bit of hand sewing with needle and
thread for this one. I do recommend you
use a heavy thread. This is not regular
sewing thread. This is heavy duty. You can use upholstery thread
or something like that. It has more strength to it. So when you pull tightly on it, it won't break as easily
as regular thread. And you can just get that
at any sewing store. I do recommend that, but
if you don't have that, you can use regular thread. I'm going to cut this
sock off at the top. And it doesn't really there's no right or wrong amount
of where you do this. Just figure out how much
of a head you want. You might want the whole thing. You could make it that
tall if you wanted to, and then we're going
to stuff that. You could make it
a really big long head or you could make
it something smaller. I'm going to cut it
right about here. Get my hand out of there
and just snip it off. The first thing we're
going to do is we're going to gather the top edge. Just with some
needle and thread. Now I will show you the
basics of how I'm doing this, but this is the same
thing we're going to do for the top of the head, the nose and the
eyes is going to use just a basic gathering stitch. I like to use a double thread. I'm going to thread
my needle and I've got two strands of
thread on there. Tie a knot at the end. I like to do a double
knot just to be sure. Just take a little
stitch towards the top and don't pull it
all the way to the edge. Then to lock this in, I'm going to pass my needle through the loop of
thread at the end. Then when I pull that down, that's going to give,
I got a tangle. That's going to give me a nice tight knot that's not
going to come out. Now I'm going to work
from just one side. You could just sew
it up this way, and that would be fine, but it would give you a flat head. I want it to be more
of a cone shaped head, so I'm going to gather it. In this gathering stitch, there is a stitch diagram
in your class downloads, if you want a drawing
of how this works, but I'm just running the
needle in and out in and out. And after a few
stitches, I pull it. Every I'd say a quarter inch to a half inch
is good for this. If you make your
stitches too long, then it's not going to be
as tight of a closing. T. At the end, I've come
back to where I started, and I want to take just
a couple more stitches. Now we pull this tight, and that should pull
everything together. If you have an opening, something is stuck in here. Sometimes the thread might
get a little knot in it. See how that happened, and
find where that knot is, and then you can get
that taken care of. I want to make sure there's
nothing sticking through that hole and then
pull that thread tight and take a couple
more stitches just to tie that make it
nice and secure. This is going to be the
top of our puppet's head. Still a sock puppet, still
making it out of the sock. But you'll see the
shape is going to be a little more
interesting on this one. To tie a knot with your
needle and thread, just take a stitch
and hold the loop. See that loop of
thread I've got. Pass your needle
through the first loop, and then that's
actually going to make a loop on the other side. Pass your needle through
that loop. And then pull up. It's easier if you put your
needle into the loop and then slowly pull and
that'll just bring that surface or that not
down to the surface perfect. Since this is going to
be hidden on the inside, it's okay if we have
some thread tails. That was our basic
gathering stitch, and we're going to be
doing that a couple more times to make the
nose and the eyes. When we turn this guy around, you see how now I did have a little bit poking
out, but that's okay. In his mouth is going to be the heel here. He's
going to look like that. Now he will get bigger
when we stuff it, it's going to stretch
this head out. We can go ahead and put
his mouth plate in Again, I'm using the heel for that. So just flatten your sock, get it as flat as you can, and even you want to have
it in the center like this. Now, don't be confused, the mouthplate
doesn't go like that. It actually needs to go
where the hinge is on this. Curved to straight. And like we did before, we're going to try to pull that curve up into the
straight part, right? I'm just going to speed
through this because you saw this is exactly like
the one we did before. It's just in a different place. Here he goes like that, and I'm going to get a
handful of stuffing. Now, I'm just going to
do this quick and dirty, and I'm going to
grab a handful of stuffing and put
it up in his head. If you were doing something
where children were going to be using these puppets and you
needed to be more careful, then you would want to actually
create a pillow made of stretch fabric and put the stuffing in that and
then put it in the head. You could even use
an off cut from your sock or something
and stuff that. Use your gathering
stitch to pull that together and then
put that up in the head. Whatever you want to do. But because this is just for me to demonstrate
how this works. Let me show you how It looks
once you stuff his head. You can use different types
of things to stuff the head. It doesn't have
to be fiber fill. I'm going to go ahead and cut
off and make the body the size that I want
because this cuff is really starting to annoy me. That should make it
easier to work with. I expect I'm going
to give this one a shirt so I can make his
body longer in a bit. And you can either
have just your thumb down here in the chin area, or sometimes I like to my
pinkies down there too, your thumb and your pinky with
this flexible mouth plate. So you can talk with
it, and then you can also do facial
expressions like this. Make him smile. B. We form the head by putting the mouth plate
in the heel of our sock, and we also created a different kind of
head shape by cutting off the top of the sock and stitching it closed with
a gathering stitch. Then we filled the head
with some fiber stuffing. You could use another
type of stuffing as well.
7. Fabric Puppet Nose: We're going to add a fabric nose to our puppet in this lesson. You'll see how to turn
any stretch fabric into a nose and give it
the look of nostrils. And then we'll stitch it
to the puppet's head. You can also play around with
the size of your circle to make the nose smaller or
bigger with this technique. Remember, this class includes a downloadable diagram
of these hand stitches, if you need to refer to that while you're making
your own puppets. There's actually a lot of hand stitching in this
one, like I said. For each time, you're going to have a double strand of thread and you want it to
be 12 to 18 " long. A much longer than that, it's going to be
hard to deal with. About 12 to 18 " double
stranded with a not at the end. Each time we're doing
these gathering stitches, you'll start with this. I do like to use a
long doll needle. Which is longer than
a regular needle. It's just easier to stitch with. You can get more stitches on it. It can go through the
puppet head further. So that's something to look for. It does make it easier. And we're just going to do
the gathering stitch again. So each time that I'm
doing gathering stitches, it's exactly like I
showed you before, and I'm not going to make
you watch every stitch. So we'll just speed
through this. With the nose, we just want a little bit of fiber
stuffing in there. You don't need too much. Pack that down, put it in there, and make sure that it gets
below that string line. Because when we
pull, we don't want stuffing sticking
all out of there. We want the fabric to curl
up around the stuffing. I'm pushing down with my
thumb into the stuffing as I pull my thread and that
gets it just like that. We can bury the thread
inside the nose. It's always a good idea to bury the thread
inside the stuffing. Come up to the right
side and you may think, Oh, my gosh, I'm going
to have a thread there, but you're not because when
you cut it at the surface, it disappears into the stuffing. Just play around with
this nose and you could leave it like this.
This is perfectly fine. I'm going to start with another needle and
thread to give him nostrils and decide which is the top, which is the bottom. Because I've got a big
wrinkle down here, I'm going to make this
the bottom of the nose. I'm going to run my needle from the back the top and
down to a nostril. You just get to decide
where that nostril is. Then about a quarter inch away, go back in again to the back. If you go to the top,
it's going to squish that nose down like this,
and we don't want that. I'm going to go to the back just on the other
side of that knot. It's best if you go ahead
and pull it, that's fine. You see how it starts
making that nostril, but you want to do
it two to three times to lock that
stitch in place. Just repeat, go down
to that nostril. Don't let your thread
tangle up on you. Go back in again, quarter inch is good. Pull that. I have a thread tail that snuck in and is trying to
get incorporated. We're going to make sure
that doesn't happen. There's one thread tail. Okay. When I pull
that second one, that should lock in place, so it's not coming like
bouncing back out again. That thread tails bugging me. It's got nose hairs, apparently. When you pull on
that, it should hold in place and not bounce back. You see that? I don't
even have to nod it. It's just going to hold.
Usually two stitches is good to hold that in place. Sometimes you'll need three, it depends on how slippery
your fabric and thread are. Going to run it down
through the other side, and give them a nostril
on the other side and just eyeball where
you want that to be. A little more here.
Again, a quarter inch away back up to the back pull. And then repeat it. Just
try to come as close. You don't have to get it through the exact same holes as before. That's not necessary, but try
to get close in that area. That's my second stitch, and when I pull that it
s hold, and it does. Now I've got my
nose with nostrils. And we can just go ahead
and we could not that off or we could go
ahead and stitch it on while we've got
this tail of thread. It's enough thread to get it on there. That's
what I'm going to do. First, I have another thread sticking out from I should have cut those tails
off before and I didn't. He just wants to
have a hairy nose. I don't really know
what to do about that. I'm going to go ahead and shade this with a colored pencil. This couldn't be any easier. I just stick my
pencil up in his nose and pinch and then just twist it around like
you're sharpening the pencil and you get
that shading inside there. Let's stitch his nose on. Play around with
the placement of the nose and decide
where you want it. You could put it
right down next to the top of the
mouth at that lip. You could put it
further up in the face. You put it anywhere you want. I would suggest keeping it
in the middle of the face. Otherwise, it's just not
going to look human. I don't know. That's good.
I think I like it there. And we're going to
ladder stitch this on. And the ladder stitch, you just take a small stitch, again, about a quarter inch
each time into the sock, and then into the
edge of the nose. And your thread will get
caught on the top of its head. Just be patient with that. Through the sock and
then through the nose and keep stitching like that all the way
around till it's done. Okay, his nose is on. I'm just going to
pull the thread down to the bottom where it's
a little less obvious. Just stick it through
there. And then tie a knot. That's how fabric
puppet noses are made. You learned how to use a
gathering stitch to turn a circle of stretch fabric into a nose with some fibropiil, and even create nostrils,
if you want to. Then you saw how to sew the nose securely to
the puppet's face.
8. Ball Eyes: Bo bo bo We're going to give
our puppet bulging eyes, and this technique is very similar to how we made the nose. But for these eyes,
I'll be using half of a rubber ball for each eye and covering it
with a white sock, so we can securely
stitch the head. Then we'll talk about
the important task of placing the pupils
on the eyeballs. We start out by stitching a gathering stitch around
two small circles of white sock or any white stretchy fabric
will work for this. And again, that was just a sock. Now I'm going to
use my rubber ball. This is just a ball
for playing Jacks. You can also use
ping pong balls. The here's a small version of a ping pong ball that's
been covered with a neoprene scuba fabric. This is typically
what I would use on a larger puppet for
the ping pong ball, but for the sock puppet,
that's pretty big. So that's why I'm going to
use this little jack ball. Also for larger puppts, easter eggs or mini aster
eggs or things like that can. This is hard to cut in half. I will say I do have some really heavy duty scissors
that can manage it. Otherwise, you might need ten snips or
something like that, and I'm just going to position my scissors right on the seam both sides and be very careful because these scissors are super sharp and heavy duty, and I am able to get
this ball cut in half. With my scissors.
But it's not again, these are super sharp
heavy duty scissors. Otherwise, you might need
ten snips or something. Again, this is a more advanced method that we're doing here, not something that you
would do with children or you wouldn't want them to have to cut
that ball in half. You just put the
ball in there with the dome side
towards the fabric. Fabric get a little pilly. Just like that, flat side up, pull your thread and see
how it gathers around, and that's going to give
us a nice dome shaped eye. Usually, I do like
three or four stitches across the back, and
that's good enough, just tie a knot at that point. There's one eyeball. I've got the nose sewn on. I've got both of the eyes with the gathered
fabric around the back, and now we're just going
to play around with how we want the eyes to look and
where we want to place them. I went ahead and
put the pupils on. We're going to take those
off when we're stitching. But just to get an idea
of how they're going to look and place your
eyes wherever you want, obviously, you can really
change the look of a puppet by where the
eyes and nose are placed. I'm like in the wide
set eyes like this. But that's a different look. Yeah, I think I'm going
to put them like this. And if you need to, you can
always use pins just to hold them in place
until you stitch them. Get an idea, and these are just temporary sticker felt pads that I'm using for pupils
so I can get an idea. I will glue them
in permanently and make sure they're in
a better place soon. So now I'm ready
to stitch the on, and I'm going to do that the
same way I did the nose. I got a double strand of fabric, a thread with a knot at the end. And we're just going
to stitch these on with the ladder stitch.
I will give you a tip. If you're right handed, put the left eye on first and then come back
and do the right eye. That way, you'll have more room. This eye is going to be in
your way if you put it on first and it'll be
harder to stitch around. So I'm going to remove that
and start on this one. And I'm going to make my not on the back of the
eyeball first. We'll just speed through
this, but you'll get the idea of
what's going on here. I do recommend removing
the sticker from the eye because
it's going to catch your thread quite a bit
as you're stitching. Another thing to consider
before you stitch your eyes in place is
the grain of the fabric. You see how you can see the vertical lines or
horizontal lines of that sock. You want your eyes to match. Just make sure that
you line that up. I'll look a little
bit better that way. Built As I said earlier, this is called the ladder stitch when we're attaching
the nose and the eyes, and there is a diagram in your class resource
downloads so that you can get a better look at how this goes in case you
need a refresher. But we're just taking a small
stitch on the sock side and then a small stitch on the
side of the eye fabric. Okay, I've got one eye sewn on, and you saw how I did the ladder stitch
all the way around, and I even went past my
starting point a little bit. If you're sewing for children, if children are
going to use this, I would recommend going around twice just to make sure
you get a lot of stitches. And you will have
maybe a little bit of zigzaggy look there, but it's not obvious at all. I mean, I'm not very good
with the ladder stitch, and it turns out
pretty clean just because of the way the ladder stitch works.
So that's one eye. I'm going to go ahead and
put the other one on, and then I'll be
right back and show you how we continue
with the pupils. Now that both eyes have
been stitched to the head. We're ready to put
the pupils on, and I'll teach you a
few tricks on that too. Again, I'm using some little felt circles that have
sticky on the back. These are used for
furniture pads. I actually buy 100 at a
time in a little bag, but you can also
find them in stores. They might be black or green instead of I buy mine in black, but you could also paint
them and then stick them on. And just a tip with puppets is you don't want to
put the pupil in the center. Of the eyes because then you get that blank stare like deer in the headlights look
on your puppet. You want it to look like the
puppet is looking at you. The trick to that
is you want it to be looking at a point
through its nose. It needs to be more in the
center and down like that. And then just eyeball
it until you get it. You see how that's a
much more engaging. It looks like it's more
looking at the camera. This one is a little off. I do find and here's
another tip for you. It's hard to eyeball
this sometimes, but if you take a picture,
it's more obvious. Just get out your cell phone
and look at it through your cell phone and the evenness of it
will be more obvious. It's easier to see
on camera than it is in person just because
of the angle of it. Play around with
that. These, you could use the adhesive
that comes on these, but that's not a
permanent adhesive. Although it is sticking
pretty good here, I might just try to leave it. But if you want to glue
it down with fabric glue, the trick to doing that is to go ahead and leave it sticky, lift up one side, add some glue, just a tiny amount. My glue gun is not
really heated up yet. Lay that back down, and then
you would do the other side. And that'll get you a per
more permanent washable glue in case you're making your puppet out of things
that can be washed. In this case, he's got
fiber fill inside, he's got cloth eyes
over a rubber ball, some stuffing, and we used
a rubber mouth plate. Everything in this guy so far can go through
the washing machine. We haven't done anything
to make him not washable. Now if you use
cardboard in the mouth, not washable, things like that. So think about that
when you're making a puppet if you want it
to be machine washable. Now you know how to
make bulging eyeballs that can be stitched
to your puppet. We also went over how
to place the pupils, so your puppet is more
engaging and alive. You can try this technique
with different balls or other shapes and different
kind of stretch fabrics. Scuba neoprene is my
favorite for this technique, but you can even use
white socks or a T shirt. If the fabric is too thin
and you can see through it, try using two layers of fabric. Don't forget there's a
PDF stitch diagram in the class downloads if you need to refer to that for
the hand stitching.
9. Mouth Lining & Eyelids: Boom boom. Let's embellish our puppet
with some more details. In this lesson, we'll add a
fabric liner to the mouth, so it contrasts with
the puppet's face. You'll need a non
framing fabric for this and felt or fleece
are typically used. I'll be using glue on the mouth, but hands stitching
is also an option. And then we'll add
some eyelids over those bulging eyes to soften the puppet's
look a little bit. I'm just going to use scraps
of sock for those eyelids. But let's start with this mouth. This is just again a
three inch circle of felt like I have a three
inch plate inside the mouth, so I'm going to start
with a three inch circle, but I'm not going to
glue it all the way to the edge yet because we may
have to trim some away. I'm going to apply
the glue actually to the mouth here and
here and here, not in the actual hinge area, and try to get this as
centered as possible. And I need to actually
I'm going to flip it. I mess that up,
and I'll tell you why because I need to get the center of this
circle in there. Otherwise, it's not
going to be wide enough. There we go, and
we'll trim this off. Before that starts sticking, let's get that glued down. This is not one of those things where you have to be super precise because we're not
professional puppeteers here. We're just playing around
with some puppets for fun. People probably are
not going to know where your mistakes are
unless you point them out. Unless you have huge
globs of glue showing. That is a little more obvious. I'm going to use my small
scissors to just trim away. Be careful that you don't
actually cut the sock. I have put a foam
noodle inside to hold things in place
while I'm working on it, and you can always do
something like that. Now, this is my
puppet mouth plate. I see I've got a little
bit of glue showing there. Try to get that covered up. One of the reasons that
I personally like using black felt for the mouth
because I like to cheat. If I have a mistake that I need to cover like a
little bit of glue, I can always get a sharpie
and just color that in. And other than the smell of the sharpie, which
you can't smell. Nobody knows that
I messed that up. You can just a little bit there. Glue glob, gone. I still there, but you
just can't see it. It's not obvious. Then let's
move on to some eyelids. I just cut off the
top of a sock. The ribbing of the top of
the sock is very stretchy, and that makes a nice eyelid. You can just play around
with what colors you want. Oftentimes I like the nose
and the eyelids to match, so that's an option. I could go light
gray, like this. Could also do something that
matches the puppet's skin, so a dark gray like that. The placement of the eyelids, if you put them high up, it looks like the eyes
are wide open, gives them more of a frantic
or angry look maybe, or you can make it further down on the eye and they look
more sleepy and subdued. That's something to play with if you're going to do eyelids. I also fold this over so that
I get a nice folded edge. You could though, on some socks, that cut edge is
so nice and clean, that you could use that
too, that would look fine. It would look perfectly fine. But let's do a folded
edge on this one. It's a little harder
with the folded edge because you've got a lot
more bulk to deal with. The way to do this is
do a little tricky way. I do want a longer one, so I need to make
sure that I have enough to go all the way and wrap around that
eyeball in the back. We don't want the white
eyeball show in there. I'm going to figure out
where I want my eyeball and I want to I'm
sorry, eye lid. I want it to be from the
top of this pupil here. This is just my positioning. Over on this side, I think I want it to be all
the way down here. Let's probably get some pens
to help us with those marks. I think all the way down to
here is where I want it. I'd say line it up with
the bottom of that pupil. And then the top of the pupil
here is where I wanted it. And then when I glue, I can put a dot of glue
in each of those spots. And I'll just glue
the sides on first. Then I can trim away the excess, and then I'll go ahead and
glue everything in the back. If you can watch me do that in a little bit
speed it up here. D. Alright, so that
was some eyelids. It's still looking like a gray version of
Homer Simpson to me. That's kind of funny. That
was not my intention. Speaking of intentions, sometimes
we can't really control the characters that come
out when we make $1 puppet. You may want it to look one way, but it's gonna somehow
form its own personality. Don't be surprised
you're bothered by this. Just go with it. Let the puppet tell
you what it wants. Know, it sounds
weird and woo woo, but every puppet maker learns
this lesson the hard way. It's like the puppet
is in charge, and it's just using your hands. There's probably some deep ungian psychology
buried in there. But anyway, in this lesson
you learned how to add a mouth, lining and eyelids. You could take these
skills even further by adding a tongue to
the mouth or spice up those eyes with
false eyelashes or even lower eyelids or
eye bags under the eyes.
10. Yarn Hair & Sock Sweater: Let's add just a bit more to our puppet with some yarn hair. You could use other things like feathers or fabric scraps too, and let's make an easy
shirt for this puppet, too. So let's do a yarn wig. And I'm just going to
get some cardboard. You can use longer if you want the puppet to have long hair
that comes down like this, or you can just use
something very short if you wanted just a little
poof of hair on the top. I think I actually do
want it shorter for this. I'm going to do something
like this. 2 ". It's only 2 ", and I'm just
going to wrap yarn around. A bunch of times until
I get I don't know, until I feel like
it's thick enough. People often ask,
how many wraps, and it really depends on
how thick your yarn is. If you have a thicker yarn, you're not going to be
able to get as many wraps. If it's a really thin
yarn, you'll want more. Just judge it by
how thick this is. Remember there's two layers, and that's going
to be your hair. This is really an eyeball
type of experience. If I were telling
you exactly which yarn to use and we
were using a pattern, then I could tell
you how many wraps. But this class is really more of a free form like use
your own materials, use your own creativity, play around, and it doesn't
have to be perfect. Just make something
that you like. Make a bunch of the m until you fall in love with one
that you've made. It's not a science
here. It's an art. And then I'm so just
super lazy at this. I'm just going to take
an extra piece of yarn, tie it in a double knot. Hopefully it's strong enough
to hold it, and it is good. Sometimes your yarn will break. Okay. Pull that off
and where my knot is. I want that to be the bottom, so I'm going to cut right
across the top. Boop. Whoo, eyelash yarn is messy. And the ties are too long, just short nose up. So now I've got this
little mop of a hair, and I think That works better. I've got a lot of cleanup to do. Yeah, I should've
thought through. Thought that through, but
I always like to keep my mess ups in my class because I screw
up all the time, too. I know when you're learning, you make a lot of mistakes, and that's how we learn. We learn from our mistakes
more than we do our successes. So don't be afraid
to screw things up. Yeah, I really am liking that. Let's go with that. And I'm not even going to
get fancy here. I'm just going to
glob a bunch of glue on top and whatever
yarn sticks to it. That's how it's going to be. I mean, it doesn't get
any simpler, right? You could stitch that
on if you wanted to. I do want to make sure
that the glue is covered. I'm going to make
sure that I get yarn covering all of the glue. Just push it in. And never underrestimate
the power of tape or a tape roller to totally
clean up your fiber messes. And one last thing, let's
give our puppet a sweater. I'm just going to
use a sock that has a cute little print on it and cut off the ankle part. Cut off the toe part. And then that becomes the body. It's easier if I put my hand in and try to do it like this. And let that sock kind
of curl up at the top, to give you a sort
of a neckline. And then if you wanted
to, you could stitch, but I will warn
you if you stitch your sweater sock onto
your puppet's neck here, it's not going to stretch
around your hand very easily because the stitches are
going to hold it tight. If you have a surger, you could go ahead
and stitch with that. If you have elastic thread,
you could use that. Just know that if you do decide to stitch your
sweater onto your puppet, then the thread that you stitch with is
going to keep it from, you're not going to be able
to get your hand in there. So a warning. Consider yourself warned that our second puppet is finished. We made a simple yarn wig by wrapping yarn around
a scrap of cardboard, and we made a simple shirt
from a piece of a sock. If you have old
sweaters or T shirts, you could use that on
your puppet body as well. Thrift stores are a
great place to find wonderful fibers for making
and dressing puppets, so don't forget to look there. This puppet took less than 1
hour from start to finish, just to give you an
idea of what was involved outside of all
that video editing.
11. Sculpted Nose and Glass Eyes: Let's learn some
advanced techniques that can be used on our puppets. I'm going to start
on a third puppet for these next lessons. And this one has half
a styrofoam ball in its head that was
covered in a soft sock. That ball will sit on
top of my hand while I work the puppet to
shape the puppet's head. This puppet also has a
plastic mouth plate. I won't be showing
all those steps for this puppet because we did
that in the last lessons, but you can go back to the
lesson on the basic puppet for the mouth plate or the lesson on a better head if you need to
see how to shape the head. Let's play with some
air dry foam clay to create a nose and horns, and we're also going to attach
some glass eyes layered over fabric circles to create
a different kind of eye. I am going to be gluing
on the facial features, but first, let me show
you how these were made. After I let those dry, at least 24 hours, I then added a couple of
coats of paint to them. I like the metallic paint, but you could use
whatever paint. I've tried different ones. I've also got one of
those makeup sponges that I showed in
the nose section. You can see how soft
and flexible that is. And you can use this is a paint that I used
on these guys here. And even though it's foam clay, it's still a little bit soft and the paint
is not chipping off. I've also used just plain
acrylic craft paint, and this stuff does work
on the softer stuff, but it's more prone
to crack and chip. Still not too bad though. Then the best one for
the flexible stuff is really the cost play
paints that you can buy. This one is by plaid, but
there are other brands, and it's flexible acrylic paint. Most acrylic paints
like this are flexible. So it's not a huge difference, but if you already are into cost play and you have
some of these paints, they really do work
nicely on the soft foam. Now I want to stuff the head, and I'm going to
start with getting that styrofoam ball up in there. I need to get it right
up in the center. And then I wanted to add
a little bit of cheeks. So I just got a
couple of balls of fluff and push it up into
those corners of the mouth. It should just hold itself
in place pretty well. If you're taking this
puppet on and off a lot, those might come out, but for occasional use. They hold in pretty good because the corners of I used a
plastic mouth plate here. It digs in and holds
that in place for you. Now I'm going to switch over
and substitute my hand for a pool noodle just to keep this guy a little filled out so I can see
what he looks like. That'll help me figure out how I want his
facial features. Again, I'm just going to
use hot glue for that. And I've got the foam nose. I do want it to hang a
little over the lip, that doesn't give me a lot of
gluing surface on the back. We'll see how that goes. I might need it a
little further up. Don't use too much glue. You don't want it to spread out. We got to get them in
the center as best as we can. Simple. If you do have any glue that seeps out, I will
give you a tip. Just let it dry and then
come back with your paint, and a tiny paint brush
and just cover that up. For the eyes, I cut. I had an extra piece of sock, nothing fancy there, and
when you stretch it, it gets curly and
a little ragged, and I wanted to use that
underneath these eyes. These are just glass cabcons. You could also use
resin if you're into pouring resin stuff, and then it's just a
printed eye on a piece of paper that we're glued
with clear glue. When you have eyes like this, you're not going to be able to center the pupils as easily. You also want to
make sure that if you have a high light
on your printout, see that little white
spec in the pupil, you want them to line up so that they're in the same spot. Otherwise it's going
to look weird. A I'm going to glue my eyes
onto the fabric first. I'm even going to be a little particular here and make sure that the arrows
like the grain of the fabric is going to match up. They're at an angle. That's not going to be that
obvious to most people. But when the fraying happens, I want it to happen
in the same place. I got a white highlight there. It really should
have been up higher. And then glue that onto him. Again, play around
with your eyes and see where do you want them. I can go ahead and spin that
highlight to be up top. You could put them
really close together. You could put them
further up on the face. You could put them
further apart, and see how you get
different looks, wherever you put them. I like them down here,
especially since I know, I'm going to have a lot of here, so I'm going to
keep them down low. That's how you sculpted
a nose and horns with air dry clay,
not hard at all. We'll add the horns
after the hair goes on. You also learned about
layering glass eyes over fabric circles
for a different look. You could use that
technique with any other eye materials as well. You can purchase glass eyes from some craft
stores or online, and if you're more adventurous, you can design and
make your own with glass cabs or resin.
12. Fur Hair and Horns: Boo. One of my
favorite materials to work with is faux fur. I'll talk about where to find furs without spending
a ton of money as I show you how to drape your puppet head with fur
to create a hairstyle. You can glue or
stitch the fur onto your puppet and we add his
horns after the hair is done. I want the hair to be going up, so my fur direction. You can see how fur
has a direction this way on this particular fur, and I want it to be pointing up. The way that I like to do fur
is I just do a little edge, and you don't even have
to have it straight. Let's do something a little fancier since we're
playing with fur. I want my little scissors
because I want to be able to cut just the backing of the fur and not the pile.
This is the pile. The furry stuff is
called the pile, and this is the backing. Let's do something that's just kind of a little
more of a hair style. Now we can go ahead
and ham it with the hot glue so we don't
have rough edges showing. Rough edges, dude? I don't know. I don't know
where that came from. If I do little clips in here, you're going to have a
better time folding that up. And when you're
turning edges under, it's good to have
your handy dandy pin that you're not afraid
to get glue on. We want it to come
to the top here. So I don't need that extra. Again, just cutting the
backing, not the fur. That's okay if it wraps around
to the back a little bit, when I glue the
back piece on and actually I'm going to
google back piece on first, then that will cover it
up and you won't see it. Fur blends very easily. It's very forgiving. Let's just do a little piece in the back and maybe
put it further back. Let's see if that's
going to work. Which is going to be
a little bare spot. We're going to need
a couple pieces, or just use this wider
piece up here that'll work. These are just
scraps of fur that I have leftover from
another project. You can get F fur obviously
at fabric stores. It can be expensive. Some of these furs
run as much as 50, $55 a yard, sometimes even higher for the
really luxury furs. However, you can
find them for less. I've seen decent furs for
as much as ten $15 a yard. And also, you don't
need a quarter yard, even if it's $50, a quarter yard of that is 12
50, and that's not too bad. And then, of course,
craft stores also sell small cuts of fur, fou furs. That's another option. I also like to go to thrift stores. I get some really cool
looking stuff on like, fur vests, for blankets,
things like that. So there's so many
different ways to get fur, and I know a lot of
people balk at it and go, Oh, it's too expensive,
I can't afford that. But if you learn how to shop, it's really not that
expensive to get good fur. And that's one way of
creating puppet hair using F f. You can add a
little or a lot. Different furs create
vastly different looks. Create different hairstyles
and play around. You also saw how
those horns were added on top of the
fur wig at the end, and our monster is
really coming together.
13. Puppet Arms: For this, next
lesson, it helps if you have a sewing or
embroidery machine. But I'll talk about
alternatives too. We're going to turn
this sock puppet into a full fledged hand
and rod puppet with arms that we can
move and gesture. I'll be using an advanced arm
pattern that has fingers, but this lesson also applies to the free pattern
you can download from the class resources. The only difference
is that free pattern doesn't have the hands. It's just the arm and legs. Otherwise, the steps to fill and attach puppet arms are the same. Check out the pattern
in the class resources for more information on that. I'm going to do something
that I think is really special and a
little more advanced. This is where we're really
starting to get into things. I'm going to give this puppet
some arms that will bend, as well as some hands
that are wired and can hold onto things and I'll
attach them to the puppet body. This is more advanced. This is an arms pattern that
I do have available, but it's not a
part of the class. You could also just roll up a sock and use that as an arm. You could stitch just a
tube along tube without the hand and use your sock or stretchy fabric and
make arms out of that. There are so many
different options, you could even use the
pool, not pool noodles. Hair curlers could use
those as some kind of arm, especially if you just
wrapped them in fabric, that works, I'm going to use
these to stuff these arms. These arms have
been stitched onto something called tear
away stabilizer, and when you trace the
pattern onto the stabilizer, you stitch directly
on your trace line, and then you can just tear that stabilizer away
from the stitches. It's not tissue paper, not the same thing, but it
comes away very easily. And then you can cut that out
and turn it right side out. I use hemostats to
make that job easier. So that's how these
are done. Let's see. I do want to go ahead and if you want to know how to
wire the fingers, I'm using flexible
aluminum armature wire, which you can buy
in the craft store. I know that Michael's has it, you can get it on Amazon, and I like to do it where I
have this more than a foot. This is probably
about 15 " of wire. I just use whatever
hand I'm wiring. I just use that as my pattern
on how to bend the wire. I bend it at each finger. Doesn't need to be perfect, but you do want to
get the length. Then go up into the hand, bend it down, bend it back up. These are my two loose ends. Then for each finger and thumb, I'm going to go ahead and
twist, twist each one. Don't twist all the way to the top because you want to have some there to change the length a little
bit if you need to. And then just
thread it in there. I'm going to speed
through this because not everybody likes
to do this stuff, and if you are into this, you've probably
seen instructions on how to do this before. I can see I just
wrapped a little bit of a piece of tape over that. And again, this is
not for children. This is an advanced sock puppet that should be for an adult. This is not something
that you want kids to play with
because they might play too rough and
that sharp wire end can poke out through the foam, and it's going to poke them.
It's not a child's toy. So whenever you're using armature wire, it is
not a child's to. I always feel like I need
to remind people of that. And then I just put the, again, foam curler that I got
at the dollar store, and I put it in there. And wherever that wire is that's how far down
it's going to go. It probably won't go all
the way into the hand, but if you're not doing a hand, you could just do an
entire foam roller, and I would suggest
that you cut it into two pieces so that you can
get this flex at the arm. So if you want to
add an arm rod, and that's something
else you can do to use on your puppet. And I want the elbow
to be right here, so I need to cut this piece off. Yeah. Put that one
up in the upper arm. This is the lower arm. And then I just ladder stitch
this closed like we did on same ladder stitch we've used in the other
sections in this class. So that's how that arm is done. To attach them,
you have options, but I do believe that stitching
them on is the best way, and you don't want to
have a thread running through the body because your hand is going
to be up in there, so you have to stitch each
one separately on the side. I'll do that very quickly. Before you stitch, if
you do have hands, make sure that the thumbs
are pointing up like this. Xx, tx than tx Normally, for arm rods, I
would use something. You can use a very stiff
wire if you have it. Hanger wire is what
some people will use, but wire hangers are
getting hard to find now. This is a thin dow rod
from the craft store. I buy them in packs, and it is and based on
my measurement, I'm going to say that is
5 millimeters thickness, which the diameter
is 5 millimeters, so it's a thinner do rod. And when you use a dow rod, you want to or any
arm rod, sorry. It needs to go right around the bottom of the hand or
the wrist area right here. And since I've
already sewn him up, I'm just going to
clip a little hole. You want it to be super small because this
sock will stretch. You just need to be big enough that you can get the
arm rod in there. And then I'm going to glue that. Squeeze a little glue in there. And add that doll rod. Now we have an arm
rod for our puppet. He's got a nice bend in the
arm and he can gesture. Now you know how puppets
get arms and how to fill them so your puppet's arm moves naturally and can gesture. We used a doll rod attached to the wrist so we can
manipulate the arm. You can add rods to
one or both arms. It's up to how skillful you
are at working the puppet. One rod is generally easier
than two for most people. If you want to add the arms
and legs to your puppet, check out the class
resources where you'll find a free PDF pattern
for straight arms and legs that are easier
than the one we just made. That pattern sheet will
also help you locate the sewing and embroidery
machine patterns for the more advanced arms and legs that have the
fingers and toes. You may have noticed that
he was already wearing a T shirt in that last section because I rearranged a lesson, but we're about to
do the T shirt next.
14. Shirt & Fangs: Boom boom. We are almost done
with this puppet, but I want to show
you how to sew a quick T shirt for
your sock puppet, and we'll finish him
off with some teeth made of felt for
a proper monster. This little puppet has a lot of character going on already, just by adding the
fur, the horns, the little metallic nose, the glass eyes that
have that shine to him. I really like this guy so far. But he naked. So let's give him a shirt. Yeah. I'll include this pattern
in your class resources. It's just a very easy
shirt with stretch fabric. You do need stretch
fabric because whenever you're going to
put this on your hand, you need to be able
to stretch and move. If you don't use stretch fabric, and it needs to be
really stretchy, you're going to have a
hard time getting this onto your puppet and
moving your hand around. It does need to be
something stretchy, an old T shirt works great or a sock or
something like that. And it's just a seam up the side and the arm
here. It's that simple. And then you just cut
a hole for the neck. I don't bother finishing up the neck or the hem or
anything like that. I just It's a sock puppet. You know, and it's non
fray stretchy fabric. So I just don't go to
great lengths to do that. If that's your style, then, by all means, take
that time to do that. But it's not my style. Even the clothes that I wear, I like unfinished edges. I just like things
unfinished. I don't know. It bodes well that I
like making sock puppets because they're just
not that complicated. Even this guy with his
fancy little hands and his fancy little clay horns. He's not that
complicated, you know? It's not like a
professional puppet that is made with a bunch of foam and a bunch of
different mechanical parts. Puppets can get
very complicated, but not these guys. That's what I like
about them. You can whip one up in a day easily. You can whip up several
of them in a day. I think he needs one more thing. I think he needs a little
bit of chest hair. Maybe coming out of his shirt, maybe coming out of his sleeves, something to bring
this white fur down into the body and
complete the look. And also going to
be honest here. Putting some fur here, it's going to cover
up the fact that my thumb is showing when I
work the puppet's mouth. Yeah. For this, we want just the tiniest
little snippet of fur. Less than that.
Maybe half of that. And as before, we're just
cutting the backing, not the actual fur cause we don't want to
shorten our fur. Okay. Where's our tape roller 'cause he's definitely
gonna need it. One thing I will
say about a puppet with a serious overbite
like this one. Really works better
when you have teeth or fangs or
something like that. Felt is what's usually used for sock puppet for
teeth or anything, and this is the cheap
craft store felt. So it is s through, which is part of the problem, but I'm going to try
something and see if we can get it a
little more sturdy. First of all, I need
to clean it off because it's got fur everywhere. And what I want to try. This is an experiment.
So bear with me, and let's see if this works. Yeah, that's enough.
I'm going to try to get a very thin layer of glue and actually hot
glue is not going to be the best for this
particular application, but I'm going to try it
and see what happens. Try to get that
as thin as I can. Fabric glue would actually
work better here. Fold it over, and
it's going to give me two layers is what I'm
going for, and that it. First of all, it's going
to stiffen the felt. It's not going to be all floppy. You don't want your teeth
like flopping around. It's going to
stiffen the felt and it's also going to
make it more opaque. So you can't see
through it anymore. Then we can cut
our little teeth. I think if I can get it so that they're flatter on the side
like how this opens up, that's going to give me
better gluing surface. I'm going to cut it this way. And there's not glue on the
edge, so I don't want that. How about this? How big do we want it?
Maybe half of that? Yeah, that'll work. Let me
get another one like that, and again, I want it at
the top edge like that. I just going to use the first one as a pattern
for the second one. I said teeth, but
really, I meant things. That one's a little too long. A little long in the
tooth. Again, there are many ways to make teeth. This is not the
only way. This is just the one that I'm making up right now because I
don't typically use teeth. One of these sides was
not glued very well. Definitely don't want
too much glue for this. Put that right
there on the edge. I get them even. I'm putting the teeth right on the edge of the mouth
plate right here, right on the outside of it. Our third puppet is finished. In this last lesson on
advanced sock puppets, you learned about
making an easy T shirt out of a stretchy fabric. You could also use T shirt, an old T shirt or sock for
that for the stretchy fabric, and we gave our monster
fangs made of felt. I like how this little
guy turned out, and he's my favorite so far. In case you're
wondering, this puppet was put together
in under 2 hours, not including the drying time for the clay, the
paint, and the glue. So even though he's
more advanced, it's still something you can
finish in less than a day.
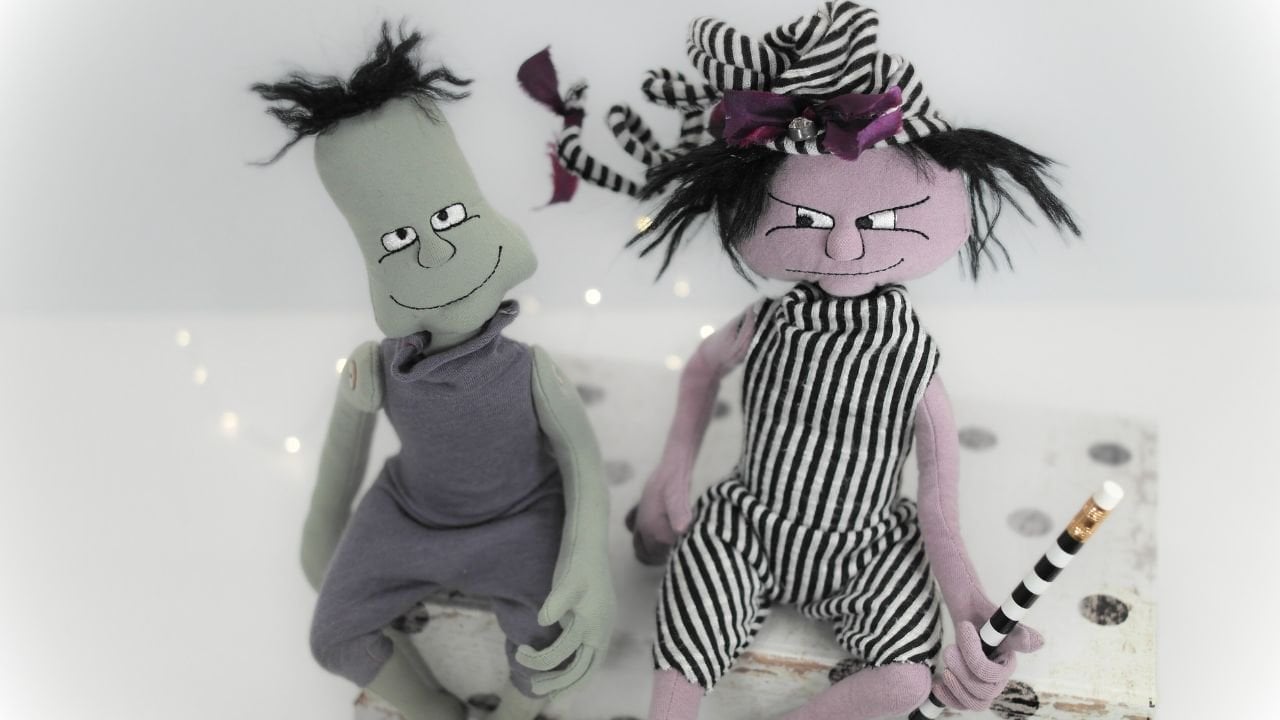
15. Gallery & Outro: That's it for our
sock puppet class. I hope you had a good time. I hope you got lots of ideas, and I really hope
that you try to make your own sock puppet as beginner or as advanced
as you want to get, I've given you plenty of ideas and skills to
play around with, different techniques
that you can try. Make several and see how
you like to make them. Everybody has different
tastes in their puppets. One of the best things
about making puppets is seeing how other people
make puppets to get different ideas and get inspired and see how different materials
are used by other people. I'm going to show you some
that I have back here that are in progress or finished
or somewhere in between. I don't know, just to give you some different
ideas on materials, skills, techniques,
things like that, that we've been talking about
through the whole class. I'll show you some examples. First example you've
already seen this one. This was just our
basic sock puppet with the cardboard mouth,
pompoms Google Eze. Nothing too complicated there, and that one was
all glued together. Our second puppet, I'm
still actually working on this because I might go
ahead and add some arms, and I've also got
some legs here. These were done on the
embroider machine. I'll also have a sewing pattern available for these in my shop. And they have toenails, but this furry fabric
you can't see it. And I'm playing around
with adding arms and legs, but this was the one that had
the fabric covered balls. These were rubber balls. You could use ping
pong balls, whatever, and a fabric nose that
we added nostrils to a little furry yarn for
hair, the mouth plate. So nothing complicated here other than a lot of hand
stitching that we did. And then, of course, sample
number three is the one where we did the sculpting with
the foam air dry clay. We did some glass eyes, fabric underneath,
teeth, mouth plate. So of course, fur, you don't need to have the
whole body made of fur. You can just have
fur peeking out. We just glued pieces on, and then we have his
shirt that covers it up. So consider different kinds
of clothes to T shirts. Of course, if you have
an embroidery machine, you could embroider
something on the shirt. I'll be doing that again soon. And arms with or without wire
with or without an arm rod. You've got tons of
options with arms, legs, shirts, things like that. A different version of arms and legs would be this guy here. I'm trying to decide if I want to put a nose
on him or not, but I think that he looks better without the nose in this case. I will be gluing some
black fur on for his hair. It's not attached yet. These are just little
plastic beads, and you can't see the bead holes because they're
hidden on the sides. This is fur yarn
that is just glued around the eyes to
make them really pop. Add in, I don't know,
it looks like a mask. And then I just used some
paint for the pupils. This is all that is, a tiny paint brush
and a little pupil. And then these are
some basic arms. These are another pattern that I have that are just
basically tubes, and then I've put
the curlers inside. This one's not finished,
so you can see, I take the wire out of
those foam curlers that you get from the dollar store
and then put those in there. And then that way it can move. There's arms and also legs.
They're exactly the same. The arms and legs are the same. These curlers still
have the wire in them, so I can pose them if I want. You can use them without
wire to make them move or with wire to make them hold the pose,
different options. This is actually in case
you're wondering, I use jars, and this is a glass
candle just to hold the puppets and while I work on them
or display them. All right, this is just
a basic sweat sock. This is as easy as
it can a white sock. He's got a pink
lining in his mouth, and then just some fur glued
on to his chin for a beard. See how that's attached and a little bit of fur on top
for his hair to fly around. The particular face on this one, this was done with
machine embroidery. You could also do
hand embroidery, and it's just the eyes, some little eyebrows,
and then there's a stitched line that
goes around here. What I do is I put stuffing
between the stabilizer. Whenever you're doing
machine embroidery, you have to have a stabilizer. Between the stabilizer and
the sock is some stuffing and that makes the nose pop out and gives it
dimension like that. For the bunny Monster thing, I'm not even sure
what to call this, but this was just a gray sock. And I did with the heel
is the mouth plate, like we've done in two
of our puppets today, and the ears are the
top of the sock. This particular sock
had the heel here, and it went all the
way to the toe. This was a men's large
sock. I'm pretty sure. I did turn it inside out. It's smoother on this side and it's more fuzzy on the
inside of the sock, so I turned it inside out
to get a more fuzzy look. These were just hand
stitched or you could stitch them on a sewing
machine, doesn't matter. A little bit of glued fur. For the eyes, I did use
plastic safety eyes for this, but they're not actually
attached from the back with the backing
of the safety eye. Because inside of here, I used half of a
foam kids football, a toy football in here. If you can see that dome shape, that's the football that's
up inside the head. And I just poked holes into the foam and the
sock and then put some glue on the stem of the eye and stuck it in there and that'll
hold it in place. These little stripy
things around the eyes. These are ponytail holders that I found at
the Dollar store, and I loved the pattern
of the stripes. And so I just cut them and made this like
tear drop shape. I did add a little bit of
paint in the corners of the eye so that the gray
wouldn't show through. The nose is very similar
to one that we've already done with a
couple of nostrils. The mouth has a little uvula, mouth plate as well as a little slice of makeup sponge that's been painted
for the tongue. It has dimension and sticks
up like a tongue would. I think that's
everything on this one. I told you everything
I've done here. This guys still. He's maybe
one of my favorites so far. This one's different
than the others. This one does use the
toe as the mouth plate, but instead of putting
your hand in it, it actually has a hole
in the back where I've glued the jaws of a clothes pin, not a safety pin, a clothes
pin to his mouth plate. So he talks like this. You squeeze the clothes pin in the back to make
the mouth move. Then I've just put him
in a little box for now. I'm looking for some kind
of special container. He does have arms,
and they can move. I may add a arm rod to him, and he's got another
makeup sponge painted with metallic
paint, a little bit of fur. Again, this is fur for
his eyebrows as well, Fur for his mustache, and these are embroidered eyes. You could use any
kind of eye for that. I think he'd look good with
some glass button eyes, too. This one also has just some
little spots of hot glue on the front for a
little fangy teeth on the bottom jaw,
but I like this guy. Okay. Don't box me in. If you want to know more
about making puppets or stop motion puppets
or dolls or plushies. Check me out at
ballyhoo creations.com. I'm on YouTube, as well
as I have a website, and you can get some patterns, and for both Borden machines and sewing machines, I do both. So if you're looking
for patterns to make your own puppets, go check that out too. Hey, if you're still here, please consider leaving
a class review to let others know that you
like this class so much, you watched it all
the way to the end. Your review really helps me out when developing
classes like this. So thanks in advance
for the review. And My
 Luci Ayyat, machine embroidery, dolls, puppets