Transcripts
1. Welcome! :): Hi, my name is Christine and welcome to another abstract painting course. Abstract painting can be very difficult to grasp with all its complexities. Even though it may look simple, it can be very confusing and frustrating. However, in this course you will learn everything you need to know step-by-step in order to create a successful abstract landscape, you will play around with different textures created by the palette knife, and then you will blend them with the help of the brush. With all of that being said, Welcome to this colorful abstract painting course.
2. Materials: For this course, you will need the following materials and utensils. You will require two brushes, one that is big and wide, and the other a little bit smaller for some details. Canvas that is 50 centimeters by four centimeters. And the plastic plate for mixing the colors. A PBL lab knife for mixing the colors and applying them. And the following acrylic paints, cadmium red, yellow, green, Mars Black, some beautiful cyan blue, dark, some gorgeous cadmium like yellow, and of course, some titanium white. And last but not least, a tiny graphite pencil for a quick sketch. With all of that led start painting.
3. Three colors of the Sky: At the beginning, because this will be a landscape, you will firstly want to identify the horizon with the pencil. If you are interesting in developing your composition in the lower part, you will want to place the horizon a little bit higher. So let's create a beautiful line around here. Not in the middle. It is better to avoid placing the horizon in the middle because it can be confusing for the eye and for the composition. Now, let's split the colors of the sky in three nuances for diversity and get used to blend and play with different colors and nuances. Let's place three beautiful zones. One smaller on the right side for some darker blue. Let's make it nice and circular to get an idea of the place where we want to place it. And another one a little bit lower on the horizon and longer towards the middle. Now that you've settled places, you will start to add the colors to the mixing palette. You will start by adding a big and nice quantity of white and a little smaller of cyan blue and the small quantity of green. After that, you will start to create a light blue for the top side of the canvas. You will want to add just a small amount of blue to this white, just to color it a little bit, you will see how powerful this blue will look once it dries on the surface of the canvas, makes it very well, and make sure there are no chunks of color left in the mix. Just move the color around and press it against the pellet. You can see through it. Once that you are satisfied with the color obtained, you can take the big brush and grab a good amount of the color from the mixing palette. So with the brush filled with this wonderful light blue, you will start applying the color on the top limit of the canvas and spread it nicely around big portion of the sky just on the top of the composition. Drag it nicely around and don't leave any spots and colored. Make sure the color reaches every top corner canvas. You will want to spread the color as much as you can. Don't apply too much if it's not needed. This layer is made just to be sure all the Canvas has color and no spots of the canvas surface can be seen. After you have successfully covered the top, you will now create a warmer hue of light blue for the next patch of sky, the one from the right side, this color will seem a little lighter than the one before and a little bit warmer. There is nothing too complicated about creating this color. Just and grab some of the white from the mixing palette and mix it with a little bit of the color from before and some of the newly added read, give it a quick mix. And now you can grab your brush and take that color with it. Look how easy it is to bring a little bit of variety to your Canvas. Just a small hint of red. You will want to spread the color as much as you can. Don't apply too much if it's not needed. This layer is made just to be sure all the Canvas has the color and no spots of the canvas surface can be seen. There is nothing too complicated. After that, you'll create a more bolder color from what's left from the pellet. So you will just grab your bullet knife and start mixing all the rest of the colors to see what kind of color you will obtain. This will help you get an idea of how flexible our colors in general, how easy it is to play with them until you arrive to a color you desire and it's pleasing. So start mixing the rest of the colors. And let's see what kind of hue of blue will be obtained. This will be quite a darker one than the other two. Let's try and make it a little bit to a greener hue with just the bit of more thaler green after you have given it a quick mixed. Now you can grab it and move to the bottom left side of the sky and carefully filled space, blending it a little in the other two colors, but don't go too much over their limits. Just make sure they intersect nicely in the middle. Now that you have nicely covered all the sky, you will continue with the next step.
4. Green Hills: After this guy is nicely covered, you will want to create a cold green by adding some yellow green to the color from before. And of course some yellow as well, for a more warmer hue of green. With this green, you will create some beautiful patches of vegetation on the bottom part of the landscape. So grab the two colors and start blending them in the color from before. You don't have to mix all of the yellow inside, just make sure it helps the color differentiate the two zones, the sky and the ground. If you will, add too much yellow and the green will look too bright, it will feel estranged from the rest of the landscape. So for the moment, let's keep the colors in a color zone. You will want to clean your brush from the previous step. Now you will take some color and start applying it on the left side. Going over this guy a little bit. Not too much, just making sure the two colors get to know each other a little bit, getting into that blue. Then you can take some more of that beautiful green from your pellet and move to the middle right side and create the next zone for the land. So starting from below the sky, just on the horizon line, gradually covered this zone of green going towards the middle, going inside the color of the sky as well. You don't have to apply too much color. This layer is made so you can cover the white of the canvas and decide domain shapes of the landscape. After that, you can take some of this green and the light and the middle right side of the sky choose between the two hues of blue, just a couple of light brushes. Now you can take some of this green, maybe taking a little bit of yellow to and move to the lower right side of the canvas with another patch of vegetation. So with your brush, you will cover the bottom left corner of the canvas, nicely spreading that first layer of color so it can cover the white of the canvas. Let's discharge the brush in that middle, just blending the two sides of the landscape and create a middle ground. You don't have to apply any more color. Just blend the two sides of the land together, going over the sky just a little bit to smudge that color inside the sky. Now, you will add some more yellow to the mixing pellet, a good amount of it, and some green to, let's add a tiny amount of bread to make that green just a little more darker. So grab your palette knife and mix them nicely until all the dark green is incorporated in the rest of the color. So easy and fun to create such a great variety of color nuances. Putting a little bit of red to make that green a little bit deeper and darker. Let's make this green even more warm and bright with a little more yellow. This will also help you create a bigger amount of color. After you're satisfied with your hue of green, you can grab your big, beautiful brush and fill it with the green. After that, you will move to the right side of the canvas just below the green from before and create some more vegetation. Colors do not differ too much, but the effect they are creating is a beautiful one. They create some delicate diversity by shifting just a little bit the hue. Going over the left corner with this beautiful green, making sure that corner is covered. And going towards the lower middle. After this, you can clean your mixing palette and your brush and proceed into the next step.
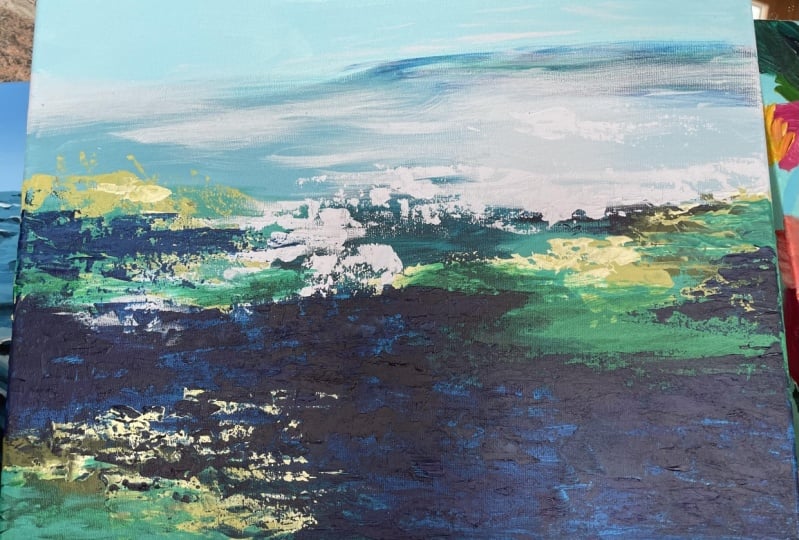
5. The Water: In this step, you will create a big mass of water for your landscape. So you will start by adding some blue to the mixing pellet and a little bit of cadmium red. By mixing the two of them, you will obtain a more deeper hue of blue with your palette knife, start incorporating the red and the blue gradually, but don't make it too dark. Just shift a little bit of that color neurons. Now you can grab your big clean brush with a good amount. The color you will cover the rest of the white from the campus going over the two sides of land. This dark blue, we'll have a good coverage and that tiny amount of red will help it seem like a deep water. You can start from the bottom nicely covering the surface, dragging the color upwards. In this step, you're interest is covered Canvas. So don't think about it too much. Just play around with the color and spread it over the surface. While doing this, you can think about how you desire your artwork to look, can always transform in a beautiful river or a stormy seascape. There are so many possibilities, but most of the time is better to go with the flow and see where your composition is heading towards. There can be very small shifts in nuances or the forums that can direct your landscape towards something new and exciting. So don't stop exploring. Just move around with your brush, mixing the colors and the layers on the canvas. Now, let's add some clean glue on the mixing palette. And then applied on the top of that beautiful dark blue. You can go over the limits of the green to blend the colors. You can make the mass of the water even bigger. Don't worry, you can always go over that water with that green to create more land. Now you will take some of this color and apply a couple of nice brush strokes between the two hues of this clay to create an interesting shadow blended nicely on the sky until you meet the middle of the canvas. Of course, this is not water you are putting on the sky, but it's still an abstract paintings. So if you feel like playing with the colors around, you should definitely do it. Now you will want to create some middle colors for the water and the land. You will do that by combining some green and some cyan. Blue on the ballot. Makes them nicely with your brush and try to get to a middle tone. It doesn't have to be a perfect color, just a nuance in between them. Now, you can take discolored and apply it in the corner just between the green and the blue. Now let's take that wonderful green and cover that faded uncertainty from the middle, going towards the left and the right side blame being in that lighter nuance of green going into the sky as well, and brushing around the colors, sweeping it around. Let's add some more of these green on this shore as well, mixing those two layers, green and blue. Look how beautiful this Luke's. And with that, you can now let the colors dry and prepare for the next step by cleaning your mixing palette and your brush.
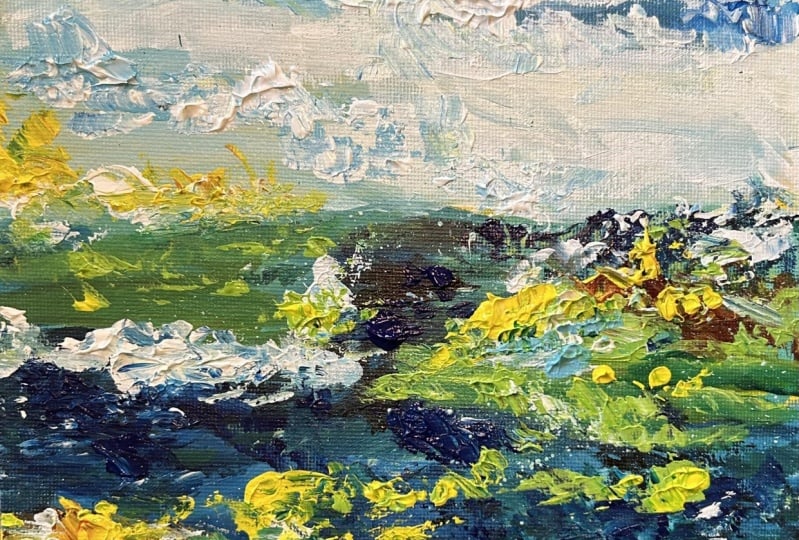
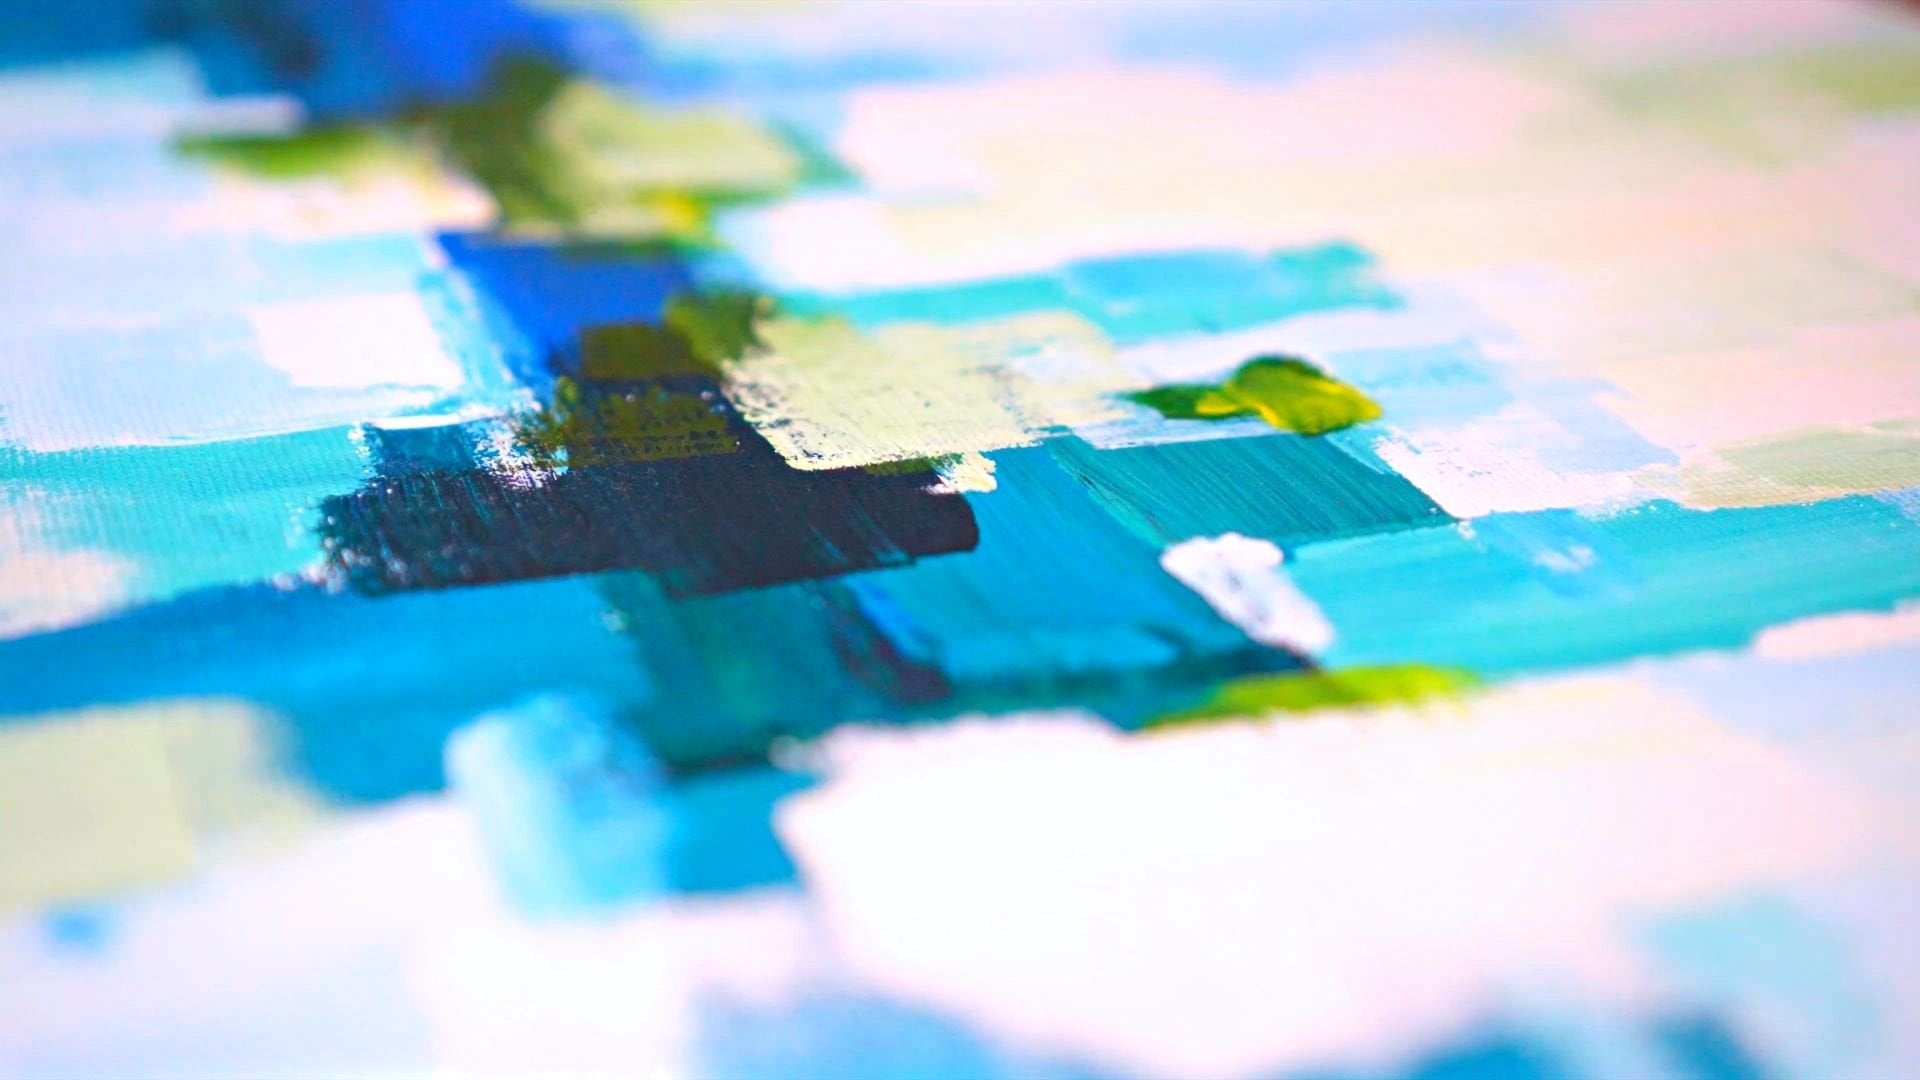
6. Dark water textures: In this beautiful step, you will start to create the first layer of textures. The textures we'll be done with the help of the palette knife. So let's start by adding some blue to the mixing pellet. And some of these wonderful read. As before, you will want to incorporate the red and the blue until you arrive to a deep dark blue. This blue, you will start to add textures to your mass of water. While creating textures, you will want to lead some of the colors from underneath to be still visible. So you will want to use your bullet knife lightly on the surface of the canvas. Let's start and create some textures on the right side of the horizon to make it more visible. It feels like that zone of the canvas. It's slightly uncertain. Let's start then create some textures on the right side of the horizon to make it more Visible, going along it and lightly dropping some color. Spread it around and lightly drag it to the side to create a little bit of weight to this side of the canvas so it can balance with the big mass of water from the bottom left corner. Now let's create some nice textures across the lighter parts of the blue water. Don't forget to let some birds from the color from underneath still visible. This is the beauty of the palette knife. The fact that it allows you to play with multiple layers, color, and still keep separated. Now let's mix some lighter blue in color and obtain another hue, a little bit lighter. You will place this hue of blue in the middle of the canvas over the light blue. As you can see, it is very easy to differentiate the two layers because they are applied in a different manner. It is very good to alternate between using the blood knife and brush while painting. This will allow you to create a great sense of complexity and playfulness. Now, let's add some more of that wonderful cyan blue to the mixing palette and mix it with some green. You don't have to add too much green tells the tiny bit because this color is very nicely segmented. Tried to create different combinations between the colors used in your artwork and find out how they can bring a sense of balance. After you have arrived to a deep hue of this greenish blue, you can add another layer in the middle. This will create color variation and textures. So spreaded carefully over the blue from below. Carefully dragging the color, not pressing too much on the surface. Then you will go down the water on the bottom right corner and create some more textures over there. Over the green and the blue part near the edge of the canvas over the bottom as well, taking some more color with the palette knife and breaking that blue mass, print the corner, dragging the color outside. Not too hard. Learning some blue from before, still visible underneath. You can play around with multiple nuances of greens and blues, as long as they don't vary too much in brightness. So let's mix what's left on the palette and you can take that color and place it over the left edge of the canvas, dragging the color inside, blending a little bit the two layers and making sure the edge of the canvas, It's nicely covered with this beautiful blue. Now you will add a little bit more textured blue to the bottom in the middle, covering that piece of land. And a little bit on the bottom right corner as well, reducing some of that texture noise. And now you can take your big brush and blend some of those harsh textures so they seem a little bit more blended in the landscape. So it doesn't seem like the textures are apart from it. So use gentle moves and don't spread it too much. Just lightly tap with the edge of the brush and disrupt some of those harsh edges, blending the textures just a little bit on bilayer from before, you can now see how easy is to silent a little bit those very contrasting edges to make them seem more integrated into the water from below, just a couple of more short brushstrokes, and this step is done before moving to the next one, makes sure the last layer is nicely dried. So let's get into the next step.
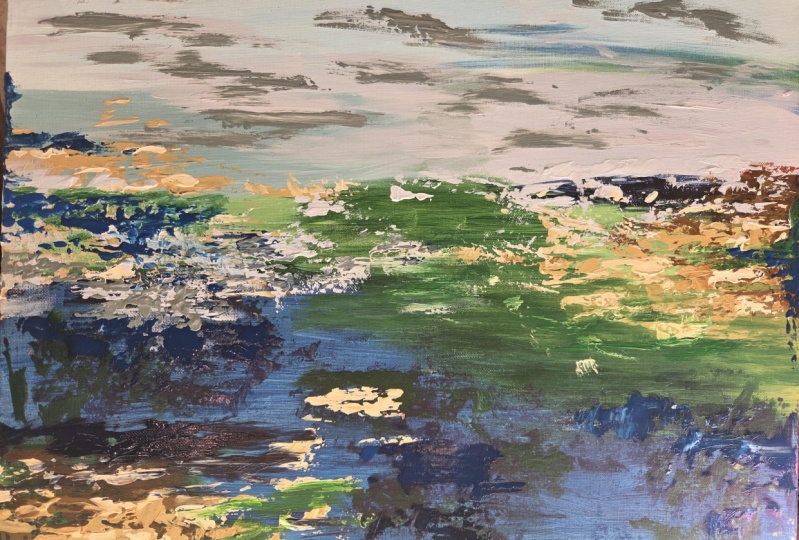
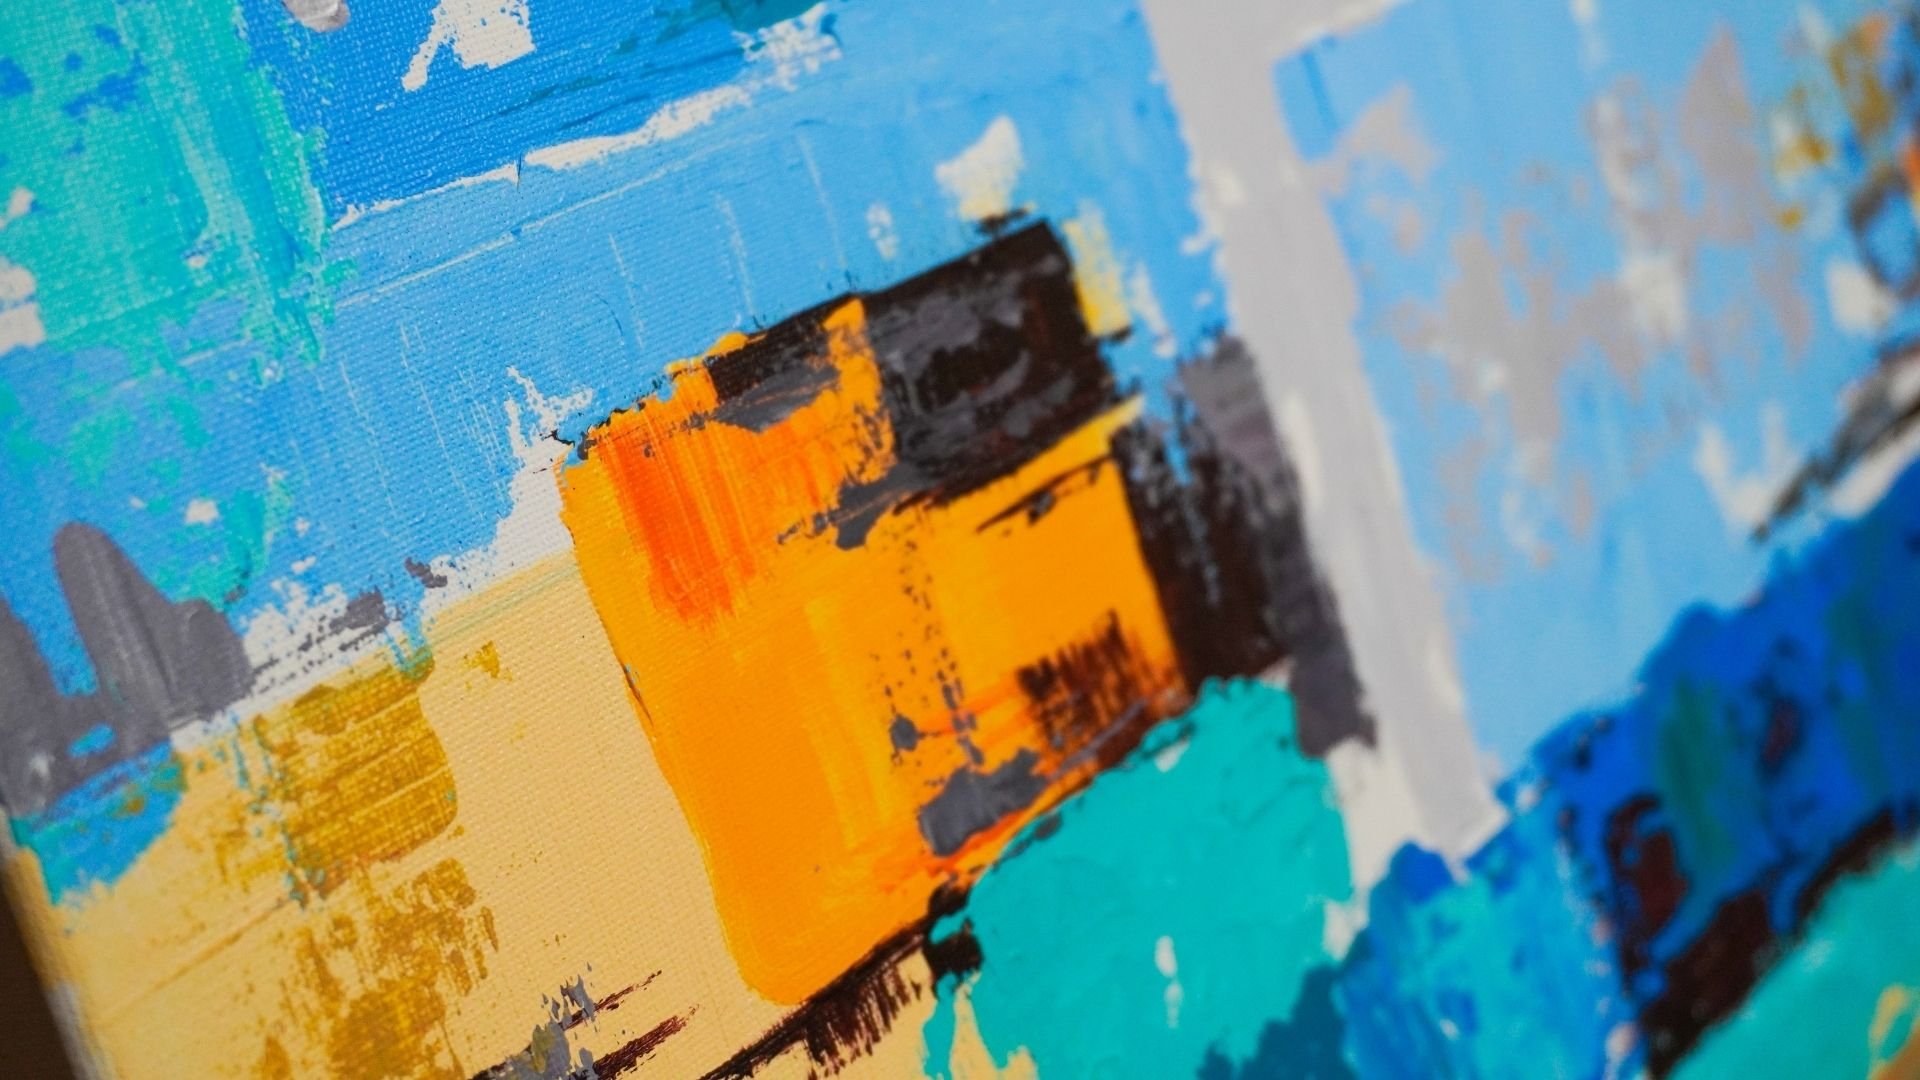
7. Dark and Light Green Hills Textures: In this next step, you will create another layer of textures for your wonderful landscape. You'll want to focus on the vegetation zones. So you will want to create a totally different hue of green, one that is much more warmer, starting with some yellow and some red on the palette, you can blend them to obtain a bright orange. Look how beautiful is this orange next to the blue? So take your palette knife and blend them. Well. Because the red is overpowering, you will want to add some more yellow. This will help you create a bigger quantity as well. So don't think too much about wasting the color. You can always change into another useful and beautiful one. Now, let's put some of that core just a little green on the mixing palette next to the orange and start adding some of it into the orange. The color obtained will be a very pleasant and dark, warm green, and the color can seem a little bit brownish book, this green will be the first layer of textured green from this step. Now you will start applying it on the bottom left corner of the canvas over the cold green from before, just over here, between the blue and the green. Now, after applying a little bit of the color on the surface, or you can take a big brush and blend it a little bit of this green into the blue from underneath. So you can later add another layer. Now you can take some of these beautiful warm green and place it over and between the light green, dark blue from the right edge of the canvas, right around the middle of it. Drag it a little bit down and makes sure the edge of the canvas is nicely covered, narrow. You can take your big brush and landed a little bit on the left-side, dragging it nicely over the other colors. So this layer of texture can integrate a little bit on the landscape. Now that you've placed the two patches of dark, warm, green, Let's create a lighter and brighter one. You will do that by firstly adding yellow to the color from before. So adding some yellow and mixing it in the color from before, taking a little bit more green, getting that green, getting all of that green inside color and mixing it nicely until all that green it's incorporated in the color. Look how Pride is this hue of green. It looks so much brighter from the one from before. This will produce a big twist in the color hue and create this beautiful earthy green, a lot more green from the one from before. Now you can take this green and add it to the bottom left corner between the World Green from before and the cold green from the previous step, likely hover over the surface, not pressing on the canvas, just drag the color over the others, barely touching the surface. Now let's take some more of this wonderful green and applied on the right side just like before, between the cold light green and the warm dark one from the top, focusing on covering the edge of the canvas and creating some interesting textures of different shapes and sizes. After that, you can add some more yellow to your color left on the mixing palette and then some white to this time, the next layer textures will be a lot more lighter, but as you will see, the color will get slightly darker as they try. So, grab your palette knife and mix the yellow and the white, the color from before, using the rest of the color from before. His. Usually helpful when you want to obtain similar colors with different shifts in neurons. And after that, you can take some of the color and apply it over the cold green from the middle right side of the canvas. You can go over the last screen as well and blend those two layers a little bit. Some swift moves, dragging the color from the right to left. You will want to make sure you leave some uncovered spots so you don't break too much the composition with two big batches of color. After that, you can take some more of this slide green and as before, place it over the green from the last layer going above it as well. Now you can take some more of this wonderful color from the mixing pellet and move to the left side just on the horizon line. Drag up and down to create a highlight over this side of the landscape. You can go over the sky as well as they don't differ too much in color intensity. So it's not bothering to the eye. Make sure the edge of the canvas is nicely covered with this beautiful light green. So you cannot see the blue edge anymore. Now going back to the mixing palette, you'll make some white with the color from before. This will help you create even more highlights. This will help a lot to brighten up the landscape and create some beautiful Final contrasts. So with your palette knife, drag the color and round and take some bits of the color of just incorporating a little bit more white into the rest of the color. Take some of the color with this color, you can go over the horizon once again and place over the green from before another beautiful layer of this lighter version, the changes in the Hughes will be very delicate, but they will have a wonderful final effect. You will want to make a couple of light patches of color over the dark green from the top. And then holding your palette knife horizontally placed just a couple of light patches of color over the green parts just here and they're dragging the color inside the composition. You will see how beautiful this color will blend in the rest of the landscape, making that land so much alive and interesting. Now for the last batch of vegetation, you will once again create some highlights over the green, going over the dark blue, as well as you will see, this will create a very powerful countries between the two layers, but you can always make them a bit more quiet Bye, adding another layer of blue over it. But that can be done a little bit later. After this layer of color, it's dry. After this step is done, you will want to make sure your colors are dry before going into the next step.
8. Mist and Clouds over the Sky: In this step, you will get to play with some bright textures to give the landscape of light atmosphere. So you will add to the mixing pellet some titanium white, a little bit of cyan blue, tiny bit of cadmium red. After that, you can grab your palette knife and start adding some blue to the white, giving it just a tiny amount of red to obtain that delicate hue of purple leash white. After mixing them a little bit, you can grab your brush and take some color. After that, you will move to the right side of the sky and start applying the color over the middle to the right, where the couple of light brush strokes over the dark blue as well to create a thicker atmosphere. So it seems like there is more humidity in the air, like the atmosphere is a little bit more denser. So using horizontal moods move around the sky, creating some light textures over the left side as well. Going over the gradient may be making some strides clouds. Now let's take some more color and move over the light green from the corner to get that filling of Horizon back. And over the darker side of the horizon from the middle, breaking that harsh line just a little bit. Now, the sky seems much more interesting with those white textures. Now you will take some more wide with the palette knife and go over the middle section of the landscape to create something like a foamy filling of water over those green hills. Who it seems like the water, it's a little bit agitated and alive. Keeping your knife in a horizontal position, lightly drag the color, leaving some blank spaces of the green here and there. Now you can go over the sky as well and create a couple of textures. And over the right side of the horizon, over the dark blue, breaking that straight line, making a little curve inside the landscape with a couple of generalist chunks of color. Now you can move over the top of the sky with just a couple of tiny brush strokes, keeping the brush edge horizontally just here and there, a couple of tiny clouds to break that mass of blue. After that, you will take the small brush and play around the wise to break some of the textures and create some new kind of lines for more diversity. So you will go over the dark parts of the sky, just blending a little that wide and smudging good over the right edge of the canvas. And going in the middle as well, creating some new clouds and textures. So just go around and blend a little the layers going over the left side a little bit as well. And then you can move over the middle left side of the canvas and smoked a couple of those textures going over the top side of the water as well. After this step is done, you can prepare for the next step by cleaning your mixing palette and your palette knife.
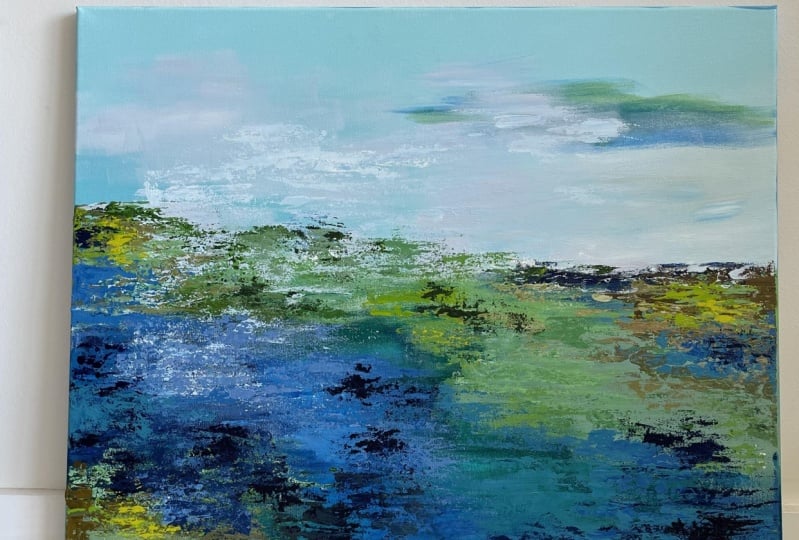
9. Cold greens Over the Hills: For this next step, you will want to create, once again, the coal green that was applied with the brush as a first layer. So you will begin by adding to your mixing palette and good amount of white, nice amount of yellow, and of course, some day low green. You will start creating this color by mixing yellow with a little bit of green. Now, let's add a little bit of blue to make this green more towards a cold nuance. You don't have to make too much quantity of this color, just enough to place a couple of very beautiful accents over the textures from the top. After you are pleased with the color, now you can take your beautiful big brush and start lightly applying the color over the right side of the landscape on the white textures from the left. Just to blend chromatic a little bit. So you will likely use the brush using just the tip of the brush to get rid of some textures from that beautiful green. You can also use the small brush if you want to have more control. Now you can take some more of this color and applied over the white parts from the left side of the landscape. Just blending a little the two layers of color, the green from the bottom and the white going over the left edges, well, covering some more of that beautiful white. You can very lightly go over the bottom as well, covering a little bit of the bottom edge. Mixing a little bit more yellow onto the palette in the color from before, and making a lighter and more warmer hue of green. Getting some more blue and mixing the color nicely until you obtain a new quantity of this color and adding a small amount of white to making that color a little bit more light it. Then you can take your brush and move over the bottom left side once again and over the corner and white that it's going over the yellow parts a little bit with a couple of horizontal brushstrokes. Now you can take some more coloring. Go over the horizon line on the right part, just around the edge of the canvas. Just a little bit of blending. And over the left side as well, just making that Bardach landscape a little more greener. There. You can move to the next step to work a little bit more on those water layers. Before that, make sure you're mixing palette and bullet knife are nice and clean.
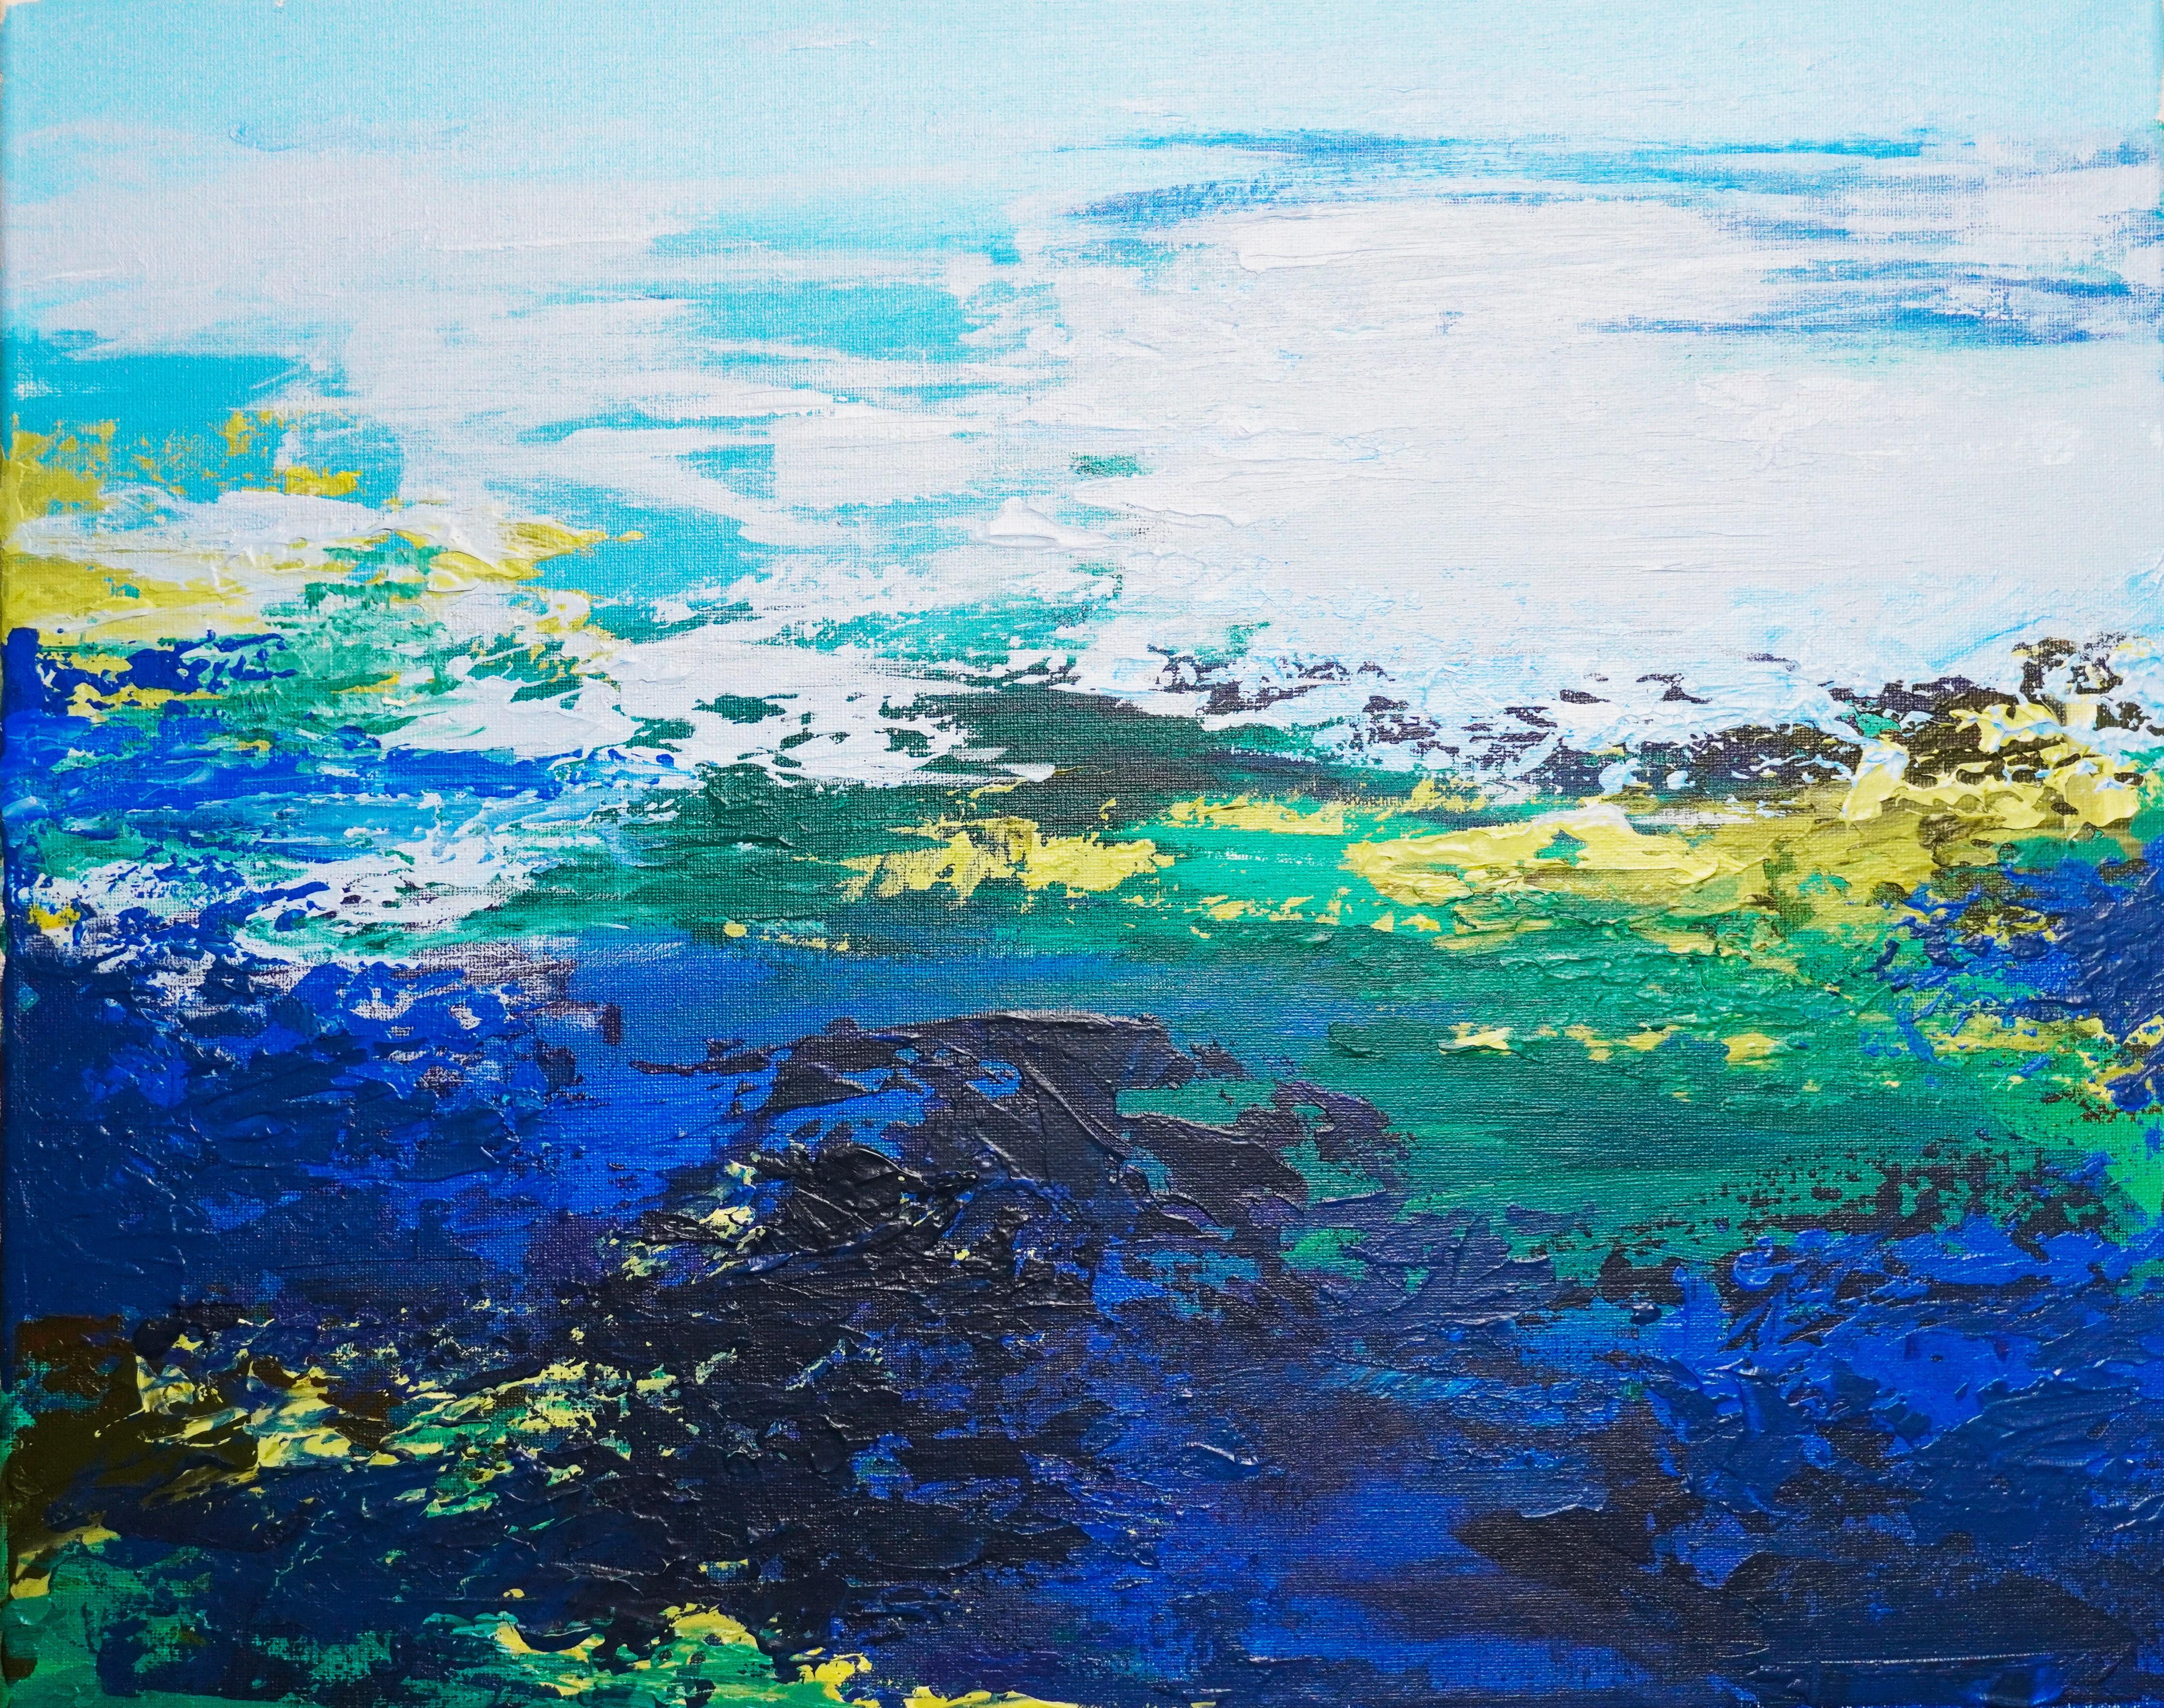
10. Deep Waters: This next step you will need to add to your mixing palette some blue and the little bit of red to make once again, a darker hue of blue for the water. Now you can take your palette knife and make some of the blue and the red in the middle until you obtain a darker hue of blue. With this blue you will creates a nice textures over the green parts from the bottom left corner, just on the top of it, a little bit to cover some of the land that it's going into the water. Now you can take your small brush and blend just a little dose textures, making some new ones over the light green parts. Just a couple of horizontal lines using the color scarcely. He can take your time. Just move over those lighter parts until the two layers seems more connected. To stake your time. Moving over those white parts, spreading that blue around the whites, creating some more textures and going town with a small brush lightly covering that nice green. You can take your palette knife and move over the bottom middle of the canvas for a couple of some heavier textures. Just cover a little bit of those lighter parts, creating some new nuances of blue. Moving to the mixing palette, you can blend the rest of the blue in color made previously and mix them together to obtain another layer of highlights over the water. After mixing them with the black life, you can go over the left part of the canvas and add some textures over the wide smudge from the water, covering just a little bit and creating some textures over the darker blue. Now you can move to the right side, right in the middle, creating some granulated textures over the middle, just a couple here and they're dragging your palette knife and smudging it a little bit in the rest of the colors. Now you will move further to the right side on that dark corner and create a nice portion of this beautiful lighter nuance of blue, letting some of the dark blue on the top because it look very nice in contrast with the green, make sure your textures don't create lines or forms that are too edgy for the eye. Now going to the top a little bit as well, on the right edge of the canvas, make a couple of textures going inward. Not too much, just to straighten up the composition because it seems a little bit too tilted to the bottom right side. There you can take some more of the color and move to the left side of the canvas over the left edge, covering a little bit of it and going inwards with the very tiny amount of textures, blending a little bit with the whites from below. Now you can add to the pellet a little bit of phthalo green and some clean cyan blue. Before mixing the colors on the mixing pellet, you will want to take some of that clean cyan blue and add a little bit of it over the left side. Just a little bit of clean blue, creating a feeling of a horizon over that smudged wide. Now I can mix some green in that blue, just a little bit of red and create a darker hue of blue for some final touches. So using your black knife, mix that color and make sure no chunks, green or red are left in the color. So when you apply it, it can have a very smooth and nice consistency. Now, after the color is nicely mixed, you can create some more textures over the left edge of the canvas, going inwards with the palette knife, keeping it horizontally. As you can see, this glue will make the colors of the water a little bit more dim because it's a middle tone between the light blue and the dark one from underneath. It will go very well just between them to create a bridge between the tones. You can wants more, Move on the right side of the canvas, on the lower side, and place some of this blue between the two nuances of blue to create that beautiful bridge we've talked about. It's like a gradient, but it's a little bit more textured and rough. Now you will move a little bit to the left and add some of this blue where the green of the land and the dark blue of the water are meeting. Just making that edge of the land a little bit more straight. Let's add a little bit more in the bottom center of this wonderful water, lightly going over the blue from underneath. Then just a little bit on that edge from the right side, taking up step back, it seems like that piece of land from the bottom left corner of the canvas is disrupting the lines, the composition. It seems like it's a little too edgy and rough for the rest of the lines. So let's enlarge that mass of water covering of the land. You will do that by firstly adding some more cyan blue to the mixing pellet and some black to help the color have a better coverage. So you will make some black in that cyan blue. You can see how powerful is that black, how abruptly and rough it's bringing the blue in a darker. So without adding any kind of beautiful color or nuances, you will want to mix that color. Very nice. So no chunks of black, of rough black are left in the color. Now that the two colors are nicely blended, you can add some of it. Starting from the edge of the land, you can move to the bottom over the land and covered the middle of it, living some of the land from the top, on the bottom still visible. You don't have to cover it completely. Just break that piece of land into parts and align them to the rest of the composition. A little bit more textures on the bottom, and the abstract composition is officially done. Congratulations on coming this far on this wonderful adventure and see you on the next one. If you enjoy taking this course, make sure you live or review, and of course, share your beautiful abstract artwork with the rest of the world.
 Cristina Handrea