Transcripts
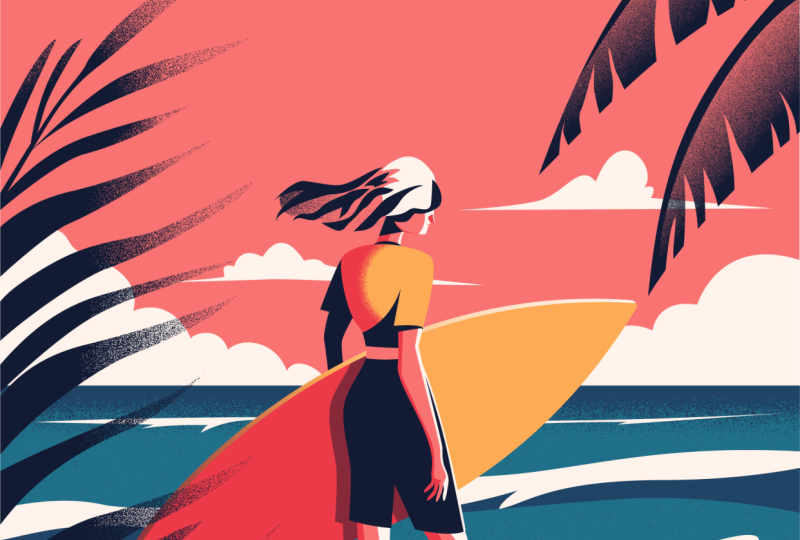
1. Introduction On the Beach : Do you want to get
good at creating awesome vector illustrations
using Adobe Illustrator? Well, you came to
the right place. I wanted to capture a serene, inviting scenery and decided
to go for a tropical beach. To make the illustration
more relatable, I needed a person in it, and I a surfer
studying the waves. To add some visual interest, I also introduced some textures by using the grain
effect in Illustrator. And at the end of my workflow, I demonstrate how to
use it in various ways. Whether you are an
aspiring illustrator, digital artist, graphic designer,
photographer, marketer, or simply someone with a passion
for visual storytelling, Mastering Illustrator
provides you with the tools to turn your ideas into
stunning vector art. I will be guiding you
through every step of the process from the initial
sketch to the final touches, giving you a comprehensive
understanding of Adobe Illustrator's incredible
tools and features. This course is perfect for you if you are new
to illustrator, or if you are self
taught and aiming to get more confident
and effective using it. I am Martin Pervic, a certified LOB professional and instructor with a
design background spanning over two decades. Throughout my career,
I've collaborated with renowned clients
such as Disney, Mattel, Cartoon Network,
Nilodeon, and BBC. Leveraging this
extensive experience, I have carefully crafted
this course to help you navigate AOB Illustrator like
a seasoned professional. I am not just
teaching Illustrator. I am empowering you
to express yourself. Tell your story and create illustrations that resonate
with your unique style. This is your chance to
create work that is truly personal and worthy of your professional
creative portfolio. You can follow along and
replicate my illustrations, or you can use the word
flows and techniques I show you and create something completely
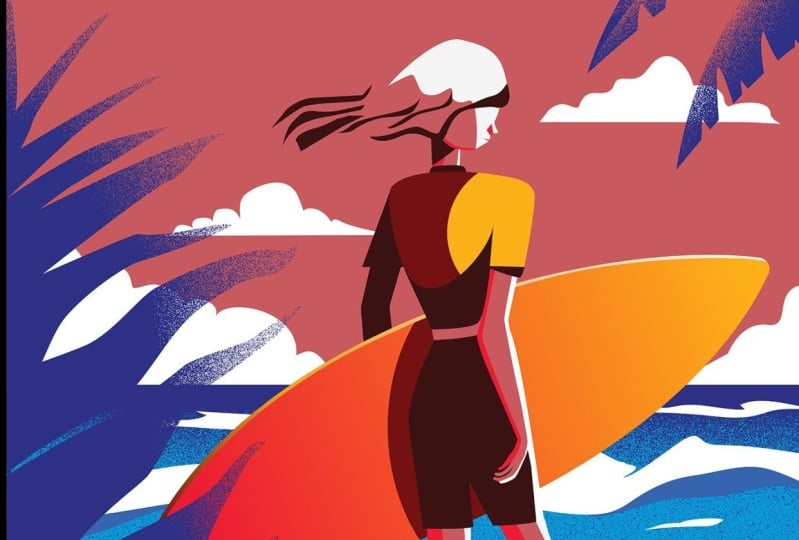
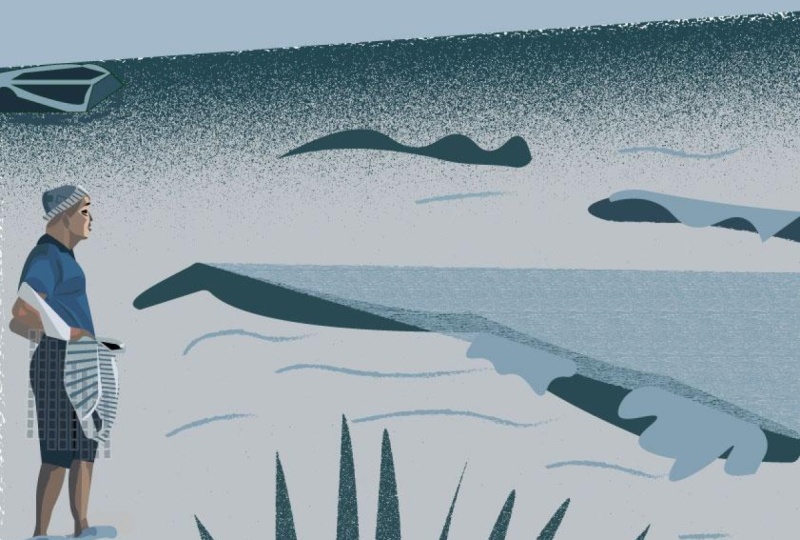
different than unique. There are at least two
additional compositions you can choose besides the one I
am using in my examples. And roll now and
let the fun begin. Your creative adventure with
Illustrator starts here.
2. Drawing the surfer's body: With most of my illustrations, I like to concentrate on
the most exciting detail. And in this case, that's clearly the subject
of the illustration, this girl who's
just going surfing. So I am going to start with her. But I think the hair is going to be the trickiest
part to nail. So I'm going to
actually start with the upper body and then
maybe the surf board itself. So let's get started. I'm going to use the
pentel because I want this illustration
to be very clean. And also just smooth
curves all around. So I don't want to have
lots of little details, and I feel like the pantal
is the best for this. So I'm going to draw one shape
here for the upper body. Let's start creating
this first curve. Now, one thing that
you can do is if you already want
to create a curve, you know that this point
here is going to be a curve, instead of just
clicking first and then only start click and dragging in the
next anchor point. What you can do is to
click and drag already, even though you haven't
created the shape yet, this will set up already
the angle of your curve. So if I decide to
go down this way, you can see it's already set
up the right way for us. That's useful, and it will help us at the end as well
when we close the shape off. So I will just come down
here and then let's maybe create a sharp corner there by clicking one more
time on the anchor point, create another curve up here. And I'm just going to come out here and then come up
and click and drag. Click and drag.
And then finally, if I just click and drag here. I just update that
direction handle that we defined
in the beginning. So that's one shape
that we will need. I'm just going to
change the color to this darker color because I would like to
add some shadows. And for this, I will actually
use the draw inside mode. So I select this shape,
choose draw inside. And then still using the panel. I'm just going to start
out here. You can drag. And what I want to
do here is to define the sleeve and come out there, and then just fill in this area here at the
bottom completely. So that's going to be this, and I'm just going to have
to select that color again. So you can see we have
the sleeve there already. And I will turn off the draw
inside now because I will draw behind this shape to
draw the other sleeve. That's just going to be a
simple shape like this. And I'll send this
behind the other one. Command left square bracket. And we can actually also
already draw the arm. I'm just going to come
down here and draw this. Again, it's going to be just a simple silhouette like that. Send it behind as well
just like before. And then we also have
another shape here for the neck of this swimsuit.
Something like that. Send it behind other shape. And by the way, if
you keep drawing things behind an object, so you want to keep things
always going behind. There's also a drawing
mode for that. So that's the second one here. You can always select that. If you keep drawing
stuff that you want to go behind like now,
if I select that, and I draw maybe something here starting from this
point coming down. And then I'm just going
to create this detail. And I changed the color to the skin tone that
I wanted to use. You can see this
automatically ended up going behind this initial shape
that we created. All right. Now, let's draw the hand. So for this, I'm going
to start drawing from here and maybe come up to this corner
like that and come down. And this can be done with
a single curve like this. Let's keep going down. And sometimes what I like to do is to just simplify some shapes. So instead of me drawing
all the fingers, I'm just going to
keep this simplified, and I will come back and
add the details later. I just like to get the
main shapes in place first to be able to better
judge what I'm doing. So that's looking good, and this actually
should be in front, so I will set the
drawing back normally, and I'll bring this up here. Yeah, is looking good. Now, of course, together
with the sketch, we have a little
bit more indication of what is going to happen here. But like I said, we will come back and add
some more details later. Now I'm going to draw the
pants or the trouser. So for this, I start from
this corner point here. I come down, create the shape, and I will actually keep
this smooth coming down. We can have a sharp corner here, then I create curve
down there and come up And then go down again, sharp curve or sharp
corner curve line, and then come up
here and maybe have a little bit more curve
on this side like this. Okay, that's looking good. Let's close this off. Set this to the dark color and send it all the
way to the back. Yeah. That's looking good. Now let's draw the surfboard. For the surfboard, we can
do a very simple technique. I'm going to click and drag here at this
point and already set up my direction handle to
be tangent to the curve. Then I come up here,
click and drag and drag it out as well
in that direction. And I can change the color of this maybe to red just so we can see what we are
doing and then use the commando Control key to
adjust this other handle. Now, before I move
on, I will use the altar option key and
drag this point down, again, set up that tangent
direction handle, which will allow us to
create this next curve. And one thing that I
don't want is when I connect to this
point here is to mess up that initial direction handle that
we created there. So I just show you
this what happens. If I click and drag here, you can see that both sides of the direction handle
is getting adjusted. So if you want to avoid this, just hold down the
alter option key, and then clicking and
dragging will only affect the new side
of this curve. So I can adjust that, and it's already
looking perfect. Just a useful little
technique with the pen tool to draw curves, where you have obviously two curve segments
next to each other, but they are interrupted on both sides with
these sharp corners. Now, if you want to round
these up, of course, we can use the corner widget, add a little bit
of roundness there and a bit more roundness
on the other side. For that to work, you have to make sure you only
select one side. So use the direct selection tool that way you don't see
that corner rigid, and when you're adjusting this, the other side is not affected. I like to use the
corner rigids because they allow me to go
back and remove them. So anytime I want to turn them back into sharp
corners, I can do that. So it's a really good
non destructive way of editing your parts.
This looks really good. But I will put this behind everything else that
I created so far, maybe apart from this hand, which is supposed
to be going behind. So you can use the layers panel, drag things up and
down or just use the keyboard shortcuts
for arranging objects. I'm not even going
to call these out. These are the ones I'm using, so the bring to front, send to back, or move them one step upward down
with these shortcuts. So I use these all the time. I'm not going to mention it. So I'm going to
continue drawing here. Let's just go down
and draw the legs. Again, using the pen tool. We can come this way. I will actually use
a clipping mask at the end to have all the
shapes that come outside of the canvas or artboard to be adjusted
and kept inside it. So I'm not worried about
that at this time. I will send this back as well. And let's just change the
color to pink just so we can see what we are
doing. That looks good. Now Let's move here. A nice little curve, curve down, straight
line. Then go up. We'll add a little
bit of curve here, a little bit of curve there, and then close it, send it to the back, and
that's looking good. Let's take a look at
this without the sketch. Yeah. I quite like how
everything is coming together.
3. Adding gradients and shading: Now for the surfboard, I might already apply a gradient because that's
what I wanted to create here. So what you can do is use the gradient panel if
you don't see that, go to the window menu
and choose gradient. And then I'm going to
choose that gradient there and make sure that it's applied to the field
color and not the stroke. And what you can do
is to press G on the keyboard to be able to
see your gradient annotator. And I like to
change things here, so I will double
click on this color. Change the color to red. And on this side, I will use
the yellow or orange color. And now we can just rotate
this gradient and then drag it down to the angle
that I wanted to have here. Yeah, looks good. Now, if you want to have
a more abrupt transition. So in case, for instance, I wanted the left side
of the surfboard to be the red color and the right
side to be orange or yellow. What you can also do is to set up new points in the gradient. So I can add another point here and set this up also
being the same red, and then set another
point up here. So you just click underneath
that gradient line and then set up that again to be the other yellow color
that we had there. And then I can just
move this up here. So these two points get
very close to each other. And this is actually not
even a real gradient. So if we turn off the
sketch, you can see this, It's not even a real gradient, but I still like to
do this sometimes, having a single object, and instead of creating two separate objects to define the yellow part
and the red part. This way it's still one object, and I have very fine controls over where I want the
colors to change. So the body is the one that
is hiding the transition. If I were to move
this shape away, we can still see that
there is a little bit of gradient there's
just hidden away. So this is a clever
little technique that I like to use sometimes. Now, what I would like to also do is to have this
shape selected. And I actually wanted to
have a shadow cast on this. So for this, I'm
going to draw inside. So this is turning
into a clipping mask. And I'm just going to
draw a big ellipse. So for this, I can just
draw this big ellipse here, holding down the space bar, I can move it around. When I let the space bar
go, I can adjust it, and I'm going to fill it in
with this darker red color. And now, when you only
need one side of a shape, a quick way to get rid of
any unwanted parts is to shift to the eraser
tool, that's shift E. Then hold down the
altar option key and delete the parts
that you don't need. So I will delete this,
and I will delete that. So that way, we only have
the shadows in these places, so in between the legs
and on that side. Now, I would like to also add
some shading on the legs. So I'm going to select them now. Turn off draw inside or press
Shift D, select the legs, and then press shift
d twice or again, use the draw mold tocals
here in the toolbar. Now that we have
this one selected, I'm going to actually
use the pen tool here. Let's just draw this down. I'm going to do
the shading here, and then just close this in and then fill it in
with this darker color. So I'm not going to use the
same dark color as that one. I'm using this color, which is actually used
on the surfboard. That looks good, and maybe let's add a highlight as
well on this side, that can run all the way down. It doesn't have to follow
exactly the outline of the leg. So I intentionally
create a separate path, come up and then fill
it in with white. Now, this will only show properly once we
have colors behind. But just so you can see it, I'm going to turn this off now, and maybe we can already
create our background layer, which will be useful
in this case. Let's just create that. And then on that
background layer, I can just fill in
the sea already now. Again, this shape can go all
the way out here for now. And let's just fill this
in with the sea color. So that's the feel. And
yeah, that looks good. So we can see
without the sketch. That's the highlight we created, but we can always come back, make adjustments to it, maybe make it a bit narrower. Here on the top, it can
be a little bit wider. Yeah, just like that.
That looks good. Let's turn off the draw inside, select this other shape,
and let's repeat this. So I will draw inside this side. I'm going to use the pan tool, and let's just draw
down this segment here. I'm just drawing
the shading first. So that's going
to be this color. And then command click away, so I can start a new line, and I'm going to
draw down this way. Try to make it look similar
to the other side, like that. And then set it to White field. And then we can come back
and adjust his an goes a bit can go even
closer, like that. Maybe here on the top, we
can drag it out a bit wider. Okay, that looks
good, obviously, I have a source of
light in my head. I imagined it coming
from the right side. So that's consistent. We have the highlights
here, shadows there. Again, the shadow is
cast in this way. The shadows again are
cast on that side. So that's again something
that you have to decide on at the beginning
and try to be consistent. For the surfboard, I also would like to
make some changes. I'm going to look my
background color for now or background layer just so
it doesn't get in the way. I go back into draw normal first and select the surfboard. And this is already a
clipping group because we created the shading earlier on. So I'm going to just select that clipping path and go
back to draw inside. So we are revisiting this shape. And I am going to draw
with the pen tool. So I'm going to draw a shape up here following the
edge of the surfboard. Like that, and then go all
the way here like this. Now let's close this
around like that. I'm going to set
this to white fill, or maybe let's use this other color just so
we can see it better. Let's turn off the sketch, so we can judge it. Now, I will definitely
use white on this, but maybe we can use
a gradient instead. So for the shape
that we created, I'm going to assign a gradient. And by default, it goes back to the previously used gradient. So if I use my
gradient annotator, there's G on the keyboard, I can see exactly
what's happening here. Now I want to change this
first stop to be white. And I actually want this
also to have an angle. So let's just drag this up here. You have to click when
you see this cursor, so closer to this end of the
gradient, you can drag it. I think it's only working
on the right side of the gradient when you are
using a linear gradient, so always go close
to the right side, and then you get
that cursor option. And when you're happy, you can obviously
reposition this, drag it further to the left, or further to the right I have this white
color set up here, and I will drag
this gradient off. So just drag it away
that removes it, and I can drag this
one away as well. And this other gradient, I want to be yellow. So transitioning from
white to yellow. And maybe we can set up
an additional gradient. Here at the end, I'm
going to add one more. I will click on that,
and let's just use this dark red as well. So that way, we have three colors that we are
transitioning between. The white can come
a bit further down. That looks good. So it starts
off as a bright highlight. And again, I'm
going to go back to my background layer just so we have something
here that we can see. I will actually duplicate this shape commando Control C
and then Comando Control F, and then the one below. We'll just extend up to here, and I will fill this with
that's going to be a sky color. So now we can see how this highlight is looking
on the surfboard, but I will come back and use the direct selection tool to move these points
around the bit. So I want this to be thinner. Really just want the
edge of it to be highlighted. Just like that. Drag it down a bit. Maybe
this can come a bit this way. And then drag this one up here. Okay. That looks quite good. Maybe let's just drag
this up a bit more. Yeah, finish off there, and drag this out
as well a bit more. Maybe this can come high again
just to make it very thin. Yeah. That looks good. Now, we will introduce
some noise later on to create some extra texture. But for now, I'm happy
with the way this looks.
4. Drawing the head and hair details: I actually wanted to also have another highlight created
here for this shape. So I'm going to go back
to that clip group, and I'm going to select
the clipping group itself. And by the way, this
is also something to keep in mind when
you start using Jaw inside and you start creating clipping masks that if you
have already a clipping mask, you won't just be able to quickly select it by
clicking anywhere on it. So like this shape here and this shape are both
clipping masks. And as you can see if
I just click on them, I can't select them directly. While, for instance, this one, which is just a normal
object or the hand, I can easily select. The legs are clipping
masks or clipping groups. So again, I can only select them by clicking on their outlines. So that's just something
to keep in mind. Again, this shape, I had
to click on the outline. And actually, from
the layers panel, I can select directly the
clipping mask itself, and then choose draw
inside from the toolbar, and then use an ellipse. And I actually wanted this
to be something like this. So this section here, want to be yellow. And the good thing is
that we can actually put this underneath the shading. So this way, we still
have the shading visible, but this high light
that we added here on the top can be now
easily adjusted. So I can drag it up a bit, maybe drag it out this way, drag that one down as well. Then we get that curve
that I was looking for. So her right shoulder
is in the sun, and that's just
looking brighter. I'm going to go back
to draw normal. And now it's probably
time to draw the head. So I'm going to draw
first the neck. This is just a simple shape. Going down like that. And the base color of
this is going to be pink. F now, I'm going to turn off the background color just to
make it easier to draw this. Send it all the way to the back. And then let's use draw
inside on this again. For clipping mask, I will use the pen tool and set up
the shading this way. So I want to be dark section. I'll set this to the
darkest color that we have, and then I'm going to
draw a white outline here for the highlight
or rim light. And then maybe I would draw another line running down here, which is going to
be the darker red, and this can go
underneath the shading. Now, the white outline will only show once we
have the background, but we will see that later. Now let's draw the face. For this, I'm going
to start drawing up here, create the jaw. And we can actually zoom
a little bit closer. Come up here. I'm going to use an outline for this just so we can see better
what we are doing. And I noticed that we started drawing this inside
the clipping mass. I'm going to go back to draw normal because this is
supposed to be drawn outside. So we can draw this. I just copy pasted
in this detail. So we have the nose
detail coming out here. I'm planning to
draw this all with a single line.
Going up like that. We won't actually see the eye, so I will draw that later. It's not looking that great yet, but I will add more
detail on it later. I'm just going to keep this simple And I will set
this one to also be pink, the field, nose stroke needed. And then I'm going
to use draw inside. And then we will just draw
a white rectangle here. Set the field to white. Let's just bring
back our background so we can see what we are doing. And then I'll draw another
shape for the nose. I just want this to be shaded. Like that. I was using the pento I will use
this darker red. And maybe we should have also a highlight here
for the jaw line. For this, I'm going to
use the pentle once more and just come and run down here along the edge and fill it in with
the darker red color. Like that. Can I
adjust this a bit? Does I have to be perfectly
following the edge. Something like that. It's
hard to see it at this point. We can see it
without the sketch. And maybe let's just adjust
things a little bit here, have a little bit
more roundness there. And also, I will go back to the actual outline of
this clipping mask, and I will round the
chin down a bit. Like that. Okay. Now
once we have the hair, it will make more sense
what we are doing here. So let's start drawing
the hair details. So for the hair, I imagine
this very minimal design, just a few strands of hair
defining how it looks. And I will probably only use
two colors or maybe three. So let's try to keep
things very minimal. I'm going to start
up here to draw the first darker detail that runs down defining this angle. So that can come down
here and then go back up. Staying close to that curve and the nicely closing
up here on the top. And let's set this to
this darker color. And then we just have to make sure that this is
in the right layer. It actually ended up going
in the background layer, but I'm going to drag it up and make sure it's moved
all the way to the top. Now, let's refine
this a little bit. So I want nice smooth
transitions here. I don't want the direction handles to overlap
the path itself. That's when you
get interruptions. Here as well, I would like this to be coming
down a bit further. That's looking good. Now I'm going to draw the next detail. We can draw this one up here. Like that. This can be straight. Coming down, I will
already set this up so we can see the
color that I'm adding. And I think we can come down
here and then curve it. That's one line. Then we can draw another one
coming this way, can overlap a bit, like that. Come back down. Close
to the other shape, but not overlapping it this time coming down
here and close it. Okay? And this should be again
going in the right layer. I'm not sure why it's adding always in the
background layer. I'm just going to lock that
background layer so we don't accidentally keep
drawing things there. We can move these two
shapes up here on the top. Now it still looks very weird, but I'm going to now
add the highlight. So this is the one
that's going to define the top of the head. Just going to draw
around it here. Let's go up there.
Row down a bit. Something like this, come
down all the way here, then define this angle here. Go behind this shape. Then come out a bit
this direction. And then this is the
front of the hair. It's important to get
this curve right, and set it to white and set it to the back. Just like that. I can refine this path a bit, have that angle move
this way a bit, and I feel like this shape
needs to be refined here, so maybe this one can come up to be aligned
and go that way. That looks good. The shape
can also come up a bit higher and the nose can be
curved up a bit as well. Just drag this up slightly. That can move up as well. The shading creating
more of an angle. And for the mouth, I want to probably have this a
little bit higher. Maybe even higher these couple of points can come up here. And then this detail here, the shading can go underneath
the front wide bit. So let's take a look at
this without the sketch. Yeah. It's coming together. It's a very minimal
design for the head. Like I said, with the sketch, I can finish off just adding maybe two more shapes
here that will define the back, or maybe three. We'll see how much we need. First, I will start drawing
this with the darker color. There's our next shape running up there that defines
that silhouette. And then maybe come down here. Go up again and close it
off with a nice curve. Then we can have another
shape running out this way. Like. Like that.
And then finally, maybe one last shape, which I bring down here. And then close it off like that. So what you can see here
is that I always kept in mind the outline of
that original sketch. But I tried to simplify
it as much as I could. So have the highlights here, the shading here on
the left, generally, this would be an outline that
you can draw with one path, and then you can draw
these shapes inside it. But sometimes I like to have that freedom of not being
restricted by a clipping mask. So I can easily
move these shapes around outside of
it and judge it later if I want these shapes to come out
in a certain angle or not. So although clipping
masks are great, It can sometimes feel a bit
limited to be working them. So like even this shape, I can independently move
to the left a bit if I feel like that defines the
shape of the head better. And for the mouth,
I feel like we need a little bit
more definition here, so I will round this shape up and also maybe round
this detail a bit more. And then this
section can actually be moved up a bit
more like that. That looks a bit softer. Let's look at this
from a distance. It is coming together. I will introduce some
shading on the hair later, but for now, I am happy
with the way this looks. Maybe we can have just one
more shape running down here. Just define this
section of the hair. Again set with the
dark color like that. And maybe this can be
moved down a bit here. Yeah. I feel like that's a
good little detail there. Now, these points here can be
turned into sharp corners. I created them as soft curves, but I'm not sure if that was a good idea since all the other details
have sharp corners. So let's just take a look
at this from a distance. And of course, we can
still use the pen tool, hold down the old
option key and add some curves on these
on the sides of it, but the corner point stays. And I feel like that's helping to make it
look more interesting. Yeah, I like this, but maybe
this point can come down a bit just to have a good
distribution of detail. Like I said, very minimal
way of indicating hair.
5. Drawing the hand: And finally, I promise that
we will refine the hand, so that's something that I'm
going to do now quickly. And I will come back to
this shape that we created. And I'm just going
to check my sketch. So I wanted the
knuckles to be here, which means that all of this bottom section
here I can delete. And instead of drawing
a shape there, I will just use
additional shapes to draw the digits
independently. So I will use the eraser
tool, take this off. Of that section, and I can use the object path simplify option to reduce the amount
of anchor points here. That looks already much better. Now let's draw this first
digit here. Coming down. I think I wanted it to be
curving here somewhere. It's hard to see the sketch on this dark color so I can just temporarily turn that off
from the layers panel. So yet, something like that, and then go back up like this. This shape can be set to white because that's where
the highlight is going to be. Then the next digit is
going to cover this up. I draw the next shape. Come down, curve a bit here, and then curve curve
curve and then close. This one can be that pink color. Then let's draw another
shape and similar to before. I create the digits
other finger ready. And then finally, the
small one coming out here and finish that off. Okay. The thumb is not going to
be visible from this side, but this finger can come
a little bit closer. That this shape can
be aligned to it. Yeah, I feel like
that looks better. So there is already
a highlight here, but we can move these shapes around a bit just so
we align them better. And I will actually use the
darker color on these two, since we will also have
a shading on the hand. So I'm just going to select the hand now and
choose raw inside. And then let's draw the shading. So this will run down around
here and then come up. This side and then follow
the edge up this way. Up, and then close it around. So let's see how this looks. This should be
this darker color. And then on the other side, we want the white
detail to go up. So from this point, or maybe somewhere from here, we can start it and then go up. Follow this outline and create the highlight
that we needed. Like that, go do, fill it in with white. And let's take a
look at this without the sketch and also turn off the draw inside mode just to be able to
better judge it. Okay? Now, let's not forget
that we had a pens here, which I temporarily turned off. And with that, it's coming
together very nicely. So this finger here, I was originally planning to
have perfect alignment on. I will use the direct
selection tool, select that point
and align it here. Maybe we can even
have a little bit of a gap between the fingers. Maybe I can add an
additional point here on it and drag it down. Make it look like it's
curving in there. And then this shape here
maybe can come up a bit. And then just drag
this out up there. This anchor point as well to
create a nice curve for it. And then this finger can
also come up slightly, just to have some
separation between them. Let's take a look at
this from a distance. Yeah, I feel like this
needs to come down as we felt a bit too long. To come down maybe here. And this highlight can
come here on the top a bit further inside
like that, like that. And maybe this one can
be narrower as well. Okay. So that is
looking much better. We have more details
on the hands, more detail on the hair. But now we can take a look
at this from a distance. And let's not forget to put everything together
into a group. So I select all
and then commando Control G. And let's
just call this surfer. So we have our background
and the surfer girl so far, which is a single object
on this additional layer. And if I turn back the sketch, we have a few additional details that we will need to
add before we can move on to adding
the texturing that will make everything look
more exciting in the end.
6. Beach, waves and clouds: So it's time to add some
additional details. First, I would like
to define the beach. So for this, I'm going to draw just a quick
shape down here. Which is going to be the sand. So just very quick and simple. Set it to yellow, and this can already be placed under the
surfer, so behind her. And probably it's the right time to also set up a global mask that this is a technique
that I use often when I want to keep things
inside the artboard, but I still would like to
have separate layers created. So what I normally do, and I use this in a couple of other
projects already in this course is to create a
new layer and call it mask. Then create a shape,
And in this case, I would like to have the shape exactly the same
size as my artboard. So I draw it out that way, aligned to the artboard. While this is the only
shape on this new layer, I can go to the
layers panel menu and choose make clipping mask. That will turn this
whole layer into a mask, and then drag the illustration
layer into this layer. And then also the background
layer can be dragged there. Just make sure you first
close the other layer, that way, they won't end up
being in the same layer. So now we have the same
structure as before, but the good news is that whatever we are
creating from now on inside either of these or
maybe even above or below, it's going to be
automatically masked out by this square that we
created here on top. So that's our mask. And this is why I call a
global mask effect. So the good thing is that if I have this path selected here, if I now draw another shape, let's just draw the form, which I want to
have above the sand created here following closely, the outline of the send. You can see it's
automatically masked out. So I'm not seeing anything
outside of the artboard. I'm just going to set
this to white and send it behind the
send like that. And then let's just fix this corner here,
round it down a bit. I want these to be
more round like that. Okay, I'm going to use
the pencil tool just quickly to draw a couple of
addition or shapes here. These are one to be a
little bit more organic. So there's one set to white. Let's draw another one here. Also set to white. Maybe one other little
foam detail here. Set to white, one more here. You can consider this the highlights on the waves as well. But it's more like the foam
when the waves hit the beach. There's one there. That's
just a another one here on the left side. Okay, looks good. Now I want to have a
larger wave detail running across the whole canvas. For this, I'm going to use
a curve with the pen tool, drag it up this way. I'll set this already
to be white and then come back down
curving this way. Maybe we can have a
detail added like that. And then run down across
and curve like this. Okay. That looks good. Maybe let's just make
this more curved. And then behind this, we can have a
darker shape that's defining the volume of the wave. That can be aligned
to this path here. And this can be a
darker blue like that, and just send it behind the foam or the white,
brighter color. And the surfer, I'm going to actually keep above everything. Maybe we can even drag it out just to have it on
its own detail. And to be honest, all of these additional details could go in the background in the end. For now, I'm just going
to keep it separate. Maybe this path here. I can use the pen tool, hold down alter option key. And drag it up a little bit, just to have a little
bit of curve on it and drag it down like
that like an S curve. And maybe we can
also have a bit of this depth created here on
the left side with the penal, again, I'm just
drawing another shape and make sure that this goes behind the other one as well. So let's just set it back there. Okay, that's looking good. And then maybe one
additional shape. I'm just going to draw here
that runs across the canvas. Just drawing this with the
pen tool just very quickly, very thin detail I
want this to be. Just a very subtle indication of another break in the water. Trying to create an
interesting detail here and then set it to white. That's just another
indication of the waves. And then we will add some
more texturing later. But now I feel like
the water looks good. If I lock the surfa layer, background layer
is already locked. I can just select all
of these shapes here, and we can call it
waves and sand. So I created this group, call it waves and sand. And like I said before, I can drop this into
the background layer because it would make
sense to have it there. So the whole background
is now together. And I will actually draw
the clouds now, again, in the background layer, so
I will lock everything else. So here while we are in
the background layer, I'm going to draw
the clouds quickly. And for this shape, I'm going to use the pen tool. I will just click here, click and drag, define
that first curve, then click on this point again. And you can see this is
actually behind the surfboard, but I still like to define
it based on my sketch, just in case I want to
move the surfer around. I will have those details already drawn in the background. It doesn't take long
to draw these curves. It's a very quick little detail, but it will define the
depth in the illustration. So there we have it.
This will have to go under the water detail. And then let's draw
the next segment here. Again, click and drag. Click, click and drag. Click. Click and drag. I can have a little
bit more detail here. And drag. Maybe this can
come out a bit further. Just use the space bar there. And the bigger curve, and one more here. Then we can just
go down, close it. The global mask is
already affecting this, now I just place it
behind the water. I actually wanted to have maybe one more cloud created up here. This one, I'm just
going to have a line at the bottom that defines
the edge of it. Maybe can draw this shape
with a point on the top. Then another one point at
the bottom, like that. And then maybe drag
this point out a bit. Keep it nice and straight. And then we can draw
one more here quickly. Pen tool, click, and then shift click to make sure
it's horizontal, and then draw these shapes
one curve, another curve. Here, I'm going to click and
drag on the top. Calm down. Click, and then maybe
just one more curve here. Maybe one last one. And then close it off. I'll just drag this point with the direct selection
tool a little bit out while holding
down the Shift key. Maybe this one as well, shift drag that way. Okay, so we have these good
horizontal lines established. Let's see it without the sketch. Yeah. That's looking quite nice.
7. Drawing the plants: Now we just need the plants. So this is something that I can do maybe on this empty layer, the one I called illustration. This can be just renamed
to plants or leaves, and this is actually going
to be above the surfa, so I already set it up
the way I wanted it. And then here, I'm going to
use the sketch as my guide. I will draw these large
shapes first here on the top, so I will start here,
click and drag. Click and then click and drag. That's our first shap ready. Set it to dark color. Then let's draw the next one. Again, click and drag. Here at the bottom, click
and drag. Close this off. And one more click and drag
and close it off. Like that. And now what I'm going
to do is to draw some shapes to cut out
of these larger shapes. And it's actually
quite tricky to see this because of the sketch
is not showing up properly. So I'm just going to brighten these up while I'm drawing them. So I can see my original sketch. Although it's fairly
simple to do this. I'm just going to draw these
shapes maybe with white. We can better see where they
are going to cut into it. There's one, then we can
draw the next one going up, maybe even going outside
of the frame like that. One more here. And one
more going up there. Like this. And now I can just select all of
these together. Use the shape builder
tool, which is Shift M, hold down alter option key, and just cut these out
of the main shape. So you just draw over them, and there you go. That
looks quite good. So this one, I can already
set back to the darker color, which is going to be used as the main color for
the palm leaves. Now here, again, I'm just
going to draw this quickly. Let's have a small little
detail here first. That's going to cut into it. I'll set this to white just
so I can see it better. Nice little detail here. I can have this one
curving this way as well. And I just don't want to have these very tiny narrow lines, so I will just adjust this and maybe set it
to a corner point. A click on it. So it doesn't
end up being a smooth point. Then I can have a little
triangle coming up here. And I'm actually going to
speed this up because it's a process that is just time consuming, but
it's repetitive. So I will continue once I have all of these
shapes in place. Oh. So, as you can see, I added some additional floral details here
on the left side, and I'm just going to make sure that this is all
in the same group, so I'll turn it off and on. We have obviously the
surfer and the background. So three main groups. And of course, our mask, which, if I turn off, we can see all the shapes going
outside of the. Going to turn that back on. It's a quick way of disableling
and enableling the mask. And one thing that
I noticed here is that I ended up creating
these very narrow shapes. I don't like to see these. So this one, again,
I'm going to set to a corner point that
way that won't happen. And then also, these
little details like the tip of this cloud is something that I
would like to fix. So I will unlock the
background layer, and that either needs to come
out a bit more this way, or it has to finish before the plant or just finish
behind the plant. It's just good to avoid having these small little
details like that. That looks more like a mistake. So I will just strike this out, have a little bit more
confidence on that line. And just going to
double check if there's anything that's looking strange. Maybe here we can have this
shape coming down a bit more. That way, it's not
aligned, and again, creating a tangent here where these lines appear at the same point from
the illustration. And the same thing, maybe
here I can move this up a bit like that. That
looks a bit better. Okay? And maybe at the bottom, as well, just fixing
these things. It's good to see, actually, I like the way it was. Maybe this one can come
a little bit closer. Detail is big enough
for it to stand out. And I just noticed that
our mask is not perfectly aligned to the edge
of the artboard. So I'm just going to do that, come closer and align
it exactly there. And I think we can do the same thing here on
the right side as well. Just align it there
as well like that. Now, looking at the surfer, there's just one quick
fix I wanted to do here. I actually would like chin or jaw line to
be a bit further in. So I'm just going to
drag that in this way. And then this shape
that we had for the shading will also
need to be adjusted. Over so slightly. And it's almost like with
a fresh eye when you work on some other parts
of the illustration, you end up seeing these mistakes
like this shape as why, we will use the
pen tool hold down alter option key and add
a bit of curve on it, instead of it being
completely straight. That looks much better already. Looks like it defines
that shape much better. And then this shading here
can come down a bit because the chin is now
further up this way. Maybe this shape can also
come out a bit like that. And generally, the neck, I think, can be a bit smaller. So if I select that, I can just highlight these two points and
drag it in a bit. Yeah, just a bit thinner. Maybe even go more this way. And then the high light can
also follow the changes. But I also noticed that this shape should be above
the highlight like that. That's much better now. Okay, subtle refinements
there on the head. Now, one minor thing I also just noticed is that for the pans, I don't have a highlight, so that's something
we can quickly fix. Use the draw inside
mode and just use the pen tool and
draw a shape here. Just very quickly fixing
this and set that to white. And then we can just adjust it. Create a very thin line. I want to make sure
the hand is still visible and also
here on the top. This needs to make sure that it completely covers that shape. Mm hm, like that.
That looks better. Let's turn off draw inside
and zoom back a bit. Yeah, I feel like that adds
a bit more detail there. And we wanted to
maybe we could even have a little bit of
highlight showing here, but that's probably
in the shade, so it probably won't be
directly affected by the sun. But yeah, if we
wanted to, we could also add a little
bit of white here. I'm going to skip that for now, but maybe we can come
back and add it later. But now we are ready to add the final finesse and
detail at the texturing.
8. Creating texture with the Grain Effect: For the style of
this illustration, I feel like the
texturing would work really well with
the noise effect. I'm going to show you how
I normally apply this, and I will use it in a couple of different ways throughout
the illustration. First, I'm going to start
with the waves or the water. I'm going to select
that shape that I created in the
background layer, and then copy paste it. Command or Control C, command or Control F. So I'll just show
you in the layers panel. There's our duplicate
layer or tuplicate object. And I can change the color of this to the darker blue color. That. And then I will click on M mask in the transparency
panel. Turn off the clip. Click on the mask icon and then paste again
at the same shape. So that's commando
Control F one more time. Now, this shape should
be set to black. So we can double click on the
switch and set it to black. So it's completely hidden. So whenever you use black
in an opacity mask, it's going to hide your object. Of course, you can change
the size of this shape. It doesn't have to be
exactly the same shape as the original one, but this is something that
we can change later anytime. While this one is set up, I will actually
switch to a gradient. So this object, instead
of just being black, should be black and
white gradient. So I will click on
this option here. It's a linear gradient, and I'm going to use
the gradient antator by pressing G on the keyboard
and drag this down. Actually want this to
be starting on the top. And then come down. Maybe have a smaller transition,
something like this. I can align it up here. If I hold down the shift key, I can make sure that
it's perfectly vertical. Okay. So we have a reveal effect essentially of this shape is showing only here on the top, and it's all hidden
down at the bottom. So from that black point down, it's completely hidden, and from here to here it's
starting to show. So it's a very subtle
gradient effect there. But here comes the
interesting bit. We actually going to apply
an effect on this mask. So the shape that we are using
to mask this detail out, we will be using the effect
menu texture grain option. And the settings that I like
to use is the following. Here on the right,
you can choose the stipd or sipled effect. And then the intensity, I like to keep fairly low
and the contrast on zero. If we increase the contrast, it's just going to
make the spread or the transition between the black and white
parts to abrupt. So contrast, I like to
keep on the lowest value. And intensity, like I said, I like to keep lower because it's going to create an interesting effect for
us, you will see later on. So I will set this up to
around 35 something like this, I think looks good.
So let's click. And already you can
see what we achieved. We have this cool
pixelated texture effect that we have here on the top, but we also have some of these specs showing
at the bottom. That's thanks to the lower
intensity that we used. If I were to go back and select this shape and increase the intensity of
the grain effect, which is available or accessible through
the appearance panel. So by going back there, increasing the intensity, I
would eliminate those specs, and I would only have
the effect up here. But I actually
prefer it this way, so I'm going to have some of those details further
down as well. Now, the only issue with the grain effect is that
it's a roster effect. And if you go to the effect menu on the document roster
effect settings, you might need to increase your resolution for it
to show up like this. So if you have
something different, let's just say you have
something very low like ten PPI, it's going to look extremely
pixelated like that, which could actually be a cool effect if you want
to go for that. But the higher you
set your resolution, the more detailed
it will become. I'm not going to
go about 72 PPI. I think that's plenty for
what I want to achieve. But you have to remember
to always check this, especially if you
re size or scale, your illustration,
you always have to adjust the document
roster effect settings. However, there is a
way to vectorize this, and I actually like to do that. So instead of keeping
it like this, what we will do is to
have this shape selected, so the one inside the mask, and I will go up
to the object menu and choose expand appearance. So this is going to prevent
me to be able to go back to adjust the
green settings anymore. But this is the first step
for vectorizing this effect. Next step is to click on image trace while this
shape is still selected. So remember we are still
working on the mask. So image trays,
and then click on the settings to be able to see the image tras and be able
to refine the settings. So that's the icon
you need to click on. And then here, first
thing you have to make sure is the parts
are set to 100%. The corners can be reduced to either minimal value
or close to minimal. Let's just say what happens
if we set it to 0%. It doesn't really make
that much difference here. What's going to make
a difference is once we start
adjusting the noise. But first, make sure you
turn on simplify as well. And also the ignore
color should be on, and the snap curse to
lines can be turned off. These are all ways of reducing the amount of anchor points and parts generated
with image traces. And that is important because if you end up having too much, then it will be a very
heavy illustrator file, and it will be hard to come
back and make changes to it. So yeah, use these settings, and now we are ready
to adjust the noise. So I'm going to first
type in five pixels. And let's see what happens. It's going to process this, and that already
looks interesting. But let's see what happens
if we go down a bit. I'm going to type in four. And you have to be
careful with this. The lower you go with
the noise value, the more it's going to
take for it to render. And I think the three point
should be working well. It's already rendering
quite a lot. And I can see it's 40,000 anchors that has been created
even with the simplify on. And what I like to do to test the vectorization is to
use this little icon. Hold it down to see the
original peak soles. And then when you let go, you can see the vectorized version. And we can see that this effect is applied here
further down as well, thanks to the intensity or
lower intensity that we used. And it looks quite nice
here on the top as well, let's just check it
on the left side. Yeah, I like how this looks. So now we can expand this. So again, this is going to make this settings that we used here in the imagery
spanel finalized. By clicking on Expand, it's going to actually turn
into a vectorized object. Close the image ase panel. And then now what we can
do is to move this up and down just to see how it's
affecting our illustration. I think it's in a
good place already, but I can just drag this
up a little bit more. Now, don't forget that this effect is
applied to an object, which can be changed in color, so I can click back
on the object itself, exiting the opacity mask. And if I change this
to a darker color, that's what's going
to appear there or any other color
that I want to use. Could be used for highlights
as well, if I wanted to. But in this case, it makes sense to use this darker color, and it works quite well, so we can see which
one we prefer. I think that is a
good one for this. So that's the first detail that we created using
this noise effect. But I would like to
introduce this on a couple of additional
details like the send. It would make sense to
use it there as well. So I'm just going to select
that, copy, paste it. And in this case, because I
don't have the swatch set up, I'm just going to double
click on the swatch and just make it a little bit darker,
something like that. Maybe a bit more
saturated as well. Maybe we can slightly drag it down on the Hu wheel
as well. Let's click. So this is again a
duplicate object, just like before, we have
this one and below it, we have the original color. So now having this one selected, I can go into make mask
and turn off the clip, select the mask, and
paste the shape in again, commando Control F, and then apply the gradient on
it, the linear gradient. And then we can just use the gradient tool
and apply it again. So here, I would like to have this e fact appearing
on the top. Like that. Maybe we can drag it up a bit, make the transition
smaller, like this. So first, you have to judge your gradient
without the effect, whether you like it or not. And I feel like it adds
to the illustration, but I want to break this up instead of it being so smooth. That's why I'm using
this grain effect. So why this mask is selected, I am going to go to
the effect menu, and now we can just reapply
the previously U settings. So apply green. The good news, we don't have
to do anything else here. Maybe we can just adjust
the angle a little bit. I click and drag up here. And I want this to be
quite subtle like this. And then we can go
into object menu, expand appearance,
then image trace. And unfortunately, the image trace settings
were not saved. That's something that you
can save as a pre set, so you can come
here and save it. But for now, I'm just going
to turn things on again. So ignore color, turn
off the snap feature. I want to simplify part on
maximum corners on minimum. And then noise I believe we
used in the N three pixels. So let's see how that looks. Once I click in another section, it's going to
generate it for us. Yeah, that looks good. I'm going to expand this, and then we can
close this window, and we can just move
this up a little bit. I think I only want to
see it on the edge there. Another cool thing that
you can do, of course, is that you can still
move these points around. If you wanted the fact to
follow this shape a bit better. You can just use tools
like the Warp tool, and I'm going to alt or
option click and drag, make the brush size bigger, and then just drag
these points down, so you can move this down. And if you hide the edges, going to the view menu, you choose hide edges from here, I already use my keyboard
shortcut F three for this, then you will be able
to do this better. So it will disappear each
time you are doing this. So that's better
aligned to the edge. Maybe we can also drag
it down a bit more here. And yeah, that's looking good. Now, if I want to change the color, I can
always come back. If I feel like it's
a bit too dark, we can refine it, make it
more subtle, like that. So it's barely noticeable,
but it's still there. It's a nice little detail.
9. Using the Grain Effect on the surfer: Of course, we can also apply
this on smaller scale. Like, for instance, here on the shoulder,
we can apply it. I'm going to just close the
background layer lock it for now and then have
this shape selected. And if you recall, this
is a clipping mask. So if I have the
clipping mask selected, I can switch back
to draw inside or just simply place an object inside it in the layer spanel. I just want to have
another circle created here with
the orange color. And what I'm going
to do is to go in to make mask for this, like before, turn off the clip option and just paste the
same shape in here, so the same circle. But this time, instead of using the gradient on the field color, I will actually remove
the field color and apply the gradient
on the stroke. So having the stroke
attribute selected, I'm going to choose
linear gradient, and then use this
third option when the gradient is applied
from the center, to the outside of the shape, so we can create it like this, and I will increase the
size of this stroke effect. Maybe go up to 100 points. And then temporarily,
the preview might not show correctly because
we have a clipping mask, and inside it, we have an
object with an opacity mask. So sometimes illustrator is struggling to show
things properly. But don't worry, once you
apply the grain on this, so we go up to the effect
menu and choose apply grain, it should look already better. But one thing that you
might need to do is to reverse the colors
of your gradient, which you can do from the
gradient panel with this icon. So if I click on that, I can check which one is
the one I wanted to create. I actually feel like this is
the one that works better. But if I use these
gradient stops here, I can see how I
can control this. So I can make the transition
a bit smoother like that. And we can actually increase
the stroke size a bit, just so we have a
larger transition. And maybe we can adjust
these stops as well. Yeah, I think that
looks quite good. And now it's
completely up to you whether you want to
vectorize this or not, but I normally
prefer to do that. So I'm going to select
the opacity mask, make sure this shape
is highlighted. I go through the same steps, expand appearance, image
trace, and then settings. Once again, I forgot to
say it as a template. I will make sure I
do it this time, so I will set the parts
higher corners lower, and then the noise this time because it's
a smaller shape. I will try to do two pixels. Maybe we can even go
down to one pixel. That just makes it more
detailed. That looks good. And by the way, the complexity can also be controlled
with the anchors. If you drag them
all the way down, you will see that the
anchors go down to 21,000. If I drag it all
the way up to 100, it goes up to 30,000. In this case, I feel like that amount of detail
will work quite nicely. And then I expand this. And then, of course, we don't need all of these extra detail. So I can use the eraser tool, hold down alto option key, and delete all of these
unnecessary details. And then we can also delete
from here on the top. And then now we can
just move this around. This actually can
come up a bit higher. We hide the edges. We can see exactly
what we are doing. So we can align this closer to what we
wanted to create here. Maybe it would be wise to
also go back to the shape itself and just drag
that up a little bit. And if I just want to avoid creating the texture
on the shading, what we can do is to drag this shape on the
shading layer like that. So this way it's set up
the way I wanted it. And we can go back to the fact. And just move it around a bit. And I feel like that
looks quite nice. Okay. So again, it's just a
more subtle transition between the two sides. But the good thing
about this is that it's completely vector based. And just to bring the details of the hair a little
bit together, I'm going to do something
quite similar here. I will click outside
of the opacity mask, and I'm just going to draw
a shape with the pen tool. Let's just draw it around here. Like that, and then
follow it up that way. Fill it in with this dark color, not for the stroke,
but the field, and then copy this shape, going to make mask, turn off clipping and
paste the same shape, that main shape that we created. And then let's use the black
and white gradient on it, not on the stroke,
but on the fiel. And in this case,
maybe we can even use the radial gradient,
or the second one, and we can just set it up with the reverse option in the
direction that we need, so we can extend this on
both sides. Like that. This point and that point, I can just do it from
here on the panel, makes it a little bit easier. So this is the perimeter
of the effect. We can drag this out a bit more, and then we can just drag the
whole thing in the middle. Like that. We can also squeeze this into
more of an ellipse, and we can even
rotate it around. And then when we are
happy with the effect, we can go up to the effect
menu and choose apply grain. And the cool thing
about this technique is that before you do
the vectorization, you can actually control
the grain much better, so you still have your
gradient annotator. You can really see what you're doing when
you're adjusting that. You can go back and forth. You can adjust these
points as well. And I essentially just wanted a little bit of detail that
connects the hair together. So I don't want this
to be too dense. Something like this works well. And then now I can
go into object, expand appearance,
then image trace. And I still haven't
saved these preset. I always forget, so I'm
just going to go through the settings again,
ignore color, simplify, and noise, again, we can do three points
on this three pixels. And maybe even go down
to one in this case. Yeah, that's much more detailed. And just so we can see
how to save the preset. All you have to do
is to click here and choose Save new preset. And I'm going to call
this noise effect. So now it's saved. And it's looking good. The only thing I
would like to do is once I expanded it is
to drag it a bit out. So the edges are not showing. They were showing a bit before. Now the edges are gone. And yeah, it looks good. Maybe here. I can drag
that down a bit as well. Okay. Let's close the
image trace option. And then maybe we can just
select the object itself and adjust the outline a bit on this by dragging
these points here. I can just show the texture
where it makes most sense.
10. Using the Grain Effect for masking: Maybe one final example of me showing how
to use the texture. For this, I'm going to use
these three leaves here, and I want to make it look
like they are see through, so we want to reveal
the sky behind them. So what I will do first of all
is to group them together. So the three shapes selected
commando Control G. Then I am going to use the make mask option.
And turn off clip. And this time, instead of
using the original shapes, I'm just going to use
some ellipses because these original shapes are also like big ellipses or
parts of ellipses. And I just have to make sure that I'm in
the opacity mask. So once the group is selected, I click on the opacity mask
and then draw the shapes. So the first ellipse that
I want to create is here, and I'm just going to
rotate this a bit, so it's more aligned to
that other shape up there. And then I will apply the linear gradient on this and I can set
up the gradient. I only want the bottom
of the leaves to a bit texturized like that. And then we can already go
into effect, apply grain, And then before you
expand this effect, of course, you have the control
over how the spread is. So we can drag this
out a bit more, have more of a
transition or less, be more subtle, like this. And then you can even flip this around by using the
reverse option. So that way we can
have it starting here, and we can also
make this look more interesting to create
the division this way. I drag it out a bit, maybe the transition can
start further out like that. And this way, it will look a bit like there is a
split in the leaf. So yeah, that shape that we created can be moved
a little bit higher. But yeah, that
essentially creates a slightly more
interesting detail. So we have a solid outline, but within the shape itself, we see through a bit. And what we can do since
the whole thing is a group, is to duplicate this object
within the opacity muscles, have that ellipse selected, and then old or option, click and drag to
duplicate it out. Now, the only thing is
that you have to be careful that once these
shapes overlap each other, they are going to affect what you can see and
what is it in a way. So one thing that you can do
is to have this ellipse cut, duplicate it, select
the two together, and then use the shape builder
tool delete these parts. So it becomes like just a
crescent or a moon shape. And then that one
is not going to affect the other details. So this way, we can set this up exactly the
way we wanted it. So align this up here, and then using the
gradient tool, we can still adjust
the values as well. That looks quite nice. And then now we just
copy this shape, paste it again, drag it up
and rotate it one more time. I don't want to overlap
this other shape, so I can even use
the eraser tool. Let's shift the and then old or option key to delete from it, drag it up here, align it. Create that nice
division in the shape, and then we can use
the gradient tool and just align it exactly
the way we wanted it. Just a very subtle
effect like that. Okay. So we can see
this from a distance. And these textures definitely
add more interest, and we could use
the same thing on the left side as well by exiting the mask and locking this group
here on the right. You can just use
Commando Control two on the keyboard that
quickly locks it. And then Commando Control A should only select
these other details, which once again, I will group together into another detail. This can be placed in
the plants as well. So that's one big object here
which I can move around. And just like before, I'm going to make a
mask, turn off clipping, and then I'm going
to use an ellipse, or it can even be a rectangle, just make sure you draw it
inside the opacity mask. So I'll just draw this
quickly and set it up as a radial gradient in this
case. That could also work. And then we can just adjust
it, maybe reverse it. That makes more sense here, and then just drag this down, drag it up, drag
it in. Like this. And then let's apply the
grain effect on this, and there you go very
nice subtle effect there. If you want more control
on where the effect shows, you could even use the
free form gradient. So that's the third option
in the gradient panel. Once you select that, it's
going to give you points, similar to the puppet warp tool, and you can apply
the colors here. So you can select that, set that up as white, then select this, set
that up as black. Then if I move the
black point here and the white point There, I will have the effect or the masking only show up
here on the left side. But if I flip this around and move the black
point up here, then I will have it showing
up around the edges. So that's a nice
way of doing it. And what we can
actually do is to trace along the
edge of this shape, so we can add additional points. Going to use black on these
points around the edges. I also add black here, and then keep drawing
around the edge. Let me just select this previous point. Following the edge. Like that. So that's
the black points, and then we have
these points here. This one here, I
would like to remove, so I can just select
that press back space on the keyboard, instead, I would like to
have this shape continued, which I was set to white. This should be set to white. And then continuing this point, I can again, trace the outline where I would
like the effect to disappear. So if we go up this way, and then also come down. This way, maybe now we
have the transition exactly aligned or closely aligned to the
outline of the shape. So when you have these
irregular shapes, this is a good technique to use. Again, you will see these stops that you create
with the gradient tool. Whenever you press
G on the keyboard, they will appear, and then you can move them individually. So for instance, now, I can just select this
point, drag it in. If I want more of the
masking effect to show, I can drag those in as well. Or if I want to be more
subtle, I can drag them out, and this point as well, I can further adjust and immediately, I can see more of the leaves. If I want to see even more, I can drag this
point in as well, and so on and so forth. So I am not going to vectorize these effects
that I applied here. I'm just going to keep
them as roster effects, just so you can compare, these are steel roster based. And these are the ones where
I vectorized it both on the water and on the sand
and on the surfer girl. And it's up to you, you can even combine the tooth
so you can keep some in roster effect format
and some already vectorized, that can also create
some nice variety. So I hope you will have fun
with this illustration. I can't wait to
see your version.
11. Conclusion: Well done for
finishing this course. I hope you had just as much fun going through it as
I had recording it. And of course, don't forget
about the class project. Because remember,
practice makes perfect. I can't wait to see your work, so make sure to submit it. And in case you
like this course, and you would like to
learn more from me, then there's plenty of other courses that
you can find here. Go ahead check them out now. I can't wait to meet
you in the next one.
 Martin Perhiniak, Graphic Designer, Illustrator & Educator