Transcripts
1. Introduction: Step into the world of
artistic expression with our scraps to Treasure's Art
Journal bookmaking workshop. This is a companion workshop to Martes andal
journals workshop, unleashing more ideas to
spark your creativity. We'll explore various
papers, vintage finds, and more, allowing you to choose the style that
suits your vision. This class is designed for creatives of all
levels and offers a unique opportunity to
blend various materials and papers into a personalized
custom art journal. I'm Denise Love, an artist
and creative educator. I'm excited to bring
you this fun and exciting dive into
handmade art journals. Whether you're looking to create a book of your own
favorite papers, art, vintage finds, and more. You'll find inspiration and
guidance as we delve into the art of creating and
binding your own art journals.
2. Class Project: Your class project,
you will create a custom art journal
from start to finish. Begin by gathering
a mix of materials, your favorite art
papers to create on, old art pieces, vintage papers, fabrics, handmade papers, and any other elements
that speak to you. Then you'll bind these
pages into a sturdy, artistic journal with
a handmade cover that reflects your personal
style and creativity. Share your progress, ideas, and final creation
with the class to help inspire and get inspired by
the collective creativity. D.
3. Inspiration & Books: Let's talk about what has
inspired this class for me. I have just gone down this
huge rabbit hole of making beautiful journals because I bought the Dina Weekly
mixed Media journal. I don't know, maybe
six months ago. And then they sold out worldwide because they were at the end of their
life of making these. This is a rather
gigantic journal that has different
types of pages in it, Watercolor pages,
burlap, Canvas, and craft paper pages. Let's see. Brown
craft paper pages. Because these have
sold out worldwide, and I have thoroughly
enjoyed painting and creating and growing my
art practice and showing up, painting this book for me is an abstract journal where I'm just picking whatever it is
that inspires me that day, whether it be a color palette or an idea or an art material, and I'm just creating
in this journal different painted layouts for whatever I'm inspired
to do that day. Because now, I am probably three quarters of the way done with this journal, and I have loved
making these so much. I thought, we need
to learn how to make these for ourselves since
we can no longer get them. That led to The first
book workshop that I did, which was the
Artisanal journals, where we recreated that
book as closely as I could. It's about 2 " about an inch and a half shorter and about an inch
shorter width wise. But to make it
affordable and feasible, that's the size I ended up with with the papers
that I was using. I decided that since I liked working on the
watercolor pages that I would put more watercolor pages and fewer of the other pages, but they're still in there, and every section has a
different material in it. Our original
inspiration journal had all the same material
in every section, whereas when you're
making them yourself, You can put a different
material in every section. I picked a canvas and
I picked a linen and I picked a jute. I picked some of these really yummy, fun, different services. I put in less craft paper because even though I
like the craft paper, they weren't my favorite, and then my favorite are
the watercolor pages. I have more watercolor
pages than anything else. I have a full art journal. With a beautiful cover
that's not just plain black, and I could have
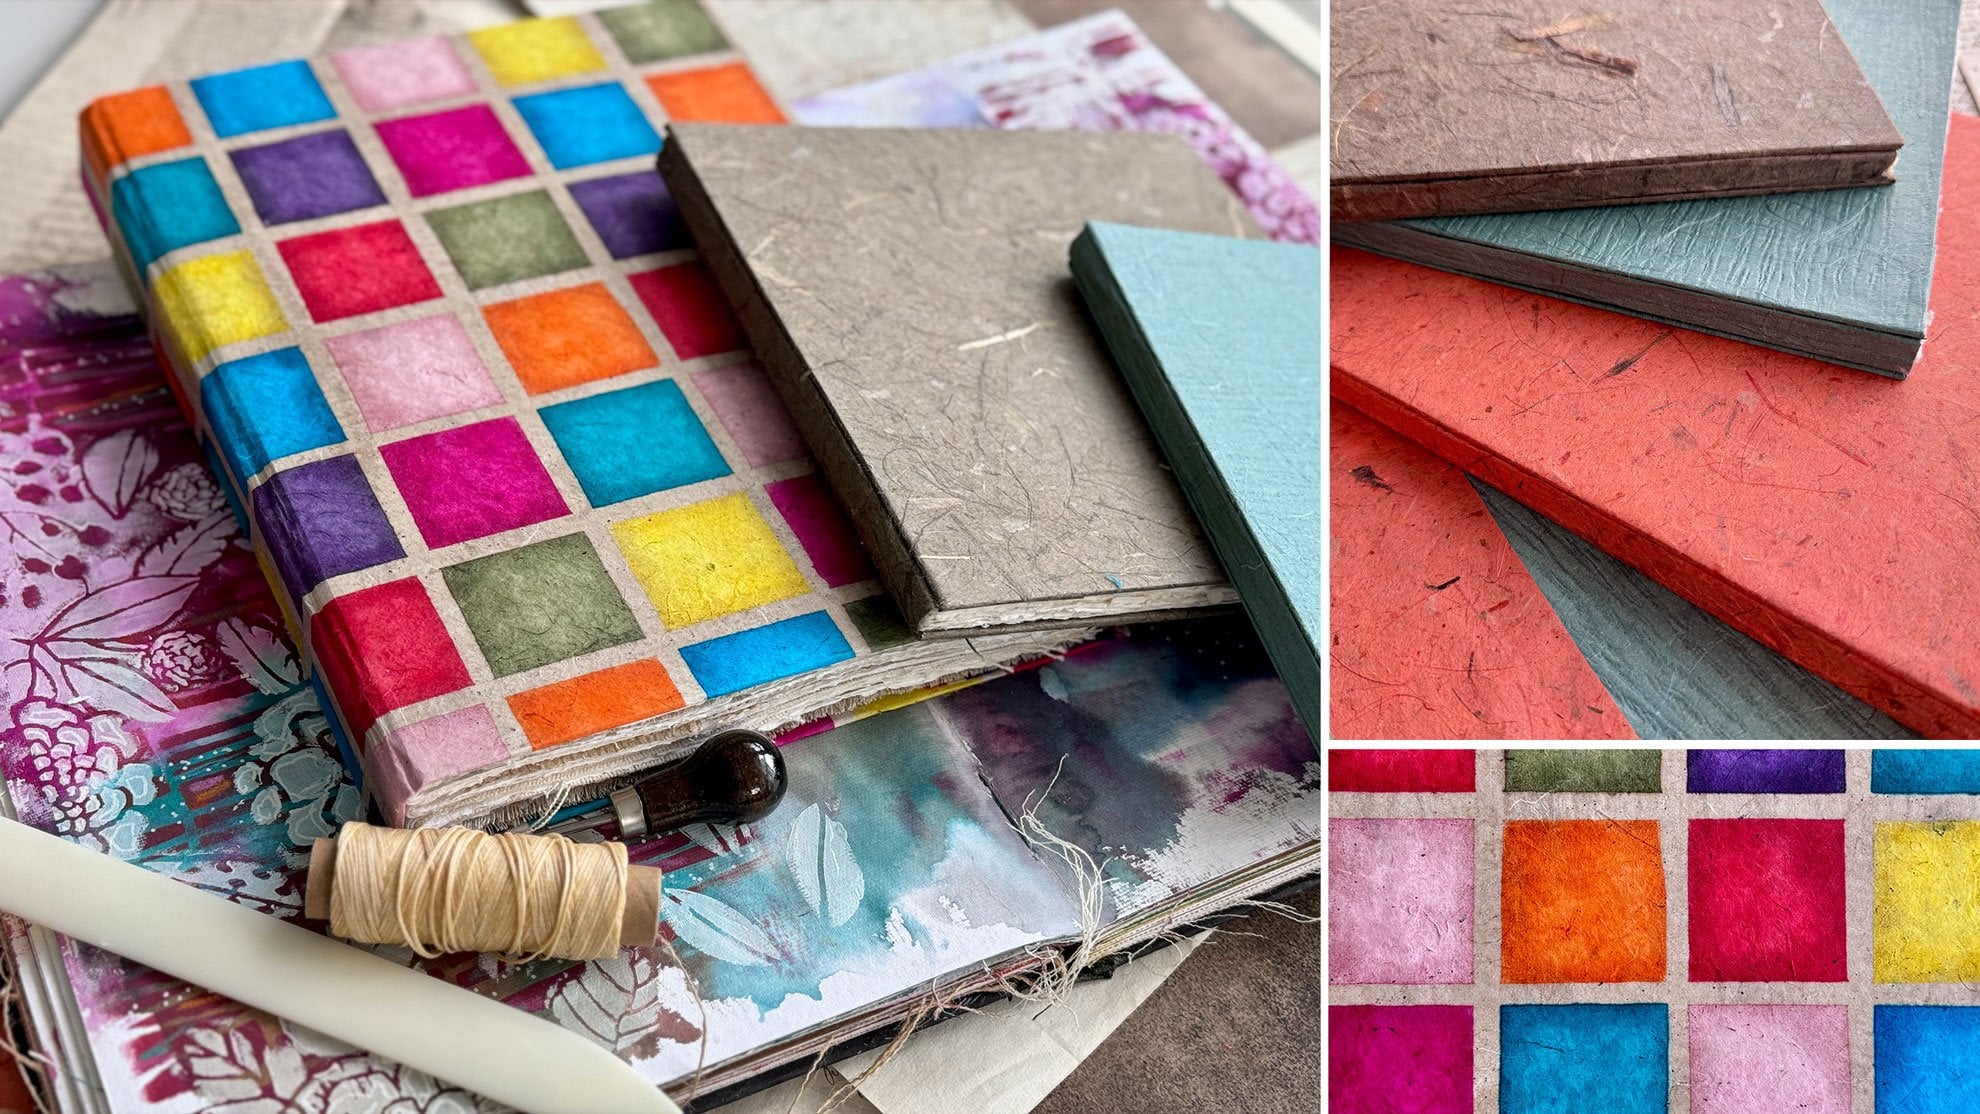
painted that, but this is a handmade paper. Now I'm super excited because
this was so beautiful. Because I loved that one so
much that I was like, Hey, what if I make another one and I intersperse even more
different papers, not the same ones from
the Inspiration journal. I made myself one of these
where I had handmade papers. And different handmade
papers and every section. I have in the first
section, this yummy, very dimensional one and
this block print one. These are handmade
papers in Nepal, and they're just beautiful. Every section, I've
got a couple of watercolor pages and very interesting
handmade paper pages, and I've got pages
with lace papers, so you can see through it. Now this journal is even more beautiful to
me and more special. Than the original
one that I made. I thought, Wow,
this is so amazing, we need to make one of these with the different
papers in it for class to expand upon our
original idea that we did. We end up making one
of these in class. This is it, and I'm using
beautiful handmade papers. And a lovely, different handmade paper here on the outside? Look how beautiful that is. I just so excited. I even made this one with
an extra signature in it. We've got even more pages in this book than we had in
the one I just showed you. I've got more dimensional
pages in here. Every section has
watercolor papers to paint on and then additional papers to
then experiment on. I know that people are
going to want to know, what do you do on these
papers like this? How do you do whatever
you're going to do. You can either leave
them like they are. If they're delicate,
or you want to use some paint on it and you don't think
it's going to hold up. You can just paint clear Gesso on whatever side you're
wanting to paint on. Maybe you'll paint
on the back side and leave the front
side like it is. You can just really all kinds
of things that you can do. But I would put clear Gesso
on that and let it dry and it's ready for whatever
you want to do with it. I have a huge variety of
different pages here. In mind that I got so excited
about being able to use in this exceptionally
beautiful art journal that I'm going to show you
in class that we've made. Then there's also some art that have already
interspersed in here. You could even paint all the art that you're going to paint and then build your book. You don't have to build
the book and then be afraid to use it because
all the pages are blank. You can paint all
the art and get all your favorite pieces
together that you're like, Okay, now I'm ready to make the book, and then when you make the
book, it'll already be done and painted
in and beautiful. Just another option
for you there. But I love how
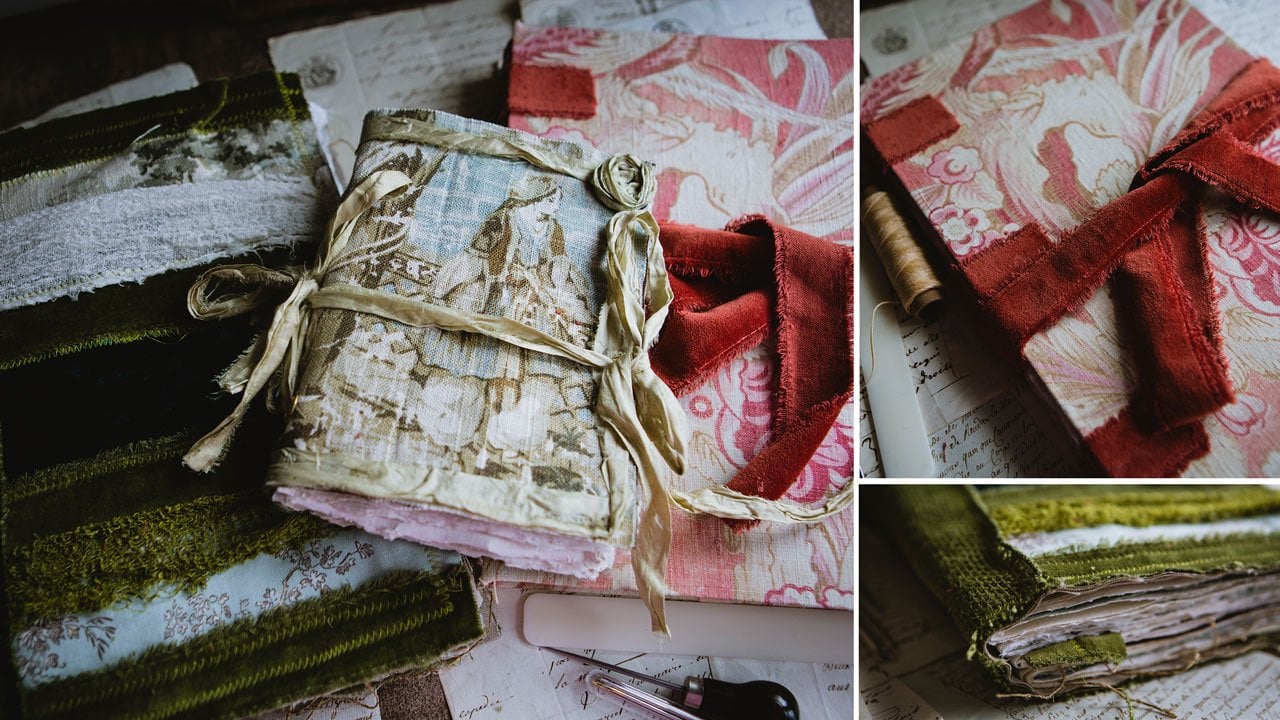
gorgeous these end up. Then I actually on this one, put a ribbon tie on it, so I'll show you how
we do that in class. Then that led to making
a little artifolios, where we have painted art pieces and some different
stuff in there. Then making a lovely
journal from old books that are basically ready to move on to the next life of
whatever they're going to be. This has just got water
paper color in it, water paper in it so that I can paint and draw and
whatever I want to do. That's the third journal that I was inspired to
make here in class. I just wanted to tell you
where that came from, how excited I got when I
made that first workshop, that I wanted to
continue giving you a few more ideas on
bookmaking that are super easy and anybody could do so that you could start making
lovely journals for yourself. Since the one that
was my favorite is gone and everybody is like, Oh, no, I think it's very intimidating to make books if you've never made one before. It is crazy, easy to make these compared to how you
think it's going to be. I just wanted to show
you a few more ideas in addition to what inspired me. I showed you some other books
in that first workshop, so I'm going to show you a few more that I happen
to have and like. Get messy art. This is the no
rules, no judgment, no pressure approach
to making art, which you know for me, That's exactly how
I like to create. This is by Kaylee
Gray, CAYLEE Gray. In here, she gives you
lots of different ideas, working in sketchbooks
and putting together art books just like what we've
created a few of here, but here's some more
inspiration for you and some other artists
it looks like in the back to be inspired by. Um, so look at that. I like having some ideas
to look at if I get stuck. That's why I like to collect books because then I can stop. I can look around in
different books and then a color or a shape, or maybe something like this will then trigger some
cool idea for me. I really liked this book
because it is about working in art journals
and not getting hung up. With working as you're going. Click how pretty that is. That would be a super easy page. You could paint a
great big piece of paper or lots
of little papers, cut it in squares, and
there's your page. I love that. That might have
inspired a whole another set of ideas for me after I
saw that. Super cool. These are This one's fun. I'm It's newer for me, so I haven't read
it cover to cover. But even just looking through
it, I'm super inspired, and I can't wait to maybe
try some of these ideas or see where these ideas take
me as a jumping off point. I love that one. Get messy art. This one's fun by Helen Wells, Expressive sketch books, develop creative skills,
courage, and confidence. This one's more
working in your book, getting inspired,
getting out in nature, looking at things in
your environment, So yeah, lots of fun
here in this one, lots of color to be inspired by. That's a good one.
Creative wonder Lust. This is by Kasia Avery, which I might have said her name wrong, I'm
sorry if I did. Look at that beautiful book that she's working on in
the cover there. That right there
makes me want to open one of these and get painting. Oh, see so many creative
people out there. I just love that there are others out
there. Look at this. I love anything that's got
a color palette on it. I love that there are other beautiful creatives out there that will share
the things that they do. They're not worried about
sharing their secrets. That's my philosophy and
my art is generosity, and I'll tell you how I
do anything that I do. I just don't think that The
secrets are the way to go. I like to inspire people
and I want you to get creative and look at
that. Oh, I like that. I want you to see where that jumps you off for your
next creative project. This one, particularly
like this one. This is creative Wonderlust. Your artistic potential through mixed media art
journaling techniques. This book I've had
for many years and I actually took
this workshop. This is a workshop, and then
she wrote a book about it. This is the painted art
journal by Jean Oliver. She is super creative, and this workshop is actually a really nice one
to take and see the different ideas and there's
a particular portrait in here with the family that
I loved that project, but you see we're
working in old books. You see where some of these
can jump you off into new ideas and she's actually
painting on the book pages. If you've got an old
book or an old ledger, old ledgers are really nice. You can paint in
those. Jess that page with clear Jess
when it's ready to paint on and it'll sturdy it up for different materials that
you might be putting on it. I love that one.
This one's focused around family and the
different people, relatives, and things like that. Here's the one I
was thinking about, different things in your life, and it makes a circle
coming out of there. Super creative.
I've always found this particularly
beautiful page. This book, I love Love. I definitely say this
would be probably my number one pick and this creative wonder lust
might be my number two pick. Then we get to get messy, my number three pick if you
want to know which ones of those are the ones that you really want to may
be inspired by. I just wanted to share
some extra inspiration for you as jumping off points after you've been
here making some of these delicious art
journals to work in. I hope you enjoy this class. It is a companion class to the artisanal journals
class where we make several different
journals in that class, including my original
one inspired by the commercial book that's
no longer available. I hope you enjoy making these and taking it
to the next level, and I'll see you guys in class.
4. Treasure Journal - Supplies: Let's take a look at the
supplies for Project one. I think on this, I might just do a supply video for each project because it
might just be overwhelming. For Project one, we are making another mixed
media journal similar to the original one that I made in the artisanal workshop,
and that was this one. This was modeled off of the Dina Wakey mixed
media journal that I have been working in that
they no longer make and I wanted something similar that had different types
of paper in it. This one has canvas and
burlap and craft paper pages. This first book
that I had made in the Artisanal journals class was as close to that type of
journal as I could get, but changing up a little bit to include The more of the
papers that I loved, still some interesting
other papers, but less of them, basically. I had more watercolor pages
because that's what I loved. I did that journal with
those different pages. Then for this workshop, it's more of your
favorites, your treasures, you include pieces of your
art in books and maybe make art books things that are, you know, special to you. I actually wanted to do
another mixed media journal for myself and I did. I made this one, but I wanted to be things that
were special to me, not a replica of the
commercial journal. In this one, I collect handmade papers when I go to the art store I have
for several years. I was like, H, D I don't know what I'm ever
going to do with these, but they're so beautiful
I got to have them. Now I am pulling
all of those out of their little di
hole under a bed in the guess room, and
I'm using them. I think these are
just going to get more and more
beautiful with age. In this book, I have
included lots of different interesting textured
papers, handmade papers. I've flanked them with watercolor
papers so that I could then have things to paint on and I can paint on the
decorative papers too, but they're almost decorated
enough as they are. Then I've actually tried to save the stickers on the ones
that I have put in here, but obviously I didn't
get that one off, but I want to save the stickers that I could
figure out what they are later. But I love including in
between the watercolor pages, these handmade decorative
papers that I have collected, wanted to use for a long time. And so that's what I've done. I have made an art journal
more custom and special to me and what I would want
in a mixed media journal. And so just to show you the different options
I've included in here, and you don't have to include
handmade papers in yours. Each section has a different
set of papers in it. There's four sections
in this book. You don't have to do
handmade papers in yours. This is how I chose to customize mine with something that I
have that is special to me. And so I've decided to use my collection of handmade papers and the cover is
a handmade paper. In class, because
I made that one, I loved it so much,
I thought, Okay, let's do that project
in this class and include papers or paintings or whatever it is
that's special to you, include that in a
lovely journal. The cover is a
handmade paper for me. And your cover could be a handmade paper or
something that you paint on a big enough piece of paper that you could
use it for the cover. Just keep in mind the size of journal that
you're going to create and the size pieces of art
or papers that you need. This book that
we're creating has different papers in it than the other one that I
created as inspiration, and it's got more sections. This has got an extra
section in it, which I love, and I have amazing sections in here that I am just insane about because
they're gorgeous. Now there's some pages in here that I don't
even have to paint, I could collage on them,
I could paint them. If I were going to use handmade papers and say I was going to paint
on the back side, I would use clear Gesso and
Jess that and let it dry and then it's ready to accept any medium or work that I
want to do on top of it. Just have some clear Gesso available to then paint
the backside of something, or if it's more delicate, Jess will protect it. Or if you choose old papers and newspapers as your special
thing, you could do that. Start thinking outside the
box and getting creative here on what it is that you
could use as these papers, and I'll go and take my tags off that I didn't
save obviously. But here's one as an example,
a painting that I did. I went ahead, included
the painting in the book, flanked by a paper
that I could then also Jess and paint or I
could leave it like it is. That could be that page, and then the other half of
that painting is here. So Get creative in the things that you're going to make
and include in your book. Doesn't have to be the same things that are special to me. I just thought this was
super interesting to have these different sections in here and then be finished off. This one is still
drying, so I'm going to set it back
under a heavy book. But look how gorgeous
this thing is with a ribbon that can wrap
around it. I love it. Let's just take a look
at the supplies for this project now that we
peek at what the project is. I'm using some glue sticks
for the cover because it's so much easier and convenient
than the liquid glue was. These came from the ****
Blick, the art store. I just picked up
a couple of sizes because I like
working with those. If you could get ones that don't yellow or acid free,
that'd be fantastic. Those don't say one
way or the other, but they're underneath stuff. They're not going to be
showing through in any way. So That's what I'm using. In general, for gluing
book spines and stuff, usually would use PH
neutral PVA glue. I actually used all of this glue and it's almost
to the very bottom, but I'd say that did
five or six books before I got down that far. The other choice of
glue that you could use is Alenes acid free. Make sure you get the acid
free one if you go this route, acid free tacky glue. This is non yellowing
photo safe, no acid in it. You want the acid free
glues if you can. That's the two choices of
glue that you might consider. Get the PA if that's the
one you're confined. Then I got a book
binding kit off Amazon. I had the different
pieces already. I had the bone folder
and I had the all and I had on the needles
already for books, and I had a thing
of waxed threads. You don't have to
get the book kit. But what I liked about
this was this kit was like seven bucks and it came with an all and I
actually like this all. I like this one too, but
it's egg shaped and weird. This one actually, I like
this one a tiny bit better. I like the one that came
in the kit comes with a waxed thread that you can
immediately begin using. It comes with several
large needles and it comes with
the bone folders. I love this kit, and I've
actually been using this in class mostly because that's
convenient and it was cheap. If you use regular linen
thread or something like that, you will need a
block of bees wax, and you need to wax that thread because it'll fray or
it'll tear pages and the waxing just cements
all that together and helps you not
tear your pages and things when
you're making stuff. You can get bees wax
and thread if you want. But I like the wax thread. Better. It's already ready. I'm also cheating a little bit on the insides of the
book so that I can move a little faster and I'm using
some book repair tape to tape things in place as I'm gluing so I can move
along a little faster. You don't have to have that, but I saw it and thought,
I need that. You could probably just use masking tape to do
the same thing. I've got a nice utility knife and a cutting board because I'm cutting some stuff on mostly
the cover of the book. For the cover of the book, You generally want to
have some bookboard. This is chipboard sheets, or I think I show you
this in class also. If you've got a watercolor
pad of some sort, the back page of that
pad is the same stuff. If you want to tear the back off of any of your
watercolor pads, you don't have to buy this.
You could just use that. If you've got any of
those sketchbook pads that are glued
together like that, steal the back of that. Because this is just
stiff cardboard. You could also just use
cardboard, your choice there. Then I chose as my
special thing for this book to be handmade
papers and these might be a little more expensive
than say painting some of your own paintings or doing some jelly plate prints
or something like that. But this is what
was special to me and what was going
to make this a true artisan book that I was going to love and
then continue painting in. Was some handmade papers. I picked a cover that I wanted and in several papers that I had really that I'd gotten over the years and I've
stash under my bed. I have found the Mulberry
Papers website has most of these if you're
not at like a **** Blick, where I find most of these. I go through their drawers
and pick out the papers and I have just obsessed with handmade papers now and I
had probably 20 of them, and I'm like, What am I
going to do with these? Because I just pick up
a few here and there. I just never knew what I
was going to do with it. That's because they were all
waiting for this project, but these range and price like seven or
eight bucks a sheet. It can get expensive. You might spend $100 making your book. If you're using this. If you want to keep
the cost down, just by just get your
pack of watercolor paper. If you're using that cody paper, there's plenty of sheets in
there for you to paint and decorate and do some stuff and then insert
them in the book, or you can just
use all watercolor pages and paint them all. You can use jelly
plate prints if you do jelly plate stuff
and maybe those are your hand painted papers
that you're including. If you're afraid of
messing up the book, which we're all afraid of that. It's a legit fear. If you're afraid of
messing up the book, paint all your pages first and then assemble your book with
all your painted pages, and then it's done when
you assemble the book. There's lots of ways to approach
making a book like this. I want to work in it and I want to be able to paint in it, and then I want to be able
to flip through the pages and see the different
textures and things. Maybe I'll add cool stuff
to the watercolor paper, but I've got these cool
graphic things in between. For me, this is what made
these special for me. You just look at it and decide what's going to
make it special for you. Then I did talk about using some ribbon or something
to wrap around the book, or if you wanted to have an
elastic piece on your book, you might need a
thing of elastic, or if you want to have a
little button here and have the thread come around and wrap around the button to
close it for a closure, you could do
something like that. You could get real creative
with cover of the book and how you want to close it and add extra elements to it. That's something to
think about. I did just get a thimble because I can't find the thimbles I had. That's very handy for
pushing the needle. That would be just a
nice if you have it, perk and a pair of scissors. That's basically all
the supplies that I'm using here in
this first project. Once we do the next project, I'll do a different
supply video for that. I hope you have fun
hunting out beautiful, special things for your
art book, journal, treasure journal, whatever it is that you decide that
you want to do for this, maybe big pieces
of old newspaper. Old magazine pages, or maybe I painted things that you want to include or maybe
jelly plate prints. You can see how you can really customize in between
pages that you can paint on pages that are already interesting
in their own way. I hope you have fun
with this project, and I'll see you back in class.
5. Treasure Journal - Selecting and cutting papers: Today, I thought we would make a treasured journal that is inspired by my
Dino Wakey journal that I made in the other class. That's the one where I
was very inspired by this Dino Weakly mixed
media journal that has the watercolor
paper and the burlap, and the Canvas and the
craft paper pages, and I loved this book so much as soon as I bought
it and started using it, it sold out and they
don't make it anymore. I decided because this is a book that I definitely
want to continue working in or something like
it in my artistic practice. We made this one in the other book class that I
filmed RTs and all journals. In this book, I
almost as close as I could replicated the
different papers in that original book. We have the watercolor paper, we have the craft paper, also put in some
canvas and I put in. In the different sections, I picked a different paper
to feature in each section. I did alter it
slightly to put more of the watercolor papers in it because that's
what I liked. Then I have four
sections in this book, so every section has some other interesting papers in it besides the watercolor, but it's basically an
interesting canvas texture, craft paper, watercolor journal. It's a nice variety, but as close to the other
book as I could get. Then we made a beautiful
hard cover for it. In this class, this
class is about things that we treasure and moving a little further
with our bookmaking. I had made another book based on that book that I had made
with a handmade paper cover, and you don't have to
do handmade paper. This could be a surface
that you've painted, and that's what your cover is, and that's what you treasure. But I've been collecting some of these handmade papers from
the art stores for a while. I've never ever
really had a purpose for and I've always thought,
This is so beautiful. I have to have it,
but I don't know why and I don't know what
I'm going to do with it. This I made yesterday
for myself. And I'm like, Whoa, we need to go ahead and
make another one of these and this can be our first
book here in this class because it'll refresh our
minds on how to sew papers into the book and put
the cover on to get us warmed up before we do some
other projects in class. What I did was I created four sections and
each section has two pieces of some type of
handmade paper material, whether it be this ultra
textured um, natural paper. I put the watercolor paper in it because I like
to paint on those. Then I found some amazing
paper texture to put in here. This one, I actually
left the tag on it, which meant to leave the tag on the piece
that I had left over. But this is the botic square. I found a bunch of these. Most of my handmade
papers came from Blick, but if you look
at the Blick site online, you don't
see a lot of these. But there is a website,
Mulberry papers, and I'll definitely provide
you a link with that where I have found all of these
Nepal handmade papers, mostly in that site. I was very excited about that. Because of the way we
make these book sections where we fold paper in half, Every one of these papers that I have put
in here are going to be featured on
two different pages because it's doubled. I treasure these
handmade papers, and I was like, Wow, I need to use these in a book. Look at this handmade
paper. Amazing. And so they're gorgeous. Some of these are so beautiful
that it's a cool way to have something already done in your journal that
you don't have to do, and then you can just
do the facing page. That's super cool. You could also just
eso this paper and paint on top of it if you've got a surface
that you're like, I want to paint it, or
I want to add to it, you could put clear Gesso on
top of your paper and that would prime it for the next
thing that you want to do. And then we get to the
other side of that. You see we've got those.
You've got two features. Every section I've done here has a different handmade
paper because I wanted a variety and only have one sheet of
each of these papers. This is how I can use one
sheet as we're making the four sections or five or however many sections you decide to put in your book. I can have a different
amazing paper that I've treasured and collected through the
years. Look at this one. It's a translucent, that paper I might leave it like it is or I might paint
some color on it. I mean, there's all kinds of
fun stuff that we can do. This is a way that we can use something that maybe we've
collected and we treasure. For me, that is these
handmade papers. This might be the
coolest journal ever because It's amazing, and then I finish
it off here with some watercolor
paper or you could just leave it like it
is as the back cover. Then the cover here
is one of the papers. I'm going to make a
second one of these in class because I love it so much and just show you how we
put this together if you haven't watched the
artisanal journals class. I'm going to be using the cody
papers because I have it, and it's easy to get ahold of, and it's the handmade
cotton paper. Then I'm going to
be using a variety of handmade papers that I got that I still have not used. I still have a
couple that haven't used that I'm like,
Oh my gosh, now, this makes me want to go back to the art store and
get for art papers. But you don't have to
use handmade papers. For something like this, you can use things
that you painted. You can paint some paintings on the paper that
you're choosing to do, and then you can intersperse those out as pre painted pages. You could do jelly plate prints. You could do just some
nice fun random mark making that you do on
something like a craft paper. You can make your own papers. It doesn't have to be
something like I've done. I just want to give you the
idea and have you thinking a little further outside the
box on what we can do. These papers are like 20 by
30 or somewhere in there. In this ti paper, I want to
say it's like 12 by 16 in. I forget what size it is
every time I go to use it 12 " by almost 17 ". It's a really good size paper. 20 sheets come in this package, and I think it was about $34 and when you fold it in half, it becomes the size of the
book that I'm going to make. I got 20 sheets, that's plenty to
do a whole book, like this book here. I did not even take
the 20 sheets. I think I used 16 sheets. I could have made a
whole fifth section. I think in this book, I'm going to maybe I'll
do an extra section, but it was a good size book. I've got four signatures
that I put in here, and I could do a one
with five signatures. We'll just see. I've
already pulled a bunch of papers that I haven't used so that I could I think I had
a glue stick just fall so that I could decide what I wanted to use in the book and what I wanted
to use as the cover. I'm going to use
this red bot batik. It is red Bat BAT IC,
floating a flower. This is the handmade
Nepal paper, and I love it so much. I think it's going to be
a really beautiful cover just like this one was, that I picked this for my cover. Then all the other papers, I've got some solid
color handmade papers, which I could leave
just like they are, I could collage on top of them, or I could just sew that
paper and then add paint. Your choice on
using solid papers, but these were so beautiful that I was like, Oh
yeah I love those. I have this textured
blue paper that I have. I've used it in something, but I don't think I've
used it in a book. I don't think I have. Then I have a Japanese
pattern paper I thought was gorgeous. Look at this paper,
it's gorgeous and then another paper where
you can see through it. I picked a really
good variety and I'm going to cut these to
the size that I need. I'm still going to have
plenty of paper leftover. Let me put the red one behind
me so that I do it last, that's going to be the cover. And basically, this is the
size of the paper I need. You can see if I'm doing that, I have at least another page
I could get out of that, and then I would
have some extras for collage paper or something. Because this has
a hand torn edge, I want to continue
that hand torn edge. Let me grab my rip ruler. This is my dual edge ripper. It's about a two feet piece of acrylic with a nice
fun edge on it, and it's going to give me an edge Almost the same as the edge that
I have on this paper. So I like the look of the papers not being straight
in my handmade book. So I have left as many
decled edges and torn edges as I could get on these so that it wasn't
straight, and I love that. Like, I love that. And so I'm just going
to take one piece of the watercolor paper that's going to be
the size of my book. And I'm just going to tear. They're very easy. You just
tear towards the ruler. And then you can save
the other half of that paper for something else, or you could put the same paper in the book twice in
two different sections. Because this is my
treasured stuff. I'm going to put a different
paper in every section, but I've got two papers, I'm putting in between
the watercolor papers. I mean there we go.
There is our first one. I went ahead and grabbed
two more pieces of paper, so we'll see those coming up. I decided because
these papers are definitely thinner than
the watercolor paper. I think that's why in the end, I decided the other book could
have used a fifth section. I'm going to do a fifth section. I'm going to go ahead
and tear or cut because a couple of these papers may not tear the rest of these papers, and then I'll just
speed this up for you. Oh. Oh. Alright, I've got all
my papers cut, I think. And what I'm gonna do is
now you can decide like, what paper do you want
to be in each section? I noticed on the
book that I made, I did one watercolor paper, I did a colored paper, I did two watercolor papers, I did a colored paper, and then another
watercolor paper. But when I did that,
that made my inside of my book cover
watercolor paper and the first page a textured
paper, which is fine. I love this book and
I'm okay with that. But I'm thinking I'd almost want this first page to
be a watercolor paper, and I'd want the last page to be a watercolor paper rather
than a a handmade paper. I think what I'm
going to do to change that because the first page of that section is my book
plate for the cover. I'm going to do two watercolor
papers on the bottom. That when I put these together, that will give me the buffer
piece of watercolor paper. Then a colored paper
and a watercolor paper. I could do two watercolor papers If I wanted that extra
piece of paper in there. Instead of an extra section, I could do an extra
piece of paper, and then the watercolor
paper on the top. That's how my sandwich
will probably look and so then I have
12 water colors, a colored, two water
colors to paint and a colored and a watercolor
and this will fold, so that gives me a watercolor
a whole watercolor section. I feel like that's
going to be mine. I've used One, I'm going
to do four, maybe one, two, three, I've used five
of the watercolor papers. If I'm going to stick
to the one package. Then four sections are
what I'm going to create. Then what I'm going to do is fold these
sections over and half, and then I'm going to
with all my weight, press this down, and then I'm
going to use a bone folder. To really help me seal that in. The bone folder is an excellent bookmaking
tool and it helps you get that nice
and squash down and I do that while I'm standing up so I can put all
my weight on it. I fold all the papers together because if you
fold them individually, then they don't seem to stack in tight and they step
out here at the end. I fold them all together
at the same time, and now I have one
section of my book. And so I can see that this is going to be
part of the cover. Now I've opened to
a watercolor page, and then I've got the watercolor
page and a book page, got a decoration, handmade
paper page, watercolor page. Then I've got a double
spread watercolor page, which I love those. Then I've got a
watercolor and a paper. Then I've got a watercolor and when you open
it to the center, you have a double spread. I'm feeling really
good about this. I'm not looking for perfection and because I've
torn all the edges. I like the hand to
edge feel of that. Line them up as best you can and then you
are ready to go. Because the piece
that I was using as my template wasn't
completely straight, these papers are not
completely straight. It adds to that lovely
handmade quality. Oh, yes. I've got two papers already going.
I'm going to get two. I may go ahead. We're going
to see how thick this is. Pick a paper, and
then two of these. And then pick a paper. I really like this one, and then watercolor in the center. I've got should have
five, one, two, handmade, one, two,
handmade, and that. Your handmade papers could
be things you paint. Could be things that you made, could be old papers, could be tissue paper, jelly plate prints
that you created. I mean, you can get
pretty creative on what that center section
might be for you, what those pieces might be
that you're treasuring. Snotypes, could be cyanotypes. Oh, yes, that gives
me a good idea right there because I do snotypes. Then now we have
two book sections. How amazing is that? I like any ones that stick out, anything that adds to
that Yummy hand madness. I love it. I'm going
to pick a paper. I want want these papers to be in the same
sections perhaps. I'm going to put two papers, pick a paper and
then the top paper. You can straighten those
up as you're going. One, two, three, four, paper. Okay. Just count to make sure. Really press those down.
They're Section three. I did notice too on some
of these packs of paper, this paper sticks together. Some of them have more
than 20 sheets, I think. You might get one or you
might get 19. I don't know. I feel like they don't come with the exact number sometimes because the papers
stick together. Okay, look at that. I love it. I'm actually going to. I've got some paper underneath my table or one of these that I did and I
didn't use all the paper. I think I'm going to go ahead
and do the fifth section. And just make this extra big. I don't know. That's pretty
big. I'll do it anyway. I've got some extra paper
under the table here. Let's just see what I got. Just to show you too,
you could have done. I put this over here,
to make this extra big. You could have done
painted on those, and that could have been a page. Because look at that. I could
go ahead and put this in. That could be one of my
pages. Why don't we do that? Then it's already painted. Then let's just use that. But you see how you can
go ahead and paint these. You don't have to
have extra papers. You could paint some of
these papers and just have yourself a go or start, or you know what else you could do because a
lot of people and myself included 23,
four, good five. I actually got two extras. I got extras. I like
it. I got extras. A lot of people,
myself included, are almost afraid to use the book because
then you start thinking, Well, I don't want
to mess it up. I don't want to Do something and then
totally ruin all the work. There's that page. You
see what I did there, I did to two watercolor
papers for the outside, I did a pretty hand made paper. I did a watercolor paper
and a watercolor paper, but this one's
already decorated. That'll be a fun. We
don't have to do anything with it surprise piece
on the one side, but the other side will
still have to paint, but it'll be it's
already done in there. A lot of times we're afraid
to get started in the book. What if you painted
all your pages first, and then put the book together. Then you're not hemmed in
by working in the book. You're not afraid to mess
a page up because you've picked all the pages
that you already love and put that book together. Now with the page
that I just picked, it's only painted on one side, because it's painted
on one side, let's find where it went. Look what that one's
going to be Oh, my goods I want them so much. This is one of my very
favorite paintings, too. I would frame that painting. But you know what? I'm
going to go ahead. I treasure this painting. This is my treasured
handmade papers. I'm going to go ahead and
let that be part of my book. I'm going to grab a clamp because I'm going
to cut the cover while we're over here on
our cutting table before we go put
the stuff together. What I'm going to do is clamp these together enough to get my book page size for the
cover, so I'll be right back. I got two clamps. One thing too, while
you were looking at the edges of our paper here, I have very obviously
done these in a rainbow. As I was putting them together. You need to decide what
paper do you want to be in the front section
and the back section, and how do you actually
want those to look as as you line them up and
you could have used the same handmade paper
on every section. I chose to do a different handmade
paper in every section to really make it super interesting as I was painting and looking
through it later. I thought, let's do it. But you can use
the same rotation of papers like we did in our inspiration journal that we did in the
artisanal journals, or you can do the different
papers in this collection because I really do love that each section has
different pages. It's exciting just to look
through and look at the pages. Here is our book, and just for the moment, I am getting them together
so that I can cut our cover. No other reason at the
moment beyond that. I've got the chipboard, which is the book board stuff. This is ten chipboard
sheets that came in here. For this size book, I'm going to use two
sheets because an odd size and going in this a way. If I go just that way, I could do the whole
book with that, but look how short it is. I'm going to cut two
covers out of two pieces, and I want these to be just a smidge bigger
than the book. If I put this on top,
right about there, actually just for this pet part, I could just take one section, but I'm going to line
it up and look at it. I want there to be a I want it to be slightly
larger on this side. I'm looking for my
pencil. Here we go. I'm just going to mark
this with my pencil. But I want it to be
slightly larger. I'm going to offset from the other side how much
larger I want it to be. I only want it to be
say a quarter of an inch bigger because I want that little bit
of lip on the front, it's not going to
matter on the back. I'm giving myself a quarter
of an inch up here and here to give me that
measurement there. Then I'm just going to
mark that with my pencil. Then I'm going to cut
both sections that size. I need my cutting mat. I need a sharp knife. Here's my cutting mat,
and I need my ruler. I'm going to cut these out. I've got a sharp utility knife. This ruler here, I got
this at the **** Blick. It's nice if you can go and
look at rulers in person. I like this because it's got a little grip where I can
hold my fingers right there, a little grip hold,
and it's got a grip on the back so that it
doesn't move around. Now I can line the ruler up with that pencil mark
that I just created. I'm going to do more
than one swipe on this because you want to have
one swipe is not enough, and so you want
to hold it sturdy and do more than one strike, more than one pass, but you want to be real careful
and a nice sharp blade. Just don't be in a hurry. Just pull that along and then go right
back and do it again. And you'll see when it releases. It's thicker than paper, but it's not so thick that you can't cut it really easily. If you have some sketchbooks, let me grab a sketchbook. If you have a sketchbook, like I have the
Honamul sketchbook pad of watercolor paper, this back section
is the same stuff, maybe even a smidge thicker. That is fantastic
for your bookboard. If you just want to
cannibalize your sketchbooks, for the back pad,
the watercolor pads, for that back piece, that I've used that in a
couple book covers. You don't always have to
buy this stuff separately. You can use the back of those. Then I'm going to go
ahead and cut this. Right there. These don't have to be I do want the
cover to be perfect, but I don't mind the book
pages not being perfect. I do try to be a little more
careful with the cover. Now, I'm going to
go ahead and use my pencil and mark the same
size on the second sheet. Then I don't throw these
extra pieces away. I just put them in my stash. They're big enough
to do something. You could do miniature books
and stuff like that with it, so they're not not wasted,
don't throw them away. I'm actually going to
cut the short side first because I want to
use this as my spine. You're going to put
two covers in a spine. Once you make one of these and
see how easy it is to make your own amazing sketchbook or art journal or
book to work in, you'll want to make some more. Now I'm obsessed,
which is why I have a second workshop of more
ideas because I'm so obsessed with making books and
I need to do things when I'm in the mood to do it so that The next time I'm in the mood to do it might
be three years from now. If I do these while I'm in the mood and do as many
as I would want to do. Then I got enough beautiful
books to work in for years. I'm just clamping this
together for a moment to see what the spine size is. I can see that the
spine is a little bit larger than my four
sections clamped together. What I'm going to
do, I want this to be A the same width as that. I just marked on here
about what that size is. Let me just double check
or even a smidge smaller, it doesn't have to be completely wall to wall because
if it's too big, it almost feels wide, which is why I thought I could have put another section in here because I made that o
wide, but not really. So thinking like the width of these things and maybe
just like a millimeter less, and then I'm going to cut that. I'm going to line up on
one of these lines here. Right there on that line. To get it straight, I could have draw the mark all the way down, but I'm working on
things with lines on it, so let's use those lines. We've got extra board
if we do it wrong, not a big deal. There we go. That's going to be my spine. This is my spine. Then
here's the extra stuff. You see, we have
enough there to be spines to be small books. I have enough there for two covers and another
spine for a smaller book. I'm just going to save all
those yummy little pieces. Then this here is our
book cover spine. I'm going to go ahead and trim the piece that
I want to use. Piece of paper I want to use. I'm going to cut that. So I'm not going to assemble this yet. I don't want to assemble
this until I get the papers done until I get
the spine sewed together. But I could go ahead and just give myself plenty of space. This is basically the way
that's going to assemble. Let me see if I can See, even this table is
not big enough. I need all the space. I need so much space. Basically, I'm going to have cover about a
quarter of an inch, the back piece, a quarter of
an inch and the other piece. I want to have about an
inch and a half to 2 " of extra space around here. I'm leaving about
2 " at the top, and then I also want to
leave about 2 " on the side. Because this is the
pretty handmade paper, I'm going to go ahead and
just use my rip ruler to rip it and give myself
that extra space. I don't have to be perfect. These papers are not straight. I mean, they they're close. They're not perfect. But I'm leaving myself enough room
that it doesn't matter. I'm going to have
plenty of space. I just want it to be the hand
cut edge because I like it. That way it's hand cut on
the one I tore off to. Then that will be my cover. Now I'm ready to start
sewing and assembling. That is how I cut all
the pieces for the book, and then the book
will have a cover. How cool is that? I'm going to move over
to my desk and we'll start sewing this and
assembling this and be all set.
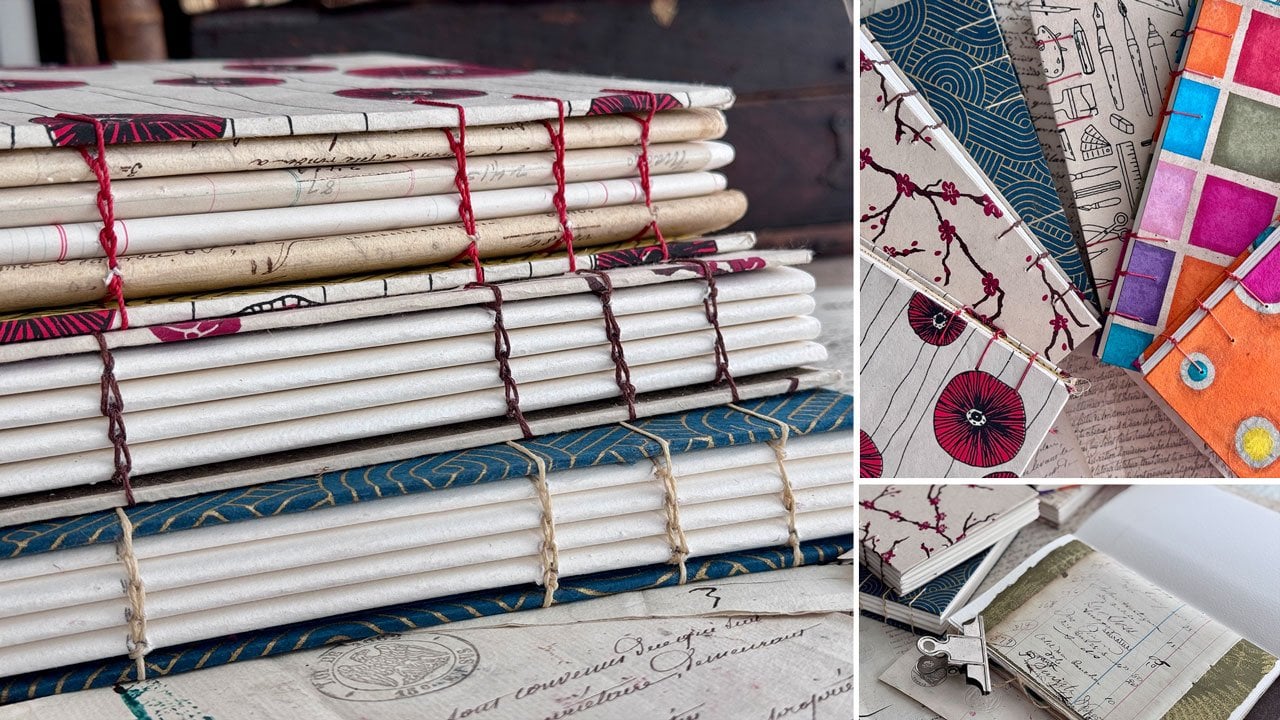
6. Treasure Journal - Sewing Signature Sections: All right. I've got all
the sections ready. We need to decide to, do we want all the
papers coming out the front or the bottom
in the way that we've got them done because
you can always flip some over and decide
if you want them going a different direction because the way I drew
them and cut them, they might all be
sticking out one side, which I'm okay with that, but you might not
be okay with that. You got to look at
these and think, do I want them come in different
directions so that it's an equal amount showing
on each end. That's cool. Yeah, I like it like that. Then what I'm going to do. This is really important
because I tend to get stuff all over the
place and move stuff around and flip things over and then they
get out of order. Once you start poking
your holes in your spine, you want them to all
go the same direction that you did when
you poked the spine. I'm just going to come here
and draw a number on each of these so that they stay in order in the way
that I wanted them, and then they stay in order on the way that I've
arranged them right here. Then I'm going to
come to the end and I'm going to draw some lines. I'm just going to get
it as even as I can. And make sure that
they're lined up the way that I want them to line up because now we are
going to take our ruler. And the long end here is 12 ". I'm going to mark this
in the center at six, and then I am going
to go 2 " and 2 ", and I'm going to come this way, 2 " and 2 ". My set of threads, you're going to stop
about 2 " from the end. You can go out
further. If you want, that's just my che,
my choice there. I'm just going to take a
little straight ruler that I have and then don't get them, don't move around
here, signatures. I'm just going to take
this straight ruler, and I'm going to draw
a line all the way up. If it helps to hold them down a little
bit, you can do that. But I'm going to draw
a line all the way up and now I want
these all to stay in the same order so that wherever I put these holes
will line up as I'm sewing. I'm so excited about this book, you can't even know, Oh my gosh, it's going to be gorgeous. These are exciting when
you start making them, and you've picked out the
papers and you've picked out the custom bits and
the ways you're going to customize this to be exactly something
that you want. If you try to buy a journal that somebody's made like this, they're expensive
because some people do make journals like this
and then sell it on ts. I've got my basic
bookmaking kit here. The few that I found are
hundreds of dollars. You got to figure if
you're going to the extent that I went on this with
the handmade papers, it was about $34 for
the watercolor paper, and then each of
these handmade papers was seven or $8 each, and if I use ten of those, that's $80 because I had
five sections plus the $34, so $114 plus my little bookmaking kit
that I got off of Amazon, which has my all, my bone
folder, some needles. This one came with
a little bit of thread and a second bone folder, and it came with
a roll of thread. I've hid the thread from myself. Oh, it's on the
table over there. I've got some other
thread though. I'm going to be
using waxed thread. I'm using waxed linen, and I like this white
one in this set. But this bookmaking
kit that was like eight bucks on
Amazon, seven or $8. It was super cheap, came
with a thing of thread. Let's pretend that's it for the moment because the
threads on the other table. That's like everything
you need right there. That you're sewing it, poking the holes, and flattening out these sections like we did. It's a fantastic little kit. I'm like, look it. Now we're going to
poke some holes. I'm going to move
these to the side. I've got them
numbered, so they'll stay in order when
we start to sew. What we're going to do, let's
grab all the pages here. It's easier if you come
back and fold it this way backwards so that you
can then pick each hole, and then at an angle, go through and you can
make sure that your needle is coming through on
the spine correctly. I just poke that all
the way through. I want that to be
a good size hole. Again, you can check
and see where it's at. If it came out way
off to the side, It's not ruined. I have
a book where they came off to the side and I realized it when I was sewing
and I'm like, Oh, When I go to
paint that page, I could just collage
on top of it, I can paint on top of it. It doesn't matter.
Don't get upset if you have two holes on
something where it got off of the center because you can just paint
or something on top of it. If it's a little
off of the center, I don't worry too
much about that. But in the center is best, because somehow I always get that center hole
a little bit off. That one's way off, so that's
why we come in at an angle. Be careful not to poke your
finger like I just did. M go ahead and do the last one. It's better if you're
coming in at the angle. It's hard to not
get in the way of the filming if I'm
doing it this way, but see if you come
in at the angle, you're on the right spot. There we go. See,
I'm going to have an extra hole here,
but I don't even care. I can just paint it, I can collage over it,
I can smooth it out. When I'm painting in the book, you'll never know it's there. I don't want you to
get upset about it, but it is better
if you come in at a 45 degree angle
just like that. Then once you've got
your holes punched, you've got your
number on here so you can remember which was
the correct direction. Go ahead and fold that back the direction that
it was supposed to be. You can do a little extra
bone there if you want. But we have our
holes ready to sew. And you got to be careful, I might have got them off
of out of line there, doing all that moving
there with that paper, but we can line
it back up there, and we're going to
be ready to sew. Now I'm going to do the next
one. Let's do number two. Just going to fold it this away. Then I'm going to
go in at an angle. You can see I've come
out on the spine. Might not be perfect. It's
okay. That one's perfect. Because when we get to sewing, it's not such a deal if it's completely perfect or not, we're going
to make it work. Now, you want to go the
same direction, though. If you flip it
over, you're coming out that way instead
of that way. I'm just thinking as I'm
going, where am I coming out? You want to keep on going in the same direction as you're going even if it's an
awkward sized book. That one's not
where I want it in the center. There we go. That one is. Then we'll
just fold that back over. Flatten those back
out real good. And we're ready to
do the third one. You can see perfection
is not necessary. Do as good as you can and
don't get hung up on it being off or to the
side or at different. Do the best you can.
Don't make this harder. Then it needs to be. Because I know we can
all make everything as hard as possible right
there in the center. Just take your time,
go in at an angle, perfect, work your way down. Perfect. By the time
you've got more than one, say you're on your
second or third one. Perfect. You'll
start to nail them. Don't get don't get hung up or frustrated on
the poke in the whole bit. All right back the way it came. Just going to fold
it down and that again. That was number three. I'm going to finish
up the last two. All right. I've got all five of these one, got a tiny bit off
on my middle holes. That seems to be my challenge
is the hole in the middle. Now I've got them
all lined back up again with the way I numbered them, one, two, three, four, five, and I'm going to
start with number one, and I'm going to
use a waxed thread. If you use a regular thread
without waxing it, the thread Seems to tear the paper serious
like just linen thread. I've got some plain
linen thread, and you can wax it
yourself with bees wax by just running the thread
over the bees wax. What a pain, you can do it
and it's really not that bad. Or you can buy thread
that's already waxed in several
different colors. You can find waxed thread anywhere that has
bookmaking materials. I'm just going to make this thread about the
length of my arm. Then I'm going to double that because I'm going
to double this thread. It's going to be a
double thickness. Then that'll give
me enough to pull to be able to pull without
pulling multiple times, maybe. If you buy the wax thread, it's like super waxed. It's so waxed, it's almost stiff and we'll stay
whichever way you put it, and then I'm going
to thread my needle. I'm going to sew this with
a double layer of thread, so it's good and strong. This is a great big needle used for book
binding. It's huge. It's got a sharpish point, but not super sharp, it's a tiny bit dull and the head is big enough to get
that gigantic thread in it. I like all my knots to be personally on the outside,
so I'm going to knot this. Just going to do that and
roll it down my finger. Try to roll it down my finger. It's very thick. I'm
going to not this up. Then that's going to
be on the outside. I'm going to start with one end, and we're just
going to be able to poke our needle through
the holes that we created and you can do it layer by
layer if you can't find the holes to go all the
way to get it started, but it gets easier
as you're going, just get each of
those threaded on. Where is this hole? I just saw it. There we go. I do find it nice to have a
thimble handy because you need to be able to push
that needle sometimes. I've got one handy
even if I don't have it stuck on my
finger the whole time, and we're just going to
pull that first thread. These tend to I don't know, in on themselves a little
bit. It's real thick. We're just going to
pull that through, I've got the knot
on the outside, and then we are ready to find the next hole and pull it
back to the other side. You can see, find the hole,
it goes right through, and I'm going to pull this all the way through
and make sure I don't have any weird loops where the thread got stuck and just pull it tat, but not so tough that I'm tearing paper or
anything like that. Then we've got the third
hole here. There we go. Again, I'm just
pulling it all the way through and pulling it taunt. Then right through
the fourth hole here, make sure I'm not
causing myself or not. Then there we go right
through the back. Just make sure you don't leave any looping here on the front. Then we're going
through the last hole. Nice and then you
can see we've got, here, and then we're
going to come back and go the other direction
and go in that hole. And then we're
going to go down to the next hole and we're going to go through
that hole again and pull through to the inside. We're going to
have a steady rope of thread all the way down. Then we're going to find
this hole it gets tough, so it might be nice to
have a thimble to help you push that than tear
up your fingers. I have a couple of thimbles, but who knows where they are? I actually bought myself a new thimble when I was out the other
day because I'm like, I need a thimble. I
need that thimble. Now I'm just going to move
this not out of the way, and I'm going to go back in that very first hole so
that I'm on the inside. You can see now while having
a great big punched hole helps because this thread is thick and it's got
the wax on it, and you're going to need
to go through the holes more than once on
this first layer. Now I'm just going to it off, I just came up underneath
that thread and made a loop and I'm going
to go back through my loop and pull that tight. And now I've made myself a knot, and I can double not it. I can either pull that
back through the back or I can leave that right there because this stuff is so thick, I'm just going to leave it right there and that's going to live there and I'm going to paint it in probably at some point, and then the back side
even going to case. I'm just going to leave
that right there. Now we're ready to
go to number two. Number two, I want
to be in order. Number one was on top,
number two a second. I want that to be in order of how I drew
those lines on the back. I'm getting short
on thread here. I think I'm going
to go ahead and string one more
piece of thread and then that piece of thread
might get me through most of the rest of these,
but it doesn't matter. We can just attach
it and tie it. It's not a big deal.
I just tie things on the outside so that you don't see it because
we're going to put a binding on top of that
and you won't even see it. Don't worry if it looks neat on the outside,
don't worry about that. Your goal is to just get it sewed and I like it to
look neat on the inside. I just don't worry
about the outside. Again, about the length of my arm is what I'm
going for here, but I can add another piece
if I need to, not a big deal. And I like that this color is about the same color as
the paper I'm using. That's what's nice about having different colors
of waxed thread. You'll see that this package here had brown and black in it. This's just waxed linen thread. I got it at Amazon years ago. I've had that for a while I
bookmaking classes years ago. Those are fun online. There's a book membership
out there that I'd seen. Now what I'm going to do
is I am going to attach these two and because I
have cut off that thread, which maybe I shouldn't have. I shouldn't have cut that
thread off, but I did. I'm actually going to not this on to this
piece and keep going. I could have already had that
on there and kept going. I'm just going to pull through that knotted loop there
and pull that tight. And pretend that that was
still attached because I want this down here to
attach to the next piece. That's how I'm going to
do that. Because now I'm going to attach
the two together. Now I'm going to go through
the whole on the second book, and I'm going to flip it
over so I can see them. Here we go. I'm just going to pull it tight, but not so tight that I'm
going to rip out what I just did or tear that section
that I just created. Then I'm going to head
back through with my needle. There we go. Then I'm going to
pull that tight just like I did on the other. I'm going to make
sure I don't have any extra little loops here. Pull it taut and there we go. Now what we are going to do
to attach section two to Section one is I'm going to come onto this side of
where that hole is and then come back out
the other side of that hole. You see I just looped it
under that thread there, I'm just going to
make that loop that attaches those two
sections and pull it, and then I'm going
to go back through that hole that we just came out of to the inside. There we go. That would be a good spot to
have that thimble. And now, just pull it taut,
just double check it, make sure it's not got
anything weird hanging out. And then we're ready to
go down to the next hole. So I just went in
that third hole. I'm going to pull it
out here on the top. And then I'm going to go under that thread on one
side of the hole on the first section and then back through underneath
on the second side, and then we are just going
to pull that nice and tight, making that little loop there, holding those two
sections together. You see why I' numbered them. I turn these all around
and by the time I'm done, I don't remember
what was up and what was down and what was
section, whatever. Definitely good to
number them so that you still get them all
in the same order and just pull that tight, and then we're
ready to go through the next hole, perfect, and then Make sure I don't
have any weird loops inside because the waxed
thread, it just gets hung up. Then we're going to go under that thread on one
side over here, come back out over here
on this other side. Pull it taut there and then
back through that hole. After you've done a
couple of these, man, it gets so easy, you just do it like you have
always been doing it. Now for this one, I'm going
to just loop through here. And I'm going to be ready
for the next section. Now I'm going to go
to the number three. Let's see how these
go. I got one. Then I've got number
two marked over here. There's number two, and
then here's number three. I'm going to make sure that
I get it same direction, even though I'm flipping
this all around. Now I'm going to go directly into take that same thread that I've already still
been working with, and I'm going to
go right down to the first hole in number three, and there we go
came right through. It gets easier. Then I'm going to come out
the second hole. I'm going to jinx myself by
telling you it gets easier. Let's see where my
needle is in here. There it is. There we go. Ah, lovely. All right. Once you find that hole,
pull that through. Perfect. I've got some of that one of those brown papers on my thread, but I don't care. Now we're going to do
this a little tiny bit different because I actually want that a little tighter coming from that
first section there. There we go. There we go. Now, because we don't want to go back to the first
section and loop around. What I want to do
here is just 1-2. I want to just go up under
the loop that I have created and get that
needle up under there. And if you do the under there
and then push it through, you can angle it up a bit. There is half round
needles that are easier to work with to do that little
underneath that loop de loop. But I don't have the
little round needle, but that's how we're going to
make that next little line. We're going to go up underneath
those two strings of thread for our catch. Then back through the same
hole that we just came through I came back in a different spot. Don't get upset if you
make an extra hole. Just remember, you can paint it, can collage over it. It's not a giant deal. Just work it until you find it. Then just pull that. Don't pull it so tight that
you're making a mess, but it. Then a third hole. I've got so many pieces
of paper that I'm doing that might be the challenge, but then there's the third hole. Make sure there's no
weird loops inside. Then we're going
to come back here to this and we're going to
loop right up underneath. This one. Number one and two, we're going to loop
underneath that. I'm just going to
pull it down so I can There we go, grab that needle. Just be super careful here.
You're working with a needle. You don't want to poke yourself, you want to be real careful, loop around and then
back down through that hole so that we can
come out the next loop. Op. That was easier.
And then just pull it taut and see how we're making a lovely
little spine there. Here we go. So just take your
time with the stitching. It's no hurry. I'm just
going to go through this. Between that loop
on one and two, I'm just going to go
down. There we go. If you just can't get it, just open the two
sections and pull it through. There we go. You can definitely see where the half round needle though. Now I need to get a half round needle because I don't have one. I've made a dozen books now just like in the
last week or so. Now I'm like, I need that. There's that one. We're going to come
through the last one, do our loop and then we're
ready for the next section. There we go. Then we will add another
piece of thread after we've attached the next section.
Here's the front. I've got one, two, three, Here's number four, going in the same direction because you see I'm all over the place. Then I'm going to
take that thread right into the next section. Found it. Thank goodness. Then I'm going to come right out the second section. I
found that one first. There we go. You can see each one you do it
gets a tiny bit easier. I'm just going to go in
between the loop here 2-3. I don't go back up to
the one and two loop. I go to the loop I just created, and I'm going to just
open this to help me get the needle back
to the other side of it. There we go. Now I'm underneath the
loop of two and three, and we're just going
to do that each time. The next section will be this loop that we're going through. I'm going to go right
back through our whole. And now I've got that
locked into that section. Now I'm just going to go ahead and finish off this section, doing the same thing, looping it underneath the
one in between it. It might be easier
just to open the book to find the needle
and go through underneath it because
I have found that to be a little tiny but easier
back through the hole. There we go. I might go ahead and add
a piece on right now and just have a
knot right here so that I can make sure I
got enough to finish the last section and
don't even bother me. You can try to put the knot somewhere else if
that's going to bother you your choice there. I'm just going to tie these off and just leave it
right here in the middle. You'll see a lot
of books with like a little hind t
right in the middle. It's pretty common, so I
wouldn't even worry about it. Then I will trim those
little edges in a bit. Then I'm going to come
right through and attach to the next loop. And then right
underneath the loop on the number three and four, and I'm actually going to
open it up and just push that back rather than
struggling with it. And I'm right through the loop. And then I'm going
to go back through that hole and come
through the last one. Then I'm going to loop around that little loop right there 2-3 again for that last one so that we're still
looping around it, and now I'm ready to
attach the last section. I'm going to put it
back to the front. That's why it's nice to
have numbers on these, so I remember what the front is. Then I'm ready to
at. The last one. I've gone through
the loop down there, I'm ready to come
through the first loop here on number five. Let me find the
center there we go. There we go. There we go. Right through the
next hole here. It's almost easier if you go the same direction
that you did your all so that it's kind of the same angle and it comes right through where it. Every time I pull my thread out, I knock something off my table. I'm going to go ahead and
pull this one a little tighter because I can see it
got loose here on the edge. I'm just trying as I'm
going to make sure that each piece
gets pulled taut, and I'm not leaving any
weird straggler out there. I'm going to get in here between these two sections
so I can see it there we go. Now I'm going between the loop
of number three and four, and I can do that this away and get my little
attachment there. Then I'm going to go back
through that hole that I came and just pull that tight. You can see I've made a n set of basically c looking stitches. There we go. I just double check inside every time because I've done
it where I didn't double check and then something didn't
do right and I had a big weird loop in
the middle of a book. I'm just going to
go under that loop, going to open this so I
can just grab my needle. This really does make it easier. Come back to the other side
of that loop so that I can just that through
the loop. There we go. Same as if I were trying
to struggle and do it this way back through the loop
that we just came through. Back through the hole, we
just came through, sorry. I got loop on the brain
and just pull that tight. Then through the next
hole. There we go. And again, I'm
just going through that loop between the
last two sections and just pushing it back through
here since I don't have a curbed needle and made a nice little loop
there around that one. And then back through that
hole that we just came out of. And here we are getting
to the very last one. G. Then pull that
tight and make sure. And then we are ready to
loop through that last hole and now I'm going to make a knot by looping through the
loop I just created, and I'm going to
make a double knot because that's not actually a knot on that first little loop that I just did, so I'm
going to do it again. I'm going to go under that, and I'm going to come
through the loop I just created and pull that
down so that knots up, and then I'm just going to trim that off and we have
bound our piece. Now, You could leave
it like it is, but every time you got to
a new section of the book, it's going to open
up and have a gap, and that drives me insane. I don't want the gap.
What I'm going to do is I'm going to glue this. I'm going
to cheat a little. I'll show you what
I'm going to do because I have some
book binding tape. I did this on another book
and it worked out fantastic. I have some book repair tape. You could probably
use Gaffers tape or it's going to
be on the inside. You're not going to
see it. You might get away with some other tape. But I'm going to use my big
clamps. Clamps are handy. If you're sprayed to damage the paper that's on the outside, you can put a little
piece of wood in between the clamp and the paper. But this paper is very thick, and this is going to be
the inside book flap, so I'm not going to see it if it leaves a dent, so
I'm okay with that. I've got some PVA glue, which is the correct
glue for this, and I also have some ileens Alan's original acid
free tacky glue. If you're going to
use tacky glue, which is another popular book binding glue. It dries clear. It does not yellow
because it's acid free. Don't get the
regular tacky glue. The regular tacky glue
is not acid free. You want to get the
acid free tacky glue, and I had to order it
because I did not see that in stock locally here. But what I'm going to do is I'm going to glue the binding, which is why I have clamped it. Then once I glue the binding, I'm going to cheat and
take a piece of book tape, so I'm going to go ahead
and get the right length. This is just going to be a double whammy for us because I want to go ahead
and make the book cover. I want it to be maybe just a tiny bit shorter
than the book. I don't want this hanging
outside of my book. I might cut a tiny bit off. But this is going
to cheat the system because basically what
you normally would do is glue this and let
it sit overnight. But I want to go ahead
and make the cover today, I'm going to cheat because I did this the other day
and it works great. I'm going to cut these off. I don't need these long, little. You could just weave
these backwards too, but I'm just going to cut
these a little shorter. Look how beautiful
our spine looks. What I'm going to do is run
glue on the spine in between, which is why I
wanted it clamped, that I want the
glue to keep going, but I do want the glue to glue
these two pages together. When we open it, we will
have a nice closed book. I did that on this one. Let me just show you
what that looks like. I didn't want that big
gap between the two. When you get to the two pages, this is exactly how my Dina
Wakey book works also. There's a glued page, but it's not open where you
can see down to the spine. Now I can paint it as if it were to one big layout like
a big double spread. Let me show you the
Dana Wakey one, and then you will see
what I'm talking about. This is the commercial made one. In between, they have
the craft paper pages. Those are glued and you can see I've done exactly
what they've done there. In between every section, they've got craft
paper pages and that's how it makes the spread and you don't see through the cover. I have watercolor
pages that I've done, and so that's going
to be where mine is. I'm basically going
to glue the spine. This glue dries clear, I'm not worried about it, and I'm just going to go down the edges for a
nice bead of glue. Then ideally, let
that dry overnight, definitely let it dry overnight before you try to
use it or open it, just let it do its thing. But that's how
we're going to get our connected pages that
don't open to the spine. I've used that whole
thing of that tacky glue. Sorry, that PVA book glue. I used the whole thing, and
I would say that that for me made five to six books. That's how much
glue was in there. If you're going to make a
whole bunch at one time, just know that's about
how far it goes. That's exactly what I
wanted to do there. Now I want to enclose the glue basically
with my book tape. You're not going to
see it, and it's going to give me a chance
to make an attach to the cover and then set it up over to the side
to dry overnight. That's how I cheat. If I want to keep on going and make the book all in one go. Now I'm going to set
this to the side and just let it be setting up because it'll set
up pretty quick, give it half an hour, an hour, and it'll be set up pretty good, so you don't have to do
this if you don't want to. It's just my extra cheat. I'll set this to the side
while we make the cover.
7. Treasure Journal - Finishing Cover & Book: Let's go ahead and
make the cover. I got a couple little things
that you might consider. If you want to do a
book that has the elastic on it like this here, and you want to be able to
elast that book like that. You'll need to have some elastic as you're
making the cover. We can look at this and it actually you can't see
where it is under here, but they've got a hole on the cover just big enough
to thread this through. Then I can tell that there is a piece of elastic right here. I can see it up underneath
the book cover. They have just glued
that in place and then glued the
paper on top of it. That's how that is attached. Basically what you
want to figure on is this to be the whole
length of your book, the whole length of
this plus maybe 2 " extra on each end to then
thread that back through. So look at some of the books that you
already have and think, I like this feature or
I like that feature. Another feature that
this little sketch book has is a piece of ribbon. Do you like to have
a little ribbon in your book to keep track
of where you're at? That is just glued down
to the spine itself. As I was doing the glue
there on that spine, and I could still
go back and add it. We could have a little
piece of ribbon. In there if we wanted
and then you could attach charms to the ribbon
if that was your thing. That's some stuff for
you to think about. You could also have a pretty
piece of ribbon that wraps the whole piece and keeps it closed when
you're not using it, that's something to consider. If you're going to do
that, you need to figure on having enough ribbon
coming out of one side, so underneath maybe
glued to the spine. Then enough to wrap around. Actually I'm wanting a wrap
around ribbon on this. Let me go grab a
piece of ribbon. I grab some ribbon. I found this at the hobby
lobby the other day, I just thought it was beautiful and I'm thinking that I want to do a wrap around
in this color. It's a pretty gold. It's
like a pretty satin ribbon. It's really pretty.
I don't know, it's a good choice? It's got some thread on it. I'm not sure what
that thread bit is. Maybe that's just to keep
it from fraying more. But I like it, so we're
going to use it anyway. I'm going to want to
decide how much of this thread that I need
based on the book. I've got the book here, it's
over there just drying, do I want to loop it around? Do I want to have a
button on the outside, that I can then
loop this around. Do I want it to just loop
around a couple of times and then slip underneath so
that that keeps it firm? I don't know. Let's get enough
to loop around a couple of times and then we'll
decide. Real exact there? It's your art book. You just go with whatever it
is you're feeling. I'm going to actually
attach this, glue this in after
I've taped all this. Let's do this. What I'm going to do is glue stick
because they're easier. Ideally, it would be nice
if you had acid free glue, this is a UH U stick. It doesn't say acid free, but it's on the inside. Got it at it's a natural glue. I got it at the ****
Blick the other day because I'm like, I
love glue sticks. You can do this
with the PVA glue, which in the artisanal
journals class. That's what I did, and I spread the glue around, but
man, it's a pain. There we go. Doesn't
matter if I've got a little on the edge
because I'm going to flip it right over and get it where I want it and see
if we've got it straight. I can check it
here. We like that. Go to go ahead. Smash that down pretty
good because it's glue. That's going to
allow the cardboard to warp a little bit later. We're going to put this under a stack of books
when we're all done and let that really set
up and dry overnight. Let's just glue stick this one. I want to leave about an eighth of an inch, quarter of an inch. We can check this I want it to be all even there, and I want one to be
shorter than the other, but we can check
that with our book. And just see, did I leave
enough room for that? If I put that there, did
I leave too much room? We can just check and
see, we get going there? Then that right there
would have right there. Yeah. That's what I want. I know the clamps
are in the way, but now I've made
several of these and I can boil it a little bit. Then if it's starting to
work a little right now, don't worry about
that, you're going to set that under heavy
books overnight. It will flatten and
look gorgeous tomorrow. Just don't get super
hung up on some of this. Again, about a
quarter of an inch. Making sure I get it level
with the other two pieces. Or as close as you can get, and then because there's
a bit of leeway, don't get super
upset or stressed. Then I'm going to cut these
edges. Let me close that up. I'm going to cut these edges, and I'm going to cut
it at an angle like a little V shape
and I'm going to leave about a quarter maybe
an eighth of an inch. I need to leave ale bit of extra paper outside the co edge here because You don't want
to cut to the cardboard. You need that little
bit of extra so that when we fold this down, it makes a nice corner. Again, I'm just coming
in at a little y, leaving myself a little
bit of space there. Then we are going to take some more glue and we're
going to glue this. If you feel like it didn't glue good enough on the
edge or something, you can you could use I didn't
get to the edges on these. You've got a few minutes and you can add a little extra glue. But when you're all done,
I don't think you're even going to notice it after
it dries overnight. I've got some wax
paper over here. I can put under this to try not to get it
all over my desk, which I did not put down today, but I've got it over here. I'm going to work edge to edge because if you work
here here here, then you might pull the paper and you might not,
but you might. I'm working opposite
ends together. I'm just going to pull this edge doesn't have to be super neat when you're done
like the inside, doesn't matter what
the inside looks like because you're not
going to see it. I feel like I might have grabbed the crooked spine rather than the straight
spine, but that's okay. I feel like that wasn't
the straight one. Just flip this over.
And we're going to just glue this side. God. You can see how it made a nice corner on
all four corners. Now I'm ready to attach the book and then all of these are going to
be glued down together. I'm going to take the
clamps off for now because it's had a little
bit of time to set up. I'm going to use the tacky
glue to to glue this to this. The very first
watercolor page of my signature and the
last watercolor page, that's going to be the
inside of my flap. So tutorials have that
inside flap being a book. Like a decorative paper for
a book cover or whatever. I just use this stuff. I just use this. Nice
thick thing of glue. I've got a little piece of
paper here that I've folded in half that I used
to spread the glue. Now, if you put
the glue all over this and then glue
this page down, you might have got
the size incorrect. I like to put the
glue on the paper. And that way, I know
I've got the right size, the right amount of glue. I do have a little
wax paper here. I can put it right in
between here to make sure that I'm not spreading off any glue onto that second
sheet as I try to get this to the edge because I do
want that edge to edge. Then I'm just going
to flatten this out. This is just that red paper
that I was working on. I keep using this
little piece of paper, so I just wipe the
glue off of it. If I've got extra glue on
it and I keep using it. It's fantastic. Now, I am going to set this
where I want it. Hopefully. I'm going to look and see if it's really
where I want it at the top. I want the same
amount of space at the top and the bottom
is what I'm going for. Then Am I straight on
the spine or did I get it where it needed to be versus this side?
I think I did. Now, I'm going to
smooth this page down, which I can see is not perfectly straight, but that's okay. I've got enough of the book, which this paper might
not have been straight. It's not that it's not straight or it might not have been
straight in my signature, but I'm going to glue it down, I've got enough of the overlap
where it's still going to cover like it and the
book will close like it. I'm just going to let
it sit right there for a second because I don't
want to forget the ribbon. The ribbon part, we could
attach right in here, go ahead and glue that in and then let it do its
little wrappi things. Why don't we do that? Yes, I'm doing that. I'm just going to glue
that right there. Now this is on the inside, so you're not going
to really see that. But because I have
this book tape, I think I'm going to
cut an extra piece of this and really
secure that in there, just as an extra bit there. Now we're ready to
glue this one down. I'm just going to again real quick before the
spine dries there, I'm going to layer this
whole thing with glue. And you've got a minute of
working time here with this, but you don't have a
whole lot of time. So don't dilly dally too long. I'm going to go ahead and get this down there on
that piece of paper. Get this right over here. This is a sturdy
book we're making a book that's going
to last our lifetime. If you love making
the books so much, you can have a
little side hustle making these books for people because people will pay good money to do all this,
thinking it's too hard. I know it was very lengthy here making this one because I was
talking at the same time, but if you get on a little
roll, you can do this. Okay. Now, we are ready. I'm going to go ahead
and slip this in here for the moment, but we are ready to go ahead
and get this page attached. I'm going to do this, and then I'm going to
open it and look at it and really smooth
that down good. And we could grab our bone
folder, that would help. You can see we've got
our ribbon going, I might come over here with the bone folder
just to make sure. We've got anything
flattened out. I don't want air bubbles
or anything like that. Then I didn't really
do that on the spine, but when we were gluing it, we could have done this with the cover also to
make sure there was nothing going on with
the cover that we glued. And then come in here
with our little finger on that little edge that we created between the spine and the other piece,
and there we go. Now, we're going to
have to let this definitely sit
overnight and dry. But look at our amazing
book and I have a yummy ribbon that I can
now loop around a couple of times and I can come through
here as we're working and that's now closed and look
how gorgeous this is. Oh, my gosh. Totally ended up
exactly like I wanted. Now you're going to stack this under of just a heavy book or two overnight and let that dry and it will be
completely perfect. Then look at how many yummy gorgeous pages that we've got to now work in and have
some cool variation. So I hope you enjoy
making one of these, can't wait to see
what unique things that you include in yours. I'll let this dry overnight, and I'll see you
guys back in class.
8. Art Folio - Supplies: Take a look at the
supplies that I'm using in our folio that we're
going to create. We're going to create this
lovely little folio of art. In here, I've got different
types of paper, gathered art, old papers, little envelopes that I have attached in
here to store some art. I've got tissue paper runoff from when I cleaned
off stencils, I've got some handmade papers. I have some vintage paper
in here that I have saved. I also at the back of here, have a pretty vintage looking
page that I have used, but it's not really old, it's a photocopy basically
of a page from an old book. Then I have used a folio
that had a photograph in it, that was an old
photograph that I just tore out of there that
I'll show you in class. Then I have finished
this off with a lovely piece of ribbon that can then hold this folio shut. This is the project that
we'll be making in class. The things that
you want to gather for this project is
something for the cover, and it doesn't have to
be an antique piece of of an old picture thing
like I have gathered. It could be, here's the
picture that came out of it. It was just one of these old things that
had a picture in it. I'll just save this for
a later piece of art. I just tore it right out. I'll show you that when we
get to the project in class. But you could use
an old piece of art or a piece of art that you love and you want
to be the cover. I've made mine like
a nine by six size, I believe, I believe
it's a nine by six. Yeah, nine by six. That is an average size
for an art journal thing, that's the perfect size. If you've got a bigger piece of art, you might cut it down. You could just
make yours bigger. You've got some choices there. Gather up pieces of
art that you love, gather up some old papers. I've got some vintage papers.
You don't have to do that. I'm just giving you options. I got pretty tissue paper. I've got some handmade
papers that I gathered up. I've got some lovely pieces of art that I was
willing to sacrifice. I don't end up using
them in this one, but gather up pieces that
you think you might want to put into your lovely
little folio, and then we will create little signatures just like we did with the
bigger art thing, but we're going to make this
a nice single little folio. I also used a glue
stick in this project. I used my book kit my book binding kit and I
used some waxed threads. I've got all the waxed thread. I've got my needle. I used all of that here in this project and
my bone folder. That's our basic tools right
there for making a book. I did use all four
of these tools. I also had some pretty ribbon that I decided to
use for my closure. This the kind of
closure I decided on, you can decide on
your own closure if you see something
you like better, if you don't have to have a
closure if you don't want, or you can just wrap ribbon around it and that can be done. I thought it was
interesting to have a grommet as my closure, it protects the paper since I tied the ribbon
through it a little bit and gave the ribbon an anchor that hopefully
when I unwrap the ribbon, I don't lose the ribbon,
anchors it to the book. To do that. I have a grommet kit that I've just
had for years and years. I got this at Home
Depot a long time ago. This has a three
eighth inch grommet and a half inch grommet. It has been so long
since I had this kit out that I ended up using the larger grommet when I intended to
use a smaller gramet. This kit, you've got all the pieces for
the smaller one and all the pieces
for the larger one, but if you hadn't
done it in a while, You might mix up the pieces and cut a bigger hole
than you intended. Then you're going to go
with the bigger one. I also ordered a gramic kit. I ordered a gramic kit with these 38 inch grommets
that didn't come in yet, but I think it's going
to be very handy, which has a grip piece, which probably isn't
good if you have grip issues or as we get older, we naturally lose our grip. This hammer one is
good if you've got grip issues and I just found
it at the hardware store. I use that in a hammer. And a glue stick.
That's basically it. I gathered all my papers, we created a signature, we sewed it into our piece. We attached any extras
that we wanted, and then we attach our closure. I want you to start gathering
interesting bits, pieces, tissue, old papers, things
that you've painted, and what it is that you'd
want to have in a folio. If you've got one of these folio covers that came
with an old picture in it, those are
very interesting. I just found this at
the antique store. I collected quite a few of
these a while back from my photography steel life stuff and now I'm like,
new life for these. And it's beautiful and
I'm going to treasure it, so I don't even feel
like I wasted it, but if you are afraid to
use something like this, feel free to look at the Tim Holtz ideology of papers because these
are nice and thick. I could have used this as a folio paper and if it
weren't strong enough, I could glue this to a piece of watercolor paper and
make it even stronger. I do like these Tim
Holt's ideology papers and envelopes and some other little goodies that I showed you in
class because I went to the hobby lobby and just
found fun interesting things, which I actually
intended to use one of these little color
palettes here in my folio. I might pull that back out. But just lots of
interesting bits and pieces that Maybe it
would be easier on some of your first projects
until you really get your groove and go and how
you'd want to create it. These might be an easier
way to go rather than sacrificing your real art or your real old papers
or what have you. I'm to the point
though where I'm actually making this for myself. I wanted to put in there the
things I wanted in there. I didn't mind sacrificing
the things that I sacrificed to make
the art books. I'm really loving some of the stuff that
I pulled together. These are so fast and easy that you can make 1 million
of these and just have a lot of little beautiful
artfolios in your studio. I hope you enjoyed this project, so I'll see you in class.
9. Art Folio - Gathering Papers: This project, I want you to gather lots of bits and
scraps and whatever you have. I'm going to make a little
art journal that's going to be mostly complete when
we're done with it, I hope. Then I might have a few pages in it that I could still
paint in and decorate. But I just want to give
you some good ideas here. You want to gather
anything that you're thinking might be cool
in an art journal and I'm going to use something a little different
for the cover of this one, or you could use
actually was going to start off using a piece
of art as my cover. If you've got a
piece of art that you like that you want to maybe be the cover of
your journal, go for it. But as I was digging
around in all my stuff, I came across this
old photograph folio, and I'm going to use
this as my cover. It does have a really
cool photo in it. I collected tons of old
papers and photographs and things for photography props and stuff over the years. I am just going to hopefully
just unattach this photo. There we go. Then I can
glue something here on the background like an
old paper or something to cover any edge
that I just peeled. But I'm going to use this as my art journal art folio cover. And I've got an interesting
idea for a clasp, so we'll get to that at the end. Then I'm just going
to save this. I like old photographs. I might use it in another
piece of art or something, but we're going to make
a signature that we will then sew into our cover. This is fun and interesting. This is a standard nine by 12, that might
not be standard, but nine by 12 size, which works perfectly here, you can see with some
watercolor paper. I have pulled out
my hoomul paper. I'm to have a couple
sheets of that in it. It's the nine by 12
paper Cal press. It was the very end
of a pad that I had sacrificed the back
cover for a book. I've got a few pages of that and I think that would
be fun to be able to then paint on those while they're in our
book when we're done. Still attached here to
its glue at the top. Then once you decide if you want a few pages to work on
in whatever medium, whatever surface here,
then start gathering other things that
you might want to include in this
particular folio. I'm going to sacrifice a
really beautiful old document. I've got tons of the old
documents because I used to scan these in and use as photoshop brushes and
digital downloads. I've got a whole big box of these that I've collected
over the years. If you want old documents, but you don't want to
sacrifice a real old document. You can find old
document downloads really easily and
inexpensively on EtS. You can just download it,
print it, and use it. This is the real deal for me because it means things to me. I've used these in
my photography and my props and you see them under just about
every photo that I take, I have a stack of
old papers that line the table, and I love them. I'm going to use them. Also have the deli paper that I use all
the time to protect things. This was some deli paper that has some excess paint
from a stencil on it. I thought that was really cool,
so I'm going to use that. Another one that had
some excess paint from a stencil. So I love that. I've got some old art
that I pulled out. I've got some pieces
of handmade papers in my junk box of old art. This is a pretty piece
of handmade paper. I've got some tissue
paper that came wrapped around something that I had ordered from an art
store, so I love that. Another piece of handmade paper. They don't all have to be the
same size, but in the end, we're going to conform
everything to this height. If I've got things that
are bigger than that, I'll cut them down
and if I've got things that end up being a
little smaller than that, I will center that in my signature so that when
you get to that page, it doesn't look odd. I've also pulled pieces of
art that I actually love, like Love love, and so I might sacrifice these to
something in the journal. If I wanted to, this
could be something on the back page covering that part that I pulled the paper
off of that could be just a interesting
piece of art back there. Yeah, I'm going to maybe
sacrifice a few pieces of art. If you want some old looking, I also pull these off my
wall, and I like that These had a color palette that
went with these paintings, and that would be neat if I could stick them in an
envelope or something. I don't know. I'm just
pulling some ideas together. Any kind of tissue papers, any papers that you like, Any handmade papers that
maybe is in your collection, anything you've painted, any jelly plate pieces
that you've done. If you don't want
another idea for you, if you don't want to sacrifice old items or you don't want
to sacrifice your art. I was at the hobby lobby
and I actually I went crazy because I love these
Tim Holt's ideology things, and I want to be able
to use some of these in my art notebooks that I'm
making, my art journals. I really like this
file cards pocket. That was a good choice. Go look at the Tim Holt site or the Hobby lobby or
something like that. I really love this idea
of old photographs. I have a ton of
old photographs of my mother and some of my family
from when they were kids. But I don't want to use them and I want to sacrifice those in a piece of art so you could scan those in and print them out. But this is a nice way to experiment with
that before you get into your own pieces because you could throw it away and you
wouldn't even care. It's not important to you,
but it's a whole package of fun photos that he's collected
and put together for us. I love the idea of
experimenting with that. If you've got something that you truly love that you created, you could put your
own photos in there. Then I really love these because there
are many file folders, and that is absolutely perfect for the book that
we're creating. I might stick one
of those in here. Because it's fun and it's
interesting and it's different, and they look antique, so it looks like it's
an old piece of paper, and old tags, those
would be great. Slipped in to some of these
little file card pockets. That's fun and you can paint on top of it and it can
be part of your art. And I'm obsessed with this
little pack because it has little color cards in it, which I actually really love, and I have a pack of these hiding somewhere
here in my art room, but I bought another
one because I'm like, Oh, I don't know where
it's at and I need it. But I like that
these are floral. I like that they have the
color swatches in here, and I love that they're vellum. They are translucent. This one I probably
will pull out and use. Then I love these old papers. If you don't have old papers
here like mine that you are willing to sacrifice or you don't want to purchase it
because they do get expensive. This is a package of lots of
papers that fit that bill. You can fake it basically
without having to spend on the real deal
and have pretty papers. I like that the back
side has a pattern, too, so they are double sided. I love this map. Oh, I love
this. I love that one. Papers and invoices. If you have some old
papers like I do, then definitely
you can use those. Lo here, we could turn
this into a flower book. With an old invoice at the back, but I love this
because it goes with the floral pieces here in
this transparent things, number two, Tim Holt's
ideology package. Getting excited. I didn't actually open these and
look at all of them. I do feel like we could
definitely use some of these in our art book because I really love
some of these options. There's a couple
of these packages. This was backdrops um
volume one and Volume four. Apparently, there's some
more volumes in there that I didn't see because I'm thinking there's a two and
a three out there. But this other one is
also look at that. It's got color palettes
in it. Oh. Okay. You can see a good
variety. Where's the? There we go. Uh, fill in flowers and color
palettes, apparently. This has got that that's
from a book and I actually have a printed
copy of that book, the can't think of the name
of it at the top of my head. But those are from
a well known book. Oh, my goodness. I love that. Okay, so I don't know if I'm ready to use that.
Oh, look at here. We could sacrifice that
to be the back page, maybe and just trim off
to the right height, and that could be the back page. Okay. Super fun. So you can see that you can use a mix of your own
stuff, art work. Purchased fun things. I like this package
pocket cards because it's got little packages of cards, and you can make
your own art cards, but it's fun sometimes if you've got something else to slip in that is just
pretty that you like. I like this a little
set of art cards. You could also just cut
down old papers and old index cards and round the corners to that to
be an art card also. You can see so many ideas. Some of this is idea
generating items for me. Some of it I'm going to use. If I'm just looking around at the hobby lobby and I'm like, I'm going to or the Michaels or the art store or
wherever, and I think, I'm going to remember
that and then I'm going to think later, what was that that I saw? Look at these little
ones here. Love that. I'm just not going to
remember. I like the size. Sometimes I will
just go ahead and purchase what it is I'm
looking at that I like, and then I can use it for ideas
and I can use it for art, but this is pocket cards
by the Tim Holtz ideology, and those are super fun. We can slip those in those
little pocket things. I really love this. This is velum envelopes of
our recollections. I love about this is I love
the idea of envelopes and pockets and things that
maybe I could stuff stuff into a little
book or something. I'm feeling like this is
going to make its way to a page that I could either glue it on top and I
could stuff stuff in it. I could cut I really like
the closure on it though, but I could cut the tab off if I wanted to just
be able to slip stuff in. I could also that could be the
center of my signature and this could be a lip
that just comes out on the other side when we get to
it as we're flipping pages. That could be something in the signature that I could
then stuff stuff in. Giving you some ideas here. If you've got some
old envelopes, those are excellent for
something like that. I am going to now decide on and cut up and make
these into a signature. Let's just get started
now that I've given you tons and tons of ideas
of what we can do. I've also, I've got an
interesting idea for, I'm going to cut this in half. Actually, I think I'll get my paper cutters that
I don't mess up here. I've also got an
interesting idea using some grommets
for the clasps. Let's just go ahead and you start your gathering and
stuff and getting ideas. I must have a dull blade or it's not all the
way in. There we go. There we go. I might need to change the
blade on my cutter, and I use those
until there. Did. A, I'm going to use the in different spots
of my signature. I'm going to go
ahead and fold them. Then I'm thinking, I really
love this right here. What I could do is I've
got a gilletine cutter. I might guillotine these
to the right height, and we'll see if that works. I think I like this one. I wonder if I can cut this. I might have just
been the old paper that got stuck, but
I want to cut this. Oh, it's a dull blade. Maybe if I flip it around. Going to have to
hunt out the blades. I've got some. They're
just going to be hiding. There we go. Good enough. Now, the nice thing about
using a piece of art is the backside is still going to be something
that you can use. I like that. Definitely going to have to change the blade
out. We will do that. Some of these still bleed, so I got to be careful. These reactivate with water. So I don't want to get them to I don't want to get
them wet. I'm thinking. So no sweaty hands. Thinking in the center. Maybe a piece of
watercolor paper. So where did I put
that? Right here? Once you pick out all of the ones that you think
you're going to use, then you can start
assembling stuff. Then you can decide on how thick you want
your piece to be, but it can't be so thick that it doesn't fit into whatever you've decided to use as your
journal because basically, we're going to get all the we're going to get the
signatures made. Something like this would
be a one signature, I believe because
it's already got one big fold that's not wide
enough for two signatures. Just need to decide
what all do I want in this signature
before I sew it in. Then I'm going to use
that on the back. I love it, and I might
put something here on the front because why not? We'll see. That's definitely
what I'm going to put there. I just need to
decide, what else are we putting in this
little journal? I have my rip ruler here, if I've got something
with a jagged edge, I could go ahead, tear that
to something a little nicer. This is something that you
can make 1 million of these. Just continue gathering
and collecting. I'm going to leave
this one edge jag cause I like it.
That to the side. Kind of centered there. I also had some canvas here that I pulled out that I
thought was pretty cool. That could be something
that fits into a pocket. Yeah, you know, also, I
wanted to use one of these. So let's pull out
these envelopes. These are shiny though and feel like antique
ones would not be shiny, but I'm just going
to pull one out. This is the mini file folders. I'm going to use it
anyway because I like it. You can take two index cards
and wash tape them together. That's another thing that
you could consider to wash tape on some of your pieces. It's very thick. I
might use it anyway. Then I really like this one. The fun thing about something
like this is basically done with a little extra
painting, maybe. That's fun. If you don't like
white paper like this, but I wanted some I could paint. But if you don't
like white paper, you could tes stain
some of these papers. That would be. Good. I'm feeling pretty good about this here. I need to decide. Do
I want this to just be hanging out on one side or do I want it to
be able to close in here? Because I could
attach this to say one of these and I could
put something in there. I could put it at the
bottom of a page. That would be fun.
I might do that. Do I have enough pages? I've got one, two, something in the center, three, four, a short one. One, two, three, four, five, six, seven, and an old paper
in the middle is eight. Maybe I'll do another
watercolor page in the center, and that'll give me one last
page to paint. That's nine. Is that what I want
in the center? All right, let's just think
about this for a moment. I'm fill in that. That's nine pages and our cover. Nine, so it's 18 pages and a
cover would be 20 is pages, and that's pretty cool and
it's getting nice and full. I'm thinking that's a
good amount for mine. All these other pieces
that I've gathered, I'm going to set to the side. Then I want to contain
this within our book here. I know that everything
that I need to do needs to be the size of this
watercolor paper, and then everything
else needs to go away. So I'm going to give this a try. I've never tried it before. I'm going to try to be cut
each one individually, but I'm going to try to just do this on my guillotine
cutter and see. We'll see. I might not work. But some of these papers are so thin that I'm hoping it will. All right, cross our
fingers. Oh, I worked. I love it. Okay. Let me flip it over so I can just
get this other side. And then Ara a ah,
look at that. Okay. I do love my guillotine cutter. You don't have to have
that to do this obviously. But that did just
make this nice and easy to cut these pieces, and then you can put
these little pieces in your scrap box and you
can keep on using them. I'm going to set
these to the side. I'm going to go ahead, make sure everything is in as
far as I can get it. Then I'm going to use
my bone folder to really if this flat. The reason I do it all together is because if you do
it all separately, then when they go in there, they tend to telescope out even further than this
is telescoping out, and I could trim these so that they're
nice and even in there, but I like when art journals have fun things that hang out. I'm leaving the edges there. I'm going to sew this
together first and then do some gluing of
other things and then it'll be ready for us later to paint in whenever
we get to this later. And you want to paint. I
need to see how big is this, and I'm going to go ahead and put a hole in the center and
then a hole on each side, and this going to be
super easy to attach. It's minimal sewing compared
to what we've done before. Here's the center, about 4.5. I think I'm going to put this at Maybe they're about an inch from each end. How about that? Then I'm actually going to do the same thing that I did on the big book and flip
this inside out. Try to keep everything together. But I'm going to flip it
inside out so that I can take my all and right in
that hole at an angle, I'm trying to get you do
it in angle because you're trying to get all the way through and come through
the center there. It's easier going in
at a slight angle, and then put this one here. Excellent. Then feel like we're
moving a little bit here. Try not to move it
around like I just did, but I feel like everything was moving and I just
couldn't help it. Let me get these
line back up again. There we go. We're lined up. I want to take a clip here for a second and see if I can keep
those from moving anywhere. While, I come over here
and I'm also going to put those same holes in my
cover because we're going to sew that
thing to the cover. I've got my ruler out and I'm going to mark it right where I
marked the other one. And we should be good to go. I probably could have put
that on there and did it at the same time, but that's okay. There's the one I
like for inside. Then I'm just going to poke
these right through where I just marked. Here we go. You can use any thread really
to bind this together. If you've got some pretty
colored DMC thread, that would be great. I've got some brown wax thread, but I think for this, I'm
just going to use on my desk. Here's a pretty brown. Might be easier just to use a little
piece of ribbon even. Let's do a little piece
of ribbon actually. Let me go grab some ribbon
and I'll be right back.
10. Art Folio Book - Assembling Book: Changed my mind. I was actually thinking like a piece
of twine like this, but I cannot find my spool of twine that I had.
It's a good idea. I did find some ribbon, but then I thought that
book is not going to lay flat if I actually
used this ribbon, and I wanted to be a little
flat or like a book. I'm going to go back for the
moment to my original idea using my waxed thread because I have it
here on the table. Then for some other art
books, I might get ahold of. I even like this cotton string
that's on that envelope. For some other art journals, I might get ahold of some stuff like that and just have
it here in my art room. E years ago, I did
plenty of sewing, but I don't really do
the sewing so much now. I'm just going to cut some
About the length of my arm. We're going to not
use all of it. We don't have to double it
because it's not a huge book. But I do want to at
least string it onto a needle without it
pulling all of it down. I'm going to use this as a single ply basically
instead of doubling it. But I need to get it on
the needle to start with. You don't need to even kn this. I'm going to start in the center and hopefully all my little
line you're still lined up, we'll just have to
may have to go into each layer and find where
the hole might have moved because I feel like I
was moving it as I was going, if you have to, just open it
and go through each layer, and then the next two holes will be easier
because they're line back up. There we go. Got the m all in there. Now I've got everything right
there in the center hole, and I'm looking for the
center hole of our book, and I'm going to come right
out of that center hole. I'm just going to
hold this much. I'm just going to
hold it out here. You can see we've got
extra twine on here and now I'm going to come in
to the top hole and I may have to do the same thing and just find each
hole in each layer. If you have to do that,
it is what it is. Don't worry about it, do it. Find that hole and then
here's the water color. Then the things that
are shorter are obviously not going
to be in our, here we go top and bottom
hole, but that's okay. Then I'm just going
to pull it firm, but I don't want to pull
this any further out, but I do want to pull it
down and I want to go back into this hole and come
out the back side again. Now we are going to be looking to come in
the bottom hole. Still going to have to
search out the holes. If you've got different
thicknesses of paper and stuff. I'm doing my best not
to catch that thread. I don't want to
catch that thread and hook that
thread. There we go. I just want to come
clear of that thread. There we go. I actually want to be on the other side of that. It's going to be a loose for
a second, but that's okay. I'm just going to pull it inside very gently from the outside, I'm just pulling it very gently. Then I can pull this thread that's hanging out
to get that nice and e. Now we're ready to come
through this bottom hole. All right. I'm just going to open these up again
and find the holes. Oh. There we go. Okay. And then I'm just
going to pull that nice and even on the back side. Look at this. Now, we're
just going to loop our thread under the
existing piece that's here. And we can tie this off. But I want to make sure I've got everything and I
want it super tight, but I don't want any
weird loose thread. I'm just going to make sure I've got it all where I like it. I can get rid of the needle. Now that I've looped it
underneath that one, it's got a nice center here, and we're just going to tie that off and knot it and you can
double knot it if you want. Here we go. You can
leave these long. You might cut them
the same size or you and you can put charms on them and they
can hang out the bottom. You can cut them shorter, which is what I'm going
to do and it's just going to be in the middle. Now I am ready to add any extra decorative bits
that I was thinking of. I was thinking of
this back here. I do want to trim that.
I know my blade is du. Let me go get a new blade. I'll be right All right I
think I've got the right one, it matches, the top matches. These just pull off of here because this spreads
a little bit, just pull that off and
get rid of the old one. The new one will have a
little plastic protector on it and just slips
right back on. That's how easy
these little fiscer cutters are to
change the blades. Now, I need to trim
this, I need to decide. I think I'm going to cut I
could cut it off the top. But that pushes that one
down almost too far, I want there to be a g. I think I'm going to cut
a little off of each. This right here is nine and
almost nine and a quarter. I want to cut this one I think I want at least
that much showing, Let's just cut that
little bit off. I'm going to cut a
little bit off the top. There we go. It's even there. That's what I wanted and
it's the right width, I'm not going to
worry about that. Then I'm just going to take a glue stick and glue that in. This is just a U
stick from **** Blue. And I just want to get
it attached in here, so I'm not wanting to get out
the big glues or nothing. I just want to get that
set the glue stick. Sometimes glue stick
is easy, easier. Then Here we go. I think that's where I want it. Now I've got the back on here. I also want to put myself an envelope in here where
I can slip stuff in. Look at that. Oh my gosh. Best to ever. So we're going to give
that time to do its thing. I really want an
envelope in here, so I can either put an
envelope on the front. That would be fun. Let's
do that. I'm feeling that. Then I could slip
stuff in it maybe. I could put little
treasures in it, or I could do it in the center, but I want to there. I'm just going to
glue stick this into the center into the front page. Sorry. I hope that's not going to get in
the way of my idea for my clasp, but I
don't think it will. I'm just going to get that
as far down as I can. I love it. I love it.
I love it. I love it. I'm almost thinking that
it could almost put a piece of art with the
color thing in there. That's a fun option. If I just trimmed a
little off of that, h. I'm going to sacrifice it. This P always say, what do you do with the art? What do you do with the
art? I'm like, I save it. I might need it for
something else. Here we go. I'm using some of all the
things that I have just stored. This might be the
wrong cutter for this. It's not going all
the way to the top. This might not be the
right blade. But it is. Close enough for me to at
least trim some off of here, so I'll have to look
and see what I've done, but I'm going to put
it in the middle. All right. There
we go. This might go to my other fiscers cutter. You can buy the cutter and then several blades when you buy the cutter and then you know
you'll have the right blade, but I have a couple of
these fiscer cutters, and so that might
be the one that goes to the other one I have. I'm actually just going to slip these in to this
little envelope. I love it. That's a
beautiful piece of art. Look at that. I might
just like it like that, but then I like that this
has the color palette. I want to just see the art. Maybe I'll save
the color palette that goes with these
for another something. Then we can just
close that up lovely. The idea that I had, let me just let that dry a moment
while we're talking. The idea that I had
for the cover is to put a grommet right here in
the middle and then ribbon. Then I can wrap
ribbon around this. I did pull out a piece
of velvet ribbon. I got a whole bunch of ribbons fabric store
and I just have strung up and hanging on my bookcase over here
for projects like this. Look at this. This is a
little velvety ribbon. These came from the hobby lobby. But now thinking can be our little wrap for coming
up through the grommet. It'll make us a little rap. I'll stop right here
like that'll knot it and we can wrap it around. Thinking like a little longer. Or I can it like
that in the grommet, and then it can wrap around
and then come out like that. I'm thinking that. All right. Let's put a gramme
in it and then we can decide with the ribbon. I have a gramic kit, I actually ordered
another little gramic kit but hasn't come in, but this is a gram kit
that I've had forever. Got it at the hardware store, general grommet tool kit, and this has the grams. This is probably half inch. That's probably three
eighths of an inch. I'm thinking this size
for this size book. Then this has a block of wood
in it that goes under here because it's like what
you're going to need a hammer the gram and
the grommet tool. This is the grommet tool. We need to make a hole first. I've got that envelope
to about right there. I need to be under the envelope. And I want to be
about right here. This little tool has something
sharp at the end here, so we can get it where we
want it and we can take our her and hammer that hole in because this
is the whole cutter. There we go. Now I
got my grommet hole. That's your gramt cutter. This is what the gram sits in. We're going to put
that underneath and feed that right
through the top there. Unless you want this to be the top, that
might be the top. What we need to do is flip
it open. There we go. I've still got this sitting on the piece of wood just protects the surface. There's that. Then this piece is our gram
thing that we hammer onto. I'm going to attach the little
grommet wheel for this. That's the wrong size,
that's the bigger one. I'm going to attach
the smaller one. Then we're not hammering
on our finger gives us extra extra room there. I've got everything lined up. If you're looking through the
side, you've got the wood, you've got the metal
grommet holder that's holding the top of that, then you've got the
grommet coming through the hole and then
the grommet tool. There we go. One side
is the correct side and the other side is the bigger
side, on the correct side. Every gut kit will be
a tiny bit different. Actually, the one I ordered
has a hand squeezy thing, but I don't know if my hands
are strong enough for that, but I thought maybe it might be nice to play and try it out. Once you get that in the
place that you want it, I think I might have
used the wrong tool. I might have should have used that smaller cutting tool now that I'm looking at
the size of that hole. Let's see. We might just
have to use the big grumt. I should have got
the smaller cutty. Yeah. I use the
bigger cutting hole. We're going to use
the bigger gram, is a big grumt, that's okay. I have a big grumt. That's okay and it's
higher than my envelope, but that's still going
to shut it for us. It's got to be the
right size hole for the right size grommet. Now I need to get
that right size. It's been so long since I've
looked at the gram kit. I should have
played. There we go. Now we're ready. Now
once you've got it all lined up and
everything's ready. You're going to
hammer the tar out of it. That's really loud. I know, but it makes the perfect gromt hole
when you're done. It's nice and tight, it's firm, it's in the right place. That's how easy it
is to do a grommet. Really you just got to get all your right
pieces out and lined up. That's the part that might be
the most confusing is pick all the little ones
for the little one and all the big
ones for the big one. But that's okay. In the end, that's
what I wanted. Everything's taped in. My glue bits should
now be secure. I could continue gluing
other things in here. I might put some
other envelopes. I might come back and
paint the white pages. But for the moment,
we've got everything in here and attached
looking super cool, and I paint something big
here in this piece here. We have all the interesting bits that we've gathered
to look through. Oh my gosh, I just love this. Got our fun little
extra piece flap here. Then you get to the
end and you've got this beautiful back.
Super pleased with that. Now I just need to
decide because what I'm going to do is I'm going to go up here like this and then pull the ribbon through
that to lock it in. I just need to decide,
do I want that double or do I want that single? I think I want to like that. I'm just going to
cut it. Let's just do it correctly now. Okay. Now, I'm going to have a
little leg hanging out here. I'm going to pull
this big long leg through that loop I just made. Now we've got ourself a nice, pretty little attachment
there that holds it, I can now loop this around. If I want, I could
use this to tie it off because I left
a little leg out here. Thinking I like two loops, and then I might want to trim this to the same length with the two loops.
How about that? Then this can be a little tie off on the front because we've left ourself a little extra ribbon
and we could tie it off. Look how pretty that
is. Oh, my gosh. We're going to call this
a bits and pieces and scraps folio with a
little ribbon tie. I've used a fun vintage folio for photographs as my
cover, which I love. Then we've got some
secret pockets inside. We've got some pages
that we can paint. We've got some yummy pages
in between that that are decorative and
pretty that we could add to or leave
them as they are. Super fun and easy way to make a journal and gather all the fun pieces and scraps that you've
already created. If you don't want to
paint in it later, you can get all painted
pieces and old papers and fabrics and make it all complete when
you sew it together. I want to work on it some more, so I do like that I
have given myself some space and a few more things that I could be doing in it. Then we can tie that off
with our pretty ribbon. Hope you enjoy making
the little artfolio, and I'll see you back in class.
11. Vintage Book Cover Art Journal - Supplies: Okay. For this vintage
book cover journal. Just going to tell you
here what supplies. I'm going to go
over these more in depth as we're creating it. But you'll need an old book, and so I'd probably hit
the T thrift stores and look for books that have just a pretty cover that
maybe you could work with, it could be plain, it could
be a book you already have. I like the thrift store because usually just
a couple dollars. I go to the antique
store and you can get tons of books
for a couple dollars. I do look for some that maybe aren't in the
best condition. I don't want a first
edition obviously. I want something
that I don't mind. Trashing and re imagining
into something else. An old book. You'll also
need some type of glue. I'm using the acid
free tacky glue, the PVA glue is also the other glue
that I use with books. I want the acid free. If you get the tacky glue, acid free, that way
it doesn't yellow, and it stays good for the life of whatever
you've used it on. The PVA book binding glue is already acid
free and perfect. I also like using a glue stick. I look for acid
free glue sticks. I got some of these
at the **** Blick the other day and they don't
say one way or another. They may not be acid free. But I do like having
acid free glue sticks or a glue stick personally
because it's easier glue and papers
sometimes with a glue stick. I may or may not
be using this one. We'll see. Then you'll need
your book binding kit. Obviously, you'll need
some waxed thread or whatever thread that you're choosing to sew your
signatures with, you'll need your all. You'll need your bone folder, and you'll need your
book binding needles, which are gigantic embroidery
needles basically. I just have my little $7 kit from Amazon that's become
my new favorite little kit. It's fantastic. There's
extra stuff in the bag, but those four items that I just showed you came in that kit. Then another thing
you'll need is whatever paper that
you're going to be using for your signatures. I've chosen a watercolor
paper in this journal. I think I might have
used the Kanson one, but Ha Muy is another
one that I like. Whatever your favorite surface is that you want to create with. You could also make these
mixed media papers, like we did in the other books with some vintage papers and some watercolor papers to paint on and you could have some handmade
papers in there. You could really just doll up in any way that you feel
like working today. Then I like having
a velvet ribbon. I did find some velvet
ribbon at the hobby lobby. This is a great width. Let me tell you what this is. This is about an
inch and a half. Is the size of that. So
about an inch and a half. Width, not the super
thin because this way, you have a nice ribbon to
wrap around and secure, and then you could put a really pretty decorative bobble
there if you wanted to. I was thinking like one of my
grandmother's old pins with the costume jewelry
pins that they used to wear on their
lapels that were so pretty would be a
pretty addition. I've also used on
here a piece of antique lace just as some extra
decoration. I loved that. I also became a
little pocket ssh for maybe some pieces of
art here that you could put on the outside
of your journal. I might even go back and glue
the bottom of the lace to make it a true pocket so that these don't
slip out the bottom, but for now it's just tucked in. That is the basics of how I'm creating my art journal
from a book and then these will be pages that I
can paint on and draw on and I can collage on because
I've got the ribbon here, I can just tuck it
closed after I use it. And I love this little journal. I also want to say, you might need a little bit of some book repair
tape if you have a particularly delicate spine when you separate the
book out of the spine. Book repair tape is fantastic. You could probably also use like a masking tape
would be okay, maybe, but this stuff super
sticky and cloth feeling, so to be flexible. I do have some book repair tape, which I'm going to show you in a separate video how you might repair a binding
before you sew it all together because
in the actual project, I didn't do that, but
I did mention that. I want to show you
how you can do that. All right. I'll
see you in class.
12. Vintage Book Cover Art Journal - Reinforcing Spine: Okay. So in this video, I want to show you real
quick how we can repair a binding if the binding
is just too delicate. And so this is a super delicate. The paper is brittle. It's breaking away. To cut the binding, I just cut the very first page
away from the spine, and then I have the
book left over. And I showed you in the video where we're
making our actual book. I showed you a whole bunch of inspiration books that I've had for photography props
that I did not make, but I purchased because I loved them from an antique dealer that like to decorate the books and
they made beautiful props. Well, the piece that
you take out of here, you can make into some of those delicious examples that I was showing you.
Don't throw this away. This is good stuff. Then We just want to clean
out that spine, just get rid of all
that dust right there, and then we will be ready
to repair the inside. This is super thin.
It's very delicate. I do have a feeling
if I were poking needles and sewing into that that I could run into a problem. This is where the book
binding tape comes in handy. You're not going to
see the inside here because when I created
our journal in class, I like to take the
very first page of my signature and use that as
my inside book cover here. You never see what's
underneath there or the spine. But if you don't want to see it hanging out the edge here, then you might come to about within a quarter of
an inch of the book, bottom and top, and basically
what I'm going to do. Is cut myself, a piece of
tape about the right length. I saw the book binders tape in white or black,
the repair tape, but I'm sure comes in
other colors because you see it on the
outside of books. A lot of times that's how
it's bound on the outside. You might look around to see if there's any colors that
you particularly like. I'm going to fold this
in half sticky sides like that and get it
positioned where I want it, and then very carefully work my way to the outside
of the book there. So that I'm making it
where it's still flexible. Now I've got an extra layer in there that's going
to protect the book. It's going to give
me something to sew into without it being
just the spine itself, and it's super sticky. Once we sew our
signatures in there and then we glue down
our face page here, you're not even going to see that and it's going to give you the extra strength
that you're going to need on a particularly
delicate book. I probably should have
done that on my book. But I didn't, but
that's how you do it. Now, you want to
do that before you punch the holes and
before you start sewing. Once you pull the center out, go ahead and secure that. If it's a book you love and
you're just trying to repair. That's how you could
repair that and then just glue a face
page back in there, and then your book is repaired. You could actually repair
an old book in that way. I just thought I would show you book repair and
book repair tape. I'm actually maybe going to
look and see if that comes in other colors for myself. It could be book repair
tape, book spine tape, some type of book tape just to see because the whites fine, and it's covered up completely like you can't even see
that I've done that, and it came in black, white
might be a better choice. But that's how we're
going to repair a spine if you need to. If you buy a really
delicate book or you just want the extra
strength in there. I'll see you guys back in class.
13. Vintage Book Cover Art Journal: This next art journal
that we're going to make, I want to show you where my
inspiration is coming from, and then the take that I'm going to do on this
because I actually want mine to be a journal with
papers in it that I can paint. I think that's
what I've decided. But I wanted to show you
some of these that I did not make that I collected
over the years, and I used them as
photography props. These are some of my
favorite possessions. I wanted to take a play off of something like this
to maybe decorate the outside or the cover perhaps or just have
some pretty ribbon or things that tie around it or just give you some ideas
really since I have them, whether I actually do any of
these on my own book or not, I wanted to give
you these ideas. These are old books that
are still old books and they're just made
for decorative purposes, I guess, but I used the
most photography props. But I really liked this one, it has a couple pieces
that are sewn together. And then just sat
on the top with some string holding it together and look
how pretty that is. That's one good idea. Another good idea is collecting like old locks and
things like that. I have a bunch of old scutchons and things that went to doors and keyholes and
stuff like that. I have some metal pieces, and I think I even
have a few locks like this that I collected
as photography props. I'll have to look
through my sash and see. But this is just a collection
of a piece of tissue paper, an old piece of a book
cover, piece of music. There's a piece of
fabric under here, and then just a little page from a book that was maybe interesting or
had some meaning, all tied together
with some twine. Lovely. Love that. This one is super
cool because it has a lovely wood piece that
is tied on to the edge. Then an old piece of
lace piece like canvas, like a stiff canvas piece, I guess that's painted. There's a painted piece of
a canvas or a painting. And then a poem by Ralph Waldo Emerson
saved in there and it's all tied
together by twine, so it can be taken apart with the pretty wood at the
side on the spine. That was super fun. Again,
it's still the whole book. It's not a journal, but these are just so inspiring to me. This has an old keyhole piece of paper that has been cut
into the shape of a feather and some old canvases
just on the front of just an interesting
looking old book tied together with some string. This one I love, it's
got some old jute and lace with a string
and it's got a couple of feathers and this
beautiful decorative piece that might have
been an old earring and footprints in the dust. An interesting word
tucked in there and it's just a little stack of books that don't have
the covers anymore, but I really love that
one. It's so beautiful. Then this one I
love. This one is actually a little more
along the lines of, I would say junk journal because it's got
papers and things stuffed into the
side that you could then use for junk journaling. It's almost like they
intended you to take this apart and use the book pages
or just as a decoration, you could have the book pages. Se now this was coming apart.
How interesting is that? Let's just take a look at it. We've got an old book
cover. Love that. Piece of ribbon
holding it together. Then inside, just lots of
papers stuffed in there. Old papers you write
on, there's some music. Some of this, I could pull
out and use and other things. Just scraps of papers tucked in. Then this is a piece
of burlap that has looks like spacing
on it or plaster. Then a lovely pin that
holds an old stamp and maybe some interesting words and then it was just
on here like that. That is super cool
and really easy and you didn't have to
deconstruct a book to do it. I have a couple
of old books here that I'm actually
going to deconstruct. I have a whole pile
of books because I use them in my photography and I collected
them for a while. I'm going to sacrifice one of these that doesn't
even bother me a bit. Some people are like, No, don't sacrifice books, save the books and
stuff like that. But I don't mind
sacrificing the books. I love the title of this
one love and Liberty. A thrilling narrative of the
French Revolution of 17 92. Well, that one's
actually in English, and I could read it. Some of my books are
in other languages. But I really like
the ones that have the decorative cover covers. I have not paid very much for
any of these books at all. I use them in photography
props for many years now. I love this cover, and I'm looking for
covers that are fairly well. Not falling apart. They're still in
fairly good condition, and I could basically cut
the page out here and pull the glued book part out and use the cover
as the journal. This is Lucy's half crown. This one is Poke. I swear that's what it says, POP, E N D, Y KE. Maybe maybe that's the author. Mr. And misses Spoop and ****. I guess there is an e
on that. How funny. I don't know what
this book would be. The 15 puzzle preparing to
enjoy themselves, Anabel Lee. Mr. Spoopen Dike of Clinton Streak is one
of the most cheery, cheerful gentlemen in Brooklyn, and his wife is the
soul of good humor. Maybe this is a
fiction book to read. Maybe I'll keep that
one and read it. I'm feeling like I'm
going to sacrifice this one because it's
already fallen apart, so I don't feel like super bad for continuing
to take it apart. It's in fairly good
condition on the outside. I think it's even coming
apart without me trying. Let's go ahead and
deconstruct this. And you can get old books
at the Thrift store. They're fairly easy
to find and get something that's not interesting
that you're not afraid to sacrifice and just go for it. I'm just cutting the end
page here and that's just letting me separate
that from the book section. That's all there is to that. That was pretty easy.
I'm going to use this as my journal cover. Then just whatever that dust is. We're going to sew
some signatures. I'm going to use a
watercolor paper because I want to be
able to paint in this. You could use art that
you've already made. You could use old papers, like we did in the art folio. You could do a variety of
papers and handmade stuff. I feel like I want to
have watercolor paper. You could even do T stained papers if you wanted
to t stain papers. I feel like I want to do watercolor paper
with deced edges. I'm either going
to pick a favorite watercolor paper
that I like to use. I could go ahead and do that because I'd have to
cut this down anyway. I could use my deced edge
ruler to cut these down. And basically, I
would cut that size. Or that size and I wouldn't
even have to decal, I wouldn't have This right here could get me two of those. I think I could get me
two of those. Let's see. Yeah, I could maybe
not quite two. Maybe if I made them a
little s, here we go. Yeah. This size paper is 140
pound cotton paper, ten. I smidge over 10 " by
a smidge over 14 ". It's 26 centimeters
by 36 centimeters. This is 12 sheets. I don't think you can get the Canson Heritage paper anymore, but I had a bunch of pads
from when you could get it, and I just saved them. Just hoarding them in my closet. Now, I feel like this is
going to be the moment to use these and Because
they're all flat edged, I might just leave
them flat edged because I wanted to use
this in one of these books. This might be the time
because now I could cut these in half and
make pages out of these. I'm thinking that we might
need to have 33 in here. Let's go ahead and I'm going
to cut these pages in half and judge if I've got
enough, out of this one pad. I'm thinking the one pad. If I do six sheets
in a signature, if I say register, I have
register on the brain. Just know every time I say
register, I mean signature. If I have six pages
per signature, and I've cut this in
half, that could be That could be nine pages
that I'd use out of here. So I wouldn't even be
using a full pad of paper and I think that would
definitely be thick enough. Let me pull these out
and I'm going to cut these in half and
I'll be right back. I have cut nine sheets in half. To give me three signatures with six pieces of paper in it. Now I'm going to fold
these in half and I'm not going to fold them
in half sheet by sheet. I'm going to fold it in half the entire register signature. See, I caught myself, but the entire signature, and I'm just going to take my bone folder and I'm
standing up so that I can lean hard on that
and make my signature. Now if you did it one by one, you see how this steps out, it's going to step
out no matter what. But if you do it
one by one, they step out way further and they don't fit inside each
other very well. Okay. Here's number two, six pages, and I may take a page out, but I'm thinking six.
This is thick paper. This is like the crim
de la crim of paper. On the bigger books, I was using that cotton cody paper
because it's affordable, it's good for mixed media. It's going to do everything that I generally might want
to do in an art journal. But for this littler book, thinking I want it to be
a paper that I love love. Lo I like the cody paper, but I don't love love
it. Let's see if two. Let's see how full this
makes us right here. Now I can see that two might be plenty and
three might be too much. I'm going to fold the
third 1.5 just to see, but we may be doing the two. If we just do the two, then I
can make a little mini one. Like I did that art folio, this one here that we made. I can just get a cover and
sew that in there with maybe some handmade paper
and make a mini folio. I'm not afraid of
just going ahead and seeing what we're going
to be using there. Let's see. Can we fit a
third or is this too many? Let's just see. Well, I can fit a third, it's definitely going to have paper hanging out at the end. Then I have to decide,
does that bother me? I don't think it bothers me. But you could always trim
those up so that they're completely even and have
them inside the book. That's a choice,
but I think with an art journal because we can tie this off with ribbon and do some fun stuff, like
them hanging out. I just need to decide,
was the two enough? Or maybe if I took a sheet out, maybe it's five sheets
instead of six, and I can use this
extra sheet of paper in some other project. Was that a better fit? Just look and judge
until you're like, I think that would be it. I do think that's
it right there. I've got just enough
covering in there. I think I'm going to
do that right there. Now what we got to do is we
have to punch all our holes, and I'm going to attach these in the same way that
I did the art folio, where we are going to tie these off in the center of that. It's going to be
super easy to sew these and we're going to have some lovely yarn or
thread showing on our spine. Let's just measure
these out and make them and get our
holes punched here. I've just got a ruler, and
I'm going to these are 7 " in length because
remember that was 14 " was the paper,
it's about seven. I'm actually going to it's seven in a line if
you're doing inches, but we're just
going to say seven. About 3.5 would
be in the center, then I think I want
to come on down here within an inch of the end. Then I am just going
to hold this ruler up. I've got a baby ruler. Where did I put it? I'll
just hold the big ruler up. I'm just going to set the
ruler down on my table and draw me a line up the side here so that these are all marked in
the same place. Then I'm going to mark
this on the book also, exactly where I want
these to sit so that I'm getting this in the same spot. So what we could do. Let's take our ruler and
just draw a line in here. I don't think that last
line was straight because I was leaning to the side.
Let's try that again. Now I got a line. I know
I'm going to have to have three holes signatures. Thinking like, if this is, This is 1.5 ". I'm thinking three
eighths of an inch from each side and then
in the center. That's where I'm going
with that. I wonder where. I'm just going to
draw myself a line. If it's exact, it's okay. If it's not exact, it's okay. I just want to give myself visually where I'm going to
put those. I wouldn't bide. Then we're going
to take our all, and we're going to poke a
hole right in this cover. This covers delicate. I'm just going to be careful. But it's no more delicate. I'm thinking than handmade
paper. It's just old. I've got a whole punch in
every spot that I've marked, and then on my signatures, I'm going to bend
them backwards. And then at the center part
here, go in at an angle, just like I've done in the other books that we've created, so I come out on the spine. It does get easier
with practice, punching these holes and getting
them in the right place. If you don't get it exactly
in the right place, don't fret, but see all three of those came out in
the correct place. Then I'm going to fold that back and do that to the other two, and then we're going to
sew that into there. Now, I want to make
sure I've got them in order because I get
these out of order, and then the lines don't add up. You want to make it in the exact same order that you did it. If you're like me and
you can't keep track, go ahead and put a number even before you punch
those holes, maybe. And then just take a look at where we are
lined up in our book. Excellent. I'm going to use the waxed thread that came
with my Amazon book kit. I'm going to get a needle out. These are the book needles. They're just gigantic
embroidery needles, I think. You don't have to double
this if you don't want to, so I'm going to do a
single thread because it's a n heavy duty thread. We've got plenty of plenty
of strength with that. I'm going to give
myself enough length. We're going to sew each
of these in separately. I'm not going to attach them like we did in our big
book that we made, not going to punch a hole. Sorry, not going to tie a knot. Thinking as I'm
going, here we go. What I'm going to do
is go right through the center hole of
our first signature, and I'm going to
pull it till I've got just a tail hanging out here and I'm going to go through our hole in our book of where
this is going to go. This one, we are
actually sewing it to the spine of the book. You want to find a book
that you think can hold up to a little
bit of wear and tear. I don't plan on abusing it, but you want to have a
tiny bit of strength. If it doesn't have
enough strength, you might wash your tape and really strengthen this
up, which I could do. I think I'm just
going to go for it. I'm going to be on the
outside of the book. I came out the center hole. I'm going to go up to one hole
that's up here at the top, and I'm going to go ahead
and come through that hole. Pull it taut. Don't do it too
hard because again, these books are delicate. Then I'm going to
go right through the top hole of our book. Signature. There we go. Now I've got that one. I'm going to come back through
the center hole. I'm holding the thread out
of my way a little bit because I don't want to grab
the thread accidentally. I'm going to go through
that hole again. There we go. Then
I'm going to go through that hole again
on the book spine. Coming out the outside. I'm not too worried right now about everything being tight because I can tighten
it in a second. Now I'm going to come
back through the hole right down here at the
bottom that I've prepped, and then I'm going
to come through the bottom hole
in our signature. Here we go. And I'm
going to hold that. Then I'm going to
make sure everything now is tightened up. On the outside. I to make
sure I've got all these where it's just making a straight line out here, just like that. Then I'm going to take
this thread here and come right through
our loop up top and that's going to give me a
little bit of strength and then I'm just going to tie this off
a double knot right there. I'm just going to double that, and then I will
clip our threads. You can leave these long or you can leave them short,
your preference. Some people leave
them long and then tie lovely little charms on
it that hang out of the book. But there's our first signature attached to the book spine. Now we're going to attach
book number two in the exact same way
coming through the second hole
there on our cover. And then we're going to attach
number three the same way, going through the third
set of holes on our cover. See where we're
going here, right through the middle and
leave myself a tail, and then through this
middle hole on the spine. Again, being just trying to
be careful with the spine. You could reinforce the spine
before you do all this. Now I'm going to
the top hole and top hole of the
book. There we go. Another thing that I
can do when we're done, I can actually glue
down this first page of the signature here to give that extra strength
attached to the back there. That would give it some
extra strength, also, which I might do
because I actually like that first page glued down,
but you don't have to. That's just an
option if you've got a more delicate book that you're working with and maybe
you didn't reinforce it. I did not reinforce this one. Thought it would be
okay, but it is a little bit delicate and
that will take away. I'm going right back
down through the center of the paper and
back down through the center of the book
to get to the outside of the book so that I got that
other line back there. Excellent. Now through the
top hole at the book and the top hole of our signature. Then we're going to tie it
off just like we did the other one. All right. Let me get that tight. Got some loops in here. Let's just pull that
tight here. Here we go. I don't want to pull it so tight that I'm going to
tear something up, but tight enough that it's just making a nice
line there on the outside. Again, I've got this pull my needle off, but
I don't need it. I've got this loop up here and I'm just going to run this thread under that loop. Make sure it's all pull taut
and we don't have anything weird on the outside.
This is the second one. Yeah. Then we're just going
to tie a knot, a double knot. And then trim legs here. Now we got two signatures in and be careful and you
got your third signature. Get a piece of thread. Then the third one in. We got number three. Are we
still the same direction? Yes, we are. Now I'm going
in to the middle one, and I'm going into
the last hole in the middle on the book cover. I'm leaving myself a
little tail inside. And we're going to one of the holes on the
top or the bottom, whichever way you're going. And then through the bottom
hole on our signature. And then we're coming up
here and going back through the middle hole
and on our spine. There we go. So now
we've got that. And then we're going
through the top hole and back through our signature, and then we're ready to
tie the third one off. I could have two many in here, but I've done the best I could. We'll just have to see what
we end up with. All right. Through the loop that we go over there and
then tie this off. T. Oh, now, I've got
three that are in here. There we go. Okay.
The third one. There we go. Little
loose on the outside. I might move on the
outside a little bit. I'm going to make sure
these are nice and squished down maybe with my bone
folder right here. Then I could put
these overnight, set in some heavy
books on top of it, that flattens it out
really nicely too. But to really strengthen this, I'm going to glue this
back page to that page so that I don't have to worry about it coming off
of our spine there. I feel like I could have
made this one tighter. I'm going to pull the knot
out of this one because I do see that it's tight. It's real loose on the outside. If you use the wax thread, you can pull the knot out. It's a really sturdy knot, but you could take
a needle and pull it out if you see that you're just having too much pop
out on the backside. There we go. I like that. Then I'm going to
glue those pages in, and then I want to
use tacky glue to make sure that it
really attaches good. Then we can decorate the cover. I'm thinking that I want to
ribbon enclosure, maybe. Like a big Of course, I could the front,
this is the front. On the back part.
If you decide you want a ribbon closure attached to the back that you can just
wrap around like we did. You want to do that
before you glue this page down on the back. This is the front and
it has a direction because I can see
the pretty cover. Do we want a big piece of ribbon that we can attach and then wrap around or do we
want a big piece of ribbon that we can just tie
around it and tie a bow? That's some interesting stuff. Let me go get some
ribbon and I'll be back. I have a whole ribbon spool of ribbon of different ribbons. I got at the hobby lobby. I feel like I want to use this pretty gold if I string all these from
this piece of ribbon, I have them strung
on because I have them strung on this and
hung on a door knob. If I string them, they're hard to get strung
back on this piece of ribbon. I just brought the
whole thing over here. I'm feeling like
because this book is such a lovely color that I think this color
would compliment that. Now I'm thinking, do I want
this coming out the back? So that it can wrap around like this and seal off like
we did on our big book, or do we want to
do something like This, just giving you some ideas here on how
you might do yours. We could do something like
this where we tie it off each time we've worked
in it and tie a big bow, and then that will
hold it closed for us. Just some ideas and you can work your bow a little better
than I just work that bow, but that's just to give you some ideas on how you
might close it up. Another consideration
is we could maybe glue some lace or vintage something
over the top of that, and then this could wrap
around on top of that. I feel like I want to
do the wrap around I might attach something
pretty and antique on here. I'll have to look in my
dash. Let's do this first. I'm going to leave
enough in there. I'm going to glue that
to the back cover and then come around a couple of times so that I can
tuck that right there. Let's just give ourselves
enough space to do that. Then we can put all these little ribbons back on the door knob, they hang on. It's a really convenient
way to do that. If you've got a bunch
of ribbon spools and you're like, how
can to store those? Let me go grab some
old pieces of lace. I'll be right back. I found a piece of antique lace that I used for
photography stuff. Feel like I want to
do this on the cover, and then I will have this wrapping around as an
additional decoration, or you could have
it go like this. I could have looped
it around before that dried and that could
have been inside. Now I'm feeling like, maybe
it needs to be inside. Is it stuck stuck? I think it's stuck stuck. It is stuck stuck. Maybe I will just loop it down and let it end or I
could cut it straighter. I should have thought of
this before I actually shut, glut before I glued
that page down. I might even just pull it off anyway because it's
not completely dry, but this tacky glue is tacky. Let's do this, where we want it? Let's get it inside there. Yeah. Then I will put some more glue on
that watercolor paper. But then I'll at
least have it in there and I can glue
this back down. Got so many ideas. This tacky glue dries clear, but if I get anywhere
I don't want it, I've got some baby
wipes here and I can just smooth that
off with a baby wipe. I do like that better that's
going under the cover. Now I'm actually
going to loop this around and let it
go up the backside. Now, I'm going to put
glue on the backside. I'm going to loop the lace while before I stick it down and then I'm going
to stick that down, but I also want to remember
to stick this down too. Don't forget this. We've got two things
to stick on here before we stick it to
the watercolor paper. I put a little glue at that
binding right there too. I'm going to stick the lace. Actually, I'm going to make sure that the book will close. I don't want to
stick the lace down. And then the book not close. Don't stick it too
far before the book. I'm going to make sure
I get this in there. Let me get this stuck a bit too. And I'm going to
get my bone folder just really smooth
that down some. Then I'm going to smooth that
front page down some also. I think I've got whole book page stuck to my bone folder here. I'm okay with the paper
sticking out a tiny bit. If you're not okay
with the paper sticking out a tiny bit, then just know it's
going to do that. I feel like I want to attach Maybe right
here on the back. I want to attach this
ribbon so that I can make sure it's always go
in the right direction. Yes, I think I'm
going to do that. I'm going to put some glue
right here on the spine. To get that to hold the lace
and that was way too much. I think that was way too much, but we're going to
stick it and see. Okay. I think we're
okay. Look at that. That's going to force it
to go the right way where I see the velvet
part of this stuff. Then because I haven't
glued this top part down, we could you guys. Let me just pull
that a little bit so that it stays and doesn't
do something weird. But we could take
some little piece of art or paper
or something that we can tuck in there as an additional little
decoration if we wanted to. I put all the little
papers away that I had, but just as an example, we had this little book cover, we had a poem and find some little piece of art or
something that maybe we love. I like, look at this. This is just a a random
watercolor thing. Let me just tear that
a little better. Worst tear job ever was heck. So pretty something
that we could then slip in underneath
that lace and it would hold those pieces
really cool for us. I also like that random
pin that was on that book. I might cannibalize that
pretty book and use that pin. Then we can just tuck
this underneath here to hold that if we want, or you could get a a
pretty decorative pin. I've got some pins that were
my grandmother's that have a pretty decoration like that old ear ring on that
one book I showed you. Some pretty pin attached
there would be pretty. I might go through some of
the old pins that we as my grandmother's and see if there's something pretty I
can attach there. Anyway, What do you think about an old book as
your art journal, picking the right paper that you want to use in
it and paint in it. Now I'll just know
when I'm using it, be a little careful
because this is an old book and I can paint in all of these pages and have a beautiful book to look at. You see the spine here. We just have to be
careful as we're looking and using that
book. How fun is that? Hope you guys enjoy
this project? I can't wait to see some of the yummy stuff that all
create in this class. I'll see you back in class.
14. Recap & Paper Prep For Painting: This video, I just want
to do a quick recap of the books that we
created in class, we did the great big art journal with some very interesting
different pages. We did the art folio and we made a journal out of
an old book cover. Just talk about what you
might consider doing to paint or prep your
pages depending on what types of papers that
you've put into your book. If you're doing the big book, and you use some type
of watercolor paper. That's ready to paint on just
like you normally would. But if you're using handmade
papers or decorative ones, then those aren't necessarily
ready to be painted on and I would prep
those pages with Gesso. I would use clear Gesso because then it will just
give you a surface to paint on without covering up the surface that
we have in the book. If you're using handmade
papers like I am, you might consider leaving
that page like it is. You could collage on
top of it and glue pieces on top of that and
let that shine through. You could flip to the backside
and just so the backside and paint something
on the back side while leaving the front
side be what it is. You've got some choices there. If you're doing something with a very heavily textured
piece like this, I would definitely
have some wax paper, kitchen wax paper
like deli paper. I would have some
of those handy. If you're going to attach
things on top of it like glue, some collage bits or
if you're going to paint and stain that paper
some different stuff. I'd protect the
page underneath it and do what I was going
to do and let it dry, and then you could pull
out the wax paper. I have a big stack of wax paper that I
always keep handy here in my art room for protecting other pages when I've
got some unusual papers. Now that's so unusual
that I might just never paint that or change it and I might paint this page and
I might paint this page. Then I might even like
cut this page to be a different size than it
is and do maybe shorter, I could do a little cutout. You all kinds of things that you could be creative with on a
piece of paper like that. I like having stuff like that in my book because
it's challenging. You have to think, Okay, what would I do with that? Then I've got some solid
colored handmade papers, I could use that for collage
work or I could just sew it. Then I've got papers
with some pattern on it. And maybe the patterns
on the one side, and it's really
beautiful and I might do a complimenting piece
here on the other side. But the backside is plain, so I could either just
so that and paint it, I could glue a piece of art
or collage on top of that, and then I could be ready to paint on the watercolor
paper beside it. You just have to be thoughtful about what the
different pages are. Now if you're doing a
book and you're afraid to mess up pages you might buy
a big sketchbook and think, I'm afraid to even use this because I don't
want to mess it up. Trust me. I'm right
there with you. If it would make you feel better to paint all your pieces, get the papers that
you want to use, paint them all and do
what you're going to do. You could leave stuff
like the handmade papers. You could leave that for work later once you've
got it in the book. But if you're going
to be afraid to even touch the watercolor pages, for instance,
because you're like, it's a big blank page, I
don't want to mess it up. Look how pretty my book is,
I don't want to ruin this. Then paint them first. And work them in your
book, already painted. This is a big
painting that I did. Then I went ahead
and just use that as one of my pages in my book. Look how gorgeous it is
on either side of it. It's one big painting that's in cut in half and you see half of it here and half of it here. You see how easy and
pretty that was, and more handmade paper that I could maybe leave
this like it is, got a pattern on it, but maybe
I could just so the back. That is how I would handle
pages in your big book. Pages in your little artfolio, This has different pages in it than what I had in that book. Pages like here, if I have
some watercolor paper, you could paint on
that like normal, the tissue paper,
which this is actually this wax paper stuff,
which amazingly enough. This is a dry wax paper is specifically what
this is called. I got a big box of it at
the Sam's club one time, and I still have it. It's a big box. But
amazingly enough, it's like a nice heavy
weight tissue paper. It's easy to paint on, and if you soak up say, paint off of a stencil
that you used. It's actually really
pretty runoff paper. That was a piece that I
could have just thrown away. It wasn't meant to
be a piece of art, but look how gorgeous it is. Save anything that
you do like that. I like that it's
translucent, like a vellum. You could paint the
other side of that, but I really think it's
beautiful like it is. And then handmade paper. I would just so
that. Again, this is another piece of tissue
paper or this wax paper. Old papers. You can
paint on old papers, but they're not really
made for wet media. I would just so this
with clear Gesso before you went to paint on it, and then
it would be ready. That's all the different papers that I have put in that book. And then the last
book that we made, I just put watercolor paper in. That would be just however you normally paint
your watercolor paper. Just be thoughtful about
what paper you use, and if it's made
for a wet medium or not, paint or what have you. If it's not, then
you can clear Gesso those pages before you paint
and you'll be good to go. I'll see you back in class.
15. Final Thoughts: As we wrap up our scraps to Treasure's rt Journal
bookmaking workshop. I hope you'll feel inspired
and empowered to continue exploring the endless
possibilities of creating your
own art journals. Keep experimenting with different materials
and techniques, and let your art journals be a space for personal expression
and artistic growth. Thank you for sharing
your creativity and stories with us, and I look forward to seeing
how your journals evolve.
 DENISE LOVE, Artist & Creative Educator