Transcripts
1. Welcome!: Hello and welcome. Have you ever dreamed of creating your own
watercolor use? But you're not sure
where to begin today? I'm here to introduce you to this inspiring and
rewarding journey of crafting your very
own watercolors, no more lifeless and
impersonal colors. Imagine the moment when you can showcase your artwork
and proudly declare. I created these watercolors myself and here's what I've painted using this unique use. My name is Aline Eli, and I'm an artist and a teacher. I specialize in semi
realistic landscapes, floral and botanical scenes, as well as abstract
watercolor art. I have a deep passion for
painting with natural pigments, and I create most of my inks
and colors from scratch. With this course,
you'll not only be able to create
your own watercolors, but you'll also gain
all the tips and techniques to work with
various pigments afterwards, whether you are
using ready to use ground pigments or raw pigments, I'll guide you
through the process. I'll explain what pigments are, the different types of
pigments available, the essence of watercolor
and its composition, and how to prepare your
own gum Arabic solution. I'll walk you through all the essential
steps to transform a pigment into a watercolor
you can paint with. Of course, I'll also cover the necessary materials
and equipment, providing you with
an easy to follow recipe for crafting
your own watercolors. Step by step, I hope
to have you join me on this colorful and
wonderful adventure.
2. Tools & Equipment: If there is one
thing that artists sometimes find lacking
its inspiration, when I began creating
my own watercolors, it sparked my inspiration. The act of crafting these colors made me
eager to test them out. This just goes to show how
inspiring this process can be. Towards the end of this
course will playfully explore and test these colors
to discover their shades. This will be the
basis of a project I encourage all of you to share. Once you've finished making
your colors through this, I'll be able to demonstrate some simple rules of layout and composition for this cause here are the equipment and tools required for
watercolor making. A glass muller or
a glass stopper. A glass ceramic or marble
palette or a ceramic plate, stone, marble or ceramic
mortar and pestle. One or two palette knives. Protective mask for fumes. Eye protection. If
crushing stones spoons, fine sieve three
glass containers, coffee filters,
coffee filter holder, empty watercolor
paint pans and or containers, natural
pigments binder. The Gomerabi clove essential
oil jar with lids, plastic bag tools for painting. Cold press watercolor paper
round brushes from size 2101. Very fine brush,
like a liner brush, your homemade watercolors, two containers of
water, paper towels. If you're ready,
let's not wait any longer and dive into
the colorful adventure.
3. What is Watercolour?: What exactly is watercolor? In this lesson, I explain what watercolor is and
what it's composed of. The aim is to acquaint you with the terms used
throughout this class. Don't forget to download the guide provided
with this course. In this guide, you can also find a recipe for
whom it gumerabic. What exactly is watercolor
and what it is made of? Watercolor is created by mixing
pigments with gumerabic. It's an incredibly
transparent paint that carries a high
water content. This characteristic
allows for delicate, precise work, multiple layers, and while maintaining
transparency. Its production is quite simple, as you'll discover in
the following lessons. The composition of water
color is pigment binder, viscosity additive, natural
preservative and water. A pigment is an insoluble color. The binder is made
with Gum Arabic and viscosity additive
like ni or glycerine. The natural preservative
is, for example, clove essential oil and
water for diluting paint. Pigments are extracted and processed into powders or inks. Pigments can be mineral, plant based, animal
derived, or synthetic. They can be obtained from de, plants, leaves, flowers,
barks, et cetera, through a precipitation
process that transitions from
a liquid states, resulting in the collection
of the Lack pigments. Alternatively,
pigments can exist in a pure states and be
ground into a powder, which ultimately imparts
colors to the paint. Example of each type
excluding synthetics. Mineral pigments could include Earth from your garden, cars, clay sandstones, Plant based pigments
might involve vegetables, berries, flowers,
leaves, fruits. Animal derived pigments
could be egg shell, kosh, nil insects, sepia, inks, and myrix. What is Gumerrabic? Don't forget to download the guide to make
your own Gumerabic. Gumerabic is a resin extracted
from African acacia trees. It's available in solid or
powdered form in stalls. Gumerabic is the
binder pre prepared, or you need to let it
rest for 24 hours. It's finely ground and
then diluted with water. When making the binder yourself, you can add honey or glycerine. For a vegan version, honey is a plasticizer
that brings shine, enhances, colors and preserves. Adding a drop or two of
clove essential oil to the mixture extends the
binders shelf life. Now the precautions when
working with stones or rocks, wear protective eye wear to prevent stone fragments
from getting in your eyes. And wear a protective
mask to avoid inhaling fumes produced when crushing materials in general, always wear a mask. When crushing stones, rocks, or any materials
emitting smoke or dust. Always check the toxicity of what you are grinding
or working with, including the
toxicity of stones, rocks, berries, plants,
fruits and vegetables. Always use pots and tools
exclusively for this purpose. Never use towels, spoons, or trees from your kitchen. Now that we have
covered these terms, precautions, and ingredients,
in the next lesson, we'll start mixing
these components together to dive into
the heart of the matter. Crafting homemade watercolors.
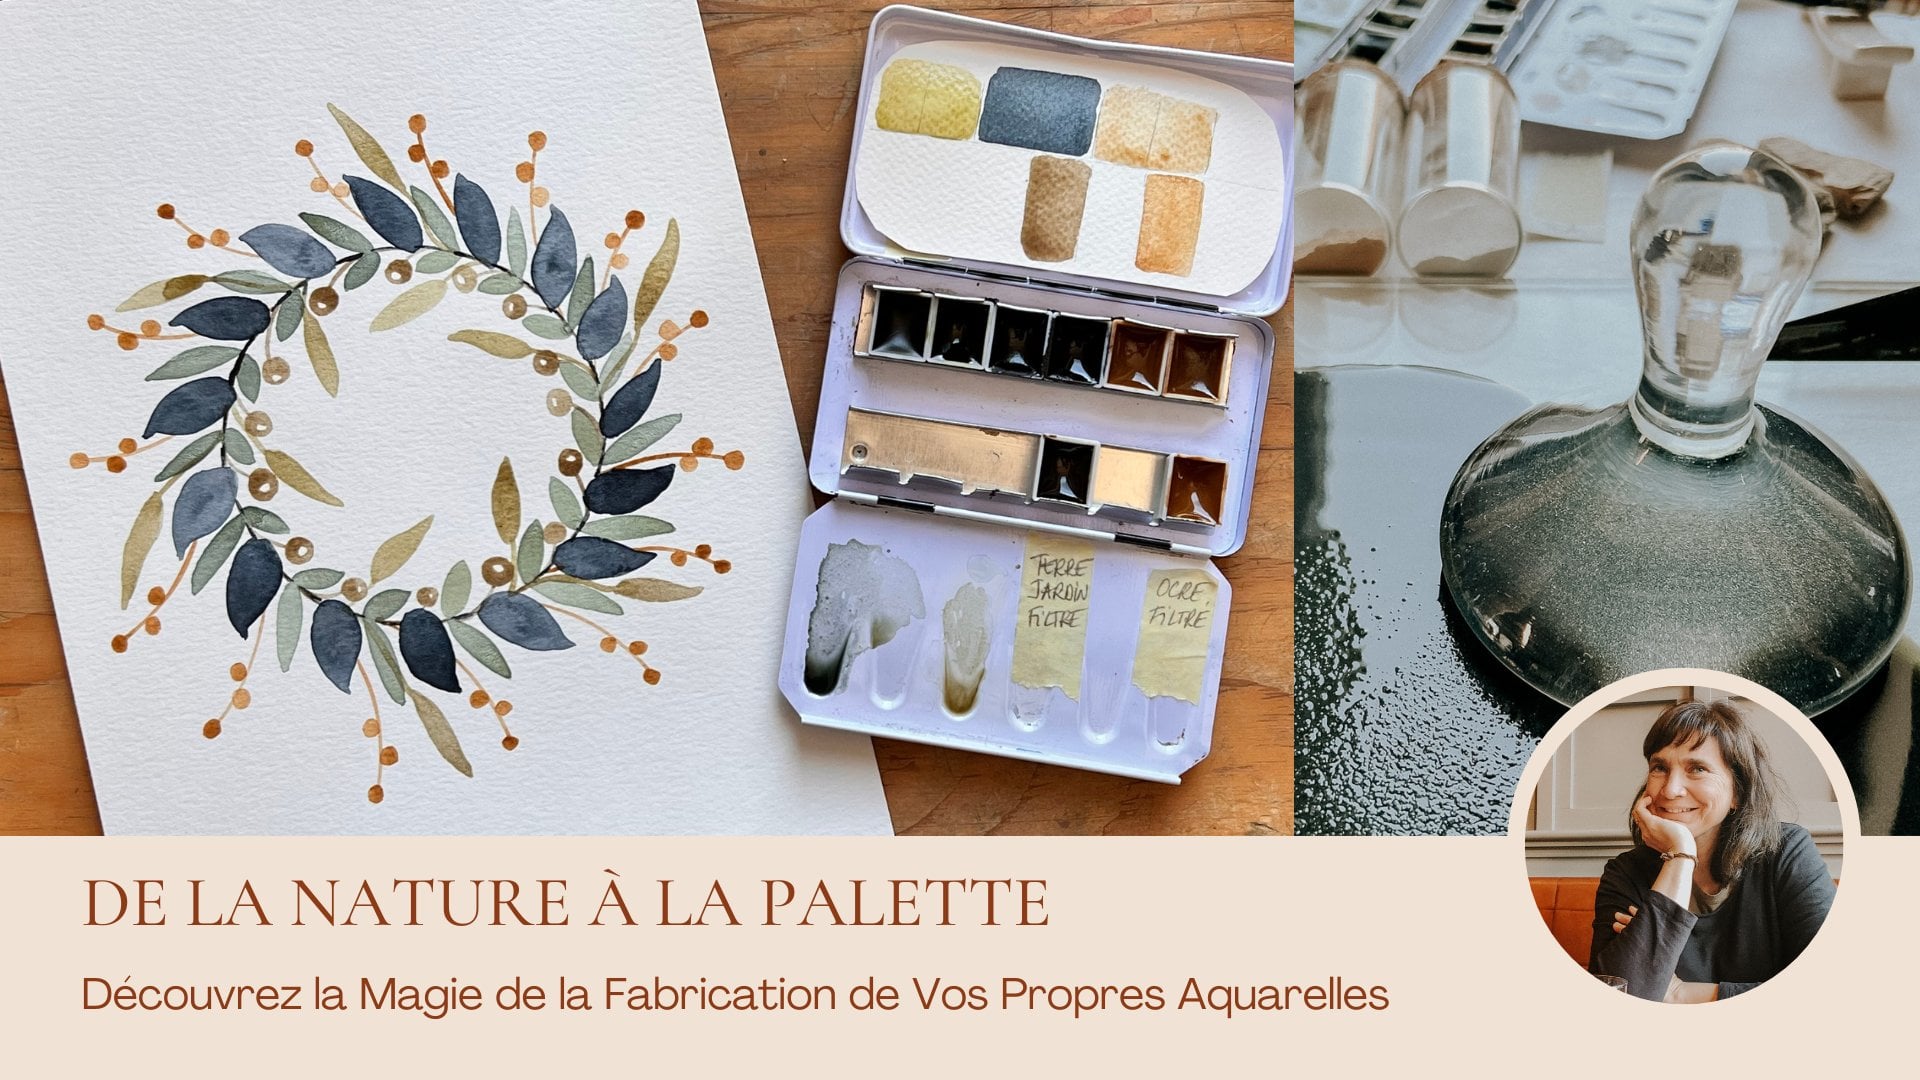
4. Vegetal Pigment Matcha Tea Colour: Let's start with pigments
that already exist, ground up, but not especially
the ones you imagine. We are going to use
matcha te powder. This color will give
green naturally. Since the powder is
ground very finely, you will see that we
can get a nice paste. If you are ready, let's dive into this
colorful adventure. I take a small spoon and place the Macht powder
on my glass tree. I create a well in the powder. To add the gamerabic, I always begin with the same proportion of
pigment powder and Gamarabic. If I've used
spoonful of machete, I'll use the same amount of gum Arabic using the
painter's knife. I mix the gum Arabic
with the match at the goal is to achieve
a very smooth paste. While mixing, I check the
consistency of the mixture. I realize I need to
add more gum Arabic. I keep a paper towel nearby
to wipe my spoon if needed. As I've just dipped it in
water to remove the gumerabi, I take the glass muller and combine everything by
making circular motions. The material adheres to the pet, creating a suction effect between the paste and
the glass mullar. I test the paste smoothness
and notice it doesn't flow, so I need to add
more gamerrabic. I add another
spoonful and continue mixing the particles together
with the glass muller. This action aims to
thoroughly mix and blend the particles of
different elements together. As for the pressure force applied while mixing with the glans molar,
it isn't strong. The pressure may
vary depending on the pigment type and its
adherence to the glass tram. Once I've thoroughly mixed
the pigments and gumerrabic, I add one to two drops of clove essential oil
for preservation. Clove essential oil
prevents mold growth. It's a powerful antibacterial
and antifungal agent. I mix again with
the painter's knife and once more with
the glass Miller. The circular motion helps work the binding particles
into the pigments. The painter's knife helps
scrape the match at paste off the Miller and gathers everything at the
center of the tree. The preparation of chat based watercolor
is nearly complete. Now it's time to transfer the mixture into
watercolor pens. To do this, I use two painters knife and slide
the mixture into the pens. You can also see why the
preparation needs to flow, otherwise it wouldn't
fit easily into the pen. Try not to waste material or leave too much
paste on your tree. If you find the pens too small, you can consider putting your color in a
lid or a, a shell. Here are the steps to create your color using
machete pigment. Place a spoonful of
pigment on the glass tree. Add a teaspoon of Gamarabic. Mix with the painter's knife. Grind and mix with
the glass Muller, add one to two drops
of clovesential oil, Grind and mix with
the glass Muller, gather everything together and collect in watercolor pens. In the next lesson, we will create a color using pigments available
in the stores. I don't tell you more. I'll see you in the next lesson.
5. Vegetal Pigment Indigo Colour: In this class, I'm using Indigo
blue, produced by Lutea. I place a small spoonful of pigment in the center
of the glass tray. The uniqueness of this indigo lies in its organic cultivation. It's an extra fine
top quality product. It's a plant based
pigment prepared from fresh leaves of
polygonum tentorium. To remove the pigment
from my spoon, I dip it in water
and then wipe it. I take the Gam Arabic and add a spoonful of it to the pigment. Using the painter's knife, I mix the pigment
and gum Arabic. I test its smoothness and notice I need
to add some liquid. I start mixing with the glass ler and I'll
add the gum Arabic later using the painter's knife, scrape the color from the
Muller back onto the tree, gathering the past at the center while
testing its smoothness. After this initial pass
with the glass Muller, I add a bit more Gum Arabic and continue mixing the
particles together, creating circular and
figure eight motions. This step, where the binder
is mixed with the pigments, is crucial because the binder, as the name suggests, binds all the different
elements to create water color. This ensures that all pigments particles bind and are coated and enveloped
in gum Arabic. I add one to two drops of clove essential oil
for preservation. I test the smoothness and give it a final pass with
the glass Muller, I apply a certain amount of pressure with my
circular motions. I gather everything using
the painter's knife, and I use another
knife to remove any material from my
knives and the palette. The tree, I feel the
watercolor pans, making sure to remove
as much paste as possible from the palette
to minimize waste. The same goes for knives. Avoid mixing too many
pigments at once. Otherwise, you might end up with excessive color which
could spoil more quickly. Always note the origin and
name your colors and pigments. Label your watercolors. This ensures that you know the mixture's origin or
what you've created, and create a color
chart for storage. Keep them in a watercolor box. The essential oil provides
excellent longevity. It doesn't matter if your watercolor cracks when it's dry. This can happen and is mainly dependent on the
nature of the pigment. Use properly, clean your tools and equipment between
different grindings. Here are the steps to create your color using indigo pigment. Place a spoonful of
pigment on the glass tray. Add a spoonful of gamerubic
mix with the painter's knife, grind and mix with
the glass mellar. Add one to two drops
of clovesential oil. Grind and mix with
the glass mellar. Gather everything and
collect in watercolor pans. In the next lesson, we will explore another process to extract color from a rock. I'll see right away.
6. Mineral Pigment Ochre Colour: We'll be working with
natural mineral pigments. Natural pigments sourced from the Earth can be found
all over the world. There are ochres,
clays, numbers, siennas, all types of
natural Earth pigments. These colors can be extracted naturally without any
chemical processes. To break the stones, the easiest way is to place the stones in a
thick plastic bag, fold it, and start
hitting the bag with a hammer or a pestle
to break the stone. This also prevents stone
harts from flying around. I gather what it is more or less crushed and place
it in a mortar. Always wear eye protection and a protective mask
when crushing stones, once you've done the
initial crushing, take a fine mesh sieve, a jar, and a spoon. Pass what you've just crushed in the mortar
through the sieve. By doing this, you'll
retain the uncrushed pieces in the seve and the powder
will fall into the jar below. Use another jar to collect
the stones that didn't pass through the sieve and continue collecting the ochre powder. By sifting it through the sieve to ensure a fine powder. I regrind the powder in the mortar and grind
the Oca powder. Again, I do this vigorously while wearing
my protective mask. I repeat the same
process with the sieve and I see that there are
no large stones left. I put everything
back in the mortar, grind one final time. Next I gather the ocher powder and place it in a
jar with a lid. This allows for
better preservation, keeping it protected
from moisture. Now let's see how to separate the ocher particles using water. I take a few spoonfuls
of the freshly crushed and sieved ocher powder
and place them in a jar. Then I add water and mix. The goal is to let the particles settle at the bottom of the jar. So you need to wait
several minutes until the particles have settled at the bottom of the container. This process helps remove tiny pieces of stone
and impurities, leading to a higher
quality water color. The collected powder
will become even finer. While the particles are settling at the bottom
of the water filled jar, we can use the freshly crushed, sieved, and collected cer. The difference is that it
hasn't been mixed with water. One could call it raw powder. I take a spoonful of pigment and place it on the glass tray, making a small depression
with the back of the spoon. I add gamerabic,
also a spoonful. Using the painter's knife, I mix the pigment
and the gamerabi, I test the smoothness and realize I need to
add some liquid. I directly add gamerabic. Since ocher is quite porous, it's normal to need
more gamerabic. I take the glass lar and mix everything in
circular motions. I add one to two drops of love, essential oil for preservation, and proceed with another
pass using my glass lar. This ensures all particles are coated with grab for high
quality water color. I gather everything using
the painter's knife and use another knife to remove
any material from my knives, the tree, and the glass muller. I try to leave nothing on the glass muller,
the glass tray, and my knives. There you go. The pans are filled. While I demonstrated the process
with raw ocher pigments, the pigment particles in the water fill jar have had
time to settle at the bottom. Therefore, we can pour this
content into a filter to collect only the clearer part or the upper part
of the sediment. To do this, I tilt the jar
slightly to avoid pouring out the lower part of the jar containing the elements
we want to get rid of. When I notice the water becoming
cloudy, I stop pouring. I let everything
pass through and dry in the bottom of
the coffee filter. There you have,
everything has dried. We can collect the
powder that has settled at the bottom
of the coffee filter. I scraped the filter using
the painter's knife, I add gumerabic. Not too much. Since I have less
pigment than usual. I mix with the painter's
knife and check the consistency
using the glass lar. I mix the different particles. When I mix, there is no sound of grains or small particles
catching on the glass tray. This is because the
ocher has been filtered. I add a small drop of clove, essential oil and mix
again using the glass lar, the pit very smooth. I can fill a
watercolor pan and use the two knives to collect
as much color as possible. Here are the steps to create your color using rocks
and ocher pigment. Breaking the rock
in a plastic bag with a pistol or a hammer. Grinding the rock in the mortar. Passing everything
through a fine se, mixing what passed through
the sieve with water, passing the mixture
through a coffee filter, adding a spoonful of
pigment to the glass. Trey, adding gumby, mixing
with the painter's knife, grinding and mixing
with the glass. Lar, adding one to
two drops of clove. Essential oil grinding and
mixing with the glass mullar. Gather everything and collect in watercolor pens to further
complete our palette. In the next lesson, we
will explore how to create a color using pigments from
the soil of our garden. I'll see right away.
7. Mineral Pigment Soil Colour: I've gathered soil from the garden and placed
it in a jar using a. So if your soil is wet, wait for it to dry. Once dried, you'll need a fine mesh sieve and the mortar to collect
the filter soil. Use a spoon to transfer the fine soil particles
into the mortar. Repeat the process to
obtain enough soil powder. Then take the mortar and
grind the collected powder. Making sure to wear
a mask to protect against fumes released
during grinding. Take your time with this step. The finer the
powder, the better. I collect the soil
in a jar with a lid. It's better for
moisture retention. If you don't use the powder, immediately place the powder in a slightly larger jar and add water to allow soil
particles to settle. The purpose of this step
is to let the particles settle at the bottom of
the jar, mix the liquid. You need to wait
several minutes until the particles have settled at the bottom of the container. This process helps remove tiny pieces of stone
and impurities, leading to a higher
quality water color. The collected powder
will become even finer. Once settled, pour the liquid
into a coffee filter to collect only the clearest part or the upper part
of the sediment. Do this tilt the jar slightly
to avoid pouring out the lower parts of the jar containing the elements
you want to get rid of. When you notice the water
becoming cloudy, stop pouring. Let everything pass through and dry at the bottom of
the coffee filter. Collect the soil that remained in the filter and is now dry. Open the filter to more easily collect the
soil in a mortar, grind it using the pestle, then place a spoonful of
filtered soil on the glass tray, making a small well with the
back of the spoon to add gum Arabic mix with the knife to combine the
soil with the Gum Arabic, begin mixing with the glass. Muller, make circular motions to allow the Gum Arabic to
penetrate the soil particles. Test the consistency
with the knife and see that more Gum Arabic is needed to make
it more liquid. Mix again with the glass muller, the consistency is good. Add one to two drops
of clovesential oil. Clovessential oil has a powerful anti fungal and
antibacterial properties. Then mix one final time
with the glass muller. Remember that this step, where the binder is
mixed with the pigments, is important because the binder, as the name suggests, binds all the different
elements to create water color. Scrape the glass
muller the glass tray, and fill a watercolor
pan with the soil color. If you overfill the pan, you can use the knife to level off the top and collect excess, then transfer it to another pan. I advise you to create several
colors on the same day and wash your instruments and
tools between each color. Of course, you'll establish a routine by repeating
the gesture and steps. Avoid mixing too many
pigments at once. Otherwise, you might end up with excessive colors which
could spoil more quickly. Always know the origin and
name your colors and pigments, label your water colors. This ensures that you know the mixtures origin or
what you've created, and create a color
chart for storage. Keep them in a water color box. The essential oil provides
excellent longevity. It doesn't matter if your watercolor
cracks once it's dry, this can happen and is
mainly dependent on the nature of the
pigment used Properly. Clean your tools and equipment between
different grindings. Here are all the steps we
completed in this lesson. Pass the soil in the sever. Grind the soil in the
motor with the pestle. Mixing soil with water passing
through a coffee filter. Let it dry, grind
the dried pigments, add one spoonful
of pigment and one spoonful of gamerabic mix
with the painter knife. Then mulling and mixing
pigments with binder, add one to two drops of love. Essential oil mix. One final time, collecting
watercolors in pans. It takes 24 to 48 hours
for the paint to dry. After one week, it's
completely dry. Now that we have these colors, let's paint something quite simple, but visually pleasing. The aim is to have fun and explore some basic
watercolor techniques. I'll see you for the final
project of this course.
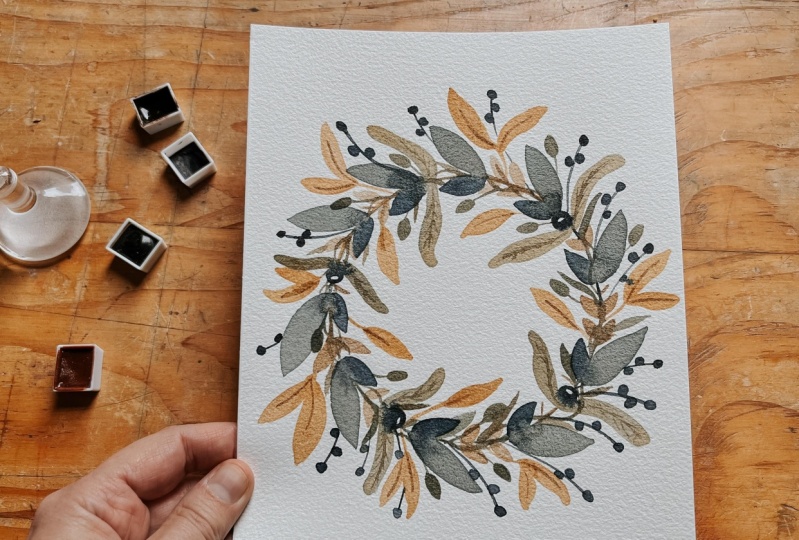
8. Final Project Let's Create With Our Colours: Draw and paint the wreath, you will need a four cold press watercolor
paper round brushes in size 210, and a liner brush. The homemade watercolors
from this class, two pots of water, a clove or paper towel, test paper, and a pencil. Start by drawing a
free hand circle in the center of your paper, or use a round
object as a guide, such as a tape roll. The circle doesn't
have to be perfect, is just a guideline for placing the leaves and elements
of your wreath. Keep a light touch with the
pencil so the line is faint. Take a size brush number ten, and dip it in water. Test the indigo. Begin painting the leaves around the outer
edge of the circle. The round brush will help
you create the leaf shape. Use the tip of the brush and extend the leave
towards the circle. Applying a slight
pressure to the brush. This allows the brush hairs to flatten into
the desired shape. Try to make the leaves
somewhat consistent, but remember that nothing
is perfect in nature. You can turn your
paper as needed. Space the leaves somewhat
evenly around the wreath. But keep in mind that natural irregularity is
good to space the leaves. Step back and consider where
you'll place the next one. The angle of your leaves should match those you've
already painted. Don't flatten a leaf
against the circle. Maintain a similar angle when you run out of indigo. Reload your brush and test
it on the test paper. While painting these leaves, you are using a wet
brush on a dry surface. This is called the
wet on dry technique. After this first set of leaves switch size
six round brush, we are going to create a mix
of Matcha, D and indigo. To do this test, the mixture on your paper, first put a bit of indigo. Then load your brush
with the green from the matcha on
your test paper. Blend the two colors. This will allow you to practice
the wet on wet technique, a well known
watercolor technique. Try this to see the
tone you can achieve. Once you are satisfied, make the mixture on your
watercolor palette. This way of testing
colors beside your work lets you adjust
and perfect your mixes. Testing for transparency so you don't add too much or
too little pigments. With the brush number six, paint a first leave
inside the circle, making these leaves smaller
than the previous ones. Take a moment to plan where
you'll space these leaves. I decided to stagger
the inner leaves. You can also place them in front of the leaves
you just painted. Since the brush is smaller, the leaves are smaller as well. Draw your leaves using
the tip of the brush, creating simple round shapes. You can add a curve or a wave
to them. That's great too. Just use the tip to
draw the leaf shape. Don't apply pressure to the As that will
make the leaf wider. That intended, keep
the same angle as much as possible and
turn your paper as needed. Keep the same brush and
add a third set of leaves. Place them opposite the
small round leaves, stretch them a bit more, creating elongated
and slender leaves. Keep using the same paint
mixture of indigo and macha T. I take a round brush number two and load it with
garden soil color. And I paint berries. When painting the berries, try to leave a circle
in the center of the berry that does not
contain water color. This allows you to
have a sense of depth as you create
a three D effect. By doing this, paint a circle, then enlarge the circle and make a round shape,
like a small ball. Then around it increase the
roundness and the circle. You can also remove the ink if you want to give
this hollow effect. I space them somewhat, but I find these
berries too cute. So I add more all
around the circle. Make a circle with your brush
and leave the center empty. No problem with
varying the sizes of the berries to insert
them into the wreath, the colors are magical. Switch to a line, a brush, and use the garden soil
color to draw fine lines. Now create a curved stem connecting each berry to
the circle of the wreath. Draw the line from the berry
towards the pencil line. Then go over the pencil line with your line of
brush to cover it. Stick with the line of brush. And now use the
filtered ocher to draw tiny branches extending
outward of the wreath. Don't brush over
existing leaves. Instead, make the
branches appear to go behind them to add rhythm. Place the branches
closer together. Draw a lightly curved line
outward from your circle, avoiding pressure on the brush to keep it from flattening. Next, take a fine brush and
add small dots for berries. Place one dot on
top of the branch, then move down the branch, adding a berry to the left
and another to the right. Make a dot with your brush and fill the circle
completely with ochre. Don't press down,
just make small dots. Repeat this For each curved
branch you just drew, Switch to a size
four round brush. Load it with match T and mix it with the garden
soil color to create a Khaki shade paint elongated leaves both inside
and outside the circle. Feel free to go back
and add more pigment. If you find the
leaves a bit dull, give a slight curve
to the leaves again. These leaves are
elongated and stretched, resembling weeping
willow leaves. For the curve, think of an S shape flipped upside
down with a gentle curve. Maintain a relatively
consistent angle. Turn your paper to
make painting easier. Finally, use the liner
brush to trace the stems of the weeping willow style leaves and connect them to the circle. Don't hesitate to give
a slight curve to the stem and to brush over
the already dry leaves. Always start the liner
line from the leave that you painted using the match
and garden soil mixture, allowing excess paint to diffuse into the
steel wet leave. This creates an interesting
effect and prevents blotches to create depth. Go over the circle, you droop with a pencil using
the liner brush and indigo. There you have it. The
wreath is complete. The colors are truly
beautiful and unique. If you want to add a
bit of complexity, vary the scales of the leaves
within the same drawing, this will add a visual
dynamic to your layout. Let your imagination
run wild and experiment with your colors
as much as you desire. If you enjoy painting something
else, feel free to do so. Express yourself freely
with your homemade colors.
9. Conclusion & Thank You: Congratulations, you have
completed the class with me, and I thank you for that. I'm delighted to have
spent this time with you. We have created no less
than four homemade colors. We have seen how to
transform soil and cor something solid into paint
to use in our heart works. We have learned about
different types of pigments and the
composition of water color. You were even able to download the recipe for Gamarabic
to make it yourself. We have learned how to measure proportions to achieve a
good watercolor consistency. And we have explored some
watercolor painting techniques. I hope you enjoyed
it as much as I did. And I invite you to
share the colors you've created at home
through the project, Allowing you to test the beautiful tones
you have created, all without the stress
of composition. Share your creations and your achievements and be proud of what you
have accomplished. Thank you for taking the course. I hope to find you
on social media. Don't hesitate to
tag me a Adline. Juli, Be on Instagram
and Facebook. I hope to see you in another
class on Skill Share. Goodbye and thank you.
 Adeline-Julie Bee, watercolor artist, pattern designer & teacher