Transcripts
1. Introduction: Hello, and welcome.
I'm Aileen Juli, a watercolor artist, pattern
designer, and a teacher. In this class, effortless floors paint a sweet repeat
pattern in Procreate. I'll show you how to turn playful sketches into a
polished repeat pattern. We'll create whimsical florals, explore color variations and
build a seamless design. Then I'll guide you step by
step to place your pattern into a mockup so you can see
it come to live on products. This class is perfect for both beginners and
experienced artists. Make sure to download
the free brushes and color swatches in
the resource section so you can follow
along right away. I can't wait to see your
beautiful creations. Let's get started.
2. Setting Up: Artboard & Class Assets: Okay, so once you
are in procreate up, what you have to do is to create an artboard, and to do that, you just have to tap on the plus sign and then
the plus icon here, see? And there you can choose the
dimension of your canvas. So for this one, we are going to use
3,000 pixels width by 3,000 pixels
eight with 300 DPI, and the color profile is
set on this one, RGB. I'm just make sure
that it's okay, 3,000 by 3,000 and
you hit Create. By default, when you
create an arboard, you have a white background
and a layer above it. I'm going to show you what kind of brush
we are going to use, and you could download
them for this lesson. So the first one is
the aquacolor one. Then you have the
watercolor wet edges, liner brush, and blending body. Those brushes are set in the order of the use
during the lesson. So this is the first one
we are going to use. And you have two stem
brush here, the petal one. It's on the lines. And that's the plain one, which is a bit different. The shape is a bit different. You can use those two ones to make the petals and to
help you make the pattern. But you can also do it yourself like you can paint
the petal by yourself. Going to show you the
colors you could download. So these ones are white and
black in useful colors. So black, white, and here you have background colors
for the pattern. And then these are
the colors that are inspired by my homemade ink. So you have mint ink, pomegranate ink,
avocado, dipladenia, privet, everlasting flour,
punsotina, and raspberry ink. We are going to use
those colors to make the petals to
color the petals.
3. Painting the Flowers: First of all, I
have my first layer ready to put the first petal. I'm choosing black. So I'm coming here. I take the stamp here and
I'm just checking the size. I know that 30% is
okay with this format. And I just have to
hit the screen, and on the first layer, I have this first stamp. If I need to lower down the
opacity, I can do that here. So the black is not so present, and I'm adding a layer above
it to color the petals, choosing the first brush. For this brush, I need four, 5%, and I'm going to choose
this ink, this color. And now because I'm
above the first layer, I'm going to color this
flower and I pinch to zoom, and I'm starting to color
the first petal like this and see the brush is
a bit blotchy on the edge. And one thing
important it's that I'm not lifting up
the brush until I've colored the whole petal because I'm going to show
you that in a minute. If you lift up the brush
and go back on the layer, the color layer like this, you have another layer of
color and we don't want that. So to undo tap with two
fingers on your screen, and I'm continuing to make
this flour and color it. And the last petal
doing the same like this coloring and filling the petal properly. And that's okay. So now I have my
first color layer. I'm adding another layer
above it because what I'm going to do is to
add another color. On the third of the petal, which is a bit with a contrast. So I'm taking this one, the raspberry ink, this one, changing my brush with
watercolor wet edge. Just checking the size here
on the side, 4% is okay. I'm pinching it, checking
I'm on the right layer, and you are going to just
add with this color, something like this on
the third of the petal, or half of it like this. And it's quite rough. Actually, we do it like half of the petal colored and quite roughly like this
with the brush strokes. And now that's the
second layer I've added. I'm going to add another layer, another color, and
something contrasty. So I'm taking this color, which is quite clear and
taking the line of brush, I'm going for 5%. I'm zooming it, just checking
I'm on the right layer. And I just feel the tip
of the petal like this. To add more contrast
and color and texture. And that's the first
flower we've made. So we keep that like this, and I'm going to add here another layer to make
another kind of flour. So I'm choosing the
black color here, taking this petal stamp and just checking that
I'm on a separate layer. 40% is okay, and I'm
just tapping here. If I want to lower the opacity, I'm tapping on the ensign here
and I'm lower the opacity. Now, what I can do is
to unshake all these. So I'm just seeing this one. I'm adding a layer
to color the petals, and I'm choosing the
first aquacolor brush. Now what I will choose is, for example, this color
with a privet ink, with the aqua color. The size of the brush is okay. I'm just pinching
and I'm feeling the petal like this with
the guide underneath. And I'm doing the four
petals like this. And the last one
is just a guide. Actually, I'm going to
unshake this guide now, but I keep it here because
it's good to have them there, but I don't see them anymore. What I need to do now is to add another layer above this one to do the same thing we've done here on the half of the petal with watercolor wet edge brush. And I'm going to choose a contrasting color this
one in the pansotina ink. Zooming it, checking that I
have a layer, that's okay. And I'm just filling half of the petal like this on every petal. Quite roughly, because we are
going to blend that later. So that's okay. I have to add
another layer here. Take a color which is contrasty. I'm going to take this
one and the liner brush. The size is okay
because I didn't change it with the last flower. And I feel the tip of the petal like this very
roughly, as you see. And now I have two
different like shape, color, and that's what we need. We are going to group that so we can keep these in a group. So to group, I need to swipe right like this
and then ask to group. That's one group. I
leave it like that. I'm just unchecking this one. I'm coming here on the
top of the layers, and I'm swiping right like this, and then I group them. So now I have two
different group. And what I need to do is to duplicate those group
to have six flowers. So first of all, I'm going to duplicate this one, so I swipe left and
I ask for duplicate. I'm just unchecking one of it, so I can see where I'm working and I'm coming
in the group to open it. You just have to tap
on the arrow here. And what we are going to do
is to change the color now. To do that, we need to
tap on the icon here, ask for Alpha lock because
if we don't do Alpha k, the color will go
on the old board. And now with asking Alpha Lock, it will just be
applied on the petals. So I'll show you that. You have tap on the icon,
check Alpha log. I'm going to change the color. I'll go for the yellow color. I'm on that layer,
the first one, and I just ask fill layer, and you see the
color has changed. I'm doing the same
thing for this layer. I tap on Alpha ok. I change the color with this one and ask
to fill the layer. The last one, the
tip of the petal, I'm going to do maybe maybe
something quite contrasty. So this one, very red one. I'm tapping on alpha ok
and then fill layer. So now you have one
group and one flour. What you can do is you
can merge them together, tap on alpha look because
we don't need that anymore, and you take it out of the group and you
come and put it here. So this group can
be deleted, okay? But we have our two originals. So I have this one
and I have this one. Now I'm going to duplicate
this flower. Shake this one. And I'm going to
do the same thing. So changing the color by
tapping here, Alpha ok. I'll go for maybe this color
fill layer coming here, ask for Alpha look, change the color here with
this color per example. Fill layer. And the last one
will be a very dark blue. So we always try
to have contrast. I'm tapping on Alpha lock
and then fill layer. So now I have the three
layers. I change the colors. I can group them together by
pinching the three layers, and I uncheck Alpha lock. I take this out of the group, so I put it here, I can delete that. And so now I have in
total four flowers, and I just need two more. So I'm going to duplicate once
more this one coming here, change the color, and I will go for something like this
with the Pneotina, tap on alpha ok, and then fill layer. Going on that layer, ask for maybe a yellow one, light yellow one,
lp ok, fill layer. And this one has to
be quite contrast it, so I'm going to go for this very dark raspberry ink and tap on Alphaloq
and then fill layer. Now I can pinch them
together like this. Check Alpha Lock, take
this out of the group, and I can delete that. Now I want to check what I have. I know I still have
to do one flower, but I'm going to move
a bit the flower so I see what kind of color and
what kind of flower I have. And to do that, I'm just
going on the layer, tapping on the selection tool and move them around
with the pencil. What I can do is to duplicate
once more this one, so I duplicate this one and check this one to have
just one selected, open the group, and I'm
going to change the color. I'll go for something like this, this color, a tap on the icon, Alpha Lock and fill layer. Then I have this color. I can change it to something maybe actually,
that's quite okay. Just changing maybe this one a little bit, but I'm not sure. Maybe it's the same one, yes. And the last one is going
to be the light blue, privet ink, alpha
ok, and fill layer. I can pinch them together. Hake Alphalog, take this
out of the group like this. And I have now six flowers. I just delete the
group, which is empty. So now what I need to do is because we're working in a
way that we keep everything, so it's non destructive
way of working. I need to duplicate this one, and I'm going to grab it to just put it here so I have
it as a security. Doing the same with this one. So I duplicate this group
and check this one, and I'm taking it here. Now what I need to do is the
same thing I did before. So it's pinching them together, taking them out of the group, and delete this group. Open this group, pinch the
three layers together, taking this one out of the group so I can
delete the group. And now we have six flowers. I just need to move this one, so I tap on the layer and the selection
tool and I move it. And I have six flowers now that are with
different colors. And what we need to do is
to use the last brush, which is the blending body. So we can blend the
colors together, so it looks more blend. So I'm going to uncheck
every layer on this one, a pinch and zoom. And because I have the
blending body set one, three or four, that's
okay, I think. We're just going to
blend a bit like this. So it's more natural. The color is more smooth
and the texture as well. If I pull the color toward this shade and stretch
it the other way, it obviously goes in
the wrong direction, and that's not what we want. You just stretch the
color from the tip, then this one and to the
petal, the main petal. So that's the first
one. It's blend. I'm going to do this one now. And as you can see, you have white spot here. We can fix that with
the blending body. I'm just stretching a bit the color as I did
before, like this. And to fix the white
spot, it's quite easy. You just have to
blend the blue color, and you don't see the
white spot anymore. You do that for
every layer. Sorry. You have to go on the
layer to be able to blend. So that's what happened. So I'm on the layer, and I'm just blending
a bit like this, taking this white spot off and those white spot here. Of course, because we
took the same example, we will find all the same
the duplicate we've done. They will have the same
white spot, of course. So I'm going on this one now
and doing the same thing. So it looks like the real
nature. That's okay. I'm going on this one, where it is here, pinching and then stretching the colors as we did
before, like this. And the last one will
be the yellow one. Once again, I didn't
tap on the layer, so I'm on the other
one, the previous one, and you have to zoom and
then just stretch the color to make a nice blending color and just erasing the white spot here by blending this color.
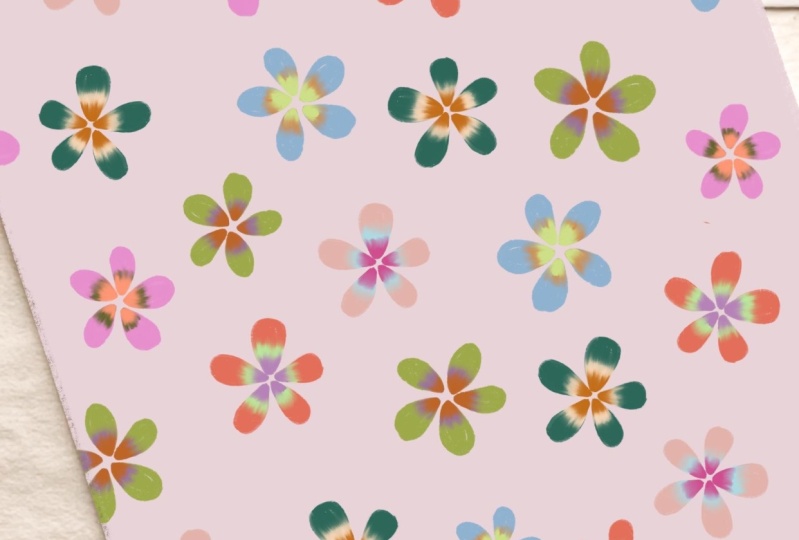
4. Making the Repeat Pattern: So now we have all the
different battles. We have our security here. And what we need to
do is to duplicate those six flowers and
move them around. So I'm going to
duplicate every layer. So I can have more flowers
and create the pattern. I'm coming on the first layer. I have to tap on the selection
here, selection two. And I'm going to uncheck
snappings and magnetics. So it's more fluid when you
move because as you can see, it's a bit hectic when
I move like this. So I'm unchecking this
and look how easy it is to move the flower now. So when you move the flowers, we can go on the corner here, but we cannot do that. It can't be cut by the border, so you cannot touch the
borders. But I leave it here. I'm taking the second flower duplicated and
maybe coming here, I can also rotate
with this green node. So I rotate it and
I put it like this. I'm going on this layer, selection tool coming here, just rotate it a bit. Going on the next layer, maybe I'm just putting it here, going on this layer, move it, rotate it a bit like
this in the corner, and the yellow one will
go maybe here like this. And as you can see, we need to duplicate once
again all the layers. So we have more flowers
for the pattern. And I'm coming here, just moving this one
here maybe like this, near the border but
not touching it. Coming on this
layer, the next one, I duplicate, maybe
putting it here. If you want, you can also
increase a bit the size, but not too much
because otherwise, maybe you will lose
in definition, taking the next
layer coming here, moving it rotate it, sorry, and moving it in the corner. The next flower will
go maybe like this. Mm. Okay, like this. And this one, we
need to do the same. I'm going to increase the
size a little bit like this. Near the border but
don't touch it. And this one, I'm
going to put it here. I'm increasing a bit the size, not touching the border. And now I'm going to
decide to duplicate this color and this color
put to fill the gaps here. So I'm duplicating this one, taking the selection tool, maybe I'm putting it here. I'm going to duplicate this one. Rotate it and putting it here. Maybe this one to duplicate
taking it here like this, and I'm going to duplicate the
yellow one to put it here. Now I have a composition
an organization that works more or
less on the square, not touching the borders. So what I can do is to pinch
all the layers together. So I just have one layer. And with that, I can manage a bit to rearrange
the composition, and that's what I'm going to do. So I have pinched
all the layers on this layer with the free
hand tool, I'm tapping here. I can go around it. And after I select
selection tool, I can just move it
a bit like this, so it's more even
and well arranged. Maybe I will change this one, so I'm on the right layer, at up on free hand tool, go around it, selection
tool, move it, and maybe I'm just rotating
a bit and resize like this. Now that I have that, I just I will duplicate
this and check it. That's my security. So I have this layer. If I want to make the pattern and go on the selection arrow, you will see that not the
whole square is selected. So the white square
is not selected, and we want to select
the whole square. Otherwise, we can't
make a proper pattern. So to do that, we
are going to trick the selection tool and
we are going to make a mark with something
like the red one here and the line of brush, but I will increase a
bit the line of brush. And what I'm going to do is just doing this on the corner here. So as you can see, I have
now marks on the corners, and that will trick
the selection tool. See, now it has selected
the whole square. To make the pattern, we have to move this square on
the four corners. So to do that, I need to duplicate four times
have four layers. I can move on the four corners. And now that I have done that, I'm on the first layer, I grab the selection tool, and I'm just checking that my magnetics
and snapping are on, and the distance and velocity
are at their max because that's how you can be accurate
when moving your square. So I'm on this layer, I tap on the selection tool. And what I'm going to do is
to move this square here. When you have the orange lines, it says it's in the
proper position, so you can release
your first layer. You go on the next
one, do the same, tap on selection tool,
grab the square. And when you see it's
orange everywhere, you can release it. Take the next layer going
down on the corner here. I have everything. The lines are orange. I can release it, and I'm
doing the last corner here. Like this, I have
all the orange lines so I can release it. Okay. So now what
I need to do is to pinch them
together like this, and I need to erase
those marks I've made. So to do that, I'm taking the eraser tool in calligraphy moonine
and I'm decreasing this so I can erase those marks properly so I
don't have anything left. I'm on this layer, and now what I need
to do is to move a bit to have a
better composition. So we need to go and
tap on free hand tool. We can go around it. And move it a bit. I'm just unchecking
magnetics and snapping, so it's more fluid.
I'm going to do that. Of course, we can move all the flowers that
are in the square, but not on the
borders, of course. And I'm going to move this
one a little bit too. So maybe I'm going
here like this. Go around this one
selection tool, moving it a bit maybe
rotated like this. I'm going to move this
one a little bit, and going like this. What we can do now is to duplicate maybe the
yellow one here. And to do that, I have
to be on the layer, tap on free hand tool, go around it, and ask
to copy and paste it. I'm selecting the layer
that I've just copied and I just move it here. Like this, maybe. So I filled that gap. And now what I need to do
is to pinch to put it in the final pattern. Let me check. I'm going to move this
one a little bit, so I go around it, selection tool, and
move it that here. So now I can duplicate
one petal and put it, I mean, flour and put it here. I'm going to go for this one. I go over copy and
paste selection tool, moving it here like this. And now I have to pinch the two layers to make this one in the
final button layer. I'm going to just move this
one a little bit so I can add another maybe I have to redo that because
I'm going to do that. And so I can add a
lanced flower here. And then I think
we will be okay. So I'm going to copy
and paste this color, the blue one, free hand
tool, copy and paste, selection tool, move it, and just rotate it and
maybe putting it here. I have to put this flower
in the final pattern so I can have the
whole tie together, and I'm going to move
this one a little bit so I go around it with
a free hand tool, tap on selection, and
move it like this. Now that we have done that, we have a quite
nice composition. Maybe I can change this one a little bit,
so I will do that. Go over it and move it
a little bit like that. So it's not so close
with this one. And what we need to do now is to because this is
the pattern tile, and I need to repeat
it to see if it works, and I can also change the dimension and the
size of the pattern. So I'm just going
to name this one. So I will say pattern tile. And just duplicate it to
keep it in my security. Now that I have
the pattern tile, what I need to do is to
duplicate four times. So I have four layers. I can move like I did before. I just tap on the arrow, tap on snapping, check
magnetics and snapping, so I'm more accurate
when I move this. And now what I need to do
because we are going to resize, we need to put the four
tile in the corner, but with a different size. So you have two ways to do that. The first one is to tap on the
blue node here and ask for the half of the dimension
of your final tile, which was 3,000 pixels. Now I've asked for half of it. That's the first
one. And it's done. I'm going on the second layer, tap on selection
tool, tap on here, the blue upper node, ask for half of it. So now it's done, doing the same for
the below part, tapping on the blue node. And asking for this dimension
half of the final time. If this is check, it means when I
tap 1,500 pixels, it will go equally
on all I mean, the square, all the borders. So you have to have that check. And the last one, I'm going to show
you the last way to do it without tapping
on the blue note, but by stretching
this like this and you can release it
because you see that the sides are correct. We have the orange line
and you can release it. So now we have our
final pattern, and we can pinch all
those ones together. And now, what I'm going to do is to rename this one
final like this. Duplicate it because
we keep everything. So we have all the step we've done so far. I don't like that. So on the final pattern, I'm going to move
a bit the flowers. So I tap on the free hand tool, I go over around this one and
I move it a bit like this, doing the same with this one
and move it a bit like this. So it's more fluid. Maybe I move a bit this one. Okay just like that. And this one a bit like that. Maybe here, I can
move this one a bit. I'm taking the free hand tool, then go around it and
move it a bit like this. So they're not aligned, and the composition
is more fluid. Maybe I change this one as well. So I go around it, selection tool, move
it a bit like that. And that's much better. So now we have the
final pattern. And what we need to
do is we can change the background so we
don't have a white color. To do that, I'm going to add a layer beneath
the final pattern. And I'm just going to duplicate this one and keep it here. I'm going on the layer for
the color of the background, and I'm choosing
this color I provide just drag and drop it
here on the layer. You can now pinch them together, so you have your final pattern
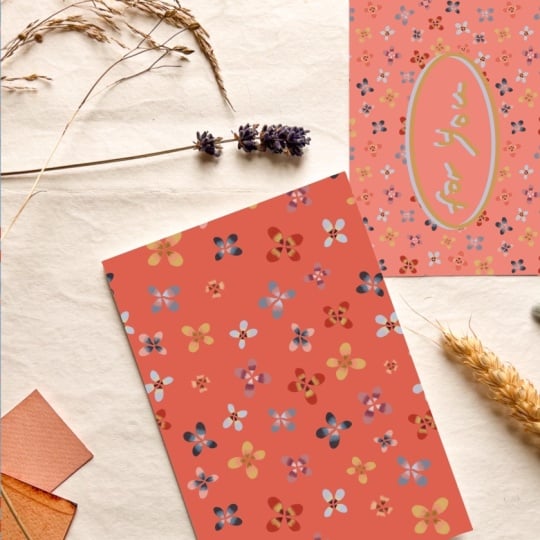
5. Mockup Time: Grab the photo I provide. And to do the mockup, we will need to make another
layer to import the picture. So I'm adding a layer. I'm tapping on the range tool, then insert a photo. Here it is. So I'm taking
this one, importing it. I can tap on fit to Canva, and I can just like this, I can fit the picture
in the frame. So I have that here. Now, to make the pattern, to put it in this card cover, I need to make a
rectangle in white. So I add a layer, choosing the white
color and grabbing the monoline brush here
to make the rectangle. So I just draw a line. And when I hold the pencil, it's straight the line, that I see, I have
to go over it a bit. So I'm starting over. Here, I hold the brush so
it straightened the line. I'm doing the same for this
one, and it's straightened. I'm doing this here,
too, like this. And the last one. And here, what I see
is I have a hole. So if I want to put
the white color here, it won't be on the rectangle because
there is a hole here. So I need to just
close that here. And now if I do there is
another hole somewhere. I have to check here,
as you can see. So I'm closing all
those corners, and now it's just match the
rectangle we have designed. So now we have this
layer and this layer, and to attribute the pattern, we need to move those layer
under the pattern like this. Select the pattern going on
the layer of the pattern. Just tap here and ask
for clipping mask, and you have your mockup with the pattern in the rectangle because you ask
for clipping mask.
6. Conclusion: I hope you enjoy this class. Together, we create
a delicate flowers, transform the colors, and build a seamless
repeat pattern with a flowing
organic composition. Finally, we placed our
design into a mockup. If you'd like to dive deeper, feel free to explore my other Skillshare
classes where I teach how to make your own
botanical inks and paint beautiful nature
inspired elements. I would also love to see
what you've created. So please upload your projects
to the class gallery, and don't hesitate to share
your work on social media. Be sure to tag me at Alen Juli B so I can celebrate
your progress with you. Thank you so much for
creating with me today. I hope to see you in
another class soon. Goodbye, and thank you.
 Adeline-Julie Bee, watercolor artist, pattern designer & teacher