Transcripts
1. Introduction: Hello, and welcome. I'm so excited to guide you on a creative and
rewarding journey of crafting your very own ink
from natural privet berries. My name is Aden Juli, and I'm an artist and a teacher with a
passion for painting, landscapes, florals, and
creating beautiful patterns. I also love making my own
inks and colors from scratch. It's such a magical process, and I'm thrilled to
share it with you. In this course, you'll
learn how to create your own homemade privet
ink and use it to paint a simple yet elegant
ginko leaf all over motif. You'll experience the
joy of working with your own handmade ink and see just how satisfying
the process can be. This class is open to everyone, whether you are a beginner
or an experienced artist. Be sure to download the
guide with all the tips and tricks for making
your natural ink. It's available in the
resource section. I can't wait to
have you join me on this colorful
creative adventure. Let's get started.
2. Ink Making Tools & Natural Ink Basics: To make privet ink, you'll need one or two
glass containers with lids, coffee filters,
coffee filter holder, a fine mesh strainer,
the plant material, the privet berries, water, a binder, which is gum
arabic, clove essential oil, vinegar, salt, a stainless steel saucepan
with a lid, spoons, one wood and one tablespoon, sticker paper for labels, and if you want rubber gloves
and some rags to clean. Always use pots and tools
for this purpose only. Don't use your kitchen
tools for ink making. Let's talk about the
natural incomposition. There is the plant material or what will give you the color, water to cook or extract the color from
the plant material. Natural preservative, which is salt and
clove essential oil. Typically, a bit of
salt and a drop of clove essential oil
help prevent mold. Vinegar helps stabilize
the color and acts as a mild
preservative and a binder. But this is optional, which is gum arabic. It can be added to
slightly thicken the ink and help it
adhere better to paper.
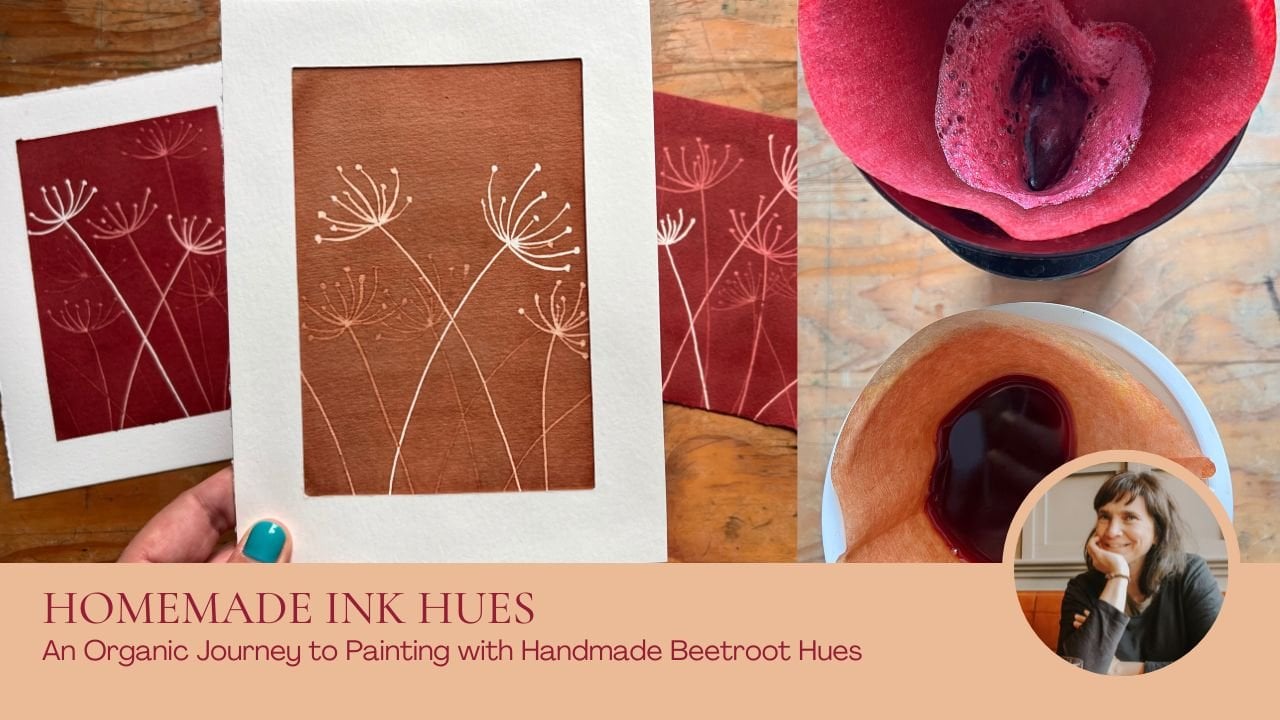
3. Make the Ink: Privet berries are
found in edges. They are fairly
dark round berries. I have privet in my garden, so I picked the berries. I remove any bits of twigs or stems that could alter
the color of the ink. I place them in a
stainless steel saucepan and cover them with water. They should float a
little, but not too much. Otherwise, you will dilute
the color of the ink. Once you've covered your
berries with water, simmer over low heat
for about an hour. As soon as the mixture
begins to simmer, you can lower the temperature. After an hour of cooking, add the vinegar and
a pinch of salt, turn off the heat and let the mixture cool
down completely. Once it has cooled, add two to three drops of clove essential oil
and stir gently. You'll notice small oily
particles floating in a mixture. This is just the
oil you've added. Over time, the oil will gradually blend more
fully with the ink, although tiny oil beads
will likely remain visible. After everything is
well mixed and cooled, you're ready to filter your ink.
4. Filter the Ink: Take your filter and
coffee filter holder and place them over
a glass container. If you have a lot of petals, berries, or plant materials, it's better to use
a strainer and hold it above the
coffee filter holder so that the solids fall into it rather than directly
in the coffee filter. That could clog the ink and prevent it from
filtering properly. Pour the ink, and you can also press down on the berries
to squeeze them a bit more, making sure you don't
miss any of the juice. Once everything has passed through and there is nothing
left in the coffee filter, label your container by
noting what it contains.
5. Supplies for Painting & Ginkgo Motif: Before we begin,
let's take a look at the materials and tools we'll need to paint the ginko leaves. Our homemade privet ink, an A five cold press
watercolor paper. Run brushes in
size four and two, water container to rinse
our paint brushes, some rags to blot your brush, prepared to take your ink. If like me, you place it
in another container. To paint a ginko leaf, let's break down its unique
shapes and features. The ginko leaf has a fan like triangular shape with a distinct broad and
slightly wavy edge. The leafs edges are
often irregular, creating a soft organic form. The middle of the leaf is
wider and tapers towards the top where it can be
slightly notched or split. The leaf is divided
into two lobes, giving it a hard
or fan like shape. The lobes are gentle
and rounded with a slight indentation at the
top center where they meet. The edges of the ginko
leaf are irregular, sometimes smooth, other times
slightly jagged or wavy. The variation in the edge adds an organic touch
and beauty to the leaf. When you paint it,
focus on the broad, fan like shapes and edges, paying attention to the
natural irregularities that make each
ginko leaf unique. You can, of course,
practice a bit before starting to paint the leaves
on your sheet of paper. I begin with the leaf itself, painting consecutive
sections toward the center, and then I pay close attention to the irregular
edges of the leaf. So if you paint
strokes side by side, like the folds of a fan, you should be able to
paint the whole leaf. Then draw a line for the stem, and just like that, you've
painted your first leaf. You can adjust the irregularity along the edge of the leaf by going over it a little and help distribute the
ink more evenly. Take a thinner brush, the round brush number two, and place the ginko leaf
close to the first one, but upside down so that it
fits nicely with the other. Always think of placing
your brush strokes close together like lines that irregularly shape the
two lobes of the leaf. Work with juxtapose strokes following the fin
like structure. Once you've done that,
draw a curve line outward opposite to the first
leaf and add your stem. Go over the edges
to stretch the ink, and also to define the
outline more clearly. Work on the irregularity of the lobes edges and adjust
the center of the leaf. Continue painting and placing
Gingo leaves on your sheet randomly or in a
staggered pattern in order to fill your sheet. Once you have a few painted, begin placing them across your page with the
intention of covering the space without forming lines or clusters that
feel too regular. Vary the angle of each leaf. So can face upward, sideways, or even gently tilt. This keeps the composition dynamic and avoids repetition
that feels mechanical. For this all over pattern
using ginko leaves, imagine you are creating
a visual rhythm. You want to fill the
space in a balanced way, but not with a perfect grid. Instead, think of natural
scattering leaves drifting to the ground
on a gentle breeze. This creates a sense
of movement and life. Let the natural texture
of the ink guide you. Some leaves might be lighter, some darker, embrace these
beautiful variations. They are what make your work deeply personal
and full of life. You can obviously
rotate your sheet to place ginko leaves where
you find it appropriate. And most importantly,
enjoy the process. Let your intuition guide where
the next leaf should land. There is a beautiful freedom in creating an all over pattern. It's about embracing
the repetition, but also the variation, just like in nature. Adding stems that extend to
the edge of your page is a great way to introduce movement and flow into
your composition. It creates the feeling that the design continues
beyond the frame, drawing the viewers eyes beyond the boundaries
of the paper. This technique also gives your pattern a
sense of openness, making it feel less
confined and more dynamic. Using elements that
go off the page or partially cut off mimics the
way nature is often seen. Not everything has
a perfect boundary, and that imperfection
adds beauty and interest. So don't hesitate
to let parts of your leaves or stems
break out of the frame. It can bring a fresh energy and a natural balance
to your work. The direction of the
stem can also bring a sense of movement and
energy to your composition. A stem that curves or twists
in different directions creates a dynamic flow leading the viewer's
eye across the page. The way you position
the stems can help tell a story or guide the
rhythm of your pattern. A straight, upright stem feels
grounded and steady while a more diagonal
or swirling stems adds a feeling of
lightness or motion. Experiment with
these variations, it's a simple way to infuse life and energy
into your design. Playing with the
borders of your sheet like positioning
ginko leaves near or extending past the edges introduces an exciting
sense of unpredictability. When elements reach out
towards the borders, they create a visual tension that draws your eye
across the composition, encouraging movement
and curiosity. This asymmetry where elements don't mirror each
other perfectly adds interest and prevents the design from feeling
too rigid or static. It's all about finding that balance between
structure and freedom. You want to create
a sense of harmony, but allow room for those little unexpected touches that make the design
feel fresh and lively. Experiment with how
elements near the borders can either lean into or
move away from the center. This small detail can really transform the overall
energy of your piece. Now that most of
the ink has dried, it's the perfect time to start adding texture to
your ginko leaves. With the surface dry, your strokes will stay
sharp and controlled, allowing you to trace
the delicate veins of the leaf without the ink
bleeding or spreading. This step is essential. By drawing the veins now, you give your leaves
structure, rhythm, and depth. The veins are what breathe life into the simple leaf shapes, creating the impression of fine details and
organic movement. Use your fine brush
to lightly draw thin branching lines that mimic the natural network you
see in real ginko leaves. You don't have to be
perfectly symmetrical. In fact, letting some
veins be thicker, longer or more curved will make your leaves look more
lively and authentic. As you add these lines, you are building texture, a visible tactile
quality that makes each leaf feel more
real and dimensional. The contrast between the smooth, soft washes of ink and the fine, precise veins will give a beautiful richness
to your composition. If you notice that there are
areas that feel a little too empty or if you see a gap that could use
a bit more attention, don't hesitate to add
another ginko leaf to make your pattern look
richer and more complete. Trust your eye. Sometimes just a small
addition can really balance the overall composition and make it feel more harmonous. In the same way, if you
feel that the borders of your sheet could use a little more connection
to the rest of the design, feel free to continue
working along the edges. Adding a few more leaves, stems, or even partial elements that touch or extend from
the borders can help to integrate the edges
more naturally into the composition and
create a sense of flow. These final touches
are important. They give you work a fuller,
more cohesive appearance, and they allow your pattern
to breathe and feel intentional as if it could
extend beyond the page itself. Each vein you trace strengthens the leafs
presence on the page. Take your time with this stage. Feel free to vary
the direction and spacing of the vein
slightly from leaf to leaf. This natural
irregularity will make your pattern even more
dynamic and engaging. In the end, it's the texture created by these
small lines that will elevate your painting from a simple shape to a
detailed living design. As you work, experiment
with how much ink you use and how you
position your strokes. The texture you create
in the veins will add complexity and
intrigue to your design, and it will make your
ginko leaves come to life with both
subtlety and strength. To wrap up this
painting session, let's quickly go over
what we explore together. We painted ginko leaves
with homemade privet ink, focusing on creating a flowing natural
composition across the page. We explored how to use the borders to add
movement and how to bring texture to the leaf by tracing their veins once
the ink had dried. Finally, we refined
our design by filling any gaps and
strengthening the edges, creating a lively
balance pattern. Through these steps, you've not only painted beautiful
Kingo leaves, but also created a
lively texture pattern full of movement
and personality.
6. Conclusion - Thank You!: I hope you enjoyed
learning how to make your own privet ink and
paint ginko leaves with it. In this lesson, we first created our own
homemade privet ink, preparing a beautiful
natural color to work with. Then we painted ginko
leaves across the page, focusing on building a
flowing organic composition. You've completed a full
creative journey from making ink to painting and
composing your design. Feel free to explore other
classes I've created, including making homemade inks and painting botanical elements. If you have any
questions or feedback, don't hesitate to reach out. I can't wait to see your
beautiful projects. Thank you for taking the course. I hope to find you
on social media. Don't hesitate to tag me at Alen Julie Be on
Instagram and Facebook. I hope to see you in another
class on Skillshare. Goodbye and thank you.
 Adeline-Julie Bee, watercolor artist, pattern designer & teacher