Transcripts
1. Intro: Hello, Artistic Cells. My name is Natalie and welcome to today's Water
Color Vida lesson. Together we are setting
sail on a creative journey, sketching aboard,
glittering across the sea. With bold strokes, and the
whimsical flow of water color, we'll capture the
essence without getting tangled in
the nitty gritty. Let's dive in,
embrace spontaneity, and let our paints
tell the story. Ready? Let's embark on
this voyage of creativity.
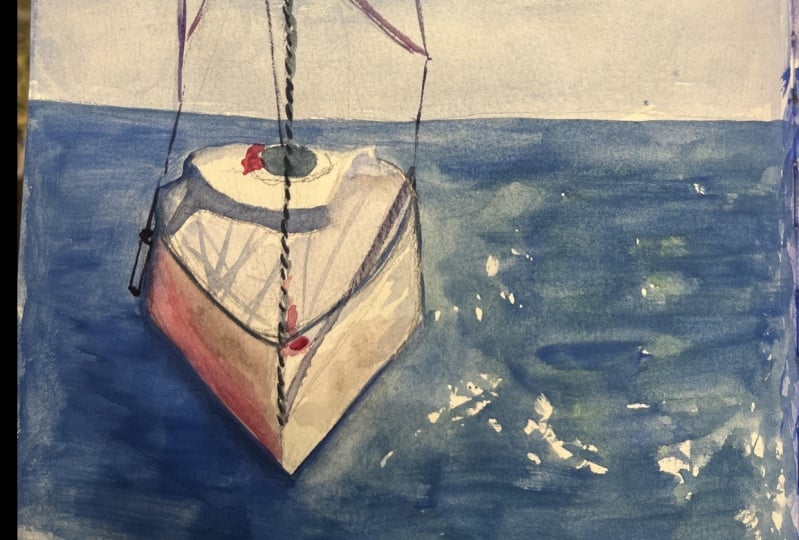
2. The plot: Okay, today we will be drawing
this particular scene. We'll sketch it in
a simplified form, simplifying the drawing a lot. We'll remove all
unnecessary details, leaving only the
board and the water. I want to remove
the background and the front boards to
avoid any distractions. This will be a
very quick lesson. I'll demonstrate how to make quick sketches that you
can use when painting outdoors or when you don't have much time to draw.
Let's get started.
3. Materials: First, I want to talk about
the materials we'll be using. First and foremost,
we need paper. I have cotton 300 ground
per square meter. We'll sector it
with paint a tip. If you're walking
in a sketch book, you can manage without tape simply using a clip
to hold the page. However, you can
also use tape in a sketch book for a firmer hold, preventing the page from bending and make it
comfortable to walk. Of course, we'll also
need watercolor paints, a container with water and napkins for soaking
up excess moisture. I use a slanted drawing board. If you have a regular one, you can simply prop it up
with tape to create an angle. You will also need a couple
of watercolor brushes, one larger with soft bristles for feeling and primary
watercolor work, and a smaller one with
a firmer bristles. Synthetic or caligraphy
would be fine, but it must have a sharp tip. A pencil with an eraser, or needed eraser and the
liner pen are also required. As for the palette, you can use a saucer. I have a lead from a pint set.
4. Colors selection: Now let's talk about
the colors we'll need. I want this sketch
to be minimalist, so I'll use only
three colors, cobalt, turquoise, but you can
substitute it with azure. The second color is
indigerdarkblue. Can mix blue with black
to get this shade. For this catch, two shades
of blue are essential, a light and a dark one. You can choose any shade
from the colors you have. The third color is red. For an accent drone, cadmium red would be perfect. I think a warm red will be
more appropriate in this case. One of these reds complement
the drawing beautifully, pairing well with the blues. I prefer this shade. It will brighten up the drawing, adding a warm daytime
hue and vibrancy. It also blends beautifully
with the turquoise, producing a lovely transition
without muddying up. I always test the color
on a small sheet before starting ensuring I can walk confidently with
the chosen sheets.
5. Pencil drawing: The next step is to secure the sheet to
the drawing board. I like to use Painter step because it's easy to
remove afterward, you can buy it on any online marketplace
or at a hardware store. Make sure to stick the tip evenly because
once we remove it, it will leave a beautiful
white frame around our work. Now we begin with
a pencil drawing. Pay a bit more attention
at this stage to get the board structure right and
maintain the proportions, because the watercolor
fees will be slightly more
straightforward right now, the task is to beautifully transfer everything onto paper. First, we determine where our
board will be and its size. The horizon line will be slightly below the
middle of the page, but I don't want
to define it too much below that horizon line
will position the board. Each shape is somewhat like a triangle with a convex edge. For now, we'll just mark that space and see
if we like it. Perhaps it should be moved
a bit to the right or left. Currently, one side aligns
right with the center. I'm not very fond of that. I'm slightly adjust
it and make it a bit larger to
maintain proportions. First, measure what's
broader, width or height. The heat here is
slightly different, but overall the sites
are roughly equal. If you make the boat too large, there is a risk that
not all parts will fit. I'm to replicate the
details as in the photo. According to measurements,
the height of the boat fits twice
into this interval, which is just right. Now we strive to
sketch the boat. The top part is an even, there is a rise here. Try not to replicate every
detail meticulously, but rather generalize a bit. Ensure everything is
level immediately, era what's not needed. Observe closely the top and bottom part
are roughly equal. We can just split it in half, draw the railings, write them slightly above the box level
to differentiate them. Check what other details need to be transferred carefully. Observe the shape,
follow the lines, and transfer the features. Now focus on the upper
part and its lines. We will later define these
lines with the liner, But for now, they
need to be marked. If it's challenging to
do freehand a ruler, there is an additional
beautiful rope here. It's essential to draw it. Let it be asymmetrical. It will add more interest. Don't forget to sketch the flag. Take a final look at it. Maybe you'll want to add
or adjust something. We need to leave
these two parts wide, the side and the top here. We will shade this
part on the desk. And here is light shadow, the Master Seeker, which
also needs to be indicated. That's it, the pencil
drawing is ready. We move on to the watercolor, the most exciting and
spontaneous part.
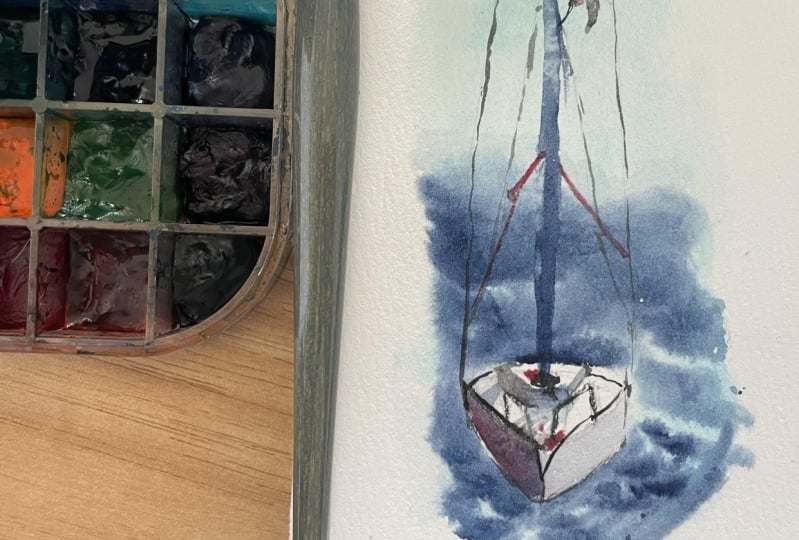
6. Watercolor: As I've already mentioned, I don't want to focus
attention on the horizon. I'll create a smooth gradient
from the sky to the water. The bright part will
be here in the sky. And on the right
bottom in the water, there will be a shadow
around the board and will also mark the
horizon with a darker color. To get beautiful, watercolor blooms are first
with the entire surface. A wooden areas have
planned to leave white. If you want, you can use an even larger brush
to make it easier, but I want to show
that in reality, a couple of brushes are more than enough
for such a drawing. If water spills onto the board, carefully blot it
with the tissue, because it's important
to keep that area untouched to create
a glowing effect. Let's start with
the light shades. You can even imitate clouds not painting everything
from but leaving gaps. Then two is mostly
transitions into dark blue. For the shadow to the
left of the boat, you can use a very tense paint because it will be the
darkest pot in the sketch. We mark the horizon, the distance to you, and then make smooth
transitions downward. You can till the paper to get horizontal water flow patterns. You can even sprinkle
a bit and make prints. Or a dark color
representing ripples. With such simple actions, we depict water in an interesting way
without detailed drawing. If a puddle forms immediately,
blot it carefully. I think there is a lack of
accents here at the bottom. You can sprinkle on top
to add more detail. Once the pan sets, you can sprinkle clean water
for additional texture. It will also look effective to get smooth
Beautiful traditions make a scene brush
and draw shadows. I use blue for the shadows too. Here, a bit lighter, you can draw shadows from robes. Show traditions, but
don't overdo it. Okay, there is something
lying on the top here. I'll show it in broad strokes. I want to slightly
shade this side, so I'll mix some red into the blue to get a
slightly warm shade. Carefully merge it
with the water. You can even add a
bit more red strokes. I'll add them here now. The perfect time to sprinkle
with just clean water. Sprinkle on the sea
here you can let the clean water flow if
the pin runs to the board. Carefully remove
it and clean up. Well an additional water
effect is created. The rest of the details can
be done on dried paper. We need to draw the
central axis, the mast. I'll use only those three
colors I've prepared for you. I make the paint densely. I hold the brush further from its base to
allow my hand to move more freely and to a straight
line parallel to the edge. In some places it might
not be fully drawn. That let there be a more
defined edge at the bottom, we start drawing the details. If it's difficult to walk on a sheet that hasn't
completely dried, you can slightly dry
it with a head dryer. I'll try to do
without it for now. Just be more careful. Currently, I'm
rendering the details that I marked with a pencil. There is something
lying at the back here. I'll mark that too. If it turns out to,
you can blot it. A few more details. Now let's add some bright spots to make the sketch interesting. I want to make the red. I take the paint and
with a single stroke, I try to draw the flag. Then I proceed to the red rope. I also take the paint
and repeat its position. I also want to add some image
red spots on the board. I also want to add a few with dark paint as the previous ones
dried and disappeared. The watercolor walk
is now finished. Now I suggest drying
the walk with a head dryer so we don't
have to wait too long.
7. Liner: The shirt has dried and all that remains is the final
part, adding details. Let's start from the top
and carefully render highlighting what we deem important and leaving out
the secondary details on the flag. I want to
show a bit more details. They also carefully draw
the ropes with quick lines. Initially, you
cannot outline them. Some lines can be dashed. Then carefully outline
the mast and the deck. You can depict a
node in general, just show what you want to
emphasize and underline, but don't overdo it to maintain
the sketch lightness and implied details which is
especially valued in sketches. The final touches, I'll emphasize the central
axis, the must. With that the sketch is done, the board is ready to set sail. Carefully remove the tape, ensuring the paper has dried. Otherwise the tape might
damage the paper surface. Here is the result. I weight your drawings. Paint your unique season bots. Be sure to share your results.
8. Outro: It's your turn now. I eagerly wait seeing
your masterpieces. And I'm always here to offer
feedback and guidance, Dave, into the magic
of Watercolor. Let your creativity shine, and don't forget to share your unique interpretations with our community until our
next artistic adventure. Keep painting and expressing
yourself farewell for now.
 Natalia Nikitiuk, Capturing Life's Beauty