Transcripts
1. Introduction: I'm Terry Renan, visual artist
and creative encourager. And today I'm taking on a project that's
pretty complicated. And I'm going to show you how I tackle these more
complicated pieces. Today we're going
to paint, draw, and whatever we want to
use to make a river boat. And I've never done this before. I've never made a river boat, so I'll show you my process
to bring this complexity of a design into a
simpler representation and how I make it my
own with what I add. And I'm sure you
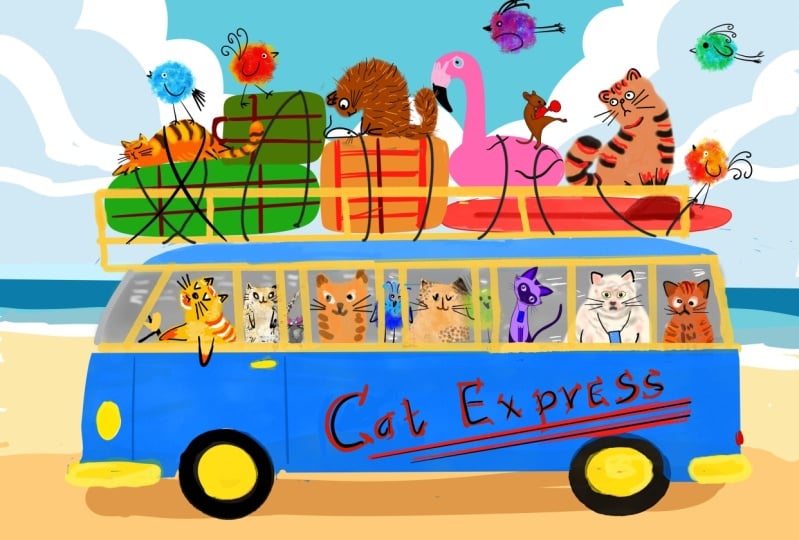
can guess there's going to be some cats in here. So, yeah, I have been
playing with art and making lots of stuff
for about 45 years. I worked at Hallmark
for 30 years and have been running my
own business since 2016. So yeah, I've been
around a little while, and I know a lot
about making mistakes and figuring it out and learning not to listen
to the inner critic. So I hope this video, which is going to be
shot in real time, will show you how I
handle these twists and turns of a more
complicated project. I see someone coming. This one's Riley. Come on. So hold on to your hat
and keep your mind open, and let's learn
something together, creating a river boat. Let's go on to the first lesson.
2. Figuring It Out: Alright. We're already here
to start our river boat. I'm going to call it
my River Boat Cats. I'm doing this river boat because today at the
Daily Creating Group, which will be
linked in the info, the prop for today was River. So I just thought, I love to make boats with
cats and cars with cats and planes with cats and all
kinds of things with cats. So let's try this
river boat thing, even though I've never
created a river boat. The way I approach these
kinds of projects, when I have no clue
really what they look like, I have
a general idea, but it's very hazy is I'll
usually use my old friend Pintrs to go through
and see photos, toys, other artists
representations of what a river boat looks like. And in my research, I found out, man, lots of
simplification required. One of the ways that you get ideas for that kind of
thing is looking at toys. Other designers have created more simple shapes than that. I'm working with
a square format, which is not the shape
of a river boat. They're very long and lean. So I'm going to have to compress this riverboat to get
the whole thing in here. And I went in and
I searched Pintr. I'm going to show you a
little bit about that here. A few of the paintings
or drawings or artwork. I couldn't find much artwork, but I just love the way some of these toys have been simplified,
particularly this one. So I'm kind of keeping that
in mind as I work here. I will share a link to this
Pintres board for you, and you can find
that in the info. And then, you know, while you're in there,
just keep looking around, see what comes to you,
what sticks out for you. And maybe this
isn't a river boat. Maybe this is some other type of boat that's a
little more simple. But I thought I'd go ahead and let you see how I kind of try to whittle things down
so they're more manageable and try
not to give up. So let's get started. Usually with a
complicated design, I will do a little sketch. I'm just going to get a
piece of this scrap paper. Maybe I'll move this paper
off so I don't soil it. And I'm going to just do
a little tiny drawing. My pencil, So we know we've got a
square that we're working within with
a very long shape. So I'm going to do
a little square here and look at this boat. I have decided I'm going
to make the boat face this way with the paddle
over this direction. And I'm going to draw really quickly what this
might look like. So it comes out like that. And the hole on this
boat is really shallow. Since it's a river boat. They've got a primary
shape on top. That kind of fits
within the center. And there's all
kinds of fun stuff going on inside here because we have passengers who
are enjoying the ride. We all know who those
passengers might be as well. So they do have one of
these smoke stacks. They actually have
two smoke stacks. I may or may not do two, and I kind of want to
do some smoke off this, so I'm realizing this
is going to have to be a little shorter
to fit that format. And what else do they have?
They often have a flag, which you can put on or not. Got a few things holding that. Some other doodads
here and there. Okay. I'm not sure I'll put all this in because it's not necessary, and of course we need our
little river shape here. Annoying me, I'll put in a few fish friends
I love the fishies. It's possible a bird might
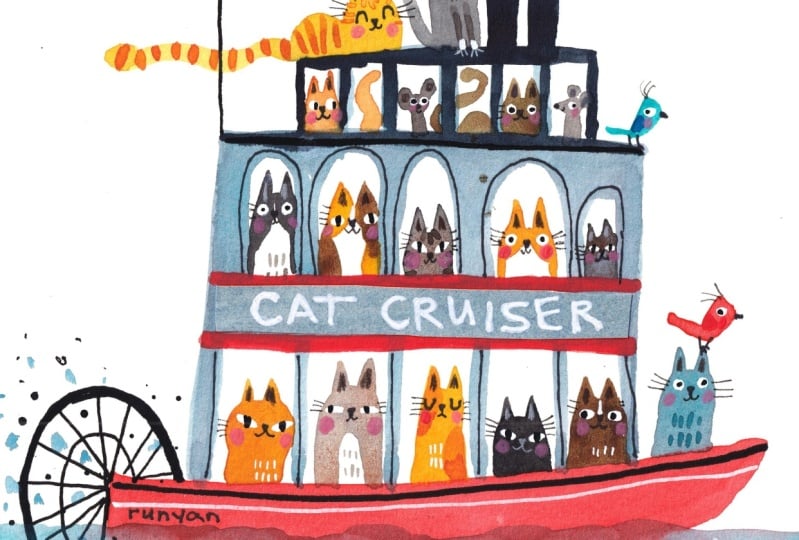
show up 'cause I also love the birds. Let's see. And sometimes they have a name here saying what the boat is. I'm going to call
this boat cat cruise. Actually, I'm going to
make this say cat cruiser. I've used the title cat cruise before on another piece I did, so I'm mixing it up by
calling a cat cruiser. Very, very inventive. And I know I'm going to
have all kinds of guys and gals of the cat variety in here. Perhaps a bird or two, some people up on deck of the cat variety, you
know, stuff like that. I love when there's this kind of complexity of shapes to be
able to squish these cats in, it just makes it so
interesting to me. And fun. So there we have it, keeping this kind of flat. And this is going to
be our sort of shape. This will probably
change massive amounts as I work because I
don't draw on the paper. I just start painting.
I kind of get an idea of where I want to start and then I go from there. So on the next video, I'm going to show you how
I get started on this. And I'm sure there'll be lots of whoops moments because that's
my favorite thing to say, possible kitty interruptions,
which no one seems to mind, except for there's
lots of cat here. Yeah, let's see what happens. We'll see you in
the next session.
3. Watercolor Shapes: Okay, then, this time
we're going to go to the paper with the paints and things and start to
create something. Again, I'm doing
this in real time. So I'm hoping you can keep up. If you need to pause
the video, that's fine. If you need to back up to
try something yourself. That is fine. Everything's fine. Also, keep in mind while
you're doing this. It's okay to copy me
while you're learning, and also to keep
in mind that when you share what you copy
from other artists, make sure to credit
them for the artwork. That's always the
best thing to do, the best policy, pretty much
all artwork is copyrighted. So I'm going to go ahead
and get started here. I use a fluid 100 watercolor
paper, 100% cotton. I have all my products that I use linked in the A section. I'm going to give it an
open. I'm looking at this. This very complicated drawing. And so I'm getting a feel for where all these things are
going to go on this page. Again, I'm not going
to use a pencil to draw it in because I prefer to paint when
things are surprising me. I've decided to make
the hull on this vessel red because
I think it's fun. You find my brush. I have all kinds of brushes here that are completely worn out. I'm gonna be using this
size ten round mimic, creative mark watercolor
brush for this project, and it's a synthetic brush. So that's always good. The
first thing I'm going to do is get some paint off
my palette here. I got this big old palette. I didn't like to use a
piece of paper to check my colors and make sure the
intensity I want them to be. And then the fun begins when all the woopsing
usually starts, let's see how this goes. Totally eyeballing. And you keep this
boat pretty flat. We know because
we're eyeballing, it's going to be
a loose painting just the way we like it. I'm not worrying
about the edges. It's not that I
don't have anything being set in my
head around this, but I'm just ignoring that because it
doesn't really matter. Since I'm doing a white
background on this artwork, I can't really keep the boat
white without drawing it in. So I'm going to go ahead
and make it a color. Not sure what color yet. This was a scarlet lake, and now I'm using a watered down Haynes gray with some turquoise
in it to do the boat. I've got this drawing, and
my boat is very wonky, so I'm just going
to go ahead and start I can't go to hikes. I want to leave room
for my smokestacks. You could tell already just how precise this
boat's going to be. But isn't it refreshing that it doesn't really
have to look like this type of boat because it's your art and your
artist's license. I'm leaving enough
room in this area here to be able to come
back in and name the boat. You can tell this looks
kind of like a toy boat. There's no river boat that
would look like this. I want to make these
round windows up here. It's great if you can
move fast enough where you're not having these
watercolors dry out, which I was not successful at. So sometimes what I'll
do with that is I'll just wet back in as I go along. I don't know if you've
watched many of my real time videos. They definitely
take a lot longer. But it gives you more of
a chance to actually work along rather than having to keep backing up
and rewatching. I'm being very, very sloppy, which I kind of adore. If that's just the
way you paint, you might as well
enjoy it, right? Let's see. I got a very
dark smokestack up here, so I'm going to put
that in some darker. This is just pretty much
straight. Paine's gray. And I use the tube watercolor of Windsor Newton for
most of the paint. Well, there I just made
an interesting error. So see this error. You know what I'm gonna do? I'm just gonna make
that error work. I'm gonna go ahead and make this top thing dark
because of a mistake. And who knows that might
be the best part of this. You're seeing
it here first. I think I'm just going
to leave it like that, and we've got what
else do we got? I'm coming in here
and looking at this. I know you've got a flag. I think I'm going to do paddles the paddle wheel
with the Posca pen. This is a Niaska pen. Have you watched any of
my videos previously? You know, you have to
shape these vigorously. Use a spare piece
of paper to make sure that it's not gonna
blob on your paper. This pin is almost
out of commission, but I'm going to use it anyway. And we're gonna do
sort of a circle here because the whole boat is wonky so we
really don't have to worry about it being
a perfect circle. So much fun to make a mess while we're painting. You know what? If you wanted to, you could
do this over and over again to get it to a place
where you feel like, I don't know, that's
getting better or not. I kind of like it when it's
pretty rustic like that. I want this to be a
little thicker black. I think this is a
little thicker or ooh, it's new, so I'm going
to go ahead and use this and I'm going
to turn my paper. Turning the paper
is not cheating. I am going to need these
special glasses, though. Whatever you can do
to make it easier for yourself is
highly recommended. So I could have used that
same pen to do this, but this one is just going
to be a little faster. Okay, there we go. Technically correct. I just
spilled on my hand. Now, see? These are the awesome things that happen while we're working, and we can let this ruin our day or make us want to
throw our painting out. I've got some posca pen, acrylic marker on my hand, and so what I'm going to do is I'm going to wipe that off. And I'm going to show
leave those there. That's just motion and drips. Maybe I'll add a
few more. There. And I think there are some
more little doodads up here, but I am going to just
keep it the way it is. Next up, more spills. I got this stuff everywhere, 'cause this is a
brand new pasca pen, so it really gave me the
juice without much work. I'm going to start adding
just a few details. Not too many for
now because I don't know exactly how
many details I want. I think I'll stop there for now. And we all know what
time it is now. It is time to start adding
the really fun part, which, for me, is the kiddies. First things first, I am
going to add a flagpole. For here, and I almost left enough room for that smoke to
come out the top. I must be getting
close to dinner time. I'm going to add just a
few more details here. I like these little
little red and you can tell that this doesn't come off clean because I'm
painting over a darker color, and this is a transparent color. So you get to do
what you want to do. And I'm really showing
you pushing to the edge here of sloppy and fun
instead of being technical. So I'm going to get started on my kitties and birds and whatever else is
going to show up. As we know, it is usually a lot of different
kinds of animals. So we got this little friend, I usually start with
ears when I do a cat, as you may be aware. Sometimes they have a fat head. Sometimes they have
a skinny head. When I get to the
edge like this, I usually turn it around, so I'm getting a better
angle on the brush. Well, I've got this
color, and I like it. I'm going to make one more kitty with some color like that. But this one's got
a white muzzle. Maybe one with a little
bit more yellow. I'm picking up a
bunch of cat hair, of course, over
here on the side. This one's going to be a little different shape,
a little more yellow. It's gonna be a skinnier kitty I like to use a lot of
variety in my work. That's what I do to
keep it interesting. Maybe this one's going
to be a little calico. See, I'm planning ahead here because I know I'm going
to put other colors in. How about the classic tabby, gray brown kitty? Let's see. This was the scarlet lake with a little bit of the yellow winds are yellow. This was
winds are yellow. That was the scarlet
lake and winds are yellow. Winds are yellow. And now I'm using a little
bit of the red oxide mixed with a little bit of Paine's gray for the brown one. Keeping the chest
white on this one. Variety. Sometimes I
have to go back with my finger to grab up the paint that isn't going
where I want it. And I'm seeing messiness here, and I just don't care. Another sort of dark kitty. This is actually Payne's
gray, too, as well. This kitty, you can't
see the whole kitty that window is so tiny. Let me see who is next. You know, you could
come in and do all kinds of different
colored cats. Mix up the shapes,
make a different boat, all kinds of different
things you can do. Well, I've got this
little bit of blue here. I'm going to give
myself some river. And I think this is all dry now. Yes, it is. Good to know. And if you just overlap the
boat a little with this, it'll look like it's
sitting in the water. Keep it sort of parallel. Like, I'm not doing
that right now, and that might be a
little confusing. My red is picking up because I've gone over it a few times. I'm going to leave it alone now. And I seem to be having a little bit of trouble
with the black picking up, too. Okay, continuing on. It's a good idea to
mix up enough of the color you want
before you start painting it down that way
you're not panicking to try to make some more color
in the similar variety, although that would
be fine, too. I got that in back
on the kiddies. It's black kiddy time. You notice I'm not talking
when I'm painting, and that's because I'm
sort of concentrating. Even when I've done
something 150,000 times, I still kind of got
to concentrate. I don't work to music
or anything like that. I just can't concentrate when I've got stuff
distracting me. And that's why when
a cat comes by, I usually get distracted. Because they have a lot
to say about themselves. What other color? How about reddish brown? This is the red oxide
with a little yellow. It's a little too red, so I'm going to add a
little black to it. Quiet again, 'cause I'm trying
to not mess up too much. I mean, it's okay to mess up. But this brush tip has got a
little bit of a bend in it. So that's not helping. Get
back into this calico, kitty. Finish it off. Keep sticking my hand in the river water. Oh, my. One left.
What shall we do? Let's try just
another brown, Katie. Kitties around
here are brown and gray with tabby yumminess. I'm thinking a
little bit right now about coming in with
some poska pens to hit these reds and make
it a little bit cleaner, but not because I have to. I'm going to have
one kitty on deck, and I think that kitty is
going to be a gray color. Got to get the paint watered
down enough. Whoops. Got here. Do I want
this kitty lying down? No, I'm gonna put it sitting up. If you use a little bit
of a better tipped brush, you'll have a little more luck
getting those pointy ears. But you don't have
to have pointy ears. Somebody here who's
going to be here. I think yellow Katy
Yellow kitty's friend, other yellow cutie. And maybe this yellow cutie
is going to be lying down. So we have just barely
enough room for that. It's going to be a very
strange kitty shape, as are they all. I just picked up
some of the blocks, as you can see, and we always
have to have the tail. I always like it when there's
some wet on wet going on. It just there's something
some depth there with that. Now we need a flag. I think I'll make the
flag red because why not keep the color
palette. Nice and simple? So birds. Maybe one of these little turquoise birds
that I love turquoise, so this one will
be up front here. And who else? Maybe we'll have one
back here as well. So I'm just sort of filling
in the story as I go. I don't know what's next. I mean, I didn't really draw
any characters in here. I'm just going with
the flow, so to speak. Maybe somebody's up
here. Who could that be? Some sort of gray blue kitty. Because we do have
the blue kiddies out there that we
love so much, too. And I think there's room for
somebody else to show up, and we haven't had sign
of a red bird yet, so this red biird I
think I put it up here. 'Cause someone needs to
ride on a kitty's ear. They come in right now with
a little bit of that blue, that light blue I used for
the water and just make a few marks to indicate water. Okay, I'm going to
end this section now because I've got
the primary shapes in, and next section, I'm going to start working
on the details, which is always so much fun. A place to add a lot of variety, a lot of your own personality. All of this is an opportunity
to add your own personality and just know your personality will show up as you go along. So I'm looking forward
to that next part, and I'll see you in a minute.
4. Details: Okay, it's the extra fun time when we get to add
all these details. I may still come back in
with more watercolor. I'm pretty much certain I will. I know I will. And I'll be using Posks pens and some
colored pencils. I usually use prisma
colored pencils. I don't know what else
is going to happen. Ink, for sure ink,
and we'll see. Let's get started. Okay. We got a good start
here with these cats. They look pretty simple to me. We can make them super
complex, if we want, because there's a
lot going on on these riverboat
steamboat things. And yeah, glasses back on. I think I'm going to now do
my cat cruise across here, and I don't do a
lot of levetering, so whether the spacing will be right on this is
unknown until I do it. I'm going to give this
a shake, pasca pen. Actually, this one is This is
a mole tau acrylic marker. And you see what
I just did there? Before that gets completely dry, I'm gonna see what I can
get. Some of it came up. That's why we don't
hold the pen over the page when we are
messing with our pen. Anyway, giving it a shake. Here's a bunch of colors I was trying yesterday with pasca. This, again, is a molotoUltra
fine line. You know what? I don't trust this pen, so
I'm going to put that over there and see what happens. Not opaque yet, so I'm
given a little tap, and it seems pretty opaque. I always have to go over the white twice
because it seems to pick up just a little
bit of the color from the watercolor
behind characters. I'm gonna vary my
eye shapes because, you know, variation is magical. I'm going over there and
tapping this a little bit as I go along to make sure
it's still flowing, but not onto my artwork, as was seen before. You can see how this paint
has come up through there because it's not
completely opaque yet. I'm over here doing
this thing some more, make sure I don't spill. Oftentimes, when you're using
the pen as you go along, it will get a little more shook
up and that really helps. M. Different shapes. Sometimes these sizes will
dictate to you as you go, which isn't the way I plan
it, but it's what happens. Some of these look sinister,
not intentionally. Squinny. I'm leaving a few
because I like to do closed eyes on some to keep this
one for the closed eyes, This is where the personality
starts coming in. With the eyes and the features, I'm going to come
back in and hit that again once it dries a bit, and I know I'm going
to need some legs on these little birds, a beak. I won't add any pupils in the eyes until that
white gets dried enough. And I'm going to use this pen for the nose and mouth as well. In a bigger painting, I'll use a black posca pen for this part because
it's blacker than this. That might have been better than a light color. I don't know. I might come back and fix that. This is a permanent
lumac color pen. It's ink, and it's permanent, so you can paint on top
of it and it will not run that's always nice because we like to come back in and paint on top of things. Got your happy cat on the top. What else do I want with this black pen while I've got it? Do a little stripe on this flag. I'm going to get the cat
here off my art and go get some more collar to give some of these cats some extra
details with their markings. This one is going to
be a little tabby. I chose this darker
color and tabby for this kitty because the tail was sort of getting lost.
It was a little light. So now this is going to keep
it jumping off the page. And this one is
also going to get some red in some markings. That's not red. That's orange. What else is happening here? You can definitely do
some tabby stripes on those tabby looking critters. I'm getting just
a darker version of what they were to begin with. I got quite a bit darker, and I'm just going to love it. This guy needs some legs. Who else needs legs?
Really nobody. I could put some on that, but, you know, you have to laugh at things when
you do that, okay? Got to laugh. And I realize that I don't have
anybody in these windows, which is kind of sad. Maybe this is where our
mouse friends show up. Let's see if that's what
wants to happen here. I really could use a better
point on this brush, but I'm going to make
do with what I have. Mouse friend one. Is there another mouse friend
here somewhere? I guess I'll do another
mouse over here. Maybe this mouse is
looking backwards. Starting with the nose, making a little bit
of a head shape, little body, little ears. Not caring if it kind of goes over other
parts of the painting. Then who else is gonna
be here, though? We got to put somebody
else in there. How about more cats? Surprising, I know. You are gonna be
squished in their cats. So good there's artist's
license going on here. This cat could actually come
through this window too. Maybe part of its tail is here and it's going to
come up around like that. You don't have a lot
of tails in here. You think another
orange kitty here. Concentration again with
that Katy's tail here. Right here, I'm
sticking my finger in paint and then
bringing it back in. I think my white eyes are dry, so I'm gonna come back
in with this Poska pin. Give it a shake. Give it a try. See that? You don't want that on the painting like
I've done already. Oh and a double coat. Some of these eyes
are pretty opaque, so I'm not going to
bother with them. Others, not so much like
this first one I did. The birds look pretty good. Got to wait on these cats
to do the first coat. I might use this white
Poska for that wet? No, maybe this cat's
got white paws. Maybe this cat's got
some white on his chest. So is this one. I
think this one can also have a little white
stripe for its nose, little white stripe here. What is everybody
doing now? Let's see. We got So fur hash marks. We love our hash marks. Variations on a theme with
these kitties. Let's see. We got This kind of
stuff is not necessary. But if you like to do details
as I do, then why not? I think I'm going to
use colored pencils to do the inside of their ears. Also, I can start adding mouths, and I'm going to use a thinner. Well, this is a number three in what is this a
unipin fine line. Water and fade proof, it says. So let's see what this is like. And this will also be used for the whiskers because we need to have whiskers
on our kitties. Doing some different
expressions. This one is sort of sleeping, so it looks grumpy. I'm going to come back
in with a lighter color on these two to do the features. These guys like to have
their little hair pieces. I'm going to start
on my whiskers now. I could have done the bird
legs with this thinner line. But I didn't. This pen is not
behaving perfectly. It's kind of skipping
on the page. Lots of turning of the paper. Still trying to run my
fingers through paint. I noticed when I was over
here that I need a little more white in this kitty's eyes. And we can start adding
some eyeballs to these other new
characters that came in a little later. That dry? No, I'm glad I
tested it. Not dry. Some of these actually, I don't know if these were dry either, but we
are going for it. Now I'm going to move
to some colored pencil. I'm going to get the noses
on these darker kitties. I'm not sure this
is going to work. I'm going to erase
that up a little bit. Which color pencils aren't perfect at erasing.
You know what? I'm gonna come back with Black again because
I don't think it's gonna stand out in that
any color of there. You sort of know
what it's doing. This one, too.
Forgot some moles. Did I forget anything else? I know that people audience always find things
that I have forgotten, but it's okay if
you forget stuff. A few details on
these smokestacks. This is ARGN acrylic marker. I don't necessarily
recommend them. They're not really super opaque, but I'm going to try this
because I think this red is a little lighter
than the pasca red, and I could be wrong, and it definitely does not
go on as opaque. I'm just trying to
help out my red here. Might end up coming
in with the posca. I'll come back to that. Where
else do we want some red? Oh, I know where I
wanted to go right here. You can see it's not opaque, which is why I'm not in
love with these pens. We're just going to
set this one aside and go back to the
posca pen in red. Back to the PoskaPen, let's see. Let's see. Yes, more opaque. So there's the conclusion
to that experiment. Stay with PoskaPens. If you're wanting to tighten
up things a little bit, you can come in with PoskaO
you can leave it loose cause that is completely
fine. Loose is good. You may remember that from
my loose watercolor glasses. I've done in the past. This
is still feeling very loose. I'm going to use the same color for that wing because
it's a little darker. This one definitely needs a nosy mouth in a lighter color. So ears, filling in the details. This is where I usually
forget something. Let's see where I can find now. Like, this one's a dark umber. I'm almost out of black. I also have this
gris chod CHAUD, all can laugh at me for not knowing how to
pronounce that. This is a gris one,
too, but way lighter. You could also check
out your colors before touching the paper
on these side bits. Look at what happened there. That is Posca pen off
my hand. We'll see. I could come on top
of that with Posca, white Poska and see if
I can get it to cover. If not, it's the way it is. So ear centers. All these things are
completely not mandatory. Some things are mandatory with
the cats I make like eyes, now, sometimes they have a mouth, sometimes
they have a nose. Definitely need some
ears of some sort. I'm going to be
lazy and just use the same color for
all these ears. If I wasn't lazy, I
could come in and use different colors
or paint them in. But I don't want this
video to be 7 hours long. Lots of inner critic
about how sloppy I'm being continuing on. Since I have this pencil, I may use it for a few more
bits of hair on these cats. It might be the only
place I want it. Apparently. These
birds need some wings. Maybe I'll try this blue paskat
might be not dark enough, and it's definitely
not opaque enough. Oh, I guess I'll just
paint the wings on. Just take a little
bit darker color, maybe a little ultramarine, darker color of blue. Since this is pasta, I really can't come back and
pick it up with water and one of these this
little hard bristle brush. You can sometimes
get watercolors up that are stubborn with this. Just don't rub too much because
you'll lose your surface. Try some more white
pasta on the lettering. This pasta pen is a spiller. Wever says PoskaPins are easy to use must know a lot more
about Posca pens than I do. So this has got a sign on it
that says cat cat Cruiser. I know cat is three letters. Cruiser is a lot of letters. I'm just gonna wing. Let me make sure I
spell this correctly. I'm notorious for
doing it incorrectly. And I have too much room, so there'll be a little
kitty head logo here. I'll come back in with another coat on that when it dries. Who else needs something? Getting close. We do need some fish. Mixing up some
dark bluish color, blackish bluish color,
painting in the fish. My fish are very simple.
That's a little dark. Nothing has to be complicated. These guys are riding along, but this one's going to
be going the other way just because somebody has
to be going the other way. Of You know, these shapes
are really simple. Everything I do pretty much is pretty simple except
for once in a while I do something and it
makes people gasp because they don't
know I work that way. I can work really
tight if I want to, and I just don't enjoy
it as much as this. This is more like
playing for me. How about a little tiny one? So everybody's there. And now I'm going give this another shot of
white on that lettering. A little sloppy, a lot sloppy. See, I just ran my hand through
these. Goodness, Terry. I'm really glad this is
happening because you get to see other ways to respond besides throwing
things in the trash. I could pick up a
little bit more of this if I wanted
to because it's still pretty wet or maybe
it won't work at all, which has been known to happen. Yeah, that may not
work. I might put a few little blue splatters.
To show movement. And this little wheel. That might be a bit much,
but like we say, it's okay. More white. More
white somewhere. Got to finish these cat eyes. And fish like to
breathe out bubbles, so that's always a good
little extra bit you can do. I'm going to come over
here and cheat this out of here with
this white pascapen you will probably
have to go over that again, stubborn stains. Something's needed,
and I think it will be the black staler
that I'll use for this. Little definition
to use windows. Yes you could just keep
going on these things. 90% of the time. I do figure out when to stop, but that did not used to
happen back in the day. Lots of overworking. This may be overworked.
I don't know. Whoops. Oh, well, see,
there's that whoops. I love that whoops.
It just jumps out. What else, Terry? You need some noses. And some lips. Smiley face on these little mice 'cause they're enjoying
being on the cruise. Yes, this another paska we're going to get these
kiddies some pupils. This has got a lot of ink coming out right now as
can be seen here. You got to be very careful. You know what? That's
my fatter one. That's why. So I will
set that over there. Use my thinner one. Okay. Okay. Oh ups. Dang. Okay, you got to see this. This is the things that happen. This is the nib for
this Posca pen. I'm going to see if I can
get it back in there, but I also spilled
over here with it. Oh, well, and yeah,
let's do this. See if this will work. That was a first. I'm actually being more messy this time than
I've been in the past. All for your entertainment. And I think that mouse
will look at this bird. We're getting pretty small
here with these details, so because you know
the variety and all I think I'll start from over here so I'm not running my
hand through it. But one of the other
things that is not necessary with painting cats that seem to
show up with my work because I'm kind of fond
of certain routines, as you can see, is cheeks.
You got to have cheeks. These guys also
need some details. Here we go. Everybody's
got an eyeball. Okay. So back to
the cheek thing. I just for me, I feel
like it just is that little cuteness
that we all love. And if you don't love
it, don't do it. This pink is a prisma color, and it's PC 929 Rose. I bought a lot of
different pencils in pink to try to find
the one I wanted, and this is the one I like. This guy's really goofy. I always like the goofiest ones. He also needs a little help
with his eyeball pupil. Is happy cats with happy cheeks. That guys getting
lost over there. He's still happy. This one
doesn't know if it's happy. It might be getting seasick or river sick because
this is a river cruise. This color will not
show up on that red, so I usually get
a little darker. There's a particular one here. It's a prismic color, and
it is called Carmine red, nine I'm sorry, WC 2926. Sometimes this will
show up, not so much. On this orange, too, you
might want to use it because it makes it
show up a little bit better. All right. Looking around looking around I made a blob of white on here, I want to run a
posca pen over just to clean it up a tiny bit. Not necessary, as is
all of what I'm doing. Here, I need another coat
of white on this lob I did. Okay, I'm at that point where I'm looking
at the painting, and I'm asking
myself, is this done? It could have been done
about 12 times already, and I'm just going to
give it one more glance over and just see what I
think or feel or whatever. That kind of tells me. I'll
be right back. Let's see. Oh, I do need something else. I need some of my
pupils on these. Thank you very much. They
also need their cheeks. Everybody's got their
own place to look. Maybe a little smile 'cause
the fish are happy, too. Oops, be happy fish. That's gonna make them
happier to have the cheek. So you can make everything
as messy as you want. It helped me figure
out my style when I started loosening up to
make things more messy. I just started enjoying
doing art more. I remember now
this last thing is the smoke coming over here because that's why we
moved this all down. This is going to be a little more difficult because we got the bird and the flag
and a cat and all that, but we're not going
to let it daunt us. A very light, grayish brown. Let's see. I guess I could
leave it at that. I'm going to lighten
up this end. So it looks as though it's
fading off into the distance. I just took a tissue
and did that. I can come in and fix these
dots with this posca pen. There's nobody who would have any nails except for this guy, but we need to add
them in because that's also something
critical to cats. My pencil was not sharp enough. I'm going to bring a little bit of a light colored pencil here to define this little
face a little bit. Lending it in. You might want to do or you may
just leave it 'cause it's quirky and quirky is good. So I'm going to stop now. I think we've moved along. Everybody's got eyeballs. Everybody's got cheeks. Everybody's got whiskers. Well, the fish don't
have whiskers. Maybe not the birds, but
they have the head whisker. Yeah. So, let's move
on to the next padium.
5. Adjustments: So I need to remember
in the future, not to ask the cats for advice
about how to spell things. They're not great at
telling me the truth. And although I do think
using a Z in Cruz is funny. I'm going to go ahead and show you what I can do to fix that and show you how to if you want to spell this correctly,
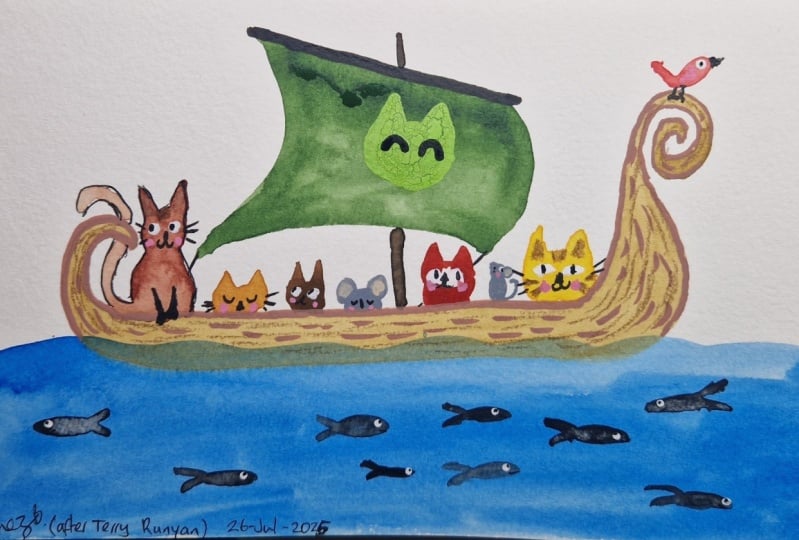
you can repair it. So let's go ahead and start now. Yes, here it is. C. So I have decided I'm going
to go ahead and come in and see what I can do to
make that B with an S. Couple of things.
One is you could just replace that letter with
a piece of paper over it. Let's see. So that's a
little bit too black. I know you understand that this does not have
to be perfect. Too dark. Yeah, it
needs a little blue. I think that's close enough. I'm going to go
ahead and just paint this paper to have
enough to use to do this little
spelling spelling fix. This isn't exactly the same
color, but we don't care. And I am painting on
a cheaper paper here, so it's going to this bending
thing, whooping thing. I'm going to go ahead
and give this a hair dry and you don't
have to watch that. Okay. So it's a little lighter than this
particular background. So I do think I'm
going to darken it up because I want to be able to see the lettering on
there, the white lettering. Although it can be
a different color, I want to stick with the white. Drying it again. Okay. I think that's
a little closer. So I'm going to go
ahead and cut out a little square to use. That'll work. There's this
possibility of gluing that on, or I can cover the whole thing with a new piece of paper and
re letter the whole thing. I'm guessing here on the size. So there's that or
I could do this. So that's a personal
decision that you'll need to make. Let me see. Let me try one more
time on that cutting. So, yeah, this
would look a little more natural to cover
the whole thing. With that. You can also use just a small piece of the painted paper
over that one letter. So you decide, I personally think I'm going
to do the full piece, and I'm going to grab
my pasta pen again. And we all know what
we need to do with a Posca pen before
adding it to artwork. One of the good things
about this is I can follow this lettering to place my letters so I
don't have to guess. In which direction do I
want this? Let's see. Give it a little trim. Some of you may be sad
to see the Z go away. I'm sorry. I might actually leave this little
cath head out, too. But you can do
whatever you want. You could actually also do this to begin with and not have to worry about messing
up on your artwork. If you spell it wrong, like
these kitties advised. You can just replace the
paper with a new one. Tucker's trying to advise
me to do a Z right there, but I'm not gonna
do what he says. So I've got that. I'm going to give
it another coat. Make sure you can see it. Trying to keep from
running my finger through the wet paska paint. That's a little funkier
than the original, but it is going to work. Now, to make the length correct, I am going to just mark
this paper centering this. With where to cut it off. Yes, that's where
it's going to go. Far from perfect, but it works. And I'm going to get a piece of paper to glue on because I don't want to get
glue everywhere. Grab my extra strength
glue stick by Elmers There we go. That's your work, grabbing
the lettering and sort of carefully setting it in place before pressing it
down to the surface. I usually will burnish these things down with a
piece of paper over them, so I don't dirty them
with my fingers. Walla. Again, not perfect, but, you know, we're now
spelling it correctly, and I actually kind of
like that there's not a catead down here
because I was sort of reading that
cat head as a why. You know, I'm not really
going to blame the cats. I was never a good
speller in school, and sometimes I just
get into the shapes of things and forget
what the letters are. So that's what really happened. I'm really sorry,
Tucker to accuse you. And now it's fixed. So now you have a
little extra something to help you with any
kind of mistakes, opportunities, whatever they
are, to play with your art, to continue with your art, even when it feels
like all is lost. So let's move on to
the next section.
6. Final Thoughts: Well, this has been a fun way to spend the afternoon
hanging out with all of you, painting this cat cruiser. My first paddle boat, and I
might make them another one sometime because
I like to repeat my motifs and change things up, and that's a good way
to keep ideas rolling. Also, I may want to do
it just to try it again. I highly recommend
trying things over and over again and not listening if you
hear stuff come up around how messy it
is or the whoops, or there's stuff you can
do, and if not, it's okay. We're playing here. This is
Art is fun, Art's for fun. I would love to see
your projects if you want to share them
in the project section. You also could tag me at
Terry Runyon on social media. And I would love to
see what you created. Oh, my gosh. You almost thought you were gonna get
away without seeing Tucker. You didn't see a
sister earlier who had a little bit of
trouble with her claws. This one is pretty
good with his claws, although he does get
his claws cut by me. Say hello to everybody, Ducky. Let's see if Tucker
likes the painting. You like the painting, Tucki? Anyway, it's been fantastic
spending this time with you, and I look forward to
seeing you again soon.
 Terry Runyan, Visual Artist & Creative Encourager