Transcripts
1. Welcome to the Class!: Anions are humble
everyday objects, but when you take a closer look, they reveal an unexpected
and beautiful complexity. When I began working
on this class, I suddenly started seeing
onions differently. Each time I peeled one, I found myself studying its
texture, color, and shape. Turning something so
ordinary into something poetic is part of what makes
painting them so rewarding. The paper dry out a
skin, curling roots, and soft inner glow create
a captivating challenge. And their earsy palette from
golden browns to purples, reds and soft whites, gives us the perfect
opportunity to explore color mixing
and tonal variation. And this class will create a limited yet expressive
color palette using warm, rich tones that bring contrast
and life to the subject. Hello, I'm Evgena and I'm so excited to welcome you to
a new watercolor journey. Together, we'll explore
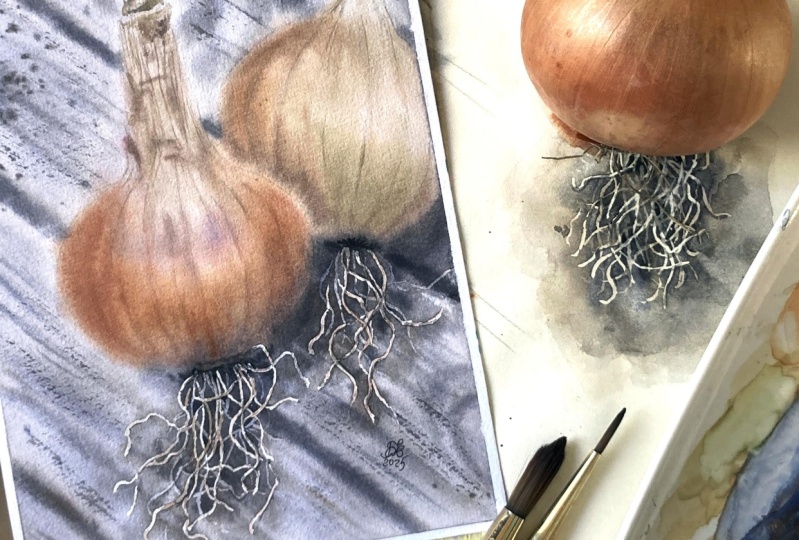
beautiful techniques to paint a richly colored red brown onion with its tussled curly roots. We'll pay special
attention to capturing the texture and detail
of layered roots. And we'll also paint a realistic wood surface
to place our onion upon. We'll begin with a
short focused exercise where you'll practice a
handy method for achieving soft transitions and
subtle layering and watercolor when your paper
taped on the painting board. Then we'll move on to complete a full onion portrait together. Grab your brushes and enjoy creative moment through this
rewarding painting process. Let's discover the magic in the everyday and turn
an anion into art. Discover free
watercolor tips and tutorials by following me
on Instagram and YouTube.
2. Your Project: Before we begin with the class, I want to thank you
for joining me today. Let's discuss our project. In the resource section, you'll discover my
completed painting as a helpful reference, along with pencil drawing
that you can trace. You have the freedom to
select your own object to paint or to closely follow
my painting as a guide. Additionally, you'll find a reference photo
and a selection of other images that can serve as inspiration for your
very own artwork. It's a great pleasure for me to give my students feedback. So after you put so much effort in your artwork,
why not share it? You can do it by taking a photo of your painting
and share it in the Student Project Gallery under the project
and Resources tab. I'd love to hear all about your painting process if you had any difficulties or what was the most enjoyable part
of the painting process. Upload your artwork by clicking Submit project on the
project and Resources tab. Upload a cover image. It can be your artwork photo, but it will be cropped. No worries. You can upload
a full photo father. Share your thoughts
about the class and your painting process. Under the field where you write, you can find three small icons. Click on the first one image, and upload your artwork. You can see your photo
appearing under your text. Scroll to the top and click on the button published
to share your project. If you have any struggles or
questions during the class, please start the discussion, and I will be sure to
answer your questions. I highly encourage you
to explore the work of your fellow students in the
student project gallery. Viewing other creations
can be truly inspiring, and also to receive support
can be incredibly reassuring. Therefore, please
consider engaging by liking and leaving comments
on each other's projects. Join me in the next lesson to explore watercolor materials.
3. Essential Tools to Elevate Your Watercolor Practice: Let's discuss general
watercolor materials and how they can enhance your
watercolor painting experience. We'll begin with the drawing. I recommend using a
soft pencil as it allows for easy arrase of pencil lines later
in the process. Having both a regular eraser and a kneading
caras is valuable. The kneading eraser,
in particular, plays a crucial role in softening the lines before
you start painting. This preparation
makes it simpler to erase the lines once your
painting is complete. For watercolor paper,
I recommend opting for thick paper with
a weight of 300 DSM. While the best paper is
typically 100% cotton, it's worth noting that
there are variations even within this category
based on different brands. The ideal approach is
to experiment with various paper types and select the one that
suits your preferences. It's important to know
that you don't always need to use 100% cotton paper. Occasionally, it's enjoyable to experiment and learn
on acid free paper, made from cellulose or a blench
of cellulose and cotton. This choice can be budget
friendly while still providing you with
the opportunity to explore various techniques. However, even in this case, I recommend choosing thick
paper with a weight of 300 GSM to ensure a sturdy surface for your
watch color endeavors. To transfer a line drawing
that you find in the resource, a sap, you can use
artist graphite paper. It's important to use wax free graphite
paper specifically, as using carbon
transfer paper is not suitable for transferring a
drawing to watercolor paper. If you're interested
in exploring three alternative methods for transferring a pencil drawing
onto watercolor paper, I invite you to check
out my other class, a dreamy landscape
in watercolor, mastering wet techniques
for beginners. Stretch my paper using graphic stretching,
watercolor paper artboard. To secure the paper, I use artist tape. For more details on the various tape types
for stretching the paper, you can refer to my other class, clear transparent water
with shells and starfish, mastering drawing
with water technique. Let's move to the
watercolor supplies, starting with brushes. I personally prefer using synthetic brushes
because they are vegan, and I appreciate the idea
of not harming animals. Generally, it's
often believed that the highest quality
watercolor brushes are made from squirrel
and sable hair, and they are resilient and hold water and paint
exceptionally well. However, modern high
quality synthetic brushes have nearly identical
capabilities to natural hair brushes. For example, Escoda offers a series of synthetic
brushes called versatile that possesses
the same qualities as natural Kolinsky
sable brushes. Dawnci brushes have
the collinear series, and Isabe offers the
beautiful Issaqua series. Ideally, you should
have two water jars, one for washing your brush
and the other for obtaining clean water for wetting your brushes, paper
or watercolors. However, I must confess that I sometimes use just one
jar for convenience, so I can concentrate
on the process without worrying about which
jar my brush goes into. Nevertheless, I always
make it a point to change my water regularly to prevent
mudding my color mixes. You can use either
watercolor cakes or tubes for your painting. There are various watercolor
brands available, and they offer
both student grade and professional
grade watercolors. Your choice between the two depends on your specific
needs and budget. If you are just starting with watercolors or working
on practice pieces, student grade paints can be
a cost effective option. For the colors used
in this class, you can refer to the
color palette lesson. To paint watercolors with this, it's a good idea to keep several paper tissues or a
cotton cloth within reach. They are very useful for
dabbing your brush or paper is needed and for
thoroughly drying your brush. If you want to truly enjoy your watercolor
painting experience, I recommend using a
ceramic mixing palette. It can also be ceramic plate. Plastic or metal
palettes tend to disrupt the smooth laying
of watercolor strokes, causing the paint to form
separate drops and pulls. A ceramic surface is ideal
for watercolor painting, and using a ceramic
mixing palette will enhance your
watercolor experience. The mixing process feels exceptionally smooth
and creamy on ceramic. A natural or synthetic
sponge is essential for making adjustments to correct small mistakes in your painting. Additionally, for some artworks, you may require masking fluid. A white gelpen or a
fine acrylic marker or white gouache to
add small details that can significantly
enhance your piece. A spray bottle is also
useful for evenly wetting your paint without
creating water pools on it. Now that you've gained insights into general
watercolor materials, let's move on to
the next lesson.
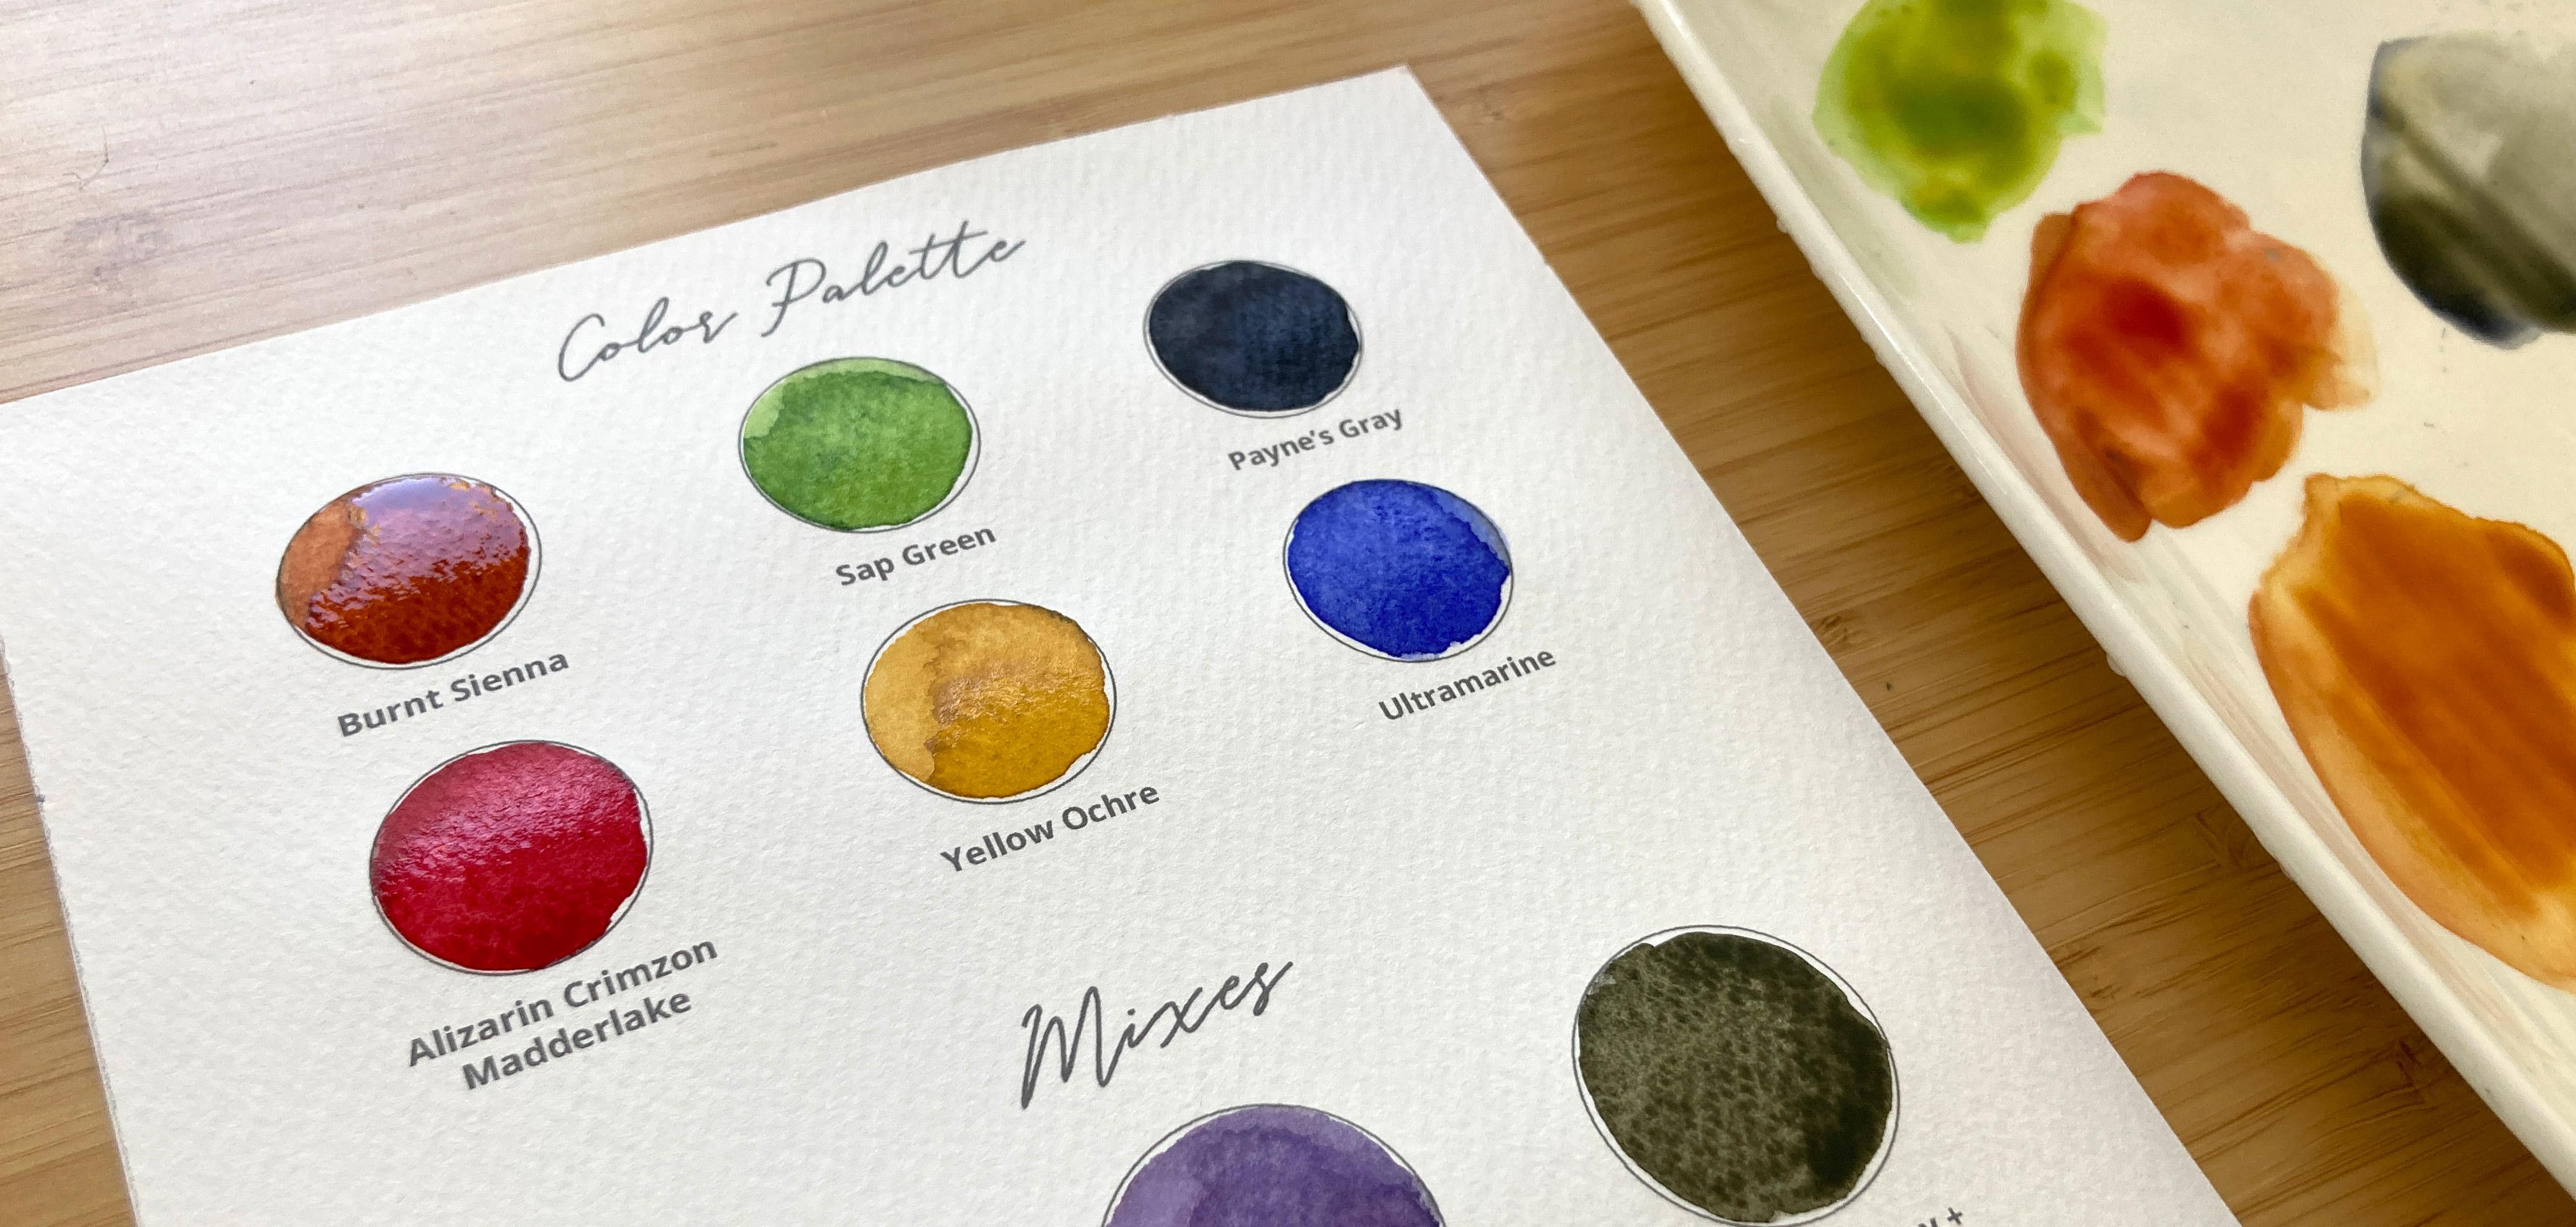
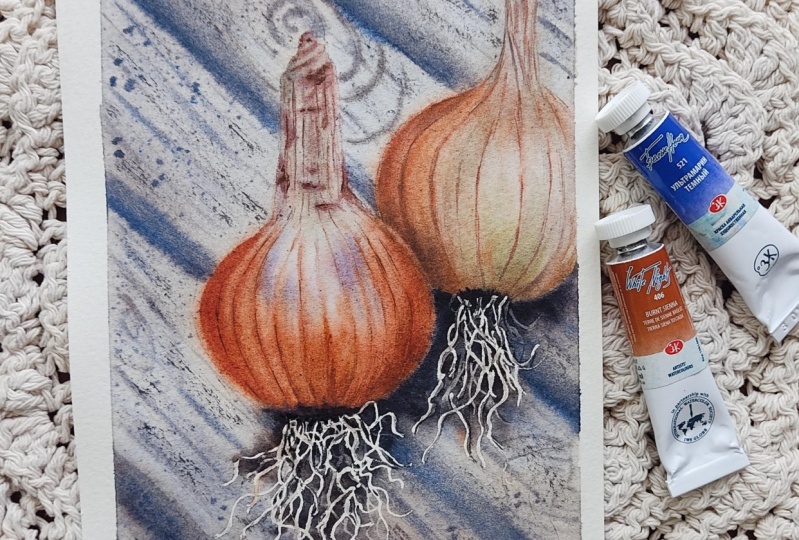
4. How to Pick the Right Color? Color Palette & Tips: M Everything begins
with the color. Choosing the right color
can be challenging. But let's look at a
couple of methods that allow you to easily
discern the right color. Let's select an onion. Often, when you start to paint, you are not sure about the
right color to choose. This tip will help
you with mixing the right color easily
for all your projects. Simply take a photo of the
subject you'd like to paint. Then zoom in until your screen
becomes a color sample. Lay your mobile on
the paper and try to mimic that color from
your basic palette. For this onion skin, I use burnt sienna. It looks too yellowish, so let's add a little bit of rose red and a drop of black. To remember the combination, just add the used colors
next to the painted sample. You can do this for everything
you'd like to paint. Let's try with this leaf. Take a photo. Zoom in. So the screen is filled
with just one solid color. Sub green is a basis, a nice bright, natural
looking green, a bit of yellow Oca, and a touch of burnt sienna, and probably just
a drop of black. This method will help you
immensely with nature painting. You can do it from a photo or if you are painting outside, you can take photos of
the objects around you. That will help you to pick
the right color easily. Onions have beautiful
earth tone colors. Burnt sienna fits
perfectly for the tint. When diluted, it gives a nice
light reddish brown tint. The upper part has
more yellow in it. So let's add more yellow Oca. The subtle lands on the
paper like skin will have more undiluted brown
tint like burnt sienna. Et's fill our palettes watches to have a guide
for the painting. You will find the
finished palette, as well as a more cup to make your own palette in the
resources section of the class. So we have burnt sienna, a nice earthy brown, sub green, a beautiful green
and a must in basic palett. Pains gray, a dark gray with a bluish tint that doesn't
dull the mixes like black. Rose red like
alizarin crimson or mother Lake, yellow Oca, and earth subdued yellow, and ultramarine to add a violet
tint to the reflections. Now we will mix the
chosen basic colours for some acchi mixes. Let's mix burnt sienna and
yellow Oca for a soft brown. Bird sienna and drowse red for a rich onion skin
color for the shadows. Altramarin and rose red
will give a violet color. Burn sienna and
ultramarine creates a beautiful granulated color that we will use
for the wood table. Ultramarine is a
granulating color, and if you add it to the mixes, it will give that sunning
grainy appearance. Paints gray and yellow oca for a greenish gray and sub green and yellow Oca
for a nice warm green. What is the right
consistency of the paint? It depends on whether
you're making a wash or just laying stains. For stains, the paint
need to be creamy, more colour, less water. Here you can see how
I mix the colours. Look how creamy the paint
lays on the palette. I take time to saturate
the brush with the colour, and after that, I lay
it on the palette. In the exercises, we'll also use watery mixes to achieve
a very different goal. If you'd like to learn more about the right
paint consistency, you can discover more in my other class snow
and watercolor, create a magical winter scene, where I explain it in detail.
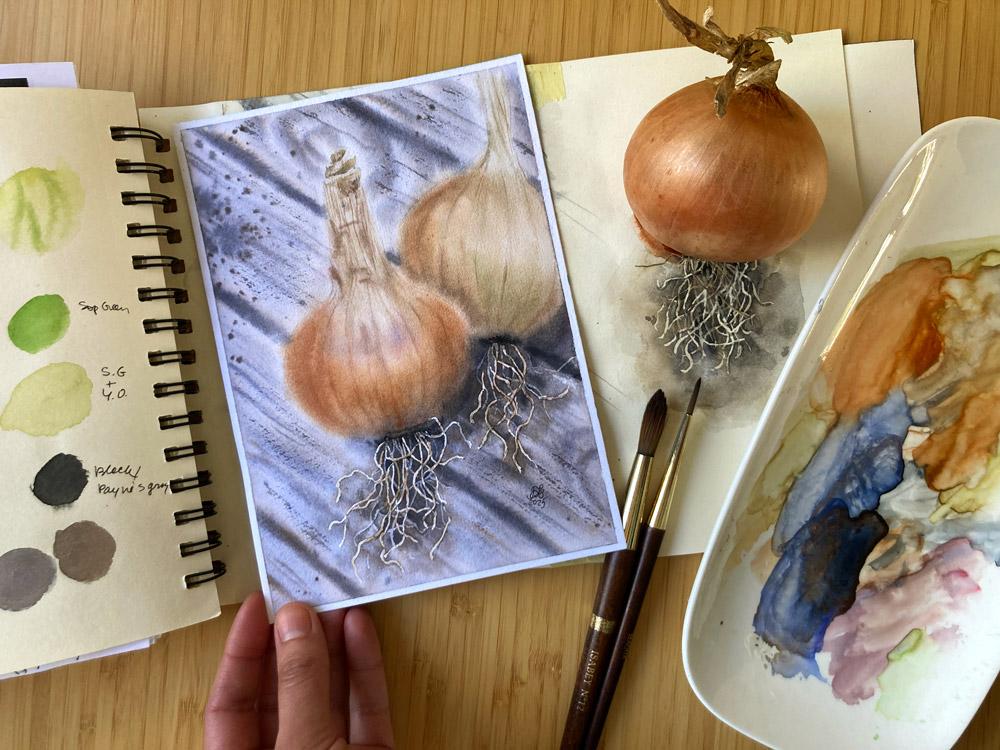
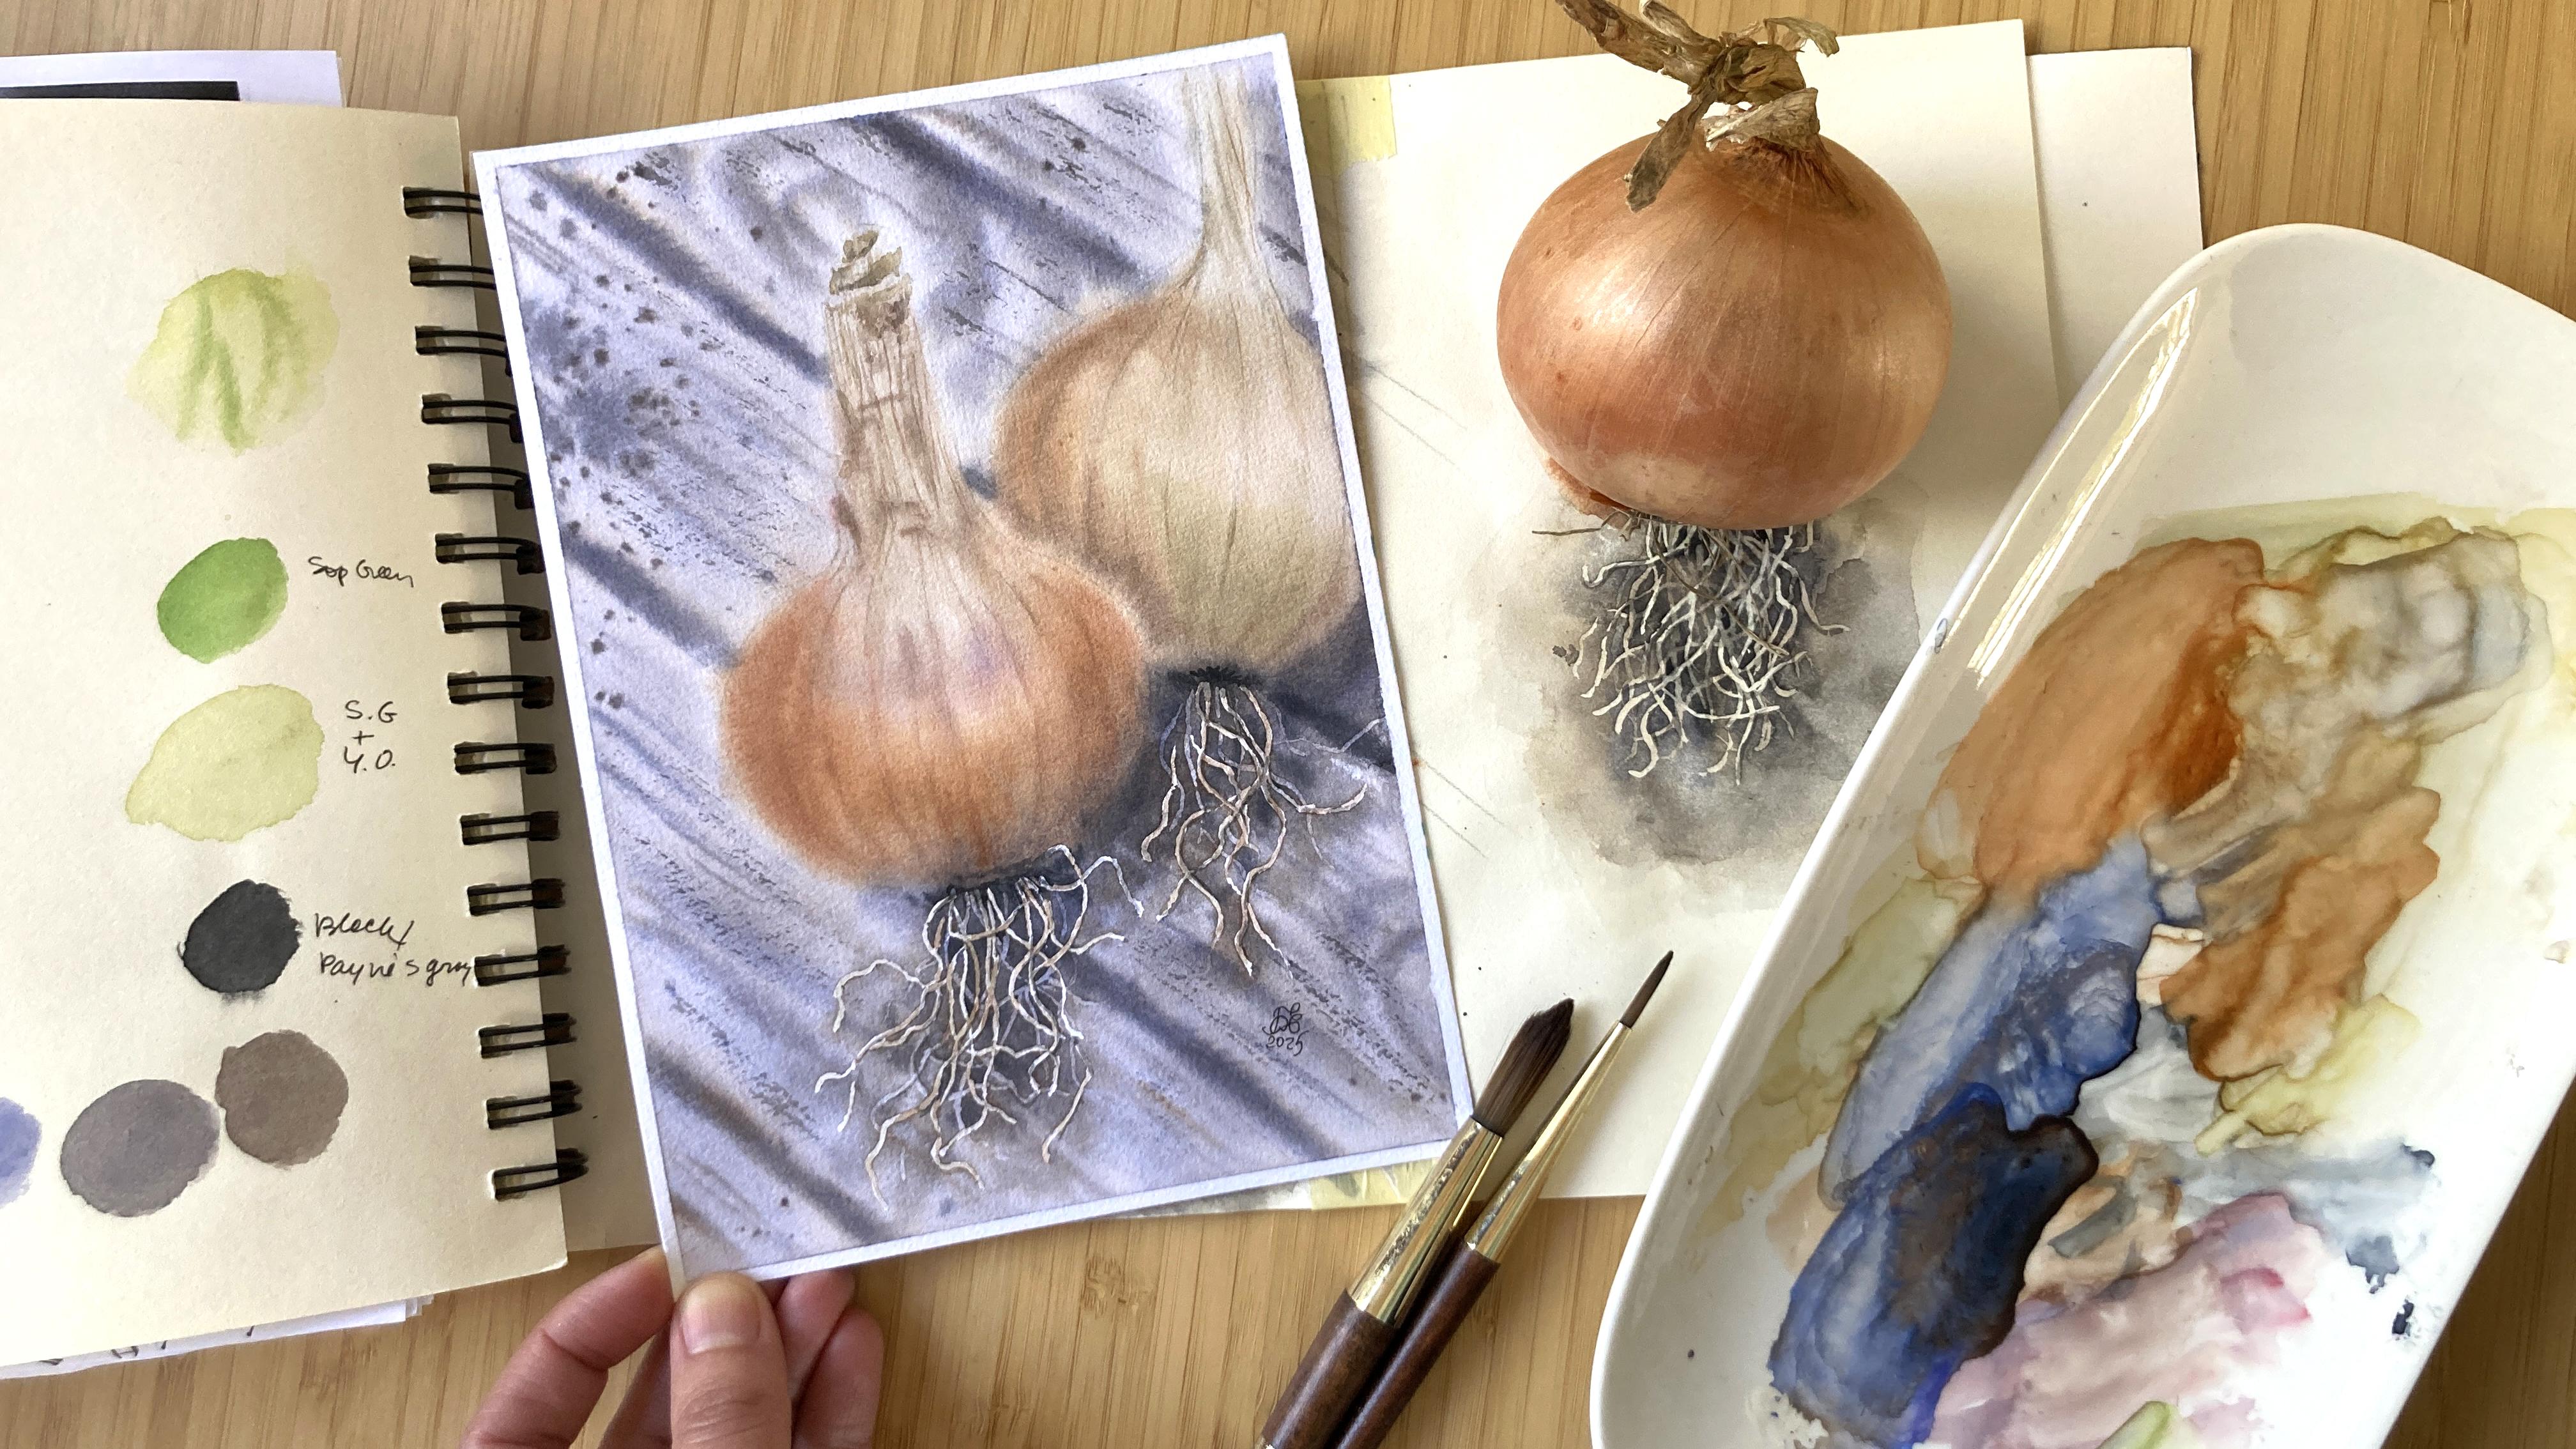
5. Painting Steps - Understanding Steps for Easy Layering: If you look at the
finished painting, it might seem complex, but it's actually
quite simple when broken down into clear
manageable steps. Water color is ideal
for working in less. Each step is easy on its own. Yet they build upon each other to create a rich layered result. So how we will paint the onion. We'll begin by
masking the roots. A very easy first step. Next, we'll wet the paper and paint the general
shape of the onion. Then we'll move on to
the wooden surface around it using a few
expressive lines. To deepen the onion richness, we'll add more color to them. And finally, we'll finish
with delicate details. When you look at each step
separately, it's quite simple, but the combination of
these small steps leads to a beautifully complex
looking final artwork.
6. Exercise - How to Wet the Paper Taped on the Painting Board?: Why do we need to
wear the paper? Is the essence of
watercolor magic. Soft transitions and
beautiful blends become possible when
your paper is moist. How to wet the paper
when it's taped to a painting board so that you don't disturb
the previous layer. Tilt your board at an angle. Take a large soft brush, wet it thoroughly and gently touch the paper without
applying pressure. Just enough to
release the water. You'll notice the water
gathers into a bead or drop. That's exactly what you want. Then continue brushing
line after line, guiding the water beat across the paper until the entire
surface is evenly moistened. This technique works well
for smaller formats. For large sheets, wetting
both sides of the paper may be more effective as it helps slow down the
drying process. Let's try quick exercise. Use any sheet of
watercolor paper, even scrap paper with
a clean backside. Mix a very watery wash
of your chosen colour. Hold your paper at an angle. Paint one watery line and observe how the water
pools at the edge. Then continue painting
line after line, guiding that water be downward. This simple practice
helps you understand water control and the consistency
of your watercolor mix. And it's great to warm up
before the actual painting.
7. Get Started - The Roots: In this quick step, we are going to mask the roots. It's important to use a fine
brush for it and afterward, clean your brush thoroughly
using some soap and water. The finer the roots, the more detailed and realistic
your painting will look. Take some masking fluid and draw thin lines using the
pencil drawing as a guide. We won't mask all the roots, only those lying on top and
appearing the lightest. Leave some roots trans
unmasked for later detailing.
8. Painting - The Onion Shape: In this lesson, we will
paint the onion shape. Let's begin by
wetting the surface thoroughly by brushing the
paper with a very wet brush. After the paper is fully
saturated with water, we will brush it again
with a damp brush. Therefore, squeeze excess water from the brush with
a paper tissue. Brush lightly a couple of times. If you live in a
very warm climate, skip this step and start
painting directly. Mix burnt seen and
alizarin crimson. It's always amazing how softly the watercolors lay
on the damp paper. So lay the color
outlining the shape and color the low part of the
onion that is in the shadow. Mix next ultramarin and a lazarm crimson
for a violet color. Color loosely the upper part, where the slightly
glimmering much surface of the smooth paper
skin reflect the sky. Mix yellow ochre
and paints gray for a greenish gray and
color the dried stem. I recommend using
100% cutton paper or a blend between
cutton and cellulose, as 100% cellulose will dry
faster than catton paper. Add the brow now more
richly at the rounded edge. Also more greenish
gray for the stem. The goal of this
step is to loosely define the shape and
the color of the onion, fully enjoying the
diffusing capability of watercolor magic. Define the shape of
the second onion. I added one for composition, but of course, you can
just paint one onion. Me brown and rose red
to add saturation. I always do it in small steps, building up the
shape as watercolor becomes lighter when it dries
or diffuse into the paper. So more creamy color to the
edges for a rounded form. With a fine brush and
just the same mix, I draw the lines
on the paper skin. They look very contrasting now. Draw the lines on
the second onion as well to accentuate
the rounded form. With the tip of the fine brush, mingle the stains with each other for a more diffuse look. I add a little yellow
ochre as well. I move the color to define
the shape using a fine brush. The strokes on the
paper feel velvety, and you see directly
that they become diffused and mingle
with other colors. Dab the brush on its
tissue and leave the color in a couple of places to
accentuate the highlights. Mix a bit of burnt sienna, paints gray and
telazarin crimson. We will paint the folds and
shadows on the dried stem. Paint with a fine brush
loosely defining the shape. They will look
like rippled skin. Draw the lines with the
same color on the stem. Some yellow oca and paints gray to paint the
falls on the stem. Lifting some
highlights will make the surface look more
rounded and realistic. Lift the color revealing
the white paper. Dab the brush on the tissue and repeat till you are
happy with the result. Some greenish gray to define the shadowed lower part
of the second onion. A couple of lines on its dried stem and shape to
make it look more round. A pair of lines to make it look rippled using the dark
brown left on your palette. With a bit of lifting around and between
the painted shadows, we complete our step. Let's dry the paper.
9. Painting - The Wooden Table: Let's start by wetting the artwork with a
thoroughly wet brush, just like we did in
the exercise lesson. Gently and lightly move the brush without
ablank pressure. I lay the paper flat and
give the table surface an extra brushing with a wet brush to saturate
it more deeply. It works perfectly as the wooden area hasn't
been painted yet. Then I squeeze water from the brush with a paper
tissue and lightly brush the surface again to absorb any excess
water from the paper. Once that's done, we
can begin painting. If you live in a warm climate, skip this last brushing and start painting
directly instead. First, I add some more
shadow on the bulb using a burnt sienna and
a sarin crimson mix. Spread the color, noticing how round the bulb
start to appear. Add more the same saturated
mix with a touch of pains gray and paint the
lower edge of the bulb, which are more shaded. Accentuate the lines
with the same colour. Use the tip of the
brush to blend the stains together
for a smoother look. I give the wooden ir
a quick path with a wet brush to ensure
it's damp enough. Using a mix of ultramarine
and burnt sienna, begin painting the table. Add scattered patches of more bluish or more brownish
tonee for an uneven texture. Notice how nicely
our masked roots stand out against the
painted background. Dance with your
brush further across the surface to cover the
table with colour lightly. Et's add more pigment
in the shadows beneath the onions and outline the bulbs with the
tip of the brush. Paint the gaps between the
wood and planks on the table. Add some more shadow
beneath the bulb. With the tip of the brush, define the wood pattern. Add a few lines for the texture. Paint loosely with the
tip of your brush. Notice how beautifully the
colors blend together. I still fall in
love with painting on wet paper every time I do it. Add some darker accents
between the roots. Saturate your brush
with pigment and deepen the color of the gaps
between the wooden planks. Tap one brush loaded
with colour against another to let the splatters
fall on the wooden table. They will resemble soil
crumbs scattered on the surface as if the onions were freshly
gathered from the garden. Paint additional lines
for the texture, taking advantage of
the peppers dampness. Add more soil specks if needed before drying
the pepper thoroughly.
10. Painting - Adding the Richness: Let's add some richness and refine the shapes of the onions. Hold your painting
board at an angle, take a soft round or flat
brush and wet it thoroughly. Just like in the
previous exercise, gently touch the paper without applying pressure and
moisten the surface. For such a small format, it will be enough to
add a couple of stains. Mix yellow ocha with
a touch of sub green and use it to paint the rounded shape of
the second onion. Add a bit more yellow oca
to one side for variation. Dry your brush on its
tissue and use it to blend the applied color
softly into the paper. Next, mix burn sienna
with yellow oca to create a warm brown and use it to add a shadow behind
the first onion. With a fine brush, paint subtle lines on the onion skin to suggest
its delicate texture. Deepen the foam by adding soft shadows around
the edge of the onion. Take a fine round brush, wet it, dab it on a tissue, and gently leaf highlights
by softly rubbing the paper. Add a couple of lines on the dried stem to
bring out more detail. Feel free to use any brownish
mix left on your palette. Mix burnt sienna with pens gray for a most
saturated shadow. It will help round out the foam. And since the paper is
still slightly damp, the added color will beautifully diffuse into the previously
painted shadows. If there is a spot
you're not happy with, adjust it easily with
a clean, damp brush. Now let's add some
warm brown stains to the table behind
the masked roots. Just a few here and there. Accentuate the shadow lines on the dried stem using a fine
brush with a pointed tip. Add some texture
with small dots. Paint a few more delicate lines on the onion skin and the stem. Painting is a bit like
assembling a puzzle. Each stain and line contributes to the
shape of the piece. Do the same for the second onion using quick, loose strokes.
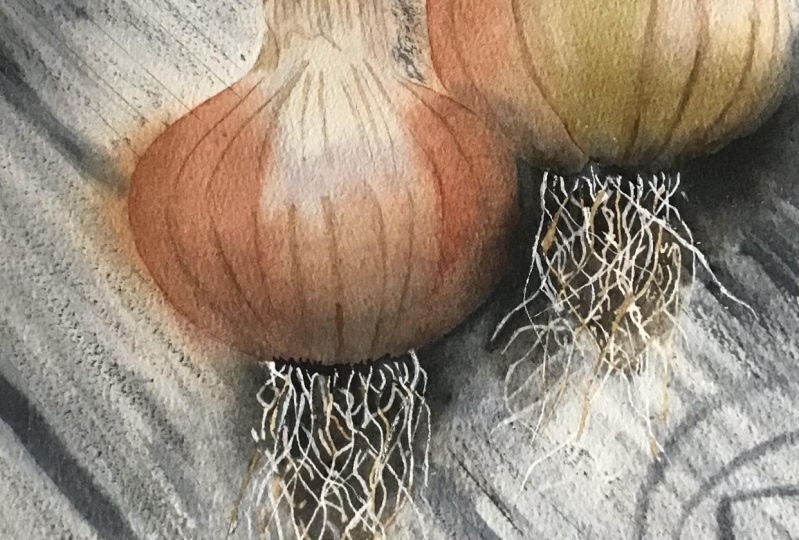
11. Painting - Masking the Roots for a Layered Look: In this short lesson, we are going to mask the roots that were left unmasked earlier. This will take on the
color of the area beneath and around the
previously masked roots. That is excellent for
showing the layered effect. Some roots will
appear lighter while others will lie beneath,
slightly shadowed. So take a masking
fluid and trace fine thin lines using the pencil marks of the
remaining roots as a guide. The finer the lines, the more realistic the result. Once you are done, jump
to the next lesson, where we'll add shadows beneath the roots and paint
the final details.
12. Painting - The Final Details: Start by gently brushing
the surface with a wet brush without applying pressure to
moisten the painting. This will create
soft transitions and prevent harsh edges. Mix burnt sienna and
ultramarine and apply playful stains here and
there around the root area. Since we masked the roots
in the previous lesson, these stains will now serve
as shadows beneath the roots, adding depth and a realistic
feel to our artwork. You'll notice the
previously masked roots appear gray against
the dark background. Fabulous. Don't hold
back on pigment. Make the mix as
saturated as possible, applying it into
the deepest shadows beneath the onions and roots. Outline the onion shape with this dark mixture to
enhance depth and contrast. Use a very dark tone, almost black, scattered between
the roots in a few spots. I also lift a small area between the roots where I want more of the table colour
to show through. Mix yellow ocha with whatever remains of the brown
blue mixture on your palette and paint
the shadowed lao part of the second onion to
enhance the rounded effect. Dry the painting thoroughly with a hair dryer or let it air dry. In this quick and fun step, we'll add wood texture using
a dry brush technique. The brush doesn't need
to be completely dry, just slightly damp to
pick up the paint. Then turn your
painting so you can gently wrap the brush
horizontally across the surface. With swift movements,
let the bristle slightly skim the paper without
pressure like a feather touch. This will create
broken stroke that beautifully mimic the
irregular texture of food. I absolutely love this technique for painting wooden surfaces. Continue this process until the entire wooden area is
covered with textured lines. If your brush dries out, touch just a drop of
water with a tip to load more color from the
palette and continue. I'm sure you love the effect. M dry the painting
again thoroughly. Erase the masking
from the roots to reveal the white and
gray paper underneath. Notice how nicely
the appear layered. Now we'll refine them a bit
for a more realistic look. With a fine brush, paint some of the lightest
roots a soft brown, others a dark brown or even dark gray to suggest roots
that fall into shadow. When you're happy
with the result, add a line of shadow beside individual roots to give them
more definition and depth. Define the root bathed
with dark brown or black and darken the
roots growing from it. Using a mix of yellow
oak and pains gray, define the shadows of the dried stem and add a few hair thin lines
from the stem to the bulb. Congratulations on
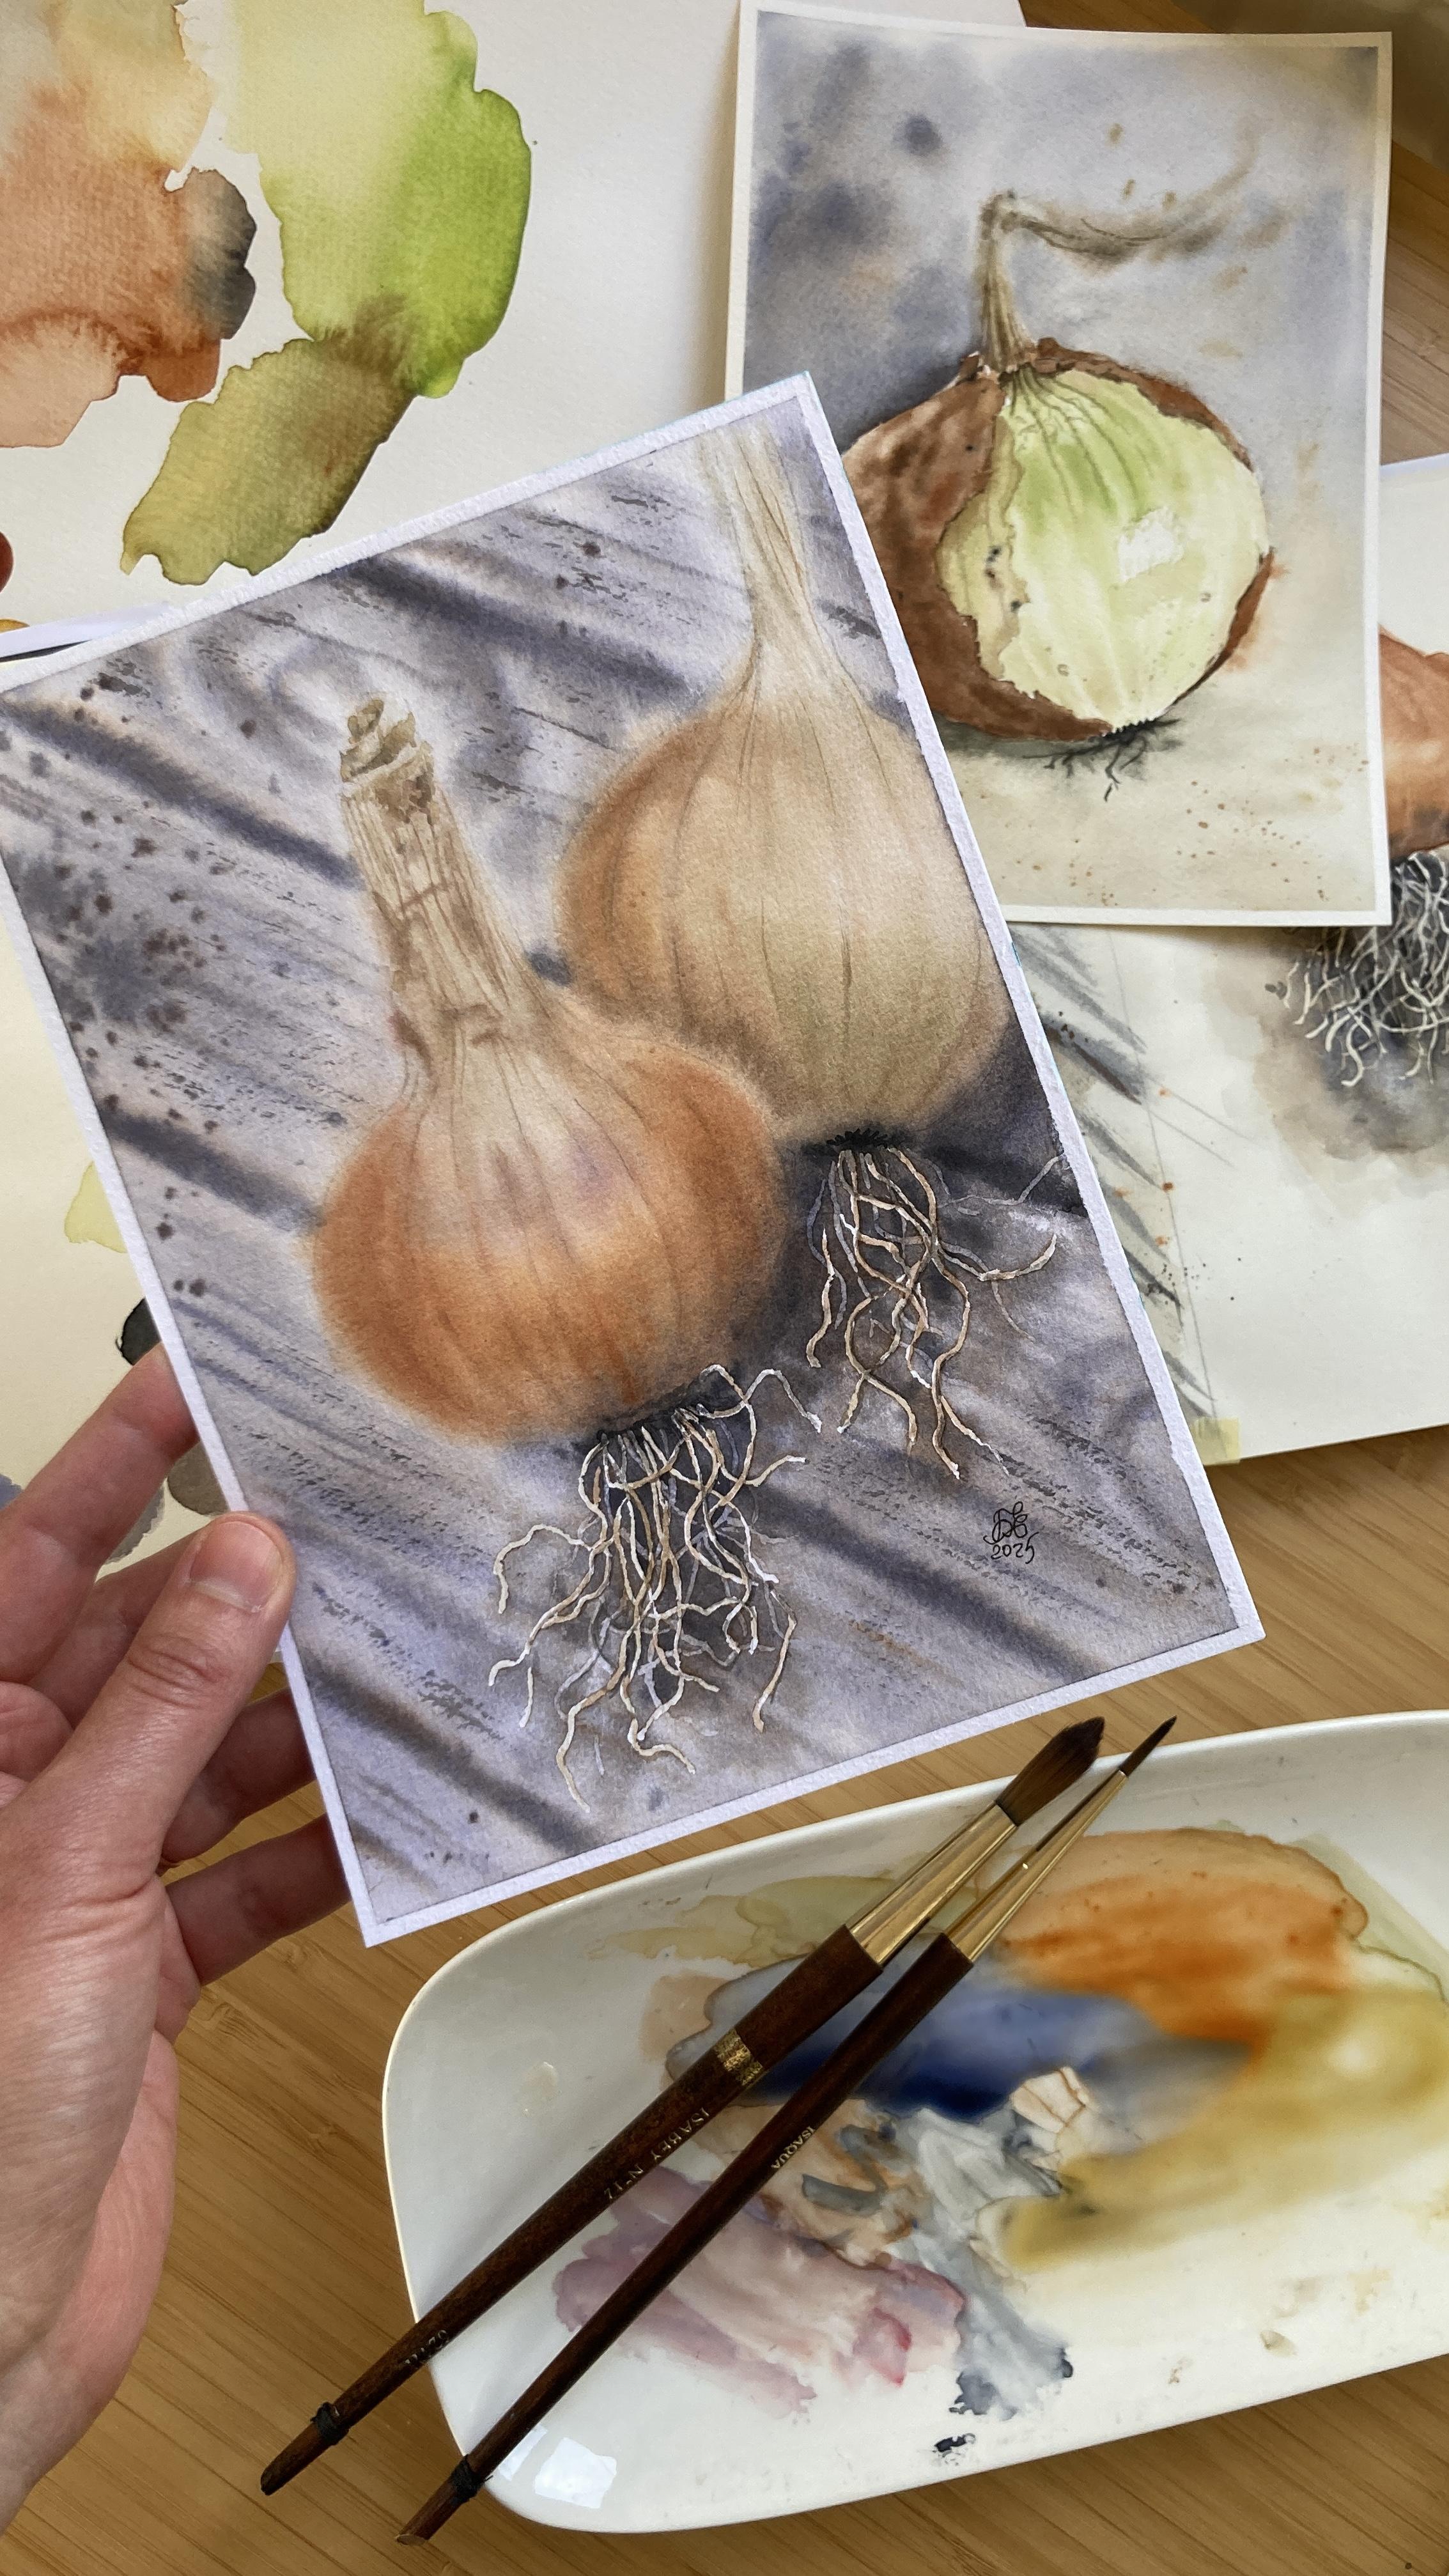
completing the artwork.
13. In a Nutshell - Concluding the Class: Let's look back at our
watercolor journey. We began with an
introduction to layering to achieve fabulous effects with
very easy separate steps. We explored practical
methods for choosing the right colours and filled out watch palettes using a limited earth tone selection
and beautiful mixes. A quick warm up exercise
showed how to wet the paper correctly when it stepped on a painting board to achieve
beautiful colour transitions. We started by masking the roots and created the
shape of the onions. We proceeded with painting
the wood table surface loosely and added more
richness to the bulbs. After that, we created
layered roots by masking them and painting
the dark shadows around to make them pop out. With the last final details, we completed our artwork. If you enjoyed the class, I would be really grateful
for getting your review it. I hope to see your artwork after you put so much
hard work in it, and I love to hear all about your painting process if you had any difficulties or what was the most enjoyable part
of the painting process. Share your artwork in the
Student Project Gallery by clicking on Submit Project under the Project
and Resources tab. Every piece of art, no matter the level
represents time, effort, and personal expression. But most importantly, it's a part of your artistic journey. It's a visual record of
your growth as an artist. If you have any questions, I'm happy to respond
and to help. Just post your thoughts
in a discussion thread. If you prefer to share your artwork on
Instagram, please tag me. I would love to
see you painting. Skillshare would also love to see the artworks of my students. So please tag them as well. I hope you enjoyed this class. I can't wait to see
your sketches and paintings in the project
gallery. See you soon.
 Evgenia Cordie, Professional Watercolor Artist, Belgium