Transcripts
1. Intro: Hi. And welcome to this class. My name is Julia, and
I'm a teacher and self taught illustrator
based in Germany. I've always been fascinated
by pattern design. In fact, wanting to
learn how to create repeating patterns
was what inspired me to learn digital
tools like Procreate, Dobe Illustrator, hot shop, and so on, because before that, I only did watercolor, and I really desperately
wanted to turn my hand painted
whales and animal into beautiful patterns. Now, fast forward,
six years later, I've learned quite a bunch about all the different
tools out there, and I really came
to love Procreate. But while Procreate is a wonderful tool to
create illustrations, creating patterns
there isn't always intuitive, especially
for beginners. Now, quite recently, I
discovered the pattern draw app, and I was quite impressed at how straightforward and
simple pattern making can be. And that discovery is what inspired me to
create this class. Class is designed for beginners who want to experiment
with pattern making in the pattern draw app and get to know the app
in a structured way. At the very beginning,
I will give you an overview of the
pattern draw interface. In this lesson, I'll
walk you through the basic structure
and layout of the app and all of
its main functions. Now, after that, we'll create a simple floral
pattern together. The design is based on one repeating flower
and leaf element, and you definitely don't need any special drawing
skills for that. Step by step, I'll show you how to draw and move elements, how the pattern comes together, and how you can create different color variations
of the same design. At the end of the class, you learn how to
export your pattern, so you can use it for
different purposes, like maybe using it as a
wallpaper for a digital device, or also uploading it to
a shop like Spoonflower. Your class project is to create a simple floral
pattern design and upload this design to the class project section for me to see and appreciate it. I hope you enjoy this
class and have fun creating your first
pattern in pattern draw. See you in class. Bye. Oh.
2. Overview I: Canvas Setup, Tiles, Colours: Hi, and welcome to this lesson. In this lesson, I
want to give you an overview of the
app, Pattern draw. It's mainly intended
for beginners or anyone who wants a
clear starting point. If you are already familiar with pattern draw or also
with Procreate. So if you know all about
using brushes, using layers, selection tool, blending modes, et cetera, you may choose
to skip this lesson. Now, I'm in the
app pattern draw, and I want to start
with the canvas setup. You can create a new canvas by hitting the plus sign here, and then you can
choose a custom size. Now, the longest
side right now is limited to 304.8 millimeters. But beneath that, you can choose every size that you wish for. You could also, instead of
millimeters, go with pixels, centimeters or
inches, and you can either do a square or you
could also do a rectangle. Now for this lesson, I will
go with a rectangle and I will choose centimeters,
just hitting that here, and I will just go by
20 by 25 centimeters. Now, with the DPI, the recommended
default is 300 DPI. If you've got the free version, you can only go as high as 210, and I can also see
the maximum layers I get with all of
these settings. Now, if I want more layers, I can't change that here. I could just make
my canvas smaller. Let's go with 20, and
then automatically, I will get more layers. Now, the larger your canvas is, the fewer layers you get. Let's set that back to 25. Now here you also got the option to choose
a pattern type. And an important note here, you can change the
pattern type later on. So if I now choose to
do a full drop and then in a couple of minutes decide I want to
have a half drop, I can then change that inside of the canvas I will be
working in in a minute, but not every design works
well with every pattern type. So after I've already
started painting, I can still choose a
different pattern type, but what I've already
drawn or painted might not work with
that pattern type. Now with the free version, you only get the full drop, and I think the very last
one, the pyramid mirror. I can't choose the pyramid
mirror right now because I don't have a square here because I've chosen
to do a rectangle. There are some pattern
options which I can't choose. Let me just quickly show you
go back to having a square, and now I've got all of the pattern types available
that I want to choose. But like I said, I want
to go with a rectangle, so I will go with 25. And then I will
choose the half drop here and just hit Create. Now, once inside the canvas, you can see the
tile border here. And if you tap on that
button here, tiles, you've got different options, you could have a tile
border on all units. Then it would look like this. You could also choose to
have no tile border at all, which I would not recommend
because you need that, especially in the beginning. And here you've got
the pattern view that you can also
enable or disable, and I will just very quickly draw something to show
you what that means. Now, if you draw inside
of pattern draw, and that is so special
about this app, pattern draw automatically
displays the live repeat. So it lets you instantly
see your pattern tiles. Now, I would just draw
a line here and you can see this line got repeated
over and over again. This is already a
seamless pattern. And I will just quickly
go back to this. Now, if I choose to
disable the pattern view, then it would look like this. Let me turn that on again. Now toggling off the tile border might be nice if you want to see your pattern without the distraction of
that tile border. You can also edit
the tile border. So you could make it thicker. You could also bump
up the opacity, then it's much more visible, or if you don't want
it to be too visible, you just bump down the opacity or maybe
also the thickness. But all of this is just
personal preference. I will just make it a bit less visible again and
then hit check. Okay, so I told you before that once you've drawn
inside of the canvas, you can't just change
the pattern type to whatever type of
pattern you want. Now, if I now go and change
this here to full drop, then it would cut off the elements that I had
drawn over the edge, and this does not work anymore. But had I just drawn
something in the middle, that would not
have been affected by changing the pattern type. So I will just quickly get rid
of that here and show you. Now I'm drawing a
circle in the middle. It's now full drop, but I could change
that to half drop or maybe half drop
flip and so on. Let's talk about colors. If you want to choose a color, you have to tap
that little circle here and then you've
got the disc, and you can move the inner
and the outer circle around, and here you see the color
that you would draw with. If I go here, the color gets much more saturated and if I
change the circle here, it becomes another
color altogether. Now I've got this very
saturated turquoise, and if I want to desaturate
that or also make it darker, I have to work with
the inner circle here. You could also go to value. Here you can enter a specific
hex code that you've got in mind that you might
want to use for your pattern. And you can also change the color that you
want to use here by working with these I'm not quite sure
what these are called. I will just call them regulators because they regulate the color. Now, going back to the disc, one specific feature that I really like about
pattern draw when it comes to color is that if you pick a
color like, let me see. Let me pick this yellow. It will automatically give you monochromatic analogous and
complimentary swatches. Now, this is a feature that
does not come with Procreate. In Procreate, you've
got your history of swatches and then you've
got your palettes here. But working with patterns, colors are so important, and that's why this
is very helpful here to have these immediate swatches
that you could work. Now here you've
got your palettes, and there are some
premade palettes in here. Here, I've already started
creating my own palette. This is a palette I'm using
for a Skillshare class. Now, to create your own palette, you can hit the plus sign here, and then you can just
hit new palette, and that would give
you an empty palette which you could
fill with colors. Could also create a
palette from photos, which is very nice, and I will show you in a minute
how that works. Or you could create a
palette from your camera. So that would just
open up the camera, and now I could take a photo, and then the palette
would consist of all of the colors that are in this
photo that I've just taken. Now, let me show
you how a palette from a photo would look. I will hit the plus sign
again, new from photos. And then I could choose a
photo maybe. Let's see. So I've got these oil
pastel textures here, and I will just tap that. And now these colors
all come from the oil pastel texture
photo I've just used. Now, we'll just quickly
show you how you can add colors to your palette. So I'll just make a new palette. And I've got this yellow here, and if I now tap, then I have a yellow swatch and I will choose the blue here. It's now here and if I tap, it will have the blue swatch. If I want another color, I could also go
here and here and now go back to the
palette and now I can also add this purple. To rename the palette, I will just hit these
three dots and go to rename and call it test. Hit rename. And I could
also share the palette if I wanted to give it to someone else who's working with
pattern draw as well. I could duplicate
it or delete it. Now, one very useful tool that you might
need when you want to create your patterns
is the color drop tool. If I tap here, hold, and then drag the
color over here, and if I now let go, the layer becomes purple. Now I will undo that. And you can also I've
got this shape here. This has to be completely
closed for this to work. I could also have a circle
and drag in the color here, and then you've immediately
got this filled out. Now, with textured brushes, it often leaves
these white lines, and you have to fill them in, but it's still much quicker than painting in
the color manually.
3. Overview II: Brushes, Import, Pattern Styles and Selections: Now let's hop over
to the brushes. You find your brushes
here by tapping that little brush
icon or pencil icon. And there are all different
types of brushes available, like pencils, inks, pastels, air brushes, markers, wet
brushes, dry brushes, sprays, dies, and furs
and also sparkles. And you can mark brushes as favorites by just
tapping on the brush. One more time, and then
hitting that little star icon, and then the brush is
saved to your favorites. You can also customize brushes. Tap on them, you've got
all different kinds of options to customize
your brushes. Now, brush customization
is a very complex topic, and I don't want to cover
that in this overview, just so you know,
maybe later on, it is possible to customize your brushes
in pattern drawer. Now, you can also
create custom brushes. I did that, for instance, with this bird stamp, and I did that by creating a
copy of an existing brush. So, for instance, I will
choose the hard round. I will swipe that to the left. Then I will hit Duplicate. And now it's already in
my custom brush library, and now I will again tap twice, and now I could adjust the
shape or the grain and create a custom brush that I might want to use
for my pattern. Now, to control your brush, so to make it smaller or bigger, you have to hop over here. Now, right now this brush is 69 pixels big could make
it smaller or bigger. Now, theoretically, you can also adjust the opacity of the brush. But I just tried
that and I realized that this is the brush
at 100% opacity, and this is the brush
at 38% opacity. Now, it should be lighter. The app is fairly new. So I think there are still some bugs they need to work on. But an option later on, if you want to
reduce the opacity is always to go to
your Layers panel, and if you tap on the N here, you could reduce the
opacity and this is how the brush would
look with 38% opacity. Now here you've got
the brush history, and there you can access the brushes you've
worked with before. For instance, now I could
choose the choppy ink, and I feel that's a
very helpful tool too. Now, I want to show
you the eraser. First, I will make
the opacity to 100%. Again, now, with the eraser, you can obviously erase. But I think it's important
to know that you can choose any brush as an eraser. So right now, I've got the
bowling pen as an eraser, but I could also maybe
go with the chalk, and then I will show you the
edge of the chalk eraser. Looks very different. I have to make it
a bit bigger here. Looks very different to the
edge of the bolding pen. Now, this is a very
straight edge here. And if I erase with the chalk, I get this lovely textured edge that I might want to
use for my patterns. Okay, next, I want to
show you the import tool. I will just hit that here. And you can either
insert a photo. You could also take a photo from where you are sitting
or standing right now. You could insert a file or
you could insert stickers. I will just quickly
show you how it looks if you insert a photo. Now, for instance, I could choose to use these
magnolias here, and then after import, I can immediately flip it
horizontally or vertically. And with these
little arrows here, I can move it pixel by pixel to the side or also down or up. I don't know if you can tell, but if I tap that
again and again, this photo just moves pixel
by pixel to the right. Now, let me get
rid of that photo here and also toggle off
the painted layer here. Yes, like I said,
I could now also take a photo from where I'm sitting right now and import
that or insert a file or, and this is a wonderful option, I could insert a sticker. And I've actually got
two options here. I can create custom stickers. Now, if I draw an
element in a pattern, I can select that element and
make a sticker out of it, and then I can use
it in every pattern that I create from then on. So here I've drawn a flower, which you probably can't
tell because it's white, which I could now put
into this canvas here. I've also got this bird, which is actually hand painted, so I imported that from a photo. So this is very efficient for recurring elements
that you want to use. Now, you can also
choose a premade shape. I will just go over here, and here you've got a
library of 143 stamps. And let me just choose one here. If I now hit that, I will show up in
the canvas again. I can flip it
horizontally, vertically. I can also adjust the size here, and I could also drag
a color into it, and then it immediately
has this color here. Now, this is extremely
helpful and time saving if you're creating
geometrical patterns. Now, I've talked
about this before, but I will just hit that. Now, like I said, you can choose all different
kinds of pattern options. Maybe I will just do it like
this so you can have a look. Now, let me choose the
mountain and the fish scale. And you've got the fallen
leaves and the butterfly. Now, you don't see a huge
difference between some of these patterns because I only got this one circle
here in the middle. But once you've drawn more
elements onto your canvas, you will see that these
are actually quite different and it's so much
fun experimenting with these. Now, next to the pattern button, there is this button here, and that will just get you
back to your tile border. And now to demonstrate
the selection tool, I will quickly just draw
in two circles here. Now, you use the selection tool to select an element
which you will then move or drag around
or flip horizontally, vertically with this
arrow symbol over here. Now, let me show
you how that works. You tap the selection tool
and then you draw around it. And now I've got only this
circle here selected. So if I now want to
move it on the canvas, I can do that by tapping next to it and
dragging it around. And like before, I can
flip it horizontally, vertically could make it bigger. And also use these
arrows to move it pixel by pixel to one
side or the other. Now, once I let go,
this yellow button merged with the purple circle. Now, if I select
that one more time, it doesn't just
select the yellow, but also the purple. So let me show you if
I now tap the arrows, now it will move all
of this together. So this is why it's important
to work with layers, which I will talk
about in a minute.
4. Overview III: Actions & Layers: Now moving on to
the actions tool, first of all, I have
to say, not all of the functions will
be covered here. That's way too extensive. But I will talk about
the key features. So if I hit the wrench icon, I've got different
options down here, and I will start with edit. Now I could cut elements, copy layers or elements,
copy everything. I can also crop elements
or replace them. Then I will move on to Canvas. Now, here you find
the option grid, and this will give you a grid which might be helpful again with arranging your patterns. You can also edit the grid
by hitting edit you can adjust the size or bump up the opacity so
it's a bit more visible. Then you've also got this symmetry tool which allows
for symmetrical drawings. I will just toggle that on. And then you see it drew
this symmetrically. Okay, then let's move on. We'll toggle off the symmetry. Picture and picture is useful if you want to use a
reference for your drawing. So I could now import a photo
like the magnolia again, and then it's a bit big, but then I could use that as
a reference for my drawing. And then I've got the
saturation brightness, which is nice if you want to adjust maybe the brightness
of your drawing. Now, if I bump that up, everything will get much
lighter if I bump it down. Will eventually get black. Let's get back to 50%. Same goes with saturation. And with the, you can change
the color completely, maybe like this or like this. Let's again go back to 50%. Then you've got
the Gaussian blur, which will blur everything
and the half tone, which I will probably never use, but maybe you are into
that kind of look. And last but not least,
you've got liquefy, which I always feel is
a very helpful tool. Now, with the liquefied tool, you can push your drawing
to all different sizes. I will make it a bit bigger. You could also do stuff like
this and have a swirl here. I use that quite
often in Procreate, at least, and I feel
it's very helpful. Now, here you've got
your canvas information, how big your canvas
is, et cetera. Going on to share, there are the or export options. Now, you can export the
file here either as a PSD, if you want to work on
it, when Photoshop, or you can save it as
a pattern draw file, then maybe in a year, if you want to get
back to it and you deleted it from your iPad, you will still have the
original layered file, which you need if you want to change anything
in your pattern. Then you can export a single
unit and a seamless unit. The single unit and
the seamless unit, if you use full
drop for instance, are looking exactly the same. If you've got a half drop or
any kind of other pattern, the seamless unit
might be the option you need if you want
to upload your pattern to a print on demand
site where it needs to work with the design
you want to put it on. And then the last export
option I feel is very interesting because with
this, just hit that. You can choose a custom size. So you could do, for instance, A four, or you could
create a screen protector. Now, I've already
got a four here, so 210 by 297 millimeters, the DPI is 300. And I could now
choose the tile size, so I could make it much
larger or also much smaller. And then I would export this as either a PNG or JPEG or TIF
or PDF, whatever I need. Now I will hit Cancel
because I don't want to export this
wonderful design. Next to the Share button, you've got your preferences, and here you've got all
different kinds of options. For instance, have a dark mode. Left hand interface would mean that your panel here
is on the right. You can either enable or disable paint with fingers
and here you could edit your brush history
if you want to or here you can
edit the snapping. I love using snapping
with patterns, but maybe you don't
want to have snapping, so then we would just toggle
that off hand gestures. Now, I use a lot of
these hand gestures. I don't use the hold for shape, especially because you've got all these lovely shape
stickers in here, so I don't try to create
shapes on my own. But let me show you if I do a two finger tap that
will undo my last steps, And if I do a three finger tab, that will redo them. And I use that on a regular basis because
it is just so helpful. If you put a finger onto
the canvas and hold it, that will pick the
color that you're on. So you can see how
it changes here. Now, I'm on this
lovely yellow or red. And if I now let go, it chooses that yellow. Last but not least, there
is a help button which you might have a look at if
you feel you need help. Now in the last step, I'm
going to talk about layers. Now, I will just
quickly delete these two because I want to
show you how layers work. Now, if I draw
anything on a layer, let me just draw this
lovely circle here. Then use a second layer, which I do by going
to the Layers panel and hitting the plus sign here. Now, if I draw a
red circle here, it's on top of the
yellow circle. If I were to drag that now
beneath the yellow layer, then it's not visible anymore. This is not because it's gone, but it's because it's
beneath that yellow layer. So you can imagine
having two papers, one of them having a drawing of a bat and the other one having
a drawing of a monster. You can see you can only see
the drawing that's on top. So if the monster is on top, you see the monster, and
if the bat is on top, you just see the bat. And for patterns, I
feel layers are very important because if you've got all your colors on
different layers, then that's the best way to get different color options
for your pattern. Now, if you tap on the
end of the layer here, you can change the opacity. Now, if I make it more
and more translucent, the red will show through. And if I make it more
and more opaque, you can't see the red circle. Then you've got all different
kinds of blending modes, which I won't go into detail just so you
know they are there. They create effects
between two layers. The layer beneath
works with this layer here if I choose these
different blending modes, and sometimes it's just
fun to play with them. But I will go back
to normal here. Now, you can also
tap on the layer, and then you've got all different kinds of
option here as well. One option that I actually use quite a lot
is clipping mask. Clipping mask means
that the layer on top only applies
to the layer beneath. If I do that now, if I make this layer here, a clipping mask, the yellow
will only appear to the red. And because the red
is much smaller, in a minute, you will have
a small yellow circle here. So let me just quickly show
you hit clipping mask. Now, the yellow
here, like I said, only applies to the red, and that's why it got smaller. Okay, so one last thing
I want to show you, you can duplicate layers
by swiping to the left. And if you hit duplicate, then you've got
another red circle and you can also delete layers. Like this and that's actually all I want to say
about layers right now. I really feel to understand the concept and
usefulness of layer, you have to work on at least a couple of patterns
to get the hang of it. So this is definitely something that comes with a
lot of practice. So I really hope you found
this overview useful. And now let's hop into
the next lesson. Bye.
5. Important UPDATE: Colourway Tool (Jan 26): So recently there has been an exciting update to
the pattern draw app, and that is the colorways tool. I will reflm my
lessons on creating the pattern tile and also creating different colorways
as soon as possible. But in this quick update lesson, I will quickly show you how
the colorways tool works, so you can already incorporate
that with your pattern because it doesn't
really change much of the creation of
the pattern process. It's more important later on for the creation of
different colorways. Now, if you want to use
the color Waite tool, you actually have
to toggle it on. So now it's off, now it's on. And then you choose the pattern type that you want to use. For this class, I went with the foldrop and then
you hit Create. And this little symbol here shows you that
colorwase is enabled. You can see here when I created the pattern
for this class, the color Wise tool
was not yet available, so it doesn't have this little symbol down
here in the left corner. Now, we'll go back in here. Now, in a minute, when
you create your pattern, the only difference now will be that if you create
a new element, you don't have to create a new layer by going to the layers panel and
hitting the plus sign. Instead, what you
will do is to just draw all the elements that
will belong to the same color. So let's say I'm drawing
some flowers here, and these are supposed
to be yellow. And now, when I've done
all my yellow flowers, let's just color in
one of them quickly. All of these are now
on Color layer two. I can just delete that here. And if I now pick a new color, let's say I will pick
this off white here. And if I draw with that, it will create a new
layer which will then be, in this case, color layer one. Now, I would strongly advise
to rename the layers. I will just quickly
do that here. So I will just tap on it
and then hit rename and call it yellow Rename, and then I will call
this here white. And now, every time
you use a new color, this will automatically
create a new layer. So you don't have to
do that manually, as I will instruct you in
the lesson as it now is. Now, let's use this brown here and draw leaf and another leaf. And then if I go to
the layers panel, you can see it
created a new layer, which I will now call rename. Brown and now I
could already change the color here by hitting change color and then
picking another one, which is already very nice. And then later on, if I tap this symbol here, the colorway symbol, here you can see this is the
colorway I have. And then I could create new colorways which I will later demonstrate in the newly filmed lesson of
creating different colorways. Now, to sum that up, if
you want to use the tool, hit colorways, use a full drop. And when you watch
the next lesson and go and create
your flower pattern, instead of adding layers here
manually with plus sign, you can skip that step, and you will have new layers automatically
if you use a new color. See you in the next lesson. Bye.
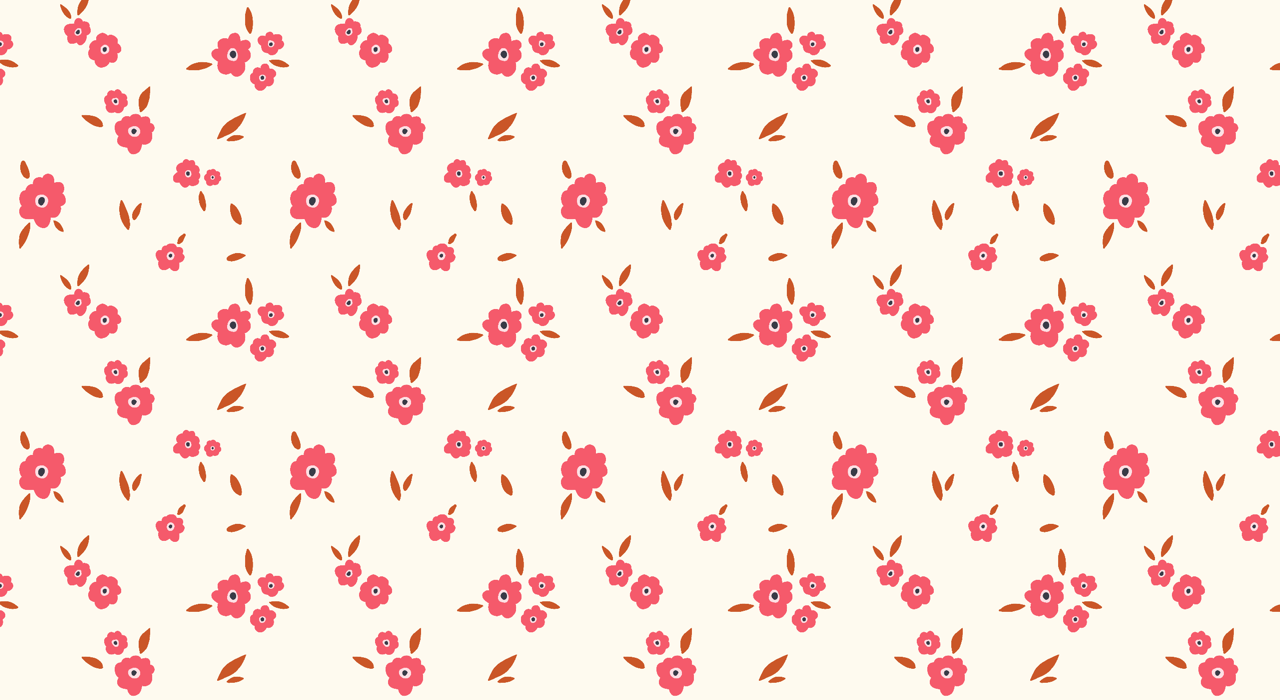
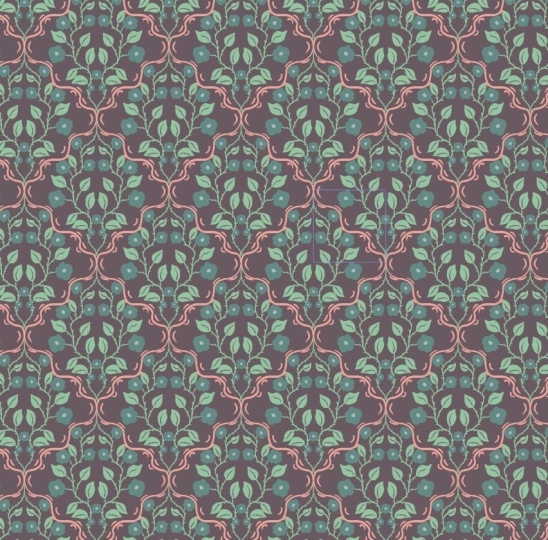
6. Creating The Pattern Tile: Hi, and welcome to this lesson. Now, before we begin
creating the pattern, I quickly want to show
you how you can import the color swatches
that I've used for the class if you want
to use them as well. Now, first of all, you have to download them from Skillshare, and if you do that on your PC, you need to somehow
transfer them to your iPad. Now, I've got mine
in my Dropbox and now I will hit these three dots, and then I can save
them to my device. And because I've
done this before, I could also just hit the
pattern draw icon and then it would immediately transport them into the pattern draw app. But I will save them to
files here and hit safe. And I will close that and then I will go to
my files, and here they are. And if I now tap on them, they are immediately
imported into pattern draw. Now, if you have never
imported a palette before, it might not import directly
like it did right now. Now, I remember the first time I tried to import the
swatches, I said, open and pattern draw here, and then I just tap that button and it
imported the watches. Now let's move on
to the pattern. Now, to create a new pattern, you first have to
create your canvas. You have to hit the
plus sign here. And then you can
choose a custom size. I will go with 20 centimeters
by 20 centimeters. You could also do pixels
millimeters or inches, and then the DPI is 300. If you've got the free version, your maximum DPI will be 210. Now, here you can choose all different types
of pattern styles, and I will go with a very
simple and easy full drop. If you've got the
paid version again, you could use the half drop, but this pattern looks
lovely as a full drop, so I will just hit Create. And now, the first
thing I will do is to have a different
background color, and I will choose this off
white here from my palette. And the brush I'm going to
use is called bolding pan. You can find it under inks. And then I will use the
pink here for the flowers. And I will just start out by drawing some of these flowers. Now, if I've drawn that,
I could just drag in the color here and also here. But then it leaves me
with this white line, which I have to take care
of as well because I don't want that to be there. Then maybe I will just make
the brush a bit smaller here. Oops. And Correct the shape of the flower a bit. Now, if you see me tapping on
the canvas with two finger, that's to undo strokes
that I don't want. Now, let me quickly show you
I don't want the stroke, so I just do a tap
with two fingers. If I want to get it back, I
could tap with three fingers. Okay, now let's go on and
fill the canvas with flowers. I will keep this
shape in general, but I will vary the size. I will also do some flowers
which are a bit smaller. And maybe a third one to
have a little cluster here. So I just saw that I could adjust the color fill threshold. I hope then this white
line won't appear, so I will bump that up. Oh, no. Not like that. I
will bump that up, it just hopefully we'll fill out the flowers
a bit better. Now, that threshold just
appeared when I dragged in the color and I just tapped
on adjust. Let's see. I will just fill out that here and then with
the next flower, I will check whether the white
lines maybe disappeared. Okay, I might do another
flower here. Let's drag in. Now, there's still
the white line. Adjusted a bit more. And let's see how that will go. Doesn't seem to shrink. Anyways, then I will
just do it manually. Now, I will keep on adding
a couple of flowers, and I will make sure
to vary their size and also to have some
of them maybe in clusters while others
are just on their own. And I try not to overthink them, neither the shape
nor the placement, because you can change
everything later on. Maybe do another flower
quite next to it. Let's see. Now, there is
still a fine white line, so I will just have
to live with that. Now, if I want to make
life easier for me, I could use elements
that I've already created instead of drawing all of them over and over again. Now, with these simple flowers, I really don't mind, it's
so easy to draw them. But let me just quickly
show you if I wanted to repeat this element
here in the middle, I could go to the
selection tool here. Select that and then
go to the wrench and do copy and then go again
to the wrench and do paste. Now I've got the
element a second time and I can drag
that along the canvas. I could flip it
horizontally, vertically. I could also make it smaller. The only thing I can't
do is to drag it across this patterntile border
because then it gets cut off. Now, the only way to have an element sitting there is to actually draw
it on the edge. So maybe I will drag them
like this and put them. I don't know, over here. Now, with the pattern,
it's always important to zoom in and out to check
whether it looks balanced. And obviously this works so
wonderful with this app. Okay, so I might
leave it at that. Now, on a new layer, which I create by hitting
the layer buttons, I will go on and draw light
pink circles on the flowers. But before I do that, I will
merge these two layers. So I've got all my pink
flowers on just one layer. I will do that by
tapping the layer here and go merge down. Now I will create a new layer. Then I will then
pick another color. I have to hit the brush first and then go and tap that and I will use the light pink here. And then I will start drawing light pink circles
onto these flowers, and I don't want them to
look too either either. And then I will start drawing light pink circles in the
middle of these flowers, and I don't want them
to be too perfect, so I will deliberately make
them look a bit wonky. Okay, again, zooming in and out. That looks totally fine. Then I will yet create a new layer on this layer
with a darker color. This is a very dark blue. I will draw in some circles, maybe a couple of them
or maybe just one. I'm not quite sure yet. I've got the option to just first of all, make the brush a bit
bigger. That's too big. Somewhere in the middle.
What's happening here? Mmm. Okay. Yes, this is better. So this is how it looks
with several dots. Maybe one smaller here,
that's too small. I could also do just one. And I think I'll go with one because I think that
looks just too busy. So we'll just undo that by
tapping with two fingers. I could also tap
on the layer and just go clear if I want to
make it completely clear. Then I will draw in singular dark dots into
all of the flowers By the way, you can
also draw outside of the patentile and then it will automatically repeat
and one here. Okay. And last but not least, I want some leaves,
and I will yet again create a new
layer for the leaves, and I will use the yellow, and then just go on and draw some leaves
next to the flowers. You can also rotate
your canvas like this by holding two
fingers and you can zoom in by
putting them farther apart and then zoom out again by putting them
closer together. This black dot is too small. I already amanoid with that, so I would just quickly
make it a bit bigger. Let me check the other ones. Okay. Go back to the layer
with the leaves. And maybe I will be
zooming out a bit to have a better overview on how
the overall pattern looks. And then I was thinking
of just creating some leaves on their
own like this, maybe. No, this has to be more
like this than maybe. And this is already very cute. Now, let's see whether there is a gap that needs
to be filled, but I think I want there
to be some white space, so I might add a leaf
here at the corner. Now, what's nice about
this pattern is that it kind of could work in
all different directions, though I just realized
I drew all of the leaves kind of to one side. So I have to have some leaves
which are pointed into this direction as well to the sides because
then otherwise the pattern would only
work like this and like this and not every side
because it would look weird. If all the leaves went there. I think I need one
more flower here. And honestly, all
of this is just now testing out,
zooming in and out, sometimes it also makes sense to leave the pattern for one or
two days and then come back to it later on because
then sometimes you spot things that you haven't
noticed when you were working deep
into the pattern. Okay, so I think I will
add one more flower here. I will just go and
choose my pink again. Dragging in the color, getting rid of the white, then going on to the layer
with the light pink, drawing in the
light pink circle, going to the layer
with the dark blue, drawing in the dark blue. I'm seeing, I have to
get back here. Okay. And then I don't
like this leaf here, which is kind of on its own, so I will just select that. I'm on the leaf layer right now. And then hitting
this symbol here, I can rotate the leaf and then move it over
to this flower, make it a bit smaller. Now I feel I want to close that little gap here a bit more and I want to
move this flower. A way to do that is
to select all of these layers by just
swiping to the right. Then going to the
selection tool, selecting this element here, tapping on the arrows, then I can move it to
the side like this. And now if I go back,
what you can see is that these got separated
from their original layers. So I want to merge them again
with their original layers, and I will do that by
tapping on the single leaf. Now, beneath that, there
is the leaf layer, so I will just tap that
and go merge down. Then the black.in the middle
is still on its own layer, so I don't have to
merge anything there, but the pink dot has
to be merged again. Merge down and this
one, again, merge down. Now, this merging
of the layers is important because I
want to show you how you can create multiple colour
ways from this pattern, and you need to have all of your colors separated
on different layers. In the next lesson, I'm
going to share how to create multiple colorways
from this pattern. See you there. Bye.
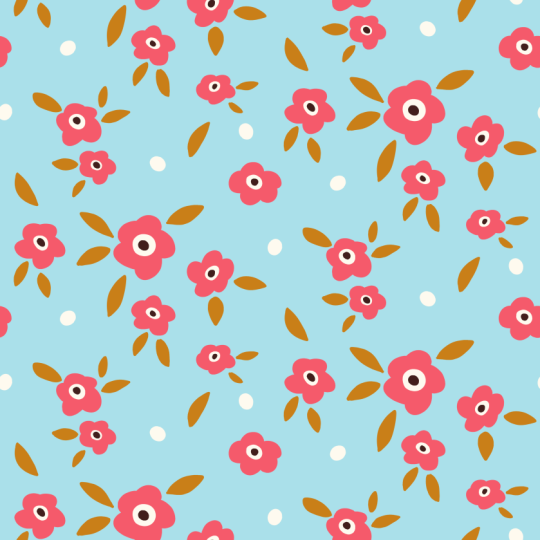
7. Creating Different Colourways: Okay, so now to change the
color of your flowers, what you have to do is to
go to the Layers panel, and I will start with
the pink flowers here. And I want these flowers to
have a very specific blue. Now, I could change
the hue on kind of a random basis by
going to the wrench icon, then canvas, and then go to
hue saturation brightness. And now I can change
the hue here. And sometimes that is nice, so I could maybe
use this green and then go down with
the saturation, which would make it a
bit more like turquoise. And so this is an option, but this doesn't give me the full control of using a certain type
of blue that I want, maybe a certain hex coat
that I have decided on. So we'll just undo that
by double tapping here. Now, a way to use a
specific color is to create a new layer on top of the layer of the element
you want to change, plus and then do make
it a clipping mask. And now I will go on and
choose this blue here, and I will just drag
that onto the canvas, and it will apply to all
of these flowers here. Now, I will do that with
the light pink as well. Again, create a new layer, make it a clipping mask, and then again,
dragging in a color, and this time it's a light blue that I will just be dragging onto the canvas and
last but not least, I will also change the
color of the leaves, which I want to
make a warm brown. Again, create a new layer, clipping mask, and just
dragging in the brown. And I could also change
the color of the dot, but I think that's
not necessary. And so I've immediately got a new color way without having destroyed
the other colors. So if I want my pink back, I can just toggle off the view of the blue, and then it's pink. Or maybe here, I want the
yellow leaves as well. And obviously, if you want a different background
color, you could do that. Let me just go with
a pure white here, for instance, or I could
do a very light gray. So this is how you will
get multiple colorways. Now in the next lesson,
I'm very quickly going to show you how you can
export your pattern. See you there.
8. Exporting Your Pattern: Okay, so now to
export your pattern, you just have to
hit the wrench icon and then go to share. And you've got
different options here. You could export the file, which would then
be a layered file as a pattern drawer file, maybe send it to
somebody else who wants to then work on it or
PSD file for Photoshop. You could export a single
unit or a seamless unit. And these units
would be seamless, so you can then
use your pattern, maybe upload it to spoonflower, whatever you want to do with it. But what I like to use right now because
I like using these, for instance, as a
screen protector, et cetera, is to just
export a pattern preview. And here you can choose a
custom size like 500 by, I don't know, 800. And you could also
change the tile sizing, so make it very small and
then export that as a PNG, JPEG, TIF, whatever you need. So this is a very nice feature. And then you just
hit Export and then maybe save the image or airdrop it or whatever
you want to do with it.
9. Outro: Thank you so much for
taking this class. I really hope you
enjoyed it and that you had a lot of fun
creating your pattern. You can find more of my
work and also a couple of videos on my Instagram
and YouTube channel, and I wish you all
the best and lots of enjoyment on your further
pattern making journey. Hope to see you soon. Bye.
 Julia Ulferts,