Transcripts
1. Intro: Hi, and welcome to my class. Cyanotype from
Botanical sun print two repeating pattern
in Procreate. My name is Julia, and I'm a teacher and
self-taught illustrator based in the lovely town of
Oldenburg, Northern Germany. In this class, we will get
outside into nature and collect leaves and flowers to create our lovely son prince. You can even take your
kid along and share this wonderful experience of creating art directly
from nature. We will then hop
onto the computer, digitize our prints and turn our gorgeous
flower motifs into repeating patterns using a foolproof and pixel-perfect
method in Procreate. At the end of the class, I will show you three ways. How you can create multiple color ways out of just one repeating
pattern block. And how he can put your
design onto the provided Procreate mock-up to
share it on social media. This class is perfect
for you if you love nature and are excited about trying out
new art techniques. Also, if like me, you are a mom and
one to incorporate your kid into your art-making
and design process. Of course, this
goes for dads too. You can take this class as a complete beginner in both
cyanotype and procreate. As I will explain
every step of the way. But it is helpful to have a basic understanding
of how Procreate works. So I would recommend taking
a beginner class and procreate before you
start with this class. There are tons of great
Procreate beginner classes here on Skillshare. You will find some of my recommendations in
the resources section. There. You will also find a list
of the materials needed. The pre-made eight by
eight inch procreate Canvas for creating your
pattern. The easy way. Scans of my cyanotype prints a color palette and
procreate mockup, which you can use to view
and showcase your design. So I hope you're as excited as I am and that I
will see you in class.
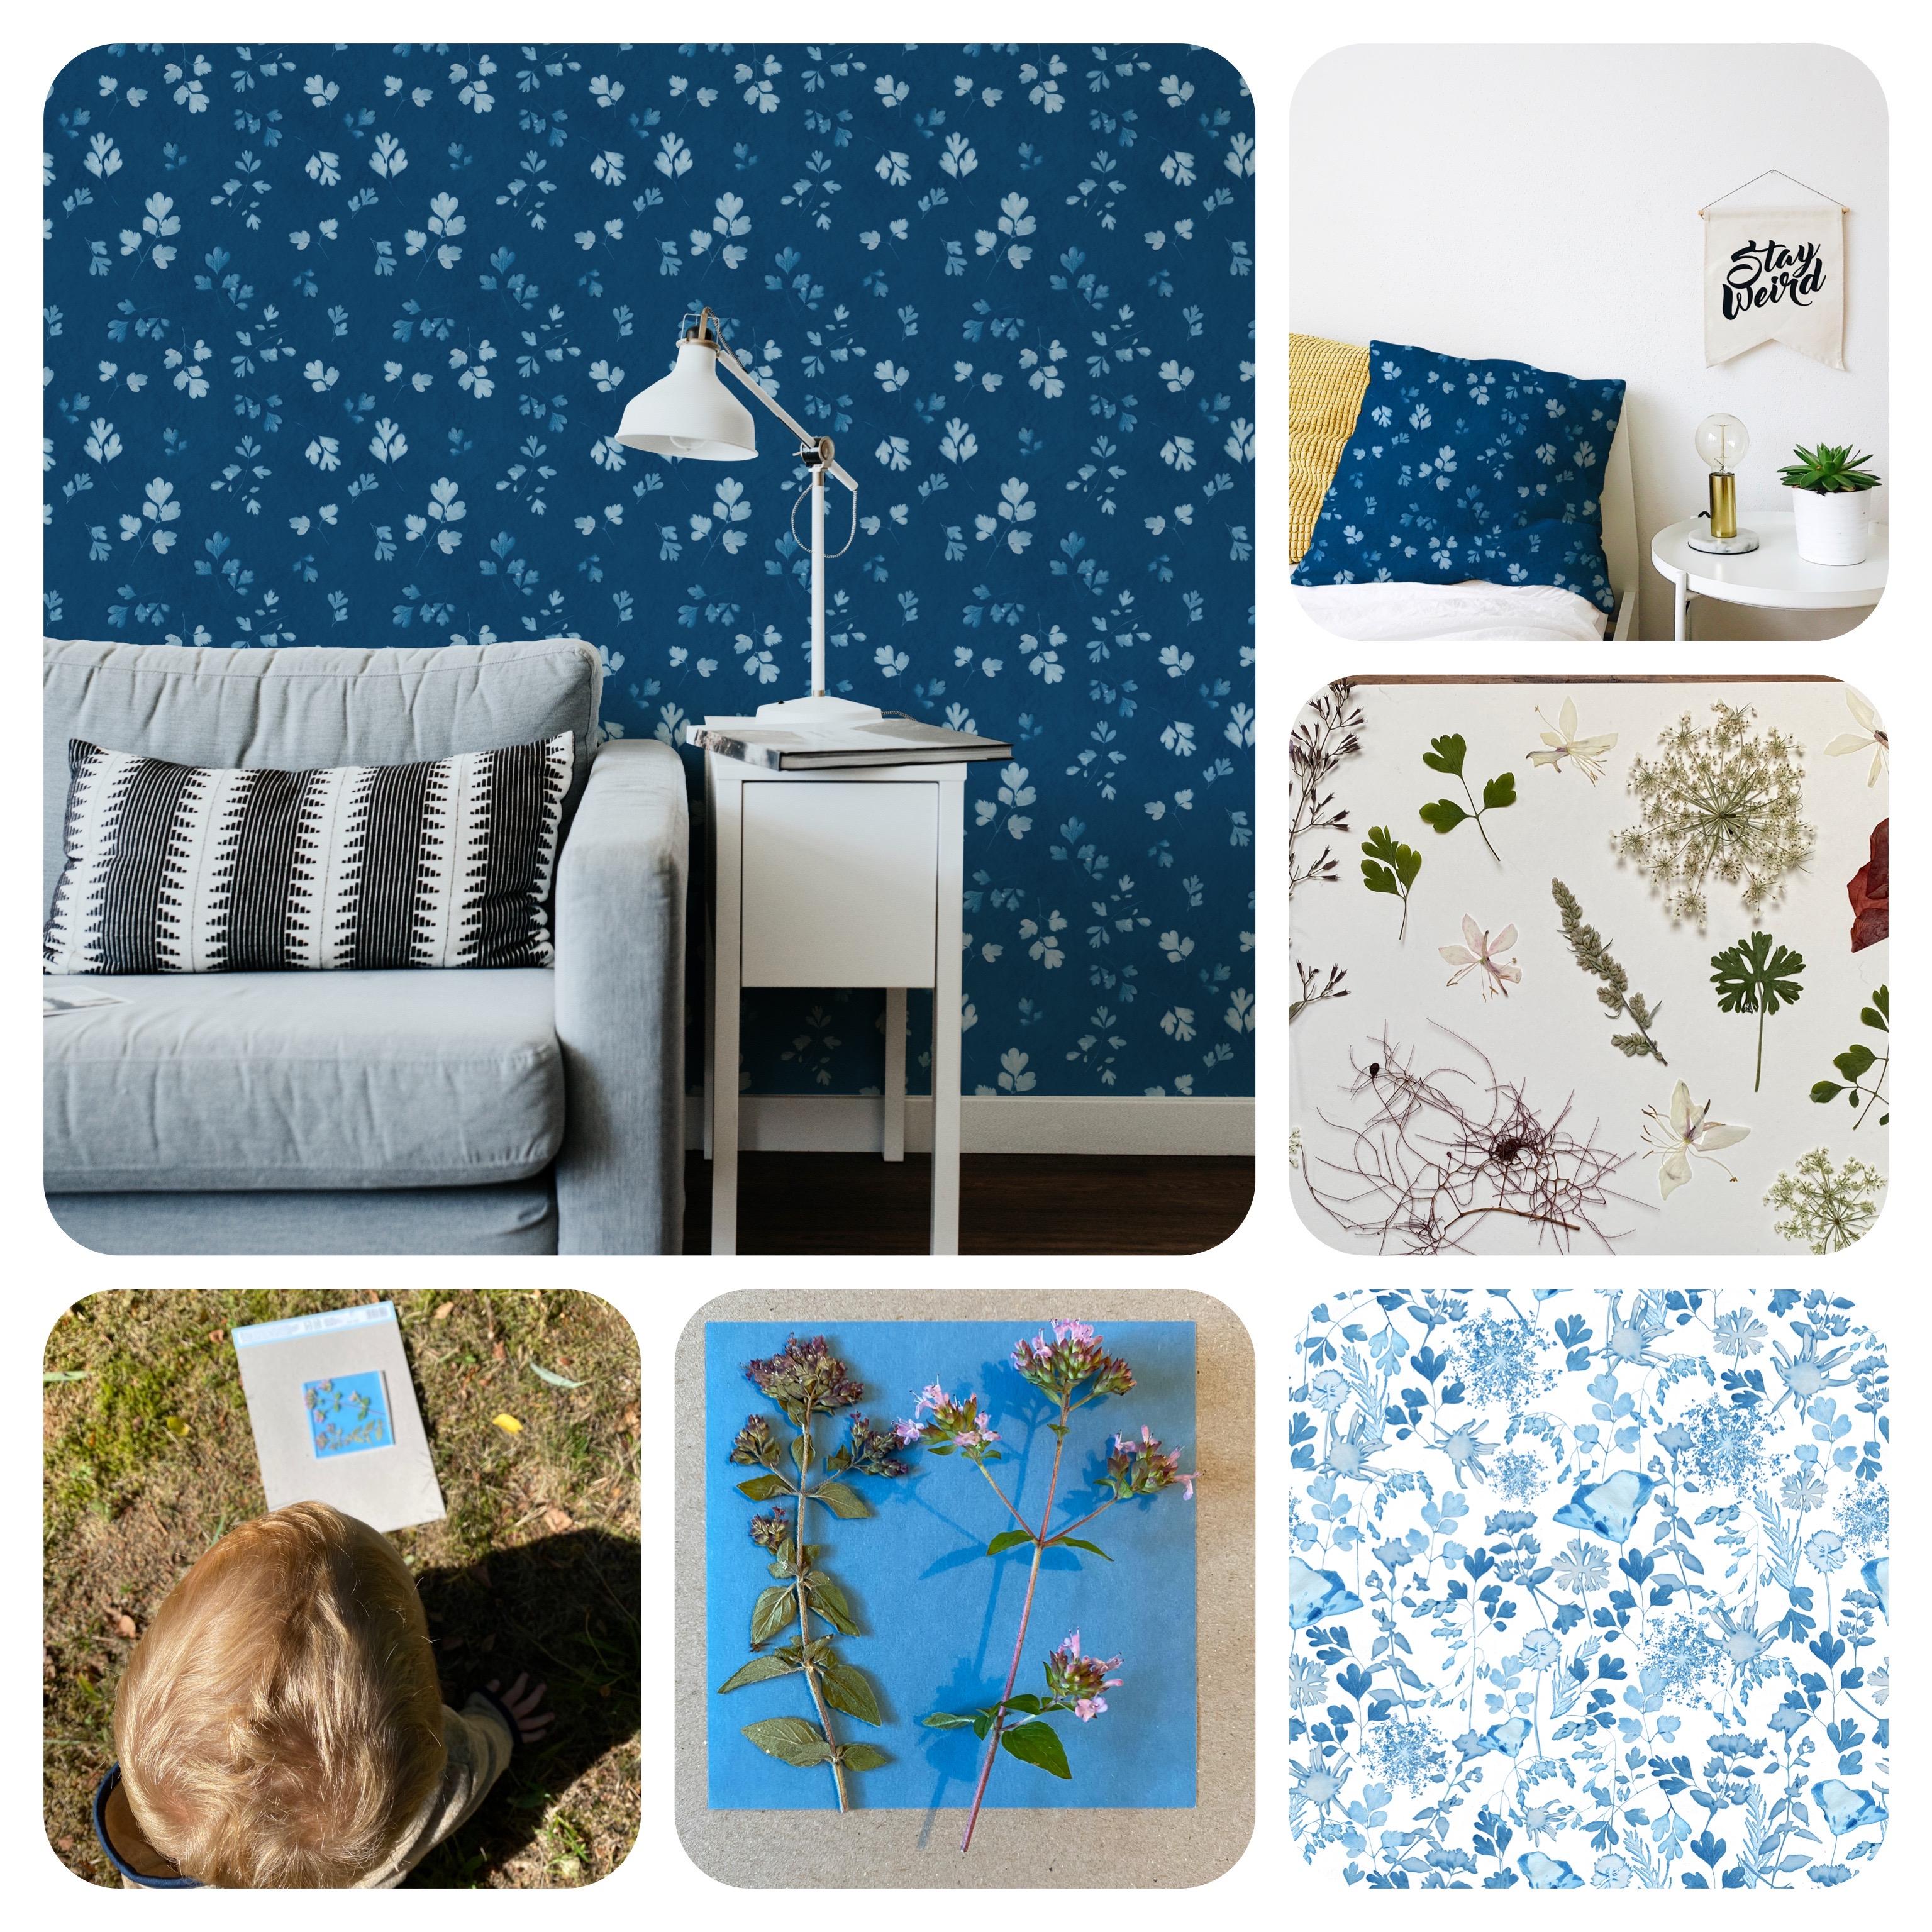
2. Class Project: Your class project is to create at least one Botanical
sun print using cyanotype paper and press
leaves and flowers. With these motives, you then create your pattern
block and procreate. Because process is key, I would love to see not just
your finished pattern block, but also photos of the flowers and leaves.
You've collected. Photos of the
creation process of the cyanotype and maybe
the provided mockup with your pattern or a photo of the wallpaper or fabric you might have ordered
on Spoonflower. For my photo collage, I've used the free and super
intuitive app in shot. In the next lesson, you will get an overview
of what you'll need for the project. See you there.
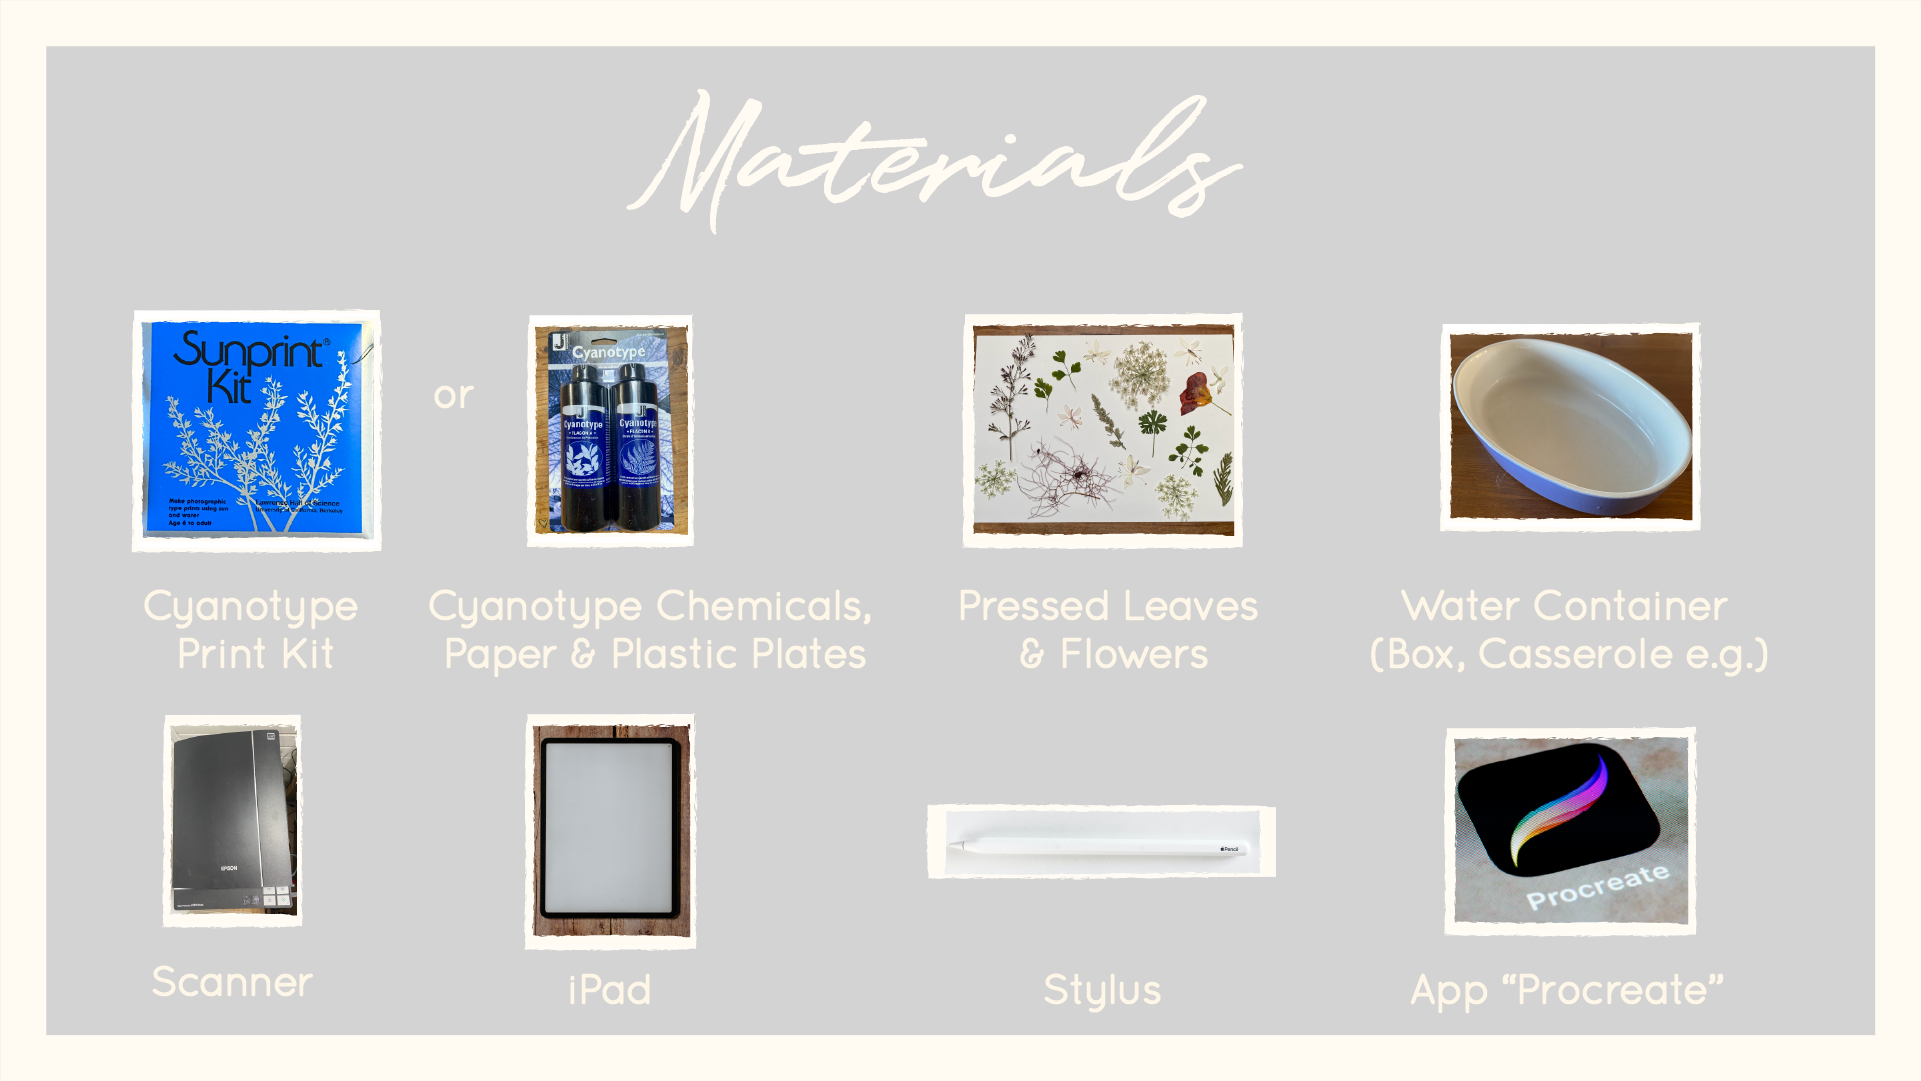
3. Materials: For the class, you will need
the following materials. First of all, a
cyanotype printed. You can easily buy these online. Mind contained about
ten or 12 pieces of a relatively
lightweight paper. And this paper is prepared with a chemical solution that will then react
with the sunlight. The kid also contains a
transparent plate which you need an order for your leaves and flowers
to stay in place, especially when
it's windy outside. Instead of this kid, you could also use cyanotype chemicals and
prepare your own paper. This definitely has a lot
of benefits and there is a great class here on
Skillshare by Sarah gravity, which shows you how to do this. But as a mom with a
limited amount of time, it will just devils in this
technique, to be honest. And who doesn't
need a certain size or quality of the paper. Buying a pre-made kit
was perfect for me. If you can't get
a hold of one of these kits or just want to start straight away
because you're so excited about the project. I've uploaded scans of the sun prints I created with my son. And you are totally
invited to use them? Yes. Also for
commercial purposes. You will then need leaves and flowers to put on
the paper later on. I really recommend pressing
them at least for a day or two because they will live
letter on the cyanotype paper. And so often produce a
more crisp looking print. After exposing your
paper to the Sun, you need to rinse it with water. I just used an old casserole. But really you could use any kind of container
or even rinse it directly under the tab to
digitize your artwork, I recommend a scanner
for the best result. But if you don't own one, you can of course,
use your camera. Last but definitely not least, you will need an iPad. The app Procreate
and the stylus. The apple pen is of course, on the more expensive side. But from what I've heard, it works best in Procreate and I really couldn't
do without it. You will find a shopping list of all the materials needed
in the resources section. Now, if you're ready, let's get started
with the printmaking.
4. Create Your Cyanotypes: Now, this is probably the
most fun part of the class. I recommend taking
an excited toddler long as you get
outside into nature, breathing fresh
air, and collect as many gorgeous flowers
and leaves as you like. Like I mentioned before, I press my flowers to make them live
flatter on the paper. This produces more crisp edges, which is helpful when converting them into
digital pattern assets. When it comes to arranging
your flowers on the paper, you have to make sure
that the paper won't be exposed to direct
sunlight too soon. To avoid this, we simply arranged flowers
inside of my house, making sure there was no direct sunlight
coming from a window. The blue side is
the right-side-up. I let my son arrange
Many of the prints. And the only thing you
need to make sure, at least if you want to
create a pattern later on, is that the flowers or leaves don't go over the
edge of your paper. Otherwise they will be cut off. Obviously. You should put
a piece of cardboard under your cyanotype paper
because you have to be able to easily pick everything
up and carry it around. We then went outside and expose the print direct sunlight
for approximately 5 min. You can see how the
paper turns white. This is how it's supposed to be. When time's up, you have to
rinse the print and water. I had my old casserole with
water right next to me. Then the print has to dry. And over the next 24 h, the blue will deepen much more. Creating these lovely prints. Now, have fun creating
your son Prince. And I will see you in
the next lesson where I'm going to show you how
to digitize your prints.
5. Scan and Transfer to iPad: So to scan my image, I opened my scanning software. I will then hit four shell,
which means preview. I mostly scan my images at
a resolution of 300 DPI. And I wouldn't advise you
to go lower than that. When I know I'll be making
a pattern for wallpaper, I sometimes scan at 1,200 DPI because this will give
me the opportunity to have my motifs at a big scale. But I only do this when
I'll be working in Photoshop because at
least on my iPad, procreate tends to crash when working with scans
at this resolution. If I'm satisfied with
the preview, I hit scan, the image will then automatically
land and my builder, which means Pictures folder. I will rename the
scan and put it in my Dropbox to be able to
access it from my iPad. Of course, you could
also use Google Drive, AirDrop your files when
you're working on a Mac, or send the files via email. Okay, So now to get my
image into Procreate, I'm going to go to my Dropbox
and then find my image, which is in my
cyano types folder, and photos, which
means pictures. And then here is my scan. So I can either just of courage, passion, which means to
save it to your iPad. So I could do that. And then
I will find it in my photos. Or what I could do
is I could go to Share and then go to the
Thai expert in export. And then I can export
it into Procreate. And this is what
I'm going to do. So it sends it
directly to procreate. And then when I get into
procreate will be imported. And here it is. The other way is when
you, what I just did, I saved my image and then I could just hit
the photo button. And then here is my image
which was safe to the camera. Roll. You go. Now we can go on. In the next lesson, you will learn how to create the assets for your
pattern. See you there.
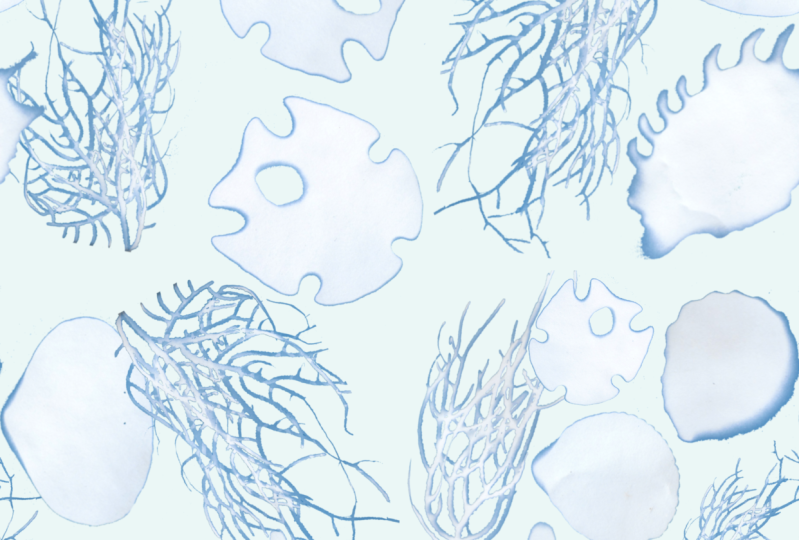
6. Create Your Assets: Okay, so now I'm getting
back into procreate. And here is my scan. So what you need if
you want to create a pattern now is
individual elements. So right now, this is
just on one layer. What I'm going to do
is I'm going to cut out flowers that I want
to use for my pattern. And I'm going to do that
with the Selection tool. And right now it's
all automatic, but I need the free hand. I'm going to tap that. And then I'm just choosing
a flower that I like and just casually drawing
around it like this. And then I can do copy paste. And that brings this
flower on a new layer. Now if I want to get
another element, I have to make sure
to get back to my original layer here. And I'm going to go to the selection tool
still on free hand. I'm going to draw around this here and going to go copy paste. And there is my new element. Again, make sure you get
back to your original layer. So if something
doesn't work out, most of the times you've just forgotten to get
back to that layer. I'm going to choose one of these very transparent flowers, which are so lovely, but a bit more
difficult to work with. But I will show you how I'm going to draw around
that one as well. Like this and copy paste. Getting back to my layer. And then, oh yes, I like this one here as well. Then copy paste. Yes, and that's it for now. I might use the other
ones on another pattern, but I'm going to work with this. So now what you also have to do is you have to get
rid of that blue here. And I'm going to show
you how to do this by, I'm going to use this one. Where is it? I'm going
to toggle that off. It's a bit easier than to see. Now what you can do
to get rid of that is to again go to your
selection tool. But then instead of
using the free hand, you go to automatic. And if you now tap on the blue, what that does is it
selects this type of blue. So I can tap here
and here, and here, and here, and here. And that's about it. So, okay, there are two
ways now to do this. You could either, I'm
going to do that now. You could either
do three fingers swipe and then just
go to cut that, cut away that blue. And then you could just use an eraser to erase all these
parts that you don't want. Or you could also work
with the layer mask. But I think I'm going to show
you that on another flower. So I'm just going to
erase that here for now. So I've created my first asset and I'm going to just
move that a bit. To move elements, you can
just use this arrow symbol. Okay, So now another
way to do this is to just show you what this
one is to use a Layer Mask. Again, I'm going to
this and to automatic. And as you can see, especially here with the stem, it selects paths that I
don't want to be selected. So the trick is what you
can do is you go to invert. And then instead of
erasing anything, you can go and create a mask. So with this layer mask, you're going to
work with a brush. If you use black, then things will disappear. If you use white, they will reappear again.
So I will show you. I'll just use, first of all, I toggle off my selection. So I will use black
with a brush. And if I now just paint over this, everything will disappear. But if I go in with
white, it will reappear. And that of course, is useful. If you just made the
mistake and erase too much, you don't have to undo. You can just leave it as is, and then go on and make it real appear
again by using white. So I will just get back here. And what I'm going to do
now is I'm going to use white and a soft brush and I'm
trying to bring back that. Them. And of course this is a bit difficult because
it's barely visible. There is actually a
much better way to do this by drawing it in. I will show you in a minute. But I just wanted
to show you that there is a way to
bring stuff back. And this can be helpful when
creating pattern elements. So I'm going to
speed it up again. Now I'm going to use black. And I'm going to get rid
of all the grain here. And I'll see you in a minute. So now you can see I've
created my second pattern. I said, I'm going
to move that up. If you're satisfied
with the assets, what you can do is you
can just pinch these together and then the layer
mask has disappeared. And it's just this acid. Okay? Now, another trick I'm
going to show you, and I'm going to show
you with this flower. These were so gorgeous, but as you can see, they
are quite transparent. And it's very difficult
to get a good selection with these if you use the Selection Tool
and go to automatic, it tends to select way too much and it's very
difficult to get that back. So what you can do, going to just undo, what you can do is to just enhance some of the
elements are some of the leaves. And I've provided
a color palette which you can use,
download and use. But you could also use just use. The eyedropper tool. Sometimes doesn't really
work for me there it is. And just pick a color from here. And I'm using a soft airbrush, but the small one, it's in the air brushing section here it is soft airbrush. And you can draw on that layer. You could also, and it's a
bit easier to erase stuff, could also draw on another layer and then pinch
them together later on. And what I'm doing
is I'm going to, oh, that's way too big. I'm going to draw in here. I'm going to pick another
color to pick this one here. And then very lightly, very lightly enhance the element by just drawing over it and
making it more visible. It's especially helpful when
you make the edges more clear and define them
a bit like this. And I will also go and just
make that a bit more visible. I named this here. Just very light pressure. That's already too much to
try that one more time. So if you paint on it too much, the texture will disappear
and that's what you not want. So I might reduce
the opacity a bit. And I already reduced the
opacity of the layer. So the texture shine
through a little bit more. Okay, and maybe
this one as well. Likely. Okay, so now lets it, before I use the selection tool, the automatic selection that I have to pinch these together. And then I'm going to
use the selection tool. And let's looks, that
looks a bit better. That goes inside of the leaf. But if I'm working with a
layer mask, doesn't matter. So I might leave it at that
gets inside the leaves again. But I can make it reappear
with the layer mask. So I'm going to go to invert. And then whenever is it mascot. So first of all, I'm going to make sure to make the parts that I still want reappear with a white
officer selection? Yes. And opacity again. And I can make this
reappear here. And here you can see how
helpful it can be to work with the layer mask
instead of an eraser. Like these edges. So I'm going to make
them more. Soft. Little bit. Might use
my textured brush. Again. Dry ink that comes
with Procreate as well as the dry ink if it's
in the inking section. And everybody seems
to love that one. And me too, I especially
like it for line work. So I want to add
that to reappear. And this over here, make that a bit bigger. Okay, Now I'm using the
black to get rid of all the grungy bits
that I don't want. I'm going to speed
that up again. Okay. So now there is one last thing that
I want to show you. Just finished that one. And that is what you can
do if there is an asset. Turn that around and just
move it a bit down here. If you've got an
asset where there is, like in my case, something probably the
leaf just broke there. And I mean, this
could look nice, but I don't really
like that here. What doesn't work? I'm going to show you
what doesn't work. Is Joseph just painted in because even if you get a
better color than I just did, you see the texture is
obviously completely different. So you would really see that. What you can do is
you're going to, I'm on the right layer. Yes. You can just stop it. Go to freehand again. And then you can
just cut that out. Because this very probably looks similar to the one
that's missing here. And then I will
go to Copy Paste. Then I've got just this
part on a new layer. And I'm going to flip that
and maybe turn it around. And I'm going to put it in here. I can do is to make
it a bit bigger. I could also distort it, but I want to do that right now. So I think I'll
leave it at that. And before I pinch
them together, what I will do in a minute, I will just very carefully
erase with a soft brush again, I will erase parts of this. So the, the transition from one part to the
others a bit smoother. Erase this a bit too much. And then I can pinch it together and
you can still see now, but from afar, He wouldn't
really notice that much. And then I'm going to do the same I did
with the other leaves. I know I probably going
to draw in the stem before I do the
automatic selection, but I'm going to create
my last asset with that. And then I will see you in the next lesson where I'm
going to show you how you can prepare your canvas to create beautiful repeating
pattern. See you there.
7. Prepare Your Canvas: Okay, so now before
I show you how to prep your Canvas to
get a repeating pattern, I actually wanted to show you what a repeating
pattern blog is. And this is not a
repeating pattern block. If I were to put this design here on a wallpaper
as it is right now. No, repeat this block over and over again and
cover war with it. There would be a
very obvious line going right across
it here and here. I just added this to
make it more visible. And this is what you want. If we were to zoom
out you would, you could really tell. It's just this design
put next to each other. So what you're going for is
a repeating pattern block, which looks like this. And the differences
that there are elements that are cut off on one side and then they are continuing directly
on the other side. Like this one for instance, or this leaf, you
can see half of, half of it is here, and the other half is up there. Or this element here, actually, it continues here. And then in this corner here. And if you repeat this
on a wallpaper and put one of this block
next to the other. It's really much harder to tell where it starts
and where it ends. And you can see there are always elements which are
crossing this border, which was so obvious before with the block that was not
repeating pattern block. Now, more than just one method to create a repeating
pattern block. And there is a very
popular method which involves the
snipping tool. So what you're doing is you're
duplicating your canvas. And then you start with
snapping and magnetics on. You start dragging it into the corners and you just have to let go when this
orange cross appears. And this method is very easy. But what I don't like about it, that at least in my case, it didn't always work properly. The snapping didn't always work. And then I had white hair
lines running from my pattern. So I was quite happy when
I discovered the method. I'm going to teach you later on, going to delete this. And with this method, do you prepare your
Canvas beforehand? Then you distribute
all your elements and you've prepared
selections in your Canvas. I will tap the selection
and then you can flip the four parts
of your canvas. When did I start? What's already there? And the last one, you flip it, and then you've got your
repeating pattern block. So this element, this
element repeats over here, and this continues down here, and this continues
down here and so on. So I'm going to show you how
to prepare your Canvas to get this type of
repeating pattern block. Okay, Now to prep your Canvas, you're going to plus
sign new canvas. And I'm working with inches. And I recommend to make sure that you've got enough
layers to work with. So if I'm going for an
eight by eight inch canvas, I've got about 90 layers, which is enough for me. The more complex
your pattern gets, the more layers
you're going to need. And I make sure it's at 300 DPI. Then I just hit Create. The first step is to
just drop any kind of color into your canvas
by color dropping. And then you have to
duplicate this three times. And it doesn't really
matter what color it is because you're going to
delete that later on. You don't need it anymore. So now what you have to do, I'm on my first layer here and I'm hitting
the arrow symbol, and I'm going to this little
blue node in the corner. And it shows me
the dimensions of my canvas or of this square. And it is 2000, 402,400 pixels. And now I just need
to divide that in half and then type that in and you have
to be quite quick. We'll show you later on what happens if you're
not quick enough. And this looks about
right, it covers about. One-quarter of
this whole Canvas. So I'm going to
the layer beneath, hitting the arrow symbol, going to the little
naught, tapping the NADH. And then again one tau 1,200
and covers one-quarter. That's perfect.
And by doing that, you're actually working
with pixels and you make sure that you're not
getting these white hair lines. So I'm hitting the air, I'm going to my third layer. I'm hitting the arrow symbol
and now I can't see it. So I have to get down
here tapping the NADH. And and the last one I'm going to show you what happens if you're
not quick enough. So I'm hitting the arrow
symbol, tapping the NADH. And then I do just
already didn't work. So and then it's always quite difficult that
worked immediately, but sometimes it doesn't. So I don't know if you can see, but there is this white hairline right now and that
sometimes happens, but it doesn't mean that you
will see it in your pattern. Because very likely if I just zoom in now or it's
already disappeared. So you can double-check. Just zoom in, but there
is no hairline in here. I just reduce them all to a
quarter of the canvas size. Now the next step is to
again tap your first layer. But instead of going
to the arrow symbol, you're going to select
the second tier, select. And then it opens this menu. Then you hit this hard
sign, save and load. Hit the plus sign. And now what that does is it will save this square down here, which is my selection. And then it's saved from now on. I'm going to my next layer. Again. Tap on the layer, tap on Select, go to the heart. And plus, this is now
my selection tool. Back to your layers. Next layer, tap on the layer, go to Select save and load. Plus. Already the last one, tap on the Layer tab, select save and load. And now it's the
square over here. And plus, and that's it. I can delete all this and
will already drag to, toggle off the selection. Otherwise it would
just drag it in this, I can already drank a
blue background and here, because that's what
I'm going to need to create my cyanotype pattern, which I will show you
in the next lesson. See you there.
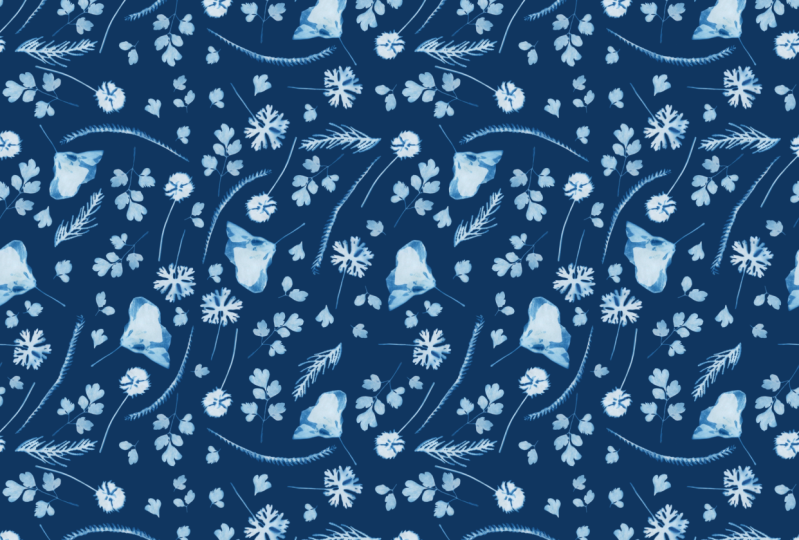
8. Create Pattern Tile: Welcome back. Now, as you can see, I renamed the canvas we created before into pattern
eight by eight. And I will select and then create a
duplicate of this one. So this can be my next pattern. Then I will rename
that into cyanotype. Skill. Share. This is the Canvas
or will be working now on my first
pattern for the class. I've created these assets
and I've got to get them into my other Canvas. So what I'm doing is
I'm, first of all, I've decided that I just want to use this type of leaf here. So we'll toggle
off the selection. It's a bit easier to see then. And I will swipe to the
right, create a group. And now what I can do, I will drag out that group
and get back to my gallery. And then I have to get
it into my Canvas. I will check on that
canvas and just let go. And there they are. It very often gives
this warning. Not everything is
important, but it is. As I can see, I've got three assets and
they're all in here. So I just ignore that.
And there they are. For my pattern, I want more
than just three assets. And what I can do is I
can duplicate this one. And the first thing I'm going to try to make
it a bit lighter because these are very light
and this is very dark. Next to these two. I will try to adjust that with
use saturation brightness. You have to tap on
the Magic Wand. Use saturation brightness. And I will just try to adjust the brightness
a little bit. And as you can see,
it gets brighter. And if I go too far with that, it looks like this.
It's turning white. And if I think about 60, 64, 63 is a good number. So I won't use the dark one, I will just drag it down here. So what I can do with this now is I go to the selection tool, make sure it's on freehand. And I just want to kind
of cut out this one. I go to Copy Paste. Now this gives me
a fourth element. And I think I will
do that once more. I will get back to
this one and maybe grab just one leaf-like. Maybe just, we'll just grab
this one here. Copy paste. This gives me another
acid I can play with. And I think I will do that
with this one as well. And I will just, this looks quite nice. Get this copy paste. And I can just
drag it over here. And might also get this
bigger part up there. Go back to the magic wand. Make sure I'm on
the right layer. And Magic Wand. Go Copy Paste. Now, I made seven out
of three elements. And this will make it easier
for me to create my pattern. Now, what I will
do now is to just, just to build all these
elements on the canvas. So I will just start in
the upper hand corner. We'll drag that over here. And I tried to get
it as close to the border as possible
without it being cut. So if I zoom in, I can see
it's not over lapping it. I start with this one
and then I will just, I think this is here. I will just drag that down. With this little green node. You can just turn it around. You can also go and
flip horizontal. Flip vertical. We'll just put that here. And then we'll take one
of these, maybe this. And again, I'm
trying to get it as close to the edge as possible. That one a bit more up. You can just take
your time with this. The more thorough you are, the less you have to work
on your pattern later on. Quite sure about that one, Maybe I'll put it like that. Then I will just use this
one up here and put it. Oh, I forgot to
mention that before. It does make sense to have your elements also upside down. Because for wallpaper,
it really doesn't matter if they're all facing
one direction like this. But if you're using
them for a fabric, it is nice to have them
tossed around like this. Instead of being just
into one direction. So with these elements, it looks quite nice if they are turned into all
sides of directions. Think I'll just leave
it like that now. And I might use this now. Just use this again, putting it a bit closer to. And then I've got, I think because these
are different in colors, I want use this again. I will use this here, which is a bit darker blue. I will duplicate it, swipe to the left and duplicate. And then I put it down
here, turn around. And I will put it here. So now I will use this
morning I might quoted here. From now on, you just have to duplicate one element after the other and distribute them
over the whole canvas. And I will speed
it up now for you. And then I will meet you in a
minute and show you how you can create the
repeating pattern tile. See you in a minute. So now I'm, so now I'm
quite happy with this. As you can see, I've
got many, many layers. That's why I
recommend it to make your pattern not
bigger than 8 ". Now, you have to create a group. Now, out of all of these, sorry, I have to de-select the background without
the background. So I create a group. And then I can
collapse that group. And now this is all of my
elements and the background. Now to use the selections
we've created before, we have to mark the
background and the group. And I'm going to the Lasso, I'm going to save a
load and selection, and I'm tapping this selection, this is this over here. And now I'm going to
the arrow symbol. Doing flip horizontally
and vertically. Now I'm doing this with all
the other selections as well. This is still selected the
group and the background. Now, going back to
the Lasso Tool, save and load, I'm hitting
my next selection. Going to the arrow. Flip horizontal, flip vertical. One more time. Save and load selection. Arrow flip horizontal,
flip vertical. And one more time, save and load selection, one, flip horizontal,
flip vertical. And you can see it created
a repeating pattern block. The element that
is cut off here, actually continuous on the
opposite side over here. Here you've got
the very tiny part of the stem of this element. And this is already
my repeating pattern. I'm quite happy with this
repeating pattern block. There is one thing
that I don't like. It's maybe this
element over here. And I think what I will do, I will flatten that group now. Maybe I will try if I can
get a duplicate just in case if I've got enough
layers, I can get one. Yes, I can. So I will put that
duplicate down here and I will flatten this image here. And what I don't like is
these so close together, so I will just go on my flowers
layer of leaves, layer, cut that out, or select
that going to the arrow. And then I can do you also
turn it around a bit? That's better. And I can work on all
of these elements on the pattern block except the ones that are
already cut off. I can't touch these. So I could, for instance, I don't know if these are both
facing the same direction. So I could select this
one here and then maybe just turn it
around a bit like this. I like that better. And here I think here is a gap. So I will just use one of
these smaller elements, maybe this one, go to Copy paste and make it a bit smaller
and I will put it in here. The gap is not that
obvious anymore. Maybe it got a bit small to you. Yes. I will just leave
it at that size. What else do I not like? Maybe this can be a bit more
down here. This one here. I will select it. Arrow symbol and arrow
selection empty. That means that, oh yes. That's why, because
I'm on that layer, I have to merge these. So, and then one more
time I'm going to this here doesn't seem to work. Oh, I just I don't
know if you can tell, but I just went to the
side and I really have to make sure that I'm double
tapping and getting back. Yes, that's perfect. Now, one more try. Selection. Arrow and maybe
I'll leave it at that. And I will see you in the next lesson where we are
testing our pattern block. See you there.
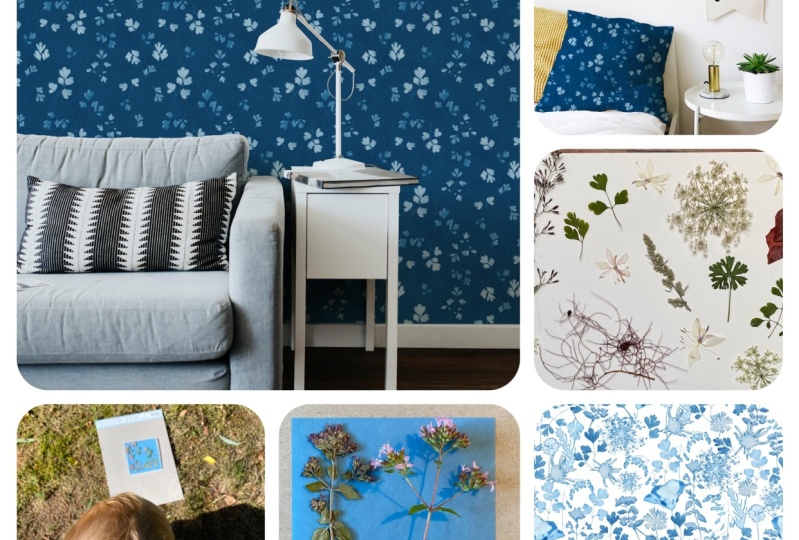
9. Test your Pattern: Now to test your pattern, you have to kind of
zoom out because then you often spot mistakes that you can't really see on your
original pattern block. So this is my original
pattern right now. And I will duplicate that four times by swiping it to the left. And I will rename that one
down here to regional pattern. And what I will
do now is I will, just like we did
in the beginning. People like them by half by tapping the nodes
and the corners. No, number one, night go
over to this node, 200. Next layer, going to that
node over here, 1,200. Now with the last one, it all comes together. I have to go into
this corner, 1,200. And now I've created for little copies of the
original pattern block. And you can already see
it repeats perfectly. And I think it looks quite nice. Zooming. Oh, yes, but there was one
thing that I don't like. I just saw that these
are very close together. Think it looks a bit weird. So I might change that. If I were to change that, I wouldn't change it on
one of these layers. That doesn't make any sense. That's just your test, will just make it more
clear and rename that test. I would have to change it on
my original pattern block, and I have to find these elements now on my
original pattern block. Sometimes it's
difficult to spot them. So I will see, oh yes, they're over here. So like I said before, you can change elements that are inside of the
patterns that are not cut off. But you couldn't
change the position of this one. At least. I mean, you could, but then you would have to grab this one as well and use them and
magnetics and snapping. And I don't really like that. I will grab this
element here by using the Lasso selection
tool freehand. And then I tap on the arrow
and now I can move it. I think I will make
it a bit smaller. That might already do the trick, maybe move it a bit over here. And maybe at the top. And now I've changed my
original pattern block. And I hope it will
look nice when I upload it to
Spoonflower later on. But before I'm doing that, I'd love to show you
three ways how you can create multiple color ways out
of this one pattern block. So hope to see you
in the next lesson.
10. Different Colourways: Now to me, this is the most fun part about
creating patterns. I really like playing
around with color. And I can show you several
ways how to create multiple color ways out of this pattern block
you just created. Now, the first thing
I want to show you is using blending
modes and you need your original pattern
block and create a duplicate of it and
just put it down here. So you've always got your
original if you need it. I will put the test
down there as well. And I will try this method with three
different backgrounds. So I will create a duplicate
of this background. And now I will use a lighter
blue as a background. So I will drag this blue
in here and we'll do another duplicate and
use an off white. This is a wide, so this
is kind of an off white. Yes. I will start with the dark blue. To change the blending mode, all you have to do is tap
on that little n here. Then you see all these
different blending mode. I will start here with
multiply and then just go through all of them. So this is normal. And then you can see
with color dodge, it gets kind of like neon blue. Sometimes you get
quite nice results. For instance, this one, I like these colors. I might try that this blending mode will change if you've got
another background. So if I toggle that
off and I use it with white, it looks like this. And if I use it
with a light blue, it looks like this. You see this especially
a difference between the dark blue
and then the light blue. I think I like that. So what I'm doing is I'm saving this block in my camera roll. And for that I tap on that little I don't know the
word for that right now. And I tap on Share and then you can either
share it as a JPEG or PNG. I will use the PNG
and save the image. And now it's saved
to my camera roll. Then go on and look at
the other blending modes. Kind of like that one as well. I will save it, maybe I
will use it later on. Png. Save the image. Now that's my pattern block
with a dark blue background. I'm will now use it
with the lighter blue. And I'm down at luminosity
and then I will go up. Oh, I really like that one. This is the divide
blending mode. I didn't like that
with the darker blue, but I like it with
a lighter blue. Another tip I've got for you sometimes when you use
another blending mode, there are things that
suddenly stand out in your pattern that you
think are looking off. Let's just look at that
leaf and I thought I might drag it over
to the side of it. So I will do that right now. Maybe turn it around like that. As I told you before, you can still change all of the elements that are
not cut off like these. All of these elements in the
middle can still be changed. Then I will go on here. Did I save it? I'm
not quite sure. Save Image PNG. So going back to
the blending modes, oh, that's nice as well. I really like that
exclusion. Where is it? I'm wrong. We'll save that. Save image. And then go back. This is kind of a
wide, that's nice too, but I can achieve that look later on with another technique. Okay, That's about it. I'm going back to normal many
and then try it with white. And you can see this
doesn't do that much. Yeah, That's nice. We'll save it. And I'm quite sure
that I won't be uploading all of these
onto Spoonflower. But it's always better
to save an image. And then you can later on decide if you want
to use it or not. Exclusion, divide
hue saturation. Okay? So I'm going back to normal and then I will not think
I will keep the white. Now the next Way to get different
colorways is to use, use saturation brightness with your pattern block and that will change the color of the leaves. So I'm going to the Magic Wand. I'm tapping hue
saturation brightness. Now I will start
with you and that, as you can see,
changes the color. I think I like the pink, but I will put down
the saturation. If I put it down
completely, it gets gray. I put it away up, it
gets very bright pink. So 50 is the middle. I think I'll go with this and I will just have a look
at the brightness. Whereas 50, I think I
will keep it at 50. And then I will save that again. Png, Save Image. And of course, you
could have a look if this pink looks
nice with the blue, light blue, or maybe with a completely different
color as well. You could now use
maybe kind of a, what do I have here? A brown that doesn't
look very nice. But you get my point. So I'm going to get back to my white and get back
on that layer, tap the Magic Wand hue
saturation, brightness, and maybe get some
kind of a green. Maybe. Oh yes, I like that as well. Get it a bit darker. That's too dark and share PNG. Save this image to
my camera roll. The last method I'm
going to show you is to make this a solid color. Right now. It's kind
of a textured leave. But what I'm going
to do now is to put a clipping mask above
this pattern block. I will tap that layer
and tap clipping mask. I will just note just to show you drag a color
into that layer. And then what
happens is these all turn the color I put
into the clipping mask. And now from here,
sky's the limit. You can use any kind of
color that you like. You could use the bright
red like this one. If you are into that. Or you could also go, I think this is I put it on the wrong layer that's not
double-tap to get back. Use this kind of and
I really like that. Save that, save image. Now, I'm really interested what kind of color
combinations you find. So if you like, include them in
your class project. And I will see you
in the next lesson where I will show you how to use this pattern block on a mockup in Procreate.
See you there.
11. Bonus: Use a Mockup: Welcome back. So quite recently I took
a Skillshare class by myofiber and I
really enjoyed it. It was about creating
mockups in Procreate. And I have to admit
up to that point, I had always been a little intimidated by creating
my own mockups. I thought that it was
very complicated, but it actually isn't. And I really recommend
taking this class. But until you do that, I provide a mock-up
that I've created. I'm taking myofibers class
and that is this one here. I got a photo from Unsplash. You get a lot of
great photos there. And I will show you how
to use this mock-up. You tap on the layers panel. Here's a clipping mask
above this pillow. And you have to go to the belief that I forgot the name again,
something with wrench. You tap on that
and then you go to add and you can insert a photo. And I'm going to see this one that puts
your design on the mockup. And I can make it a
bit smaller here. And that's about
it. And if you want to share it without
the photo credits, just toggle off that layer and then you can share
it on social media. Now, if you feel
that your design is not the right scale here, what you can do is
you go back into your gallery and you use one of the designs
you've created before, like this one, and you open it. And now, just like
we did before, we are creating
duplicates of this layer. And we're tapping the
blue corner nodes to get four little squares. I will speed that
up now for you. And wallah, here you've
got your design, but at a smaller scale, and you just have to export
that now, Share PNG. And I will save it
to my camera roll. Then I'm getting
back into my mockup. And I will clear
that layer here. And I will import the
design I just created. Insert a photo. And here you can
see, here it is. And now this is your design
at a much smaller scale. And I think this actually
looks much better with this design than the
one I've done before. So that's how you put
a design on a mockup. Make sure to include
this mockup with your design in the
project gallery.
12. Thanks!: Thank you so much for taking
the time watching my class. I really hope you enjoyed it and that you learn
some new skills. I'm looking forward
to seeing all of your beautiful sun prints
and repeating patterns. So make sure to upload them
in the class project section. If you want to connect with me, you can find me on Instagram. My name is Ed julia,
Alpha, illustration. Hope to see you soon and
have a lovely time creating.
 Julia Ulferts,