Transcripts
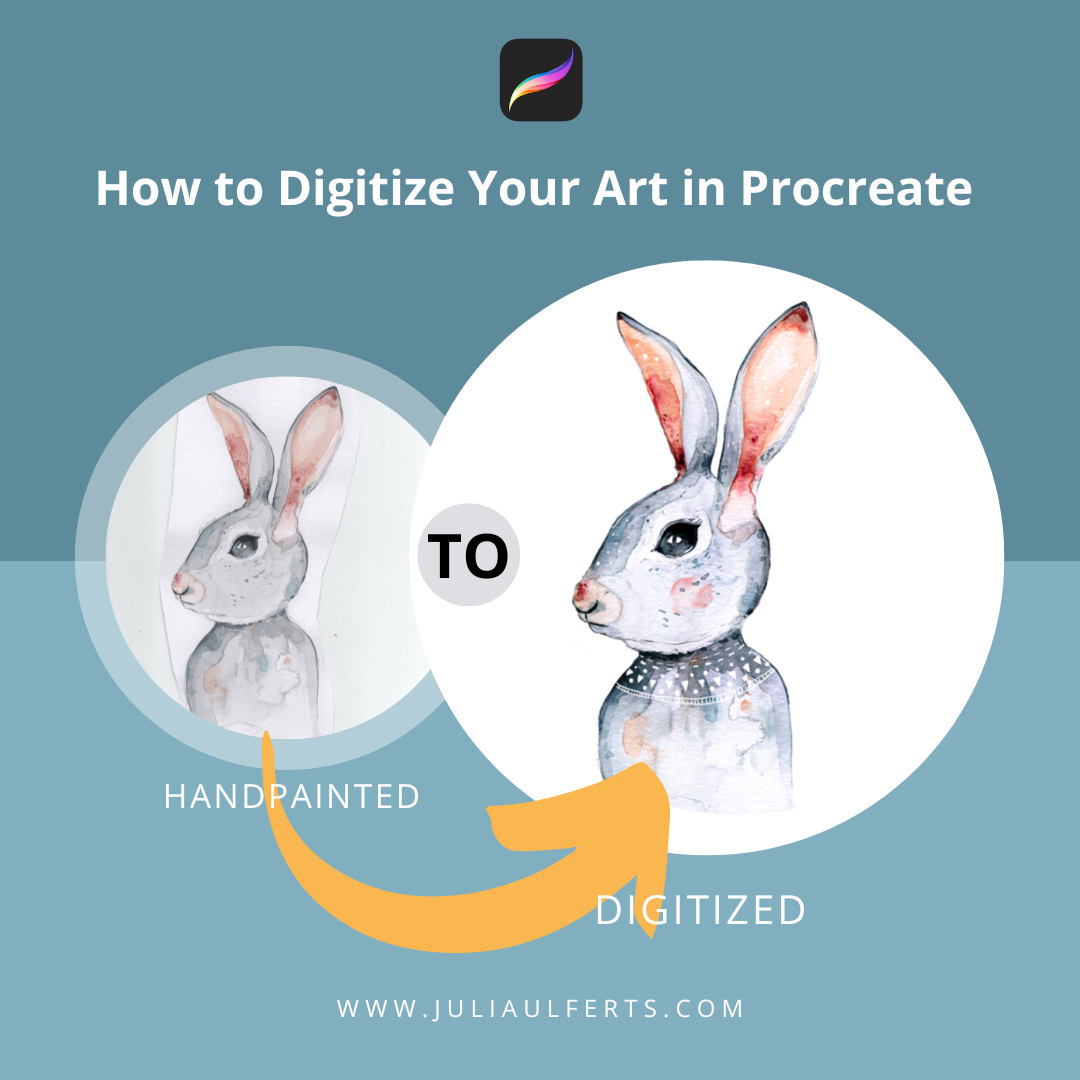
1. Intro & Class Project: Hi, and welcome to my class on how to digitize your
artwork in Procreate. My name is Julia, and I'm a teacher and self-taught illustrator from lovely Oldenburg,
Northern Germany. In this course, you will
learn how to create a digital file of your hand painted or
hand-drawn artwork. How to remove the white
background by using the selection tool and
applying layer masks. The app Procreate. And you will learn
how to enhance the look of your
artwork even more with a few simple tricks like using blending modes and
drawing in details. Being able to digitize your artwork will
enable you to use it on products for print on demand sites like
Society6 and Redbubble. You can use them for repeating patterns or sell them on websites like Creative
Market or design cuts. For this class, you will
need a scanner, camera, or phone, and an iPad
with the app Procreate. Your class project is to
digitize an artwork of yours and upload the results to the project and
resources section. If at any point you're
stuck and need help, make sure to ask your question
in the discussion section. I'll be more than
happy to assist, hope to see you in class.
2. Quick Procreate Basic: Now, before we actually start
to digitize our artwork, I wanted to give you
a quick overview of the functions that
the app procreate has. And if you're already
familiar with Procreate, you can totally
skip this lesson. But if you've never
opened it before, I advise you to just watch the next couple of
minutes so you will better understand what
we are doing later on. I'm going to open Procreate. And to create a new Canvas, I will tap the plus sign. And I've got all kinds
of canvases here. I'm just going
within a four now. The first thing I want
to show you is that you can zoom in and zoom out
by using two fingers. On the right here you've
got your brushes. And let's see, recent year
I used these brushes. Some of them are
more like stems. I created this one myself. And I've got some brush
sets that I bought, like these ones, for
instance, by Lisa glands. They are absolutely lovely. And there are also a lot of brushes that come
with procreate, and I'm actually using
quite a lot of these. Now let's see. I'm going to the inking
section and I'm going to use one of my favorite
brushes, the dry ink. And I will just draw a circle. Now with the smudge tool, you can smudge everything
you've painted. And with the eraser, of course, you can erase what
you've painted and with the smudge tool
and the eraser, you can also use different
kinds of brushes. Now I'm going to erase
with the dry ink. And here you can bump up
the size or turn it down. I need a bigger size.
You get the point. Now, this symbol is very important because
this is your Layers panel. You can create a new layer
by hitting the plus sign. And you can delete the layer
by swiping it to the left. And then just hit Delete. Over here, you've
got your colors and you can use different
views here. I, most of the time
I'm using the disk and I've got some kind of custom color palette
that I'm using. So now what I want to show
you is how layers work. And I will fill this
layer with a color. And I can do that by just
dragging this color ramp to the layer and it fills
the complete layer. Now on the layer above, I will be painting some kind of, let's say, some kind of circle. And again, if I want
to fill that circle, I just have to drop
in a color and then the circle is filled out. Now. Right now this circle is
on top of the yellow layer. But if I were to
interchange them, as you can see, this
so-called disappeared. And that is because this
layer is on top of it. If I toggle it off, the circle is still here. But if I toggle it on, it just covers the circle. Now, if I swap them again, you will be able
to see the circle. Now with the layers panel, you can also access a lot of blending modes and you do that by tapping this little n here. And I will just show
you with this circle. If I change the blending mode, the color of the
circle also changes. And this can give you
some real nice effects. Than other thing I want to
show you is how masks work. I will create a new layer
by hitting the plus sign. And in this class we will be
using two kinds of masks. We will be using layer masks. And I will explain in
depth what they are. And we will also
use clipping masks. Now to get to the masks, you can just tap the layer. And here you find the mask. And here you find
the clipping mask. And I just quickly
want to show you what a clipping mask does. This is now a clipping mask and everything that I'm going
to paint on this mask, we'll just apply to the circle. I will pick some white and
use maybe a pattern brush. One of the instant
artists, pattern brushes. I will just use
these lovely leaves. If I now paint on that canvas. We'll just bump up
the size of it. As you can see, I'm
painting on the yellow. And actually it
does paint there, but you can't see it because this layer is a clipping mask. Now, everything I painted just apply to this little circle. If I were to make it
a normal layer again. So I just tap that and
go to Clipping Mask. Everything that I
painted is visible. Now, if I make it
a clipping mask, again, we'll just
apply to that circle. Now, as I mentioned before, I will explain what masks do so I won't go in
detail about that now. Now, two more things
I wanted to show you if you've got an
object like this one, if you want to move it,
I'll drag it around. You can hit the arrow. With this green node. You can turn it around. You can make it
smaller and bigger. And by dragging next to it, you can just move it
around the canvas. Another thing we want to
use is the selection tool. And you can find it here. Tap that little snake,
S, lasso, whatever. And here you've got two options. You've got more, but we're
going to use two options. You've got the
automatic selection and the freehand selection. And we will be using both. Now with the
automatic selection, you just tap once and it just selects all the
pixels of the same color. If you want to undo something, you just tap with two fingers. If you want to redo it, you tap with three fingers. I want to undo that. And with the freehand selection, you can just draw a
selection like this one. And now everything inside
of that circle is selected. And if for instance I
would just hit Copy Paste, it would copy this
selection here and pasted onto a new layer. And you can see it here. There it is. If I toggle that off, you can see here is the
selection I just made. Now the last thing
that comes in handy is to export your files. And for that you go to
that little wrench. And here you can see Share, and you can share your image, for instance, as a JPEG. I could maybe save
it to my Dropbox or wherever I want to save it. You can also import
something as a PNG. And this is what I
use most of the time. And if I want to have a
transparent background, you have to toggle off
that background color if that is still on white and
if you export it as a PNG, you will have a
white background. So now as you can see, I don't have a background. And I will just go again
to the range and hit PNG. And then I can save the image to my camera roll or
exported into my Dropbox. Okay, I think these are all the functions you need
to know for this class. I will seep in the next
lesson where we're going to digitize our
artwork. See you there.
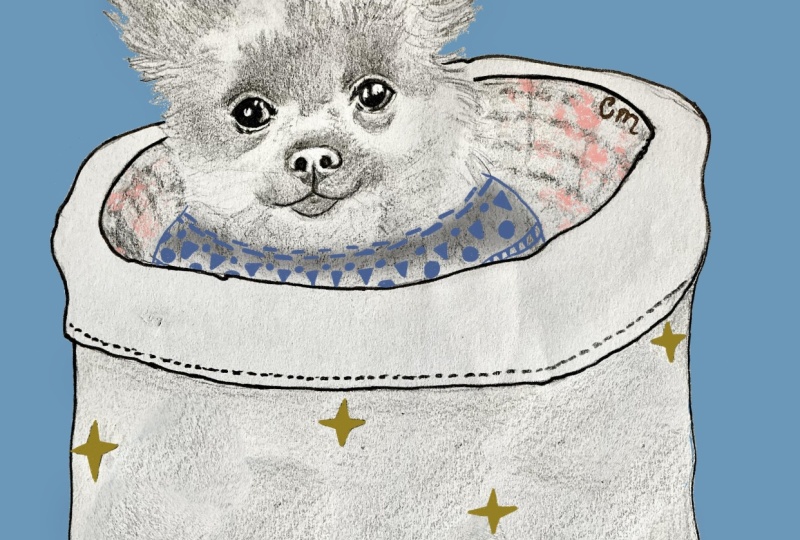
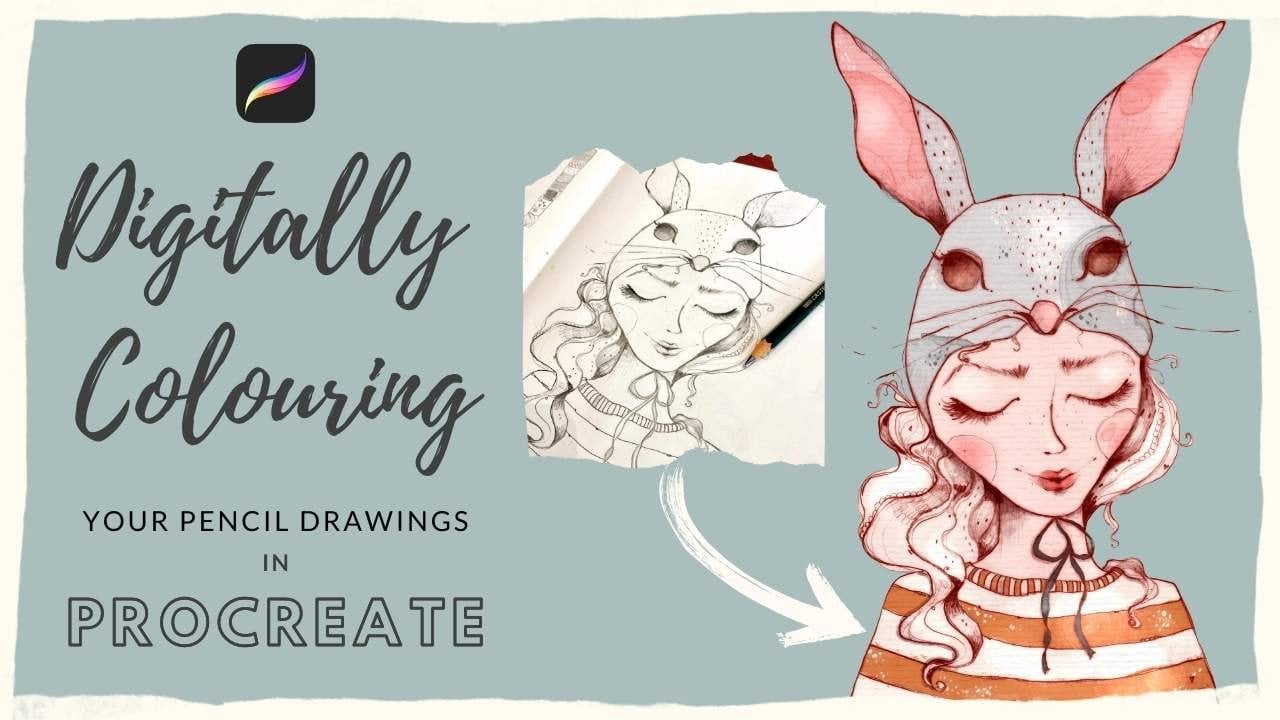
3. Digitize - Scans & Photos: There are two main
options when it comes to digitizing
your artwork. One option is to
scan the artwork, and that is what I
would recommend. Mainly because you can scan
the image at high resolution, which means that you can enlarge it and use it for
print on demand sites. But the second option is
just to take a photo. And that works as well. But keep in mind, if you want to have a
high resolution image, a large image, it's best to use a scanner and scan at the
highest resolution possible. So this is my scanner
software and the scan setting dialog box will of course
vary from scanner, scanner. I've got mine on
professional mode, which allows me to change
all kinds of settings. But I rarely change any other settings
than the color mode. Sometimes I do scan
in gray scale. And of course, the most
important setting, DPI, which I will
talk about later on. Take a look at your
scanner software and play around with the
settings if you like. But be assured that most of the changes you will make
to your image can also be done later by
editing the scan or photo of your artwork
directly on your iPad. A little side note, 99% of the time I'm using my Epson Perfection V3
hundred and 70 photo. I also do own another scanner. This one came with my
epsilon equal tank printer, and it scans up to 600 DPI. But the quality is not as good since it is not
a photo scanner. So if you do want to
invest in a scanner, make sure it's a photo scanner. So I will check that
I'm scanning in color. And then I will
start at 1,200 dpi. If that works with
Procreate, That's great. If it doesn't, I always
have a backup at around 600 DPI because sometimes the images
seem to be too large for Procreate
or for my iPad. And when I tried
to work on them, appropriate just
crashes all the time. So it's nice to have a
backup that's a bit smaller. That will definitely work. I will first hit four
shell, that's preview. And then in a minute
you will see the bunny. So there it is. And I will put that frame as close to the bunny as possible because the less background I
have to remove, the better. If you're wondering why
I cut that bunny out, That's just because
the bunny was drawn on an A3 paper and that didn't
fit onto my scanner, so I just cut it out. So I will now scan at 1,200
dpi and that takes a while. As you can see, I already named it bunny Epson Perfection because
I tried once before. And this is my second try. Now, I will just hit, Okay, and that will
save it as a JPEG. And with 1,200 DPI, it just takes awhile. I will just get a coffee now. Okay, So now here it is, the bunny and it's the 1,200 dpi scanner will
just add that here. Because in a minute I will
do another one at 600. And what I will do now is to just drag it into my Dropbox. And I've already
created a folder here and put it in there. The nice thing about
having something like Dropbox or Google Drive is that you can access your files from any
device that you've got. So if I just want to access my photos and scans on my iPad, I just have to get into
my Dropbox folder. And I don't have to use
any kind of cable or email to just put them from
my computer onto my iPad. Now if you don't own a scanner and are unsure about buying one, just start with using your
camera phone instead. You will also get
beautiful results. Although you might not
be able to use it on large products like
murals, et cetera, because the resolution
is not high enough for getting
the best results, you should definitely
use natural light. Don't use a flash. Set your phone or camera
to the highest quality possible and make sure you have a straight
on perspective. Meaning that you hold
your camera or phone directly from above without
holding it at an angle. Now, when you're ready, I will see you in the next
lesson where we will be downloading and editing
our images on our iPads. See you there.
4. Adjustments: Welcome to lesson three, where we will be downloading
our skin or photo onto our iPad and what we will be doing some adjustments
if needed. So first of all, I'm going to open my Dropbox. And then there is this folder
where I've got my image. Let me see. I think
it's in here. Yes. And I will be starting out. I think with this one, I will just hit these
three little dots here and go to Save Image. And that will downloaded
onto my iPad. And then I will be
going into photos. And here it is. Now, the adjustments
I'm about to do, I wouldn't necessarily do
them with every image I scan. For instance, I'm
going to show you these two animals
are due awhile back. And with this little fox, I think it already is very
vibrant and colorful. So I would just leave it at that same would
go for the bunny. But the bunny I painted
here is a bit flat. And if I were to use Photoshop, I would use a feature which
is called Tony aquatic too. I think that's tonal correction. That would make the image more vibrant and bump up
the contrast a bit. So as I'm not using Photoshop, I tried to replicate that with the editing program
here on my iPad. And as you can see, you've got all these different
kinds of options here. And to be honest, I rarely use it. So I don't really know
what they're all doing. But what I'm doing is I
just play around with them. So if I go to exposure
and just have a look, okay, that doesn't
do really a lot. Let me see one more. This is bit better
because as you can see, it removes a bit of that
darkness here in the background, which I want to
get rid of anyway. So I might, let me see. Yes, I might bump that up. And I've got some darker areas here with paper was warped. I could have avoided that by pressing the paper
before I scanned it, but I'm usually too lazy
or unorganized to do that. So if I pump up that exposure, I get rid of that anyway. Now I'm going to brilliance and just play around with that. Oh, and I liked that the dark, the dark background gets, gets back a bit. But if I look at the
bunny that looks better than before, definitely, I will bump that up to
match with the shadows. Really doesn't change that much. Contrast. Let me see, bump it up, put it down a bit. But I think I like it around here. Okay. That I hit done. So that's it for now. I will see you in
the next lesson. And that lesson we
will get rid of the white background here around the bunny. See you there. All right.
5. Removing the White Background - Selection Tool & Layer Mask: Now to import your skin
or photo into Procreate, just tap on photo and then tap on the one
you want to import. And here it is. The
first thing I will do is just to cut away some
of that whitespace. And I will just do that by
using the selection tool. And I make sure
it's on freehand. And then I very
loosely draw rounded. And I will a three finger
swipe and go to cut and paste. That automatically put the
money on a another layer. And I will just delete
this layer here. And if I now change the
background color to something dark, can use black, then you can see it's cut out and having the
background color on a dark color like black or could also be some dark
blue really doesn't matter. But that will help you later on when you have to get
rid of that white. Because then you
can see what you've already removed and what
you haven't removed. Good. Now, I will go on and again tap on
that selection symbol. And then now I will
go to automatic. And I will just show
you what happens. I'll end. I think
it's easier to see if I use another
background color. Let me just see,
I'll use some kind of darker, darker red. With the automatic selection, you can adjust the threshold. So you can see here if
I swipe to the left, the threshold gets put down. So now the threshold is
very low and it doesn't select as much white as it
does when I bump it up, and I will do that now, you can see it gets higher and higher and it selects much more. But as you can see now, that happens, especially with
light watercolor paintings. It's selected more than
I want to have selected, because I actually want to
keep that part of the money. But I've got a cool
trick which lets you select a lot of white and still lets you get that pop back in a
minute and I will show you how I'm
going to do that. I've got all of this selected. I might even select this year, because the more I select, the less I have to
get rid of later on. And instead of cutting
that out, now, what I will be
doing is I will tap invert and then I
will go to my layer. And I will tap that
layer and tap mask. And this created a layer mask. And a layer mask is
super-helpful when it comes to digitizing your art because
it's non-destructive. And what that means is that with a Layer
Mask, I don't erase. I use a brush and I normally
use the dry ink from the inking section to
have some textured edge. Or I might also use some kind of soft brush from
the airbrushing section. For this, I will stay
with the dry ink. And what happens when I paint
on this layer mask with black is that I
mask these parts. They are not visible anymore, but they are still there. Because here you can see
my bunny is still intact. But I painted with
black over it. So you can't see it,
but it's not gone. If I disable the layer mask, everything is still there. That's a really cool feature. Because what I can also do is I can paint with white on it. I'm using the dry
ink again and then I'm choosing a pure white. Yes, it's already on pure white. You can double-tap this and
then it goes to pure white. And if I now paint on it, you will see this brings back part of the
bunny I want to keep. And I will just very quickly
brush, isn't that big, but I will just very
quickly use a color drop. And so I do have that pop back. And I will now get rid of these parts that I
don't want by using a black and maybe getting back
some parts by using a white. And it helps to zoom in. Here you can see why I'm
using a textured brush. Because these edges of my watercolor artwork
are also textured. And if I were to use, let me see some hard brush
like this one for instance, the edge gets quiet defined and that's what I
don t want with watercolor. So I'm getting back
to my previous brush, which was the dry ink. Getting some of these here. Back. Yeah. It's up to you how
thorough you want to be. I usually tend to be quite
meticulous about this. I also enjoy it. So it's really not
a pain to do that. I will speed that process up for you and then I will
see you in a minute. Sometimes I do check
if I want to keep some white parts like I
will do here with his ears. I just brought them back mouth and then I decide
that I don't like it. And then I'll get back to
black by holding that. This is actually quite nice. You can just tap that and hold it and get back
to your previous color. And with layer masks, this is really a quick way to
change from black to white. Again, here's the part where I wanted to check if I'm made me want to get some of that white, black and I think I like that, so I'll just leave it in here. And as you see, I darkened my background color
to be able to see, well these tiny
white parts better. Okay, so that's it for now. In the next lesson, I will be showing
you how you can further improve the
look of your artwork. Make sure to meet me there.
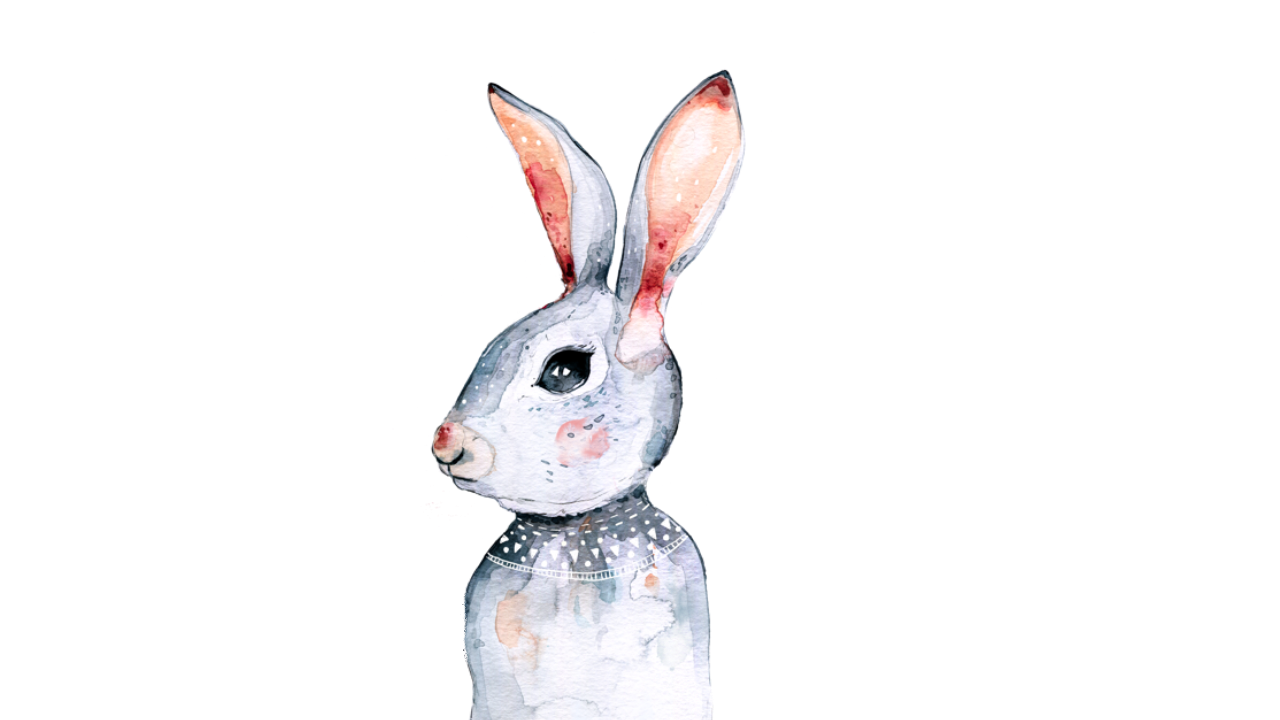
6. Further Enhancements: Welcome back. Now, technically, you're done. You've cut out your artwork. If you want, you can
export it as a PNG with a transparent background or with some color
background as a JPEG. But in this case, I'm not really satisfied
with the result yet because I think I
could do a bit better. So the first thing
I would try is to make my bunny look
a bit more vibrant. I will do that by adding a
layer on top of the bunny. I will make that
a clipping mask. And I will use a blending
mode called soft light. And then I will
use a soft brush. And I've already got it here. And the nice thing about this
brush is that it will vary. The more pressure I
put on my screen. The darker the color gets, the less pressure I apply, the lighter the color gets. I will use a black. And then I will just carefully start painting here and there. And what that blending mode
does is it makes the parts of the image I'm painting on a bit darker and especially in
this case with watercolor, a bit more vibrant. Do that here. Maybe here around the eye. Now, I don't know, I will zoom in. I don't know if you can
tell the difference, but there definitely is one. If i think that's too
intense, what I could do, I could just lower
the opacity here from but for now I think
I'll leave it at that. Now another thing I'd
like to do here is to give my bunny a
little watercolor cheek. And I will do that by
adding a new layer. And then I will pick
some kind of pink. And I deliberately pick a pink that's already
in the bunny, so I don't go to the color palette and
look for something, but I take your pink that
I find here in the ears. And then I will go to the
Lisa glands are pro real set. Choose a splotch and I think
we'll go with this one here. Just tap once. This is obviously too intense. But what you can do is to
just reduce the opacity. And I think I would make
it a bit smaller here. Maybe turn it around like that. Yes. And I think like that, maybe even a bit smaller. Okay, good. Now the last thing I
want to do is to add a little pattern to the bunny. And I again use another
layer for that. And then I will check that
I've got the dry ink. It's in the inking section, and I do use a
white or off-white. And I simply draw on
the bunny like this. And again, because
I'm on a new layer, if I don't like what I'm doing, I can just delete it later on by simply
deleting that layer. So I will draw this pattern and speed
that process up for you. And then I will see
you in a minute. Now to make the pattern
even more visible, try to add another layer of soft light just
around the neck. I will make it a clipping mask. Go to soft light. Go to the soft brush. Black. Just a little more. I feel it's a bit too intense, so I will reduce the opacity
and I like it around that. Now, the last thing I will
do is to see whether I can add some highlights
to my bunny. Just see how that looks. I start out with a
very visible white. But I will later on reduce the opacity
of this layer here. To make it not too much. Maybe I will add some little
things here and there. Let's just see what happens
if I don't like this one. Like this little
tiny ones there? Yes, I might leave them in. Now as you can see, you can play around with it as
much as you like. And every time you
don't like something, you can just delete the
layer you've created it on. I want to show you one
last time how the bunny looks with and without
the enhancements I made. And that's the before. And now I will quickly
turn the song. That's the after. And I have to say, I definitely prefer the bunny with all these little effects.
7. Thanks & Let's Connect!: Thank you so much for taking the time and
watching my class. I really hope you got
something out of it. And if there are
any questions left, please make sure to ask them. In the discussion section, I would be delighted if we
connect it on Instagram. My Instagram account
is at Julia, offers illustrations or you can visit my homepage,
julia of.com.
 Julia Ulferts,