Transcripts
1. Intro: Hello, and welcome.
My name is Julia, and I'm a teacher
and self taught artist from Oldenburg,
Northern Germany. In this course, I want
to guide you through creating four cute
animal illustrations. The twist, each illustration will be done in a
different medium. Pencil, watercolor, mixed
media collage and procreate. So if you've recently found
yourself stuck in a rut, only using one
medium all the time, this course could
really help you get your creative juices flowing
into new directions. While at the same
time, you might get a cute little poster for your child's bedroom or even
for a print on demand side. The type of animal
illustration we will be creating is perfect
for beginners. Since we will mainly
be focusing on creating a cute head
with a short body, which is more kind of
just a rectangular shape. This means you won't
have to tackle the more complex aspects of a full blown animal
character design, such as hands, legs, posture proportions, and maybe even having
a scenic background. This is great news since it allows you to keep things simple while focusing on
the exciting parts of the creative process. You can have fun with
experimenting with different colors and crafting textures and cutting and gluing, and simply soaking up the joy of the creative process without having to put a
lot of effort into a more complex
drawing beforehand. So let me give you a quick
overview on the course. I will be starting by
sharing my pinterest board I created and the prompt list derived from the illustrations. I then share a few
quick thoughts on the sketching process
where I tried to figure out which animals
I wanted to draw eventually and roughly how
they were supposed to look. After that, I will be diving into the four main
characters of the course, starting out with a badger, which I completely
drew with a pencil, then going on to a fox, which was created
with watercolors. Then going on to an owl, which is a mixed media collage. And last but not least creating a cute little froggy
in Procreate. If you already know
that you want to do one illustration
in Procreate, then please consider taking appropriate beginner
course beforehand. Since I won't be going too much into detail
here in this class, and if you want to learn how to digitize your analog artwork, you could consider
taking my class, digitizing your
artwork in procreate. So that being said, have fun creating
your illustrations and see you in the next lesson. Bye. O.
2. Class Project: Your class project
will be to create at least one cute
animal illustration with any medium you prefer. So just start out with what
you're drawn to naturally. But I would also challenge
you to maybe try a new or at least more
unfamiliar medium as well, since that is where
your artistic growth will probably happen. And when you're done,
please make sure to share your class project here in the class project
section on skill share. Now, let's get
inspired, hay. Oh.
3. Finding Inspiration - Pinterest and Prompt List: Hello, and welcome
to this lesson. Now, there are many ways
to gather inspiration, but I felt that especially
with this project, it was a very helpful way to hop on to
Pinterest and create a special board dedicated to these kinds of illustrations. Now, as you can already see, there are so many lovely
illustrations out there, and they are all created in all these different kinds
of styles and mediums. So just looking at these
images makes me want to jump to my drawing table and create an
illustration myself. So if you're not that
familiar with Pinterest, it has this great function where you're clicking
on an image, and then it recommends more
of these types of images. So I gathered the first images by looking for keywords like cute animal illustration
and also cute nursery illustration or
nursery illustration poster. And then I went from there. So after I had my first
ten to 15 images, I very often went with the recommend function of Pinterest and gathered
all these images. What I was mainly looking for were fairly simple
illustrations. So by that, I mean
illustrations that don't acquire a high
level of drawing skills. And I also mainly pinned
illustrations that were animals that
were kind of cut around the area where
their belly is. So I don't have a
lot of animals with a whole body where you can see the whole body or the legs. And I also wanted to
make sure that I have all different kinds of
ideas and styles in there. So that I could
get a good idea on how to draw the
facial expressions of these animals and also which types of
accessors I could use. At the bottom, you can see
that Pinterest recommends even more illustrations based on the board you've
already created. So be careful to not
get lost for too long. Now, using all of these
different images, I had pinched on
my Pinter s board. I created a prompt
list for myself. Or it's actually two
prompt prompt lists. So one of them is all of the different animals
I saw and which I feel that I particularly like or that I feel that would
look particularly cute. And then I also made a list of all the different types
of accessories I saw, so that I could just mix and match them to my
liking later on. You will find this
list and the link to my Pintrest board in the resources section
as a PDF document. So if you want, you
can hop over to my board and get
inspired yourself, or you can use the
prompt list if you want to do different
animals than I did. I hope to see you in the
next lesson where we will be sketching our
ideas. See you there.
4. Sketching Your Ideas: Hello, and welcome to lesson
three of this course. And in this lesson, I want to
share my sketching process, which helped me to generate some ideas of what I
eventually wanted to draw. And in the previous lesson, I've shown you my
pinterest board. And while I was sketching
these animals here, I loosely referenced that board, so I had it next to me on
my iPad, and it was open. But I didn't look
at it all the time and didn't copy the
animals one by one. It was more like taking a quick look at them and
then deciding, Okay, so the next animal, I want to sketch is a bear, and then I want to
go on with a cat. And I also referenced the
prompt list I had made. So I thought maybe
I will do a bunny, but I won't do the
bunny with a party hat. Instead. I will draw him with a striped pull over
or I don't know, a crown or whatever. Now, I made sure to use very simple copier paper
for the sketching and just some random
pencil I had lying around to be not too
precious about my sketches. This is something
I really had to learn the hard way
over the years, that it is important to have specific times in
your art process where you are just doing some sketching and where nothing
has to be perfect. So at this point, I was still quite
open minded about what kind of illustrations I
wanted to create later on. And in the end, you know that I will
be doing animals that have quite a big head
and then a tiny body. And these are two
separate parts. But in the beginning, I could also imagine
doing a couple of different birds like this
one, you can see on the left. Or animals that look like the bear in the it's not the
middle. It's the second one. Animals that are just, you know, some kind of oval mountain shape and don't have a separate head. So the fox is actually fairly similar to what I will
be doing in the end. So when I will be doing
the watercolor fox, And what I'm doing
at this stage is also experimenting with the eyes quite a bit because the eyes, I feel are quite an important
part in these animals. So thew actually has a very similar eye to what
I will be using later on. But I also like the
option of the bear two and then the fox who just have these
tiny dots as eyes. I really like that look as well. And then we have these half half moon eyes
that look very cute, but we're a bit too happy
and funny for my taste, so I didn't opt for
this type of eyes. I remember that at this point, when I was drawing
this little bunny, I had decided that
I actually wanted to have a separate
head and body. And this is why from now on, I will just be drawing these
kind of illustrations. What I wasn't doing at
this point is to have the head very big and the
body comparatively small. This is actually
something I decided when I was doing
the actual badger. So I really want to
encourage you to do at least eight of these
little sketches like I did, and probably even
more because A, you will be honing
your drawing skills, and that's always a good thing. And B, I feel like the
process itself generates so many new ideas that
it is really helpful to do several of these
little drawings. Also, I'm quite
sure that I will be doing more of these cute
little animals because it was just so much fun and such a rewarding thing
to illustrate them. And now I can always use these sketches as a
reference then later on, if I want to do
another illustration. So I'm already on
my last drawing. Here, you can see the color
that will eventually land on the fox and the yes that I will be using for all
the other animals. See you in the next lesson where we will be drawing a
cute little badger. See you there. A
5. Badger: Pencil Drawing: I wanted to start with very short intro into
working with a pencil. Pencils come in
different grades, marked with the letters, H and B. H stands for
Hard. B is for black. So a five H is a
very hot pencil, which produces a
light and sharp line perfect for technical drawings. And eight B on the other
side is very soft, dark and smothes easily. B and H B are somewhere
in the middle. My absolute favorite brand, which I also see many artists use when it comes to
pencils is Faber Castell. But if you don't have any
faber Castell pencils at home, any other brand will
do just as good. Only if you're going to do a lot of pencil
drawings in the future, I would advise you to test out different brands to find
your perfect pencil. As for paper, I like to work on slightly toned and
or textured paper. This one here I got from
my local art dealer. It has a very soft
pinkish tone to it, and also a lot of
little fine hairs. But you can totally just use white copier paper
for this exercise. So again, please don't feel stressed about needing
the right material. For this illustration, I start
with an HB and B pencil, which both produce a clearly visible yet
relatively light line, which is easily erasable. When I'm done with putting
down my final shape, I will be adding
a lot of details with a two B and four B pencil. Using the softer pencils creates more contrast since
more graphite gets rubbed onto the paper, and so the line is much darker. If you take a look
at this badger, it is broken down into
these easy shapes. Seeing that always helps me to feel less intimidated
by drawing. Also, the stages
here show you how the illustration really comes to life while working
on it for a while. I will start out by drawing
a circle for the head. And since I know that a badger has a very long, slim head, I then add the part where
his nose will be sitting, making the head more
like a soft triangle. I work very loosely at this stage and just try to
get in the basic shapes. I want the body to be very small in comparison to its head. The bigger the head,
the younger and cuter a child or animal looks. I add a big nose. Two little ears. Here, you can see
me deliberately tilting the line
of the head a bit, because the asymmetry
creates a bit of extra interest.
Drawing the crown. A and sectioning the
part of his face, where there will be
the two dark stripes. I use the Farber Castel
dust free eraser, which erases very well without leaving a lot of dust or
destroying the paper. And I absolutely love
these two eraser pencils, which allow me to erase very small details without affecting the line
work I want to keep. Here, the crown got in
the way of the ear, and even though I
was a bit reluctant, I decided to redraw it to put
it a bit more to the left. Adding stripes to the body. I'm using bold strokes and keep my lines
deliberately wonky. Adding the most important
thing, the eyes. Again, I try to let my line
work not to be too perfect. So, for example, the round of
the eyes is not perfectly, but more like a very
kind of ish square. Now I'm getting in
with a two B pencil to add more contrast. I'm also adding a
lot of small dots, sometimes a little cross edge, or some marks,
triangles, et cetera. And even at this stage, I'm still erasing some lines which haven't yet
been properly erased. And again, you can see me
use bold and wonky lines, which I feel fit children's
illustrations so well because that often is the way that a child
would draw a line, bod stroke and sort of wonky. I prefer filling shapes with hatching and cross hatching
instead of coloring in. I just love how it
looks very sketch like. Here, I added some
shading beneath the head, which I later erased
because I felt that it didn't fit the flatter
style that this badger has. Adding some lines
on top of his eyes, which could be eyelids, but which I mainly draw
to create more interest. Towards the end, I'm adding a lot of tiny
strokes to indicate the black stripes
that a badger has on its face from his ears
down to his snout. I incorporate this
type of texture in many of my drawings because
I like the look of it, and it is very
meditative to draw these little marks. S. Adding even more darker
toned marks and dots. All in all, it is very
important that the drawing has enough contrast between
light and dark areas, especially if there
is no color involved. For the light gray of the crown, I do a kind of circular movement with
a very light pressure, and same goes for the ears. And alla, our first cute
nursery illustration is done.
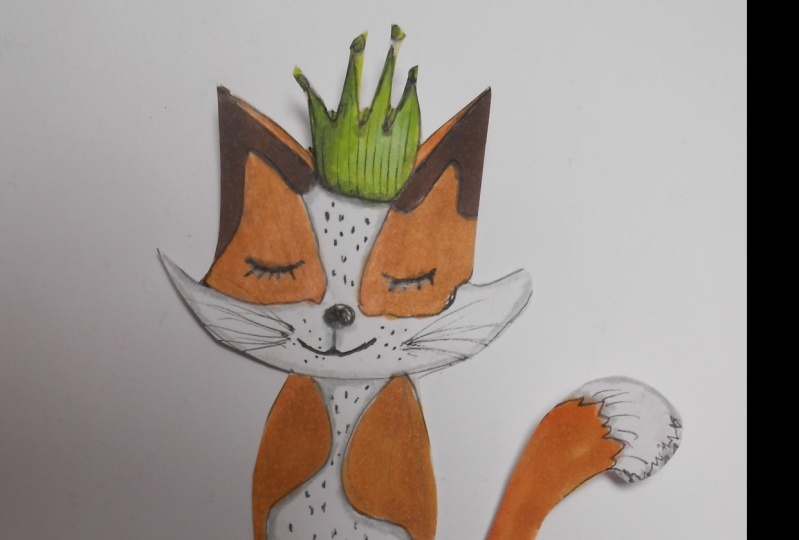
6. Fox: Watercolor Painting: For the watercolor fox, I will be using the Van goo
watercolors by royal talons. This little travel set has a nice quality and
cost me about $16, which is quite inexpensive
for watercolors. It also has all the colors
you need plus some more. So if you are a beginner, I absolutely recommend the set. To mix my colors, I will be using this porcelain
ceramic mixing palette, but you can totally just use a white plate
from your kitchen. As for brushes, I mainly used the synthetic Da vinci
Casaneo watercolor brushes, which work well and
are reasonably priced, starting at around six or
$7 for the smaller brushes. When it came to brushes, I never felt I needed
the most expensive ones, though I would not use very cheap ones since
they tend to lose hair, which is quite annoying. I start by doing some test swatches to find
the right colors for my fox. At this point, I already know I want to use a blue or bluish green as a
complimentary color to go with a brownish
orange for the fox. So I started with a brown
called Burnt Sienna, and I later mixed that
with Chinese white to get a lighter and more desaturated
version of this brown. Swatching is nice because
it allows you to play around with the color and warm up to the painting process. I then start trying out my blue and bluish green
tones by mixing blue white, and if I want to get a more
greenish tone, some ochre. After I was done swatching, I created a very rough
version of the fox. I wanted to paint to see how the colors would
look side by side. I also wanted to decide
at this point which brown and which blue I would eventually use on my
finished painting. So I used the more
desaturated brown, the one that I had mixed
with white on the left, and the more vibrant
raw color on the right. On the head, I tried
out the blues. Later on, I created swatches
of all possible color combos beneath my fox to finally decide on the
colors I wanted to use. Spoiler alert. In the end, I will be using all of them
plus some darkened versions, though I will decide on the more desaturated version of the brown as my base
color for the fox. When it comes to paper, you need watercolor paper. Make sure that it is at
least 200 gram/square meter. And I feel it is
easier to work with hot pressed instead
of cold pressed paper because the colors don't
get absorbed as fast, and therefore, the water or
pigments can be moved around, and they build these
wonderful blooms at the rims when they dry. Here you can see me
drawing a square. I want to make sure that the width of my
fox is not bigger than 20 centimeters
because I want to be able to create a four and A
three prints later on. These are my very
rough sketches. Like the badger, the fox can be broken down into
these easy shapes. It's a circle for the head, two triangles left and right. Triangles for the ears and head, square for the body and nose, and circles or half circles for the sectioning of the face, the pompom, the
eyes, and the color. I use either B or HB pencil and start out
with the shape of the head. Like I said, I need the
width to fit my square, so I can make sure it will fit
in a three posta later on. The height can actually
be outside of my square. While I'm drawing, I'm referencing
my two rough sketches. I like the lower one, which was looking
a bit to the side, but decided against it
because I wanted all of my animals to look like
part of a collection, even though they were created
with different mediums, drawing the nose, Here you can see me
adjusting the width of the head because at this point, it didn't fit my 20
centimeter square. In general, I draw and erase
and redraw quite a bit, and so very slowly, make my way to the final result. The eyes are similar to
the ones of the badger. I just made sure to have them a bit more straight
since the badger turned out to look a bit
sat with the outer corner of the eyes being a bit lower
than the inner corners. Here, I'm strengthening some lines because
with watercolor, I like it when they
shine through a bit, and then there's not much
more to say other than I try to get a result that I like by adjusting the
linework here and there. So here it is the
sketch of the fox. And now let's move on to the fun part of coloring
with water color. I start with a mix of Chinese
white and burnt sienna. If I want the color
to peel lighter, I add more water, and at this point, I use burnt sienna without the
white to create darker areas. Later on, I will also be
adding spots of burnt umber, which is an even darker brown. I've been doing watercolors ever since I started making art, and it was love at first sight. I love the translucent
delicateness, and its unpredictability. And if I have one tip for you, embrace that watercolor won't be perfectly controllable,
that's the beauty of it. Dabbing in spots of
burnt sienna here. If you dab new color into
already wet or semi wet areas, these lovely watercolor
blooms appear, moving on to the body. Dabbing in some Chinese white just to try out how
that might look. Now, while the fox
is still drying, I start coloring the hat because if I were
to color the color, for instance, the
still wet brown and the green will
float into each other. Though, honestly, I don't
mind too much if that happens sometimes because it can actually look
quite interesting. Here you can see me using different amounts of
water with the blue. The idea is to make
the water colors bloom and the blue to
be not too solid. I also dab in a darker blue, which I created by adding a little bit of paints
gray to my blue. You can see here that
the water on the ears is not completely dry because
the pigments dissolve. The area beneath its
head on the other hand, is dry, so these spots
are quite visible. But I like the way
they create interest. Here I'm adding the burnt umber I've been talking about before. And the green for the.
Again, my first layer is quite watery here. I will be adding more layers
on top of it later on. I don't leave the white of
the Fox's face paper white. Instead, I mix an off white with Chinese white and yellow
ochre and a lot of water. I also add a very
light gray later on, and this is just paints
gray with a lot of water. Now, you might have noticed that my approach to watercolor
is more experimental, trying out different
things along the way to see if
they work or not. But that is probably the reason I enjoy watercolors so much. I get back to the head and use a more dark
blue on the left. At this point, I was unsure if I really wanted to
incorporate shadows. So I didn't keep
the darker tones to one side as I would have done if I wanted
there to be a shadow. I later on will be feeling
that the hat looks too messy and paint over it with a more solid layer
of my original blue. If you look closely, you
see that the orange of the fogs bled into
the blue of the heat, I might either decide
that I like it or I will fix it later on
when I digitize my fog. Layering the color is mostly an intuitive process for me
where I just kind of feel that something is missing
or that I want to intensify the color at a
bit of texture, et cetera. In general, you can say that it is important to have
contrast in your work. That means that you incorporate some very dark parts and
some very light values. It is a bit more tricky to see
that if you work in color. But if you look at my
finished fox in gray scale, you can see that there are very light parts on his
face, and of course, the background, and also very
dark parts under his head, his nose and eyes, and the left side of
the head and body. For the eyes, I use a mixture of paints
gray and burnt umber, just because the brown makes the color look a bit
more natural and warm. I'm taking away a bit of
the color with a brush. You can also use a rag
or paper tissue to dab away some of the color if
you feel it is too intense. From now on, it is mainly
adding color here and there. Like I said before, doing that in a very
intuitive way and keeping in mind that I want to a
contrast in my values. O h. I darkened the green of the collar by
adding some pines gray, and since I imagine that
his head casts a shadow, I darkened the upper
area of the collar. I intentionally kept the
cheeks quite translucent. I don't want them to
be too prominent. So I add a lot of water
to the mixture of Chinese white and the M e deep. I also love how the second
cheek has a little gap, which I deliberately didn't
fix in my digitizing process. I added a white highlight to the eye when I
digitized the fox. If you don't want to
digitize your artwork, you either need to
leave a white spot, which is a bit tricky to do. I'd recommend masking fluid, which will cover the area, so it will stay white or use white guash or a
white gel pen later on. Here you see me fixing the
color of the head that was a bit too messy even for
my messy liking taste. S And then finally, I'm decideing to have a bit of a shadow on the left
side of the heat. So I paint over the side with
a very watery paints gray. So by no means, are my watercolor
skills perfect, but the point is to get
out of your comfort zone, try out new stuff, and keep your creative alive. So I really encourage
you to just and play around with the
color and enjoy the process. See you in the next lesson, where I will be doing something that I've never
really done before, and that is making a collage. See you there.
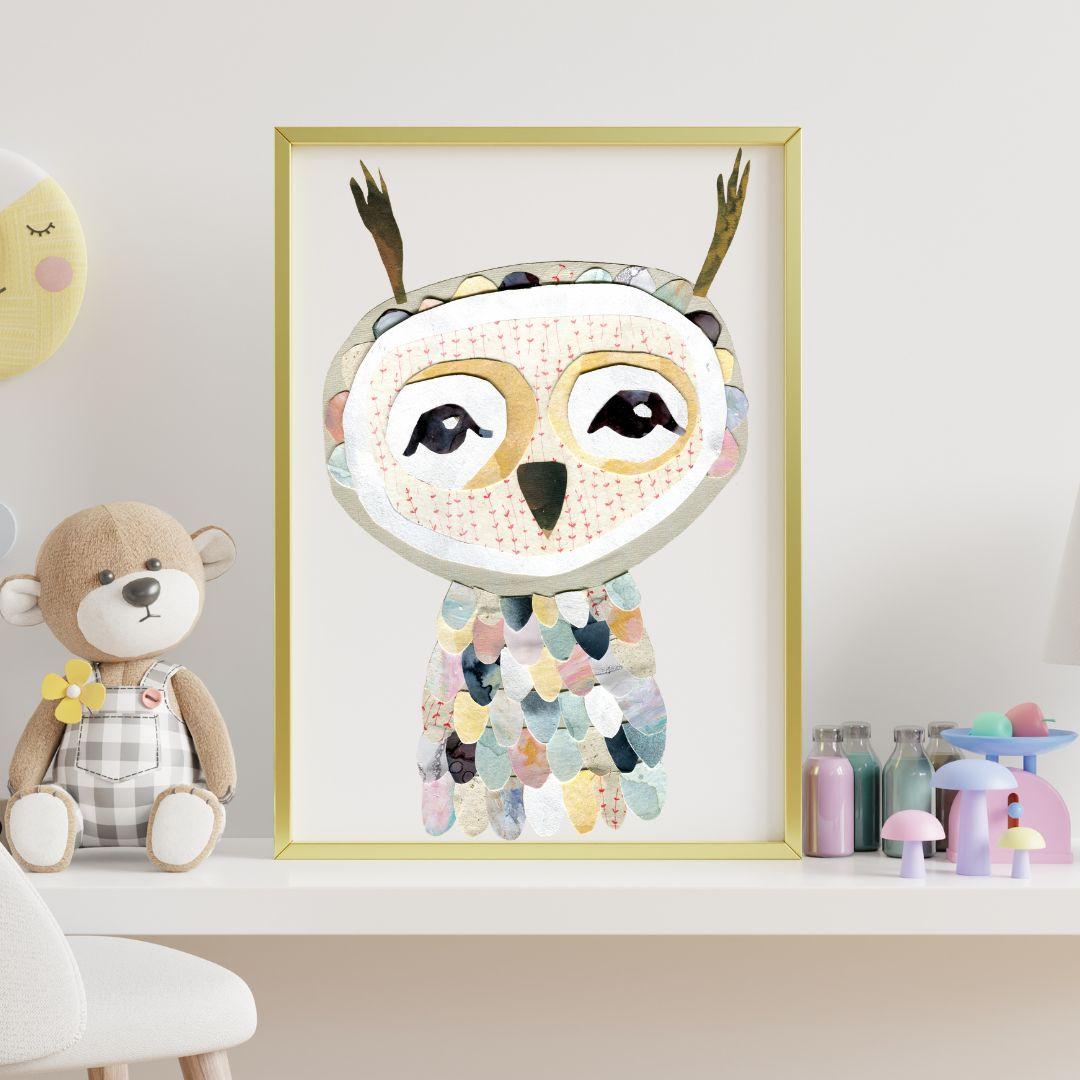
7. Owl: Mixed Media Collage: Welcome to this lesson. So, as you can see, I started out by doing some
sketches in procreate. I already knew I wanted the
owl to have some scallops on her body because I thought that this would look so
lovely as a collage. And it really turned out to be my favorite part of
the illustration. I wanted to be consistent with having a big head
and small body. But I also knew that the body of the owl might have
to be a bit bigger than the body of
the other animals in order for the scallops
to be not too tiny. I wanted the shape
of the head or at least the inner circle of the face to be kind
of heart shaped, though in the end, I didn't
follow through with it, which I regret a little bit. For the eyes, I kept
it consistent and drew the same kind of eyes I also used on the
badger and the fox. I also came up with a kind of
color palette for the owl, which I wanted to
be grayish blue, light pink, of white and gray. But having seen
my owl, you know, that I didn't stick to
that palette too closely. It was a guidance though
for the creation of the different kinds of
papers used for my collage. Now, the next part was one of the most fun parts for
me because I could just play around
with color without worrying about having
to do it the right way. I used gah oil pistels, white acrylic on brown
paper carbon, water color. Gouache again, and
also some alcohol ink. Next to that, I used some pattern papers which
I found in my studio. You could also use pencil, felt markers, colored pencil, chalk pastels, ink,
newspaper magazines, old book pages,
fabric, et cetera. For the collage making, you will need scissors. Tweezers are really,
very helpful with very tiny pieces of
paper, a glutick, and or acrylic medium, which is basically
transparent acrylic paint, and a brush to apply
the acrylic medium. Don't worry if you don't
have any acrylic medium. You can totally just use a glue stick or
craft glue as well. I won't go into a lot of
detail on how I created the papers because I really
just followed my intuition. For the guash and
the watercolors, I had a thicker paper. You should use at least
180 grams/square meter. And then I just applied
colors. I had mixed. I applied them with different
kinds of brush strokes, like dabbing the color or
dragging and pushing it. And I varied the amount
of water I was using. And very importantly, I put on some nice music and just enjoyed the process of playing
around with the colors. Now, I will just show you
a few sped up examples, so you get a rough
idea on what I did. I also involved my
son in this project, and I let him do a
paper with oil pastels, which he absolutely loved. I feel it is always
quite special to find ways to make your children be part of your
artistic process, even if they are
still very small. As a base for my owl, I used an old Amazon carton, which is a bit
bigger than A four. I sketched the basic outline
of my owl onto the carton and then tried to find which paper I wanted to
use for the head and body. I decided on that
light gray paper here, which is a pastel paper that I bought at
my local art shop. Here I thought about
using that nice, white and red pattern paper, and I used the
head I had already cut out as a template
for the other parts. So I'm making that smaller here. And then I know I also wanted to have some
white on the head. So I'm using my carton
painted with white acrylic. Here I'm trying to decide
whether I want to put the pattern paper on top of the white or the white on top
of the pattern paper. And then I decide to put
the pattern paper on top, which I honestly
regret a little bit because I feel it's
looking kind of too busy. When I digitized
my owl later on, I reduced the pattern
paper a bit by painting on it with white
digital watercolor. For the circles around the eyes, I tried not to cut them, but to tear the paper because
I really like the look of torn paper when you get these
lovely irregular edges. But in the end, I will decide to use circles that were
cut with scissors because I didn't like
the inconsistency of everything apart from the
eyes being cut with scissors. Here I'm trying to find
out which paper I want to use for yet another
circle around the eyes. And then I didn't use the black wash as I had
planned for the actual eyes, but the alcohol ink paper, because I saw this funny
little circle in there, and I thought that might
look cute as an eye. I compared it to the other
type of eye I had in mind, and in the end, I like
that much better. For the second eye,
I will be using the first eye I made
as a template again, just cutting around it. Using the white acrylic carton for the little
highlights of the eye. And then I'm trying out my pink oil pastel paper to have yet another
circle around the eyes. Cutting out the beak
and then trying to have dark circles around the
eyes, which I don't like. Making a collage is
a lot about trying all different kinds of options to see whether
they work or not. So here you can see me using an older watercolor painting and preferring that color
over the pink because I feel it matches better with
a pattern paper underneath. Like I said, the tweezers
can come in handy, especially for very tiny details like the white in the eyes. Now, what I did
with the scallops was to first just cut them out very roughly because I just wanted to get a feel for
how they would look. And I also wanted to find
out which papers I wanted to in the scallops and
which I didn't want to use. So I'm adjusting the yes there, and this is when I
decide I want to have white circles that were
cut instead of torn. Then I go on to cut a lot of these scallops and
just lay them down. This is one of the
papers my son created, and I actually used
that quite a lot. I then realized I also needed to have some darker parts
in the illustration. I talked about that
in the Fox lesson that it's often good to have very light and
very dark parts in your illustrations
to create interest. Here, you can see me
cutting out the body. I'm using that same
gray pestle paper I've used for the head, and you won't be seeing much
of that in the end result. But I wasn't quite
sure at this point, and that's why I thought it
was better to cover the area underneath the scallops with the same paper I've
used for the head. Here I started putting tiny half circles around
the head of the owl, and I just had the idea
while I was working on it. This is actually one
of the best parts of creating a collage. It is in itself, a
really playful process, and you will probably get
so many new ideas along the way while the papers kind of guide you
to your end result, which might look very different to what you have planned before. I also tried out
this golden paper, but I won't be
using it in the end because it just didn't fit
with the other papers. Here I'm getting organized
and tidying up my workspace, which got messy very quickly. And then I decided to finally glue down the first
parts of the owl. As you might have noticed, I didn't bother to put all the scallops in
their definitive order. I just needed a little
preview of how it looked. And then later, when
I'm gluing them down, I will be deciding on where to put which individual scallop. I'm tilting the head
a bit because I always feel it looks cuter
if the head is a bit tilted. And I used both the gluetick and the acrylic medium to
glue down the body parts. So I found out you can use both the acrylic medium
or the glue stick. I just used the acrylic
medium because I enjoyed the process of using a brush
to apply it to the paper. I also feel that it
might work a bit better if you use
thicker paper or carton. At this stage, I also recut
many of the elements. In general, I found that it often took three
or more times of cutting to get to the perfect shape and size
of an object for my collage. What I realized later
when I had digitized my art was that I felt the
actual eyes were too small. So in the digital version, I selected them and
enlarged them a bit. The white circle on
the left is a bit off. It's not at the center
of the yellow one. I did that on purpose because I often feel
that a little bit of asymmetry and imperfection gives character to your work. I'm not a huge fan of the brown feathers on
top of the owl's head, because they look a little bit like antlers, to be honest. I would probably be doing that differently if I
did another owl. Now I'm getting back
to the scallops, and I'm cutting all of them, making them a bit smaller and cutting them
out more precisely. I will be making the mistake of starting to glue them
at the top of the body. But then I will
realize that if I put one row after
another on top, that you will always see the
upper edge of the scallop, which actually should be hidden if the
scallops are layered. So after I realized that, I had to quickly
take them off again, and then I started
properly by doing the first row at the
bottom of the owl body. As I've mentioned
in the last lesson, I've never really done a
proper collage before, but I wanted to incorporate
this in my class because A, I was curious about how I would like doing a collage and B, because with this class, I really want to encourage
you to try out something new, even if it might not
feel comfortable, and you are not totally
happy with the result, because you will very likely learn something about yourself. I realized that I will probably not become
a collage artist. The parts I enjoyed the most, where when I had some
kind of brush in my hand, like when I created
the papers for the collage and when I glued them down with
the acrylic medium. I also felt that the arranging of the different parts
was a bit stressful, and that reminded
me of the time when I thought I wanted to
be a pattern designer, and then realized after a couple of weeks
that every time I had to arrange the elements for my repeating pattern block, I rushed the process and
was a bit annoyed by it. So I learned that this was definitely not
the path for me. Now, getting back
to the collage, I could have also
found out that I absolutely loved cutting
the paper or arranging it. And then I would probably
have found ways to incorporate that into
my daily art practice. The last part here is to find an order for the half
circles I put on the head. Since I had already
glued down the carton, I had to lift up the edge
of a bit with the tweezers. This would of course not
have been possible had it not been thicker
carton, but just paper. But I was lucky
and able to stick the little half circles
beneath the white circle, which looked better than just
aligning it to the edge. And here it is, a
cute little owl. Just look at the
gorgeous textures you can see in these scallows. Like I said before, this to me is the most
beautiful part. I'm also quite happy
with the colors, but I'm not as happy
with the head. Like I said, I feel that the pattern paper
is a bit too much. And also the feathers that look like Atras are
not my favorite part. But I was glad I
tried it out and have gotten a couple of
new ideas for collaging, though, probably in a
smaller and simpler way. So, I hope to see you
in the next lesson, where I will be getting into more comfortable
waters again and painting a cute
little froggy and procreate on my
iPad. See you there.
8. Frog: Procreate : Welcome to the last
lesson of this course, where we will create
a cute little froggy. I will be using
the App Procreate. Now, if you're not yet
familiar with procreate, you should consider
taking some kind of short beginner course to learn about Procreate's
most important tools, such as, for instance, the selection tool or clipping masks and blending
modes, et cetera. For this lesson, I will provide a procreate texture
overlay Canvas, which will give you illustration an immediate textured look. Next to the Canvas, you
get a brush set with all the brushes and stamps
I use on this frog as well. Okay, so let's get started. Now, for the frog, I did not make a sketch before
opening procreate. At this point, I had already created several of
these illustrations, and I had illustrated
a frog before, which I loosely referenced
for this illustration. So I felt quite
confident that I could do the frog without doing
a sketch beforehand. I work beneath the
texture layers, use a reddish brown
and the dry ink brush, which is a native
procreate brush. I start out with
the circle and then go from there when it comes
to the shape of the head. The eyes are the same eyes I've done before on all
the other animals. I wanted the frog to
have a little bow tie. I had also thought about
giving him a cylinder hat, but that would have
glided with the bulges on the top of his head
where his eyes sit. So I opted for the
bow tie instead. And I thought it would look nice using complimentary colors. So the frog would be some shade of green
or greenish blue, and the bow tie would be red. Again, you can see me work on the line work
for quite a while, so it feels just
right in the end. I also wanted him
to look friendly, so I changed the mouth
and made it a bit more curved up towards the outer
corners of the mouth. Here I'm selecting the eyes with the selection tool and
make them a bit bigger. Tilting the bow tie,
just a tiny bit. Setting this layer
to linear burn, and then on a new
layer beneath that, I test out the colors I
want to use later on. I'm using the selection tool and then the color fill option to get just a quick idea
which color I want to use. As you can see, I started
out with this light green, but then went on to use one of my custom more bluish
green tones instead, just because I like
that color much more. You can change the color
of a layer quickly by either setting it to alphaog, and then use fill layer when you've got the right
color already selected. Or another option is to put a clipping mask
on top of the layer, which you want to
change the color of, and then you just drag that desired color into
the clipping mask. Now, I'm lowering the opacity
of my initial sketch. And on a new layer on
top of that sketch, I do the final line work. Again, I'm using a reddish brown and the procreate
native brush dry ink. Thank you. As in and out to find
out whether I feel that the frog looks well balanced
or if it looks somehow off. And with this frog, as well, I tried to add interest by
adding some mark making, doing some cross hatching, and also by sometimes
drawing lines, not just once, but twice. Oh. You can see me using the liquefy tool here. This is really helpful if
you want to push your color around or in this
case, the lines. So I don't have to erase
and redraw anything. I just pushed the lines a little bit to where
I want them to be. I select the mouth and drag
it a bit to the right side. And then I'm setting that
linework layer to linear burn. And now I will be working
on a new layer beneath that with the bluish green
I decided upon earlier. I started out by using the color fill option
with the selection tool, and then I used a
brush to fill in the narrow gaps close
to the linework. On a new layer, I'm using
white for the bow tie, and this will later change
into red because I really didn't like how the red dots
looked on that bow tie. So I felt they look
very unnatural. Again, you could see that I had a clipping mask on top
of the white bow tie, just dragged that red into the clipping mask and then pinched those
two layers together. Here I'm playing with the
saturation and brightness, and I'm making the bow tie a bit lighter and a bit
more saturated. So the red is not too bright. This is a pattern brush
that you can find in my brush set for the course
I've mentioned before, textured illustrations
in Procreate. Of course, you could also
draw these dots by hand. And what I'm then
doing is to erase the parts of the dots where
they don't make any sense. So that would be
close to the cases which are indicated
by the brown lines. Here, I'm painting the ice brown on a new layer
beneath the linework, and then I used
the dry ink brush to create some highlights. Here, you can see me playing
around with the placement of the highlights just to find out which direction
they look best. And I feel that my
first idea to put them in the upper right
corner was the best option. Using the selection tool
to make the belly white. And then I set the brown of the eyes beneath the
line work to Apha. That helps me to paint on it
without having to worry that I will paint on anything
but this brown circle. What I'm doing here is to get some color variation
into the eyes, so they will be darker
right beneath the eyelids, and I want them to be brighter
somewhere in the middle. I'm also working a bit on their shape and then
by using the liquefol. Here I'm trying something with the procreate native
sticks brush. So I realized I wanted to have
some lighter parts there, but I couldn't
really make it work. So I painted the whole
upper area with an off white and then
used the gasian blur, which blurred that
layer and made it look more like it was blending in with the base color of the frog. A Now I use a watercolor brush as an eraser to get rid of parts
of that white area. Then I add a clipping mask
on top of the frog and I use one of my
alcohol ink brushes to add some textures to it. I use the base color for the frog and set that
procate layer to multiply, so the color will appear darker. Sometimes I want to make the
effect even more intense. I just duplicate the
layer with stamp. S. You can also turn around these stamps to find the
perfect position for them. Here I'm using a cross hatch
stamp with a dark version of my bluish green to add some texture and also start
building up a bit of shadow, for instance,
beneath the bow tie. Then I decide I want to use
the alcohol stamps again, and here you can see me toggle
on and off the visibility of the layer to figure out
which look I like best. B b b. Here, I've duplicated
the white area and dragged it down to his nose because I wanted to have a lighter
area there as well. I also use my scratch brush with white to add some
scratches to the frog. When it comes to texture, I use a lot of
different brushes and stamps and build up the
texture bit by bit. A similar procedure
applies to the bow tie. I'm putting layers as clipping masks on
top of the bow tie, use the same or similar
red with different kind of texture stamps and often set these layer to either
linear burn or to multiply. Using the dry ink brush to intensify the
reflection in the eye. On top of the frog, I will be using first
my stitch brush and then the Jets brush to
add some white texture. And now I'm running
out of layers, so I will be cropping my canvas. I have resample Canvas enabled because that will ensure that I've got the
same dimension. And it also makes
sure that nothing of the texture group that is on top of the frog
will be cropped. Using a dark version
of the dot brush. Here I'm getting organized and grouping some of the layers. In the long run, that
makes everything easier. So I would recommend grouping your layers if you've got
more than ten of them. I've added a new layer
here on top of everything. Set that layer to multiply, and I'm using a
desaturated purple and the fresco watercolor brush
that comes with procreate. This is supposed to be
a layer for shadows. It doesn't really look that good on the belly of the frog, so I deleted that again. It works better on
the green and red. In general, it is
much easier to have one shadow layer instead of having shadows for
every color separately. And with shadows, I'm still experimenting to find out
where the right placement is. But that's the good
thing about procreate. If you're not happy, you can always undo what you did with double tap or you can just delete a layer or
erase something. Oh. I'm using my star burst stamp, which has become kind
of my signature stamp, because I'm using it on
nearly every illustration. At this point, I
was not quite sure whether I was happy
with the result or not. And I felt that the
linework was too intense. So what I did is to put a mask on top of
the linework layer, and then paint with
black on that mask. So without erasing the layer, I can make parts of the
linework disappear. If I were to toggle
off that layer mask, they would reappear again. I didn't paint over the mouth obviously and the
eyes and the nose. But nearly every
other line I may disappear by using
this layer mask. Then I'm going in
with a texture brush. It's the sticks brush to refine the edge of the green
because I didn't really pay that much
attention to it before that when I still had the
linework around the edge. And I wanted it to look
good without the linework. Again, toggling on and off different layers to see
whether I like the effect or not. Thank you. I really like the textured edge because it immediately
looks more handmade. Here I'm defining
the outline a bit more by using a dark
green on the edges. Here I want to break up
the linework of the eyes by using a bit more texture
brush on top of it. So the line doesn't
look too straight. Again, making the outline
of the frog even more dark, zooming in and out to check
whether it looks good or not. Here I'm adding a bit more
light with a very light brown. It's kind of nearly pink to the eyes to make them
look more interesting. With the fresco brush, I'm adding some red cheeks, and I immediately like them. Grouping the eyes. Trying out different
blending modes on the cheek, and it seems that I'm
going for the darken. Here I'm defining the
edge of the bow tie, the same I did before
with the frog by using the same color or maybe even a bit darker version
and the sticks brush. Here I'm putting a new layer
on top of the frog and using one of my
alcohol ink stamps for a bit darker texture. And another layer with a
procreate native brush called turpentine and light gray
to get some lighter areas. I'm still not quite sure at this point about
the linework, so I'm trying to how it looks
with different opacities. Here I'm dragging down the eyes because I felt that this
will look a bit cuter. It's a bit tricky because
I also have to drag around the highlights
and the shadows as well. So I'm pushing down the
shadow with a liquefied tool, so I don't have to select it
and drag it down. Thank you. At this point, I'm duplicating
the linework because I want to try to have a
dark green outline. And I also want to smudge it. So I set the new linework
layer to alpha log, and then paint on some of the lines with a
very dark green. On the bow tie, I paint
it with a dark red, and I leave the mouth
and the eyes and the nose as they are
in a dark brown. Now, I ended the Alpha log mode, and I'm using this smudg
tool to smudg the outline. I feel that this way
the outline looks a bit more built in instead
of just put on top. And so everything looks
a bit more cohesive. B. On the bow tie, I'm also pushing
the outline with a liquefied tool because it didn't really match
the bow tie anymore. Using the fresco brush to add a bit more of white
around the eyes. I feel that that makes the dark of the
eyes pop even more. Adding some more darker
areas to the frog. And I remember that
at this point, I really felt like it was
coming together a bit more, and I started to like my result. Here I'm creating
more shadows on the bow tie this time with a
multiply layer and dark red, and then I'm adding a lighter area with a
light pink as well. So I'm nearly done here. Just adding some highlights with the layer set to add mode. Setting your layer to add, lets everything look a bit like there is
light shining on it. So it's a quite intense mode, but I use it quite a lot. Okay, and so I'm
done with a frog. I really hope you
enjoyed this lesson and make sure to watch the
next very short lesson, where we we'll be sharing
ways to connect with me and ways to sharing your
class projects. Bye
9. Let's Connect! : So, that's it. The
course is done. I really hope you got
something out of it. Mostly joy and a
fresh creative spark, but maybe also some new ideas and techniques you didn't
know about before. I'm very passionate about
teaching art and illustration, and I not just do that
here on Skillshare, but also on my YouTube channel. So maybe check that out. I'm also an Instagram, and if you want me to see and
share your project there, please make sure to use the following hashtag and make sure to also tag
me because otherwise, I might not see your work, since sometimes that's a bit difficult on Instagram,
as we all know. Hope to see you soon and
have fun creating. Bye
 Julia Ulferts,