Transcripts
1. Introduction: What's going on? What music
producers and welcome to my FL Studio master
course and sampling. I of course am your
instructor, Curtis King. Thank you for trusting me to be the instructor that shows you the ins and
outs of sampling. Now, whether you're a
beginner, intermediate, advanced level sample-based
producer within FL Studio, I assure you you're
in the right place. There's something to
learn here for everyone. Your instructor
has over 17 years plus of experience when
it comes to sapling specifically in FL
Studio and beyond a music producer
that you probably seen from my YouTube
channel or social medias. And you got to understand, I'm a music lover just
like anybody else. Sampling is an operant sooner that it takes something
that you already love and make us something
that you love even more if you have the
right approach to it. Now, three goals that
I have specifically for the music producers
that take this course. The first goal I
want to give you a step-by-step walk-through
of how I approach shopping, arranging, and
mixing my samples. Second goal that I have for you, I don't want you to just
know how to sample. You can literally go
to a YouTube video. I have YouTube videos for that. I want to teach you how
to control your samples, how to manipulate
them in a way that humanizes them and makes
them not sounds stiff. Third and final goal
that I have for you, I want to show you how to make your own vintage melody loops. And not just a loop, but I want you to
make some music that people will
legitimately asked you, where did you sample that from? And I'm not talking
about samples that you just run through our C20. We're going to
talk about some of the plug-ins I use
and things like that. But I want to show you
the musicianship that is behind these brilliant samples. But that being said, I am so excited to be with
you on this journey. I think it's time for us to in module one and move
on to module two, Curtis, where do you
find your samples? I'm glad that you asked.
2. Where To Find Your Samples: In module two, I want to cover this specific places that I go looking whenever I'm
searching for samples, whenever I'm looking for
the perfect inspiration or the right textures, all these websites have that one word in
common, textures. This first website is
called track live. The thing that makes
track Lib a little bit different from all the
other websites is the fact that they're providing you actual master recordings of
some really popular records. If you want to go
through the process of clearing a record like an actual song from a certain era or certain artists like say for instance,
Ray Charles. I think they even have some
Isaac Hayes recordings here. They have a lot of classic
stuff within here. This is the platform to go to. Now, I will warn you, I've gone through this process before and I've
cleared a sample, it can get a little bit tedious, especially if you want
to do it the right way. They want to make sure
that you have some kind of performance rights
organization to report and to
register your work, they walk you
through the process. Let's see, that's
the one thing I got to say about Trek live. If they have an advantage
is that if you're using these master recordings, It's not always that they're better than all the other ones. It's just that they're
more authentic in terms of really having vet, vinyl texturing crackle and those things that
are really from Ivana like these are
things that of course you can duplicate to processing, but it's just nothing
like the real thing. And maybe it's just a little
bit of bias of my hand, but those records are definitely advantageous if you want to
get that particular texture. But hopefully by the
end of this course, it won't matter where you're
getting your samples from. You'll know how to treat, mixed them and arrange them
in a way that made people asked the same questions they asked when you get
original samples. So that's track lives. Splice. Splice is my
ultimate goal to, aside from the third
option, I want to explain, butt splice has over
2 million sounds. 2 million sounds, sounds from ridiculous sounding left field Foley all the way from eight
awaits to kicks to snares, any particular instrument you
can think of what I really love about splice though,
the vocal samples. And somebody is super, super soulful melodic loops. They have an app that
you can download, that you can literally
download your sounds, but then also drag them straight
over until you're done. I love this app and it's
a great complement to multiply experience some of this stuff that is
on here though, because you have
access to not just any producer who's uploading. You have access to some of the best musicians in the
world through this platform. So say for instance, do
we have this sample? That's a beautiful
sample and that's by hidden gym sound designers
name Hidden Gems. You have a lot of folks
that you can go to when I'm definitely gonna be giving you some names as we go through it. But splice is a place that you definitely want to
dig deep and try to find sounds that really fit the aesthetic of
what you're looking for. For me, I'm a sucker for like samples that have
choir samples that have really pretty bright sounds that are complemented
by like live sounds. If the sounds sound
like somebody literally quantize and put them
straight to the grid. It's not going to
inspire a whole lot. I love human error. I felt like human error is
an opportunity for me to do something that
would be a little bit unexpected or a little
bit out of the box. So for me, it's really
important that I have samples that have space, that have human error, that have the special little
moments that I'm like, Oh, I could take just that one
little sound and then echo it, delay it and do all kinds
of different things. So it, and then drip it in some reverb and really
make it a special little, little punch into
what I'm doing. But a lot of that has to do with knowing what you're looking for. Usually when I'm using
his desktop app, I'm searching by the key of whatever the beat
I'm working on. But if you're just
searching in general, the key doesn't really
matter right now. What matters is that you
figure out sort of the genre in the styles and some of the keywords that you're
looking for right now. I would say the
most important term for me would be just soul. So let's go ahead and
locate the word soul. Boom. Now you give
it an abundance of all these different
sounds that really are under the category of soul. So now that I have is under
the category of soul, what am I actually looking for? I'm actually looking for some
keys. Let's get the keys. Now it's going to
basically generate all these different keys that fall underneath that category. Something I'd also like to
look for is whether or not these sounds are dry
our process now, for those of you that don't know the difference when
a sound is dry, that means that they
didn't apply any effects to that particular
sample or melodic loop. When it's processed. Obviously has gone
through the process of having these effects
already glue to the sound. So I don't mind
having a process. I think sometimes there's some really creative ethics
chains that producers do. So let's go ahead
and go to process. Let's start playing
these from the top. Something like that has
some special moments, but it still sounds
to synthetic. It sounds too predictable
and it sounds too straight to the grid for me, I'm looking for something
that's just really special. Something that plays
along with timing. See something like this. Something like that is just
a playground because it has all these different
like drop-offs and all these reversing
portions of it, I would take that and have a field day with it.
Let's keep going now. Something like that. So
it's hard to explain, but that's my job to explain. But there's a certain type
of authenticity that you hear when a real musician
has touched the music. And that's not a shots
anybody that's not any disrespect to
anybody, but you know, when it's a musician that's
actually sitting behind the keys and someone who's
just fiddling around. And so when I'm
hearing melodic loops that are too predictable, that's what draws me away now, before we get into
any kind of depth with this and then get into
the last website that I use. Let me explain that as well. Why are we actually
hear on splice and why are we using 100%
royalty-free sounds? Now, you want to
look at the terms of every single sound designer or sound company that says their sounds are
100% royalty free. Generally speaking,
when they say that they're a 100% royalty free, they're saying that their only
concern is the front end. There are only concerned
about you paying for whatever subscription
or whatever their individual
pack prices are. They're concerned about that. At least that's how it is what my company slap experts
with me and oh gosh. But you want to check
the terms because some people's terms are
a little bit funky, especially if you get a
placement or it gets really, really popular on streaming. They're gonna want a little
bit of kickback for that, a little bit of
money after that. So you want to pay attention. But in the early 2000s, like this was not
something you had access to unless
you had a friend who could play the keys or
you knew somebody that was a musician that you could
hire to be a potty a session. You are having access to people
that you would otherwise, they have to pay
either hundreds or even thousands of dollars to sit in on your session and provide the keys that
you're looking for. And splice of courses went and took the liberty of helping you to organize your way
through these 2 million sounds. This is why we're actually diving into these
royalty-free sounds. But like I said, everybody
has different terms. Splice guarantees that all sitewide that these are
a 100% royalty-free. I would still double-check, especially if you're
going to be pitching this or getting us to
sink in licensing, I can tell you right now, I had a Justin Timberlake
placement that was in collaboration with Levi's and I use like two or three
splice sounds from it. Like the vocals
and a few guitars. I think we're in
there. I use that specifically from splice
and everything was okay. So that concludes Module
two and Module three, I'm gonna cover how do I
actually choose my samples? I very briefly dug into it when we're going
through the splice, but I want to make sure that you understand the psychology
and the why behind why I choose a specific
samples and the portions of the samples that I go and look for is a lot more
to it than just, Oh, it sounds authentic. I want to make sure I
break that down for you before we actually dive into these other modules
that are going to help you start to master
your sampling process. See you in module three.
3. How To Pick Samples: How I choose the
samples that I choose, what I'm actually listening for. And how do I know yet That's the one that I'm going
to actually chop up. I'm going to use Track live
as part of the example, but broke this down so that
it's easy to remember. It's a little
acronym that I call MSG that should be super
easy for you to remember. The M stands for musicianship, the S stands for space
for reproduction, and G stands for goosebumps. Let's break that down. As I'm listening to the
samples here on track lip, I think there's gonna be
a great place to actually do this set because a lot of these I have
never heard before. So as I'm hearing them in
real-time, I can tell you, oh, I'm gonna stop there because that's probably something
I'm going to chop. You're gonna see me do
this thing multiple times, but I want to make sure that you see it for the first
time in real-time here. I can already tell you just
from the first four seconds. Whenever a sample is
heavy with drums, I personally, you may be different depending on what
genre of music you do. But because I like to pull from Soul Records
where the drums are a little bit quieter than what
we expect in modern music. That's why I'm gravitating
towards those now, of course, I'm gonna
show you ways you can filter out the drums bit. I just don't like the way
the end results sounds. It's so many
different things that you're actually working
against because now you're taking that
rhythm from wherever time signature that
was trying to flip it, trying to add your
snare over there, snare and sometimes your snare
maybe on top of the kick, and it can just be a clutter
of a mess through mixing. And that's just something
that I do not find to be enjoyable as I'm sitting
here through these samples. But every once in a while,
I'll break that rule because there's an exception
to every single rule. I can tell you right
now based upon that, I probably would
end up skipping in It's a beautiful
sample, honestly. Also something to look at as you're looking at
these waveforms. You can kind of see based upon the transients are
the high points within these waveforms where the snares are at or
where the base red. When you look at the
waveform and you see it gets a little bit thicker and you don't really
see too many changes. You'd probably know that as
a baseline or some kind of a vocal that is taking
up that way form. So a cada either Goto that are just scroll
past it because I know that's gonna be something
that's gonna be a little bit more
of a challenge to add other production over the top of what that sale
is, go to another sample. By the way, this is
probably by one of the greatest melody
loop creators, musicians in our era right now, Frank Dukes is just freaking
amazing at what he does. But this already tells me a lot about the MSG
acronym that I have. One that musicianship, you can tell based upon the
weight at Frank Dukes is running through these keys
that there's a level of musicianship that
makes you want to listen more as a producer
because you're like, man, there's things
that I can do with this will keep IT plan. This intro alone. This gives us the S, which is the space
for reproduction. Now, you and I are going to basically reproduce
this production, the song, whenever
we sample a beat. So if we are going
to reproduce this, we need space so that we
can say something over it. It's almost like
imagine having a song, whether it's just allow
talking throughout the whole thing and there's not one space and the personal data. And you're trying to
wrap over the top of it, maybe in 20 or 50 years, that can be a new style in today and it's just
called audio clutter. So you would want to find
a way to kind of like filter out the original vocal so that your
vocals can be heard. It's almost the same thing when it comes to the musicianship, I'm always looking for
space because there's so much space and they're
not overproducing it. And because I'm
listening and I'm like, I could filter that base out. It's a lot easier to filter
that base out than if it was the full drum production of the first sample that we heard. This brings us to
the G goosebumps. Every soul once in awhile and maybe you don't get
into very beginning, but show here's something
that just makes you saying, ****, that is the
goosebumps moment. I have those moments all
the time when sampling, which is why I love it so much. It doesn't happen for everybody. Some people, they get those
goosebumps moments when I hear the way that somebody
approaches the flow of a beat, some people have it when they
hear a certain guitar solo. When I hear vocals and I'm
just hearing like oohs and ahs of like acquire or
vocalist and the background. And the music just
opens up and I'm just listening and I'm like
yellow, there's no drums. There's so many dopamine
spikes going off for me, that is the goosebumps. This is right up my alley. That type of genres that I actually gravitates
who are gonna be R&B and sold a lot of these
are using these minor chords. A lot of these are just
played from a place of pain, a place of vulnerability, a place of hope and inspiration. That's what I'm hearing through
these chord progressions and the attention to detail
that Frank Dukes puts, puts into this, it's ridiculous. Let's go to someone else here. I already got the m,
which is musicianship. I can hear the drums are not that bad in terms of being in front of the mic split. I'm already listening
to this and saying, I wish I could see myself
doing something with his. Now I'm looking
for the goosebumps core progression right there, but display it again. It's something
that's going to be supremely important to pay attention to is that
I like to chop in. Usually intervals of 12 are for what's so special about
this sample is that as I'm listening to what I
can imagine it being individual pieces
that I can either slow down or speed up and then make sense over whatever
temple that I choose. So if I do a trap beat, I can make that makes sense because I can take
each sound like, let me count the sounds. We hear. The first DO One, 23 fours coming up. Bom, bom, bom. That's another 567. So we hear I hear eight individual chops
in my head right now. And if you don't hear it
right now, it's okay. It'll make more sense
when we pull this up into Edison and when we pull
this up into the slicer, but right now I'm already seeing the lines of the
individual slices we will take so that we can reproduce this and put
them in different places. I want you to start listening to these samples and just listening for these portions that you
make cut as individuals. Because now whatever key
that's in, so this is an, a minor right now we're gonna
end up taking that key and then figuring out how are we going to make this
feel different? Because the only thing that
needs to stay consistent no matter what your sampling
and needs to feel like. There is a beginning
of a conversation, there's a middle of the conversation, and
then there's an int. That's how I look at every
single melodic loop. Every single loop that
I've put together must have some kind of resolution, as they say in music theory. Let's go to another one. Already. I'm hearing the
drums and I'm like, that's kind of taken me away from at least Mastaba sampling. Some people love taking
the drums within the samples and then just layering over the
top of them already. I'm thinking it's going
to require a little bit of work to really
make this owned. At the time period 1981. Something that
I've found is that my favorites samples generally
come from the 1970's. And because a lot of
times, I mean, you know, it was crazy because
track lib does have some options that
allow you to do that. You don't have the
original stems, you don't have the
original horn section or the original string section that came from a
certain Motown records. So you kinda just given that master recording
and so a look, do whatever you want
to do with that. What sampling in general, what I found is
that when you use sounds that are
like before 1975, generally just anything in
the seventies or sixties. As you move a
little bit earlier, the drums becomes a little
bit more tucked in the mix, a little bit softer. But of course, as you find sounds that are a
little bit more modern, a little bit more
in our time period, you start to hear the drums sit a little bit more
prevalent within the mix. Artists who actually move
this bar release year. Let's go, let's move this
away from the twenties one. And let's go to, let's
say, test this theory. Let's go like 197876. And let's go because you don't want to go too
far back because then you start dealing with
different time signatures that may or may not make sense for the style of
music that you make. 1960s and 1970s six is where you're going
to find so many of the soul samples, the ones that you'll hear me reference a lot on
these delay records, you're gonna find a lot of those that are sitting within this. But by the end of this course, you'll be able to take
pretty much anything and flip it the way you do. These are just my
personal preferences. I don't know what
these sound like, but I can look at the
wave forms entail. Some of these have more spikes
in the wave forms which are telling me that
they're probably very sharp drums that are in it. I'm just take it for a, a test drive and see,
Let's test this one out. Man seems to nobody's talking about or I was looking
at his other one, this one right here
looks like it may be like a guitar or some kind of lead of some kind that is like a baseline is a
really thick audio, doesn't really have a lot
of spikes and drop-offs. Let's see what this is.
That's what I'm saying. At some point in
time you're gonna be able to just look
at these and say, I don't know if this is a
sample that I want to go. So let's actually
go to this one. I've actually sampled this one. The position shift. Space watch where it goes. Right there, oops, box. And that's the payoff. If we go inside here to my
track lip collection folder, you'll see a lot of
the samples that I chose have a lot in common. For instance, a lot of them
are sticking right here, 19701969196819741970 to 1975. Let's go ahead and
play some of these. One more acronym I probably
should have added solo, but it would have ruined
this amazing MSG acronym that I have is quality. Quality is subjective
and it's all about what kind of
experience you want your listener to have and
what kind of experience you want to have as a
producer who asked to engineer and mix these. Sometimes when folks pull these recordings from
the original source, It's almost as if it's
a producer that over processed or over
compressed a melodic loop, you can't really do
anything to reverse that. It just is what it is. As I'm listening to this, I sampled this record, but I remember this
being a pain and ask. If you listen on a right ear. You can also hear like this
weird like static effect. That really is what
happens when you try to send a sample to
some noise reduction and you put too much
computed noise reduction on it and play it again in the white debt. So like like when you
put your phone next to the microphone and it starts
to have this feedback. That's what happens
when they're adding way too much noise reduction trying to make it sound like
a clean recording. I can hear that entail
that from listening those kind of things
sometimes turn me off, but I'm not looking for the most cleanest because
the whole purpose of this is for it to be a certain aesthetic,
a certain texture. So I'm not going to take
that away because of that. But if it sounds to computerize, I tend to back away from it. I want them to be as
worn out as they may be. That's what I'm
specifically looking for. Like this. Also some songs that dope thing about using these records from the original errors is that because of the way that
they recorded them, you're able to pull like a sound from your left pan and
then double that into your right pan in cases not consistent because they
weren't recording in the same ways that
we record now by having these original records, you can take like
the vocal that's sitting primarily in the left. You could take the
keys and you could double that down and
not have to even worry about that digital frequency interference
that we're hearing. So keeping that in mind, most sounds when dealing with royalty free samples, you're not going to
worry about that. Musicianship space
goosebumps quality, that's definitely
watch holds that one. Has beautiful
musicianship space. Goosebumps. Quality. One thing you want to
apply to your sampling, and I'm going to tell you
this early so that you understand why we're doing
it when we doing it, even though we don't
use every sample, you want to take more
chops than you're going to need when you come across
a goldmine like this, that has so many different
things that you're like, Oh, Oh, Oh, I like I like that. Well, I like the way
he said that, Oh, you want that
sample and you want to chop a lot more
than you'd need. Something. I'll
look for a psi from just the oohs and ahs that
you hear a vocalist do, especially if you're
sampling songs, I'm looking for phrases
that I can just take. And I feel like in my head, I can chop it up and
make it make sense over whatever style of music
I'm choosing to work on? If there is a phrase
that I hear a singer sing safe from the
sixties or seventies. That is such a general term. Maybe they're
talking about love, but it applies to something that someone else may
want to write about. Or maybe applying to someone going through something
completely different or going through some kind of heartbreak or whatever
this song is about. I'm taking that
because I feel like that phrase is
something that I can either repeat our AAC and find a way to make
it modern again, are bringing another spin. So would, so I'm always
looking for phrases as well. I want to show you what
I sampled from this. I'm gonna do everything
I can to please your baby because I don't
want you to never ever, ever, ever leave me. Never, never, ever ever, never, never, never ever leave. That can be about
a lot of things. This could be a
battle rapper who don't want money to
ever leave them. The Guess what if I
take that phrase, I have now created
that Guess what if I make this an instrumental that
I'll put up for streaming? I have that for somebody to take and make it mean
something for them. So I'm always looking
for those phrases as another opportunity to create a special moment in
my sampled beats. Now those same guidelines for me apply as I'm going through
any samples honestly. So we're going to
go here through some Aaron Barbara samples. Remember that name
if you don't know it because he's going
to be somebody that we're going to have a
conversation within this particular
course to show you how to make your own authentic, vintage sounding melodic loops. Let's take one of these
and I'm gonna show you how it still passes
the same task, even though this is not from
the sixties or seventies. Already here, the musicianship. Now I'm looking for
the goosebumps. S1, the core, the core change space. You're given space here
to do some things over the top of this goosebumps. In reality. This is what I'm saying.
It doesn't matter what particular
sample you're getting your sample from
those feelings are those feelings the quality
is obviously there as well. And that's the last thing
here is really a topic that I think is more so about
the culture of sampling. But I think it's a very
important thing to talk about. A lot of sample-based producers. They don't really care about the quality
of the sample being pristine and sounding as clear as possible and as
horrific as possible. A lot of us don't even
care about having the BPMs are the keys
attached to them? That wasn't a thing. When you are pulling vinyls
from some goodwill are some garage sale and you brought them home to a vinyl player and you
started to chop up. That wasn't a thing. You're getting those now. And I think this is what makes a lot of these
melodic loops, especially when they treat
them with that care. This is what makes them so appealing and this is why
I've been choosing to use the majority of
moss samples now are from my friend Aaron
Barbara because this, it takes care of all
those categories. The musicianship that I
love from the 70s and 60s, this space that I need to add my own flavor over
the top of or to add built her resort
plug-ins and things that make it sound even more
like from that air, the goosebumps that happened from these chords shifts
and he's core changes. And I can even add
sounds from Splice like the quires over the top of this to give me that same layer. It's almost like I'm rebuilding the samples
that I would just usually take from the
master recordings of a song from the sixties. And I can just get that right here and build it up myself, take advantage of
living in the now. That's what I'm doing is
a sample-based producer. There's a lot of sample-based
produces at home. He is a man that appears
that don't like it, don't won't know parts of it. They want you to go
ahead and figure this whole thing out
and low-powered. So my understanding, but I do understand at all so that it's up to a lot of you
produces that are starting now and
sample-based hip hop. So we evolved this in
whatever way possible. So that being said, that concludes module
three and module four. Ironically, we're gonna
be talking about how to find the BPM in the key of the samples in the event
that you do get some melodic loose maybe from a
sound pack or a sample pack, and they don't have them
included. That's very common.
4. How To Find The Key And BPM In Any Sample: In module four, I'm going
to cover in great detail how to find the key as well
as the BPM of your sample. I want to show you a few
different ways to do that. These are ways that
have helped me as I progressed and got a
little bit better. My ear, he got a little
bit better and I'm able to find what the
keys are of samples. Now, why is this important? In order for you to add a proper baseline or proper
aid await your samples. You're going to want
to know what the key, at the very least with the
key of your sample is. Bbm is important because as you chop these samples
and you start to see that the kicks are following their own grid or
off the grid nature, you want to at least
have a ballpark figure of where things are landing
and you don't want to just always eyeball that
you want to be able to know this is the source sound and BPM so that you're able to manipulate it in a way that I feel like it's a
lot more efficient. A lot of sound
packs, as you know, do not come with the
key information or BPMs if you're dealing
with splice yet, all those sounds come with it if you're dealing
with slap experts, of course all of our sounds come with that
information on it. But you want to know how to do this just in case something just doesn't sound right or sometimes they're
inaccurate as well. We're gonna use an
errand barber sample first to really
show you how to do this first method which is using a plugin by a company
called Captain plugins. And it is a plugin
called mixed and key. Mixing key basically listens to the sounds that
are being played. You get to dictate what
modes you want it to be in, or what key notation you
want it to be flat, sharp, Camelot, I choose sharp and then I just let
the sample play. Now the reason why
we do on this, on this sample first
is because we have the information here
that's already accurate, thanks to Aaron barber. So we can see how
accurate mixed in key is. It is not a 100% accurate. So I would not put all
of my money on this one, but it is helpful. Now it says it's about 89% sure that this particular
sample is an, a minor. Well, that's backed up by
Aaron Barbara who says this is an a minor, so
that's super-helpful. It works for pretty
much any style of music, any particular sample. But like I said, it's
not a 100% accurate. Something within
FL Studio that can get you even more accuracy is something that you
have to access through this program that has a
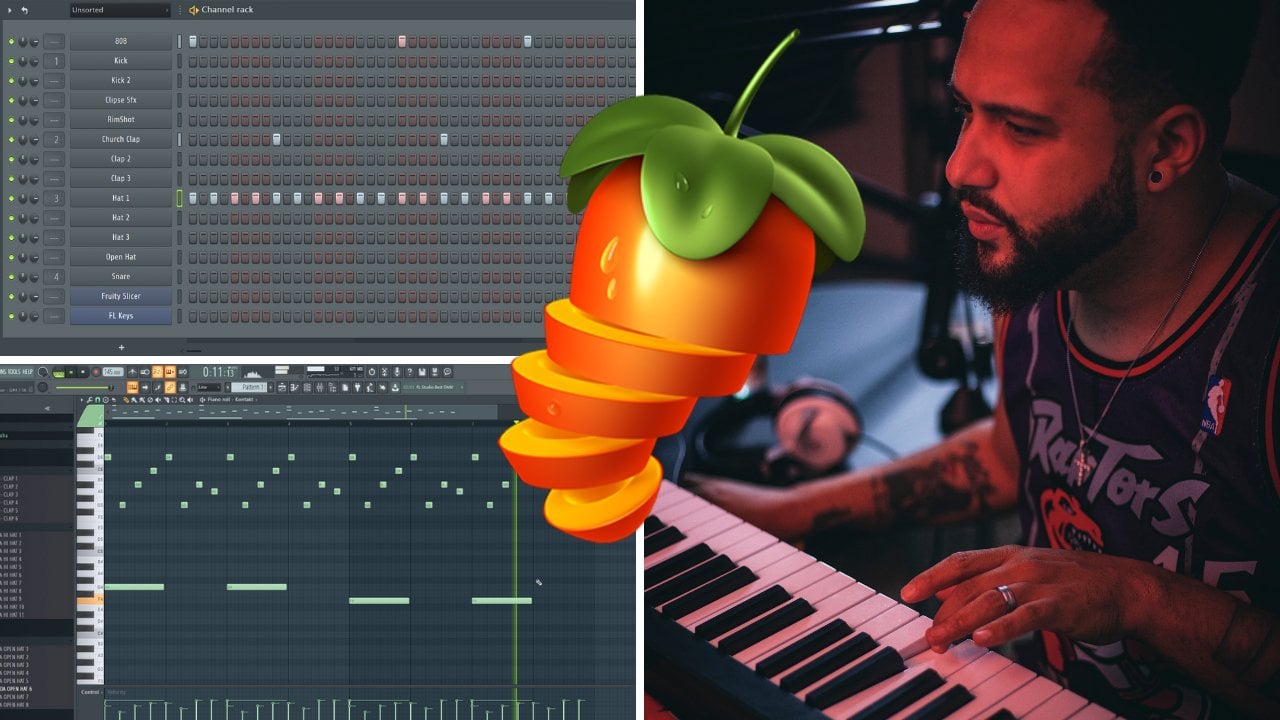
stock program called Edison. I'm sure you've heard of
it, especially if you're into sampling at this
stage of your career. The way that we access
that is that we take this sound that we have here and you can access it from
a few different places. Obviously, this is here on the channel rack as
well as the playlist. But if you double-click and you right-click
here and hit Edit and audio editor or
just hit Control E. You can open this up. Edison is going to be
the most important tool that we use aside
from FL slicer, which we'll talk about
in the next module, when it comes to sampling within FL Studio, Edison is powerful. It's underrated, but it's
very, very powerful. What we want to do is find
a loop to basically have FL Studio do It's wizardry to figure out what
keys are being played. I wanted to display the sample and don't feel like
you have to understand everything I'm doing in
terms of looping because we're gonna go over that
in the next module. But I want to just basically
get a clean loop on this. And then we're gonna go ahead and trim off the rest of it. Nice, Now that we have this, we want to basically trim it. You could do that
two different ways. One you can go to
edit and then trim, or you can just go back here
and push Control, Delete. So now we have that portion
that we looped around. Don't feel like you have to
remember that quite yet. I just want you to see what
that looks like an Edison. We'll go over that
a little bit later. Now that I have this sample here that I've
trimmed when I push Control a so that I can get the entire sample highlighted. Then I'm going to use as
little wizard-like tool that FL Studio has when you
right-click on a sample, go to Tools, and then convert to score and dumps a piano roll. Click on that. Here is where
it's basically going to dump every key that it can
detect within this loop. Let's see how accurate this is. I'm going to drag
this sample here to the playlist, the
original sample. Now we're going to open this
up actually using F0 keys. I'm going to go ahead and
Control C and dump this. Took it from where it
originally dumped at, which was on the
actual sample itself. We don't want to do
that, copied it, and then I'll paste it
here. How you do that? Control C, control V here. Now it's here, Let's play it. Once again, not a
1000% accurate, but it'll at least gets
you in the ballpark. And it's really
helpful tool when you start thinking
about, okay, well, I really want to try to find at least the ballpark
of some of these notes. Because as you're trying
to do that yourself, if you don't have prior
music theory knowledge or you don't know your
way around the keys, it can be frustrating in a
little bit overwhelming. So at least being
in the ballpark is a good place to
learn from blend. I would much rather you
attempt to do it this way. Take your time with it. It takes a little
bit of patients, a little bit of ear development, but you will get it in
notes on, trust me. So we're going to loop this back around. What I'm gonna do. I'm gonna get rid of that. I'm going to play the sample
and I'm going to start at C. And I'm gonna go up the keys. And Sal, I figure out a key
between these two octaves. That feels like this sample fits someone to play this key long. Then after playing it for
that long duration of time, beginning of the
loop to the end, if that note feels like it
fits in there like a glove, that's probably the key,
ladies and gentlemen. So let's try it out. Towards the tail end of that. See you start to see it's not quite the one that
fits like a glove. They are going to be keys
that sound like they do. So you gotta be very, very, your ear has to get really, really careful about which
ones you're gonna pick. I did not think could see. It's clashing with somebody
who's high your notes. E is really, really close. Not that one. I'm just doing yp it right now. Yes. I think that's it. Itself is a little bit
of disruption there. We have established
that this key is a next question I have after we dictate what
key this sample is in, is, what is the scale? Is that a minor scale
or a major scale that is important because if
it's a major or minor, that's gonna tell us basically what keys we can play
along with this. Now the way that
you dictate whether it's a minor or major scale. We're going to
pull up this image that I've found here on Google. Minor scales are usually one whole note and
then a half-note. Major scales are
usually a whole note up than another whole note
and then a half note. What does that sound
like when we're talking about on the keys, I'm going to play it
for you right now. So let's do major first as
it was gonna be pretty easy. Keep in mind if you've
never been exposed to this. Basically, that's a whole step. That's a half-step. You're trying to get C to D. That's half the half the
duration their bone. That's the whole step. Same thing if you went
from the black keys. So this is 0.5.555.5. So this is a whole.
Now. Then another hole from this half have
this is the whole. The most important thing
to keep in mind is that every note is separated
by a half note. Even when we're talking about
this is not whole notes, a whole Notice total,
it's a half note, a whole note from this note, which is E, would be F-sharp. Now, the reason why this is important is
because once again, it's gonna tell you all the
keys that you can play after you figure out the key and
then the scale that it's in, the way that we're
going to figure out if this sample that we're
messing around with is an a minor or major is basically by taking
this key of a. Then seeing based
upon this pattern or this diagram right now if we
go minor scale, What is it? So starting from here,
let's go a whole note of, so this is a half-note. This is how, this is a
whole note right here. Does the half note, whole note. This is the first W that you
see up here on the screen. First w, Okay. And then the next one's a half. No. You see how that feels?
A little bit dark? That's a half note,
that's a minor scale. Next one, major scale. So starting from a. We start with a W,
which is a whole, another whole. We're
gonna skip one. So keeping in mind just
those first three notes, because you can keep going down a scale to figure out more keys. Typically the major
scales are gonna sound a lot brighter and happier
and more Disney esque. The minor are going to sound
a little bit more darker. Boom, boom, boom. Let's see, based upon just
those keys right there, if we can figure out if
the sample that we're working with is a
minor or major, try not to look at
the screen right now. Does that feel right?
Just try minor. Now there's a million ways that you can dictate whether or not this is a minor or major. That's what helps me
because as I start to go down now on the keys
and scale of this, because I memorized the a minor, I know that it's all white keys. Right? Now if I tried to play
that with the sample, every key **** pretty
much work within that. But a is obviously the strongest one because
it's in the key of a. There we go. That's a minor. See how that can
be very helpful, especially as you start to
realize that your keyboard, depending on the size
of your keyboard, is really just separated
into these, these octaves. Once you see that the keyboard becomes so much more small, especially for
sample-based producers who are probably
getting into this because of a lack of music theory learning
just that right there. And then maybe a little
bit later on getting into your scales and
whatnot and see if you can memorize that right
there is going to be a game changer because now
when you get a sample, you know, based
upon that sample, what keys you can play and
say you don't memorize what the minor scale or
major scale patterns are. Another cheat code that you
can use. Let's see Use here. Let's go to D minor. If I just simply go
on the Internet, on Google and just
look up D minor, D minor scale, piano. There's all these diagrams
that are going to tell me what D minor
scale looks like. Boom, which show me right here. Based upon his sample. When I play it, I
should be able to play any of these notes right here. And it'll give me
the same effect as that last Aaron Barbara sample, where all the keys are
working within it. But the strongest being obviously D because that's
the key that it's in. Salah you, if that is
the only music theory that you learned right now
when it comes to sampling, it will be the best investment
of time that you make. So from now on, This is what I'm
suggesting that you do, especially if you want
to add baselines, which you're going
to want to add baselines to your samples. So that's how you figure out
the key of those samples. Let's test it out one
more time actually, since we don't even know what this particular key is here. I'm actually going to open
this up and Edison one more time because I want to grab just the sample itself. Just keep table, okay, now that we have this sample, Let's go ahead and
just drag this over here to the playlists. And as you can see it
falling a little bit short because this is not the
true BPM of this sample. Now, one way to find that
it's not a 1000% accurate, but it does help you get
in the ballpark is to right-click on the sample
and detect simple. It says the temple was
around 67, close to 70. So if we do seven,
it's about 140. If we're doing double
time, it says 70, that's not accurate because
look at all the spaces here. These are four bars, by the way, let's actually teach
you how to count bars in case you don't know
because we're going to need, so basically work our samples
in four bar measurements. This is going to help
to really focus in on. In one particular part of a sample that you
want to attack as you add drums and
all that good stuff later on in the
different modules. So I'm gonna do that right now. Basically this is
the way you counted 1234 and you switch
that first number for the next bar and you say
234, switch again, 32344234. That is basically dictating
what bar you are on. So let's do that here in
Rhode songs 123434323443, for that's how you
count bars in case, no matter where
you're at in a song, you can always find that by
basically doing that account. And you can pretty much
tell what's coming up next just in case you've
never been exposed to that. I wanted to go ahead and
teach you that really quick. Now, focusing back
here on his sample, this is nowhere near four bars, even though I know what I
was a 4-bar measurement, we're gonna need to make
a few changes here. Let's double-click the sample. Go down here to auto mode. And what that's gonna do
is basically stretched this sample without
changing the key. What's natural BPM
because it didn't give us an accurate and one
unfortunately it's not 70. If you've been
playing, you can hear. That's not the BBM
and sounds off. Let's actually play it
with the metronome, which I actually changed to
a hi-hat by right-clicking. And let's drag this
temple up and down to see what this actual BPM is. You'll see because you
have it here in auto mode. And this is just for
this example right now, I generally use stretch mode, which gives it a high quality real-time stretching when we're trying to stretch the sample and change the key we don't want to do because we want to find the actual BPM and a key
of the original on auto. Let's drag this temple. I wanted to stretch and
get as close as possible just to take cool. So we know at least
that portion that we chopped up is a 135
beats per minute. Now, why did FL Studio
why were they so off? I mean, they weren't
that off there about five beats per minutes off. But it's because a lot of times because these samples are, these songs are being played
by live drummers did not always quantize and I'm always on the grid sometimes
is break down, sometimes there's
chord changes or bridge changes that basically changed the BPM of
the song a tad bit. And if it's taking an
average of all that, it's not gonna be
the most accurate, especially when you're trying to pinpoint certain
parts of that song. But we got it now, a spot 135 beats per minute
for this song, what key is it in as the
next question I have, let's open up FL keys
to figure that out. I'll just keep taking
different octane. That doesn't feel right. I'm gonna say that
this is in E. Now, I want to see if that's
E minor or E major. We can go back here to this pattern and we can
figure that out right now. If we go one whole note on e, then a half note, we're starting at e. Whole know. That's the minor scale. Now the major will
be one half-step up. Now let's see if it's
E major or a minor. Let's play the sample now. What do you think it is? A major? Mine was play it again. E minor. Now let's actually
double-check that. We said it's 135 beats per
minute and it's an E minor. Let's see how accurate
that is because track lip actually has a lot
of us information on it. It says it's about 141, so FL Studio was actually
pretty accurate. It just didn't feel right in
that pocket for some reason. E minor, we got it
right there it is. Round of applause, bone, bone. So cool. I've showed you how
to figure out the key for a song that does not have
a key attached to it. Now we've got to figure
out this drum loop. Let's double-check
with fl Studio Ghibli and right-click detect simple. It says the tempo is 137. Let's go ahead and just
assume that it is. It says 137. Let's click
here on estimate it. And that's going to
basically change the entire BPM of
the entire session. Now, now you can see that this
is an actual two-bar loop. So it should be accurate, looks pretty accurate like
a straight to the grid. If we zoom in. I think that's pretty
accurate as players, you can tell by how clean the loop transitions
into the other one, that this is the right BPM. This one's a little bit tricky
because of the way that the drums are being played
as sort of a swing time, someone to choose another one. See you at the same
thing still applies. Go to detect temple
136 is what it says. So let's just trust it
didn't go down near 136. There it is. So that pretty much works for any sample that
you're working with, as long as you're
able to count that you're able to
figure out the BPM. So keep that in mind as we move a little bit further down. And so these modules, you'll see certain samples will require a little bit more
digging in order to figure out what
the actual BPM is. Especially when we start
chopping a sample, we won't necessarily need that. This is more so when
you're choosing samples and you're not going to chop
them up or manipulate them, which is something I still do. I don't think that's a knock
on anybody's skillset. I just think that
it's a matter of what is the sample call for? What is your style of sampling? Which is why I want
to expose you to so many different styles
so that you can say, Okay, I think I'm more so a producer likes to let the
sample breathe or more. So a producer likes
to take a canvas, chop it up, and then turn it
into another piece of art. Always feel like
it's the best to have the ability to do both. But I think that
as long as you're exposed to when you'll figure
out what feels like home.
5. Chopping Techniques: Edison Method: In module five is going to be probably the hefty us
because we're talking about shopping techniques as well as the tools
that we are using. Now, I think it's fair to first start off with what do
we mean when we say we are chopping a
sampled for those either intermediate and
advanced, have no fear. You can go ahead and move a
little further on this one. But for the levels were
having questions about that. Let me make sure that I
explained this to you. When someone says that they
are chopping a sample, it basically means that they
are taking a longer piece of audio and then chopping it
down to a certain parameter, whether it's four
bars, eight bars, whatever they're trying
to chop it down soon. They're chopping it down
or they're slicing it down as a language that
you get an FL Studio. That's pretty much it, right? You have different slicing
and chopping styles, same way that you would
have like a shift. A shift has different
shopping styles depending on the vegetable or the
food that they're chopping. For instance, a chef may shop
down cilantro, our onions. They may dice them down
on a certain weight. Same thing applies
to actual music. You're going to slice
it down depending on what type of vibe or
aesthetic you're going for, or just what kind of energy
you want the sample, new energy you want
the sample to have. Same way that there's another
style of Dole chopping. A lot of producers
do that as well, where they'll basically
let the sample breathe. They'll change the pitch, maybe the timing, but
for the most part, they're letting the
original sound play out, but it's still a
chop nonetheless. It's a longer shot, but it's
lit shot him on the list. I'm gonna show you
what that visually looks like in just a second, but I wanted to make sure that I explained that before we start to dive into some of the tools first that
we're gonna be using. In the last module, I showed you that if you take a sample, double-click it, right-click
it excludes the excuse the clicking in the
background, edit an audio. This is how you access Edison. And in case say for instance
you exit on accident. You can click here
on your mixer, go to master channel. Here's the same sample that
you opened up an Edison. Cool. Now, why is Edison
so important one? Because if you have
a longer sample, you're probably
not going to want to just drag it right here. If you chop everything up here, it's gonna be more tedious because if you have
special moments, you're gonna literally go
in here and slice right? You got the glowing
and slice it in. Remember the slices
that you had, the process I'm gonna show you instead of this is going to help alleviate some of the chaos that can happen when
you do slice that away. I do slice that way. It's kind of considered
manual shopping or manual slicing, but I tend to stick with fl slicers before we get
all over the place though. Let's deal with Edison first and then I'm going
to show you what I mean by dragging me samples
out individually and basically putting them
here on the channel wreck. Now, let's do a
quick little tour of Edison and some tools that
you're going to want to pay attention to if
you're looking for an extended overview
of the entire Edison, there's YouTube videos for that. We're here specifically
for sampling. Stop panel was pretty obvious here these are where
your loop features are. Your play button. There's a scrub wheel. Don't really use that. And
then up Stop button, right? These are things
that you can dig into in your, at
your own leisure. But I'm really concerned
with this loop feature that basically takes any piece of audio and went to
press the play button. Lungs that's yellow.
It's activated, is basically just looping it around over and over and
over and over again. So you've got the loop
button, you've got the play button, and you've
got the Stop button. Straightforward. This
panel right underneath it. This is where you can save
your samples or load samples. Any event that you load
up Edison in the mixer. Now you can do that in any
particular Mixer Channel by going over here to the
FX slots and then just opening up Edison, super
straightforward, right? So this is your file features, this is your format features, you're editing features,
your tool features, your pitch region features
which comes in handy for specifically Ada
weights and sometimes finding individual
keys of a sample. Your views, snap, select, Zoom. I don't really maneuver
too much through here because everything
I access up here, I can access here
by right-clicking. Everything is the
same thing here. And if you ever get lost in
terms of what things are, look here on the top
left-hand corner. It works across
all of FL Studio. In this section,
this doc right here, this is an important button. This is your undo button. Now I'm always having my fingers own control Z just
in case I mess up. But if you need to
undo, undo here, I don't really use
the claw machine or the normalized feature. I'm just using this
section really to get more control of the
samples before I start to dump them
into FL slicer. This fade in fade out
feature can come in handy, but I don't really use it. I really want to make
sure that whatever loop, I basically take the beginning
point and end point. So I want to make sure
that sounds sonically clear without having to do too
much fade in and fade out. A lot of people who
try to hide bad loops, right, where they're not
actually looping correctly. Are there looping where
the endpoint is a little bit too fast or too soon and it loops back to the
beginning to sound. Some people are high
that by trying to fade in the audio on the beginning of a fade
and the audio at the end. That's not what I do. I
need to make sure that in its raw state
it sounds clean. I'll show you what that means in just a second when we start to loop this run script feature is something that's really
interesting because although I don't use too many
things in here, this ethics,
old-school features. Pretty cool. Let me show
you what this sounds like. So you hear this
sample as it is. It's a little bit of processing, but checkout what it
does when you play it. Very minimal processing. But when you go to get
a run and you go to FX, it's almost like
having your own RC 20 just sitting
here in FL Studio. And if you don't
know, are C20 is like a cassette emulator,
vinyl emulator. I have one as well
for my plugins, which is called a boy, but check out the sample now. So basically it runs it the
old-school ethics shame, pretty cool feature that I'd
just recently discovered. Everything else here. I mean, you can see
what they say here. This blurred, this is reverb. You have a slicing feature
that is in here as well. Looks pretty cool. Only issue I have with it is
that it's slicing so much of the sounds and I can't really individually take those
out using just that soul. Here are the two
things that I really pay the most attention
to when his section, Not so much this one, but this one right here. This option basically allows you to loop around a
piece of audio lists, actually go through the process of looping some audio right now. What I'm listening
for now, two things. One, I want to see when
the sample repeats, do I hear any kind
of clicking in our clipping are like a
really very distinct sound. You might have to listen
a few times to hear it. If I'm hearing a clicking where it sounds
like the sample is just you can tell that it's being looped. It's
not a clean loop. When I'm doing is I'm basically dragging these endpoints to see if I can catch it to where the music repeats
itself once again, there's no drums, so counting the bars is a little
bit more difficult, but it's not
impossible obviously, but I want to just show you what this looks like in real time. And I'm using a mouse
wheel that allows me to basically Zoom In and Out. Holly suggest getting one of those mouses to go ahead and
do some of this editing. If not, you can go
ahead and press Page Up In page down
on your keyboard. But you've got to
make sure you point your mouse in a direction
that you want to go in. It's just so much
easier to do this with. A mouse will listen with me and see if you can hear any
kind of a clicky clipping. Heard it, but very minimal. That means this
is a pretty good, It's pretty good loop when
I'm looping around sounds, especially in Edison,
I'm trying to basically catch a sound when
it dips down here. It's like a 0 thresh mark. Not necessarily all the
weights at the bottom, but I'm trying to catch
it in a place where he won't be noticeable when
it flips back around, I want it loops back around. Same thing goes for It's
very beginning portion. What I've found is
sometimes when you find the lowest threshold, it creates the cleanest
sort of loop around. Sometimes it does,
sometimes it doesn't. But for the most
part, that's where I'm keeping my mouse around. Trying to catch a little higher
up here in this waveform. Goes as clean. It may take some
getting used to, but at least you don't have this annoying playback mark
or going back and forth, imagine finally finding it and then it moves the
entire window over. I've had that happen
in one-to-many toms in the beginning of
my sample in career. But that's probably one of the most important things
to get a grasp on. And I actually want
you to do a little bit of practicing with samples and longer samples that you can basically
go through it now, once again, how am
I able to dictate? Okay, that's the full loop. How did you know
that? Well, one, I'm listening for the music and seeing where does it
repeat and when it repeats over against it was don't do num. I like to make sure when I'm
jumping into samples that I'm grabbing at least
like four bars. You can grab more,
but I think four bars is a good place to go
through because within these four bars there are
countless chops that we can make depending on the nature of the chopping that we're gonna
do for this style. One shot to shot, shot for shot, shot,
shot. Seven shots. And just look at the waveforms
every time you look at the waveforms and they
become a little bit larger, you see some of those transients every time they become large, I'm looking and saying
something there can be chopped. It's noticeable. That's where the music makes some kind of a dramatic shift or the velocity changes
pretty dramatically. Those are kind of things I'm
looking for, but right now, not even thinking
about smaller shops, I'm just trying to get
the things that are the most lovely about this sample. So now that we have a
clean loop wellness, we're going to open up
the channel rack and we are basically going to
be moved this stuff wrong. I'm on the keyboard
is down there. I'm gonna take this
loop that I just created because I
want to find more, more stuff to actually chop
up and put into this session. I'm going to go over here to
the drag-and-drop feature. Drag this on down and I'll even like name this
something like main, main shops with that is
now keep in mind when I actually move this
over to FL slicer, it's going to change the name so it's good that you're
naming them here, so at least you
have a reference. So we got one cool
chop right here. Let's look for some more. Music. Kinda repeats itself. Changes right here. Let's grab this. Let's see every
repeating yourself. It does. I'm just gonna grab
the first part of this. Let's grab the
first part of this. You can generally sale. The music is shifting
once again by paying attention to the
spikes in the sounds. Sometimes it's hard to see. So you need to zoom in, which once again you
can use page up, page down. In order to do that. I'm using my mouse will though, but as an eyeball it, I can tell it's a little
bit close to here. I want to say it's
around, around here. The end of the luteal lifo, the beginning of the next one, another beginning of the year. You want to make
sure that when you grabbing the beginning point, you don't go too
far into the loop. You want to give it a little bit of space in the beginning. Because the more
that you loop it, the more that it will expose just how many seconds off
that actual loop cut it. So I try to leave a really
micro amount of space in the beginning of
this loop so that it doesn't like oddball,
the timing of it. Sounds good. Let's take
the slave off of here. I don't typically
chop it that way. I'm always listening to music is shifting and I'm hearing
drums in my head, right? I'm hearing a timing of my head, but when you first start, that can be very, very helpful to have
this on and then click. Basically what it's doing
is linking the Edison. So your main Play button and all of your main tools such
as your metronome. Boom, taking this off, let's go ahead and
just press this and see if we looked us around. Here, the clipping
I hear clipping. Try to get this a
little bit cleaner. Clipping may be coming from either the beginning or the end. It's up to us to really
eyeball that and see if we have not picked a clean place like this might not
be the clean place. Let's try this here. Now the reason why that
worked is because the music became a little bit more intense around this
section right here. Because the obviously
the velocity in the volume of the music
is shifting throughout it. It became more
intense at the end. That is, unless I choose
a portion of it that is not as intense because it's transitioning
to the next part. One of that intensity
is attached to the next loop or the
next part of the music. So by grabbing this
end point here, I'm just literally holding down the mouse and I'm
dragging it in. Just to kind of show you exactly what it looks
like on a mouse, I wanted to change the
angle really quick just so you can see how it's looking on my clean loop right there. Pretty much that's
the benefit of having a mouse with a mouse
wheel on it is that you're able to get that pinpoint in real time as it's playing. So I'm gonna take this portion and I'm going to
actually drag it down here. And let's call this course. We're going to call
this chorus shop. You can name this whatever
you want to name them. This is just so I'd know
what's what as I start to chop NFL slicer, then we
can just start there. Actually, there's a lot more in this sample that
we can go back, you can get, but that's
pretty much the process. That is Edison,
ladies and gentlemen, that is the power of Edison. There's so much that
we can do it like, especially when
we're talking about an example of maybe some of the smaller chops that I will probably do for
a sample like this. Right there. Not a clean shop, so we
got to get this clean. My job were very stubborn mouse, there was just made
this Windows updates. So you want to have nearly as much issues as I'm
having right now. It's actually a challenge. Trauma shaft, the
ease with this mouse. Now we have a smaller shop. They get dragged down, but I just wanted to show
you that as an example of some other things
that you can do an Edison and ways
to get a clean loop. Getting a clean Lou, I
feel like it's gonna be one of the most important
things that you do achieve as you start to learn and perfect sampling
in the very beginning, you just want to make sure
that you can do a clean loop. So practice on as many different styles
of music as you can and keep in mind that
everything is not the same time signature. Sometimes signatures
are 1223442223445. That's a swing timing, right? Some of them are, it looks actually check
this out right here. You can actually see what timing the project you're
working on is. Let me see. This
is 400 for timing. It's my time signature
was for for timing.
6. Chopping Techniques: FL Slicer Chopping: The next thing we
need to talk about is the beast that is FL slicer. Now, I know a lot of producers
use FL slice x, right? It's not really my forte.
There's a lot here. It can do a lot, but this is really something
that I feel like if you are trying to get
used to sampling first one, if you are in the
beginning stages, don't even look at slice and x, but if you're an intermediate
or advanced level, there are so many
things here where it's like once you commit
to using slice x, you're married to using the features because of
the way that it works, I'm just turned off
by it because it's just sometimes less is more. And this is why slicer has
just been Old Faithful for me, never did me wrong, has always been very, very reliable and easy to use with that said,
ladies and gentlemen, this is FL slice or fruity
slicer to be exempt, put this on detached
mode so it does not get off the window
when we move stuff around. So FL slicer toward, let's go ahead and cite
that are really quick. So up here you basically have these detailed settings that allow you to change pretty
much the same thing. You can change an every FL
Studio window that has audio, got the envelopes and
the waveforms, right? A lot of his stuff
that you do find in slice x as just in
different places. But I felt like
if you're already somewhat used to FL are
getting used to it, it's important to just like no, these are here and you're able to manipulate sound with these. We're focused in on this
section right here though. First and foremost, you can open up what are
called beat grooves. I do not touch those
beat creator grooves. I have not such those, but I'm assuming those are file formats that are
pre chopped Kia samples. This is where you
can load a sample and we're not going to
load it here this way. But just to know, you can go
in here, It's pretty cool. You can open up a
sample directly into Edison and we're not gonna do
that because we're in 2021. Next, you have a
slicing tool option. This is gonna be
important once we actually get our sound here, but I want you to at
least see that this has different styles of slicing, which will make a lot more sense when you see the audio here. Here, this is where you're able to add some things
that we're actually going to do in a different
way which are able to reverse randomize our
flattened the shops. You're able to shift
up or shift down, quantized pitch up the
beat, wideness stereo. All that is stuff you can do
in the piano roll in post. I'm not really concerned
with doing that in there, but it's pretty cool
that they give you that option to do it here. And I think this is
probably where it's crucial for us to actually
put a sample in here, basically in order
to get your sound from here into fruity slicer, you're gonna take this audio
waveform you see out it has a little finger right here
with the box around it. Hold down the left-click or the left button on your mouse. Drag. Just to take you drag it over. And then when you drag it over, you get this hot
mess right here. So basically what FL did was an auto chopped
it in an adult, dumped it, straightened
to the piano roll. So these are all different parts of the beat that it auto shop, I won't tell you right
now, the auto shop sucks. Don't ever use the
auto shop that comes default with fl Studio. It's shops it but it's
just a pain to deal with and you don't even want to try to chop alongside with this. So the first thing I would
do is basically go in here. And so the Piano
Roll, get Control a, and then push, delete, just to get rid of those. Next, you want to take this adult don't feature off
because anytime that you edit something is gonna do the same thing it
just did and dump all those waveforms back here
as shops in the piano roll. Sake that off auto fit. You can keep that on D
click, you can keep that on. It really depends on a sample. Sometimes this is a
little bit harsh. What it basically
does is take away those clicks that
we were trying to get rid of any initial audio. We don't really need
it though because we had clean shops and
what we're doing. Now, It's basically
d clicking according to which chops individually,
the ones that it may, so it may need it
you never know, you just got to listen what
your ear and see next, you gotta reverse feature. Right? And as you can see, anytime you click on one of these shops that are
auto-generated for you, it'll show up in this window right here, and it's
even selling you. This is Slice Five, pretty cool features
here that it allows you to change the character of it. You can make it a scratch
pull, scratch push. I'd never touched that, but because I know
that you can do that. Here it shows you what keys are actually triggering these. So as you are playing them alongside your piano
or your midi keyboard, you'll see this says
that this shop right here is e. It wasn't line. So cool. You got that. These are the features there. Now next is this pitch and time
manipulation doc right here. This left section changes
the pitch of your sample. So right now if we
play the sample out, actually go down here. When you play to n, This is going to make sure that as you press any of these chops is going to play the sample
all the way to the end. I want you to be
able to hear this. I want to press this key and I'm gonna manipulate the
pitch at the same time. So this is the first one. Keep in mind all of your
samples start on middle C, whatever that is for
the saucy or keyboard, it's going to start
on middle seat. I actually want to take
that reverse off because now it's starting to get
a little bit annoying. When you are
manipulating a sample. The most common thing to
manipulate aside from the timing is going to
be the pitch of it. And then some other sound
design related plugins are techniques and
affects and whatnot. So we're doing the pitch
manipulation here, but it keep in mind you change the pitch by the sense
you're changing the key. And this goes in
increments of a $0.100. I mean, it goes a
little bit more finite, but you want to move these by, since you want to move
these by hundreds of sense, you don't want to do 570. So that's gonna be a horrible
thing to try to tune your, your piano or whatever
else, your baseline. So, so do it incense. So I look at these
since as by the 600s, you're moving down an octave. So if you go down negative 600, that's like going
down a whole octave, but in the same key
if you go down 1200, whereas, whereas ends that's
going down two octaves. So now this should sound
really, really pitched down. Now you starting to get a lot of exposure to those clicking. So let's go ahead
and push this back on and see what that does. I don't particularly like that, but it's good that I now
know what that sounds like. Enough demoed it there. Let's go to 600. Actually for right now, let's take all the slices off because I want to be able to hear this sample clean and we're gonna get
the chops back, but we're gonna make
sure we get these off. How do you do that down here, you get an auto slicing doc
that basically allows you to dictate how many of the low frequencies
are being shocked, how many of the high
frequencies are being recognized and shopped. I don't want it to
recognize any of those I wanted to
just be playing so that we get a clean audio.
We can really hear it. Because when you have these and you're playing
the actual sample, it's playing through
the chops, right? They're not playing
is all fluid. They're playing to the shops. Kinda hard to see what
you're working winds. So let's go ahead and
push. All of these are qualities to the left. We've got a clear idea of what the pitch
sounds like there. Now you can take it to
whatever since you want to. But once again, I do suggest
going by the hundreds. Beautiful thing about
sampling is that when you do manipulate the pitch, you are manipulating
the emotion. And this is part of how
you're going to rewrite what people are hearing and rewrite how they're
interpreting these records. So many things that you
can do just literally by changing the pitch of the yields go up
at a whole octave. It's so crazy how many
different production styles that you're going to hear. Like you may hear some
Kanye or you may hear some just blades that you may hear whatever producer
that you're in. So they all have a pitch area that a lot
of their samples live in. A lot of those
early Kanye records had like very chip
monkey sounds. And it's crazy because a lot of that stuff repeats
itself in time. I think that's pretty
dope, but I wanted to make sure I expose you to that. And once again, we're
manipulating these by the sense. Now you want to be careful because sometimes
certain samples, because they carry their
own unique frequencies, certain samples will not
react the same way, right? Certain samples are
gonna sound flat out ugly his hail when you take
it up all the way, right? Those sounds synthetic. They'll sound way to doctor. But of course that's all
up to you and your ears. And what you think,
what I'd like to do is just sit with the sample
and see what feels right. The original feels amazing. But the whole idea of sampling is to bring new life to it. So I kinda want to commit
to actually changing the pitch a little
bit too low for me. You can even see some of the
nature of the drums changed. They become a little
bit more boomy because it's in a lower pitch. Snare. I can EQ a lot of
that stuff out, but I want to make sure I get
this as clean as possible. Just an FL slicer, little bit too high. Like that. Just contains $0.300 up we chose the pitch
shift is right here. Next section of this particular
doc is the time stretch. Now we stretched out the pitch. Right now we're stretching
out the timing. This is important
because you want, want to know what BPM am I actually doing all of my beats. So this is where it's important to have a little bit
of strategy, right? So something I like to
do is take a drum loop. Now we had this one right
here from the last example. Let's go ahead and fit to tempo. This time it's a
little bit different because we want this beat to basically fit to the Temple of this beat we're
working on right now. Which if I'm not mistaken, the original is 141
is actually now. Click here, fit to tempo. Take their word for it. Time shift is important, especially if you're using a different BPM than the
original BPM of the sample. I think, if anything,
I want to make this a little bit.
What am I thinking? I can play it? I want to make it faster. So I'm thinking, let's go to one SQL-like 166 is
what I'm thinking. I'm going to stretch out all these channel because
I have some drums on here. Something else that I want
to go ahead and change here is we know what the original sample
length is and that is down here to eight beats, because it's four bars. We're gonna say
it's eight beats. And that's around
the BPM that it is, this is going to ensure
that everything here is changing according to
what that original was. We're gonna shift that
again though here in the time stretch if necessary. How do we know if
it's necessary? We're going to let this
whole sample play out by itself before we do any
chopping individually, we're going to have this
sample just play out when a right-click or once
at a piano roll. I wanted to lay this
out for four bars. I'm going to grab this
pattern here and see how much I need some
manipulate the timing so that it matches
with these drums. Let's go ahead and do that now. Way too slow. Way too slow. So in order to make
that makes sense, what we're gonna do is we're
gonna take this timing. And whenever you go down
on the time stretch, it goes faster, you go
up, it goes slower. Listening to this, you can tell that the sample is way too slow because it's
not even able to finish itself in the process. So let's go down. Let's try 88 or 89%. Got to make it significantly
faster than that. Not they're fast. Let's go to 70 to 80. I liked the drums. I want to change the drum to
another drum loop. I just wanted to show you what
that sounds like with it. Pretty close right there. Right. And all we
did is basically change this time
stretch feature here. That's if you want to do long style sampling now that
comes in handy because once you are able to pinpoint
that percentage every time that you're in
the channel rack. And you copy this
over, clone it over. You bring another
sample that has the same lymph bar wise. It's basically
going to adjust to whatever parameters you
set for the original one. So it's the same BPM, everything stays the same. So then when you add
new sample chops, everything is steel pretty
much in the same family, which is really important. That's a good place to start. That's about as
simple as sampling is going to get right to have one long sample that you get according to
time with the beat. Can add a baseline here. But that's going to get boring. And you know what's
going to get boring. You may be getting excited
if you're a beginning at, at sampling, you may get excited about that.
That's not enough. That's where it's
gonna be important to understand more of the tools that are within this very powerful
tool of NFL slicer. Now we talked about
time stretch. We already manipulated that
before modes it has an x dot. It looks actually go back a few steps and
let's actually get some shops ADL
sliced by FL Studio. And then I'm gonna
show you how to edit those in the event that you don't like some of
the slices or you want to make one a
little bit more. So that's the one
style is sampling, the other status sampling
that is the most common. Let's slice according to the B. Now that we did this, FL Studio basically has laid out every single one of these
shops according to the beat. Every shop is 1.5. Note up. That's where
it ends right there. This is where you start to
bring another life to it. Now this is a style of chopping that once again,
producers who'd suit, whose sample they have
this style in their bag, but there's a whole, another
vibe to the entire sample. With this, I probably
would even change the pitch back down. See what I mean. So
the other one is cool. It's entertaining, it
gets the job done. It's a great one
to learn off of, but this is where
you start to really unlock the power of FL slicer. I'm gonna take a whole
another pattern here. Let's go to pattern too. Let's move this out of
the way for right now. And I'm going to loop
this around here, a quick little tool
that I want to start to get embedded
in your mind, especially as we talk about
manual chopping here in a second is when you
click here on a slicer, if you just right-click it and nothing is happening, right? You could hold it down and
create a slice like this. That's helpful. You can
hold it down and do that. But it's not always accurate. Hold down Shift and then hold down the left mouse and
all of a sudden bone. Now that we have those drums, I actually want to
take you through your first shopping session, the small chop way, as you see right here, these are all the chops
that were pre-made for us because we sliced
according to the beat. Now when you go to
according to 1 sixth, the chops become ridiculous. Once again, it depends on a
kind of shift that you are. If you want to. Some
crazy things can be done. But I think for the
sake of this course, it makes more sense
to stick to beat. Now one more thing
before we jump into this shop and session
over this drum loop, I want you to pay
attention to this fade-in feature and it's fade
out feature here. When you go up on
this fade in feature, it basically fades in every
single one of the clips are the shops and it makes
it to where it has a smooth fade in. You'll notice even
more dramatically when I go all the way up. That's once again a
style preference thing. I typically put it up. It depends on the sample, but I don't want to take too
much of a life out of it. I'm really more so concerned about the way that
it fades out because a lot of times
that's where I hear the biggest clips
on the fade-out. Also add clicked on his earlier. But if you ever want
to just have one of these chops playing and not continue into the
rest of the sample. Click off the plate in and it won't play the
sample to the end. See how just stops there now. Now let's do a little
shopping session. The way that I'd do
that as a same way I've been previewing,
get here with you. I want to loop around a beat
and I want to basically just run through
all these shops. They want to find the
ones that I like. I'm going to record it live. Or if I wanted to do what I could do it here in
the piano roll as well. But what fun is
that? I want you to actually get used
to doing it live. So let's go ahead and do a lot. The possibilities are completely enlist about it sounds like
a super Disney cliche, but it really is like that. Now the same way you
record any melody or sound in FL Studio
is a sandwich. You're going to
record these chops. It just gonna be
like playing keys, but you're playing chops. Let's go ahead and record. Let's go to notes and
automation. And let's play it. Cool simplistic
chart that gives it a whole another energy than
what it was initially. Let's see what it sounds
like in its raw state. Let's see what happens
when we quantize these, which is something that
I am not a big fan of. But I think for the sake
of understanding this, for the beginners that
are watching this, it's important that you
see it to the grid, but don't get married
to that idea. How doesn't want you to see
what it looks like and pretty much took the timing of it and how consistent
is going to stay. All right, So Control Q quantizes it straight
to the grid, which is something you're
not going to want to do because the drums are
not to the grids. So why would you want it
to be sober computerize until the grid if the drums have a natural swings with them, that is part of what
gives the music life. But like I said, once again, we want to just
get some accuracy here as we're teaching it, Control L extends all
the different audios. And actually we can
just repeat these over. For the sake of timing and making sure that
we have this is due. They're highlight all at ease and make sure that the highlight it and then just push Control B to loop
it back around. You got to make sure
we go down here to the pattern and actually
extend this out as well. Now this is important
because this is where we're going to add
some more character. We got a basic bone structure of the chops and the
different energy that we're going to
take with these chops. Now we need to add
a little bit of character here in a little
bit of unexpected natured. So it just to give
it its own style and possess because you know, there's gotta be produces. We've had this sample and
shop the same exact way. So let's add your style
on it, your flavor on. Something I may do is do
another sharp of this module. We're going to shop at
the same exact way here. Now see how easy it is to take these shops and give this
an entirely new life, just literally by chopping
different portions of it. It still feels like
it has a beginning and an end because we're taking portions of the way that it was originally laid out, but we're doing it
in restarting it and remixed again in a way
that feels like ****, this is my approach
to these keys. Let's try to reverse one of
these and see what that does. I'm going to reverse this 565. Let's draw their 56. Now all the samples
are reversed. See how bet like this little
things that you can do. It is all about
your creativity is only so much I can
teach you about that. I can show you an exposure
to the things that I use. But this is where you can have literally all the
financial world. This becomes your playground by literally going
in here and saying, I wonder what happens
if I take this and I chopped this
individually here. Now that does take me to another option here
we need to discuss. I showed you pretty much every single doc here
and what it does. I have not shown you how
to individually chop these in FL slicer if you click on
any of these windows here. And I want to make it less
confusing by reversing these, you see how you can literally
click over the top of this. And when you click over it, you can pinpoint where the next part of this
sample is going to be. So when you listen to
this, let's take this. You're hearing, boom. You're hearing two
different notes and you can see where there's two
different hits on that waveform is more so the
base that's taken up there, waveform, say I wanted to separate those by
clicking on here, I get a preview to the
best of my ability, this is where FL slicer has
a bit of his limitations. For right-click here. I can split that slice. Now I have another, have another sample to
basically work with. However, be careful
when you do that, because once you do that, these shops are
going to have to be moved again because now you've extended this now from
seven shops to eight shops. Now some stuff is going to
have to be moved around. I didn't want to show
you that you could do that if you want
to get rid of it. Click on the window that
you want to get rid of, Right-click and then removed slice and it goes back
to its original place. Alright, now that I've shown
you pretty much the ins and outs of Edison as
well as slicer. You have pretty much the most important
tools that you could ask for when it comes
to chopping up samples.
7. Chopping Techniques: Manual Playlist Chopping: In this module, we needed to
talk about manual chopping. With manual chopping,
some of you may prefer to do it this way. Maybe somebody you don't
want to manipulate anything within FL slicer. I get it. I understand that every row slices,
not for everybody. I just have a love
affair with it because of the way
that I can take the keys and basically have them all across
my midi keyboard. That to me is almost
like the equivalent of somebody playing
these on the drum pad. I don't use my drum bad because I feel like
it's a bit limits it. I like to have more options. And what I've found is that by having the samples laid out, because sometimes I have
longer samples than that. Most times I do that go all
the way down the keyboard. I want to basically be
able to go through all that owes without having
to go an octave up, switched down here on the pads. This is the reason
why I don't use a drum pads for the samples. Now that's the more traditional
hardware approach to it. I just like doing this because this is what I've been doing from the very beginning
and I want to make sure that I
give you my best. But for those who would
prefer to see the audio because there are limitations when you're dealing
with the piano roll. A workaround for this
would be actually manually chopping the
samples on the playlists. How can we do that by basically taking these samples
we have right here. Let's actually start with
a known of the sample. Now, let's start with the Arun Barbara one
and let's listen. So wouldn't see if we want
to keep this same BPM. Why not? Let's do that.
Remember that sample, let's take that and drag
it here to the playlist. Now just on the eye test alone, you know that this
sample is shorter than the duration of
eight bars right now, our goal is to either speed it up so that
it becomes four bars, are slow it down so that
it becomes eight bars. Let's test out both. Before we do that though, I want to draw your attention up here to the stretch button. You're going to be toggling
around with this a whole lot. If you plan on doing
manual shopping, basically what this does is it changes what you're able
to do with the sample. You see how, when I
go to the endpoint of this window of the audio we dragged in here and I basically, and just going back through here and just cropping the sound, I'm not changing anything. I'm not making it faster,
shorter, longer economy. I'm not changing anything
or manipulating anything. The way that I do
manipulate it though, is to go here to stretch. And what that's gonna
do is basically, as it says, stretch
out the audio. Let me take this back to
where it was originally. So it says the BPM for this, Let's fit it so our
tempo right now, and it says, let's actually
type in what it says. It says It's one hundred
twenty one-twenty. This is basically
locking it down. So four bars right now. It's up to you whether
you think that sounds good or if
you like it or not. But as I'm listening to, it, just sounds like It's
WHO doctor TO generic. It sounds too happy. I'm kinda fell on like
slowing this whole thing down before I do that and
change the key of something, I'm gonna go ahead and click on the audio and change the mode. And I'm going to
change the mode, excuse my mouse, to stretch. By changing this
to stretch mode, it's going to keep the
original key and I'm in control of changing the pitch
and all that good stuff. In other ways. I'm going
to show you here shortly, right now this is at four bars. Let's try it at eight bars. Stretched. Feels good. Sounds likes, and
storytelling spiced up here. Only issue I have what
it is, the pitch. So if we double-click
on my audio waveform, we can manipulate the pitch
in two different ways. One, we can manipulate
the pitch here in the time stretch feature by going down by the
sense once again, if you wanted to get a
little bit more precise, we can mess around with some
other sense and just see. Liked that it
sounds really good. Now another way to manipulate the pitch when we
reset this over here, is to go here to the pitch now. Changed the setting
to a multiple of six. So 6121824 y six, because six represents
an octave shift from the next scene
up octave wise. That all represents
six semitones. In the event of this sampling, we have a knob that's
six semitones here. Let's try 12 semitones
and other equivalent of six and see what happens
when we press Play on this, but then take it up to walk. This is to walk
down, this is 12. Once again. That's just another way that
you can manipulate the pitch literally through using
that knob right there. It comes in handy
most times I'm using his pitch knob for
vocals that are added to the samples because I
pretty much want to keep the key of it and then
manipulate it from there. Now the only thing with using this time stretch feature
is that because you have more control over
the exact pitch that you're pitching it down, it's going to change the key. At least we're keeping
this in stretch mode. It stays consistent. What key you're changing it. So Tom out all across
the board, the pitch, you're going to change the
key unless you're going in increments of 600. We
talked about before. But for this example, once we figure out where we want to go and I think
it was like 800. You can use the same
technique I showed you earlier about how to
find that new key. One thing that you know
for sure is that whatever key it's now in is
gonna be a minor scale. So that's gonna
take care of that. It's actually run
through and just see. This is where it comes in
handy to have mixed in key or another program
to back you up. We're saying C-sharp minor. Let's look up
C-sharp minor then. Bombs. So what it helps to
have some backups and when it comes to
dictate and a key, that being said with
the manual shopping, That's how you change
everything there. Now the question becomes, how do we do that
other stylet shopping that we did with fl slicer? This is where this
way becomes super, super fun because now you can see the audio that you
want to manipulate. I'm going here and I'm right-clicking now to get
rid of the other part of it. And I can just loop this around. Holding down shift In, hovering over a piece of audio allows you
to copy it over. Taking off the stretch
mode allows you to now shop these
down to your liking. Word shopping according
to the line in the grid. These lines in the middle here, you couldn't do a
little bit more finite shopping using these, we'll get to that
in just a second. But for right now, shopping
to the line is just fine. In my head. I'm starting
to hear some of the parts that I might
bring in Ford shop. So let's just try
this out much try basically now what I'm
doing is I'm trying to find according to the
kick and the snare, which a lot of much
shops are occurring. Because I'm a very
rhythmic shopper. I'm trying to figure out if
I hear special points in the sample that makes me want to chop the manually and
have them repeat it. I'm not going for
any rhyme or reason. I'm just literally going
off of my ear and saying, Oh, that sounds nice. Let's move that over here and just see what it sounds like. I promise you this is not me
fast-forwarding the process. This is how it goes. I sit here and then I
puzzle piece this together. Sometimes things work,
sometimes they don't, and you got to keep on
puzzlement together. Only warning is I
do not suggest this if you were just getting
started within sampling, but I do want to
expose you to this. See how piecing this together one thing leads to another idea, shopping something,
repeating it. You just got to get
in here and get experimental with where you
want to get things going. Now, a little bit of framework or groundwork
or foundation for those of you that
are still very new to this process
in the beginning, chop according to the
kicks and the snares. So the cakes are obviously
the, that's the kick. This is a snare. That's a snare. This is mute. This, this is the kid. Using a drum loop
is going to give you a foundation to work with. It's going to inspire
your new shopping ideas. I'm chopping this sample
of a certain type of way, whether I want to
admit it or not according to what this
drum loop is giving me. Now, when you chop up
without a drum loop, can you do some creative things? Absolutely. I know a lot of
my advanced samplers in here. You can agree with me on that, but I do find that in terms of foreign advance
and for beginner, it has a lot of benefits. Put a drum loop down here
for an advance shopper. It gives them an
opportunity to kind of freak the sample
in a different way. You may add some kind of
weird 1 third timing, like for instance, let's
do this real quick. Let's actually change this
timing to 1 third beat. And we're gonna go to the grid. We're going to
actually repeat this. Boom, boom, boom, boom. Actually not want to go a little bit different with that shop. I want to space it out here. So let's do we're gonna
repeat this over. You hear that it's
actually played as this is why I say manual
chopping is a little bit more for intermediate
and advanced, but we're still going to talk about it because
on a lot of you in here are sitting at
that stage as well. But for those beginners in near stick to slicer
for right now, test this out and see if
you liked this better. But I would say slicer was a
good place to start because it's a lot of these things
are taken care of for you. For instance, the
fact that you're hearing the clipping
in-between these sounds. In order to change that for those of you that are looking
to do it in his style, go to the clicking mode and then click to
a generic bleed, a small bleed or
across faded all depends on how dramatic
you want the bleeds. B, I'm gonna say
generic for right now. And you see it
applies the slices to smooth out the sample shots. Can even take this pitch backup. With the manual shopping, that is how you get the
ultimate control over it. Some other things that
I like to do with the manual chopping that can
take it to another level. And I'm of course, sockets in my intermediate and advanced
students in here is I liked to take an
individual sound and reverse it
into another drug. So probably that one
right there would be a good spot sake that shop that I want to reverse highlight it with
the select tool, then push Control C to consolidate it down
and make a new waveform. If I were to change the pitch of this note before
consolidating, it, would change every other note in here and it's actually
changed the color of this so that we know
this is a anomalies. Everything else, stew blue. Cool. Now let's reverse this. And let's actually fade in
little quick fade in here. I'm actually going to change
the octave to stretch. Gotta change, does stretch mode even go another octave down? You could do some really,
really interesting things, especially when you
start to get in here with the manual chopping, I find myself using FL slice
or more because like a sale, like to see the samples
laid out on the keyboard. But I find myself jumping
into this whenever I'm just like hungry
to chop something up, like whenever I want
to get straight to the point and I don't
really want to go through the process of separating
the sounds and throwing them in there I'd
sent to just go straight. So within here.
8. Chopping Techniques: Sample Stacking: Now that we know
how to use Addison, we know how to use Slicer. We want to make sure that we get the most out of the
samples that we're sampling. And what that means is
basically we're gonna be taking samples and combining
them with each other. Now this is a technique that you don't really hear a lot
of modern producers doing because they
don't want to Clough the mix too much and leave
room for the artist. But if you want
to do beat saves, you went to instrumental albums. This is something
you're going to want to learn because
this is going to utilize parts of the sample that otherwise
you would leave alone. Now, let's take these manual
chops off for right now because I want to
focus in on FL slicer. So we have these chops
that we had from before. We need to go back into the
sample and actually grab some more stuff. That's one. Let's actually do that. Let's go ahead and drag
this and drag it into here. And actually let's
delete this and make sure we aloneness, but it's all the same key
and all that stuff pitch. Alright, so that's one symbol where you're
going to make this, I'm gonna say this year. So we know what we're
triggering when we actually press them
on a midi keyboard. Let's get some more
stuff in here. Mind you, this can be anything like you're
basically digging through this looking
for the equivalent of one shots, melodic one-shot. You're looking for
that through here. It could be a horn
that you may want to add an echo or delayed. So it could be a vocal. I'm looking for it up
for the vocals because right now it sounds really
good in terms of the loop, but it sounds really
plane as well. So I want to make
sure that we add little textures to what that make it feel like
it has new life. Just keep taking,
just keep taking, adjust contagious,
keep taking thoughts. Have you in my view. All right, we're gonna add that in there and then call that U. And right now it sounds kind of crazy by how are we going to
make this blend together? I want to show you a few different ways to
do that in a second. Now the reason why
I'm choosing vocals, because it's gonna
be the easiest thing to identify when I start to trigger them as layers
over the samples. Now, we have this original
sample that we know. Obviously it's in the same key because it came
from the same song. Now, although that is true, sometimes was key changes. So this is where we
got to really mess around with this and
doctorate to our liking. In order to do this though, we're going to need
to get rid of some of the musical elements in the
background with these vocals and habits aware the
vocals sit in the front of the mix and the music kind
of sits in the background. How are we gonna do
that high-pass filter? So let's take all of
these vocal stabs, one shots, and let's put them
out on their own channel. Let's put them actually
here in channeled Susan's, we got sample here. Let's put Vox stabs. Alright, so let's open up
love filtered, love filters. Like the first thing I
like to go to when it comes to doing a
high-pass filter, Let's go ahead and
do simple high-pass. Now let's listen to the sounds as we're playing the
list. Play one from here. Now you're seeing how when you
have that on your hearing, more of the vocal and less of the music in the background.
Let's take it off. Now. You hear that base
and at muffle, we can actually take
some more of that off, but we're not going
to be concerned with that just quite yet. We want to test out
everything else. We want to get rid of. Want to get rid
of these shops as well because these are so short, we don't know the
needs and chop them. You do that by once
again, taking these down. It was quite a sample unless basically just see
what the high pass filter, how much it blends with this. Same key wise, it's
almost like trying to find the right place
for these to fit in. But once you find it
in so many things, you can add effect wise to
it to make it blend even, even more so it doesn't
sound so abrupt. But this is once again another style of
sampling and shopping. So as I'm going through here, and it sounds so good
within the mix that I can honestly play it over the top of the other music and it won't be interfering.
So let's play it. I'll probably do a U Oh, yeah. Say it is right
here. It's a weird might actually do an auto
shop on this one to the beat. It's not necessary, but I liked the way these are
blending already. But what I can do with this now, because I have these vocal steps here now I can
start doing things like having a delayed so
that it blends in even more. Because somebody may wrap to
this beat and want to wrap along with the EU parts and incorporate that
into the concept. But his song is actually
put f delay three on this. I'm gonna move this up
manually on his part. Okay, so I don't want to get too deep into the actual
mixing of this. I just want to show you
that you can layer over the top sounds and make
it sound more textured, more interesting, more amazing, more melodic, more musical. Because when you
chop down music, it wasn't originally intended
for it to be chopped. It was just made as music
as a sample-based producer, it's your job to now take these shops and do
something with it. When an onion was
originally grown, it was grown to be
a certain size. When you die set up, you better put it in a pot or do something with it.
Same thing here. When you dice these samples up, have some kind of intent with which you'd shop and don't
just on chop everything. You can shop a lot in half
stuff sitting in here, but don't chop just for
the sake of shopping. Listen to that and say,
I can see that being a layered sample or I can
see that being a switch up, our change up and
what I'm doing. So I took another part of
this sample right here. I want to drag this over
here. Replace this here. We have one sample
style right ear. Want to duplicate
this and try just extending the entire
sample and see if there's a way to build around
that other part, right? So we're actually going
to stop the shop. We may or may not
have to copy this over into another channel that's got a copy of this. So let's copy this over. This is the main sharp. We're now going to speed it up since we did the Chop Shop here, Let's actually speed it up here. Once again, how are
we going to do that with the time stretch? Say these all the way out. Now we can layer over the top this new sample that
we just put together. And we can let that
layer the same way. Even though two different
parts of the same song. We've got to actually do the
same thing for this one. I think we synthase down to 81%. All right, so now we can take this original sample that we had here since we got
the timing right. And at time stretch. I don't like the way
the first part of this, so samples are clashing
as we're trying to manipulate them to
sound good together. So what I'm gonna do is
I'm going to actually cut this sample in half. I'm gonna do this
accordance. Who beats? What I wanna do is get wanted
to take that right there. I liked the way that sounds is record that alive actually. Bone. Now we got some
sampled shops here. That little mistake here
was actually pretty dope. Now, literally would just
the same suit shops. We haven't even got to
like formatting the beat, which is gonna be
another module, but just those two
sections alone. Look what we have so far. So we're going to play
these back-to-back, since these are two
different parts of the beat. If you could do so much with
so little with sampling. This is why I love it so much. We haven't even transitioned to any other portions of this beat, but we did chop this up
to where we get literally make four or five beats
out of the same sample. This is why samples you hear over time get used
so many different times because there's so many different shops and reiterations that you
can put on top of it, but that's how you manipulate
samples so that they sound good as they are
blending into one another. Now, although as I said earlier, there's not really a rhyme or reason when I'm
actually sampling. There are some things that
I want you to pay attention to that are all actually
stylistic things, right? The reason why you hear
so many of the same note here is because
literally the length of this note is not long enough
to sound like this and keep the same note and keep the same repetitive nature
into the next note. It's not long enough because when you extend this node out, right, Let's just go
here and do this. It starts to fall off beat. So another way that you
can cheat if you are using a different BPM and
you haven't re-adjusted it, is to chop the sample before
the next part comes in. So that's kind of what they
call the endless loop. You see it a lot of times
for vocals as well. So as I'm showing you this, I want to basically
make it seem like a vocal never actually
stops moving. In order to do that, we can actually switch
these around and I want you to hear what it
sounds like if we take this and we're basically going to have its say, Phil would doubt. Oh yeah, oh yeah, yeah. I think that's the best one. Rid of somebody's shops.
Somebody shouts may since before don't
make sense right now. To get this endless
shops section going, let's go ahead and take this. If we want to find the
end of our doubts. So we will try to get the word not gonna be the
cleanest endless sample. What we're gonna find another
one that can do that. I'm going to chop this. Let's do that. Let's chop this around. And it's gonna feel like it's
steel continuously going. This works so much
better on vocals. But I just want to show you
what you're able to do. Once you have this to a certain type of grid or
certain type of control. Let's see how the sample is
kind of an endless loop. You could do that with so many different styles of sampling. I didn't want to show
you what that sounds like there as much
as you would think. It would disrupt
the vibrator beat. It doesn't, it fits
in a background. It sounds like something
you just play in the background and it works. You want to be very selective
about how you do that. But I just want to show
you there are so many ways that you can layer it and
manipulated within that.
9. How To Add Character To Your Samples: In module six, we're gonna
be discussing how to add character and just a little bit of flavor to your samples. I think initially
when I first got comfortable with how
to actually sample, I started seeing it became
a little bit easier to find the timing and add my drums over the top of it
and things like that. That's when I started
to say, Okay, this is cool that I
understand the basics, but how do I separate myself from other
producers and how to I'll put more of my
personality within my sample, flipping all my
shopping and whatnot. So this is where we're
going to need to discuss a little bit of detail the effects that I use and that I suggest that you
told around with I mean, there's no rules to the effects. Pretty much for
me. The only thing that I'm thinking
about is what's going to add another
character to the sample. But it makes sense for the
mood that I've set with the bare basics of the
foundation that I've laid out. That's the most
important thing to me. We still have the same sample
we're working on here. Let's go ahead and
replay it is in case of refresh your memory. Now something that we can do and it depends on what
you want to work with and what you feel
comfortable working with at this stage of your
production career. For some folks, it
probably would be easier for you to copy over a pattern and then start to fool around with the
effects and see if you want to add it like say for the last eight
bars of a verse, or maybe you want to just
test it out for the intro. You might want to
just cologne it over. It's probably the easiest
thing. Let's start with that method first. The second method is
going to be consolidating these sounds so that you have
new waveforms to work with. And then you can basically assign them to their
own mixer track. And from there you can add effects that are
pretty much just for that particular waveform that you went and consolidate
it with that sale. Let's do the first method.
First method and the situation we want to mess around with
this first portion here. What I want to do first
is push Control a. And I want to make space for just this amount of bars, right? So this is eight
bars right here. Let's move this over to
the side because I want the sample that I'm going to be messing around with to breathe. So as you can see, there's a little bit of extra vocal here from an
endless sample we did. Let's go ahead and just
cut that off right. Now. Let's focus
our efforts here. These are just the
sample chops right now, one thing I want to
do is make this one unique by clicking here on the piano one of the
top left-hand corner go to make unique. Once we do that, we're on a
new pattern. Pretty much. You do not want to manipulate this particular channel though, because if you manipulate this is going to change
the entire beat. Once again, we're
going to clone him. I think it probably would be wise for us to start naming
these so we know what's what. So we'll say lead
verse sample to. Also, let's extend this out. We know what everything is
and I'm gonna copy that over and name it appropriately. So I'm copying that.
Go to the second one. We'll call this 1.51111. Then this one right here,
it would just be one. We know these are pretty
much linked together. This is the one that
we're going to actually mess around with and put effects over it to make it have a different vibe on him. So I just copied
that over by pushing Control C and then Control
V into the next channel. And I'm gonna go ahead and push Control X to get rid of that. Now that we have this chart here that's separate
from everything, we can start having fun
with some of the effects. Now I want to take this
particular version of the chops we did. I want to put it on
its own channels. So let's call this. This is just for the sake of this lesson, sample ethics test, okay, so now we
basically need to assign this to it's own mixer. Right-click Shanna routing. Boom. Now we have a channel
to basically experiment with. Some of the most common
things that I'll do when it comes to
samples like this, because I mean, they sound
so good as they are. We've pitched it down,
we've manipulated all kind of different ways. We've change the order of the
notes and things like that. Something I want to do is you don't mess
around with maybe like a chorus effect or
maybe add some reverb. So with that, I'll give it a
whole, another lively feel. There's really no
rules to Whitman. I'm gonna show you
the ones that are the most common ones for me to use. I want to start with
a stock ones first. We mess around with this
in the last module, but footie love filter
is kind of a place that I love to start
off with my samples. The reason I start with this, because I know a lot of
producers will start off with E queuing first to try to get rid of any of the bad signals, or maybe some signals
that they want to add their own instruments over
the top of cipher instance, you do sort of a cut in the low frequencies because you want to add your own base, which is something I want
to do in the next module. I like to do the effects first because it gives me
ideas of ways to approach this sample and
then previews what it sounds like when I'm actually cutting these frequencies off. So I'm going through these
just basically see if there's something that inspires an idea. I could easily use this
effect and it could be like the last eight bars
of averse, last four bars, just something that adds a
little bit of character, takes away a little bit of the warm four seconds
of the beat kind of feels empty for a second
and then it comes back and it fills that
much more powerful. There's little things
that you'll find that psychologically you can do in the music that affects
your listener. This is one of
them. This is why I start off with the
effects first. But when it comes to
the actual mixing, I'm primarily going
to start with the EQ one because
that's where I want to start making Rome for some of the elements that are add
on top of the sample, primarily use the simple
band-pass, the high pass. And the simple low-pass. It is depends on the aesthetic
that you want to go for. So I'm gonna go ahead and
mute this for right now, but just know that is
one that I use a lot. Another stock plugin that
I'll use that kind of gives a chorus effect is ironically
not fruity course. It's the flanger
and then a flying IS both are stock
within your FAL. Let's try flanger first. I typically like to use
this effect on intros, kinda gives a just blaze effect. So it kind of makes it
feel like the sample is washing away in his kind of light coming into its clarity. In the very beginning, I
liked the way that vibes out. Imagine that in combination
with the high-pass. And the priest says,
and tell me though, those primarily of
what I'm using. I'm not really going in
here and dig in too deep into some of these
other parameters. But if I do hear something that I want to change
around that I just kind of like listen for what's happening that's
affecting them today. This is a fact. The plan. We can run through some
more presets on this. Let's see how it
adds more character. So it's at a point where you
want another producer could sample literally the same
portions in the same way. But this is gonna
stand out more because you're adding more
depth to the sample. It's almost like taking a
movie scene and putting it over new dialogue or
putting it over a new score. That's kinda what
you're doing when you're adding these
effects over it. Let's move on to another one. The other one that
I use a lot for sampling is the flooding IS, which is another stock
one in FL Studio. Let's hear without now
let's hear it with it. Imagine having a beat
where the sample plays out as it is. And then for one of the loops
that comes in and fight. This is how you create an auditory experience
for your listener. And I think this is why it's important to mess around with these effects and have just like a general foundation
of where to go. There's really no rules
with that though. Those are pretty much the stock ones that
are mess around with. I didn't want to expose you to some more that I
think can really, really help you control these samples from an
ethics standpoint. One that you see a lot of my live streams that I use
a lot is Analysts smell, which is probably
the least expensive, one of all the ones
that are here, a psi from mine, which is the next one,
which is called table. Unless smile, endless
smile is basically a OneNote plug-in made by the same people who
make sausage fan. And I know you've heard of that. And as you turn the
intensity knob, you get to basically here
in ethics chain that was pre-processed for you to use
over whatever you using. I don't use these like
throughout a whole beat. You could if you find a
vibe that feels right, but I use these for more. So vocals over the
top of samples, checked his first setting out. What's ironic about
it is that it was made specifically for EDM. So as you go through
somebody's settings, you're going to realize, okay, this is probably where
they using stuff to build anticipation before
a buildup in a drop. Same thing can be applied energetically and
sonically to sampling. Let's listen to what these type of things that
just gonna give a whole another energy to your beats to the point where people
want to be like man, Aside from choosing
this fire sample, aside from having
a Fi arrangement. And I'm like, man, how did
you actually program that? I how did you automate
all that stuff? And so this is where these
programs come in handy. A little quick tip
for automating these. And that's more So
I guess advanced for FL and advanced
for the sample based produces that are
here is to basically go to Browse parameters
and then touch a knob. And by touch it, it'll tell you what you're actually
affecting here. If you right-click this and go to create automation clips, same way you can do for
most knobs in FL Studio. Now, I can have this
basically play out. It's actually do it with this. Let's play it out.
Extend this out. So say you want the effect to
start intense here, right? And then start to
fall off around here. We can do that. I think I want it
to be climax tier. And then start here with the sample listed like
a slow climb on this. Maybe not that Simon. And I'm just right-clicking
of his points. That also reminds me though, I wanted to save this
for another module, but I think it applies for
what we're doing right here. So that's same sort of phasing effect that you heard
right now would enlist smile a kind of how it
feels like it's coming out of the abyss and
then becoming clear, you can do something
similar to that. I mean, you could do it pretty much anything you can do want to plug-in with the stock plug-ins, you just takes a little
bit more effort. You can do that literally
by dragging this band down. High-pass, going to the
number seven ban over here, dragging that down
to a low-pass. But basically now you're
going to drag this, I drag the first
one up like this. Drag the ban order, drag that about steep eight. Then you're going to
drag this one to about, I'd say about 30 hertz. Drag that back down to 0. And then what you want
to do is basically automate this seven
high frequency. You want to be able to
automate this up and down. This is what it's
gonna sound like. Now the question is, how
do you automate that? By looking down here at
the knobs and seeing as you drag that what is
actually getting moved. So if I take this here to its highest point,
it's this one. So let's go ahead and right-click
create automation clip. As you can see, here's the automation clip that
we were just manipulating. If I start there, that's actually the zero-point where nothing is
getting shifted. But if I start down here. Now see how that kind of
makes it feel like an intro, like the energy is building
up and it's anticipating and you're building up all
this energy and then it finally drops into the drums. This is where adding character and effects is so important. This is done in your
stock and mind you, I'm not showing
you stock plug-ins because I'm thinking
that childhood cheap, You're not gonna
go by no plug-ins, but that's what I use. I literally use the stock
plug-ins because they get the job done and it's a
lot better on the CPU. I want to show you another
cool effect though with this parametric equalizer
that we just automate it. I like to do this
V-shape dip out and it creates this weird
effect that I like a lot. I'm going to drag
out this point, created, this point right here. I'm going to create
another point by right-clicking This right here. For whatever reason is just like a really cool
sounding effect. Actually, you need
to hear this without this sample on top of it. Because we didn't
put that in effect. Almost like that record effect. It sounds a lot cooler on
different types of samples, but let's see, more time. I liked that. Then from there you can
always duplicate this over to get the same
effect early on. What I mean, That's where adding all that his character is very,
very, very important. So that was one little cool
effect you can do once again, what are their stock plugin? Now the ones I know
that shear probably more so concerned with are going to be things that are like these other plug-ins
that you buy afterwards. One of the most popular
ones obviously is our C120. And it is a powerful plugin. It does do a lot of
that work for you to really add more
character to your samples. It kind of does a combination of some of the things that
I'm showing you right now. Like it'll have its own
built-in, high-pass, its own built-in vinyl crackles, its own built-in flanged jury, his own built-in
filtering and whatnot. So it is very powerful. I want to loop this
around as you can hear the vinyl and
the background. My agenda is go on through
the presets right now. I'm not even going
into any detail about these particular
plug-ins because most of the time I'm only
using presets, right? Once you get a preset that kind of captures
some inspiration, then you want to go into here
specifically and ask, okay, so what does every
one of these domains, so this right here
is the noise effect where you're adding
vinyl sounds. This right here is a
wobble effect that basically detuned the
pitch for a second. This is a distortion that
distorts the sample. This is a digital knob that
basically gives it like a digital sound on the sample. This is a space effect
that adds a bit of reverb. This is a magnetic effect
that adds a little bit of flutter in where to the
sound dropouts and whatnot. This right here is
pretty much your EQ. This right here is
your input gain knob. And this is your
output gain knob. This is your stereo width. If you want the sample to
sound more narrow or wider. Here's your tone to figure
out where you want to basically focus your tone now that he'd like you wanted
to sound more base here, do you want it to
sound more traveling? Here's a few of your tone modes that you can
use, but that's my point, is that once you get in
the general vicinity, you're gonna be like,
okay, this is close, but let me tweak it away. Some of the presets that
I like using on this one are the VHS mode. I
like this one a lot. Now that is our C120. There is no way you see
me mentioning RC 20 without talking about my own
plug-in which is say boy, now i and u are seats are
wanting is bought on it and some at the
recording of this type, boys above 3995 at say
boy plug-in dot com. You're welcome. This one
has very similar features, but has some things that you won't find in any
other plug-in as well. First and foremost, that has
a lo-fi mode that basically allows you to add different
sound effects along with. Your production, a lot of sample-based producers
now come in the form of Lo-fi producers who want to use ambient
sounds in the background. Maybe that's the
same thing for you. Even if you're not
a lo-fi producers. That's fine. We have all these
different effects. Now that you can add
your sync button. You got a rainstorm. Vinyl crackles. Got to wobble effect here, a little bit of dark in here. The ratio of the duck. We're going to talk about
ducking here in just a second and the importance of it. So next you have a warmth
button that basically adds these different
analog presets or analog compressions and
warmth tool your sounds. So whenever you want
to warm up a sample, you will want to
basically go over here to these parameters. Eight-bit gives it a more
of a digitize effect, kind of what you saw an RC
20 with the digital knob. But this one here is more so centered on like an
8-bit, 16-bit type of folks will primarily use that on froms because
you'll really get to get a little bit of that grit in my digital grid
out of the drums, but that's pretty much that. And you have like an
EQ band down here that gives you that
FL Studio love filter by if you've got
a mix knob here. Now speaking of ducking, this is another thing
that I want to make sure that you're exposed to. There are two different
plugins that I primarily use when it comes to
ducking my sounds. One of those is
called kickstart, and they're both
inexpensive, but kickstart, I'll use these
especially when I have a sample with heavy,
heavy drums, right? When I have a sample
that has just like, it's too much going on and I'm trying to like duck
those out the way. What I'll do is I'll add
this and we actually let's do this on
the master channel. So what we're gonna do
is we're gonna treat the samp pull that
we're sampling as a sample if that
makes any sense. So you see right
now how my voice is kick-starting right
now is basically ducking the very beginning of my voice to a certain ratio. We're gonna do that
to the sample now. Now you see how that takes out the intensity of the drums. This becomes really helpful
to do some kind of ducking, which you can do manual
ducking within FL Studio. It's not the easiest
thing to do, especially if you are just
getting started with this, I would highly suggest if that is a style that you
want to get into, I would highly suggest
getting one of these plugins. Kickstart is one that does it. Another one that does it is
a plugin called mighty duck, which you can get as
slap experts.com. Now as you probably can imagine, a lot of his stuff
comes in handy when you have samples that are a
little bit more stubborn. Samples that have heavy
elements in the background. This is where ducklings gonna get really, really important. But I at least wanted to
make sure that you were exposed to that
because as we start to run into somebody's
modules where I'm making the sample
beats in front of you, in showing you this process
all over again in real-time. You'll understand
why I'm doing that. But that's a quick
little tip in case you across a sample that has heavy drums try ducking
underneath the drums. Now some other plug-ins that are honorable
mentions and mind you, I had to get rid
of these because the CPU started
lagging a little bit. But I'll use this other
one called Easy mix, but I primarily use that on drums And I want to show you
what it does right here. I'm actually going
to just loop it around here because I want you to hear just the
drums right now. So let's go ahead and bring
this here, sort of beginning. And I'm gonna loop
this around and I want you to hear
what it sounds like. Open up easy mix. A little bit more pricier than the other ones by
open up easy mix. And as a few presets
of lights to use in here for my samples. Check this out. I like to use that one on
whenever I want to create like a really big stadium failing
within the actual drums, I typically use it
on drums because it sounds freaking nuts
with the sample. It'll actually play this together, unmute
everything else. So certain drum loops sound even crazier than this one
with that effect. But I use easy mix just for their presets and knowing
that the run these through their own gear kind of inspires new ideas
the same way that FL, love filter does for me. Let's move to another one now. Little plate is
another one that I use because once again, it's just going to inspire
new ideas for the sample. So we're gonna use this not
on the drums, actually. We want to use this
on the sample itself. Let's go here to the side. And let's turn these
drums off right here. Now let's test out this loop of the sample in little plate
so you can see what he's capable of doing is
basically a reverb plug-in that has humongous
sounding reverbs. I like to use these more soul on the outro of songs because it
just feels like once again, how the song comes from
that low band up to the high band and it
feels like it starts to rise up and get life. I like to kind of like dip my samples right back
into that low filter. With using this
crazy reverb filter, it is kinda brings
the right back down. It's almost like it's going
back and down underwater. I love using this
effect for that. But the thing I'll say about all these effects
that I think are most important to keep in mind because you don't
need all of these. These are just ones that
I've over the years collected and saw that creates
an interesting effect. Do what's necessary, listen to what the
sample is giving you. Sometimes a sample as
you're chopping it up, gives you ideas and
inspires you to say, Oh, okay, That's crazy at the
way that he sang that. I wonder how it would sound
in little plate or in easy mix or whatever
the case may be when that happens, try it. If it doesn't work. The beautiful thing about having a digital audio workstations that you can press Control Z or whatever it is on Apple devices, you can literally get rid
of it and go back and undo. There's no mistakes in a moment. Do what makes sense, but
be purposeful about it. Just try things out and if it doesn't add anything
so it don't add it. So some basic things
that taken mine. Now something else
that I mentioned earlier in his module when
it's the last thing we were talking about before
we move on to the next one is
say for instance, you do want to add an effect, but you want to manipulate it without having to change
every single one of these instead of going here
to have this to be unique. And this is more so from my intermediate and
advanced samplers NFL cipher instance, I want this particular
drum right here. Say I want to, for a second. Add that heavy river
we had earlier. Basically highlight
what I want to consolidate and turned into a
waveform, a new wave forms. This is already a waveform,
push Control Alt, see, it's in a way 32-bit float. And you want to definitely
when you consolidate, you want the WAV bit
depth to be 32-bits. I learned that the quality
is better when it comes to turning sounds up when
you keep it at 32 bits. So make sure you keep
that at 30 to bid for the quality sampling,
it's average quality. If you have the room for it, go to 512 on that. And then I generally want
to wrap the remainder so that we're not having
any issues with it interfering with
the rest of the loop. So let's go ahead and
do that. Let's start. Now what's happening
is that this is not linked to any mixer track. Any effects are already glued to this old drum loop and these are steel in the original state. Now what I can do
with this is if it's on stretch mode as it should be, OK, and now it's
turned a pitch down. I can even have it to where it goes to its own channel now, and I add more effects
on here in this chain. We're going to leave that alone. But that is the power
of using these samples, putting effects on them, consolidating down the
samples and then place them in different places
and manipulated in ways that you see fit. That's just the ways that I manipulate samples and I'll
give it new character. But this applies
to if you're doing FL slicer sampling or if you're doing manual chopping
here on the playlist, both are of equal value. It just depends on what
your experience level is. I do a combination
of both depending on the samples that I'm
manipulating around with. But that's that. Next
we're gonna take this sample and we're going
to actually add a baseline. So this is where that music theory
knowledge that we got earlier is going
to apply to this. And then being able to listen
to what we've been given from the original
base that's already in here because
there's a base that's already playing in here. We just want to play
over the top of it and hit some of the
sweet spots and then just kind of keep it
consistent throughout without being disruptive
to what's going on.
10. How To Add A Bassline And Keys To Your Sample: We're gonna be discussing
how to add keys and how to add a baseline
to your samples. Now when you get into manipulating the
samples and the pitch, and when you get to
adding effects to the beat is going to start
to feel ironically empty, nonempty, but it just doesn't
feel like it's complete. I should say. That's
because all of this editing that
we did was done deliberately so that
we have space to create over the top
of that being said, now that you've carved out
all this space through your filtering or through your EQ and whatever
you chose to go with. This is where we have
room now to add elements. We're going to even carve even more Rome once we figure out what this baseline in the original sample is
telling us earlier, we established that this is in the scale of E minor
scale. I believe. This play the sample and
check it one more time. So it's an E minor scale. So what that means is that
all of these notes are basically all we have to be concerned with when it comes to. So what this means is that
as long as we remember these keys that we played
throughout this scale, we can figure out this
baseline or at least figure out some of the sweet
spots of the baseline. So let's listen to the baseline. Boom, boom. And that's the, obviously
the lowest octave on here. And stretch them out. These notes. That's
following the original. But we're not trying to
do all that because we're going to basically
add our own baseline. Why am I using FL keys instead of an actual
baseline on 808? Because as I'm mixing and headphones or making my
beats and headphones, the sounds can be
a bit deceiving if we start off with base
and our ears on that, improperly trained for that, everything's going to sound
good and a low octave, you ever get an eight await. And it just sounds like no
matter what key you play, it kinda sounds like it
fits as because our ears start to deceive us when we
get into those lower octaves, it makes it harder
for our ears and our brain to decipher
the difference between notes because it's
all sitting there and at muddy low-end. So I use FL keys
because it's very clear to hear what I'm playing,
especially in headphones. The higher octaves I go, the more clear it becomes. I even do this with my Ada
weights and my baselines. Only issue is that the contact library that
I'm gonna show you that I use for my baselines doesn't
go all the way up here, right on that without
some manipulation, I want to use FL keys at stock. And it's really helpful because if you figure it out here, you can copy and paste it to whatever baseline or
808 that you want. So now let's find a sweet spots. So I want to get
the one you got. What he got was a rocket figure out soon. Let's lay down those keys. And that's gonna be
our new baseline. And in the process we're going to have to make room for it. But let's at least just lay this down while
we can still hear the original baseline
and then we'll take out that baseline
through some dequeuing. So let's lay this down. It's going to sound
very basic right now. So we can take that since the loop pretty much
repeats itself. Where this slapping it
writes a grid just for right now we can always add
a little bit of flavor. Afterwards, I'm
going to highlight just this section and Control
B to loop this around. Now as it is, it sounds pretty
stale and we're going to figure out ways to
really give it new life. But let's copy this over
into the contact library. You can use whatever
baseline you would like. I'm
going to mute this. Uh, kinda like
those notes better. Now let's take this
down a few octaves. There's a favorite baseline
of mine that is really, really nice, which is
called the debase. You're probably noticing
is a little bit of clashing with
the frequencies are starting to have this distortion and it's clipping going on. One is because the volume of
the baseline is too loud. But then what's Because We're competing with the
original baseline. So let's mute the new baseline. Let's take this sample. Let's actually start carving out the frequencies of
this sample first, better represent the baselines. We're going to open up
the parametric equalizer to know the baseline is
sitting in this section. Why? Because it says sub bass, bass, low base or low mid. We want to get written
carve out sections here. It's actually exaggerate
them to see what part of the base every section
plays around with mind you, I'm going to use my mouse wheel to get more of a
pinpoint so I can really hear what
frequency this is, what is actually changing. I know I definitely got to
get rid of that frequency. Definitely got to
get rid of that one. So what I'm gonna do
is I'm actually going to use this band right here. So basically cut off
this entire section. What makes sense? So right now we got this on
a high pass band. We're going to go
to steep eight. We're just going to cut it off so we can actually
right-click this and reset it. You can still hear elements of the base, but the
base does, doesn't, it doesn't feel like a
base anymore now the base feels like almost like another instrument
entirely, right? They just compliments or
whatever we play on a baseline. Now we've carved out space. You don't want to
carve out too much, but it depends on
the sample really. After this is before. You can still fill the base.
Now let's take it out. Now, the beautiful
thing about that now as it leaves room
for our new base, the saving deceiving, I thought that was an
a right key with us. An example of what I'm
talking about. Let's see. Maybe it is, maybe you see
how that's out of qi now. That's not the right key.
I'm going to go up one. This is why you want
to test it out on how your Octave if you
don't have the ear forward. Now as I hear this, I'm hearing. Or I can actually
chop these up to create more movement
in the base. Now I'm just chopping
this according to the actual sample itself.
Let's see what it sounds like. What the drums over the top of their liked to have the
baseline following the kicks. And sometimes it's neighbors
but more so the kicks. And so as I'm going back
through this baseline, you're going to
watch me actually manipulate this base to follow this drum loop just
so it feels like the music is more cohesive. It glues together a
little bit better. So let's see. Now I kinda want to extend his
back out to where I had it. All right, I just
want to come do some variation and see
what that sounds like. We're gonna keep
that right there. So we got this
baseline down here. Let's do the same thing now. We can just copy this over, but what does it do
the same thing now for the Ada weights in case, say you're doing
this for trap beat. And actually let's bring
a trap loop in here, just so we have something
to build off of. Let's do that. Let's go ahead and
just fits the temple. Assignment. Knows
what the tempo is. Look and see if the
measurements makes sense. They don't drag it out. Let's go ahead and mute
this for right now. Now we're gonna add 800 and
we already know the keys. And we know that this eight
await here is in the key of, and I'm actually
want to take some of the tailing off of this. We know that this
has already and see how can we
double-check that. Editing audio. Hit the pitch regions. Detect pitch regions? Yes, it's obviously in C. Good. If I take this baseline, we put an inputted here. Now, go in here and
edit a few things. First, mainly the envelope
and instruments settings. Take the attack
time here, upset, It's up my leave everything
else as is for right now. Now the Ada weights
should pretty much stop and start
wherever we dictate. So I'm gonna actually
push Control L to extend everything.
But here we go. These are way too low
for this eight away. I'm not gonna do the
same thing I did exactly because it's
not gonna make sense. Once again, I am
following the kick now of this new trap beat we put
over the top of this. Now that's a pretty
basic aid await pattern. I will probably go in there and start doing slides and whatnot. But for the sake of
this lesson plan, I want to make sure that
you just see and you're exposed to how to
add a baseline. Now, let's talk about keys
because we know the scale. That means that we
can pretty much experiment however
we want with this. Now, all I'm doing is playing up and down a scale. Let's see the importance
of understanding the scales or at least
be an exposed to like a Google search of
what scale you're in when you understand
that and you see the key that you can play with, the same thing applies up
and down the keyboard. So with that said, my friends, that is how you're
going to be able to add keys to which
you have going on. Let's actually play
around with it and see if there's something
that we can add. Actually want to open up mellotron v. This
just naturally. Has sounds that fit. I think I'm just
vibe with his Nicely played drums for light. Now. Let's turn it up a little bit so because we can barely
hear in the background. I want another instrument. Let's try this one out. Nice. Boom. And now you have your melody
line over the top of that. So that's how you basically lay a melody line over the top. Some tips for that are don't get in the
way of the sample. And if you're going to get
in the way of the sample, make sure that
you're carving out the necessary space forward. I chose an instrument that
I felt like would play very lightly over the
top of the original, but also not try to
hog up all the rooms. And these are the things
that I wanted to tell you about as we start
to get closer to some of them are
mixing techniques and the way that I approach making all this sound like
it belongs in the same beat. But the most important
thing is making sure that as you lay these
foundational steps, we haven't even started mixing it and it sounds pretty decent. The key here in what I hope
that you're getting from all the lessons that
I am teaching is that get it right
in its raw state. And when you add all of the effects and you
add all the plugins, it just gonna be
icing on the cake. So you want to
make sure that you are picking good sounds. Make sure that you're
picking interesting samples that fit that MSG plus quality criteria that I set out there for you earlier. And then also making sure that as you lay these keys down, they make sense with what the musicians were
originally plane. But that concludes module
seven and module eight, we're gonna keep using
a sample because I think it's gonna be
a really good way to understand as you go through the process
what this looks like. Do me a favor as you
learn these things, sit with the free
FL Studio session. That's not going to be for a beat that you're
going to release. Just sit with the session, have a free session and
try these things out. Maybe it's, I'm going to
spend 30 minutes today memorizing this
particular scale. Then I'm going to
find samples on Splice that fit this scale. And then I'm gonna try
playing over the top of those are putting a
baseline over those, right? Maybe it's spinning time with just trying to
get the structure of your samples
and testing things out and layering them
on top of each other. Take each one of these
sections as an opportunity for you to hyperfocus and
tightened up on the process.
11. How To Arrange Your Sampled Beats: I'm gonna show you how to
arrange this beat that we've been kinda going very
slowly through the process. I want to show you how
I arrange it as well as how to create
seamless transitions as we start to
sample more things within this particular
sample that we chose. Now as I said before, I'm going to show you
more examples later on in the other modules
when I actually run back through this process, but in a more fluid way. So right now as you remember, we had a baseline as well as a top-line sense to go along with this sample
that we already had. We had a drum loop and so we kept things
pretty simplistic. I think I even went into like
a trap drum loop as well. We're gonna go ahead and
arrange all that is and find some places for
everything to land. Now, in order to do that, something I like to do
first is make sure that I get rid of the things
that aren't necessary. So here, anything that's not getting used when
you go over here to the tools and the macros, you can pretty much get rid of anything that's not
being currently used. Someone to go ahead and purge
all the unused audio clips. Then I'm going to go back and get rid of
the unused channels. Just so it makes it
surprisingly easy for us as we start to mix what's
necessary right now, this is a very minimal
approach to a sample, but I just want to make
sure that we get this for the sake of these lesson plans, at least a walking you
through this process. It's a very unnatural
process for me when teaching it
while I'm doing it, because I'm usually
right there in a flow state of things, but it's gonna make sense
as we move forward. So right now we have this intro that has a lot of different
elements in it, right? We have this base unless I
actually named this synth, because it's gonna be very
important as we start to move these two
different places. We have our drum loop here. I'm gonna go ahead and
name that drum loop. This is drum loop till
it as the trap one. Treppe drum loop. This right here is sample. Let's put echo. Just so we know what
we're moving around as we move through
this arrangement. We want to make sure
we know what we have. This is lead sample. Then leaves sample. This is another sample echo. Believe it is. What
is this going to? What does that channel
that is channeled to? Those are the Vox steps. So yeah, there's a whole list of VOC stabs instead of a sample. Just so we know what's, what. This one once again
is another Vox. And we have our eight
hundred, eight hundred, so we still have that
same eight away pattern. I was going to go over the
sample that we had already. So it's a very minimal,
supremely minimal setup, but it's still feels
like a full production because you have a lot
of things going on here. Now, another thing that's
gonna be important is that now that we have
named all the instruments, let's go back here
to the pattern. And I actually want to separate these patterns
so I know what's what. So we're gonna go over here
to this pattern block, right-click it, and then
we're gonna split by channel. Now, when we lay everything out, this is a lease gonna give
us what I'm considering, I guess the chorus of this, the course of this sample. We have the base and
everything else that we name. So cool, we have that. What does pattern one thing that was just something
that we were working on a sort of like a demo
in our earlier module. What is pattern one now? Switch up, so we're
going to call this, let's just call this verse. This is worth things sort of mix up a little
bit and let me see, make sure it's only the
sample on this one. So yeah, it's only
two sample chops. I'm going to actually change
the color of this one because I'm probably gonna separate those
vocal chops, right? So let's go ahead and
let's split by channel. I actually want to
do that again now, so it was renamed these, I'm going to make them
Let's make them red. On the wall. They said that the brown
eyed is an umbrella. I guess it only did one of
them was to the other one. Just so we make sure we have. The same colors going on here, except that bom, bom, cool. So now we know this is
verse right ear, right? This also was another one. So let's see what's in this. What is it? Is it
just the sample? The vec vocal echo. So we're gonna say
rename this vocal three. We're also going to
make this color-coding. This red. Boom, boom. Now we know all
that is verse also because I did this and the unorthodox way in terms of having that
everlasting sample go, I'm going to split
this just so that we can keep this width, the verses as we
move things around. Now, this is a stylistic thing, was something I liked to do is either display the
sample chops as my intro or let the
original sample breathe in the intro
so that people can get a vibe of
what's going on within. So let's actually move some of these elements over and
move them all over. So pushing control. And a no here is gonna be at
least like an a bar intro. So let's see what happens
if we just use as lead sample right
now with the chops. Okay, so we're going to
arrange now that we have that. Let's actually start with
the chorus and then we're going to then move these
other elements over. I'm actually going
to move the edit 808 element because this
is where the beat is gonna have a little
bit of a switch. And we're going to move this complete
course a little bit later down the line as well. Because what I found is
that you want to let the music gradually build itself when it comes in and all, everything's swinging
at the same time, it can be a little bit
overwhelming for the listener. So take off a base in a sense. We haven't added any
switch ups or any drops. But we just want to have
that going for right now as we start to build
now into this course, I think we're gonna save
this eight away part to be sort of an outro. Let's just move this
over here to the side. And then we're going
to now bring in this complete portion here to be at least one of the
course loop around. I'm thinking that it's probably going to make
sense with the drums, going to let the drums
breathe during the course. Then I'm thinking maybe just the base or the
synth. Let's see. I'll say no bass. Want to listen for
these things and see what makes the most sense. But right now, I think this
is gonna make the most sense. These you'll sound girl, but I kinda want
to save that to be a transition for
the next section. Maybe even have a baseline
I kind of kick up here. Let's see what this
sense sounds like halfway through
the first course. Then from there we're gonna
do a rinse and repeat. Now we just need to leave
enough space to actually move this dramatically bag
just so we know we have enough space to do what we
need to do with the repeat. What I'm gonna do another verse. Same exact way, holding down Shift a highlighted
all the sounds. Bone. This first portion, lot of things going on here, but I liked this so far with just the Ada weight
and this portion. So now, this right now is in
its most simplistic format. As an arrangement,
we have an intro, we have averse,
we have a chorus. We actually have a
little bit of a chorus here as well to lead it in. And then we have the chorus here, then we have
the verse again. We have a chorus, and
then we have an outro, pretty basic
arrangement right now. So at this point with
everything laid out, we're gonna go ahead
and review things and then just listen to see what doesn't feel
like a natural transition. I already hear it, but
I want you to hear it back and you'd sell
me in your mind, the things that
you're hearing of, things that you may want to
shift when you start to find those things that's
going to help you as you start to
build up your sample. They speak registry. If I could say you right now, the things that are
poking out to me right now is that that
sample where it says they feel would thou could use a little bit more EQ going
to make it blend in. And I think the
echo right now is a little bit too overbearing. I think I either want to add more reverb so
it's so that it feels like it smoothly fits in with this mix right
now, this rough mix. And then I also need to add
a baseline to the verse. So let's actually do
that really quick. I'm gonna actually clone over the baseline that we
made for the other part, but we got to move
some notes around. I'm going to make it unique. Let's actually focus in the
**** and taken notes on, but I want to make sure that
we have this as an option. I like that sample. I think we're gonna do
a little variation at the end of this loop.
On his other part. It sounds pretty solid now that we have
a baseline here, we can open up everything
back up and then we'll save this baseline for the second half of the verse so
it has more minimum. Let's go ahead and
fix this other vocal, which I think is the
problematic area right now. Some hearing a lot
of elements in his vocal stab that feel
like they need to be EQ out. Namely there's
something in the May at right now that's
carrying a note that's conflicting
with what we're actually sampling
in the background. So let's go ahead and loop. And I kind of want to run an aggressive cutoff from the base frequency right now let's see what
this sounds like. I'm still hearing that. Want to pinpoint this. Not as bad. Okay. Now, here is where
I want to start to tweak around a little bit wet
with this echo I have here. I'm going to manipulate
this cutoff so that it's still echoes, but the frequency does
sort of look like a cutoff filtering
effect that doesn't impose on the next
portion of the sample. I'm just trying to
make it to where it's a smoother transition
with the sample itself. Before I start doing
a little bit of magic with the drums, I'm gonna show you something that has been sort of like Mom, I want to call it a secret. It's not a secret, but it's like a way to smoothly transition sounds that normally would
not smoothly transition because you're doing
a bunch of shopping. So let me go ahead
and play this. And I'm trying to get a smooth
as I can for right now. We're going to take
off some of the amount of echoes like that. All right, so let's play this with the rest of the sample. Also, we need to do a
little bit of panning. So let's go ahead and pan
this thing to the right. And then we're gonna
turn this down. Alright, and I'm
also starting to hear a little bit of a clip, the beginning of this
portion here of the sample. So I'm gonna go in here. I'm going to remember
this section right here at the fade-in. I'm going to make sure
that this fades in. Let's do about
seven milliseconds. And once again, I'm
looking at the numbers in the left-hand corner.
C uses eight. Now, lost money. That sounds smooth, but something that we can
do and we're going to open up splice for this one. Something that we
can do that can make our lives
surprisingly easy, is if we start to collect
up symbol transitions, this sort of distracts
the listener from paying too much close attention to how the sound is
being manipulated. I like to use these
all the time to make small transitions
within my arrangement and we're gonna do that here. So I'm gonna go here
to the drum section and I'm gonna look up trend. And if not, just go here, it should be one of these. Let's try this one. I wanted a little bit longer. I liked this running. Go ahead and take this here. The idea is to allow
that rise to occur before the drop and then
the symbol is going to end on where
the course starts. So the last few bars of the verse leading
into the chorus, this symbol transition is supposed to land right on there. Now what's important
about this is that we need to go over here to the snap feature and go to none because you want to
manually move these things over. This is something
you're gonna see with the manual chopping that I do
when I don't use FL slicer. Let's actually
play it right now. Let's see what this sounds like. Unmute this. See how that just everything
just feels like it's, it's kind of cohesively
coming together. So let's pull out all this stuff together and let's turn it down. When I actually assign
us towards OWN channel. Just call this symbol
for right now. See how it kind of
feels like this is a natural part of the music. That's the reason I use those. You can use any kind of
transition effect forward. That's just the
one that I prefer. Something that can
make this even more interesting is if we find in the ethics section
what's called a fall. This is something that I like to use like definitely if you want to be sampling
and I guess it really depends upon your style. But because of the
mechanics of sampling, sound effects are going to be something that you're going
to need to stack up on. I have all these followers. That one's kind of interesting. Doing this one like that I want. So we're gonna go ahead
and have that fall right there on the
beginning of the sample. Then take this and assign
it to its own channel. So this is the S FX. Right-click routes of
this track channel. It might even add one more. Like this sound for some reason, I've liked to sound
being hearing. They all left and we only
eat all their splicing, but we're gonna make sure
that we do turn it down. Accordingly. We're going
to basically run routes of that part of the mixer and
then we're going to turn it down manually here.
And these other settings. Now we'll even bring the
transition to basically transition the rough
chops into the verse. Again. We pretty much have
the beat arranged. I think if anything, I wanted to take
this right here, and I want to do
something special to this section right here, which is the intro. So I'm gonna consolidate
this down Control Alt C, which is what I
prefer to deal with, especially if you've got
amendment manipulating things in reverse
and things if we're going to do all that
with the arrangement, and if we're going
to add more effects, so now we're gonna use
this and we're gonna actually titled this intro. We're going to channel
route this boom. Now as I showed you before
with some of the effects, I now want to go back in here. And let's do the same
parametric equalizer TO thing that we did. Let's go to the steep eight. Boom, Let's move this
over here to the side. It's about 30. Then move this here. Go here to this section
and being manipulated. And then we're going to
create automation clip. Now I only want to do it in this section instead of having a goal throughout
the whole beats. So let's highlight where we
want the automation to occur. Go back to the mixer, back to the parametric equalizer til back to that parameter we're affecting and then
push, create automation glue. Now we have an automation clip just for this
section right here. So start low here and
then have a transition. Since we're already
doing this as well in terms of consolidate. And let's do this for the last
sample here in the verse. Be careful when
you're consolidating to make sure that you highlight, put your mouse around the right place and
tronic a solid date. So this is the right way
for Monica summer day. This main shop. Right. And we're going
to now take this. And I think we're
going to actually see what it sounds like. Two goes 12 semitones up and
then go lower on the page. Let's see what that
transition sounds like. Yeah, I don't really like that, but I now have the ultimate control over
manipulating a sound. And I think what I want
to do is routed here and put verse change
up. All right. This is kind of to
avoid having to do too much automation, right? We can do automation which
would definitely make it easier on this
sample channel. But when you consolidate, you can visually see
it enough to move all the sounds over our economy. You have it right here now where you can change the color of it. And I can just say, okay,
that's that particular section. So I'm gonna go ahead and
click on this and make it light green or something
NES completely opposite. Save it. Boom. Now I know that this
is a section here that has its own channel that's being manipulated in its own way. So this is verse change up. Now what I want to
do is let's do like one of the love
filters on this part. I'm going to loop it
around so we know what we're actually doing to it. Let's try the flange rolls like that. Let's do this. Now
that we have this, let's play everything
from SOP and with the switches up and see
what we are looking like. Register, it will just return. No need to repeat that over because we know
that the verse and chorus of sounding
good transition wise, arrangement wise. Now let's see what this last
portion is. Sound alike. Now, as I showed you before, something I like
to do for outros Is run that little plate
or a heavy reverb. This is all about what
you wanna do with your b. You want it to sound, just wanted to give
you a basic framework for sampling in FL Studio, which is the purpose
of this entire course. But let me go ahead and go
here to this last section. I'm gonna consolidate
it is we're going to make this its
own unique channel. Let's change the color
on this to like, like a yellow or some
or all of our gifts. It says, I think I have row
studios, colorblind, loci. Okay, cool. So this is gonna be our outros. We have an anthro,
we have an outro. Outro, co with this outro now, we should be able to run them little plate
over the top of this and is going to
sound larger than life. Just in this section. Nice, I like that. I think I'm also going to run the love filter that we had
here was just a flanger it, there it is right there, buddy. So let's take this, let's run that for the outro. A moss are going
to do a fade-out. Right-click here. Automate body when it goes straight
to the audio here. So I'm gonna go ahead
and just fade it out right here using the endpoint. Also think I want to
manipulate the pitch of it on this one because
I think it calls forward. This a little bit of
a little aggressive. So I think I'm gonna
go a flange IAS instead of the flanger. That's sunrise or like that. Ladies and gentlemen, we have
made our way through our first sampled beat all the
way up into the arrangement. Now we need to move our
way over to the mixing as well as testing out whether or not we
want a side chain. Side chain is really
a preference thing, but I at least want
to expose you to it because you don't have a sampling course
without talking about the power of side
chaining, shout-outs. My folks, stolen drums and
the side-chain society. But that is something
that is really, really, really enriched in the culture of sampling within
hip hop side chaining is just something that
adds a certain added sued and a certain air and
swing about sugar beets. So we're gonna
talk about that in the mixing stage and a reason
why we're talking about it. And I'm mixing modules because a lot of the things we
have to do are found here, right here on the
mixer channels. So that is it for
the arrangement. I mean, some other things
that you can possibly do. Let's look for safer
instance, a drum roll. Let's go to my kit
that I have for free, which is called Tom foolery. Let's turn it down. It's a little bit,
or at alike that Tom role is actually
assign it to its own channel. I'm Raul. Cool. Right-click. Route this track. Okay, so now we know everything
should be your range. If it's not, then we need
to put it somewhere. So this is drum loop.
This needs to go. We needed a sign that
So its own place. We got these two
drum loops here. Let's go ahead and put those
drum loops right here. Basically preparing ourselves
for the mixing stage, which is gonna be
super important. So let's actually make
sure that we macro, get rid of any
unused audio clips, as well as any
unused channels we don't need because we just
added some new sounds. Boom. Then also we're gonna take these channels and we're
going to route them here. So right here, channel routing, but we're going to
select this one route selected channels
starting from this track. Now they, everything
is separated here, but everything has a home, which means it is now
time for us to get to the mixing stage of
this particular beam.
12. How To Mix And Sidechain Your Samples: In Module nine, I'm
going to show you how I approach mixing
sampled beats now, something to keep in mind for the sample beats because you are mixing music that was
already mastered. Your approach to what is
going to have to be touch and feel no matter what
sample you using because, you know, you can try your best to clean up these samples. But when we're talking
about what the appeal are, the sort of nostalgia that is created by
the style of beats. A lot of that has to do with
the characteristics they hold with them when you
retrieve them from the vinyls, a lot of it has to do
with the dropouts, the pitch manipulation or warps the vinyl crackles
and a background. A lot of the errors is
what I'm basically saying is a part of the appeal
with sample beats. And a lot of that even occurs to not just hip
hop and boom bap, but even with lo-fi on notices that the ambient sounds
in the background or the deed zoning of the piano is part of embracing human errors. So it's a lot different in your approach in
terms of trying to go for the cleanest
mixed possible in this, it is very important to definitely pay
attention to the basics. We're still going to do some gang stage
and our levelling, but we're not trying to
go for the cleanest. We just want to make
sure we get rid of the problematic areas that don't set themselves up to be a representation of the emotion
we want from this beat. So that being said, let's listen to what
we have starting and probably one of the
loudest sections of this. And I think that's
here in the course because you got the base and the synthesized IR and
all that stuff. For starters, I want to make
sure that on the master, I do one of two
things and I actually go back and forth between these. And I liked to see
what they sound like. But now right now here on the
mixer, I have the limiter. I'm not gonna add so many
things to the actual master, but as it is, this is steel given
me the volume, it's making sure
that the low spots that are within the beat, our steel rising up with it. So it's kind of
keeping my beat in a really nice volume
as I'm working on it. If I'd take the limit or
off look at the difference. You notice it losing
a bit of its punch. Now this will my
limiter looks like, and I'll even leave a
preset of this limiter within the folders so that you can load it up
directly in your FL. Right now, my gain knob
is at 2.1 saturation. I just literally just turned it. So it was deactivated at his
waited until the turn rib. Boom. Now it's ready. Ceiling
is all the way up to the top and pretty much left
everything else the same. But that's pretty much how I am doing the master channel
now an alternative to this. And this is specifically if
you're just making a beat. I liked the way it sounds. A lot of producers have their approaches and
their opinions about it, but throwing this fruity
soft clipper over the top ensures that none of the sounds are
going to peek over. And when they do hit the roof, which is I guess 0
is a smooth sort of correction of that velocity
because it's a soft clippers. So instead of doing
a hard clipper or brick wall clipping, it does a soft clipping
over the top of it. I liked the way it sounds. Everybody's not
incentive to have the soft clip on a master. For the most part, you
would see it on the kick. But sometimes I liked the way it actually sounds right here. But for the most
part, the limiter is going to get the job done. Let's listen to both of them and see which one I want to go with. Like the fruity soft clip or more because it feels more
pleasing to the ears. But I feel like the
limiters given me a more accurate idea of problem spots
throughout the bead, I'm going to go with
the limiter and I'm going to correct things as such. Looking through here, I
can already see some of the problematic areas by what's popping here
in the orange. I'm not mixing at a
high volume right now. But I don't need to to see
what things are coming through a little bit too
strong on a mixed right now. One of those being
the drum loop. Now, something I could do is add the soft
clipper to this drum. So let's do that fruity
soft clipper just to ensure that the drums steel
hold their intensity, but they're not
clipping over the top. This is more than
likely going to be the loudest thing within
the mix as the drums. The second loudest thing
is probably going to end up being the space. Third is probably going to
be the actual sample itself. Now as I'm listening to
what I can already hear, some problematic
areas, especially as the base in a sample or
going against one another. And I think it's because
there's a lot of frequencies in the sample.
That knee, Correct? Actually, I know it's a lot of problematic areas and
have an EQ correction. So I'm going to open up
another FL parametric EQ. So I'm going to do
some subtractive EQN, which is basically going
to be rolling down here on these points here in
these different frequencies. Then boosting them
to see if I find problematic sounds
in that frequency. So let's play. Let's actually
mute the other stuff. I just want the sap right now. That's problematic. Let's go ahead and now duck that low whistle there. Get that down. It's interesting. The highest points. Let's see what that sounds
like with the base register. Now we're also going to do another Parametric Equalizer
on the base and get rid of the frequencies of
base doesn't need to exist in namely the high frequencies. Everything's live in
right here, right? Salt pulling up here. I'm going to turn us down just a little bit for right now. Since we're focused
here on the sample than the drum to think
it's a good time to at least expose you to what the
side chaining looks like. What a side chain him look like. Let's actually run the
drums over to channel once, like I said, is
the loudest sound. And that's gonna be
very important as we start to do a little
bit of routing. And we use the fruity limiter to do this side chaining.
What does side-chain? The beginning with side chaining
is when one sound plays, and whenever it plays
it punches a hole in the other one are carves a
whole and the other one. Now why would one sounding
to do that to the other? Well, you see side chaining, especially in our genre
of hip hop and trap. When a kick is over an eight await when a
producer wants to kick, to come in a little bit
more present and more loud. They'll basically have the kick side-chain
to the ATO weight. And whenever the
kick comes through, the Ada weight is
going to have a bit of a velocity decays edge that
makes room for this kick. Now, some people use
that a stylistic choice. Some people use that
as a mixing choice. It's all up to you
and your ears. This case, we're gonna
be using this drum loop. Basically carve out some room in a sample so that the
drums are hitting. And it just creates this interesting effect that
a lot of folks like him, a lot of folks use
within their beats. So first matter of
business to do this, we need to highlight the
drum loop and we need to right-click where we want the drum to punch a hole into. I'm saying this specifically so that you remember
when I'm saying we're gonna punch a hole here into
the sin, right-click it. And then we're going to
psi chain to this track. Now whenever this drum plays. Is going to do something's gonna punch a hole
into this sample. But in order to
trigger best punching, we're gonna need
to go over here. Fruity limiter, and we need to change around a few things. Okay? So for starters, we
need to go over here to the compression
side of things. And we needed to turn
the knee all the way up ratio all the way up. And then we're gonna
turn a threshold down. It's a pretty
aggressive threshold. We also need to go over here to this side chain input number, which now we know is one because our drums was sitting
here on channel one. And let's do a before and after. So right now everything
is pretty much as it is. I want you to see if you can notice whenever
that kit comes in, let's just focus on the
kick and snare if you can notice a ducking
occurring within a sample. Pretty cool right? Now, as you can see, this is something that's really, really aggressive in
terms of the ducking, what it comes down to style. This sounds so fire on
different styles of sampling. But you got to see
if it's something that meshes with your ears. I wanted to expose you
to it because it is something that could be
considered a mixing technique. But this really is another style of sampling had to
expose you to it. I don't know if I'm going
to keep that there. I liked the way it sounds, but I want to make
sure that I don't confuse the sonics
that you're hearing, especially if you've never
really mess with that before. It also makes the drums filled just that much more
powerful because obviously now they're
the thing sitting in the front of the mix of
the loudest thing already. But now what that sample no
longer competing with it now is just drums And
it's the base, right? Just turn the threshold
up a little bit. This turn this synth. I think I'm going to also put a soft Clipper on
this Tom as well. Since it's coming
in strong and I'm trying to do my best to stick to the stock plug-ins that are already there so
you can save a little money. But keep in mind there are some other plug-ins that I use, especially like for
the sample itself. So just to kind of give you a little
bit of exposure to it, something I like to use is
like the waves plugins in. One of the ones that I
use is our compressor. What Superdome bought our
compressor is that they have a preset on here that will allow me to basically tame the loud sounds and
a sample that go to loud after a
certain threshold, and then also bring up the
sounds that are too quiet. So it has like a very
consistent signal. So like imagine
when you're talking like you're talking like this and then maybe
your voice goes down. The compression is
going to ensure that everything stays
at the same level. But it's not a noticeable
thing that people who don't know anything about mixing will even understand. So now that we have
our compressor open, we're going to
basically Goldie here. So a preset that I use, It's a factory preset
and it's called bouncy. Now that we have our
compressor open, we're gonna basically
compress this sound. We want to look for where
the volume is average, hitting at where it's going
a little bit too high, like a little bit
in-between where it goes too high and
where it's averaging. And we don't want to be too aggressive
about the way that it's hitting the actual ratio. Basically the rate at which
the compression is hitting. And then now when we
basically turn this knob up, it's considered the makeup
gain that has going to make the volume all together
rise up as the same. So now that we've
kind of crushed, it's just a little bit interesting. Now something I like
to do here is probably add a little bit of width
to the original sample. So let's go ahead and
add a little bit of width that I just sounds it sounds like a
little bit more lighting. This is a free plugin, by the way, by poly verse. So you can go ahead
and just download this infected much from, I think it's the folks
that are behind it. Something else I'd like
to do for the base is use another plugin
called our base. Okay, now that we
have our base open, I want to go ahead
and run through a few of these presets and
see what feels the best in terms of giving the base a little bit
more weight in warmth. It doesn't need too
much help because that original contexts sound is already pretty
processing treated. But just to give it a
little bit of warmth and want to turn that
down just a little bit. Like what I have going on here. So we got the mix here
sounding pretty good, sounds good loud as well as low. Let's see what the rest
of the B sounds like. Okay, so we make our
lives a lot easier when we're not actually having
some mix individual drums. I want to show you what
that process looks like when I actually make
another beef from scratch. And I'm sure you went
a bonus material. That's pretty much the
mixing process as it is. So let's test out
the last part of this and makes sure everything
is still sounding good. Nice, nice, nice, nice. As you can see what
the mixing process, it's actually a lot
more error can be, I should say, a lot more
simplistic than when you're mixing individual
original elements, right? So you haven't like a
synthesized from ominous fear. You're having maybe a piano
from a contact library and you're putting all these
different drums you're getting from
different drum pegs. That's why the mixing
process can be a lot more tedious when doing what
the original production, dealing with
original production. But with this, it says
tedious as you want it to be. A lot of this has to do with
keeping human error intact. A lot of this has to do with listening and trusting your ear that this is the direction
that you're feeling emotionally you should go with. But the process is literally taking someone else's
Canvas and saying, Okay, I like so many
different elements of this. And imagine you could rip the colors off of a
painting and then repeat some images off and then create your own on
another canvas. This is part of the
art form that it is in your approach to it. There is no wrong approach. Body at least wanted to show you if you've never had
anybody else do this, which I at least wanted to show you what that looks
like my friends.
13. How To Create Your Own Vintage Samples: The easiest way to create a realistic sample anytime is by playing either the midi info
in via hardware instrument, midi controller through
virtual instruments. Thank goodness for the
plane going overhead, you probably hear that playing
a physical instrument or a virtual instrument
in will always give you a realistic
and organic sound. Now moving over to
keyboard and piano, specifically, having
at your disposal, either 6173 or 88 will always give you a fluid sound because when you switch octaves, you're not having a hit
buttons to change the actors. So you get a fluid motion, whether you're playing
it or sequencing. Sequencing also has a
style in sound to it. It doesn't sound like
someone playing. It sounds like the
computer playing it that has a style of its own. Let's talk about foot
pedals. For now. I just have one, and that's my sustained pedal. And that helps me with obviously keeping the lines sustained when my hands can't. And it actually has
a different sound than drawing your
notes in via midi. This one here will
sound different than something physically
held out here. That's because there are
different sounds that come in when you're actually
holding your pedal. If you play on a real piano, you'll actually
hear the hammers on the keys creating harmonics. Muffled sound a bit. As you pedal, there's so much at play when you play
all puns intended. Another thing about
creating realistic samples, treat it as instead of writing a sample or instead of
writing a sweet spot, a lot of music producers
will give you a section rather than give you
a full composition, producers will grab
the one sample. The more you give
producers to grab from, the more value you add in, the more realistic the sample is because it's
not just one part. So writing more sections
in your sample gives, gives a sample more movement
in turn makes it feel like something that was taken
off a vinyl record. And the more expression, the more realistic
your sample will be. Yes, there is a lot to
take in and a lot to consider when you're making a symbol doesn't have
to be that complicated. Know, you can just
throw sounds together. There's movement there and
there's things there though would take forever to automate, play, whatever you
can, give you a tip. Now this takes a little bit
of the human error out of it. Say you can't play
as well as I do, but you can play
your general idea. Remember what your, what
your tempo was minus 130. So I'm gonna bring it down here. You can't play it
in at that speed. Slow it down. Capture it. Record that. The like I said, the more movement you give. What started as
something simple. Look how fluid this idea became. What started out as a
simple one fingered melody. By slowing it down, I gave
my mind the availability to process and to think about what I want to
happen musically, Let's turn it back up to 130. It came more fluidly when I
slowed it down to play it. Now, like I said, it might
not sound as natural, but there's a lot of automation. You're not gonna have
to go and put in, find the sweet spot of playing
things at a slower pace. You can also go and overdub. It has a very nice
effect for strings. I'll show you that in a second. It's very clean. This
doesn't sound like me. It's still sounds human, which is very surprising to me. It still sounds human. It's just very clean. It's like if I had
15 more years of experience and
constant practice, this what I'd sound like, but a little grit and a little
dirt never hurts a sample. That's another part of
being, of sounding real. I will always encourage playing
for realism because that will always allow the
music to flow and develop. It's like water in a
river versus water in a pond or water and a little
puddle. It's stagnant. It's not going anywhere
versus water in a river which is constantly moving,
it's always refreshing. I know this went from
being how to create realistic samples to being more of tried to play
as much as you can, but playing as much
as you can will help you to create more
realistic samples. Let's switch to strings. Now that we're on
strings, we're at 130. Even if you've gotta go
one note at a time what I do. I started there. You'll make mistakes, but
the layers will come. That's a sound by the way, I can't get by doing chords. This is sounding more
like an orchestra. Doing this restraints actually adds a more realistic
string sounds because orchestras are made up
of different musicians playing at the same time
with different timing. Is this the same way
that we think about our drums having them
all on the grid. Nobody plays like that. Real musicians,
when we hit things, we're not always on
grid, especially meat, even that was not on grid. With strings. It's tedious. It is tedious, but my goodness,
does it help look, look, watch again. There's
another one. Let's go. We're getting a
whole orchestra now as you see me playing these in, this went from one melody to becoming something you'd
have to play in as cords or something you'd have to draw in,
in different ways. And this already has more
alive and more realism to it. So let's add another one. Let's add our base
section of the orchestra. So I was doing a minor. They're a little
bit of music theory helps go a long way to, boom, Let's talk about
shifting chords. Let's talk about going
from major. It's a minor. I'm gonna use chill bytes as
an example because I can't really think of anything off
the top of my head, right? We had a sample called storms
over the floating kingdom. It is in B-flat minor, but at 1 at the very end, I go like this. Shifting octaves
with my left hand. We had that shift
from B-flat minor. This whole thing was in
B-flat minor the whole time. And then it goes. I
even use an accidental, like a beat and actually play B-flat major and B-flat
minor at the same time. This sense of false triumph, shifting from major to minor to switch the
color of a chord. It doesn't get more real
than that, does it. Maybe you're going for a live musicians sound
adjusting your velocity, adjusting your notes, timing because nobody play like that. Versus it's cleaner. But there's not
as much character as a real person would have if you have tricks for
drawing things in and making things sound realistic
that way, use them. As well as putting your mindset
into that of a musician. I think I've covered
everything that I can. Oh, no, I haven't say
we're getting to the end of a piece and I'm happy to
say I've had this experience. You're getting to
the end of a piece. Your musical
statement is ending. Little outros like that
will go a long way. By the way, I was
meat it sounded like an ended abruptly because I
took my foot off the pedal. Little outros, if you can, just sounds like
musicians of jamming, sounds like you're
jabbing jamming. The more of myself
that I get to do this, the more instances of this, the more real it sounds
because it sounds like there's multiple
people playing it. Even though it was just me, you can find a way to incorporate
that into your samples. That's another way
to make things just sound that much
more real spacing. So say I've got my music is breathing. Then I'll go and say it again. Probably different octaves,
same, probably right here. More movements you have, the more space between, between the main
motif that you have. The first instrument
we had was our voice. We have to take
breaths in-between, between singing long phrases. After that little breath,
I'm gonna do it again. The closer you get to playing your musical data in the more realistic
things are gonna sound. You know what? Another thing, I found another
tip, your latency. Latency will mess you
up if you're like me and you play things in, look at this very
bottom left corner, you see where it tells me
I've got 26 milliseconds, 26 milliseconds of latency, and then there's
hardware latency. So if you are using hardware, you're gonna run into
whatever the hardware has got plus whatever your
plugins are giving you. So just get in there, have fun getting there
and break things, get in there and try to play. You saw some of the effects
of what can be done. When you take things
one note at a time.
14. How To Create Your Own Vintage Drum Breaks: This is going to
show you basically a walk-through of how to make
your own vintage drum brakes. Any event that you either want
to sail these drum brakes to other producers
or if you just want to create that
aesthetic for yourself, this is a very important
piece to my sampling process. Having drum brakes creates so many creative ideas for me or inspires a lot of creative ideas simply because once again,
we're borrowing pockets. Sometimes you could be on a good 11 day and create
these rhythms, right? Using one of your
either fpc stock, live drums or using
some of your one shots, or using a contact library like some of the ones that
I'm gonna show you right now. You create these drum loops, drum brakes add these
effects, process them. And then another day when you're uninspired with the drums, always have it's sitting there. So this is why it's
an important skill to learn along your
sampling process. It's also going to help you get a better ear for which
samples to goto, which samples are
actually ones that you can do something
with an FL Studio. There is a stock plugin
that gives you live drums, and I'll also allow you to
program your drums here. That's not something
that we're going to cover in here because like
I said, I don't use it, but I have tutorials on my YouTube channel that can
show you how to program that. I might even add that in
here as a bonus material, but FBC is pretty
dope because it allows you to basically take either drum loops
or you can save these presets that have
stylized live drums. Now when you're making
your own drum brakes, I have found in my
experience that you want to start with drums that are
as clean as possible. You can obviously break
these rules, but I want us, I usually start with drums
that are clean as possible. So it gives me more
headspace to add effects into process compressed and do whatever I plan on doing. But I like to start
with very clean drums and I don't like to
Cloud them up with too many sounds only because I'm going to end up glowing
this all together. And then when you give this to someone else or you
use it yourself, you're married to whatever that particular loop is doing
or that break is doing. So it's kind of like
a healthy balance. Sometimes it takes a
little bit of time, but here's an example of something that we're
getting ready to do. Now with these
particular drum brakes. They are a combination
of sounds from slap experts one
shots and they're also a little bit of the live drums that
you're going to see here. An EPC as well as concept which has their own libraries
that are well-worth. Their price tag in things
like studio drummer is also some more vintage ones that kind of do some of the
processing for you. For instance, like
seventies drummer, which is one of
my favorite ones, is go ahead and bring here and let that load up while
we're doing all this stuff, we're going to
actually start here. And as you can see, when we go down a keyboard, every instrument that is in here, and you
can replace those. Obviously, every instrument
has their own key assigned. So the first thing
I'm gonna do is assign these drums to
their own channel. Let's go ahead and
put them here. And then we're going to open
up Edison so that it records pretty much anything that
comes through to it. Have it on this option here where it says
record on input. So basically record on
input and then from there, or just basically going
to press record and that every time we put a sound
is getting recorded. You want to make
sure this is not too crazy volume because
we are going to be boosted a lot of these sounds
and soft clipping them. I'm gonna go back here and
actually turn this down. There we go. Also something to keep in mind is that
if you're going to play a loop and you find that you're going
to commit to that loop, makes sure that you complete
it by starting it over. What I mean is
basically just adding an extra kick after
that loop is completed. I'm going to show
you what I mean now. This extra kick is what's
going to complete it. So basically moving forward, whatever I choose to commit to, I got to add an
extra kick so that we can get a clean loop
on what we're doing. You don't have to
do it, but it makes your life a lot easier. Okay, Cool. So let's take
one of these at the end. We're going to actually start laying this out in song mall, but we're going to layer it up with different instruments. Just take this
same rules, apply. Open up your drums. Fine. Some clean beginning
and end points like this. Drag that out ear
to the song mode. Then let's mute this
year on the drums. Okay, sweet. So now
that we have that here, Let's go ahead and see
what the BPM of this is. Saying. 130, cool. Well let's go ahead and
trusted on this 130, but that doesn't make it
a full four-bar loop, which is what we play it. I could tell by us counting
the bars on this one, someone to actually send
it back here to 130. And we're gonna keep
on extending it out until it meets the
end of that bar. So right around there
should be the BPO. I start off with Edison because that's gonna give me
a natural swaying, says I'm not going
to be according to our grid, our metronome. I like to keep it that
way so that when I add high hats and things like
that on the next layer, it's following this
swing instead of a quantize straight
to the grid swing. So now that I have that, I can add some
hi-hats and things. Like I said, you want to keep it kind of simplistic because you don't want to
have to commit to too many sounds and what if
you don't like them later on? Let us see what that
sounds like. I'm gonna start manually moving
some of these over to left for like they're
in the right place. I want to vary it
up towards the end. Let's see what we
can do with that. All right. Now, right now it sounds pretty simplistic and steel to me,
I'll be honest with you, but that's the whole purpose is that we're just trying to get a clean signal so that we can start to add
character later on. But we got to get something
clean in the very beginning. Like the natural swings. Something else I'd like
to do sometimes is do a little bit of quantizing
and us more stout manner. What I mean is
that FL Studio has these quantizing presets that can add some interesting
rhythms here. When you click on Alt Q, that gives you the
quantizing settings in here, you're gonna be able to
click here on this menu, that folder and then see some different styles
of quantizing. Not gonna feel more
like a live drummer. I like to do loose feel, liked to do hip-hop
Westside in drummers swing, depending on what I'm affecting. Get this the high hats,
It's what I like to do. Let's actually play
it in preview, this. Like this. All right, now we're kind of
running out of options here. So you might want to start
adding either one shot or if you do have other
libraries are easy drummers. Another great program. This is where you
can start taking advantage of more of
these lives sounds. What does it add needs a
really minimal sounds because the processing is going to
bring the life out of this. Something else I like to do to kind of give it a
little bit more life is our take a one-shot
from one of my drum kits. Just to add a little bit
more life on top of it. So it's not to steal. We're not over
doing it right now, but we at least want to give
it a little bit more life, keep the volumes at
a reasonable level. So I'm just going to
basically follow the key. I'm gonna slice somebody's
off the grid a little bit. And then try a different key. Snap it back to the grid. Like the punch on his right now. It's a little clavicle.
It's obvious. Once again, go into
here and kind of manually shift stuff off. Little crash right here. Like this. Okay,
cool, let's do this. Let's leave that as is sliding off the
grid a little bit. Now that we have this, What we're gonna do now is take all these sounds,
consolidate them down. If I liked the mix already,
consolidate them down. My first test before
I start processing the actual vintage drum
brake is to make sure that it sounds good when I
change the mode to stretch. And I tried in
different pitches. Usually a great
drum break from me involves if I can
turn it down like at least $0.600 and I could
turn it up in a steel. Sounds good. It has
a lot of range and a lot of head space for me
to add other things to it. Like even before processing. Because you've got to
think those pitches represent different
styles of music. As people are speeding up the samples that
stretching them, they're toning them
down, toning them up. This is why you want to see
if you've got a range on it. I kind of like negative
$0.300 right now. Like that. So let's take this new
consolidated sound. And let's go here and
call this drum brake. And we're actually gonna fly this consolidated version here. First thing I'm
gonna do is open up an EQ parametric equalizer to, and I'm gonna see if there's
parts of this sample that I need to boost
up to give more life. I go narrow on these
parameters whenever I'm trying to pinpoint what
exactly is being affected. But I'm going to boost the
sounds up and leave it. I like to make sure that
the bands are wide. And just as a reminder, you can go into mouse scroll to basically widen or narrow it. That being said, let's
go ahead and boost some of these areas
that sound good. We've got a pretty
clean drum here, but you're seeing
are starting to spike up the more that we start adding boasts
here on the EQ bands. So what I like to do for some extra security
is either put the FL soft clipper or another plugin They're
like to use is smack. Smack et seq is a
transient shaper that basically steal allows
you to have the smack and the character of your drums or whatever
instrument you're using it on without compromising
too much of the sound. But it also does apply clipping and limiting depending on what parameter you choose. This is just for added security so that anything that we
add, and as you can see, an ethics chain or
I like to put this usually towards the
bottom of the chain. So anything we add
here in between, the drums we know are not
going to clip over the top because that is sort of the security blanket
for everything else. Now this is where we start to get into a little
bit of the fun. And this is where it
comes down to what you want to make this
sample sound like. Some people like this as is, I prefer to dirty it up. A plug-in from
Native Instruments I like to use to dirty it up. Is this plug-in right
here called bytes. It is going to add like some
16 8-bit features to it. And it is really going to
give it a very vintage field, like the word s sound in. So the next thing I want to
do is possibly at some RC 20, that's another
plugin that you can use is going to give you more of that vintage dirty drum
break from another error. Now, I have some presets
on here that I use, one of which I've
named dirty *** drums. That's kind of nice. Let's take some of the low man like that. So let's do this. Let's actually take
this control alt C of a drum brake
that we just did. Now something else
we can do to this to really bring it out even more. That vintage feel is something I just started recently
using an Edison, which is something I
might have previewed. So you want to earlier module. But if you go here to run
script and Edison ethics, you go to old school. You've got an old
school, it's gonna give it another vintage field. Let's put these side-by-side. Like the process in our economy, like the processing done with the FL Studio Edison preset. But it just goes to
show you that in order to get shore beats
to that level, to that vintage sound, There's so many ways
to go about it and you can use the stock
plug-ins to do that. But if you do have the luxury of buying plugins and being
able to add other textures. I mean, the possibilities
are really endless.
15. Sampling A Song From Scratch (Method 1): This is where I'm
going to show you the same things that I taught you throughout these
lessons in the same order. I just want to make
sure that I showed you in real-time
what it looks like. And I'm actually getting
in a groove and not having to stop and teach
every aspect of it. So with that said, follow along, I have a sample and
it's going to actually play as sort of a dual lesson. The dual lesson being how to sample samples that have
sort of a swing times. So you have your regular 44 time and then you also have a
swaying Thomas like to, like the jazz or bossa
nova type of odds. You find those sometimes
as some records. So I want to use that
for the first example. And then a second Mona's
video is going to be an Aaron Barbara sample that we're gonna do some
manual shopping on. So with that said, let's go ahead and grab
this Johnny old his band. Right-click and
open out an Epson. It. Now some of these
don't make sense in terms of the way we're
going to sample them. Because when it comes to
swaying time samples, something I like to do is take the chops in
multiples of one. And so, because
you've got that boom, boom, boom symptom because you don't have that
swing time and going. You kinda have to
get a little bit. You kinda have to finesse
the way that you'd shop. These are kind of chop them
in multiples of one or two. Maybe like kick snare. And that's the shots.
So I have two hits. Boom, boom, boom, boom, boom, boom, boom, boom, boom. It's like three
shots, boom, boom, boom, boom, boom, boom. They're not sake
those two charts. Because I'm hearing that
could be one shop, bone. It could be a second shop. Even at That's
another sample shop that I can add there as well. Don't have to get a
perfect loop on that one because we're gonna
end up shopping at any man or woman. No. Real good. A man or a woman, no real good man or woman. A woman, no real
good man or woman. No real good man or a woman. No real good man, woman, no real good man or woman, no real good man or woman. No real good man or a woman. A good man or woman, no real good man or woman. No real good man or woman. No real good man or woman. No real good man or woman. No real good man or woman. No real good man or woman. No real good man or woman. Real good man or woman, no. Real good man. A woman, no real
good man or woman. No real good man or a woman. No real good man or woman. No. Real good man or woman. No real good man or woman, no real good man or woman. There we go. Finally, sweet. Foundation. It can be like a Vox he had almost. Sweet. All right, let's
open up FL slicer. Also determine a BPM as well. So it's getting FL slicer
into the mix free slicer. Let's take off the auto dump. Of course, let's do the plates. And auto fit declared. We can keep those
on for right now. Sample wise, I'm here in sort of a trappy be for this one. I could just see this
being pretty dope. So let's go ahead and
right-click and do a tap in. Some don't want us. Sagacity a few different
directions with this one. Let's do, let's do 83 illness. Let's just try them. We're actually going to build
the drums up on this one. Let's pour some drums
from some kits. Actually openness. Halftime. Now, my speed it up from the 1.5 times. Speed at all. Hat times. This to scratch mode. Gonna be gonna go crazy on the same channel. Get FL slicer. So I'm gonna take this
first little part here. Feels like the transition, like going into something
that's going to be a layer over the top and a layer that's going
to be an ad lib. Let's get the first part
in here, breaking up. Same way I showed you before. First, let's name
this, let's call this. They only had to
change the color. Let's first name this. This is Lee sample, lead sample or main sample
wherever you want to do. Let's actually go here
and the parameters. Let's change the
slicing to the beat. And not all as accurate as I would
like them to be in terms of where
they're hitting it. Because like
something like this, I wouldn't want to right-click
and split that slice. Take the play to animate
or played on and off. I'm going to go right here
in the middle here and split this because I want this to
be, instead I've done it. I want this to be actually split that one till gonna
take this, remove this. Remove this because I want
this to be one piece. We're going to split this. Then remove this. This is all in one
slide. Split this. So this is own slice right here. Now that's if you're doing, usually have a dude this
much surgery which is samples unless it's the
established you're going for. But in this event, I want to make sure that we do this because we're going to have to chop all of his stuff up because of the
style of sample. Let's get that all the
hit in the right place. I think we're going to
have this be wondering. I'm gonna do that first. I liked the way that sounds, may even change the pitch. I think I might change the sample on that part right there. But for right now, I
like what he's a Sedna. It just so happened at the
BPM work for this one, right? Part of that could
be my experience in IT are part of that
could be just pure luck. Lucky is definitely a
component of what we're doing. Sometimes it is R. Let's try different pitches. Because I felt like
that middle law note. Gonna complete this. And we've called this long note. That note or is it this long? It might be down
when it might be that Britain has been Mrs. Dora. Never know. That's not it. That's not that's not a bad
little notes I have in there. Like putting a puzzle. I'm curious, so this
one is sampled, so Let's try that. I want us Cologne this one.
Let's do the same thing. Don't think about
the Cologne is that if you have not noticed by now, anytime you clone it takes on the features of the last one. So whatever notes
that you put it in, whatever timing you put it in, it's going to carry that
over to the next one. Most times that works
for all the samples. Sometimes when they're shorter, you may have to do
a little bit more doctoring of the timing, but the pitch stays the
same, which is important. Sorry, I need this shop
to happen right here. We're going to do another
1 fourth to beat. For whatever reason
I just downloaded, I guess, a new version of FLC. You're not seeing some
of the red slices. You shouldn't have
that happening, but as you can see,
it is still true. So don't be concerned if you actually want
to turn some of the We still toying around with
it to see what else we got. This chronic toyed
with this one before. I'll write that on. This one is interesting. This one is interesting
because it's not, the samples is not as long
as we'd like it to be. We have two choices. One, you could do that endless samples Dao that
I showed you where you repeat the notes
over and hit it in certain places where it's
not noticeable to the ear, or we could just
slow the sample. Now, let's try first the easiest one where I think
it's slow in a sample down. Actually, no, I
don't want to sound, I want to slow it down. I think the easiest
thing to do for this is going to be to take the sample and chop
it up a few times. I want to slow that down now because I kind of want
to hear what this sounds like. Slow it down. Remember we just
got to basically hit in the other direction. Which is I just really wanted to extend long enough so that
I can repeat it. The other kids in the end now, 16. Right now what I'm
noticing is that there's some rough spots
here in a sample. And we have to do
with the fade ends. Let's see. Alright, cool. So we have one continuous loop
That sounds good. Only thing that's kind of
stretching out to me right now. That's not only thing that's standing out
to me right now, that doesn't feel good as a fact that the sample is a little
bit harsh on the ears. Definitely passed the
musicianship tests. It pass the space tests, right? And then the
goosebumps I got from some of those horn and just
the texture of the sample. But the quality is not
in the best quality, but you're gonna find a lot of samples that are like this. This is why it's good
to train with these. Because it's gonna make you appreciate the other one's more. But then all seed is
going to become a better sample-based produce
a message with you. We gotta get rid of
the ugly frequencies first with some subtracted bq. Okay? Now we're controlling
his sample. We're getting a sound
on the way we want. So let's see what happens. We widen up a
little bit of time. Now what I want to do is layered some of the other
samples over the top of it. And that's going to involve some EQ or some
filtering and E queuing. We're gonna call this
the vocal sample. Because even though
we're gonna take this and run this
through a similar chain. So what I'm basically
going to take this, but share the EQ that's
over here right now. You could just copy it over. Save. It says preset. Saved that preset over to here
by dragging it over here. But I'm thinking that this is going to have its own
ethics chain on his side. And it's going to share
this general ethics, the general parametric
equalizer here. So we got our basically route this so that it's not showing
up to the master channel, but it's showing up here before it shows up to
the master channel. And why are we doing that? So that we can have any effects that we add here to
the main sample, to this vocal sample. Only thing that I
really need to make sure it gets changed
and have vocal sample is that there is a high pass filter routes at his track only. Now any sound that
comes out of this, which is the vocal sample, is going to first go
through its own effects. Love filter to a high
pass filter for this. And then it's also going to run through the same
effects that are getting rid of those other frequencies in May or may not be necessary. But I kind of feel like everything needs to be
treated very similarly. So let's see what
it sounds like. I need to make sure that I have a vocal sample ready to go. Let's try that one. Slowed down a whole lot. So at time is not perfect, but at least we
can get this down and then tweak around the
time parameters after. Let's try a little
bit too fast deal. Let's drag it up a
little bit more. Drug and back down
because you want to make sure that the snares
and everything are hitting with the words
because you want warming. Now. So let me see how I kind of dragged at
the end of that sample. Let's get a little bit speed. I'm actually going to drag it
off the grid a bit by using the shift is fine
time-shifting button here. That way he's not a
straight to the grid, but she's starting to see
its slot a little bit off. Now that we have that.
And this actually dues another vocal effect. Since we know that
this is already works. Mine I needed to
have it dismissed. We may not need to
have it this loaves. Let's actually reset it yesterday. Alright, so it helps to
beat box with this artist. Say the words out loud that
you're going to match. If you're going to the
style of sampling. That's why you hear me yeah. Actually talking with it. It's something I like to do sometimes is like
do a fake echo, right? So basically you repeat it whatever timing that you
want and then you through a slow decline on these
velocity. Notes down here. Now that we have this, let's start to actually find the key so that we
can add a baseline. So all the stuff that
we have going on here. So let's find FL keys. As I always tend to use someone who actually mute the drums because the drums carry their own notes,
believe it or not. It was like a I believe that's an a major. If I'm not confused, Let's actually pull
it up really quick. See what pops up. Let's see. Major, a major scale. Major scale. I'm gonna say piano. Yes, sir. Okay, I feel good. Exotic animal still got
them on music theory. That is the, a major scale
demands or it has golf. So we know that all the
notes that we're using, and it helps in Psalms
and keep repeating them. But just so you know what
you're working with. Let's get an eight
a way to here. So we know that that's
a major scale is gone. Let's take that. All right, let's go through
the process with that. We're going to let that ate away breed kick. All right, so we
got one transition. I kinda want to make
another sampled shop to complete this idea. Let's actually
clone this channel actually, no, we're not
gonna call him agenda. We're going to
actually separate it. For the sake of this lesson. I'm not gonna rename these because we know
what everything is. Going to lay this all out. You can see what it looks like. We can go a few
different directions. We can either mess around
with the other samples, which I kind of want to try. But let's see what
happens if we did that. Let's see if we take a, another pattern called
a sample course. These are gonna be
new shops that we're gonna do in the patterns. Something I like to
do, especially if. I'm going to a transition. He is, I like to loop around
the last few bars of where I'm transitioning
just to see that it is a smooth transition. So let's actually
start from here. I'll just do that just to
get the first note that I'm going to actually step
up with the next part. So we're gonna call this. This is the core sampling. I don't even know what the
course is gonna be quite yet. My VM right here says, Yes, we got to do some
treatment on this one. Like it, but let's also
test out the other one just in case the other sample
shop that we may. Using cases more potential here. Let's try that out. Now we can loop it
around because we know what sounds good
as a transition. So I'm gonna focus in on
his next section now. See if we can piece
together something special. That's kind of mask. Something else I do sometimes is outtake a sample
and echo it off. I definitely showed you
that in an earlier module, but I want to show you
this in real action of what it can do to make the same sample sound a little bit, a
little bit different. I think we need to pay off here. So maybe it's sitting
in this disorder. Nice little no, right there. I think there's something here. So what I'm basically listening for is what needs
to be repeated. Making a seamless transition. That transition into
the 13th challenge. Once again, it goes okay. That's the eight
away pattern now he calls. So that's why I play
the keys once again to get the clarity,
we'll go from there. There it is. Everything from the top now. All right, so now we're in a predicament
where we have to find a smooth transition
between its hill because right now they don't
really sound to smooth. It sounds like Sue
different movements of music and they
both sound good. But we want to make sure that
they've married together. Some things that I'll do to
kind of transition is in, is out, give a little bit of sample of what's to come
in the loop before. By basically doing like
an echo from bottom. Basically an echo
that builds up and climax right into
the next transition. So what do I mean? Let's take this sample
shot that we have here. At least this transition, right? We can take this
note or we can take, let's take this,
let's just take this, let's take these notes right
here. We're working with. Let's actually make
our lives easy. Let's go ahead and
split this by channel. Cool. Now we know that we only have these
elements here to work with. So I can already hear it. So we want to do is I want
to add another pattern. And I'm gonna copy over the
pattern from the course. That's the pattern. And we're going to
customize this so we can feel that a transition is
getting ready to happen. Then we're gonna bring in reverse symbol to really
drive home this transition. See how that very
like you listen to what you can tell
something's coming up, but you just don't know, but it feels like the transition
makes complete sense. Unlike the last
sentence I just said, you hear it, listens. Goals. Sometimes taken away as more, sometimes taken away
will give you more. Let's go to splice now, because I want a symbol effect to transition this part
into the other part. So look it up. Kind of like this one. This one, just like this. And right now, once again, we want to basically put
this on the none snap. Makes sure that the climax
hits right where the loop starts to change and that
the rest hits where the, the Ada weights are coming
in for the next session. Here we go. Turn it down. We did a same thing
that we did for that other transition
here to this pattern. Let's go ahead and clone
this. Put it here. And we can even do the same
exact pattern if we want to. And which one is
his lead sample? Let's take lead sample
into the same thing. So this one is a new one. I'm going to copy this, delete and then go over
here to lead sample. That's one way to do it. Another crazy kind
of way to do it is to take this sample. Let's consolidate it down. Design we are already
familiar with Edison's, so you should be
comfortable doing this. But we consolidate it down and we actually don't want to mute the
original source. So let's unmute that. All we want to do for here is literally take this first
section of this sample. And what we wanna
do is go to Edison. And I actually want to get rid of all the
rest of this stuff. We get rid of this two. I
just want the first note. Next, what we're gonna
do is we're going to actually tap in
here to the reverb. Make sure you add that sale. Turned to witness up a
little bit, little bit more. Except now I want
you to go to Edit, Highlight, edit,
and then excuse me, tools and then reverse. Now take this sample and
drag it back in here. And basically we're going
to use this almost alike, how we use the reverse symbol. I'm going to get rid of that. And we're gonna
transition it here. The whole point of
consolidating his down was that we had an audio
form to work with. Now let's see what
this sounds like. Wrong place. There it goes. So we're gonna take that
to where it feels like the note is getting
reversed into the note. Look for single kind of accentuating. Right there. The more I start to
mess around with this, the more I kinda want to reverse everything in terms of
the order of the song. So I think that the
part of fall was the course is going to
end up being the verse. That's fine. It happens. We need to do now is
do a little bit of arrangement so that we can
make that makes sense. First thing I think
we need to do is let the sample breathe. I think we should let it
breathe for eight bars. Sam hypotonic had asked the course for sure. Okay. So we're going to simulate this a few bars
over some businesses. That's going to be four bars
in another one who was going to be the eight bars? Let's just do this for the
sake of arrangement right now. I liked the way that sounds. You've got the drums, you got this transition here. All right, cool. Let's go ahead and do
that. Let's bring this in. I think for this one,
we're going to let this be the transition for the
last part of this. And then it's gonna go into
the next portion of his beat, which is nice. We can look at loop that around. And actually I think we can add two more bars. Sorry about that. Not going for perfection, I'm going for more sledges. You can see what this process looks like to complete the beat. Alright, so go over here and I think we're
going to open this up for the verse some more. Their goals. So we got this. Now we're gonna go ahead
and assign everything to a channel on the mixer, do a little light mix on this. And I believe we have
everything we need from here. So let's go ahead and purge all the audio we're
not currently using. Let's make sure
everything has a home. This is for the eight awaits. Let's go here, here. And let's go get the kick, kick us out already at one, but I at least want
to see it here. Silver route and that there. And you've got the clap here. So to clap and the snare can actually go on the
same channel for me. Boehm and then the high hats, which are the loops or the
audio loops can actually go. Here. This is the transition, so we're gonna call this SF6. Microphone off the way. You can keep this out. I'm basically just doing
my microphone, right? Okay, cool. Okay, So the famous starting
to bug me a little bit is the fact that this
sample right now, the vocal samples a little
bit rough around the edges. So I did do some basically I need to do some subtractive EQN on his vocal because it's coming
out a little bit hard. Let's vocally. So let's actually looped around certain section. Whereas it Cool. We got some good
things going on here. Let me go ahead and do
a little side chain from the kick to the sample. To sample, open up the limiter. I'm going to use my
preset that I had already for the side-chain. Hi, there it is.
16. Sampling A Song From Scratch (Method 2): This one, I'm gonna show
you some manual chopping, this time using a
more unorthodox type of sample from Aaron Barbara. Unorthodox because it doesn't
necessarily have any drums. And so we're gonna have
to really rely upon our ability to pick up on where the sample begins and ends the beginning points
and the endpoints that we discussed earlier, we've got to really pay attention to how
we're doing this. And this is where
having a drum brake as a foundation is going
to really help us. The sample we're using
is actually included in your sample folder and bonus folder of sounds
that we provided you. So as I go along, you can actually mess around with it the
same way that I am. This is in 120 beats per minute. And I actually like
that beats per minute as a place to
kind of make beats. I loved the fact
that when you do have time beats in this and
when I say half time on, basically meaning instead of, instead of making a beat, that sounds like techno, is boom, boom, boom, boom, boom, boom. Like that. Because there's a certain weird swinging bounce
twilight zone area in this 120 area that creates the most
bounces beats for me. But that being said, Knowing that Aaron
Barbara play this sample according that beats per minute, this is going to make
our jobs so much easier. So before we put a drum down, I want to see what parts of this sample
do I like the most? So let's go ahead and
shop do this manually. We're gonna be using two tools, primarily this slice
tool right here, and then also this pencil tool whenever we need it. But
let's go through it. Of course I'm holding down Shift and I'm holding
down the mouse on this slicing tool so that I could make my slices nice. Upper sure, I'll keep
that as an outro. I liked the way he
does his altro. So for right now, I need to focus in on
what is going to be the primary focus of this. What's part of this sample? I liked this being a burst, so I'm gonna pull
this down here. Like as being a chorus. Was pulled it down here. Also Mike was being a part of, and maybe this is part of
a person right here and just pull this down here. I'm cool mornings. Lot of special parts and a
lot of things you can do. So let's loop
around some things. Let's focus in on just these
four bars for right now. Let's look for per
minute that fits the one-to-one or something close. It's actually get this beats per minute where it needs to be. Let's stretch it down. I think we're going
to end up right here. Let's see. I want that smear to fall
right on top of the metric. It's still a manual. Now, this is a very
lazy approach. So sampling in the context
of what we're doing here. But it's definitely a good vibe now we need to actually
do some shopping in here. It's a create our own production over this amazing sample. Part of that is
going to be figuring out what Increments do we
want to chop this up in? I'm thinking for something that sounds so pretty as it is. I don't want to go to chop crazy on it, right? I'm listening. So what and I'm like maybe we do a chop of one.
Something like this. Like this stopping right here. So I'm thinking we do some
kind of a repeat mode. I'm changing here the D
clicking mode so that it changes the way that the
sample fades in and fades out. And it's gonna make a
lot more sense when you hear it back and forth. Take it off the stretch mode. All right, we're just chopping this and trying to
give it a whole, another flavor to it. Barely tell his chops. What I'm gonna do is
highlight both of these. And then pull at the
endpoints on both of these. The same thing as student a double up right here. Now that we have
that, let's repeat the same ideas I'm hearing. And then it comes
back on a snare. Do the same thing. But now the beautiful thing about us chopping in this
way is that whenever we change the women to
change the mode, first of all, but whenever
we change the pitch of this sample is going to change all the samples
at the same time. You know how NFL Slicer, we didn't have
really the option of changing all the slices
at the same time. Both of these have
their pros and cons, but I'm basically saying
someone this manual chopping, a lot different because you're able to change
everything at the same time. So let's actually go
down 12 semitones. Sounds like that. Kind of takes a little bit
of the impact away from the sample though,
of the sample chops. Rocking with us right now, changed his sins and
see if that dose for those of you who
asked and you don't have to change the pitch. It's just something
that's a preference for sample-based produces
would like to change it just to give it
its own unique spin. Folks who have heard
this sample of this song would feel like, okay, that's kind
of predictable. See what you did with that. But depending on your ears and depending on what you like, don't let the peers
ways of producer hoods stop you from just let
in a sample breathe. I kinda like it in its original pitch
because other things that we can do to really bring
out that other elements. Now that we have that sharp, Let's go ahead and
do some other stuff that we didn't do before. Like for instance, I'm going
to insert and I'm going to pull out a splice loop vocal. When I go down here and I'm
gonna look for a vocal. Samples of a minor. Look at around
kind of like that. The scratch this out. I want to see what this sounds
like. Him half the time. We just manually
chopping these things. Another dope thing about
doing manual chopping in this way is that you
can make it unique. And I can actually affect these samples in different ways so that they're
all not affect it. When I shorten the
stretch on one. When I speed one up, All
of them are not sped up. All right. So now
that I have these all kind of in their own spots, I'm going to put these
all on the same channel. And then I'm gonna
consolidate them down because I want to put
the same effects on all of them since
we did separate some of them from the bunch, it's gonna be important for
me to make sure that they all are cohesive in their
approach to the mix. So let's go ahead and
do some cuts on it. This is nice. Okay, cool. So let's take this consolidated down. Now I want to test out in different pitches since it's
gonna be in the same key. Because I have it
in stretch mode, because I'm going to go ahead and use the
consolidated version. Let's see what it sounds
like in a high pitch. Like it. Okay, so. We're gonna keep it
original and we're going to actually take this box. We're going to now put it because all that
immersion here, add a delay to it. Just put a baseline down. It. Bom, bom. Notice it's a minor
which is all liking. Bom, bom, bom. All right. Laid out ideas down
while it's still fresh. I think that sounds good. But I think that it's going to be I think it's
two loops in one, but they're all
smashed together. What I mean by that is this. I think that this is going to be a great addition to the
second part of his loping. But I think we should
keep the first part of this loop as simple as possible so that we're pretty
much walking the baseline, not doing too much. So I'm gonna take out this
first node, the second now, I'm gonna see what it
sounds like to just have these extended, these
notes, right ear. Actually latest out,
latest sample out. We're gonna repeat this
vocal 2times. Just mute. These are solo, these wrong one that makes extend this out and that was my mistake. Right? Let's just change
the face sound. I think we're good
to go on his face. Slide it off at a
grid a low bit. Somehow we got a natural
rhythm that is being Play. Let's hear it now, all
with the drums and everything else like that. Now, the original sample
has so much going on. We don't really need to
add a whole lot of things, but I think will be
interesting to add some nice little bright
instruments here and there. So I'm going to go to another
VST that I have in here and let's see what we have
because you don't need much for something like this. I think we want to
open up contact. I think I might want to go
to some guitar strum minds. You can use whatever
your heart desires, but that's what I'm
hearing right now. So let's try this evolution, strawberries, what
I was looking for. Let's try a preset here. We're going to do lava lamp, I think are becoming
come funky kind of fork. Alright, so let's go ahead
and mess around with. Effective in taxes. That is the power of
knowing your scales. It makes life so much easier. So let's actually
play this sample. It's freestyle over this one. Good. It, it feels like it fits coal. Like it's supposed to go
with the original sound. Raul citizen, because
they're going to both use same parameters. It wrong. Salt liberal on this morning. Add a little effect to the guitar to space
it out some more. I'm gonna do in the
smile on this one, this one my favorite plug-ins. Alright, so I'm separating
the sounds right now because we're going to get sued the arrangement of things. We need to transition this other part of the
sample, which is another key. We actually saw it right here. Let's go ahead and separate this because it's
gonna be it's own. Whenever you are dealing
with this many shops, you're gonna want to
get into grouping. Now basically grouping
is going to, as it says, group all these sounds
together so that when you move one, all
of them go with it. What's dope about doing
chops this way as well is that we can
also extend this out. And it's gonna be music
that's already on beat. But it's going to change
up, check it out. What I wanted to do is
kind of lead the base into this next key change. So I'm gonna make this unique. Instead of going down,
it's gonna go up. Make this one unique TO, because we want to
change the base again. This one, I think we're going to extend out a little bit more. There you go. What's the ISA is a key change, which means a scale is going to change slightly through here. But you can kind of
kinda guesstimate where everything is gonna fall. That by the time you figure
out the first scale. What are they looking
at his truck? Honest. Test that out. I want to stop guesstimate and they
just test it out. Tried to different hospitals. Hello, in Arles, copy it over and
let's drop it down. Markers. You have had last semester. No right ear. I think
I want to bring it back down to C sharp. Love it, or it has got to do it. Getting some mistakes
in there, but I'll try. Alike. It makes that transition
a lot smoother. Now, using that as part of this. Let's go. Alright, so fx is final color. Really bring this home. Alright, so let's make
some space for an intro. We're pretty much arranged
all upon this already. It's not a full beat,
but it's enough to get an idea of the things
that we would probably repeat for a second beat or
second verse and whatnot. So I kind of feel like take this
sample and let's extend this out and let it
naturally go into here. This baseline habit play towards the end
of the first low. The guitars for the
second part of the brief. And I'm like getting some
from rolls in here as well. Just so people know where the actual drums are
gonna drop right here. Stretch it out. I liked the season mortal. Let's try this way. Okay. Mixing a bone but a bang. Cool. We've got to
start mixing this. So everything has its
rightful position. Not too many channels
on this one. So let's go ahead
and just put this in its rightful place. I'm going to categorize
this as a sound effect, even though it's the
reverse symbol and whatnot, that's a nine. This is also going to be in. I think I'm going to
actually bring that in for the intro as well. Another plugin I
didn't really talk about because I usually
use it for vocals, but I like this Reggae influence
dub station plugging in. I use this a lot when it
comes to wanting to get a different type
of bounce in Echo and reverb and delay and
all that good stuff on the guitar and vocals
or wherever I'm working on. Let's see. Wrong channel and his baseline just noticed that right now. Let's go to the channel. Also something likes to do
with the Tom roles is hit this faith stereotypical left
and right really easily. Lipid. Highlight all of these. Sometimes you got
to make sure you go back for some quality control. Make sure you don't hear a clip. When all the other
sounds that together, sometimes you only ear the
quality of other sounds. Ladies and gentlemen,
that concludes this course on sampling, this masterclass in FL sampling, at least when it comes
to approaching samples. The way that I do, I greatly
appreciate your patience. I really appreciate you sitting through
all these modules. If you have any other
specific questions, make sure you e-mail me yet
Curtis king, TV at gmail.com. If it is something that I can answer with an
e-mail, I'll do that. But if not, I would love to make more modules and
more bonus material. That's going to help
you along your way.
17. Conclusion: I just want to say thank
you once again for being patient and go
into the process. I hope that you learned exactly what you
came here to learn. Feel free to email me at
Curtis king TV at gmail.com. So then that way I can add
bonus pieces to this course. Any event I didn't cover the particular subject
that you're thinking, um, or the one that you
will looking forward, there's no wrong
way to do sampling. I highly suggest that you
continue your education on and find other sample-based produces watch their process to this day, I'm still looking at other
sample-based produces and finding new ways to
advance this art form from ourself in sample-based production is something that I love is something that's steel holds very dear to my heart. But also, I just
want to say thank you once again and
congratulations.
 Curtiss King, DIY Musician, Author, & YouTuber