Transcripts
1. Welcome to Class Four: Welcome to class for in the
eye color armor theories. If you're new to
this amazing app, I encourage you to
take class one, which explains the
basic instructions. This app is an
ideal accompaniment to procreate and other digital artists and only costs around
sixth US dollars once only. In this class, we'll begin
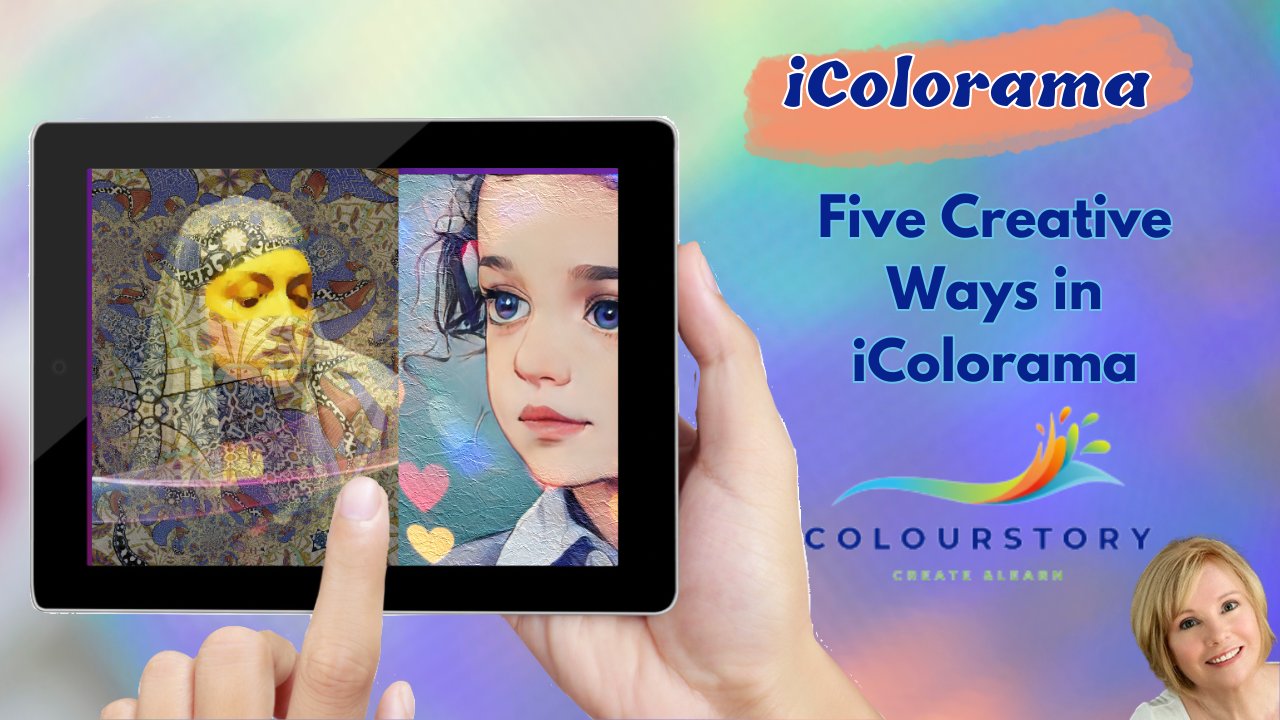
with the masked woman, which features the
mosaic effect. Next, we'll create the dragon using the edge flow technique. The concept cave is ideal for a game artists and utilizes
the coherence effect. This delicate Japanese woman showcases the watercolor
and sketch technique. And finally, the
romantic lady with fan is achieved with
a painterly effect. I think you'll enjoy
creating these pieces of art with mine or
your own images. Please tap the Follow button top-left so I can let you
know a future courses. I would appreciate a
review and would love to see your creations uploaded
to class projects. So without further ado, let's start less than one.
2. Lesson One The Masked Woman : Welcome to Lesson one. In this lesson, we will blend the flower image
with a mass woman. The techniques used are blend, coherence, charm, a mosaic. So let's begin. Open up Eichler on
bringing the flower image, the library, go into
form and mirror. So we've flipped the image
over to the left-hand side. So saved the adjustment. Then we're going to go into
style and look for flow. Go down to the window in the
bottom right-hand corner. And select preset for
safety adjustment. We're going to go into
adjust and tone lab. Look at the presets. I think we're going
to choose number two. So save that adjustment. Now we want to save the
flower to our camera roll. If I go to the top
right-hand corner and save to camera roll, because we're going to
bring this image in later. Now go to the top
left hand corner and import image from the library. Going to import the masks woman. Now we'll go to style and
coherence window at the bottom. And we're going to
choose number two. We're going to save
that adjustment. Now we're going to go into turn. Look along the second
menu to find charm. Tap the window in the
bottom right-hand corner. And you can try different ones. But for this image, I chose number for, preset for. So I'm going to save
that adjustment. Now we're going to go
into effects and blend. This is where we bring
in the flower image, going to tap the picture
icon in the bottom right. And we're going to bring in
the flipped flower image. Now we're going to
turn down the feature to about 50 per cent. Tap the circle mask on
the left-hand side. In the new menu that comes up, tap the plus sign. And then with your finger, moves the mask over the
face, expand it slightly. And we're just going to
raise the blur radius. So it's a little bit softer. Save to adjustments. Then we're going
to go into style. And in the second
menu, find mosaic. Tap the window in the
bottom right-hand corner. You can see the different mosaic looks that you can choose from. For this one, I've
chosen preset eight. I think that looks quite nice. Now we're going to press
the circle mask again on the left-hand side. Press Plus. I'm going to move this circle over the face again and
increase the blur radius. Saved two adjustments. Now as usual, we'll put a texture on. So go to texture
and go to paper. The window in the bottom
right-hand corner. Look at the different textures. For this one I think
will choose Preset five. Going to reduce
the size a little, put the intensity up a
little, saved to adjustments. Now let's just
review the history. Previously we bought
in the flower image, flipped it, adjusted it, and save to camera roll. So in this part, we bought in the picture
of the mass woman. Then we use coherence. And we change the
color with charm. We bought in the flower image. And then we put the
mosaic effect on. And lastly, the texture effects. That's our whole picture done. So go to the top
right-hand corner and save to camera roll. I think you'll agree that's
quite a pleasing effect. So now we'll go
on to lesson two.
3. Lesson Two The Dragon: Welcome to lesson two. In this lesson, we are going to blend three images together. The dragon, the lantern,
and the temple. The techniques used
are at flow and blend, and then finishing off
with a sparkly texture. So let's get started. Open up Eichler armor. Tap the picture icon and
import the dragon picture. Now we're going to go to Style. And at flow. Press the preset window
in the bottom right. And we're going to
leave it on number one. On the bottom menu, we're going to change the
Sigma and the Sigma p. Further going to change the
sigma all to around about 2.5 and the Sigma P to about 12. Now we're going to save
that to adjustments. Now we're going to go
into effects and blend. Tap the picture in
the bottom right, and import the lantern. Now we're going to reduce
the feature quite a lot. And I think we'll move the London picture up
to the right-hand side. And we're going to
reduce the opacity. Now we're going to go to the brush mask and
choose a soft brush. We're just going to go
around the sharp edges and remove the London picture
that covers the dragon. Just got a hint of the lanterns, they're going to
save the adjustment. Now we're going to go back
into effects and blend again. Now we're going to go
into the picture icon on the bottom right
and tap the temple. Now we're going to use
our fingers to reduce the size and put the temple
down in the left-hand corner. Going to reduce the opacity. And then we're going to
choose the brush mask again. She's the soft airbrush. And then we're just
going to lightly go around the edges of
the temporal picture. So it blends in, I think, will reduce the
opacity a little bit more. Just want it to be a
hint in the background. Save the adjustment. Now we're going to
go into texture and all the way along
until we see sparkles. Tap the window in the
bottom right-hand corner, the presets choose number 11. Now we're going to rotate. We have the proper orientation. Now we're going to spread the
sparkles with our fingers. That's looking quite good. I think we'll use
the brush mask. Just a little over the dragon. That's how pitcher finished. You've got a hint of the
Chinese London and a hint as the Chinese temple that makes
a blend of three images. So all done. Save to camera roll. Okay, let's review our work. Fresh. The history icon on
the top left-hand corner. Number one, we bought
in our dragon image. Then we change the look of
the dragon image with upflow. Then we went into blend
and added in the lanterns. And then we went into blend again an added in
the Chinese temple. And finally, we put a
sparkle effect on there. So that's the picture
all finished. I will move on to lesson three.
4. Lesson Three The Concept Cave: Welcome to lesson three. In this lesson, we will
create a concept environment. The techniques include
blending three objects, de-noise, the grain,
coherence and tone. This process could be useful for fantasy character artist who needs a quick
concept background. So let's begin. Open up Eichler armor. We're going to do
this concept cave in three different pictures. So first of all, we'll tap the picture
icon, import the dragon. Now we're going to go
to adjust and turn lab. Tap the window in the
bottom right-hand corner and choose number 13. And save two adjustments. Next, we're going to go
into effects and the noise. And we're going to
choose the grain. That gives us a
much softer effect. Save that to adjustments. And we're going to go
into style and coherence. The window at the bottom. And we're going to choose
number to save to adjustments. Then we're going to go into tone unmuted window
at the bottom, we're going to
choose number one. Then we're going to
change the Gamma to about 30% and save
the adjustment. Now that's all the changes we're going to make with the dragon. So we're going to save
to the camera roll. But this time we must
save it as a PNG. So we have no background
on the picture. Next we're going to
work on the eyes. So tap the picture icon
and import the eye image. Now we're going to go to adjust equal to the window in the
bottom right-hand corner. And choose number six. So that brightens the
eye up quite a bit. And we're going to save
that to adjustments. Next, we're going to go into
style and painterly tap the window at the bottom
right-hand corner and go right the way down to the end of that menu and choose painter HQ. And that's the adjustments
made to the eye. So we're going to save this
as a PNG to our camera roll. Now we're going to go to the Window icon on the top
left and import the cave. Now we're going to
make some adjustments to the cave picture. So go to adjust and tone
lab, tap the window. And we're going to
find number 16. Share that brightens up
the picture quiet a bit. Save two adjustments. Now we're going to go
to style and coherence. Tap the window in the bottom
right and choose number to save two adjustments. Next, we're going to go
into effects and blend. And this is where we bring
in the dragon and the I. To start with, we'll
bring in the eye. So tap the picture
icon on the bottom right and choose the eye that we've made the
adjustments too. Use your fingers to reduce the size and place it
around about there. Now we're going to go
into the brush mask. Going to choose a brush. The basic number one. I make the brush
size quite small. Just going to gradually
fit that into the window. Make the breast as
small as you can. And then we're going to
just uncover the window. So it looks as if the eye
is behind the window. If you go over the eye in
places that you don't want, you can always bring the
eye picture back by tapping this icon on the
brush mask menu. It will restore the places
that you've gone over. Back to the brush. It's a little bit
fiddly this part. But you can keep
changing between the, the brush and the
restore as often as you like until you get
it about right? I think that's about it. If you want, you can tap the zoom and make the eye
bigger. Tap it again. And just tidy up. Tap off the brush mask. Tap the zoom. Moves the picture back down. Tap the Zoom. Are we going to change the
sliders at the bottom? We're going to put
the feature on 90 and the opacity down to 70. I think we still need a little
more masking on the eye. So I'm going to go back into the brush mask and just tidy
It's a little bit more. Now we're going to save
that to adjustments. Now we're going to
bring in the dragon. So go to effects
and blend again. Tap the picture icon
in the bottom right. We're going to
bring in the dragon that we previously saved. Use your fingers to
move the dragon. Make sure you've
brushed Mask is off. We'll put the dragon, the
bat there so it looks as if the eye is looking up
towards the dragon. Now we're going to reduce
the feature because it's a little bit Bryce to 60. That looks much better than we going to save the adjustment. Have a little look
at the history. We bought in the cave picture. We changed the tone. Use coherence,
bought in the eye. And finally finished
with the dragon. So that's our picture finished. We're going to save it as a
J peg to our camera roll. Now this is great
for concept artists, especially if you do fantasy figures and you just
want a quick background. I think this will be an
ideal technique to use. So now we'll move
on to lesson four.
5. Lesson Four Japanese Woman: Welcome to lesson four. In this lesson, we will
blend three images together and the techniques used will be watercolor sketch. Then to finish off, we'll put a bokeh effect on the picture or the
pleasing texture. So here we go. Open up eye color on there. Go to the picture icon on the top left hand corner and import the image as
the Japanese lady. Now we're going to go into
style and find edges. Go to the window in the
bottom right-hand corner. And from that menu,
choose number eight. Now we're going to use
this picture later. So we were not going to
save two adjustments. We're going to save directly
to our camera roll. Now we're going to go
to the picture icon again and bringing the
image of the lady. Going to go to Style water. The window in the bottom right. I'm going to go right
the way down to the bottom and choose 16. This gives us a really
pleasing watercolor effect. Now we're going to
reduce the opacity too. At this time we will
say as an adjustment. Now go to effects and blend. The picture icon on the
bottom right. Tap that. And we're going to bring in the sketch that we
previously saved. Now, going to turn the feature down to twenty-five percent, the opacity down to 90. And that gives us a
nice sketch effects around the Japanese lady. Going to save to adjustments. Then we're going to
go back into blend. The picture icon on
the bottom right. And we're going to
import cherry blossom. Now with the fingers,
reduce the size and position this
around about there. We're going to turn
the feature down to 60 and the opacity to 75. Now tap the brush
mask on the left. Tap the brush and
choose the basic one. She's the first
brush at the top. Reduce the brush
size quite a lot. And then gently mask
around the blossom. Removes the hard edges. Just like that. Save two adjustments. Now we have to save this
also to the camera roll. Go to the picture icon in the top left hand corner and import that the image
that you've just saved. Now we're going to go into
effect some blend again. The picture icon bottom right. We're going to bring
in the picture of the Japanese lady's head. Usual fingers to reduce the
size and position the head. I think that's about right. Turn the feature down to 80. The opacity to 80. Tap the brush mask on the left and check you're
still on that basic brush. Reduce the brush size and
gently mascots the parts of the picture that we don't want
to get closer in the Zoom. And there's a picture of an ad. So we've got a clearer
view of the lady's head. Tap the Zoom again to set the possession and gently
go around the image. Removing all the unwanted
parts of the picture. Tap the brush mask
again to tap it off. Tap soon to put it back into position and save
the adjustment. Now we're going to go
into texture and Bokeh. Rotate the bokeh around so
it's the right orientation. And spread it to the
edge of the picture. Tap the window in
the bottom rise, and look at all the
different brokers. But we're going to
choose Preset ten. Now we're going to reduce
the opacity to 50 per cent. Now using the brush
mask sets again on number one, small brush size, I'm going to just
gently remove the bokeh from the figures there. That's about it. So we're
going to save two adjustments. Now we're going to go
into tone. And Postel. Click the window in
the bottom right, and choose preset to. That gives us a nice color. Now we're going to
save that picture directly to the camera roll. Go to the top
left-hand picture icon and import the image
that you've just saved. Now to finish off,
we're going to pause a nice texture on the picture. So go to texture and paper. Go down to the window
and choose Preset five or whichever one you like That looks
pleasing to you. Reduce the size.
Just a little bit. There. That's all finished
our Japanese scene. So go to the top
right-hand corner and save your finished project. I hope you enjoyed this
lesson and now we'll move on to the final lesson.
Number five.
6. Lesson Five Romantic Lady with Fan: Welcome to lesson five. This romantic lady is made up of three blended images
and uses watercolor, crop, and painterly techniques. These images are taken
from museum sites. And our marks CC, which means Creative Commons, which is copyright free. Creative Commons
and museum sites are a good source for
artistic inspiration. Just make sure to search and
use images mark CC only. Okay, let's make
our lady open up eye color on top the picture icon in the
top left-hand corner. And we're going to start off by bringing in the West Area. Now we're going to go
to Style and water. Going to choose Presets. Number three from the
window in the bottom right. And then we're going to
put the opacity down to 50 per cent and the
edge down to 35. Now we're going to save
this picture directly to our camera roll to
bring in to use later. So tapped the top right, save to camera roll. Now we're going to tap the
picture icon in the top left and bringing the
image of the lady. Going to start by
cropping the image Dan. You'll find crop in form. And crop just moves
the edges in. That looks about right. So I'm going to save
it to adjustments. Now we're going to
import the fan. We go into effect some bland. Tuck the window in the bottom right-hand corner and bringing the fan
from your picture. I tap zoom and bring the picture in so you can
see the whole picture. Tap zoom again. Now moves a fan to
the size you want. And the position you want. That looks about right? So we're going to
save that adjustment. Now, going to style and painterly tap the window
in the bottom right, and choose the fourth one down. That's marked paint. That gives us a nice soft image. Save two adjustments. Now go back into his
facts and blend. We're going to import the garden picture that
we previously saved. Now turn the opacity
down so you can see the lady underneath and
tap the brush mask. Reduce the brush size. Tap the brush and choose
number one, basic. Now, with your Apple pencil, remove the exterior
garden from off the lady and off the fan. I put the opacity
up and you'll see, it will show you bits
that you've missed. Just go over it again, making sure that the fan and the lady is
completely clear. Gone a bit too far there. So I'm going to tap the eraser and put
that back in again. I'm going to tap the
brush and the Zoom. I've got a little
bit more control. Mask. Add a little bit more. Tap the brush mask off, tap the Zoom and moves back in. Zoom off the brush
mask on again, and just make sure little
bit there on the eye. We've masked all of the wrist
area covering the lady. Tap the brush mask off, and save two adjustments. Now we're going to go
into texture and paper. Tap the window in
the bottom right, and look at the different
paper textures. In this instance, I've
chosen number 25. I've put the size
that's about 80. And the intensity up slightly. That gives us quite a nice
texture for this painting. Going to save two adjustments. I will just have a
look at the history. Started off with this picture. We cropped it. We added in the fan. Then we put the painterly
effect on there. Then we added in the
hysteria garden. Then finally, we added
a paper texture. And that's our picture complete. So now we can go to the top right and save
to the camera roll. Hope you enjoyed this lesson. And that's the end of class
for see you in the next one.
7. Class Four Wrap Up: Thank you for taking Eichler
armor class for I hope you've enjoyed the
lessons and it's got your creative
juices flowing. There's so many
ways you can blend three or even more images together to create
a unique work. I encourage you to experiment with the methods I've shown you. I'd be delighted to see
your finished pictures. Please upload them
for everyone to see. The follow button
in the top left. So I can let you know when
the next course is ready. I would appreciate a review
if you have a moment. Thank you again for
taking my course. If you'd like to
know more about me, please visit my website,
color story.com. I started my creative journey
writing books and audios, as you can see here. Then I return to my first love art and
created all kinds of art. Finally, I have 20
years of mind, body, and spirit articles to help my readers navigate
our complex world. I think you'll find it
very interesting to visit my website, color story.com.
 Christine Sherborne, Artist and Author