Transcripts
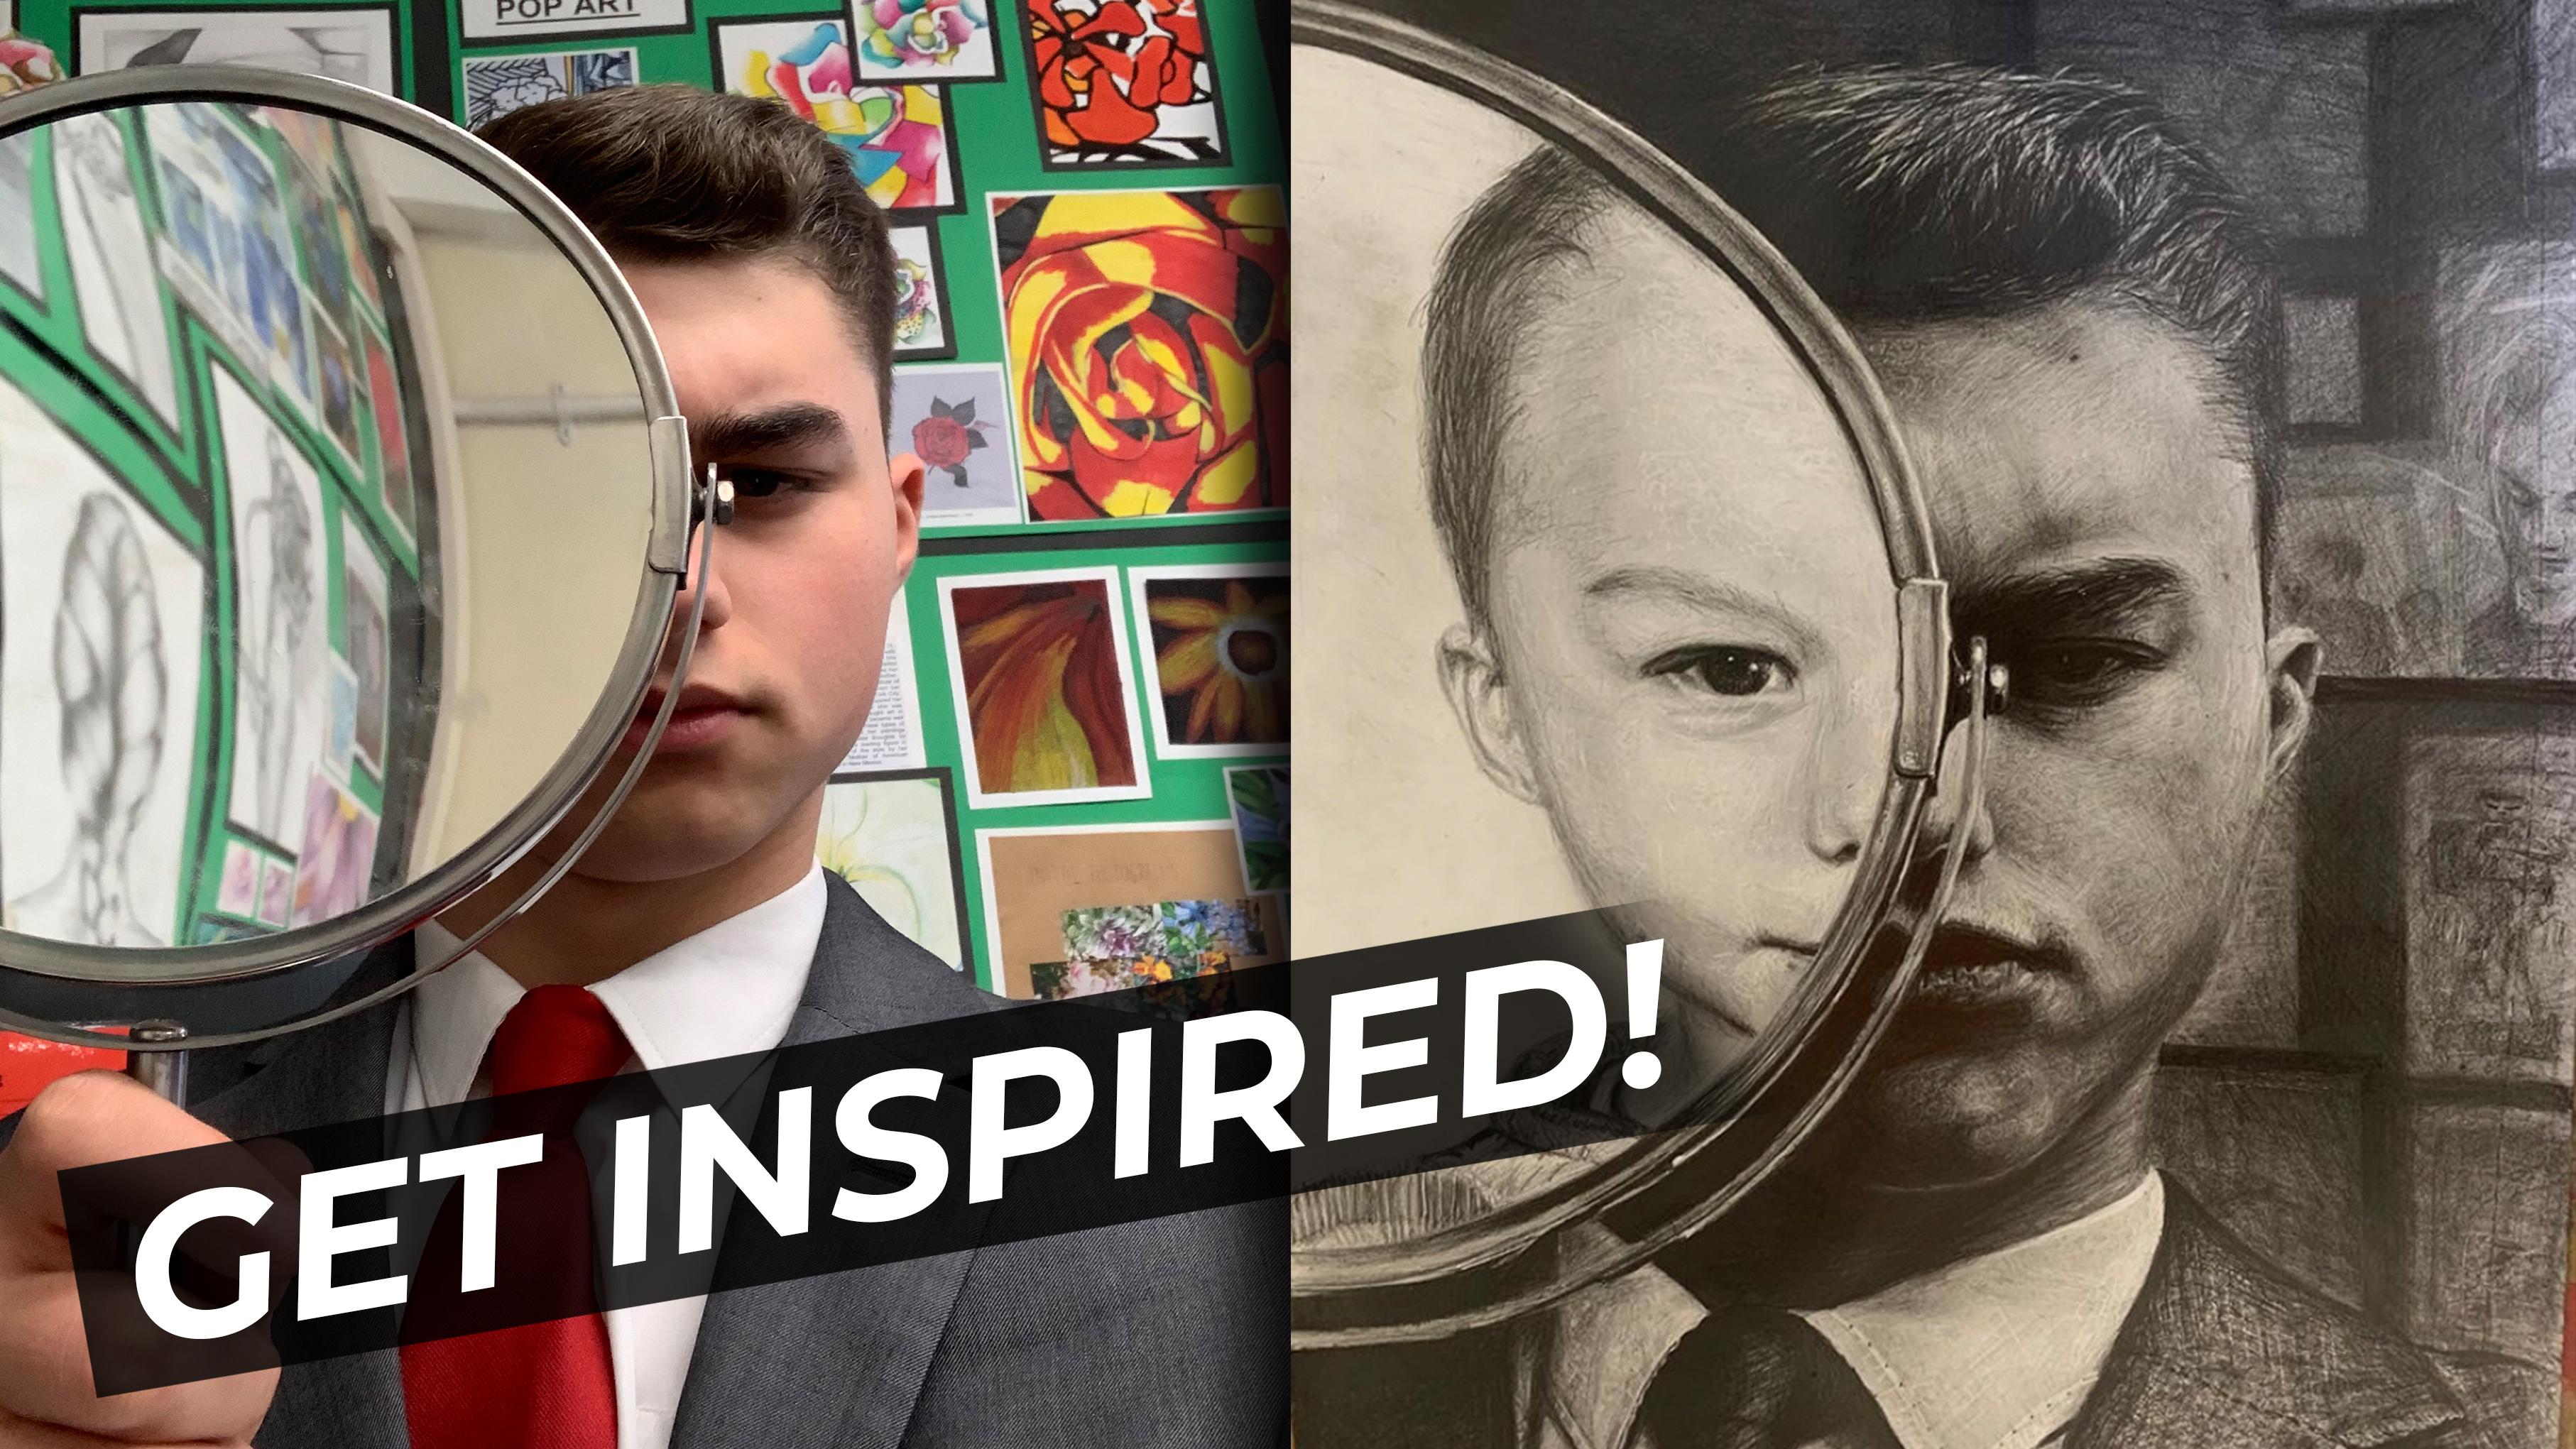
1. Introduction: Hi and welcome to the school share class where today we're gonna be learning how to draw a photorealistic portraits. My name is Ambrosa and I'm thrilled and honored to be your Scotia instructor for this course. I'm an artist based in London. And ever since I could remember, drawing and creativity has always been a big passion of life. The more they experimented, and the more I looked into it, the more religious How beautiful therapeutic, un-fun drone can be. And this is why designers create discourse because there's so much more to it than meets the eye. And I feel like photorealistic portraits like these unknowns by Jaime can really transform the way that you think as a creative. Now how this course is going to work, as I've broken it down into segments. And each segment is sort of like a little mini bootcamp. So every lesson that you go through as like another checkpoint I can tick off the list and be proud of. So in the first part, we're gonna be looking at how to prepare for the class, as well as Haas take good compositional for OS. Now this can be done using either a camera that you may have or even your phone. However, if you don't have access to one of these two things, I've left a Pinterest pin where I've scoured the Internet and look for some of the best compositional photos I could find on Google, which you can use as part of this course. In part two, we're gonna be looking at what materials will be required for this class, as well as any other optional ones. Now 90 tickle your taste buds. And furthermore, we're gonna be looking at how do mark making. Now for those that don't know what mark making is, essentially different lines that you can place on the piece of paper to craft different effects. Now these can really make a big difference in your drawing. And I'm not going to lie. It's one of the secrets to how I drew photorealistic port traits. And part three, we're gonna be looking at the anatomy sketches, shaving on detailing or things such as your eyes, your mouth, you knows, your a's, and even your hat. So we'll be taking photos of those. I'm going to show you how to edit them to perfect for your drawings. I wouldn't be going of auto techniques that are required to do it. If do you have any questions during this course and you're a bit worried or get stuck on something, don't hesitate to contact me via the discussion section down below in the course. And I'll be the essence. I can't answer any questions that you may have, whether you're a beginner or even the next picasso, This course is GIF, absolutely anyone. And he's all my last seven years of drawing experience as those older commissioned pieces that I've done for so many different people around the world, as well as how my art recognized by big celebrities like Morgan Freeman, I decided to craft an oriented discourse. I break that automates techniques Darwin called the essentials and the building blocks for drawing. I've also included all the challenges that I faced throughout this journey, which I hope permit you differ from making those same mistakes as I did, which went home, hopefully fast-tracked your progress as an artist. But enough talking for now, I can't wait to join you. In the next lesson, we're going to start looking at how to prepare for this class.
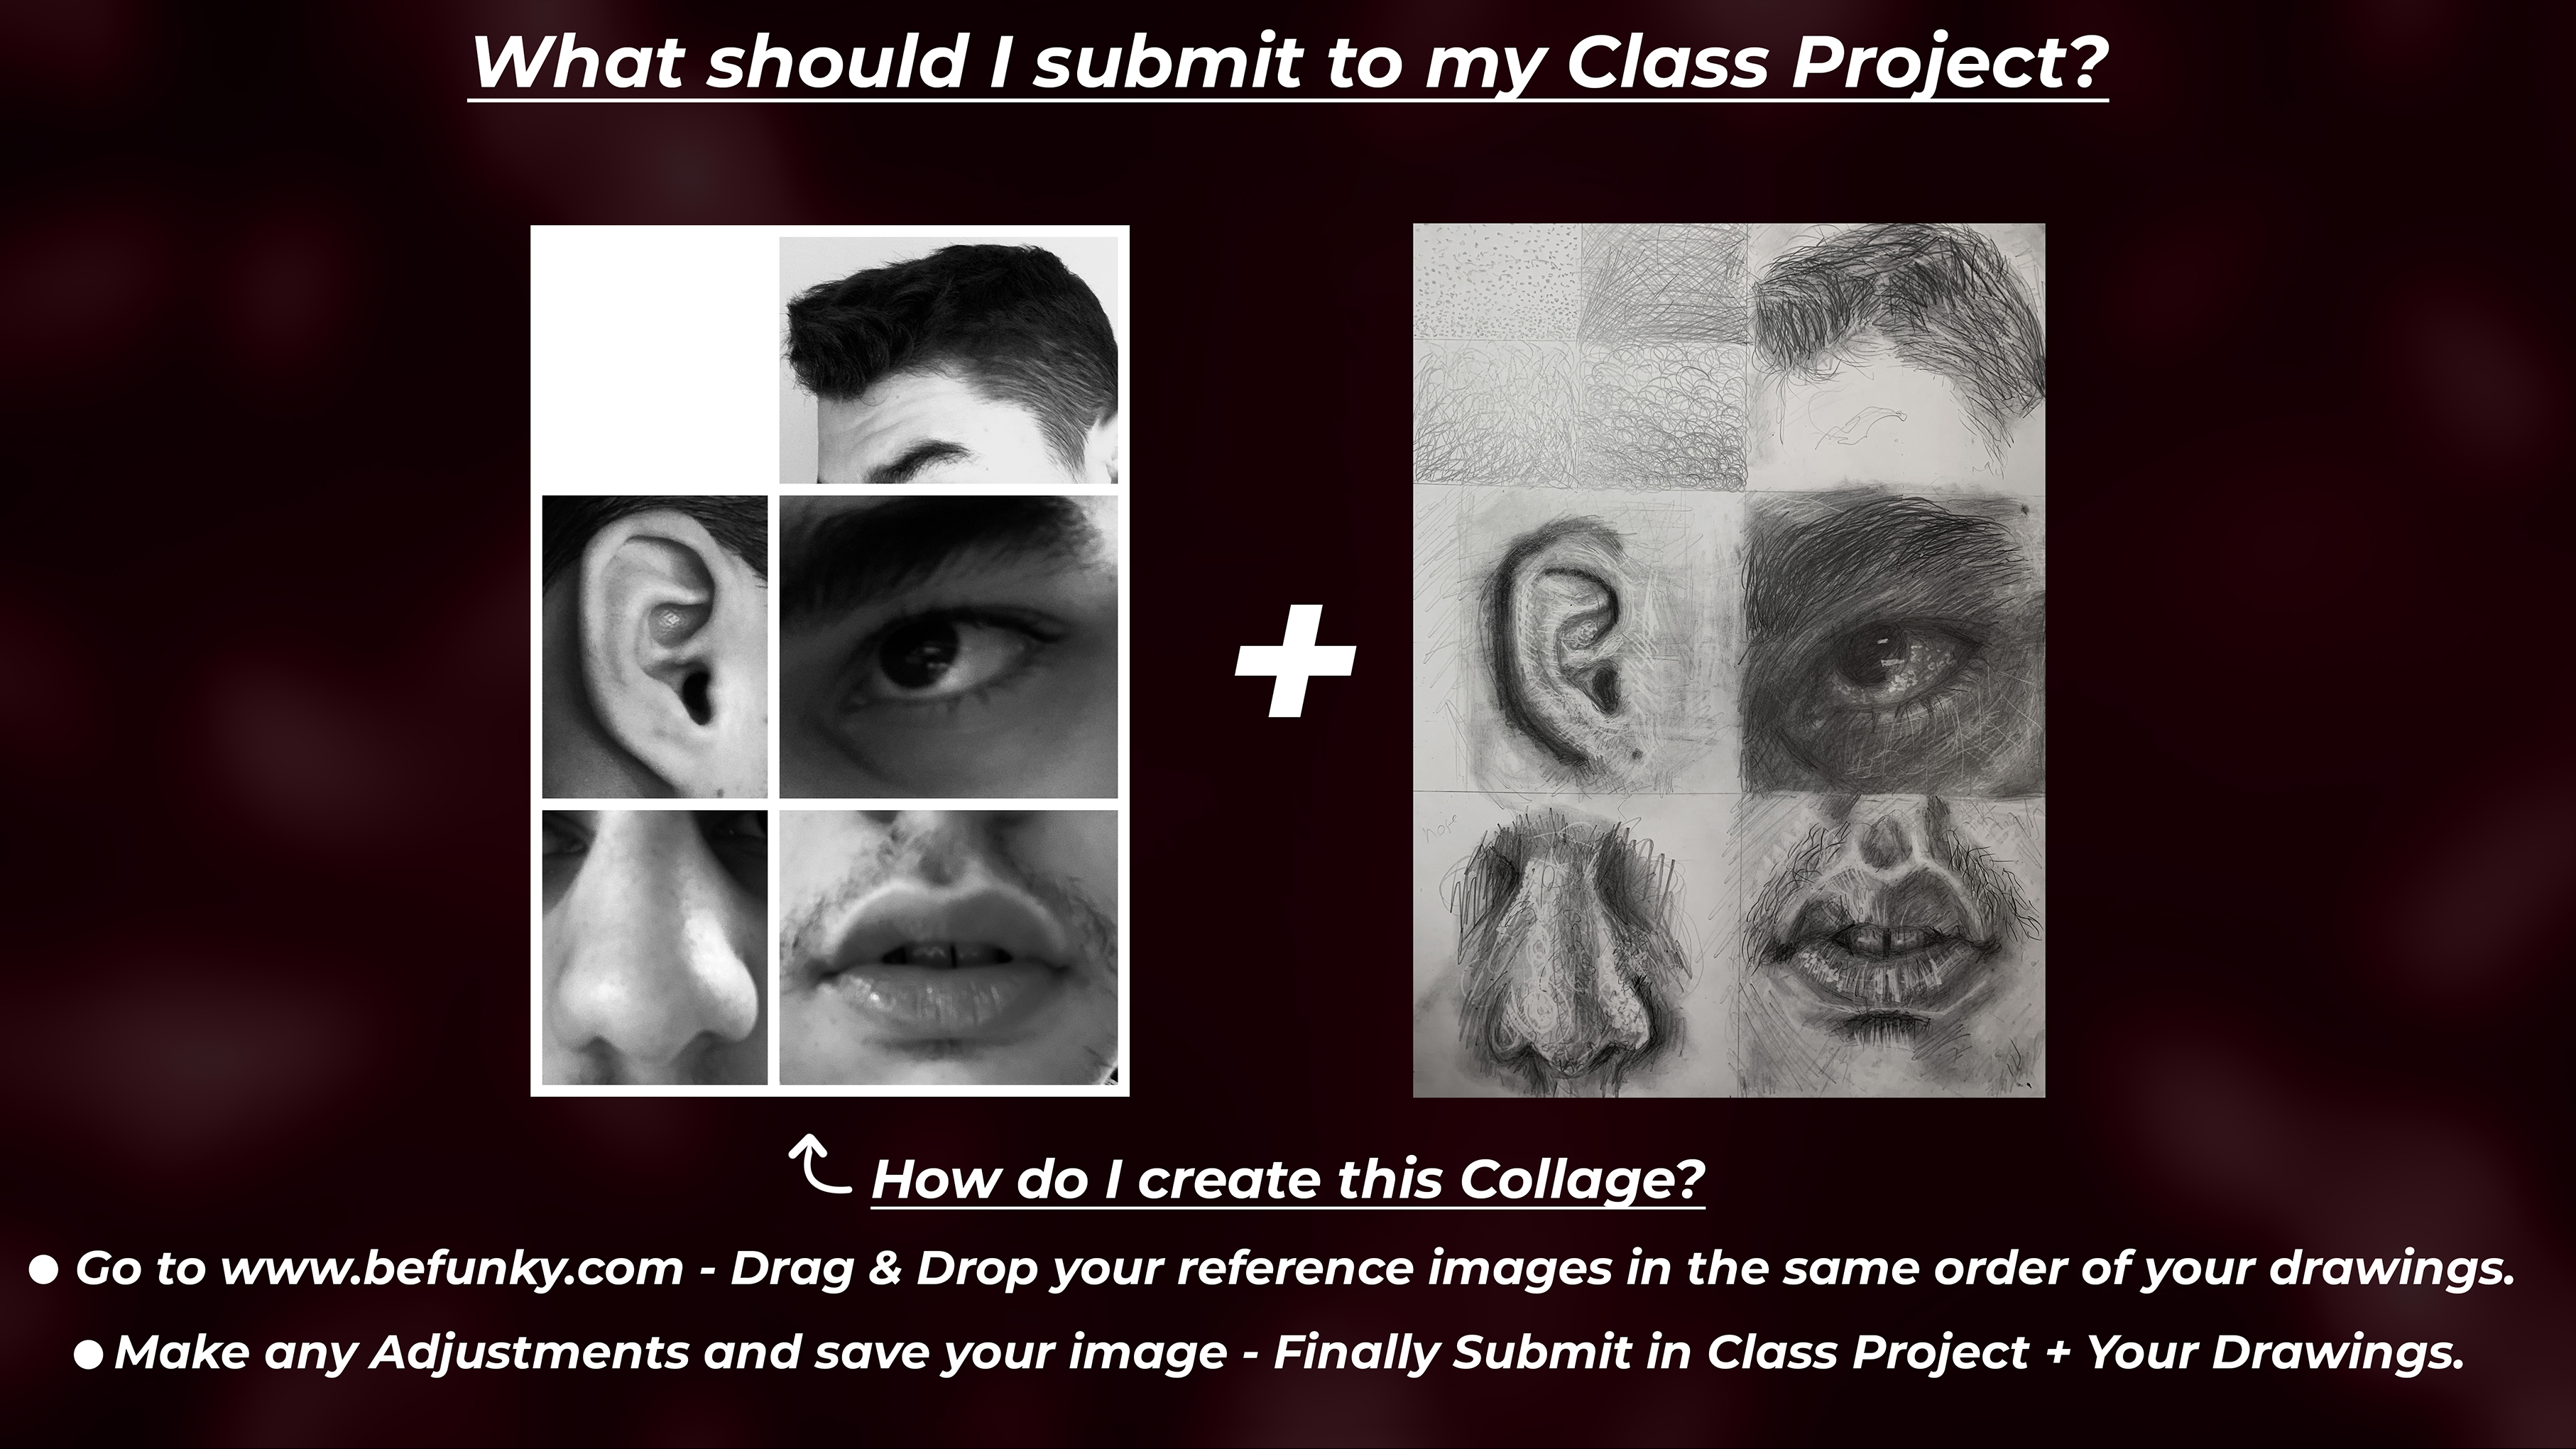
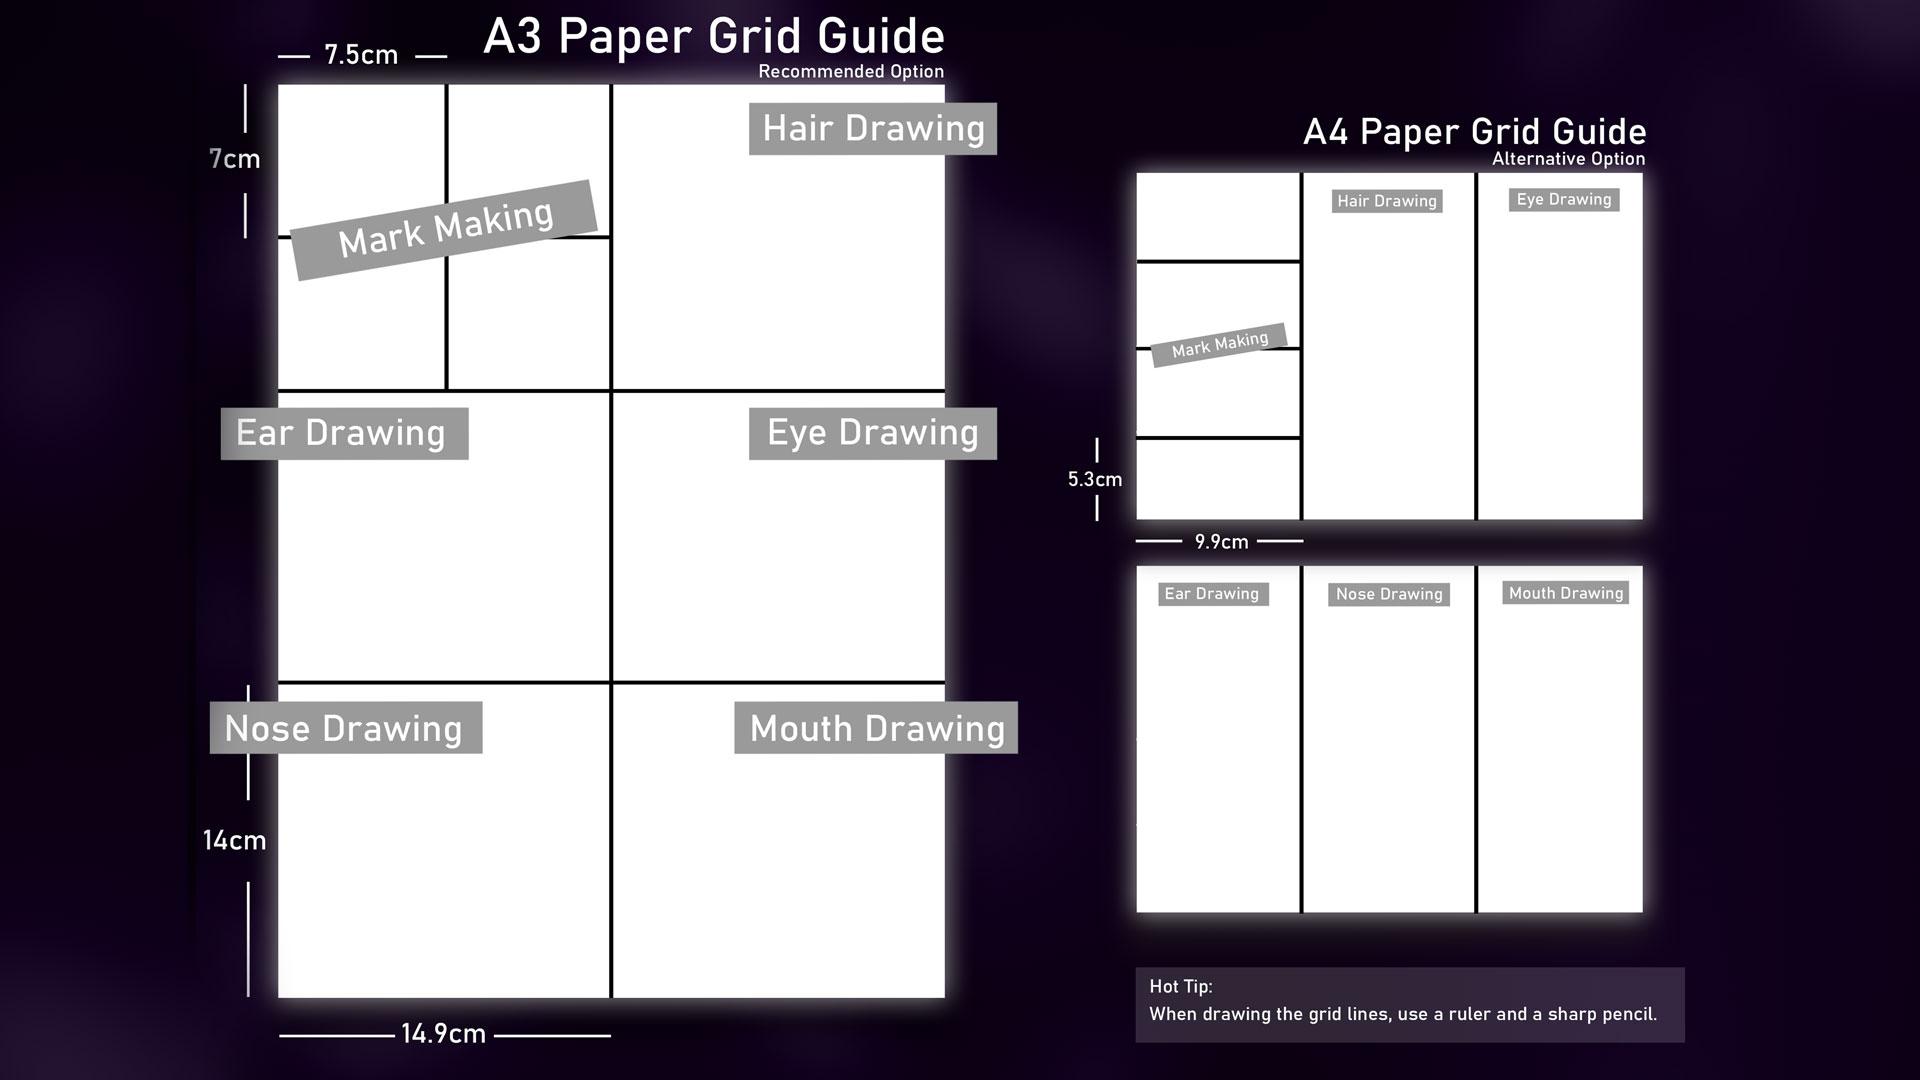
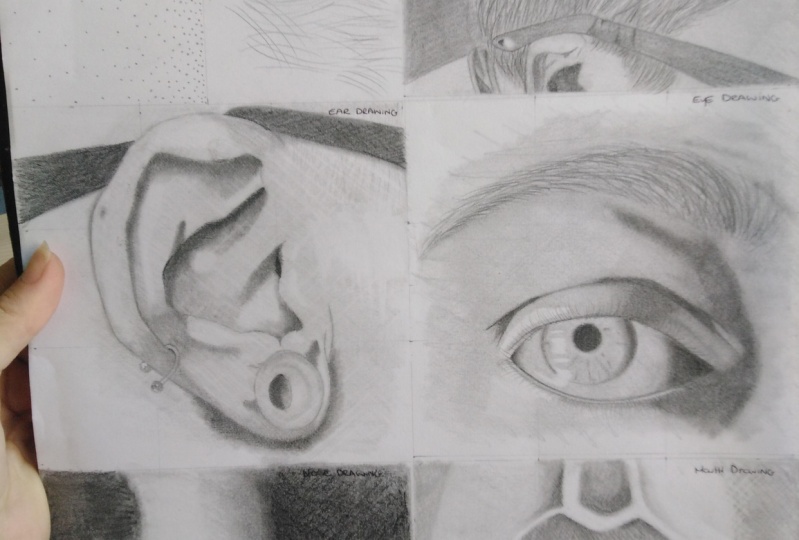
2. Project Intro: Hello and welcome back to this Scotia clause. When this lesson we are going to be discussed in our project is how are we going to get started on what basically entails. So without further ado, let's get right into it. So the first thing we're gonna do is we're gonna start by looking at our reference images and how we're going to take them. Who will be talking a bit more about things like composition, lighting, and also editing, post production for these pictures. So really ensure that we get the most out of these pictures and the reference images so that we can read through and nice dream from them. Because in my opinion, the reference image is just as important as a dorm. So once we've got this done, we're going to have an A3 piece of paper. Don't worry if you do not have a3, I can always use an A4 piece of paper. A flow is pretty much a son decides about that size. And I'm saying this as if you can actually see what I mean. But anyway, this is a sense of scale. This is essentially a through a piece of paper. I'm, what we're gonna do is we're going to grip that up into different boxes. I'll have a Guide to safety on screen right now. So you see what I'm saying? They will clarity. If you don't have an A3 piece of paper, I can always use an a for how fast or do recommend using an A3 just because we have a lot more space play around with. And therefore you can do a lot more detail in your work. And once with a gridding up is complete, we're ready to get started on our mini boot camp exercises. So by doing these exercises, you're gonna understand your facial for more, lot more. Understand the different sizes and shapes. For example, the sizes of your eyes into the shape of your AES, everything outside that. And therefore do nasa a more accurate drawing of ourselves, which would be the basically the last part of this class, which would be to create your own self portrait. But without jumping the gun, we are going to be talking about on many bootcamp exercises, which I think are really fun and definitely a blast to complete. So the first thing we're gonna do is once we have the piece of paper, we will bring up the first books into four smaller boxes. And these would be on not making books. So essentially the beginning of a full very important and key Mark makings, I do think are so important when it comes to drawing. And these consist of things like crosshatch in spirals, even points in it. And these will really help you understand how we can these how a piece of work often you've sort of done the baseline shading. So for the second box, you might be wondering what's going up next. Well, but a second books while we do have, we do have to sketch the shading and detailing of R hat. Now it's important to note right off the bat that, you know, auto anatomy are different. However, if for example you might have an Africa, I've got very shortened straight hat. So you know, you might say, oh, you told us to draw, but actually she want us true to be fat. But I didn't know that they will have sort of similarities and differences. And what you will see is the process of drawing will be quite similar. They'll only be a few differences. For example, if you're doing after hat, you know, you might be using what most spiral mock making hay. Whereas if have straight hadn't been using that more cross Hutcheon straight lines. So the processes are pretty much similar. They'll just be a few differences I can look out for. And I'll be talking about in a hot tips during the class. So be sure to account for those. And it'll be popping up every now and then. So in the same things will apply for the third, fourth, fifth, 6 books, which will basically until, you know, the sketching, shading and detailing of your, is your eyes. Those on your mouth. And once we get one of them says is complete, you can then submit that to the class project on Scotia hair. I've been, once we've done that, we can start discussing a self-portrait joins, which I'm super excited to see. I'm stop. So you might be wondering what materials will not need to use to complete this class. And that's an excellent question. So what I've done was I had decided that there will be essential materials that you'll definitely need. However, some materials that made tickling the taste buds. And you might be thinking, you know what? I want some of that. So I think there is a pubs or these materials and there's definitely some advantages. However, you know, it just depends what your budget is, sort of what you want to invest into this class. But what I will say is ODE's materials. So the more that you have, the more you can experiment with, and certainly the more you can sort of get out of this class, let's say in that list dot with the Essentials. So definitely gonna need a pencil. Now for pencils, while I tend to use is a brand called favor Costco. And I usually use an I think these are pretty much the main the main pencils you're gonna need. I know via HB pencil, this would be used for, you know, sketch in. Then you're gonna be using something called a 2B pencil, which is slightly darker and isn't good fossil getting or shadings died. And in a 4B pencil for those really thought shutters an areas. If you can get your hands on a nice set of pencils from 8B, highly recommend getting these because again, you're going to have more tonal variation and shadows and highlights. Saying that that needs me to the next one, which will be an eraser. Now you can use a books on the visa is ok. hover one would recommend and I've definitely do you think is super employee is having a nice thin arrays are declared using a 3D fat chunky eraser can be quite difficult to get this really nice thin highlight lines that you want. So I would definitely recommend again, and when things are quite fancy, I'm not gonna lie. Is a timber. One is there are Raisa. And essentially what these are really thin raises. His uncle was a pen by just rubs out live 3D nice thin lines. And these are grateful. So I'm not making with an eraser getting into this nice textured lines. I'm already met your wife glut hyper-realistic. Alternatively, you can use an electric robot. This is really, really fun and useful to use. But as I said before, whatever you can sort of get your hands-on will be absolutely fine. But essentially, an eraser is what you need. Then you will need to shop and always to keep the pencils Nassim shop. Because we always need a nice sharp pencil factories and everything. You're gonna need some blending materials. These are like super important. So do have a few alternatives that you can use to his acute tip economies acute tick. Basically these, you know, the ones that you find maybe in a bathroom to clean your AES. These are great for shading and 3DS miniature areas and get no no of shading on DES heading in. Alternatively, what you could do, you can use a makeup brush no, not for your face, but for that piece of paper. And the reason why I like to use these is because we get no shading done very quickly. And his great uniform mocking out why your darkness and lightness areas on a page right from the get-go. So if you have one of these lying around, definitely go grab that. And you can get started with the bending processes. And then once we're done with that, we will obviously needs a piece of pavements rule on. Now you don't need anything in particular can use cartridge PayPal, even something that prints out. But if you can get your hands on some fancy ones are definitely leave some links down below to the ones that I use. And in my opinion, a good piece of paper can really make a big difference, say in that dial premature to wrap up this part of the class. So without further ado, nest jumped. Ryan's taking our reference images, taken up. Ooh, nice cool selfies. I'll see you there.
3. Material Breakdown: Introduction: Hello and welcome back to the skill share costs. When this video on lesson, we'll be having a look at different materials and how to essentially use each and every one. Now we're getting into a brief rundown, hover through the course and throughout all of the other lessons, I'll be going into a lot more detail into how to use specific material such as, for example, a blending stump, and more cases where you can use them. But for now, we're going to be doing a brief rundown of exactly what sort of each material is used for and how we can use it effectively and efficiently. So without further ado, let's jump right into it. What we're gonna be doing first is when you having a look into how to use different pencils and what they essentially youthful. So here I have a two-page pencil. And why not to use to hate pencils for especially HB as well. And these are sort of the two Too bad boys when it comes to sketching, simply because they're very light and hard pencils, but that easy to rub out when you make a mistake. So for instance, we are going to be using a two edge pencil here. I'm briefly doing some reliance, right? I can start to rubbed out. And it rubs out very easily. So obviously, for example, if you have something like an electric razor, this will come out very, very easily. And just like that, it's like magic prime. So let's have a little look at, for example, the shading pencils. So here I've got a 2B pencil. And as some people like to say, is it to be or not to be, either use a 2B pencil to start up my shading process. I went if I do shade ID 0.2x aside of my pencil. So for example, if I go in and John pin, you can see if I use a sudden my pants so you get a nice, nice shade effect. However, if I do a lot to change up and use the tip of the pencil, you can see is a lot harsher on a lot harder to rubbed out. Because as you will see here, if I were my rubber, if I use the electric eraser and if this were about very easily, and also be very easy to blend in later on. Whereas if I use the tip of the pencil on the arrays, look what happens. The lines are still solve there. And just as a 2B pencil, I do similar things with the 4B pencil and solve anything in between. So anything between a to B and a 5B, for instance, I do use these for shading. So with this pencil here is a 4B pencil. I will use again the side of the pencil, but unlikely to be potent. So you will start with the same amount of pressure. You are gonna get a lot of a darker shade. So this is definitely something you should keep into account when you are shading later on in this course. And if you really want to get some nice dark shadows, certainly start to use a lot darker pencils. For, for example, the 78 B pencils. I liked to reserve these pencils for 3D the Dockers points of uterine. For instance, he might use them for your iris. So if you look here I am using a Tivo dependence. So here I am and this is very, very small. But you can really start to see that compared to the two x2, the 8B pencil certainly does give a lot of a darker effect on even if you're shading with the same amount of pressure. The difference is quite large.
4. Material Breakdown: Pencils: So we've got that too. So we can note that down here. Hey, we got the HB pencil. And we also are doing a cross hatch and the method here. And you will learn a lot more about this in the making process. But I am using the same sort of cross hatch side of the pencil method for the shading here. And as you can see, the HB is slightly darker than the two h. So this is our H B. Now we will have a little look at the 2B pencil. So using again the side of the pencil, we will gently shade in the to be region. And as you can start to see, there is a little jump in how it's getting already. For example, if you are looking at a two-page competitor to be, you will notice that there's a big jump in terms of how dark the pencils are again. But it's only gonna get darker because we will be using the 4B pencil and now, again using the side of the pencil using the same amount of pressure. Now is important to note that when you are jumping into the hatches, the pencils do get harder. However, they do get enlightened. What I mean by that is the lead is a lot harder to break, but it does provide a lighter shading capability. Whereas the higher you get in the bees, the software depends on gas, but also the darker it will become. So this is great for shading in, and as you can see, the full b again is starting to get a lot darker. And finally, the 70 pencil, you will start to notice just how this will be got in. Again using the side of my pencil, shaving and middle crosshatch. And then we've got the seven B. Why do you have is a PRISMA kala black pencil is cooling off, and that's French for black. And I wouldn't be using this in this class, but if you do have this around somehow, you can always use it. And as you can see, is a lot darker than all the other B pencils that we have actually used. But I simply don't use it because it just isn't the same as graphite. It's more like an oil-based pencil. And I will just write NWA. But yeah, that sort of shows the transition of what you can expect when it comes to the shading of these pencils.
5. Material Breakdown: Shading: Okay, now for blend them, what we do have, we have three different mutants was a, a, so we've got makeup brush, pretty fancy file to say so myself. We've got some Q tips per Illinois and Musso, We have a few Tiki blending storms. Now, in my opinion, will sort of grasp over the years of shading. I'm sort of drawing with graphite pencils. There's my two favorite are currently not the Q tips, but it is the makeup brush and blending stump simply because you have a lot more precision and control. Whereas the Q tip sometimes breakdowns are not harder to smooth. But for example, with a Q tip, you can use the side of the Q-tip on is made out of cotton, so it will pick up the graphite quite easily, hence move it and gently or use a bit of pressure. Can emotions on stop to shade in. As you can see, we no longer have those lines, but rather we'll be starting to pick up on a nice smooth transition. And we can do the same with the two HB blend in using Slotkin emotions that hates me into two h. And what do you like about the Q-tip since it can change to the other side once one gets quiet dot t and button. So that's summarizes pretty much the Q tip and what you can do that you can always discard them once, then no, don't already usable and affording a pop. And I'm gonna be looking at the makeup brushes. And essentially what I ought to do is use a tip. And so we'll drag it into the piece of paper. But the good thing of a makeup brush is you can achieve but more of a smooth transition and a shading with the graphite that you'll use them simply because you're not rubbing against a PayPal, but rather you're rubbing the graphite into the paper. Now what we can use now on these, on my favor, it will be the blending stones. Now with these bending stones, we do have three different sizes on. These are fresh out of the pack. So they are looking very nice. But over time, what you will see, this will be what becomes the bending song off to a few uses. And I did end up using standard tape around the center just to keep them intact. But once you do get to the stage where they become ready to me, if you do want to clean that, you can always rub against some sudden paint pop from all the sides and you will start to notice a will become as fresh as these, but still fresh shot unusable. But without further ado, let's jump right into using these. So these are made out of paper, pretty much. I'm, I will use a small one here just so that you can see. But you can sort of use a tip, unsmooth it around, and as you can see, it picked up that graphite and bang. You can now also draw with it in which I've already love. So for example, we can really do what it needs when you're nice, small tech Sharon, user, not pointillism, Verde, Cool. And now we can use sort of the medium size one. We can use the sides. We can use a tip. You can do whatever you want it to be fast. And it was really nicely. Well, I will say though with the blending stump, is you want to achieve a smooth, smooth transition, a smooth sort of shade. But rather you will have like a stained sort of texturing, which as you can see here, it's not perfect. It doesn't look kind of grainy, but this is really good for sort of doing skin pose. I'm so of skin texture. When it comes to that stages in your dorm rooms, you have the biggest size here. I'm going to use a sort of same process, smooth, unsteady. Now you can use quite a bit of pressure when doing this or it can be very smooth. And Jim tool, it is completely up to you on that. Yeah. And we're just pretty much smoother and everything's got Law. And as you can see what a NWA, it doesn't really smooth. Which is why I don't really use this pencil because it is oil based on a won't blend into the rakefile PayPal as easily.
6. Material Breakdown: Erasers: Now we do have three fluency and really cool raises. So you do have your books tended one actually calling it for, you do have the normal one. Budget were to use these anymore simply because I felt like there's a lot of things you can do them on a quite limited in their ability. But what we do have, we do have the tumbling window 0 arrays on. We do also have the went alleged coup arrays. And we finally have the need to bool arrays. I'm not gonna lie. I don't use it as much as I probably should, but I do think it's quite satisfying to use. And the fact that you can need to change its size, its shape, a refund is really, really cool. And I've had this for probably 23 years now. And when it doesn't get to the point where it's super, IOS gave a nice little rents in the sink, clean that bit. And it's ready to go again, mostly when you're using Mitchell as o. And that is quite dry. Anywhere. And off of those DIY fixes, let's jump right into how it's used. These arrays is. So for instance, what we're gonna do in, I'm going to start off with the needs of all Riza. And I'll do some cameras a lot. You can see what I'm doing. And molded sulfite Plato in the sense they can move the up into, for example, a tick. Studies this little tip. And you can sort of Gemini pickup the graphite on the page on whether these are quite stuff tool. You can use a bit more pressure, remove layers of graphite. But this is more for sort of building up form in your drawing, but I'm not specifically for detailing. So just keep that in mind. Whereas for example, the electric arrays, and we're going to stop pressing this button to activate it. I can just do solve. Nice dots overnight and lines. May Kim. And as you can see, even in the darker regions, is quite fun to use, IS sometimes use more often than not, tumble racer. Now, these are very thin, as you can see. Pretty sure they like one millimeter thick and you combine different sizes, but I just like the smallest one. And it's pretty much a rubber, a Penzu. I just had the unnatural can raise or you can buy replacement heads. I'm one seems to get quite DTM blunt. You can just snip off using a scalpel. But for now let's just keep it like this. And what you can do is have a lot more control. And so do cross hatched lines. Or even like scribbles. And this is perfect for when you're doing facial hair. Or any hair will even doing a sort of skin texture in. And I uses and honestly, I genuinely do food. I, it makes a huge difference in the quality and outcome of one doing. So, we'll wrap up the material breakdown for this class. I hope you've found a use for it and enjoyed it. And without further ado, let's just jump right into the next cross, which would be to start on lovemaking process.
7. Capture/Edit Awesome Reference Images: Hello and welcome back to this skill share class where in this lesson we're gonna be taking a look at how we can take good reference images. And he saw tips and tricks that I've learned on how to take good ones and how we can edit them to make them perfect for our drawings. So without further ado, let's just jump right into it. So to begin, we'll have done was I have taken some selfies of all of the components in my face and we are going to edit these together. So essentially, right here we're looking at the first image is a picture of my eye and is quite zoomed in because I pretty much put the camera right on my face. And essentially what I did was I made sure that the environment I was M, which was my room, it was well-lit and had a sort of natural light element, which was from my window. But if for example, you can't do this in your room, I'd recommend going outside, perhaps our POC and taking the reference images there. Simply because you're gonna have a lot of natural, like hopefully during the daytime and you'll just be able to get a nice photo done. So for instance, here, you know, you've got a lot of waiters base around the eye. So what I'm gonna do because we are focusing on the I completely, is I am going to start by adjusting and pretty much cropping into that area. We can go straight to the editing tool on our phone. Now, I do have an iPhone, so I'll be using the camera here. So essentially I do have a sort of preset that I always use how far I will recommend always changing up and try and experiment for yourself. But what I've found was if you go to exposure and go all the way up to 16, you can start to see that natural lighting sort of increases. If you're all the way to a 100 is way too much. By default, like 16 as a sweet spot center, if you go all the way to brilliance and you go to minus 35, what you will see as the darkness sort of accentuates a little bit, especially in the eyebrows is a lot more darkness and at what depth? And this is really good for building a lot of form and depth in your drawings. And now, if we go to highlights when it bringing, these are a little bit. So let's go all the way up to 45. Now for the shutters, what we're gonna do is gonna go to minus 25. This is just to help bring out the shadows, especially near the eyes and towards the names as well as on the eyebrows. And now for the contrast, we are going to go to minus 20. And as you can see, if we've really increase the contrast, it really doesn't increase the shadows towards a coupon eyebrow. Boasted there'll be overcome. We don't want that. And we don't really use NO, there's nice details. So what we are going to do is we are going to go all the way to 20. And as for the brightness, we don't want to have too much brightness, but we do want to get a bit of shadows and what we will do is go to minus 30. But what you can do is it can solve, play around and see our pictures will be a lot different. Simply cause we're gonna have a lot of different lighting. So these presets won't be exact for you. Hover. What you will start to notice is, you know, you can sort of play around and sort of adjust the presets I've sort of suggested. And as you can see, I've just dropped down a brightness or obey, I put the Saturation to minus 100 because we are working in black and white contrast. We can up it down. V1 can go all the way up to 30. And I do think that works quite nicely. Now we do have a lot of tonal variation, which is what we're looking for, especially near the pupil. That nice juicy darkness and that brightness with the people behind it. It works really nicely. And of course the eyebrows can do a lot with. So now pretty much wrap up the pupil. I didn't have a different one that I thought would work. But as you can see, the composition of this for simply isn't that effective? And t, because the eye is not in center and you're losing quite a bit orbit. So this is an example of a picture that doesn't really work that well. Whereas this one is a lot more effective and definitely a lot more compositionally accurate. That's the story. And these presets. If your reference images, simply because as I've mentioned before, our lighting source, the environment we've taken the pictures in and we'll all be different. So therefore, we can always play around and see roughly where we can adjust it. But definitely when you take reference images, some post editing is certainly required to help you out. Vr pretty much wrap up this lesson. I can't wait to jump right into sketching the shading and detailing of all of these stories.
8. Mark Making: Cross Hatching: Hello, welcome back to this Scotia class, where in this lesson we're going to be taking a look at the world of mark making, right? So to begin, what I've done was I would read it on a piece of paper. However, I'll be leaving links downloads where you can actually download this template and prints out within the printer. If not, you can follow along the dimensions and drew out yourself like I've done. But let's start off with the Mark makings. So the first one we're gonna be taking a look at will be the crosshatching. And now crosshatching a certain port when it comes to detain and as well as creating some really nice. So if Skin texture, what it was like, it's kind of like you might see on social media and everything. However, it goes a lot deeper than that. So before we get started and show that you have nice sharp pencil. And I would recommend using something like a H B, or a B pencil. We are saying that let's just jump right into it. So a lot of the time I use crosshatching and try and build up the soap base layer of shade and my dream, because this will help create that sort of foundation that x2 equal and certainly a lot easier to work on in the future. If, because if you're blending in this crosshatch where for example, a makeup brush, which is something you spoke about any material breakdown class. Then you still have these nice lines beneath the shade. And this will help create that sort of slayer of details TO drawn, but on a very basic crosshatch here. But the beauty of it is, is the closer the lines altogether, the darker the shade becomes a cause. You'll see that once these nine saw overlapped him, keep in mind, I'm using the same amount of pressure. They start creating darker tones. As you can see, this sort of regions a lot darker than this region because we have fewer lines and a further apart here in comparisons over here. So we can keep doing this, by the way, can keep voting up reliance, ensuring our pencils nice and sharp, of course, changing the angle. And you see as a cross progresses, I used this technique a lot within my drawings. And I'll say probably 60% of mentoring is made up of cross action. So it's definitely something that I think is really underestimated. I'm a technique I do feel like it's very easy to Mostafa. So as you can see, I'm just changing directions, making my lands a lot darker over here in comparison to hey, and so creating that nice transition effect. Now my lines also straight, but you can sort of curve then depending on surface that you're trying to draw. But just for this exercise, we're just gonna create a nice smooth gradient from right to left. And the way I see it right is by crosshatching and sort of simplifying the detailing process. And you're just making it easier for yourself. Because as you can see, that this region, if you really look into it, there's a lot of things happening, there's a lot going on, but from far, it's all very nice and smooth. And you'll see once we start later on in this class, once we start using a makeup brush and blending is in, you'll see that the details still remain underneath the surface. Which I certainly do feel like it's a very nice thing. So I'll pretty much wrap up the crosshatching section. So without further ado, let's jump right in to the spirals.
9. Mark Making: Spirals: Right next up we have the spiral technique. Now definitely this is another very important technique and I use that mainly when it comes to facial hair. I'm going say right curly or after her. Simply because it really simplifies everything that you're doing. And you can really build up details and layers because of this. So you'll see what I mean. So similarly to cross hatching, the techniques sort of stays the same. The spiral. Essentially, I like Santa Cruz but scribbly. And it can lead you to scribble along. However, it is important to note that the bigger the spiral and the further apart they are lighter it becomes. And then the smaller the spirals and the more close-knit they ought to get far. Darker thing becomes. So this is just something to take into account it evenly. So draw normal sack was icon down here. You can actually just queryable. And essentially you're creating these nice spiral technique. Now the sock was that had to be perfect. I'm literally draw and if you look closely, almost w's now is really nothing particular. And you can see him becoming a lot more loose with my spirals. Quit. I'm trying to get into lighter region. And now I'm coming back into the dark region. I'm gonna become a lot more precise and a lot more with home during my spirals and showing that there are a lot more close knit together. Now, make sure once more when you want in this, your pencil was nice enough shot because you want to make sure that these lines are super thin and thick. I knew so not just how you could do this produces such as on your clothing, especially when I get to see yourself portrayed.
10. Mark Making: Pointillism: Next up we do have the pointillism technique. Now this is a lot more tedious and essentially is made up of very small dots closely packed together. Is really important that you do follow along and understand what clientelism is useful. Because I deform because another really underestimate technique that does make a huge difference in drawings. So essentially what you can use this as on when you're detailing of face. Because if you look really closely, you can solve her prep these low dots in spots as skin pose. Knows the lease can pose when we'll be joined with the same shape. Pencil, for example, the major NIH pencil, or even 4H pens with maybe even an 8B pencil. Every just depends on the reference image. However, the principle still remains. Again, ensure that your pencils announcing sharp because you see when you are really nice ten dots. And just like with other two techniques, the closer the dots are together, the darker the sort of transition becomes. And you can also use this on jewelry, for example, when Possibly during the whole watch wears quite shiny annealing, that nice contrast, thin contrast between the dots and lines. This could also be used needle to pronounce highlighted dots and you'll see what I mean by that in a second. And furthermore, what you should do is exclusive create spots and pimples on the face using this technique. It's super important that you do complete this exercise. As by doing so, you also have had the understanding, unless the muscle memory of how to do these pointillism dots, I will say my Saturn recognized way can add them simply by looking at your reference image. Noisy since we're getting into the sort of lighter region now on the left-hand side, you're going to start with sin and talks and becoming a lot more further apart. Homos USA socially distant. And once was a right-hand side. They're very much more together. Now that we've done with the pointillism, you can finally go into the wavy lines.
11. Mark Making: Wavy Lines: Now what are the wavy lines I hear you ask. Now use wavy lines predominantly when it comes to hair. For example, eyelashes wave in starch. And essentially what it consists of a nice stringy lines that go in different directions. Kind of like your crosshatch during the difference will be there a lot more random, not so like conjoint and then basically on a more free than less stray and diagonal anymore. Hence the wave aspect. So I'm just going to do this and show that the pencil is again glass and sharp. And just automate the direction, the curvature of your lines. You can make them nice and smooth. That's a long. And keep in mind, the further apart these lines are, the light of the region will become an explosive packed. They are the dark colored region will become, let us say. And you can also be used to try and define or create formula in a drawing. For example, on the cheeks, waving around the eyes. So don't just think of it as, oh, this has to be just for high, so use it's trying to find a so of region within your drawing. Now though these lines and not making it seem like love, John von Neumann, one says, so I'm pulling different foundations and layers of graphite. You're gonna start to see that this whole detailing of your drawing is going to come a lot stronger and will definitely start to look more 30 radius deck, which is hopefully the aim and outcome of this course, that it's premature to wrap up and not making section of this course. I hope you found it somewhat helpful. So without further ado, let's jump right into the next lesson in which we'll be starting to draw your head. I'll see you there.
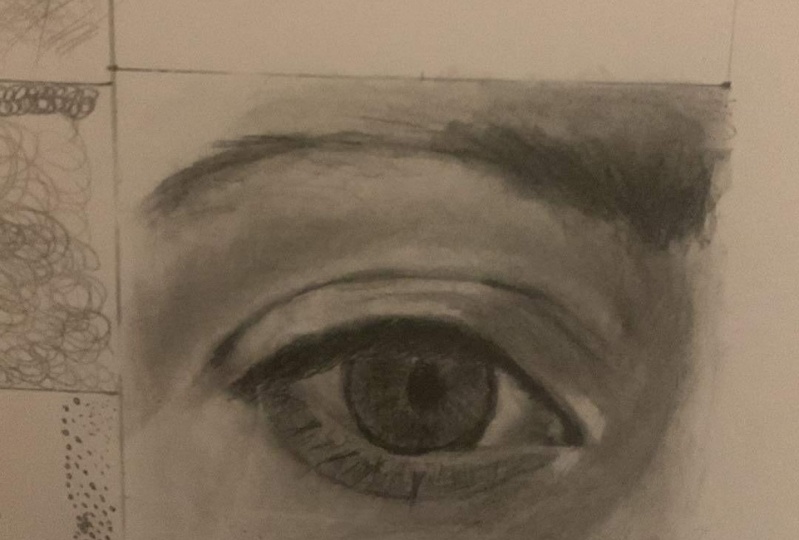
12. Sketching 101: Eyes: Hello and welcome back to this, the oceanic class where in this part we aren't going to come and look at how we can start drawing the eye. So with that being said, this chum right into the demonstration of how we can sketch the, why I have done is I've grabbed myself a H pencil. And the reason why is because I don't have a pencil that is really easy to rip out in case I'm making their stake. And therefore, something that we don't send stone on the piece of paper. Just yak. Also, when you are doing a great, Make sure that it is nice and light, as you can see, is a little bit dark, but we can always drop these out, often. Lead to this. You can just lightly brush off some of the graphite. As you can see. Read just brush and I'm not pushing into the piece of paper whenever I've been out is more than light gentle scrub, if you will. But with that being said, this shunt right to sketch and because I don't know about you, but I'm pretty excited skin to it. So pretty much if ever paid battleships. The grid method is quite similar in the sense, you know, you have different boxes and each box, you use a sort of breakdown or the facial features or whatever your drone. So for instance, looking at my reference image here, I'm gonna start on the top left. I have lacked some read 3A, eyebrow, eye abroad. I just lifting up on that top left box and it goes about midway and it crosses out into the next books, about halfway as well. And I'm just generalizing what I'm seeing. By the way, I'm not going into all the details. For example, I provided these lines here, but we're gonna focus on that at a later stage. Shouldn't worry for this moment. Also, the eyebrow pretty much commences around this area on this books. And it crosses out into this one. No, no reason why I love the grid methods so much is because you can really break down a complex image and it makes it so much more easier to draw. So there's definitely something I would highly recommend trying out and use also when it comes to sketching for I've already do often for myself get overwhelmed with how many different shapes and 9-0. So definitely the grid method is definitely a nice way to really break down what you're drawing. Really simplify the process which might seem very daunting at fast. So we've pretty much at this point you've got the general shape of my eyebrow. And we they're all like this little like few heads down here. So we're going to circle that region as well as daunting as well. And it crosses over on this books. Few more heads down here. So just quit out for now and find me. And pretty much that's sort of the Aja Brown saw it. And now we can start to look down here where I have bags off. You've got this line that crosses in from the bottom left and bottom right books. And this sort of region is already shadow. So that's really highlight that by finding where the lines on the ISR. So for instance, we have the top lip of my eye dragging him from this books are out one to one opposite. It crosses up feud or millimeters into the next books and into that one. So I know I'm being very generic when I'm saying these things. However, I do feel that as a very visual subjects. So you might be seeing what I'm doing and sort of cross-referencing with my reference image. And so seeing how I'm sketching and sketching, actually what I've noticed is this line actually goes up a little bit further off. So you can just indicate that back. And as such, that's why that goes down in there. And as you can see middle that mistake, which is absolutely fine because we have a robot and you can find out very easily because we are using a light HB pencil. So this line now goes up a lot of f by r i Boulez now and iris say across it a little bit into this box, out, into this one ever so slightly. Now, to make sure that we do not go over the top, let's find where a bottleneck EPS says about a few millimeters up in this box. It goes into the next one, going slightly more steeper. And it curves up, puts I'm joins up with this line. So now that we know where that line is, we can really walk how where the pupil crosses into. As you can see, we can just cross out this line. Now we can start with this side of the people. We do have a few Lawrence I just crosses over here. And for image has a small gap between this line and this line. And it is a little cup that as you can see what a reference image. And this is all in shadows, we can just leave that out. So now finally get this ISO it. We do have a few more little highlights in the eye. But then why we can always add these later stage with an eraser. And this will pretty much wrap up this portion of the class which was just a sketch. The i. Now we do have a few more details such as this shade, hey, that cross it out to this box. And as such, this one of a muddy the old things that we can sort of walk how as we go on with the class could easily do this sort of region like a citizen's shutter. Same with this as she can actually get an r i dot. So that's pretty much who that's required for the sketch. We've got eyebrows, eyelashes. We will draw the end. So if an Hey, we've got few popping up up. And who's down here? Of course, little bit here. And then of course we were all shades. And of course I'll, I ended up bang center, the upper much rapid and sketch plus Jon right into the shading process. So what we're gonna do is we will start this shade by Doctrine needs 9's ever so slightly so we didn't lose them. And you'll see why we're going to do that in a second. So we're just being not rough obviously when it Kiva accuracy from our sketch. But we're going to go in and have access to a. And the reason for this, and this is sort of a life hack when it comes to drink. I have discovered is we are going to add.
13. Eyes Shading: Part 1: So what we're gonna do is we will start this shaped by so many needs. 9's ever so slightly so we don't use them. And you'll see why we're gonna do that in a second. So just being not rough, obviously when Akiva accuracy for my sketch, but we're just gonna go over them ever so slightly. And the reason for this, and this is sort of a life hack when it comes to drawing. The I've discovered is we are going to add a cross hatch foundation of graphite over this I. Now the reason why we're gonna do this is we're going to shade this in using a makeup brush. And oh, this is gonna do is it's going to create that nicely lay off graphite wacko. So I'm just gonna do it like an x factor here. We just have these crosses as demonstrated in the Mont making session running up and down diagonal, horizontal. I'm doing this were really key already equal layer of graphite, if you will. Now you might be like, whoa Sam, what happens if you know you go over the highlighted areas? Well, don't worry for now. This is why we haven't arrays. I'm specifically unreadable eraser. And we can really have dragged out this highlights. But for now, we're just means a makeup brush. If you don't have a makeup brush, you can always use a Q tip. Alright, so what we have, we have the sketch underneath. You can still have saw it when you see it. And we have a nice foundation may of graphite to work with. So what we're gonna do is we're gonna draw over again the lines of our sketch. We can start to indicate where doctors regions on just this one line. You say, this is why looking by reference images so important. Alright, so we can sort of look straight away. I'm not okay, cool. So we're gonna change pencil was first and foremost. And what we're gonna do is we're going to start shading in using a son of a pencil. So the regions where there's a lot more darkness and lightness. So essentially, we can do to eyes and look at your reference image and 3D stopped to take notes on way your doc has unlocked it shades of. So we do have a nice juicy darkness towards the left of this I, which is essentially the Shonda between the eye on the nose. So any lines that means total views a little bit. We're going to bring them back him again so that we don't use them. And we're gonna keep building up using the crosshatch method. Now, towards this top of the eye, Haidt is a lot of dark. So over regions. So we're going to really try and extension rate these darkness is n dot times using this 2B pencil. But as the class progresses, you're gonna see that when the site using a lot darker pencils. And it's very hard to bring out this nice juicy shadows. Or you will notice is bulletins save files. I've used the crosshatch method. Nothing more, nothing less. I haven't got any scribbling. And this is why Daphne do fill it out across. Harsh method is so essential. We will get a makeup brush again and gently blend what we already have. And now we're going to whip out the blending stump and really consolidate the shadows. And you might be asking yourself, what about all the highlight Sam was going to happen today is, well, you wanna see what we're gonna do in just a minute. And also when you are bending, try and describe the form of what you want lending. Replicate this using. So in lines and directions of your pencil. We're gonna do now is going to start directing out. Well highlights are. So just using, you know, more rapidly he needs needed for me it's a hey, if you wish. Wherever you have less control and more comfort with, bring out where the highlights are. For example, in the IPO here, where the light reflects. And also try not to be so delicate with how you're doing this or try and keep within your sketch. Don't be so picture perfect. So that's pretty much forward. The highlights that we do have, maybe missing one or two low areas, but as always, go back and forth as a beauty of nothing is set in stone and tune you say instead. And so what we're gonna do now is we're gonna start building up more shadow. This, do this within a week. How a 4B pencil, and this is where the magic really happens. Let shows us and sharp and we're ready to go again. So we're going to bring out this nice shadow above the eye. Connectionist line comes down. Just follow where our sketch was. Especially when it comes to the shading, we don't admit your shadows bigger or smaller than necessary speak because it's Can we have the realism of Utah m, k. So now we've got that darkness in our people. And we will do is we will cross hatch this to make sure that the whole people saw of LAN on the same foundation. And we won't cross hatch using this 4B pencil. And just consolidate this. We will blend in using a blending stuff. Now, we will start on a famous shadow within the iPhone. Again, crosshatching, shading. And what do you have thoughts, nurses as these really harsh lines that we created using the crosshatch method that pretty much most move now. And this is thanks to our planning stone that we can continue to doctrine up. So the shades around this, I have to really bring in that 3D form. And as you can see, I'm reading a physics side, so of one being very casual with how I'm paying my lines. I'm not being see perlite slag is ouzo of release and you wanna keep it names for now. Because when it gets it a detainee process, that's when we can be very technocrat with how we place different makings using either a pencil or an error is off. So something that I've found with industry in general is the more loose animal experiments where you are. And unless two of fragile U1 with placing lines, the better your outcome will become. Simply because you're not, because you're more opens taking risks. And sometimes these risks can certainly be ones that really make a drawing look. Cpi's. What you will start to notice as this aisle signs get lot more form as we start to add more shading.
14. Eyes Shading: Part 2: There's an a and a bit more of the and advise towards the bottom lip to 3D SHO dot-dot-dot. Who's behind all of it? On a lot more darkness on the right-hand side of this aisle. Now I'm adding a bit more pressure using the side of the pencil. Tyranny varying out. There's nice dark shadows around you. The I F. Next we're gonna whip how 6B pencil. And this was V again to consolidate our shutters, especially in people. And now as this XB parents source a lot softer because I spoke about in the material right down the further along you go into Bs. The softer depends who becomes. So now we can start to use and really the tip of the pencil to really bring out the most doubtless. As we know, it is important when you are using pencils. You don't press super hot when you're not to show at place. And what I mean by this is, for example, if I press really hot over here in this region, and considering I don't need that much graphite, there would be very hard to draw out when trying to add highlights. So make sure you really vary the pressure on the pencil to really generate different effects. Here the inquest soft with Han placing the pencil lines and do that I am using now really pretty much a tape will depend Sue and being very delicate with pressure and ensuring directly placed the graph phi where absolutely needs to be. So now we can solve shaped back in these regions. Using the standard, the blending stone. Then again, the midterms with their shutters that we just added, MIT turns being the lightest sections of history, for instance, on right here. And four here we can use a tip with a vending stone. 3d smooth, nicely, nice highlights and shadows, Skybox. See, he didn't matter. And what you want to ask is when I am blending with the blending stump, the sort of movements I'm using a source like a scribble mark making if you think about it, you know, I'm doing in circular motions the same way that we did it with a pencil and second emissions. Now what we will do is we are going to start adding in the hair. And to do this, what we can do is we can simply shade in quite darkly in their regions. And we could do each line individually. However, while have found is a lot faster and a little more accurate to just do these lines individually as sort of blocking out these regions and then adding highlights and everything. So it creates an unnatural effect, which is not what we're looking for. So make sure the pencils announcing shot and using the wavy lined them up making technique, we can start identical Sunlight's eyebrow lines using a 6B pencil. Now if your eyebrows are not as thick as my, simply use a lighter pencil, for example, 2B pencil, and just build up the tones that way. But because myVar is very thick and quite doc, issues are not quick, kinda lot easier just to go straight in with a darker pencil. Just keep making sure that your pens was nice and sharp. It's not your lines and asking thing because you don't want to have them super thick as if think about it. You know, eyebrow has to even hand General. Typically it's very thin. We can do now is we can get our blending stone and blend in this whole region this will do is create a nice shadow base layer beneath the half that we can sort of work on. Really keep everything nice and succinct. And it can really be quite loose with how we're shading. Can literally drag it right into the skin around the eye. And although it's not as thick as we need it, so we can now, again, on top of this area of essentially duplicate and what we've just created. Now by doing this, what we've done is we've created an additional layer of half. And this will help bring out the depth and the thickness is that we'd want to mention the online's 97 close together. Now for this, we are using the tip of the pencil as we are working with nice deadlines. And what you'll start to notice is we're creating this really nice thick eyebrow. And to really bring out the shape of it, what we're gonna do is we're going to shade around this IRA whether shadows are, sort of exaggerate this. So pretty much rock hop, the shading process of this path. So without further ado, I can't wait to jump into the next drawing movie. So let's get right into it.
15. Shading: Hair: Hello, hello, hello, and welcome back to their Scotia class. When this episode, we're going to be taking a look at how we can draw hat. Now there's a few tips and tricks and when we go over and so some shortcuts to yet. But what I've done is I've simply just on the sketch behind the scenes. So we're ready to go and get right into the nice detailing. So what I've done was, well how I see it sort of loads and loads of different lines build up within different layers. And so there's a few ways you can tackle this. So as you've seen with the I and the eyebrow, what we did was we built gradually. But there's another few methods where we can do and I'm going to briefly go over them in this tutorial, though here's what we're gonna do. We're gonna stray away, find where r. Because I do have a fait, brought my hair as a Nobel buffet d1. And I'm going to have a look at sort of where the different gradients are, if you will. So we've got a darker sort region up here. And then we've got the mid tones around here, this nice triangle. And then finally the lightest tones being Hey, whether light is definitely him. And almost through an eyebrow, hey, which we're not gonna focus on. And we'll see the folks in the skin which we also want look at but we will do is have a look at the hair. So since this is the talker's area, what we will do is we're going to use some cross hat, Chin and crosshatch into this region using the side of the 6B pencil, but particularly ensuring the undo this quite softly. But enough to really stand out on a piece of paper or build up a tomes. Right now that we're happy with that what we're gonna do next is since this region here is the midterms, what we're gonna do is when it gets cheeky little freebie pencil under the same, again, not using too much pressure about the same amount crosshatch into this region using doc 3B pencil. And what I'm doing here is I'm creating that gradient using prompts actually. And it will really help speed up the process. So finally, what we're gonna do, we're gonna get hate should be or the pencil under the same flavor. And as you can see, we still have a gradient going almost like a fade with time. And we haven't even started detailing or shading F. So what we're gonna do, we're gonna get the blending stone this time. And just blend in this region. Economy quite rough with it, can be quite soft. You can use a tip or the side. It's completely up to you, whatever tickles your taste bud. As I like to say, we can now blend this into the other tones. And as you can see, what we've got going at the moment is pretty much a gradient. You know, you can kind of see it, which is exactly what we wanted. So you might be wondering, all right, so what's next? So this is essentially our foundation layer and this is what we're going to be walking on top of. So we're gonna get a nice juicy 4B pencil. It's, I'm going to make sure that it's nice and sharp. And when we'd get go in and start adding in the has, now these will be individual strands. And that's absolutely fine. But we are going to be used in making technique, which was the waving, the wavy lines. Since I don't have curly hair, we won't be using the square root's. So what we're gonna be doing, simply just finding where hotdog has regions are. So we've got a nice dark patch here. Another dark patch up here, another patch over here. And it's sort of like mumbo jumbo is ground here. So we can do that as we go along. But you can start wherever you want. I tend to start the top border middle. Whereas Rooney, up to you. And you can read, you have a lot of fun with this. I'm just take it all in your own time. Now don't worry too much about the highlights. We will take how those using literary, the similar method but using the razor I later stage however, so we can leave that for now and not worry about it. Just sort of big noise that, well, we should just keep in mind to now go over those regions. And we can just keep following the directions. So that's another thing. Always when you are drawing hair, look at the general direction of weathers, half-strands outgoing, and try your best to replicate this within your drawing. Who's often we do have hair in this region. So I'm going from left to right unless wavy curvy line. So we're gonna replicate this without pencil. Policy. We won't go in this direction as hasn't gradient direction, but rather this sort of slot.
16. Detailing: Hair: Now keep in mind we're under an honors a bit cheeky, but is something that I like to call soap and life hack when it comes off. And it's, I'm not looking at every individual has done, I know of CD photorealism like Heidi. They copied every single line. However, I do think this is a little bit tedious and it may give better results. I feel that if you follow the soul generic, so shapes and lines within that region, you're gonna produce something quiet, accurate and certainly something that has a bit more life to it. You know, it doesn't seem several Patek how you've drawn it. For instance, Hey, we've got going everywhere. So we can sort of follow through with that same format. We don't have to be so true if how we put lines. But what we will do now is we're gonna very gently, very gently blend in what we've done so far. And you might be wondering, why aren't we doing that? My reason for it is we're going to create again another layer of hair. Since it's sort of like the background layer. And I'm going to build a midtone layer and then finally the detailed layout. But because this is the Midtown where we're going to use as a 10 rates are now because my tip isn't the E y will do is our grew up my scalpel. And I'll be very careful when doing this. And now very carefully snip off the end of the phrase. So now we have a 9.2. We're gonna go ahead and follow it with the same, So a form as we did with the pencil. But only the only difference would be, would be doing it with the eraser. Now you see the lines are not going to be c pop invisible, but the ones that are going to be rubbing out right now. And the reason for that is because we don't have a lot of shade so far. All we're doing is we're sort of building up the highlights and really creating an additional layer of hat. And this will create a lot of depth and thickness within that. So as you can see, the highlights are more prominent in this region than this 170 because there's a lot more shaved head. And we will start doing the same process again, but this time with a 6B pencil. Again, make sure your pens was nice and sharp. And really get into those Nice Doc every is fundamental again, the same sort of routine and the same sort of movement. In particular regions. For instance, in this region my has a lot more curved. Whereas in this region here is an almost perpendicular, straight. So that's what we're going to replicate with our friends. He's made sure they'd been very meticulous with how your pacing lines has to be very particular. I'm very selective to really make your hand, you're touring convincing. And when we can finally sought to do is get on an electric razor, made sure that the tip of the ratio is nice and straight. And simply we can start either in lines. But finally, what we're doing, we're going to jump in with the 8B pen. So I've doc has Penzu. I didn't. The last finishing touches that are half measure using the tip of the pencil was nice and sharp. And if you really want a Hindu, an additional layer which will be using Tumblr arrays are, and this would just be going over these regions one small. Finally, what we're gonna do is we're going to go in with a pencil and adding Moody's exterior lines that so go everywhere. These lines out soil for not following the same suit. So jumping everyone, we're gonna add their science him right now. Again, make sure your pencil nothing shot. And be careful not to press too hard on when has not so sharp. So pretty much wrap up the hat. And we're going to jump right into the next tour now. So I hope to see you there. And I can't wait to see what you've accomplished so far.
17. Shading: Ears: Hello and welcome back to this Gill share class. When this episode we're gonna be taking a look at how we can start to shade and detail is to particular footage reference image. I'll be going over how I did this join. However, you can always use the tips and tricks that I've told you about. I can use them to Rudy Fox track and improve your drawings for your reference images. So without further ado, let's get right into it. So what we're going to start off by doing is just like the other Juran's. We will go ahead and create a nice faced home that we can let from. Now I'm going to do this so very loosely, you will have to be super specific, would fight again Lyons. Just what are the generic form for crosshatching and you'll be absolutely fine. And now what we can do, and you've probably guessed this already, is we can go ahead and grab a makeup brush and smooth these lines out. Whereas what we can do next is we can go ahead and start to create a highlights would be, but we're gonna go ahead galleries. I can use a needle one if you wish, or just a normal raise doesn't really matter. And we're just gonna go ahead and add in where our highlights are, where our lightest tones would be. For instance, we've got to on the globe without ever really have one around this region had ministry is be as specific as you can with these lines and make sure they're in the right place. Just because you don't want to get to the end of the drawing and realize that your shade. And so if you're highlights and shadows either RAM area. So you really wanna make sure that you get this right. And it's just as important as it could sketch. So we just working out well I highlights and if it helps, can do is squint your eyes, your reference image, and you'll start to see it. It's a lot easier. Now just with the highlights. What we can start to do now, and this is a bit cheeky and we can start, I think, in deep shadows. So for instance, hey, right into the whole of my ay, we can add this nice juicy shudder when add this in and be quiet calf with how we adding in this shutter is, can just use a TIF my pencil if I wish, because I know that this is exactly by one the shutters. And what we can do next is we can do the same. But this time up towards the top of this air, again being quiet scaffold Han placing my lines are just remember when it comes to Android and what I've learned is every sort of detail and shape. It will pretty much costs it's own individual shadow. So just keep this in mind when you want to run. And, you know, if you are a bit stuck with refer back to this key point. And then we're gonna create that nice cause shadow behind the a. Alright, so what we're gonna do is we're going to go ahead and create this nice shutter right off the bat. And just because we want to really bring out that a number can add in the bill of half v one plus a is popped by reference image. But I'm just gonna sort of Amman minds, blood is out. I just really stick to focusing specifically on air. We're gonna do is gonna grab our blending stump and blend these lines into the piece of paper. But when we are blending, since we want this cause shadow, we're gonna blend from right to left. Do the same for this region here. And also it is a nice shadow bouncing out what this area. So we are going to add that in. And it can be quite scribbling when it comes to that identity shadows right away. You don't have to be say pod facts with there is. Keep in mind this is pencil say can always wrap up any mistakes, especially with an electric probe. And here I'm just looking out for any more shatters that we've missed, for instance, over here next to this bone. And keep in mind, I'm not going in either. A is one of the most complex things you can't draw because there's just so much going on in such a small space. And any sort of era and your drain can make a big difference. So make sure that when you're sketching this up, if you haven't already, to really take your time with this one specifically. And don't worry if things are quite daunting at first. Trust me, the more you practice when it comes to drawing the ISA if economy. I've probably drawn dozens and dozens of different eyes, Different is different mouths and the list just goes on. So I also know the shortcuts and what to look for. And this is why create this class or try and help you realize your shortcuts right from the start. So you don't have to go through years and years of drawing an adjustment where the tips and tricks, alright, so, so, so, so, so what we can do next is we've got pretty much a very basic, basic, basic shading thing going on that lemon. And we will build upon this right now.
18. Detailing: Ears: We're going to grab ammonium 0, a razor. And we're gonna do some nice cross hatch lines over the whole. I don't know what you're thinking. You probably think I'm a bit mad. But trust me, by doing this, we are creating texture and we're creating it very, very quickly. So obviously you don't want to go over the top. Ii, just wanted to be quiet. So2 are there. And then use a makeup brush to go over it. Again, I'm gonna use a slightly different technique this time. And this tutorial is there's not gonna be the exact same as the other ones. I'm going to be a lot more specific with how place my lines. So we're gonna go ahead and get our 2h Pencil here. And since this is sort of like a mid tone, we're going to do that because zigzag sort of shading technique. I'm OK, Herodotus alone, up towards the top of the, so when we're doing is we're creating this nice texture. We can work from. What we've done here is we've added a really dark time. Then we can really push back towards the left hand side. And this is essentially all cause shadow. How about we just really exaggerating it? Rubber gonna shade us by kids at a piece of paper. And as you can see, the 3D pop out the page, which is really what we wanted. And as you can see, if you squint your eyes at this reference image. In particular, you'll see that there's another 3D dark shadow here that we really need to get an urgent need. So we're gonna do is we're gonna either in now, now we are alternating between four BCE and six B pencils depending on the region and depending on how intensive shutters are. So just keep this in mind and we will bring out this shadow. Now we'll shade this in using a very smooth blending stone this time. And we've got another nice juicy chateaux. Next, this region. I'm going to exaggerate this shadow. I know what you might be thinking And you're probably like sun burns looking very flat. But don't worry, we're gonna go ahead and it should be right now and fix that. And we're going to start building in some form. So we can do, we can saw angling online's 3D suit the form of a unready create that Mayas shade coming from your shutter and get blending stump. I'm blend this up into the highlight. Now depending on the angle of your AI that you've taken and also the lighting, the steps that you will be taken will possibly be a bit different to mine. How would a Techniques and everything else will be the same? So as long as you pick up the key points from this tutorial, if you will, then you'll be absolutely fine when it comes to drawer. And I'm going to come in now with my mono 0 eraser and start adding some texture lines to a, but which will help also bring out the highlights that we need. And what I can do is I can add some shades around this region too. And we just drank a nice level lines, but literally just doing lines for now. And we're dragging this from the shutters into the highlights and so on and so forth. The beauty is both to the a and we can just look at more shape to it so it's not so flat. Rather does look them molecule spot. I didn't mentioned previously with unsung highlights hair citizen well-being. And when it comes, I definitely do you believe in a saying less is more. So just I feel it overdose. I'm not making for suffice. And finally, what we're gonna do it is using a pencil, we would darken up this region as well as behind the air. And now pretty much from cleared the air. So we've pretty much finished. So without further ado, I can't wait to jump right into the next lesson, which would be to draw your nose.
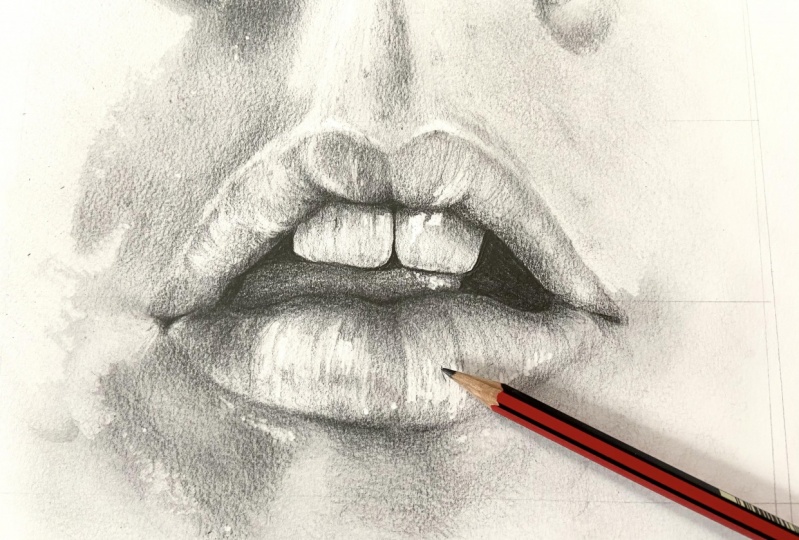
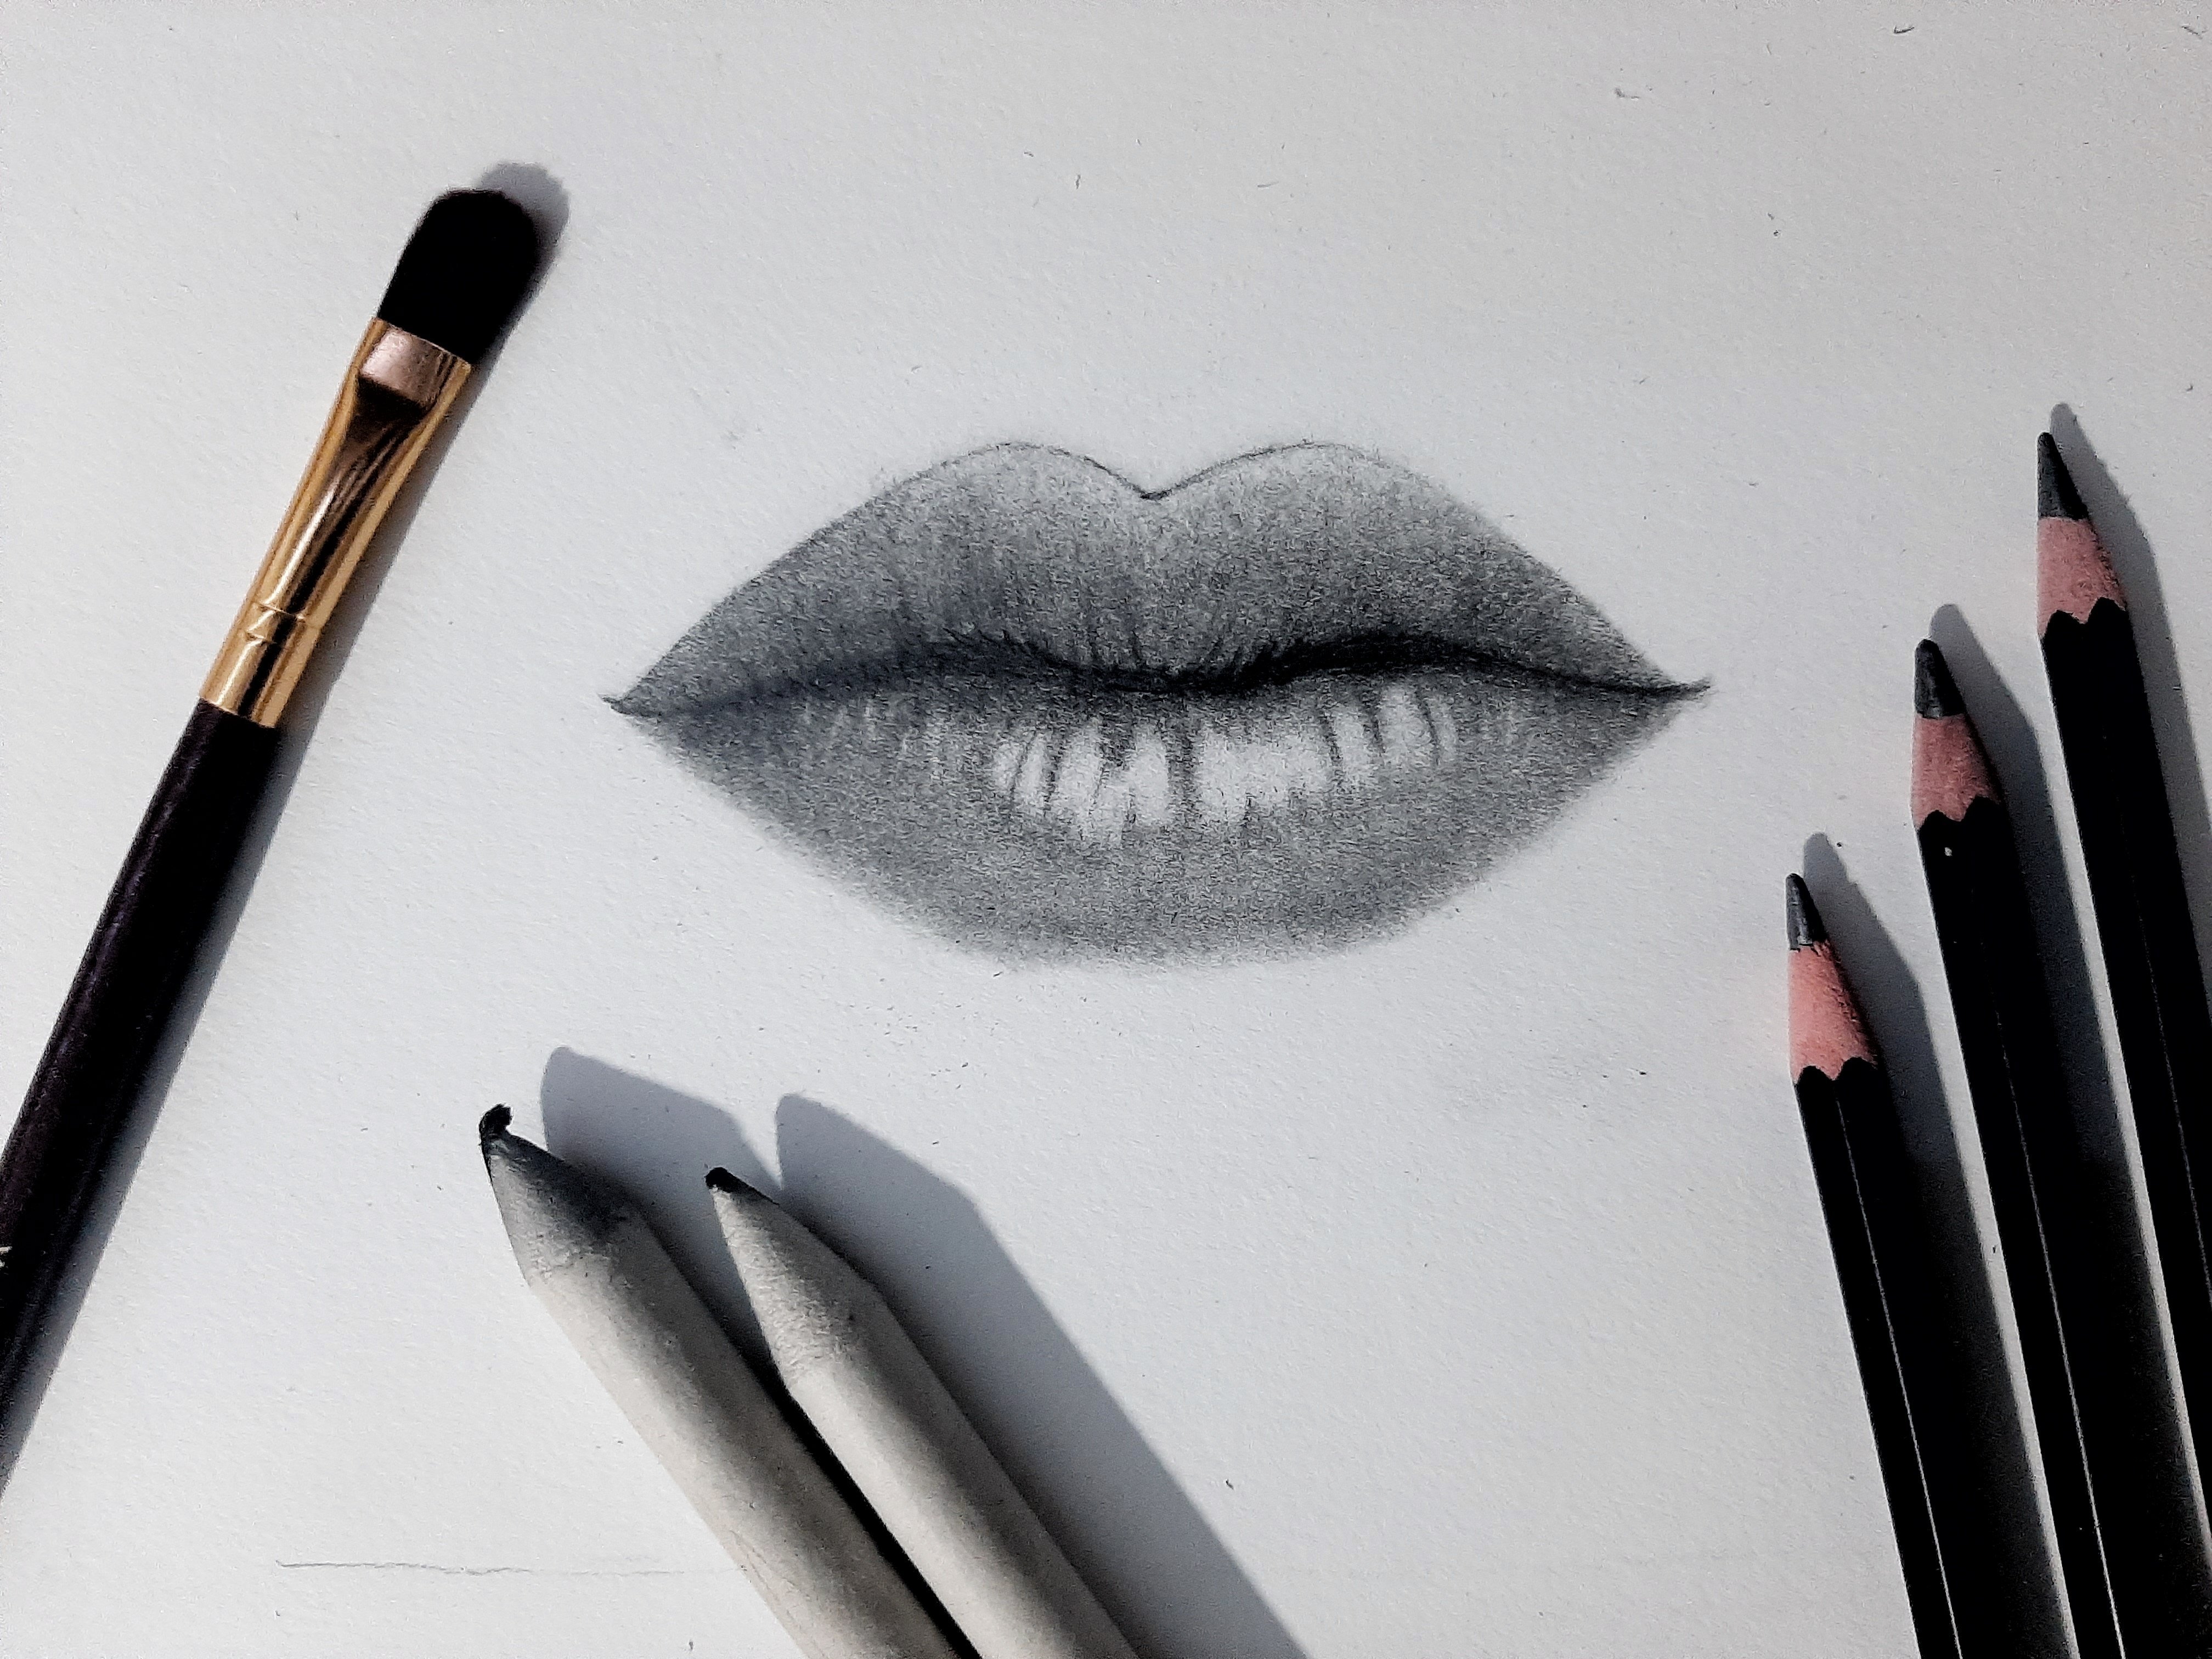
19. Shading: Mouth: Hello and welcome back to this Scotia. Cool, so endlessness. And we'll be taking a look at how we can draw lips and specifically the lips and the TIF. So without further ado, let's jump right into it. So what we're going to start off by doing is we're gonna go ahead and dock cannot sketch just a little bit. Now the reason for this is once we're gonna go ahead and create that foundation layer of shade, we end up losing the sketch that we just created. And so it's important that we talk in the sketch. I know of it just so that it doesn't get lost within that foundation and nail is complete. What we can do now is create that foundation layer. So using the side of that pencil, for example, I am using a B Pencil here. Make sure you do this quite lightly and that these lines are not darker than your sketch. And you can go ahead and cross hatched this hope box. Next, we're gonna go ahead and grab a makeup brush. I'm gonna just go in circular motions to shade in this region. Now I am using clapping makeup brush just so I can get these areas shaded quite quickly over. You could always use a blending stump. Make sure if you are using one dot decides that you are using on asynchrony. Okay, so now that is complete, we can go ahead and do is rather robot and find where our lightest areas. So if you're finding this quite difficult, as mentioned previously in this course, where you can do squint your eyes and look at your reference image. Because by doing this, you'll be able to find and locate these highlights, but not easy. And also as a pro tip when it does come through these areas where there's only a few lines, for example, in the nips predominantly because if you think about it, and then when we have Dr. nips, our lips tend to become quite SKD. Or you can start to see quite a few lines on them. And once light reflects off that it's gonna become quite prominent and hence create these really nice strong highlights. So what we can do is we can just generalize this shape for now. You know, we'd have to be super specific where these highlights are. As long as it's in the correct region, that is the main thing. So if with these softer shadows, I will be using my rubber lighter. So scrubbing the paper rather than pressing into it. So I can sort of create this contrast within the shadows and the highlights. I make sure that you do create these highlights and shadows, not just on the lips were also around it. Cuz this is super important for lifting the lives of, of the page. I'm creating that three-dimensional look. Now that we got done with that, we can then go ahead and start creating and distinguishing where autonomous regions are. And just like with the highlights, can we screen you eyes and relocate these regions are not easier. But for instance, the darkest regions just right off the bat would be up here next to the bridge between the nose and the mouth. Whereas on this dip, right, hey, I'm finally within the mouth itself. On o. So if you do have an OH, look, there are a few more regions around the mouth as well as beneath the bottom lip. And by getting these unready, recognizing where these areas are, you'll create right off the bat a much more three-dimensional looking object. And in this instance, have lips that ready too. Have that realistic and photo her like look to it. So let's go ahead and really press into the shadows. And what we can do now is so Shade deeds in quite lightly using a blending stone. Now for instance, that isn't really my fist keynote. As long as we're shading these n into the mountains and highlights that we just created. You will start to notice a ready is this power of lips, this on to pop out of the background. And now the paid Po1 is in an already created that three-dimensional note that you need and the reason for its buckling, we have a sort of nice contrast between those highlights and shadows. Alternatively, what you can do, this is what I'm gonna do because it just makes life a lot easier. You saw over up out the complete region, whether TIF, for instance. And then we've got this, so a front area. And so we'll push back any sort of highlighted regions that you just created that didn't belong there. And in those areas, you sort of exaggerate. That shut. This way from scientists side, you can sort of measure using either a Rudolf or perhaps, you know, mathematical reasoning. And just try and walk out, went that tooth or teeth stops on EMS. So now that we've sort of created that region, we can now do is create a foundation nail for the teeth. But it's pretty much, it's just a light to cross hatch over both for them. And this will help bringing them back into the shutter is understood that we can now create just like we did for the whole mouth and lips, that ONE individual highlights on shut a's. So if you notice there's a shadow on the bottom region of these teeth in comparison to the top. So we can just sort of replicate that quickly. Again, I am using the side of the pen. So whenever it comes to shading. And as t four, not 100% flat, you know, you do have perhaps ridges within them. What we will do now is we will go ahead and use a non-zero razor and sort of create these nice highlighted lines or perhaps ridges within the TIF. And on the left two, if we do have a sort of McDonald's logo looking thing. So we will distinguish that within the Durham. Okay, so what we can do now is Doctrine up some shadows around the mouth and also how created them will form and texture within the short run. As current any, you know, the top and bottom lip do look quite flat. It cannot be shattered. The dope it more. As mentioned previously. Can we squint your eyes for this, but make sure that when you are placing on the shadows, you're being really specific for your drink. And what I mean by this is you're constantly referring back to your reference to image. I'm really finding an sculpting out the shadows and highlights. And even if it does look quite bizarre, don't worry, as long as it's the same as your reference image. You have nothing to worry about, you know, and you can really embrace mistakes and you never know what can come from it. For example, there was a project I did in high school or secondary school where I send any side drawing over some paint. And it turns out now that that's sort of my unique speciality when it comes to what tends to do is I use a watercolor wash and then I had sort of draw over it. There are uses for port char and pretty much any fan outs. So I filled out the moral of this story is to really embrace your mistakes. I'm quotes in the experiment when it comes off. So perhaps this artist on may not be for you. My definitely do feel like once you sort of get a hang of realism, you can solve lambda rules to R and then break them and break them to your needs. So specifically for the bottom-left now, now that I'm finished with my little story time, and we can create this nice lined textured effect. But by doing this, we're also going to create a bit more shadow and so Shade within this region. So by doing this, I will be able to create a bit more form within that Bowman IP. I'm really helped to bring it out of the page. So what we can do now is use a bit more shading on this specific region. Now I am still using a 2B pencil for this. So just how it without highlight region, we are going to create a bit more shunting outside of the mouth. And as mentioned previously, this will help bring out the page. I'm create that nice 3D look.
20. Detailing: Mouth: So now that is pretty much complete. What we are going to do now is to look into this little micro details like highlights cool down as these sort of details when I really smooth things in your drawing that make a huge difference. So for instance, I would say right now, is this bottom lip is still looking a little bit flat. So if you have a little close look between this shadow on the bottom lip, there is actually a fine line here. And this is so a whether light bounces off. I'm, I'm sort of pushing this into your drawing. You will create that nice 3D look a bit easier. And obviously, to redo this effectively, we would need to darken up this shadow and also blend into the bottleneck. So you'll see exactly what I mean by that in just a second. So let's do this. I'm going to grab a 7B pencil. And as you can see, the darkness has literary went through the roof. So we're just going to darken up this area using the side of the pencil. Another table, what you can do is you can use your index finger, press it on top of the pencil and push that into the page. So pretty much when it comes to this sort of like a tennis match, you know, you when waves bouncing back and forth between a shutter is highlight, SHA-1 is highlights. And it's important that we do that so that we can keep everything in honoring noise and inconsistent. What we can do now is get so get some highlights. The starch has going making technique that we've used previously to wavy lines. And we can begin using this against that foundation I that we just created. Now may not seem like much, but trust me, by doing this, we feel will create the highlights of our heads. And we can now go ahead and do the same thing, but this time would have shop. Seven, be pencil. Now you can be quite wild with how your pace and needs for Has, it doesn't have to be. As mentioned previously in this class picture perfect. You can initially placed them getting in any direction, but any show that they are going in the same general direction. So you may not know is that we have gone a little bit to dot, dot left hand side, but it's actually no worries. So what we can do is in this instance we could use a neater board raise, I'm gently rubbed out. Both scrape away some of the shutters. But we can go ahead and use on 10 rates on and very gently create a few more hair texture is going in that same general direction. And what you will notice quite quickly is actually we are reducing that Naomi has. And just like that, we all pretty much good to go. So we're just another few more has just because I do wish I had a moustache. So we also affirm shop in real life, they may go and in times of facial hand we are pretty much done. You know, I'm not gonna go into the chin or that sort of reach embodied that undecided. But for now, let's focus specifically in this sort of region. So just how fast clients, we do have a few more shadows that need documenting, for instance, on that top lit and we can use that to 70 pence would assign a van to reduce the shadows a bit more on for now and do not worry about any details. We won't get into those later stage, but for now, let's just stick to the shadows. So we can start to do now is we're gonna use that money and make sure it doesn't have a nice sharp edge. If it doesn't, you can always use a scalpel to rectify it. So it's to this, what I will do is essentially is pretty much in lines going in new directions. And this is sort of like the skin of the nips stretching out. So we can solve blend for example, the highlight regions into the lip. And I would say only do this in the regions that need it because as you know, less is more and you do not want to go over the top with deeds, textures, and details. Specifically, these are the most permanent in the bottom lip on nice footage reference image. So what we can do is we will actually do this with a hobo omit, even though it's not permanent areas. And we'll sort lines going in the opposite direction. So if perpendicular to those lines, we would then shade this in very lightly. And by doing this with sort of blurring that texture out. And just create some room for us to go ahead and use a Docker pencil to really accentuate and exaggerate these textures. Now we can also create this texture on the bottom left of this Boehm nip. This is also a highlighted region that we do need to make sure with that we add in using perhaps I nitric Rebecca. I mean, we'll get into these nice highlight lines. And then we add in a bit more, shut it towards that bottleneck. We will once more highlight this very, MY career in another layer of soil texture. And finally, we're gonna go ahead and get electric eraser and read ego has an idea in these nice highlights. And do you have a few more small micro details? And not, for example, will apply to this bomb shadow underneath the bottom unit. And I've been that you're gonna put a few lines going from that highlight into the shutter. And this will replicate has now coming from underneath my Bowman AMP. But that's pretty much boom. We, we needed to do for this nip. You know, we've got the highlights or shadows, we've got some detailing. And that will pretty much wrap up this lip. So we're gonna go into the last one to final Hadoop for this course, which will be to create the nose. So without further ado, let's jump right into it.
21. Shading: Nose: Hello, hello, hello, and welcome back to almost pretty much a final lesson to disco shackles when this one will be taken a look at how we can draw basically shade in detail than those. So this is bordered a loss. I'm gonna hear me say this. So without further ado can get right into it. So how are we going to start this off is the same as any other drone bomb and I didn't want less change up for the final lesson. So what we're gonna do is we're gonna take every sort of detail and shadow shade and its own on its own time. So you'll see what I mean by that as we jumped right into this class. So this time we're gonna change. I'm going to stop with the shadows. So I did actually draw or sketch desk in my own time and off camera just to save some time because there is a lot to go into. I don't know what to get done. So what we're gonna do, we're gonna start with the shutter is using to start off with a pencil, just with standards be pencil. And what we will do is using a cross hatch method. Crosshatch in these really harsh shutter is. And this won't be specifically between the eyes which wouldn't be located around this region and the nose. So by getting this in straight away, we can really lift off the nodes from the page. And you can get right into the shutters and your shades and also the three-dimensional look to whatever you're drawing. So we, we will blend in using a blending stump, applying some pressure to it. Also, as the nose is quite cuffed, You know, I have actually sketched in red these shadows unchanged. So this has made my life a lot easier. So what I will do it using the side of the pencil and using sort of curved lines. So it described a form with that knows and how it sort of bends towards that side. So I will watch you use these curved lines. Specifically not crosshatch, but because by cross hatch in Ukraine now so a flat tone. Whereas if you're using more angular lines, you know, you will create that nice shape and form. So I am using a bending stone, but I will be shading in that direction that I want the form to be in. And then obviously towards the top is gonna be a bit more flat. So what we're gonna do the same for around the bottom of the nose. We want to be very careful to not over do. We'll go over the top of the shadows. So see beneath the nose is a bit more flats as we are dealing with some skin texture here. And we will then shade in this region using a bending slump. And the same will apply for the other side. Obviously you won't be the exactly same because the light sources slightly different. But we will do the same sort of approach, which is a cross hatch in these regions. And what you'll start to notice straight away is actually this noses becoming 3D. And we've added anything to it. So we're gonna do the same on the other side with the shading, very lightly create that shade or rounded Austral unsold the same within itself for this obviously is a blending stump as it is because it does have some graphite on it. And you're graphite that it does have this nice and soft and describing that soul form within the noise from the anatomy. And as you can see, unready to shading and applying shutter 2x, there's actually shade. And I'm trying to go into annual de highlighted regions. And in a way we've converted to what we were doing previously. But I just wanted to show you guys and gals that there's actually more than one way to draw. And it doesn't matter how you stop. And it's about the final result to your dream or op piece, which is what counts. So whether the same, I think a bit more shut out to the right side of this drawing and making sure the airlines on ice and comped for Angular. And try not to remove annual these highlights that we have already. So we're gonna do is we're gonna start darkening up the shadows. So by doing this, we're gonna get offset and be Penzu. And very lightly dot cannot. Specific regions don't worry them whether it's chateaux, but specific ones that need that low to it. So specifically on the top region with as a nice shutter and dip towards the eyes. Obviously I am using the side of the pen. So the reason why I'm banging on about this specific tip is because it's such an important one, but you need to remember because they can really make a big difference to your drawings. That's why I'm really hammering at home because in the long run, you'll find me for it. And what we can start to do is create a bin will turn underneath this nice. Mostly I want to define where on nostrils are. Just so that we never lose this with an entrepreneurial. And don't worry if you do end up going over the highlights so you can always remove that as a drain progresses. The reason why I'm doing it in this way, this specific drawing is I want to really expose you to the different ways that you can draw. And of course, I'm sure there's more ways that you can do in, but these are the sort of the way is the idle. Now everyone needs to try out as many different methods as you can to really understand not just how to draw, but also explore and find your own way or joy not really hammers home. I'm really works for you cuz we are all different people. We will think differently. And perhaps the methods to I've used may not really be okay with you. But perhaps this one is easier for you to use and so replicate. So what we're gonna do is we're gonna add a bit more, shut it towards the top of this. Nice, but it's going to create that foam towards the top or the nose and really consolidate what we have so far. Talking up anymore shadows. And we need to really consolidate. The nostril was specifically because as you can see, that sort of getting lost within a different kind of allow that to happen. So I'm gonna put it back on track. And St. Peter cannot this region here, shade it back into the drawer. And so we have a nice car shadow under the same on the other side. Now we will create unready, So foundation shutter beneath this no stroke of course is not that dot and the reference image, which is why now I'm gonna go ahead and get off when I was there a razor and start to re sculpture and redefining what a highlights on
22. Detailing: Nose: And again, if you realize that there are a few little areas that needs a bit more darkening up, such as, for example, my reference image, this right hand side. We can always rectify that and approach that. Now. Like I said before, it's pretty much like a tennis match always going back and forth. And it's important that you recognize any areas that you make from the start rather than at t n. So we look back at the reference image and if it does help, look back at your drawing with fresh eyes before you go into any detail. So really recognize if you made any mistakes or not. So, so if I spot the difference between the reference image and you're Jordan. Also, as mentioned previously, made sure that you keep shading in the direction of the form of wherever you wanted to run. And this applies to pretty much anything that you will ever drool. Whether that be, you know, the human anatomy, portraiture, even a Ferrari. It doesn't really matter on some of the tips and everything that I've mentioned in this course can be cross applied to practically anything that you choose to join a feature. So if you always need to, you can always refer back to this cross. Try and seek out those top tips I'm pro tips were even maybe screenshot them as I put them on the screen just so that you have them ready to go whenever you need them. So that is pretty much complete. What we can do now is have a look at how we can start detailing the nice. Well, before we do that, we're going to make sure that any lines that we did and 3D dark pencil, we essentially dilute them if they are too strong phase on pull on that leftmost rule. So what we can do now is we can start detailing and we can use some sort of making techniques like we've done previously. But looking at the skin texture of Manet's, we cannot choose. So scrip, who's using the one who's ever arrays to really simplify this texture. And we can do the same using a pencil. For this, I will be using a 6B pencil, but being very lie on using the tip of the pencil. And what we will do now is we're going to gently shade over all of the stuff we've done so far. Just to really consolidate, not just those textures, because also of dilute them if they are too harsh. And now it's pretty much a process of matching the tens. For example, this region here is pretty much the same as this region hand times of type two where we need to make sure that we've Rudy extension rate doesn't really exaggerate this to ensure the algebraic, non-indexed, consistent most every anesthetic. So what we can find a D for the final touches is add some more shutter Moses somewhat details in this highlighted regions as well. How create a bit more form within those regions. So if you're really isolate what we've drawn into a book. So you can see that this region is, we know a bit flat in comparison to this one. Here. There's more happening. Then hey, we really want to keep this consistent as much as possible. Which came out a few more details using some lovemaking techniques, using the eraser. And that will pretty much wrap up this drawing. If you really want to, you can use an electric arrays ought to really bring out anymore highlights. Now pretty much wrap up the snow storing. So without further ado, I'll see you in a closing video.
23. Final Thoughts: Ok, hello Hannah. And finally we have reached the end of this course. And I hope first and foremost that you found it helpful and definitely really opened your eyes to what's possible with your drain skills. But also like to see a huge congratulations for not only taking this course, but being open-minded to really learning and developing your skills as an artist. Now, what I would like you to take away from this course would be to really be open to risks and really be willing to try different things and different techniques. And really experiencing because in my opinion, you know, doing these things can make such a big difference when it comes to your drones. And also finding new different ways that you can draw and really share wherever it is that you want through. Our furthermore, while night to see is be sure to submit what you've done so far through the class projects down below and a comment to see what you've done and also share my thoughts on your drone. I perhaps share some feedback on your drawings and they may be wondering, what is the next step. Why don't you to do now is take your own reference for, for your self portrait. Now this can be as creative as you want it to be, as bad as you want it to be. But the main thing is to have fun with this process. So you can take it using either the selfie mode on your camera or perhaps get someone to take the reference image for you. And what I'd like you to do is once you've taken this beautiful reference image, I'd like you to edit it in a same way that we did with our reference images for this course. And once we've done that, go ahead and start during your reference image on your self portrait. And you can use water tips and tricks that you've learned in this course for drawing a different analyses or the face. And I'm sure gonna have enough fun with it because in the plug them with your music and just enjoying the process. And once you have done there so you can share your progress and ARAF announce in a class projects once more, and share it with your classmates. Share your expertise, anything that you've learned, and anything that you've overcome with this course. And I can't wait to read it all down below in a class discussion and projects. So that being said, thank you once again for taking this course and well done on all your hard work. So this is all for now. I'll see you in the next course.
 Sam Barroso, Portraiture Artist