Transcripts
1. Intro: Hello everyone and welcome to this course about how to draw realistic loops. So this class is for all levels, but especially for beginners. So we will all learn today how to draw the ellipse. You'll be first talking about tools you'll need. Then we will talking, we'll be talking about the outline of the lips. And last tool we'll be talking about the shading of the lips. So this class comes as one course of the series that I'm making, which talks about how draw facial anatomy step-by-step. First visit the eyes, the nose, and now we are going to do with the lips. Until at the end. Now I'm going to make a course about how to draw a full portrait. So without further ado, let's get started.
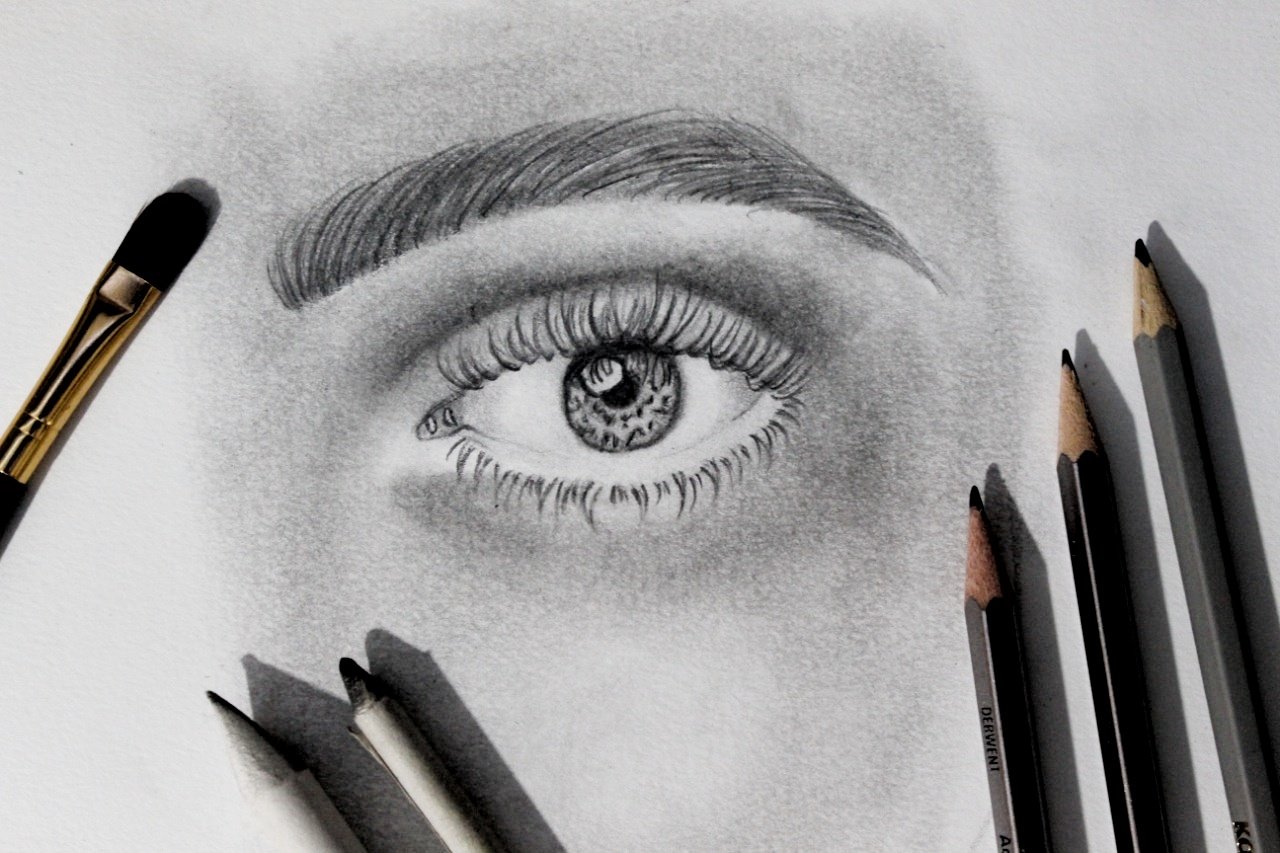
2. tools: So today we will be learning how to draw a realistic mouth, or it's better to say a realistic lips. So to do that first we are going to need an HB pencil. And then to start shading, we are going to need a pencil. And at last we are going to use a 5-bit pencil for the darkening at the end. Don't mind my Chinese pencils. And of course we are going to use some needed, I'm sorry, some blending stumps. And said of those you can use some paper tissues. You can use even your hand. But by doing so, you are going to leave some marks. That's why we use these blending stumps so we can keep our paper as clean as possible and the dark spots right where we want them to be. And at last but not least, we are going to use a kneaded eraser. Okay, when we use this eraser to erase some spots that we want, we can shape it. Anyway. We want like this, for example, to make some lines, some highlights. But of course you can use a solid eraser. It's up to you. And of course, make sure to really sharpen up your pencils to make some straight lines and not make everything a smudge. I have some tips and tricks of my own. I use this pencil eraser. Okay, it helps me even have more details in the highlights. They may of those nowadays. A metallic pencil eraser. You can use that too. And I like this. You can take off the remains of the eraser. So that's it with our tools. Now, let's get started with our drawing.
3. Outline: Hey guys, So first we are going to start by doing the shape of our lives. Okay? So first we're going to start by drawing a line, okay? Or we can draw a wave, or we can draw either sides, the upper side or lower side. It depends whatever you want. But each line shape you start with is gonna decide which shape of lips you're going to have at the end. So first, now I'm going to make a line, simple straight line, just as guidance. So first I'm going to start in the center. You can choose any point and you can use it as center for later. So first I'm going to just draw small arc, okay? And after we do this, we're going to mark the extremities. So you can do this at any direction you like. Okay, so I'm going to throw like this and make sure to have the extremities evenly apart. You can use your settle as a measurement tool as I am doing right here. Okay? So you can see they are evenly apart. So what we're going to do next is that we are going to make them together. K, You can do this also as any shape you want appear. This is the opening of the mouth. So I'm just going to do it like this. Okay, so now you have to make sure that the two sides are kind of symmetrical. Try your best. Okay, so you can use the left side that I drew first as reference to draw the other side. Okay, so now that this is done, next thing that we're going to do is the top side. Okay? Make sure that these have the same height. Okay? So when we're all done with this, we're going to erase the line that we drew at first. We don't need it anymore. I'm going to use my special catch it and just take off any eraser marks left. Okay, so next, what we're going to do is the top. You can do any shape you like. You can do either a V-shape or you can do. An arc shape or even anything as a straight line. Okay, so you can use any of these. But what we are going to do is that we're going to draw a V-shape. Okay? And the center of our drawing. Okay. So you can draw this at higher or lower, depends on how thick you want your lips to be. K. So once you've done this, just draw a line that connects them to the sides. I'm going to do the same thing. Okay, make sure that these start at the same height. Try your best to make them symmetrical. Okay, So this is done. Let's erase this line that we drew as a reference. Okay, so what we're going to do next is that we are going to draw the lower side. So at the low side, just draw a simply arc line likelihood. Okay? So this has the same distance as the upper side, k, the same distance from the opening of the mouth. Okay. If you wanted to, you can make it little more or less. Snow problem is just the thickness of your lips. So once you go from here, you have two choices. If you're going to draw an ellipse that has lipstick on it, you need to continue this line up until the end. Because when we are going to shade, of course, if there's lipstick, that means that there's color, which means every part of the ellipse is going to be shaded. But if you don't have lipsticks, you can just leave it. You don't have to connect it all. So just drew up until the middle of it from both sides. Okay. So now that we are done with this step, it's time for our next step that is shading. Okay? Remember to keep your construction lines light. As you can see here. You can barely see what we have drawn. Okay, but this is basically the shape of our lives and everything will come out perfect in the end. Okay, so let's start shade.
4. Shading technique: Okay guys, just before we continue, I'm going to teach you how to shade. I'm going to teach you the shading method. So first, what is your entropy per cell or in general, for any drawing you want to draw. If you want to shade, take your pencil, use it like this, okay? Or if you don't want to, if you don't feel comfortable, you can do it the normal way. Okay? And just make some strokes. Okay? The direct pencil, the closer to the strokes are, the better. Okay. And don't go with your with your fingers. Go with your elbow. Okay. With the wrist. I'm sorry. So just go on close strokes. Okay. That way you will have some good shading. You can practice this so you can have the same color of shading. Okay? Don't do it like this. Because if you do it like this, it's going to be harsh. There will be more gaps and there will be different colors inside. And there will be much difficulties while you want to blend. Okay, let's try this. If I want to blend this one, as you can see, a dense, quite fast, okay? But if I want to blend this one is going to be much harder. It's not going to look realistic. And as you can see, you can still see the harsh lines. Unless you want to blend. Here. You can see that the lines, the more you blend, they will eventually go and make one color. Okay, So this is the method. Just put your pencil with your wrist and do some light strokes. Okay, so let's start shading the lips.
5. shading first layer: Hey guys, So using the method that we talked about earlier, we're going to start trading. Okay? So all in the same direction. And each time you take your pencil off, just do some at the side so you make sure that you have as you can see, I have a lot of gaps. So I'm just going to redo them again this time. The gaps. And don't worry, if you go a little bit outside, you can just slightly erase it as we are doing soft shading. So there won't be a problem. It will be easy to go and you won't have any difficulties doing so. So once we are done with our primarily shape shading, we are going to blend. Okay, so let's blend everything. Okay? So once we're done, we're done. First, we're going to erase the extra blending that went outside the lines that we drew. Now we are going to redraw over lines, as you can see the slightly lighter drew above them. Okay, So now we're done with this. We are going to take okay, and you are going to redraw the lines, but with a little bit. So now that we're done with this, we are going to start shading different boards of the lips.
6. Shading layer two: Okay guys, so now we're going to retake our HB pencil and we are going to start shading the lower part of the lips. But first we are going to draw our reflection, which is at the center. And I'm going to choose at the left, also at the right. So you can choose this as you like, as the light in your reference photo. Okay? This is just the reflection of the light on your picture. So if you have a reference picture which the light comes the opposite side, you can shift this reflection area to the other side. So we're going to draw the shape K. You can use any shape you want. But I prefer to use this one. And I'm going to do second one. Okay, So this is the flexion area I'm going to use. So let's get started with our J.
7. Fibers: Okay guys, so our first step is going to be, we're going to draw some shading lines, okay? But remember that the lips are a kind of semi sphere. Okay? So they have a curve. So we're going to draw like this. At this side, they are going to be like this direction. Then at the center they are going to be like this. Kind of a intermediates between the two and the left side. They are going to be in the opposite direction. Okay, So let's get started. Okay, so remember to have kind of a straight line at the center and slightly begin to occur once you go to the right side. Okay? So once we're done with this, we are going to just redo it again to make sure that we have the correct lines. I'm using thin lines, but you can if you want to also be as good. Okay.
8. Darkening lower lip: Okay guys, so now we're going to start shaping and changing our light source. So we're going to look in the lower side all the way to the end. Hey guys. So just draw some shading lines at the bottom side of the ellipse. As you can see, it has been it has darkened from the lower side. And we're going to do everything once again till we have a really darker side. Now what we're going to do is we're gonna start at the top. But make sure to leave some spaces. Gate it's not as dark as the lower side, so just draw some lines to connect the dark sides. Especially at these points. This is check for any difference in color. As you can see here, it's less dark. So I'm just going to do some more. Shane declines just to have the same darkness and on the lower area. As you can see, I have made it too dark in the middle, so I'm just going to create some highlights. A toast to lighten things. Okay, So let's go to our next step.
9. Lower lip blending: Hey guys, so now we're going to start blending. I have drawn. So let's just blend everything together. Just erase any excess blending. Reason for this, it will make it easier. As the kneaded eraser gives you more precision. Check, always check for places that have been done. Again. Okay, so now let's go to our next step. Take a pencil and start by drawing the opening of the mouth. Just through TO more time with you. Okay, so after this, we're going to start shading the upper part of the lower lip. Okay, so just imagine with me, this is a human being lip. And the upper lip is always more to the front. So it blocks the light, kind of like this. This is why this area gets more light. And the area behind the pencil is always darker. As it gets no light, it gets blocked by the upper lip. That's why we're going to just darken our line and start shading from under it. So our next step is going to be blending downwards from this shading. Okay, So just blend one going slightly and go in the same directions as we have said before. Okay, So once this is done, just check for places that have excess. The places you need to do once again, all blend. Just stop, take a look from far behind just to check if everything is in place. Just gonna go one more time with my five b. Just like we are. Good to go.
10. lower lip Highlights: To start doing some highlights. Okay, if you still have the shapes you have already drawn to the better. If not, you can always just improvise. Okay? So now we are going to improvise because as you can see, the shapes are gone. But you can always use a kneaded eraser, K. It's much easier than to do it with a normal eraser. So let's just start just going to sharpen my eraser. But the shape of the shading. Okay guys. So I've said you haven't done this. Just blend the loaded area without making it. As you can see, we have not blended this area yet. So just we have to blend things together because this difference, this difference in color, won't make it any realistic. I'm just going to create a little space here because god is not realistic. So just we have to keep the darkness in the upper side and the lowest type. As you go, you can always just just these kind of tips. Okay. Just to make sure that the reflection areas he seems realistic as it's not a rectangular anything. It's just the reflection of the light between the race. I'm just going to throw a couple here. I'm just going to draw some random lines just to restore this angular shape. As the lines just disappeared between the blending. Some light lines with your pins.
11. lower lip details: Okay guys, so now we're going to continue our highlights. I couldn't find my meters eraser, so I'm going to use the edge of this razor, but it's better to use a kneaded eraser if you have one. So I'm just going to create at the sides small highlights, fairly small islands such as points. Okay, Just a few at each side. I'm going to also add some points under the main reflection area, D. These points will give it a realistic view. As you can see. Remember the whiter this area is, the better, because the reflection between the dark upper area and the lighter area is the best. It's what makes the drawing out. Okay, so now I'm going to use my HB and through just a few small fibers between the flexion, they just throw them randomly. No particular way to draw this. Anyway, you like. For our next step, I'm going to just blend it a little bit because it seems inconsistent. Don't blend over the areas we have just made the highlight. Okay, So next I'm going to just make sure once again with my five B and draw this line once again. So just simply redoing the earlier steps just to make sure that the, I have the correct color. So this is basically drawing, just putting a layer of graphite on top of another and blending things together to make them look realistic. Okay, so let's go to our next step.
12. lower lip final touches: Now we're going to start with our upper lead, their lip. But before we do that, just erase any excess. Okay. Just have a quick look on your lower lip, see if there's any modifications you'd like to make. Okay. So this does not have to be a straight line. So just gently blend a little bit here to give it the realistic view. Okay, so once you do this, just make sure that there's no difference in differences.
13. Upper lip shading: Onto our upper lip, you're going to start by making kind of a reference line. Okay, just follow my lead. Okay. This is our reference line for the light and for the difference and Congressman, just going to lower it a little bit from this side. Okay. So let's continue. First, we are going to draw lines like we did down. But in the same difference in the direction that we're going to do is decide you are going to use this direction. In the center. We are going to be kind of intermediate. And this side we are going to use this ink. I'm going to use the sink. So let's get started. Find the line that we drew now, we're going to explain everything later. Hey, don't go all the way up as we did in the lower lip to whatever the pencil stops, but not at the end. Okay. As you can see, I have different kinds of lines. It doesn't matter as we are going to blend everything later on. And we're going to make everything look just fine. So what we're gonna do now is we are going to continue doing this, but we're going to start from the lower side. What you're gonna do is that we are going to, for example, the left side, we have this line. When we're going to draw another line from the bottom and make kind of a wavy line and start from this. So you can see what I mean. And then the next line. Okay, so now I'm going to take my pencil and just draw these wavy lines and making small fibers. As you can see, this area above. Because this area gets the light. This is the area that gets the light. As in this side. We have a kind of like this. Okay? So this is the area that gets the most light. So here we're going to have a lighter area. So you'll see what we're gonna do with this next. For now, just continue drawing lines.
14. Upper lip blending: So take your blending stump or use tissue paper, doesn't matter. And just start blending these fibers to get K, make sure to don't blend the upper side. Just blend the fibers from the rope. If you get there, there's no problem. We can fix that and just try your best. Okay guys. So now I'm going to take my five B and I'm going to draw this line once again. Okay, So I'm going to remake these points. The wavy line that we drew. And now I'm going to take my five B and just through just to get the shape of the fibers back again. Try to keep them as light as possible. We don't want lines to show. My five b. Okay, so what we're gonna do next is we're going to do some lines would be on the lower side of both sides. We are going to okay guys, so now what we're going to make, we're going to make this upper side lighter than the lower slit caissons. I don't have a razor wire lost it. For you. You can roll your kneaded eraser okay. At this land and then just thrown it on the upper side. I'm going to again, but this time including the edge. So let's clean this mess with you. Don't make it likely check if everything is still in place. Okay, so now I'm going to make this point. Okay, So now as for the line that we drew at first, okay, now we're going to use it. We are going to redraw it with our eraser, kind of. And we're going to use it as a reference to make the whole area above this line lighter than the
15. upper lip final touches: So after doing this, I'm going to do some random lines. I'm going to blend once again. But this time very likely to keep the area above the area, the lowest area. And I'm going to make this reflection that we drew little bit lighter. So everything would go together, smooth. Some final touches. Take you five, be redraw these points. You can include some small fibers. As you can see, when is almost ruined. Okay guys, so finally just erase the edges. So you can have a clear view of what you have done. Of course, if you're drawing a full face, you can skip this step. This step is only for throwing. Okay guys, so I think this is our result. You can always find things to do. You can always find things to make, things look, to make the drawing look better. But if you do so, you will never stop because this is how it is. So this is the final drawing. I hope you liked it, and I hope you can use it in real portraits, which we will be getting to in courses later on. As what I'm doing now is I'm starting with individual courses about human portrait. Part by part the ears, nose, the eyes, and the mouth in this lesson. So I hope to see you soon guys. And I hope you enjoyed this lesson.
16. Final words: Okay guys, thank you so much for watching this course. I really hope that you found it really informative. And that's you all learned how to draw realistic lips now. So don't forget to give you a review on this course and to write your honest opinion. I really hope that I made everything clear step-by-step as we went through. And in the end, please do the project. So we can all learn from your experience and you can share your work so we can all appreciate it. Thank you again, everyone, and see you on the other coast.
 Youssef Khalil