Transcripts
1. Intro: Hello everyone, My name is. And today I will be teaching you how to draw a realistic I. So this class is for all levels, but especially for beginners. And at the end of this class, I'm hoping that all of you know how to draw realistic I. So first to start with the outline of the eye, then the shading of the iris and the eyebrows and eyelashes. And at the end we'll be talking about shading of the oval of the eye, the bones around it, and the areas that get light and those that doesn't. All of these details will be discussed in this course. And I'm hoping that you will all participate with us and do the project so we can all share your experience. So let's get started.
2. Tools: Okay guys, so now we're going to start with our tools. First, we are going to need an HB pencil and a to-be pencil. Also, another for B pencil and 5 B pencil. And you can use either seven or eight B, you can use either one of those. And then we're going to use some blending stumps so we can land. You can replace these with some tissue paper or even your fingers. And I will give you some tips if you want to use your fingers or tissue paper later on while we draw. So also of course, we're going to need an eraser. And if you want, you can use a kneaded eraser. So let's get started.
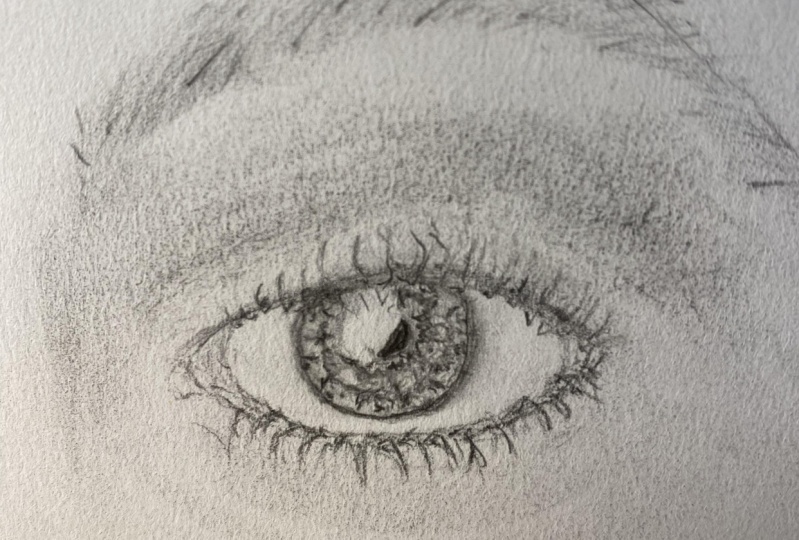
3. Outline eye and iris: Okay guys, So let's get started. First, take your HB pencil and just sketch a rough oval shape. Okay, just draw an oval shape. Okay. And remember to make it as light as possible. This is just going to be our outline. Now we are going to cross our oval with two colors that will make the eyelids. So first we're going to the upper eyelid and then we're going to do the lower right. For the lower eyelid, just start a little bit under the upper eyelid. So we can draw at this place right here. We can draw later on the lacrimal area. I will tell you what that is later. So now just do the outline and the touch at the site. Okay, so now we're going to add some rims to our eyelids to give them some thickness. Okay. So at this side of the eye, in the lower eyelid just make this side much thicker because this is how we are going to make our light reference. Okay? But of course, if you are making this a Golding to another reference photo, just go ahead and do as you see. Ok, So at the end of this class, I'm going to put our project. And our project will be, this will be using this I am just drawing right now as a template for you to make as a project. Okay, so now I'm going to draw the iris. The iris is the middle round part of the eye. Okay, so I'm going to just draw this round circle. Let's start from bottom. Okay, So this is our iris. I can see that I have made it to the left, so I'm going to take that off and make it once again. It's okay to have some measurement mistakes. So K we are at our beginning of the drawing, so don't worry. That's why we are using a light pencil so we can correct our mistakes whenever we need to. So I'm going to just slightly to the right side. Okay, so now we are going to draw the pupil, which is another circle inside the eye gaze and just draw the central circle in the middle of the iris. And then we are going to make an area that is a shape of a reflection of the light as we are going to draw in this. So you can draw whatever shape you want. I'm going to use this shape. Okay? And then we're going to also leave a point here as a reflection. And I'm going to draw the corners of the eyeball in the eye. Okay? Okay, So this is the outline of our eye. Now, we are going to make the outline of the eyebrows.
4. Iris fibres: Okay guys, so now we're going to start shading our iris. And to do that, we are going to take our softest pencil, which means a seven b or an API. Okay, you can use either one. And so we are going to darken the central of the iris, which means the pupil, okay? The darkness of the pupil will define the contrast for the rest of the drawing. So for that I'm going to use my eight instead of seven. But if you don't have an AB, you can always just use the 70. I'm just going to darken this circle that we drew. And I'm going to avoid that affliction area that I drew. Well done with that. Now we're going to take our pencil and we are going to draw with our Tooby fibers coming from the center of the iris that go around the reflection to the site of the iris. Okay. So from the center of the iris, I'm going to go keep your pencil slightly tilted to make the lines soft. Make sure to not draw any fibers on the reflection. Gay. So when we're done with that, we're going to start darkening the edge of the iris. So we're going to do the same five rules but on the opposite side. And so once we are done with that, we're going to draw a ring around the pupil. So we're going to just draw some sort of ring around the pupil. Okay? And we're going to draw some mixed fibers. These fibers will eventually give us realistic view of the eye. Pencil. We're going to darken the edge even more. Okay? So we're going to just slightly dark and it knows no harsh lines. Okay. Just a little bit stronger on the pens. Okay, so once we're done with that, we're going to draw some fibers that are darker than the others. Okay, So just some individual fibers.
5. Iris shading 1: Okay, so now we're going to use the same pencil to shade all the iris. Okay, so we're just going to shade it lightly, just just to break the white areas of the background. And the lightly do it, the better. Because when you do it lightly, there'll be no harsh lines. There will be no differences that pop out that make it look unrealistic. And once again, make sure to not say the reflection area. And if you do, make sure to okay, So a few do just shade the reflection area and not cheated. Like just if you drew some something inside by mistake and just raise it off. Okay, so now that we're done with our shading, you're going to draw a semi shadow around the ring and little shadows between the fibers. Okay, so I'm going to take my, you can use your kneaded eraser now. I'm going to use my pencil eraser. I'm just going to create some areas between the fibers. Okay, so now we are going, we are creating. So as you can see, you want the shape to appear. Okay, so you can see now it's totally different. It's not just some fibers drawn, it kind of getting a realistic view. Okay, so now what we're going to do at the edge around here, we're going to draw like a semicircle. Okay? Remember no harsh lines just to everything. To darken our central ring. Once again, this slightly so it doesn't go mixed with the others to create some more shadows. Now we're going to darken the outermost part of the eye. Okay, you don't want it to be light shadows, but the shadows have to be inside. So we're going to just lightly shaded and draw some more fibers. You see that to shade this area between the two rings a little more. Ok. And we're going to also create some shadows. Okay, so now we're going to take our four B pencil returns. And we are going to make sure it's properly sharpened, and we're going to use it to accentuate the shadows we have already dropped. Okay, so we're going to start with the outermost. Outer moves to parts of the eye. And we're going to make it darker as always. Likely. Okay, so now we're going to essentially the shadows that we have already drawn. So this part's just accentuate them. So when we, when we make dark points next to light points, as you can see, it pops out. And when these bots pops out, it makes the eye look more realistic. So this is the main idea that we're going to do. Now I'm going to use my eraser. However you want. I like to do it this way. So now I'm just going to so I can make the dark parts out. Okay, so now we're going to make this dark area blend in with the interior area. So we're going to just drew to make the stick. Okay, so t is the time drawing will eventually gives the eye the sophisticated look at it really is. So now what I'm going to do is I'm going to darken this area around the pupil, but not so much. Just keep in mind that we need some spots of light. And we need some spots that between the dark sides and the light sides. It's what, it's, what makes it look more realistic.
6. Iris shading 2: So now I'm going to take my blending stump and I'm going to suddenly, I'm going to gently just blend the outline of the iris. So the iris is a part of the eyeball. So it shouldn't have a completely sharp edge. Therefore, I'm just going to land around it lightly. You don't go too far. Okay, that should do. So now I'm going to retake my pencil eyelid over k. So this part, this is why I haven't focused on the spot. As you can see, I did not make it I did not make these shadows that we have made in this part because I knew that we're going to draw the shadow of the upper eyelid and this area. Okay, So, but keep in mind that the AI isn't flat. So make sure to have this edge just above the reflection area. Okay, So this is the reflection of the upper eyelid. And what we're going to do is that we are going to raise the upper eyelid that we have already drawn with. We are going to make it lower to around here. Okay? So iris that shows. Okay, so it's just the this part of the ice. So what I'm going to do, this is the benefit of using the HB pencil at the start, is that you can easily, if you have some stakes in your your measurements or any mistakes at all, you can just raise it and do it again. Sangam do it again, but with my HB pencil so I can do it with my comfort and erase it if I did not like it. So I'm going to make it this area and this area. I'm going to just erase it. So it's going to be like this. And the upper part also. And I'm going to erase. Okay, so as you can see, I have taken into consideration, I just use my full b so I can have a dark line. And there you go. Okay, so I'm just going to shade it one last time. T. So now what we're going to do is that we are going to draw the shadow of the eyelashes on the iris k, as you can imagine, the eyelashes will be around here and they will have a reflection on the iris. So this reflection will be most visible over the reflection area. This is why we can see it. We will draw it in this area the most. So we start here. As you can see, it doesn't show very much. But when we come to the reflection area, it will be more physical reflection. Okay, So keep in mind that as in the side, the rule have this direction, and in this side the heroine have this direction. Okay? So we have come to this size, so I'm going to draw it the opposite direction as such. So I'm just tracing some extent SRA doing that should not be in my reflection area. As you can see, I have this amazing tool where you can just erase from, from the side. Okay, so now I'm going to put down my FOB pencil and I'm going to take my five B and I'm going to adjust the contrast of the eye. Okay, So I'm going to darken the shadows to make the lights out. Okay? So now that we have done this, we are going to erase the boards between the upper ring and the lowering. Okay, so we're just going to make these pots lighter. If you want, you can use your eraser. Okay, so what do you need to do is just, as you can see, I've made a dark point around here. Then I have erased the right side, the left side, and the center side is shaded but litres. Okay. So this is the actual site of the inside of the eye. So I'm gonna do the same thing on the upper side. And we are going to darken everything once again. So don't worry if it seems like you are just drawing and erasing. No problem. So now we're going to start shading things with our four B, I'm sorry, with our five B to adjust the contrast. Okay. So this is it for our iris. I'm just going to darken our eyelashes. Okay, So I think we are good to go. Just one last thing. As you can see, when I blended the IOUs inside the eyeball, I went too far. Okay, So this is not good. Just reduce it to a minimum. So you don't have any harsh lines. And you will have the result you want. Okay? So this is the final shape of our eyes. So now let's start with our eye.
7. Eyebrow: Okay guys, so now we're going to start with our eyeballs. So first take the HB pencil and draw the direction of the hairs and the eyebrows. As I have deleted my eyebrow, raised my integral, I'm going to throw the outline once again. As I already said, the upper part, do it as a straight line. Okay, So after doing the outline, just draw the direction of the hair of the eyebrows. So first we're going to start with kind of vertical hair. Okay, don't push too much on the pencil. Then start tilting the hash key. So tilt the head and go up and the IRA, when you are around this point, we are going to have this direct. Okay. And in this side, the upper side, we are going to have some opposite direction. Don't worry if it's messy, it has to be for now. Don't worry. The eyebrows are never never straight. They never even a few. They are drawn. Even if you go to a clinic, they are never super straight. So that's what we are going to do now. We are going to take our pencil and we're going to draw. A draw is one by one. But don't throw them. Schottky. So as follows. As you can see, I'm drawing them one by one. But I'm like, what? Just if you I know this doesn't seem correct for no, but it will all come together later. Now we're going to do the same thing, but with our obedience to darken things up. Okay? So what you are going to do next is we are going to align the eyebrows. So what does that mean? First, we are going to look at this. This is not natural. This is okay. You see here there's kind of a line as I started from the outline that I have drawn before. But this should be it a natural shape. So just throw some start off her from different positions. Don't make them at the same distance from each other. Just like that. Okay. As you can see, now, now we have to start doing some outline control. So as you can see here, it's way too up. This is not what we started with. So when you're done, just I can take this off. But I'm going to draw these with you. That goes on the opposite side. Just to give it the natural look. Okay, Now we're going to take our HB pencil, k. This is the softest pencil. To just add some more darkness. Just add some some stray hair, okay, to your hair. This dark hairs that we are doing now will give some kind of realism into our drawing. I'm going to draw some little hair here. And some here. Oh, okay. So that's about it for our eyebrows for now. So we now we start with the eyelashes. Just doing some final touches. Okay. So.
8. Eyelashes : And raised historic spot. Okay, and we are good to go. So now take your pencil. And without a pencil we are going to sketch the direction and the shape of the eyelashes. So before you start, look in the mirror, tried to understand what you see. Okay, the eyelashes are curvy and the shape will be affected by perspective. They go slightly down right from the rim of the upper eyelid and then the curve up. What does that mean? Let's see. Mentioned this is the upper eyelid. Okay. So first it goes down, then goes up. Okay, So that's what we are going to do. As you can see, on the different sides, we have different directions of the eyelashes. Okay, So next up we are going to do the load eyelashes the same way, okay? But the opposite is that they go up then they go down first. Okay? Okay, So we just drew the lines. The important thing to say here is the direction of the month k. So now we are going to create some sharp lumps because the eyelashes tend to stick to each other. So long to read some lumps hidden there. So we do the same thing on the upper side. Okay, so after doing so, now we're going to take and we're going to add some more. So with our food through in-between the lumps that we have already made and darken the eyelashes we have already done. Now what we are going to do is that we are going to add this direction that I talked about earlier. Okay. So this will bring up the direction that we spoke about earlier, that the eyelashes go down for they go up. Now we're going to look things up also in the lower eyelid. Okay, now I'm going to take my pencil and I'm going to darken these. Keep in mind to draw each on its own. Okay, Now what's our HB pencil? We are going to accentuate some of the eyelashes, make them darker.
9. Final touches: We have to do something that will make this throwing even more realistic. Now we are going to make some highlights between the head of the eyelashes and specifically the lower eyelashes. So I'm going to create these highlight highlights inside the lumps that I have already made. Okay. So start from the upper limb and go inside the lumps. I'm gonna do some also in the upper. Okay, so now I'm going to remake some inputs. Okay? So as a final act, just accentuate some parts of the lower eyelid and go. So what we're going to do next is you have to look at the drawing from a distance and try to see how the shading can be improved for yourself. Okay, you can use any pencil for this task. You can darken some parts. You can lighten some pots to your choosing. Now, one last thing is that don't forget to not forget that this is all a One drawing, only eyelashes and only eyebrows altogether to shade around. Okay, one last thing. You see this area. This area is where we have a bone. This bone is above the eye and under the eyelashes. This bone, bone sticks out, which means that it gets more light then around it. So at this level and you must have kind of a flight circle, okay? But as you can see here, this is not the way it should be, so I'll just erase it and then slightly blend in. As you can see for yourself, the result is a lighter area but without harsh differences. So that's it guys. If you want to make some touches, we can. As I can see now, the highlights of the lecture material can pick up blended in side the others. So let's just create them. As you can see each time that you look at your drawing, you are going to see some improvement that you can do. It's not run. It's always like this. It's always going to stay like this. This does not change. Okay, it's who we are. We always want to be better at what we do. Because we know we can be better, because we can all be better. Hope you will be perturbed by learning these techniques. And I hope that I am delivering my ideas to you. Like I said, I'm just doing some final touches. We look at the okay guys. I hope you enjoyed my lesson. Okay. So if you have any comments or anything, make sure to leave it in the review. I'll be doing some more lessons later on till we complete our set of parts of the portrait, till we finally get there. Thank you everyone.
10. End: Thank you everyone for watching this course. I'm hoping you all learned how to draw a realistic I. And I hope you will all do the project so we can all share the experience. Thank you everyone for your time. Have a nice day.
 Youssef Khalil