Transcripts
1. Introduction: Do you want to draw great cartoon characters and to be able to draw
them in motion. Hi, my name is Maria Abramovic and I'm an
illustrator and I made, and I'm here to teach you figure drawing for cartoon characters. Characters can be a
challenging things to draw. And yet even more so when you
have to put them in motion. That's why I designed
this course for you. In this course, I'm
going to guide you step-by-step and teach you how to draw any
cartoon character. Moshe, we're going to start with a very simple structure
using just a stick figure. And we're going to draw a character in motion
from the ground up. You're going to learn
about proportions of cartoon characters in
comparison to humans. And you're going to learn about body mechanics when they
perform different tasks. We're going to
draw characters in sitting position, characters
daring, heavyweight. And also we are going to study the body mechanics
of push and pull. We're going to also
draw body language, how to bother, which
conveys emotions. And also we are going
to talk about how h changes our body
and our posture, and how you can draw
characters of different ages. Last but not least, we're going to draw unconventional characters
with crazy proportions and apply the same body
mechanics that we did with characters that have
more human proportions. So I hope this encourages
you to join me in this journey and opened the
door to your creativity. If you liked the course. Don't forget to
review and comment. Thank you. I hope I'll see you
inside the course.
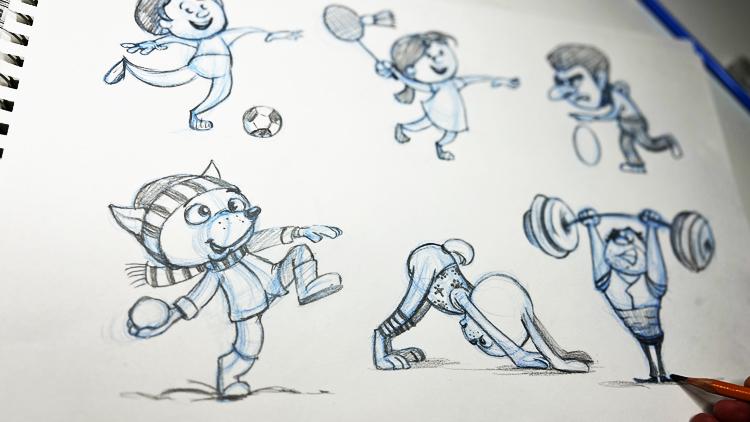
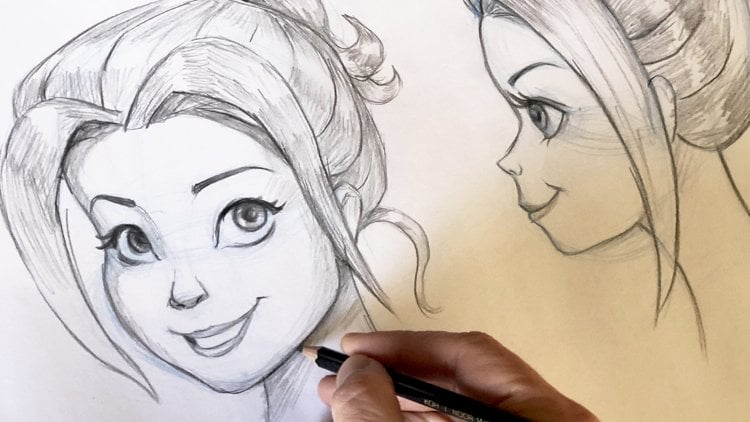
2. Warm up: Hello there. Let's start our
lesson by warming up. And you would say, why would I warm up? While the thing is that usually you have the image in your head of what do
you want to draw, but your hand is not following. That's why I want you
to loosen up your hand. So you become fearless saw you trust the image in your head when you start
drawing the real thing. And I'm using two
pencils, again, those were followed
me know that I use blue pencil to draw
the sketchy stuff, the structure of the
character before I draw and define the character
with a black pencil. And here I'm using, this one is fable
Faber Castile pencil. It's an oil pencil. And Usually I just
go and try out pencils the store and feel
like how does it feel like? I don't want this tensor to
do very, very thick lines. I want to have it
a lighter lines. And I want this
one to be thicker. So I'm using just
a normal pencil. This is three b,
which is pretty soft. It is not to solve like ATP, but it just leaves a much
stronger line than this one. So just try out
different pencils. And if you have any kind of children set of pencils at home, that also doesn't work. So what I'm going to ask
you to do now is loosen your hand like that
and very loose. Just don't go around
and just like dark, really, really strict and you
want to do the right thing. This is your kitchen. Your have to do the things in the wrong way or not in the wrong way and
by trying it out. So I want you to just
listen your hand from the shoulder down and just
draw some lines like that. Just aimlessly. Draw curves. We're going
to draw a lot of curves. So I want to be loose
with those curves. I don't want you to do a
curve like that and try to. I mean, because I've
trained so much, I can't even do the
right curvy nails. I'm just so used to do this. Very loose curves. So that's what I want you
to also follow me, do here. Loose curves. You can even use the black
pencil, it doesn't matter. Just loosen up the
curves that you do. I want to also randomly draw spheres and with
the blue pencil, because the blue
pencil gives you more thicker lines and
the curve becomes, appears visible more quickly. So if you just draw
spheres like that, we're going to draw
a lot of spheres. This lecture, if you're
starting my lessons now, this can seem
completely nonsense. Just keep at it and
do a lot of doubt. And in the next
lecture, he will. This all makes sense and you will see why
you're doing it. You're not wasting
time or money. So just go ahead and do as many of those small
exercises as possible. And when you feel that
you can draw more like dot with our hand
tilted like that. And fast spheres. The new done. And let's go ahead and start drawing characters
and pose characters. I'm going to do that
in the next lecture. See you there.
3. Structure of a Boy character: Well, welcome back, and let's start drawing the real stuff. So why is this figure drawing
for cartoon characters? And because cartoon
characters are easy to draw, and also they have an anatomy that is very
similar to human drawing. Although the proportions
are a little bit different than
the real human, it is, they have
almost the same rules, the same principles
of the anatomy. And it's much easier and
forgiving to start drawing figures which are cartoon
characters than a real figures, human figures,
because you can be slightly off proportions
with human beings and it is noticeable
and this can seem very discouraging to you
to continue drawing. Practice makes perfect
is valid here too. But this lecture is for you to encourage you to
start drawing figures and also help you in the process of drawing
your cartoon characters, whatever you wanna do a
book or an illustration, or just practice drawing. So that's why I'm
going to start here by drawing a character for a
figure of a little boy. And I'm always doubting
with the head. This is a little bit an exercise that is going
forward and back, drawing 11 part of the body
continuing with the other. And a cartoony character
of a little boy. They also usually
have large heads. Because cartoon character,
they look like kids. And kids have larger heads in
comparison to their bodies. That's why they look cute. But that doesn't
apply only to humans. It applies also to animals. That's why cartoon characters. Animals, they look
often like kids. So I'm going to start by drawing a large head and I want to follow me here or
in this exercise. Here we have use
of the lines and the spheres we did in
the warm-up lecture. So you see, I am drawing this
fear over and over again. The lines are very
loose, very light, but there is a thickness shaping for the head
for a sphere that will later lead us to finalize
it with a black pencil. So this is our head. Now, let's design the body. And I want the body to be rather small in comparison to the
head for this little boy. So I'm going to draw another sphere right
there, the body. And here it is. Time to just draw a line. I'm going to draw a boy, a body that is straight
forward towards us. So I'm going to draw a
line that goes straight down and this is the
middle or character. So everything on both
sides will be symmetrical. That will help us a
little bit guide us into where everything
is going to be. So I'm going to draw the body, which is slightly smaller. Here. I'm going to start aiming
to where the legs are. And I want the legs to be not
as long, slightly smaller. So I'm going to say
with just lines. And you see here
comes a curvy lines, the life that we did, that we did very softly. And here are going
to be the feet. Now, these proportions, how did I come up with
these proportions? I want the ball to look like, kind of like a human boy. And talking about
proportions here, I'm going to tell you a little
bit about measurements. Don't get too confused
because these things in cartoony characters changes. But for the perfect
proportions for some boy like a hero
boy or something, we want him to look as well
proportionate as possible. Not to have two legs
that are too big, or we just want him to
look cute basically. So one thing is that to
have a proportional body. Or upper leg. If you bend it, it will go around to where the
shoulder is also this part and this part are kind of similar
approximately. This is not an exact thing. And the upper part of the leg usually is the same size as
the lower part of the leg. So these proportions here, even though they're very minimized as a
human proportions, they are equivalent to the proportions of a
body of a human being. Another thing now that we
can take into consideration, let's line up the nice here. So now we have
discovered the knees. And for a small sphere where the needs are and
here are the feet. And now we have two proportions. And let's go ahead and place two lines where
the shoulders are. The shoulders are
approximately here because we measured this
length to this length. And now let's measure
where are the hips? And here we have to
imagine a little bit because the body
continuous right here, right? But, or legs. If you think about anatomy
or legs continue and join the hips where or
buttocks is on the other part. And the buttocks is not
just straight to the hips. There is a flesh and
muscles underneath. If we go into too
complex explanation. But we draw these two lines and they are going to
be the hip line. And here is also symmetrical. This point is symmetrical to this one according to this line. That's why we found
this symmetry. So here we have some things figured out and
we have the spine here. Now, how do we find
where the arms are? And another thing
of human anatomy is the elbow usually
is on the line. If you draw a line from
where the waste is, now, our boys will not have
a proper waste because we're going to round this
up like around body. But we assume that the
waste of the boy is here, like waste is approximately
where your belly button is. So if we say like
the belly button is over here a little bit
lower than the waste, then the waste comes
approximately here. So that way we can mark that the elbows of oral
boy are going to be here. Just draw small dots or bolts. Okay. So now we can draw
upper arm from the shoulder is coming from the shoulders or arms are
connected to the shoulders. They are not coming
from the head. Like we as a beginners usually draw the arms
coming from the head. They do not. So let's measure
this proportion now, how do we find the lower part of the arm is the same
thing like the legs. The upper part of an arm is equal to the lower
part of the arm. So if you measure
your upper part here, and it's going to be an E. If you take that
measurement over here, this is going to be the
lower part of the voice are. And again, draw a line
through this point where you, which you already found to find the other part
of the arm here. And you add a poem here. Usually a human pound is
equal to the human face. But you'll see that
that's going to be really weird if we draw
a huge hand here. So another measurement
to figure out is that when a
person is standing, the palm adds approximately
in the middle of the leg. Like done. So I'm going to
draw another line here for the arm and connect
it to the other side. So now we have the
measurements of our boy, starting with having a huge had, having a smaller body and applying the principles
of anatomy of a real human to a cartoon character to
balance out the proportions. So now let's go ahead and actually design this
point, this design. And now it's really easy because we have
these proportions here. And let's start with
also designing the face. So we have the middle
line here of the boy. And why I do this middle line here and not
in the middle of the face. Because kids have larger heads and their face in
comparison, look smaller. And more the kids grow, the more this part of the head, it goes up and the face takes the whole place and the **** becomes a little
bit more proportional. That's how you actually can design kids from different ages. So this boy, I assume, is approximately seven
years old, 67 years old. So that's why I brought this line of the nose a
little bit higher up. I want him to look
a little older. If I wanted him to look
like a baby, well, maybe I would have
drawn this line even lower down and draw
his nose over here approximately and have all
this part being cheeks and eyes being over here and have this large
head like a baby. But I've aged female little bit just by bringing the nose, the part of the face a little
bit higher up and still keep him pretty young
as 767 years old boy. So now let's find the mouth and the mouth here as
depending on how I want, how proportionate I
want this boy to be. I can now see the
cheeks over here. I can mark them with an ellipse shape on each
part if you want to. This is your kitchens, so you're allowed
to draw and mess up your drawing and Move
bars up and down. And that's why I'm
telling you it's very important to draw with
a whole hand like that. So you don't have very, very thick lines that
later on it's going to be difficult to move up and down
because your perception, your eyes will draw you to
where the thick line is. Just delay the thickness of the arm until you see you know, that the character you're designing something
of your liking. So I'm going to draw his
mouth or rather here, so closer to the nose. Here is really
about proportions. Usually the mouth of a real person is very
close to the null. So approximately here, this
boy have a small chin. So usually the
proportions from the nose to the mouth to the chin
is equal in real person. But because this is
cartoon character, we can push it up, push them off up, design a larger chin, and have the boy have this small little face that
will keep him young as age. Because if we designed
proper proportions, It's going to be looking
like a more grown up boy. So squeeze the face in to keep the age of your
character younger. Now let's draw the eyes and the eyebrows are
approximately here, because we want the
face to be around this area, very close together. So I'm going to
draw the two eyes, large, large eyes, because
kids have large eyes. And if we draw characters
with large eyes much larger than they actually
are, exaggerate them. They make it that makes them look cartoony
because they look cute. And now let's draw the pupils. And usually when we draw
cartoony characters, the pupils are
slightly cross-eyed, but they are actually
looking straight forward when we draw
the 3D characters. Because babies have these
features that have crossed ICT. Features, they look like their pupils are
closer in phase. And that's why when we draw
it up for our character, the character looks
young and cute. And let's round up
the mouth here, a very tiny mouth. And now draw another sphere. Just on the middle line, the middle of this line, and on top of the lips to actually find the
structure of the lips. And now let's have our eyebrows. Now we drew the eyes larger. So we said these are
going to be the eyebrows, and this is also another
design in the face. You have a little bit more
freedom to design it. So I'm going to push the
eyebrows a little higher up. And you can follow me with that. And you can change the position of your
eyebrows. You can. Draw exactly the
same character and move the features
around up and down. Move this line as long as
you have this structure. It's going to be easy for you to play with this character and see what kind of a character
design you get. And now I'm going to
just draw the hair and one chunk of our hair
is falling down his face. Another chunk of hair
is shaping this face. And I'm going to even exceeded
the line of the head. You know, that our hair is not staying on or exactly
on the scalp. It has some volume. So I'm going to
exceed that volume here and have this
hair line over here. And also on the other side. Notice again the
lines that I draw. And now the ears here, the ears are also
aligned with the nose. The lower part of the year in the human figure is
aligned with the nose. So having the ears kinda anatomically
correct to a real person, even though they're
much further out, is also giving right
proportion for our character. So basically cartoony character as just tricking
some proportions, keeping some proportions
as they are in the human body to keep it balanced and to keep
it looking good. So let's define or a character
with a head like that. I'll let small neck. And now, how do we
have the arms here? We're going to continue this shoulders and we are
going to make sausage. So just draw shape on top of the line and other
shape on top of this line. Here, like an ellipse and
a sphere on the arms, this is the easiest
way to dress up the flesh of your character. And here as well, on the legs just
connecting this part of the joints where
the other part, and this is also is going
to be refined later on. This is still a placeholder
for your character. And here you can have the
feet being proportional. Have another fear for the feet. The feet usually is almost
like half of this space, half of the the foreleg. But I've extended them a
little bit here because again, like puppies and kittens, they have big pulse. And if you give a
guy or a character, big feet, or they will
look more childish. And that's what we want. We want to accomplish
this kind of look. So here we have the first
structure of our character. Let's go ahead and define our character in
the next lecture.
4. Refining the Boy character: Hi there, welcome back. Now we have all the
elements for our character. And let's define
that a little bit now with the real,
with the proportions. So we know where everything is. We are going to use
this fear that I drew here to form the
cheek of the boy. And we are going
to form the ears. Just have another thickness to the blue pencil
than the one you have. So you know how your character looks like, exactly, knows. I'm just going to
add two dots here or a lines to define
just the child is nose. I'm going to define
the eyes properly. And you see how when you
design with light pencil, you can have this freedom
later to design a character. And now I can dress
up my little boy. I can have them, have some t-shirt
here on the neck. And now, because I
have this shapes, I don't need them to
look like sausages. On top of that, I will refined the boy's arm
and this part will connect with this part here of the sausage that I
designed before. And I'm going to just
connect these two parts to design the elbow
with that part. And here, I can just
trust my judgment to see how this boy
looks like better. And just have the curvy line. Go all the way down and
smooth out the sausages. There are just help lines and now I know what a
waste of my voice. So I'm going to give him some trousers that are
ending up on this waste. From now on, everything is very simple because you know
where everything is. And I'm going to
have some leaves from the t-shirt I here. And maybe another design on the T-shirt and
design the pants. And they are going
to end up here, even though you see how
the leg goes up here. But we have the right
proportions of everything. And now I'm designing even
pants on top of that. And everything looks right and good because we have
done this exercise. So just connect this part
of the leg and smooth it out following the
guidance of the sausages. And just to have even it out and symmetrical
to the other leg. Just like that. And now let's have him, his shoes and just complete
the upper part of the sphere. Add some flat surface
here for the shoes. Maybe add another line to form the structure
of the shoes. Then maybe sneakers or whatever
design you want to have. I'm just going to design
this simple shoes. Just to have it
easy for you to see how this spherical shape
design, design the boy. And now we have
this arm here that is pretty much we
see what the armies, and it is bent. Wet. Fingers a little bit, bend down. And the thumb here, and the fingers a
little bit bent down. We can even lift this arm here because to give him
more appealing look, we can change the
proportions now because they are so close to the real, well-designed proportions
of the human body. And now we have this completely new
cartoon character that is very well balanced. And it actually reminds us of the proportions
of a human being. And now we can also go over it with the black pencil to
enhance its features even more. And add details at patterns
or whatever we want. Here we don't have to
draw the whole year. We can just draw a little bit
of a curvature like that. Cartoony characters are also
very simplified characters. So you can allow
yourself to just generalize whatever
object it is, whatever it is in the
ear or hair like that. We don't need to
draw all the hair. We can just draw a chunk of hair as the summary of all the hair. Now. Here it is. We'll define the eye. We have the I very much
clear with the blue lines, so we don't need to figure
this stuff out with a pencil, with a black pencil. And as you see, I'm not using an eraser. This is my method of
not using an eraser, is to actually help you trust, trust yourself when you draw. And by drawing first
with blue pencil, being free to actually
make mistakes, you start trusting
yourself and you trust you start becoming even
better artists. And as you see, I left some
space white because it gives like some kind of light bouncing on the ire of
the God or little guy. And it makes him look more real. It just gives life to it. Now will form the mouth. We have this little shape here of the mouth that will continue. Small mouth. Here. We just connect the small bowl that we drew here sphere with
the corners of the mouth. And we have mao here. So I'm going to give
him another chunk of hair because we are kind of
like ready with a design. And we'll go on to extend
this chunk of hair here. So he'll have more life to it. And I'm going to
continue the hair. And now just let's have
maybe some belt on him here. Small belt. I'm going to color it shaded black to make
it clear what this design of his tensor and has something that holds the
belt on the trousers. Here, you are free to actually explore the design
of your character. And you can see
that I might have shortened the neck a little
bit that will make him, his face look even
more childish. And there are so many ways
to design your character and we're going to
take that exercise and explorer other
characters later on. But I wanted to start with a boy because I just wanted
to see in a simple way how human features in
real life and figure the real human beings applies to the features of a character
that is a cartoony character. And how you can actually
balance out your character. So it looks more
balanced, more real. And now I've added some kind
of trousers that are falling on top of the shoe
stay a little longer. Trousers. This is just an
extra thing you can do. You can do maybe
something here or he's having some
kind of trousers, so he's kind of suit them
up here with something, or very playful a little boy. And let's have his arm here. And because his arm
is a little band, I will lift his thumb and
his hand a little app. But if he's straight up, then it should go up to here. They are not
anatomically correct way of a real human boy. And I'm going to design his
fingers very symbolically. Valley, very yeah. Just that thumb. And there you have it. You can give him
maybe some freckles to have him look even cuter. And from now on, you can even around his cheeks. And we see that we
have this very, very VCG line here of the
spheres that we drew for the, for the chicks that we can use to add some
chicks on this guy. And here it is, our first cartoon character. Now let's use the same principle and design another
character over here, an animal character using
the same principles. I'll do that in
the next lecture. I'll see you there.
5. Drawing a Bear according to the structure above: Hello students and welcome back. I hope you had a nice
break and you had some coffee or tea or
juice if your kid. So here we are, and we're going to design another character using
the same principles, but have different proportions. Just to let you see how, how human proportions apply in a way to cartoon characters and how designing it this way, you can both mixed up
human proportions as well as designing a
character that has big, had large body, whatever. So here we're going to
design an animal character. Let's design a bear. So I'm going to start
with much larger head. Again. You see, I'm using my arm, the whole arm to draw. And if you get used
to this technique, you will never be
afraid of drawing. I'm drawing many, many lines, keeping it flows and
having this body. Now, let's, let's find
the middle line here. So I'm going to have this character standing
up, just right both. And now I want to have the head build really
large, almost. I don't want to have any neck. So I'm going to draw a
very tiny bear body. So maybe you like
that over here. And I'm going to design almost the same line to where
the feet are standing on the same line like the boy and have the legs
being over here. So what do you
notice immediately? The proportions of the body, according to the legs, are very similar in principle as the way
we designed the boy. So, so if you draw the
lines where the hips are, you will find the
hips over here. You will find the shoulders
over here because I don't want to have a
visible neck like that. And now, where are the
needs of our bare? They're almost here. So this part and this
part is very similar. And this pot and the knee, if you bend the knee, it will come
approximately over here. It's not exactly, this
part is a little larger. But let's find the knee over
here market with a joint, with a small ball. Here are the feet and
you're going to have large, large fit, much
larger than the kids. We're going to play
with proportions, but some proportions
are like human-like. Another thing. Let's find where the arms are. And if we assume that the
bears waste is over here, if the belly button
is over here. So the arms, let's put it a
little bit higher up here. So if the belly button is here, so the bear's arm is
going to end up here, the elbow, and the low part
is going to be over here. And let's find the other arm. So let's have the upper arm. And the lower arm should
be approximately the same. And it will end up over here. And now let's have some
polls that are very large, large pores, so they're almost reaching
down to the ground. This is where I get
disproportional. But the proportions according
to where everything is, has the same anatomy
as a human being. From here on, Let's
design or Bayer. And again, I'm going to
have a very young bear. So I'm going to keep
the bear's face over here and have the
bear her very large head. So I'm going to have the bear's nose B over
here, draw another sphere. And let's have the bears eyes. This, this huge,
huge puppy eyes. Over here. And let's find the pupils. Have one pupil here
and another one here. And you see that when I have this pupils are having one
larger eyes than this boy. And I'm going to have the bear's nose be like
a triangular over here. This part. And I'm going
to have the bears mouth. So this line will continue
here on the face. And I'm just going
to split the bears mouth into and have
the law part B, the buyers mouth and
then just gone in shade. This eyes. I'm going to give it some eyebrows to have
a cute, cute pair. And now on both sides are
approximately find kind of like just draw another
line here and have where the ears are
going to be. 40 years. I'm going to draw two
small ellipsis spheres, just hold them out like that. And that left having this small ears like
that Laughter Bear, having really, really large hat. So now let's continue refining. Our character. Does have the ears like that. And we already see how
the character look like and have the whole
face of the bear. Now, you can just repeat those
lines on top of the bear. And now let's do
the sausage thing. But because I want the arms
to be a little bit chunkier, I'm going to make
larger sausages, dots and extend the little
bears body and have one sausage here and one
sausage here on both sides. And now let's less
refined even that. I'm going to refine the bears lag by
connecting these sausages. Again, remember they're
just help lines and draw the feet and add some
nails or tos for the Bayer. They don't have shoes or at least this bear
one tap shoes. I mean, some animals
intentionally have dress our dressed up. And now the only thing to have S just to
connect the lines. And I'm going to have this bare, have the arms like that. Just connected here is
just everything is given. You can play around with
the proportions and have the arm being really just maybe you have
just one pole here and you have basically
the bare dumb. Now, let's refine it
with the black pencil and leave at least some white for this small light
that we are talking about. To make it look more alive. Maybe you can leave
one here as well. So it has this shiny nose, nose, as animal knows. And then we're going to
have the nodes here. And Let's do some, don't, some have some whiskers. We're not going to
draw the whiskers, but we don't see a lot
of whiskers on there. So it's going to be
more like a cat. If you do that,
which is not wrong, you can turn your
bear into a cat. That's fine too. But we said we're
going to draw a bear. So everything is about practice, but it's also about having fun. Exploring designs is
not going to work. Maybe every time the
way you want it. Because the thing is that you have this
image in your head, how you wanted things to be and suddenly they don't
get that on paper. And they might get even better. But because you have had some intention of
what you wanna do. And you say, Well, does this got
really, really bad? I'm going to bring
you the good news. The good news is there
is always more paper. Just start over and you will find many,
many different designs. And if you have taken
my other courses, you know that I give you so many different approaches of how you can do
cartoony characters. Account how you can
draw anything you want. And now I don't even need to
design this bulkiness here. I want the arms of the
Bayer to be straight. And maybe just designed. Draw this a little. Thumb and the other arm. I can just draw it like
it's bent backwards. So I don't even need to
draw the toe or the thumb. When you draw and when you talk, you kind of get into your space and talking
becomes weird. So sorry about that. I hope you understand what I mean as I'm showing it alone. And this is very
meditative as well. Because it kinda
stops everything. All the worries you have, all the problems who's
gonna do the dishes or I was going to take
out the garbage. Or if you go to kindergarten, who took your bow? Goes away and you're
having a lot of fun. It's never, never changing, no matter how many, how many years you are, how old you are or young UR. This process is still
the best thing you can do for yourself or
meditation or just having fun. So here is our bear, which design that where the same principle,
like this boy. And if you want, you can have also some
clothing on the bear. Now, you can have here the neck, you can have some shorts maybe. Now we can draw on top
of the belly button. They can have some shorts
and that extend the leg. But now you have
the structure of this character and you
can draw on top of that. So I'm going to shade it with different colors so we can
see that their trousers, because once you drew character, you already see those lines. And you see it takes
time for your brain to adjust and not see these legs. And if you show this
drawing to some new person, then will not see
the blue lines. They will not see
even those lines. And they'll see addressed there. Uh, maybe let's have this bare, have the t-shirt on
small dots or spheres. Just to see that this design of the t-shirt
is different than the bears. Other parts of the
body that it has some pattern that symbolize
that this is just a cloth. And now even the belly
button has disappeared here and it looks like some belt. You can just play
around without. So here we have another
cartoony characters just using the right
proportions of a human being and playing around with shrinking the body,
extending the head. But the balance of those
proportions are equal to the human being or to the
proportions of a real human. So you see how doing dots with cartoon characters
can help you actually learn more for yourself
and still learn about the proportions and figure drawing of a human being. Now, let's do a
different exercise. In the next lecture. I'll see you there.
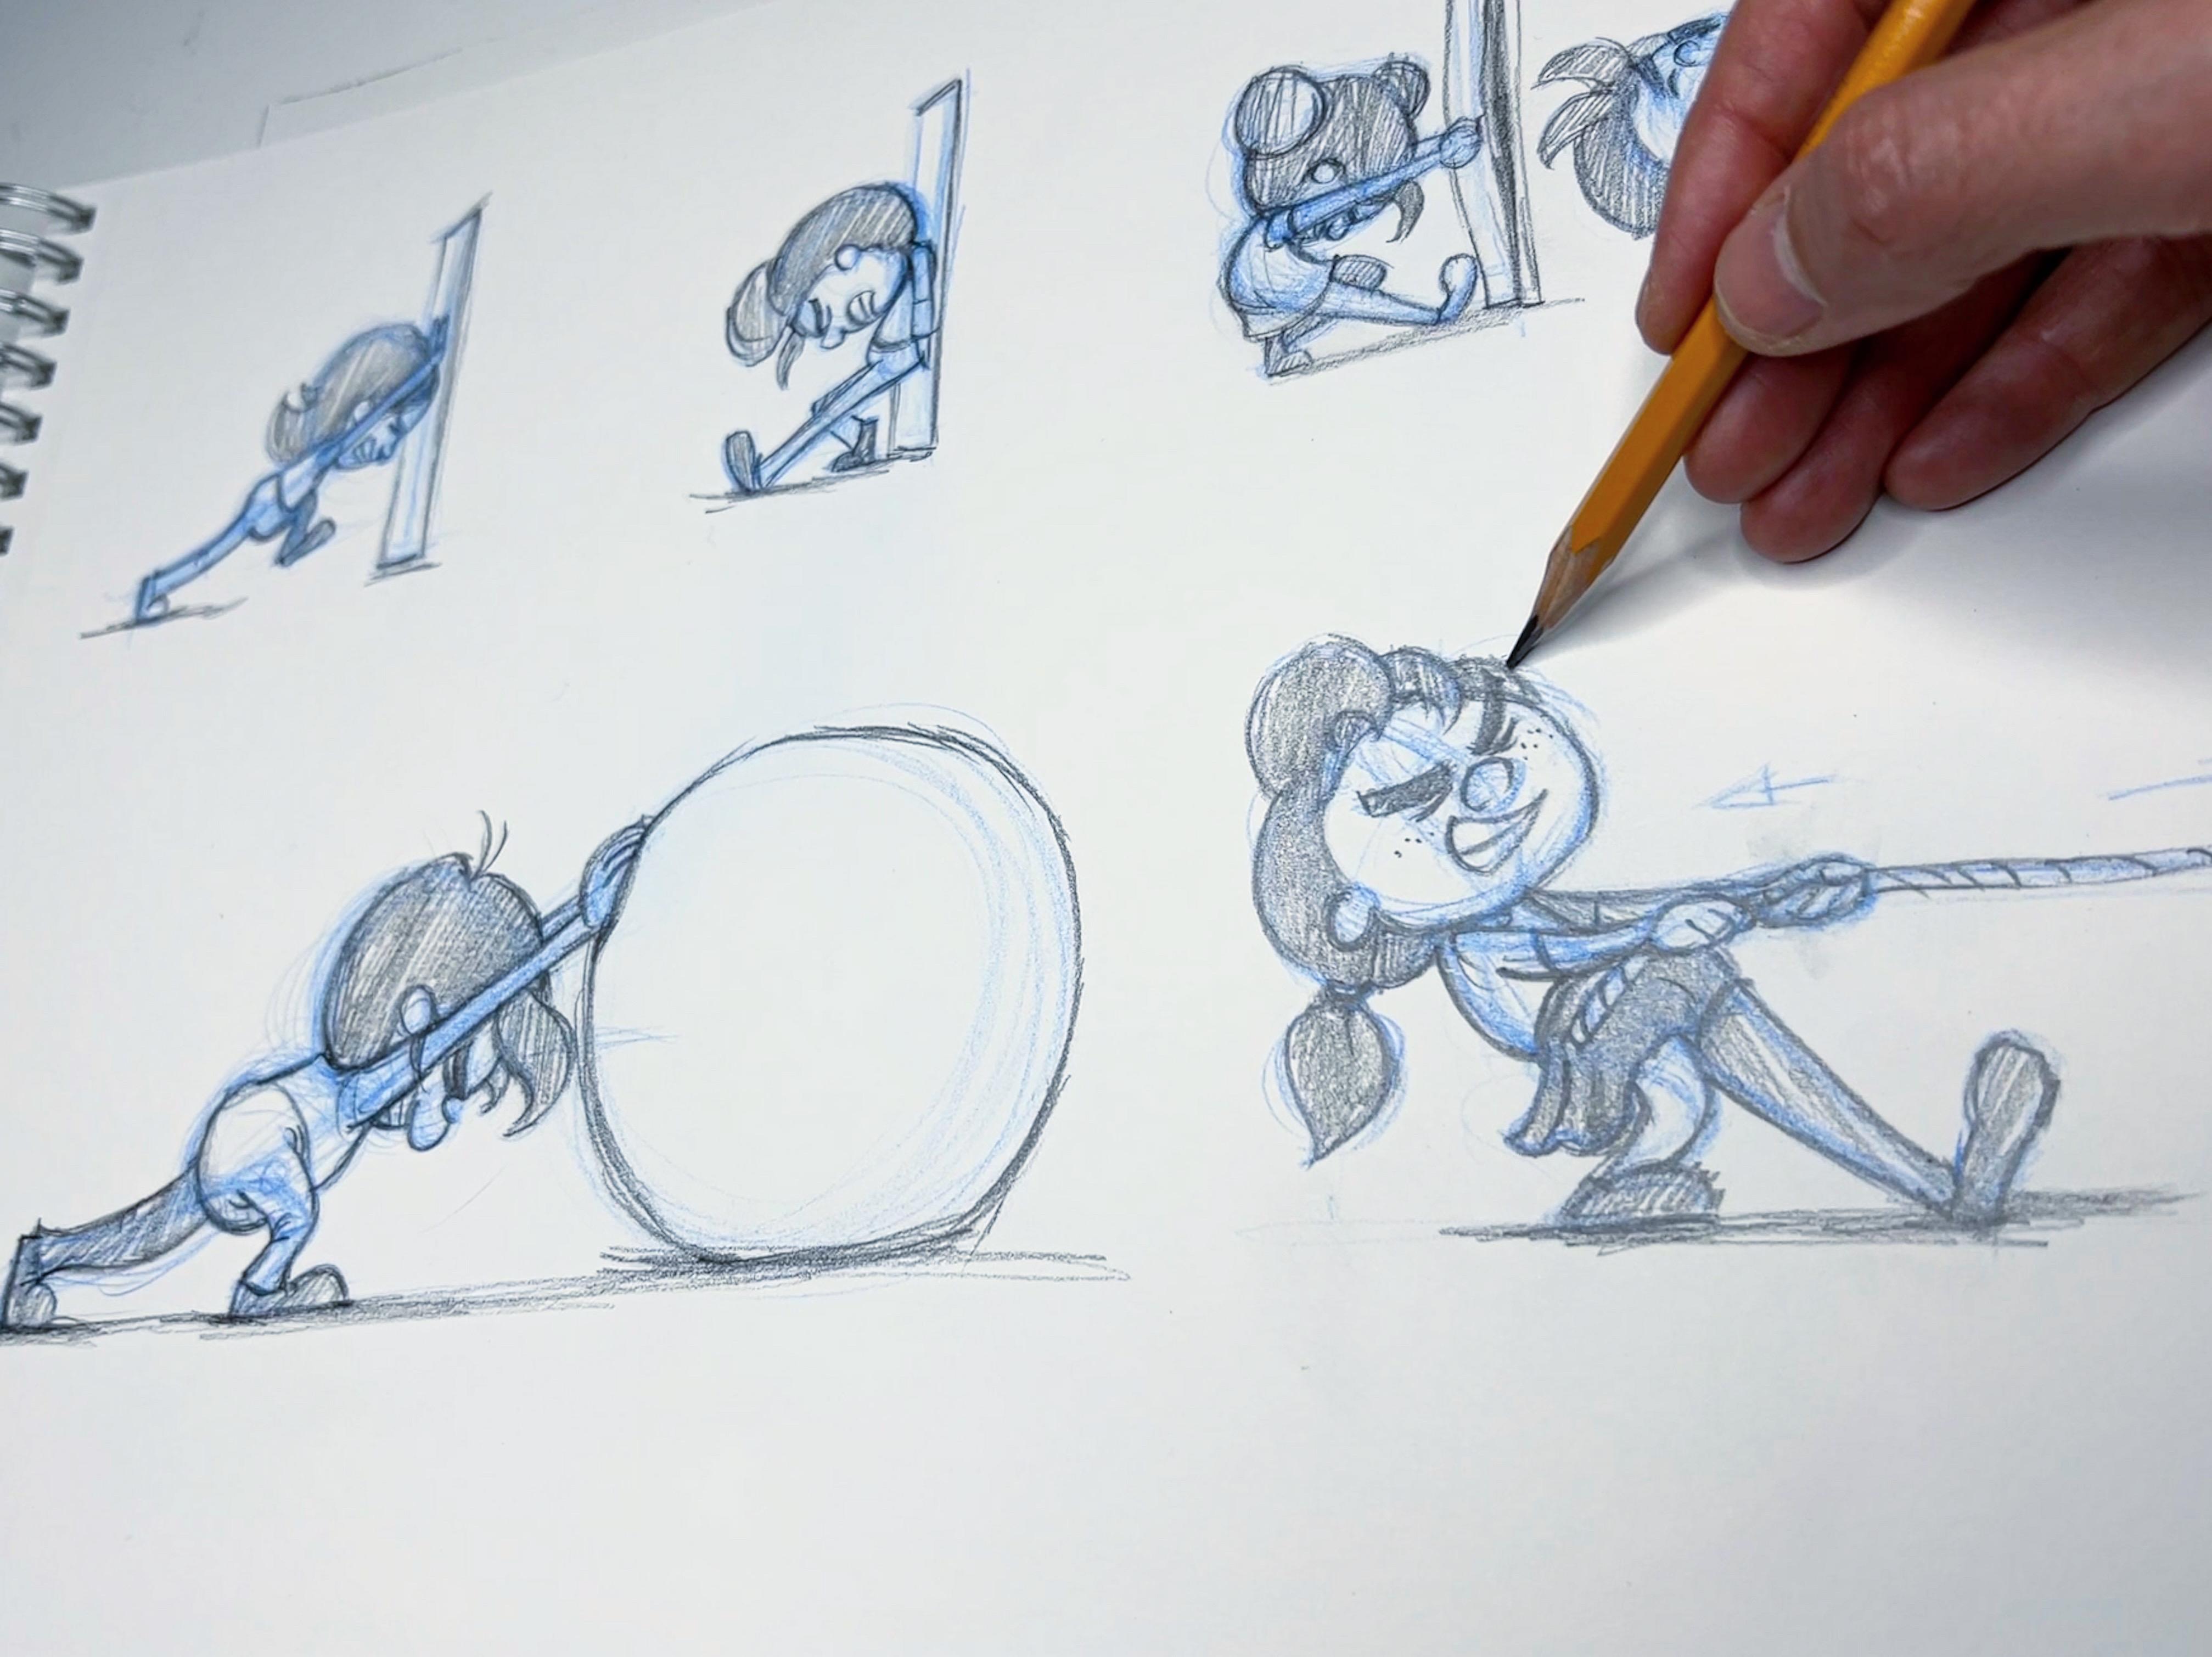
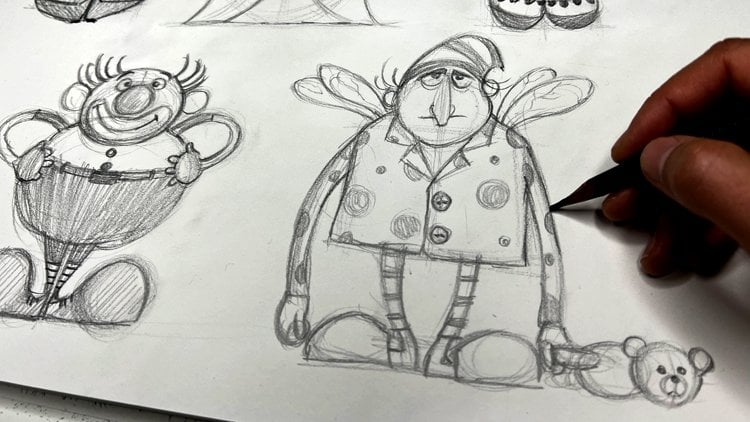
6. Long Legs, Short Body: Hello there and welcome back. Now, let's look at some cases where the body
is really, really off. And you have really short
body with very long legs, or you have a really large
body with very short legs. How do the proportions
look dentin? Because, you know, in cartoony characters,
anything is possible. You can go wild
with proportions, but there are still some
measurements that make your character very well balanced and it looks
better if you know them. So let's design a guy that has someone like
a despicable Me, e.g. as really small bodies. So we're going to
start with the body. So let's start drawing
or spheres and has mostly like a proportionate
head to the body. So they're the same. We are going to
shape these heads a little bit more differently. Now we have just an
intention to have a really small body
and long legs. So let's find the
middle line here. And let's have his
legs be dark long. Yes, that's right. And now you see
that you can't do the same measurement as the one that we showed in a
previous lecture. That the measurement of the
upper part of the leg is similar to this length here, because that's not
going to be true here. And why do we measure them? So we draw the leg and you see that I always draw
the leg a little bit tilted because that's
how a normal figure stents, they don't stand with
your legs spread out. They usually stand with a
leg put together and it's a nice spouse to have
some symmetry to that. So let's have the
legs being over here. And let's start with
our measurements. What else do we know? So first of all, let's find where the needs are, because this is a measurement that is always good to have that the upper part of the leg is equal to the
lower part of the leg. This measurement we can keep. So if we assume that
the hips are over here, let's draw this line where
the hips are connected inside the body and we're
going to eyeball it. So somewhere here, I would measure that this part
is equal to dispatch, almost maybe a little
bit down here, but approximately like that. So this part equals This part is kind of like pretty sure
it out where I measured. Remember that I my I
is trained so well now that I can see what a middle parties
and you gotta get that. For the time being. You can use a pencil
to measure it. And you can measure
this part and this part and see approximately
where is the middle part. So the knees are over here. What else can we take
into consideration? Let's draw the shoulders. Let's have the
shoulders be over here. And now you see
that we cannot have the measurement as
the previous one where the elbow is meeting the waistline because that's going to be too short. Hands or arms? I mean, yeah, sure. You can do that as well. If you do short arms that are approximately as the
upper part of this body, you can have them
stretch over here. And they can be a really short
path for a beggar balance. If you stand up and try to
keep your arms straight, your palm will
reach approximately just some fingers
above your knee here. So our hands or arms will be that long
and for a longer people, they go maybe a little
bit lower down. Now we're going to
keep them over here. And this is kind of
keeping human proportions. The rest has nothing to do
with human proportions, is just made up. So let's now start applying
features to or a character. And this is a
character that is a grown-up because the features
of the face and the body, they applied, this
is not a chart because children has much
they have much larger heads. So who is this guy? Usually, when you
have this lone guy, Let's give him a
long nose as well. Have this features that
applied to his face as well. So just have a long
nose on this guy. And let's have the eyebrows
beam over here like that. Whereas the mouth, if
the if the nose is long, maybe the mouth can be
even under his nose. I'm just thinking loudly here. You can even have
the mouth here. Remember that in
cartoony characters, you can heavier
imagination running wild. There is no wrong
way of doing it. But the proportions
I'm giving you now is how you can make your cartoon
character look balanced, well-balanced when you start working with cartoon characters. And I'm going to keep
his face also small, so I'm going to
ignore this sphere, but he used that just
as a placeholder. So if I have a line here
where one side of his faces, I can approximately measure
where does this line apply on the other side
of this middle line here? And measure the
space it gives me from the sphere I've
drawn to the line in. So I have some kind of symmetry. And again, I'm using, I'm drawing very
loose line as you see because I'm I'm not a computer. I'm not super good
at measuring at one. So I'm just drawing
thicker lines to help me see where
the face really is, where it becomes symmetrical. Let's draw a sphere
for the chin here. Again, that's just
a help sphere. So we can connect the jaw
from this part to the chin. Maybe we can use that in the
character design later on. What else can we give it less? Give him this weird hair. Just a chunk of hair
over here on one side. And here we don't have to
be symmetrical because the hair can be anywhere really. I'm going to give him
a chunk of hair here. And I'm going to use
this curvy lines that we use and try to
find a haircut and maybe some hair strokes that just continue over
here on the cat head. And now we have pretty
much the figure. Before we continue
with the face. Let's go back to
your proportions. A good rule of thumb is that you don't
finish just one thing. You go from one thing
to the other until you see the right proportions
for your character. Now, here, the principles of, the principle of
the arm applies. Now let's do the exercise while the upper arm is equally
long as the lower arm. So basically his shoulders
are going to be I mean, his elbows are going to
be approximately here. Let's add another joined
or sphere to mark that. And we'll have the
lower part here. And we'll say that. Let's bring up the arm
a little bit higher up. And from here to here, let's say they're, the
palms are like that. So if you measure and if you put all the Germans to
start with and build like a stop-motion puppet. Like you'll see these puppets or maybe just puppets
that help you draw. You've seen those
wooden puppets. And if you do that before
you design your character, it's going to be a
placeholder for you then easily to add
up the features. So let's continue with the face. We have all the measurements. And let's continue to see
who this character is. I'm going to make
really big eyebrows. Now. I'm just using the line
that I already drew. And I'm trying to
see the symmetry. Comparing the distance from
this point to the eyebrow and comparing it for the same distance from this
point to the next eyebrow. As I'll just continue with that. And remember, this is still
the kitchen of our drawings. We can make mistakes. We're actually allowed to
make mistakes at all times, because the more you draw one character the battery
character becomes, and the more precise you are the features
for the next joint. And you can still draw many, many lines on top of that. And as you see, eventually, we are going to end up with
a nice contour drawing. Anyway. I'm going to make this
tired eyes is kind of an old guy cartoon character. I'm not going to
draw the whole eye. There's going to be
like droopy eyes. And I'm going to
draw his pupils over here like that are really
tired, cartoony character guy. But he's going to
be a rather happy, so I'm just going to
make him smiling. So he's not super
scary and super sad. So I'm going to draw the
mouth just like a line. That's all I need. Now, let's shake
it up even more. We know where the hair is, let's draw the ears. And as I said, the ears here is again
approximately where the nose. And so if I take that
into consideration and match them also to where the ears and approximately
on the eyes, on the line of the eye. That will also give another
human measurement proportion. And we'll bring the
character closer to having a more human look rather
than a made-up look, which it actually eats. It is a made-up look because such character
doesn't exist. Is it basically caricature
of a character? When you draw caricatures, what you do is you
take some features, you exaggerate them, and
you keep other features the same or at least the proportions between
the features the same. So let's now design
this character's body. We said that this is
going to be his body. And what can we shade in here? Let's go and shape the shoulders and we
don't see his neck. Let's give him some kind of
a suit, maybe these guys. So we are going to use
the middle line to find the middle of this
suits approximately here. And let's give him pants that go to the waistline over here
with the waistline is here. Shape his body. You can straighten up
his body if you want to. Later on, I decide to bring
the legs a little bit closer. So I'm just drawing a line
again from the middle line. Curvature that makes the
legs basically thicker. You can decide to make really
small legs just like that. That's also okay. From here, you can, you can elaborate
with this shape and really design a
different character. But I'm going to keep
this proportions and design some kind of
hence for this guy. Go forth and back and choose, shall I use this line
that I already drew? Or should we just move
the features a little bit out or in to get
the proper character. And basically when
you look at it, your eyes will go on to lead you to what you
really want to do. Here. I'm going to draw some shoes. So just follow me and
draw some shoe if you see lines after this middle line and then it's just a triangular shape
forward where the ground is. I've drawn a line where
the ground is going to be so easy from there, like that. Spans. And then we're going
to add some more details. Let's go ahead and draw
even the arms and the head. I'm going to have him
has small, small arms. And maybe the suit
will end up here. Again, the suit
will end up here. And I'm just connecting on top of the line that
I already drew. Connecting for the arms. And here because the
hand is in profile, which means you don't
see the whole hand. We don't see all the fingers. We just see the thumb
and the index finger. And the rest of the
fingers will be maybe just small wines or shading. That's basically enough. And here we have our cartoony
character shaping up. So let's design the
costume little more. Maybe he's going to have some knots color
about a tie here. Like dots and bringing
the costume or the suit a little bit more into shape with a color
on both sides. Now you see how easy
it is when you have the construction to
have this character. And now the suit is going
to be really small because we've decided that
this guy is really, really has a very tiny body. And you see that even
though it has a tiny body, this guy has features of a human being and
looks like a human being. You would see, well,
I saw this guy yesterday on my street, right? Is that he had legs like doubts. But sometimes when
we see told people, I mean, we see them exaggerated. It's like, how can you be? Of course, that's just a joke. I'm not saying that
tells people are like, You know what I mean? Now you basically are
ready with our character. Let's go ahead and refine the features in
the next lecture.
7. Refining the character: Hello and welcome back. Now let's refine the
features of this guy and add some fun details to him, who the guy is, and what what profession
does it has this probably, I don't know, a
clerk or something. And this level, I'm
always thinking, what character
does this guy has. Because every time you think of the character of your
cartoony character, you add more personality
to it. In your head. What kind of person
this structure is, because they are real people. When you create them, they start having
their own lives. And when you talk about his
character in your head, you can add details
today, a costume today, our faces that are kind of as a result of their
personality and lifestyle. Because your lifestyle is
affecting the way you dress, the way you talk, the way you comb your hair. It affects everything
you do or personality. That's why it's so nice
that we are so different. Because the way we
express ourselves, because of our differences. It's so it's so different, it has so many variations. And we like to see
different people. We don't want to
see just one guy, one girl walking down the
street looking exactly the same as the other guy
or the other girl. We want to have differences. That's why it's interesting
when you design your character to think
about their personality. And that's really the
fun of it because your character is alive
and it has features. And now you see that I'm also
leaving some white spot. That's gonna become like
something you just do. You don't even think about it. Because immediately
it gives more life to your character
without any shading, without any other
features or color. This white spot gives your
character personality. And I'm going to draw his
smiling face like that. And this guy maybe like
maybe around 40, 50 either. No. And it has this long
chain that actually matches the long body
that he has, long legs. And here we have his tie. Maybe he will have some
kind of a I don't know, some abnormality, something
that is personal to him. He becomes a
different character. And his tie like that. If you want, you can
give the tie. Now. Other features like either no patterns of flowers and dots. Is it something that
you can take in new digital program
and color up? Or you do. You like you can play
with the features. He said, Well, now I've
talked about shorthands. Well, try them out and
see how they work, how you feel about
that character. Because sometimes you say something and you
haven't tried it, and you don't know why you're
doing the things you do. But when you try them
out, you'll learn. Why do I do these things? I do and what motivates me to design this character
precisely this way? Or maybe I like the
other way better. Maybe it is something
that you can add to the features
of the character. Depending on the story. It's like a character with very short hands and you
have a story about it. How this character has
a really nice body, but very, very short arms and he can't reach anything
for everything he does. He has to bend and
take the things up. Right. But then that can
affect his body. He can have a hunch just
because his arms are short. There are so many possibilities and so many different
stories come out with just brainstorming of
who your character is and the motivation of
the doing what you do. And I mean, for me, it's also good to do
that here because. I have become, become so used to draw these characters
as a character design. And sometimes immediately I
want to find the perfection, the symmetry, and I want to find the balance
in this character. Because I now know in my
gut what I need to do. Something that you will learn. But sometime, sometimes
breaking these rules will give me kind of different personality is something that
I have unexpected. And that's the thing. And cartooning is that you
can do anything you want. You can play with features, and it is allowed,
everything is allowed. You can have your own
style by doing that. But you see how his character, by just keeping
the proportions of some features of the
human proportion, is giving you a
well-balanced character that has a
well-balanced features. And this is something
that some students have asked me about and that's why I decide to make this
lecture seven. Yeah, we can do this justice, but what makes them look good? And this is the thing. You keep some features
like human features. And here you see
I make the shoes really long and I
apply again another feature that the fit
of everyone is coming up to the half of the leg. So I keep that
measurement as well. And I don't do to
feed very small. But this is another
feature that is true to a real human being. And now I'm giving the
shoe some texture. I mean, when you start
without it doesn't, because you can add
so many details. You see now that
the bands are done, we can shade them
and you see shading, I do with just
tilting the pencil. And you see I called it even
almost like perpendicular. Limit up, down, down. And just with very, very brief strokes go in between the contours of the character
and you get this shading, which implies that the
pants are darker color. And this is how you
basically integrate, differentiate
different textures and materials when you do a
black and white character, as you see, this shading here is not as
dark as the shoes, which applies that
he probably has, maybe brown pants,
but black shoes. This is how you
differentiate them. And I'm going to
keep his suit white, and I'm going to do maybe some stripes and see
who this character is. He's like a funny, funny guy. It's a positive character
because he doesn't have everything super
normal and stiff. He has a suit that
has this stripes. And that makes him
interesting already. Who is this guy? Is he may be a lawyer
or funny lawyer. And I don't know. You tell me who this guy is
or find out who this guy is, like Delta, and it's
pretty much done. So here is a nice cartoony
character that we just did. Just coming up with the intention
of having a small body, keeping the head almost
same as the body, but applying human features and measurements like a
real chapter on the legs, the arms, the shoes, the ears, dots it, and the character
looks well-balanced. Now let's do the opposite. Let's have a really large body, small head, short legs, and see how that applies there. We will do that in
the next lecture. See you there.
8. Short Legs, Large Body: Hello there and welcome back. I hope you're ready to
start a new character. It's always exciting,
it's always a challenge. And you don't know who
you're going to get, you have a blank page here
and in a few minutes, you're going to have an
interesting personality that you just want to
tell stories about. You want to animate two you want to send to your relatives. Not the real one. I mean, the drawing, right? So what did we say? Let's have a really large body. Let's maybe designed his wife that is exactly the
opposite of him. Opposites attract. So let's have a really,
really large body. So we start from something we intend to do and we
kind of keep this line as the ground so we bring the body down and you see how many lines I already drew? Because I still don't know
how large will the body B, this is going to change. And I'm going to have
a tiny head over here. For his wife. She's going to be like
a nice, grainy, nice. Let's first go ahead
and do the usual. Let's find the middle line. And you see that I'm drawing with a couple of
times just to see dots. When I eyeball it, It's approximately
in the middle of these two spheres like that. So what else did we say? This person is going
to have short legs. So let's design short legs here. And now. Again, the same
thing applies here. There is no way that this
part here can be equal. The whole this part here, right? So what kind of measurements
do we fit in here? And now I want to break down even the hips because the
hips cannot be in here. She cannot have the middle
line or the midst of here. So now we're just going
to imagine the legs. And the legs are going to have the same principle
as the human leg. So this part over here is going to be equal to
this box over here. So let's draw a line approximately in the
middle of this dots where the joints are and also at the feet over here like that. And I want her to have her
waist all the way up here. So I'm going to draw the
shoulders like that over here. Very, very narrow shoulders. Okay. So she's going to be
this large woman. And I'm going to also
give her normal arms, which means they're going
to be way too short. They're not going to reach
in the middle of her tie, but she's going to have her upper arm being
equal to the lower arm and it's going to be
approximately on how waste so where is her waist? I've decided how waste is going
to be approximately here. Social has a really
large lower body. So I'm going to design the arms that are going to be
like maybe up to here. And that means that
her upper arm, this one is approximately
on her waist. If we assume that
that is her waist, and this one is equal
to her lower arm. And then we have
the hand over here. And let's add the other arm. And let's have the arm
maybe having being on how? Waist, one arm. So I'm going to apply the same measurement
from here to here. Now we are breaking the
shape up a little bit with, you can measure it
by using your pen, using your finger like that and measure this distance,
this distance, and move with the
pencil again where the distance is
and just apply it. It's gonna be hard. It's going to apply
approximately, approximately to the other side. So I eyeball it over here. And the lower arm is going
to be with the same size. I'm curving the
arm a little bit. And here is the hand just
going to put a sphere here. And that's it. The construction
of this woman is done. Let's now go ahead and
find her features. Who this woman is. And I'm going to do a
really chunky face. So I'm going to make
her chin really big as well and put her face
approximately over here. You'll see if you want to have
some something appear big, make a feature that is
around us really small. If I push the face up over here, it's going to make
her chin look big. And when her chin looks big, She's going to look
rather chunky. But she's not going to have unpleasant luxury is
going to be the cute. Because remember who has all the features very close
together, that's kids. And keeping the features
together like that are giving your characters
rather cute look. And I'm going to give
her some round eyes, big eyes, like kids. But now I'm going to give
her a large eyelashes. She's going to be a character that is very much
aware of herself, of her beauty, and she's cute and she cares about
the way she looks. And I'm going to give
her also large hair. Let's give her chunks
of hair like that. Just with spheres. You can make her
hair look curly. Just put a lot of spheres
on top of each other. And later on, we will just round up this feature even
more to look like curls. Let's go ahead and
draw the body. Apparently she's going to
have a dress like that. And let's draw her arms. Let's do this messages here because she'll have
a gonna have chunky our arms and the lower arm and her hands are going
to be slightly small. I'm going to give
her smaller hands because if I give
her small hands, she will be more
tender in the way and her upper arms will
look even bigger. So I'm going to
minimize the hands in comparison to the real
features like that. And let's give her some dress and see how much of her legs are
we going to see? I'm going to end the dress
when you have the shape, our stomach, it's going to
start falling from here. If it's not too tight dress. The material of a normal
dress is just bending slightly where biggest parties, and we're going to curve
it around a little bit. So to give the dress this
kind of cloth material, it is not around like a doubt. And what else can make if we
can design the translator. Now we see that we see only
the lower part of her legs. But because we know
why the upper part is, it is easier to just design
the lower part of the legs. And we're going to give
her very, very small fits. So this fit will apply again to the human proportions
because this foot is equal, is coming to the middle of the lower leg to the curve and some
little feet like that. And what else can we do? Let's, let's start be a skirt. Actually, social is going
to have a blue and a skirt. And the skirt is going to be round as if it's going
around her body. And because we said
this is a waste, that helps us even more to define where the
blues is ending. And she's going to have
a sleeve over here and sleep over here on top
of the cell search. And let's round her arms. And this arm is coming here. And because we lifted
the hand a little bit, maybe she's holding
it tight like that. And we are going to form
just the other arm. And because we did the sausages, now it's very obvious
where it ends. Here. The fingers, we're
gonna do very, very tiny fingers like
the heart and her chest. Her breasts are
going to be here, so mark them both on the different parts of the
middle line, almost like that. And we can figure out what's happening there a
little later when we give the blues and the features
a little more texture. So this is our next character. Let's go ahead and add
contours with a black pencil. I'm going to do that
in the next lecture. Go have some break
before you come back and less refined and find
out who this character is. I'll see you there.
9. Refining the Character: Welcome back. So now
let's go ahead and actually a refined or character
that bright of this guy. I had an uncle and aunt who
looked exactly like that. Well, not exactly, but she was
very short and he was very long and they loved each other through the
whole of their lives. So he had to bend to kiss her. That were cute. So
let's start and shaping up the
face and the eyes. Now, it's easy part. And from here on, we can add texture. We can add some marks on our characters or
dull or wrinkles or whatever we want to add
and find out who they really are and refine her eyes. You see how easy it is now
when we have the structure, when we have drawn and
draw layer after layer, and you have followed
me on thinking process, why you do the things you do. Why you add this line, why you keep these proportions
but not the others? It is just a play of what
you can keep and want you can change to get a
well-balanced character. And now that we have
her face over here, let's add some chin that is closer to her face and
now she has double chain. That's easy. That was so easy. So now let's add
the chunks of hair. So we're just going to pick
some of these lines from the spheres and make sure that we just add
some curliness to it, some small lines in-between that signified chunks of hair. So you don't need to
draw all the hair, curly hair, because it's really, really a lot of hair. That's gonna take you
a whole day to fix. But just drawing out
some spheres like that. You can then use par of
the lines from the spheres to actually draw the
chunks of even curly hair. There is always a method
in order to simplify and help your drawing process. So you don't have to think
about in this whole thing. If you can draw it first time, you are lost forever and you'll never draw in the
rest of your life. I mean, who does doubts? It's like saying, if you can't walk for the first
time when your baby, you will not be a walker. You will not ever, ever woke. Again. It's just the walking and the drawing that makes you
better and better at drawing. And you don't have
to do it perfectly. The first, the second, the third, the
thousands of time. It doesn't really matter. As long as you enjoy drawing, you will find your way, you find your mat, and you will be good at that. Let's give her some
freckle here like that. Like this lady is really
like him or herself and to, to buy maybe necklaces. So let's give her a
necklace, more spheres. Now, on top of this dress thing, we'll use that to
add small spheres as a necklace and have her being
pretty the way she thinks. She's pretty. When we draw a
character like that, we have to think of
what do they like. It's not necessarily
something that we like. We can be punks or we can
like disco or like to dress in different clouds that are mostly like genes
and modern clothes. But what does this
character like? You have to come in, in her head and actually choose something that she would
think she's beautiful. And then that can also be
part of her personality. Why does she think that she's
beautiful in these clouds? I've noticed people
that some people are kind of like they've had the best time in the '70s
and '80s or some age. And they kind of thing. That this was the happiest
time of their lives. And they started dressing in certain way and they keep
on dressing the same way, even though the
fashion has changed. So we'll have to, we can think about why does, why do they do that and why our character thinks
that she's good, good-looking by
choosing these clouds. So she's having her
hand in the nuts. Maybe next time I
will draw her out. Maybe shrink the arms
a little bit more. As I see now she can they
can be a little bit smaller. I'm going to try to smooth them out so they're not like
bodybuilding arms about. So far. Let's go along and designed
this character and you see how her tiny feet
make her look bigger. And gizmo personality to her, give her a look. Alike are really
funny character, a really interesting character. Sometimes when you break down the different shapes of the character and you'll
find different proportions. You make them more
interesting to look at and to discover who they are. Again, it comes up
with the differences, the different
people that we are, and the beauty of doubt that we have
different features and there is something in all
of us to discover and to enjoy because it's different
and it's interesting. We liked difference. That makes it interesting. So what else can we do? Well, let's give her some also dots here because it's easier
to do at the moment. You can give her maybe flowers. Pattern. I'm going to just use delta
because it's easy to do and it's quickly gives another
texture to a clouding. And it makes character look more complete and more interesting. So if you want to
add another button, triangles or flowers
or smaller dots, you can do that or you can
just leave it like that. And I'm going to shade
her dress black. So she fits with her husband. They have this family thing. They have a blues or shirt, or a city that has some color, and skirt and pans
are black or brown. That could be a thing. Some couple, some couples
dressed like that. Similar clouds. That's also interesting
and fun to watch. I mean, I do love people. I love to observe
them and there's so much to discover
and they never, ever sees to surprise me. That's why I think
character design is so giving and so
forgiving because that's how you can explore the personalities that
you meet on your way. If you have a long
commute to work, I mean, observe people that are around you and think about
their personalities and later tried to implement them in your
character design, you see how much more
interesting that will become. So now we have these two
different personalities. Again, what did we apply here? We don't see even her ears here. So we applied large body, smaller head, much smaller head. And we used the proportions of the arms compared
to the waist. And the arms compare to in
comparison to one another. Week, we didn't go with
the hips finding thing, but we drew the legs very small. And the upper part of the leg is equal to the
lower part of the leg. The shoes economy has this proportions
like a human being, with a shoe being a proportion
of half of the lower leg. And that's how he found a
well-balanced character. So two different proportions, still using some of the
human features on it. And I hope you enjoyed that. I hope you learned
a lot, had fun. Design nice drawings
and are ready to continue with the
next lecture in a bit. I'll see you there.
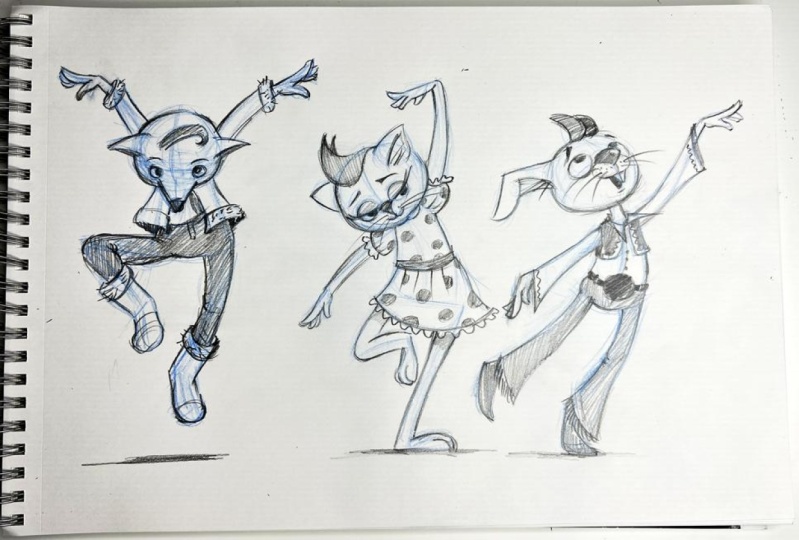
10. Normal Proportions - A Cat design: Hi there. We're going
to have a lot of fun. So relaxed. Had some coffee,
some tea, juice. We're going to have fun. It is important to have fun. So here we're going to talk about weight,
weight and balance. And first of all, we're going to design the
character that we are going to play around with and do
some weight exercises. And this character,
I'm going to give some pretty normal
human proportions so that you can practice with that. And I'm going to start
with a hand over here. And let's have this
be maybe a cat. It can be a girl,
it can be a dog, it can be anything
with human features. So I'm going to draw the
body approximately here, a longer body like that. And I'm going to have
the ground over here. So again, the hips
are over here. Let's draw the middle
line like that. And again, you see the hips are over here and the
legs are over here. So this part of the heap, if you bend your knee, you're going to have the, this size equals two, the size up to the shoulder. So the shoulders are
going to be around here. We're going to draw
another line over here for the shoulders. And the lower part, this part here is
equal to this part. So maybe the feet are going
to be a little higher up. Something like that. You're going to get
more shoes here. And let's do the other one. So let's find the knees. Knees are here. For a sphere. The hips are here. Put one sphere here. And once we are here, maybe a little closer. Because it's going
to be kind of like a normal girl character. Girl, cat, the cat
lady or the cat girl. Now, it's going to be
a child character. So we're going to keep
childish features because in some cartoony character
and it's funny, it's much better looking to do. It's not like a princess, so she's going to be around
778 years old or adult age. The head starts looking normal. It's not a large hat. It's still rather small in
comparison to grown ups, but it has already
normal features. Now, let's have the
arms over here. So if this is the waste and this is where
the arm is going to end. Let's design that. We are drawing a
line up to here. And the other one up to here, where the arm is
ending and the head. And if the elbow is over here, the upper part of the
arm is over here. So this is equal this. And it has a little bit
place for the hand. And let's draw the lines to find the placement of
the other proportions. One dot here, one dot
over here for the elbow. Here is again the structure
of our normal character. You see that the proportions, without even having
any features, they look like
human proportions. You see how is it this
method is to find the proportions of
your character before you even know who
this guy arteries. From. Now on, Let's start drawing the character we said is
going to be a cute cats. So we're going to draw the
mouth and the nose over here. We are going to have
some big eyes like that. This is the designer choose
basically can choose. You can have eyes
like just dots, but I really like big
eyes because they have big pupils and they can be
so much more expressive. And I'm going to draw
the nose over here and The mouth of the cat over
here and has some ears. It's basically a cartoon
character that is an animal. And looking like human. Has the mouth over
here and like that, and the lower part of the
mouth over here and some neck. Okay. So let's go with the
features we are, I want this guy to be
actually dressed up, so we're going to have
her upper body over here. I'm going to now
draw the upper body. And if you want to split
up a body of a character, you just use again, spheres as a place
holders like that. So I can say this is
the waste and you already know that
because you have even this guidance of the elbow. So I'm going to round
her waist like that. And like that. And you know, female characters, they have more of a waste, while men has more shoulders. That is a difference in design when you design your character. And now I don't want her
to have chunky arms. I'm just going to keep the arms are rather small and
close to the body. And her pulse or her hands, I'm going to give
her a human hand now because I brought
the body closer. I'm not using this
line over here, the one from the sphere. I can even bring
the arms closer. I can draw a line
on top of a line with a blue pencil because
this is my kitchen. Remember, This is
the kitchen and I'm allowed to do whatever I want. I want as long as I want. And I want you to see doubts. I want you to follow
me with that and see that this is
a normal process. It is not something that
you are doing wrong, you're doing right. Now. It is a normal process to actually discover
your character. And I'm going to give her a
big chunk of hair like that. Why not? Why not? She's going to look cuter. Any way I can make this
character look cute. So she's maybe like some
kind of a superhero. Usually, when you design characters that are supposed
to be very likable, you design them with
the right proportions. I think I know I
mentioned this before, but I'm going to say it again. That is the way to make
your characters likable. And I'm going to design
here or width pants because we're going to do
a lot of weight exercises. And I want you to see her where her weight is
and how this relates. So I'm going to do
some sausages on the, up on the inner
part of the body. I want her legs to be
closer together like that. And now I see that I
have drawn her legs are a little bit longer
than I would like to, so I'm just bringing it closer. Draw some feeds like pulse like that and draw another cell search for
the lower part of the leg. I'm basically just
doodling it out. This is like It's not a leg. It's a doodle. That's it. So don't be afraid to do though. It's fun and it loosens you up. It finds where your
character is, really. How does your
character look like without committing
to any line yet, we have not committed
to the final character. We're going to do that when
we go in with a black pencil. Let's do that in
the next lecture. So I don't keep you too long without a break.
You need a break. Go take something to drink. And I'll see you in
the next lecture.
11. Refining the Cat character: Well, hello there. I hope you got
some refreshments. Now, let's begin with
refining or Kat's character. This could be a girl as well. I just chose to be a cat
because we already had a boy. Now, we can have a
girl, a cat girl. The cats woman is
still a cat girl. So I'm going to draw the
nose here and add some face. Her mouth is going
to look appealing. And let's see if I'm going
to draw this chicks really. I mean, let's explore the
version without them. Why not? Now we can start
exploring the character. We already have all the lines. We need to have a nice character to have her
body being proportionate. So here, from now on, we can just explore what kind of features we want her to have. And I'm going to around
the ears like that. And this one, we have
the middle line, so they're kind of
like proportionate. And this can be a
little tricky for us to start with you not to
have the exact same year. I mean, you see that? I don't even have it exact year. If you want to do that, you will have to really measure, but we don't want to,
I'll do that here. Well, let's draw this upper part of the of the cheeks here. Kind of look cute,
didn't matter. And I'm going to draw
maybe some whiskers. Now you have another
cat's cute character. And let's see what
she has as clouding. We said, she's going to
look like a normal girl. Wait, pants. Let's give her some nice jeans. Maybe. Cool cat with genes. And the genes are a lockout. They're not on her waist. A little cooler, right. And if you're watching
that and different time, that is not now. I can tell you this
kind of jeans were popular ones and it
looked cool about if we are now back to the '70s and we have
upper cut jeans, sorry, that's not cool for you. Who knows how long these lessons are
going to be out there? I hope you're having fun
and enjoying whatever, whenever you're watching them. And I'll find some cool costume clouding for your own character. And I'm going to
do also a t-shirt. I'm doing all of them
with dishes because springtime is coming here
and it's pretty warm. And I kind of want
to think t-shirts. But if you're if it is
winter where you are, I mean, don't hesitate to do longer slaves if that's
comfortable for you. So let's do the
genes and have them like the little normal features. So they have, we know already, where do you lower
part of the body is? Are we now where the leg is? So we can also add elements
like wrinkles on the genes. And now we can add
the genes having this curvature here
being falling on top of the legs like that. Cool called genes. And I've even twisted
without even knowing because I'm always used
to posing a character. I don't like a character
that is standing straight. So unintentionally I've actually already put her wait
a little bit on this side of the leg so she has normal, more
relaxed posture. Remember when you draw
your characters in posing, you give them even more
personality and stand up, just having them. I'll stand straight. We want to see how
someone is standing. And I'm going to do
some large force here. And for now, I'm not
going to add some shoes. Large feet. Again, the proportions
of the feeds are kind of similar
to human proportions, but slightly bigger because she's a child and
I want to give her these cute look of Puppy
where they have larger feet. And now let's round up these
proportions of the arms. I'm going to bring
the arms closer. And she's having here a
pore here and some fingers. Same over here. This arm is closer to the body. Now, why is it
getting like that? Because as we design
and as we find even the waste and other
features of the body, some features will move around because we're also
posing the character. The weight is falling
on this leg and you see that she's more like
standing on this leg. So this is our character, Kat. She looks like a hero in
like a normal character. There is nothing
disproportionate about it except for the larger head. Because she is a
cartoon character. Still. Otherwise, she reminds us very
much of human proportions. So what are we going to do here is we're going to
take that skeleton, that character, and talk about
how to add weight to it. It means like how the posture changes when the
character lifts stuff, when Gary's Harvest staff, when it's standing in one leg or basically everything
connected to figure and wait. So I'm going to start doing
it in the next lecture. I'll see you there.
12. Weight and Balance exercise: Hello there and welcome back. Now, let's begin the
exercise of weight. Now, what does it mean? It means that when we lean
on one side or the other, or when we carry
something heavy, the poster of our body changes. It means that we
lean and we place our body instinctively in that way that we can
carry the weight in. As a character designer, as a, as an artist, you need to know how to
balance your character weight so you give the right weight to whatever they are carrying, but also to make sure
that they are imbalanced. So now we're going to start
just by sketching lines. We're not going to draw so far the facial
features and so on. But we'll take into
consideration this character. And now we're going to draw
this character caring, e.g. a. Heavy ball. So I'm going to start from
the spine and the head. How does the body reacts when
it carries a heavyweight? And you see that I'm now eyeballing those features
that I already did. That's why I'm always
glands and forth and back, four and back to my character. I know that these features
are correct and again, adjusting them in my drawing, and let's have the heavy sphere, heavy ball being over here. So when we carry
something heavy, we bend backwards to
keep the balance so we don't fall as well as we
tried to carry this weight. So the body looks almost
like a curve like that. And the legs also
goes backwards. So we are going to look
almost something like that. And now again, I'm measuring, I'm eyeballing
these measurements. So where are the arms? If we assume that here are the shoulders and he also
lift the shoulders up to make sure that our muscles are handling the waste so
we don't break or back. We're trying all the
possible way to carry this weight and the
arms are straight, then the pounds are
exactly under the weight. This is the most
comfortable way to carry the weight because
if the arms are over here, this way it will not be, not be too heavy. And now we have
the ni over here. The character is in profile, so we're just going to draw the body and the face over here. And the face slightly
leans this way. So I'm going to just draw the middle line of
the face over here. And the line where the
facial features are, slightly tilt our head
backwards so we can do anything we can with our
muscles to carry this weight. And now we also have the
other leg around here. Approximately. If these are the hips here, this is the knee. We have the other leg here. Or even slightly backwards. Maybe we can have
the leg like that. This is something as more as
you bend the body backwards, the heavier the
weight will appear. And it will have some
kind of effort to it. Now, let's leave this
pulse right now, and let's draw the same
pose next to here. But this way, Let's have the sphere or the bowl
being maybe a beach ball. How would the body
look like that? Well, if the ball is not heavy, we're not going to impose the same kind of strength
to carrying that ball. So I'm going to start with
a body approximately here. I'm kind of assuming
what I had is and the body is kind of like standing in
a normal position. So I'm just stretching the arms and the ball can be even here. You see it's the
same size of ball. But this time the character is carrying it with the
hands over here. And standing. If these are the hips. Here, it's standing like that. So now, how do you see
the difference here? How heavy is this ball
comparing to that ball? You can even have a
larger bowl over here. It doesn't matter. The mat, what matters is to see how the body is reacting
by carrying it. So now, let's do
another exercise here. Let's do another
exercise here where the character is leaning
forward standing in one leg. Again. I'm going to do
the head here and I'm always doing the
body in comparison, eyeballing these
proportions that I already gave my character. The character is going
to be in profile. And this is the spine. I'm going to round
spine line over here and the head is
going to be slightly up. Now that I curve the line here, I see that I can lift the
head a little bit upwards. And I have the shoulders here. And we're going to
have the shoulder on the other side of the body so we don't see
the other bowl here. And we're just going
to see the arms being on the air
just balancing out. Also try to do this. Pose yourself. You, your leg. If that's, those are
the hips over here. Your leg your body is
twisting the law part in one side and the
leg is slightly bent. Again, I eyeball the
size of those legs and I will know approximately
where the knee is going to be. But by just drawing
a curve like that, you already automatically
get the middle line here. Where is the band of the
curve as it's very natural. So the leg will be slightly bent and forward to
carry the weight and the other leg will
be in the air like that. And this is the natural pulse of holding the balance
and the arms are actually going to hold the
balance of this position. So if you have, you tried to stand this way, if your arms are down or
if there are straight up, it's much more difficult. But if you spread your arms, you're spreading the weight on different parts of the body. And now let's do another
very simple pulse. Again by character carrying
the weight in only one side. So the character is carrying
heavy bag on one side. Let's start with the head and let's say the bag is over here. Again. What we do now is we
want this back to be heavy. So we distribute the
spine, bend this way. Immediately, I drove a curve how the balance is going to
be for the whole body. And this is going
to be the body. So I'm just kind of drawing the body on top of this curve. And I'm going to
find immediately the the shoulders here and the heavy weight is always trying to
pull the body down. You don't carry the
heavy weight. Over here. It does stretch your arm. The heavyweight is
always down bands of the body in such a way that you can carry these heavy weight. So you basically try to place your legs and
you balance out with your other arm like that
to carry this heavy weight. Your heavier hips, balance out the way so you stretch
this part as much as possible using your
muscle strength and bend your legs so it looks like you are
falling off balance, but actually this weight that
is holding you in balance. So if you didn't have this weight and just
drew this pose, you would gun a fall. But just with this weight, you see that you are completely balanced and the
character is completely balanced and we usually
spread our fingers like that to balance our body. You see how just with this simple skeleton that
we started the character. We can actually also
draw the poses to the character without
adding any features to start with that and distributing
the weight of the body. Now, let's go ahead
and draw this poses now with our
real character. And you see how this exercise, with the proportions
build up actually gives you real character and how now that you
have the browsers, you don't have to figure
so many things out. You just have to draw the outlines of your
character onto this poses. I'll do that in
the next lecture. I'll see you there.
13. Lifting a heavy ball: Hello there and welcome back. Now that we have our
character's poses done, let's add the character to it. So let's start with this pulse and we know that lots to do. So, we have to split
this into two. Find the elbow. The elbow will be
approximately here. So you can either
eyeball it or you can measure it with your pencil. The way I showed you before. And this is the
characters are cell. Now let's add the
rest of the body. And we are going to
curve this body over here to add the
spine, the backside, and the buttocks
of our character, trying to have really human-like features
for this character. And the genes are over here. We said, if this is
the, now the waste, we have a low cut jeans and we can do the sausage
thing now for the legs. And you see that now one
leg will cover the other. And the sausage thing here
and add a pole over here. And the same thing for the arms. Very slight sausages because
it's a small drawing now that we do that
on paper and we don't have a lot of scope to do very thick sausages and
basically allows do the face. And we already have the
middle line over here. So let's do the face slightly towards us and give its
facial expression later on. Now, let's do the
middle line, even, move it even more towards us
to add a little bit more, wait until the backwards. Now that we have the pose, you can move those
lines for feedback, give even more
exaggerated expression of character carrying
this heavyweight. And here are the eyes. And the eyes. Maybe it will be closed
for carrying this weight. And the year, one year is here. And you basically, what
you do is you try to imagine where the ear of this
character is going to be. The distance approximately from the eye to the ear over here. And we'll add a chunk
of hair over here. And maybe we are not going to be able to see the other ear. Just very sketchy. And now let's go ahead with
a black pencil and refine, refine this drawing so we
can start with the face. And here is the nose on
this middle line over here. That is going exactly
around the sphere, because everything that is
on the sphere is around it follows these parameters of the sphere that we are
drawing of the head. And now we are going to give the character facial expression
of a really heavy weight. So the mouth is kind of like
like that we grinding or tiff when we carry a
heavy weight so we can just draw or
teeth like that. Giving it more
exaggerated expression. We'll draw the eyes
squinted and let's draw even the other eye on the other side of
this line like that. And let's add some
eyebrows here. That even, even though we don't
have eyebrows over there, we can add some
flashy eyebrows to convey that the
weight is really, really heavy for this little
cats and the whiskers. And now I'm going to shrug our shoulders a
little more to make the, the weights are really, really heavy and just
add the ears here. I'm going to jump from
one detail to the next. So I make sure all my
details are on the right, On the right place. And drawing the detail here, the sleeve of the T-shirt and continuing with the
arm on top of the sausage. And now I have this half sphere here that is signifying where
the arm is going to be. Here. I'm going to bring up the term of the arm on
top of this sphere. And that's how easy it is
actually to draw the arms. Now, when you have everything
on the right place and I'm going to have the
butt on this girl Cat. And let's draw even the ball. You can imagine already
having maybe some stone, stone bowl or something. And just add the
legs of the cat. Here is the front leg. The way those genes,
some modern genes. Let's add texture of
the genes over here. And the leg is
really pulling back, trying to keep the
weight of the cat. And the other leg is over
here on the backside. And let's draw the
pole over here. Just do the same process as
the one that we did with that other cat with a
normal pulse and this leg, we don't really see it
and we can even just shade it in darker color just to make sure this leg
is behind and we'll just have the leg
bent on the backside. The whole poster of
all this is already showing that this cat is carrying a bowl
with heavyweight. So now let's add the whiskers
over here on this side. And basically, or character is coming to
live carrying a heavy ball. Yeah, so this is
basically our first pose, just starting with
the proportions and finding the weights before we even put the
character in there. So having that in mind, let's continue and actually
add the character to the next pose where she's
carrying a beach ball. And I'll do that in
the next lecture. I'll see you there.
14. Lifting a beach ball: Hello there. And now let's go ahead
and draw our next poll, the cat carrying the beach ball. And now things are getting
easier and easier for you. And why I draw so many
of these exercises because I want to encourage
you to draw and draw more. Because the more you draw, the better you become. So again, let's start with
figuring out where the body, the shoulders, we have
the middle line over here, bend just slightly. And now we're even looking at the chat a little
bit from the front, and it is holding the ball
a little bit at the site. So let's design the
arms over here. The term is going
to be over here. You can even find the poles
and the time just adding some small lines like that to guide you where the tummy is,
where everything is. And you see we have a hand
already here with very, very few strokes. So the cat is going
to be over here. Here is the body, here are the genes, and here is the
waste of this cat. And so here are the
niece of this cat. The sausage thing,
the sausage thing. There is another subset. Another sausage just runs
really, really roughly. Areas one leg, one pole or fit. So to say here is the other one. And then data, here you go, you have the Cat already. Let's find the middle
line of these faces cat, it's all around here. And using this line, this middle line of the face, finding this part of the cat and the nose and just drawing
the eyes on both sides of the cat of this
middle line and finding the pupils little bit
cross-eyed because it is. That's how cartoony
characters are. That's how they look
alike children. And now we're going to have an expression that
the cat is smiling. This ball is not heavy at all. It is just light beach ball. So we have the cat's already
figured out in all the ways. Now, let's just draw the pants. The genes over here and comparing it
always with our model. That's why it's good
to have your model on the side so you can
always compare, compare it to your
original cats. And now I'm going to
ignore this sausage here. And I see that the cat, the leg is finishing over here. So I'm going to just have that as a lead to
pull the legs a little closer together and have these pine line being
really defined. And have the polls, the polls, the fit here carrying the weight of the cat and he's
just slightly bend, much less than this one to carry the weight of this beach ball. That's it. Now, let's go ahead and refine
it with the black pencil. And you can start from
whatever you feel comfortable. Yes, I'm going to
start from the face. Now. It's just easy peasy, because you have everything,
everything there. You can just enjoy
the process here. We have our happy, happy cat carrying a very
light beach ball, not efforts. There is no effort at
all for her to carry this beach ball around and
play with it a little bit, throw it in the air. Yes, play with it. So the more you do, again this exercise, the
better you will become. Some of these things are
felt rather than non. You're not mathematician. You're an artist who needs
to know your material. And the only way to do that
is by drawing and drawing, put it into your body,
into your system. In the same way that you
know how to lean your bike. When you ride a bike,
you don't fall. In the same way. You have the feeling
of distance. When you drive your
car without having to make the calculations
of how long it is two, the next car so you don't crash. That's the same way that
you are going to feel about finding the weight
to your character. Because our bodies are complex, we have complex
system of bones and muscles that are keeping us on our feet,
keeping us stable. So we don't fall all the time and we can carry
around heavy stuff. And we don't even think
about carrying stuff. But when you have to draw that, while you basically
have to know it, this is like a
speaking a language without necessarily having
to know the grammar. You know that when the people who actually
know the grandmother best are people who are not speaking their native language in every, in the countries. They know the grammar, but they can speak. And it's the same way here. I can teach you the
principles of how this works. But then it's up to you to actually get the
feeling of this, of how these fields. And that happens
only by practice. Because every new drawing, you have to, in a way, guess where, where
the way it is. And you see, I use this
even square fingers here, and I'm just using
these lines and just giving them more volume to design the hand of this cat. It's very easy. It's very easy to use any
kind of helpline, spheres, rectangular lines to design your character before you even give the character any flesh. And you see I'm
designing the belt on this character using
this middle line here. It's all help that I
need is already there. And I'm going to put this
belt thing there as well. And I'm going to shape the
legs of this cat over here. And everything is
already given to me. I'm just refining on top of already subject something that I have designed from Skeleton. And that's what you need to do. You need to forget about just drawing clean
drawings in the beginning. I know you are impatient. I know you want to
get there right away. But believe me, you will
find such pleasure in actually putting life into your character by movement,
by correct movement. And putting this last drawing of a character in eventually will be as the
icing on the cake. You will enjoy it so much more when you know
what you're doing. And now I'm even going to
enhance the feeling of beach ball by adding some
beach ball patterns. And you see, I followed
the curvy line of the sphere and they'll
longer it comes, the closet comes to
the end of the sphere, the more bent they become following this pattern,
these spheres curve. That is because there
is a perspective to it of all the lines
on the sphere. But that's another lecture
and I have that talk about this sphere and
perspective a lot in my course. How the ultimate guide to draw
a cartoon characters where we use only spheres to design
perspective of a character. If you're interested. I'm going to make this
line thicker here. And here we go. We have our cat carrying a very, very light bulb compared to this one where the same
bowl and you want smaller is much heavier. I forgot the whiskers,
the whiskers. The icing on the cake, right? You look like a real
cats, woman, cat girl. Here you go. Now, let's draw the next
pose in our next lecture, I'll see you there.
15. Balancing the body Pose: So welcome back. Now, let's continue redrawing the character on
this pose over here. So again, we know that the
character is looking down. So let's find the
character's face over here. It depends on you. If you want the character to
look down or slightly up. I'm going to have the
casual look around here. So we'll have the face
being somewhere over here. And I'm going to draw the
middle line over here. So this is the character's
nose and the characters I. And it's going to be in profile. So this line has to be
approximately over here. So we have begun
to have only one. I am going to have the cat's hair and I'm
going to draw the ear. And now we're not going
to draw the whole sphere. We're going to find
where the genes are. And we said the waste is
approximately over here. Now that we drew this
cat over and over again. And we have the front leg, the leg that is towards us, actually on the floor. So we have this leg over here. Let's find the knee over here, and let's draw the sausage. The sausage here,
the pore over here, and the body is over here. Now, let's find the knee on this patch
approximately over here. And I hope by now you are
going to get the sense of measurement without
even having to measure. I would encourage you to
just measure like that. Anyway, even if you're
roaming the first time, even if you get it wrong, just put this sphere here and here and here and
draw on top of it, make it dirty drawing
until you find it so that you get used to getting these proportions
inside your body. So you instantly think, instinctively, feel
where they are. Now, let's draw these genes leg on top of the
cell, such thing. And let's draw the
sausage here and here, and just continue
these lines over here. Let's draw the pole
over here for this leg. And this leg is
going to be slightly shorter here because
it is a perspective. This leg is behind this leg. So I'm going to draw
the sausage here, the sausage here to find
where the arms are. Just use that as guidance
to find the arm. And just use this line to define where the spine is
and where the stomach is. Here we have the neck on top
of this curvy line here. That gives us this suggestion
to find where the spine is. The arm. And we have the
arms like bend forward. Here are the fingers and 23. And usually it's funny that you have just three fingers
on cartoony character. Usually if you have, if you see Mickey Mouse and
other cartoony characters, they just have actually four fingers with
the index finger, with the thumb, they
have four fingers. So it feels like kind of
like character balancing. Five fingers is
way too many dots. Okay, so we have our
character sketch that out, and let's draw it
with a black pencil. So I'm going to draw the
ear here and the hair. We're not going to see
maybe the other one, the other ear is and refine
the facial features. Now we never drawn our
character yet in profile. This is something
also interesting that how do you guess how your
character look in profile? Because we look
differently from. All sites, or that is, your job as character
designed to discover, to discover is this
volume here of the cat? Is it something that pops out from the face or is it flat? How do you want your character
to look like in profile? This is up to you. There is no rule to it. You will, you are the designer. I'm going to have a popping
out a little bit and have the aisle look straightforward
with the pupil here. And the cat is maybe smiling. And this is the
cat from the side and have this whiskers
are here and the neck. And here we have really the
pulse already figured out where the sleeve being over here and t-shirts
and the cat's body. And now we're just refining on lines that we drew
with the sausages. And that thumb. And the fingers here that we
draw just like small cubes. That's enough to look like real, real fingers and arms. And design the genes over here and the leg
that is in front. Let's draw, draw some
wrinkles of the genes. The nice. And go with the genes here, we see how the structure
looks like over here. So I'll just add some wrinkles. Are the genes falling
on top of the leg? The feet over here. This arm is also this hand over here with
fingers spread out. And Tom over here and just follow the lines that are already given
from the sketch. No more thinking here, just refining and finding out what is it that
feels correct. What is it that
feels right to me? That feels good now,
because you already see your character done. So you can experiment, you can have your
feeling. Guide you. And wallah, some
whiskers over here. And now we have the character in this pose distributing
the weight forward. And you see that
it's very hard to tell if you haven't drawn
it where the weight is, but it's approximately here. If you draw a line up, the weight of the character
will be distributed in the set in a way
that the bent knee holds up the weight of this
heavy body here and head. And the arms and the legs are actually balancing out so
you don't fall forward. And you know that if we bend the leg a
little bit upwards, this body needs to lean forward a little bit
because it's going to be really hard for us to keep the balance
and not fall down. And even that pose is
a very hard balance. So you know that
you have to recall where we go with the
arms and the legs and the body to keep that
post steady if you are trying to keep that pulse. So this is a nice exercise to find the weight
of your character. I mean, photograph yourself
in this pulse and use that as a reference to see and feel how the body is tense
in this position. So now let's do the last
box here for our character. And I'm going to do that
in the next lesson. I'll see you there.
16. Carrying a heavy bucket: So, welcome back. And now let's finish
this pose with the cat carrying heavy
bucket or something. And as you see, the weight is distributed
somewhere here. So if you put a straight
line down over here. So the weight of this bucket and the weight of this body is trying to balance
out each other. Again, we're not
mathematicians, we are artists. So this is something
that you have to draw over and over
to get it right. So I'm going to put the face of this character being
over here on this line, on the curvy line here. Now you can see why we
needed to draw so many lines and spheres in the
beginning of the lecture, that wasn't for nothing, right? And we can see the, the waste being
approximately over here. And now the, the hips are trying also to balance out this
weight as much as possible. So having this keep
a little bit higher up and this hip a
little bit lower down. And finding the
middle line here of the leg and the one over here. And the arm is actually
straight down. So it is even if you stretch
the arm slightly here, because it's the arm that is
contributing the way it is. Shouldn't be curvy, it shouldn't be this
this arm is straight, going straight
down and trying to actually lean on the hips, on the body so it can carry
these heavy, heavy bucket. And this one is just balancing. So eyeball the middle of
these two parts as usual, and have the arm over here
and have one line for the thumb here and one curvy line for
the finger over here, and for this one, and this one. And now we have more elements than we had just a second ago. And this is a hand that is
actually holding the bucket. And now let's refine. The rest of the features. Will find the legs
down here, the feet. And let's start by
adding the face. Will add the mouth over here, the eyes on the
two parts of this, on the two sides of this
line and the hair, the eyes, maybe we should also squint this cat's eye and
convey struggle. And convey struggle even with the facial expression of the mouth and signify
what the ears are. Just small triangles. Here. Where are the hips? Let's design the, the shirt
to the searches over here. Sausage, so such,
again, sausage, sausage here to very
slightly because now we have small drawings and you want to keep it
as clean as possible. And that's it. So now let's go ahead and actually clean up
or drawing here, starting from the head. So, so just to get
a clear character, now that she is
carrying heavy weight. And we do some mouth like dots, which is conveying struggle. Very symbolically because
all cartoon characters, they are most symbolic features. Stylized expression of
human being, expression. That's what's good about it. Because it's easier to draw. And especially as a beginner, you can draw cartoon
characters and actually train to draw a realistic
characters as well. Because you can get the
expression and look by very few lines and still
have very realistic, very nice-looking characters
with human proportions, as we do here, is much more forgiving. Because strong human
proportions and getting them wrong is
not very forgiving. The viewers and human, you will notice something
is not well balanced, but here you are allowed to make mistakes and no one will notice. And you can get is
rewarding feeling. It's not that it's wrong
to make mistakes is just a reward that you get
from drawing. Something. Nice will give you a boost
to continue drawing it. And you see that
now this curvy line that we draw is guiding me to draw the rest of the
body following this character. And now that I have drawn it three more times or
four more times, It's actually easy to apply. And you have my feeling also guide me to find the
rest of the body. Now having a town
over here on top of this sphere that signifies
the hand and the bucket. We don't know what we
have is in this bucket. We just filled out the bucket is already heavy, very, very heavy. Just by adding this
pulse to the character and drawing on top of sausages
binding the other arm. We hear the term, let's get them kind
of like chunky, square looks as well. Like dots. They don't have to have nails
and anything like that. And when you draw a
character like that and you get a good balance, it, the details that you are
drawing on the character as very, become
very insignificant. Because they are because you have your character
coming to life. And the details are
not as essential for your viewer as the pulse and the feeling that the
character is conveying. And now even this leg
can be slightly bend the other one because
we have already balanced the weight
on this leg here. So it can kind of like
trying to keep the weight of this leg and the balance on on the leg that
is in front of us. And basically, that's it. We have all of our characters carrying
something balancing out. And I hope this exercise, our whiskers, whiskers, I forgot the most
important part, right? So I hope you enjoyed this
exercise and you see how you build the characters from the ground up and not
the other way around. You don't start by adding
head and eyes and whiskers. And then try to find
how the character is standing and what the
character is scaring. But you start with a
wait and try to find a balance with very simple
shapes with lines and curves. And then you add the
character on top. And in fact, I'm going to do such exercise in
the next chapter, where I'm going to draw the same proportions but without having a
character in mind and then adding
character on top of it when we're ready with the
balance and the proportions, and when we're ready
with everything, and you see how easy that will become to draw
something and then add the character when you have the body and the
balance figured out. So just take a nice long break. Maybe a day or two. I don't know whatever
you are at right now. And I'm going to see you
in the next chapter. I'll see you there.
17. Sitting on a chair - Poses_Part 1: Hello there and welcome back to another section of figure
drawing for cartoon characters. Now that you have tried
a little approaches, Let's challenge ourselves here. This exercise will T2 that
proportions are very relatable to one another and
you can easily find the proportions of your
character if you have this thinking process in mind
that I will show you here. So we're going to do
character sitting on a chair. And we're not going to
have a specific character, but we're just going
to use proportions for our character and then refine
the character afterwards. So you don't have to have
a model a character to, to hold the proportions too. That way you will be allowed to make the so-called mistakes. Because there are no
mistakes in drawing. There. There is just trying out sketching and finding
a real character basically is you cannot draw a perfect flowers
are perfect character. If you don't learn. This method, I've actually
drawn sketchy and free yourself from all the
misconceptions that you have, that you have to be an artist
from the get-go and you have to draw a perfect fourths and perfect character
from the get-go. No one in any profession
will say that to someone. You will not be a Dr. from
the first operation or your not be an architect from
your first building. Is the same about drawing. So this is your kitchen. Here is how you can try
out different things. Now that you know about designs, Let's start by posing or
character on a chair. And what do we have? The character hips needs
always to be on a chair, or the character needs to
be sitting on a chair. So you have that position. And you will keep the
proportions of the legs and the arms in the way that we show that it relates
to human proportions, it means that the lower
border of the arm is equal to the upper part, the same for the legs. Rest of that, the
proportions of the body and the head will keep fluent
and to keep different. So we'll have a character
with a large hat sitting properly on a chair. So we will have the
body with the curve being that small and the
head being that large. Let's leave that for a moment
and go for the next pulse. In this pose, the
character will be almost leaning on a chair. So let's have the character's
body being over here. And let's take this
proportions of the large head being over here, almost leaning on a chair with the head and the hips
being over here. Let's leave that as well. Let's draw another character
where the character is sitting on the side of the
chair will have this curve. But now we'll have in mind that the character will be
looking towards us. So the hips are going to
be approximately here. Let's have this large hat. Again. I like that. And that's all we have to do. That's all we have to do here. Now, let's go ahead
with this other poses. Let's have this
time the characters sitting with his
legs on the chair. So let's have the head
being slightly up here. Let's have the body being on this side of the
chair like that. And let's have legs here. So we'll have one leg
here and one here. So it's kinda like leaning with his arms
towards the chair. That's it. Let's leave that as well. What else do we have? Let's have a character here
with with crossed legs. So we'll have a
larger character, a larger body,
because we need to be able to cross the
character's legs. And let's have a
smaller head here. And we'll have the
legs over here. But let's leave that
as well and design our last pose with just
the head and the neck. It's going to be a character
sitting on a chair or holding holding
her or his legs. Let's have the spine
really bent and the head being over here
and very small legs. So this part of the leg is the upper part and this
one is the lower part, and they equal each other, this one and this one. So we have those pauses that are already given and it's
very easy to start this way. Let's put some arms and legs. And here you can start by designing this
territory because you see the contact of the
characters with the chair. Here, you can experiment
a little bit with proportions of the
arms, of the legs. So let's have this character
being like a child. And let's design the
body on top of that. So maybe like a round body. And let's have the legs
being slightly smaller. We'll have the legs just hanging on the chair
and the small leg. So let's have the proportions
of the legs here. They are not going to be
proportional to the body, but this part of the leg will
equal this part of the leg. And let's have very large
feet for our character here. And let's design the other
leg in this going to be approximately
on the other side. So we'll just see
a part of this leg here and a part of the foot. And let's have this character having his arms on the chair. So we'll have Hand over here. We'll have the arm
being over here. So now when we draw a
line of the, of the arm, will know that this part of the arm needs to
be equal to this bot. So naturally will put the elbow over here and our character will have maybe announced
that is over here so we can define where
the character is looking at. And that is all we
need to know for now. For this character,
Let's have the one, the character that
is leaning forward. So we'll have the
body being over here. Now you see that I can put
as many lines as I want. I can put spheres, I can put whatever I need to put to basically
define my character. How do I want the legs to be? Now, let, lets him
have larger legs. So he leans down on the ground and he has
the feet up like that. And the other one is a
little bit further away because we have some perspective
happening over here. So it's slightly,
slightly smaller, assuming the ground is
over here and there is a perspective going this way. So naturally, using the principles of the
short body, large legs, we know that even though they are large and
they don't apply the measurement
of the upper part of the leg being
equal to the body. We're just going
to split this one into equal parts
to find the knee. And the character's arms are going to be
approximately as long. And you're going to have
the elbow over here. And that part of the arm
is equal to this one. So he's going to have one arm placed on one hand
placed on his body. And it maybe he's just let have him maybe
waving to someone. It's like bring me coffee. Let's have his arm in the air. And the thumb here just
signify the fingers. Wet. Some some lines. You have the elbow
naturally here. Why? Because when we curve
the line like that, we naturally see that
where the curve is bending is going
to be the elbow. And it naturally appears that this part of the arm is equal, this part up DR. So we have this lazy character slacking on top of the chair. Now, this one, we said that this one is going to
be turned towards us. So we have a body like that. And how do we sit now that you have your
body turn towards us? One thing is that you design the proportions and the sitting position
of your character. And one thing is that
you have to think of how the body is comfortable to sit. Now you can't draw what leg stretched over here because that's not going to be natural. You can't bend these
joints in that way. So the leg can be
stretched down here. You will have to maybe
try out this position, sit in this way that you're
on the side of the chair. So one thing is that you're
going to have your arms stretched on that chair or
maybe leaned on that chair. I'm going to do just
the different vowels. Does the arm is over here, bend on the chair. That will give me a suggestion. Now, how is this
body comfortable? Maybe if their hips
are over here, one leg will be bent forward. So we have a dramatic change, romantic perspective change, and we will not
see the upper part of the leg from the
angle we're seeing. We'll just assume
that it is here. And then another leg come, another part of the
leg goes in here. So we'll only see the
lower part of the leg. And the foot is over here. And the other leg can be
on falling on the ground, but you have to see that this leg is also needs
to be comfortable. It means to have a comfortable
position on the ground. So it just hanging from the chair does curved out
and we will have one hand. Now, if the hand
is hanging loose, is tries to basically
reach the lowest position. There is muscles that are
holding the hand here, but still the hand tries to
go down as much as possible. And this character is having the other arm just placed
on the body over here. So the shoulders are really, really twisted like that. Now this poses are done. Let's continue with the other
pulses in the next lecture. Take a break and
I'll see you there.
18. Sitting on a chair - Poses_Part 2: Hi there and welcome back. Now let's continue
with this pose. We said that the character
is bent backwards, sitting on a chair. So let's start by
drawing the legs. And the legs is all
this junk of mesh here that is going to be
so here are the knee. And we'll have, you can decide how much flesh do you
want this character to have on top of these lines? And the arms are going to
be stretched over here. The shoulders are here
because this line is giving us the directions
where the hips are, you know, where the
legs are starting from and where the elbows
are starting to them. That's why this is
so useful to do. And let's have a large hand
or pour whatever it is. Just this character leaning
on top of the chair, which means that the
elbow naturally will be split and it's going
to be around here. It will split this line, the arm into equal parts, no matter how big the body is, the arms and the legs are always half of the upper
and lower part. So it's easy to take
that into consideration. Will have the character
sitting like that. And we'll have the foot being maybe at the
site over here. And the other side, we'll see Giles, the
foot a little bit here. And this is the stomach will
have the fleshy characters, but we'll have the
construction already there. Now, let's continue
with this one. This one, we said that the
legs will cross each other. So let's design a more
proportional character here. So we will have enough volume, enough thickness or Solemnis of the leg so it
can cross its legs. And usually when it crosses leg, it needs to support the
weight of this leg. Here we'll have a foot that has taught us
that we can see. So we'll have this proportion of the leg being
equal to this one. On top of that, we'll have a leg that's
coming on top of this one. And we'll have
another lower part of the leg coming on top of that and a foot
that is over here. And let's design this character's
body being rather slim. So he can actually do
this exercise here, like with the one
leg crossed animal have this shoulders
being over here. So this is more of a natural proportion of a
human being where the leg equals the distance from
the hip to the shoulder. So this distance
equals this one. When you want to create more
believable human character. This is what you can
consider as a measurement. And we'll have the
waste being over here. So we'll have these characters
are being over here. And let's have this
character may be sitting on a train
looking at a phone. So let's design the phone here. I'm just a sphere or half
a sphere for the hand. And you already, by
these few strokes, you have a pause here, a very well balanced posts. On top of that. You can create a character. Here. Let's go with the last pose and have these character being maybe a tiny character that is either afraid or is
just mischievous, sitting on a chair in an
improper way, holding her hands. So you basically have the the arms are
starting from here, so the body is really bad. And this posture signifies
that the spine is really bad. So I can just maybe rough
out the body here and just do the arms and the
legs are already drawn here. And let's draw the feet just at the end of the
chair coming down. And we don't know how much of the other foot we will see
when we draw our character. But basically, those
are the pulses of seating character that
we redrew with very, very few brushstrokes
or pencil strokes. I'll just say not. Now let's go ahead and design the character that
have those poses. And I'm going to do that
in the next lecture. So you have a little
break in between and get some refreshments,
come back later. And let's start with the upper poses and just
start drawing or characters. I'll see you in
the next lecture.
19. Sitting on a chair - Character 1: Hi there and welcome back. Now let's put some
cartoony characters on top of these structures
that we already drew. So let's start
with the first one and just draw on top
of what we have. And let's draw the arm. We know that this
sphere here is going to be a hand that is
holding the chair. And all we need to
do to get that is just draw a thumb here and split this fear to in three different
parts to draw fingers. That, that's easy. We have the nows. And let's design some head. Let's see what kind of
character do we have? And let's flesh first the legs. Maybe you will just have sausage as for the legs to
make it even more cartoony, not have any bones or
any nice or anything. And let's maybe just draw a character that has
very, very cartoony eyes. Very cartoony features are little guy and as some eyebrows. Funny little guy with
a mouth and cheeks. Just the head. And it can be just
a nice character. Let's draw his ear very roughly, just like a bowl. And just continue
this pose here, this sphere and refine it. And let's have some hair. The hair can really
exceed the head, and we'll just throw
a chunk of hair here. We'll draw the hair
around his ear. And here, over here. And just continue this hair on this little guy sitting on a chair and
maybe a little boy, like dots and maybe around this chunk of hair here
to give it more volume. And it's basically pretty
much done or character. It's that easy. So we can maybe put
some pants on them. Maybe just draw the
shoes around out the shape that you have
round up the other leg, the stomach, maybe the
pants just thicken the upper line around the other leg on top of this
line that you already true. And what is going to
continue on the other side. So maybe just make the leg, the other leg being maybe
underneath this one and shade that a little bit so we know that there is a
volume coming in, but we don't really
see it quite. So I'm going to have the
pen's being up here. And that's it. Or first, a cartoony
character is basically there. And now I'm just going to refine it with the black pencil. Draw all these features
with the black pencil. So we have a real nice
cartoony character starting from just the pulse, just starting first from a chair so we know
why the character is going to sit and having the
intention of how does we, do we want this
character to sit? And we said he's
going to sit with one arm holding the chair. And so we drew that. First. We drew how the
spine is going to be with a line and
we draw the head. That's all we had. And you see that
following the line of thought that we had, we designed the legs, we designed where the
legs are going to be and that this character is going
to have really large hat. So when we design that, we kind of like put
very small legs and we helped the proportions
of a human for the legs, which means that the part of one of the upper leg is equal to the part
of the lower leg. That's the only true proportion that we helped for
the rest of the body. We have been playing
with proportions. And that is what is
different weight. Figure drawing for cartoony characters
comparing to figure drawing for now,
for real humans. And if you want to
know more about how to draw proportions
for real humans, you can sign up for my lecture, how to sketch people from life. Because sketching
people from real life is the best way for you
to learn proportions, to have them get in
your system in a, just filling it naturally because that's what's
going to happen. It's like riding a bike. And first, when you started writing this by q-hat
four wheels, right? So you can support
yourself not to fall. And this is Lecture
is like that, is this four wheels of yours. But the more you draw,
the more you draw. So people from life, this will come naturally to you. You will not even know
exactly how to turn and how to balance on your bike
so that you don't fall. So here is our first character that we defined with
from just this shape. And let's, you can design cloth here if
you want, and so on. But that's basically it. So let's continue with the next slacking character
Who wants coffee. And let's see what kind
of design we can figure out there and how to find
the features of his body. I'll do that in
the next lecture. I'll see you there.
20. Sitting on a chair - Character 2: Hello there and welcome back. So let's go ahead and
draw this character. What kind of character is this character with
this kind of posture? So let's start with
doing what we know. So this character is basically have larger legs, longer legs. So we'll draw the sausage part here and we'll draw
just the thickness. Or you can just around a line on following this curve
here in the middle. If you want the
arms to be thick. And because we are not
on a digital tool, we can't zoom in. Here will have to basically be more careful with the lines if you want the character
to be rather thing. We're going to have this
arm being over here and the hand being
slightly larger hand. And what else do we know? We'll have the body and we'll
have the character's legs. So let's draw the legs. And we'll have a leg
that is rather more defined and has maybe
some knee here. And we have the pants
like we did on the cat. There are slim and legs
will have this one here. We'll use this sphere
here to be the knee. Continuous downwards. Let's continue with 1 ft. Maybe it's going to be turned
a little bit towards us. So it's not gonna be in
profile for that purpose. Let's do a sphere here so we
know how this can look like. We'll go on and give it a
middle pouch being over here. That is what you do. So if you want to find the shape of something
and you don't know, just draw a sphere
on top of them. Tried to figure out
how is this going? And the heels are on the floor. We know this arm is also
equal to this other arm. We have the fingers
being over here. So just thicken the lines
that you already drew. Where maybe half a
sphere and you will get this arm of the
character and just draw the arm being like
that with two lines following the
skeleton line that we first drew to get the hand. And we'll have the
hand being over here, the thickness of the thumb. Now, let's design the character. Let's assume that the
character's nose is here. We'll have this be
in the middle part. And let's design a large nose. Maybe being like that
and a mouth saying, Come on, give me
some coffee here. And we'll have a lazy look. So we'll have the eyebrows. And maybe we'll have the eyes being exactly
like on this guy. Very simple eyes, just dots
will have the eyebrows. Calling for the coffee. And I just wanted to
keep it simple here for you so you can
easily achieve success. It is very important to achieve success when
you start drawing, because you will
keep on drawing. And now let's draw these
boys had differently. And it could be maybe
even a girl, this one. So I'm going to just give her
some pony tails like that. You can change your
design at any time and give some features that signify that this character
is a girl or a boy. And I'm going to give her some chunks of hair like
that, a little bit. A little chunk of
hair coming out of her face and a small
pony tail here. And her head is leaned
on the chair, like dots. So here we have fingers. You just split this shape
forward and three parts. And we have a very, very simple cartoon
character with a nice pulse. And now let's go ahead and refine that with
the black pencil. Now it's just easy or
job is really easy. So you can just
refine the mouth. And I withdraw such Mao because there is a perspective change
for the mouth this way. So to draw a correct mouth in
this pose of the character, you need to account that there
is a flesh going inwards, and that's why you
just draw half of it. And this is an easy way to
simplify a cartoony character and still have the correctness of the perspective being there. So this girl is saying, just come on, I'm here, give me some coffee. And I do not want to
move because I've done my homework and it's
really, really difficult. So I'm just taking
a smaller risks. So not getting up for coffee. You can play with your
character like that. And just draw the hand. And each time you draw
this character later on, the batter, this character, it will become, you'll
remember that the first day of any character is the
first sake of any character. It's just going to
improve from there. And this is just an
exploration process always until you're done. And I usually draw my
character designs over and over again from
different poses to discover who these
characters are, to discover more of
their personality. Before I even go ahead and draw so-called
real characters. Now I have some of her cheeks and draw her hair over here. Maybe she's, it's
falling down this way. It's a funny Girl
funny Girl character and have her ponytail. We have her shoulders here. And let's shade the
head a little bit. I usually go as you know, for back with my characters until I find who
they really are. And because I have
this proportions already, I'm just exploring. And these proportions
are giving me the freedom to experiment
with the shape with some maybe wrinkles
here with where the where the sleeve is. This is something
that I can just be calm in knowing that the
pause is already there. She's sitting comfortable
on the chair. And now it, this is just
details coming in and refining your character and just making it
better and better. And that's why drawing first, with blue lines starting from the ground up and not
the other way around. We'll give you this freedom. And I'm going to have the
genes being over here. We don't see the belt
because she's covered it in with her arms. But we need to have some kind of maybe differentiation between the upper part of the costume of her clothing
to the law barred. Maybe we'll have darker
shirt like that. Now we can have
wrinkles on the genes. We can have shoes being here with maybe some, some snickers. And this one being
over here and have the other one there. So refined the genes
and this part here. And just shading this leg. So we see that this leg
is behind this one. This is an easy way to create depth in your black
and white drawings. Just just shade the parts
that are behind the parts. And now we can draw the chair
like that because we see her butt is sitting on
this part on the chair. And now you can see we
know where the ground is. This chair is ending over here. Maybe this, This foot is
slightly towards us or the leg. The chair doesn't need to
be on the same line because she can be turned this
way as it looks like. And maybe you can
shade where she's sitting on the chair to have even better contact
with the chair. And even in this head to have a better contact with
why the chair is. Maybe add some freckles to make this little
girl even cuter. Maybe some eyelashes to
small eyelashes like that. There you go. You have your Mexico
to need character. I'm going to shake the
head, but that's it. Basically you have your
next cartoony character already done just by following
these simple proportions. So let's go ahead and do
this next character and see who is hiding in this little structure
there that we have. So I hope to see you
in the next lecture.
21. Sitting on a chair - Character 3: Hello there and welcome back. Let's continue with
our other character. Now we said that this character
is sitting on a chair with one leg or
pull on the chair. So let's design that. Let's design actually
maybe a little cat here. So we will design the poll. I'm going to bring
that right on. And we have the
small leg here and he's going to be a humanoid cat. So the proportions will be
rather humanoids than the cat. And let's design a big nose here for this cat
and small chicks. I'm going to use
this middle line to design the symmetry of the cats on both
sides of its face. So I'm going to
have the whole Mao being here and I'm
going to have the cats, the cat's eyes being a rather around and cartoony
like the one that we did on the previous lectures. And they're going to be that big and a little
bit tilted actually because this eye is
rather in perspective. And it's looking
from down to up. So I'm going to
draw some eyebrows. Are suspicious Little Cat. It's going to be looking
at someone out there. And we're going to draw a very large ears just to make
the cat a lot even cuter. You remember that the kids have this large proportions
and when we apply them to our
cartoon characters, they also look very cute. But as you see, you can design
any kind of characters. So I'm finding the
inner part of the ear by doing a sphere and we had one sphere on
the upper part. You can just use that and
round out this features. And you get a cat's ear and the other year is going to be turned
on the other way. So we have the little
mouth here of the kitten and we got a really
cute design, a ride on. And we'll have the arm being a hidden on the backside
of the, of the kitten. A little bit around
that, not as small. And now we have the kittens pore basically here just
going downward. So I will just add poll with small triangles and
maybe have the, the thumb here as well. Being kind of like
a human thumb. And it's leaning on a chair
and having 1 ft on the chair. And here we have the spine, will have the stomach
on the front. And we'll have the other
four leaning on a chair. So we'll have the
poor being over here, just do another sphere to find it and connect the
sausages, basically. The other leg here you have all the guidance that you need. And if you don't, just do another sphere and
find where the other pulses, and that's it basically. That's it. We had everything we needed. So I'll draw the other pole
with just a small town. There's a resting on the
cat's leg. This is all. This is all too wet. So now let's relaxed
a little bit more the cats arm because we see
that it is struggling a bit. So it's not really
leaning on the chair this weekend or repair or
with the fine drawing. So we will have
the cats are here and we know that this
part of the cat, the arm is equal to this part. So we kept disproportions. We will adjust the chair. The chair is actually coming
forward from the cats arm. And we'll just refined the other features
for this character. Here. The ear here. And you see that
this character was actually had the same proportions
like this character's. We just decided to do
a different character. Just putting
characters on top of already ready structures makes
your job so much easier. Because one thing why your
character design is not working is because they
don't look right there. Poses don't look right. As long as you have the
poses Looking right, you're going to easily
find the character. So this is basically the
most important thing for you to learn that your drawing for cartoony characters. And I'm giving you a lot of different approaches
because I don't know what's going
to click for you. There are different
approaches and I'm giving you those that I myself found easy when I draw cartoony characters
and still find easy. And I'm giving you this and that because
for different people, different approaches will make them comfortable
withdrawing characters. You have to find what's, what's comfortable for you. And I hope that one of those
approaches that I gave you is going to help you
start drawing even better. And remember, don't put the idea in your head that
you're not good at drawing. Drawing, like any other
talent or ability, is a matter of practice. It is not a matter of talent. Okay, I would say that a musician is better
than another musician, but they have practice more
and they are actually, what I discovered is that
they are even more relaxed in their practice than
other than other people. So being relaxed and trusting yourself in what you
do will bring you only better drawing and more fun and also much less
stress, right? Because, I mean, you can
feel disappointed if you don't draw the characters that are right or if
you don't draw like me. Eventually, when you
find your own style, you will stop drawing like me. I'm giving you justice
exercises so you know that you can draw all this on your own. So I'm going to have the
chair being here and refine the chair for cat because we
see that it's coming along. And it was so easy. We know the character is sitting and adjusted the proportions according to what
we want to achieve. And let's maybe give this cat some patterns on the
head is going to make it even cuter and it's going to look
even more like a cat. So I'm going to give
at this stripes, a cat with stripes like, No, not like someone like
Garfield, the orange cats. And I'm going to give
it some patterns here. This is just about how you feel that your character
will look like. It's already done
with its proportions. I'm going to give it
some belly button. Or if you want to give
it some clothing. That's just alright because everything you need,
you already have. And this is basically a
cute little character. You can see how it's sitting. You can even suggest a
little bit the lower part of the upper part of the
leg with a line here. Just suggest that
because we don't see it. It's on the other side. And you can feel how this
character is sitting already. I don't have to explain
how is this city now the pulse is totally
clear to you, right? And that's how easy it is. Now, let's go ahead and give
you some more training on these other posters and have the thinking process going there because it doesn't matter. Because the more you do it, the more you follow me in
this thinking process, the better you will become
when you're on your own. Draw your characters. You will know what you're
looking for and how to think. So, I'll see you in
the next lecture.
22. Sitting on a chair -Character 4: Hello there. I hope
you had a nice break. And now let's go ahead and easily draw our
next character. This character to me anyway, looks like a little
girl sitting like that. So that's what I'm
going to approach this character with
the intention of. So I'm going to draw our
arms, very small arms, and I'm going to continue
here with the, the shoulders. And I'm going to have her, hence being a rather small. So these are going to be the
fingers of my little girl. I'm going to draw
cartoony nose like that. And I'm going to draw her
on top of the sphere. I'm going to draw the mouth
and the face like that. And just trying out, which is the best way to do. She'll have an open mouth. And this is something that
you can use the sphere for just to have the
lower part of the mouth. And I'm going to have large
for this little girl. So another chunk of hair, it could be rounded, it could be more sharp
like the girl there. And I'm going to have her eyes, large, large, cartoony eyes. Looking up at something. The eyebrow, and you can already see the
character I'm sure of. Even though if I haven't
drawn at that yet, I'm going to draw
the ears and really, really enlarge her
head with more hair. And I'm going to have a really a large ponytail as
long as her body like that. And let's leave it there and
find the other features. So she is having her arm over
here and the fingers and just split this part of the hand in three
parts and have a thumb. That's how easy it is. So we have her stomach here, her legs, as we already know. And we'll have the bend
of her legs over here. And we'll have the chair
where she is sitting. And we'll have the legs. They are already
defined spheres. We see where they are and we
see what the other leg are. And let's give her a dress, small dress coming up to here. And sleeve is here. So her shoulder like she's
really stretching forward and having even her other arm and hand maybe somewhere behind
that we don't really see. And that's basically it. Let's go ahead now and refined even this character
where the black pencil. Let's start from the
chunk of hair like that and round it
up a little bit. Maybe have another chunk
of hair here behind. Just for fun. Because we do have our
character already. And just around her head on top of the sphere that we doodled
out with many, many lines. Having her nose, her eyebrows. I'm always leaving a small
white dots on my characters. So they're live, their eyes
immediately come to life. I'm Ryan around the
app, the mouth. Maybe I'll add some teeth
over here like that. And just continuing
the round face. Giving her some eyelashes. Like about and having
her cuter and cuter and refining the other part of her hair that we see
extending the head because, you know, the hair can
be really, really big. So the head that we have
is usually just or scalp, but then we can have
really large here. And this girl does have one. And here we have her body. And her ponytail lying
on top of the body. You already see where it
is and her elbow is here. So the chair is over here. And here she's sitting. And again, as you know, we already measured
that this part is equal to this part approximately. So she's stretching forward. So she's bending really forward. So you have to account for
that in your measurements. When the spine is banned. It can look differently. Your measurements can
look different than you will want to measure in the
way the spine is banned. But you have to
account really for that change that the body gets. And I'm going to
just shade the APA, the other arm, like
that's just behind. So we see that there
is an arm over there about what is it doing? Oh no. We'll just leave it like
that because it's on the back side and we're going
to give this girl shoes. Maybe we'll have to
see the shoes a little bit from the lower part. And just around
them up like that. This shoes and the other
shoe is also there, but it's further away. So let's say that
like doubts and round her niece and basically just
give her hair some shading. So it's, it's better. It looks better graphically and it gives you
character completion. You see that when
I shave the hair, I very lean my hand and
have very, very thin lines. And if I want another shading, I just go over it again with
very thin and easy lines. And if I want another shading, I go over it yet again. So if you draw with the
top of your pencils, you will get darker lines. If you draw with a side of your pencil and
slightly linear arm, you will get your hand. You will get more of a shading rather than,
rather than lines. Now I'm into my drawing
process and I'm thinking, Wait, I'll have to
talk ourselves. I'll have to talk
what I'm doing. And this is a good part. So if you start drawing, that you start drawing now
it is so metadata if you forget about all your
problems and you'll say like, wait a minute, I had a
fight with my boyfriend. What was this about
or or something. I had to throw out the trash. Oh, I'm sorry. I'll have to excuse
myself that I was in meditative drawing state
and I totally forgot time. That's what's going
to happen to you. It's so nice to draw it so meditative and it's
very healing as well. You forgot, you forget
all of your problems. So let's give some
pattern to this girl. I'm going to go with the spheres because
it's the easiest. And it gives some
different differentiation of the clothing from the
other parts of the body, especially when you
have a pulse like that, that many body parts are
close to each other. I just gave a little
bit nicer look. And that's basically it for this pulse or designed or character on top of what we had. And now you see that we have two empty shelves,
just skeleton design. And let's go ahead
and draw them as well and see who is
hiding in there as well. And I'll do that in
the next lecture. I'll see you there.
23. Sitting on a chair -Character 5: Hello there and welcome back. Now that we have this spouse, someone looking at
the phone and we have proportions
closer to a grown up. Let's do a grown up
cartoony character. So one thing I'm gonna do, I'm going to use this
sphere and neck to design kind of a guy
looking at his phone. I'm going to design a large ear, which we'll assume he'll have a very interesting proportions. Maybe he'll have a hat. So I'm going to start
designing this hat. Just a caricature
really of a normal guy. And I'm just doodling
here really. I'm going to design a
big nose like that. So I see that here are the
eyebrows and here is kids little chin and just bite that
we have a nice character. So let's explore. Let's have this line here. One hand that is
holding the phone, discovering the
form little more. So he has thumb so
you just split that. You have one term here. That's what I'm thinking about. A thumb. And he maybe has the other hand holding the phone over here so we don't
see the other arm. Just drew draw a hand that
is on the other side. Let's design the arms. So just continue the arms that are over here and
design long sleeves. And where the elbow is here. And what else can you do? You can design a color, maybe lets him have a blues, cold weather,
something less have, let him have thin legs. So he's slightly relaxed
because his hips are over here. And just continue or drill sausages if you want or
thick lines like that. If you want, if you want to
find the flesh of this guy. But now we have a bone that finishes over
here on the knee. And we have the leg over here. We see this is the toss. So he has shoes on his foot. Let's design shoe. Just two lines to design shoe. And let's imagine how
it should look like. So this is already
looking like a shoe. Just make the design of the shoe with just very few
pencil strokes. And he has a pencil or the pen structure
is that usually it goes around the leg on the backside and it
stretches on the front side. That's one leg. Let's design the other leg
with now that the knee is over here and it's
crossed the guy's legs. So we will only see a
part of this his leg behind and we're
going to see a lot of the lower part of the leg. And let's design the shoe. Now this can be a difficult and perspective to achieve because it's slightly turn towards us, as well as the twister
dislike what's going on here. So to do that, you can do a couple of strokes like that to define the movement or the
perspective of the shoe. And you'll have at
approximately over here. So just like a rounded shape
here we have the pants. If you are struggling, you just do it. Symbolically. You basically generalize,
do just a sphere. You don't have to do
so complex shoes. If you can't, it's up to you in a hurry as much
as you're able to don't try to do things that you are not sure with at the moment. Well challenge
yourself, really lame, but you need to be continuing
drawing to become better. And to do that, you need to draw things that
you see that you can draw. And now here we are going to draw the chair because he's
leaning on this chair thing. So everything is movable. Is we adjustable? So you just go along
with what you have. Urea, just urine do or not redo but just
play around with it. Don't take it too seriously and throw your TV
station or something. Because you can draw
I can I understand. You can get frustrated. It can get frustrating. But believe me, it's
going to happen. Just keep your TV's save away from you in case
you get frustrated. Right? So now let's refine this
character with these big nose. Let's have him looking
down and that can look only just a line like that
can make him look down. You don't have to draw any eyes. You'll see that you already have this character and
where is his mouth? What is he looking? Maybe she's looking something
shocking on Instagram. So I'm just going to draw
his mouth and he's like, oh my god, the youth today, what are they doing? That kind of expression? This is basically
or character done. Let's go ahead and
finalize it with the black pencil and
see who we got here. As a little guy that came
out only the structure or whatever of lines and spheres and an intention of how the character is
going to be sitting. You see why it's so much
easier to practice with finding proportions for
cartoony characters because they can be moved. If you draw a human being, that's not going
to be forgivable, you have to follow all the time the rights
of a proportion. You have to have the
same measurements. The basically like
those measurements, except the head is way too big for a normal character
in this guy. But the proportions
are very humanoid. They're mostly like humans. Okay, let's make him
smile a little bit. So it's not this little guy. Maybe he has this wrinkled. So he makes him looks older, a little bit older. Let's draw his neck and draw his costume
or whatever he has. We know where his shoulders are. Throw the sleeves. You see how easy it is now that we know where
everything is. To draw on top of that, I'm repeating it over and
over because I basically, I know that you don't believe
me with every drawing, you're wondering, oh my God, what's going to happen
with this drawing now? I made it through
the other drawings, but this one is really hard. So I'm telling you
over and over, just do these
exercises and sit on a chair and just
photograph yourself. Let's draw this form here. And the hand that is behind him and sit on a chair and
photograph yourself. Use those images to draw your characters
and have in mind, think, where are the hips? Where is my head? How am I sitting comfortably? But as long as you find
the hips and the head, you can play around with whatever you are
getting those images. And basically just draw different
sizes of legs and arms. And that's it. That's all you have to do
to get better at drawing. But really you have to do it. An even better way is to
draw that with other people. Just look outside your
window or go on in a cafe and just try to see
how people are sitting, how they are drinking,
how they're walking. And find out where the hips are, just with lines and spheres
and where their heads are. The most important
thing is that the hips and the head and how
the spine is moving. If you have that already, you can design any
kind of character. And it's going to look good
no matter what you do. It's very, very hot to fail
when you know those things. So I'm going to draw his foot over here
that is on the site. You'll see that I've
drawn shoes here. That is just a silhouette. Just for your sake. You don't have to struggle. If you want, you can
design a nicer shoe. You have delicious here. The leashes or whatever. You have, the opening
and closing of the shoe. And not delicious. It is hard with
language sometimes, especially when you're drawing, you can come out in any way, but I like for you to
follow me while I'm drawing and follow me along
in my thinking process. This is the best way
for you to learn. That's why I'm doing
it this way and not recording videos and
sound separately, because this is going to
follow you everywhere, this kind of approach. So this is basically
our next character. Now we have five different
characters here. Let's go ahead and see who
this character is as well. I'm going to do that
in the next lecture. I'll see you there.
24. Sitting on a chair -Character 6: Hello. I hope you're ready
for last character. And now this character has a kind of childish
switching pulse. I think. So let's use that and create
maybe another boy character. Let's exaggerate
the head even more. And let's have the
mouth being over here. Let's have the ears
being over here. And let's design
these guys arms. So I'm choosing this guy
to have much thicker arms. So I'm going to
thicken them a lot, much more than the
other characters. So it's going to
look even smaller. And I'm going to have
the arm or the hand that is from the other side to
hold this hand like that. So we will not see this hand, but we'll see some fingers here. This is an area where
it's at, what's going on. You don't have to draw
everything completely, but it will suggest to
you how you draw it, how things are on the other side of the
things that we don't see. So I'm going to have the boy's mouth being
over here and the face. And now we have the neck
a little bit over here, even though we
don't see the neck, we know that the
neck is here and the boy's head is
tilted backwards. So how do we suggest that? Because we have the
sitting pulse here and spying on all the
way here and you know that the spine is attaching to the head or the head is
attached to the spine. So they keep together. Otherwise, the head will
fall if the spine is over here and this voice
said is here and now, you don't know how things will go if that
is a real person. So unless design these boys
trousers and his legs. So we have this leg here. You can draw a sausage
to see how this goes. So you can draw
another sausage here on top of this line
and you can have his feet maybe being slightly small or let's
have like a normal, normal feed means that the foot is equal to this space here. So they are a little bit bigger. But just let's go along with
that and see what we get. So the leg is slightly
turned towards us as well. Now let's design the bot, the boys times he's going
to have a small T-shirt. And here are the shoulders. Let's design the boys sleeve. Again. I'm drawing
everything with some workloads or spring clothes because it's getting warm here, but It's up to you to put
designs on this character. And here is the elbow
of the little boy. Like that. Let's design his features. We have the small
little nose like that, and we have the mouth. We have the eyebrows over here, and we have the hair here. And this way you see
that I'm going for from bike while
designing characters. So I have the scope. I can change my
mind at any time. And let's have the boys, I being more of a
cartoony kind of I here looking forward and
having his eyebrow here. And having now the mouth of
this little boy being here. And let's draw some
cheeks on his boy. So I'm signifying a game that chicks with some,
another sphere. I can do though,
as much as I want. And I'll have the boy's
smile widely like that. And let's shape. He's had very, very simple
character design, really. I'm doing that intentionally so you can follow along
and you can have fun. And let's have his hair and
a chunk of hair over here, and a large chunk of hair
falling on his face. And that's it. Basically. Now, let's refine. The boy is working weird
when this thing here. But that's going to go away. So start withdrawing the eye. Like that. And the eyebrow. It's the same process here is no different than any
other character. I'm just figuring
out as I go along. I didn't know that
to start with. And I'm going to use this line, like the tif of the boy having some chicks on top
of this line here. And having his hair, chunk of hair falling
on top of him. Having his face continuing
stylized with the mouth. Here, we start with a body. The thing that we already drew. We start with and
we round the spine. Now, there is no
guessing process really. It's just fun because you have the new guessing process before with simple, simple shapes. So I want to encourage you to do such exercises over and over. You know, when you want
to learn something, you want to learn it
and get done with it, I'm going to bring you good
news and bad news, right? So what do you want
me to start with? So you will never be done. Which means that every
time you improve, you will want to come
to the next level. So you will always develop. And this is both the good news and the bad news
is the same news. But if you think that you're going to
draw it out and be done, well that's not gonna happen. So I'm going to bring a term over here because
I sat there are arms and hence that
are holding this hand. I'm just continuing
this hand here and suggesting the other
hand on top, this one. I'm also suggesting that
this other shoulder here is going forward with very, very few lines and shading. And I'm also suggesting a small
neck on this guy as well. So I'm going to round out his butt and I can add some
wrinkles for his pants. And having a sitting
position here, shading his pants
with different color. Just to give it clear, to make it clear that these are different kind of
texture on the pattern. And now, let's just go ahead
and finish our character. Make it as close as possible. But if you don't
make it a skewed, skewed as you wanted to make it. There is always another
paper to start with, right? So the thing is you can never be done or whatever
your level you read, you will always
want to get better. So just relax,
relaxing the join. You don't have to rush, you don't have to curry. There is no a point that you are going to wanting to reach. But the more you draw, the more you will change
your, your goals. Because now you just want to draw like this person
or this person. You just want to make
something in a pretty, before he started this lecture, all you wanted to do is to start drawing without having to do all these sketching and doodling
and blah, blah, blah. You just want it
to be born artist. You wanted to draw from
the outlines down. You wanted to draw something
pretty from the get-go and you thought people who
did out or very talented. And you'll say, I
don't have a talent. And now you know,
this is not true. So the more you involve, your next priority will
be to become better. And the more you draw, you will see that it's vast. It's how many, how much
more fun you can have. Along the way, how many
more characters you have to discover is just fun forward on from this realization
that you now have is so much more liberating and so much
more fun when you know, talent is not defining you. It's your practice that
is defining your end. The firm that is defined in it. Because if you don't have fun, you will not continue doing it. And that's the end of it. So as long as you have fun, just do it, keep on doing it. So here we had the
sitting exercises. I hope you had fun
the magic word. And now let's see what the next lecture
is hiding for you. Goodbye for now.
25. Figure drawing in Sports - Poses: Hello there and welcome back to another section of figure
drawing for cartoon characters. Now that you have the
opportunity to try, involve designing characters and also have them in motion, trying the weight and
balance of characters. We're going to
challenge ourselves with another
exercise and sports. In sports, the characters or
a body is moving constantly. So when you draw cartoony
characters during sports, what is important to take
into consideration is which pose describes the
best the sport that the character is engaged, and which pose is the most
extreme pose for that spot. So let's try just by doing
a random characters. And now we're going
to use so-called RAX. Rax describe motion of the
character and can easily help you find the balance
of the character because our bodies is in arc, it means that there is a spine and the weight
is balancing on the feet in a certain
curvature that is called arc. And this is a rule of thumb. It is now a rules are
written in stone, but something that can
guide you when you draw your characters in balance
and when they are in motion. So let's approach this exercise
by drawing characters, the motion of the characters, and not worry so much how big
are the arms and the legs? But just follow the exercise by trying to get
the motion right. So let's do football here. So when you have a football, so one leg will be
starting to hit the ball, which means the whole body
is basically balancing on this side and the
ball is over here. So let's do draw the head. The head can be small, it can be large because
it is cartoony character. What we care about here is
the pose of the character, the rest we're going
to figure out later. And now that we know the
measurements of the leg, that low part is equal
to the upper part. We can actually draw legs
of different length. If we just take this
into consideration, what happens with the
body when we hit a ball. So one arm is balancing
the same way that we did with a poster when the character is
carrying heavy bucket. So we'll stretch one arm to balance all this way
that is going over here. And one arm is balancing on the other side, maybe
slightly forward. So the arms are like the tail of a cat is balancing the
weight of the cat. The cat is jumping. This is what the arms are doing when the body or the
humans are balancing. And the phase is over here. So let's have a pulse here of a character playing badminton. And let's do a similar arc like this one because they're
using the same strength. And now instead of with the leg, we have the line of the arm and the rocket hitting
the shuttlecock here as this is called. So we'll do that in one goal. And it is approximately
here, hand holding it. And now let's design the body. How is the body standing? Let's design, Let's
draw the head. It can be big, small head, but because it is
cartoony character, we can draw bigger head. Let's push the body even more because the
pulse is kind of similar to doubt polls
that you James strength. But this time with
the upper body. And you have one leg up front balancing your body and one leg. Is actually balancing
the upper part of the body with just a curve. And you have one arm, front, also the same in a similar way, balancing out the body. Just draw that with
different with some wines. And we have the pulse
of the badminton, which is similar to football, but still different
because you have a different kind of sport here. So the next one that we
are going to do is basket. How do you dribble a
ball with the baskets? So you have a body, you have a curve, lean forward. We'll have the head. The body is running but
it's not running too fast. So we'll have one leg over here. We'll have the hips in this way. And we'll have the
other leg behind, one leg picking up the weight. And with while
keeping the weight steady while a running
and with the other arm, we dribble the ball
with the other arm. And you see that I'm
drawing just curves here, which is different
now from the body because you have learned how to discover how to measure the middle line of
the arms and legs. And now you can just
play with the posers. So we'll have the
head looking upwards, so signified just with a nose. And we have that pulse here of playing basket and we'll
have a ball in motion. So we'll have a slightly
stretched the way you draw a ball when you animate it from one
pulse to another. So we'll have this middle
pose of the ball like that. So it looks like the
character is played. So the next one is having a
character throwing snowballs. And well, it's not
really a sport. Maybe it should be. So we will have a
character really gaining strength to push
the ball into the air. If we have the character
arms and we'll see what the connection is so we
know what to bend the body. So now we'll have the
body turn towards us. So the hips are
approximately over here. And we will have a leg
actually balancing out this strength and this this energy that is
building in the body. And with the other leg, Jane in even more energy. So you push one leg forward
and you have the other arm. Actually balancing,
balancing dot pose. And that's it. We have the character
that is gaining strength to push
the ball forward. And this, these are posters
that you can learn how to do, but it's all about observation. And that's why I'm doing
this exercise here. So you learn to actually draw
such pulses and for you to become natural to you that you can draw this poses
in this simple way. Another pulse here,
we'll do a yoga pose. So we'll have the
body stretching over here and we'll have the body, a small body here,
just stretching. If the head is over
here looking upwards, we'll have the arms being on the floor stretching
and really up. We'll have the ties
over here, the butt, and we'll have the legs on both sides of the
body stretching. And again, we can play with the proportions
of the leg here. Because you can now eyeball
this pose is very easily, I hope so that you have done so many exercises and you have another arm or
hand being over here. Now, let's draw another
pulse, lifting weights. And we have practiced with the weightlifting
thing with the bulb. But how do you lift weights? If you are if you leave
them on top of your head. And we're going to
just take this balls, just place the head and again curve the spine so it
holds the balance. Push the body forward. And we have arms over here. We have the weights
on both sides. Arm. You can be a sketchy as
you want to be done. Don't be afraid to sketch. This is, this is an exercise. If you want to draw this
paper away, duet path, just keep your old drawings and to see the
improvement of you. And here are the weights. And this character is
pushing the backside really further up stretching to be able to hold these weights in the air and
pushing the chest forward, curves, curves the back so the
weights going to be heavy. And I'm naturally drawing
this character to have broad shoulders
because I associate characters that
lift weights with broader shoulders
and smaller legs. So I'm adding that here as well immediately as
a personality to even get better perception of the character holding weight. And that's it basically, or six figures that for sports. Now let's go ahead and create some characters
on top of that. I'll do that in
the next lecture. I'll see you there.
26. Soccer Pose: Hello and welcome back. Now let's flesh out our characters to design
a real characters. And now let's simplify
it even more. So you see how easy
it is less design the body on top of this character
and create a really, really simple character
with legs like that. Kind of like triangular legs. So we don't have to
find really the knee, but we know that the knee is over here where
the curvature is. And we'll have the shoes
being more like drops off. More like a triangular and very, very simple way like soft
legs, very symbolic. And let's have the mouth
of this character. We have the nodes already, will have the
characters smiling, will add the same shape
to the arms and just continue with the fingers
on top of these lines. Just like small,
small sausages to get the shape the
same on the fingers, just draw small
spheres or ellipses or sausages if you want and
expand even the arm. The arm gets smaller at the end. This is also a way to
design new character. Let's have GIs of
the character here, just like small dots, like a guy character. And we will have the ears. And let's design
some hair as well. On this simple character. Again with a chunk of
hair here and having the hair around his ears little bit thicker
than the head. And because we have
cartoony characters, we can have as large head
SV want really the hair, the head continuous
hero or the hair, I mean, like that, add some more chunks
of hair there, and that is our first character. Let's refine it with
the black pencil. Drawing the eyes, leaving out
some glands for the eyes. Drawing the eyebrows,
drawing the mouth again, the cartoony mouth
accounting that, accounting for the
flesh that we don't see in the part of the
mouth that we don't see. So we make a half mouth. This is also a very
common way to draw cartoony characters
that are very stylized and allows for interpretation of the shapes and forms for
the cartoony characters. So from this time
on, it's just fun. But I'm going to
do that with you here so that you follow
me in this process. And this is yet another exercise that is actually similar
to the other exercises, but with different poses. And the more you do it, the better you will become. And by now you can see drastic improvement of
your drawings, I think. And I'm sure of because that is what happens from
not being able to draw, to be really, really handling proportions
and movement very well. So expect that to
happen as you go along and draw along with me. And when you do that and when you see how much
you are improving. You will also understand
how easy it is and how this playing around thing
and scribbling with the pencil is so useful
and good for you. I'm going to draw the fingers
here very schematically. And this one as well. These fingers are going to be thicker and larger because
they are closer to us. So everything that
is closer to us has a perspective that
makes it look bigger. And if this things
were closer together, they would have looked very, they would have
had the same size. And now we place
the football here and we'll have some
pattern of the ball. I don't play football, so I don't know the exact
pattern of the ball. I usually have to look at it. But if you are very
interested in football, you can make this
squares more precise, but just with dots. You can see that
we get this ball. That is basically our football. And the character is Janie, energy to hit the ball. And basically, this is it
for the first character. Let's go ahead and draw our next character
playing badminton. In the next lecture, I'll see you there.
27. Badminton Pose: Hello there. I hope you had a nice break. Now, let's continue
with the next one with a badminton game and
refine the features. Now let's have the nodes
of the character here, and let's have a girl
character playing badminton. So I'm going to draw
again a similar mouth. And I'm going to
give her a haircut. I'm going to draw
the same kind of very simple eyes so
that it's easy for you. Also to draw these eyes. You can have characters that
looks anyhow or really. And I'm going to give her
some hair in flying in the air and chunks of hair
just to make her look cute. Like dots. And I'll have a year being over here and hair
coming around the ear. And let's see where the hand is. And if the hand is before the body or
the other way around, this is something that
you can figure out. I'm going to do the arm in
front of her body and have the ponytail being here and
behind the hand, the arm. So we can really see
what's going on here. And I'm going to draw the fingers just by
doing some curvy lines, three curvy lines
inside this sphere. And I'm going to have
her having a dress. So I'm going to have
very simplified dress. And I'm going to have the
other arm stretched forward. And now that I know
what the legs are, I'm going to have her legs just the lower part
of her legs being visible. And I'm going to
do the same shoes, kind of like, like this one. Black shoes or darker shoes. And I'm going to have this part of the leg
being more visible. Because basically the dressed
is coming forward when she is leaning and the dress has
also certain movement to it. So I'm going to draw even her
other leg in similar way. And I'm going to draw her fingers again
like sausages. 123. Again, three fingers
for cartoony characters has become some kind of rule. I don't know why. But it looks it
looks pretty good actually with just
three fingers and we'll have the racket
down and some kind of nuts on it very quickly. And we have this
shutter shuttle ****, which is a funny word.
I don't know why. But that's what the
name is like that. So let's go ahead and
define even this character. Maybe make her eyes a little bit rounder than the guy's eyes. This is just our
design thing, really. You can design this character. You can also design a cat, as we did before. It is up to you what kind of
character you can put now in this placeholders,
in these poses. And it's a lot of freedom
from this point on. When you have the
placeholder and you know how the pulse is, is looking. So I hope you are
having fun drawing dots and pausing the video when you need to see
how things are done. Good thing now that you
can pause the videos, I had to basically go
and learn from books. And our teacher, let us
draw sketches a day. While. Why me what, 13 in art school. Because we had to get used to the body posture and we had
to draw from real people. So we basically had hang, hanging around the
railroad station. We drew people there and
there were no places for normal passenger to sit because it was only
asked from art school, just taking space, so they
had to kick us out of there. And yeah, but this is the only useful
way to become better, to draw people from life and also to draw this simple
pulses if you want to become artist and draw
cartoony characters, just doing these poses. What helped me a lot. Now you can find even
images online and try to, to break them down into poles, this alike, like I've
showed you here. And draw the hips,
draw the legs. And you see as you, when you pose the, the body and the head, the arms and the legs can
be bigger or smaller. And you can play around
with the proportions. But the most important thing is to get the movement right. So there is no other way
of doing and then just observing and drawing
it over and over again. And then your, your mind, we are going to tell you when you make mistakes.
So wait a minute. This arm needs to be a little bit longer or a
little bit shorter. This body or dislike needs to be more on this
side or this side. This is something that you
are going to feel how to do. I promise you,
this is the reason why I'm giving so much
exercises of motion. So this is the next character. Let's go ahead and do
the basket character. And I'm going to do that
in the next lecture. Go take some break and
come back here later.
28. Basketball Pose: Welcome back. Let's go ahead and start drawing this character
here, playing basket. So we'll have the
arm just dribbling. The ball. Will have the arm over here. And let's have maybe
a different kind of character playing basket. So let's draw a big nose. Let's have him being really serious about this basket thing. And with the other
eyebrow signifying, I'm going to beat you here. And I'm with them. Sneaky mouth, just
struggling to hit the ball. Let's have the eyes
coming from under the eyebrows focusing
on the on the ball. And maybe have his face
being slightly slimmer. Just the tip here, making his ear being a
rather large ear, y-naught. And who is this character? Some kind of maybe evil
guy deciding to win. So I'm going to draw big chunky hair is not
as young as these guys. But we can get use to draw
with the same proportion. Drawing older, older
people, younger people. It is just a matter
of how you add proportions of the
face in this matter. So you don't have
very small phase, you have larger knows which very insignificant for older adults. And you have more stricter,
more smaller face. You don't have as round face. And you aren't like that
feature after feature. And you have characters
looking a little older. So we'll have this
space here from the, from the round face that
we decided to change. So I'm just going to put it into the character design that heel Gama have a large color, is freezing but still
playing basket. So I'm going to give
him some pens here. And let's design the legs. The legs. And it's just either you
add more flesh to the legs. You know, the this point
is where the the knee, the knee is and this
is very easy now to see that you've done
the other exercises. Maybe I don't need to repeat it. And we'll have just
a very simple shoe. Let's design similar
legs like that. So a rather thicker
than these guys, because we are trying to
design a different character. And just a very simple feet here and not the other arm
is just showing from behind. So just around this out and
this character is done. So let's refine it. It looks like maybe Scrooge
or something, screwed up. Basketball. He wants to win all the
competitions and never wants to let kids When
basketball competitions. Now, there is a new story. Why not? I mean, if when you draw
like that and talk to yourself and find out
who your characters are. You will find new stories as well that will lead
you to new stories. So you can have yourself surprised by talking
and designing different characters
and what kind of character and personality
they will lead you to. So I'm just going to have schematic ear and very stylized. And let's draw the, the hair, some kind of Elvis kind of hair. Maybe he likes Elvis
Presley or I don't know. It has a lot of products on his hair and all the gel just to
keep his hair and neat. And now let's have his color being as a
part of this design. This doesn't matter now
because we know how the character is and anything
we choose to do here, it's going to work out. Because we have the
character figured out. From the get-go. It is just a matter of discovery from this point on and
dress up this skeleton. That's a way we picked, maybe it's winter and he made me solve some kids playing basket. And he said, wow, Come here, I'll show
you how this is played. Give me the ball. And he didn't they didn't
give him the ball, but he took kids. Right? So now we got this character
with kind of really baskets are
determined basketball tournament to show the
kids how it's played. But maybe he's not as
good as she thinks. So have this dialogue
in your head and see what is dialogue
lead you to. I really like finding
my characters and talking to my characters
while I'm drawing it. Well, I don't tell this to my friends when I
go out for drinks because talking to weird
characters all day long. Keeping saying that's
important to know. I don't want to tell them. I talk to aliens today
where I talked to a guy who likes to
steal kids basketball, and that's what I drew. And it's like What are
you doing Now you so, yeah, they wouldn't understand. So this character is
kinda done so shaded, shading hair to give more graphic look and
more complete look. Just to have differentiation between different parts
of the character. And maybe I'll shade even
though the pants like that. And here we have or
basketball playing character. Now, let's go ahead
with the next bowls and see who is hiding in there. I'll do that in
the next lecture. See you there.
29. Throwing a Snowball Pose: Hello people and welcome back. Now, let's go ahead and
draw this character. Who can we draw here? I mean, Let's draw a little forks so that
when you have your pulse, you can draw anything you want. So what does a fox? Well, it has a nose. So let's design the
nose being over here. And like that. And let's have the
mouth being down here. So just by using
this middle line, I'm actually finding a
different character. And let's have
this large chicks. And the Fox maybe has a hat with our openings for
the foxes years here. A warm hat because it is
a snowball fight right? From the middle line. I'm going to draw the eyes one over here and one over here. Now, I'm spreading it out a little bit than the
previous characters. Why? Well, because you can do that
with cartoony characters. You can have the eyes closer
together or further apart. This is a part of your design. I'm from that moment on. And I'm going to have
the other ear being over here and the nice
hats like that. And basically,
that's my character. I'll have some eyebrows. Now what else do we do? Well, maybe the fox
has some warm clouds, so I'm just going to do
the body like you have a jacket or a coat here
and it has some scarf. This scarf is in the air, flying maybe like dots. And just let's draw the thickness of the cout
here on top of this arm. And the thickness of the code, even on the top of that are. And let's draw the
pulse or the fingers of the Foxy like that. And more rather rounder
fingers than the previous, than the previous characters because it's more
of a fluffy design. So I'm just going to give
her some fingers behind the ball and find that. And let's give her
the fox warm shoes. So maybe boots. So I'm going to just start
the boot from over here, assuming that this
part and this part or equal to find where the knee
is, that's already given. A1 here. Just thicken the part of the
knee on top of these lines. And maybe we will go
on and see the shoe or the boot a little
bit from below here. So just make it a little dark if you don't
know where it is, just doodle some darkness. Pillow. Make it easier for you to draw
this character like that. And this is all we
need to know before we start refining it
with black pencil. So let's have some fluffy, nice half for our folks. Start drawing the eyes. As soon as you start
drawing the eyes, the character comes to wife. And you become more
motivated to draw them. And it's rewarding. You are dealing with
real characters here because these characters, when you look at them,
they have personality, they have life to it. And for the kids, if you put this
character in the story, you know very well
that for the kids, these characters exist for real. Can imagine how rewarding
this profession is when you know that some kid is going to bed at night and believing. This character leaves
for real and you pass. Real home, comes back
to their parents. It's dinner. And he wants to know more
about this character. They fall in love with
these characters. And this is your profession. Or if it is not your profession, at least if you do
those characters, this is what you give to
other people, to the world. You give them your personalities
of those characters, they will become
real for someone, for you basically, I mean, I do live with these characters. I know what it is. They're talking to me
and now I'm not crazy. Well, you'll have
to prove that your normal as well dear
friends will get there. And you have to be lucky. You will have to feel lucky that you have this desire to draw. It is very, very
rewarding to create, create new life in a way. So we'll draw the soft scarf
and everything is now. Given it's there, you
just refine it fine. Maybe other features
on top of those. Maybe I'll have a fluffy code, so I'll make thickness
around here. So the code has slightly
different design like that. And the code goes down and up because of this
leg is in the air. The code is kind of lifted
up by the leg on this part. And it goes down on this part. And I'm rounding the
corners here of the code. So I can give it
more softer look. The whole these designer wanted
to have a softer look to it because of the
fluffy, fluffy folks. So I'm rounding up the boots and the space here and now
I'm just also shading. Shading the lower part. And there you go. You have your lower part
of the, of the book. It's easy. That's
how easy it is. Now let's go back. I'm always going for
from back to make sure that my proportions
are correct. That I don't go ahead and draw some detail
and suddenly I notice, wait a minute, this
is way too off. And when something is off, another thing is
going to be off. So I make sure everything
goes hand in hand. But maybe it is folks
also has gloves. That's why I didn't
think about that. If it's called. The fox will also
have some gloves. And you see that
even if you drew and doodle these lines
from the beginning, you're not even seeing them
and they kind of look nice. The design looks nice
when it looks like that. So I'm going to shade this leg because
it's in the distance just to give it some
more depth to it. And also this arm. And maybe I'm just going to have some pattern on the scarf. Just to make the design
looks even nicer. This is just adding
icing on the cake. When you have everything they're designing, pattern,
designing clothes. It's just so giving. And I'm going to draw the pattern over here and
you see that I'm drawing a pattern on the same direction
that these lines are. So I'm trying to basically
follow the pattern of the head here to draw the lines. Because the character
has a volume. It's not flat. Well, you can also
draw a flat character. It's different kind of design, but I'm trying to give volume
to these characters here. So the roundness of the character is expressed by following these
lines of the sphere, the fox, and maybe give it some dots of the
texture of the fox. The eyebrows of the little fox. And maybe just draw some snow. It's stepping in. In a snow, even in snow is
not there. In the beginning. We can just continuing
to refining our design to make it
look better and better. So this is our next character. Let's do the yoga. Pause now and see who is this
character hiding in there? Follow me in the next lecture. I'll see you there.
30. Yoga Pose: Hello there and welcome back. Now that we have this
character down here, let's do another
animal character and let this be of bunny. So one thing I
already think about the bunnies that
you have long ears. So we're going to add
this to the design. By the long ears falling
down on the ground. I'm going to have a fluffy
ear here falling on the ground and the other
one on the other side. And let's start by drawing
large polls for this bunny. And having the arms of this
bonding being a rather thick. And we'll have the bunny
looking down here. Here are the cheeks, here are the eyes, and here is the nose of the bunny with very,
very large hat. And let's do the pupil here
so you can see that design. And it's really trying to relax. Maybe this'll
stressed little bunny trying to do some yoga poses. And let's round up the body, pretty much follow up the
shape that we already did. And have the leg of the
budget of the bunny over here and the other one
lower here, just follow. This, stretched these
lines over here and maybe some fleshy leg
on the other part. And let's draw the toes of the bunny or it's
more like like pulse. So I'm just going to split
this lower part in tree. And that's how easy
you get pulse. So I'm going to do
the same thing for the other side
because this bunny has a longer legs or feet than the character
we initially started. We have, when you have both, you can just add that initial. I cannot just add that as a correction for this
character, the spouse. And basically that's done. Let's do some really
nice tail for the bunny. Doing some yoga. And what kind of clothes shall
we design for this bunny? Some funny yoga clouds. Maybe we'll have
this tight pants and some very stretchy yoga. I don't know. Yogurt clouding. Maybe we'll do some
patterns later on. But basically that is all you need to refine this character. Let's go ahead and refine it with the black pencil and
discover who this bunny is. We'll have sports
quotes like that. And let's design the face here with the little
mouth breathing, having some breathing exercises. And the nose here on
the bunny and the eyes, leaving out some white. So it has more life to it. And some dots for the whiskers. And continuing with
the face of the bunny. Like dots and stretched arms, trying to do relaxing yoga pose. Why is this bunny so stressed? We don't know. You
can think about it. Here is another story
here with starting. Thinking of the story
of this bunny again. And that's what's fun about it. Just take the edge
of your drawing and just have fun refining
these things. It's not a big deal. If you do it wrong, It's not a big deal if you
don't get it from the get-go, it's gonna come down to worry. And another thing is like if you whatever
profession you've had, you know, that there is a learning curve
to whatever it is. I mean, even if
you start working on at a store somewhere, you don't start
working right away. They'll going to
show you how to put different products
in different places. You will have to learn
where everything stands. I mean, everything is like that. There is no exception. So why would you why would you expect drawing
to be different? Why do people or society, as this can this
misconception that you have to have just tell him to draw I don't know
where this came from. I have no idea where
everyone knows, everyone who draws knows that this is not
what's happening. You have a desire and you
evolve while drawing, you have to practice. So even in films, you can hear the phrase like, I'm really, really
bad at drawing. I can't even draw
a stick figure. Well, why do they say that? I have no idea, but we are here to change that. So I'm going to do this 80's. I don't know. Pattern when they
had this socks. Socks during the '80s, if you remember them. I got Jane Fonda
and other Aerobics. Anaerobic instructors
had doubts. So that was fun. So we'll do this for
the bunny as well. And we'll have a spot where
the bunny is going to have its tail, the yoga bunny. And this is it. You can refine it as
much as you want. Maybe just shade this leg so
you will create a little bit more of a perspective and
push this leg further back. And this one is, so to signify that
this leg is in front. And basically, let's do
some flowers on our bodies, on our abandons costume. It's appropriate to do that
because of the yoga clothing. They have different patterns
that are more of a peace, love and peace and yoga
for you who do yoga? Maybe you have such clothing. I cannot do yoga. Yoga after I've trained
really hard because I'm mostly Never
relaxed after yoga. I'm just getting
more stressed out from from the fact that
it's very, very slow. Yeah. That's just an extra thing while we're completing or
Bonnie and here it is. So let's go ahead and finish up the last drawing
for this section where the bodybuilding
person on the heavy weights. I'll do that in
the next lecture. I'll see you there.
31. Bodybuilding Pose: Hi there and welcome back. So we have this last figure to figure out who
this character is. And we said that this
character is very strong. So let's just go ahead and
find these strong personality. And I'm deciding that
this character is going to be maybe a pirate's. So let's draw a large
nose like that. And let's have his
mouth being over here. And he's going to
have one eye with a patch and another
one is over here. So I'm just going to draw really an eye that is trying really hard
to lift this weight. And the teeth are grinding. So I'm going to have the
patch to go over the head. Really, really funny
kind of drawing. Why not? We can do
any kind of drawing. When we have our
characters down. I lift everything up
this up with a null. So to add a little
bit more strength to this character to be lifting
up this heavy weight. Now, half of the arm, half of the hand here is
going to be the fingers. So just split this
in half and draw one to two lines to
get the fingers. And somewhere in
here is the weights. Same thing here. Just a refine and
split this arm in two. We have the sum over
here and just 12. There you go. You've got the fingers, refine them and shade the heavyweight almost
bursting under him. And we can refine
the weights as well. I'm just going to
draw them roughly. If you want to draw very proper
weights, you can do that. I'm just going to shade them and draw moral weights on it. Just to see, just to justify this body posture and this
strength that he's building. And the expression on his face showing that this weight is
really, really heavy. So what else does
the pirate have? It has this costume
in costume thing. And I'm going to draw some
small legs on the pirate. They are strong, but they
have very small legs. Why not? We said we can play
with the proportions. And you have this trousers
and you have this huge belt. It's a cloth belt that
they have and they keep the weapons in
this belt, right? So let's draw this pirates. How did I come up
with the pirates? While I don't really know, I just hence the idea of having
someone lift this weight, but someone that is almost
half comfortable of lifting. This way, it's not as
comfortable and they should be. So pirate was kind of like
a good thing to try out. And let's have their skirts. So we have a costume of the pirate looking
something like that, and a vest. Vest like that. And they have maybe
another another kind of, I don't know, t-shirt
or something. Yeah. So we have
these clouding of the parent and that's
basically enough to go ahead and continue the drawing and
explore more details. When we're done with that. We have the large
nose and the eye. Now I'm going to make
the pupil really small. That makes the pirate
looks rather scary. And also. Has this this look on him as something is
really heavy and he is trying his best not to drop the weights because his boss
is not going to like it. Yeah, he's not the boss. So I'm going to have
even his other eyebrow. Conveying this idea of being really, really
heavy weights. And yes, pirates is also
a cartoony character. Can be, you can be able, you should be able to draw
any kind of character that no matter of h,
of the character. Yes, it can be stylized and drawn as cartoony
character as this pirate. So we have the thumb of the pirate over here
and the other fingers. Now that we have the lines, we can just refine that. We can find where the weight is, this part of the weights. And just to refine
it, holding yet hard, this for pirates has to prove himself strong
for his boss. Who knows what happens next? Maybe he drops the weight
and right on his door. Yeah. Why not? And let's
draw the weights. Now. This is basically not sports. Any moment. We have begun with doing
sports for the characters, but we ended up with doing different characters on
top of the sports poses, starting from a very, very simple character
and continuing with more complex characters
like animals and the last of all, pirates. And I'm still stylizing even his arms and the shirt here that is coming
from underneath. Like a sailor's
shirt, like that. And it has a vest. It can have ornaments, but I'm not gonna do that. I'm going to add though, this belt that the pirates have. It's kind of like very
simplified by Red Belt. And I'm going to have
the belt being really, really large and very, very tiny lower body. Now that we did that, or pirate looks having a
really large upper body. And this is something
that I've talked about in the other lectures. If you want to have
something appear big, make something in
comparison much smaller. In that way. We doing, we're doing
the legs much smaller. But as you see, the proportions of
the legs as they are, is in the same. They are proportionate, which
means that the upper part of the leg is equal to the
lower part of the leg. That proportions hasn't
changed and that's why they look proportionate
towards one another. That's something
that is a default. So let's also shape this
weights here as well. And here. And just contour everything. I'm just playing around
here countering everything. While I'm trying
to give you tips and ideas of how you
can trick yourself into relaxing or
within your process and start experimenting with design and drawing
better and better. I really love to see
students who post online and comments on the review section that they cannot believe that
they can draw like that? Well, you have always been
able to draw like that. It's just that have been
telling you that you count. That's the difference. So I'm going to draw some
crazy hair on these pirates. So we can see that the
hair is over here. We can see that is up there, the hair and maybe some beer
on shaven, kind of pirates. Having some beer. Now you can do
whatever you want. You can shade even
this a little bit more so it looks like
it's a red thing. And you can add some
ground to the pirate, maybe to the bunny as well. Some shading, well, look as the pulses
are even more stable. They have perspective
there on the ground. And basically, this is it. So this was the sports section
for a cartoony characters. I hope you had fun
and enjoyed yourself, and I hope you come up with a lot of ideas now that you
have this facet in hand, other characters
that you can do, and you can experiment with
the same pulses and put other characters on top on your own and you see what you get. So hope to see you again. Goodbye for now.
32. Push And Pull - Part 1: Hello, there. I hope you've had a nice break
since the last exercise. Had some wall can have
time to think about it. So let's go back to
another exercise. And this time we're going to
talk about push and pull. And why is that important? It is very important. Weight exercise that will
show you body kinematics that are quite different than the ones that we
drew from so far. So I'm going to draw a door. So I encourage you
to draw small doors, slight in perspective, and leave some space on each
door to practice. To draw the figure
of this character. Those characters does,
we're going to draw. So I'm going to draw
here, push and pull. And they're pretty much
each other's opposites. So let's start by bringing
in the poses here. So here we have unknown. And let's start with the pushing poses will
not draw so much. The door knob here. And when you have a
potion pole pulse, the body interacts with another kind of power that
is working against it, or a body is trying
to work against it. So we have the structure
of the door being closed and the body that is trying
to push the door opened. So we can have two poses of
character pushing the door. And usually when
you push the door, you tried to to account for
as much force as possible. So the door will come open. So usually you use your
whole body and we'll draw just a straight line for this pose to signify
pushing the door. Another thing that you need to take into consideration
here is how big is the head
according to the hands. So if the head is two, big according to this pulse, while maybe the head
will go up a little bit or down a little
bit like that, just to accumulate this
strength for pushing the door. But let's do a character because we are free
to do a character now that can push the
door with his hands. So we'll have the
elbows being over here and the hand
being over here. Just signify it with a line. And we'll have the
character's body being small. And let's draw the feet. And feet are also trying to take this force and trying to
push as much as possible. And usually we have
a character with either both feet pushing
heart, or using one-foot, just trying to add an
extra force here and contrast that kinematic
force of the door. So let's assume we have
the body over here just with a sphere and
we'll have a leg pushing. It's not even touching
the door is just trying to do accumulate this force that comes from this
line over here. What's another way of
pushing a door open? Well, maybe the character is standing and trying
with the whole body, having the whole
body push the door and applying this
force with his legs. So let's do this curve here that signifies the force that
the character is applying. And we have the character
shoulders here. And the character
is even bringing his head down as part of this, pushing the nice
line to push with as much as possible
with his spine or her spine and usually the
legs or maybe stretched out helping the body
push this door open, this force and contrast
this force with two legs. Like that. It can, we can have
one leg bent to also accumulate this power
of pushing the door. Now, what are the other poses? Now, let's do the
contrast of this pulse. Let's have a character
actually pulling the door. What do you need to do? Well, when the character
is pulling the door, then the opposite reaction
of this curve is valid. So the character uses
his arm and uses the spine to pull
the door opened. So you use the spine
as much as possible. Pose, push the backside
as much as possible. So I'll just draw a curve just
to see how the motion is. Again, draw as many curves as you need to feel the
movement because you have done this movement
before you have your cell tried to pull door. And maybe you have the character
is having the knees bend like that here and
trying to pull it with the other knee over here. Or the character is really pulling the door with the
whole body next image. So let's accumulate
this trend here and let's make the arms
as long as we need for the character
to actually pull the door and the hands are
going to be straight here. And maybe the
character is going to push the door with
his or her feet. And you are really
nice arc here. Even push the head farther out. So basically, the
arms are accumulating the strength of this
character pulling the door. Let's find this positions a little later who
these characters are. And before we do that, let's go ahead and have similar exercise here,
pushing and pulling. But this time we
don't have a door. We have other objects to kind of integrate the same poses
of those push and pull, but on different elements. I'll do that in
the next lecture.
33. Push And Pull - Part 2: Hello there and welcome back. Now, let's use this
poses of push and pull. But this time, let's
push our large stone. Maybe you have this large stone. And the character is
trying to push it forward. What do we have? Let's do a character
with large head. And the character is
going to account for the waiter he's had basically
the design needs to be accounted for how
large the head is. And can the arms or
the arms large enough to come over the head
and push this down. Let's design a character
that can do that. So we have a character
actually pushing, having his arms higher up, pretty much similar to dispose. And accounting for the body. I'm pushing forward the
same pulse over here. Like the legs pushing really forward and
with the other leg actually going
forward and moving. So you push with one leg and you hold the balance the
body with the other, as well as you are
moving forward. If the ball is moving forward, then the next step you take is going to be this leg
moving backwards, picking up the
weight of the stone. The stone is not moving in the opposite
direction because this don't use this pressure that goes in the opposite
direction of this guy. And this kind of post
you can have also, if you push any kind
of heavy object, also, the body will
look rather forward. If e.g. going against the wind, where you have heavy winds, push the body in this direction and
the body is trying to control that in
this direction. And the stronger the wind, the more lean the
body is going to be. But now we apply a
physical object pulling, pushing the body
in that direction. This is another pulse where the, where the body is
actually pulling a rope. Because the rope is
also a movable object. It is not an object like a
knob that is standing still. So in this situation, one hand needs to hold
the rope at all times, so don't drop it. So the body needs to balance
out in a different position. So you have the body maybe. I'm being at a site here. We have the hips over
here and we have one leg straight forward
to pull that strength. And this other arm is
also closer together, but it's always one arm that is holding the rope on its spot. And with the other arm helping to contract this force that is actually dragging in
the other direction. And the body is trying to
control that in this direction. And this is the leg that is
actually moving forward. So with one leg as contouring this trend here and
the other leg is actually trying to move
in this direction. So we always have a
force that is applied at all times in this
direction and we have the head over here. So these are basically the
main poses for push and pull. Now, let's account
for this poses and draw characters on top of dots. I'll do that in the next
lecture. See you there.
34. Push A Dorr - Pose 1: Hi there. Now that we have our poses done, we're going to do the fun
part and have our character, character designs
on top of that. And we can have a very easy character
designs just to learn how these forces apply. So I'm going to do this little
guy here that is pushing the door and we have even
the other hand here. And we have this character. This character is looking
down to be able to even use the whole spine as much as possible so the spine
doesn't hold the head, but applies this force here. And we have a facial expression with eyes closed in
character that is pushing this door and we have really force applying
into his face to convey the idea that this
character is really pushing and the eye is closed like that, then we can have any kind of
features for our character. Let's have a little a guy here. The body is on top of this line and we have
the spine going here. And let's design
the pants this way. And we have the
hips going one heap here and the other is in
the opposite direction. So we can have the pants, the other leg coming
out from here. And we have the guy's foot. Just very, very simple. Keep it simple if
you are studying disposal so you understand
them really well. Because these poses will
help you when you draw your own characters
and you can go back and do this exercise
as much as you want. And you see that the curve
that we are doing is kind of like signifying the
middle of this leg, where the knee is. And now you should be able to instinctively feel
where the leg is. So we'll have this character, Let's give him some hair. Maybe. Even just a girl
character pushing hard this door and having the
hair over here, like dots. And thus what all we need
to get this character in, let's refine our
character and have the hand being here. Pushing hard the door and finding one of these
many blue lines that you like and render it or refine it as the
line of your character. And facial features
are turned down. The face is looking
downwards and we have this girl's hair on
the back of her neck. And she's going to have pants. Jeans maybe. So let's refine the costume or the clothing that she has here. If she was a movie characters, thus will be her costume genes. But now she is just a
normal girl character. And let's do the leg
pushing forward, trying very hard to break in what's gone
to hide in there. Well, that's maybe
candy or she's being left out from someone and
she's trying to break in. Here comes the storytelling
part of the character. So let's shade her hair
with a darker color. Of course I forgot her face
because it's already given. Xi is just pushing that or that we had that with the blue lines and
very, very simple character. So everyone should be
able to achieve it. If you don't achieve it
from the first time, just enjoy the process of finding the weight
for this character. You will be able
to do that later. To achieve that. Don't worry too much about
the execution right now. Just study, study where
this is going and how is this character doing? The pushing. So shade this leg a little bit. So we see that the character
is pushing this, this side. And now let's just mark
where the door is. So the image is kind
of consequence. And we'll do kind of
shading to mark the grounds or makes it even more clear
that this leg is in the air, accounting for these
forces are pushing. And that's basically
or first character. So now let's go ahead
and do the next one. Another pulse of pushing. I'll see you in
the next lecture.
35. Push A Dorr - Pose 2: So welcome back. And let's design the
pushing of this character. And now we have the
hips over here, and we'll have again, a small body and just more childish and
larger heads that we had. So let's just account for
dot will have the shoulders really pushing as
much as possible. So the shoulders, we'll
shrug a little bit. Now, let's design the hand here, just half of a sphere. And let's have this
leg account for this force here of pushing. And also the head is
really going downwards. So you can, the
character is giving all the force it can
with his or her back. We have undecided
what to do here. Let's do a guy pushing that. And let's have this
facial expression again to account for the
force and I squint, that will give even more
power to the movement. Let's have the ear
over here and maybe some chunk of hair like that and the hair
continue over here. So we'll have our
cartoony character pushing in this way and maybe chunk of
hair is falling on his face while he is pushing. So just schematically designed the whole thing while
you're thinking process is going on and the character will have
maybe Simple shoes, just a half a sphere, or the way that you are now
used to draw your characters. You're already feeling
maybe comfortable with the style that you
can apply. Even hear. The guy is trying to
basically help the process with the other leg as well
as maybe changing legs. Because the more you push in this way at some point
the body will start to move down in because
you don't really have a support and the
body is moving down. So if the character is both supporting
himself with this leg, so he doesn't start
sliding down, as well as giving a
chance to the body to later on push even
with dart leg. So let's design the hair even more and see
where it tastes. And maybe just have the
face come down like that. And that's all we need
for this character. Now, let's go up way
the black pencil and refine the features of those characters and this
character right now, it's good if you have sharper
pencil in this exercise. If you are doing the exercise, the way I do it, because the characters are starting to be really,
really small here. Yes. So we'll need to
be careful with as many lines we do because we want our characters to
look goat basically. So I'm just going to around the hat a little bit
in this direction. And again, don't worry, if you make the
so-called mistake. It is just a normal
process of learning. It's like if I'm telling you that you're going to feel these motions naturally, the more you draw. I know you might not believe me, but how you learned to walk or stand up or
things like that, it's, it takes time and effort. And also the result when you get it is very, very rewarding. So the head is pushed down because he has very large head, head for this body. And we'll just make
some fingers here, but the pulse is already there. And you can see the force
applied to this character. And you can have now an understanding why these
things are like that. And you have seen
already this poses. You have experienced yourself
these pulses so you know, instinctively how they
feel in your body. And this is a very
important thing to know as a character designer. So I'm going to leave
the pulse like that. This force is done. I'm going to draw the door. So it's more obvious here where the ground is an consequence
with the other drawing. And we have even the
force applied even more. Let's continue
explore, exploring the other drawing and what the character is
pulling the door. I'm going to do that
in the next lecture. I'll see you there.
36. Pull A Dorr - Pose 1: Hi and welcome back. Now we have this pose here
when the character is actually doing exactly the opposite as the lecture before, we have the spine really arched. So let's design the body here. Almost the same proportions
as the other characters. And the arms are
really stretched. No band arms here because
this force is trying to pull the door as
much as possible. So the shoulders can be pushed forward as
much as possible. And the body can be arched
as much as possible. And we have the middle
of the arm over here. So this stays, this distance
is equal to this one. So far we have the, the head coming down here
trying to really pull the door with the arched back and
having this foot really fall. And we'll have the foot basically pulling
from the Hill up and the other leg
is just supporting this foot with the
hills with the toss. I mean. So you really have this
force applied to the door. If the door didn't
exist, I mean, this false wouldn't work because this character would
have fallen down. This is only, this is a false, only when you have external
forces applied to it. So let's also design a really simple character here just to help you
understand the pulse. And we'll have hair, maybe another girl character
will have the ears here, maybe a pony tail. The head is really going down to press this, this strength here. So round pony tails
for the character. The face is looking down. Here. We don't
maybe even see it. We're going to just
suggest the eyes here. And that's all we need to
start refining this pose. So let's just draw
a similar arm. And let's have the hands
be just holding this knob. A really, really tight. Here is the other hand as well. So we can, we can just
simplify the hands and do this forceful movement of this little girl
trying to open the door. And she can have
maybe a skirt here. We can apply all
kinds of clouds. And the clouds will be following the structure
of this body. So we see that the
skirt or dress is covering part of her ties. And we see, we know that this part of the leg
is equal to this one. That we, we know because of
the curvature we design here. And now we naturally feel where the knee is after
all these exercises. And we'll draw even the other the other leg
similar to this one. So she's going to have
a smaller leg over here on the back to be
similar to this one. And let's shade the
leg that is behind to create more depth
in our drawing. And let's just draw the nose. The eyebrows really squinted. And we have the mouth here. Really, really pressing forward. Let's draw the ear and the girl's hair and ponytail just to signify
where the head is. These designs, these designs are intentionally very simple so that you don't go into too many details
with these designs, but rather explore the pulse
and still get nice results. So just to make the hair
look even more forward, let's have a chunk of hair falling down on her
face from her face here and having a
little nicer silhouette and shade the head, the hair with other color. And to make sure
that this is a hair, this is another
texture of the body because we don't see
a lot of her face. Maybe just draw the teeth that we're not going to be
able to see a lot of them because the head is really
hidden behind, behind her arm. And we see how much
she is having here. This in the other direction
to try to open a door. And if you are designing
this illustration, maybe you will have the
door slightly open. So you see that this force is actually may be working in
the force is so strong, so you kind of
enhance the force. She is she is having
on that door that it's successful in a way that door is pulling
out, it's giving away. And let's shade even
these character. And let's go ahead and design. The last pose were the pull of the door is really by
using the whole spine. I'll see you in
the next lecture.
37. Pull A Dorr - Pose 2: Hello there and welcome back. And let's draw even dispose of the character
pulling the door. And now you know the
process we are having the body really arched here. So you just draw
the body on top of this line and we know
whether the arms are. So the elbow is over here. The arms are really
straightforward, trying to pull as much as
possible from this door. And in cartoony characters, you are even allowed to
stretch the arms a little bit that are maybe not
part of the design, but just for the purpose
to convey the idea of really applying
force while pulling. It is allowed to extend
the arms or the, the elements that are
applying this force. And maybe this character is
even pushing with his feet. We have the character's
head kind of completing this arc and
looking even upwards or not. Maybe not even looking
just trying to pull. The eyes are going to be here. Let's do an eyebrow. Dots, signify maybe
pain or effort. And let's have the teeth and
the facial expression of the mouth also have the same expression
of applying effort. We'll have dust half
a mouth like that. This is a very common
cartoony expression and you'll have the
teeth grinding. And this small expression
is actually helping us achieve this feeling
of applying effort. And we're going to have to see
the neck in this position. So this character needs
to have some neck. And let's apply
another boy character and having chunks of
hair falling down. Because also the head is tilted and we can see the
neck and the body. And that's all we need. We'll have the other
leg over here. So that's all we need to start and refining
our characters, even though we have a messy drawing now with
all the blue lines, it's much easier when we
have such a messy drawing to choose a line that
feels comfortable to us. And that's why it's good to have this uncompleted drawings. So you can try out which line is actually working out
for this character. And eventually you will feel the lines that are
doing the best job. Because when you see other people's character
design and look good to you. And also what you see other people's character designs that don't look good to you. You get, you have this feeling in yourself
That's saying that why this character looks
good to me and why this character doesn't
look good to me. And the same feeling, well apply to your
own characters, even though in the beginning, you will be slightly blinded of what's working and
what's not working. It's going to come
naturally later on. So let's do the sleeves. And this arm is
really just very, very much longer
than it should be. But this is something
that is allowed in cartoon characters when they apply this force just to enhance the emotion even more. And I'm going to push the
body even higher up here, just orchard and
almost linear down. It's almost falling. And you see that if
the character is pulling the door in this
way and the door opens, the character will
definitely fall. Because the force is
so strong that it will shoot him forward and he
will definitely for himself, but he will achieve his
goal of opening that door. And now we have the character a little
bit in perspective. Let's draw the other leg. And the other leg is
also pushed closer to this leg to apply to apply as much force as
possible and not lose the momentum of that
force by struggling, by pulling the door and I'm
going to arch the door. So we see that this character is also going to be successful, maybe in pulling the
door with all the force applied to it and it's
going he's going to fall. That's for sure. And I'm going to add some
shading in here so to see that this part is a door
and this one is an empty space behind that door. And I'm going to shade
again the guy's hair just to give the character more
clarity of what is what. And later on when you get your characters than
you can put them in a digital program
and clean them up. They will look even better than, but you have then all
the poses that you want for a character that's
pushing, falling a door. And now I'm going to
shorten that door because we need to have
the character standing, standing here on the ground. And this is basically a clear both of character
pulling that door. Now, let's use the
same principles with these two characters. Pulling and pushing. Different element that is
not static like the door is. So I'll do that in
the next lecture. I'll see you there.
38. Pushing A Stone: So I hope you had a nice break. And now let's go ahead
and do this character that is pushing the heavy stone. Let's play around a little
bit with his proportions. And now we see that this hip is moving forward and this
is going backward. So if we see the
hips on both sides, it will look
something like that. Here will be one hip and
here it will be the other. So they are not
on the same spot. Because when the body moves with one leg and one in front, the whole hips are
helping this process. And the arms are almost
on the same position because they are locked
on this weight over here. So let's have the head
being pulled down a really forward and then we'll have the eyeline being
maybe over here. The head is trying to
help this pushing. And we'll have the pose where
the character has This, his teeth grinding,
applying force, and the eye is squinted, the eyebrows is low. And now let's draw the arms. Let's have D. D, arms are really
pushing that stone. And I'm just going to
draw lines on top of, on each side of this
middle line here. And even again,
as it gets messy, Don't worry about it because that's what learnings
process is all about. And now let's design
this guy's hair. We're going to keep the same
character as we did before. Just to make it easier
for you to design. Because now the design is really difficult as the
arms are in front of the character and
makes it difficult to guess this character's design
and difficult to draw. So let's keep on
with what we had. The guys, the little guys here that is on
the other images, make it easier for you to
complete this exercise. And later on, when you have
your character design, you will know how to
apply this feature. So now this character, this leg that is in front
of us is actually bend. And it doesn't really matter which leg is bent
because they are going to they're going to
change each other. They're going to be one
leg after the other. They're going to take
their turns in pushing. So one leg is keeping the
balance and the other one is pushing to enforce the
stone of foreign moving. And this is now pretty much what we need to have to
complete this character. That little is necessary. Let's go on with
the black pencil. And I could have left
the designs pretty much like that, like
really sketchy. But the pleasure of designing
a character on top of the sketch is going to
motivate you to do even more. That's why I want you to
do it together with me. Because you're going to get more and more used to doing it. So I just want to
get this opportunity to give you all the assets
that you need to succeed. And now I'm starting
to move my arm. I always move my drawing around to get more demo
comfortable position. But here it is important. Just stay in camera. Otherwise. That's going to be difficult to have an exercise
that's off-camera. Yeah. I hope even though the lectures are many lectures that
you're taking it in your own time to accomplish these exercises
because these are important poses and exercises and you will have use
of them later on. Now this is really, really long. And that's why I wanted to account for this force and
have this cartoony drawing. Really push the stone. But if you have a character
with shorter arms, you have to either leave the head higher
up or lower down. You will have to account for whatever character design you are doing to put the
elements for this character. I'm fit them in the motion. This is something that you can take into consideration with
your own character designs. But for now on just
Judy's exercise, you can do it maybe
a couple of times. So you get the feeling of how this motion is and
try to push a door, tried to perform this movement. Again. Photograph yourself. I'm going to have this
character's hair. I'm being a little bit
different than the other ones. So we have maybe a chunk of small hair coming out
here just to have more fun with different
design features and to not be bored, bored out with the
same character, it is important to
stay motivated. So I'm just going
to draw the eyebrow and the mouth being really, really in the expression
or grinding teeth. Squeezing this ellipse. Or all what I can do to
convey the idea of pushing. Because that's what you do. You convey the idea of weight. You convey the idea of motion with your
character designs. And whether you are
looking forward to become an illustrator
and animator, or just doing that for fun
for your own children. It is you will
know that you will change someone's world
with these characters. And whether it is
just one person, may be some your children, or whether it is a whole nation. If you become character
designer or an illustrator, these characters
that you design, they will stay after you and
they will inspire someone. So while you are sitting
here and having fun with me, think of that, that this is
also something that will stay and live after, after you. And that can motivate you to have more fun with these
characters and know that these characters will inspire a little kit that will also want to become an illustrator. We are connected to
one another and we inspire each other with
our art, with our work. Some inspire us with our food. Everyone has something. And if you have, if you are here
now in my lecture, that means that you are
given this desire to draw. Otherwise you wouldn't have
the patience to do it. So this is it for
this pose and added some shading just to make the
character more believable, but it was all there. The construction just gave us the character and
this forces here. And let's continue with this last pose before we
finish up this chapter. I will do that in
the next lecture. Go get some refreshments
and I'll see you there.
39. Pulling A Rope: Hello and welcome back. Now, let's go ahead and design our last character here
that is pulling a rope. So let's draw the hands
that are falling the row. And one hand is in
front of the other. And the character is
a little bit bend on the site because it is
really pulling with one leg. The rope is an organic thing. It is not something
that is standing fast, so it really needs
to use all that he or she can to pull the rope so it lifts the shoulder higher up events so we can
take that into consideration. Uses the body. We can put the body even higher up to connect with the shoulder. Let's draw the rope just straight line because the
forces that apply here, there are really countering each other in one straight line. So to apply forces, you don't have to
have the elbow bend and the legs should be straight because that's applied even more force on
your character pose. So I'm going to draw the face of this character coming
maybe over here. And accounting for where, where this neck is, maybe
approximately here. And just having the nose
maybe being over here and shrugging the face
and just to having this heavy weight and
the overall pose. And let's do the face
with Chief grinding. And again, let's dump be
maybe the girl character. So let's design some chunks of hair and let's have pony tails. Just in disarray, also
falling down on her face. Just extending the hair of this girl a little
bit outside her face and having the chunks of hair falling down here
and another one here. And this chunk of
hair, her ponytail, also conveys the idea that
she's really leaning, leaning backwards, and the
ponytail is just falling. Just dragged by the gravity. And let's have the
foot of this girl. Maybe have this
triangular shape that we used for the other
characters have this shoe. We have our sphere here, and let's have this also. The knee here and the triangular
shape of this character. And let's have her thumb
here pulling and separate the little sphere in tree to
find where the fingers are. So just draw these fingers here, split it in three, and just have the
thumb over here. And I have the rope. And let's have this
girl's dress or whatever. She's having. Cloths, polling. And we have the sleeves. We have maybe a little
skirt falling down. And we have the skirt forming on top of her upper leg
and forming here, but the part of her skirt
as also has weight, it's falling down here. And so that's what we
need to start drawing our character with
the black pencil. Now, drew a large
nose because you see that our character wasn't
shaped when we started. And I just put features on the
character as I went along. And I hope that you can do that and you can
apply other features on your character will
give you a lot of scope to fill up the
character with your own. Characters and personalities. Maybe a cat, maybe some other
kind of character. If you've taken my other course. Cartoony characters, designing cartoon characters
and cartoony humans. There are a bunch of examples
there of how to draw completely different characters with different personalities. And now that you have this
figure drawing for characters, you'll have the possibility to really design your characters and also give them movements and give
them proper movement. So let's design this
girl's shoulders pulling from here and
she's holding the rope. Let's maybe draw a rope
over here coming in. This game that we play
with pulling the rope. Well, it's something
like that now you can even draw it
and have a bunch of characters one behind
another pulling that rope. So we have the hand over here and we have the
tongue of the girl. Actually over here. I had put it on the other way, but that's the thing that
sometimes you have to actually do that yourself to
see where are the fingers, how does it look
like from this side? So we have the fingers
being over here. All three fingers
or four fingers. And we have the rope. Maybe we have a term here. So we have the rope pulled her hand. So it's much easier if
you actually Google, do reference and see how they're
really holding the rope. Because you basically, sometimes it's the
best way to do it. Most of the times when
as a character designer, we use always references
because you not only, I'm always remembering
how things are not cheating
to use references, you still have to apply the same motion to your
own character design. So this human movements, you'll have to have
really a library of mental images which
you're doing right now. You're, you're actually creating mental images for you to use
whenever you are designing. But also, you need to
have a library of images that will help you as a
reference for your character. So don't be afraid
to have reference. That's, that's not cheating. Anything that can
help you design and good character is
upheld, is allowed. That's still is going
to be your own art, your own take on it. Now I'm going to shade the skirt because we can differentiate
this skirt elements towards her dress and to
see even how the wrinkles fall and how the other elements
of her face and body are. I'm going to shade
the hair as well. Just to have a nicer look. There's a simple,
simple characters. I didn't draw any
other character, so it's easy for you to explore because it is enough complexity. The whole movement
is very complex. We started with very
simple characters, drawing a straight bows. We start and then it continued with sitting,
sitting characters. And things got more
and more complex the more the father you
went into the course. And I hope it's helpful for
you and you learn a lot. So I would like to
hear what you think. Just leave a review and comment
on the comments section. And let me know what you think. And this helps me also design my other characters and C.
And this helped me also designed my other courses and hear what has been helpful or what should
I add and so on. And I'm shading this leg
again just to add some depth. Maybe I'll do some kind of a
cute freckles to this girl. Because here we have a
larger character and not as little as those poses. And I can't zoom in, which believe me, I do want to. But it is very useful
to draw on paper. There is completely
they're feeling to it. So here we have our
push and pull exercise. I hope you've learned a lot. It has been helpful. So go ahead and
practice some more, and I'll see you in
the next chapter. Bye for now.
40. Push Against the Wind: Hi there. So now that I have been talking about pushing your
weight against the wind, I was thinking maybe
I will give you one example where you have
nothing else to push forward, but you're working against the wind and your body
posture is different. So let's draw a
simple character. We have the force of the
wind coming from here. And the stronger the wind, the more the body
is pushing forward. So we're going to make
basically a very strong wind. Just signify this force, this pushing posts
with one straight line where the spine is
connected to the lower leg. And we have one line here for the leg and one line here for
the toes pushing forward. And we have the
character really bendy. He's had forward to generate
more force with this arc. Draw a sphere on top of this
line that is connecting the head with the
neck and the spine. And now we have maybe also the poster of the
character freezing. So if you want the character
to keep the arms forward, That's not a natural
pose for a character because we don't
have anything he, he or she is pushing forward to just let the character
gather his arms and hands together to
have even more of this dynamic pose to Jane
force with his buddies. So we'll have the arms bend, maybe holding or
his or her jacket. Let's draw the hands on top of that just by
drawing spheres. And that's basically
the pulse or the, with the other leg, the character is trying
to push forward. So if we assume that
this is the hits, how did we find the
hips while we just chose approximately
where the hips are, you can draw the
hips over here if you want to have a more
disproportion of character. But this character, as long
as the other character, apart from the head
being too large, a kind of approximately very similar to
human proportions, which means that this
part of the leg is equal to the part which
reaches the shoulders almost. Now the legs are too
short for this character, but they're almost there. They're not way too
disproportionate. So we have one heap here for
the leg reaching backwards. And we have this, this motion where the
hips come forward, one hip goes forward. So let's design a line in the leg that is
moving backwards. This is the leg moving forward. So all this area, the hips will rotate. So signify that with a sphere. And we'll have the legs
or maybe just a curve, draw a curve and we have the parameters of
the ground being here and just have the other
foot pushing on the ground, then the foot is trying
to move the body forward while the other
one is balancing, pushing against the wind. And that is basically the pulse. Let's move the other hip, maybe a little bit more bank. And that is basically the pulse. That is a character
pushing against the wind. Now, let's draw
the character and let's use again the
simple character. So where will be the nose? The nose is here. We have the character again with this expression that it
is difficult to walk. So we'll have the
character squinting, will have the eyebrows gathered forward in the middle
where the nose starts. And we'll have the grinding
teeth that the characters is implying applying
force to this movement. And maybe we'll have a head. The hair is hidden inside
the head and maybe we'll have the head also following
this motion of the wind. So the wind is blowing
forward like that, and the head is
following this movement. So let's have even the head. Illustrates. The direction and
the strength of this wind that the
character is fighting with. So just to make the character even tutor
will have a chunk of hair. So just a triangular shape. Also blowing in the wind
following this direction. That will give us even
more elements to go ahead and illustrate why
is this character in such, in such a power. So the thing here is, again, just split this fear in, in three by adding
lines and then you can around the sphere just to
have separate fingers. And I've made the hand, I've rounded up even this area just to give it more of a hand, look, this other sphere, we have the thumb being
on the opposite side. So you have the thing over here. So split this sphere in
three to make the fingers. And now you can around the fingers to create
the other hand. It is that simple. So let's design the jacket here. Let's design the
codes or the jacket. And you can just think of there is a thicker material
when it is the jacket, so you have a lot of layers. One for the arms, you have muscles,
you have flesh. And on top of that, you have another volume of maybe pullover doors close
and then on top of that, you even have the code. And it is holding
is called here. Maybe it has scarred, flying in the air. Another element that enhances
the feeling of heavy wind. And now we have the, this leg coming forward so we know that this leg is forward, so we'll draw the leg. Here is the same thing. You have. You have the flesh, you have the bones. You have the trousers on top of that, maybe
thick trousers. And let's draw maybe
boats here, very simple. And here we have toes here. So just help us
here for the toes and connect the toes
with their leg. And we have the boats
coming in here, so kind of like a similar size. And here you can already watch the proportions and you
see that I'm drawing are really the boots being
a rounded here because we have a volume of the
flesh and the bolts. It's not it is not flat. So to signify when
something is not flat, you can think of what kind of roundedness it there
is on this body. And maybe just draw lines
like that to see how is flesh and the volume
going in this direction. So let's have the
pants and the code. Maybe the coat is also
flopping in the air. So just extend the
code a little bit, just to signify that it
is a material that is lighter and it is
flopping in the air. And let's draw the code here. Stuck to the body. It doesn't fall because
the wind is too heavy and is blowing
in this direction. So maybe you can draw
a wind like that. Now, we are ready to finish up this drawing
with a black pencil. Let's draw the eyebrows, the squinted eyes, and
just round up the face. Here. The chief
that are grinding, it's really, really,
really cold. And already when you
see these elements, before even you
drew the elements, actually you saw
that the poles is struggling against
an invisible force. Now that you get more and
more elements that flopping, scarf and the hat
and the hair chunk, you get more of the perception
of what is going on. It just gets stronger and stronger of what this
character is fighting against. And you don't want to be
this character going, being out there and
struggling against this wind. You can feel how
strong the wind is. And here is just a matter of basically meditation because you have all the elements there. You just have to watch
that everything is in proportions because
here you have the possibility to fix things. If something is off, you can change it. But other than that, just cleaning up the drawing of the blue pencil and having
fun, just relaxing. Your job is done. And you can really
just draw now. So we'll have something, maybe a jacket
that he's holding. We won't see very clear
what he's holding, but just dispose of the hands signified
that maybe it's called maybe just have a little bit of something coming up
here and we will not see what he's holding. We'll understand that he's holding his jacket
so he can protect himself from the code and
trying to push to go home. I push against the wind. And we'll have the scarf, the scar blowing in the air. And just extend that. And just have these patterns of this curve that we did
in the previous curve. Now that we've started with
these patterns of scar, we can use it even
in this design. So maybe you can, here you can add more
patterns, whatever you want. It's just up to you to find other designs
you have already. The proportions, the
movement, which is correct. And it's very useful for you. If you are drawing above
illustrating a book, a Christmas book of a character, having to go home and is
struggling against the wind. Now you have the place holder of that motion that you can use. And you know the thinking
process for that. And you have some
other pulses there. With with the fox drawing, throwing snowballs. And so we'll have these legs always signify here
are the patterns. Maybe we'll see
them from the side. So just finish up your
drawing on top of these drawings and you can make a model of the boat
so you can just maybe have a heel here and have it
a little darker the hill. And you don't need to draw all the half sphere that
the toes are making. Some wrinkles on the ladder of the shoes or the
material of the shoes. So you can add that there. You can shade this one. Here. Maybe you can
make some patterns on, down on the head and at the chunk of hair here maybe
you can make this one here. Maybe you can make
also the patterns or material that is on this
the bowl of the head. There also in this direction
that the wind is blowing. And just add some
shading on this leg. And maybe just draw the floor and maybe just
shed where the ending. These features, I'm the leg and the characters
really pushing. You draw these lines to show the direction of
the wind like that, and that is basically done. So this is also a pulse, what a character is
pushing against, a force that is invisible, but there is a force
applied to it. So you know why the body
is behaving in that way. So that's it for now. I'll see you in
the next chapter. Bye for now.
41. 40 Bodylanguage Poses: Hello there and welcome back to another section of drawing figures for cartoon characters. Now, in this section, we're going to talk
about body language. Body language is connected
to our emotions. So what we're going
to explore here is a couple of pulses that
convey or our emotions. So let's start and
investigate how our body behaves when we convey different emotions are when
we feel different emotions. So let's start by
drawing a set pulse. We're going to start
by drawing the head, really big head again, and we're going to
draw a set pulse. So what do we do when we're sad? We shrug, we draw
down all the body. We're basically without energy. We have no energy and we let
the spine carry or wait. So we curve the
spine really a lot. And we balanced with the hips. The hips are here. And then we'll kind of
like almost trying to drag or legs so that we
can hold the violence. So sometimes we
have even the legs curved against each
other at the knees. And we see that wanted me
draw the curve around. We assume that the knees
are approximately here. We get this natural
middle line of the knees. So where are the where
are the shoulders now? Now we have the head, which is covering the shoulders
because it's really down. If we assume that we
are looking down, we have the arms
hanging a lifeless. So we'll just have
lines for the arm. And we'll have also the hand just hanging in there
port by the arm, buttock muscles by the
muscles of the arm, as well as dragged
down by the gravity. So where is the next shoulder, if we assume that the
spine goes in here and somewhere in here
there is the neck. So the next arm is
going to start on. The next shoulder is
going to be around here if we assume that
the body is transparent. So here is the other arm. Draw another line down. So we have the other
arm drugged and we can approximately find the length
of the other arm here. Just draw another sphere or maybe just more triangular
shape around shape. And this is basically all we
need to design a set pounds. You see that we have the weight of the
whole body drag down. Now, let's draw a happy both. What do we have? We have the happy pose. Well, we opened
from the core up. So we have the opposite
on this pose and we have a body that is
open for the world. It just stretches up. We have the head higher up. The energy is, energy is high. We are ready to share with the world anything
because we're just happy. So we're going to draw
the line of this action. And here are the arms. If we assume that these
are the shoulders and because of the bodies a
little bit in perspective, you see that I
drew the shoulders here with a little bit
different distance from the middle line. So this one is much
shorter than the other one because of this perspective
change we have here. And this is something
that you have to think about when you
draw your characters. Will draw the arms like that. We'll draw a sphere
for each arm. This arm being bigger than this one because of
the perspective. I'm drawing it a little
bit in three-quarter. I'm having one leg here. So let's find the hips. The hips are over here. We'll have one leg. Balancing from here and
one leg is over here, can even have the leg
little closer together. That doesn't matter. We have a lot of energy that
balanced or about your work. We have this poacher
conveying that we are opened to the world and
maybe the head is lifted up. So we have the null
somewhere here. And that's basically
it for the heavy pose. Now, let's have a post that
is more conservative here. We'll have a post that
is conveying suspicion. So usually when a character is suspicious of something
or feeling threatened, what do they do? They can shrug
everything, they shrink. Basically. They try to put all
the features together. We usually hold or hands lift or shoulders in kind of
liking protection. And maybe we hold or
arms, cross your arms. And so we'll have, this is a difficult pulse, so we'll have the shoulder here and the shoulder
on the other side. Again, this is three-quarters. Let's draw the spine. And the spine is bent in this direction and
the hips are coming forward as if we are
pushing the body inwards. So we are trying to protect, to protect, or heart
or core or stomach. And we'll draw one
arm coming from this shoulder and draw just a sphere to
signify where it is, one coming from this shoulder. And we can have that this arm is coming
underneath the other arm. So I'll just draw a line
here to signify where the armies and draw the arm
coming from underneath. And now we'll have another arm holding or
armed with this one. And where are the hips? The hips are here, so we'll have the hole, this part and the legs are maybe also closer
together because we are trying to really shrug
would shrink and to not be visible in order to protect
ourselves from the world. This is also looking like
kind of like a freezing both. And that's what happens when we actually are scared or
distrustful to the world. It's the same body
poacher as if it's, as if it's, we're freezing. So we try to protect or core, or core being the
stomach, the heart area. And when we are happy, we are exposing this life-force, the area which are a
life force come from. And when we are
suspicious or scared, we are trying to protect it. So what else can we do? Another pose is angry. So when we are angry, we are attacking the other
person or we are trying to convey to exceed energy
with the whole body, with the head, with all words, we are trying to
attack with words. So you have the head coming
as forward as possible. And we'll have the budget
really gathered together. So we'll have the body
in straight line, just delivering this energy from the chest to the mouth
and attacking with words. So we're screaming and someone, then we'll have the shoulders
over here in the body. If we see only the head here, we'll have the shoulders
really pulling back and we'll have the
arms on both sides. Just the hand, tight fist. And we'll have the legs just balancing out this energy just supporting the upper
part of the body that is now trying to attack and
the legs are gathered. Everything is basically just
more of a line of force. It is in the same
way when we push the door open or tried
to push something here, we are trying to push
an energy out with the head that is conveying
this idea of angry. And now we see a pose of angry without even having
a facial expression. That's what body
language is all about, without having character,
without having anything else. But just these few strokes of a poster that conveys
the idea of an emotion. So what other emotion can we do? Let's do another pulse of angry. Someone that is
already helpless. And when you are
helpless, angry, you have nothing else to do. You have done all you can
to fix the situation. And now what you do is you
basically jump up and down. And the poster of angry is always that your fist
or tie-ins in a note. So you basically have the pulse, more like a sports, both jumping up and down. So you have the
shoulders, shrug up. Let's find where the
shoulders are and find where the hips are
approximately here. And we have 1 ft on the floor. Just in a jumping pulse, you are not jumping
in a regular moves. You jump really quickly. It's energetic. More of you tried to stay
up in the air and just released this angry energy as fast as possible
because it's gathered, It's Jane within you. So you have the
shoulders, really up, shrugged shoulders, and here
you have the upper arm. The lower arm, they're
equal to each other. This is, you already know, we have the other arm, so you have this arms also
tied in closer to the body, trying to protect your
body from this energy because it is
painful to be angry. And the whole body
tenses in this energy. And we have this phase. The phase is also
turned downwards. So your body is
trying to protect this area and to
release this energy with the movement with
fast pacing jumps. And you'll see that here. We'll have the head coming down. And we just these few
strokes you have posture, really a body language that you understand what it is all about. Now, let's have the poacher
of lazy and the boater of lazy is also similar
to the poacher of sad. But instead of having
the head going down, instead of going down, the departure of lazy is mostly the head going up as if
you're really bored. So you're not trying
to protect your area, but you're just trying to show are you don't
have any energy for just this thing or for
whatever it is you have to do. You have to clean your
room or something. So you just show how much energy less you
are about this thing. And you try to
basically go down to resting position as much
as possible to sink down. So we have the hips over here. The shoulders are forward, the neck is holding the head. The head is tilted up with
the nose is over here, and the spine is really arched. The hands are loose, the same pose as this one. The hands are hanging
dragged by the gravity. And also the hand. This hand is on the other side. You have the hips coming
forward, bending the back. The back is not
holding your straight. You basically try to keep your balance part by
whatever muscles you have. And as well as borrows sac, sac down and show that
I'm really bored now. And this hand could
be behind the torso. You see the difference
from this pose to this pose is that this
is just the head. The heaviness of the mood
is dragging you down. And this is just you don't want to have
your head in the sky. You're really bored
from some situations. So these are just very
simple sketches just with lines and spheres
that describe emotions. So let's go ahead and find the characters behind
these emotions. I'm going to do that
in the next lecture. I'll see you there.
42. Sad Pose: Hello there and welcome back. Now, let's go ahead
and draw this poses and find out who
those characters are. Let's this time draw a different character just to have some variation for you. So you don't get
bored like this guy. So let's draw a bunny. Bunny is something
very, very cute. You just want to make something
to make this bunny happy. That's why we are going to
draw a sad little cute bunny. So we're going to draw the eyes of the
bunny on both sides. And now look that I'm making the eyes more like an ellipsis. Why? Because the
bunny is looking downwards and the
eyes are the spheres of the eyes change
every time we come closer to this end
of the sphere. If they are in the middle, there won't be around. But if they are anywhere
around the sphere, they get smaller and
smaller and they look like ellipses rather
than spheres. And I'm talking about
that if you are interested to know more
about that in my lecture, The Ultimate Guide to
draw cartoony characters. If you just accuracy, want to draw more. Otherwise, just
follow me here and I've summarized it
really quickly. So I'm, I'm also adding a sad
expression on this bunny. When we're sad, we narrow
or eyebrows and lift up the front corner of our eyebrows and we
usually look down. So I'm going to have this
funny looking down and maybe just drag
down the eyelids. Eyelids, basically
everything as energy less, we don't have an energy
to pull up or eyelids. We have no energy for anything. And I'm going to draw some
chicks here of the bunny. We don't see the bunnies mouth. And I know that when
you draw a character, you want to see all the
face, the facial features. And you feel like where am
I putting the mouth now? But just get comfortable with any position
of your character. And this is one of it. So we said that the
shoulders is here. The body is really arched, so we need to connect this part of the
shoulder with the body. So we'll have the
body being over here. And even if you don't see
the body on this side, when you draw with
the blue pencil, you can sketch it out. Even the body behind. So you know what you are leaving out the thick of the picture. And you know how to continue
this part of the body. And how much
thickness do you add? Because if you have a
shoulder that are broad, you need some more thickness
to this character. And let's draw some arms. And the arms are just lines on both sides
of this line here. So the same way that
we did other lectures, and if it is unclear, it has been unclear until now. That's why I'm saying it. Again. You can draw arms on
both sides or on this side. This is mostly about design. Now we have the posture there. So let's draw some pants. Maybe we'll have the pens
or the bunny over here. So let's have his pants
coming here on the body. And because the body is
tense, is leaning forward, the curve that describes
the bands will curve in this direction and
not in the other direction. The stomach is
somewhere over here and the pulse are going to
be slightly larger. So I'm just going
to extend that. And here we have the fingers. So just draw this part. So you have one sphere here
at one half sphere here. And want to do, you just do
two lines to describe pause or fingers and just extend that hand on the
other side as well. So we'll have a hand,
a loosely falling, but this time on this side, we will need to
see that as well. So we'll have a
hand falling down. You can also feel yourself. How is your hand
looking like when you are sulking and when
everything is loose? Maybe just take that
pause and try it out. Really. We have the bunnies legs. Just bend around the
knee and do some lines. I'm maybe have the legs being a little smaller
than I initially started drawing this leg curve on at the nice side and having the
bunnies feeds or pulse here. And again, we'll draw
the pulse just by adding some lines where we want the
direction of the leg to be. So maybe I want this
leg to be slightly twisted towards the other leg. So that's why I'm adding some
lines in this direction. And it gives us the
illusion that the legs are twisted towards each other. Because that's what we do. We create illusion of reality. And here are the bunnies ears. So let's even make some
ears that are floppy, floppy ears and they're
hanging on top of his head. We have the floppy ears
just hanging on both sides. And we assume that the other ear is all the way round the head. If the head is transparent, we are going to see
the ear beginning approximately here on the
other side of the bunny. Because we can
eyeball the distance from perhaps this
eyebrow to the ear. And we can imagine the same
distance from the end of this point of the eyebrow
to the other side. And count for this distance
by making these lines. And imagine that this is
the other side of the head. So just draw a line for the other ear and
around that line. So it looks like floppy
ear and they're coming down and dragged down by
the weight of the gravity, the weight of the
head and everything looks just sad,
sad little bunny. So we're ready to go
ahead and refine, or budget or bunny. Let's start from the ears. So just have the ears
really dragging down. And now you see we have
again a lot of lines, a lot of blue lines. And by now you see that they
actually look pretty good. Where the blue lines
look like some kind of a shading for our characters. Now, let's draw the eye, the sad little bunny. So one thing in illustration, when you try to convey an
idea and emotional idea. And if you try to convey
an idea of sadness, something that people
will feel sorry about. Try to work with the contrast. So, who are you going to fail? Most, sorry about said pirate
or a sad little bunny. Now, because the pirates
we associate with being mean and how
strong something. So the contrast of
having a bunny, a cute little bunny that
has no will to live, that feels even more sad to us. So just drawing a character that usually we associate with
happiness and fluffiness. And giving it this facial
expression just makes it makes the viewers feel more of the sadness and want to
basically make this bunny happy. So here is the nose. I'm going to leave just a
white dots as if there is a glance bouncing on the
nose of the bunnies. So we see that it is
a different texture. And now I'm going to make
the cheeks of this bunny. We're not seeing the
Bunnies Bunnies mouth and we will enhance the eyelids
so we can see them even more. Let's draw just
contour lines that you already have that
you've already created. And we don't know how this looks from the front because
we didn't design this. The Spanish will
readjust discovering those characters because we are doing the poses
that they convey. And just for the sake
of giving you a break from this other very
simple characters. And just letting you know that as long as you
have your poses, you can design any kind of
character on top of that. And you see that we had pretty much the same approach to this poses with the
lines where the spine, same body, but they have different
characters attached to them. Now, this arm is
more dragged down. So I'll need to accommodate for some more flesh on this
bunny on this arm. Because maybe this arm
is a little bit longer. Maybe the bunny is dragging
this arm slightly more and just around the fingers now and here we can have
even a small thumb. And now let's do the
pants of this bunny. Draw the other ear hanging. And maybe we'll have some chunk of hair
here for the bunny. So it's not just fluff and ears, it has some hair gout. It makes it look more human. And let's design the pants. And we wonder why is
the bunny so sad? It didn't get his carrots. It's a real disaster
if you don't have your carrots served. So just counter all the lines. And this is again, just playful time
where you can enjoy seeing new character coming to life and listening to music, thinking about something else. And listening to podcasts. I listen to podcasts while I, while I drove to inspire me and you get into
the zone basically. So I'm going to do maybe some texture on these
bunnies, trousers. I'm going to do some
pants and some belt. So just to give it
more character, now that we have
the whole pulse, you would like to
have your bunny looking better and better. And I'm going to shade
it with another shade. You see that? I just lean my hand and I don't
really push the pencil. I like the pencil. Just draw smooth. And that's how you get
a tone instead of, uh, instead of a line. And I'm going to
shade even this year. Why? Because it gives
you more depth. It pushes the ear farther
out and it looks like this year is behind the head
instead of in front of it. And the same with this are just shaded so it
gives you more depth. And I'm just going to shade the ground to make them
bunny stand stable. And I'm going to
do some whiskers. And they are also conveying
an idea of binding being said because they are
also dragged downward, that drawn downwards
in the directions. So every single element
that you have should convey the idea of
sadness for this bunny. This character is done. Now, let's go and draw some happy feelings
with this pose. I'm going to do that
in the next lecture. I'll see you there.
43. Happy Pose: Hi there and welcome back. Now let's go ahead and draw, even though this happy pose. And now let's have the nodes being the nose of a little fox. So we'll have this line being the middle of
the body, of the head. And in this line is the line where the eyes lie
on both sides. And here in the middle we
can draw a sphere that will help us draw the nose
and that sphere, you just connect this point of the face from this line with
this point and just draw a triangular shape
upwards to find where the nose is in this pose because it
can be challenging. And now that the nose
is in this perspective, the lower part of the
nodes will be marked in this way downwards
because we are looking at the perspective
from this way up. This is the nose of the folks. Let's have some
mouth of the fox, where the nose is ending of the sphere that
we already drew. And let's have the
mouth being here. And the fox is also squinting, closing its size in happiness. And this time we are also
arching eyebrows upwards. Enjoy. What do they say? Pain and pleasure
are very similar. And that's very true if you look at the
facial expression. So we'll have one year here. The ear is almost on
top of the fox's head. So just draw a slight triangle and we're not going
to see the other ear. We're going to continue
the head of the fox. What else do we see
in this position? We are going to see a little
bit of the neck of the fox. So it's kind of a little sphere pointed in this direction, the same as the pointing nose. And here we have the curve
of the ear of the fox. Now, let's dress up Folks. Let's have the body, the flesh of the body on top
of this shape that we drew. And again, the body here, it has also a volume, it has flesh on that
top, it has stomach. Then we have the butts
on the backside. And this is something we
can again signify and mark with just a sphere
or half a sphere. And now you connect
this part with half of the sphere and this part with
half of the sphere here. To find this volume and use this half of the sphere
to design the clouds. And now let's design again, maybe these folks being
happy with the snow. Maybe it is the same
folks that we drew in the previous lecture
that was drawing balls. And now it's happy
with the snow. And now we have the arm's
starting from here. And you can use this arm
because now your eye is leading you towards this
proportions here. You know, automatically
that you cannot start the arm from the
middle line here and have an arm over here
that will be too high up. You have the body finishing
here and you have the pulse. And now you see that
we will have the arm. And here is a good
thing to do to have the fox enjoying
life even more, open up to life, even more and spreading
her, her fingers. So we'll add tos like
that just with lines to signify where the fingers
are and the other arm, you see it's a slightly thinner because it's
on the other side. And in this direction we have the arm and we have the hand, the toe of a here. We have the thumb over here, and we have 123 fingers,
fingers spread out. In joy. This fox is really
enjoying life, and let's design the boats. And this drawing is much bigger so we can draw the large boats. And because the body
is in this direction, the legs will
appear longer. Why? Because they are closer to us. Even proportions of The legs and the face and
the other elements have this rule of perspective change the things that
appear closer to us. They expand a
little bit in size. So when we draw them, we need to account for this
optical illusion of our eyes. That's how we actually
see in depth. The things in depth change, like when you are in
the railway station and you see the railways
disappear in the distance. They're not really disappearing is just that your perception is looking at them as if they
become smaller and smaller. And this applies also to
every single element that we draw and is in a relation
with some other element. At this time. It is basically the, the boots, the legs,
and the phase. So here we've got the cheeks, and that's all we need to have
for this pose of the fox. And we can even draw
some snowflakes here just to account
for the happy folks. And we got inspired by the folks that we
drew throwing snowballs. So we got this character
with inspiration from oral lost, our
previous lecture. Now that's all we need to
have to do, the happy fox. Now, let's draw the lines
and leave out some lines. This is always a
matter of perception. But you'll see now that
this exercise and has given you the possibility
to choose your lines. Where do you want to
put them to see really, when the things gets right and when the things gets a
little bit of proportions. So you can account
for that and do the next drawing a little better. And now we have the fox, the happy little fox, the eyebrows, thick eyebrows. That's why it's nice
to have eyebrows on, even on animal characters
because they complete the expression for this
emotion, for this character. And we're going to have just a little bit
of eyebrow here. We don't see the other eyebrow will have some dose
for the whiskers. And let's also start
and design the code. And we'll have maybe
the scarf here. So instead of drawing a neck, I'm just going to do another
shape that is similar to the neck and make it a scarf. And let's have the scarf
having this pattern, okay, The Fox had
dropped the hat. So it doesn't have
a hat anymore. But That's alright. Happy people. They throw their hats in the
air and just love, right? So that's what the
fox has done as well. So we'll have the code
starting from here. We'll have the lower part of this arm will have
this little element, the fluff around the code. Also here. And we'll have the posts
that are kind of arms. So I'm doing now is just, just doing two lines in equal
distance for this line, this blue line here, to just draw the finger and used this sphere as the
same thing here. One thing with the thumb is that it has some
flesh over here. So just draw a line here to account for
that fleshy thing, for the term and the term, it has more perspective. So it's rather turned this way. And that's how easy you can
make hands on your character. And let's refined coat. And here the genes or the pants, whatever the fox is having. And here we can even
have some fluff as well, signifying the fluff with small
dots as if they're small, small hairs on this
pattern, on this material. This is how you can
simply visually. Make fluffy material. Just make small, small hairs. Not all of them. That will take you a long time and it's not even necessary. So just draw the outline
of the other leg. And you'll see that we
actually had the spouse being happy without the
facial expression at all, just with body language. And that's why it's
important when you draw a figure drawing to know these expressions
of body language and know where everything is, how the body reacts for
different emotions. And let's also draw this code. Now. I have accounted that the
code also have volumes. So I have extended
a little bit of code and just have
it being thicker. That's why, that's how I give more also volume to a material. Just extend the line and
have it a little bit coming, coming on the other
side of this body here. This is just an extra
thing and something that is even a little bit more complex for you to try out. You need to try out different
approaches for you to one. And now the thumb
will have this, our hand over here and again, just around the fingers even with even if you can do them, maybe a little bit square, they will still look good. And I'm going to have this little finger being slightly separated
because in the, in character design, having variations will give you Over, make it look better. And I'm going to say that
again to give it more depth. And basically just
draw the snow. And if we got here, not only pose, we got
a whole illustration. This is basically
a Christmas card, ready Christmas card for
you to have and post. And maybe together
with the snowballing, snow drawing exercise,
you can have that as a Christmas card. And basically the
happy path is done. And you see how different the same body can
look and the energy that it can convey just by posing or body in
different ways. And now let's go ahead and finish this other
pulse of suspicion. And I'm going to do that
in the next lecture. I'll see you there.
44. Skeptical Pose: Hello there and welcome back. Now, let's go ahead and
draw or skeptical poles, or even this trust or false. I mean, that's what skeptical. So this is always a tricky pose. Let's do this first. We have this arm here. And when we cross or arms, one hand go under the arm, the other arm, and
another hand go over the arm of
the opposite arm. It can be pretty tricky. So if we make this arm under
arm go in this direction, and if this hand is on
top of this arm here, Let's signify maybe
just with a square, then it means that this one
is going under this arm. So if we have the arm over here, so this one is going
to be the arm going on the top of the arm that is
there, something like that? So let's pick up this thought alone while
designing this character. And we're going to
figure out the rest. So follow me again. In the drawing process, I have you have your
pen and your paper. So what kind of skeptical
character will do here? Let's do maybe a teenager, they're always skeptical, right? They always like, look at you like What is this really true? So let's do a teenager and
we'll have a girl teenager. And the expression
of skeptical is when the eyebrows go in
the opposite direction. So let's draw that. If this is the nose, one eyebrow is lower down, and one is higher up. This pose usually is
very subtle in humans, but in cartoon characters,
you can exaggerated. There are few people
that can do that, like Jim Carrey and the rock, the rock and move his eyebrows. Really like a cartoon character. It can have one
eyebrow really up and one other
eyebrow really down. So we'll have the eyes of
this character being here. And let's now first design
who this character is. Let's have these eyes that the simple eyes that we did before. And we have one eyes squinted
and the other I opened. So you know what you're doing. And let's have this girl
being around us skinny. So just around her
face like that. And she also has her
head slightly tilted. We're going to have
maybe the hair of the girl being this
kind of hair cut. We haven't done this
haircut before. So let's try it
out from one side, the big chunk from this side and a big chunk from the other
side and something up front. So this girl has smaller face. So it still signifies younger, younger character, but it's
not a little girl anymore. So the more proportionate the
head of your characterised, the older there will appear. And that's how we'll
have her mouth. Really skeptical. So the part of the
mouth that screens is always around the eye
that is squinting. So we have the whole of
this area opened up and the whole of these areas squinting instead of
the other way around. This is a rule of
thumb where it can do a bigger impact on the emotion when you have one part open up
and the other way, the other part squashed
a little bit more. So we'll have this
girl characters or less, have her arms. Being a rather
slim now will come up in this for this design. And they always
shrunk a little bit. So we'll have also, together with having
the suspicious spouse, we are going also to have a
body posture of a teenager. So on this square here because her fingers are really small, Let's just do two lines
to make the hand. And the other hand
will be inside there, behind there behind
her lower arm. And we have the elbow, this arm being here so we
thicken even this area. Again, this pulse
can be tricky so don't beat yourself up if you
can get it the first time. Just follow me along with this drawing and just
try another one and try this crossing of the arm thing on your own when you do that. So we'll have this
leg supporting it. So the body is also
slightly tilted. So this part of the body, the shoulders falling
in this direction, and this one is leaning
in that direction. In that way, the body
is likely a relaxed, but you see it feels
like she's freezing. Teenagers look as if they're
freezing and best slippy. We all been there. So let's have some
genes on these girls, some snickers, a large Snickers because
they're fashionable. And whatever Snickers
you do, large or small, It's always starting
with a half of a sphere to have
as a place holder for the shoes and just draw the other leg a little
bit quiet behind. And then you have to account
for the proportions. You'll have to account
for this tilt here. Because this hip is going to be lower down and this is
going to be higher up. The proportions for these leg will start from this point on, n For this leg from
this point on. So they will not be quite equal. And this foot, this
leg is also bent. So now that we know her design, Let's have the paints. Actually this part of the
body being slightly smaller. It's not a cartoon
character like those guys. Let's give her
some slimmer body. Maybe she has large skirt, large shirt that is hanging. So we'll use that, that round sphere that we did
to put it in her character, in her costume, in her clouding. And use this part to
have slimmer shoulders. And maybe some shirt coming out from here just to know that this part is shirt. And basically that's all
we need to know for now. Let's refine and discover who this character is with
the black pencil. So we'll just draw a nose, will draw the sneaky, had squinted and needs
like asking Why. What are you talking about? Like always in disbelief. I didn't do that. You're accusing me of
something I didn't do. And maybe just open the
mouth a little bit. Just talking and maybe give
her this freckles digestive. Have the freckles. And let's design the hair so we know what the chunks
of hair are going. Just refine, explore
this character. You can design a different
haircut as well. Here is just an
exploration process and we will keep that
around face design. That from the sphere
that we have. Just to be easier for you. I mean, it is, I know it is enough trouble having the
whole hand thing figured out. It is a difficult pose. But you'll have to
challenge yourself as well. If you want to improve. Don't be discouraged. If you can't draw
anything, it's gonna come. I promise you that. It's like when I was little, I started going down
the bed with my head first and I always bumped my head on the floor and I
was like, What's going on? That's how I became an artist. Yeah. Well, no. But I just didn't know. I did everything with
my head forward first. But how come it didn't
work out when I was going down the beds are my
grandmother showed me no. You first you turn
around and you have your feet on the ground
first and then the head. And I didn't get
it why I had to do that until it kind
of made sense. And it's going to have just an allegory for
this happening to me. Maybe you have another experience
that you can relate to. Something that has
happened to you that later when you understood what
everything was all about, you kind of felt that
well, that makes sense. Now, here is the arm
that's on the body. It's actually, the fingers are slightly bigger,
but that's alright. We'll have the shrugging. Both her arms is
smaller and we'll have the other one just behind. And let's have, let's have this shirt now coming as
slaves from her costume. So that's all you need to do. We'll maybe have some color here from the shirt
that's hanging in there. And we came up with
that while designing. And while we
actually didn't need this whole shape because
these are fluffy characters and we actually decided to
draw much skinnier teenagers. So now we'll have to
account for all the lines. And sometimes the
lines can give you suggestions for what you
can do with your character. So now you have to make sure
that these arms connect. So no, that's not this arm continuous
and this one starts, I don't know, somewhere else. You have to think about
the small things, but I'm sure you do. These are questions that you're asking yourself
that I'm sure of. So we'll see her genes, her skinny legs like that and we'll have the
hips shifted forward. So see maybe something from
the back of her of her back. Her about here. So we'll have the
skinny skinny legs and let's have the shirt here. Coming behind maybe has
different layers of this shirt. And maybe some really she's
taken her boyfriend shirt or her father's church is basically oversized
for this teenager. But they like to cuddle in long sleeve, clouding,
whacked out. And if you are one of my
students and if yours, a teenager, even better, You know what I'm talking about? You can use that to design
even better characters. So I'm going to shade this leg just to create more
perspective and more volume. So I'm going to say it even the hair to design
a better character. And give you the idea of how simply by
drawing these shapes, following the thought process, you can design your own
characters later on because you're not going to draw just the same characters
over and over. You're going to start
designing your own characters. That is the goal, right? It's not just drawing this same characters and this
same process over and over. So that is something that
you're going to see. So I'm going to shade
a little bit just to create more poacher. And basically this is the skeptical girl character with a pulse all put together. So let's go ahead and
draw I'm angry character. And I'm going to do that
in the next lecture. I'll see you there.
45. Angry Pose (Shouting): Hello there and welcome back. Now, let's go ahead and
draw some angry character here to see how we express
this energy through our mouth. Because we want to basically attack with our model
with all words. And words can be
very painful back towards maybe more painful than, than a real punch Really. So we'll have the character
trying to exceed the energy, straightforward and
attack its opponents. And being angry is also a
feeling of helplessness. So you gather all
your body parts together in fear of
this helplessness. And now you have
the eyebrows AND opposite direction of
the other characters of being sad and happy. So you kinda shrug the eyebrows closer together to the nodes. And let's design. I'm angry guy here. Maybe he had, they had a fight with his friends and he
is really, really angry. So I'm going to draw maybe larger ears
just to make a difference.
46. Angry Pose (Helpless): Hello there and welcome back. So now that we did
the angry posts, this pose is basically
also an energy pulse trying to release
energy as much as, as much as possible. So now that we have
this thing here, we picked it up or I did
your gels listening with me. So let's have someone being
really, really angry. And let's have maybe
our soccer player or a football player just being angry for not
being able to resolve their soccer football
thing the way it's called. So let's design them. Let's have the nose having
been over here and the face and body are really going
towards each other. Just containing the
N and G of the body that has built up and
trying to release it. So now you just draw the
arms on top Of those of this middle line and you
draw the, draw the fingers. So we'll have the
finger, the thumb here. And you have half of the
sphere split in three. So you have the Feast here, and you'll have this one also, but the other way around. And we will not going to see the whole arm,
the whole hand. And we'll have a little time
here to make the feast. And then you have
the angry pulse. Now, this is more anger out of helplessness and already
it's not pointed at anyone. This one here is an attack. This is a variable
attack towards someone. So you see the energy
is pointed this way and out of the guy. This one is more helpless. I have nothing else to do. I mean, we've been
talking about it, soccer football and whatever. It's not resolved. So whatever, what do you do? You jump jump up and down, and there is nothing
else you can do because that's not
gonna be resolved. Nothing you can do. Saudi. Angry eyes. The eyebrow squinted, even the eyes are not looking at someone anymore at anyone. The eyes are also screen debt. So we'll have this character
and tiff or a grinding. And the energy is just built up. And let's have the sleeves
of the soccer player. I'm going to say
soccer because while sometimes I might
just say football because I'm so used to it. I don't play any of it
and I'm not interested, so I never really
feel this poses. But I know something
else I have felt before. I don't get so angry anymore. But yeah, I can imagine
people being really, really mad about it. So let's have a leg, the legs of the soccer player. And because of the design, I'm going to make
some thicker legs. And here, maybe not. That takes us to
a sports people. They have smaller legs. So I'll have the shoe. Just design a house fear again. And here, a house fear. So for this character, you will see the lower
part of the shoes. So you just design on top
of that just an ellipse. And let's have the nice, so you'll have some
perspective here going on. So just follow me
in this drawing. So you just draw on both
sides of this line. But here we have
the knee and you're looking at the character
from this side. So we'll have this lower part
of the leg coming forward, the upper part of the
leg like doubts and ending up here in
smaller, smaller leg. Lower Lego cow. So let's draw some shorts
here of angry soccer player. And I don't know any team. So I have no idea. We'll just pick up
something and it may be a new team arising
after this lecture. Or some people can
be just made up. I don't know any team and
I may happen to draw. Just a pattern of certain
team and I will have no idea. So just be patient
with me for this pose. We're just drawing
characters here. So what else does
this guy have that is angry and a sports
person, sportsman. So we'll have maybe
hair in this array. So let's design some
chunks of hair. Because he's been
jumping up and down. And he's completely insane. No one understands. He cannot resolve it. He's been talking on
Twitter trying to argue about this thing and use
it soccer, is it football? No one has listened and it
has led him to nowhere. So the only thing he can do is just jumping up and down
and releasing this energy. Now, it's all we need for that. Now let's go ahead and refine
it with black pencil here. So we'll have the eye, so we don't have to
have any direction of the eyes, will have eyebrows. You'll see that I
draw thick eyebrows, but they don't have
to be like that. You can design your own eyebrows later on, slimmer, wider. I'm just giving you a simple design that also
you can get used to. This design have the most closest to cumin
proportions as possible. So you have trained
all these poses with having all the measurements
that we talked about, where the legs and the arms
and elbows here being in, coming to the waistline. They are very close to what
we've talked about all along. So that's why I used the same and same
proportions to get you used to this this drawing. And at the same time, I'm just trying to give you
some character traits and how can you use those designs and design your own character? You see these guys are probably sweaty because maybe he
just finished training. And there have been
someone in the audience, a good football game guy. And he's like It's
not football. Soccer. Yeah. So let's design the shirt
and around the legs. And now we'll have the, the shorts on top of these legs. You see that I'm not
drawing them straight. I'm following this body, this volume here because
the leg is not straight, it has flesh, it has muscles. So you have to account for that. So we'll have some socks here. And the source can be also
a little rounded like that. And let's draw the other leg. Again. I'm jumping
from one place to the other to make sure
everything is proportionate. Everything is looking good. And here, this this part of the shorts are falling down so they have a little
bit different structure. They're not right on the
leg, they're not tight. So they can be a little
loose and little different than
those other shorts. And we'll have the leg over here and so we'll have the
lower part of the shoe. I mean, if you have
an idea of how to draw Snickers of certain brand, I have no idea. Different brands. Well, I know some
brands, but yeah. I'm just going to draw
simple, Simple shoes. So let's continue
with the shirt. And again, the hand is
increased tight in feasts. The character is basically
squeezing all the body parts. This is also a posture
that is rather defensive and in rage. And just draw every line does follow up the lines that
you've already drawn. And here I'm just
going to continue the shirt and give
it some movement. So I'm just extending
it a little bit and that will give
it some movement. That thing that will
look like it is, this guy has been jumping
up and down four. For a while now, and it hasn't
resolved the problem. So poor guy is no way he
can resolve that problem. So let's draw the hair, the hair and has really
here in this array. And the hair goes
around the ears. And so you see that I'm drawing chunks of
hair like a triangle. And here in this other
character and the girl, I've drawn the care,
the hair around. So when you draw
bunches of hair, they look like triangle, usually chunks of hair. And if you draw a haircut
that is more currently, they have a rounder edges. This is something
you can remember. I'll have another chunk of
hair on the back of his head. And here we'll have another
arm in the background. But let's just
shade it even more. Just a silhouette because
it is important to be clear where the silhouette of this guy is and then how
the pulse looks like. And you see that I'm posing, this pauses not from
the front of this guy, not from the front,
but a three-quarters. Why? Because the clear idea you have of each pulse to
convey to your viewers, the better your illustrations
you will design. You are basically
trying to convey ideas to trick them into
a different reality. Because we know that
every action is actually a number of browsers. This is not just one
pulse of jumping. There are more pulses, I'm jumping and you have
to choose one of them. So choose the post that
conveys this idea best. I'm going to give
him the same shirt. I have no idea if a soccer
team has these patterns, but maybe someone here knows. I'm giving him even
darker trousers. So it really looks like a soccer player and
being believable. So this is very close to an end. And I'm just refining,
refining things. And just of the pulse is
basically already done. And I'm just going
to draw that he's on the football plan,
the soccer playing, and I'm going to have some
grass as well just to signify that anger out for
football or soccer player. And maybe you can do some
lines like that as well. Here. These lines are signifying
in cartoon characters, in cartoony drawing
signifying motion. It means that the
leg has been down, this arm or this character has
been up and has come down. So these lines are very typical. So this is the angry false. Now let's go ahead and
do some lazy poles to round up or chapter
of body language. I'll see you in
the next lecture.
47. Lazy Pose: Hello there and welcome back. Let's go back to our characters and we
have the lazy pose. So let's do a little girl here that is really,
really bored. And I want to use the girl's character
because it's really cute. Little bored girl evokes a
little bit of a simpler, you just want one to
feed her candies. So also, because I have
the opportunity to have another element here
that can describe this, this dragging out the
body and it is ponytail. So I'm going to add a pony
tails to her on both sides. And this one is
over here and she's going to have her
eyebrows looking up. We'll have the nulls here. And now we split the
face on both sides, sides of this line. This line is leading us to
find where the features are. And this line is
leading us to find where the chicks
are, the cheeks. The one trick is
here and one here, and the eyes are on
top of the cheeks. Now we have a perspective
change for these eyes. So we have to account for that. Will have much smaller eye here and a slightly bigger here. And we have her looking
up in the sky and Slack. Please just give me something
because I'm so bored. And let's have her mouth
being tiny little mouth here. And just sulking,
sulking little girl. And we'll have her
neck visible here, and her hair continue
here behind. And she has really large
head like children. That's how she looks like. Children will have the other
one I just suggested here. And now you have
the pulse already. So just design maybe
some little dress and we will use 3D spheres
to design her shoulders. One won't be on the back side, and this one will
be on the front. She's going to have
a little bodies. So we'll draw this part that we drew just a very short dress. And we'll have the
sleeves come in here. And the hand just
turned this direction. So we'll see a little
bit of the little finger and less design the, the legs. Just design them
maybe just like this triangular shapes that we did. And this one here, they are kind of like meeting
each other level beds. So just draw this leg. And again, how spheres
for the feed and the other hand is somewhere
here between the two legs, but I'm not sure we're even going to see them if
we have this design, but what we can see, maybe it's the lower
part of the girl's hair. So this is all we need. She started drawing
this drawing. So we'll have the
girls little nose and we'll have this boring board
eyes, not boring eyes. They're very cute eyes. It's just boring. She's just bored. And we'll have her
eyes looking up. And this one is on
the other side. We have to account from this middle point really
where the other is, and also thinking about design, this can be hard on you. If, Sorry, Just follow me. And you will also get the feeling in our
of how to do things. Because again, while
doing so many exercise, you will get just better and better and there is
no coming back now. There is no coming back
up you not knowing, not doing these exercises, but the improvement is
absolutely remarkable. Remarkable. That's
what I'm sure, because that is what everyone what has
happened to everyone. So I'm just going to draw her lips and her
chief over here. Just looking something in the air and maybe
some kind of bug. Just give her some
small chunk of hair. Now, everything here
comes really close. So you should have
sharpen your pencils. So you can have these
features happening here. And let's draw some big freckles to make her even cuter. Refine the eye and
have the head, the neck, and the hair. And no, it's just easy. These guidelines give you
the position of everything. That's why it's good always to have them and to
get used to that, to get used to draw
loose as well. Not to try to have clean a line as just start with
pajamas to draw loose. And now we have the
other shoulder and the arm on the back and we'll have her stomach coming here. Let's continue the arm because it is on the front of her body. She's barely able to walk because she's just so she
has so much lack of energy. And that's because she is bored. Little girl does
give her some candy. That's going to fix everything. Yes, that's what every
little girl things and maybe not just a
little girls might be. Their parents as well. Can the fixes everything
who doesn't like candy? Yeah. It's not. It's just going to make
you hyperactive down. That's the next thing. Then you gotta be some
of these other guys. Yes, there are a lot
of emotions to cover. So I'm accounting for some of them and
covering some of them. But the easy way, again, is to act
out this emotion. Many emotions, they kind
of overlap each other. They're similar, they
have similar pulses. So if you know how the character is angry, there's similarities. A lot, two other posters
and you can generalize. But when you have this exercise and you see how body language affect the culture and the figure on the door
of your drawings, you will think about what
feeling you want to convey, what emotion you want to convey with your drawings next time. So you're now how everything
how everything works. And now I'm going to give
her some flower dress. Some large flower
just to differentiate one texture from another and give some life
to this character. So she's not a boring, she's bored, but she
should not be boring. So big flower dress and she's
a very simple character. I hope you've managed to sound. Now. I'm going to shade
the the legs in this way. And I shaved the leg that is on the other side
to create that. You already know that and
see and seen how this works. And that's it. So now we have six characters
with different emotions, starting from the pouch
or up, just doodling. And when you have
the character now, the next step is easy. If you scan it, if you clean it up in a digital
tube or two colors to it. And then you have illustrations. Your illustration done. But you cannot start without having the
construction of the body. That's where all your troubles slide that this
misconception that oh, I can't draw thing. It's basically because
you're trying to draw the outlines forest without
having a construction. You're trying to build the
house from the windows down, that's not gonna work. So I hope this has proven
to you yet another example. Go take some big break a
day to a week or maybe come back the next day if you're ready to go with
the next lecture, I'll see you there.
48. Old Guy - Structure: Hello there and welcome back to another section of figure
drawing for cartoon characters. Now, let's look
at figure drawing according to age and weight. Let's first start with h. So even though we have the
same proportions as we age, there is something that's
happening in the body that changes the
posture of characters. If you are going
to draw characters that are of a certain
age or older, or want to behave all there because sometimes
you want to have a younger character acting out a role as an
older character, then you can have
those posters in mind. So let's draw the spine. And the spine as we age, starts to shrink because
the spine is like a spring. It has an elasticity. And the spine is also
held by, by our muscles. And as we age, the
muscles weakens. And they have two
forces applied to them. First is the force of the
muscles holding the spine up. And also there is the force of the gravity that is
pulling our bodies down. The weight of our bodies
will have the spine held by the muscles
of the core area, the muscles of the back
and most of the muscles of the stomach that
are holding us up. And also we have the muscles of the back area and the muscles of the ties that
are holding us up, but now are weakened
by the changes of the body and also
the lack of exercise. So exercise can keep our
muscles intact even as we age. So let's just see what natural causes can
cause to the body. So this is just a
character design things so you don't have to know all the biology and
anatomy of the body, but you have to
briefly understand what's happening so you can be able to draw these characters. So the head is here and the character must
be able to look up. But the neck is
basically a strange. So usually the Nike is always a holding the
head looking up. So I'm just going to briefly
draw the head over here. And here, it doesn't matter
how big the head is. The head of the older people are much in human
characters that are not disproportion is much smaller than the head of the
cartoony character. And let's draw the legs. And the legs are always curves. So the knees are always bent. For older characters,
all the people, because they're always trying to balance out all
this area here and the older people
and sometimes not managing to carry this
weight on their own. So they're using an extra help kind of like the third
leg they're using maybe came to hold themselves up and to be
able to move forward. So we're going to have this extra balancing thing because sometimes
the muscles doesn't hold up and they need to basically balance on one
leg to move forward. So we have this
curved body posture. We have the both
hips on both sides. And I'm drawing it
in perspective. So you have a better seal. What I've done to pose
of an older person. You have the shoulders on
both sides of this spine. If we assume the spine is
here in the middle and it's very curved spine will have a line going from this
pose to this pose. And you know, because
it is in perspective, it is slightly
different in size. So it means that this part
is slightly bigger than this part because we are having a perspective going this way. And the other arm is
maybe a relaxed down, but it can do anything we want. So this is basically the
poacher of an older person. Let's flesh it out
in the next lecture and see how all
the body parts are situated in here
when the spine is dance and how to this
character could look like. So let's fantasize out
a character and I'm going to do that in the next
lecture. See you there.
49. Old Guy - Refining: Hi there. So let's continue with the
older character and design, also, an old character. We haven't done this before, so it's a good way
to practice to draw even characters
of different ages. So let's find where the
phases and the phases, the nose is on this line, the character is
looking up and really dragging is the spine
and his neck forward. Just drawing different
spheres here and there. Just to have the feeling
where everything is. You see, I don't keep anything
clean in adult stage. You already know about it. So let's draw the nose on
top of this middle line. So just draw a large sphere. When we grow older, the nose is continually
growing obviously. So let's exaggerate
that and draw even bigger nose to
enhance that feature. Because cartoony drawings
is about exaggeration, stylizing, and experimenting with features and the characteristics
for different ages. So let's draw the eyebrows, Let's draw thick eyebrows and
they're kind of triangular, having more bushy eyebrows at
the front of the eyebrows, closer to the nose and
slightly smaller at the end. Let's do that on the other
side of this middle line. Now considering wider
noses and things, so we have another measurement. And as you know, as this curve goes around, these parts of the body, of the face gets slightly
smaller in perspective. To look realistic, It's
not the same size. We have to account for that. And let's draw some wrinkle just to signify an older
person and older phase, we have the mouth
and happy balls. What else can we do? We can design very
easy or character. So just design the eye as just the dot and the other
one is as well like that. You can design any
kind of character. Let's design some wrinkles on the guy's face just
connected to his eye. That is very simple. I like the character
that we did. It's on a young character. And justice wrinkles here. Simple features can
convey the idea of the character being old and design some wrinkles
on the forehead. And let's have his mouth
maybe opened some chin. And we have to account for
the fleshiness over here. So let's also designed
the guy's face. And what else becomes
bigger is also the ears. So let's grow. Let's draw longer ears
and design the skull. And let's see,
we're going to add some hair later on because
old people have less hair. And let's design where the
shoulders are endless. Design the whole this area as the neck for the Nike's
connected the spine. So let's first find the
old person's body is. So here is one hip and
here is the other hip. So let's design also the body
being curved in that way, going to the next shoulder and the stomach being
somewhere in here, draw another sphere
to discover where the stomach is
because the spine is going inside the body. And let's draw the
shoulder here and the arms of the guy on both
sides of this middle line. And now you can move some
features for fun back just to make sure everything
is looking good. And here, you know, the old thing that we do, It's applies even here. Just draw half of a sphere. And we'll have the cane here, and we'll have the fingers drum. Very simple way, maybe a
thumb on the other side. And let's draw the fence. And the shoes just have a very simplified character
and very simplified trousers. I'm drawing over and over
the lines to have my, I feel that character design, how does it look like here? And the other shoe
on the other side. The stomach here, the character
is coming to you live. And this is going to be fixed
even later on when I have, when I designed the character
even with the black pencil. And I'll have maybe
some hand here on the other side signified
with half of a sphere. And we are going to
complete this later on. When we are drawing with the black pencil and we have
the posture of an older guy. So let's go ahead and
refine that where the black pencil and see what kind of character
we get here. So I'm going to
draw the eyebrows, really bushy eyebrows,
especially of guys, are getting thicker
when they age. These are changes in the
body that are happening. And yes, so we have
wrinkles on the forehead. We have the nose. Just refining now
the half sphere or the ellipse shape that we got to have the other eye
on the other side. And you see that
I'm still drawing the small white dots and
the glands in the eye. This is still a
cartoon character. It's not just an old person, It's a cartoon character. So you can stylize and simplify the features
of your character. To have him look as
cartoony character. You draw. Children's book
about your granny or your grant that this is a good exercise to
do so you know how the body is and why
the body is like that. So I'm going to
draw just nice tif, even though the old people
maybe have less stiff, but this guy should be also
likable in cartooning. So let's have the
ear here coming in. And it is also on our proximately on
the side of the nose. And we can have flashy skin falling down like
that for this character. But the more you actually draw
the simplified character, the more they will look
cartoony and a little childish. If you want to have
a likable character, even as an old person. So if you want to have
an evil character, you can exaggerate features that makes the
character this likable. Or just add more details. Just the eyebrows lower down
more like an angry person. More not as rounded shapes,
rather sharper shapes. So let's have the neck. And the neck is just pulling, just keeping the
head on the spine. And let's just
draw the shoulders and draw on top of the
blue lines that we drew. A lot of. I hope, watching me doing that
and seeing how characters come along that
you are encouraged to not keep your drawings
clean to start with. And you're not afraid to just
do a bunch of lines there and see why this
process takes you, because this is the way
you design characters. So let's have the arm and
some wrinkles on a shirt. We haven't even decided
his clothing here, but we can add some
wrinkles because we have now the position
of the elbow. You see that the curvature
of this line here is immediately giving us the
position of the elbow. The old people are having a rather thick clouds,
maybe a pullover. So that because they are
feeling cold like that, this is also can enhance this
feeling of an older person. So I'm just going to draw the
gain a little bit in front of this foot because
he is carrying the cane width arm that
is in front of us. That is towards us, and the other arm
is just hanging. And let's refine the clouds. He said he's going to have
some kind of a pullover and they usually mean
sometimes have well, what I'm thinking
is basically what I know my granddad and how he is dressing up. He had like a shirt
underneath his pullover. So if you had different
reference for an older person and how do you know that
your granddad has dressed? Use that as a reference as to dress your character design. And this is just an icing
on the cake that we know. And the old people now or never, usually straight
on the backend and neck and their legs because that's how they have
come to this pose. They have ended up with this pose and they are
not straightening up. And actually the
exercise, I believe, and I know an
exercise just keeping the muscles that are holding
up their spouse in shape. Again, actually restore a
lot of this was happening, the gravity and the muscles that are pulling
us up and the bones. These are two forces in constant interaction
with each other. What I wanted to say is that the muscles that
are pulling you up are always a reversible and you can actually train
yourself to be younger. They are women and men that
are doing marathons at 9,000. We have these two
movements and pulling weights and contouring
this gravity and this decay of muscles is always there for us to
know and can see Dar. But as character designer, you have to know what kind
of person you are drawing. Is it the person
that is trim and holding the muscles intact? Or is it, Is it a granny
on granddad has not so much of our attention on those things and they
enjoy life anyway. So that's what we're doing here. So we'll have maybe
some hair that are not chunks of hair like
on the younger person. The loss there, hello, especially men will have
just chunks of hair like that and maybe just
a little hair here, three pieces of hair, three chunks of hair
on the other side to convey an idea of
an older person. And we'll have the
ground year maybe shade, shade this leg just
to have the depth of the drawing and having
the leg appear backwards, but I'm also at the same
time going to shade darker. So why do you do when you have fans being darker
and you want to create more depth while you go over another layer of shading
on the leg that is behind, that is basically all you need. So now we designed
an older person. Let's try out and see just
an impulse or to how this, all the person will be moving. Performing this,
performing some task just to see the difference
from the younger characters. I will do that in
the next lecture. I'll see you there.
50. Old Guy Kicking a Ball - structure: Hello there and welcome back. Now, let's investigate how
a body of an older person and older character will perform some of the tasks that we
did in the previous lecture. Let's say the character
is kicking a ball, and we'll talk
about soccer again. So what is going to happen here? This character won't
be able to straighten the spine and you
won't be able to get this Jane the strength
to kick the ball because the spine the spine
is banned permanently. So what is he going to do? And let's try to discover. A postdoc can do that. The character will
have the spine basically bends what else will. So it has to link. The character needs to
lean on one side to balance out a leg that is
going to be in the air. So what the character
needs to lean on one side. So let's draw the shoulders here and one line,
leaning this way. And we are going to move
the cane on the other side. So we're going to draw an
arm leaning on my cane. So let's draw a ball where
the cane is going to be, where the arm is going to end, and the hand is going to pick up the weight with this cane. So what else do we know? We can lift the hips
a little bit up to have somewhat
proportionate character. And you see I'm just doodling to find that where the hips
are, whether spine is. So we're going to have one
hip here, one heap here, and we're going to
have a leg if we assume the gain is
ending over here. So we'll have one
leg bent again. Because this is also
a permanent change. The muscles of the ties are
not holding up the body anymore when the spine is damaged and it's
permanently bent that way, then you have to split
the whole balance on all the parts of the
border in this matter, the legs and the lower leg. So you always have this spring effect distributed
to different parts. And we're not going to
have the character, basically James strength
to push the leg higher up. So we're going to have
just the leg slightly bend and not as far away
because they are not as strong. The older people I know
I left the head out, so let's draw the head and
maybe the character is looking forward to try to
hit the, the goal. And the character
is also going to have the arms closer together, maybe an, a hand
tight in a feast. So let's draw another sphere. And this is basically
the force out the older person kicking a football. Let's draw the full bow there, maybe going to have it
as close as possible to where the foot is because they're just going
to push it basically, they don't have that strength
to Jane and this energy. Because the farther away the
more we prepare for the hit, the stronger the
heat is going to be. Older people don't
have the ability to Jane and this force to
kick a ball really strong. And this is the difference from the character, the
younger characters. So let's go ahead and design this older person and see where the body parts will end
up in this drawing. And I'm going to do that
in the next lecture. I'll see you there.
51. Old Guy Kicking a Ball - Design: So welcome back. I hope you had
some refreshments. Maybe you have practiced on
this drawing couple of times, so you're ready now to
add some character to it. So let's have the head and we said the head is looking up. So one of my doodles that I scribbled on to
find this sphere, that way is already here. And that gives me the idea
to use that scribble to draw the middle line of the character and the
character is looking forward. Maybe this will be the line, the beginning of the nodes
is going to be here. You can also draw a line if you want to find the
ending of the nodes. Remember, you can draw as
many lines as you want to. There is no a root or how
many lines you can draw. So let's have a big nose
and let's have the eyebrows coming exactly where
the nose is ending. Node B will have the same
kind of character here. We'll have him
looking forward and we'll have the ring girls
will have a happy character. He is trying to hit
the ball and he's not. He is basically doing
whatever he can with the features with
a strength that he can. Maybe he's playing with
his grandchildren. So he's happy to be
around them like that. And so let's go ahead and
discover why the bodies so the head is attached
to the neck and we will extend the
neck like that. Because the flesh of
the older people, even under the neck, it loses its elasticity. So the neck is wider. So let's design the
body of this character. What do you want to
start from first? If you want to start from
discovering the hips, just draw another
ellipse on the hips. Maybe draw another
ellipse if you want to, on the shoulders. And what you need to do
is basically connect this ellipse here with
the ellipse below. This one here with
the other ellipse. That's another easy way to find where the body is,
just connecting them. So if that is the spine and
the body has some thickness, so we will have
the stomach being of here and the stomach, the hips are moved
forward because the body is basically
balancing with all these hips and the core and the legs with the ties and just the spring
effect of the legs and the upper part
and the spine are creating the spring effect that the older people need to actually perform any task
and to move forward. So this is a really
a difficult task for the guy to perform. That's, that's basically
what he's doing. He's turned on one side. He is leaning on the canes
so he can hit that ball. And now if we see the
hand from this side, we know that it's going
to be at thumb over here. And the fingers here are
going to be in perspective. So we can just draw one finger here and another one
on the backside. And we'll have this fleshy
area here for the tongue. And just connect this sphere
where the lower sphere. And that's all we
need to create, the cane fist that
is holding the cane. And we'll have the trousers and another half sphere
for the shoes. That is just making
it easier for you. So you can really design
your characters and you can put your attention on
the motion of the character. So we'll have the arm, just like a sausage,
just two lines. We know whether our elbow is, where is the top
of the curvature here on this little curve is basically where the elbow is. It comes natural. And now we have the
hand here, tight fist. So we'll have 12 lines and that is enough
to draw fingers. And we'll have just
a small sphere on an ellipse just
to draw the thumb. That's all you need
to draw the arm. And he's basically or a
character coming to live here. So let's go ahead
and investigate, even and refine who
this character is. And by now you know that
the design might change. The design will get refined and the personality
of the character. We'll come forward. So let's discover who
this character is. Without that might be with
that it is the same character. But let's see. We're going to have some fun here when the character design, because we are talking
about figure drawing. And when you draw the figure, you out to have
some fun and design a little different
characters if you want to. So the same and the same
way that we have to train or core muscles or ties or a muscle or a bag
that are holding us together, that are enabling us to perform tasks and to stay healthy
and able to move properly. In the same way, you have to train by
drawing characters. So you can get these, you can get your
drawing muscle intact. It is not a muscle only it is not your hand that is drawing. It is basically your
mind that is drawing. It tells you where to put
the lines and aware not to bother making so many lines
now gives you an option. Do you want a chin to be
over here or over here? I mean, both are possible. If the gene is here, maybe the character will have rather more humanoid features. And I've been guided from the fact that I have drawn more and more
characters that are closer to human anatomy. And that will give you
the possibility to draw complex characters with having these proportions done, because this is
basically what's more difficult to draw when you
draw cartoony characters. And now I'm going to
draw his, his skull. And let's draw the neck in in comparison in relation to the
chest and to the shoulders. Let's pull the shoulders back. So he's basically leaning his
body on this gain here is distributing the weight both
on this leg and on the cane. And this is going to
last non-variable long he cannot keep the
balance for very long. So he needs to shoot
the ball really quickly and go back to
supporting himself with both legs and the cane. He's holding the cane. And you can apply this poster
to younger people as well, younger characters if
they're acting out. As always. If you have a
storytelling where a guy or a girl does the character
who is pretending to be old. You know what to do, you know how to create the body. So design the spine
and the body. So it acts like all the person. Now I see that this
lines here are inappropriate because
the character is rather turn towards that. So this line won't be visible. So I'm just, I'm just
doodling over them really. I'll try not to use the eraser and also have
followed me, knows no why. Because you need to
learn to trust yourself. You need to experiment
and learn to experiment. You don't, you
don't have to tell your brain that you are wrong. And this is your kitchen. You have to be free to create. While in your kitchen, you have to be free
to have it messier. Before you get the
recipe that you need. So now here, I am giving you the recipe for how to
draw cartoony characters. And I'm not
encouraging you to use the eraser because
that's creates distrust in your ability to
actually find it without it. I don't want to give
you a crutches to go with while you are
learning to draw. I want you to trust yourself. And that's why I'm not
using any eraser and I'm not encouraging
you to do that. You will have the time
to do that later on. When when you have
drawn your characters, maybe you want to, later on, just pick up a
character and refine it and you want to
actually erase it. Daniel, create your
children's book. Or when you are ready to go ahead with
your character design, then you can erase and try
out different approaches, but don't do that when we are working here, when
we experimenting. It is very, it must
be very new for you in the
experimentation phase. So you might feel like you have a brand new shoes
on and they are hurting. It hurts in your heart. Just doodle out and
make it messy drawing. I know, I know it hurts, but just place your focus, focus on the learning and not really so much on the outcome. Because the outcome will come naturally when you have learned. That's a promise. That's a promise. We have all been there. I have been there. And now we are here
and I know the way and you can trust me because I've been
there just where you are. That's why I can tell
you all those things. Because I've been there
and I know you're how you feel about the drawing and so-called failure that you cannot do whatever
I do and so on. Don't worry, just imitate
the drawings that I do. Follow me and listen and you will know why
you did things you do. And later on, you are
going to be on your own, drawing your own characters
and you will know why. I happened to be the
same guy playing here. And this is his neck
and this is the color, and this is the pullover. And you'll see that I
draw these lines in curvature as well that
follow this line. And they're not just straight, they follow a thickness. They follow this line because that's what that's what they do. That's what the perspective do. It is a perspective change here. And it is there is a
volume to the body. So I'm going to draw some grass, maybe here as well. They're on a soft
guitar playing. And for those who are in Europe, they're on the football plane. Yes, it is a happy guy. It is not an angry guy, so I'm not going to pick up the old soccer football fight. So I hope you learned a
lot from this lecture. Let's just pick up
another pulse here of an old guy to see how they
perform some other tasks. I'm going to do that
in the next lecture. I'll see you there.
52. An Old Lady - Structure: Hello there and welcome back. Now that we drew
an old man and the way they actually balanced their bodies when
they perform tasks, I decided to draw even a female, older woman because they have a little bit different
distribution of proportions. So if we have an older
woman character, Let's turn her in the opposite direction
so you don't get used to draw characters just in one direction and play around a little bit
of proportions. So why do we have here we have the spine that is really curved. Again, the spine has lost
its strength and elasticity. The shoulders are
moving forward, so we'll design the
shoulders over here. What else do we have
in a female character, while usually female,
older people, they jane more weight around
the stomach and the hips. The hips area. It changes a little better way. They stand. So if we have a
character over here, and this is the spine and
more design the hips, maybe just more from the
site of this character. Let's find the hips over here and we'll have the
stomach over here. In this wide shoulders
are more narrow. And we'll have the chest area here just signified
with another sphere. What else do we have? Let's connect the legs. Just draw another
curve for the legs. And here, another curve
for this leg as well. And we have the chest
area being here, and we have the head here. And here it is about
character design. How big do you want
the hair to be? And they have the same a
need to support themselves, but they carry maybe
an extra weight while they're also
very small grannies. That's for sure. But just let's give you
this exercise where she is carrying on extra weight and it comes also
from the chest. So if this is the spine and
these are the chest here, and there is a line going also around this shape that
describes the stomach, the middle of the chest. And we can design our breaths on both sides and
they're also sagging. And so everything is
squashed in the middle. And maybe she is
awesome because the, the female muscles are weaker. They have less muscles
to start with. From the male character, maybe she is also
holding her back. So design an arms are one
part here, one part here. And the hand is over here. Does design another sphere. And she's looking forward and she's also supporting
herself with a cane. So does design the other
arm on the back with a curvy line and have her also support herself
with the cane. And here, let's draw
another one sausage here. One sausage here. Same thing here to do find
out where her legs are and a half of a sphere and a half of a sphere
here for the feet. And basically we have a
female character that has more weight around
the waist and the hips. That's where female Jane, mostly weight which is enhanced when we want people grow older. So let's go ahead and
design this character. And I'm going to do that
in the next lecture. I'll see you there.
53. An Old Lady - Refining: Welcome back. Let's go ahead and design
this character. Now. The female characters that have gentler features and
they have smaller noses and they have more open phases and gentler eyebrows, mouth. And let's design
even a happy granny. So I'm just going to
keep it very simple. And just draw a nose as a
sphere and eyebrows as lines. And we're going to have
the eyes just like a line because the flesh
on top of the eyes, the eye logs are also losing elasticity and they fall
on top of our eyes, giving us this kind
of just squinted. I look solos design her
ear approximately here. And how do we want this
graph to look like? Maybe she's going
to have a scarf. And let's draw that
on top of her face, on top of those features
because there is a hair under underneath and the
cloth that will give them extra proportions. And let's just end this
curve here with the button, the sphere that will
symbolize the not. So we're not going to see her
years of just draw over it. You'll see how easy that
is without any fear, just doodle out things. And let's draw a
triangle shape here and another one here just
to signify that there is not going to continue
this scarf that is just continuing on her back. And that's basically it. So let's draw her hand. It is a gentler hand. Even if we drew so big sphere, we can change it because we decided to draw a gentler head. So we just minimize
this sphere and we draw up thumb over here. We'll see the hand from this
side where the thumb is, and we'll see two fingers
maybe, and a cane. Maybe the gain has
this features. So she's holding herself, she is balancing on
the cane while she has the other arm the
other hand on her ties. Let's draw her arms. So just draw a sphere. Just drawn an ellipse here. And an ellipse on top. Sausage, sausage,
as we talked about. These are the wide
the arms are and maybe the sleeve of a dress. And let's draw here
just these lines to signify where the fingers
are on this sphere. And then here is the thumb. And that's very easy to
see where the fingers are. So let's draw maybe
also the fingers on top of this lines now
that we know their position. And you can just draw
them as sausages. As if you draw sausages. Maybe I should have had the lecture in the beginning
how to draw a sausage. Yeah. So she's going to have a dress or skirt and we
know where her legs are. Just connect these two
sausages to describe her legs. This too as well with a line and maybe extend this one to have the same thickness as this one. Here you have to
start eyeballing things so that they
look proportionate. That's why one stage is just discovering the skeleton and how the poacher is,
how the bodies. The next pose is designing the character plus figuring out the proportions of
each element and that they match
against each other. So she will have a skirt. Awesome. The proportions of the older
people shrink a little bit. So their legs there. Everything we shrink a little
bit when we get older. And this is also a
part of the lost of tissue in the muscles
and the, and the bones. So this is something that
is happening and you have to think about it when
you draw your character. And now we'll have, we have basically
everything we need to start drawing or
Garter. You see how Step-by-step, you kind
of get your character coming forward and you
don't need to rush, you don't need to stress. You just have to get
comfortable with the process. There is no rush. You have enough
time to get better and we're going to continue
learning as we go along. So we'll have her
eyes being rather squint that will
have the eyebrows. And we're not going to draw
too many wrinkles because a cartoon character has less
details, it's more stylized. And if we don't need to draw just a granny as
wrinkly as she is. Maybe we can have some two
wrinkles around the mouth, like on this guy. And that is basically
all you need to age her a little bit more and
less design her hair. So some grants that have
the hair in the middle. So we'll use this line here to find the middle of her hair. And from that point on, you draw a triangular. And that is where
the scarf is coming. So same thing on the other side, but this time the
hair is much smaller as four because we have
this perspective change and we can have some lines here
to signify that her hair is type in a note at
the back of her head. And just round out the features. For this granny. This is a simple
design for you so you can follow along
and get nice results. And I hope you are
enjoying the process. And again, I'm giving
you both the structure of a character and the
features of the character. Because it is nice to have the guidance when
you have the structure, how do you find your character? And each character
is a new challenge. And that's how it's going to be. And even though I have
done this for a long time, each character is at Discovery. Don't think that every time
I start a new character, I know exactly how
it's going to end. I'm willing to discover
each new character. But with this passage in
hand, with these rules, when you know how to create
your character design, when you are free to
experiment your designs. Welcome alone. Now I'm going to do the dress. She is really hunched forward and trying to carry the
weight of the upper part, the breasts and this weight
here around the stomach. So let's design her
arms, her hands. Now, we're just
outlining whatever we drew with and blue pencil. As usual. You can find examples from your own life of how
to design a granny. Yes, we all have a nice feelings about granny is
because they are, they feel like home. You like you have this
impression as the child being loved by your grandmother
and they feel like home, like you coming home and you
are loved and taken care of. So this is what my
design conveys. And you are probably having a different clothing and different image that
you're going to put into your drawing
and just design the character the way you felt
about your grand parents. So, yes, so when
people get older, they become very they become
very loving to the families. You understand the
importance of family and. You get closer and
closer to your family. So I'm going to design the skirt and it follows
this volume here. The sphere that we
do, that we did, but also it falls down because
it is a softer material, so it doesn't go up like that. Unless you want your granny to be dressed with some kind of a different kind of costume
that has a thicker material, maybe to do some wrinkles. So this material goes on top of the body and at the point where the material meets
the highest point of this volume
here of the flesh, it starts falling down instead. And now that I know
where the stomach is, when the hips are, where the legs are, the upper and the lower legs. I can much easier discover and draw just the lower legs because I know that
the knee is over here. And I don't need to
guess it anymore. I can just enjoy the process of design, designing anything, and just giving some patterns
might be she'll have dress, maybe she'll have just this. Yeah. I don't know what this is
called when you are cooking. And my grandma had that. She was always cooking and
she always wanted us to eat. That's what grand grandma's
feel like they have to do. Yes. So this is an old fashioned,
old-fashioned grandma. That's what I'm designing, an archetype of what an
old fashioned grandma is. The grandmas after day will
definitely be different, or there are a lot of
different grandmas and there other people
that keep in shape and they actually don't
get this poster as much as anything else. We interact with our
world, with the gravity, with the nature of the living creatures
living being me and a bunch of hormones and flesh and everything that needs to be maintained the way you maintain maybe a car or
your bike or your home. If you just left and
left your home outwards, it was going to start to decay and things will
start falling apart, is the same way with our bodies. If we don't maintain oral muscles intact and
train and actually impose some other strand
because our muscles are meant to be used, then they're going to
give away to the gravity, will start shrinking
and losing tunnels. Go to the gym. Who am I to say? This is
just a drawing lesson, so don't take it too seriously. I'm just explaining why the old people and the
characters that we draw now have different posture. So that's basically it. Let's give it some ground here. And this is a nice
exercise for you to do to draw older characters. So you also have that
in your mantle library. So whenever you
need to do why you do the things you do when
you design your characters. I hope you had fun. You enjoyed this lecture. So goodbye for now.
54. A simple Bunny character: Hello there and welcome back. So now you have been talking
about humanoid characters, which has pretty much
human proportions. But you'll say, what about characters that have completely
different proportions? That e.g. have the body
and the head in one. And you have really
short legs or I mean, all kinds of crazy
proportions which you can do in cartoony characters. So this section is about that. So let's start with designing such a character that has a really strange proportions,
very simple character. So simplify them even more. They don't have body parts in the way that the human half. So let's have a bowl
and really launch legs and see who
is this character? Long legs maybe has
very small feet. Everything is just
disproportional and it has maybe such arms as well. So just draw lines for the arms. And here we have, if we have one arm here, we'll have to find the volume of the character
on the other side, even though this character
is just one sphere, it has a volume. And let's find the middle
line for this character. So this one is basically
the line of the shoulders. And now let's see how big
the face is going to be. Because this is going to be
a body and a face in one. Maybe it's going to be some
kind of super crazy bunnies. So let's just draw
the nose over here. Maybe can be just around now. So you decide that Let's draw this very, very simple eyes. Like half of a sphere is maybe you can have
the round eyes. You can choose how to
have your eyes here. And let's draw this really, really big mouth that stretches
all over the character. A smiling mouth. It has nothing to do with
the proportions with it. It's just crazy character. And let's have some funny
teeth here for the bunny. Maybe frontier really big
and some other team members. Very, very funny character. And let's have some ears. Just being on top of the
head of funny character. Bonnie, very easy. We'll have some arms. So what do we do? Let's design this character
with the black pencil. It is very easy. Do so I'm just keeping even this little
thing that the nulls. I'm not going to have made
any anatomical things, anatomical features
of the bunny. Yes, you are so much more free. One your design
reactors for cartoon, because you can
experiment a lot. You can be, you can do
any kind of characters, just go crazy with
your imagination. And so these characters, that he just a head and
a body in one goal. And that's it basically
as smiling bunny. And it has a large legs
which Bunnies don't have. It has none of the features of the
band except that it has some teeth and some ears that signify that
this is a bunny. And if you were unsecure with drawing
humanoid characters, just draw such simple, simple characters and give yourself permission to go wild. And because you are
living with this concept, that character's needs to look
exactly like the original. And they don't have to be. Depends on what
intention do you have. So let's draw just stick
figure for this funny. It doesn't have any
other lecture cells. Very simple stick figure. And we'll have the arms, maybe also as a stick figure. So we'll just have a
palm that is black and just design just a
stick figure of the arms. And we'll have the thumb here. Very simple. You can decide if you want, then maybe do some hair
on the bunny just to make it look fluffy and you
draw the other arm. So what proportions
do we have here that the proportions
that we talked about. One thing is that if
you find the knee of the bunny is going
to be around here. So this part of the leg equals this part
again with the elbow. This part of the arm
equals this part. The rest of the
bunny has nothing to do with the proportions
that we talked about. Has now had, it has the spine
is together with the body. And basically that's just
really funny character. It can be, it can design similar character for
any kind of care. That can be maybe a B or
either no, even cats, whatever you want it to be, you can just add features
to this character that applies to those characters. So I'm just going
to add some hair to make it fluffy. And that's it. I mean, it's that kind
of character design, that which one do we do when you have such a character design? And how do they perform
different tasks. But now, let's do some other character
design and explore that. First, how we can split
the proportions before we go into breaking down and have a pulse
with this character. I'm going to do that
in the next lecture. I'll see you there.
55. A simple Cat character: Hello there and welcome back. Now, let's go ahead and design another character here that
is very unconventional. It doesn't have any phase. So now let's just draw a
huge chunk of something. So just a round shape. And you see that
my hand is going freely on top of the paper. I don't push. I'm trying to do that
with many lines. So when you do that
with a blue pencil, your brain is giving
you permission to draw many lines and it's telling
you that it's not final. Because if you draw
with black pencil, we usually associate that
with finished drawings. And we become much more
careful of what we're drawing and we don't give
yourself permission to explore. We want to have the
drawing done and to look good from the get-go. That's seldom happens even for a train character
designers and artists that seldom happens
there do a couple of drawings usually and try to find the shape before the shore. I've what they are drawing and I know that from
experience obviously. So again, you're drawing
this character and three-quarters will find the middle line of
this character. But it's just a big blob
with a middle line. What else do we have? We will have a face
and a body in one. We'll have maybe this time, I'll little sneaky cats. So we'll have the nose
and the mouth over here. So let's draw the eyes. And you can just draw a line if it is helpful
because it's not going to be a straight line
but around line to describe, um, this, this volume of the cats on both
sides of this line. Just considering
this middle line and considering that
the distance from the eye to the middle is bigger because it
is closer to us. The distance from the middle
line to this slightly smaller because there is a
slight perspective going on, but not as much. Because the character is kind
of like looking towards us. And this is just slightly
smaller than this one. And just round them up. See how this looks bigger
and how this looks smaller. Will have a character being slightly cross ICT
because cross eyed characters look like
kids and they look cute so the character
doesn't look cross-eyed, but it just looks cute. So we'll have announced over
here on top of this line and we kind of tried to have
the nodes in the middle. We will think of this
middle line and just design a line that will split
those chicks into. And we will run the app. Maybe we'll have a mouth here. And the lower part, and we'll have the ears. The cat, maybe just small ear. So we'll have this big
cat was small ears. Now, what else we can do that is unconventional and the opposite that we did for
the other designs. Let's have this cat having
really, really small pulse, just black dots, black
lines basically. And it has the pulse in this, the pulse, the arms in this way, so the way the cats having it, and let's have polls that
are very, very tiny here. It has nothing to do
with the proportions. What else can we have? Let's have a tail over here. So jealous design, a curvy line going on
the back of the cat, but we don't see
where it is going. So we'll just wanted to have
a nice silhouette to give as many elements of
a cat as possible. And maybe we'll
have whiskers here. Something like that. That's
basically it, our design. Now, let's clean it up
with the black pencil. You can also have a cat
having this kind of eyes. Why not incur term Inca tuning? Everything is possible. There is no new rule that you
have to follow character, have to look this
way or this way. You can experiment. That is where your
originality lies. That you can take what you
know and you can break it down and experiment to
find your own design. And we are all in a way. Affected by the
characters that we have, like the films
that we have seen. And that is true for me. And that's true for
everyone really. So how do you do your character designs will be affected by the
films you like, the films you have seen. But we, as artists, we are going to have to
experiment with that. And also we are going
to try to break those rules to design
something new. Or personality lies. Who, who are you as a designer and what's
your personality? Maybe you break it down in
a different way and expand this idea of
different proportions and design your own characters. But the idea of motion, we, humans are always
performing certain tasks, certain way we are limited to our bodies and our
body mechanics. So figure drawing is very
essential for you to know how, no matter what
character you draw, how the body is performing certain tasks according
to the human motion. Because cartoony
characters are humanized, made-up characters that can be anything but they
have human features. So I'm just going to draw this little pause and
then just black dots. That's basically all you need. This character has no hat, is just a big blob. So we are going to explore
data later on and see how this character is
performing different tasks. And we will have
the whiskers here. And we'll have the
tail, fluffy tail. It's kind of a cute
cat character. Very different design
for that of the bunny. You'll see that the bunny has long legs like stick figure
and nothing applies. The bunny kind of legs. It's nothing that is
similar with this bunny. It's a made-up character. So it's good for you to train with that as well and
see the difference so that you don't think that only humanoid characters
are possible in cartooning? No, that's not true. So I'm going to free here by drawing completely
crazy characters. So the fluffy cat with just one body and a face
and a tail is done. Let's see what else
can we do over here? I will do that in
the next lecture. See you there.
56. A simple Dog character: Hi there and welcome
back to another lecture of how to draw unconventional
cartoon characters. Now, let's design a very
strong character here. So let's design a
big blob again, but we'll have the upper part of the body being a
strong character. And so we'll have
maybe a dog character. So let's just have this
fear that is larger on the upper part and
smaller on the lower part. So what else can we do to
make this jog or working? Let's find the middle line. And let's design the nose of the dog being higher up here. So just another sphere to find where the
nodes of this dog, yes, and this time let's make
large nose and small mouth. So maybe the nodes
will be over here. I'll signify that. And what else can we do? We can have this dog and
maybe just his eyes closed, just like dots like that. And what else do we do? We'll have the ears being
over here. Why not? We can experiment with
that and just try to find where the ears are
and maybe just play around a little bit
where the ears should be. And let's have the dog's mouth. Go on this line here. I'm being all the way down here. You see how you can
play with the features. And now this dog has this
volume here of the nodes with the proportions and down
here with the mouth. What else can we do? Let's have a really,
really tiny bodies. So on top of that, following this line, we have
very, very small trousers. And what else do we do? We have very, very tiny legs. But you see when I do the legs, I assume that this part of
the leg is equal, this spot, so the knees are
approximately here, so we keep those proportions even if the legs are very tiny. What else can we go crazy with? Let's do the arms, Let's do super huge arms. Some kind of bodybuilding dog, just designed to sphere two spheres or ellipses,
almost endless. Decide that here are going to be the shoulders because
this dog has no body. And you can have
the body being as well over here like that. I'm just going to draw a small
body and these large head. This is also possible. Everything is possible. And now I can draw hands like that and
easily ignore them. Because if I put the hands
of the arms over here, that's going to be the default for my
character later on, cos, I'm going to enhance
that with black lines. So now this is
just a test thing. And now I'm going to do the elbows of the
dog being over here. So even though this part of the arm is going
to look bigger, the elbow and the dog is going to be in equal parts
from this one to this one. It's just that the thickness of the arm suggests
that this part of the door of the arm of the dog is much larger
than this part, but there is symmetry. There is a connection to where the elbows
are. So that's it. Let's, let's refine the dog with the black pencil and see how
the dog will come to life. And I'm just going to
finish up this blob here, the sphere in small triangle and connected with the
upper part just to make the nose of the dog looking more of triangular,
triangular shape. And I'm going to leave
this white glands here. The nose of the dog looks
as if it is wet and it has this smooth material
or texture to it. I'm going to draw some dots too. Make this dog, this character
look more like the dog. So I'm taking a random shape, I decide what kind of
character I want to do. Then I'm taking up features that such character or
animal has in real life. I'm going to do the
mouth here and I'm going to extend this line all the way down and to draw
the mouth of this character. And it got us going to
have just like that. And let's draw those
features designed. The ears of the dog and a knee or maybe
I'm just going to do a smaller ear here and
extend this shape. It is a stylized character of that gives you
the idea of the dog. It has nothing to do with
what a real dog looks like. But it's still you say, well, this is a dog. So you kind of
like my big hands, like a really maybe a watchdog and you have very small hands. So what else did we
say about having something appearing big
is make something else, in comparison, look small. So I've just put one arm
of the dog behind and one from dad been thinking
maybe giving it some clothing. But let's not do that
for this character. And now I'm just going to draw the legs here with very
tiny legs, just black. And that's basically it. It's a nice fun in
character or a dog. So let's see how
these characters will behave when they perform
different tasks. I'm going to start out
in the next lecture. I'll see you there.
57. The Bunny in a sitting pose: Hello there. So now that we have this
tree, weird characters, let me go and tell
you how can you think of these characters
as construction? So you can put them in the movements that
we already drew. So let's take this bunny, e.g. and let's have a chair
for this bunny to sit on. So I'm going to just
draw a normal chair from the side as on
the other characters. So what do we have
specific for this bunny? So first we have the
roundness of the bunny. And to see where his hips are, how would he sit comfortably? E.g. we'll have the sphere
over here sitting on a chair. And we'll know that
he doesn't have a head and his legs are
attached to the body. He also has long legs. So one thing that we have to think about it now
is that the whole, all this fear needs to sit
comfortably on the chair. So you can't have
the back only here. If this is a round creature, maybe you want it to
be flat at the site. That's also fine, but I assume
that this bunny is round. So I'm going to assume that
his hips are over here. So the legs are starting. From this point on. I will approximately measure
from my main character, what, how do the legs
applied to the body? So maybe this leg is maybe coming up to here so
you can measure it like that. So this leg is big and it comes to maybe his
nose approximately here. So I can measure it in this way. So this leg should come
approximately to this side. And I'm going to
apply it and think about perspective
change as well. And he has another, the other leg that is
equal to this one. So this is given and
now we can make him sit with his 1 ft
is on the chair. He has very small fit. We can have the other
leg may be placed on the floor because it's
going from the other side down and he has such a long
legs that it can actually they can actually be placed even on the floor If we assume
that that is the floor. And we'll have the foot a
little bit around that. And the bunny has his
arms approximately here. So if we assume this is the where the shoulders are of this bunny and
this place is the head. So let's draw the arms that will be
approximately that big. So you also can
measure the arms. How big are the arms? According to the body? Maybe they apply approximately
almost to the whole body. So you have to consider
that this arm is bent. So you measure arm that is approximately as
big as this distance here. So he's going to have his arms, maybe on one leg, and maybe he's going to have the other arm on the other leg here
from the other side. So we assume that if this
body is see-through, this other part of the body, the other shoulder
is going to be approximately on the other side. And this arm is continuing over here and maybe a
little bit stretched. We don't know how he's holding
the arm on the other side. So now we have to draw the face. And we saw that the, the arm here, the shoulder is starting a little bit
lower from the nose. So we'll say the
nose is done here. Just a little distance here. We'll draw the nose
and the mouth is now drawn from a
perspective from the side. So we'll say the mouth
is coming up to here. We haven't
investigated this Mao, how big this mouth is. And we haven't investigated how the bunny looks
like from the side. So here is a little bit of
scope for interpretation. And the bunny has one
tooth and the thief. We are going to be a little bit. In perspective. And we'll have the bunnies eyes like that and the
other eye in this way. And we will have the
bunnies eyebrows and we'll have one
ear over here, so you just draw it as
an ellipse a little bit, and the other ear will be on
the other side of the bunny. And now I'm going on
top of this drawing. That's alright. I'm basically, that is how this bunny is going
to be seated. So I'm going to
draw character with the black pencil to discover that everything is
on the right spot. And also investigate how
this money can be seated. This is basically the
thinking process for you to add to the knowledge of
the characters anatomy. Pose the pose as
human characters. Human anatomy. And this here is a
character that is very much simpler and
has a different anatomy. But it has to look
like human as well, or applied to human principles. Because the cartoony
characters are really just characters that
they are applied humans, human features to them. That's how we feel
with their emotions. We humanize them and we
think that they are like us. So we are going to have the
other year on the other side. And let's draw the the rest
of the body and just now draw one arm just placed comfortably on the leg that is
lint on the chair. So we'll have the leg here and we'll have this part
of the leg over here. We'll have the little foot will have the hand
comfortably placed. Just as a black line, really. This is, this is
okay. It's allowed. You see how simple
it is just to make any character using
these principles, these proportions
that I've given you and even other
kinds of characters. And you just think
where, where is. Now that I have
drawn that leg down, so I have to
accommodate for that. So I'm just going to
ignore this arm here and stretch this arm
longer down here. How easy it is to really accomplish some changes
in your character and you just position that the
leg here can be stretched the other leg on the other side and maybe add
some small fingers in black. Draw this character. And that is how this bunny can
be seated. You can design. You can also have his
mouth being darker. And how do you want
this mouth to look? Do you want it to be Flats? Do you want to have some perspective and add
some more volume here? This is also a part of
for interpretation. And I'm going to
maybe around up his, his eyebrows here and just add some fluffiness to
the seat that bunny just to make it look like this other bonding as if
it's the same character. So basically that's, that's
it for this character. And you saw how, how the thinking processes. You see that I have drawn all the lines just to
discover where the other, the other armies, just to make sure the
construction is right. And now that you have
the black lines, you don't really see
the blue lines, right? You're now seeing this character and it
looks good to you. But I know where everything is. So I tried to see
the character as a see-through volume to
be able to do that. So let's go ahead and see
what this guy is gonna do. I'm going to do that
in the next lecture. I'll see you there.
58. The Cat pushing a door: So welcome back. I hope you had some refreshment
and now are ready to go ahead and try out a post with this character,
unconventional character. So let's have this
cat pushing a door. And now I'm going to
minimize the cat a lot because I wanted to fit
within this area here. So no matter how big you
draw your characters, they need to have just the proportions are
related to one another. So even if the cost that
this cat is very tiny, the proportions are only related to other
proportions of the body. So let's draw this cat, maybe pushing a door. So how would you have this gas
spiny doesn't have a head, so it doesn't really apply as a character that we did from the
previous lecture. What else do we know here? The arms are really short. So what we need to do is bring the cat as closer to
the door as possible. And the line of action will
be this line of action. And this one is going to
involve the whole body. So we don't have a head and
the head is not going to be tilted and not the cat needs
to push with both arms. So we'll draw the door
as close as possible. And one thing that we talked about that in
cartoony characters, when you have shorter arms or
even if you don't, if you, if you apply force to something, you are allowed to draw the arms slightly larger to make sure that there is a
force applied to it. So we have this arms here
and we can stretch them and move them up as if there is
a flesh coming over here. And we move them up so we
can change the position of the arm and we can establish them that this
character can do that. So if you have a character
that cannot do that, if this is a form, a surface or volume, something maybe, I
don't know, an egg e.g. that can not do that, then you have to
accommodate for that. And then let the
arms will be over here at Delta and the body
will come even closer. So think of the structure
of your character and what are you allowing
this charter to do? Because whatever
you're allowing, your audience will
just buy that. And it's going to be alright for this
character to do that. So it has very short legs. So let's make one leg here. Let's stretch the
other leg all the way over here from
the other side just to show that it is
doing everything he can in its power
to push this pose. And now all these areas just doesn't look
right in the leg, will be so much fathering. But here, you're allowed to cheat a little bit with
the poses for the purpose, to express a movement. And now we'll have maybe
the tail over here. There's going to be
on the same spot. And where do we draw the face? The face is either down here and lean to
really, really down. Or we can have the face higher up and have the
face visible to us, may be linked in one side. So maybe just draw a
middle line over here so we see more of
the cats expression. So we'll have the
nodes of a year. The eyes are really
squinting, so closed eyes. And maybe we'll
draw the eyebrows. And maybe we'll have the
mouth here opened in. Struggle. Dust, the mouth where
the grinding teeth. And here we can have the, the ears just triangular shape and the other year
will be on the other side. So you just have
the year visible a little bit over
here, and that's it. That's all you need to
start drawing this cat, and let's start refining
it with the black pencil. So I just have this arms
and the pulse just pushing. We'll have the simple
around the shape. And you see that I now am
eyeballing the proportions. You can start eyeballing the proportions and
you can try and draw as much as possible by eyeballing your character
and not measuring too much. That's how you will enhance your ability to approximate
the proportions. And it's going to
be easier for you. You're going to instinctively
feel how big things are in comparison
to other things. And you don't have to be hundred
percent on size, really. You can have a slight deviation. I'm from the measurements
of your character. When your character is moving. All these things are
allowed in cartoony drawing because it is an organic
matter and organic character. It should change proportions. I mean, when you stretch, e.g. you become longer, but you don't change the
length of your arms. You just look as if you
are longer than otherwise. So in Cantonese, characters, exaggeration is actually a key. You are allowed to exaggerate
these proportions. So just draw the ears and
the cat is getting really, really funny, trying to push
the door, the door open. And now I've drawn a really large guts
or a very tiny door. Depends on how you
want to see it. So the door is a little
bit in perspective. So I'm going to add some
perspective because we have this other pole
pushing from here. And we'll have this door and the thickness of the door
or something like that. And then we'll have
the tail coming here and just draw
another line close to it, just to draw the other
part of the tail and thickness and that set
just do shade the pattern. So we can have, we
can see that this is this particular cats. And basically that is it. Now you drew the cat. Maybe you can expand the
features later on because it is a little rounder this side. And if you want to investigate
how your cat is moving, you just draw this gas
in different poses. Just having the same thought
process as we have here. And that is how you do, who do things really accommodate for the hips
and the arms and try to figure out how does
apply to human movement. So let's go ahead and have even this crazy
character over here, how that character move? I'm going to do that
in the next lecture. I'll see you there.
59. the Dog throwing a Ball: Hello there and welcome back. Now, let's go ahead
and play with this character and see how this character is doing things. So let's have this character
maybe throwing a ball. So what do we need
to account for? This character has
a very large body. Let's have the line of
action for the body. So you just draw
a line that will imply how the movement
is happening and where the legs are
approximately as big as this character will have this character and
leaned on one side, like the throwing
of the bowl thing. And less design this
character's body approximately on both
sides of this middle line. Just fill it up. If you want to draw maybe first sphere and then
maybe around that up. You can feel how this
is comfortable for you. What else did we know
about the throwing pulse? One arm is preparing to draw. This character has a
really large arms. You have to think about
this character throwing a ball that he needs to
accommodate for this stays here. So maybe he's raising his
arm a little bit higher up and we'll have the ball held with his tiny
hand over here. What else do we know? Well, if we have the shoulders
over here established, Find the shoulders by seeing
here approximately where thickness of this character
are, the arms starting. So we'll say approximately on the curve that starts
downwards approximately here. So I'm just eyeballing it. What else do we know now? For the pose that
the other arm is balancing this pose and
it is on the other side. So it's a little bit
further from us. So it has slight
perspective change, any slightly smaller. So here we have a couple
of elements already there. We have the arms, we have the body. Now, let's accommodate
for this tiny, tiny torso or hips. And they are going
to be approximately at the end of this embody. And let's have the legs in the same pulse as the
ones that we drew for their throwing a ball
pulse and he's maybe having 1 ft down
and the other leg. Like about to Jane
force the same human, human pulse that we
drew for the body. Now, let's think of that. I mean, what does
character be able to carry such a huge body with this
tiny legs while probably not. That's why cartoony
character exaggeration is that you have characters that maybe would not
balanced in real life. But you put a pause on them that is very
similar to human pose. And that's how you create the illusion that there
actually are balancing. So we'll have the, the face being
approximately over here. So I'll draw another
line for the face. And you can turn the face the way you want that
because this is basically a body and the
head and how you turn the face of someone who has his head
attached to the body? Well, you just move the
features around the body. And that's how you can have the illusion that he's
turning the head, but he's actually just
moving the features. And now we'll have the
middle line then of the face because the whole
phase is going down here. So it's going to be
approximately here and you measure how long is this mouth
comparator, this creature. So approximately
measure this distance according to something else, maybe this distance and
you say that, okay, this distance is longer
than the lower distance. Eyeball it approximately here or measure it according
to the arms. You find something to
measure it against. And we'll have the
mouth slightly open, maybe some teeth here. The character is trying hard, and then we'll do the ears. Now, this ear is here in, in this pose and
the other one is rather much more
behind like that. And that's it basically
for our character. Now let's start refining
this character. Drawing the long nose and ears nose now
is looking upwards. So I imagined that these nodes is a larger when we're
looking at it at the front. And we can see more
of this part of the nodes when the body is
tilted in this direction. So that's what I assume. So I account for that in
my drawing of the body. In this perspective, you can play with the proportions
until you find your character, because this is a
made-up character and the rules that
you are giving for this character will be
accepted by your audience, but you have to be
consistent of those rolls. In. Now that I have this flesh of these nodes established
in that way, well, I have to think
that this is how this character is N have
to continue drawing it. In the same way. I can't change in the middle
of design or something. I can draw another
character which has maybe flatness and it's
not as round to now. I'll have one eye here and
maybe have some eyebrow. And do I see the other? I am going to make it so I
can see even the other eye. That's the thing with made-up
cartoony characters or with characters that are less human knew that they
are more crazy. You can cheat more in your
poses and new design. Because for the purpose to
create nice silhouette. So I'm just having
the hand here, grabbing the ball as just a
black shading shaded place. And then I'm just stretching, even stretching this arm, curve the body even more. And then I make it around. And then here are the
small trousers, tiny legs, just taking this position
of this character as the human position and
balancing with the other arm. And now I'm going to do 12
fingers just like small lines. And that's enough
to actually have the illusion that
this guy has fingers. I'm going to thicken this leg
and just have it even more around it so that it picks
up the balance of this body. So I'm going to make the leg even more like he's
balancing on his toes. And I'm just going to shade the ground to give
it more perspective. And you see that
he's almost touching the ground with his
large, large arm. And I'll have to think about it, that it has very tiny body, lower part of the body. And he says very large upper
part of the body and the face is basically just
part of this body. And that's how you can use the same pulses,
the same methods, but accommodate for your
own character design if it's very simple
character design, that's how you can think about it and play around
with the posers. So I hope this was useful. You can take this character designs that we drew
here and try to, and try to apply some
other pulses that we went through in the
other lectures like this. Sitting pulses and have the characters sit
where they are hits, how they are arms
will look like. Just try out
different things with the poses that you
already know how to draw. And that's how you do it. So that's it for now. I hope you enjoyed this class. If you liked it, Just give
me a review and comment. This will help me design
even better courses for you. I hope to see you
back here again.
 Maria Avramova, Illustrator/Animator/Filmmaker