Transcripts
1. Class Trailer: Hi, and welcome to
this course on drawing figurative gesture
poses and anatomy. Here's what you'll be learning. Firstly, we'll explore the
basics of constructing a simple figure using basic shapes like boxes,
cylinders, and spheres. Next, we'll learn
how to draw this manic and figure in
various action poses. You'll discover how
to use gesture and perspective to give the
figure energy and motion. Then we'll build on this
knowledge and add muscles to the poses to make them
look even more realistic. We'll explore different body
parts like the arm, legs, and torso, as well as drawing the anatomy
for the whole figure. By the end of this course, you'll understand
how to construct the figure in various poses, as well as drawing
the basic anatomy. Well, I hope you found
this video helpful, and I'll see you on the inside.
2. Drawing the Manikin Figure: Now that you know the
fundamentals of the figure, it's time to take
one step forward and learn about
gestures and poses. This is important
in figure training because through
gesture and pose, the figure gains
life and becomes an interesting element
in any composition. So that you understand why this part is important to know. Think of the following scenario. You want to draw a swordsman
in his fight stance. Thus, you will want to make him look like he has a steady foot, but also flexible and fluid to indicate that
he can move as well. You absolutely do not want to make him look stiff
or too rigid. I will show you a few examples and guide you for the drawings. But before any of that, we
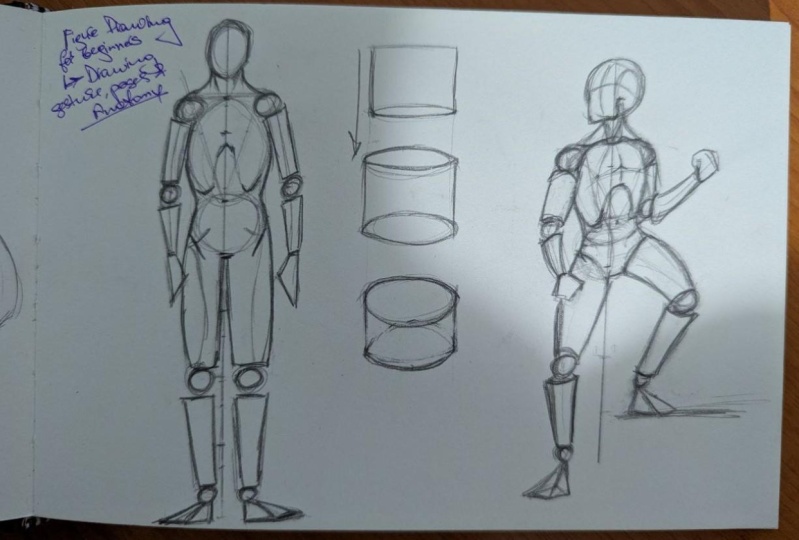
need to build a mannequin. The manikin will be based on the diagram used in
the proportion video. Only this time, we will use freely shapes to
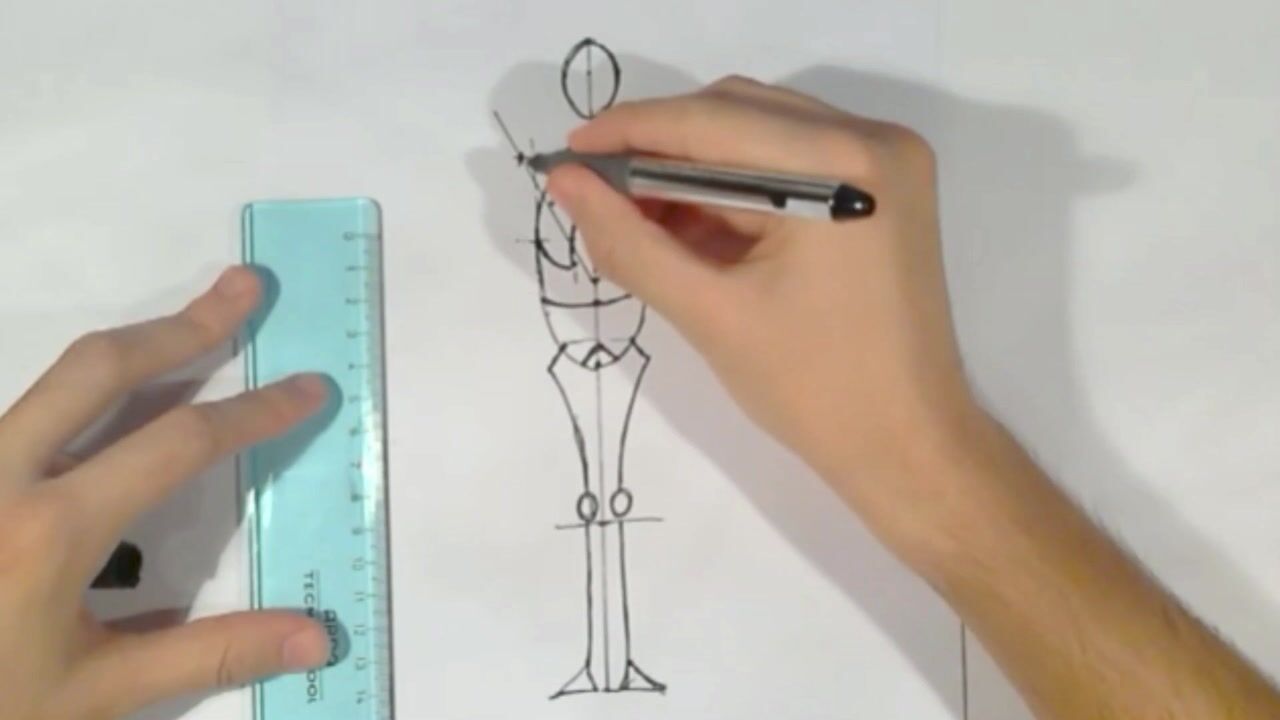
define the figure, namely spheres and cylinders. We are going to start
this diagram with the total height and divide
it into eight equal parts. Now, we have the basic guides that we'll need to
draw the figure. After this, we'll use
free ovals for the head, chest and pelvis. Okay. Now, we have this done. This is our main structure for
drawing the figure in three D. We are always
going to start with the spine. In this case, the spine is a straight vertical
line that is also used as dymmetry axis and the line for the toll
height of the figure. And afterwards, we have the free ovals for the
head chest and pelts. These elements will be the backbone of the
figures from now on. After this, we'll have to find the main joints and articulations that are going
to be drawn with spheres. So let's try to
find the shoulders. So we have there and here. Just going to drag these
lines down as we did with diagram, the
original diagram. Let's draw the shoulders
with these spheres. Now for the volume
of the limbs or the hand the arm in this
case, we'll use cylinders. Okay. Generally, the cylinder from the upper
part of the arm is going to be bigger than the
cylinder for the forearm. Let's to the legs now. Okay. Remember how the
femur looked like. It had a starting point
from here from the pelvis. It went out a bit, and then it curved back in towards the
knees to the interior. So we had it like this. Now, this part of the leg
is going to use a cylinder, but the cylinder is going
to be slightly curved. I'm going to have
that curve right there because of the
construction of the femur. But leaving that aside
and following the figure, we now have to draw the knees. Again, to simple spheres and
the lower part of the leg. Again, to cylinders. To small spheres for the ankles, and we are nearly done. For the feet, I'll use
some simple pyramids. This is the best shape
to close the feet in. And for the hands,
we can either use a rectangular shape like
this or a fist outline. Depending on the case. Since we have this, we can give a little more
definition on the torso. And why not give the
neck some definition? And we are done with this. I'm just going to take this
marker and the outline. Okay. M. It up so you have only
the polished lines, and there we have it. This is going to be the main we're going
to use throughout. I'll use this line to
define the rib cage. And after defining the pelts
and drawing the figure, I'm going to do this to it. I'm going to define
where the legs start and where the
abdomen starts. And this will be our mannequin. Okay.
3. Drawing a Super Hero Pose: I have used cylinders to give the volume
the limbs needed. But remember that the
cylinders are in perspective. Depending on the position of it, we'll ears see more or
less from each cylinder. I'll draw a cylinder in three different situations
so that you can see what's happening
in each case. Here is a normal cylinder in the free four view and below the eye level,
plain and simple. But what happens when we look
at it from the eye level? Something like this will happen. We'll see a straight line on the top surface because we are looking at it exactly
from the edge, and we will see very little
from the lower surface. And we'll have a very
short and wide ellipse. Moving on to the third case, This is when we look
at the cylinder from almost from the top. The ellipses are
now almost circles, and it seems that it's very. This is an effect of
foreshortening. And now, Something like this is going
to happen when we will draw the figure and put
it into perspective. The cylinders are
going to behave like this From eye level, we're going to see
a straight line. And as we look down, the surfaces are
going to show more. That means that the ellipses
are going to become tall. This is also a combined effect of perspective and
foreshortening. This is something
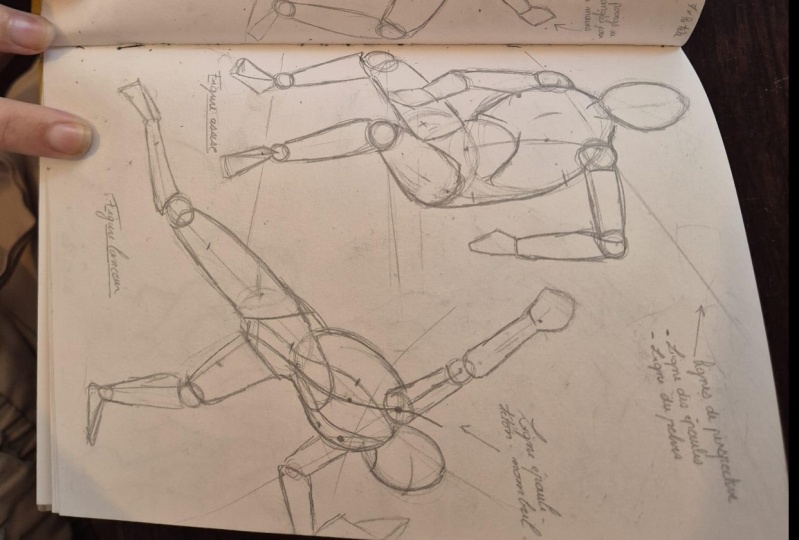
that is going to be encountered with dynamic poses. And some specific static poses. And now, I'm going to show you free figures in three
different poses, a generic superhero pose, a figure sitting in a chair, and a very dynamic pose
of a baseball pitcher. This is the generic
superhero pose. Free quarter view,
slightly in perspective. Eye level is around here. One leg is slightly raised. One hand pointing down, the other is raised from the
elbow, both fists clenched. Despite the fact that
this pose is static, it brings forth some
nice tricks on how to avoid making a doll.
Let's start from the top. The head is rotated
away from the body, and because of perspective, we have the impression that
it is tilted back just a bit. The chest is wide and open like the lungs are
in heading at maximum. This gives us a definition to the pectorals and the abdomen. The pelvis is a bit
rotated towards us because one leg is on an object and lifted
above the ground. The strick with the leg is
to give the overall figure a curve that is more appealing
than a straight line. The center of gravity should
be right below the neck, and if we take a line and
drag it straight down, it will be near the ankle. This will make the
figure look very stable because one leg holds most of the
weight of the body, and the other leg
is almost resting. Lastly, because of
the leg being lifted, the pelvis is tilted sideways. Like this. So to compensate the shoulders are tilted sideways on the opposite. So you see, even if
the figure is static, it does not have to be boring. Now, I'm going to
show you have to draw this figure step by step. First, we have to establish
the height of the finger. Now we can divide the height
into eight equal parts together the right
proportion and have some guides that we
use throughout the figure. The figure will always begin
with the spine and the head. So the spine was curved. So the spine was curved, and it will be
something like this. It's going to have a
diagonal for the neck, and it's going to curve because of the chess
going to make an arch, and then tend to straighten
as it goes towards the pelvis and towards
the lumbar region. Okay. So we'll have that tilt there. The curve, the arch. And where it's getting straight. Let's draw the head. That you do it? Okay. We're going to use
some simple lines to indicate some important
landmarks of the figure. First, there's the
line of the shoulder. This, and then the
line of the pelvis. These two lines will help us when we are going to draw
the chest and the pelvis. Having this done,
let's sketch in the limbs using some
simple lines like these. Now, due to the curve
nature of the spine, the and the pelvis
are going to be. Let's get those in. Okay. Okay. If you want to check and verify the perspective
of one of the elements, you can enclose them in a box. I'm going to do that with the So there is that box I was
telling you about. If the box is in
correct perspective, then that means
the element within the box is incorrect
perspective as well. Now we can finally
build the limbs. We're going to start with
the arms and then dele. Let's find shoulders,
first of all, So if the chest is here, this is the rib cage, then the navel should
be around here, which means that the nipples are going to be here and here. Now we can calculate where
the shoulders will be. And here is the first one, and there is the second one. Now, since this figure is
in three quarter view, we won't see that much
of the arm right here. But we'll see the entire
arm on the other side. So we have the first cylinder? The elbow and the second one. And we have that outline. Okay. All right? Now, let's draw the other arm. Now that the shoulder is there. I don't see much of it, but that's not an
excuse not to draw it. The elbow should be around here. And there we have our cylinder. And the other cylinder
and the elbow. Once I'm done drawing
the for I'm going to erase the lines that
I don't need anymore. I'm going to use the marker to redraw the lines that
I want to be there. Now, let's focus on the legs. Checking to see if
they are right. And I'm using the
initial eight parts to figure out the proportion
to check if it's correct, and I'm using them
as guidelines. I'll have the right there. And here is the first cylinder. That means that here is going
to be the second cylinder. Another sphere for the
ankles and the pyramid. This is going to be the pyramid. We have the triangle. And here will be the
tip of the pyramid. Okay. And for the second leg? Not that I've used the eight
head proportion ratio. The initial height was divided
into eight equal parts, and I'm using that as reference throughout the entire figure
because I'm able to do that. We don't have too much for
shortening happening here. And therefore, all
of the elements are seen at almost full length. Even the leg that is lifted above the ground
is still at full length. So I'm not worrying about
foreshortening in this case. So I made the first cynder the knee and the second one. Note that some cylinders
will overlay one another when the arm is bending or the knee is bending
and you don't have to worry about that because anatomy will solve
those problems. Remember that the human body
is made of soft tissue, flesh, and muscle, and They will fit together
in different positions, so don't worry about that. But at this stage, the
only thing you have to worry about is drawing
the mankin right, even if some parts
overlay each other. The ankle small sphere. And that perm once again. So this should be done. I want to give it some
definition on the side. I'm going to take eraser and erase one we
don't want in there. Some transparencies,
some guidelines, part of the initial sketch, and leave it only
to finish drawing. Okay. Some simple definition
for the neck. Basically, there are two lines connecting the oval
for the head to the point on which the
sphere makes contact to the Let me show you here. So we have this line coming from there and going
to this point where the sphere makes contact with the chest and on the other
side, the same story. I'm going to take this marker and redraw what
we actually need. And there we have it. This is our finished far. Now, let's move on to
the next one. Okay.
4. Drawing a Sitting Pose: This is the figure
sitting in the chair. It's not a dynamic pose, but it's good for
learning, foreshortening. And I really like this pose
due to a variety of reasons. The first reason
would be that it's in the free quarter view and the eye level is around
here, so plain and simple. But because of the fact that the spine is arched and the upper body
is leaning forward, The head is going
to overlay a bit of the chest and the chest is going to overlay a
bit of the pelvis. The second reason would be that we have foreshortening
happening and not. For instance, this femur is oriented towards us and because of that
it is foreshortened, whereas this one is viewed from the side and it
is at full length. And the same thing happens with this forearm and this one. So not only we have foreshortening happening
within the figure, but we also have ways to compare elements at full length and the ones that
are foreshortened. And lastly, the figure isn't just plain
and simply staying. It's interacting with something. It's interacting with
the environment. And it's also interacting
with itself because it's leaning forward and the hand
is resting on the femur. And not only resting, but it's also holding somewhat
of the upper body weight. So without further ado, let's start drawing this figure, and you'll see that it's
not that hard to build. This time we're going to
start by sketching in the spine and the
other main lines. So I want to make the fine, nice and arched lean forward. This should be the
line of the shoulders. And let's just indicate
the position of the arms, and here indicate the
position of the legs. So that should do it. In this case, we don't see the figure as we
did before it does. We could not start
with the total height without sketching in
the main lines first. Now that we have done it, we can start to divide the lines and figure out
the right proportion. So here is where the
pelvis will end. And that means I should have about three units
from here to here, and this should be the
first unit or the head. But since the perspective
is taking place and we have foreshortening because the
torso is leaned forward. We're going to have here
only from here to here, about 123 half units. Is. And from here from the beginning of the femur
to the bottom of the knee, should be about two units and two units from
here to the floor. And here as well, but since port shortening
is making some distortions, we can't really
appreciate the proportion unless we start building
the main shape. So let's start with the head. During have the head. And
now let's build the chest. That should be and the pit Not how these rough shapes
are overlaying each other, slightly, not by much, but they are making
some kind of contact. All right. So we have
these main shapes in. Now, let's build the legs. And we're going to start
with this one because it's at full length and
it's viewed from the side. So we have the knee. And about two units
up to that point. So the sphere for the knee and the cylinder for the femur. Great. Now, we
have to this part. Okay. P another cylinder. A sphere for the ankle and the foot. All right. Now, now that we actually
build more elements, we can start to correct some of the mistakes that
might have came along. Let's try the other leg. Since we have the first leg now, we can make a few
perspective lines. Okay. So here's the knee. And here is the
cylinder for the leg. And there we have the back. And now, the second cynder for the angle There we have it. Uh huh. Pretty simple up to this point. And now, we can build
our arms and we're done. So let's find the n
should be around here, which means that the nipples
so be here and here. Since it's a free D shaped, lines are going to warp roundval when intersecting with the shoulder line will give us the shoulder here and here. You're going to
start with this arm, the one that's going to
be foreshortened the bit. Now, the first cinder is done. We know where the elbow is going to sketching
a sphere there. So let's build the
cylinder that is part. We'll start with
the first ellipse, then the second one
and connect the lines. And that's it.
Now, a rectangular shape for the hand.
And that's it. The same thing happened with the femurx would have
the first ellipse, the second end, connecting
the two extreme points. Now, lastly, the arm
that's resting on the back wrist shoulder elbow. And cylinder. Now, forearm and a simple rectangular shape. Now that the figure is done, I can correct any mistakes
that might have occurred. And I think that the head is a big too big so I'm
going to adjust it. I'm going to make
it bit smaller. It's a bit better now. I'm going to connect
those lines for the neck. And we are and going
to clean it up a bit and show the result. Okay. Okay. And there you have it. Now, we are going to
move to the last figure. And then I got a little
surprise for you. Okay.
5. Drawing a Throwing Pose: This is a baseball pitcher as he is right about
to let go of the ball. I like this one
because it's very dynamic and it's not
very foreshortened. So it's a simple drawing. When you want to make something dynamic, you have two options. You can make an
exaggerated perspective, or you can make
diagonal intersections. This is the second case. As you can see, if we drag a line all the way from
the foot to the neck, we'll have a line that will
intersect with a line going all the way through the arm and shoulders
and the other arm. So let me use this marker and the pencil to
demonstrate that. And here you clearly
see that intersection. Now, if we take these lines
further, we'll get a figure. This is not a complex figure
to draw, as I said before. We only have one hand that
is slightly foreshortened, and the position of
the legs is somewhat different because of the
technique of the frog. The one beneath the body holds all the weight
and is highly tensed. The chest is rotated away from the pelvis and is
orientated forward, which makes the spine rotate, and the head is pulled
back towards the spine. And because of the
position of the legs, the pelvis has a tendency to somewhat be
rotated towards us, but That is not
entirely correct, and I will show you exactly
what's happening here. That's because of the
throwing technique. Now, let's start
accurate drawing it. We're going to start
like last time and sketching all the lines. And we will begin with that primary line. This one right here. And the secondary line that's going to create
that intersection. Okay. This. All right, we have the
main intersection, and the lines that are giving the composition, it's dynamic. From this point, we can start
to add the shoulder line, the pelvis line, and
of course, the spine. We're going to start with
the spine as always. So the head is pulled
towards the spine. And the chest is rotated, which makes pelvis rotate
a little bit as well. To look like something
something like this. We would have here the shoulder line and
here the tevis line. Of course, the
arms and the legs. And the lengths and I should be enough
for a beginning. Now, let's start to draw in the first and most
important elements. The head and pelvis.'s
been with the head. I just want to sketch
them loosely in. So I have an idea of
what's happening. So I'm going to use
some very simple lines. And these lines should
do the job nicely. Now, I can make those parts for proportion based on these lines right here. Since it's a dynamic pose, it's pretty hard to estimate
the right proportion. So that's why I wanted to add
these major shapes first. So I have here the head, which would be one unit. I have about 2.5 so Okay. So almost
the right amounts. From here, I should have about two units to
here, That's correct. And since here I have
some foreshortening, I will have only about
a unit and a half. The pose is rotated, on the opposite side,
which will be there. You have two shorter units to the me there and foreshortening
again on this side, another two shorter units. About that. Okay. The shoulder should be the end of
the pelvis is here. One unit, we have here the naval We should have the nipples here and
somewhere there. If we do lines, we will have here one so
and on the other side, which is not visible, but it's around here, the other. Okay. Okay. And I'm going to have about two units and a bit. And here again, two shorter units because there is a little bit of
for shortening and perspective with this and. Right, so I have
the major shapes and about all the guys that I need to finish
up the figure. Now, let's move on to
defining the chest. The chest is viewed from this eye level here. So there's not much perspective
happening with the chest, but since it's very
rotated and tilted, Something is happening with it. And I'm going to use this to show you exactly
what's happening. Let's start with the pelvis. The pelvis is viewed from
almost free quarter view. So let's say this would be that. Now, rotating that
further from us so we see a little bit more
towards profile view. Here we have the chest. Now, another bit further to profile or side view
entirely is the head. So here we would have the chest. And here should be to tell All right, so you have that. And now let's define
that a little bit. That should pretty
much be enough. So we see a little bit
of underneath the chin. And this line is for the
line of the eyebrows, which is wrapping
around the head. All right. So we have the
main building blocks there. Let's finish it up with the legs and the
arms and clean it up. I'm going to start with this leg because it's almost
at full length. So we have here the knee. And that means the
rest is a cylinder. Just like that. And this part
again, another cylinder. Wanting to rotate the
paper that you can see what's happening and you're having a hard time
drawing certain lines, simply rotate the paper. It's much more easier and it will help you get better lines. All right. We have that
done now for the foot. That should be. Remember that even
though the foot is back and stretch back, this is the top of the foot, the surface right here. Okay. Okay. Okay. And now
let's focus on this one, which is a bit foreshortened. So we have here the first joint. But moving that on
the other side, it would be right behind it, and we will not see it. But we know where
it is and we can measure from there to
the knee two units, and find out where the knee
will be, which will be here. And from there, you can draw the clinder Now, we can draw the other
cylinder as well. The small sphere for the ankle. And we are done with that also. The pyramid and that's it. Now we are almost ready. What is the hands and your
arms, and we're done. Let's start with the hand that is stretched out and
foreshortened a bit. So we have here the shoulder, first of all, very important. And somewhere around half of that distance, we
have the elbow, so we can sketch it in right there and draw the cylinders. First one, and the second one. And the outline of the
hand holding the baseball. And maybe even make
that hand a bit larger than it should be
because of perspective, and it's closer to us
than the other hand. Now, if it is done, let's move on to drawing
the other shoulder, which is on the opposite side, the same story with
the pelvis joints and the socket for the femurs. So it's on the other side. We don't see it, but
we know where it is. So we can draw it should be around here and there
should be the elbow. And this is the second
cylinder for that arm. All right. And here we
have the baseball glove. Okay. And there we have it. I'm going to use the
eraser and clean up a bit. And use the marker to
define the final lines. Okay. Just going to zoom and show you guys some of the details. And this is it. As complex as you
might have at first, it's a simple drawing
once you know how to the figure and work
with the mannequin. Okay.
6. Drawing Figure From Imagination: Here's a homework assignment you can do to practice poses. Best way would be
to draw from life, get a friend or a relative and draw
them like hydro Dmqins. Start with the
lines, divide them, check for proportion,
and add volume. Draw a figure in about
10 minutes or so. The point of a manqin figure is not to spend a
lot of time on one, but to spend a little amount of time and make many of them. Each in a different pose. At this stage, you
need quantity. The more figures you draw, the more comfortable you will be with the
figure in general. Ideally, would be
to get a group of friends and all draw
the same person, but each from somewhere
else so that afterwards, you can compare your drawings to help out each other and
to learn from each other. But if you can't do that, look for pictures or images
on the Internet and books and comic books anywhere and draw the figures you'll
find interesting, but draw them like mannequins. It's very important to not make it passively, make it actively. Think of what you are drawing and why you are
drawing it like that. Like when I said about the
shoulders and the pelvis, detailed oppositely to
compensate each other. So think of what you are doing and not to
copy it blindly. Once you are comfortable
with the mannequin, it's time to start
drawing from imagination. I'm going to draw a figure
right now from imagination, I'll guide you step by
step. All right, so. As before, I'm going to search for some
interesting intersections. So I'm going to
sketch a few lines and see if we can find
a starting point. I think I found something. So just going to try to see
if I'm on the right track. Going to sketch in the head. So a simple sphere. Then chest. And then he So I think this
might actually work. So I'm going to try to
find the shoulder line. Try to try to see how I can give this
shape some definition. So I have the three
main building blocks. And now I'm trying
to find a position for the legs and the arms. And I actually think I've found something. All right. So this will work.
It's at this stage, I'm thinking of tracker
or something like that, some fantasy teamed character. So that's why I want this
figure to be in light. It's searching for some tracks. So that's why he's actually kneeling and has one
hand on the ground. And what to do with
the other hand. This might be an
interesting idea. I'm going to make this character carry a staff a long staff. So we have here a arm
that is foreshortened, a leg that is foreshortened. And the other two
elements are going to be a full length or
almost full length. Right. And I've started from those initial
first couple of lines. I've checked for some
interesting intersections, and I've winded up with this. And it's a good
exercise to start from interesting lines and
see what kind of figure you can get starting
from those lines. But since this is now here,
I'm going to work with it. And I'm going to start
actually with the legs. So I have here. The pelvis, I'm
going to zoom in. So I have here the pelvis
at a free quarter view and the upper body is
leaning forward and the chest is actually
almost facing us. So it's a pretty twisted shape, but we can work with that. So we have here the knee. And here we have
the first cylinder. Okay. Actually, I want to need to be a little
bit above the ground. So it's going to be there here is that first cylinder, right. Now I'm going to build
the second cylinder. Should be around there. And there we have it now. The foot And dad should pretty much do it. All right. Now. One down. Want to go? So I have here Dane. And I have here first
cner's a bit long, I'm going to shorten
it to put it here. So I'm racing first attempt. So I have the knee there. And the first cylinder
here. All right. Since we have a little
bit of perspective here. We're going to have the foot here a bit lower than this one. And the arm is going
to be around here. So we have the
ankle. And the foot. And do we have our length. Now, let's move on to the chest. So the chest is
almost facing us. That means we'll have here. And it will go up
in that direction, which makes the back come
along that line right here. If you remember that
stretch bean shape, I used to build the torso from the side
and free quarter view, it will help you understand
what I just did here. So there we have it. I'm going to draw this arm
for someone sharpened pencil. All right. So the naples
should be around here. The nipples and on there. So if we drag those lines, we will get the shoulders
here and there. Okay. So I drawing the spheres for the
shoulders right now. There go. We have
here the elbow. And here is the first
cylinder of the arm. The elbow. And here is the forearm just overlaying
a bit of the elbow. Then we have the hand.
And there is that staff. No I initially sketched it, but sits near there. All right. So we have that. Of course, we can always
till that a bit to the sides if we're not
happy with its position. So I think I'm actually
going to tilt it. A bit. So it won't overlay this
area right here. Going to raise that
action right now. Now what's left would be
to define the head bit. And now, the remaining form. So I know where the shoulder is. I'm building that sphere. And somewhere half
of this distance should be the elbow right here going to draw
the elbow right now. And we have Okay. Okay. Okay. The first cylinder. And the second one, going to correct
this area a bit. I want to make this a bit longer and this
one shorter put in the po lastly, and right there. Han, are pretty much done. Now, I want to clean
it up a bit and show you the result this fast sketch. So I think it took me about
roughly 10 minutes or so time in which I had to concentrate on explaining
what I was doing. So to make a drawing
like this should take about 10 minutes less
than 10 minutes. Okay. And here it is.
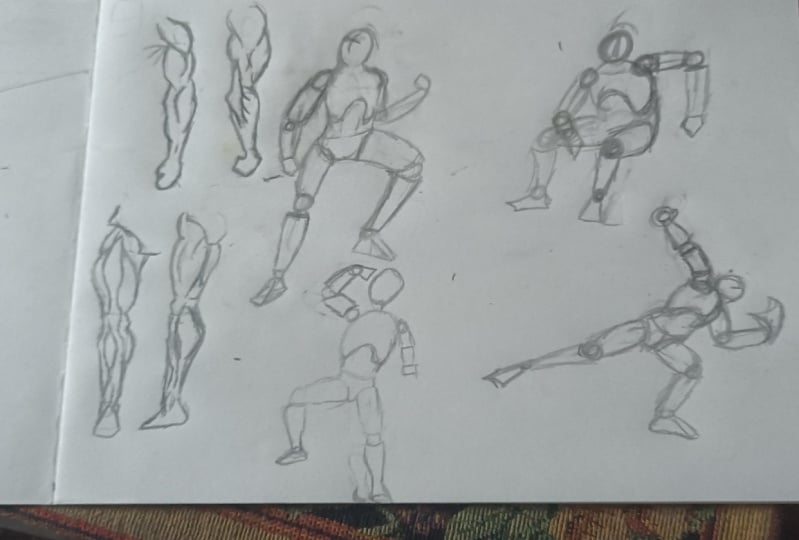
7. Drawing the Torso: Hi. And this video we'll
be covering anatomy. To be exact where
we're going to apply some basic muscles to the maaqin to make it a complete figure. Keep in mind that
this is orientated for beginners to dust. I will use a simplified
style to draw the muscles, and they might be exaggerated in certain situations just so that you can see what's
happening better. For this video, I
will demonstrate how to add muscles correctly to the Makin in stand alone
diagrams of body part, the torso, the back,
the arms and the legs. I will show you how the muscles behave in different positions
of these body parts. And lastly, I will sum up
all the information from this video and give free
Mannequins an atomic definition. To begin with, let's take
a look over the torso. The torso and the back are the only individual parts of the that are symmetric
if divided in half. I will explain to you on one side of the diagram
and draw on the other. The torso is quite
easy to understand. You have the packs
here and they go under the deltoid or the shoulder
muscle around here. This point will be an intersection point
between the deltoid, peck and biceps, and it will help you
draw this entire area. Afterwards, you have three
important muscle groups. The abs, external obliques
and the rib muscles. These three are strongly
related to each other. The abs are actually four
pairs of two muscle groups. And usually the lower ab is not defined as well
as the top three. And therefore, only
the top three are usually visible and they
create the six pack. Next to them, we have
the external obliques. Usually, we have one
oblique for each ab. So we have one, two, three, and four. The lower oblique goes all
the way around the hip, all the way to the back, and it does not intersect with the rib muscles as
do the top obliques. Afterwards, we have
the lat muscle. It's more visible from the back. It's a muscle of the back. But from the front view, we have only this small
portion right here. This muscle stretches all
the way from the lower back, goes over the lower oblique, and then goes all the
way up to the deltoid. Lastly, we would have
here the trapeze, another muscle of
the back that is also visible from
the front view. And next to that, we have
here the muscles of the neck. Just to be complete, here we have a part of the
upper arm, the biceps, and this is just so that
we can draw the deltoid with that intersection
point I was telling you about. Right. Now, I'll show you
how to draw it. We will begin with the deltoid. I'm going to start
the deltoid from this point of the sphere, the shoulder and a third of
the slender around here. I'm going to draw an oval there. Going to have to make it. Okay. All right. And now I'm going to make another oval for the
bicep starting from the top of the cylinder going all the way to the
end of the cylinder. And now I'm going to have two intersection
points here and here. Is going to cleaned up. From this intersection point, I want to drive a line all the way to half of the color bone. The color bone is
going to be here. And half of that
distance is around here. That is the general
shape of my deltoid. Now, from this second
intersection point, I want to start the peck. It's going to go over the bicep bit then down towards the nipple
beneath it, then up again. If you pay close
attention to this side, we also see a small
amount of the triceps. So I'm just going to double the line of the oval to do that. Okay. There. Let's make this line a bit more curved, so it wraps around the bicep
and give it some definition. Now we can make another
small arched line like this. To add some extra definition to the entire construction. All right. Now I'm going to
focus on this area. For the neck muscles. You're just going to start from next to the jaw line here, and you're going to make
a slightly arch line towards the color
bone, like that. Afterwards, for the trapeze, at the chin's height at
this point to about near the near the beginning of that first oval with which
we started the deltoid. It's going to look like this. Before drawing the apps, I want to point out
two important things. The first is that they are
found in the chest cavity. So right here, it's
inside the cavity. And the other thing is that the two top pairs have
a descending line here. All right, would that sets them. Going to use vals to figure out their volume
and skate out their position. All right, this should do it. Okay. What they pay attention to is this
line here and here. They won't go all the way and touch the cavity
just on the top. The top pair makes that arch and touches the cavity or the
sternum to be more exact. Okay. And the other pairs are simply following the
edge of the first pairs. So we have here the end
of the first pair of pbs. And from there, there's this straight vertical line that will limit the other pairs. And the lower ab is a bit
more different than the rest. You see that these
pairs here are made up of individual
groups of muscles. But the lower one can be
considered both a pair and a single individual
muscle because we have here some
tendency of a pair, but the lowest part
of it is actually an entire single muscle. Now, let's tackle the obliques. As I said, there's usually
one oblique for one ab. So we'll start
with the first ab. And we'll use these arch
lines to make the blinks. We have the first blink
for the first ab. Second, and the third. Note how they get
bigger as I progress. And they will end where the test ends here where the
rib cage will end. And here, we will have
the lower oblique, which starts from the point where the ribcage
ends and it goes a bit outward of the
top of the pelvis here. Do we have it.
Here are the rest. Now, I want to draw
the lat muscle, going to start from that same point where
I started the lower oblique and draw a
line all the way to that first intersection
point of the deltoid here. And that I want to give
it a slight curve. And that's it. Now the last part
is the rib muscle. I'm going to take a line from the nipple and drag it down, but slightly diagonally, give it a small angle, and I will have these
intersection points. And now I'm going to
start from the top of the upper line here the line. I'm going to start
from there, make a very arch line like this. Then again down again. That's how you draw it. I'm going to clean up a bit. And this is it. Let's move on to the back.
8. Drawing the Back: As before, we have
the major muscles of the back and a small
part of the upper arm. Here is the deltoid covering the shoulder and the
triceps this time. Next to it is the trapeze, which stretches
over the rib cage to the neck along the spine. Here, we have the lat muscle that stretches all the way from the deltoid to the lower back and next to it
is the lower oblique. What's important from this view is the detail to the deltoid. Now we see the deltoid actually covering more of the triceps and behaving as the part of the pec muscle that was
actually next to the deltoid. And furthermore, we see that the deltoid is actually
made of smaller muscles. So we'll use more
ovals when drawing it. Let's begin. As as before. I'm going to select
those two points, top of the sphere
and firt cylinder. And I'm going to draw the oval. Now, from the top
of the cylinder to the end of the cylinder. I'll have another wall. All right. And we have those
two intersection points. Okay. Here and here. And note that I've made the
oval bit than the cylinder. You can make it as long as the cylinder or a
bit shorter than it because you will see later
on how the trip looks like. Now let's try to
sketch the color bone. It's going to be there. So half of it is going
to be around here. And that should be it normally. But remember that this
is the rear view and we see more of the
deltoid this time. So I'm going to start from here, and make another short
oval from here to here. This is the intersection between that line with the first oval, and this is where the line intersects with the
circle or sphere, which we use to draw the
shoulder of the mannequin. So I'm going to make an oval and you will see
why a bit later. Okay. All right. So there we have it. I want to erase a bit. Right? Now I'm going to continue
from here to cover the trips and this circle. Okay. Remember that when the
circle touches the tricep, you're going to go
over it like this. And from the first intersection, the same thing, you're
going to go over it. You're going to form
this curved shape for the deltoid and double this line a bit more to the interior. So that we give it
that definition. Okay. All right. And now from here the
top of the circle, we're going to connect a line
to this circle like this. Now, this is the general
shape of the deltoid. Now we can make these
smaller inside that shape. To give it that exact
definition there. Yeah, I'm going to draw the
lad and the lower oblique. To find the starting
point of the lat, you're going to
make an like this. And a little more to the
inside of the center of the x would be where the lat
muscle is going to start. And it's going to go
along the root cage. Like that. And the same thing as before, the lowest point of the root cage is where the lower oblique
is going to start. Like that. Now, the lad
is going to go up a bit, make that arch here. It's going to go up an arch, then a vertical line. And from here, we have the So we're going to start from here. We're going to make a line
arch line like this so that it forms this
S shape. Okay. Not that pronounced,
something like this. And within this, we
have three ovals. One, two, and free. Let me darken them out. O two and free. I'm going to seen them out, make a nice transition. And that's how the
trapeze looks like. Now for the last part, the same as we did with
the front view with the torso slightly lower than the a drag that line here. Dalines going to
go a bit inwards. Then we'll have this
part right here. This is the muscle of the neck that's
going to go forward. And there we have it.
Now, I can't clean it up. And this is it. Just to be sure that
everything is correct, if we select the center of those circles for
the shoulders and the middle of the top line of the pelvis or where the pelvis
ends and the spine starts. So here. If we connect
these free points, we'll have that specific
V shape of the back. And the lads should
make a nice curve and transition from the deltoid to the oblique and lower back so that we have that natural v.
9. Drawing the Arm: Now, it's time to
move on to the arm. The arm is pretty
tricky to draw, but once you understand the
basic mechanical function, it should not be a
problem to draw it. I will start with the arm in front view and back
free quarter view. Afterwards, I will explain how it works from a
mechanical point of view. The easiest part of the
arm is the upper arm. Here, we have the deltoid biceps and a small part of the triceps. The forearm is more complex. It has two muscle groups, extensors on the outside here, and flexors on the inside here. These two groups allow the
rotation of the forearm. After that, we have a
number of smaller muscles here and here that allow
the bending of the arm. Here's a quick tip. Think of the muscles of the forearm as if they wrap around the arm up to the biceps in
a spiral motion. It will help you understand the drawing method I will use. We know by now how to
draw the upper arm. What you need to add to that is the fact that the biceps gets stretched as it nears the
sphere, which is the elbow. And that should be in with
the biceps and the deltoid. Now, for the triceps, I'm just going to double the
line of the biceps. Like this. I think to this one out a bit. That And, what's going to happen
with this part? I said that it's going
to be stretched, so it's going to come up
and a tendency to fade in. It's going to be smaller
around this area. Can we just erase that? There. Now, as I said, think of the muscles of the forearm wrapping around
the arm up until the biceps. So we will have a spiral like
motion to these muscles. Go to begin with the first one. This is the stem. And it is going to look like this. Then
we have another one. Then the last one there. Let me just start them out a bit one to four lines. There we go. Now, these two here are extensors and this one allows the
bending of the arm. This one pulls the
entire forearm up together with this
one from here. Okay. Now, for the elbow, it's barely visible
from this angle. You only have a small tip of a bone here, this small bump. And then we have the flexors. That should be the two, this one right here and
the smaller one here. Let me just correct
this part Okay. And this should be it. Of course, I've exaggerated. This entirely is more
of a body builders arm. It's very thick and defined
and the muscle mass is huge. But I've done that
so you can see these individual larger muscles, the more important ones, and to demonstrate
this drawing method. What I like about this drawing
method is that it gives you a certain flexibility in deciding the outcome
of the drawing. You can leave it like this, darken the lines a
bit, clean them up, and erase some of the
construction lines, and you will have
a drawing in which the muscles are very defined
as if the arm is flexed, or you can erase most of them and leave the
outline and a few of the interior intersections and get a arm that is
defined but relaxed.
10. The Arm in 3/4 View: Here is the back free cord view. Note that the hand
is pulled back so you can see how the forearm
behaves in this situation. We'll start with the biceps. This time, it will
be smaller because we won't see much from
it from this angle, then the triceps
and the deltoid. We have here the bones showing, which means that they are not entirely covered with muscle. The elbow is going to
have this angle here. As for the forearm, it's going
to be leaner in this case. Remember that here
is a bone visible. Father said, Let's draw it. For the triceps, I want to start from here
from this point of the circle and go two furs
down the up until here. All right, that should do it. I want to zoom in a bit more and show you what's going
to happen with the elbow. We have a bone here, and that starts
from the middle of the cylinder to that
angle of the elbow. So from here to here. It's a flat surface. We're going to
draw it like this. Then the elbow is going to
have that angle like this. Now, the triceps is
going to cover it. So it's going to
start from here and go like this going
to start from there, go up and down again beneath the deltit And the triceps is actually up two
muscle groups. So I want to make this line
here just to emphasize that. All right, I want to
clean it up a bit. Okay. All right. Now, what's going to
happen to this part? How are we going to
continue to the forearm? SMS before, but we're going to start here from the triceps. We're going to continue
these two lines down up until here, the end of the cylinder and
from there, just the angle. And from here, we're going to make those lines that are
wrapping around the forearm. But because of the
hand is pulled back, these are going to
be a lot leaner, they won't have
that much volume. So we have the first one. Second one and the one, which is going down. Then we'll have this one here and let me just
darken the mouth I'm going to clean it up. Okay. And
11. Drawing the Leg: The legs are fairly easy to
drop once you are familiar with the forearm because they are drawn with
the same method. Let's start from the front view. The knee is going to be the major landmark
in this diagram. Above the knee, we will have
these three large muscles. You see those two are actually behind this
one in the middle. So you see these two
on the outside are behind this one in the middle. And below the knee, we will have the shin
bone that's going to be the second important landmark to one side of the shin bone, we will have some muscles
wrapping around the lower leg. And on the other side, on the inside of the leg,
we will have the calf. Above here, the bridge between the leg and the pelvis
or the hip area, we have a number of
ligaments and small muscles. But those are pretty
complex draw. And at this stage, at the beginning, you don't
need to know all of them. You just need to focus on
the more larger muscles that will make your mannequin look good and be
an atomic correct. So with all that said,
let's start drawing. We'll start from the knee. The knee is going to be
simplified into a diamond shape, and we are going to
place it slightly above the sphere
and going to make it long and thin like that. You can also place it right
on the end of the cylinder. With that done, let's move on
to the large muscles above. I'm going to start from here from the edge of the cylinder, go out and inside again. The same thing on
the other side. Note how the most point is down here on this side and
up here on the other side. If we connect those two points, we'll have a 45 degree
angle at this line here. Now, from the knee, we're going to begin with the muscle that's
on top of these two. Okay. Okay. And that's about it. Just going to darken
these lines now. And now, I'm going
to clean up bit to clean up as well and
show how you can turn that dam shape into something
more realistic. So here was that diamond shape. What you can do is actually
make this small arched line. And that will be the knee right there and another
one there, and that's it. I'm going to do the
same thing above. And I've turned that
diamond into a knee, very simple and very efficient. Now, I'm going to continue
with the shin bone. First, it goes inwards, then it goes outwards,
so then out. And we'll make this slide angle. Now, we have these two
lines right there. They are going to finish
the knee overall. Actually, going to make
them a bit taller. These two lines on the side
of the knee are actually made of tendons and
ligaments, and so on. Because the knee is supporting an immense
weight and all of pressure. So it has not only have to be
strong, but also flexible. After that, they're going
to draw these muscles. Okay. All right. And sally. The count. I don't want to
exaggerate too much with this part because if I make
this one go out too much, then it won't look natural. And here we have the ankles
and we are done. Okay.
12. The Leg in 3/4 View: This is the three quarter
back view of the leg. Behind the back of the knee, we have a group of long muscles, and above that, we
have the glottis maxs. Below the knee are the calf
muscles and Achilles tendon. What is to remember here, especially is that
behind the knee, there is a diamond shaped
space that is empty. It is like this to
allow the knee to bend. At this point, you should
be fairly familiar on how to tackle this drawing. So let's get right into it. I'm going to start
with this shape. And I want it to be here. Even though it's
a diamond shape, it's longer on top
and shorter down. And that should be enough. You're going to position it on the end of the top
cylinder of the leg. Now, can draw these
muscles here. I'm going to use a to
get down the main shape. The same thing with the calf. The next step is to create a smooth transition from here to the knee to the calf to the tendon and to the foot. Remember that the ct
is actually made from two separate muscles put
one next to each other. So we have to suggest
that at least. I'm going to do that. With these two lines, a long line that's going
like this and a short and going up and there we have it. Okay. Now, up here is the same issue. There are two muscles here. I'm going to take this line from the diamond and drag it up and give it a slight curve like this and now I can
darken this line here. Now we can draw the.
From this angle, it's going to be a
small bump like this, slightly above the
middle of the circle. From here, I'm going
to have two lines. Here and here. Then this. These lines are from the muscles that were in the front view
to the outside of the leg. How to finish the upper leg. Let's draw the gloats maximus. This so be the shape of it Okay. Okay. Now, let's
finish this part. We have the heel. But before we actually
draw the ankle, we have to draw the shin bone. Here's visible. Then we have here a
straight line that's going down and we have
here with the ankle. Okay. And that's it. With this last diagram done, we have finished all
the standalone parts of the body. Okay.
13. Drawing the Whole Figure (Heroic Pose): These should be the
stepping stones that you will use when applying muscle to the maquin in order to create a simple
realistic figure. As a last part to this video, I will demonstrate how to use
the information I just gave you and turn free mannequins
into free figures. This figure should
be a combination of the diagrams I
showed you earlier. The torso is slightly
turned and a bit arched. Lastly, one leg is lifted
above the ground and bent. Other than that, you
should be able to draw it without any problems. I'm going to draw over the mannequin and
we'll be zooming in so you can follow me. Thank you. This leg, even
though it is lifted, it has the same anatomy
as any other leg. You see this is the muscle that was on
the inside of the leg. And this is the one
that was above it. And there you have it. There. The knee is bent, and you
can actually draw it using two circles have the first
part here and the lower part. That's all there is to it. And we have the coal here, the other part there. Okay. And that's it. He and ankle and
this leg is done. Okay Okay. Okay. Okay. And there is a
figure from Hanan. Moving on to the next figure. Okay.
14. Drawing the Whole Figure (Sitting Pose): This figure has been dealt
with in the previous section, and you should be
familiar to it. Don't worry about the
effects of foreshortening. The distortion is
not that heavy. Pay attention to the
position of the arm. The arm is held
backwards and lifted, and that makes the
shoulder rotate. And in return, the deltoid
is rotated as well. The knees are bent, and therefore, we can no longer use the diamond
shape to draw them. But you can draw it, in fact, with two circles above, being larger and then
correcting the lines. It's an easy method to tackle
the knee when it's bent. Just don't forget the shamble. A let's draw it. Let's begin with this leg here. I'm going to start
with the knee. I'm going to make that f
circle or oval in this case. And then the other And there is the knee, going to race those
construction lines. And there we have
it nice and easy. Now, let's continue
with the shin bone. Okay. And the camp here. And we are done
with the lower leg. Yeah, for the muscles
of the upper leg. Okay. And that's the. I'm going to try the second leg. I'm going to use the same left. And there is the knee. And that you do. Now,
let's focus on this arm. I draw the color bones. And now I can start to dt Okay. Okay. So there's the biceps. And there's the Peck. And for the trips. Elbow. And for. Okay. I have. Yes almost. I was trying to figure
out the shoulder. And that's it. Now, we are going to move
on to the last figure. Okay.
15. Drawing the Whole Figure (Back View): This figure focuses on the back. Let's take a quick view over it. One hand is very foreshortened, and the other is in a
three quarter angle. Due to perspective and
the position of the legs, one seems larger because
it's closer to us, and the other seems smaller because it's farther
away from us. What is more to that is the fact that the
head is stuck down, which will give the
spine a certain curve, and one shoulder is closer
to us than the other. Which will make Traps behave
accordingly in perspective. This will be and this
will be smaller. This effect is also
enhanced by the fact that this arm is held normally, and this one is pushed forward. This should cover
the explanation. Let's get started on drawing it. Okay. Okay. Okay. Okay. And we are Okay.
16. Constructing the Hand: Hi, and welcome to this
video on drawing the hand. Here's a quick summary of what we are going
to go through. I will begin by showing
you how to draw the hand using very
simple shapes. Afterwards, we will learn how to put details like
fingernails and wrinkles. And finally, we will look into a few hand gestures that will bring forth a few
interesting situations. Before we begin, let's
take a look over the hand. When you're going to draw it, you will simplify it
as much as you can. Therefore, you will
have two components. The primary component,
which consists of the body of the hand and the
fingers and the thumb. Now, let's look into
these components. The body of the hand
has the carpal bones here near the wrist and
then has four metacarpals, here, here, here, and here, they connect from the
wrist to each knuckle. And afterwards, the fingers
have three sets of phalanges. One, two, and three. The foam is a particular
case because it has a metacarpal here that's at a reasonable
distance to this metacarpal. And if we compare it, these two are quite
near each other, whereas this is quite far away. And this gives the fum
wide range of mobility. Moving on, the thumb also has only two phalanges in contrast to the regular
fingers that have three. Now, here are a few quick tips. Remember that the fingers
are with different sizes. The middle finger is the biggest followed by
the index finger, ring finger, and pinky finger. The tip of the pinky
finger will reach half of the ring finger and if we put the thumb next
to the index finger, the tip of the thumb
will reach half of the first phalanx of
the index finger. And lastly, from the tip
of the middle finger to the knuckle and from the knuckle to the wrist
is the same distance. So if we take the
distance from the tip of the middle finger all the way to the wrist and divide it into, we will get here
where the knuckle is. This will help you understand
a few tricks later on. The last thing I
want to show you is related to the overall
mobility of the hand. I've already showed you that the thumb is quite
flexible as it is, but also the pinky finger
can move quite a lot. And this will also help
you later on when you're going to draw a
few hand gestures. With that in mind, let's
move on to drawing the hand viewed in two D and
then in three D. First, I'm going to draw square. And then, draw
another one, Bup it. This one is going to
be for the body of the hand and this one is
going to be for the fingers. Now, I want to make
an arch line from here all the way to here. And I want this part to
be higher than this one. I'm going to start from
here and go just a bit above this line
and go down again. I will have this. Now, on this line, I will have the knuckles, and I want to draw them
by using a circle. Keep in mind the size of each
finger because that will reflect on the circles we're going to use now and later on. All right. Now we can
actually put some lines. I'm going to start with
the middle finger and drag this straight vertical
line up to here. This line will give the finger its direction and going to do the same thing
with the rest, only that the wrist
are a bit arched, and they have a tendency to focus somewhere above
the middle finger. That's why I'm going to take
those lines and drag them up and slightly arched
towards the middle finger. All right, like this. The next step is to divide
each line into three parts. But keep in mind that
those parts become gradually smaller as we
get closer to the tip. So that's one, two,
and three. Okay. Now, how to check
if this is correct? First, we have this
arched line here. Now we can make another
one up here that connects these first marks. Now, another line for these. And lastly, for the
tip of each finger. And they will focus
somewhere here. So this is just a trick to
check if everything is right. But in this case, the fingers
are one next to each other. If they will be
spread out like this, then these lines, of course, are going to look differently, but they still will
have that tendency to converge somewhere
around this area, even though it will
be farther away. All right, but with
this being done, we can now make on each
mark a circle like here, but, of course,
gradually smaller. I'm going to begin with
the middle finger. All right, so this is
how it looks like now. The next step is to
connect these circles with two lines like this. Just slightly, slightly inwards. So not directly put
the most outer point, but a bit inwards, a bit. These two lines in Fred
will be a cylinder, and it will represent
the phalange. Now, I'm going to do
the same thing upwards. But as I get to the tip, let me make this bigger. As I get to the tip, I
can't do the same thing because I don't
have another circle to connect the lines to. Instead, I'm going
to use a shape like a cone or if you're
black it more with a bullet. So prefer making it look
like an arrow head, but that's a bit too
extreme for my tastes. So I prefer this rounded shape. Now I'm going to do the
same thing with the rest. All right. Note that there is just a little bit space
between the fingers. Now, this may vary from
one person to another. But there is always some slight space
between each finger. Now we can move on to the
outer part of the hand. And how we are going to do this. We're going to take
this point and make a nice curved line
just next to the circle. And once we reach this point, we're going to go a bit
outward, then inwards again. But how much inwards? We're going to take a
point from the middle of this circle and drag
it down straight down, and it will meet this
part of the first square. And that's where
this line will go. Here we are going to have a part that's going outwards and then down where
the wrist is. This is how look. All right. Now for the thumb, how are we going to
tackle the thumb? We're going to take a
line from the middle of the knuckle of the index
finger and pull it down. And we'll get this point. From here, we are going to make a diagonal
line like this. Let's say about a third, a bit more than a third
up of the first square. So here, we're going
to make a circle. Here is the wrist, and I'm
going to connect a line from here to the outer
part of the circle here. Now, what's going to follow is this going to make two lines. Just going to check if
they're not too long. In this relaxed
position outwards, the tip of the thumb
is going to be somewhere around the knuckle
of the index finger. So here, then I can use these two lines to decide on
the direction of the finger, whereas in this case, I used a single line that I
divided into three parts. And where I have this angle, I'm going to have
another circle. Going to connect them? And we're almost done. There is that skin that connects the index
with the thumb. And we are done. Keep in mind that some might have different
proportions for the hand. Some might have the
ring finger bigger than the index or the thumb
position higher or lower, but this is the general rule. Some might have even
a very thick wrist or a very slim wrist or a wrist in which the
bones are very prominent. It all depends on the person. But this is the general
rule and concept on how you're going to approach
the arms from now on.
17. Hand Drawing 1 : This is what we're
going to draw. We can't use a square because it is in three D,
so we'll use a box. The foam is in our way, but we still have to
draw what is behind it. First, we are going
to start with the box together with the arch
line for the knuckles. This should be the box. And this is that
arch for knuckles. Now, let's add them. I want to adjust the size a bit. And there that should work. Now I want to give each
finger its direction. Now I'm going to start with
the pinky and work my way up. Just some simple lines slightly curved because in
this situation, they are slightly curved. Now I can divide them into three parts and
straighten the lines out. All right, due to perspective
and foreshortening, it seems that the pinky is bigger than I
initially told you. But remember that it's in freed. Perspective is taking place and foreshortening is
distorting the image. The hand is pulled
slightly back and the fingers are pulled
also a bit back. But the pinky is
pointing forward, and that's why we
have this angle here. And because of that,
it is closer to us, which means that it is slightly larger than
it should have been. And these are smaller. Combined, they create
this type of effect. All right. Now, if
you want to check, if everything is correct, going to use those lines. And as it seems, everything's
going as it should. All right now, I'm going
to add the rest of the circles and make the
cylinders this time. And that should do it. Now, the cylinders,
and the cones. Why did I said cylinders? Because we are going to do this. We're going to make those
lines where they meet. That's because
afterwards, I want to put in some details to this
drawing like here. By doing those
cylinders like that, I'm actually making
those wrinkles. It is done mostly. Now let's focus on the
outer part of the hand. As I said, we're
going to begin with a curved line, then out, then in again where we
have the wrist here. Drag the line from the middle
of this circle down but parallel to the edge
of the box to here, and this is where the wrist Just going to correct
a few parts here. Now for. As before, going to take that same instance
and drag that line from here this time up and
make that circle here. Keep in mind perspective and foreshortening will cause
all sorts of distortions. Here is the second circle. Use. And that should be pretty much it. No, I want to clean it up. I want to remove as much
the construction as I can. Because now I'm going to
focus on some of the details. On the inside, so this
is the palm here. On the inside of the hand, where the palm is, and here
where the knuckles are, we have this soft tissue with muscles here and especially here,
where the thumb is. And to demonstrate that, I'm going to make
a line like this, starting from the fum. I'm going to make one and
another one above it. And I'm going to draw this line just to give the fum
some detail, articulation. In this particular case, we see only one fingernail, that of the thumb
and have to draw it. Going to select somewhat the middle of this
line just around here and make this
sort of shape. Let me zoom in. Going to
make a straight line, maybe a bit curved, really dark in that area. And as I go up, I'm going to remove some pressure and make
the line brighter. And that's how you
draw in a fingernail. Simple and very efficient. And a few more wrinkles, and we are done with that. The thing is, I like these
circles and cylinder because they do a good job with helping
me drawing the wrinkles. So I know where they are. I know how to draw them. And I know also how to make that soft tissue because of
this type of construction. I'm going to swim out
and show you here. So we have the index,
and we have here the first wrinkle
and some tissue. Again, another wrinkle and some soft tissue again
at that part there, and we are going to continue
towards the middle finger. Go up over that circle. And again, and make
the tip of the finger. And Now, let's make this one. As you can see, because I
already made those cylinders, the wrinkles are
there from the start. I'm just darkening out the lines that I erased
from the construction. Some of the lines for the
palm and we are done. Just finishing the
last wrinkles. And this is pretty much it. And if you really want to
make something complete, especially here on the wrist, you can make these
two lines like this. So one and two. And there good hand. Moving on to the next diagram. In
18. Hand Drawing 2: As you see here, the
hand is in a position from which we don't see
each finger individually. Again, the same situation. We don't see it, but
we have to draw it. We will adapt the technique to build a hand to
suit the situation. And therefore, what we
won't see will only be suggested so we know how
to draw what is visible. I'm going to start from that arch line of the
knuckles this time. Alright, so this
should be as you see. If we were to find it here, it would be something like this, a very short and oblique
line exactly like this one. Now I can actually draw the box. And that should be the box. In order to avoid making too
many construction lines on the drawing and getting a
dirty drawing in the end, I'll only suggest the
position of those lines with some simple dots like that. And I'm going to begin
this time with the fum Can you darken these
out a bit more. And that should do it. Now we have here
the index finger. So there's my index finger. And now for that can that's
connecting these two. And of course, the knuckle
and the body of the hand. The wrist should be
somewhere around this area and we
are almost done. Now, to continue with
the rest of the fingers, I'm going to start from
there and estimate based on the first circle
of the index finger. If the knuckle of the
index finger is here, then the middle finger
should be around here. So that is how it looks like. I'm going to continue
with the ring finger. Ask me the pinkin. Even though I don't see it, I know that I have here a
little part that is showing. I have here that soft
tissue that's going like this and another part of the middle or the ring
finger that visible here. I don't want to complicate
it too much down there. And that should do it. Now, I'm going to clean it
up at the final details, and we're done with
this one also. To add the wrinkles
to the index finger, I'm simply going to follow those cylinders. Like that. And for that soft tissue, I'm going to do these two folds, and for this I'm going
to go from that fold, I'm going to do a
curved line like this. Afterwards, another one
that's following that, but going slightly away. I'm starting from very dark and finishing thin
and right like that. We have that soft
tissue of the fumb here that's creating some
very interesting fold. Just going to make two of them. Then there's the
rest of the hand that's going into the wrist. And even though we
don't see it as much, the thumb has a knuckle
also right here. And how do we suggest that? I'm going to make a
small angle there. Let me in a small
angle like that and then make a very long
curved line like this. I want the darkest part to
be here towards the ending. Like that, and maybe just
small tail in front. Just some nitching
with the pencil. And a bit on the
other side as well. Just some nitching until I get a somewhat of a diamond
shape like this. Just going to erase
it a bit more. But I there that you
do it just nicely. And for the nail, as I said, somewhere around the
middle of this part here. But since it's more visible, now I'm going to make it
a bit wider than before. And that's all there is to it. I'm going to finish
these two fingers. Maybe some wrinkles
over here. I look nice. A few here, here. And there. And that's it. We're
done with this one.
19. Hand Drawing 3: Here is a fist in
free quarter view. As you know, when
you're holding a fist, the fingers are curling into the palm and the
thumb covers them. You might think that you have to draw each finger individually, but that is not correct. You will only complicate
the drawing too much. What you want to do is start with the line
of the knuckle, make that correctly, and then the box of the
body of the hand. Afterwards, you're going to draw only the index finger
and the thumb. The rest of the
fingers, these three, the middle finger, ring finger, and pinky, are going to
be treated as one volume. And how are you
going to do that? After you're going to
construct the index finger, you can figure out how to draw the rest of the fingers
based on the index. That way, you'll have a clean drawing and a correct drawing. The thing with the fist is that it's compact and it's modular. Each finger is doing
the same thing. So if you draw the
index correctly, you'll figure out easily
enough how to draw the rest or only how
to draw their outline. So you avoid all
those cylinders and circles and all the
rest of the headache. And finally, you're
going to have to draw the thumb that's
covering this. So as you see here,
in this case, we'll begin with the arch
line for the nuffle, the box, index, followed by the other three fingers
and the thumb covering it. It's going to be fast and it's going to be simple. Let's begin. And this is it. Now I'm going to clean it
up and I had some details, and most importantly, I'm going to show you how
to draw the knuckle. There are a few foldings here, and that's kind of from the index to the thumb is
stretching quite a lot. I want to make another line there just to suggest
how much it stretches. Okay, now for the knuckle, I'm going to start with a
line over the circle and going towards the second circle with a line short
line like this. Now I want to make something
similar on the other side. But it's going to be a line, a curve, and another
line like that. And that should
pretty much do it. Now, let's make it
a bit more angular. I wanted to have some
strain lines like this. And now I'm going to continue with the rest of the fingers. Yeah. Over the top of the hand, there is a slight
bump like this. It's because of the
bone structure. And now I'm going
to finish it with the wrist going down my cell. And there we have it. Mm.
20. Hand Drawing 4: Here's a fist in
different position. The same rules are
going to apply, so you should be able
to draw it on your own. I'm going to draw it here and you can follow
me as I do it. I'm going to use
the same technique, so it's going to be easy. All right, then
this should be it. Now, here's a little
trick you can pull off. You can darken this area here. Make it dark and
darken these lines. And this one too. Since you have only lines here, this is called line weight. It's when you make a line darker or thicker
than the rest of the lines to suggest that it's darker there or
simply it's heavier. And now moving on to
the last diagram.
21. Hand Drawing 5: This diagram might seem a bit confusing or complicated
or even scary. But in reality,
it's easy to draw. The fingers are
pointing towards us, and therefore they are
heavily foreshortened. We see only a small amount of each cylinder and a small
amount of the palm. But in contrast to that, we see the nice arch that the line of the
knuckles are forming. And it has that continuous flow. We have a nice arch
from here to here, and we see each finger in a different situation
of foreshortening. At this point, you
should be familiar with how to draw the hand
even in this position. So let's begin. I'm going to draw
it here and you can follow me if you are unsure
on how to tackle this. And with this done, we
have finished this video. Drawing the hand can be
complicated at times. It's not enough to
draw a few hands, few hand gestures and expect to be able to draw the
hand without any problems. You need practice. And here's a little assignment
you can do at home without any problems. Draw your own hand, put it in a position and simply
draw it or take a picture of your hand in a
certain position or holding a pen or a
glass or something. If it's interacting with
something with an object, it will be a bit more
difficult to draw, but you will learn much more. Or that or you can
ask a friend to make some hand gestures and
draw that keep it simple. Draw it like this.
It's important to get the main position of the handwrite and
the proportion and the perspective and
foreshortening. And the basics are
the most important. Details come last. You can't add details
if the building blocks, this is not done properly. Don't spend too much time on one hand gesture if
you're going to do that. Spend at least 2 minutes, but a maximum of
five to 7 minutes. Don't draw a hand in 15 minutes or in half
an hour because it's not efficient and it's
counterproductive. If it's wrong, simply
get a clean piece of paper and draw it again
from the beginning. If it has flaws, leave it like that and draw another one until
you get it right. Practice makes perfect.
Remember that.
22. Constructing the Foot: Hi, A Welcome. In this video, we will learn how to draw feet. I will show you a very
simple technique. And since the feet are
similar to the hands, the technique should
be familiar to you, but it has a small twist. The first thing I want to
show you is this diagram. It's a simple figure
put in perspective. The reason for this is to
avoid a very common mistake. When you look at a
figure, this figure, for instance, we see
it from eye level. Our eyes are here and we're looking straight
at the figure. We're going to see the face
and fruh frontal view. But as we increasingly look
down towards the feet, we are going to see the
top surface of the feet. And when you put
that in perspective, this is what we
are going to see. We're going to see this
surface and this surface. Now, most beginners make
a very innocent mistake. They draw the feet view
it from this angle. So they're going to
view the toes in the foreground and then just
a little bit of top surface. But we are interested in the
top surface more because of perspective to
emphasize this effect, we have three squares here. Even though we see a line here, it's actually a square heavily foreshorted
by perspective. And therefore, we
see only a line. And as we gradually look down, we see more of each square. We see more of its surface. The same thing happens with
the feet. They are down. We are looking down. We
see them from above, we see the top of them. Keep in mind that. Of course, perspective
and the position of the figure will affect
how we are going to draw the feet and the entire
figure, of course. To help you with that, you can always draw these perspective lines.
They are going to help you. And you can even drag some lines to give
direction to the feet. For instance, here, I can
drag a line from the heel through the fingertips
and have this line. And the same thing here, I'm going to have this line. And by having that, I will
know how to draw the feed and avoid making that mistake in which I draw them
from this angle. Now let's move on
to drying the foot. We're going to begin with the simplified footprint viewed from the top, so it's in two D. When you're going to
begin drawing the foot, you're always going
to have three points here, here, and here. Now you're going to connect these three points and
create a triangle. This line is going to be slightly arched, as
well as this one. And this line is going
to be heavily arched. And this is your basic shape. You're going to put this
triangle in perspective and always get the right
angle for the foot. The next step is to
build a pyramid from this triangle because the
foot will be drawn in free D. And since this is two D, the pyramid is going to
look somewhat strange, but it's going to make more
sense when we put it in fred. The first thing is figuring
out the tip of the pyramid. Tip of the pyramid
is going to be in the center of the ankle, and we simplify the
ankle with a sphere, which will be here. And therefore, here will
be the tip of the pyramid. Now, let's connect those
three points with the tip. And here we have the pyramid. Now, afterwards, we have to put down three spheres,
one for the heel, and two spheres here. Smaller one here. This is going to be for the
knuckle of the big toe and a bigger one that is in
a different direction. It's slightly rotated. Like this. From the top, it looks
like an ellipse. But in freedi it's
going to be rounded. And it's free also. Alright, and now we have the
main volume for the foot. Note how these lines
go just barely touching or overlapping
our spheres. They don't leave a distance
or they don't go over them, only touching the outline. The next step is the toes. Now, the toes are very
similar to the fingers, but it's pointless to draw
spheres between each cylinder, because the construction, the skeletal construction
is different. So what are we going to do? We are going to drag a line, a arched line like this to establish the
direction of the toes. Now we are going to put down spheres for the tip of the toes. Yout to start with the big toe? And then for smaller spheres, that are gradually smaller and shorter in distance between the center of the
she and the natles. Keep in mind that there
is a small gap between the big toe and the
one next to it. Now, we are going to
have only one cylinder for the big toe, and that's it. We are going to have one
cylinder for each of the following three toes which will be divided
in half each. And the little toe
is going to have only one cylinder,
and that's it. This is the basic
construction for the foot. In free D, you are going to also put lines to establish
the direction of each toe. That isn't always mandatory, but it will help you if the
position of the toes is a bit complicated or if they are curled or bent or
won over each other. Now, with this done
and explained, let's move on to drawing the foot in the
free quarter view.
23. Drawing the Foot (3/4 View): This is what we
are going to draw. Let's take a look over it
and make a quick recap. You are going to start
with the three points, then build the triangle
followed by the pyramid. Then we're going to have to draw the sphere
for the ankle and then one sphere for the heel and two spheres
for the knuckles. Remember that there is a gap between the big toe
and the one next to and remember that trick I told you in the
hand drawing video. But when we don't see each individual finger,
only a small part of it. We're going to apply
that trick here. It's very important
from this angle is a characteristic of the foot. Remember that the edge of
the pyramid is arched, which means we have an
arch here and one here. This arch is called the
medial longitudinal arch, and it comes in three shapes. But this is the
most simple form, and beneath this arch, we have an empty space here. I'm going to add a
bit of value to it. So that's the empty space. And how are we going to
hint that only with lines? We are going to make
this line go over this one so that it
seems that this line, which will outline the heel is coming underneath
somewhere here, which is entirely correct. With that explained,
let's start the drawing. I've put down those
three points, and now I'm going to make the triangle And now, the pyramid. See how arched these
edges are actually. I couldn't show that in two D, but now I can show
you that in freed. And this is the tip
of our pyramid, and it will also be the
center of the ankle. Like that. And now for the heel. I don't want to put the
sphere for the heel too much away from the ankle because
it's pretty close to it. In fact, I want them to
intersect just a bit. All right, just like that. And then I'm going to have those two fingers
for the knuckles. This one and this one. Alright now, I want to
quickly clean this up. To finish the ankle, we are going to have to put
in two smaller spheres, one here, and the other
on the other side. We don't see that, but it
should be around there. Now we have this fire here. This is actually a bone, and we are going to
have to make this line with an angle so that we have that specific
shape of the ankle. There. Now, let's make some
sketches for the toes. We're going to start with
the line for the direction. Alright, so the big toe is going to have this direction,
a straight line. But the following toes are
going to be slightly curled. We're going to have that. And
the other ones are going to have the same thing only that they will be
increasingly shorter. Get rid of that. Now, let's make those spheres have one
here for the big toe, one for the one next
to it, and the rest. Now we have that cylinder
for the big toe. The one next to it.
And the rest are just going to follow
the one next to it. And that should be
pretty much it. Now, let's finish
with this area. I want to make another
arch over this one. And I want to start
it from here. That sphere, the knuckles. I want to start from here
and drag it all the way to the ankle and then go
slightly with the sphere, just a bit and then go up. As for the other side, we have here the
achilles tendon. It's going to look like this. It's going to have a nice curve, and then it's going
to follow the heel. It's going to follow the heel
all the way to this point. Following this is
going to be this area. You want to make this
line on top of this one. To make that, we will
simply start from here from the sphere of the big toe knuckle and
follow it with a nice curve. I want to make it a bit long. Like that, and then
start from here where we have the line of triangle and continue
into the hell. That you do it. If you want, you can straighten
this line a bit. Straighten that. Not much
just a small amount. There. Yeah, for the toes. I'm going to give a little
angle to the big toe. And we are going to have
a line that's following the sphere and then going
up over the cylinder. And then we are going to darken this line of the cylinder
that connects to the sphere and follows this line. There you have it.
Clean it up a bit. I'm going to clean the
rest of them also. As for the toenail, the same with the fingernails. Have a darker e here. And a brighter one
towards the tip. Next, I want to
make a small bump over the intersection of the
sphere and the cylinder and then continue with the cylinder until it meets the sphere
of the knuckle and then maybe make another
small bump like that. I want to clean
this arch to erase it slightly because I want
to show you a nice trick. Here, we have a bone structure. And this is an arch covering the top surface
of the pyramid, so to say. And I want to make this line that's darker here at the
bottom and goes bright upward. So this one. I want to make that
and then I want to make another line that's following that
erased arch to this line. But I just want to make
it about this long. It will give the foot some depth and anatomy landmark that it needs in most cases. And what's left is to draw the rest of the
toes and we are done. Did you do it?
Another small pump there for the last knuckle, and we should be that
another toenail here. The same principle,
the same concept as with any type of nail. And that is it. Go to zoom out and clean
this up a bit here. And we are done. Now let's
move on to the next.
24. Drawing the Foot (Bottom View): This is a view of the
sole of the foot. This will actually simplify
our drawing by quite a lot. We will only have triangle because we won't
see the pyramid. And afterwards, we will
have the free spheres, a small amount of
the ankle here and, of course, the toes. What's important from this view is the position of each toe. Look how the big toe
is standing straight, and gradually next to it, they are curling more. And because of that, we
see more of each toenail. If we were to connect
them with a line, we would have a pretty
interesting line. Going like this. And this is a relatively
relaxed position of the toes. The next thing you would want to pay attention to
are these lines. These lines give the salt some depth, direction,
and definition. And how are these drawn? Well, when you draw
those three spheres, you are basically drawing these
lines from the beginning. We have here a part of the
knuckle of the big toe, and then we have
here the sphere for the knuckles of the
other four toes, this line follows
the heel and goes towards the sphere of the
knuckles, and that's about it. So it's pretty
simple and drawing. Keep in mind this
small gap between the toe and the one next to it, and it should be
done quite easy. The toes are going to
be drawn with spheres. We're going to start
with the spheres and then put the cylinders. What's happening here where we have the cylinder
above the sphere, we're simply going to use a sphere and then
pull it back a bit, so it continues into the
cylinder, and that should be it. Now, let's draw this. There I have my free points. Now, let's connect them. Now let's move on
to the spheres. In this case, I want to start with the
direction for each toe. Thi should be
pretty much it with the sketch and the construction. Let's finish off with the
spheres for the toes. And then the cylinders.
That you do? And there are those lines
I was telling you about. Let me just clean this up
and darken out the outline. See how I'm following
the outline of the heel. It gives me that
nice round shape. And then I'm moving
into this one. I'm following that as well. Going inwards and
connecting with the heel. As for those lines
that give definition, simply following the
spheres that were there and connecting them
with these loose lines. There is this small
part of the ankle that is visible and how to do that. But here's a little trick. We know that the
tip of the pyramid should be around here, that means that the ankle
is on this direction. Generally, there is a
90 degree angle between the direction of the foot and
the direction of the ankle. Let me draw that here. So this is the
direction of the foot, and this is the
direction of the ankle. Here we have that 90 degree. That means the ankle
is going to be here, and I want to make that
small angle to it, and there we have it. Now, for the toes, I'm going to start with the little
toe because as you see, the little toe is overlapping the one next to it and so on. So that's why I want to
start with this one. I'm going to continue from
the line of the knuckles, and I'm going to have this angle there and
continue following the sphere. And that's it now to
add toenail and done. Now the next one a small part of the cylinder
is visible there. And again, a bit of
toenail. The next one. Even less toenail this time. And almost the last one. I want to make this part especially dark because
we have that gap. And for the big toe. I want to continue
this line here just a bit inwards and on the
other side, the same thing. Then continue the cylinder
into the knuckle. And we are done. Just want to clean
it up just a bit. And there, that's it. Out for the next diagram.
25. Drawing the Foot (Bottom 3/4 View): This is a combination between
the two previous drawings. We have here the
sole of the foot. This line differentiates the
sole from the side view. We have here the ankle the achilles tendon and
the toes, of course. Note the direction of the toes. Look at their direction. The big toe is
pointing straight, and they're gradually
more curled downwards. How are you going to
start this drawing? Well, you're going to begin
as always with the triangle, but this time you also
have the pyramid. Keep in mind that
due to the position and angle and the fact that the toes are pulled back somewhat it look
somewhat strange, but the pyramid is going to have the arches here where the
center of the ankle is, and a very small amount of the bottom of the pyramid
is going to be visible. That's it. Let's draw. There we have it. Now
we're going to go over a diagram with the mechanical function
of the heel. It.
26. Drawing the Foot (Tiptoe): This diagram is very
simplified version of the foot from side view. We have here the ankle, the outline of the heel, Achilles tendon, and
the pyramid shape. Now, what's happening when
the foot is extended? So when this pyramid rotates so that the toes are
pointing downwards, a lot of muscles are working
to create this movement. But we are interested in the bones and how they
behave within this movement. Some of them only pivot and some of them slightly
move their position was the heel and the tarsal bones
from here rotate entirely. So they change their
position entirely. That means that this arch
here is going to move here. And the heel or this arch
is going to move here. Now I'm going to slightly
erase the previous lines. And stick only
with the new ones. You see how the tip of
the pyramid changed its position from here to
somewhere around this point. And now we have these
two points here. So what's going to
happen with them? You might think we will connect them with
a straight line, but that's not true. We're going to have an
angle to that line. It's not curved. It's a steep angle. And it will create
something similar to this. Now, the heel is
going to be here. So let's just sketch
that in with this shape. And the achilles tendon
is going to be here. It can be either
relaxed or flexed. Of course, here we are going to have the knuckles for the toes. And it will create a shape
similar to this one. Now, keep in mind
this is exaggerated a bit just to demonstrate
the principle, the mechanical principle
behind the movement. This change in position will
create something that is overlooked in this position when drawing the
foot in most cases. We will have an arch here
and another one here, and only then we will
continue with the shin. So there are actually
two arches here. And why is that? It's because
of the shape of the tibia. It comes down. It has that sort of shape that continues here. Now, here we have the ankle but here we have a
number of smaller bones. And after that, we will have
the metotarsal bones that will continue into the toes. I've exaggerated this by slight. I haven't exaggerated that much, but I'm darkening
these lines so that you can see these two arches. This is a pretty important
trick to know to make these in your drawing because
it will give the foot in this position credibility. It will make it look real, and it will give it a certain
depth and feel to it. And we're done with this. And now let's move on
to the last drawing. Since I just explained
this position of the food, you should be able to draw this on your own without
any help whatsoever. Keep in mind that this is
slightly in free core view, so you're going to have to adjust the spheres and
the triangle accordingly. And another thing
to pay attention to is the position of the toes. Look how the big toe
is straight whilst the other toes are
in this position. They are having a
certain direction. They are straight, then up, then straight again.
Let me see them in. I see they have that position and orientation similar
to a staircase. And the little toe is
almost straight entirely. Wow, further ado. Let's
start the drawing. And do we have? I hope you enjoyed
watching this video, and here is a small assignment I can give you to practice
drawing feet on your own. As with the hands, ask a friend, a relative or a parent
to pose for you. But if they don't
have enough time, then take pictures of their
feet in different positions with different gestures with the toes and
different positions, curling, bending, one
sitting over another, so on. And the best advice
I can give you towards that is don't be afraid to draw angles or positions which you are
not comfortable with. Don't be afraid to draw them
because that's how you can master them and be
comfortable with them by drawing them and
tackling them head on. I've given you the information that you need to draw them, and the rest is practice,
practice, and practice. So with all that
said, good luck.
27. Shading Basics - How to Hold the Pencil: Let's begin with ways
to hold the pencil. This is your average pencil. It doesn't need a
special introduction. The most common way to
hold a pencil is by using a tripod grip or a
writing grip like this, you're going to hold it with your thumb index
and ring finger. And the best way
to position it is to put the middle of the index finger on
the middle of the pencil. This type of grip is
perfect for accuracy. You're going to make
very exact lines, and it's perfect for
rendering and detailing. Let me zoom in. So you're
going to have these lines, and you're going to
have a lot of control over those lines and
how they will go. But the downside to this type of grip is that you're
going to have a very, very monotone line,
and the only luxurity is that you have
pressure variation. You can have dark lines and brighter lines,
but that's it. They all have roughly
the same thickness. And if you struggle, you
can use more of the lead, but it's very hard to twist all of your hand to
have a more flexible line. And in this case, we would have another type
of grip, namely this one. You're going to hold
the pencil with all of your fingers on the top of it, and on the bottom of the pencil, you're going to put your thumb. And you're going to
hold it like this. You turn this paper and zoom in. As you're holding the
pencil like this, you can have a lot
of line variation. You can use the
tip of the lead or the side of it to have
these thick lines, shorter lines, thinner lines, darker lines, brighter lines. It gives you so much variation, and you have a very plastic
line with using this grip. You can add some very, very rough shading
like this very fast. It's very good to use
this for surface shading. When you have a a large surface, you want to cover with the exact value you're
going to use this grip. And you can also shade with
lines, not just surfaces. It gives you basically
a lot of control over the outcome of the
lines of the drawing, of the shading of the
value of everything. It's very flexible in
contrast to the tripod grip. Now, each of these grips are
good in certain situations. For instance, the tripod grip
is perfect for rendering, as I told you earlier. You have a lot of
accuracy with this grip, and you can make
very, very small details and textures with this. And also, shading is pretty
comfortable with this grip. You can have soft blends. Let me adjust the
angle of the camera. So you can have soft
blends like this, but they can take a lot of time, but you can make them. You can shade with
lines and you can even follow forms with lines to create a
certain type of shading. Now, with this grip, you can make very
beautiful sketches and fast drawings and shade
very, very quickly, make a surface really
fast and have a lot of pressure control can go
from thin to dark gradually. But with this grip, something
interesting happens. For instance, I have
this line here. And if I follow that line
with this grip and try to move to the left and right and add more pressure
on the inside the surface. I will create
something like this. It looks like a
very blurred line. And that's the beauty
of it because I can make a sketch and redraw over it with more exact lines and keep on repeating that until I am satisfied
with what I have. I can easily erase the
lines that I don't want and leave only the
darker, more exact lines. That's why this grip is
very useful and very good for sketching
and adding some very, very rough shades and values. Now, let's move on to
different types of pencils.
28. Shading Basics - Types of Pencil: This is a mechanical
pencil or a clutch pencil. This one uses 0.5
millimeter leads. So you see that
this pencil has a very, very monotone line. It has the same lines. No matter how much
pressure I apply, it will always have
the same thickness. And that's roughly the beauty of this type of pencil because
I don't have to sharpen the tip that often and
if I use harder leads, for instance, two H leads, I can make a very, very exact and transparent
construction to the drawing prior to applying value and darkening it
and rendering it. This is a good thing
about clutch pencils. Besides lines, I can also
make surfaces and shade, but it takes a lot of time. It takes a lot of time, but rendering has to take
time because you have to pay attention
to those details that will add up and
give your drawing life. Now this is a clutch
or mechanical pencil that uses a two millimeter lead. It has a very thick lead
compared to the five lead. You can see the
difference there. And let's see how this works. First of all, covering a wider surface is
easier with this one. And since the lead is so thick, I can have more line variation
and have a plastic line. And I can even hold
the pencil like this and really have a
lot of line variation. This pencil can be used either with the tripod
grip or with this grip, and this one will always be exclusively to
the tripod grip. Now, besides these pencils, I want to show you something interesting with
the regular pencil. There is a different
way to sharpen it. Let me put those aside. So this is the regular
way to sharpen it. You're going to use a
normal pencil sharpener. And there is this to
obtain this type of tip, you're going to use
a box cutter and remove the wood
from the graphite and leave out as much graphite as you can, something like this. This has about a centimeter. This is quite useful
for sketching. As I told you, with this grip, you'll obtain those
blurry lines, and it's perfect for sketching
and shading and so on. But in contrast to
to the regular tip. When you're going
to use this one, you're going to be very
careful to not break the lead, and that will force you to go from soft to darker
tones gradually, and you won't have
to worry that you go too dark from the
very beginning. And this gives you the
most of the lead you have every possible way to use it when sharpening it like this. But eventually, the tip
is going to get dull, so you have to sharpen it again, but you are not going
to use the box cart. You're going to use a
small part of sandpaper. And how are you
going to sharpen it? You're going to put
this as horizontal as possible and shade
on the sandpaper. So like this, and then rotate it a bit on
the other side and keep rotating slightly
as you shade on the sandpaper and you will
create a tip on the lead. And now you can have very
thin lines that are barely visible and have surface
and very thick lines. Even though I presented
you a few types of pencils and a few grips and
a few ways to sharpen it. The way you are going to use
it depends entirely on you. You are not going to draw
with a certain grip or with a certain type of pencil throughout
an entire drawing. You're going to
switch between them. You're going to use them
in certain situations. And, of course,
you're going to use what you feel most
comfortable with. If you want to make a drawing
from the beginning to the end with a clutch
pencil, then do it. If you feel good when doing it, if you're comfortable
when doing it, use it. If you prefer pencils, use them. The only thing is that you have to have a good
drawing in the end, no matter what
instrument you use.
29. Shading Basics - Different Types of Shading: Now, let's talk about
different types of shading. Alright, so the first type
of shading is when you make parallel lines one next to each other at a 45 degree angle. And you're going to use
the tripod grip for that. This is the most
common way to shade, and it's basically the
easiest way to do it. You can't get it wrong
when you do it like this, although this is the most time consuming of all
the shading times. The other type of shading is at the other
end when you hold it like this and you follow the form of what
you are trying to shade, so let me just make this cylinder end here. You're going to hold a
pencil like this and follow the cylinder and
create the form. You're going to follow the
form and slowly render it. You're going to do it
with parallel lines. That's one way of shading
with this technique. Or you can make a surface like this without
following the form. And there is a midground
between these. When you hold a
pencil like this and shade a surface very roughly and then come in with the
tripod grip and give the finer shading to certain areas to make
it a bit different. As I said earlier, this is generally
done when you sketch values in and try to suggest
the form of something. And after doing this sketch, you will come in with some very exact shading and
some rendering and so on. Besides this, there is a way to create a
neutral surfaces. And how do you do that? Going to draw it here. You're going to make that 45
degree shading like this. And then come over
crosswise with 45 degrees. And by doing so, you create a grid and it will
create a neutral surface. This is generally used
for the background of the drawing or
the areas that are supposed to be background or everything else that
is not point of interest. So for instance, you
have a still nature. You have a sphere on a table, and you want the entire focus of the viewer to be
concentrated on that sphere. That means that the
table is going to be shaded with this. When you're holding
the pencil like this, this is a very good
way to render and add values to
wrinkles because you are going to have
a very fluid line. So as you see, this covers a
lot of surface very quickly, and it allows you to
go from bright to dark without worrying
about certain mistakes. And once you are satisfied
with what is here, then you're going to, of course, use the tripod grip and start
rendering what is there. Keep in mind that
with the tripod grip, you're having a lot of
pressure available. You can add a lot of
pressure to a line. Let me show you that here. You can have a very, very dark line and then a very
bright one fast. Whereas when you're
holding it like this, that's about as dark as it. S. I'm really struggling
to get very dark line, but I can't without risking to break the
tip of the pencil. And this is the main difference
of using these two grips. You're going to use the tripod
grip when you want to get really dark shades and even the brighter ones when you're trying
to render something. And when you want surfaces
and shading sketches, just to catch the rough value of a element you're
going to use this grip. Now, of course, that
the other types of pencils, the
mechanical pencil, this is perfect for rendering because you're always going to have a constant line. It will have a constant
thickness, no matter what. You can afford to take
your time and pay attention to what you're doing and focus on the small
details with this. Now with this explain, let's move on to adding value or shading a
few simple objects. We're going to
start with a sphere and then a cylinder and lastly, move on to a body part.
30. Shading Basics - Shading a Sphere: Let's start by
drawing the sphere. That you do it? Now, we have to establish the direction of the
light or the position of the light source
to be from here. So the light is coming
from that direction, and it's going to hit
our sphere in this area. Now, what's going to happen? You're going to
draw on the sphere a few ellipses like this. First Second. Fourth, and another one there. Why did I did this? Well, this is because light behaves in a certain
way when meeting a sphere. We are going to
have a shade that's going from very bright here, where the light hits the sphere, gradually darker as we get to here where it's almost dark. The equator of the
sphere is around here, and there is a way to
find that equator. By following the direction of the light all the way to
the center of the sphere, we can make a ax that has a 90 degree angle towards
that direction of the light. And thus, we will
have the two points intersecting our
sphere here and here. And from those points, we
will create our equator. Light all of the sphere
from the brightest point, all the way to the
equator and from the equator towards the back of the sphere, we have shadow. That means that we
are going to have a gradient of tones
from the brightest to the darkest and we
are going to have some bounced light back to
the bottom of the sphere. Light comes in from
this direction and it doesn't stop on the sphere. It goes all the
way around it and it engulfs the sphere and light. And on the surface on which
the sphere is sitting, it will bounce back on
the back of the sphere. And from this, we can calculate now the shadow of the sphere. So we have the direction. Again, another direction
we are going to make parallel to the
direction of the light. So this line here and from the surface on
which the sphere is sitting. So the contact point,
we're going to draw a horizontal line towards
the line from here, you will get this
intersection point. And now between
these two points, we will have a ellipse that
will be shadow of the sphere. Now, I want to make
it just a bit more wider than that point because we have the same effect
happening here, which will create an ellipse that's going a bit
beneath our sphere. So from there, all the
way to there and back. Now to make things clear, I want to draw here a edge of the surface on
which the sphere is sitting. We will use that later for some compositional
corrections. Now, having everything figured
out, let's start shading. We will begin with the
brightest points here and work our way towards the dark shades towards the back of the sphere. All right, the first
thing to do is to add a base layer of bright tones. That's what I've just done. I've added that base layer, and I've left out white here and here where
that bounced light is. And now you can take
this script and start following the
equator and those ellipses I drew at the beginning and
start shading the sphere and giving it the All right. Now, I want to clean up the edge of the
sphere just slightly. And on this side also
right that you do it. And now I'm going to
take a pencil that has a softer lead and
render the shadow. So the darkest points
are going to be here. Let's make a small
ellipse there. So that's actually the
darkest part of the shadow, and I'm going to make
another one slightly larger. Where we have, let's
say, midton and here we have the brightest
tones from that shadow. So let's begin to begin with
the darkest part this time. I'm going to add, let's
say, pure black there. Now, as I'm gradually
going towards the edge of that large ellipse,
I'm going brighter. That should be enough. And now
for the last part is this. I want to make over this line just a little bit of shading, but I want to use the
tip of the pencil and create that neutral surface
I was telling you about. So I'm going to begin very
dark near the sphere, and as I go away from it, I'm going to use
slightly brighter lines. So let's begin from here. Something like that. And as for this side, I want to do the same
thing only I want to come up all the way here. I'm taking a pin piece of paper, and I'm folding it in half so that I can put
it over drawing on this part so that I won't smudge the graphite with the palm or the
bridge of the hand. Now, let's create that surface. Seems that this pencil is
going to be dull shortly. So let's sharpen it. There we go, much better. Right now. I'm just going
to rotate it a bit. It's more comfortable
to do it again, at a 45 degree angle. But as I rotated the paper, that angle is going to be now crosswise to that first angle. They want to work
this area a bit more. It All right. And make one very dark line, a lot of pressure towards
that edge of the sphere. I want to follow that edge and bring it out as much
as I can, like that. Same thing on this side. I want to do the same thing. But as I go towards the shadow, I'm releasing pressure and
making that line brighter. Same thing on top here. All right. Now, with the eraser, I'm going to correct some of the overshading when I made a
few mistakes along the way. These shades that
go over where you don't want to eventually happen. So you're going to
pay attention to let those happen in areas where you know you're going
to erase afterwards. So I knew that I'm
going to erase some highlights in the
sphere in this region. So I afforded to make
those small errors. All right, so there, and let's make that
bounced light down here. A bit more. Like that. Going to zoom out and work a bit on the shadow. It's too hard. I want it
to be a bit more softer. So I'm going to
erase the edge of it just slightly and on
the area where it's brighter and then
take a paper spread. And spread that graph
a bit and make it blurred towards that
first edge it had. Did you do the trick?
Now I want to me again. There. Just a bit. And that's correction. And now I can take the clutch pencil and give to sphere some
final rendering. Just a simple, clean
shade with lines, small lines and make
them gradually darker. And this should be it.
31. Shading Basics - Shading a Cylinder: Draw the cylinder. Go to
start with the main axis, then define height for it and draw the top surface
and the bottom surface, which are going to be ellipses. All right. Now, the same thing as
we did with the sphere. We have to establish a
direction for the light. And this time, I want it to
be hitting the object here. So the light is
going to come from here and it's going to
hit the object here. And that will create the same thing as it
did on the sphere, but we don't have ellipses here. We have only these
vertical surfaces. And of course, we
have a damped light back on the very edge
of the cylinder. But since the light
is hitting here, we will have this direction
coming from the center of the cylinder and going
through that point, we'll create this direction. Now, this direction will cast a shadow parallel to this line. This will be the shadow, and it will be about this though since it's
coming from above, and it will shorten the
object in perspective. All right. Now, let's
start adding value to it. I'm going to begin by
adding on the top surface, a base layer like this. Et me seen. And then I'm going to do the exact same thing
only with vertical lines on the edge of the cylinder. That will be my darkest
area on the cylinder. And from that towards here, I have only brighter tones. Now, if I am going to do this on the entire surface is
going to take a lot of time. So I'm going to use this grip to get surface
and to finish it faster. But even though I'm using this, I'm going very bright
from the beginning. And then another one
slightly darker. And another one. It's all reading to get
that volume I wanted. Tone here. And
that should do it. Now, I can either continue
with this pencil or take the clutch pencil and start
making that fine shading. But for this part,
I prefer using the clutch pencil because I
don't have to sharpen it, and this is the
most time consuming part of the entire process. Right now I can take
this pencil again and I'm going to rotate this
a bit and follow the form, I'm going to start
dark and go bright. And by doing so and
repeating this process, I will create that round
effect of the cylinder. Again, shading is the most time consuming part of any drawing. I want to add there
just a bit more value. Like that. Now for the shadow. All right. And now for a few final touches, I want to make the bottom of the cylinder really
dark so I go towards the shadow and slightly
blurred towards the outside. I like that. No, I
want to continue that bit up like that. And create these lines. I want to add some darker
shade on this area, but only a small line to
define the shadow really well. And up here, another
one, and that's it. So Now, with the eraser, going to brighten
this area like that, remove some of the
graphite from here. And going to create a surface about the size
to add this line there. And should do it. To make sure that what
you are erasing is straight because I have there that curve line
which I don't want. First, I'm going to spread
the graphite a bit. Then I'm going to put a
piece of paper like this and use the eraser to erase a very sharp edge
to the highlight. There. Did you do it? You know, again, same thing for. That side. And almost done. I just want to add a
little bit of shade there. And we're done
with the cylinder.
32. Shading Basics - Shading a Torso: Won't be our last drawing. It's a torso, and it's in a slightly twisted position because the chest is
leaned back a bit, and the lower abs is
actually a bit in front. So I'm going to take this
piece of paper and draw here a profile view of this. Zoom in. So we have the chest with
the panks there. The abs here are going down. And in this area, the chest or the ribs are slightly outwards
here in this area. They are slightly outwards, which means that we are
going to have a lot of shadow or darker values here. Here we are going to have the obliques coming
out slightly, and then going back in. Which means that means them out, which means that we
are going to have light here and shadow here. And as the light is falling
from the top, you have light, shadow here, light here, shadow on the abs, light here, and then
shadow again here. If we transpose that here, it's going to be light, shadow, light and shadow. Another thing to keep in
mind is that the torso, when viewed from the
top, looks like this. Thus, when we have light
coming from this side, we will have the shadow on this side, on
the opposite side. In this case, lights
coming from here. This is the direction
of the light, which means that we are
going to have light here and then shadow here. Overall, our darkest area
is going to be this side, especially here
beneath the pack. Alright, so that should
be the introduction. Now, let's continue
with shading. Go to start by sketching in some surfaces and then
gradually going darker. And lastly, I'm going to take the clutch pencil to add
that fine detail in the end. Once that is done, I'm going
to add some high light. And with a softer lead pencil, I'm going to add the
darker shadows to make a fine contrast
between light and dark and give the torques some depth and
some extra volume. So I'm going to begin
let's say from the top. I just want to finish
drawing the neck muscles. All right. And let's begin. All right, so we are nearly
done with this first layer. Just want to add
some darker values to bring forth the form. That should be enough. I'm going to take
the clutch pencil and add another
layer of shading. Especially to defined
darker areas. Now, since the torso is fluid, it's not geometric, it
doesn't have surfaces. It only has these
curved surfaces. It's not a plane. I can follow
the form with the pencil. And how do I do that? Well, I'm going to
take lines and simply follow the flow of
the muscles and give them some definition specially on darker areas. Right now, I'm going
to take a pencil, and I prefer, for this part
using this type of tip. And with the tripod grip, I'm going to adjust some tones on certain
areas and darten and um As you see, I'm following
a certain flow or pattern. I know that the abs are freed, they go in towards
the edge and they come out towards
the center of them. That means that my
brighter tones are going to be in the center of each ab, and I can afford to go dark towards the rib cavity or
when they touch each other. Right now, it's time to
add some highlights. Go to take the eraser and
carefully erase certain parts. This I want to use a circular motion for
the abs and the pecks. Like this. Yeah. I need to make a
small contact surface for the urine for the abs. And I'm going to make them
very bright up here like that. And as for the rest, as for the rest, going
carefully move just a bit As I'm going lower, I want to remove more. And here I want to make
something like that, a belt of light. I want to continue that
like this. All right. Make that transition
area softer. And finally, add a bit
more contrast on the side. Here, few details like Make sure I have a bounced
light here on this side, like on the cylinder
and slightly remove here a few
strokes of graphite, so I can suggest or hint some bounced light on the
muscles in that area. What should be enough. To make everything
blend in more, I'm going to use
the paper spreader. Blend in a few of these details. And again, as a bit afterwards. I can even use paper spread to add some value
here and there. Not much, but just add some
shade, some blurred lines. It's easier to
take graphite from darker areas and replace
them somewhere else. Something like that. I know that between the pecks, I have a small line. I want to mimic that
taking graphite out of darker areas and creating
that ix ag line. Like that. And I want to adjust
the highlight again. Always make sure that you
have the right tip for the eraser to do
what you want to do. Like, that should be
pretty much enough. Now I'm taking the
softer lead pencil to add the final contrast, and the drawing should be done. So as you see, I'm starting
dark and gradually going brighter in a short
area or a longer area, like here, wherever
I can afford it, and also make these
suggested lines that offer depth to
certain muscles. I'm going to push really
hard to get that dark tone out and put it in where
most of the shadows are. And as you see, I'm using
a shading on the shape. I'm following the shape. And as I advance
towards the light, I'm going brighter
and I'm creating strong contrast between
dark and the light. Okay. Right there and here and I can continue to
do so until I'm satisfied with the drawing. What to make here just
a slight patch of dark. There that gives the
drawing a lot of depth now, same pin on the other side. I want to make that part larger and continue here
to make it darker. Here as well. All right. Again, with the paper spread, I want to spread a bit
of graphite there. There there just a bit
and get a bit there. This area seemed
to be too bright, so I'm trying to darken it a bit without
using the pencil. Won't have a soft blend. Like that. No, I'm going
to take the erase or make a very thin edge like this and follow
this line here. It will give the drawing a little bit of
contrast that it needs. So that's that. And just some small patches
of light on each ab. Just a quick quick
erase one line on each one, one, one here. Is one I want to
make that fingers. I'm going to insist
on that area. Not completely satisfied
with this area here, so I'm going to add
a little value to it and leave it like that
maybe straighten this part, make it equal to rest and
insist a bit here on this side. I want to erase that area there, bit so I can add the
navel to it like that. Now for the nav, I want to have it a
certain direction. I want it to be slightly
tilted, not vertical. So I'm going to
make this ellipse and continue to insist on it and make it darker where the
light is hitting from. So the light is
moving like that, and I'm going to
have it on the top side darker like that. And just pin up
this on the side, and that's it. To some mouth. And this is the torso
shaded and finished.
33. Full Figure (Overview of Reference): Hi, and welcome. In this video, we are going to draw a full
figure from the beginning to the end based on
a reference image. The figure is going
to be a female nude, and we are going to divide this video into two major parts. The first part is going to be about constructing the figure. We're going to start by sketching
it in, by measuring it, by checking if what is on the reference is correct
to what we have on paper. And afterwards, we are
going to refine the drawing until we get a polished
and good looking line art. Afterwards, in part two, we are going to
shade that line art and create from a flat
to the drawing of lines, we are going to create a three D figure that
has volume and depth. Let's begin by introducing the figure and
analyzing it a bit. Now, let's look over the image. The head is in a
simple freqor view, slightly tilted backwards, but that won't give us
too much of problem. The hair is in a pony tail, so it's going to be
pretty easy to render. And moving on to the spine, the spine is actually following a very nice arched line
from here to here. And from that point,
you can continue that line towards
the tip of the foot. This line will give us a very important guideline on
which to add the elements, such as the hips, the
shoulders, torso, and so on. It's going to be easy having these landmarks put in
because of that guideline. Continuing, we
have the arms that are holding the
weight of the torso, specifically the
chest and the head. Look how the chest gives the impression of hanging
from the shoulders. It will create this V made
from the clavicles or collar bones that
are going to connect with the sternum or the
middle of the chest. Note that the face is
facing one direction, and the chest is facing
the opposite direction. An interesting thing
happening with this figure is that we have to pay attention
to two specific areas, namely here and here. And why is that? It's because certain parts are behind others. And even though we don't
see, for instance, here, we don't see the shin
bone of the lower leg only here from the
beginning of the knee, and we don't see
the clave muscles from the lower leg as well. We have to draw that
or simply hint that in constructing it so
that we know how to place what is
visible from the foot. The same thing is going to
happen with the chest here. We know that the chest
is round or cylindrical, so it will continue
behind the arm a bit. I'm going to take
you step by step, and we are going to begin
by measuring the head.
34. Full Figure (Drawing the Outline): I want to measure the
height of the head, which in this case should be
slightly over 4 centimeters. And now I want to measure the entire
height of the figure, which is slightly over 15, which means that the head fits in roughly about four times. Now to check the entire width
of the figure, almost 19.5. So the head should fit in
about five times in width. Now, having this
ratio of four units tall and five units wide, I can convert that
to my drawing page. Going to measure to see
how we can fit that in. I think a good 20 should do it. Simply mark a point
there and here. And if we divide 20
centimeters by four, we will have 5 centimeters. So one unit is going
to be 5 centimeters. Right? Now, let's
measure the width. Should be around 25. And I want to place that here. Now, I can continue to measure a few landmarks that I know
how to place the head, the shoulders, hands,
the knees, and so on. The first thing I
want to measure is how to place the head. I'm going to measure the distance from the chin
to the edge of the figure. 4 centimeters here,
so that's roughly a unit on the drawing paper. That means about 5 centimeters. So I have the head here. I'm using this sketch grip, and I'm holding as far away from the tip
as I can because I want to use soft lines
and barely visible lines. This is a H pencil. It leaves pretty bright
lines behind it. And with this grip combination, it's pretty good tool to sketch
and to start the figure. Now, let's move on
with the measurements. The next measurement I
want to make is this. So one head below the chin, we would have this area here, this line on which we would have the lowest
point of the breast, this line of the hip and the
beginning of the sternum. So one in the down
should be here. And I want to suggest that. All right. The next thing is
going to be this area. So from here from
the beginning of the sternum to there we have
about a unit and a half. And from that point, we will have a descent
towards the knee. And from the knee
to the lower part of the sternum, we
have two units. So one, two, there, and here. And a half should be about
7.5 centimeters here. And now I can continue
with sketching in the arms slightly
suggest the hands, the legs, and the feet. Going to begin by giving
the chest a direction and continuing with
collar bones that are creating a V shoulders. And now that line we used to define the
direction of the arms. Note how this arm has a slight
arch and this one also. And they tend to be more apart from each other at the elbows and
closer at the hands. Just to be sure we are not
making them too short, I want to measure that again, so have a good unit
and a half, roughly. Let's measure that as well. And right on the spot,
almost a unit and a half. Now I'm drawing that
line for the hip. There. And the lost part of figure is going to
be where the knee is. And I want to place
the knee right there so that I can connect the hip with a
smooth line to the chest. I'm going to zoom in, show you exactly what I mean. This line is for the hips. And we know that hips
are starting from here and following a line. We have here the
knee and the leg. Drawing in the cylinders for the leg so you
can see them better. And from this point of the hip, I'm going to drag a
line straight for now, all the way to the chest. And at the chest, I'm
going to draw this arch for the stomach and that cavity in the
middle of the chest. For now, for this stage, this is more than enough. Now, I want to continue with the lower part of
the legs and the feet. We know that this leg
continues in that direction, as we can see here, it's coming down and going up, and this one is
continuously going down. So let's try to suggest that. I am using a straight
line to suggest the direction of the shinbone
for the leg that is hidden. I will probably finish
around here from which the foot is
going to start. Or let's place it be here
due to foreshortening. And we will have the foot there. Was this leg erase some of it. While this one is fully visible, it's going to have a lot of
detail that we are going to go through later on after finishing the sketch and starting to
refine the drawing. And for the foot, I want to put there a simple
shape to suggest it only. That you do it. I don't want to go too much in depth at this point
because I want to have the overall figure
drawn and afterwards, start refining it
and correcting it. Now, for the hands, I'm going
to establish the elbows, first of all, and there
that should do it. I want to place this
arch bit lower. All right, like that. And
now I'm simply going to add the cylinders and the spheres to give that initial
volume to the arms. Y. The last thing to add
to the initial sketch is the object on which
the figure is sitting on. We know that it's a
rectangular surface, so it has pretty
good perspective, and we have to suggest that. Note how this edge here goes
slightly above the foot beneath the knee and is ending
here, beneath the wrist. Beneath the wrist
should be here. From there, we are going to drag a line all the way to the foot and beneath the knee. And from these two points, we're going to drag some verticals down like that here also. That edge, and we're going
to follow that edge back. Go to follow that there. And from this corner here, we are going to make the
perspective line for this one. I think they should meet each
other roughly around here. I'm going to erase that again. And erase a bit of the lines
that we don't need now. I'm going to start
refining the sketch through erasing
certain parts of it. I'm going to zoom in. So that you see what's
going to happen now. O we're going to start to focus and give a
little definition to this area. We're going to begin
with this area. We are going to hint a few of the characteristics of the face, the line of the eyes and the eyebrows and the middle axis. Afterwards, we're going to
focus a bit on the shoulders, collar bones, neck muscles, and the breasts, followed by
the arms and stomach or abs. So let's begin with face. I said slightly
tilted, so like that. There we have the middle axis. I want to adjust a few
things on this arm. It's a bit too thick. I want to continue with
drawing this shoulder. As you see from the shoulder, we have a arched line. We have a bit more curve here. And then it flows back in a bit. It follows the normal direction
all the way to the elbow. So it goes out a bit
and then it comes in, and there we have the elbow. And that's our collar bone. Has this nice arched line, goes up, goes back in, comes up again
over the shoulder. From there, we have
the neck muscles in this area and in that one. You know, for the neck, a simple straight line there, and other one there. I don't want to have
a steep angle there, but I want to have
a nice smoothness. And how do you achieve that? You're going to follow this one. Going to follow this
line here and go all the way following through the back of the figure and coming
out again at the shoulder. And from there, we have
the collar bone, again. So it goes up, comes down and goes up again. The same thing is
happening here. We have a bit more thickness, then it goes back in
as it meets the elbow. You remember that there
is that small gap here, and here we're going
to have another one. And that these gaps are
underneath the color bones. From this arch, I want to take a line and draw the sternum. And from where the sternum
starts all the way down, I want to drag a
nice arched line. So like this and that so that it's following the stomach and
the surface of the abs. And that line is going
to go like this roughly. I do raise here and here. And a bit there. Now, how are we going
to draw the breasts? First, we are going to establish their angle
and their position. If we look at our image, we'll see that they are
almost on the same height. This one is lower than this one, so we're going to have a
arched line like this. And now we can place her
actually two spheres. Like this. And this. And why is that? Because I want to
take the pencil. At first, I'm going to finish the chest or the
rib cage, in this case. Once I have the rib cage drawn, I can now draw this breast and actually
don't go out that much. As you see here, it's
only slightly outside of the line of the rib cage. And that's what I
want to do here. Only slightly out, then back in. As for this one,
I'm simply going to withdraw that sphere, the lower side of the sphere. Like that? I kind of continue
to draw this arm. Note how there's that small gap between the line of the
breast and the inner line of the arm and also how this line has a
tendency to be vertical. So from here to here we
have a straight line, and afterwards we're going
to add that definition to the muscles. Okay. Okay. Now, look at this forearm. Not how the elbow is there, but it goes in. So it's going to be
covered with muscles. The figure is not that athletic, so it won't have that
much definition. We know, on the other hand, how the muscles cover the bones, and we can't hint that We can hint that the elbow
is going in and that it's covered with muscles starting from the back and going over it. Same thing happening
on the front side. We don't have that
much definition, but we can use the knowledge
to help us draw the outline. All right. And now let's look at this area. Going to cement. Not how the abs are going in, they are forming
this V shape again. And we have another
line covering the outside of that V. And
the same thing happens here. What's actually seen
here are the muscles that are covering the
exterior part of the abs. So the lat muscles, we see those And we also see the rib muscles
and the obliques. So we are going to draw
that V. I want to make a pretty strong line with a powerful arch going in and then a more softer
line following the outline. Like that. I want
to just this one, make that strong as well. And slightly hint
that effect here. Now, let's continue to the legs, first of all, and
then we're going to continue with this area. First, I want to finish
drawing this upper part. As you see in the figure, we have actually two slight
bumps here from the obliques, and here for the glatias maximus and the rest of the
muscles of the upper leg. So I want to put
that in my drawing. I want to have a arch
line, small arch there. And then continue with
another one there. Afterwards, at this point, I'll have another one. Now, we've drawn this part of the cylinder and we
actually have it here. So that's this line, and we're going to
follow that line. We're going to follow it down. And because the legs are one next to each other and they're pushing against each
other due to the weight, that line is going
to have this effect. It's going to go down. It's going to go in and out
again as it reaches the knee. And as for the knee, in this case, you can see here very clearly
the free surfaces. We have one surface here
continuing to the shin bone. We have the upper surface on which we have
light hitting it, and we have this surface going towards the stomach
where we have shadow. You can use a simple trick here by drawing those surfaces. Now that you have the surfaces, you can nicely draw in the shin bone and also draw the area where
you're going to have shadow. And by doing that,
you already hint the general construction
of the knee. What's left or this lower part. And if you remember, you're going to draw that
by using two circles, first one and the second one. Tell me about that. Look here at the calf muscles. Look how they are
going out here and here because the leg behind
it is pushing it forward. That will push the muscles and the soft tissue
back towards the bone, forcing it to move either up or down which will
make us just angle. Have two lines going up, down and continuing
to ankle and down, we're going to have
the same effect. Now, for Disney,
we're going to use the same principle
drawdo surfaces. Roughly there. And when you look, you'll see that there's actually this continuous line going all
the way from here to here. And we have very little
definition to the knee here. This part that's continuing with the shin bone towards the foot. So we're going to
have the first circle and the second one there. But I don't want to go too over the top with this lower line, so I'm going to make it a bit thinner and note that there are actually two
small bumps there. We have one there and
another one here. I'm going to draw
that one there. Barely visible there. And another one there, a bit more visible this time. And why do we have them? Well, the reason for that
is pretty simple because that soft tissue there is pressing on the
edge of the surface. So we have here the edge
of the surface and here. And the soft tissue is there. And what goes over that
edge will actually go down. So that's why we have here
these two small bumps. Alright, and to finish
drawing this leg, we would have a pretty
dark area here. I just want to hint that there and and we are done with
the initial sketch. I want to take some
time and refine it in certain areas
mostly at the arms.
35. Full Figure (Drawing the Head): Okay. For the next part, we are going to focus on drawing on a separate
piece of paper, the hands, feet, and the face. The reason for doing that
is to get comfortable with these parts so that when we are going
to draw them here, we will know how to draw it and maybe take some shortcuts
on the construction and maybe draw only the outline of them and refine that outline because these are pretty detailed and
small detailed elements. And we can't afford
on this scale to go in with a pretty
rigorous construction without making the drawing
too complex or having in that
small surface a ton of lines that will
only complicate things and make mistakes very
likely to happen. So that's why we are going
to draw those three elements separately and then draw
them on this paper. But before doing that, let's try to clean up
this drawing a bit. Okay, now that the drawing
is cleaned up a bit, let's take a quick five minute
break to refresh the yes. And by doing that, once we return to the drawing, we might see a few mistakes. Taking breaks is important, and you should do that
probably once every hour or so or every 45 minutes. Whilst drawing your eyes
are going to get used to what's in front of them and you might overlook
some mistakes. That's why taking breaks is
important. And we are back. The first thing that popped
into my eyes from returning is that we haven't drawn
these details here. So the obliques. And I
want to draw them in. They're going to follow
that V of the abs. So there and there, I just want to hint
that like this. And I haven't drawn this part of the leg that's visible and the part
that's covered with shadows. So I'm going to draw that now. And I should be it. All right, here's a
quick trick you can use. You can actually turn
the paper upside down to see if there are
any obvious mistakes. By turning the page upside down, you are actually going to trick your mind into fking that this is a totally
different drawing. And at a new drawing, one that you have
never seen before, you are more likely to see the mistakes or
the quick faults. Here we have a close
up of the face. The most important aspect of this is that the head
is slightly tilted. Not much, but enough
that we can suggest. After that, we have
neck muscles that are obviously
visible and the way shadow falls on
these surfaces and how light bounces off some of them and how light reflects. Due to the fact that
it's a young female, we don't have sharp edges. We don't have wrinkles. We have only smooth
surfaces that we are going to render through shading. Where are we going to have dark lines and
construction lines? It's going to be this area of the neck and where
the collar bones are. And that's it for the face, we have to use the
minimal amount of lines so that we'll have a
clean drawing in the end. But for this purpose, we draw on a separate paper
and at a bigger scale because once we shrink
that and draw it on our actual drawing, we will know how to draw it and we will use the
minimal amount of lines. So let's begin here. I want to make sure
this will fit in. I'll start, of course, with the main axis, which should be this one followed by This sphere. And on that sphere, we are going to have symmetry
axis line of the eyebrow, the nose and the chin here. So 12 and free. We are going to connect these
lines here, the jaw line. And here to bear. Now, to be sure that
we have a resemblance, a very important factor in
creating resemblance with a reference image is the
roundness of the face. So the main structure of it. That being said, the chin, jaw line, and the cheek bones. So for that, we're going to
make the chin bit shorter. Like this and make sure
that the face is round. For that, we are going to
make the cheek bones here, go out a bit and then in sliding out again for
the arch of the eyebrows. Back again and up. To dis, I want to add simple with a few lines,
the neck muscles. Collar bone. And shoulder here. And on the other side, the neck. I'm just going to add some
quick value for the gaps beneath the car bones, and here. Now with that done, I can erase some of the construction and continue to draw the face. And what's going to be important here is the shape of the nose. See how the nose
is small and very smooth from the forehead
to the tip of the nose. So we have a very smooth line, no hard edge, no surfaces,
just smoothness. How do we indicate that
well, between the eyebrows, we are going to
draw a very line, very smooth line like this, go a bit inwards, and then continue out. So we are following
the smoothness of the reference image. Once we have that, we
can draw the nose. Like that and have
here the lips. I simply want to avoid is
making this area too big. I don't want to have
that much space, so I have to make
the lips bigger, which in result will
make a bigger nose. So let's start with the lips. I want to make the
cheeks a bit more round. Something like How do we suggest a smile? Well, to suggest a smile, we are going to draw
the lips as normal, but we are going to
stretch them a bit. We're going to make them lower lip a bit thinner than usually, which will make them almost
the same in thickness. And we're going to add just
a slight small line there, something like a niche
done with a pencil. So like that, something very, very small that
will suggest that the lips are pointing
upwards towards the end. Same thing there. Now, let's continue with the nos. And that should do it. Remember to begin the nose
with a circle or sphere for the tip that will
determine how it's oriented, if it's pointing
upwards or down, how wide it is, and so on. Now, let's continue with
the eyebrows from here. Going up, then down
towards the edge. Same thing I want to
do on the other side. Just like that.
And for the eyes, I'm going to make a line on which I will
position the eyes, and I'm going to
start with this one. Go to draw in a ellipse like this and a circle
over that ellipse. Now, why did I draw ellipse
and over that a circle? Well, the circle is for the eyeball and the ellipse
is for the eyelids. Having the ellipse
there, I can now follow to some
degree the eyelids. And I'm using that as a
simple guideline once again. Not for it. Iris and D you probably do. Just want to get
the position right. The eyelashes in this case are just some fine details that
we are not interested in. We are interested only in the
construction of the face. So this eye is about done. Now, let's work
on the other one. The same principle. Going to start right there right
next to the nose. I want to draw
this oval line up, and that line will
continue down as well. And once it gets near the nose, it will go up again. Think of this shape
as a tear drop. I will make it easier to draw once you have
something to compare it to. Go to double that upper
line for thickness, and we are done with that. Course for is and the opening. And that's it. Now, let's clean that up a bit. And now for hair. Since it's a ponytail, it's going to be
pretty easy to draw. We're going to have a straight
line above the head here. Then a arched line, a curved line like this that's going all
the way to the ear. We have this and then this for the back we're going to
have something like this. We are not interested
in the details, but on the overall drawing. Of course, that most of them
resemblance is going to come from shading and the finer details
are going to apply. But this should serve nicely
as a construction drawing. Yeah. Remember to adjust the jaw. That's a very common mistake
to leave it too angular or too wide and always pay
attention to the chin. To avoid making mistakes,
when shading the chin, you are going to draw a circle like this and remember that the chin can
be enclosed in a sphere. So if light is coming from here, like in this case, you're
going to have light here, darker values there. What's left is the ear. Let's follow the
overall shape of it. It's going up just them in. It's going up and actually
starting from here. So it's going up and
then out down and in. So this would be the
overall shape of the ear. Then we are going to make this small bump there and
double the outer line on the inside up until this point where we
move inwards like that. Then we're going to have
this cartilage there, this arch there, and we're
going to double that line. So that arch is going
to have thickness. And that's it. Now we're going to
focus on the hands.
36. Full Figure (Drawing the Hands): Here's a close up
with the hands. The first thing that
pops up is the fact that this arm is on the
edge of the surface, and therefore, it has
90 degree angle here. To draw the hands, we are
going to use the trick we used before when we don't see
each individual finger. Note that the fingers
are only about 50% visible except the two
fingers closest to us. In this hand, it's the
pinky and the ring finger. And on this one, it's the
thumb and index finger. We're only going to draw these two fingers
on each hand and then figure out or simply double the
line for each finger. So let's begin with this hand, and we will begin
with the wrist. Should have roughly
this direction. Oh And here we have the main part of the hand. Let's start to add
the directions and the spheres for the
knuckles of each finger. So the pinky foreshortened because it's
pointing towards us. And the ring finger
middle and index. And, of course, the fum there. Here at the top
side of the wrist, we have some wrinkles. Right now for the fingernail. With the pinky All right. And now for the second hand. First, we are going to
start with the angle. Remember that the hand has a weight and it's pushing
down on the surface, which will make the surface. I'm going to draw that here. The surface is going
to come up and then go down as the
hand is pushing down. And we will have this area covering the lower
part of our thumb. And as you do with the hand. Next and last detail
are going to be defeat.
37. Full Figure (Drawing the Feet): Here is a close up of the feet. As we said in the beginning, the toes are curled back, which would make the overall
foot look a bit strange. To add to that, the foot is also a
bit foreshortened. But despite of that, we
still have to construct it. We still have to build
it. We know how to do it. So let's get started. We would begin by drawing
the corner somewhere here. Let's see. Something like that. And here we have the
ankle. The soil. Here we have the ankle. And the shin is going to
go on that direction. Going to add these
two points there and here to give the
ankle some volume. And then I'm going to
continue with this line. For the calves, but remember that because
of the foot behind it, pressing against this one, the calve is going to
have more volume here. And on the lower side, are going to have
this sort of line. Right? Now, since the shin will
have a volume of its own, we're going to have here
some shadow because the soft tissue here is trying
to come out, so to say. Therefore, we will
have some shadow here. I'm referring to this area. It's going to
create such a line. Now, to continue with
the foot itself, simply remember how we drew the foot in the
beginning with the pyramid. I feel is going to
be somewhere around there we have here
up for the big toe, the rest of the toes, and I want to make it a bit longer. And now for the toes, you're going to draw in the
knuckle for the big toe. Draw that arch and draw the big toe with
the one next to it. Note that There is
that angle forming there here and it suddenly disappears and we
are going to the other toes, but the first two have
that angle which I want to suggest here like this. As far as the toenails go, we will only see the
toenail of the big toe, and we're going to
see that much of it. Remember that this
part is actually covering part of the toenail, and therefore we will
have this line here. Don't you pretty
much do the job? Just going to darken these lines and erase what we
don't need anymore. And this would be
our end result. Let me just highlight
the areas on which we will have light. That's the main area where
we are going to have light. And here are shadows
there, here and there. Now, for what's happening
behind the foot, we have the other one. So let's sketch
that in real fast. It. So I've sketched
that in real fast, but remember that
we are actually going to have a more
elaborate construction or at least a footprint behind this leg so that we would know how the other one is going to be and where it's going to be. So I'm going to erase
what we actually have in the foreground and leave only what we have behind. So that, you know, see better. Going to take a
more softer lead. And what's it? What is in the foreground. So something like that. And this is what is
in the background. A heavily for shoded foot with the shin bone continuing
in that direction. All right. With this
explained, now, let's move back to our drawing and add
these three elements, the face, the hands and feet, followed by refining and
getting a polished line art.
38. Full Figure (Adding Details): For this part, I'm
going to switch to another pencil to
this clutch pencil. It has two weight hard leads, but they have 0.5
millimeter thickness. So I'll always have a
very thin and hard line, and I won't have to sharpen
the pencil too often. I prefer using the clutch
pencil for this stage of work so that I can afford
to draw and draw over. And until I'm satisfied
with the drawing, I can easily erase and
draw again over it. So at this stage,
it's pretty much a push and pull type of process, so a tug of war. So let's get started
with the face and start to render it. Okay. Now I'm going to take the erater and clean up part
of the drawing, and I'm going to redraw it
with a more finer line. And as we are going to progress, we will add the
hands and the feet. All right now, it's time to
focus on the legs and feet. And then we'll make a
quick review of what we've done so far and see what
adjustments we can make. Going to put a
piece of paper over drawing so that we won't smear
the grapte. Let's begin. What's left now is to draw
the foot that is behind. So the one here, if we continue the shin bone, you will end up here
having the ankles. So let's try to do that here. If we continue the shin bone, we would have the
ankle somewhere here, and then the foot would be here due to the fact
that it is foreshortened. And And that should be it. Coming to racing a bin. And toenail. And um All right. Just going to make some quick adjustments
here and there. Basically, I'm just setting some areas where light and shadow would hit the knees as we did in
the initial sketch. I'm only refining those areas a bit and slightly erasing them. I don't want to erase
too much because we will have shading and we are going to add values
and tones and use a number of techniques
to render the figure. But I just want to clean up
those rather messy areas. Right? Now, I want to look
a bit at the face and see if I can make some
more adjustments. Clearly, there's enough
space for improvement. I think I know where. And that I First off, I want to put the eyebrow
higher, just a bit. Like that, which
in result should also place the eye
bit higher as well. That you do it. Have to raise that
eyebrow a bit, and There we go. And the hairline, I
want to til that swell. Bit more, actually. Didn't you do it?
And now for lips, I want to make them
in one line like this so that they can be on the same
direction as the eyes are. There. That's better.
Alright, the figure is drawn. Now, let's take a quick
five minute break and come back and
check it again.
39. Full Figure (Adding Line Weight): All right back from the break. The drawing is looking
good at this stage. I'm pleased with how it looks. Certain areas could use
some more refinement, but that's going to be
solved with shading. What I want to do now is
simply add some line weight. It will give the line art some depth without
actually shading it. And how are we going to do? Well, we are going to look
where the darker areas are and use a softer lead pencil
to draw over the lines. This is a clutch pencil with a two B lead,
so it's softer. It leaves more darker line. And let's start. The first major area
would be here and here. So we would have this
line entirely darkened. I'm going to start from up here and follow the line carefully. All the way to here. That's it just there. And that's how you
add line weight. Now, I want to focus
a bit on this area. We have a few lines there at the collar bone
and beneath the chin. So here we have a bit there. And there. Door part as well. The last thing I want to do is draw that rectangular surface. I'm going to use a ruler for
this. And there we have it. And we have finished
the line drawing. Next is the most time consuming
part, namely shading. Before we start shading, I want to introduce
to you the tools that we are going to use. We're going to start
off with hard lead. That being said a two H lead. Here's a clutch pencil
with two H leads. Then we have two B pencil. Also, both versions, normal
pencil and clutch pencil. Then the four B pencil, followed by a wide flat
brush with synthetic hair. Paper spreader and, of
course, new eraser. Now, let's explain these tools. We're going to start
the drawing with the two H normal pencil. We're going to focus on
the brighter values. We're going to start from
the brighter shades of gray and then work our way
towards the darker ones. Then we're going to use
the Tube pencil and add darker values which
are actually the shadows. Then we are going
to use the brush to spread some of that graphite evenly throughout the figure. The reason for that is to
create a soft blend between these shades and create
a mid tone of gray, so a flat surface, so to say. Afterwards, we are going to use the eraser to put in some
light on the figure, where light hits the figure
and some reflections. By doing so, we will
create contrast. Then we are going to use the clutch pencils to polish the shading and to
focus on certain areas. We're going to start
off, of course, with H clutch pencil, and then the two B clutch
pencil for darker areas. Then spread again with the brush and followed by an erase
to bring contrast. The paper spreader is there
in case we erase too much and want to cover some of
the area we've erased. We're going to use the paper
spread exactly for that. The last instrument
is the four B pencil. The four B pencil will be to put in the drawing black lines, pure black, if need be, so that we have a
very strong contrast between light and shadow. And it will give the drawing a good perception
of light and dark. Here's a quick heads
up of what is to come. We are going to use hard led
pencils in the beginning, we are going to
use two H pencils, and we are going to
start from bright and work our way towards
the darker colors. And as we do that, we
are going to switch from the two H to a two B
pencil, which is softer. And lastly, we are going to use a four B pencil for the really dark areas where
we have the most shadow. And then we are going to
use both the two B and the four B pencil to draw the object on which
the figure is sitting on, and followed by that is erasing certain
areas to bring forth contrast then another phase of shading in which we
refine what we have erased. Lastly, adding some detail and maybe erasing again for some more contrast
in certain areas. As I said before, this is
a push and pull process. It's time consuming, but the end result depends on how much time you
want to invest.
40. Full Figure (Shading Part 1): So we are going to begin
with the two H pencil. Here's how I'm going to hold it. For most of the shading, I'm going to use
the tripod grip, but on certain occasions, I'm going to use this grip. So that I can actually use
the flat side of the tip, so I'll have more
surface and be able to make smoother lines
and smoother blends, especially where I
have round shapes, for instance, the forehead, the cheek, the breast, and certain parts of the legs. I'm going to start
with this area, going to start with
the neck and the face, and then move on
towards the hands, arms, torso, legs, and
finally with the feet. Take a look over this area here. Note how we have here this
small part of shadow. This shadow is caused
by the breast. And this area here
is a natural shadow, and that is not casted. See the difference of normal
shadow and cast shadow. The casted shadow will
be much more darker and it has somewhat of a
sharp edge here and here. And as it warps around
the cylinder of the arm, it tends to fade out, whereas this one fades
in and fades out. So we're going to
have to pay attention to this area and this one. And note how there's this
small portion of light here. Pay attention to
these areas as they tend to be a bit more
difficult to approach, and they require more attention. To be sure that you are not
going to mistake these areas, you can use the pencil
to h in this case, do the job just nicely
and make a small area, highlight your area
with an outline, and you'll know that you have to shade within that area
with a certain tone. And that's just what I did now. I've marked the areas. And now I'm going to
continue shading. The same technique is going to be applied
throughout the figure. So let's continue. So that we don't damage the drawing or
smear the graphite, we are going to place
a clean sheet of paper over the drawing so that when you are going
to shade this area, the bridg of the hand is
going to be on the paper. Make sure that you
hold the paper with your other hand so that
you won't move the paper. By moving the paper, you will
also smear the graphite, so pay attention to that. Make sure the paper is
steady and should be right. Yes. I've just noticed
a small mistake. If we zoom in and compare
this line with this one, we'll see that this one is actually lower
than it should be. What I'm going to do is that I'm going to make
another line above it like this so that it's going to
be correct now. I'll try to softly erase
the one beneath it. The one that is incorrect. For reasons such as this, I prefer using clutch pencils. The lines left behind are
much more easy to erase and correct than the ones left
behind by normal pencils. And since we are using
a two H hard lead, it's easy to make adjustments and erase some of the
values that are put wrong. So this is the first
layer of values. It's starting to catch shape. Now, before we continue, we should take a
quick break and come back and try to
spot some mistakes.
41. Full Figure (Shading Part 2): Right now we are
going to switch to the two B pencil and add
the more darker values. Afterwards, we're going
to take the brush and spread the graphy. Remember to constantly sharpen the pencil because if
it gets a dull tip, the shading is going to suffer a bit and the quality
of the shading as well. So always remember
to sharpen your tip. Now we are going to
take the brush and start to spread some
of the graphite. I don't want to spread the
graphite out of the figure. I want to spread in the figure. So I'm going to start the stroke from where
I have most graphite and go towards the bright areas. It doesn't matter what kind of stroke you use as long as you spread that graphite
in the finger. You can use a upstroke
or downstroke. A circular motion will
spread most graphite, but only only in that
motion area of contact. So the best way to spread it would be to actually
combine these strokes. That should do it. Now that
we have created our midtone, I just wanted to finish
doing this part. Alright. I'm going
to take the eraser and first erase
the outline a bit. Now, to add contrast. Let's begin with the face. Go to take the eraser
and erase out the light. Just make sure to
have a small tip to the eraser so that you
won't erase too much. Something like that, you do
nicely. Now, let's begin. And as I said, if you
erase too much or want to correct what you've erased, you're going to take
the paper spreader and spread some of the graphite. Now, as in my case, if the paper spreader is not new and if you have
already graphite on it, you can take a box cutter. So this and simply cut away the graph one. Now it's working really nice. And let's continue with adding contrast and
correcting as we go along. If you want to erase in a
gradient way like that, you have to have a flat
surface round and make sure that the eraser is thin
as thin as you can, because having a
thin flat surface, you won't be able to apply too much pressure in one point, and you'll have to make a repeated movement to
erase more and more. And that's how you get
that nice gradient. Mm. And we have finished
with the eraser. Now, what's left is to
polish the drawing. We're going to take
the clutch pencils and redraw some of the lines
and reshade a few areas. After that, if need be, we are going to
add some contrast again and maybe spread
some graphite a bit. But that's just optional. The last step is
going to be adding some dark black lines
with the four B pencil.
42. Full Figure (Shading Part 3): This is the two B clutch pencil, and I'm going to start directly with the
darker areas now. Okay. The figure is almost done. Now we have to add some
of the smaller details, specifically the eye, the nails, fingernails
and toenails. And lastly, the nipples. I'm going to show you a
quick trick how to do them, but they are going to be less. So let's start with the eyes. First, I want to erase them so that they are
white. They're pure white. And I'm going to use the eraser from the
clutch pencil because it's smaller and it has
a smaller contact area. But I just want to use the eraser to
add a few more details, certain parts at the
nose, the lower lip, and there and just a bit at the ear. D that you do it? And now, I'm using the
twoH clutch pencil for the IRS be very careful while doing this. You don't want to make any
mistakes now because this is something that
you do only once. All right. And for the second one. Done. Now I'm going to switch
to the tube pencil and draw a pupil. Just a small black
dot there also, and we are done. Now I'm going to
add the eyelashes. But first, I'm going to darken the line of the upper
eyelid, like that. Same thing on the other one. And I'll finally add the
eyelashes, some small lines, small strokes upwards from that darkened line
of the eyelid, up and very short lines
and just here and there. Only a few, not too many don't want to exaggerate that area. Just hint that they are there. Now for the eyebrows, the eyebrows are
going to be treated as a singular surface. We're not going to draw
each hair individually. A And now, for your lips, I want to make just a
dark line between them. And that's it. Done with the face. Let's try the fingernails. Because we are working
at this scale, we can't actually
go that much in depth with the fingernails. The best thing we can do
is to make a dark line to show that they are there and that they are
long, and that's it. T. Once we will get to shading this surface, the white fingernails are
going to pop out immediately. And as for the two
visible toenails, we're just going to
add some small value there and bit of shading. There. And now we are going to add some
light reflection. And that's it. Now, in order to
draw the nipples, here's a quick trick. As you see, light is coming
from two directions. You have light coming
from here and from here. And the nipple, in essence, being a small cylinder, that cylinder having
lights on two surfaces, you are going to draw
it by using two lines. One like this and one like this. Basically, a circle without
this area and this one. If the light would have
come only from this angle, then we would have simply drawn the circle
without this part, resulting only in that C shape. But since we have two light
sources, a stronger one, and a weaker one, I'll have
to draw those two lines. I'm going to switch to
the two H pencil because, again, this is something
you do only once. I want to put it here. All right. Now let's
draw those lines. A larger lower one. With some shading in between
from the two H pencil. And I'm going to take
the normal pencil and draw the surface. C to the circular motion and correct river
that's not good. That shaped the end. You go with the small eraser. To add two reflections. And that's as simple as that. For the other one,
the same thing. Only this time, we see
it more from the side, and that way we're going to
draw only one line here. And finally, there
is our figure. Now, the last thing
we want to shade is the black object the
figure is sitting on. That's going to be
the easiest part. And for that, we
are going to use a simple flat shading with no hint of volume because we want to kill that
shape, that form. We want to make it
as flat and dull as possible so that
all the attention will fall onto the
figure itself. But before we get to that, let's add those
small black lines. And we are going
to add them where we have them on the figure, for instance, here, here we have a large
surface and here. And maybe just one there. So let's do that. He Now, we have to be pencil. I want to correct this error. I want to make that edge softer. I'm going to use the paper
spreader to blend it a bit and make it softer. Now, it looks better. Going to start with
the Tube pencil. And I want to make such a shank, something like a flat surface. I'm going to leave a very, very thin white line there. So that we'll know it's an edge and continue
web chaining. As you see here, we
have a few gray spots, and that is because we have light hitting
the black surface. We are going to
highlight those areas. And we are going to
have two strong shades. We're going to have a gray shade and a black one with no blending
whatsoever between them. Are you going to start
with the black one? And now we have
finished our drawing. This brings us to the end of this video. I hope you like it. When you're going to
draw your figure, remember the basics, a good construction
is the first task. And then shading
is a long process. You're going to start from the brightest tones and work your way towards the darkest. It's a rigorous work. It's time consuming,
and you have to pay attention in certain areas. It's not something that
is done mechanically, passively, you
have to be active. When in shading, you have
to know what you're doing. Don't let your hand slip away. And I hope the tricks
I've showed you in the video will help you when you're going
to draw your figure.
 Ethan Nguyen, Portrait Artist & Art Instructor