Transcripts
1. Proportions Class Trailer: Hi, and welcome
to this course on the basics of drawing
human proportions. This course will cover
the different types of proportions and how to construct the figure from different angles
like front view, side view, and
three quarter view. This class is designed to be accessible to everyone with step by step lessons that will build on your skills
progressively. Well, I'm sure you're
excited to start improving your figure drawing,
so let's get started.
2. Intro to Figure Proportions: Let's talk about proportion. The first question that comes to mind is, what is proportion? The answer to this question
is that proportion is actually a ratio between the elements of the
human body and the head. Usually, this ratio depicts the total height of the figure and the
height of the head, meaning that the head is
used as a measuring tool. For instance, the
average adult male has a proportion of
seven or 7.5 heads. This means that in the height
of the average adult male, the head fits in about
seven or 7.5 times. Or we can simply say
that the figure is seven or 7.5 heads tall. Now that we know
what proportion is, you also need to know that it is determined by a wide variety
of factors such as height, body weight, body
type, gender, age, occupation, physical traits,
genetics, and so on. Height and eight being the
most important factors. Why is that? Well, let's imagine a baby
in the baby's height, its head would fit
almost four times. Now let's imagine a young
adult and its height, its head would fit in
about seven times. You should get the sense
where I'm going at. But if all these factors
influence proportion, then we would have
an immense number of different proportions. True. But for you as a beginner, you only need to know three
fundamental proportions. The average adult male, the idealistic adult male, and the idealistic adult female. Let's start with the
average adult male. This is the proportion
you'd have in real life and it is 7.2 heads, 1,234,567.5 There are a
few important landmarks in the body that help
finding proportions. The first important landmark
is half of the total height. In this case, it is this line, and it is slightly
above the crutch. Now one head above the
crutch is the navel, and one head above that are the nipples at one head or one unit apart
from each other. The elbows are slightly
above the navel. The knees are two heads
above the ground, but counted as half a unit, one unit, and another half, adding up to two units in total. The width of the body, the
entire body is two heads wide. All seems good, but
there are a few issues. That all the landmarks are
exactly between units, and therefore it can get confusing when
you want to draw it. That's why for a beginner, the eight head
proportion is better. Not only it's more
aesthetically appealing, but it also is more practical. Now, the first difference you
see is clearly the height. This figure is taller. Therefore, the total height
and the head ratio is bigger. Which brings us to the next
thing you need to remember, as the total height of
the body is smaller, the head in comparison to that total height will be
bigger like in our situation. If the height is bigger, then the head in comparison to the height becomes smaller. Anyway, let's move
on to the landlords. In this case, if we divide
the total half into, we would have this line
which is exactly on crutch, we already start to
notice some differences. The navel is still one
head above the crotch. The nipples are still one head above the navel and one
head apart from each other, but the elbows are on
the line with the navel. The finger tips are usually
health unit below the crotch. The wrists are exactly at the
same height as the crutch. The knees are just above
two heads from the ground. You have 12 and exactly
the knees right there. In this case, the width of
the body isn't two heads, but two and a third heads, or even 2.5 heads. You see that this
particular proportion removes a few of the
landmark position issues. And because of that, it is
easier to follow even more, it's much easier to build, and we'll get to that
in a few minutes. Lastly, the idealistic
adult female, as you can see, and we all know women are shorter than
men most of the times. But despite that, the proportion is still eight heads tall. We have 1,234,567.8 heads. This means that the
same rules apply, but at a smaller scale. You can clearly see
that this figure is shorter than
even this figure. But the landmarks are in the same position as in
the eight head proportion. If we divide the total
height of the body in, we would find the line on
which there's the crutch. One head above the
crutch is the navel, head above that are the
nipples, and so on. All the landmarks
keep their position, but with a few differences in with the width of the
body is two heads, not two, and a far or 2.5 The waist is a bit
more than a head wide. The hips are two heads wide, even more the shoulders and the calves are more smooth
than in the male figure, where they tend to
be more angular. These are the major
differences between these fundamental
types of proportion. The one you really
need to know is the idealistic male proportion. Because of this, I will
now show you how to draw in this proportion
in three different views, front side, and three corners. I'm going to draw a
simple diagram and explain you step by
step, the whole process. I'm going to tell you how
you can practice at home so that you embed in
your mind this process.
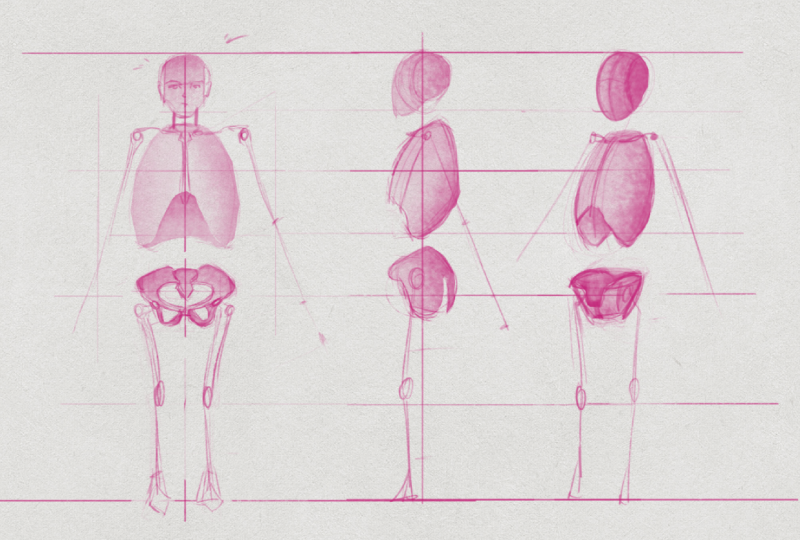
3. Constructing the Figure (Front View): When drawing from
the front view, we're going to start with
a straight vertical line, like so this will determine
our figures total height. If we divide this in half, we'll find where
the crutch will be. Now if we divide the
upper half in two, we will find the line on
which the nipples will be. To find the distance
between the nipples, we have to find the
head or one unit. In order to do that, we
need to divide and have again the remaining upper
part. Let's do that. There is the head. All right, now let's take
this unit, put it here, and find the nipples around here. Now we need to find the navel. In order to do that, again, we're going to divide this
unit in half, right there. Now we can find the shoulders. How are we going to do that? We're going to take two
lines and drag them from the navel
through each nipple. I'm going to make
those lines bigger, just so that you can see
better what's happening. All right, now we
have these two lines. The next step is to find half of this unit just around here. We're going to take the ruler through that point right there. We are going to mark two
spots on the same line, on those two lines that go from the nap
through the nipple. And here we have our shoulders
on these two points. Just to make sure that
these are correct, we can measure and see if they are almost two
heads apart and they are. Up until this point,
everything is correct. Now we can build
the rib cage and the pelvis so that we can move on afterwards to the
legs and the arms. To build the rib
cage and the pelvis, we are going to draw an oval starting from the
line of the shoulders, which was here half of
this unit right here. From that point to the crutch, how wide should that oval be? Well, it should
be around half of the distance between
shoulders and the nipples. That line on that line, we're going to have the
extreme point of that oval. And the extreme
point is going to be at the middle of this unit between the navel and
the nipples here. That is going to be our
extreme point for that oval. The extreme point
of the whip cage. All right, there and there. The same thing here. All right, now we
need to section it. We're going to start slightly
beneath the nipples. Here. We're going to move our way down slightly
above the naval, but half of the distance between the nipple
and the naval. That's half the distance
between the nipple and the naval striking above. The naval would be around here. We have that, the same thing
repeated on the other side. We're going to connect
that point right there to that extreme point. And there you have it.
Now for the pelvis, somewhat of a fair distance
beneath the navel. There's going to be a point from that point
you're going to drag a line in an arch way slightly above that first
initial point on one side. And the same thing
on the other side. On the lower part,
you're going to make a small V like this. This is the silhouette
of the pelvis. The pelvis is a pretty
complex bone structure. It's a combination of several
bones, to be precise. There is no point in going
into details in that. You just need to know
the outer extremities so you can focus only on
proportion in this section. But with that done, you have already the
most complex part of the drawing finish. What's left is to draw the
legs and then the arms. For the legs, we have to
find the knees first. And how we are going to do that, we're going to divide this
lower unit into have, just above that point, right there are the knees. We have one knee here
and another one here. Now we can simply draw the legs. We can now add the color bones like that. Simple. The color bones are, are starting from, have
a unit beneath the chin, on the shoulder line. They go up a bit and down again. If you were to compare
it to a letter, it will be a very stretched
M, capital M letter. Now let's draw the arms. To do that, we're going to
take a line, the shoulders, and drag it all the way down to of the distance
between the crutch and the lower part of the knee
to find out where that is. Around here. Here we have our fingertips. Here we have our fingertips. And on the same height with
the navel there is the elbow. And on the same height with
the crutch is the wrist. This distance the length
of the entire arm when extended with the palm
also extended like this. Of course, depending on posture, the shoulders can be
placed differently. And that strictly depends on the characteristics
of each individual. But this is a general rule of proportion so that
you know how to draw. And we're going to repeat that same thing on the other side. I'm going to draw the line from the shoulder all the way to have a distance between the
crutch and the lower knees. The elbow and the
wrist. And that's it. There you have it. Let's move on to drawing the figure
from the side.
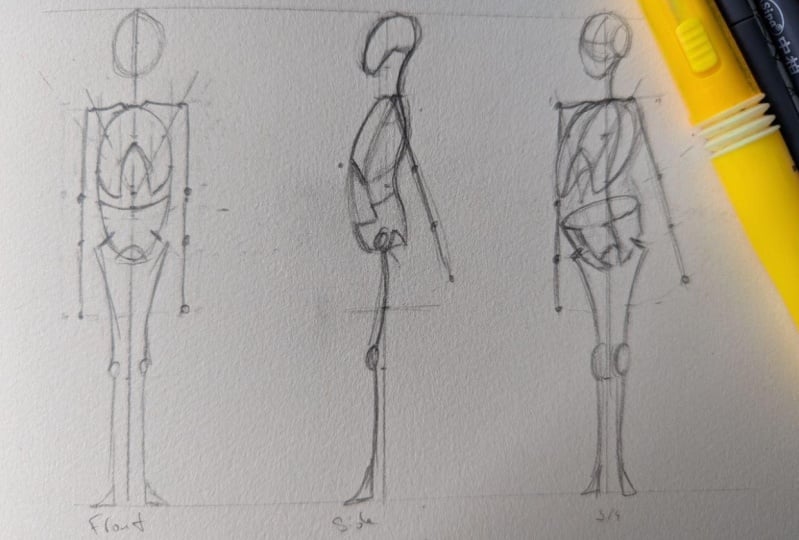
4. Constructing the Figure (Side View): Drawing from the side, things are going to get a
bit more difficult because we won't have symmetry anymore when drawing
from the front. We had symmetry on both sides, but the figure is
viewed from the side. We don't have that anymore. We can't draw a
straight vertical line anymore because the spine
is arched like a nest. But we can take our extreme
points and work with them. We have our two extreme
points that are going to define the total
height of our figure. We can start to
divide this in half, and so on until we get
the units that we need. I've divided this segment, this invisible segment, in half. Here we know where
the crutch will be. That's a start dividing
this part in half. Again, we're always going
to work with halves. Again, we have our units here. Let's start with the head. This time we know that the head or the human cranium has this
part missing right here. So we can actually put
down there a sphere or a oval because the spine starts from here,
That point there. Now we're going to divide
this unit in half. From there, it's going
to start the rip cage. It will connect with the
lower part of the pelvis, which will be right here. If you remember that oval shape, when it's viewed from the side, it looks like a stretched beam. It's going to go down like
this and then come back in. And how much? Well, this point right here is the navel right above that
is that extreme point, that lowest point
of the rib cage, which will be around here. We now can draw the rib cage which should be about this side, if it has about 1.5 in height. And from this outer point
to this right here, it should be a head. It's one head wide and
a and a half tall. Now for the pelvis, this is a really
complex bone structure. As I said before, it can
be enclosed in a box, but that won't look all that good in this particular drawing. So I'm going to draw
its silhouette, which is pretty complex. But to make this simple, you can draw a novel, then make a section like this. As I said, that bean shape, if you make this dotted line
right there, right here, you see that stretched
bean shape here, you would have spine. You have an arch going
in, one going out, another one going in the last
part of the lower spine. That transforms actu into
the sacrum, goes out again. All right, but the
hardest part is done. So we can now finally move onto the legs and arms
and we're done. We're going to take
that lower part, that lower unit, we're
going to divide it in half. Above that point, we have the knees here at the lower
part of the lower part, towards the mid
part of the pilps. We have the socket
for the femur. The femur is slightly
arched backwards, then the tibia that is slightly
arch backwards as well, and finally the foot. With that done, we can move to building or drawing the
arm and we're done. The arm with the finger
tips extended at full length should reach around this line when
hold straight down. But because of the
drawing, if I do that, it's going to overlay with this and it's going to look awful. What I'm going to
do, I'm going to rotate the arm
slightly backwards. If I do that, I'm going to use this marker to show you the center of rotation. Should be here, right there. If I rotate it like this, if that line turns into an
arch, I'm going to do that. Have the center
of rotation here, where the shoulder is right there and there we have our arm, elbow right there.
Let me zoom in. I've took this point right here. I've made an arch
starting from there, and another arch
from the crutch. By doing so, I found out where the elbow and wrist should be. Here are the fingertips. Remember that this length of the arm is only when
it's fully extended, with the finger tips pointing
outwards at maximum. In the normal case, the arm is going to be relaxed. It's going to be
slightly arched, and the finger tips are
going to be arched as well. So they're going to
stay something like this and not fully
extended like this. But this diagram is to show you the full length and the straight
posture of the figure to see exactly how
proportion works when the body is fully extended
and in a straight position. With this done, and this also, we can now finally move
to the hardest part, which is drawing the figure in proportion and in
the free quarter view.
5. Constructing the Figure (3/4 View): When drawing in the
three quarter view, the issue of rotation occurs. We'll see more from one side of the figure and less
from the opposite side. Besides that, proportion
still remains the same. And as well as the way
to find landmarks, we are going to take
the extreme points, the top and the lower points that define the total height
of the figure as always. Then divided in half. Here we have the crutch again, there we have the line on
which we'll find the nipples, dividing the upper part in half. Again, there we have
the unit for the head. Now lastly, I want to
divide this in half. Also we have the
naval crutch nipples, the highest point of
the figure starting off with a sphere and
adding to that sphere, the facial structure there. We have that. Now let's move on to drawing
that stretched being, so we have the rib
cage and the pelvis. I'm just going to make a few dotted lines that
will be used as guidelines. Half of this section right here is where
there going to be. You know that here
is where the oval or the bean for the rib cage
and pelvis will start here. It's going to end to
try and make that, I'm going to make that
with dotted lines. Good, wider as a guideline. You can think that in the rib
cage or the chest cavity, two heads fit perfectly
in as volume. Because we are not drawing in two D like from the
front or the side. We are drawing in three
D, we have volume. Now we work with three D shapes. We would have about a bit
more than a head in width, but the height stays the same. So from here, 1.5 to here, the lowest part is
going to be here. Since it's free, we know
that here is the front. It's the free quarter
view we have here, that cavity in the
chest and all right, there we have it
now for the pelvis, as I said before, it's a
pretty complex bone structure. I'm going to try to simplified since this stretched, being stretched
sphere in the end, we cut it with a straight plane. Then we're going to
have here an ellipse. Because we are cutting away
from a sphere in the general. Notice that's why we'll
have this form there in the simplified way. This is pretty much how
tall this looks like. We would have here the spine that's continuing down there. It's making that arch
I told you about. Again, the hard part
is basically done. Now we can divide this
place right here, this last lower segment. And here we have the knees. I'm going to repeat the same
thing on the other side. And if we figure out where
the center of the skull is, the center of the skull is on the same axis with the
center of gravity. It's very important
to know. It should be around right here. If you want to really
find out where it is exactly going to take a line, go through the half
of the sphere, right in the center
of the sphere. Going to work your way down, it's going to be right there. Now let's take a
line through that, all the way throughout
the entire figure. And you can see how that line goes right through the
center of the chest, the center of the pelvis between the knees and between the feet. What's left now is to find the arms to draw
them and we're done. The navel should
be on right there. If we find where
the nipples are, then we can build and find out where the
shoulders are exactly. The navel is here, and we know that the Naples are one
head apart from each other. But since it's rotated, then perspective takes place and it takes over
the entire drawing. It won't be an entire head, it would be about half a head there. We have it. This
is the shoulder line, this is where we will have
the color bones right there. The other one here,
first shoulder and the second shoulder. I'm going to tilt the arm slightly sideways so it won't overlay the drawing, but I have to finger out, first of all those
main landmarks, the fingertips, I'm going to divide this section here and
a half to be around here. And then I'm going to
take an arch coming up. I know that on this line
where the crutches, I'll have the wrists on
this line, I'll have elbow. Want to rotate it
there? I have it. There's my arm. Elbow right
here and wrist right there. We have the shoulder right here. In this situation, I will draw the hand pointing straight down so you can see
what's happening. Because the body is rotated
and it's in three D. Drag this started line along this one also the one for
the cut is already there. I'm going to drag
it straight down. I'm going to use the
ruler, just to be exact, 12.3 there we go. We have here a
visible part here. Lastly, of course,
here's the wrist, and here's the elbow. Notice how the elbow is slightly underneath the
lowest point of the rib cage. All right, so this should
be pretty much it. This is a very
simplified diagram. I've used the simplified
volumes of the skeleton. So we have the rib cage,
the pelvis, the cranium, and not an entire body because in proportions
we're interested, especially in the skeleton. If this figure
would have been of a flesh and blood
human realistic figure or a live drawing of person, then I wouldn't be
seeing this part at all. I would just from the
hand, the shoulder. And maybe depending on
how relaxed the arm is, I would see a bit of the
fore arm, but just a bit. And I would see the entire
arm from this side. But even though you
don't see what's behind the figure at this angle, you have to know
how it is built, how it works, so that
can draw it correctly. As a home assignment, I want you to draw one of the diagram figures
alongside the video, then try to draw it by yourself. If you have problems, look at the respective
part in the video, then try again until
you manage on your own. Then wait for about 10 minutes. Afterwards, draw again
without the video. Pause for 40 minutes this
time and repeat the drawing. Do this as many times
until you are able to take long pauses and draw the diagram by
heart without any help. You will do this with
all three views, and I guarantee you that by
the end of this assignment, you will be able to draw
correctly in proportion.
6. Intro to Perspective: Hi, and welcome to this video on drawing the human
figure in perspective. We will begin this video with a short introduction
on perspective. And then put the figure in
different situations of perspective so you
can see how it is deformed by perspective. Without further ado,
let's get right into it. So what is perspective? Perspective is a
representation in arts of an object
as seen by the eye. Perspective is affected by the distance from the
eye to the object. Based on that distance,
two distortions occur. I'm going to use
these two pencils to show you those
two distortions. The first distortion is related to the scale
of the object. These two objects are at an equal distance
from the viewpoint. In this case, it's
the camera recording. But when I move the dispencil
towards the camera, it seems to be larger
than dispencil. That means that the distance, the longer the distance from
the viewpoint to the object, the smaller the object will be, the shorter distances the object will be or will
seem to be larger. The second distortion is called foreshortening and it is related to the
orientation of the object. Now this pencil has two points, one here and one here if
I orientated like this. So I leave one point there
at one distance and I move on distance point closer, I change its angle
and its orientation. And therefore, it appears to be foreshortened because of that, it seems smaller than this one. If I go even further
oriented like this, we only see the
tip of the pencil, therefore its way smaller than this one laid
down horizontally. These are the two distortion
that perspective creates. And I'm going to use this
drawing to show you how these, these illusions can affect
more complicated optics. We have here an
ellipse or an novel. It could also be an egg. If we orientated like this, trying to figure out a
good angle like this, you see how it's
starting to change. I try to orientate it like this. If I struggle a bit more, I can make from
that oval a circle. This is how you can create simple illusions based on
perspective and foreshortening. These effects will also
occur in the human figure. I'm going to use this drawing to show you that now this is the human figure as seen from the front
full frontal view. But if I the paper like this, it would seem that
we are looking from above at a human figure. A few interesting
effects occur here. First of all, the head seems larger than the
rest of the body. The legs are shorter and the
arms are almost as long, as long as the legs
are or even longer. These distortions occur
within the figure, but not only in this
single surface drawing, but also in three D. If we turn that around now, it would seem that
we are looking from beneath or from the ground
upwards to the figure. The same thing
happens. What's closer to the viewpoint is larger, and what's further away
from it seems smaller.
7. Types of Perspective: Let's take this
grid for instance. Now the first thing you're
going to notice is that these squares from
the top of the page, the closest to the viewpoint, are larger than the ones here. But also squares
still are squares, but the ones that are away seem to be more of
a rectangular shape. That's not it. All
these lines here, these vertical lines have
a equal distance up here. But as they go away from the viewpoint
increasingly smaller. If we were to continue
these lines infinitely, they would eventually
meet at a certain point. That point is called
a vanishing point. This is how we control perspective with those
vanishing points. Now, there are
three situations of vanishing points with a
single vanishing point. When we look at an
object from the front, we rotate that object, we will have two
vanishing points. If we look at an object that is rotated and look
from above it, we will have three
vanishing points. Now let's quickly go
through all of those three. First, we will need
the horizon line on which we will have
the vanishing point. So this is our vanishing point. Now let's take the
first situation with only one vanishing point. The best example I can give you here is with some
railway tracks. Imagine yourself sitting on some railway tracks and you're
looking straightforward, and they're in a straight line. Eventually those railways will
meet in a single point on the horizon line as shown by this drawing.
But that's not it. As I shown you with
the grid earlier, the railways will have
those wooden beams called sleepers. I believe they'll have a distance equal distance
from one to another. But because perspective, that distance will
be increasingly smaller, something like that. But perspective won't affect just what is underneath the horizon line but
also what is above it. Let's say that we have telephone poles right
next to the track. Because of their height, they seem to be above
the horizon line. But if we take two lines
from those extreme points and drag them all the way
to the vanishing point, we can build the rest of the telephone poles
correctly in perspective. This is the first situation with only one vanishing point. Now let's take the second
situation in which we have a cube and that cube
will be rotated. The first thing we need is a starting point,
which will be this. Let's say that these
two points here will be our two
vanishing points. We're going to draw a line from our starting point towards
those two vanishing points. Now we can start to build our, there we have the first surface, our contact surface or
bottom face of the cube. Now we can erect the verticals. In this case of perspective, the verticals are not affected. But if we would have had
three vanishing points, then it would have been. I will show you that
in just a moment, after we finished with the E. We have here our intersection
between the verticals and those lines from the main points to
the vanishing points. So we created the edges and
exterior points of our cube. I'm just going to create the
top surface and we're done. This is the perspective
with two vanishing points. Now let's move on to the final situation with
three vanishing points. First I'm going to draw the
from the previous situation, and then I'm going to add
that third vanishing point. I'm going to show how that
affects the entire drawing. So we have our
points right there. And I'm going to darken those
lines so you can see them. Now the vanishing point is
usually or above the object, or in this case I'm going to put it right beneath the object. In this case, all
the vertical lines are going to converge to
that furred vanishing point. Let's do that and see how the
cube is going to look like, right, the first vertical line, and we will get new
intersection points. I'm going to really
darken out the new cube, the one that is
heavily distorted. Now this is how it looks. I'm even going to erase
the initial lines from the first and leave only
these new lines. In this situation, with
free vanishing points, the object is very distorted. And it seems that we are viewing the
object either really, really close to it
or from above it. This is a very rare
type of perspective, and you will rarely encounter it when drawing
the human figure. When drawing the human figure, you're going to generally use this type of perspective
because you're going to enclose the figure into a box and put that
box in perspective. In special occasions when
you're going to draw the figure from above or
from the ground level, then you're going to use
this type of perspective. It's pretty important
to know about it, but you won't use it that much. This is your work horse. Now with this done and explain, we're going to move one step closer into drawing
the human figure.
8. Drawing Spheres in a Box: Let's draw three circles,
one above another, First 1, second one, and the third one, all right? Now, these circles are actually going to be
treated as spheres. They can be enclosed
in a tower shaped box. Let's draw that box
in perspective. And then draw the
spheres in that box. All right, so we
have our box and now let's draw the sears. Notice how the spheres are
overlapping each other, and that means we won't
see the full sphere. We're only going to see the first spheres of
the one that is on top. We're going to see
the full sphere here. But the middle one, you're only going to see what's left as well as the bottom one. We won't see that part. And this part based
on this principle, this is how we're going
to draw the figure. Put in perspective, we're going to enclose the
figure into a box, and then draw it
within that box. I'm going to take a new
piece of paper and try, try to draw the spheres. But in a box viewed from above. Please note that the box is heavily distorted
by foreshortening. Now let's try to
draw those spheres. We're going to start with the first sphere,
the bottom sphere, the second one and the last one, right? So let's
define the outline and erase what we don't see. This is how it should
look like when those three spheres
are viewed from above. Note the difference between
these two situations. Of course, what is closer
to the viewpoint is larger. Therefore, the sphere on top is larger than the sphere from the bottom as well
as the middle. Whereas in this situation, differences are
not, are not that obvious or they're
not there at all. But drawing in a perspective with two vanishing
points is essential because you will want the position of the
various elements of the human finger to
be in the right place. You don't want to put a shoulder to up and the other 12 down so that
they will look strange. Or the placement of the arms, the elbows, the hips, the knees, they all
are in perspective. And with this example done, we can finally start drawing the human
figure in perspective.
9. Drawing the Figure in Perspective: Putting the human
figure in perspective. There are a few important lines. The first important
line is this one, on which you will draw the
clavicles or the color bones. The next line is the line
where the elbows are, then the line of the hips, the line of the
knees of the fiend. These are your most important
lines besides these lines, the line of the finger tips. But depending on the posture and the position and gesture of the figure you're
going to draw, this line will change. It might be, it
might not be there. That's why this is
a secondary line. There is the line of the eyes. This is also secondary
because you won't put the head entirely
in perspective. It will be affected
by perspective, but not that much. So you have an entire
line dedicated to it. You will only have this small cross that is going
to be drawn on the head. And these are the only
lines that are going to be extended so that they will
help you draw the figure. Now let's draw the figure
in the free quarter view. And let's begin with the box in which we will
enclose the figure. This will be the box in which we will enclose our human figure. Let's begin drawing it. First of all, we're going to take the middle of the lower surface
and the middle of, or the center of
the top surface, and draw a vertical line. Now that line is going to be divided into eight equal parts. The first one is going to
be here, here, and here. We have now four equal parts. I'm going to do
that again to get a 1,234,567.8 That's it. Now we can also divide this line right here and take a vertical
line down the middle. We can also divide that in equal eight equal
parts as well. But that would be
somewhat of an overkill. That's why we're going to
divide it only in half. Again. We're going to do the
same thing on this surface. Now we have the perfect
position to build our figure. So let's begin. We have, we all have the
head right there. Then there's the rib cage here, followed by the pelvis. And this should be the
basic construction. Now to this assembly, we will add the
arms and the legs. But first let's give these
shapes some definition. Let's draw the legs. Yeah, And now lastly, you are note that the rib
cage has a volume. And because of that, I don't see the entire arm on this side. But I do know that it is there. And therefore, I can
draw what it is visible. This should pretty much be it. Now I'm going to
use this drawing and show you those main
lines that I put here. I'm going to draw them
here in perspective. The line of the
knees, of the feet, of the hips, elbows, and of course, of
the color bone. Note how these lines change
angle as they progress. This is caused by
perspective and effect of the lines converting to that one vanishing
point I told you about. Now I've made this complex
drawing to show you how, how to draw it correctly with complicated method when you're going to draw your
figure in perspective. If you are at the beginning the box and use it to draw
all those main lines. The main axis that
you're going to divide into eight equal parts and
then put in perspective, main lines I told you about. And then you can easily
draw your figure. If you feel that
you are ready and know how to draw the figure and have an
idea of perspective, then you can go ahead and
use the important lines. And use only these lines, put them in perspective, and then draw your figure. But if you're a beginner, I highly recommend using this box method and
just practice on this.
10. Three Point Perspective from Above: Let's try something more
interesting this time. Let's draw a box viewed from above and see how foreshortening will
affect the human figure. Note that this box will have a perspective with
free brandishing points. So this should be it. I've put down the diagonals of the upper surface to find the center of the same thing I did with the lower surface. Found the center, and now I have the main
axis of the figure. Now I can divide this
in eight equal parts, but that would be wrong, because as I showed
you with the grid, what would be closer to the
viewpoint will be larger. Dividing this segment in eight equal parts
would be incorrect. Let's try to A eyeball. Eyeball. The entire thing. I can show you the
drawing we did earlier and we're
going to try to reproduce that here only
with the human figure, so we have a large head, so we have the head there. Then we would have the rib cage. Oh boy, the pelvis. And lastly, the legs. And of course the arms. Yeah, let's try to
darken this out. And this should be it. This is how the figure
looks in this situation, the head is very large compared to the rest of the body because you are looking
straight from above. And of course, because I've exaggerated the
perspective quite a bit, the head is very close
drawn to the viewpoint. The distance from the eyeball to the head in this case
is not that much. And because of that,
the head seems disproportionately large compared to the
rest of the body. This is not necessarily wrong, but it is one of
the illusions that foreshortening will
create when it is used. Don't think that this
drawing is wrong. This is just highly exaggerated so that you
have a sense of what's happening and you capture
the essence of this effect. Now see the rotation
of the angles. The rotation is very steep. And let's make
these lines darker. See how exaggerated the
perspective really is? You see how exaggerated
this all is. If we would have drawn
these lines longer, then they would
have met somewhere reasonably far from the paper. In most cases, the
vanishing points are very far away from
the objects if you have a good distance
from the object to you, from where you are viewing it. But since this is so close, the vanishing points are
fairly close to you. Because of that, all
these illusions occur. But the line of the color bones
respect this perspective. This line right here, these
lines are almost parallel. And the line of the legs, I mean the line of the feet are clearly respecting
this line right here.
11. Three Point Perspective from Below: Now let's try to do the same
thing with foreshortening, only this time we're going to view our figure from beneath. Again, this type of perspective
is highly exaggerated. After this, I'm going to show
you another way of drawing the figure from a
different perspective as before, the diagonals here. And here we have our axis line of the feet. Now we can begin. We would have the
head really small, this time just going
to zoom in a bit. We have there the head
real small and then followed by the rib, then the pelvis, which is
almost as big as the rib cage. Now we'd have the feet
and the legs right there. And the hands, of course. All right, let's give these
shapes definition now. And we're going to
start with the pelvis. So it looks, it's
going to look a bit odd this time there with me, it's going to look
something like this. It's very hard to draw
from at this angle. Then we would have a rib cage, everything we see underneath it. And lastly, the skull over
the head right there. Now, since we have the line
of the shoulders right here, right, That we don't see
the color bones anymore, but we know that we have
here and here the shoulders. So that would be one arm
and this is the other. Here is one leg and
there's the other one. And of course the feet. This type of angle and this perspective type is
the hardest to draw from. Drawing, as you would see below, the figure is very hard, but if you enclose
the figure in a box, it will help you with this. And now let's move on to that
angle I was talking about. That angle is when you have the floor or the surface right there to measure it so that I can capture it
on the camera right there. The figure is going
to be distal. All right, so now we
can somehow divide it. I know that the middle of
this height is around here. But I want to put
the middle bit above it so I can adjust
the perspective. Now I have the line that's going through
the top of the skull, right there, right here. Now, since I have
these two lines, these two lines that are going to converge on the
vanishing point. I can adjust the rest of my
lines based on these angles. I know that I have here an
angle something like this. Not to tilt it, and this one
about tilted as this one. Since I have these
lines put down, I can start to draw my figure without worrying that I won't draw the
perspective correctly. I can darken those lines that you'll see what's
happening here. And there we have it based
on these primary lines. Because I started with
the two extreme lines that are going to focus
towards the vanishing point. I can easily adjust, figure out the rest of the
lines that are going to go through the parallel elements or the symmetric
elements of the figure. For instance, the
shoulders, elbows, knees, hips, fingertips, feet, all these lines
are in perspective. This is another way of
trying perspective. But this version would be for those of you who are
a bit more advanced. All right, and now
let's try to move on to figuring out what
is happening with the arm when it's put
into perspective.
12. The Arm in Perspective: First I want to draw a head. And so let's do that. So we want to free. All right, so this is done. Now, if we rotate the
arm in the same plane, frontal plane, it would
have the same length. It is going to adjust
the clavicle and then we know that the humerus is going
to be this long. And here is going to be
the elbow right here. Now what happens if I
try to move the arm and orientated towards the
viewer or the point of view? Well, then foreshortening
is going to happen. This is the arm pointed
downwards horizontally. Now I'm going to rotate it
and angle it like this. This is going to be the
new angle of the R. Because of that, the
humerus is going to appear a lot more shorter
than it actually is. Just going to adjust the
clavicle again where the humor starts and
where it is going to end. Now having that there is correct to help you
better understand this, I'm going to continue
with this positions with the radius and then put
the hand like this. And I'm going to replicate
that in perspective here. I know that this is the
direction of the arm. The radius is shorter
than the humerus, that means it's going
to be this long. And then finally, we're going to have the hand right there. Not the difference. I'm going to use those same two pencils, the arm full frontal place horizontally and then
from the same point, put like this, I'm going to
try to hold it like this. This is the effect of
foreshortening and how it affects the drawings and how perspective will affect
the human figure to make it seem a wheel and
maybe even a bit exaggerated. I've made the hand also
bigger than it is here. For instance, I've got it here, like this big here. You can obviously see
that it is a bit bigger. Not by much, because it's not necessarily a lot closer to the viewer,
but it is closer. I have to make it
slightly bigger. With this explained,
I can move on to the last drawing
of this video. I'm going to show you how figure with arms wide open
orientated towards us, not the free quarter view, but more towards us, More rotated towards us. How that is going to
affect the figure. How one hand, the hand
closer to us is going to be a lot larger than the one
farther away from us. Let's get started
with that drawing.
13. Perspective Figure in 3/4 View: It is going to be
the last drawing or diagram in this video. It's going to be a
bit complicated. Let me draw here the figure. You'll understand how
it's going to look like. I'm going to draw it from above. This is, let me zoom in. This is going to be the
head and he is going to have arms wide open like this. But, um, this is
going to be rotated. Some thing about this, this is how rotated this
position will be towards us and we are going
to view it from here. It's a, it's a bit
more than that. The free core view would have
been a bit less rotated. It would have been
something about this. But we're going to use the
more rotated version because we want to exaggerate
the perspective a bit so that you'll see what's
happening with the figure. I'm just going to quickly
sketch in the head and record. So that will be the head now, 123. So this will be the outer lines of the angle
for our vanishing point. Now let's move on
with the rib cage. All right, so with this done now we can figure out where
the hands are going to be. So we know that here is the center part between
the two color bones. Let's check angle
is correct and it is what's left to draw is defining the
lines and we're done. The first color bone
and where the humor, that's where the
elbow is going to be, radius and the rest. And of course, the hand. Now we can take the pencil and use it
as a measuring tool. The total distance and length
of them up until the wrist. From the shoulder,
the wrist would be about this much. We
can put it here. We can shorten that have
to get the right length. This is a simple trick you can use to calculate perspective. This will be the hand. This is a pretty
nice trick to use when you're drawing perspective. To take distance
length to measure it, and then to put it on
the other side and then to shrink that in this case, I shrunk that length by half because that's approximately
what's happening here. And it seems correct. It feels correct,
and it is correct. Then how did I get that
size of this hand? Because it's farther away from the point of
view than this one. That means it's smaller. We're going to take
the fingertips from here and put
them in perspective. Draw the lines to
the finishing point. And we will get right here, our fingertips for this hand. And that's it. Along this video, you have seen how perspective affects
the human figure. How foreshortening
affects the rotation and angle of the figure
towards the viewer, the eyeball or the
point of view. When you're going
to draw the figure, and you will have
all sort of stances, poses, and gestures, always take into account
these two optical illusions. The distance and the
size of the object, and perspective,
and foreshortening. If you keep these
two effects in mind, your drawing is always
going to look realistic.
 Ethan Nguyen, Portrait Artist & Art Instructor