Transcripts
1. Introduction of the class: Hello, everyone, and welcome to my class in which we
are going to learn how to make a Christmas tree on canvas by using paper
quilling strips. Yes, we think that paper quilling strips are
the simple piece of paper. But no, with the help
of the paper strips, we can make intricate
and beautiful designs which we can't even think of. Yes, my name is Saba, and today, I'm going to teach you how to make a Christmas tree on canvas. Paper quilling is a
simple and relaxing craft with the help of which you
can make beautiful designs. In this class, I'm going
to teach you step by step how to make the festive Christmas
tree on the canvas, which you can use it in the
many ways you can gift it to someone or you can use as an embellishment for
the greeting cards, or you can also make
it as a wall decor. You can just frame it and
place it on the wall, and even you can use it
for your small business. If you want to start
your small business, you can use this technique. Most important, this is
complete hands on class. So just take your tools, paper stripe, and
just start with me. And don't worry if you're new
to this class. It's fine. I'm going to teach you every detail whatever we
are going to make. So what are we waiting
for? Let's get started.
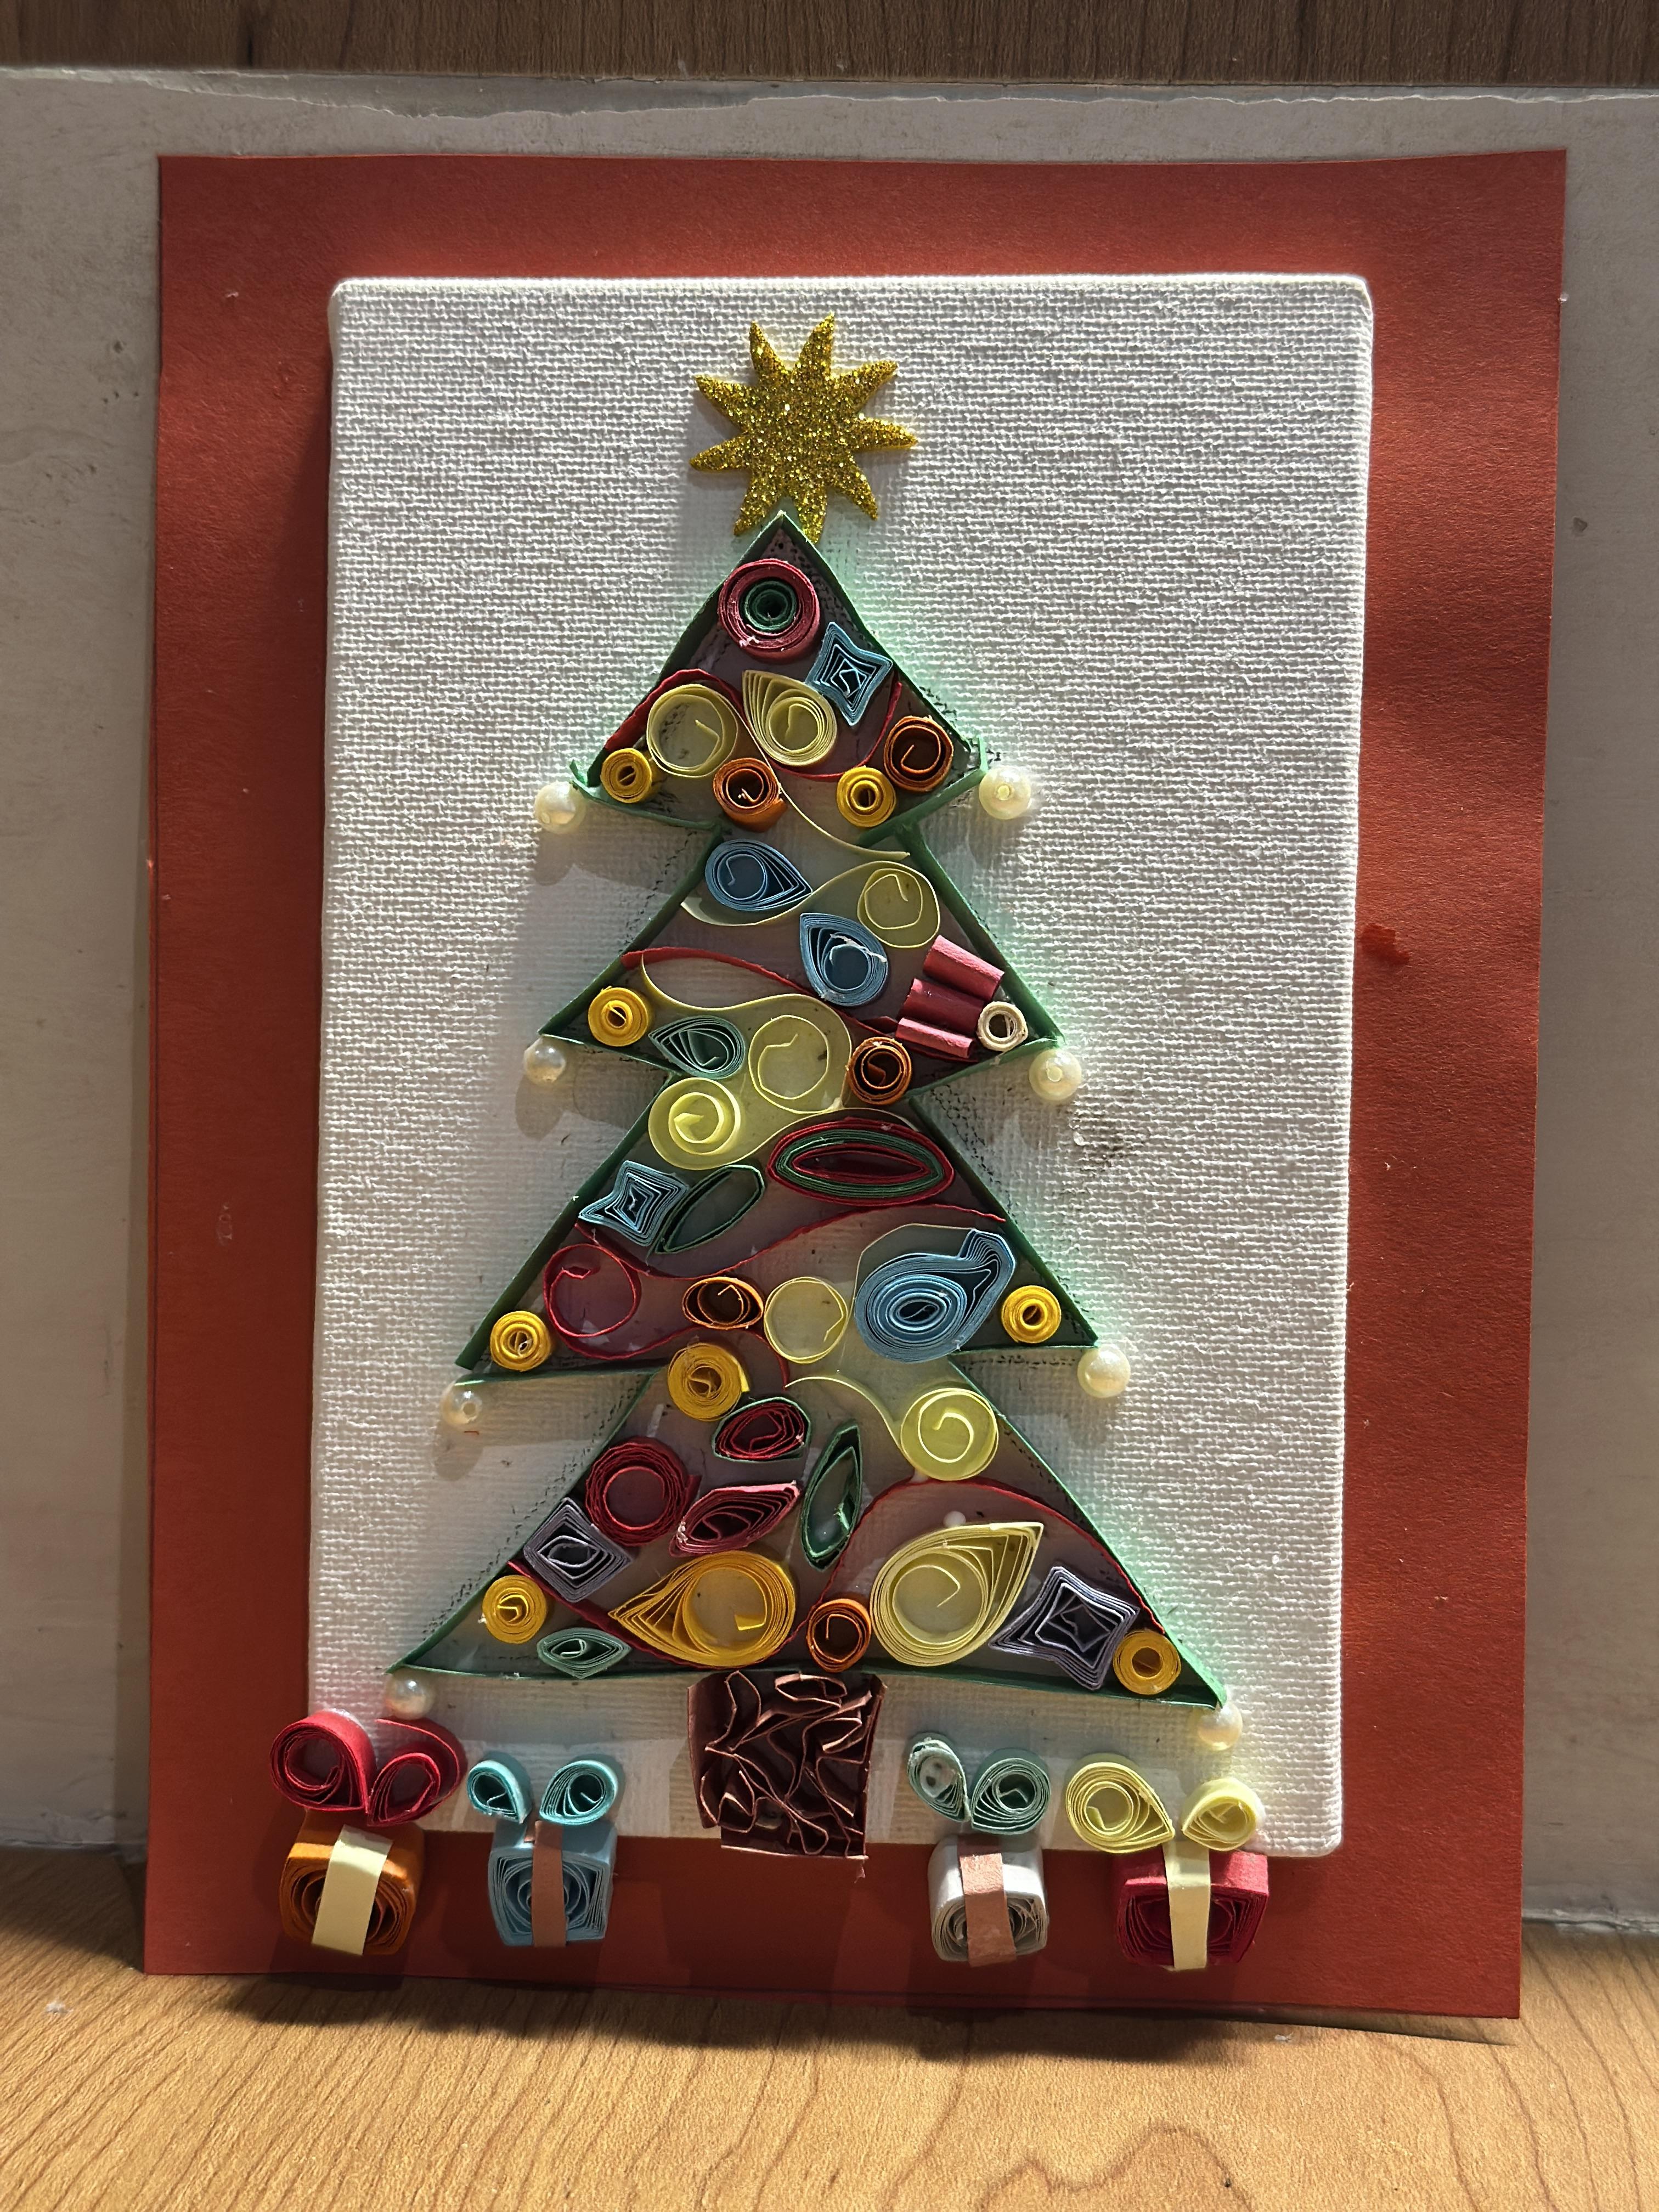
2. Materials required to make Christmas tree: Hi, everyone. So let us start. Okay, so we are going to use this red card sheet
paper and a canvas. As you can see, it's written
artist quality canvas, and the size is 4 " by 6 ". And this is the green quiling paper which
we are going to use for quiling and the
materials like tweezers, more colorful quilling papers
and one colorful star. And also to make it
look more fancy, we are going to use small peels. So these are the tools
which we are going to use, and let's not forget one thing. Quilling tool. Okay.
So let us start now.
3. Start with the outline of the tree with paper stripe: Hello, everyone. So
let us start now. First, let us remove this
covering of the canvas. Okay. So now we can stick
the canvas on this or we can do one thing. With the help of the pencil, we can draw Christmas tree. Here we go. So now, roughly, we have drawn the Christmas
tree, as you can see this. Now let us stick here. I So let us stick on
the paper right now. We can just press it out so that it get stick very
nicely. Here we go. So now we can go for
a Christmas tree. So first, with the help of this paper ulling green colour, we can just cover this border. So with the help of this,
we can reduce the tensity of the paper, as you can see. Okay. So let us do all
these things first. Okay. Now we can cut this. Here we go. So in this way, we can
make to every line. This So basically, we can take the major
like this and then we can cut it and
just stick the paper. Again, we can take
the major like this. And then we can just stick. As you can see, so
we are going in a slow but steady
because it takes time. Quilling is, you know,
a very calm thing to do. And I love it. Oh Similarly, we are going to do the side. So here we go. So
here we are done with the outline of
the screen Christmas. Okay, see you in the next class.
4. Fill the trunk with Paper Quilling Art: Hello, everyone. So now we are going to start
with the trunk. So we are going to use
the brown color paper. Here we go. And now we
are going to fill inside. So I'm doing it with the
hand only, as you can see, one, two, three, four. The four folds. So in this way, we can fill the four
folds as you can see. So this is just a
random thing which we are doing. Like this. Two. In this way, we can make two or three more. If you find that
this is going above, so we can just cut it. Okay, so we can There's
a technique to use it. So we can take glue. And with the help
of the tweezers, we can take some glue in that. And we can just put
it in the center. Okay, so here we go. So this is the trunk, as you can see, and now I'll start with the tree
in the next class.
5. Learn to make tight coils to start decorating.: Everyone. So now we are
going to start with this. So let us take the
colorful papers. I'll start with the yellow. So what we can do is we can
make the tight coils first. So this much small
tight coil is enough. So we can cut the rest. So in this way, we are going to make more five to
seven. So let us start. Oh We can just make it half. And go for it. Okay, so let us
stick this first. So you have to stick
the yellow coils. Now, let's some
flower decoration. For that, we'll see
you in the next class.
6. Learn to make garland for christmas tree: Hello, everyone. So now let
us make different design. So let us take the red color. And with the help of this, we can make the way we pattern. So here we go. As you can see that we have got
the wavy pattern. So now we can just make this wave over here.
I'll show you how. We can just cut with
the help of the glue. We can make this proper line. We can make the wavy line, too. Okay. So in this way, we have made the wiggly
lines and the way we too. In the next class, we'll go with the next design then.
So in the next class,
7. Adding more shapes in christmas tree: Hello, everyone. So now we
can make as it is a very, very calm thing to do, so it's very important
to do it very carefully. And now we can go for
some other shape. We can make a leaf shape. So let us take some
colorful papers. So I'm taking this.
Making it into three. Now let us make the leaf. Make it loose, join. Fix it with a clue. Wait till it gets stick. And here we get glee shape. In this way, we can make more. You can even make with
the different colours. Los in it. Fix it with the glue. And here we go. Lose in it. You'll get this design. I think we don't need to
make it in a leaf shape. This looks pretty
cool. Leave as it is. Remove it and loosen it and we can just loosen the
tendency of this paper. So in this way, we
will get the shape. In this way, we can make
as many shapes as we want. Here I have some
already made shapes. So for this, you
can watch my class, which is already there
on the skill share in which I'm teaching
all the basic shapes. Okay, here we go. We have
these two shapes. One more. We can also add this,
so let us start. Here we go. So we
have some designs. We can make more designs
in the next class. Thank you. Oh
8. Complete the tree with coils,leaves.: Hello, everyone. So now
we can add more designs. Like we can add two colors
and make a tight coil. So first, we'll add
green and pink. For that, we have to
take green and pink, and let's join this first. Here we go. Now, with the help
of the coiling tool, we can make the tight coil. So you can see this. So we are getting two
different colors. Secure it with glue. In this way, we can mix two
or three colors together. So let us start. So we can mix green
and red first. So in this way, I have prepared the all designs,
these all patterns. So you can see this, which
we already made it for this. And also by mixing
the two colors, I've given some leaf shape, and this is a simple green leaf. So let us add this. It's definitely going
to look beautiful. As you can see, I'm adding
randomly wherever I like. So basically,
you're going to use your own ideas where you want
to add, you can just add. This is the bigger one. I think we should
add it over here. Here we go. Oh. As you can see, it's
just sticking and. It's just securing with
the glue and sticking. So this much designs are done. You have to add more than two. Let us go ahead. Here we go. Just add a touch over here. You can put this over here. Here we go. And it's a here. Hm. Okay. So I think few spaces are still remaining over here,
here, we can see that. So let us add few
designs over there. So for that, we are going
to make some squeezy lines. I'm going to show you this. Let's take the sky blue colour. So just make a coil and cut, remove, loosen the coil and fix with the glue. And we can give it
as a teardrop shape. Let's go ahead. Another one. Loosen the coil.
Fix with a glue. And it's a teardrop shape. Okay. This here we go again
with a different color. Loosen the coil. Fix it with a glue and make
it as a teardrop shape. Again. Loose in the coil. Again,
we have to stick with the glue and just
secure it with a glue. Make a teardrop shape, just pinching it at the edge. Let's just add all this You can take a little glue
and just stick it over here. Looks perfect. Again, a glue. You can put it over here.
Okay. Again, a glue. You can put it over
here and over here. So here we go. Now we can make a simple single coils and we can put it over here. For this, see you
the next class.
9. Add more small tight coils in the remaining empty places: Hello, everyone. Before that, I'm going to take
this orange color, and we're just going to
make a small tight coil and we're going to add it
wherever the place we can see. So for that, we just
have to take one stripe, one paper strip, make a coil. When you find a little
thin coil is done, you can just cut and remove it. Slowly and little you can loosen it and secure
with the glue. In this way, we can
make more five coils. Oh. So we are making coil. So that wherever the place
we can find, we can fix it. And so now we are adding this wherever
we can find the place. The last place where we
can see is over here. Here we go. Okay, now, so
we are done with this. So the next class,
we are going to add the finishing part. See
you in the next class.
10. Add gift boxes to complete the card: Hello, everyone. So now
we are going to make the bows for this. Let us first, stick this. We are going to
stick it over here. Okay, here we go one. This is another one. Third, and the
fourth. Here we go. Now we just need
to make the bow. For making bow, we have to
use paper quilling again and just make a
small tight coils, stick it to the edge and
give it a tear drop sheet. In this way, we can
make two for this, we have to make in total
eight. So let us start. And Okay, so now we are done
with two, three, four. Now this is the next. More colors so let us take the red one. Okay, so basically we're
adding the bows by making the tight coil first and then making it loose and giving
it a shape of teardrop. You can add of different sizes. You can use it any
size you want. It's not like you have to
be fixed in your size. So this is the last one. Here we go. So these are the gift boxes, which
you can see now. So I hope you like this
card. Thank you so much.
11. Finally adding pearls to it!: Hello, everyone. So now, let us add this falls. Okay. So I'm going to
keep the poles over here. You can add your own ideas too. So for that, we'll need a glue. And the pole, we
can just add it at the corner of each tree shape. We can add it over
here. And then we can just add it over here. It looks very, very
nice and beautiful. Okay. So we have
added the poles. It's looking very beautiful. Now we can add a star. So I think green or
golden will look perfect. Let us go for the golden one. Yeah, I think this
looks perfect. H It's already having
a sticker behind. We just need to remove
and add. Here we go. So now we can I think one
thing I am missing is, of course, two, three boxes
of lift box, of course. So let us make that.
So here I have this. You can go with a coil. First, let us make loose coil of at least two or three colors. Here we go. Okay. So one coil. This is the third one. And here is the fourth. Okay. So now, basically, these are the four gift, but we are going to make it
in a first square shape. The first square shape, you have to give it as a
square shape, as you can see. You can just sharpen the
sides with the help of the squealing tool and
pinch slowly at the edge. Here we get the square shape. In this way, we can do it from both the side,
just a little pinch. Here we go. Second one is ready. The third one. Here we go. This is the third one.
And now the next. Shop on the sides. Here we go. So these are the four
boxes of gift box. Now we can just add this ribbon. I can show you how it is done. Just take the glue and just tick it on
the sides like this. In this way, we'll
get the ribbon. Similarly, we can do
it for the other also. But don't use the same color. We can use the alternate color. For this, we can use this
color, but this is very big. We can use this color. But I think gift
box is very small, so we should make a
thin paper Here we go. Okay, now it would look good. As you can see, here we go. We just have to cut the extras. Okay. Here we have joined. The third one, we can
use the same color. But we can just
make it thin first. And the last one is
this. There we go. So these are the ribbons
which we have already set. Now we can do one thing.
We have to make a bow. So for the bow, we are going to see you in the next class.
12. It's your turn to do!: Everyone. So there's
a project for you. So you have to make Christmas
tree on the canvas. So as I have taught
you in the class, you have to use your
own tricks, also. Like, whatever is
taught in the class, I would suggest not to
just replicate them. You can have your own ideas. You can have your own shapes. You can have your
own color choice and just put all your
creations on the canvas. So as we have seen in the class, the steps which we
are using is like, first we have to
make the outline, allow it to dry completely. Then you can have
some wiggly lines or some shapes of your choice
and just tick it calmly. I would say don't make a hurry. Just keep it very slow
and peaceful and slowly, slowly when all the things are setting up and all the
things are getting dry, just share it in the
project gallery. So I'm just waiting
for your creations. So don't forget to put in
the project gallery. Bye
13. It's a wrap!: Hello, everyone, and congratulations on
completing this class. I hope you like this class as much as I love teaching you. So as it was completely
hands on class, so I hope you have done completely everything,
whatever I have taught. So remember one thing, you
can use your own techniques, own patterns in
your own designs. It's completely your wish because the possibilities
are endless. It's a very versatile activity. I would suggest you just not
to replicate that thing. Try to innovate and try to
use your own skills too. I know your creations
will be more wonderful. And please, if you are
making that creations, post it in the project gallery, and I would just
love to see them. And remember one thing, it's
not like you are only going to use it in a Christmas
tree on the canvas. You can make it as a gift tags, you can make it as a gift paper. It's totally up to you, and you can even start your
own small business with that. So it's totally about
experimenting and creating. Thank you once again for
joining me in this class. Until then, keep creating
Happy crafting. Bye bye.
 Saba Faisal