Craft Your Creativity: Hands-On Paper Quilling Alphabet Art on Canvas. | Saba Faisal | Skillshare
Search

Playback Speed


1.0x


  • 0.5x
  • 0.75x
  • 1x (Normal)
  • 1.25x
  • 1.5x
  • 1.75x
  • 2x

Craft Your Creativity: Hands-On Paper Quilling Alphabet Art on Canvas.

teacher avatar Saba Faisal

Watch this class and thousands more

Get unlimited access to every class
Taught by industry leaders & working professionals
Topics include illustration, design, photography, and more

Watch this class and thousands more

Get unlimited access to every class
Taught by industry leaders & working professionals
Topics include illustration, design, photography, and more

Lessons in This Class

    • 1.

      Introduction to the class!

      0:51

    • 2.

      Materials required to make alphabet design on canvas

      1:06

    • 3.

      Start with the outline of alphabet.

      7:27

    • 4.

      Let's make different shapes for our Alphabet

      2:31

    • 5.

      Let's do filling and sticking of Alphabet 'A'

      2:19

    • 6.

      Sticking at the outer sides of Alphabet 'A'

      5:40

    • 7.

      It's your time to do something now!

      1:39

    • 8.

      Proud moment for all!

      1:06

  • --
  • Beginner level
  • Intermediate level
  • Advanced level
  • All levels

Community Generated

The level is determined by a majority opinion of students who have reviewed this class. The teacher's recommendation is shown until at least 5 student responses are collected.

38

Students

--

Projects

About This Class

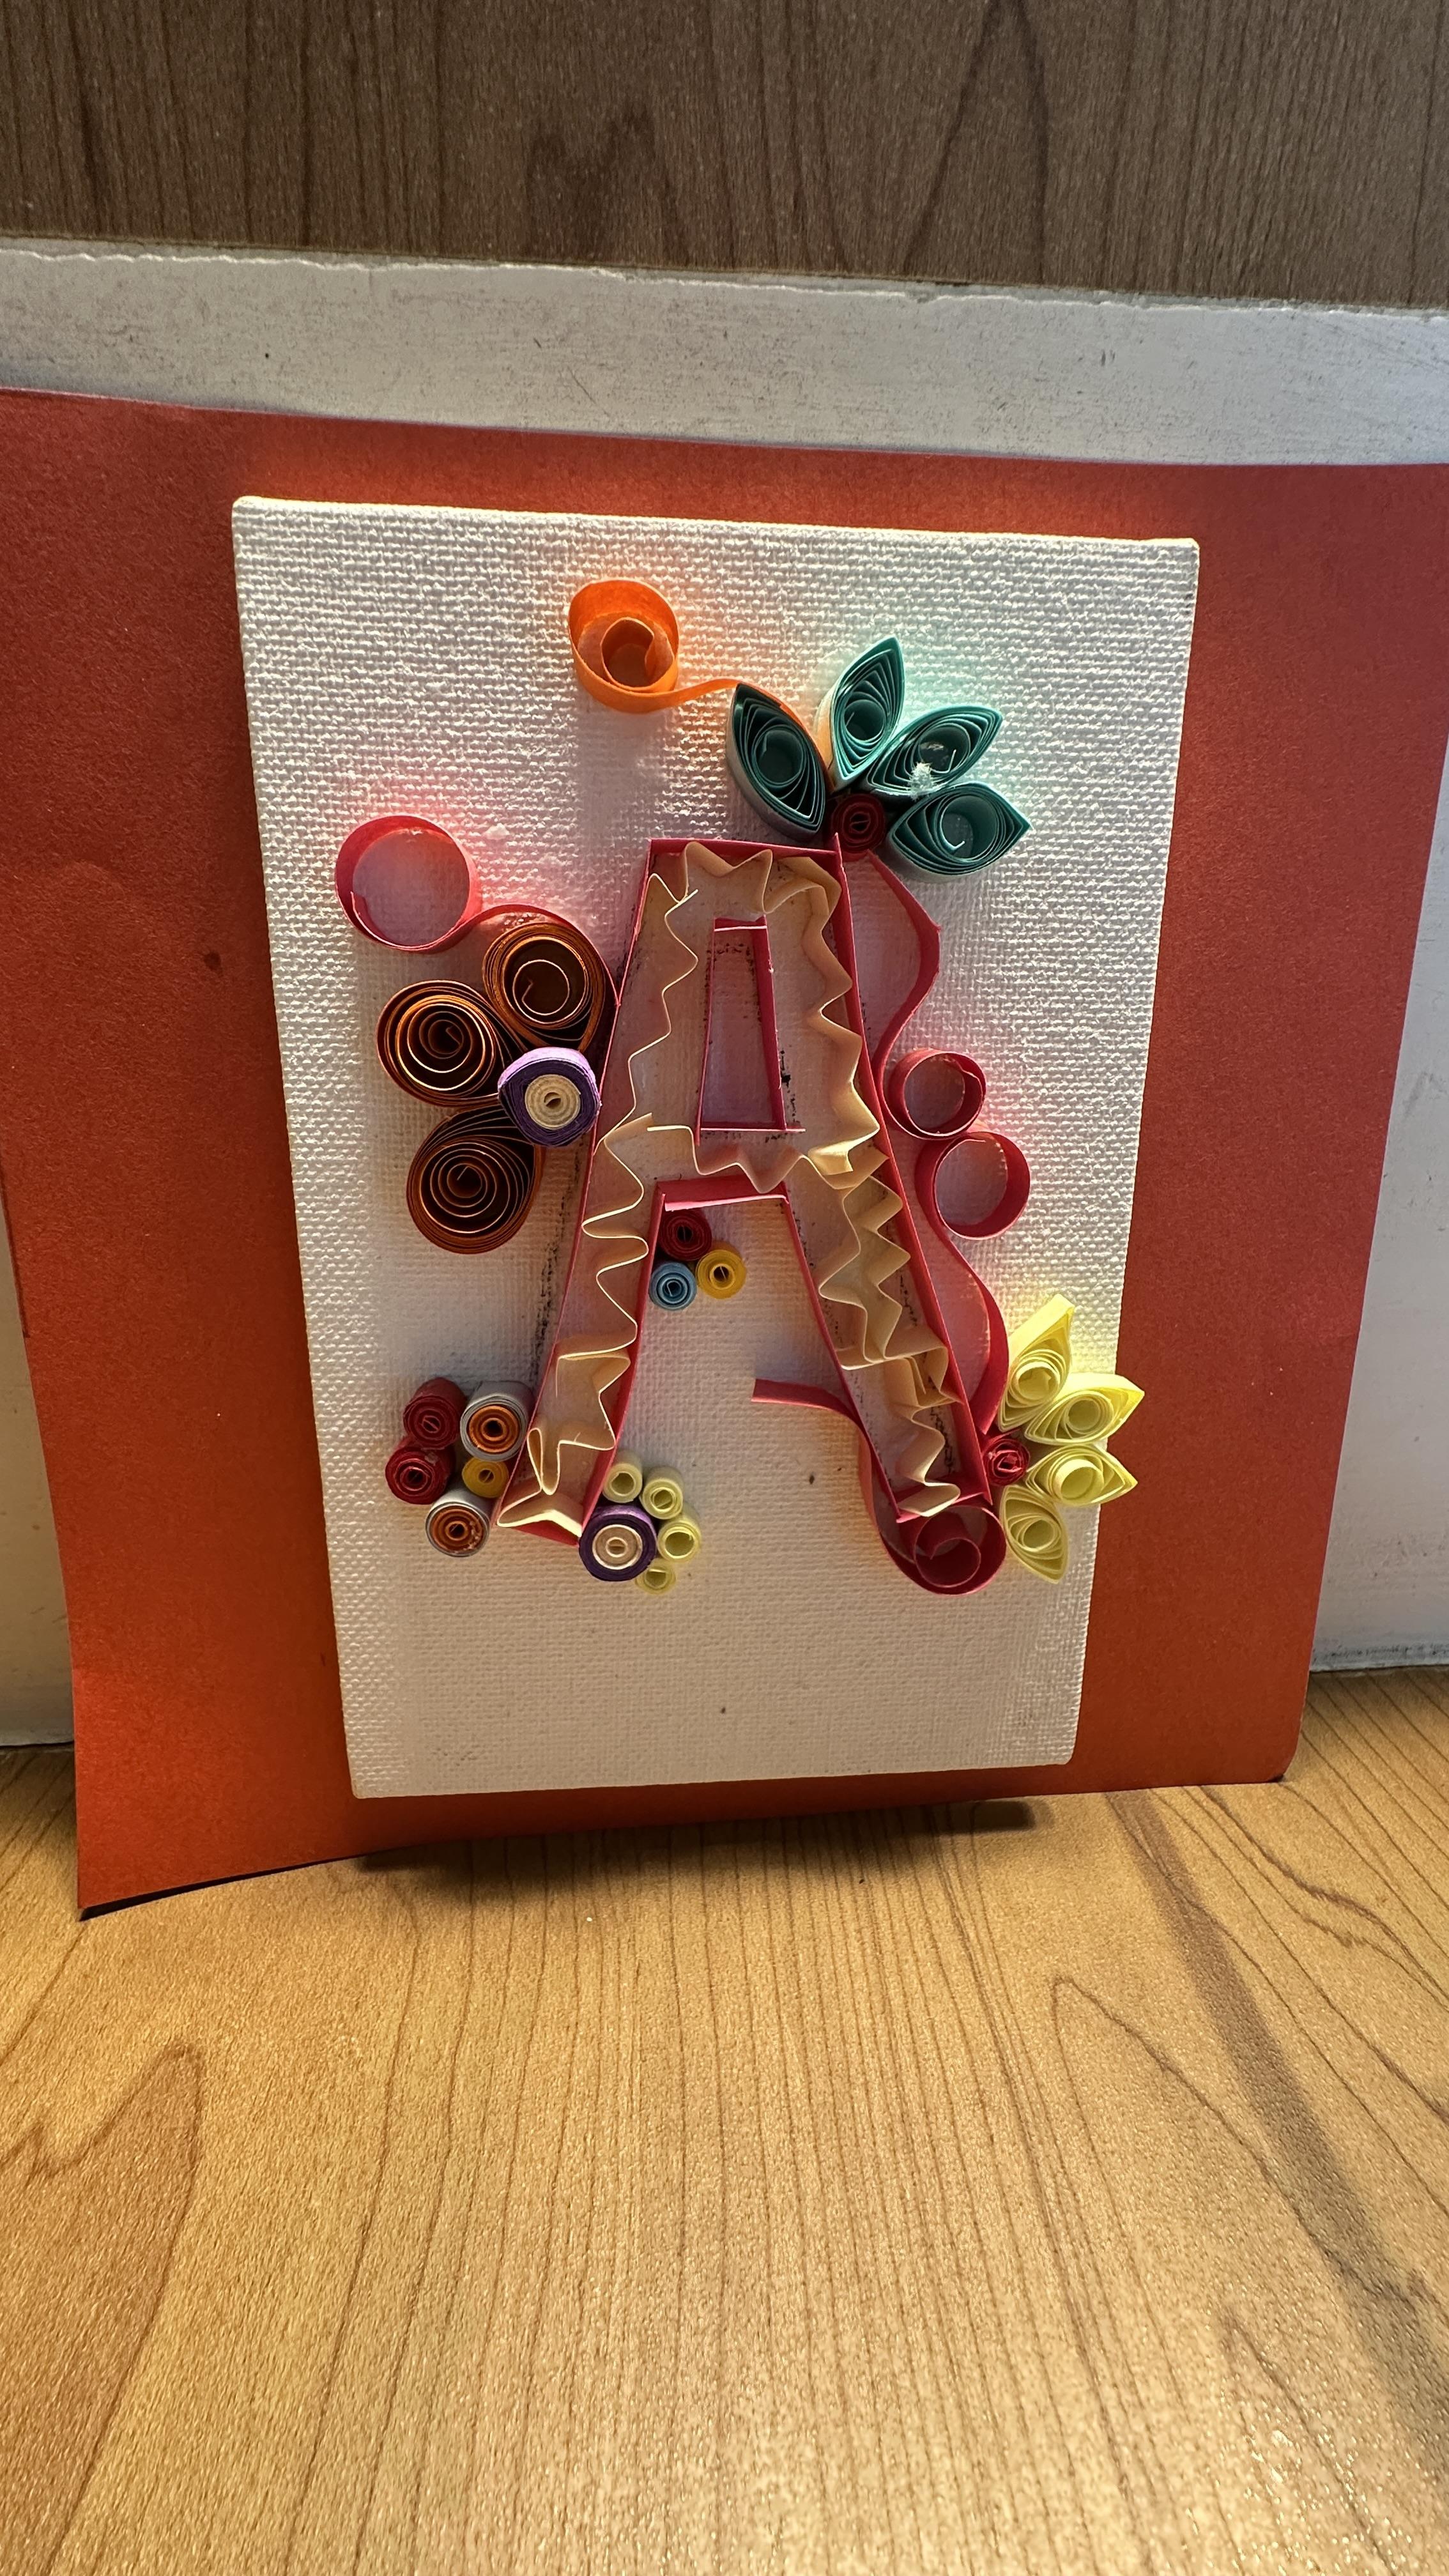
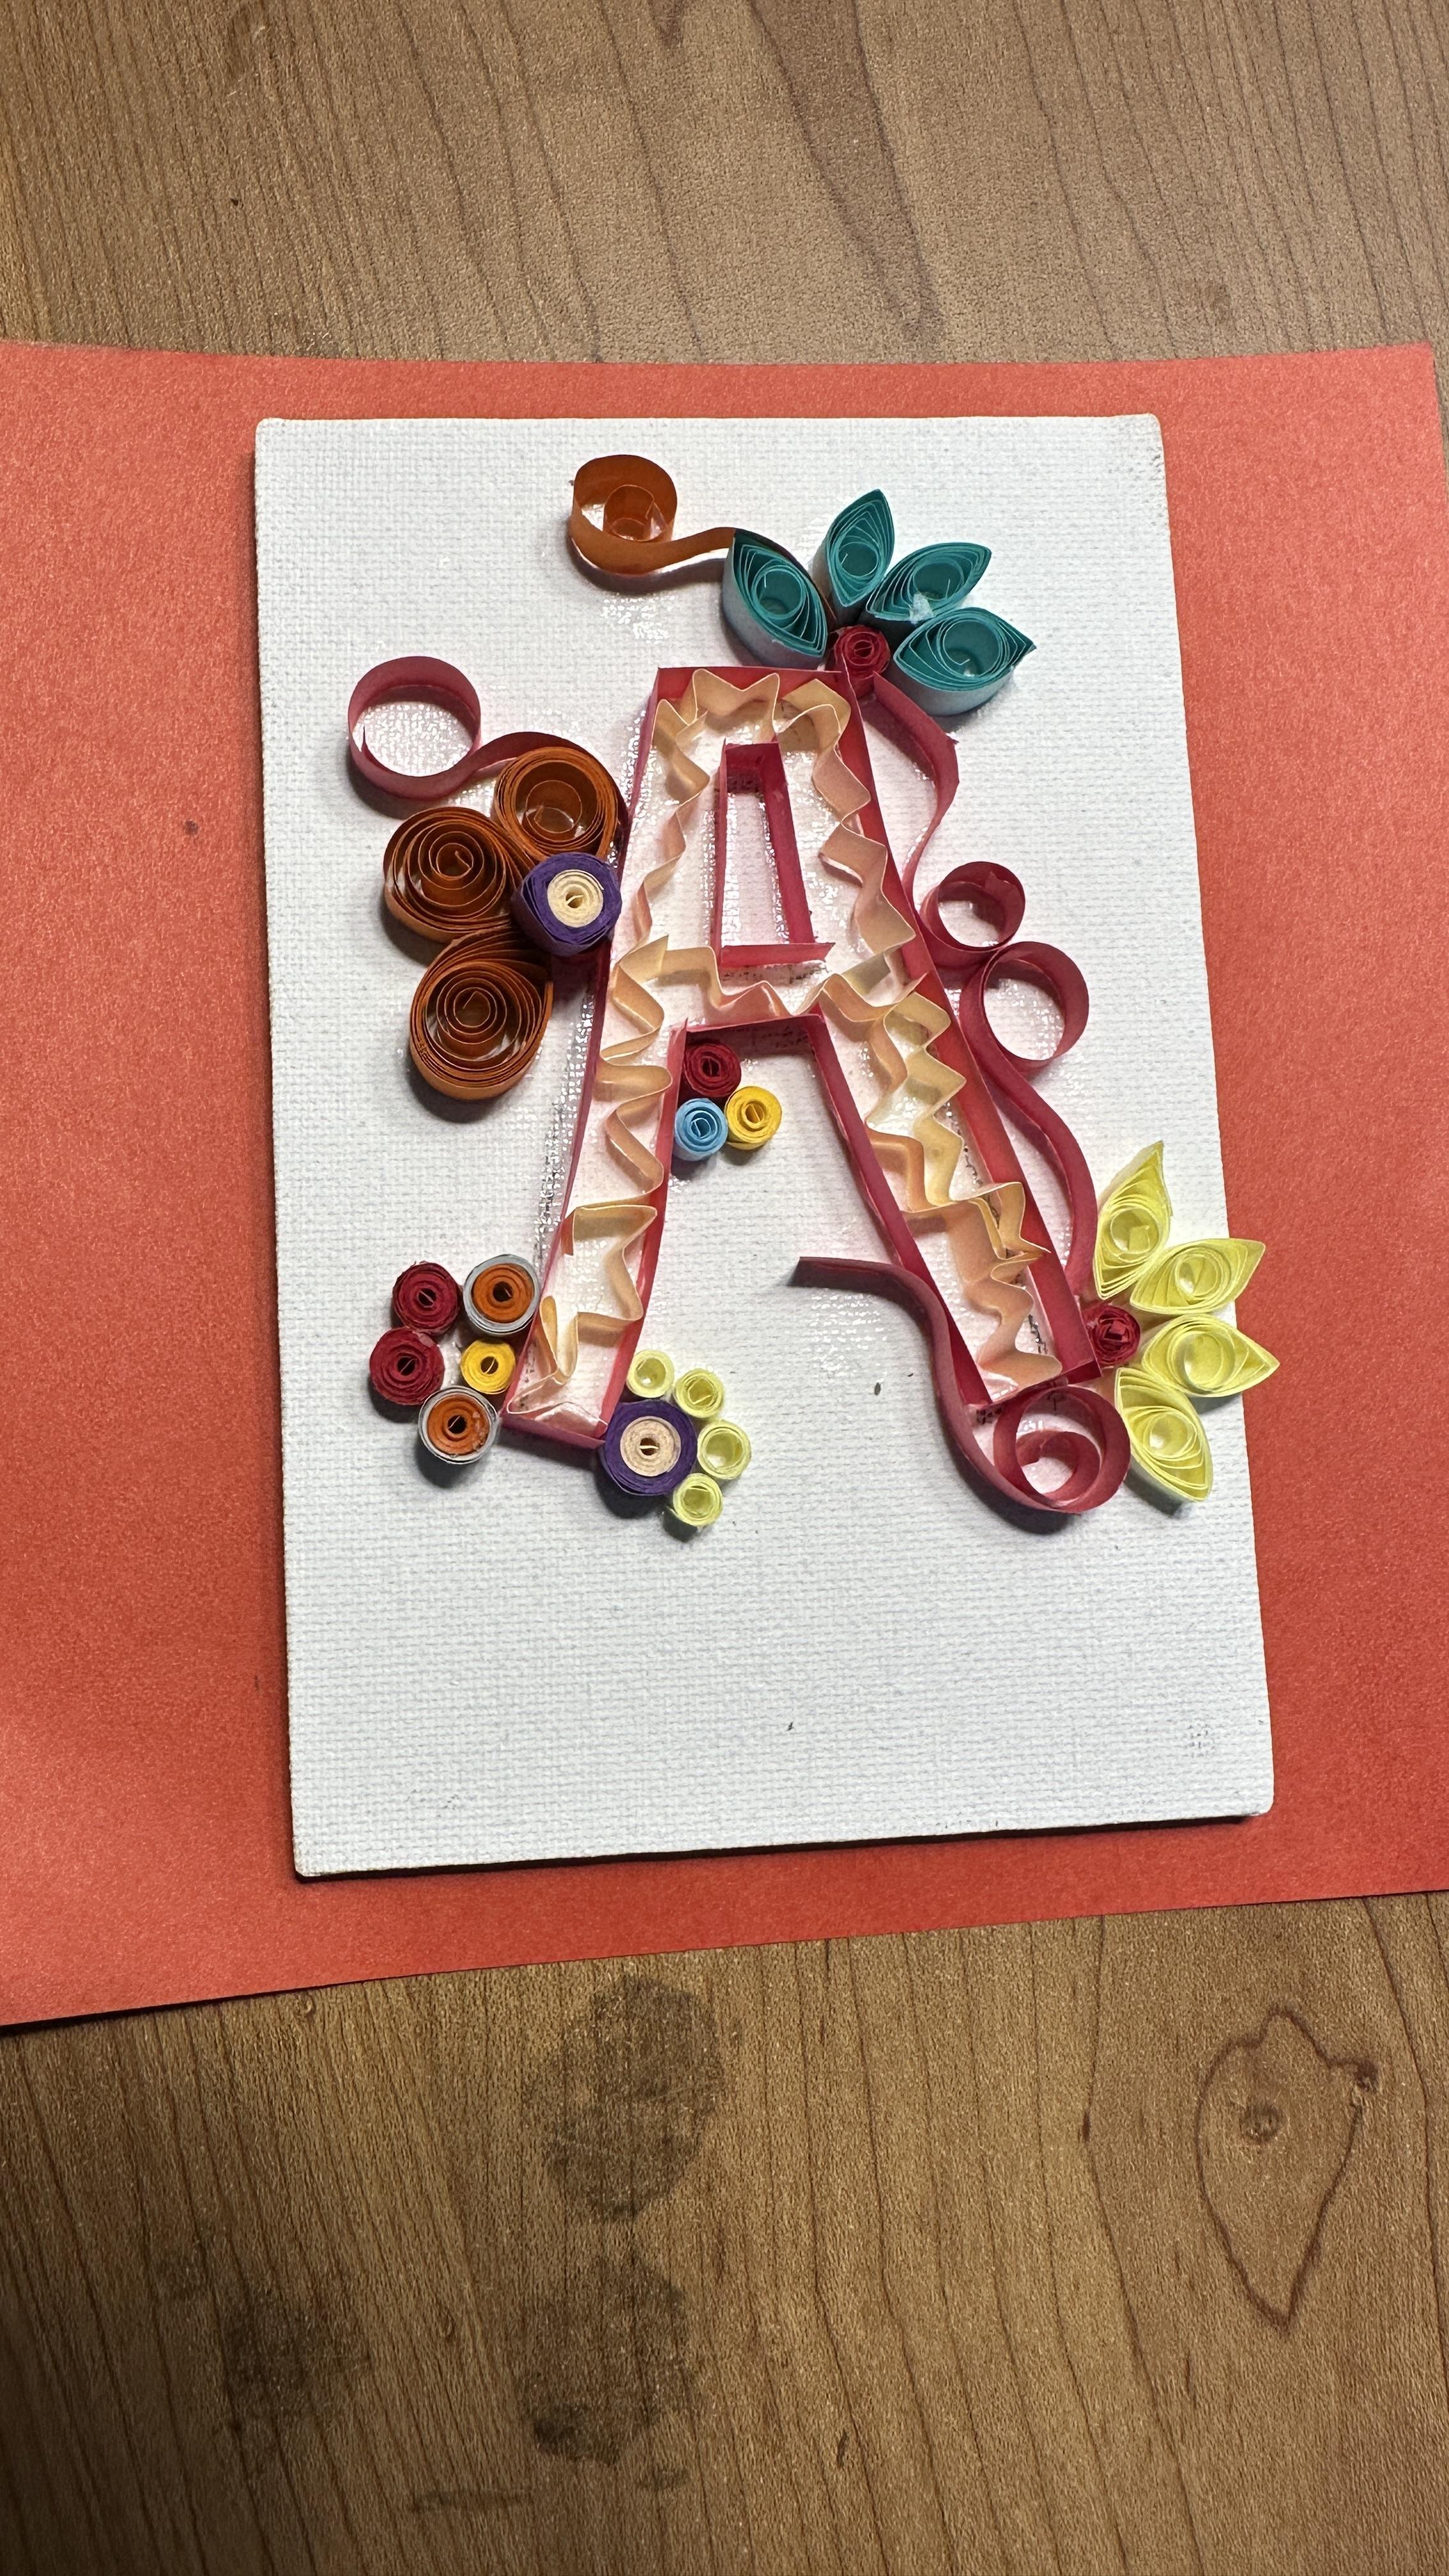
This class is a perfect blend of creativity and skill-building where you’ll learn how to create stunning alphabet designs on canvas using the art of paper quilling. In this session, you’ll work on designing the letter “A” step by step while exploring techniques like rolling, shaping, and arranging quilling paper to create beautiful patterns.  

Why This Class is Useful:

•⁠ ⁠Enhances Creativity: This class inspires you to think creatively and develop unique designs that reflect your personal style.
•⁠ ⁠Hands-On Learning: With a practical approach, you'll gain confidence in working with paper quilling tools and materials.
•⁠ ⁠Skill Development: Learn a versatile craft that can be used for various projects like greeting cards, home décor, and personalized gifts.

Who Should Take This Class:

•⁠ ⁠Art Enthusiasts: Whether you’re a beginner or experienced, this class is designed to fuel your passion for art.
•⁠ ⁠DIY Lovers: If you love crafting and creating personalized items, this class will be a valuable addition to your skills.
•⁠ ⁠Students and Hobbyists: Ideal for anyone looking to explore a new hobby or improve their artistic abilities.
•⁠ ⁠Gift Creators : Perfect for those who want to make thoughtful, handmade gifts for loved ones.

By the end of this class, you’ll not only master the basics of paper quilling but also have the confidence to create unique and personalized alphabet designs.

Meet Your Teacher

Teacher Profile Image

Saba Faisal

Teacher

"Hello, I'm Saba, a passionate graphic/UI and UX designer with several years of experience in the industry. I've worked with numerous clients, creating impactful designs for their brands. Now, I'm excited to share my knowledge and skills as an instructor on Skillshare."

In my classes, I believe in a hands-on approach where students can actively apply what they learn. I provide step-by-step instructions, practical exercises, and real-world examples to help students develop their skills and gain confidence in using sketch tools.

By taking my classes, you will gain a detailed introduction to sketch tools and learn how to create professional logos for brands. Through hands-on projects and guidance, you will develop the skills and confidence needed to bring yo... See full profile

Level: All Levels

Class Ratings

Expectations Met?
    Exceeded!
  • 0%
  • Yes
  • 0%
  • Somewhat
  • 0%
  • Not really
  • 0%

Why Join Skillshare?

Take award-winning Skillshare Original Classes

Each class has short lessons, hands-on projects

Your membership supports Skillshare teachers

Learn From Anywhere

Take classes on the go with the Skillshare app. Stream or download to watch on the plane, the subway, or wherever you learn best.

Transcripts

1. Introduction to the class!: Hello, everyone, and welcome to my class. My name is Saba, and today, I'm going to teach you how to beautifully design alphabet A on the canvas by using the art of paper quiling. Paper quiling is the fantastic way of converting the paper quilling stripes into the intricate designs. In this hand class, we will be focusing completely on the designing of an alphabet A, which can be used as a gifting to someone or the custom made orders. So yes, if you have a small business and if you have any custom orders, you can use this techniques as well. The most important, don't worry if you're a beginner because this class is completely hands on and it is for everyone. So by the end of this class, you will have a masterpiece to display or to give someone. So without wasting our time, let's start. 2. Materials required to make alphabet design on canvas: Hello, everyone. So let us start. First, we'll talk about the tools which are required. So, of course, first, we'll be quilling needle, quilling papers, and for making the alphabet letter, I'm using this card sheet paper. So basically, I have just taken the card sheet paper like this. And if you can do it without measuring, that's fine. Otherwise, we can just measure it and we have to just make a line and just cut. So, yeah. So in this way, we are going to get this paper stripe. Next, some quilling tools, fav coal, and paper crimpler. And about the canvas, it is your choice. You can take any size you want. Here I'm using size four inch as to six inch. It is white canvas board. So these are the tools you are going to use. So let us start now. We'll see you in the next class. 3. Start with the outline of alphabet.: Hello, everyone. So let us start. Let's open the canvas plastic first. Okay. So here's the white canvas board. Now, first, we have to draw. Now, the alphabet, whichever you want. Like I'm going to use the alphabet A. So we can draw. So here you can see roughly. I've done the letter A. I'll let the start. First, we'll cover all the outlines with the help of this paper string. Take the major. Pointed over here. Got. Okay. Another Again, take a point over here. And a card. You just need to clip it and take the major, as you can see. Okay. Like this. So let us stick this first. Okay, I think we should do this also. One. Two. Okay, so let us stick this first. Here's the glue. So we can do one thing. Start sticking it. Okay. So now we have to stick this. Let us take the measurement of the inside part now. It is very slow work, I would say, so do it very calmly. Slowly, slowly, we are taking the measurement first. As you can see, Here we go. Hm. It's very convenient to use a tweezer. Hold it for some time and leave. Again, use tweezer and just hold it for some time. Alright. And now let's take the major of this. Okay. So we had already taken it. I just forgot. Yeah. So just use this glue. Let's use the tweezers because it's becoming difficult to hold it. Okay. So now the three lines are remaining. So let us take the major. Done with this. And the thaw. Okay. So now let us join. This is one. This is second. And here we go for the third. Okay, as you can see, we have done with this. Let it allow it to dry now. So in the next class we'll start with the patterns. Thank you. 4. Let's make different shapes for our Alphabet: Hello, everyone. So let us start now. So first, we are going to use the tight coils which I've already made it. So if you want to know how to make the tight coil, I already have one class in the Skillshare in which I'm teaching all the basic patterns of the paper quiling art. So you can learn all styles in that. Also, I'll show you this, how to make it. So let's start with this first. So just take one paper stripe. And with the help of the ulling needle, you can reduce the intensity of the paper. Simply, you just have to put the paper inside, roll it maximum nine to ten rolls, and then just leave it. And then with the help of scissor, just cut over here and you can give a nice curvy shape to this by just rolling the needle. Here we go. In this way, you can make all this pattern. Next pattern is teardrop, which is also taught in that class, which I'm talking about, basic patterns which are taught in that class. Here we go. In this tight coil, I'm using the two colors, as you can see purple and white, and this is leaf shape. Simply make the coil, loosen it, and then just press from both the end. Again, this also is taught in that class. So now let us stick this. Okay, I forgot one thing. One new pattern which I'm going to show you. It's just a normal wiggly lines, which I have not used any tools or anything. It's just I have made it with the hand. I'll show this also how to do it. Simply consider this as a paper. You just have to take it one, two, three, four or five folds, and just leave it. If you want, you can take more. Okay. And just cut. Here we go. In this way, we'll get the wiggly lines. We should put all these patterns now around this. Let us start. 5. Let's do filling and sticking of Alphabet 'A': Hello, everyone. So now it's time to stick. So without wasting our time, let us start. So let us stick this first. For that, we have to do one thing. I'll show you what. Just take the glue over here. Okay. So now it's time. Just dip the edges over here. Okay. It has to be very carefully as there is already very less space. Hold it for some time to get it stick. Here we go. Similarly, we have to do the rest. Okay. So you have to do it. All these things. Okay, so carefully stick this. Here we go. Here is the next thing. If you wind, the place is small and the wavy weekly lines paper is big. So you can just squeeze a little. That's perfectly fine. I think here is some place. We can just fix it over here. Here we go. So we are done with this with the weekly lines. So in the next class, we'll do the rest thing. Thank you. 6. Sticking at the outer sides of Alphabet 'A': Hello, everyone. So let us stick the designs now. So go ahead now. Take the pincers. And this all patterns we have to stick. Keep everything aside. Just this. Okay, suppose we are sticking this. Next is this. Here we go for the next. Okay. So basically, sticking part is very easy and fast. Just the thing is you need to prepare everything before. So for that, you can check my class, which is already there on the Skillshare, which I have shown many patterns, so you will get the ideas of what all you can make. And Okay, so next, we can use this now. Okay, now let's go for this design. All right. We can fix this anywhere in the corner. As you can see, it's looking very pretty. Okay, I think this will look good over here. And this one over here. All right. Now, this is the final one. I think it will look pretty over here. Yeah. So basically, it is totally your choice, wherever you want to put, wherever you find wherever you find it beautiful, go for it. Okay, now, let us go for this. Okay. The small one will look beautiful over here. No, this will look the same color. Yeah, I think this will look good over here. Mm hmm. No, I think Okay. So I have got the place where I can fit this. This goes over here. Alright, so this looks good over you. And now, this is the final one. It's over here. Just a minute. There is less clue over here. Okay, so we have to just give it some time to stick. Yeah. So we are done with this. As you can see, Alright, so this is done. I hope you like my class. Thank you. 7. It's your time to do something now!: Again. So in this project, I would like to encourage you to add your own personal touch to the project. So for example, if in the class, I have used alphabet A on the canvas board. So please don't replicate the same design. You can use your own ideas. Like for example, if you're using the alphabet U, so you can take the canvas, and just like I have shown, you have to trace letter U with the help of the pencil in a very lighter way, and then you can add the paper in the outline areas, and then you have to start adding the designs of paper coiling. Like, you can add the pattern of coils, tight coils, loose coils, heart shape. Like, it's totally up to you. Possibilities are endless. Just open up your mind and you can use your own creativity and ideas. So just make sure don't make it very loud, add some simple designs in the starting. And trust me, it will be eye catching designs. So yes, you can start with that slowly, slowly after adding all the designs, you can stick it and then allow it to try. And then you can use it as a gifting to your loved ones, or you can just frame it and use it as a wall decor, or you can simply gift someone to your loved ones. So I am 100% sure that after completing this project, you will be surprised to see your own masterpiece. And, yes, don't forget to share that masterpiece with me in the project gallery. I'm waiting for that creation. Thank you. 8. Proud moment for all!: Hello, and congratulations on competing this class. I'm very happy that your masterpiece is ready. Like in the class, it was as hands on practical class. I'm totally sure that you will be surprised to see your own masterpiece after making it. So now this is a very unique technique which creativity, which adds as a personal touch and love when you gift this as a personalized gift to your loved ones. This was just Alphabet A. You can use your own initials or letters if you want to gift or you want to customize for your orders. I hope you enjoyed this hands on class and feel inspired to keep exploring the world of paper quiling art. And it's a versatile form and so much to offer, and I assure you that once you start your creativity and once you unlock your creativity, I'm sure that you will be able to make the masterpiece one on one. So if you love this class, feel free to share your designs with me. I will be thrilled to see all of them. So till that time, happy Qulling, happy crafting. Bye bye.