Transcripts
1. Intro: Hi, I'm commercial and I am so excited to bring
you this class. We're gonna be creating flow, string our hearts
using Procreate. Then we're gonna get out of
our Procreate comfort zone. And we're actually going
to create the real thing. I'm a writer, designer, procreate, artist, and teacher. My inspiration and
low for String Art having to come about in 2017 when I got this from my
daughter and my son-in-law. And being a lover of Procreate for the
last couple of years, I decided to incorporate Into, will just play around a
bit till we get to design. We want to encourage you to
free on your own design, should you on something entirely different from the first
part of this class? We're going to create our
design and our first project. Use an iPad, the Procreate
app, and Apple pencil. But you can use your
finger or a stylus. Will then create
some phone nails and draw out our string
art in procreate. After our creation is complete, we'll convert our design that we just created and turn
it into a template. For the second part
of this class, we will need the
following supplies to create 3D wall art. But I discussed this
and this applies. This lesson will prep the would. Use our template,
stencil, our design. We can hammer in our nails. Then we'll finish it off by wrapping our
design and string. Did I mentioned how excited
I am for this class. I thought so. If you're ready,
let's get started.
2. Class Project: In this lesson, we'll
discuss the class project. For the class project, I really would love to see
your design that you came up with for your string aren't
hearts and procreate. Then if you decide to get out
of Procreate comfort zone, I really would love to
see your string art. Next, we'll talk about
the free resources.
3. Free Resources : In this lesson, I'll show you the free resources I
created for this class. You'll find them in the
project and resources section on the
Skillshare website, rather than inside
the Skillshare app. I supply you with several different hearts to choose from. But please don't limit yourself. You can certainly for hand, I'm also supplying a
thick monoline brush that you can use for the snails. I also wanted to add a wooden background
image should you choose to use it in
your procreate design. I'll also show you some other
options where you can find some more wooden images for
your background as well. Up next, we'll talk about
the supplies we need. If we're going to
create the 3D wall art.
4. Supplies for Wall Art: In this lesson, we'll discuss some supplies that you'll need. If you want to
actually step out of that Procreate comfort zone and create some actual string
art for your wall. The first part of this class
we'll be using the iPad, the Procreate app,
and an Apple pencil. But you can use a stylus or your finger for the second
half of this class. If you want to get out of
the Procreate comfort zone, you'll need the following. You can use a size
that's easily found. Your local craft shop or your
home improvement Center? I am using a one by 12, but it's actually measuring a three-quarters by
11 and one-eighths. I actually had the home
improvement center down for me. You can use stain or
just polyurethane. You might not be at
a towel too much of a difference between the two. This is polyurethane and
this is just polyurethane. But it does give
it a little bit of a Finnish and less
likely Catch snags. Just gives it a little
bit of a coding. You're going to want
to hammer some gloves. This way is saves
time with cleanup. Paintbrush. Obviously. You can use markers
towards the end if you want to paint some
kind of quote. I am using one and
three-eighths inch nails. Just because I found it available at the Home
Improvement Center. I actually used a
screwdriver straight edge to open like hands rather than an actual paint can-opener
and he couldn't find one. I used a spoon to stir it, a wooden str, that's great. I use tape for my template. Thread, string. This is cotton yarn. But you can also use embroidery floss or
twine if you haven't. Marker or pen for the
template or your sketch. The printed template
for penciling, which is optional because
you can freehand it. Hooks for the back
if you want to hang it on the wall when
you're finished. Next, we'll talk about
choosing our design.
5. Choosing a Design: In this lesson, we'll go over some ideas
that you might want to consider using
the heart stamps I provided in Procreate. For this class. I'm just dabbing and using different colors to get an idea of what we have. And I wanted to give
you an idea of what you can choose for your design. This way, you can come up
with something totally different than the design
I'm creating today. Sometimes the best
thing you can do when you get something new is
to play around with it, to see what you have and what ideas you can
create with it. I just asked every
time I receive a new set of procreate brushes. I like to make a running
list in procreate of ideas and future uses
for the brushes. Just something for
you to keep in mind. Here's a few more
ideas like this one. This way, very cool to have the side hearts represent wings. Here's another idea. I love this one. We have the two center
hearts and then we have Paul prints and
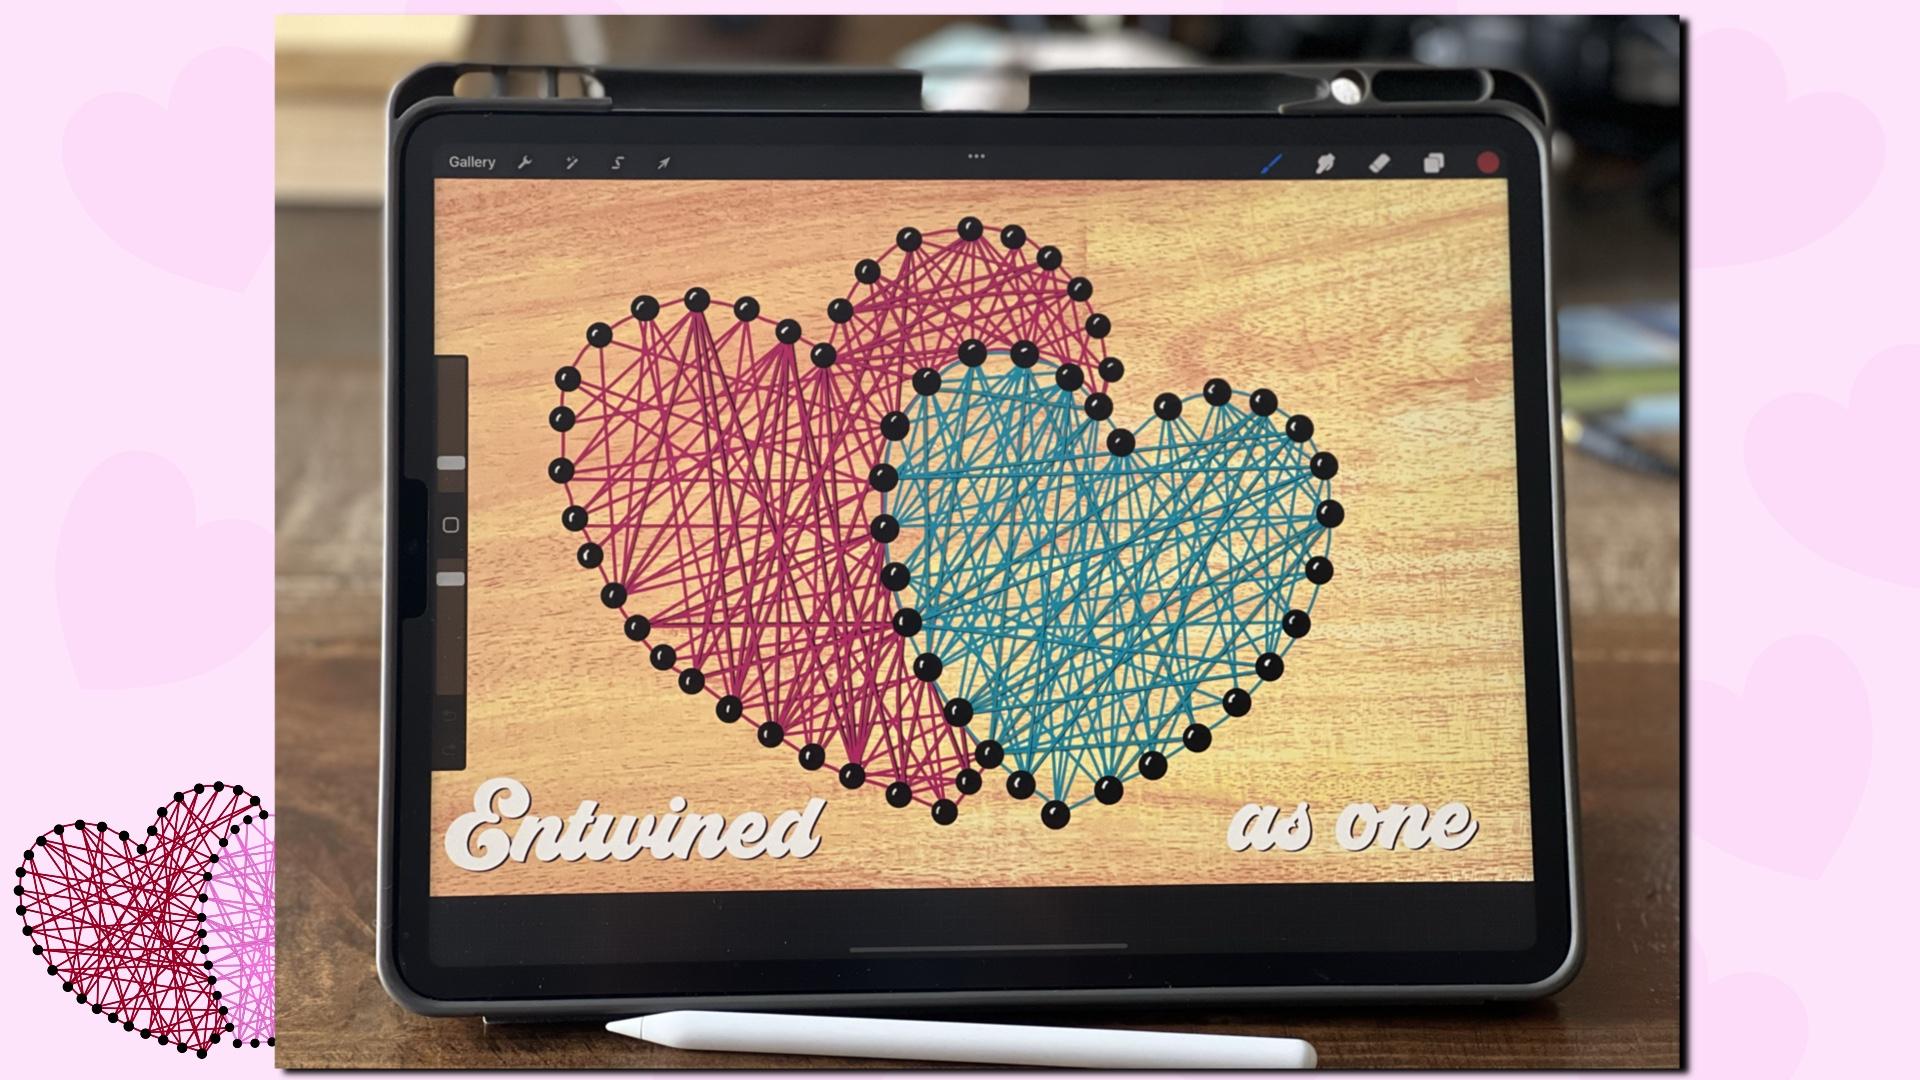
the smaller ones. I came up with
entwined because I just thought it was sitting up. Next. We're going to sketch out
our design in Procreate.
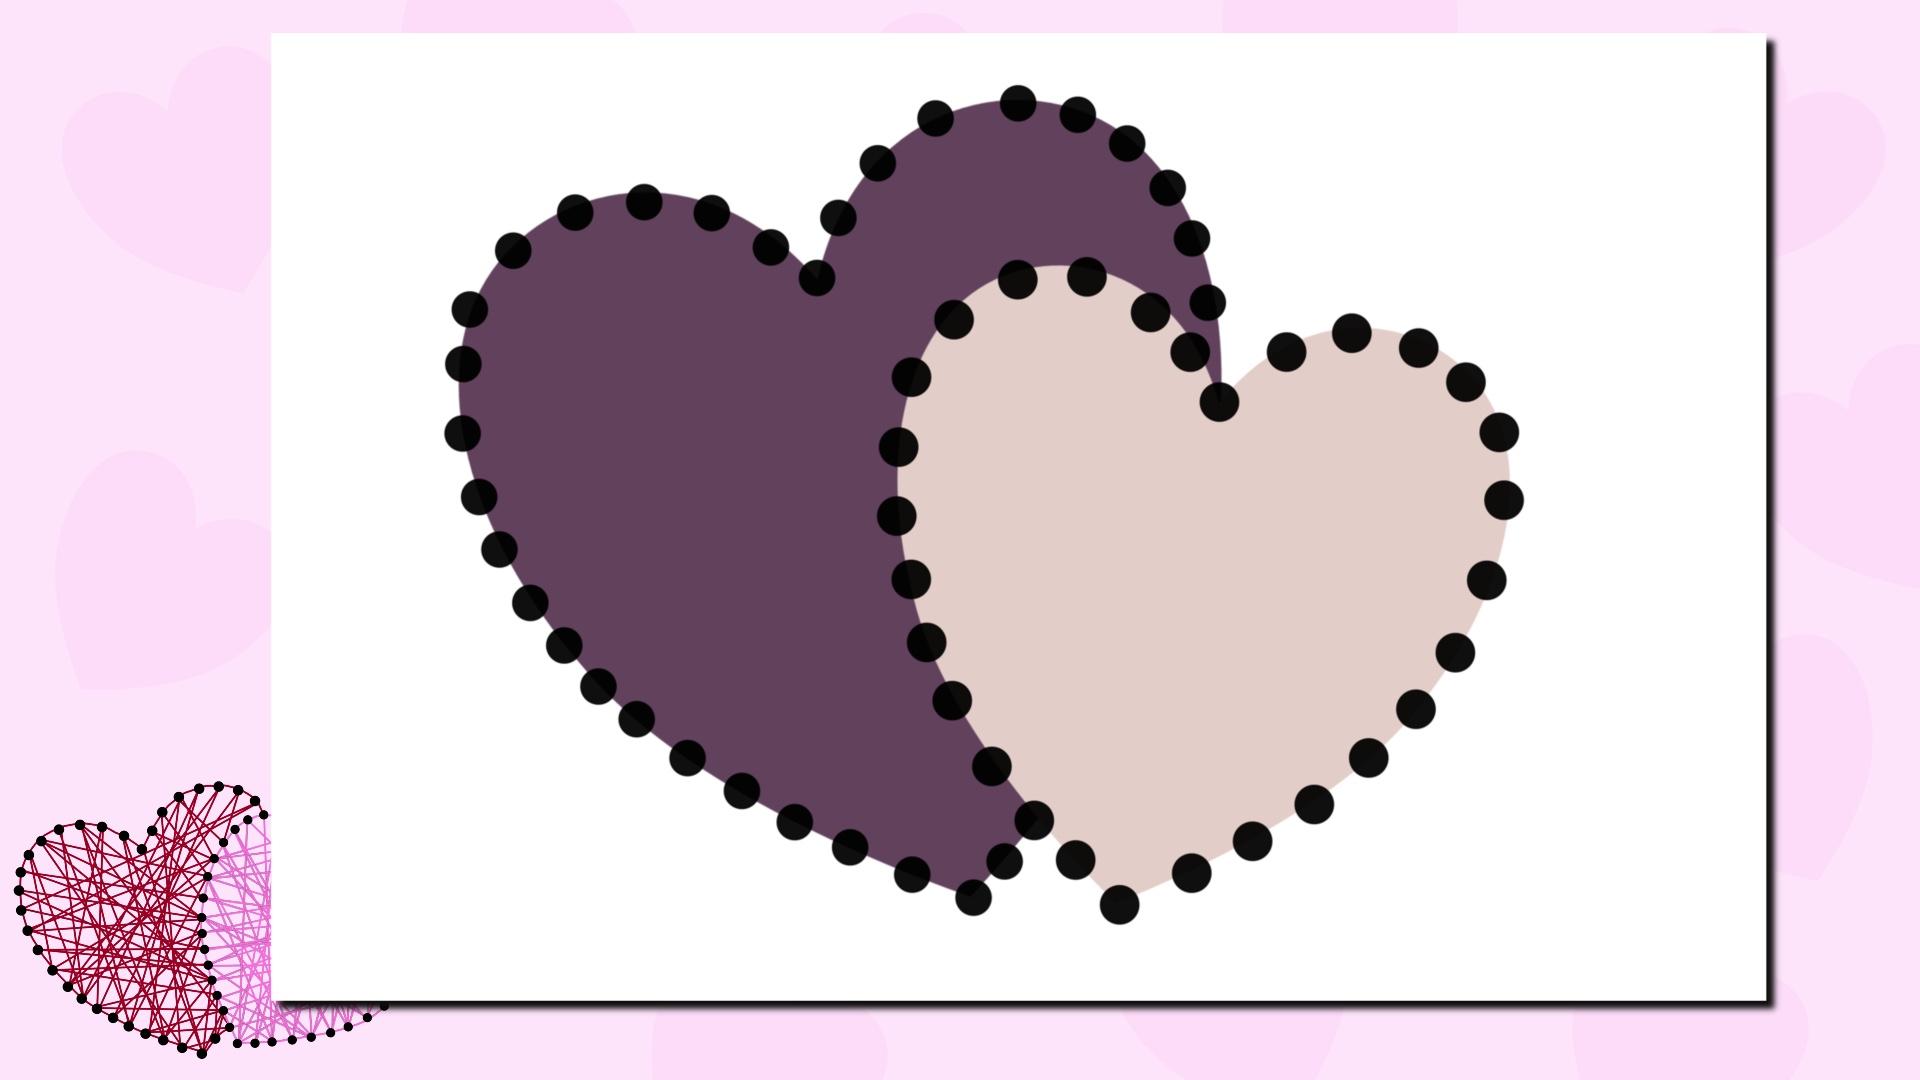
6. Sketching : In this lesson, we'll
do a sketch using our heart stance or
freehand if you prefer. And creating an outline
using our lettering brush by dotting the screen and procreate
and creating foe nails. We're going to use a 17 by
11 inch form to start with. We're gonna go and tap the
plus symbol at the top right. Do 17 by 11 inches
and tap Create. I'm choosing the heart from the heart stamp set
that I provided. And tapping the screen,
size and position. We're going to have
to turn off snapping. I can get my heart
position correctly. Right now, color isn't
important for me. I'm just getting a size,
dimensions and positioning. Add a layer. We're going
to tap a second heart. Resize and change position. Keep in mind you do
not have to choose this layout for your design. Just playing around with it until I get it right
where I want it. Now I'm just grabbing a
thick monoline brush. I will include this with the heart stamps.
For this class. I'm adjusting my size. I'm just tapping the screen to make it look like
a head of a nail. I am going around the outside
perimeter of the heart. Right now, as you can see, there is some opacity
to my phone nails. This helps me align it better on the outside
edge of the heart. Now I'm very Pete
for the second part, we're going to add
a layer before we start adding our phone nails. And we're just repeating the process like we did
with the other heart. I'm going to speed up the video. I'm actually going to group these two original
colored hearts together and turn it off. And there's our positioning
for our Finance. Up next, we're going to
start drawing our string.
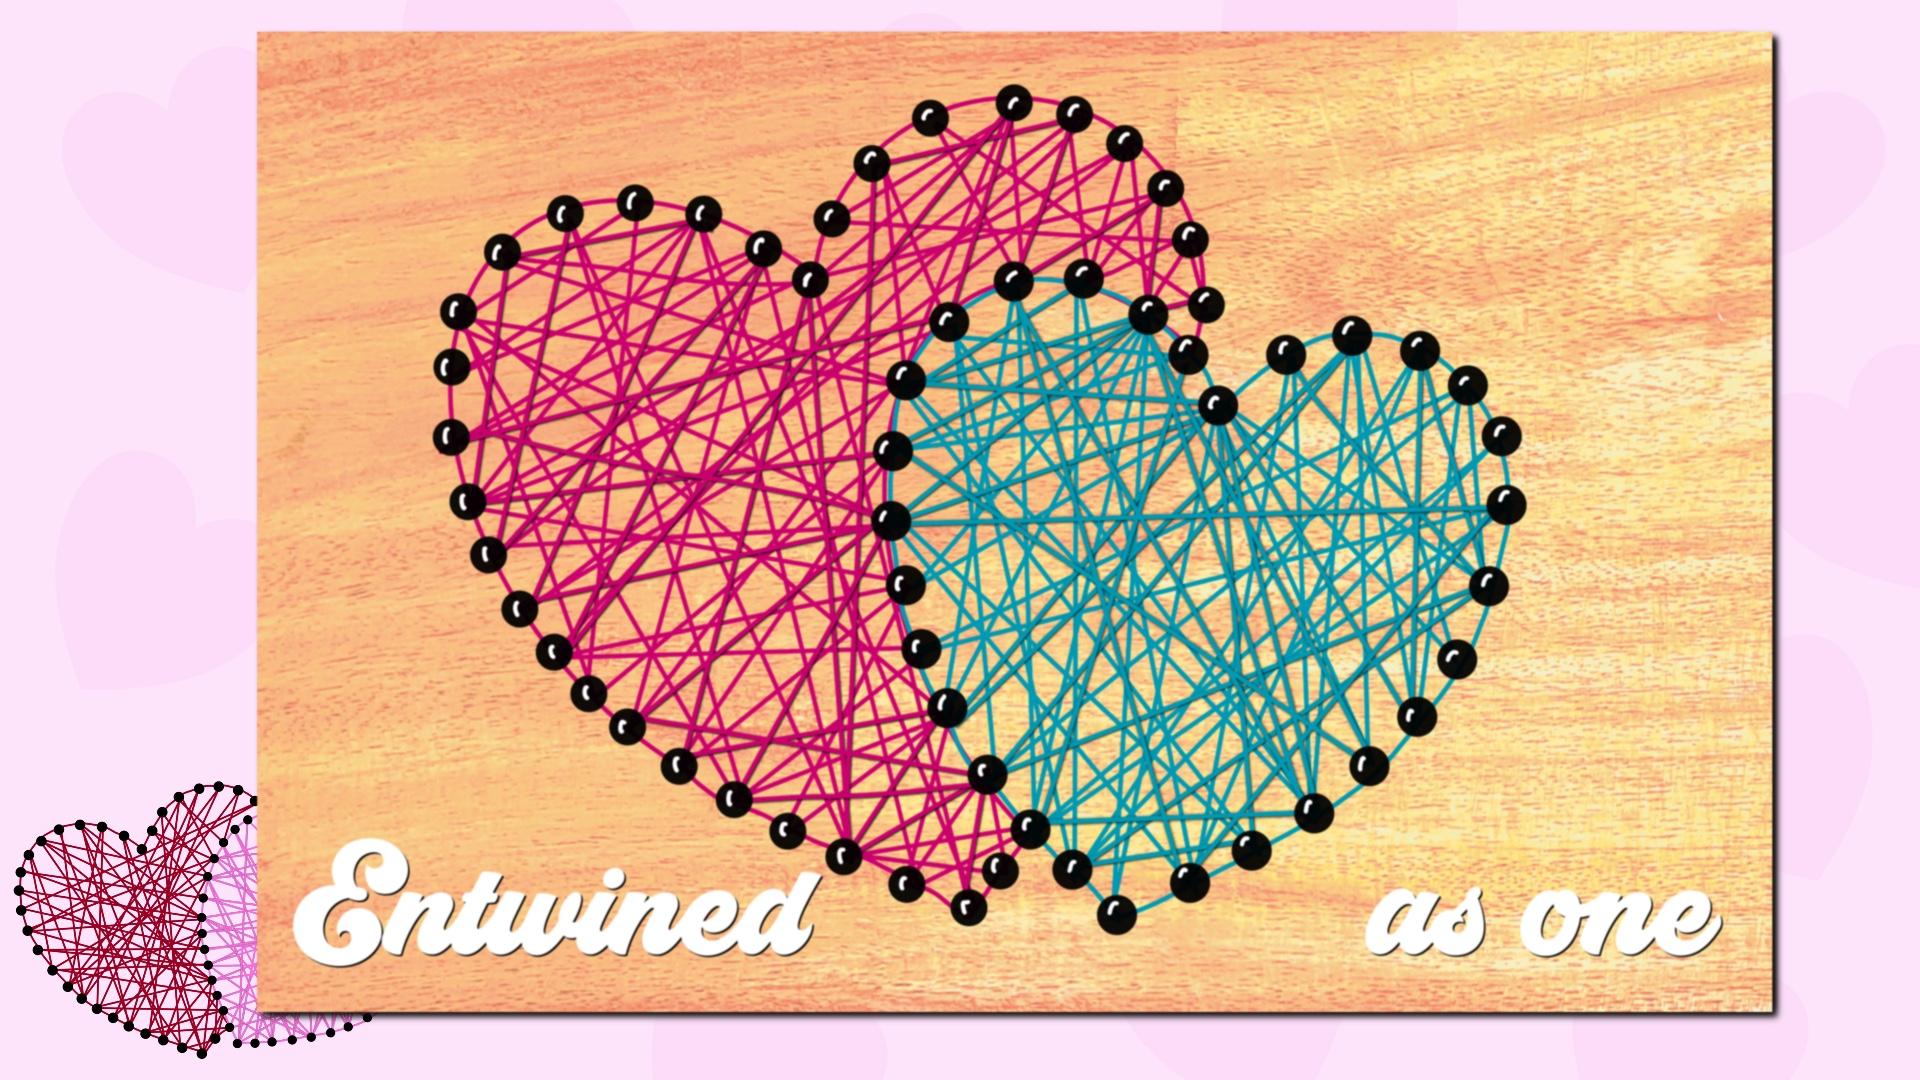
7. Drawing String: This lesson will
draw out our string. I'm going to group the two
layers of bone nails together. Choosing a color. We're going to use a
smaller monoline brush. And you can find this
into calligraphy brushes. You still may need to adjust
the size accordingly. We'll start drawing
in our string. And I'm just going from
one shot to the next. Where I end is where
I'll start a new line. I just go back and forth
until all dots are connected. As you can see it, you
don't want to go on the inside of your second heart. We're just going to
repeat the process like we did with
the first heart. I'm adding a new layer
and using a second color. Start drawing my string pri, second heart until all dots, or should I say for
nails are used. Layer. This is where
I'm going to draw around the perimeter
of my heart, just like can close it all in. Now I'll do the
same with the blue. Add a layer and just draw around the
perimeter of your heart. Now I'm just finding
my nail layer. I'm going to duplicate
this. Each one. So my nails are darker. I'm adding the two duplications
together by merging down. I'm still keeping the two
different hearts separate. I'm actually going to place
some wood background and you can find some wood
backgrounds here. Unsplash.com is a
good place to start. Just type in your
search bar using wood are wood background to
get something to choose from. You can also look
on pixabay.com, again, using the
same search terms as well as Pexels.com. Now these listings, or good for personal
and commercial use, also add a free JPA
for you to use. And save time in searching. Now I'm going to add
another layer of string. This way we can add some shadow behind it just to give it a
little bit more dimension. I'm going to start drawing
my pink string art here. Just connecting dots, two dots. I tried to see or haven't used the string in a
certain direction before and try to place it
in a different position. If this was real streamer, you wouldn't notice it as much. In a drawing. It just makes your line figure. Now, I'm just
duplicating the layer. I just drew out alpha locking the bottom layer and
changing the color to black. I'm going to unlock it, tap it to the bottom
right just a bit, go to the line and hit
Gaussian Blur to about 3%. I'm going to add it to multiply. Now I'm gonna do another
layer and do the same thing. We're just going to
fast-forward the video. Again, I'll duplicate it. Alpha, lock the bottom layer
and change it to black. So two fingers
again to unlock it. Just tap a little
bit to the right. Hit the wand and Gaussian
blur to about 3%. Now I'm going to repeat the same process
with the blue heart. In this kind of
fast-forward the video while I finish drawing this out. Up next is finishing touches.
8. Finishing Touches: In this lesson, we'll do some finishing touches for
our string art in procreate. I'm just going to group
these, rename them. I want to come back
and change any of the other layers. At anytime. I'm just going to
add some highlights to the top of her nails. Just to give it a little
bit more realism. I'm using a monoline
brush and using white. I'm making sure I'm doing in
the same place on each now. I'm assuming light is coming in from the top left of my artwork. My highlights are going to be
the top-left of each. Now. I'm just going to
fast-forward the video. Why finishes up? Now I'm going to tap the wind and use Gaussian
blur to about 3%. I'm going to rename this
layer to highlights. Now I'm going to add some texts. I really think this
fits entwined as one, so two hearts entwined as one. Re-positioning to
the right height. Now, I'll rasterize
is to split it apart and move as one to the
other side of the heart's. I'm gonna duplicate it. Alpha lock the bottom layer. The layer to black, unlock it, tap it to the bottom right just to give
it a little bit of shadow. If you happen to sell
your string art design, just remember the fonts you choose needs to have
a commercial license. In order to do so. If you want to give your
string are even more detail, we're going to draw
even more lines on the top of the string art
by using a monoline brush. Well, since this
isn't thin enough, will duplicate the
monoline brush. And tap properties. Change minimum size to
1% and maximum to 10%. With this new brush, we're going to trace
the outer edges of just a few streamlines. You don't want to overlap
or bisect your lines. You'll need to designate
intersections with just one string as being on top. Like this. I'll do this with a few
lines on both hearts. And I'll fast-forward the video. Now's a great time to share your project in the projects
and resources section. Next, we're gonna use our design and create a template
for a 3D wall art.
9. Create a Template for 3D Wall Art: In this lesson, we will take our previously designed
hearts that we created in Procreate and create a
template that we can actually use an adapt for our
wooden wall art. I'm going to have to
check off the background. And now I have just that
layer and nothing behind it. And we're going to copy canvas. I'm going to create another
document, 17 by 11. Hit Create, and I'm
going to paste it. Now. I just have the double hearts. I'm going to cut out freehand by swiping three
fingers down, cut and paste. This way I have the
two hearts separate. I'm going to move over
trying to get it lined up. I can print it on
two different pages. I'm going to actually turn on
the drawing guides so I can see where the center
of this 17 by 11 is. And you can see that some of
my nails are overlapping, so I'm gonna have to bring
back my second heart. Fix the positioning. Now I'll cut out the additional dots of my
phone nails or my first heart. So this way I can position it on the second page with
the smaller heart. Will have to line these up. Once we print them out and
use it for our template, for our wall art. Each will fit on 8.5 by 11. So I can print out two
PDFs for my printer. I'm just going to group
these two layers to keep them organized and
to keep them together. Now I'm moving everything to
the right side of my Canvas and we're going to resize
the canvas to 8.5 by 11. This way we can save them as PDFs and they can get printed
off from the printer. Not just crop the canvas, so it's half by 11. You can save this as a PDF. Since you're only going
to use it as a template, you can just hit good
for the quality. You can save it to your files or I'm actually going
to print it directly. Same thing with a second page. Adjusting your template
if you're signing of your board is not going to be as big as the canvas that you just created your first
string, our hearts in. That can easily be adjusted. Tap the wrench icon
top-left and go to canvas, Crop and Resize,
Moving your sides. And change your settings to
the size you need it to be. I'm going to use 14
by 11 as an example. The dental hearts may
be too large for your 14 by 11 size. What we're gonna do is just
resize and reposition. This would be to your liking, however big you want it to be. I want to turn on
the drawing guides just so I can see the
center of our canvas. Go to the Wrench icon top-left. Go to Canvas, drawing guide
and edit the Drawing Guide. You want to go to symmetry and make sure it is on vertical. This way the vertical line
in the center shows up. I'm just going around
everything that fits on the left
side of our Canvas. Swiping three fingers
down, cut and paste. This way I have two layers. Now I'm just going
to reposition, move everything
over to the right. And I'm going to go
back to the wrench, to the canvas, Crop and Resize. Not going to change the
settings to 8.5 by 11. This way it's gonna be a
size I get printed off from my printer and
adjust the canvas. Now I'm going to turn on
the drawing guide off. Here are my two PDFs. I'm just going to recenter
it on the 8.5 by 11. Now I have to resize
PDFs ready to go. Next, we're gonna start
prepping the wood.
10. Prepping Wood: In this lesson, we'll
start prepping the wood. I'm going to add stain to mine. I had some cherry. I'm stirring. I'm just
doing a nice even coat. Apply your stain if
you're using it, you want to let
it dry before you flip it and stay
in the backside? Again, you're going
to want to let it dry and then you're gonna want to seal it
with polyurethane. If you don't want to stay there, at least seal it
with polyurethane. This way you're not getting wood shavings caught
on your fingers. When you're touching
the wood, let it dry. You want to flip it so you
can see all the backside. Up. Next, we'll
start stencil using our template and creating
our design on our wood.
11. Stenciling : In this lesson, we'll take our template that we created and stencil it out onto our wood
for our nail positioning. Just laying out my
two printed templates here, taping it together. The top, so this way
has a little edge. I'm going to try and center it. You can see my wood
split a little bit, so I got to be careful that
I don't know directly on that split because
it could crack more. I'm going to turn
my board around. Just repositioning
my template again. This way to avoid that
split in the woods, it takes more effort to try to bleed through two
layers of paper. So I actually went
and trims off the extra there's only a one layer of paper or my pen
will bleed through. I'm just going to fast-forward
while I finish this up. I keep checking just to
make sure it goes through. There you have it. There's our double
hearts on our wood. Up next we'll start
adding the nails.
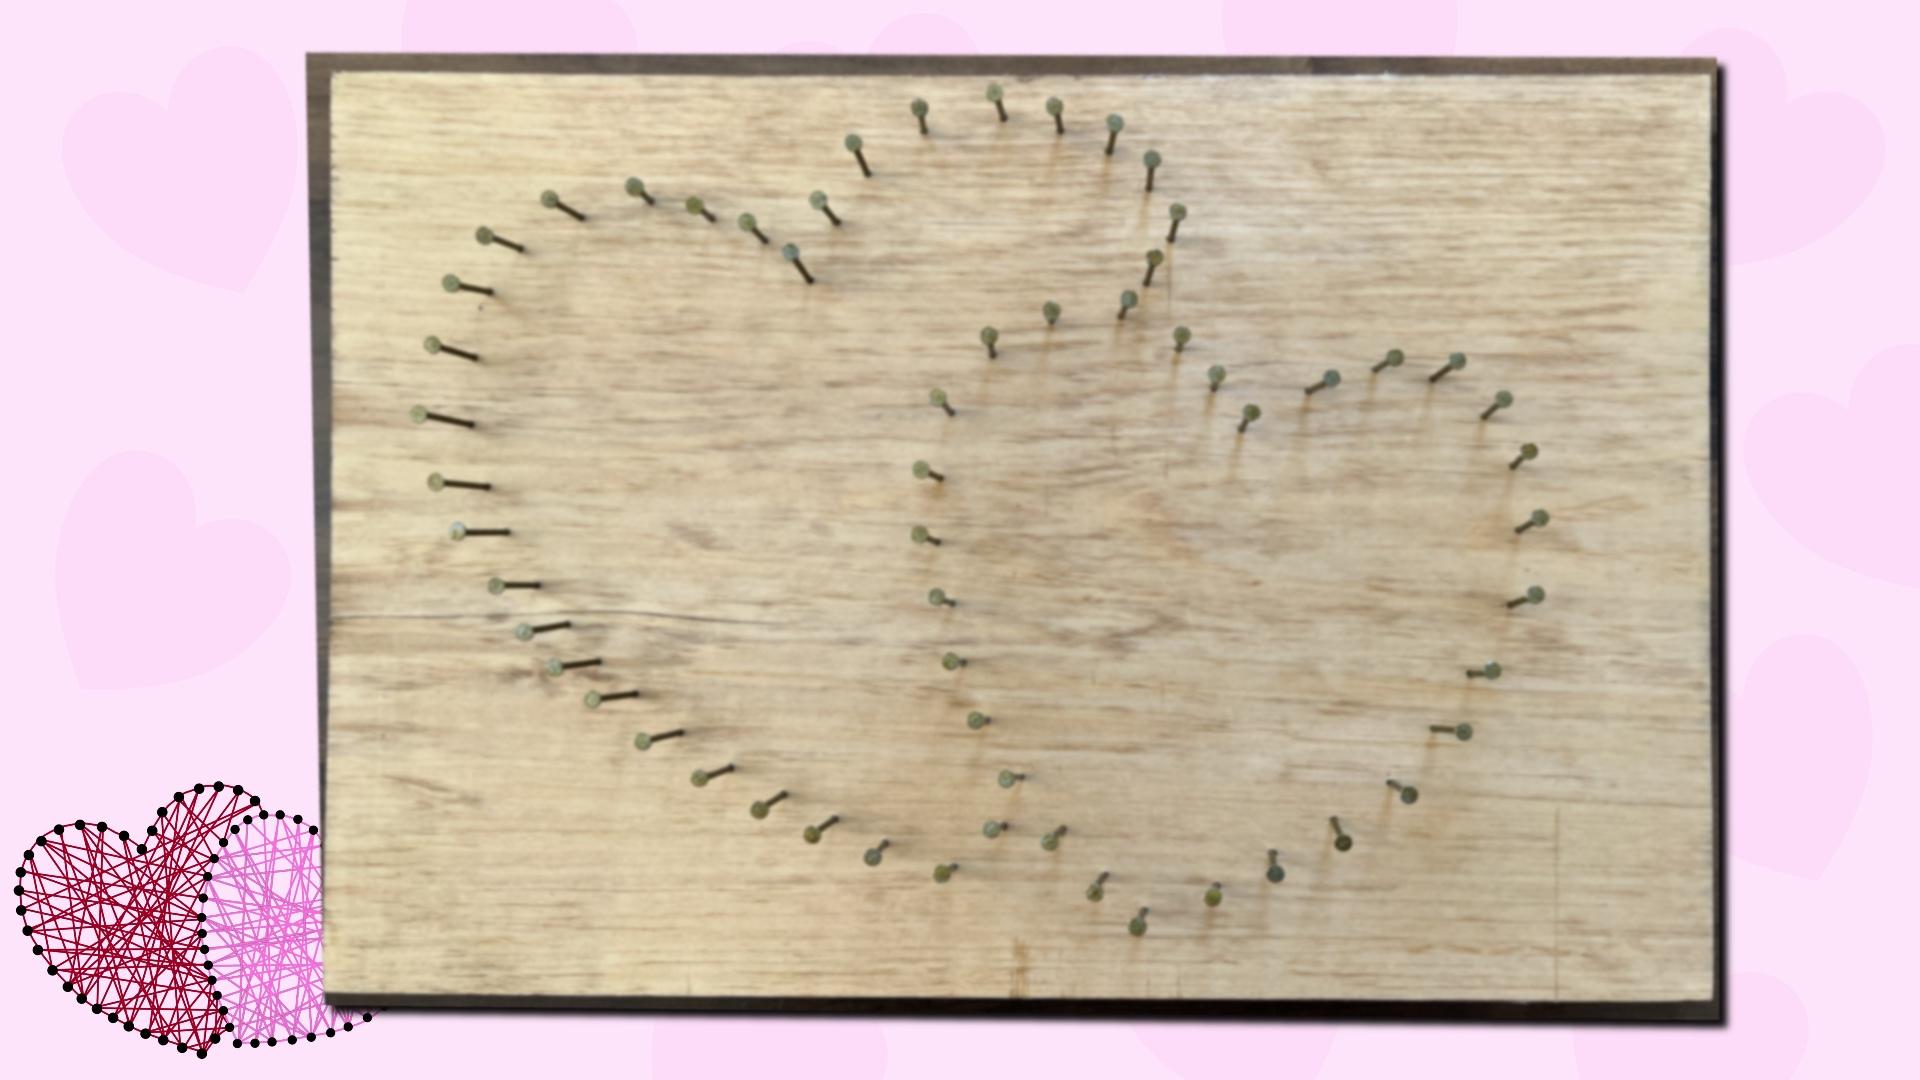
12. Adding Nails: In this lesson, we'll
start adding our nails. This is what I'm using. I'm
using one and three-eighths. You want to make sure that
whatever nails you're using, they're not too large. You wanted to stick
up somewhat but not go all the way
through your board. You could use smaller ones. These are one inch, but it's still not going to give you a lot of
room for your string, but it is still usable. Want to make sure the
top of your nails has somewhat of a head
so you're streaming. Hammering in place. Fast-forward the video. While I finish this up. Next, we'll start
wrapping our string.
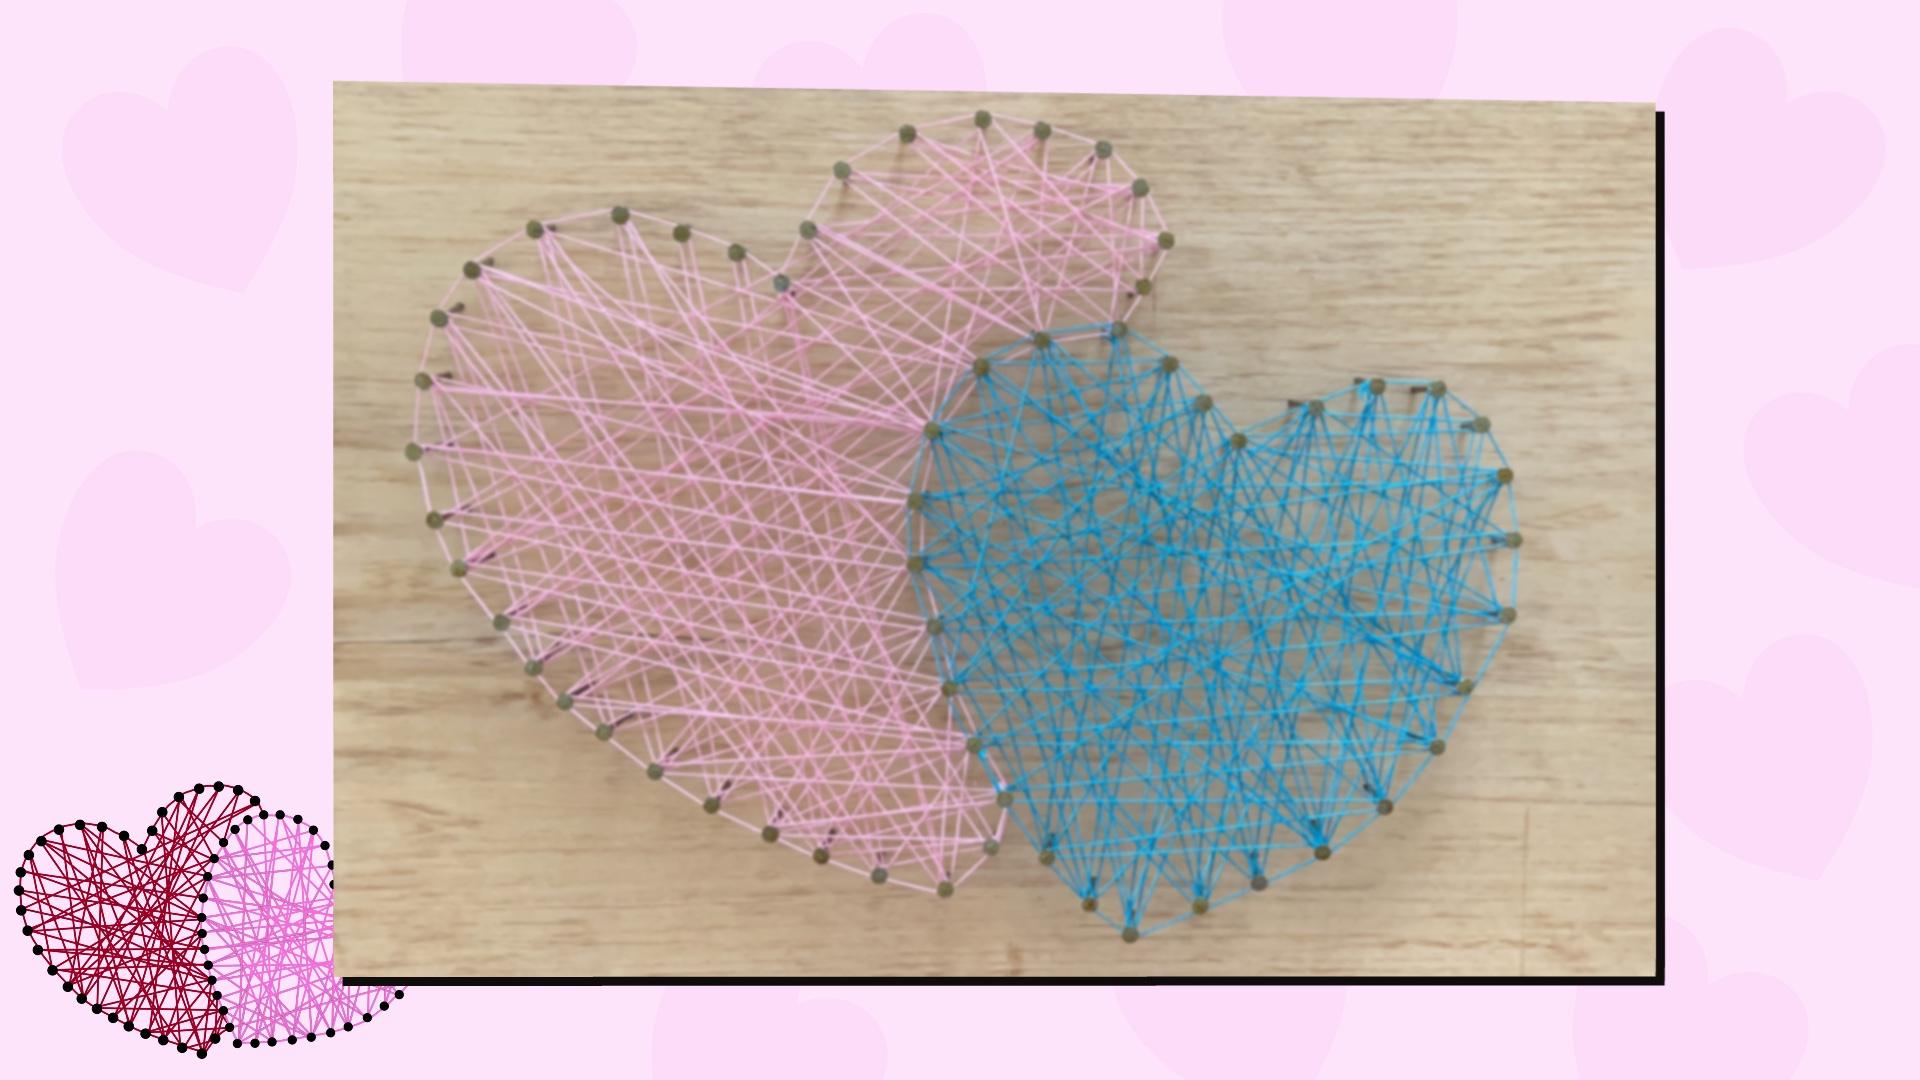
13. Wrapping Hearts: In this lesson,
we'll start wrapping our hearts with string. Here's some examples of some
string that you can use. Other cotton. Appreciate the thread. Embroidery floss, or even twine. You'll need scissors. I'm choosing my colors it onto one of the nails. Just by nodding it, I'm slipping it through a
loop and pull on it through. I'm just going to not at twice just to make sure
it's nice and tight. I'm just going to
snip off the excess. Now I'm just wrapping, holding tight as I go. Just wrapping, being careful not to tangle
up with the other nails. Just trying to catch
all of the nails. You may have to press down. You have more space
for your string. I'm just wrapping, going different directions from
one nail to the next. I'm just going to
speed up the video as I finish up my first heart. Now, I'm going to wrap around each now on the
outside of the heart, just to give it an outline. I'm going to try to go in the same direction
with each now. Otherwise my thread
is gonna go on the inside versus the
outside of the nails. Actually, I just
not as I would go on on the inside and I wanted to all be in the same path. So I'm going to go back and fix that number. Cut my string, not
it around a nail, secure it in place
with several knots. I'm actually just going to
wrap it around another now. Monnet and trim the excess
off just to be sure. Now I'm gonna do the same
process using my second color. I'm starting with a nail, nodding it and trimming
off the excess. Now we'll just continue to wrap. Just like I did the first heart. As you can see, I
nodded it too soon. I didn't wrap around
the outside edge, but that can be fixed. We'll just tie the two ends together and trim
the excess off. Finish wrapping
the outside edge. Now we can call this
complete or we can add our entwined as one just like we did in the Procreate artwork. Next is a great big thank you.
14. Thank You: I want to say thank you for taking some time and
spending it with me. I really hope you enjoyed this class as much as
I enjoyed creating it. Now that you've created
some fostering our heart, you can not only
sell your design, you can sell a template, you can create it into a surface design pattern
and sell it online. This is exactly what I did. Don't forget to
share your project. Don't forget to leave a review. Follow me here on Skillshare if you want to be notified
of my next class. If you're on Instagram,
follow me at Cambridge. I can't wait to
see you next time. And if you happen to
have a spare moment, make sure you check
out my other classes here on Skillshare.
 Kimber Shook, Artist | Designer | Creator | Teacher