Transcripts
1. Introduction: Hi, everyone. It's
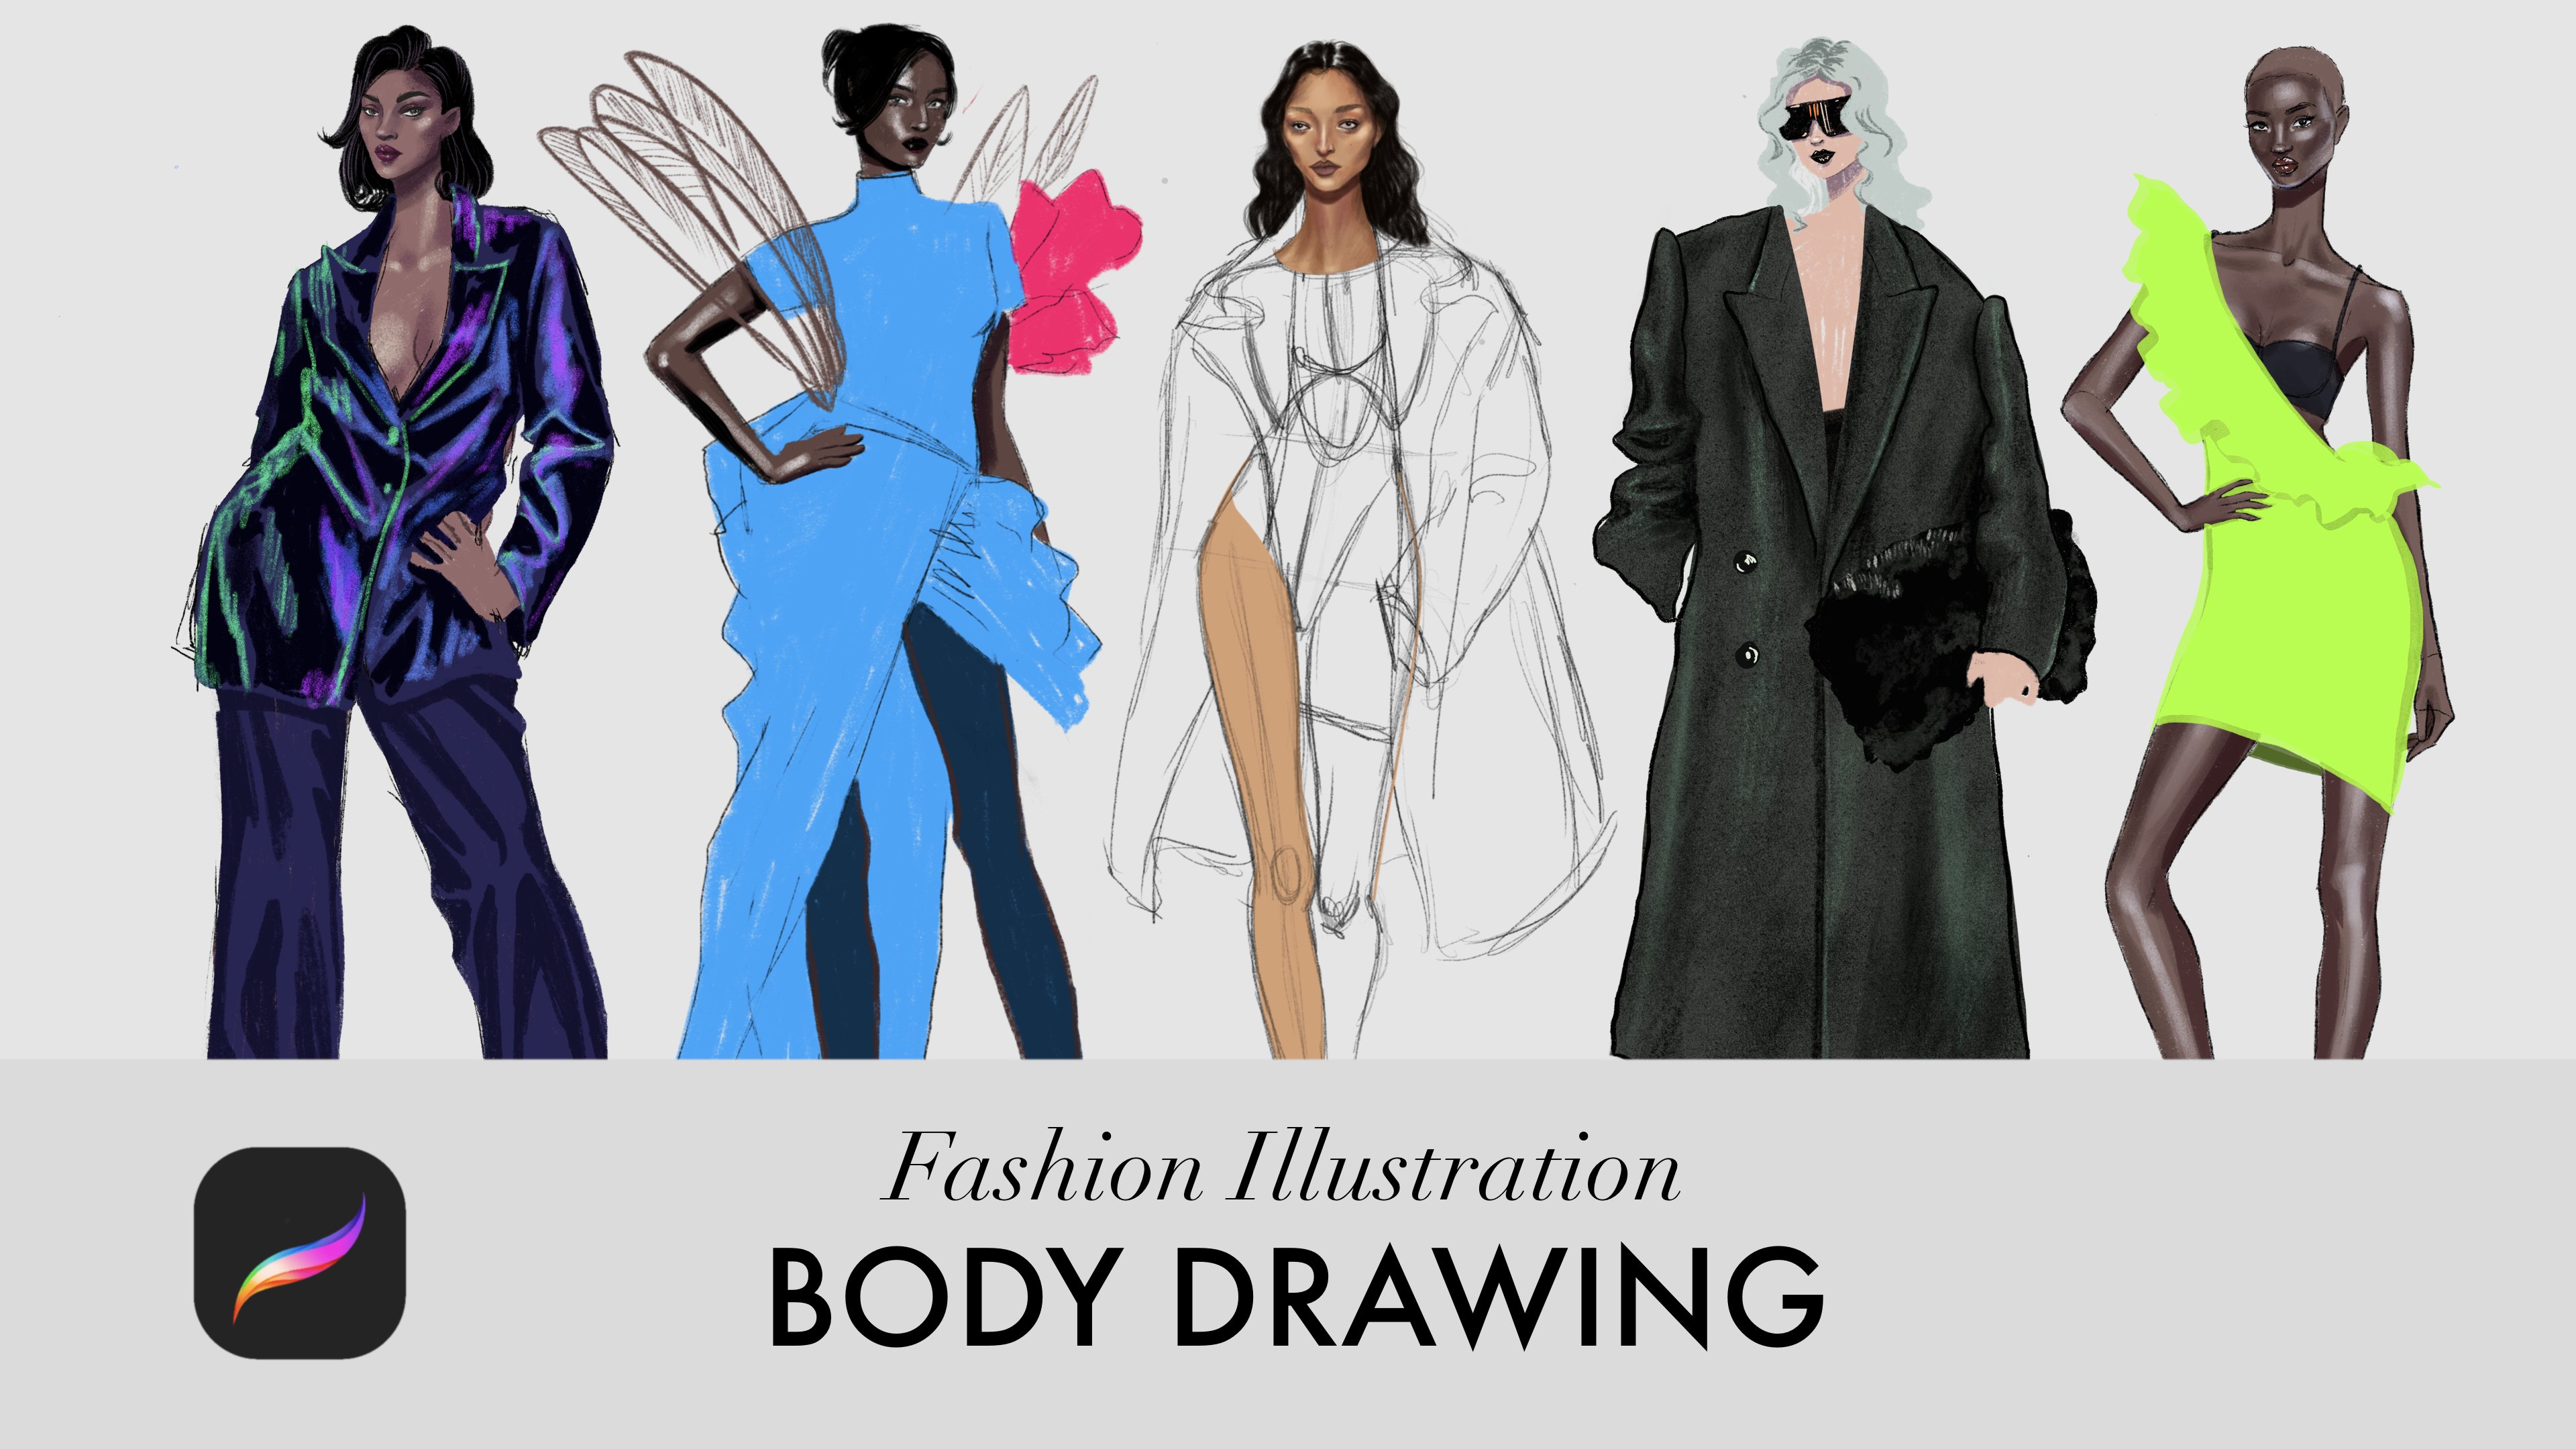
FSketcher Skillshare class, and I am Aliya. This class is
dedicated to drawing a fashion figure in which we're going to use at Procreate, which is a very powerful and easy to use iPad application. We're going to learn how
to draw a face scheme, which will let you draw
so many different faces. We will also learn how to
draw a body scheme that will let to draw
different fashion poses. We'll draw a face
and body features, learn how to make
a clean line work, and eventually
we'll learn how to color the body and
draw basics swimwear. This class is designed for anyone who's interested
in fashion illustration, fashion design students, and actual fashion designers. I tried to break this course so it's clear
and easy to follow. If you have any questions, you can always ask in
the discussion boards. I will be very happy to
see your final works, and let's create something
beautiful together.
2. Lesson 1: FACE SCHEME: To draw a face, I need to draw a face schema. For that, I'm picking
A4 size paper and HB pencil that you can find
in the painting tools. Just pick some dark gray. Let's start drawing a circle. If you draw any circle
and just tap your screen, you'll get a perfect circle. Then go to Actions
menu and in Canvas, pick drawing guide and pick Edit Drawing Guide to
customize your grid. So I pick 2D Grid, and in the grid size instead
of 111, I'm picking 124. Next I'm going to use
transformation tool and just increase my circle, decrease it depending
on how you drew it, so it's five squares
in width and length. Next, draw a vertical line, and if you just hold
your pen on the screen, then it become straight. I have it exactly
in the center of my circle and I'm dividing this area inside of
the circle by three, and drawing this horizontal line across this lower division. Next, pick the selections tools and exactly freehand selection, and just select
this upper segment above the horizontal
line inside the circle. Next, go to Actions Menu, and in the Add
section, select Copy. Then go to the
same Actions Menu, add and then paste. We have the segment duplicated. I'm dropping it below
this horizontal line, and then going to
layer's, picking that, inserted image and merging it down so we have
everything on one layer. I can now take the eraser and just get rid of this
part of the line. The lower division is
going to be our chin. Next division at the bottom
of the circle is nose. Next division was the horizontal
line is for the eyes. Next, what we need
to do is to draw two vertical lines on both sides to make our
head flatter on the sides. This distance between
two vertical lines, I'm going to divide it by two. Two halves on both sides of its, I'm dividing by two as
well and making this dots. Please repeat the process
on the other side as well. Next, I'm going to
label these dots. You don't have to do that. I'm doing it for the
sake of explanation. We have dot number one, and dot number two, those are the
corners of the eyes. I need to draw the
inner corner of the eye a bit below
this horizontal line. I'm doing the same on the
other side just a little bit. I'm going to erase those
numbers. We don't need them. You can just shorten that division for the
center of the eye. Next let's draw her nose. Nose looks like an upside down triangle with
rounded corners, I'll draw the bigger version. It's a little bit
like a cat nose. Next, please divide the distance between her nose
and chin by three, and we need this upper division, that's opening of the mouth. I'm drawing her nose bridge. Imagine that you want to
draw a heart starting from her nose bridge,
I'm going up. Then I'm trying to reach this intersection between
the vertical line and the circle and trying to be as close as
possible to the circle, and just try to reach her mouth. Then I'm drawing
this diagonal line. It has very subtle slope, and then we have these turn
at the level of her mouth. This is how we
show her jaw line, like really sloped line, you can see it, and just
connecting it with the chin. Now, I'm picking the eraser. I'm going to erase
everything on the left side. Then go to selections, pick the free hand
selection tool, select the half of the face, go to Actions Menu, copy, paste, and then we have this
flip horizontally tool or action and just flip
that half and align it. Then merge that inserted layer
with the layer below it. We have everything on one layer. Our face scheme is ready
and we're going to draw facial features
in the next lesson.
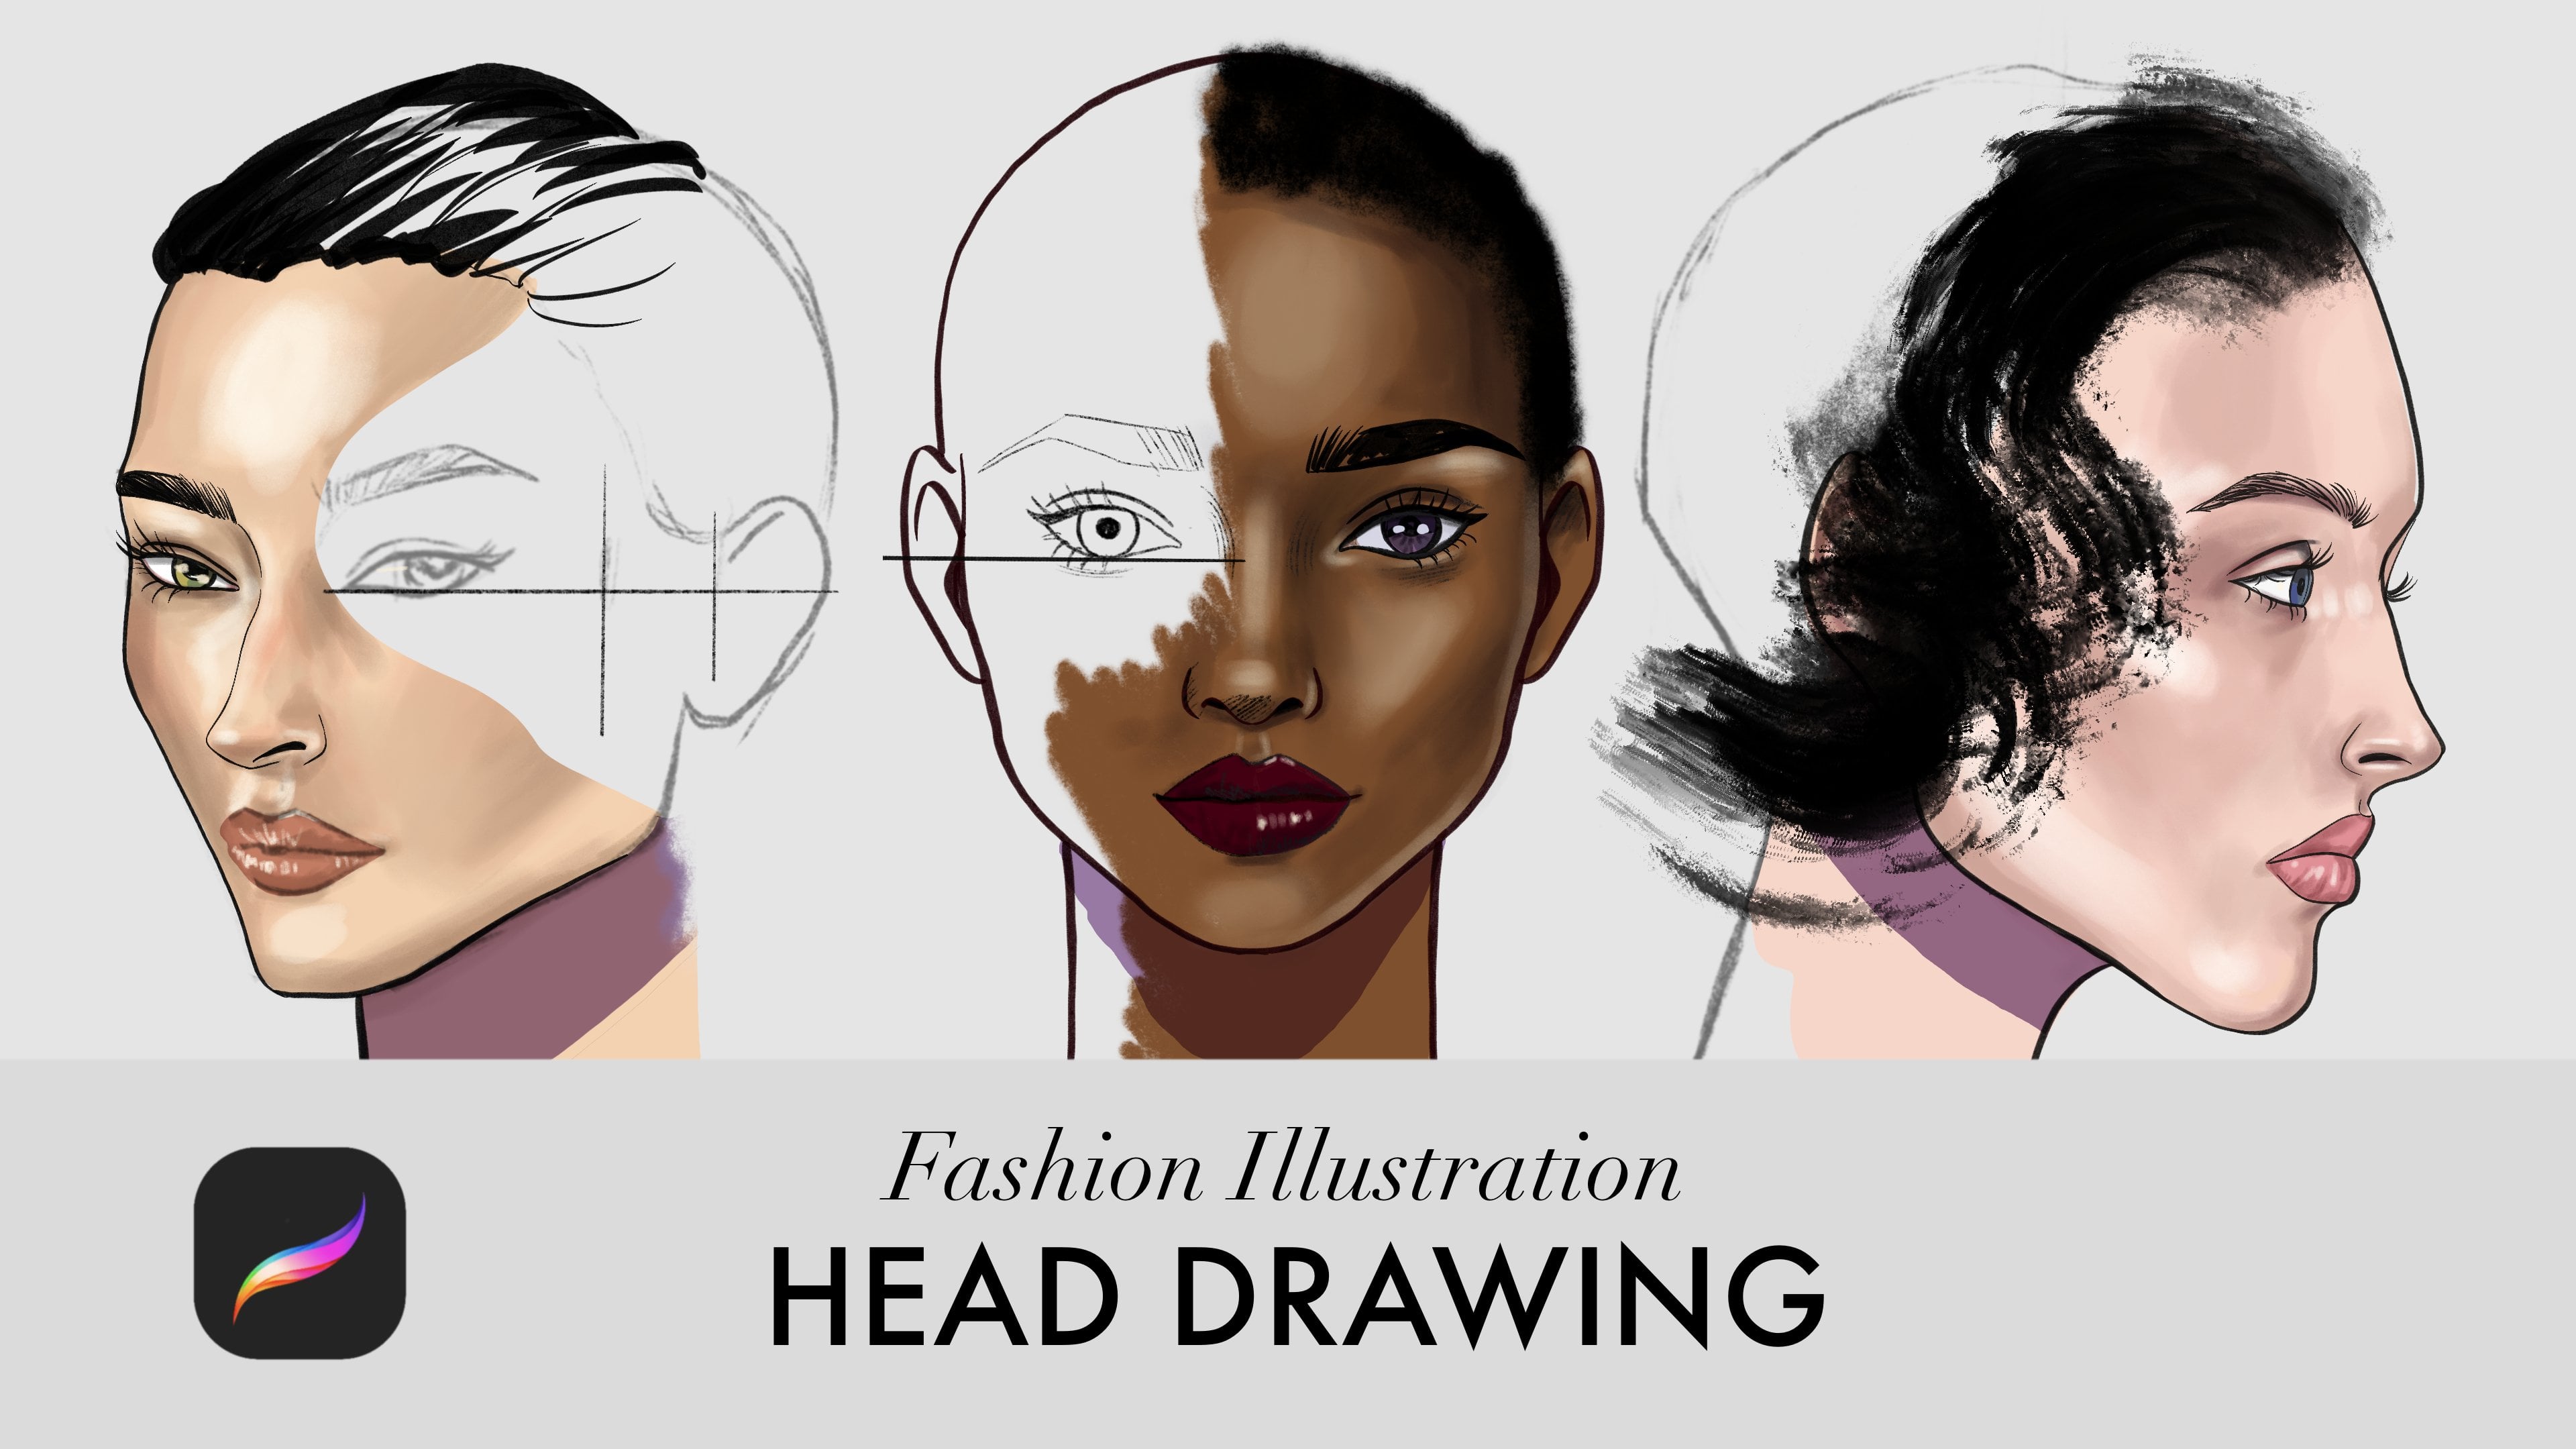
3. Lesson 2: FACE DRAWING: In this lesson, we're going to draw
facial features. Let's call this
layer face scheme with which we can draw
so many different faces. Let's decrease the opacity. I'm just clicking on
that N letter and then making opacity around 40. Swipe the layer to the
left and lock it so we don't draw anything accidentally on top of it and
create a new layer. I'm picking studio pen. You can pick actually any pen or pencil that you like
because this is a draft. We'll have line-work later. I'm connecting out the corner of the eye with the inner
corner of the eye. Pay attention to the
curvature on the lines. You can use a reference image. For example, here you can see that we have different lines, different shapes depending on the eye that we want to draw. You can just follow me, and we can draw
some similar model, and then you'll experiment with different reference images. Now I'm drawing her eyebrow
following that heart shape. You don't need to draw
specific hair right now. We'll draw all of
the textures later. Just define the thickness of the eyebrow and the
general shape of it. Adding some eyeliner. I think eyeliner
makes it pretty. I'm creating extra layer for the nodes, you
don't need it. Pay attention to these lines. Quite flat diagonal, and it reaches the
center of your eye. Then it becomes curved and just connects to the
outer corner of the eye. Then we have one
more diagonal line, but it doesn't reach the center. It's quite short. Then we have these
flat wave that is stretched to the
inner corner of the eye. This is specific for this
eye that I'm drawing. I'm deactivating the nodes, and let's start
drawing her nose. For that, I'm just following the line below that triangle and then adding
nostrils on the sides. In some way, it just looks
like a handle of a bicycle. If you have a problem
with the symmetry, you can copy one-half, past it, and flip
it horizontally. Here you can also see that you can use a
reference image, draw different nostrils, and also draw your triangle based on the shape of the nose. It can be a bit
taller or it can be flatter depending on the
nose that you want to draw. Next, I'm drawing
this line between her lips as a wave and then
the shape of her lips. I want to make it more rounded
without sharp corners. The lower lip usually a bit
thicker than the upper lip. The heart shape is dictating me how to draw the cheekbones. If you don't want too
prominent cheekbones, you can draw them a bit flatter. The ears, I'm start
drawing them at the eyebrow level and finish approximately at her nose level. For her jawline and her skull, you can just follow the
shape of that face scheme. Now I want to change lightly
that line between her lips, make it a bit flatter, and add some details
to her ears. Now with the freehand
selection tool, I'm picking everything except
for her nose because I drew her nose for both sides. Then go into Actions menu, Copy and then Paste. Flipping horizontally and
aligning with the right side. Since the left side
is copied and pasted, let's merge it down so it's on one layer with the face drawing. Now we have everything
on one layer. One hand detecting to check
the symmetry of your face, just go to transform tool and flip your
face horizontally. I have obvious problem with
the symmetry of her nose. I'm going to erase nostrils and just redraw them a
bit differently. I don't want perfectly
symmetrical nose, so I'm just very softly fixing it and erasing a bit the bottom of her nose
so it's not that dark. But at this step, it's not
really important really. Next, I'm activating
the face scheme and drawing her pupils and iris. As you can see, one-third of the
pupil and iris is hidden under her upper eyelid. Let's take a look. I like it so far. There is one extra
very useful tool. We go to adjustments menu, and it's called liquify. Just pick the size of the
brush that works for you, and you can reshape anything, basically. You're
pushing pixels. For example, I want to make the top of the
head a bit longer and the sides of the head a bit narrower so her head is not
too wide in the upper half. You can also change the shape of your lips, eyes, anything. It's really handy tool, so you don't have to redraw
everything to maybe get the exact shape of the
jawline or ears as you want. We have our facial
features ready. I'll delete this layer, and let's call this
layer face base. In the next lesson, we're going to learn how
to build the body scheme, and after that, we'll
draw the actual body.
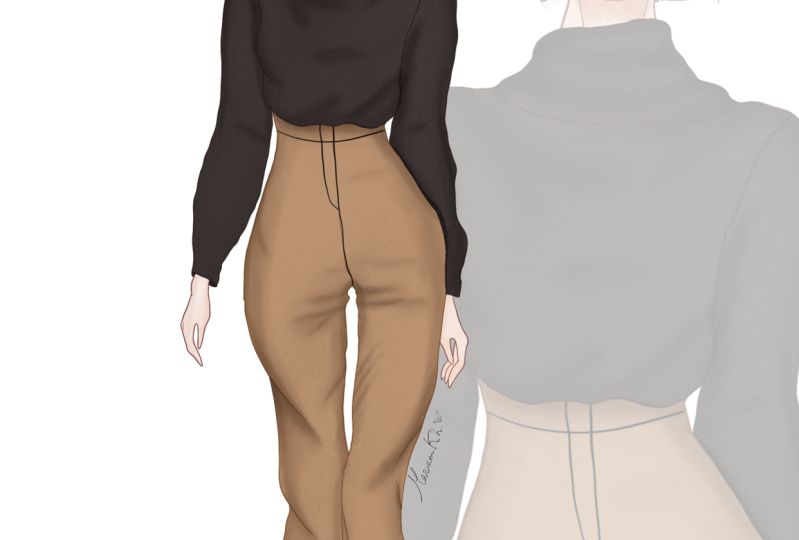
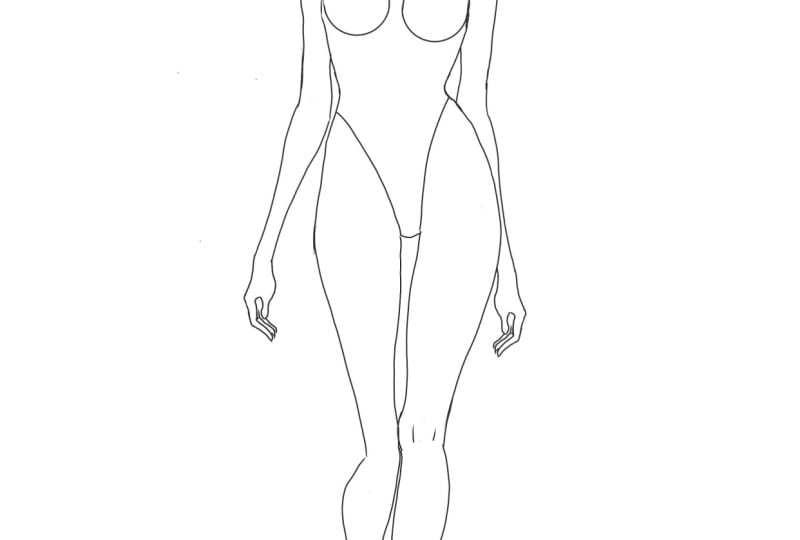
4. Lesson 3: BODY SCHEME: [MUSIC] I have the same project
from the previous lesson, head scheme and head base. Let's go to the gallery and select this project
and duplicate it. We have one file saved
with a face scheme. I'm using this copy and
I'm going to delete face scheme because I
need only face right now. Now go to actions menu and
activate the drawing guide. I'm going to use the
same grid of 124 pixels. I'm increasing the opacity just to make it clearly
visible for you. You don't need it that
dark if you don't want to. Select Transform tool and pick the Uniform transformation, so it's exactly three squares. I'm placing it in the middle, so It has these line
dividing the face in two. I'm creating extra layer for the nodes. You
don't need it. I'm going to use it to
explain the proportions. In this course, I've decided
to talk about proportions of the body in terms of
units instead of heads, as very often it's done. I don't know why in fashion
figure because head is an ellipse and it's huge. It's not very convenient
for the measurement. If we use this exact grid, we have 26 squares. Each square is equal to one
centimeter in lens or a 0.4 inches if you want to draw this figure on actual A4 paper. Twenty six squares means
that midpoint is 13 squares. But where going to
have the crotch at 12, which means that the upper
body is a bit short. If you are not so much into
all these measurements, you can just draw the legs
longer than the upper body. Let's create our first layer. I'm peaking HB
pencil of dark gray. At five squares. I'm going to draw these hole
that we have at the base are our neck, juggler points. I'm connecting two
diagonal lines to it, stretching them from that
approximately center of the jaw line,
creating extra layer. Now I'm drawing a trapezium. On the top, we're going to
have five square in length. Then the height is going
to be fours squares. The bottom, we're going to
have three squares in length. Next, create one more layer. I'm drawing upside down
trapezium, the same one, but the only difference
is that the height is going to be only three squares. We have now three on the
top and five at the bottom. It's important to know which side is going to
have the front leg. Let's say on our right
side is going to be our stepping front leg and on the left side is going
to be our back leg. It means that the
hip is going to be higher on the side
of the front leg, we will have this
inclination of the slope. The hip is a bit higher
than the crotch. The shoulders will be
just opposite version of the hip line with a
very similar slope. We're drawing it a bit higher than that hole that we
drew in the beginning. I want just to make this
one more inclined and, let's define the center
to find the crotch. The crotch will be on the
side of the front leg, in relation to
that central line. Also let's draw that
central line at the bottom to locate
her from foot. The front foot will be
exactly in the center. That's how we draw it. Taking the upper trapezium
and locating it so its center is aligned with the center of
that juggler point. Then taking this
bottom trapezium and aligning it with the crotch. Taking this upper one and make sure that you have these
free-form transformation, because we want only
to change the height. I want to just
have some distance between your ribs and
your pelvic bone here. I want to rotate
it a little bit. Just so everything is positioned well in
relation to each other. I'm coming back to notes
and just i want to erase everything that is
not necessary anymore. Creating one more layer
and drawing your spine, just make very smooth curve that connects your
neck with your crotch. One more layer. I'm
creating this point at her pelvis and connecting
it do with your foot. This is our front leg. Our knee on the straight leg is going to be at 17 squares, creating one more
layer and drawing. Now the knee that is going
to be lower because is just bent, is positioned lower. Drawing your foot. Now I'm just erasing
all my notes. That's how it looks
without side notes. This is how it looks
without the drawing guide. Let's select all these layers by swiping them to the
right and group them. Then duplicate that
group and then just flatten the first group. We have our scheme
ready on one layer. Let's call it body scheme. Deactivate this one. Let's come back to our
new group that we made. I made all these
parts separately with a purpose because now
I want to manipulate them. I deactivated your spine
because you can just delete it. We don't need a curve. Now she's going to
stand straight. I am putting all these
trapezium shapes, so they are just straight. Now I see that my front foot is actually on the
layer with my back leg. Let's just merge down
the two layers that are made for the legs and erase the back leg and
rotating this leg. I also don't need that crotch. Let's position it properly. Then I'm going to Actions
menu, copying it, pasting, and then
flipping it horizontally. Let's just rotate both
legs a little bit. When you draw legs like
this, with this scheme, you'll have some space between her legs and it looks
more, I don't know. I think it looks nicer. Rather than drawing
your as a soldier. In the next lesson
we're going to draw the actual body shape
for the walking figure. But you will be able to draw
standing figure as well. I will also provide
some references in the materials for this class. We are actually very close to building and
finishing our model. [MUSIC]
5. Lesson 4: BODY DRAWING: We're starting drawing her body, please log the
body scheme layer. Also, decrease its
opacity to around 40 and create new
layer above it. Ignore all those layers
that I have in this project because I just showed
this video before. For now, you need
only face base, body scheme, and this new
layer for the body drawing. We're starting with
the jugular point, that hole at the
base of the neck and then I'm drawing her collarbone. You can see it's
at the angle and then we use our freehand
selection tool, I'm selecting that collarbone, go into Actions menu
copying and pasting, and then flipping it
horizontally and then aligning it with relation
to this trapezium. Then merging down
this collarbone, with the layer of
a buddy drawing, starting drawing your neck
and we have this curve. This is how shoulders look
like at those corners. Imagine that you are
drawing top of her body. We're just cutting her
shoulders and drawing this ribcage that's close to your waistline
and your pelvis, and then it's close
to your hips. Pay attention to
this protrusion. It's not just rounded, it has this prominent part. I'm creating extra layer
and drawing circles. You can draw a circle of
any size for your breasts. Pay attention to the distance from her collarbones
bones to your breasts. Your breasts are not too high, then I'm duplicating that layer and positioning it on the left. I'm merging down this layer and the breast with the
body drawing as well. Taking the eraser tool and getting rid of everything
that I don't need anymore. We're going to have
the line work, so don't worry about
being very clean, this is sort of a draft. Drawing the side
of your breasts, showing your armpits and doing
the same on the left side. I want to make your
ribcage a bit narrower so I'm erasing it and redrawing. This body scheme is a guide. You can make certain body parts wider on there,
where as you want. This is how it looks
without body scheme, I like it so far, but I want to drop your breast, left side breast a little
bit, maybe like this. Then I'm drawing
these lines from the edge of your pelvic
bone to your crotch, then around her knee, I'm drawing one line
that looks like a bracket and the outline
that is just flat. I need to connect her
hips with her knees. You can see that keeps our curved on the top
and flat at the bottom. I'm drawing the inner
line of her thighs, that looks like a wave. I'm adding this nodes
just to make it clear, and here you can
see the upper half is curved and the
lower half is flat. Let's draw the part of
her leg below her knee. First I'm drawing her bone then the outline you
can see it's quite curved and then we have
a flatter inner line. Let's make her knee more
prominent on the inside. If we divide this part
of her leg in two, you can see that upper half is curved and the
lower half is flat, just as in the case
of your thigh. It works in the same way
for your inner line. We have these bones
at the ankle and the inner bone is higher
than the outer bone. I'm just continuing
that bone line. The inner line of
her foot is parallel to it and the outer line
is almost vertical. Let's get rid of all of
these structure lines. Adding details to your knee, and let's draw your back leg. We're drawing the
thigh in the same way. I'm drawing the bone
of your lower leg. Since we're looking at your
bent leg at the ankle, it will be a bit distorted. It will be still more curved in the upper half and flat in the lower half if
we're talking about this outer line but it
will be more curved. The foot also will have
a bit different shape, it will be longer because we're looking at
your foot from the top. Just like in this
example, you can see, we have one foot with the top view and one foot
with the front view. Getting rid of
everything that is unnecessary and
creating extra layer for the arm structure. Take a look at this image. On the right side, the
leg is at the front, but your arm is at the back and is much closer to your body. Whereas on the sides with
the back leg which is bent, the arm is in the front and it's positioned further to
the side from the body. We have our front leg
on the right side and I'm drawing your arm at the
back and closer to your body. Her elbow will be a bit
lower than your waist and your wrist will be at 13 squares just in the
middle of your body. I'm duplicating the layer with this arm structure and
flipping it horizontally. Now let's rotate it, because this arm is located a bit further to the
side from her body. I'm merging this layer
with the previous one. We have arm structure
on one layer, and I'm decreasing
the opacity of it and creating extra
layer on the top, so we start actually
drawing the arms. I'll start from the
lower half of your arms because it has very
easy shape of a carrot. Just want to reshape it a bit, then duplicate this layer
with the transform tool, a little bit horizontally
and align it with that bone structure
on the right. I'm erasing everything
that is behind your hips, merging down those
layers with carrots, connecting shoulders
with this elbow part. You can see that area
was below the shoulders, see it's a bit prominent, and then arm becomes narrower and then it becomes
wider at your elbow. With a freehand selection
tool I'm selecting this part of the arm and
then in the Actions menu, I'm copying it and then pasting. In digital fashion
drawing, it's that easy. I need just to
position it correctly. I'm merging down the
layers with the arms, with body drawing, and you can delete the
arm structure layer, we don't need it anymore. Create extra layer for the structure of your hands, and I'm drawing a tetragon. Just of the shape that you
see that is one square in height and adding structure
for your fingers. Please pay attention to the land and proportions in
relation to those squares. In total, the hand occupies two squares or two
centimeters or 0.8 inches on the paper and you can see that one square is palm, one square goes to fingers. I'm decreasing the opacity of that layer with the
hand structure, creating extra layer above it, and drawing fingers
around that structure. Just follow me. Next I'm deactivating
that structure layer and then with a freehand
selection tool, I'm selecting the hand and
then copying and pasting it. Flip it horizontally and
position it on the right side. I'm erasing everything
that is behind, now I'm merging all the layers that have the body drawing. I don't need anything
with a structure. I have arms, hands, and the body, everything
in one layer. Perfect, so getting rid of
everything unnecessary. This is how our body looks with a drawing
guide deactivated. In the next lesson, we're going to create clean, nice linework before
starting coloring our body. Let's call this layer body base and jump into the next
lesson, we're almost there.
6. Lesson 5: CLEAN LINEWORK: [MUSIC] When creating line work, avoid using just your wrist. Instead, try to use
your whole arm. If you do so, you will get loose and more dynamic strokes. You can see these strokes they have certain
directionality. There is a difference
in the pressure, in the thickness of line, and it makes just more
interesting drawing. Also, when you create line work, just keep rotating and
zooming your drawing, so it's more convenient for you to create those
dynamic lines. You can always tap
the screen with two fingers to redo something. Actually, when your
work on the linework, you redo those lines many
times, and it's okay. These are the layers that we're going to have in this lesson. We already have body
base and face base to reduce the opacity of those
layers to 40 percent, and we have a new layer
for the linework. I showed those layers
because, again, in this project, I have some unnecessary layers. Please ignore them. You will need to lock
the body base and face base just in case so we
don't spoil those layers. Now, I'm working on the
layer for the linework, and I'm using the technical pen. [MUSIC] When drawing eye, start from the roots, from the bottom, and make these strokes, so the upper edges of
hair look thinner. [MUSIC] When I was
editing this video, I had to cut out all my
trials with the lines, just to make the video shorter. But as I told you before, you will constantly
tap the screen was two fingers to redo the lines, and it's absolutely normal. Don't worry, try to
enjoy the process. With time, your arm
will become more agile, and you'll do it much faster. [MUSIC] I'm repeating the process for the eyebrows on the other side. You can always just copy one eyebrow and just
flip it horizontally. But I like when facial features
are not very symmetrical. Showing the corners
of the mouth, trying not to make too
thick lines for the lips. Showing that eyeliner
on both sides. [MUSIC] Also, try to make quick lines. Usually, quick lines
are dynamic ones. Because if you tried
to control precisely all that pressure you
actually will make it worse. Is better to make maybe
10 or 20 trials making quick strokes than having two, three trials, just
making it slowly because they will
look fake in the end, and you practice more. You create these
fast, loose strokes. You get used to it. You get used to this movement. Then if it feels unnatural for you to
work from your shoulder, later it will be normal for you. [MUSIC] You can also choose
the thickness of the pen and type
of painting tool, as well because maybe you prefer some textured pencil
strokes rather than ink. You can experiment
with different tools. [MUSIC] You can also break
your line work if you have the really thin
subtle line work, and certain fragments might
even have no line visible. Usually, if the lighter
parts area that is super lite can have really
thin or no line work at all. Or the objects that are located further and the parts in the shadow or objects
located closer, I usually have thicker outline. [MUSIC] We have thinner lines
for the details, like those lines on her knee. [MUSIC] Here is what we have, and now I'm adding
some fine lines to show the details on her body. We're almost done. All clean. My linework is ready. In the next lesson, we're going to run the skin and add some life to
our fashion figure. See you there. [MUSIC]
7. Lesson 6: FACE COLORING: This is the project that we
had in our previous lesson. Let's go to gallery duplicate
it and open the copy. Next, I'm unlocking
body base and face base and then deleting all those
layers except for line work. Next, I'm duplicating
the line work, deactivating one of them, then picking the new one
and alpha locking it. Next, I'm picking hard
brush and then selecting color that is a bit darker
than the intended skin tone. Then just coloring
all that line work. This option is for
those of you who likes more subtle outline without
that much of contrast, because the black outline is very common for
comic style drawing. If you want less contrast, you can just color it with something that is very
close to the skin tone. Maybe just a little bit darker. I didn't touch eyebrows, eyes, and nostrils. I'm renaming this layer, just line work color. Anything. Creating extra layer and it should be
below our line work. I'm calling it face base, but in this case, there's going to be the
base color for the skin. Now I'm going to my palette, and here I made
the two palettes, one for the dark skin and
one for the light skin. Our base color is the second
coloring in this order. The first one the lightest is the color for the highlights, third one for the shadows, fourth one for the
pencil strokes, when we'll make the
touch-ups we'll use it. Then last two colors
are for the lips, one is base color, and one is for the shadows. We have these new layer
for the face base. I'm using studio pen. First I want to transfer all
those colors to my layer. I can use a color pick tool
to easily access all of these hues without going
all the time to the pellet. I'm picking the second color. Using studio pen is
really important that you have 100 percent opacity. Now you can see I'm starting
from your right here just going along the outline. It's important that you have no space between the outline and your stroke and that you're also don't go
beyond the outline. Don't worry that when we zoom in our image
is a bit pixelated, it's normal because we're
not drawing a portrait, this head is going to be really small and on our scale
it will the good. Next I'm selecting the color
in the upper right corner, clicking on it and
dragging it to the area that I want to fill
in and then just releasing. In the color panel pick the classic and choose light gray. With that light gray fill
in the area of the eye; there should be white. It's not that visible
because the value of that gray is similar to
the value of the skin. But it's really important
that you don't fill in that the area
with pure white. Next, for blue eyes, I'm picking desaturated blue. The same goes for green. Just try not to choose two saturated bright colors because that doesn't look natural if it's
not some contacts. Next, I'm picking base
color for the lips, creating extra layer. Calling it lips. Filling in the area of the lips. Create a layer above lips, clip it to the layer below
by activating clipping mask. Then decrease the
opacity of your brush. Let's add the shadows. Picking the darker
value and adding some extra shadows between
your lips on the sides, at the bottom. With
a color picker, choosing color between
light and dark area and adding it in between, then merging down the
shadows with the lips. We have everything for
the lips on one layer, creating extra layer above the face base and calling
it soft highlights. Clipping it to the face base, so it should be above face base. Then picking our first color, the one that is for highlights. Picking soft brush. Then increasing a bit the size and starting from your forehead. You can see that there is
not much of a contrast. It's just a little bit
lighter than her skin tone. Whenever you add highlights, try to push more in
the central part of that highlighted
area and less on the sides so there
is a transition. I added highlights on
the tip of her nose, then now showing
here a nose breach. Pushing less as I go up, then adding highlights below here in a corner of the
eye on the right side. I'll be constantly changing
the size of my brush. I'll work you on the left side and then adding highlights on the right side cheekbone. On the left side cheekbone, decreasing the
size of the brush. Adding highlights below
the outer edge of the eyebrow and the
same on the other side. Highlights on the chin. Now going up connecting the highlighted area
but I'm pushing very softly so you can hardly
see that highlighted area, but it is there. It is just the flat
area of the face. Creating layer above
soft highlights and calling it shadows. Click on that and let's
make it multiply. Now we need to create
the shadow brush. Open Brush Library and
click on the plus icon. I'm creating it into
the drawn category. Then change the spacing in
Stroke Path to 25 percent. Go to taper. Then move those handles, change the size to 64 percent, change the Opacity from
non to 44 percent, and the tip to 17 percent. Go to Shape and change the count jitter
from non to 71 percent. In the Grain in the
upper-right corner of the right triangle, you see the edit. Click on it, click on
"Import" and source library, peak the bonobo,
and click "Done". Change the grains
killed to 11 percent. The last step about this brush, you can call it just click on that untitled brush and you
can call it shadow brush. Then click "Done". Now we have our brush ready and I'm going to use
it to create shadows. I'm picking the third color. Using it, now adding shadows
between here nostrils. Showing her nostrils. Again, changes are very subtle, so please pay attention
to my narrative. Adding shadows around
those highlights on the tip of her nose, showing cure lower eyelids
on the right side, and then on the left side. Then adding shadows along her upper eyelids
on the left side. Just along that black line
and then on the right side. Increasing the size of
my brush and adding shadows below here, cheekbones. Adding shadows, at her temples. Then as I approach
the highlighted area, I push less and less. I get this nice gradient. Top of her head, cheekbones. Coming up closer to
the highlighted area, draws her chin and repeating the process
on the other side. Her jawline, chin,
pushing less and less, the auto color of her eyes. Beat more, and then temples. Let's make this
layer also clipped. I'm clicking on
the clipping mask, adding extra shadows on
the left side of her head and inside of her ears
in the upper half. Next, open the Actions menu, and then in Canvas activate the Drawing Guide and
Edit Drawing Guide. Peak the symmetry. On the top, we have a slider. Select the color that is
well visible and then locate this line with the
blue handle in the middle of your face
and then click "Done". Now you can see that the layer
with shadows is assisted. Whatever I draw on
the right side of this line is mirrored
on the left side. Is very handy, especially when you draw
something like a nose breach, and I try not to use it for anything on her face except
for the nose bridge. We don't get
artificial's training. Increasing the
size of the brush, adding shadows on the
sides of her nose, and then deactivating
the drawing guide. It's important that you go to the shadows layer and
deactivate the Drawing Assist. In the next lesson,
we'll add the tie chops and finish our face.
8. Lesson 7: FACE TOUCHUPS: Now create a new layer
above shadows layer. Here you can see I still
have shadows layer assisted. You should deactivate
Drawing Assist, I'm showing in the previous
lesson at the end of it. Activate clipping mask
for the new layer. Pick our fourth color
that is made for pencil and choose Procreate
pencil in painting tools. Now I'm starting from the
inner corner of your eye. Let's make this
new layer multiply by clicking on that N letter
and changing the mode. I'm just drawing
along that eyelid and coloring two
sides of the eyelid. In smudging tool pick soft brush and
smudging a little bit. Whenever you get too
harsh pencil strokes, you can smudge
them very lightly. Working with the eyelids
on the other side. With a bit bigger brush
and lower opacity, I'm adding strokes below your right side
cheekbone, very lightly. Then doing the same
on the left side. Showing your nose bridge
on the right side, and then on the left side. You can deliberately make
the strokes more visible, stronger if you want. Working with left
side lower eyelid, and then with the
right side lower eyelid, making them stronger. Adding shadows between
your nostrils, showing your nostrils as well. Adding extra strokes along your nose bridge
on the right side. Next, with a smudging
tool and soft brush, I'm softening some
of those strokes. Adding strokes on your
right side cheek bone. You see they are very light so it's hard to recognize,
so follow me. Next, picking a
bit darker color, a bit grayish brown, and adding shadows onto
your nose very softly. Don't push too much, and some shadows above
your cupid's bow. Let's call this layer
pencil strokes. Then create a new layer
and call it touch ups. Now I'm taking technical pen, picking that black of your eyeliner and
drawing your eyelashes. This is the overall shape. Try to draw multiple
ones together. So there should be the
dynamic lines that are thicker at the roots
and thinner at the ends. I'm just drawing few of
them of different length. Then picking white or something
that is close to pure white and covering
that black outline. Again, we're working
in touch ups layer, so don't mess your line work. Then picking darker skin
tone on your eyelid and covering the rest of that black line that
is still visible. After finishing with
previous black, I'm drawing lower eyelashes. A bit on the side. Picking some darker colors along your upper eyelid
and doing the same, I want to just thin a
little bit that line. Doing the same on the left side, just making it not that strong. Here, let's pick this one. You can even break that line. Then drawing your eyelashes. Then picking dark color
on your lower eyelid, covering the black line, picking some white,
covering the rest, and drawing the eyelashes. You can draw thinner, soft eyelashes if you want. Let's draw those inner
corners of your eyes. Next with black, I want to make those outer
corners a bit narrow. Picking pure white and adding
highlights to your pupils. Also adding highlights
on that gray area, and basically the whites
of the eyes to show this, the wetness of your eyes. Next, adding this white
on the tip of your nose, and then on your nose bridge. Next, adding highlights
on your lips. I'm adding some tiny dots on your right side cheekbone. It's optional. I like some glitter and doing
the same on the left side. Adding some glitter on the outer edge of
your eyebrow as well, and the same on the other side. Adding some highlights
on the top of your ears. Go into shadows layer, picking some neat value of
gray, picking soft brush. I'm filling in the area between the hair
of your eyebrows, very, very softly. Darkening your
eyelids a little bit. With the same brush, adding shadows under
your upper eyelid inside of your eyes. Go to your line work layer and then with the
freehand selection tool, select your nostrils. Then go to adjustments, pick hue saturation
and brightness, and increase a little
bit the brightness, just to give a softer
look to your nose. Then I come back to
pencil strokes layer and smudge a little bit those strokes under
your cheekbone. Going to line work layer, selecting your eyebrows. Again, going to adjustments, use saturation and brightness and increasing the
brightness a bit. Our face is ready. In the next lesson, we'll start working
on your body. See you there.
9. Lesson 8: BODY HIGHLIGHTS: [MUSIC] We have our face ready. Let's go to Layers. We have line work, we have touch ups
layer above line work. I'm taking all the layers
below line work that belong to her face
and grouping them. Let's rename this group and
I'm going to call it head, you can call it face
it doesn't matter. Just let's make
everything clean. Above the head group, I'm creating a new layer
and calling it body base. Just like with your face, we're going to use this
layer to add the base color. I'm piking Studio Pen, increasing the opacity
to 100 percent. Now following the line work of her body without leaving any gap between line-work and your skin and just outlining your body. We're using the second color
from our skin palette. I want to fill in
first torso and then just fill in the next
fragment, and so on. You can outline
the whole body and then fill it in with color. I just find it easier to work with fragments
because if you have any gap in your outline, you can find it faster. Next I'm working
with your thigh, closing this area
and filling it in. I filled in all your body, now let's go to Layers and create one more layer
above that body base. I'm going to call
it soft highlights, just as we did when we
worked with your face. I'm activating clipping mask and peaking soft brush
in painting tools. Selecting very first
color from my palate, starting from your juggler
point and stretching this triangle on your neck, then adding also in the shape of a triangle are the highlights
above your collarbones, and doing the same
on the other side. Adding highlights
between your breasts, the center of
highlighted area should be stronger you push
there more and you push less as you go further to build a nice transition from highlighted area to
not highlighted area, so here I push less. Armpits, same on the other side. Shoulders, and here as well. Then stretching highlights
along your arm in the middle. Here you see that all those highlighted parts
really resemble triangles. Adding highlights
on the other arm. Next, decreasing the size of the brush and
increasing the opacity. Adding some stronger
highlights on your collarbone. Other side, increasing the
size of the brush, decreasing the opacity and adding highlights
on your breasts. Pushing more in the center, pushing less as I go further. Next, going below your breasts, showing your hips, adding highlights in the
middle of your stomach, your belly, stretching
highlights up and pushing less. The sides, showing your pelvic bone,
this mermaid lines. For your arms, you add highlights in the
middle of your arms. Adding highlights
in the middle of your front fingers and on the
tips of your back fingers, and doing the same
on the other side. Now working with your legs, adding highlights
on your thighs. Pushing more in the center and pushing less as I
go to the sides. You can see I'm not adding highlights on the inner thighs. Working with the other side. Adding highlights on your knees you can push a bit harder here. Then showing the bone
of your lower leg. If for thighs we were showing
the soft tissues more, for the lower leg, we show bone, it's
the most shiny part. The front leg is more highlighted than the
back leg because the back leg is bent and it's receiving less of light so
I'm adding just a little bit. Next, adding highlights in
the middle of your feet. We finished with
highlights on your body. In the next lesson,
we'll add shadows and touch ups and our
body will be ready. See you in the next lesson. [MUSIC]
10. Lesson 9: BODY SHADOWS & TOUCHUPS: Starting from where we finished
in the previous lesson, creating extra layer above soft highlights and
calling it shadows. Activating clipping mask, and clicking on that N letter, and changing the
mode to multiply. Picking our shadow brush in
my case it's called untitled brush and I showed in the face coloring lesson
how to create this brush. Picking now a third color for the shadows and starting
working with shading. You can see the
size of the brush and the opacity on the screen. Adding shadows under her jaws. Then above her collarbone. Pushing less as I'm going upper. Making this turn. Working on the other side. Adding extra shadows on the top, under her chin, on the sides along those lines. Adding shadows under
her collarbones, between two highlighted areas. Showing the shape
of her breasts. Adding more shadows on the
sides and in the low part, and as I'm approaching the highlighted area in
the center, I push less. It's really important
to get a nice gradient from deeper shadows
to the highlights. Here I'm pushing, adding
shadows at her armpits, defining those muscles
on both sides. Then adding shadows
on the inner side of your arms showing that cavity on the other side of your elbow. More shadows at her ribs. Adding shadows between
the highlights of her belly and highlights
of the pelvic bone, ribs on the other side. Showing a bit the abs. Using smudging tool and pick the same brush that we're using for the shadows in
the Smudging tool. I'm just smudging
all those parts that I feel like ended
up being too dark, so they look a bit softer. Then keep working with
the painting tool , showing her pelvis. Again we'll have some
triangles here on the sides. Here adding shadows on
the inner thighs pushing more closer to the outline and less as I'm approaching
the highlights. Again, picking Smudging tool
and just getting rid of those obvious strokes so
the shadows are smoother. Adding shadows on the sides. Next working with your arms. We have highlights in the center and
shadows on the sides. Decreasing the size of the brush and adding shadows
on her fingers. I'm not showing too many
details on her hands. Just adding shadows inside and keeping centers off
her fingers highlighted. Working with the other side. Next, increasing the
size of the brush, working with inner
thighs on the other leg. Showing the shadows under her knee and our
bent leg is a bit darker because
it's for receiving less light so you can keep
just a bit of highlight. Then adding shadows
on her back foot and adding shadows on her
front leg just on the sides, keeping that bone lit and
adding shadows everywhere else. Our shadows are ready, let's create one
more layer above Shadows layer and call it
Pencil or Pencil Strokes. I'm activating clipping
mask and picking, of course, color. Then selecting
"Procreate Pencil" and let's make this
layer multiply as well. You can see the size of
the brush in that opacity, I'm starting again
from her neck. Two layers would work, I think. Adding some on the right side between the thinner
line and the outline. Above the collarbone
on the right side, showing collarbone
on the left side. Adding shadows in the jugular
points above collarbone. Basically anywhere where
we have darker shadows, you can enhance them
using these strokes. More above the collarbone on the right and then on the left. Shoulders on the left. Shoulders on the right. Adding shadows
below her breasts. You can make darker strongest
strokes if you want to. Armpits on the left and then
going down along her arms, ribs, then adding shadows
inside your hands, leaving the tips of
the fingers lit, and adding some details
with the pencil strokes. Then some strokes below her right side breast
and on her ribs. Then taking Smudging tool, and in Smudging tool I'm picking Shadow Brush and then
smudging those strokes. You can use soft brush
as well for smudging. I'm not pushing hard, so I still have pencil strokes, but they don't look
like scratches. Showing her abs, smudging them too then
adding pencil strokes on her right arm along the inner line and then
along the outline. Let's go to a pencil layer of her face and add some
strokes there too. I'm adding on the right temple and then on the left temple. Also in the upper half of her ears and then coming back
to my body pencil layer, adding pencil strokes
on her thigh on the right side,
then smudging them. On her thighs, I didn't have a lot of strokes, so it's hard to see. I add strokes and
then smudge them. Then let's show her
knees on the left, here you can add
stronger shadows because her leg is bent and it's dark and
below her knees. Again, smudging. You can experiment and try
to use some other hues, maybe purple for
the pencil strokes. Then adding pencil on
the right leg along the outline on her knee. Adding more on her knee. Now I'm selecting all the
layers belonging to the body and then grouping them and
let's call this group Body. I'm going to Touch ups layer, I will work on the same layer as one that I used for her face, but you can create a new one. Picking Studio Pen and White, and then adding some
strong highlights on her collarbones,
some glitter. You can see I've added
some highlights on her breasts and some tiny dots around to show the glitter. You can add highlights also on her thighs in the middle if
you want some shiny legs. Overall, we've
finished her body. In the next lesson,
we'll learn the hair. You did a great job. See you in the next lesson.
11. Lesson 10: HAIR RENDERING: In this lesson, we'll draw hair, and I'm starting with
creating a new layer. Let's call it hair base. Here, we will define
a silhouette for our hairstyle and fill it
in with a desired color. We will have some classic bald. Again, we're working
with dynamic lines, and you can make many, redo these lines until you
get ones that you like. I actually have many trials. Again, when I was
editing this video, I had to cut them out. This happens when the
area is not closed. Here we have the gap. Sometimes I get some
accidental dots. I'll keep this one. It
looks like a nice mold. Working on the other side, filling in and you can
color with your brush any pieces that are
left uncolored. Creating extra layer, and let's call it shadows. I'm activating Clipping Mask and picking Syrup. With this brush, you
can see the opacity in size and creating strokes
starting from parting. I vary length and pressure. All these strokes
be different in length and thickness and
also in their opacity. In keeping some part of her hair leads in the up half
as you can see, then part of your hair is dark especially behind your
neck and behind your ears. Working in the same
way on the other side, again, I have the
highlighted area. It looks a bit like a river. Next, picking
Smudging tool and in the Smudging tool, I
choose soft brush. Let's decrease the size. I'm not pushing hard, mostly working with
edges of these strokes, just smoothing them out a
little bit, just a bit. We still want to
see that texture. Next, creating a layer above shadows layer and
calling it highlights, and also activating
Clipping Mask. Working with the same brush and choosing some lighter value. Really thin brush and I'm
decreasing significantly the opacity so you can see
how my strokes look like. I mostly work in highlighted
area but I still cover some strokes that
I made for the shadows. Doing the same on
the other side, and then increasing the size of the brush and showing
the highlights. Again, it resembles a river. Adding some wider strokes, adding some stronger highlights
on the front strands. Then with Smudging tool
still have soft brush there, I'm just softening
those highlights. This is how it looks
on the screen. Next, coming back to Shadows
and picking darker value. Let's just reduce
the size a bit. I think this is too dark
picking a bit lighter brown and making strokes. Since we have highlights now, those shadows look stronger. We have more contrast. Here you will feel where is right to add or mostly between those highlights and in the area where you
add the shadows. Next, creating a new layer above highlights and
calling it touch-ups. With the same dark brown and the smaller
size of the brush, let's activate the
Clipping Mask. I'm creating similar strokes to the light ones that we
made before like thin ones. I'm drawing them on
the top of highlights, on the top of shadows to make it resemble hair not like
a solid plastic piece. Then was a Smudging tool very lightly I'm
touching those strokes, so they are not that harsh. Then creating extra layer above, and I'm not activating Clipping Mask in this
case because I need to draw beyond the color base area and I'm picking technical pen. Let's draw some hair pieces that are sticking out from
the main silhouette. Some around as well. You can add some more
on the top of hair. Just play with the size
of the brush opacity. Then going to Luminance
on the same layer, picking lighter value, and adding these spots
at the highlights. Then picking Smudging
tool, decreasing the size. First, I smudge in
the direction of those highlights to
make them a bit smaller and then I stretch
them to the outside. Coming back to the
shadows of your face, picking some darker
values on your skin. With a shadow brush, I'm adding some shading
along your hairline, also add some shadows
in your parting. I feel like your forehead
looks a bit flat right now so I want to add extra shadows
to give it some depth. Adding shadows on the
sides on the top of the forehead and with
a Smudging tool, just softening the
edges and spreading the shadows bit
closer to the center. What if you want to change
the color of your hair? I combined all the layers
or hair into group, and let's duplicate it and then flatten your group and
deactivate the one below it. I'm going to Adjustments and in hue saturation
brightness, I'm just playing with the hue and picking one that I like. Then changing brightness, in saturation let's
desaturate it, so it's not that
greenish-yellow. That's what I have. It looks a bit as if it lacks contrast. I created additional layer, I make it multiply, and in Painting
tool picking Syrup. Adjust the size and
opacity of the brush, and let's pick some
hue from your hair. I'm adding some strokes
mostly where we have darker ones already
just to add that contrast. Of course, it's better to
know which color you want to have and start rendering
with that in mind, with those specific colors. But this technique is still
handy when you want to change the hue within the
same value of colors. Now I'm smudging some
of those strokes. We're done with your hair. In the next lesson, we'll add
some clothing to your body, see you there.
12. Lesson 11: ADDING CLOTHES: In this lesson, we'll be adding some clothes on our model here. What we have, we have the
whole cloak here ready, and this is what will get
at the end of this lesson. Let's go to "Layers" and
create one layer above the layer that I've got just by flattening all those
layers that we made. On this new layer, I'm using studio pen and I'm drawing the outline
of our sweater. Again, I cut out all my
trials with these lines. I'm doing everything fast, but it doesn't work this way. If you have to
redraw these lines many times, it's
absolutely normal. [MUSIC] It's a bit tuck
at the waistline, that's why we have some
volume over there. In this lesson, we're just testing
the rendering of clothing because this class
is dedicated to drawing body. We'll learn that in more
details all these shading, folds and other details
in the other class. I wanted to have this
lantern type of sleeves. [MUSIC] Next, I'm making a
copy of this outline, going back to the
layer below and filling in with some dark gray, creating one more
layer above the layer with the color,
activating Clipping Mask. Next, I'm taking noise brush and picking some light gray, and adding this noise to
give it a bit rough texture. Just going over
all these surfaces and because I have
Clipping Mask activated, it just covers only the
area in the dark gray. Creating one more layer. Again, activating Clipping Mask and making this layer multiply, picking out shadow brush, adjusting the size of the brush, and starting adding the shadows. For those of you who didn't
go through all the lessons, I'm showing how to create this shadow brush in the
face coloring tutorial. Shown some darker shadows between your sleeves and bodies. We have some wrinkles, clues to her shoulders adding some shadows at the
seam that attach her sleeves to her body's
then showing those wrinkles. Have your elbows
along the outline on the outside of the sleeves
then the folds on your collar. Adding shadows along
that seam that attaches your collar to the bodice and work on their
right shoulder. Then stretching the shadows to your breasts and then below
your left side breast, right sides stretching
those folds towards your waistline and some shadows
between your breasts. Shadows alone are in a line
on the right side sleeve. Some wrinkles at your elbow, some wrinkles stretching
towards your shoulder, and shadows along the sleeves. Next, I'm picking smudging
tool and there I'm picking the same
shadow brush and going through all these
strokes just to make them softer because
after all, it's wool. We try to avoid strong
contrasts with the wool. This is our result. I'm creating one more layer
just below the shadow layer. Also activating Clipping
Mask and picking some much lighter gray and also
with the noise brush, I want to add more of the texture just going
over the whole sweater. [MUSIC] Next I'm creating one more layer just above all of them because this
one will be above the pants and just drawing
the outline of your pants. As I told you before, we'll learn about
the dynamics of the fabrics, how they fold, how they behave, and how they reflect the light
in other classes, so don't worry, let's just have some fun with this last lesson. I'm using the same
dynamic lines to make this outline
for your pants. Here on her right side, I want to cut out some of
your body so I will draw the shape of your
pants and later I'll show how to fix this area. Working with the other side, we have some folds because
she's bending her leg. Try to draw these folds in
the unique different ways. Your right side folds don't resemble too to the
left side folds. I'm duplicating this layer with the outline going
to the first layer of these two and filled it
in with some camel color. Here, I forgot to
close that part. I'm going, there and with the same studio pen that
I used for the outline. I'm just closing that
part and filling in with the camel
color of my choice. I'm unlocking the
body layer that I previously locked and
just erasing that area. You remember where I drew trousers on and
now I'm grouping all the layers that belong to your sweater and
flattening the group, going to adjustments
and became liquefy. Now I can stretch her sleeve, so it goes just
behind her pants. Next, let's create
one more layer above. I'll call layer,
activate clipping mask, and make it multiply. I'm using shadow brush
and now I'm going just to add all the shadows
for your pants. I'm continuously
adjusting the size of my brush and opacity, and it's something
more intuitive. You feel like here we
have deeper wrinkles, so I want to make
them a bit darker. Maybe in some places, you had just soft
shadows so you need maybe wider and some
lights and shadows. Now I'm showing all these folds that I made because of
all the tension between your legs and adding shadows
on the side of your hips, on the right side. Stretching those faults here. We have some wrinkles because of this rotation of the
fabric around your leg, and the same on the inner side. Adding some wider
softer shadows. Also adding more
around your crotch, then working with the left side, adding deeper shadows inside those faults around your knee. Adding shadows on your hips on the left and some shadows on the
sides at the knee area, at the overlap, and some wrinkles on the fabric just because of this movement. Let's deepen shadows
at the overlap, stretching this fault
on the right side. Then with the less capacity
and wider size of the brush, I'm adding some soft
shadows along the outline and just around all these
folds to make some transition. Then I'm taking a smudging tool and just softening the shadows. Just smudging. I'm making better transition
from shadows to highlight by stretching some of the
edges of this shaded area. Being dark gray I'm adding some
deeper shadows in certain area that should be
darker like in the crotch, in these really deep faults. Here at the overlap
between two legs, creating extra layer
above shadows layer, also activating clipping
mask and then with a noise brush and just dark
color value of that camel, I'm adding this texture to
give it some juicy texture. Creating extra layer, picking some black
and procreate pencil, and drawing the
details of your pants. Drawing that sly and then
go into shadows layer, picking some mid-gray
and shadows brush and shading these
opening on the fly. Good. Creating an extra
layer above her sweater. This new layer just should
be behind your trousers. All of those layers that
belong to trousers, because we're working
with her shoes. Now I need to draw the
full outline of her shoes. Using studio ink, I'm drawing the outline and actually I'm finishing and closing
it on the top, but because the shoes are
behind, you can't see it. I can fill it in
with this dark gray, creating a layer above and making a multiply and
activating clipping mask. This one is going to
be a shadow slayer, picking our shadow brush and adding the
shading on her pants, and showing the overall
shape of your shoes. Good. Grouping these two
layers and flattening them. Our right side
[inaudible] is ready, taking studio pen and I want
to draw your other shoe. If I deactivate the
color lay of your pants, I can see that it's probable that the tip of
your bad shoe is visible. I'm drawing the full outline, it's going to be
like two triangles, and then just filling
them in with this gray. I will also create a
layer for the shadows, adding just tiny bit of
shadows and we're done. This is our first look, and I hope that you enjoyed
the creation of it. I'm looking forward to seeing your work in the
project gallery.
 Aliya Uten, teaches fashion drawing