Transcripts
1. Introduction: Hello everyone. My name is Basil and
I'm here to teach you how to do
technical drawings. I moved to Paris to the dream
city, study Fashion Design. I've got my MBA and luxury
brand management and my master international business and corporate development. Since 2017, I start to work here under on
fashion project. So through these videos, you will learn how to do
the technical drawing of a rap skirt. All the tools that you need
to use on Adobe Illustrator. If you are a fashion
design student, if you are a fashion designer or if you're a fashion design
for an answer like me, this course is for you. This course is beginner
friendly because I will explain all the tools that you need
to use on edible us writer. So do not panic if you don't know that much about
out of illustrator. By the end of this course, you'll be able to draw the technical drawing
of a rap skirt, but also with that knowledge, you can cry other kind
of technical drawings. In the next video, I will
talk about the class project. So please keep watching.
2. Class Project: Once again, welcome
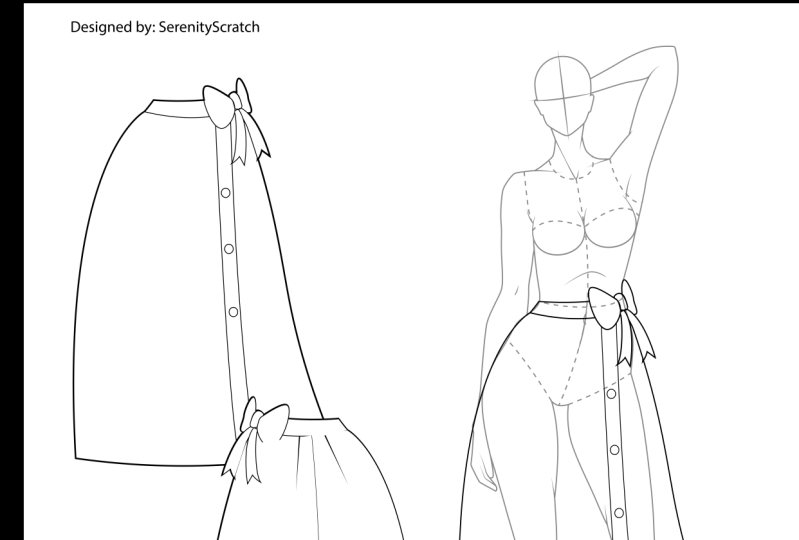
to this course. So for the final project, you need to hand in
three different kind of wrap scars that inspired by three different
fabric materials. I will recommend you to use Pinterest as a source
of inspiration would always use
your own creativity to change the designs. To complete this project you
need out of illustrator. So please do not hesitate
to download it or upgrade the version that
you have already in. Don't forget, please do not hesitate to contact
me if you have any question regarding the
course and the project.
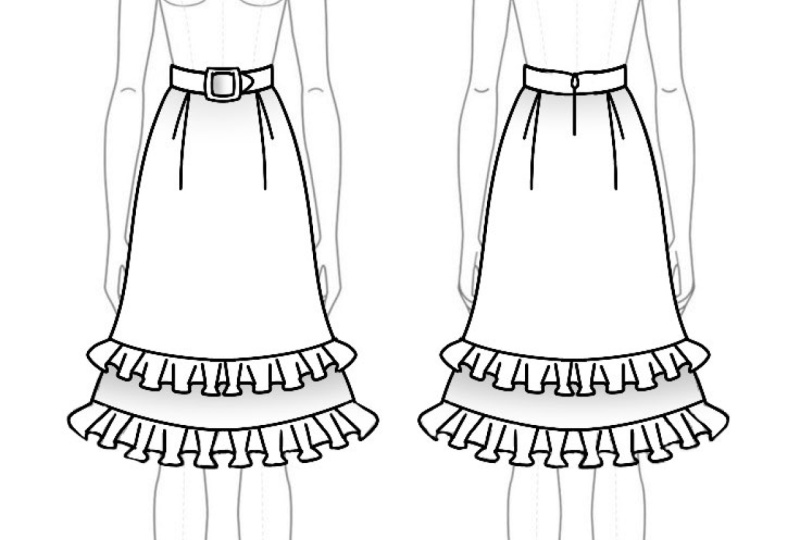
3. Wrap Skirt (Front): Hello everyone and
welcome to this video. During this session, we
are going to learn how to create the front part
of the rap skirt. We're going to start
by creating the belt. But before we start
to draw the belt, I need to tell you what kind of tools we are going to use to
create a technical drawing. The main one is the
pen tool and the line. So with the pen tool, you can create straight
or curved lines, add anchor points
or remove them. Always check on your designs to understand how to draw
your technical drawing. I draw the waist band on the waistline by
using the Pen tool. After finishing the waist band, you need to start drawing
the side part of the skirt. So I'm using the pen tool here
and I create a curvy line, more on the hips and then wider on the
bottom of the skirt. Because according to my design, their scurried has a line shape. To create the other
side of the scale, you don't need to
draw the line again. So just copy and paste
aligned as you already drove on the other side and
then reflect it vertically. Be careful the angle
should be 90 degrees. And here you go, you
have the lines now. And then we need to continue
by drawing the bottom lines. According to my design, the right part of the
skirt is a bit wider, so I just follow my
design, create the lines. And since it's a rap skirt, I need to also draw the
splice lie in the front. Make sure you don't forget that. According to my designer, also need to add a pocket on
the left side of my skirt. It's kind of a big pocket. So I start with the top part, make a curved line, and continue to draw
the line a bit more to the outside of the skirt that gives a depth to the pocket. Now is the time to make
this pleats line in the front part of the
skirt more curvy. To do so, we add an anchor point to the
middle of the split and then hold shift in C button and drag the anchor point to the left
to make the line curvy. Now we have to create the belt. To do so, we need to start with this plate on the waist band. This plate is where
the belt is coming from inside the skirt
to the outside. After we're finished
with the splits, we have to create the buckle. The buckle is very simple. You just need to
create two squares to give that dimension
to your buckle. The material that we use
for dispels is fabric. In the technical drawing, we have to give more movement to the belt
to give that idea of the fabric belt color
that smaller square in the bulk L. Then for the bigger score,
choose the gradient. This will give a
dimension to your buckle. It gives a 3D shape. And when people look at it, they can feel like it's
not something flat. When you are done
with the buckle, you have to draw
the avails itself. So the belt is coming
out from this plate, going on top of the left
side of the buckle and then go on the right
side of the buckle. Don't forget to create all the details and
the technical drawing. You have to make
sure that you draw everything and then always go and check your designed
to make sure that you are following what you
have already designed. Now is the time to create the other side of
the belt as well. To do so, we just need to create another rectangle on
the rights of the belt. Here you go, the
design is finished, the front side is already done. We just need to change the
color of their lines to lack. I have chosen another color
to make it more visible for myself and for you to draw
the lines on the template. You can also decrease the
capacity of the template to make the lines more
reasonable for you when you are drawing
over the template. After you're done with
your technical drawing, zoom in and check all the
details that you already drove. Make sure that the
waist band is curvy. And also at the back part of
the skirt to the baseband. Always remember in a
technical drawing, all the inner lines are
thinner than the outer lines. That is why now I'm changing the bottom line of the waist
band to a thinner line. Always remember to
change the bottom line of your technical
drawing to a curve line. This makes your technical
drawing look nicer. Thanks for watching and
see you in the next video.
4. Wrap Skirt (Back): Welcome back to the forest. During this video, you're
going to learn how to draw the backside
of the rap skirt. To create the backside
of the rap skirt, we are going to copy and paste the front part of the
skirt and then reflect it. Always remember that
you need to reflect vertically and 90 degree
after your reflected, you have to get
rid of the details that you don't need
in the backside. As I have designed a skirt, I know how it looks in
the backside as well. So you have to always
check your design to make sure you're
not missing anything. I have deleted the belt and split in the front and
reshape the bottom side. Now we can draw the darts
by using the Pen Tool. Draw your anchor point on the waist band and
then drag it to the down by holding the Shift button to
make a straight line. After I get drove the
first stars just selected. And then from the menu on the
right side, choose stroke. The stroke. We can change the thickness and the
shape of the line. If you cannot find the
stroke and the right menu, go to Window and
then select stroke after daddy can change the thickness and the
shape of the line. So make it thinner and also
change the shape to try and guilty have more smooth line
after finishing the dark. Now's the time to
reshape the pocket. According to my design, they're smaller part
of the pocket is seen from the backside
of the skirt. That's why we need to
make the puck is smaller in the backside
combined with a front, after finishing with the
design of the pocket, we have to make sure that all the anchor points are
correctly placed on the lines. Always remember on technical
drawing on Adam Illustrator, if you want to create
a straight line, it doesn't matter if
the line is coming down or he's going up or it's
going to arise or left, you have to hold
the Shift button, go to the bottom part
of this skirt to check if everything
looks perfect. We have a string line in the
back of the skirt as well. So I add that to the backside of the scar from the waist band
to the bottom of the skirt. And now the backside is
radio as well as I've said, is really simple and you
don't need to change so many things in the
backside of the skirt. Normally we have two doors in
the backside of the skirts, but it's really important to
always check your design. Maybe on some special designs, there's a different number of darts in the backside
of this skirt. Thanks for watching and
see you in the next video.
5. Congratulations!: If you've got to this video, I have to say thank
you for watching all the videos and I
have to congratulate you for being able to follow all the process of
creating a technical grounding. Please do not forget to
upload the class project. I should also mention that in the next ten days I will
upload another course. So stay tuned. Please do not forget
to leave a comment. This will help me to
improve my classes. Thank you so much and hope
to see you again. Bye.
 Ghazal Mobasseri, Freelance Fashion Designer & Stylist