Transcripts
1. Introduction : Transform your artworks from a simple portraits to expressive
meaningful works of art. Hello, this is [inaudible]. I'm a watercolor
artist and instructor. As a professional artist who has been painting
landscapes, cityscapes, and portraits for many years, my artworks have been exhibited
in different parts of the world and took their
place at collectors' homes. I have a passion for watercolor because
it's a special medium. What makes it special is, it is transparency feature. We can achieve image that we cannot achieve
with other paints. Another thing I like
about watercolor is that it is not
completely controllable. The water and colors that dry on the paper after my brush
strokes, always surprise me. This means that water
also has a say in the outcome which enriches
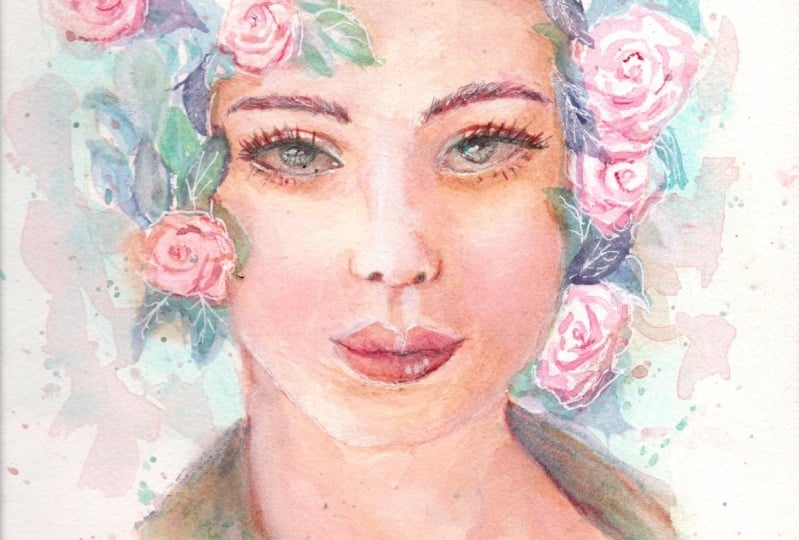
the story of the portrait. Using transparent
colors and details, I create emotionally
evocative portraits that are layered, rich, and convey the
story to the viewer. I am really excited to teach
this class because I see watercolor portrait
as a way to express ourselves really using
our creative ideas. You will be the creator of the story while painting
watercolor portraits, and there are no limits
to your creativity. In this class, you
will learn about the art materials needed
for watercolor portraits, I will teach 10 important
techniques that will enable you to use your
creativity when painting. These are wet on wet, wet on dry, dry on dry, dry on wet, lifting, layering, blending, watercolor blossoms,
backwash, and splashing. I will show you
how to do pencils sketch and what you study, which are the basis of
watercolor portraits. You will have all the
tricks and tips that I have learned from many years of
experience, and of course, I will teach you step-by-step how to realize the
creative ideas and the techniques by painting a watercolor portrait
from my reference. A portrait conveys more than
just a picture of the face. There's a connection
and transfer of emotion between the
portrait and the viewer. I will give you all the tools you need to express yourself with your creative ideas
through watercolor portraits. At the end of this class, you will be able to create your own expressive
watercolor portrait. If you are a beginner or if you are already
an advanced artist, but want to learn a
new way of expression, this class is for you. I'm sure this class
has something new for everyone and I can't wait
to share it with you. Let's get started.
2. Class Orientation : [MUSIC] Hello, guy. Glad to
see you joining the class. In this class, we are
going to learn how to paint expressive
watercolor portraits with creative techniques. In the end of this class, you will be able to come up with your own creative ideas and to create your own
watercolor portraits. For the project of this class, you will create a
watercolor portrait by applying the techniques
you have learned. You will practice wet on wet, wet on dry, dry on dry, dry on wet, lifting, layering, blending,
watercolor blossoms, back wash, and
splashing techniques. It is really
important to practice these techniques
before moving onto portrait painting
because it will allow you to make
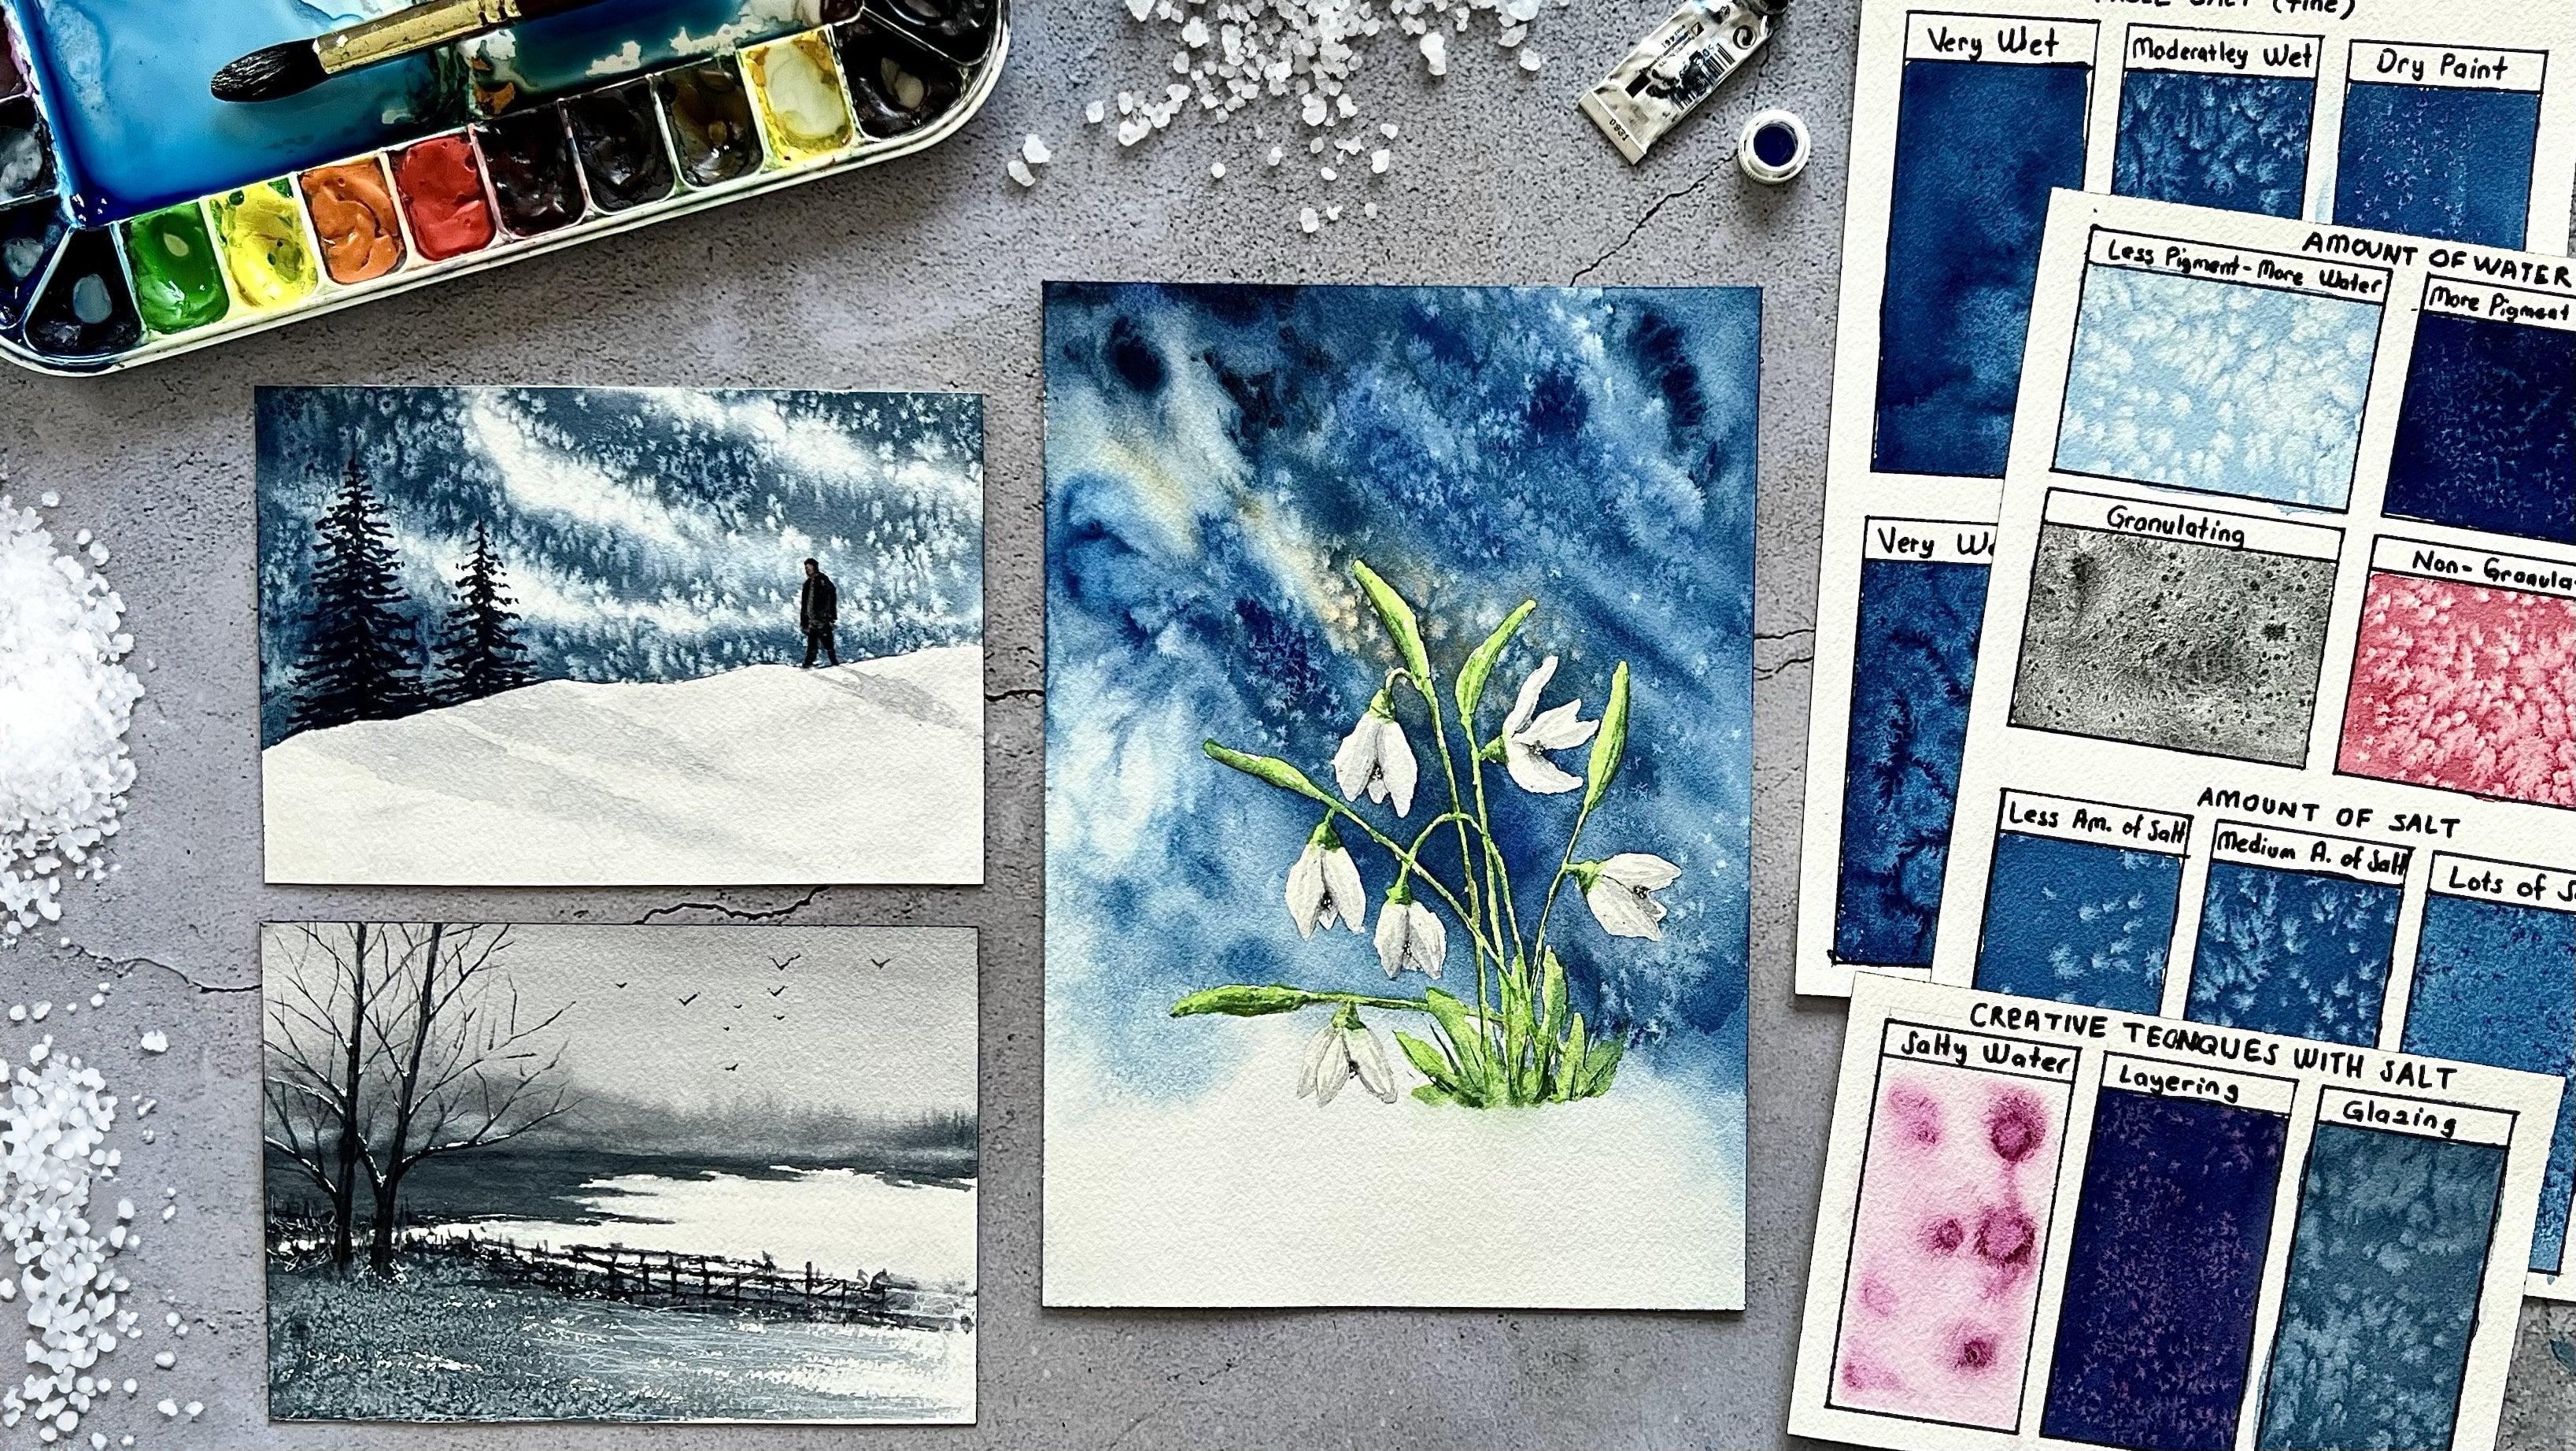
confident brush strokes. I will also include an image of watercolor techniques in the resources section
of the class, so you can use it as a
reference while practicing. I choose this portrait because
I can easily demonstrate all the techniques
on it and I think it is suitable for
real in creativity. If you wish, you can
paint this portrait because it is a good place
to start for beginners, or you can paint a
different portrait by enriching it with
your imagination. In the next lesson, I will show all the
materials needed. I am so excited to get started. Let's open your
favorite playlist and make yourself a cup of tea. I'll see you in the
fastest. [MUSIC]
3. Setting Up!: [MUSIC] In this lesson, I will explain the
watercolor materials I use while creating
my portraits, and especially what materials you will need for the class. Let's start with papers. The most important
part of getting good results in watercolor
is the paper we use. There are 100 percent cotton and cellulose
cotton mixed papers. I use 100 percent cotton paper. It can hold more water and it
also allow for corrections. I also prefer arches or
Saint Miller as a brand. In this class, I will use the cold press paper of
the Saunders series. If you don't have 100 percent
cotton paper, don't worry. You can use whatever you
have as a watercolor paper. When it comes to the brushes, there are two different
types of them. Natural bristles and
synthetic bristle brushes. Natural bristles brushes hold more water and have
softer bristles. On the other hand, synthetic brushes are harder
and have a more fine tip. I have many different shapes of brushes, natural and synthetic. For this class, I
will use my number 8, natural bristle brush, and number 2, synthetic brush. You can use a round and
medium brush that you have. Let's move on to paints. There are two types
of watercolor paints. Tubes and pans. Mostly, I prefer to
use tube paints. Brands, I like to use Holbein, Van Gogh, Winsor &
Newton, and Schiminke. I like to try different
brands and compare them. I want to give you a tip. Since I paint too many
layers in my portraits, I make sure that the paint
I use is transparent. You can tell if your paint is transparent by looking at the box on the back of the tube. Mostly, I will use
Ultramarine Blue, [inaudible] and
yellow for skin tone. For the creative part, we can use the color we want. We also need a palette. Mostly, I use this
one as palette. I can carry it everywhere easily because it is leak proof. For my sketch, I prefer to use mechanical
pencil or FOB sketch pencil. We need an eraser. I have two. With this soft eraser, I use it to reduce the
density of the pencil. We also need some napkins and
a water bottle. That's it. What materials are best for
you can only be discovered by experimenting
with many products that are on the market. As you become more experienced, you will narrow down your
choice of equipment. I hope this lesson make
this process go faster. In the next lesson, I will show you the creative
watercolor techniques. Now, we can move on.
4. Creative Watercolor Techniques - 1: [MUSIC] Let's start learning
watercolor techniques. Our first technique
is Wet on Wet, we should use a clean brush and clean water
to wet the paper. [MUSIC] Then we dip our brush into the paint and paint
the area we just wet. This technique gives us a nice flowery look that can be applied in
different ways. It will allow us to
make soft edges. Let's move on to our second technique
which is Wet on Dry. Our paper should be completely dry while our brush is wet. This technique is
used to achieve more defined shapes and we
can achieve very fine edges. We also have a lot of control of the paint which is
good for portraits. [MUSIC] The next
technique is Dry on Dry, which is also known as
dry brush technique. For this technique,
your brush should have very little water, almost dry. Then you need to fill
your brush with paint. If you need, you can remove
excess water with a napkin. This technique is good for creating a rough
looking texture. A reminder for you, since this is a dry technique, paint remains almost the
same as when you applied it, it will not fade after drying. Our forth technique
is Dry on Wet. Our brush should be almost dry while using this technique. If you're working with
watercolor tubes, you can use the paint
straight from the tubes. I make sure that the area I
will paint is still dump. Be careful and do not
let the paper dry. [MUSIC] The paint will spread, forming soft edges
on the wet paper. However, we will have
more control over the paint compared to the
Wet on Wet technique. Our fifth technique is Lifting. I paint a small
area on dry paper, then I rub it with a completely clean and wet brush to remove the paint
from the paper. We need to clean our brush
with water frequently. [MUSIC] We can use
this technique to achieve a blurry image. Now let's move on to my favorite techniques,
which is Layering. As you know, most
watercolors are transparent. This means that if you
paint over something, the underlying color will show. In this way, you can create streaking undertones and
dark in your painting. The essential part is that
we need to make sure that the underlying
paint is completely dry before adding
the second layer. If the underlying
layer has not dried, the paints will mix each other. [MUSIC] In this lesson, we covered six
watercolor techniques. You can practice them before
moving on the next lesson, which I will show you the
other creative techniques.
5. Creative Watercolor Techniques - 2: [MUSIC] Let's dive in other
watercolor techniques. Our seventh technique
is blending. We can apply this
technique in two ways, on wet or dry paper. [MUSIC] Let's try
the wet one first. [MUSIC] I need to wet my
paper with the clean water. [MUSIC] Then I allow two colors to mix each other. [MUSIC] Now, let's try dry paper. [MUSIC] I will apply two
whitewash colors to the paper. [MUSIC] Now, I softened the edge
of dry paint with a wet brush and let the
different colors blend together. Remember this, when
we blend colors, we don't have much control
over how our paint reacts. This is the best part
of this technique. Watercolors surprise
us when it dries. Next technique is
watercolor blossoms. First of all, I paint my
paper with any color I want. Then I let my paper
absorb the paint. The level of dryness is really important and the paint
should be dumped not dry. Then I drop clean water with a completely clean brush
and magic happens. With this technique you can achieve beautiful
watercolor blooms. [MUSIC] You can do the same thing using two colors. First, I applied the first wash and wait for it to dry a little. [MUSIC] Then I apply different color right
next to the first one. Two colors will come into
contact with each other. The color we add later will create a bloom on
the first layer. [MUSIC] The third
technique is back washes. Like the previous technique, we should pay attention to dryness level of our
paper for this technique. I apply a wet wash to the paper. [MUSIC] Then I lift
my paper a little. Meanwhile, the
color on the paper flows on the area I painted. When my paper starts
to dry a little, I lay the paper flat. [MUSIC] In this way, as the paint starts to dry, it creates a backwash. Now let's move on to most enjoyable watercolor
technique, splashing. I use a synthetic brush in this technique because
it has harder bristles. I load my brush with plenty of wet paint and splash
it on dry paper. [MUSIC] We can also apply
this technique on wet paper. First, I need to wet my
paper with the clean water. Then I splash paint
with my brush. I wet my paper with clean water. But we can also apply
it to on other colors. Of course, the size
of the brush you choose will determine
the size of your dots. [MUSIC] If you learn
watercolor techniques well, you will enter the
field of creativity. Having a white paper and
watercolor in front of you means there are countless
possibilities to create. Each brush stroke will take your painting to
another dimension. Every painting you
make will be unique. Before moving on to
the next lesson, you should practice
these techniques. You will make more
confident brush strokes. In the next lesson, I will show portrait sketch
and will your study. Now, we can move on.
6. Portrait Sketch and Value Study: [MUSIC] Good painting
can not hide a bad drawing so you have
to be a good observer. In this lesson I will
teach you how to observe the subject and what is
necessary for a good sketch. Moreover I will share tips that will make it
easier for you to draw. I will use this photo as a
reference in this lesson. Using photography as
a deriving reference is really helpful and practical. However it doesn't matter if
you draw from a photo only. There are two things to
consider while drawing to create an expressive
portrait with watercolor. The first one is proportion. You should pay attention to the proportion while
drawing a portrait. If there's a problem
with proportion it will be very difficult to
correct it with watercolor. The second is to capture the
light areas on the face. Why is this important? Because when we paint portrait we will paint based on
the value of the color. The best way to improve
it is to do value study. It will be very helpful to choose a fit
portrait photos from the Internet as a reference and make quick sketch
in small size. I always do this study before
starting a large painting. Now I will show two examples. First I choose a black
and white photo. It is easier to notice the illuminated areas in
black and white photos. I draw the base lines quickly, I lay the illuminated
RL as they are. I do it by pressing
my pencil lightly on medium tones and by pressing
harder on dark tones. This sketch don't
have to be perfect so you don't need to care about
proportions in this case. Secondly I want to use a color photo and I choose
our reference photo for this. Again I quickly draw the basic lines and carefully observe the
light in the photo. It can be a little
difficult to notice the illuminated areas
in a color photo, so here's a tip for you. You can increase the contrast of the light areas by editing the photo so you can easily spot the light and dark areas. I did it by increasing
the exposure on the iPad. I will use this value study as a reference while painting. Now let's move on to
our actual drawing. I kept this sketch very simple, I draw only the basic lines because this sketch will
serve as just a frame for us. I draw the edge of the face, eyes, nose and mouth. I draw by looking at the photo. For you I will also upload the pencil sketch to the
resources section of the class. If you have difficulty in drawing you can
draw by looking at the reference I
uploaded or you can put the drawing on the
watercolor paper and press it with a pen. Don't forget to sketch lots
of work to try to increase your understanding of light and shadow which are the foundations
of watercolor portraits. In the next lesson we will start coloring our portrait
with watercolors. Let the water guide us.
7. Light Tones : [MUSIC] When painting
a complex portrait, you may find yourself having trouble deciding where to paint. Deciding on shadows and
highlights can be all learning. While trying to give
meaning to our painting, we can lose the separate of the painting by overworking it. I like to reflect
the meaning and mood in portraits rather
than the reality. This is why I care so much
about simplifying the photo. Now, let's start using the techniques we
learned while painting. We will start with
the lightest tone first and gradually
move on to darker ones. Now, I will use the wet-on-dry technique because I
want to paint the fine [inaudible] I take very little and mix my
red and blue color. I also add a little orange. The secret is that my brush has very little pigment
and lots of water. At this stage, try to keep your color as
light as possible. I'm starting to
paint from the head. [MUSIC] Now, I'm painting jaw lines. Now, I'm moving on
to the eyelids. I am adding a little
blue to my paint. As you can see, my paint
has a little darker tones. I will smooth the age of
the eyelids with water. [MUSIC] By the way, I would like to talk
a little bit about the story behind this painting. I got my inspiration for
this portrait from Gaia, the first goddess
of Greek mythology. Gaia represents power, nature, and female fertility, and she
is the mother of the art. According to mythology, Gaia splits and transfer her
attributes to other goddess, which is a wonderful representation
of female solidarity. She has been important for me in terms of the values
she presents. That is why I chose
her as my muers. Another important point is not to work with the same
color all the time. We should use
different color tones to give life to the portrait. Now I'm adding some red and
of course lots of water. Now I will add another layer for
eyelids, small red color. Another tip is that at
this stage you should definitely not paint again
before the paint is dry. If you paint while the
underlying layer is still damp, the colors will blend together. This is why I paint
different areas on portraits and let
the other areas dry. I will move on to cheek parts. Cheeks should be lighter
than the eye area. I add some [inaudible] to my paint to achieve
more reddish color. I add some water to create watercolor blooms
on the cheeks part. Now I add a little
blue to my color because I want a cooler
tone on the eyes. In the meantime, it is really important not to lose the light. Because of this, I do not paint the forehead area and
the top of the nose. Now let's paint the
dark areas on the nose. I mixed burnt sienna, cobalt blue, and
alizarin red for this. For the top of the noise, I am using the lighter tones. Lots of water. I'm using more darker
tones for nostrils. Now I am moving on the lips. I want to use for lips alizarin, cobalt blue and burnt sienna, and I get a more reddish color. I do not paint the
lips in one go, I leave highlights especially
on the lower lips. Now I will let the face dry
and move on to the neck area. I mix cobalt blue, orange, and a little
burnt sienna. I'm starting to paint
the rest of the body, taking a lot of water and a
little paint on my brush. I use alizarin red, cobalt blue, and
yellow for the body. I also add a little
orange for some parts. Of course I paint
using a lot of water, I want a lighter
color on the body. Using warm and cold colors together will increase
the vitality. Because of this, I paint some areas by adding
the blue color. Do not forget to use different
tones for body parts. I want to add more
darker tones to lips. Actually, you are free to use the tones you want
while painting. All you have to do is not
to paint the lighted areas. Water searching that, watercolor has made me
more patient person. Now, I will let the
painting dry completely. We will start adding medium and dark tones in
the next lesson.
8. Middle and Dark Tones: [MUSIC] Now we can
start painting the mid tones and using
other techniques. I want more red tones around
the eyes to emphasize them. [MUSIC] I decrease the intensity of the color as get closer
to the eye springs. Now, I use the
layering technique. I will add the second
wash on top of the first layer that
has completely dried, and again, there are a lot of water and less
pigment in my brush. [MUSIC] Now, I will add more paint to
eyelids using wet on wet technique and I am
smoothing the area of the eyes. I have painted the cheeks in
red tones before because I want to emphasize the
vitality and energy of her. Now, I'm going to paint
it in shades of green. The reason is that I
want to hit you harmony with the flowers I will
add to the head later. [MUSIC] I mixed green with my brush and the color
to get a warm green tone. [MUSIC] Now, I use the
colors alizarin red, cobalt blue, and
burnt sienna to get a deep reddish color for
my mid tones [MUSIC]. I use this color on the
nose edge and holes because they should be dark
to emphasize nose [MUSIC]. I want to add more
paint to eyelids. One of the eyes is
still damp [MUSIC]. Let's move to the
neck part again. I will use burnt
sienna, cobalt blue, and transparent orange, and
a little bit, alizarin red. I will use a darker tone while making the
second layer for the neck part because this area is completely
overshadowed. I want to smooth
edges of the paint. I will add some orange
color for some parts. I also used the green tone in the body part to remind the oak. Feel free to use creativity. You can add what you want. I will use the same color under the lips and the holes
of the nose [MUSIC]. Now while we use the splashing technique
with the clearing paint, if you want you can use the watercolor
blossoms techniques. Like me now I am using it. You can create watercolor blooms by dropping a few drops of clean water on certain moist
areas on the body [MUSIC]. Now, I want to repaint the eyes with dark red color
to highlight them. I add more blue and I'm using wet on wet techniques because
I want smooth edges. I want to create
eyelash effect [MUSIC]. Now I want to use more reddish
color inside of the eyes. [MUSIC] Now I move on to another
eyes and do the same thing. I use dark tones for eyelash and I will smooth the
edges with water [MUSIC]. Be careful, don't make
big brush strokes. You can use your finest brush. [MUSIC] Again, I am using dark
red color inside of the eyes and I will
smooth the edge of it. [MUSIC] Now, I will add dark tones
to the lips. [MUSIC] I will paint a little bit darker the lower lip because
lower lip is in shape. [MUSIC] Do not forget to leave
highlights on the lower lip. [MUSIC] Now, I will add another
layer around the eyes. [MUSIC] The area around the eyes, the nose and lower
part of the lip, and neck should be darker as
they are made in the shade. [MUSIC] Now, let's paint the eyes. We will use wet on wet
technique to paint the eyes. Firstly, I just wet the eyes
with water and I'll wait for a while for the paper absorbs the water for about 30 seconds. [MUSIC] I paint it to dark blue. If you carry a painting
outside while painting, you can easily clean it with
a dry and clean napkin. [MUSIC] I will paint the iris of eyes and the pupil while the
eye is still moist. [MUSIC] The technique I
use here is dry on wet. I use my fine tip
synthetic brush, and my brush is almost dry. For this, you can choose a
dark color close to black, or you can get a dark
tone by mixing red, blue, amber or sienna. [MUSIC] I want her eyes to look Miss D, so I use different color tones
inside her eyes as well. [MUSIC] The reason I choose
blue for her eyes is because it reminds me
of the sea on nature. [MUSIC] Now, I will add some lines on her eyes with dark red color. [MUSIC] Now, I want to add top
layer to the lips of her. [MUSIC] The inside of the
lips should be more darker. [MUSIC] I left some highlights again. [MUSIC] By the way, I want to share one
more tip with you. I'm starting to creating
layers by painting dark areas. [MUSIC] I think we
painted the fourth layer. However, I wouldn't recommend painting more than six layers. Because if you do more layers, the overlapping colors
will create a muddy color. [MUSIC] Now, I will add more red color
on the edges of the lips. [MUSIC] I think the face is almost done. In the next lesson, I will show you how to
bring the portrait to the life and paint the
final details. [MUSIC]
9. Final Details: [MUSIC] As you can
see, the expression of the portrait began to match. Now I will paint the darkest
areas as final types. [MUSIC] I'm working on eyelashes and eyebrows a little more. [MUSIC] I think I need to add a darker
layer to the nose corner. [MUSIC] I will work
on more on the lips. One of the most important
skills we must occur in watercolor is
knowing where to stop. [MUSIC] It can be
really difficult. We may want to paint
more and add new layers. However, our portrait may seem overlooked
and lost its soul. This is something
I struggle with. I like this quote
from Paul Gartner, A painting is never finished, it simply stops in
interesting places. [MUSIC] I think that's enough. Now, I want to stop here and move on to the part
that I like very much. Now, I will use
this white gel pen to give life to her
looks and expression. If you do not have
a white gel pen, you can use whitewash
or white watercolor. However, you must use
this paint directly from the tube we tell
mixing with water. I will draw two white
dots for the eyes. [MUSIC] Since the tip of the nose is also bright, I want to add a highlight there. [MUSIC] I want to add
some highlights to the lips as for Sheila
to the lower lips. I think eyes looks darker. I want to paint there also. [MUSIC] I want to add some
highlights to the eyebrows. Not too much. [MUSIC] That's it.
Let's move on to the next lesson to spark
your creativity. [MUSIC]
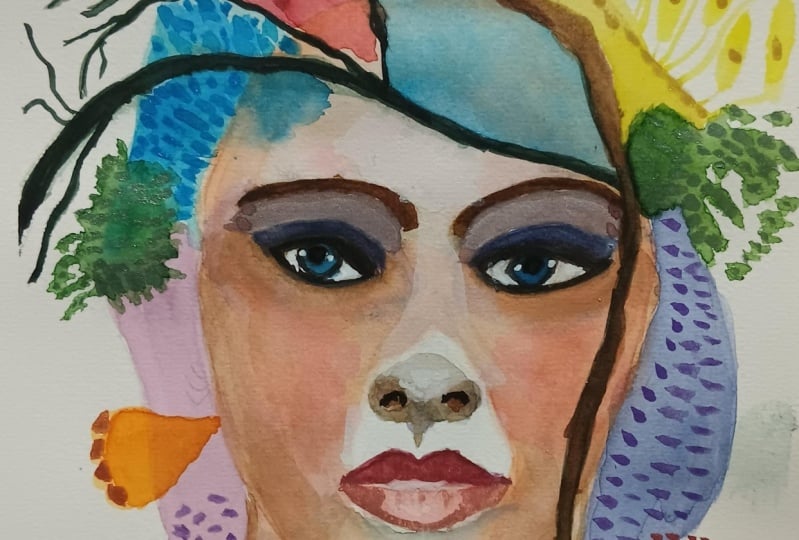
10. Creative Freedom in Watercolor Portraits : [MUSIC] Don't be slayed
to your reference. In this lesson, we'll learn
how to make creative addition to our portraits regardless
of our reference. At this stage, you will no
longer need a reference photo. I just want to you look
at the painting you have made and imagine
a different face. If you want you can get
inspiration from Pinterest. Or you can write down a
few ideas that come to your mind and start driving
the most impressive one. [MUSIC] As I said before, I got my inspiration
from Gaia, Mother Earth, so I want to add flowers and leaves to
the head part of her. On her body I will use all
tones to remind the earth. At the same time I will draw a green branch of her neck
that wraps around her body. I take a lot of water and paint on my brush for
the green branch. I will use a dark green shade. What you should be careful
about is to have plenty of water and less
pigment in your brush. [MUSIC] Now, I want to paint a brown branch to remind the spring and
autumn at the same time. [MUSIC] I will add clean water to create
watercolor blossoms. [MUSIC] I started to paint flowers. If you want you can use
reference photos for flowers, but I want to draw
from my imagination. [MUSIC] I need to smooth the heads of flowers. [MUSIC] It's important to use different color
tones for green. [MUSIC] I will add darker blue for blue flower. As you can see, the
underlying layer is still damp and I will
get smooth edges. [MUSIC] In some place like here, while the painting is still wet, I've blended it
with another color. However, it is important not to use these techniques too much, otherwise it will seem
unclear and moody. [MUSIC] Now is the time to show your creativity. I am driving flower
for my portrait. If you wish you can
draw butterflies, birds, skies, stars
instead of flowers. I mean, ending as
you find exciting. Or you can use a single color instead of colorful painting. [MUSIC] Now, I will add little tones
to the brown branch. [MUSIC] Now, I will use dry or wet
technique for purple flowers. My green leaves
are still wet and I want to use
backwash techniques. [MUSIC] Now, I will add top layer
to the pink flower. [MUSIC] I paint another brown branch to the head part but
I didn't like it. You can always correct
your painting with clean water but you
should be quick. [MUSIC] I want to add yellow flowers
in either side. [MUSIC] By the way, I also get help
from color theory. I try to use contrast
color together such as orange and blue
or red and green. [MUSIC] Now I want to add a
lavender to the half face. [MUSIC] Now I will use splashing technique. [MUSIC] I think around of her neck should be darker, and I will add darker tones. [MUSIC] The way to be creative is to use the
techniques you have learned effectively and to come
up with a good idea. Push the limits of your
imagination and relax your mind, then you will start to come up with creative ideas. [MUSIC]
11. Conclusion: [MUSIC] Congratulations on
completing the class and pushing yourself for drawing
your artistic journey. Watercolor portraits
may seem challenging, but I hope this class has
given you the knowledge, techniques, and tips needed to create expressible
watercolor portraits. In this class, we covered the materials you will need
for a watercolor portrait, how to do a portrait sketch, and what you study. Next, we covered tank create watercolor techniques and how to use these techniques for
watercolor portraits. Of course, you learn to
make creative touch to your portrait by becoming
independent of the reference. Remember to practice
the techniques you have learned to do what you study before painting and
to spark your creativity. If you have any question, you can ask them in the
discussion page of the class. I will be happy to answer
and please leave a review. I would like to know what
you think about the class. Finally, be sure to share your paintings in the project
gallery of the class. I will look at each painting you share and leave a comment. If you like this class, hit the Follow
button on my name. I can't wait to see
what you have created.
 Züleyha Aydoğdu, Artist, Instructor