Transcripts
1. Welcome Back !: [MUSIC] Painting a cityscape has always been my dream. [MUSIC] It's not easy. There are so many
things you need to learn before attempting
your first work. There is sketching,
there is perspective, and the last one, the
color composition. Well, trust me, I
have done more than once regarding the
color composition. What if I told you guys that
I have found a simple way, a shortcut if you will, to paint these cityscapes in
very simple and easy steps. You don't need a lot of watercolor skills to attempt
these simple cityscapes. Do you know wet-on-wet technique and wet-on-dry technique? The two most simple
exercises in watercolors, and of course, a little
bit of sketching. Then this class is for you. This class will go
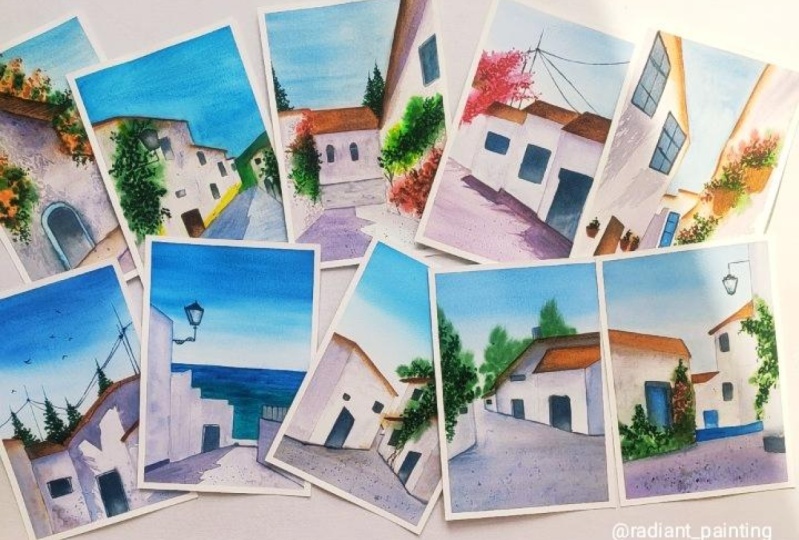
on for 10 days, and on each day we're going to paint a very
expressive cityscape. All of these projects
are looking similar. It's because I have created
a special color palette. We're going to paint
all the class projects with the same colors. Along with the colors, we're going to also
discuss the rest of the supplies that we're going
to need to get started. Are you in with me on
this 10 days project of painting simple and
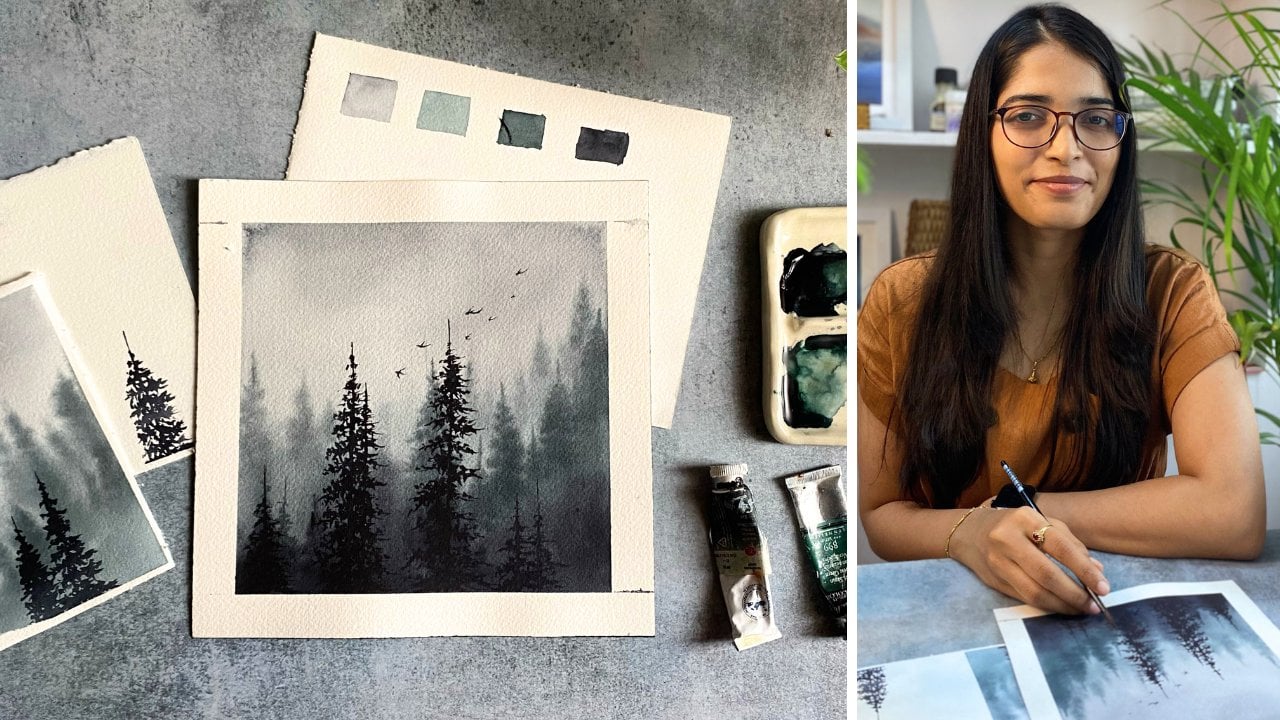
expressive cityscapes? [MUSIC] Hi. I'm Sukrutha, watercolor artist
and art instructor. [MUSIC] Well,
without further ado, let's jump into next video. [MUSIC]
2. Art Supplies: Let's discuss art supplies. I'm going to first
start with the brushes. I have used only two brushes
for this entire class. My silver black velvet number
14 is the primary brush, I would say, because I have used it for literally everything. This is my silver black
velvet number 6 brush. I have used this
one for detailing. Coming to the papers, I have used a Fabriano, 300 GSM, 100 percent
cotton paper. It's artistic paper, as you can see here
the watermark. You guys probably know this is my most favorite
paper because I've used this paper for
almost all of my classes. I love the texture and the
water-holding capacity. But if you don't have this one, you can use any 100
percent cotton paper. The color is actually the most important
part of this class. I had to make sure
the colors look very bright and lively. I have created a
special color palette, which will be in the next video. The colors part, I won't be mentioning here in
the art supplies. You can move on to the next video to get the
details about the colors. The tissue papers
are very important, a water jar, and a masking tape. I guess we have covered all the art supplies that we are going to need to get started. I'm going to see you guys
in the next video where we will discuss about the special color palette that
I have created. Thank you for watching.
3. Color Palette: See in that supplies
and now we'll see the color palette
that we're going to need for all the ten projects. [MUSIC] There are
total of eight colors, which I'm going to
swatch on the paper. You will get the
idea of which shed you're going to
have to use if you don't have these
particular colors. I'm going to first start
with primary yellow. This is from a brand
called Sennelier. If you don't have Sennelier, you're free to use any brand, but make sure it's
a primary yellow. I have all these colors
on my palette here. Just before this, I have painted a couple
of class projects. That's why my
palette is so messy. The second color is
Sennelier orange. Obviously, it's from
the brand called Sennelier and I have observed it's a little bit darker than the oranges
in all the brands. So that's okay. It doesn't make much
of a difference. Use any brand you want. This is Queen Rose
from White Nights. To be honest, I absolutely
love all of these colors. Doesn't matter which
brand they are from. Because while I was painting, these colors are getting
mixed up very smoothly. I just love that. This is French vermilion
from Sennelier. It's such a bright red. I love this color. I have only used French
vermilion to paint flowers, but I love to use it for an entire painting,
maybe one day. This is dioxazine
purple from Sennelier. Forget about this purple. The next color is my
another favorite. It's Tallow blue
from Daniel Smith. When you see a sunset, and just after that, the sky becomes
dark and you catch this color in the sky just before the nightfall
and just after the sunset. That's why I love
this color so much. I always try to catch
that color in the sky. I have recently taken a
picture from my recent trip. You can see that
color in the sky. It's wonderful, isn't it? Now comes forest green
from the brand Sennelier. It's darker shade of sap green. You can use any brand
of the color you want. Just make sure it's in the darker shade of greens
and not the lighter shade. The last color is indigo, it's from White Nights. You guys know it's a
must color for me. These are all the
colors that we need, but wait, we are not
done with the colors. There are two more important
colors that we're going to have to make on our own, which are actually
very important. One is the shadow purple. For that, I'm mixing Tallow
blue and Queen Rose. You know this color
is used to paint all the shadows in the painting
in the class projects. [MUSIC] For the next color, I'm going to mix orange
color and purple. This gives a burnt sienna. You might be wondering, you can easily get a
burnt sienna tube. But I wanted to mix my own color because the one
in the tube was very dull. I wanted the burnt
sienna to be very fresh and very lively and very bright because that's the soul of these cityscapes and are
very cheerful to look at. [MUSIC] The entire
class projects are actually made
of these two sheds, shadow purple and burnt sienna. We have used other colors, yes. But these are the pillars. Make sure you have
these two colors ready. [MUSIC] In some cases, I have used a darker
shadow purple shed. For that I have mixed Queen
Rose with the indigo. But that's very rare. I have always used Tallow
blue and Queen Rose. For burnt sienna, I have mixed dioxazine purple and orange. [MUSIC] That is it guys. These are all the colors and
sheds that we're going to need to start our tender journey of painting cheerful cityscapes. I hope you have
all these colors. [MUSIC] I'm going to see you guys in the next video where we're going to start
with our first-class project. [MUSIC]
4. Class Project 1 - Sidewalk: Let's start with our
first class project, and the first step
is always sketching. There are no tips and
tricks in this video, you only need a scale and a
pencil for a good sketch. If you find sketching along with me
a little bit difficult, you can always go back to resources tab and you will find an image
of the sketch ready and you can sketch it at your own pace and then come back here to continue the painting. Since this is the
first class project, I'm painting a very simple
house with a lot of flowers and a road
in front of it. Small door here. This little house is
actually having two doors, so this is the small one
and the one that I'm sketching right now
is the bigger door, and of course, it will have
a larger set of flowers. I'm going to just place
where the flowers and green tree should be. We're not going to be painting a detailed flower and plants. Just we're going
to put the colors. This is the bigger door
that I was talking about. Word of caution, do not sketch the door
right now with me, wait a couple of seconds then
I will get the shape right, so you can proceed. Everything looks
great right now. You can pause the video right here if you
are not done with the sketching and sketch
at your own pace. We can later start with
painting the first layer. But first the colors, but we have already talked
about the colors before. I have taken those on
my palette right here. We are set with the sketch and the colors, let's get started
with the first layer. First, I'm going to take my Silver Black Velvet
Number 14 brush, and I'm going to wet the
entire paper with it. At first, I only added the
water in the house area, later I have realized I'm wasting my time because
to make it work, I'm going to first have
to start with the sky, so I have to wet the
sky area as well. The entire paper
except the road area, you need to add the water and that's what I'm
doing right here. I'm using a tallow
blue to paint the sky. Paint very carefully, do not let the blue color
touch the roof or any of the sketch over there because the flowers
will be coming there. This is summer season here. It's very hot, so I have to work faster
before my paper gets dried up. Very quickly, I'm
adding orange color. These are the
flowers by the way. The paper is still wet, so the color will
spread very easily. If you are in the
hot area like me, as you can see right here, the paper has already dried up. I'm going wet that
little area and I'm going to continue painting
these orange color. I'm going to take
the forest green and I'm going to paint green color leaves in between
these orange flowers. You have to alternate
between orange and green until your
paper dries up. Now, do not make it too orangey and do not
make it too greenish, make sure you find the perfect
balance and by the way, this is not the final step in painting these
flowers and plants. We're going to have to add one more layer in
the next step later. Right now you're just
going to have to spread these two colors, orange and the green,
with the perfect balance. Now, I'm going to take a
tallow blue and Quin rose. I'm going to make a little
bit of shadow color, I'm going to add it on
the wall of this house. I'm not completely adding
this color to the house, I'm just adding at
specific places. Make sure you follow exactly
what I'm doing right here. Your paper doesn't have
to be soaking wet. Mine is damp. It's time to mix another one of the important colors,
burnt sienna. I have mixed purple
and orange to get this bright burnt sienna color and I'm painting
it on this roof. My paper has already dried up at least 70
percent, so it's okay. Your paper doesn't have
to stay wet for all this, only for that flower and
plant part, it has to be wet. Now I'm going to add the roof here as well with the
same burnt sienna color. Now, you have to
forgive me for this, I don't know how this
color ended up here. I think I spilled it over at
some point, I don't know. Now you have to bear that
ugly sight of color, but it's one of my favorite color so I didn't mind, I hope you don't too. Now we're going to
paint the road. I'm wetting the road area with my Silver Black Velvet
number 14 brush and I'm going to take the light
shade of burnt sienna. I actually took the
darker shade later, I have removed the color. I'm warning you guys to take the lighter shade now itself. Now it's perfect. I'm going to take the
shadow purple and I'm going to paint lightly
over the road. This indicates the shadows
that are falling on the road. The shadow purple is the perfect color, I guess. With my smaller Silver Black
Velvet number 6 brush, I'm painting a few details. The paper is still damp here, so it's easier for me to
just blend the color. Now I'm taking my
favorite color, indigo, and I'm going to paint the doors with this color. As you can see, the first half, I'm filling it with
the darker color, and the second half, I'm just dragging the color down without adding any color. It shows that the upper part, the dark color, I mean, it is covered in the shadow and the rest of the door is lighter in color
because it has no shadow. It is one of the
important details to get the door right, so make sure you are painting the doors in
two different shades. With the same indigo color, I'm going to add a
few more details. This detail is important because it's going to
help you differentiate between the wall and the
road so do not skip it. Instead of tallow
blue and Quin rose, I'm going to be adding
indigo and Quin rose because I need the
darker purple shade. I'm going to add that
color just under the roof. Now with a wet brush, I'm going to blend this
color into the wall. I'm going to just let this darker indigo
color spread into that darker purple shade. The paper is still wet here, that's why this effect
is possible for me. But if your paper is dried up, do not try this step. I'm adding this
darker purple shade at random places on the wall. With that same
darker purple shade. We're going to paint the
details on the road I mean. These are the shadows that I'm painting at the
edge of the door. Make sure the door is
not in a uniform color. You have to show variations using different
shades of the color. I have messed up a
little I did not add green color at the
edge of the paper, so I'm adding it right now. That is it for the first layer. Now we're going to have
to let the paper dry completely before we get
started with the second layer. Once your paper has
completely dried up, it's time to add second layer. Second layer is all about adding details and
there are lots of them. First I'm going to start with adding the shadows to the roof. I'm using indigo color for that. Follow my brushstrokes. You're going to get that the shadow part and the
roof part perfectly. Add a layer of indigo
under this roof as well. It shows that the roof has
the shadow below the wall. Now let's take the tallow
blue color and let's add this color to those two dots. You are going to have to add a few
more details to it. But we're going to let
this layer dry first. Now comes the very longest
part of this painting. I'm going to take orange
color and I'm going to take the green as well, not
together, separately. I'm going to just
add the flowers. This is not a detailed flower. Just add the dots. They're going to look
fantastic at the end. First complete with
the orange color later you can add the green. It is done. We're going to take the darker, purple
shade and we're going to continue adding the shadows. Remember, I told you, we're going to have to add
details later to that door. I'm going to take
indigo color and I'm going to get started
with adding the details. Adding the details. I meant adding the shadows. To add the shadows, I'm using indigo color and
just follow my brush strokes. It'll be easier for you. You're almost there. Now we're going to add
the shadows to the road. For that, I'm going to be
using the darker purple shade. Now take the shadow purple color the mix of tallow
blue, and quin rose. We're going to get
started with adding the shadows for those
flowers on the wall. Very careful while painting the shadows because it is very easier to get carried away. Just paint in one direction and in the same shape as well. Here, I'm painting the
shadows in diagonal shape. Please follow that as well. Do not paint the shadows
in a straight line. A little bit of
last-minute detailing, but that's just my problem because I don't
know when to stop. For now, though, this
class project is perfect. I hope you guys enjoyed painting this simple but very cheerful
cityscape with me. I'm going to see you guys tomorrow with a brand
new class project. Thank you so much
for joining me.
5. Class Project 2 - Mountains Afar: [MUSIC] Hello. Welcome back to
today's class project. This class was super hit
yesterday and I hope it continues to be the same
for the rest of 9 days. For today's class project, I am following a
reference picture. Whenever I take a
reference picture, I don't always sketch
exactly the same. I always change a lot of things. Today is no different. I have only taken a couple of buildings on each side of the paper from the
reference picture, and I've skipped
a lot of things. That's why I'm not going to share the picture on the screen, it'll just be here on my table. If you guys find
sketching with me a little bit difficult,
that's completely okay. There is a final picture of
the sketch in resources tab. You can pause this video, go there and
screenshot the image, and sketch at your own pace. You guys know that I had surgery on both my eyes, muscle surgery, so it's still a bit difficult for me
to actually sketch. I found that painting
is not that difficult, the difficulty comes only when sketching because I have to move my eye a lot from reference
picture to my paper. Really that's why
the sketching part is so long for this
class projects. Under normal circumstances,
this would have taken me around 5 minutes
or 6 minutes tops. If you guys want
to save some time, my suggestion would be to go to the resources tab
where I've shared the final sketching picture
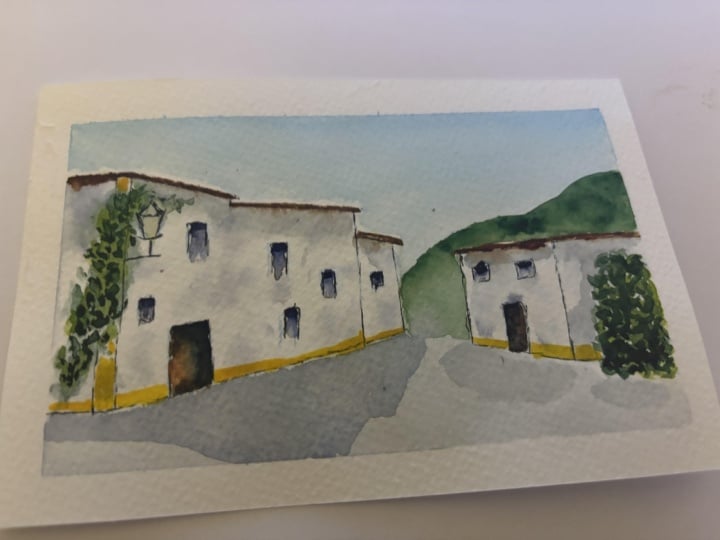
and sketch from there. Today's class project is
probably my third favorite. I just fell in love with
the simplicity of it all. There are only two buildings and there is a
road and a shadow. My favorite part is the
mountains which will come in between
these two buildings. One of my favorite
things to paint in watercolor is
the street light. We have the street light
for this class project. Now we're going to just
place the plant on the wall. We're not going to any details, just like yesterday's
class project. Finally, the mountains
that I was talking about. After that, the
sketching is done. Did you guys get
your colors ready? I've got mine right here. Let's get started
with the first step. My silhouette black
rounded brush, number 14. I'm going to wet the first
building with clean water. Make sure you're not adding
water to that street light as well as
doors and windows. Let's get started with
the dark shadow color. I'm using indigo and queen rose to mix the shadow color
instead of phthalo blue. Paint the colors
at random places and then blend it all in. Do not completely make this
building into shadow purple. Remember we have to paint
those plants in wet on wet, so I'm going to take my
smaller brush, number 6, and I'm going to
take green color, and I'm going to
get started with the first layer of plants. We have painted orange and green yesterday and today we are
painting only green color. As you know, this is
only the first layer. We're going to have to add details later after
the paper has dried. Let's add a little bit of shadow purple on both
sides of the plant, the top and the bottom. Let's mix orange and
purple to get burnt sienna so we can get started on painting
the roofs of the building. [MUSIC] Blend it with shadow purple. I'm taking indigo color
and I'm going to get started on painting
those doors and windows. Yesterday we have painted the doors with a
small technique. That is, the top
part should be in darker color and the bottom
part should be lighter. I'm painting these
doors and windows with the same technique
like yesterday. For the large main door here, we're going to use
burnt sienna and I'm using orange and
purple to get the color. This door too in
the same technique, the top part should
be darker color, and the bottom part
should be lighter. Now the interesting part, I'm taking primary yellow
color and I'm going to paint the borders at the
bottom of the building. This step is not my own idea. I am following the
reference picture for this and I found it really beautiful that you add
an unexpected color, so I did not want to skip that. Roofs are looking really dull, so I'm going to add one
more layer of burnt sienna. Now one side of the
building is done. We're going to paint the
other side of the building. It's very small.
It's going to take only two minutes, I think. Paint with all the
colors that I have used on the other side of
the building that is burnt sienna for the roof
and indigo for the doors. Now we're going to
take the forest green again and we're going to add the detailed layer to
those plants and leaves. At this point, the
paper should be dried. But if your paper is still wet, you have to wait a couple
of minutes until it's dried to paint the second layer
of the plants and leaves. We are done with the
second layer of plants. We're going to keep
this for drying and the next step will be a little bit tricky,
but not difficult. That is, we're going
to paint the sky. I'm going to keep
this for drying and I'll come back
once it's dried. My paper is dried. I'm going to keep it in the opposite side
and I'm going to start wetting the paper
with clean water, the sky area only. Do not proceed with this step if your paper is still wet or else the burnt sienna
you're seeing on the roof will just come off into the sky area and we
do not want that. Move to the other side, take tallow blue and let's get started with painting the sky. This is why I love
Fabriano paper so much. You can just see how
buttery the paper is. The paint is just gliding
into it so smoothly [MUSIC] [MUSIC] I just take the shadow blue and I
will paint the road now. Make sure there is not much difference between
the tallow blue and the shadow purple. But if for some reason the
difference is showing up, there is a distinct difference
between those two colors, it's okay to not worry because we're going to still
have to paint the mountains. Painting the mountains
will cover it up, cover any difference
that you see between the horizon line and the road. We'll go on adding a few more shadows on this large building and I'm
using shadow purple for this. Let's add the shadows on the
smaller building as well. This is my favorite
part, the mountains, and make sure the paper
is completely dried, and I'm taking forest
green color and I'm going to start
painting those mountains. It's very easy step, but it's going to give you a lot of depth
to the painting. Relying completely on
the reference picture for this mountains' part. As you can see,
the mountains are covered completely
in the background, so I'm going to just attempt to replicate the same
on my painting as well. The green color is looking
lighter here because I have accidentally dipped my
brush in the yellow color. I'm going to mix
some shadow color, and I'm going to get
started on painting the shadow that has
fallen on the road. Painting shadows is
a very tricky part. You have to use the
same color but at different tonal values to
give the shadow effect. Now you're going to
have to also make sure to add shadows
at the right place. This is why,
especially if you are a beginner in
painting cityscapes, I strongly advise you to
follow a reference picture, so you will know where
to add the shadows. Now I'm going to use the
indigo color and I'm going to paint the street light. Pre-observe I'm using
a small technique to paint the street light. That is, I'm adding darker
color of indigo on one side, and I'm intentionally keeping the other side in
a lighter shade. This skews the realistic
effect to the street lamp. [MUSIC] We are actually done. But you guys know that I
don't know when to stop. I will keep hovering
over my painting for at least 30 minutes
after it finishes. Right now, I'm adding a few shadows using
shadow purple color. [MUSIC] Then we are done with
class Project 2, and I hope you guys
enjoyed painting this one, just like you have enjoyed painting yesterday's
class project. I'm going to see you guys
tomorrow with a brand new one. Thank you for joining.
6. Class Project 3 Sunny Portugal: Hello guys, welcome back. Let's start with class project 3 and I'm
following this picture. Of course, I'm going
to make my own changes so I will not be
sharing the picture. I'm going to start with the
sketching of course. If you want to sketch
at your own pace, you can directly follow the final picture of the
sketching in the Resources tab. Today's sketching
will be very simple, and, of course, the painting will be simple too. The picture that I'm following, the reference picture, is from the country
called Portugal, and it's a street view. If you google street
view pictures of this particular country, you can see a lot of similar cityscapes that we
are painting in this class. Yes, if you want to experiment these type of
cityscapes on your own, that's where you should start because they are so
similar to what we are learning here. Today's sketch is
about three buildings. One is on the side, the other one is our main focus, which is on my right. The middle one,
which is actually my favorite because it will be so far behind and we have to paint it with lots of shadow color, and I enjoyed the process of painting that
particular building. Sketching is almost same as
previous class projects. We have doors, windows, and we have those
plants and flowers. I'm almost done
with the sketching, and I hope you guys are
ready for the next step. Please make sure you have
the color palette ready. I have mine right here, and I'm going to get started
by wetting the paper, wetting the sky area with my silver black
velvet number 14 brush. We're going to get
started with painting the sky first. For a change, I'm going
to mix a little bit of indigo to Phthalo blue color. I want the sky to look darker in today's class project. Let's paint the sky
very carefully. This is wet-on-wet
technique, by the way. I'm sure you guys know. The sky is done. We're going to just paint that ground as well
with the same color, but we're going to lighten the color so much that
it's hardly visible, because we are going to have
to add the shadows later. Once that is done, we're going to keep
this one for drying. After it's completely dried, we're going to get started
on painting those buildings. Paper has dried. I'm going to wet the
building that is on my right with clean water. I'm going to use two
shades of green today. One is a lighter green
and one is darker green. For the lighter green, I'm going to mix yellow
color with forest green, so I get sap green color. I'm going to paint those
plants and leaves, of course, in
wet-on-wet technique, just like we have done in
previous class projects. Want to achieve depth in your paintings
with watercolors? You need to add a lot of different shades
of the same color just like I'm doing right here. I'm alternating
between light color, light green color, and
the dark green color. Now I'm going to take red color, French vermilion, not orange, French vermilion color, and I'm going to get
started on painting those flowers just under that green foliage
that we have painted. Already mixed burnt sienna, which is the mix of
orange and the purple, and I'm just going
to add a tiny bit of it in those red flowers. Like I said, I want to add the depth to those
flowers as well. I'm going to take more burnt sienna color and
I'm going to get started on painting the
roof of the building. Take Phthalo blue and very lightly paint that
window over there. Now I'm going to quickly
take the forest green, and I'm going to add the details to that
foliage, green foliage. We are not done with the
building that is on my right. We're going to come back
to it later but for now, we're going to
finish the buildings that are on my right
and in the middle. Take shadow color
and wet the area, and then add the shadow
color to that building. We have to add
shadow color here, because these buildings
are in the shade, and they're not having that
direct sunlight on them, so they will be a
little bit darker color than the building on my right. While we are at it, let's add green and red color. Of course, burnt sienna. Now let's get started on
the building in the middle. For this, I'm taking indigo
mixed with Queen Rose. I'm taking the
darker shadow color because like I mentioned before, this building will be far behind than these two
on my right and left, so it'll be a little bit darker. That color, the
darker shadow purple is spreading into
the road, it's okay. You can just dab it
with a tissue paper. It is drying. I'm going to add the
shadow purple to the building on my right, just under the roof. Now while we're at it, let's add the shadows to that green foliage as
well as the red flowers. This painting I have observed that the green color and the red color has
completely dried. I'm going to
continue adding that detailed leaves
using green color and later I'm going to add
the red color as well. These are the steps that we have done in previous class
projects as well. I'm going to add a few details
to those window as well. I'm not going to
go deep into it. This is a shadow part. I'm using indigo color for this. I use the same color, indigo to complete these
two little windows as well. This building in the middle, I was looking at the picture, there is a distinction between the top side and the bottom. The bottom is a lot
darker so I'm just adding the darker shade of purple at the bottom
of this building. Add a few more details to differentiate the
wall and the ground. Burnt sienna to paint the roof. Add the details, of the flowers and the green foliage on
this building as well. Add a few stems to these green
plants on my right. It is just something I saw
on the reference picture. I thought I should
not include it, but at the last minute
I decided I would because they were
so cute not to. Another round of shadow purple for the
building in the middle. Your shadows on
the roof as well. Wing on my left was looking rather
pale and plane so I'm going to add a few
more shadows to it as well. The same shadow purple color, I'm going to complete the
shadow on the ground as well. Details of the shadow on this side of the
building as well. More details to the
building in the middle. Same shadow purple color, I'm going to add
a few details to that window and under
that roof as well. The shadow is not looking that good and it has to look very detailed so I'm going to add one more layer of the shadow. I'm going to take the forest
green color and I'm going to add a couple of trees
on these buildings. I'm intentionally
adding the pine tree, on the masking tape, I just want a glimpse of it to be seen in the painting
and not the complete tree. But if you want to paint the complete tree
into the painting, you can as well, you don't have to paint on the masking tape. Apply more on this side of the
building as well. That is it for today's
class project. I hope you enjoyed
painting this very simple, but very bright and
colorful cityscape. I'm going to see
you with a brand new class project tomorrow. Thank you so much
for joining me.
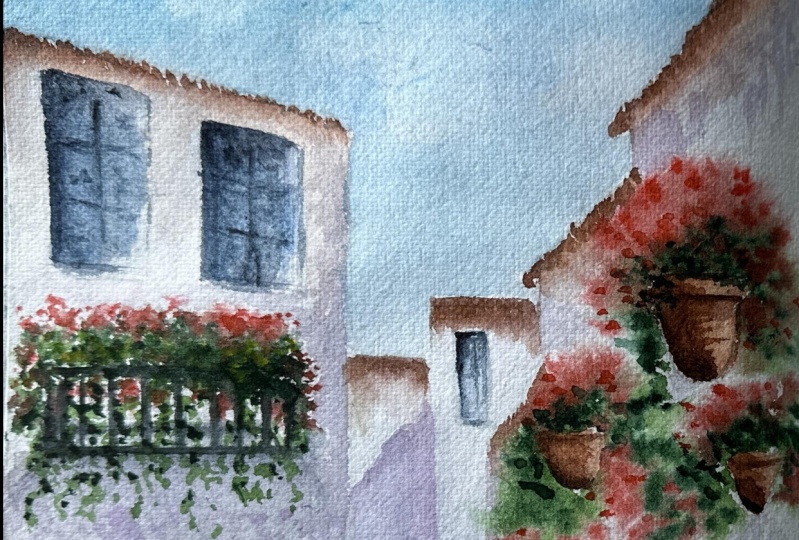
7. Class Project 4 - Flowery Street: Hey guys. Welcome to
today's class project. As usual, I'm going
to get started with the sketching and I'm
using a reference picture. But there are a lot of changes
that I'm going to make because the picture is not even 10 percent of what
I wanted to paint today. There will be no road and there will be no shadow on the road in today's class because
the angle that this photograph was
taken is completely different, it's upward angle. But the contents
are all the same. There is a building and a
few plants and flowers, windows and a roof. No compromise on the color
palette and that's a relief. As usual you can find the final sketch in
the references tab. I would suggest you guys to open up that image and sketch
at your own pace. Because personally I find it really impossible to
paint along with someone. There were these plants and flowers on the right side of the building in
yesterday's class project. We're going to have
the same in today's, but there is a difference. There will be two
gorgeous flower pots too on the wall in
this class project. I have never painted a
flower pot on a wall before, so it was challenging, but at the end everything worked out
and I actually enjoyed painting this particular
building in this class project. Isn't it great when
you take chances and it works out at the end? It is not a big deal probably, but I enjoy small victories. We are done with the sketching. I hope you have
your color palette ready and I have mine
right over here. I'm first mixing
the shadow color. Later, I'm going to take my silver black velvet
number 14 brush and I'm going to wet the building that is on my left
with clean water. Sure you are not wetting
those doors and windows. Let's add the shadow color to the building that we
had just used water and make sure do not just paint the shadow or
wall of that building. Just at random places and
then blend it properly. Burnt sienna and just paint those little flower pots on the left side of the building while the paper is still wet. Now I'm going to take the Thalo blue color and I'm
going to paint those windows on the left
side of the building. Paper is wet, the color can bleed
out into the building. You can just use the
tissue paper for that to dab the extra paint. Now I'm going to wet
that building in the middle using clean water. Later, add the shadow color just like we have done to
the building on the left. It is drying, it's time to wet the building on the
right with clean water. Add the shadow color
only on the top. To add the flowers
and the plants first, I'm going to take green color and I'm going to
get started with the foliage and I have also mixed a little
bit of yellow in there. We're going to paint
the flowers as well as the plants at the
same time and we're going to also paint both layers that is the wet on wet as well as the detailed layers back to back because the paper is not that wet and I don't want to waste a lot of time for that. It's looking so
beautiful, isn't it? Get started on
painting the roofs and for that I'm mixing
burnt sienna color. If you see that
friend's picture, there is no roof in
burnt sienna color, it's just what I I'm
painting on my own. Sure you are not leaving hard edges between the
building and the roof. Make sure you're blending that color into the
building properly. Follow my brush strokes so
it will be easier for you. Add roof to this
building as well. The door on this side of the building it will be in burnt sienna color
as per the picture, so I'm just going to add
the burnt sienna color. Let's complete the painting of these small flower parts
on this side of the building. I'm going to first
add burnt sienna later I'm going to
add green color. Later using a wet brush, just drag the paint down so it indicates that the shadows
are falling on the building. But if you find
that your color is bleeding too much into the shadow do not
attempt this step, it can be a little tricky. I'm going to just add this one small line of the paint near the
door using burnt sienna. I just found this on
the picture as well. Paint the window from this one. The building in the middle. Take burnt sienna and paint the roof for this building too. The same burnt sienna, let's work on these
flower parts. Now I'm going to start
adding the details. It could very well
be called the second part of the video because this only consists of adding
the details as much as possible to the entire painting. This indigo color I just wanted to darken these windows and then I'm going to add the shadows as well. Let's paint the same for
this window in the middle. Like I said, we're going
to add a lot of details, and details include shadows. Start with the building
in the middle, and later we can move on to
the building on my right. Well, this detail is not
in the reference picture. I wanted to add the shadows
for these windows as well. It might look messy, but then it was looking fine. I would suggest you guys
to follow along with me. But in any case, if you find this step
totally unnecessary, you can always skip. My most favorite part, adding the shadows to
these plants and flowers. Do not add the shadow
in a straight line, make sure you're
adding it at an angle. That's how the sun
rays fall if you observe any picture
or anywhere else. That's an important
detail to remember. That is done, it's time to paint the sky. I think this is
my favorite part, not the shadow part. I'm going to wet the paper
with clean water first. I only start adding
the halo blue color. Do not be impulse, you make
sure you check the borders. Do not paint over those rules. Make sure to add very slowly. With this sky a few more
details on the windows. I'm using indigo color for this. We're almost done. I really hope you enjoyed
this class project today. I'm so glad that you guys found the previous
class projects very helpful and very fun to paint. Thank you so much and I'm going to
see you guys tomorrow.
8. Class Project 5 - Little Houses: Hi, welcome to today's
class project. Today's painting
will be very simple. I'm going to just paint
a couple of buildings, houses, and then there'll be a road and shadow of course. That's what we have painted for all of these class
projects I know, but I will try to include a
few more extra details for this painting we'll see. As usual, the picture of the final painting will be available in the resources tab. If you find sketching with me
a bit difficult, you can directly refer that image and sketch
at your own pace. I told you guys that I'll make some changes that I'll include a few things
in this painting. One of those is this
one, the poles. We haven't sketched the poles before in previous
class projects. I'm going to include a few flowers as
well on the left side of the painting. Final step is to sketch
those doors and windows. You guys have your
color palettes ready? Without any delay,
let's get started by wetting the paper
with clean water. I'm wetting the entire paper
except that road area. I'm using tallow blue to paint the sky. I'm taking a smaller
brush and Quin rose, I'm going to quickly
add those flowers wet-on-wet like we have done
in previous class projects. Since that is done, I'm going to take shadow
color, lots of it. I'm going to paint these
houses with the shadow color. These houses as they go back, they should be lighter in color. The first one that I'm
painting here is in darker color and the one behind that is a
little bit lighter, and the one behind
it is even lighter. Now, there is this
small building here in front of the first one. There is a small line that
should be even more darker. This one that I'm
painting right here. Now I'm mixing this gorgeous
burnt sienna color. We're using orange and purple. I'm going to paint
the roofs of it burnt sienna now. You're seeing the
color variation right at the building that is behind the main one is lighter and the behind
one is even lighter. To get the lighter color, you need to add more
water and less paint. Taking Quin Rose and I'm going to add the detailed leaves, just like we have done in
previous class project. But if the paper is still wet, you have to wait a couple of
minutes to try this step. I'm painting the roofs once again with the burnt
sienna because they are looking very dull
after they have dried. Yeah. Lets take shadow color and paint
the main house with it. We'll now read the road area
with clean water first. There will be a few more
layers that we need to paint for this road, but for now I'm using the mix of shadow color and burnt
sienna for the first layer Now like we have done in
previous class projects, we are going to
paint a few details at the borders of the
wall on the road. You can distinctly see where the wall ends and
the road starts, it's very important detail. We'll keep this
drawing and I'll come back once it's completely dried. How dull the colors have dried, we have to add a few more layers to few more things later, but for now we're going to paint the doors and the windows. For this, I'm using
indigo color. I'm mixing a lot
of shadow color, so I can get started on adding layers of this shadow
color onto these houses. Make sure the windows
and the doors are dried up before
attempting this step. Mine was still wet but I think I managed to not make a mess, but I would advise you
guys to wait a couple of minutes until your
paint has dried; the windows and the doors, and you can carry on after your paper has dried. I'm mixing shadow color again, so I can get started on
painting the shadow that is on the road which
is always my favorite. suggestion here would be to paint the shadows
in less brushstrokes. Do not make a lot
of brushstrokes because they tend
to leave a stain on the ground which actually
will not look smooth, that's what we are
trying here while painting shadows especially. The same shadow color
I'm going to add a few more layers
to these houses using indigo color, I'm
going to get started on painting those
poles and the wires. Just adjusting a few
things on the road, this is another layer. This is also the last layer that we're going to
paint on the road. For this, I'm using
a shadow blue color. Near that wall I'm going to be adding a few more details, and for that I'm
using indigo color. Add one more layer of burnt sienna color to the
roofs of these houses. That is it for today. I think today's class project has been the easiest of
all of those that we have painted before
and I'm going to see you guys tomorrow with
a brand new class project. Thank you so much for joining.
9. Class Project 6 - Sunny Side: Hello people. Welcome to
today's class project. A few months ago I was
practicing for this class. This was one of my
practice pieces and I thought I would recreate it for
today's class project. [MUSIC] The picture of the final sketch will be
available in the resources tab. You can refer to that image
and sketch at your own pace. [MUSIC] All of our
class projects are in portrait mode and this practice piece is
in a landscape mode. At first I thought it
will be difficult. You're not to convert
it into portrait mode, but the trick was to increase
the area of the sky. I did not think
it would turn out so good but wait till the end. This one has to be my favorite
class project so far. [MUSIC] Random lines that I'm painting on these houses
are actually shadows. It all make sense at
the end, trust me. [MUSIC] Such a simple sketch. We are done with sketching. I hope you guys have your color palette ready.
We're going to get started. I'm going to wet the sky area with clean water and I'm using my silver black velvet brush. [MUSIC] Mixing my tallow blue with the indigo to get that
darker shade to the sky. [MUSIC] You can use cobalt blue or ultramarine blue in the place
of tallow blue. [MUSIC] I'm done with the sky
right now and I'm going to keep it for
drying and I'll come back once it's completely dried. Let's mix orange
and purple to get burnt sienna and
let's get started on painting these roofs
of all these houses. I am going to paint
the darker color on the left side of the
roof and on the right, it'll be in lighter shade. The roof will be
lighter in shade on the right because it
has no shadow over it. While on the left, the shadow
of this small building you are seeing on the left
is falling on the roof. [MUSIC] Let's paint the roof
of this next building here using the same color
and the same brush. [MUSIC] End it into the house
softly using a wet brush. [MUSIC] Now, let's paint the building in the
middle with shadow color. The roof will be dry by now, but if yours is still wet, please wait a couple of minutes and then get started
with the building. [MUSIC] While this is still wet, I'm going to be
adding a few drops of burnt sienna into the mix in order to give
that extra drama. Paint the next building
with the same color, but make sure you are leaving just a small wide gap
between these two buildings. [MUSIC] Bring that burnt sienna into this building as well, while the paper is still wet. [MUSIC] Touch burnt sienna to this roof over here. [MUSIC] Blending, I'm also adding just
a touch of shadow purple. Make sure you are
not adding too much. This one has to be in
whiter shade and not in purple shade because sun
is falling on this building. Sun is not falling on this side of the building so we are covering it
with the purple shade. [MUSIC] Of course a few drops
of burnt sienna. Because burnt sienna
is quite dull on this roof so I'm
adding one more layer. Using indigo color, I'm going to get started on painting these windows
and the doors. [MUSIC] You guys know how to paint
these doors and windows. The top part should be in darker color and the bottom
should be in lighter shade. [MUSIC] With indigo, I'm going to add a few details on
this roof over here. [MUSIC] The most important part of
this class project starts. Mix a lot of shadow color because
we're going to be adding the shadows for
all these houses. Keep in mind that
shadow should be only in one direction
and as you can see, the direction that I'm
choosing is diagonal. [MUSIC] These two buildings on my right will mostly be in white color because the sun rays are directly falling on them, they will only have
sharp shadows, while the two small
buildings on my left will be mostly covered in shadow color because
they are in shade. [MUSIC] Paint the shadows in
very less brushstrokes. Also, make sure you have
lots of shadow color in your palette because
while you're mixing, these shadows will
get dried up and it'll not look smooth
when you continue it. [MUSIC] I'll take a small break from talking and let
you guys enjoy painting these shadows all by
yourself because this is my most favorite part
in this class project. [MUSIC] Hope you enjoyed the
process and I'm going to splatter some remaining paint. Then I'm going to take forest green color
and I'm going to get started on painting those
trees in the background. [MUSIC] By the way, we're not completely done
with painting the shadows. We have a few brush
strokes left. [MUSIC] We'll continue it after
finishing up these trees. [MUSIC] A lot of shadow purple color now
and we're going to paint shadows to point O. [MUSIC] These details actually make no sense but please follow my brushstrokes
and trust me, they're going to look
wonderful at the end. [MUSIC] I'm just going to darken this wall
just under the roof. That makes these shadows
look even more realistic. [MUSIC] I'm going to take the
indigo color and I'm going to paint a few light poles, just like we have painted in
yesterday's class projects. I have loved them so
much and I wanted to paint in this class
project as well. [MUSIC] Paint a few birds, because we haven't painted birds in any of our class projects. [MUSIC] That is it for today's
class project and I bet you guys loved
this class project more than any of
the previous ones. I'm going to see you guys with
a brand new one tomorrow. Thank you so much for joining. [MUSIC]
10. Class Project 7 Beach Sun: Hey guys. Welcome
to Class Project 7. Today, we are going to grease. [MUSIC] I'm going to get started
with the sketching. As usual, you can find the picture of the final
sketch in the References tab. Most of you guys messaged
me that you loved the sketching part in
all the class projects. I'm very glad to hear
that because when I started to go for this
particular subject, I was really worried
about the sketching part because I was never
really good at sketching. That's one of the reasons
why the sketching is very simple in all of
these class projects. The thing that
actually help me in getting the hang of these
sketches is observation. I always take time
and I will wait patiently for at
least 10 seconds before I put the
pencil to the paper. Most of you don't know this, but I always try the sketch on a small piece of paper before I attempt
on the main paper. They all the tips that I can give you guys about
the sketching. I know only a few. Like I said before,
I'm not an expert. This is something new in this class project,
the street light, and I'm going to have to use a new technique
to cover it up, that is using masking tape. We're going to have
to paint the sky, so I don't know how
we can cover that up. We have to paint around it. Instead of that,
I'm using masking tape to cover that small area. We're going to need
masking tape to cover that horizon line as well so
we can paint the sky easily. It's perfect now
to paint the sky, so I'm going to get started
by wetting the paper, only the sky area and make sure you don't wet that
building over there. Use clean water. Also, I'm using my silver black
velvet number 14 brush. I'm using thalo blue color. You can use cobalt blue or
ultramarine blue for this. I'm painting very lightly. Perfect, isn't it? I'm going to keep this for drying and I will come back once it's
completely dried. I'm breaking our code guys. This is the extra color that
I'm going to use today, turquoise green from Sennelier. I'm going to use it just a
little bit to paint the ocean. If you don't have this color, I think everyone will be having turquoise blue, so use that. I'm going to just take
it on my palette. I'm going to remove
that masking tape covering the horizon line as well because my paper has dried. Using two colors to
paint the ocean, thalo blue and turquoise green. I'm also going to mix a
little bit of yellow into the turquoise green to
make it look more lighter. At the horizon line, we're going to paint the darker
color that is thalo blue. Slowly, we're going to add turquoise green as well as turquoise green
and yellow mix. Gradually, we are going
to make it lighter. That is done. Take
thalo blue and add these small horizontal lines while the paper is still damp. You are showing that
the water has ripples. A lot of shadow color because we're going to
need it in the next step. We're going to
first wet the area. You can wait until the
ocean part is dry, but my paper is already
at the stage of drying, so I just got it out
by wetting the paper. I'm taking shadow color, I'm going to add wherever
the color is necessary. Follow my brushstrokes and
paint where I am painting. The shadows are
very important part for this class project. [MUSIC] Let's add one more layer because clearly
this is not enough. [MUSIC] By using indigo color, I'm going to paint
a few details, like we have done in
previous class projects. You guys remember that we
are going to have to add details between the wall
and where the road starts. I'm going to just
go ahead and paint those shadows between wall on the road using indigo color. [MUSIC] Paint here using shadow color as well. [MUSIC] Also clearly, this is not enough
we're going to have to wait until this layer dries so we can proceed
with the next layer. I'm going to come back once
it's completely dried. [MUSIC] Using shadow color, I'm going to paint one
more layer of the details. [MUSIC] In spite of the wall should be in a darker color
because it is in the shade. [MUSIC] Paint, the shadow
color to this part of the building as well. It's in the shade too. [MUSIC] I'm going to add one more
layer of shadow color here. [MUSIC] Using the shadow color, let's paint the shadows. My favorite part of
the class project. [MUSIC] Plotting the paint
isn't my habit. You don't have to do it
if you don't like it. Now, I'm taking indigo color and I'm going to paint the door, but make sure the
paper is dry there. [MUSIC] We're going to wait until this whole paper dries up so we can get started
with that street lamp, which is also my
favorite thing to paint. [MUSIC] The paper has dried, so I'm going to remove
the masking tape. [MUSIC] Entire lamp is
painted in indigo, so use only that color. [MUSIC] Also use a smaller brush so you can paint
the details easily. [MUSIC] Normally, I add the
light indigo color in that white-space, just like when you see
a bulb which is on, you don't see a dark color, it will be in lighter shade. [MUSIC] Leave this one drying and I will come back once it's
completely dried. I just have to add
few more details. [MUSIC] Add one more line
of indigo color, but only after it's
completely dried. Add that line towards the
right, not in the middle. [MUSIC] Fix indigo color to your already mixed to shadow color to get
this darker shadow color. I know it's very confusing [LAUGHTER] so I'm painting
this one more detail. It's like I'm painting
a shadow on the shadow. [MUSIC] At this point, I'm just finishing up
those small details that you go for before
removing the tape. [MUSIC] Today's class project is really very
limited in colors. I hope you enjoyed
painting this with me. I'm going to see
you guys tomorrow with a brand new class project. Thank you for watching. [MUSIC]
11. Class Project 8 Serene Street: Hey guys, welcome to
today's class project. I'm going to get
started with sketching. As always, you can
find the picture of final sketch in references tab. Today is the date and only two days left for
this class to complete. I don't know about you, but
I'm feeling sad already. I'm going to come up with a new
class very soon. Thank you so much for showing such support to this class, especially after I have
taken a long break. As you can see,
today's class project is also a very simple sketch. A few houses and a
plant on my right. I'm going to probably use
only green color for that. I'm not going to use
more than one color. I will not complicate it by sketching a lot
of things here. I'm going to keep it simple. I'm going to now get started by wetting the
paper with clean water. I'm wetting only the sky area. I'm using my silver black
velvet number 14 brush. I'm using Phthalo blue
to paint the sky. If you don't have Phthalo blue, you can use ultramarine
blue or cobalt blue. Paint very carefully and do not paint it in
a very dark color. Just light blue is enough. There is this gap in
between two buildings. It's okay if you can't
get the paint in there. We're going to come
back for it later, we're going to paint it
again in later steps. This is sky and now you don't have to wait
for this one to dry because we're going
to have to paint that plant in green
color wet on wet. I'm using forest
green color here. Any dark green will do if
you don't have forest green. I'll wet this area a little bit so I can get this green color. That wet on wet effect. Now, this is only Step 1
in painting this plant. We're going to come
back for it later. We're going to have to add
details in wet on dry. Remember, we have
done this before in all of our class
projects almost. Technically, you have to wait until the sky and
the plant dries up, but here the temperature is 44 degrees today so
it's already dried. But if your work is still wet, you have to wait for a
couple of minutes before you get started on
painting those roofs. For the roof I'm
using burnt sienna. Now I'm going to add shadows
to these buildings wherever the shadows are needed so get
your shadow color already. In a few places, the darker shadow
color will be there, so almost all of these buildings will be
in light shadow color. This is light shadow. I will tell you where
the dark shadows will be there so you guys can
differentiate the shades. This is light shadow as well, the one we are painting now. Now comes the dark shadow color. I have added a lot of
indigo to the shade. The roofs are
looking really dull so I'm going to add one
more layer of burnt sienna. I'm going to paint the road now. For that, I'm going to be using two light shades of burnt
sienna and shadow color. I'm going to just add a little bit of shadow color in-between two
buildings over there. It shows that there are two very little buildings
at the horizon. Now I'm going to Phthalo blue here because I have missed
adding at the beginning. I'm going to take
the indigo color, I'm going to add lots
and lots of details. With the same indigo color, I'm going to complete painting those windows and the doors. Guys know how to paint
these doors and windows. The top part should
be in darker shade, the bottom part
should be in lighter. Complete this side as well. With the same indigo color, I'm going to paint
a few more details. You know I can paint details for hours so I really need
someone to stop me, especially while
painting the details because it never is enough. If you guys really want to
paint along with me, you can, but if your painting
is looking perfect, you don't have to add
thousands of details. Take darker forest green color, I mean darker green color, and we're going to add the details for this
plant over here. Paint those stems
using burnt sienna. I have again fallen in this
well of adding details. I'm using a mix of
shadow color and indigo color to give
those last touch ups. This class project is
the shortest of all and I really hope you guys
enjoyed painting this with me. I'm going to see
you guys tomorrow with a brand new class project. Thank you so much
for joining me.
12. Class Project 9 Before The Summer: Hi everyone. Welcome
to Class Project 9. As always, I'm going to get
started with sketching. You can find the picture of the final sketch in the
references tab below. [MUSIC] Only two days left for
this class to complete. [MUSIC] I have mixed
feelings about this. Obviously, I'm very sad to
leave these projects behind. I'm also very excited to get
started with new projects. I have been experimenting
a lot behind the scenes and have
taken a long break in Feb and March and I've used that time to explore a lot of different
teams in watercolor. [MUSIC] I'm very excited to bring those projects
to you very soon. I'm also very thankful
that you keep showing me your
support and you keep sending me all these messages that you love my classes
and you love my ideas. That means so much to me. [MUSIC] I hope you guys got
your colors ready because we're going to get
started with the next step. That is, painting the sky. I'm using my silver
black velvet number 14, brush and tallow blue
color to paint the sky. [MUSIC] Do not use darker shades of
blue for painting the skies. You can use any light color, light shade of blue. Cobalt blue would be perfect. I would also recommend
ultramarine blue. Now while the paper
is still wet, I'm going to use my silver
black velvet number 6 brush, and I'm going to use
forest green color. I'll get started on painting the foliage plants
in wet-on-wet. [MUSIC] We have to paint very fast
here because at least here, there is a heat
wave going on and my paper is drying
up really fast. I'm not kidding, it's 44
degrees Celsius here. [MUSIC] Clearly, you have to wait
until this paper dries before starting on painting
the roofs using burnt sienna. Like I said, my paper
has already dried up, so I'm going to get started on painting the roofs using
burnt sienna color. [MUSIC] It's completely normal if your work is not
looking like mine. If I paint this again, there is a 90 percent chance that it won't be looking
exactly the same. That's how watercolor works. Because there is wet-on-wet
technique here as well, you can't predict the results. The only thing that
is important is learning the techniques so
you can paint on your own. [MUSIC] Mixing a shadow color. I'm mixing it in a
very light shade so I can get started on
painting those houses. [MUSIC] Be careful when adding
the shadow color because you can very
easily add a darker shade. It will just ruin the painting because these buildings
are facing the sun, so they have to be
in lighter shade. I'm going to tell you when I'm
adding the darker shade so you now differentiate
between the two shades. Now, this is a bit darker shade, but not that dark. I hope you are getting
what I'm saying. Just add little bit of indigo or tallow blue so it will become a little bit darker than
the previous shade. I'm going to wet the road area with clean
water now so I can get started painting
the road as well. I'm using my Etsy love block
Number 14 brush for that. Zinc two shades. Just like I have used, these two shades ready
to paint the road. The burnt sienna, as well
as the shadow color. Not final yet, we're
going to have to paint another layer for the road. Now I'm using indigo. I'm just going to
paint a few details. Now, one more layer
of shadow color, but this too is not final. We're going to have
to paint again. You guys, if I'm using
darker shadow color, I had just added indigo color to the already existed shadow
color to make it a bit darker. I'm adding it to
these shaded areas. These two sides of the
houses are in the shade. The direct sunlight is
not falling on them, so they have to be in
darker shadow color. The same shadow color, I'm going to just go in
there and add a few details. We'll use indigo color and we're going to finish
these doors and windows. I'm going to take forest
green color now and I'm going to finish up painting the
foliage in wet-on-dry. But I'm going to paint
only on the left side. I'm going to leave that
foliage in the middle and on to the right side alone. I'm not going to
paint wet-on-dry technique there
because they're in the background and we're
going to have to add details only to the foliage that
is on the foreground. Take the shadow color. You
are seeing these two blocks. The one that is facing you should be in darker
color, shadow color. The other one should be in
the lighter because sun is falling on that side
and not on this side. Same applied to those
houses as well. I'm using shadow color and I'm painting lots and
lots of details. When I say we are painting
lots and lots of details, it means that we are at
the end of the painting. It's just like shopping. At the end of it, you're just going to throw
whatever you see in your cart. It's just like that, it doesn't make sense. You just have to act
on that impulse. We're going to paint one more layer of the
colors to the road. I'm just going to add darker shadow color
and then indigo color, light indigo to make the road look shaded at the foreground. The background is
lighter if you absorb. The sunlight is falling there. The foreground is covered in the shade because
there are lots of houses on the foreground. I hope I'm making sense because I'm just explaining how
the light works here. I enjoyed painting
today's class project. I'm going to see
you guys tomorrow. Thank you so much for watching.
13. Class Project 10: Hello, guys. Welcome
to class project 10. I have saved the best for last. This is actually the
first one I have experimented with
the faster project, but it came out so good so I thought I would
keep it at the last. The picture of the final sketch is available
in the reference tab below. As always, please go through it to sketch out your own pace, I understand it to be difficult
to paint along with me. I wanted to go for a very
simple sketch at the beginning. Like I said, this was
the first class project, but I ended up going for very complicated
reference picture. I had to adjust a lot of things from picture
to the painting. That's why I'm not showing
you guys a French picture because there is
nothing similar to it. When compared to all
the class projects, this one can be a
little bit complicated, there are a lot of
steps to follow, so that's one of the reasons why you have kept
this for the last. You have already got
the practice painting all those nine projects so it'll be easier for
you to paint this one. As you can see, I cannot make up my mind on what the sketch from
the reference picture. This was the class project and the first experimental also, so that's why the sketching
part is a bit messy. Again, my suggestion
would be to directly go for the final picture
in the reference staff. You don't have to
see all this mess. I also want to let you guys
know that I appreciate you joining me for this 10
day watercolor practice. I have received so many
messages and there are so many reviews
for this class, I appreciate it so much. We're done with the sketching, so I hope you guys have
your color palette ready. We're going to get started
with the first step. I'm using my silver black
or red number 14 brush and I'm wetting the sky
area with clean water. Don't wet the lantern just wet the background
area, that is, sky. I'm using Polo blue to paint the sky. I have to add one more
layer to the sky, which we have never done in
previous class projects, but this, we're going to
have to add two layers. I'm going to walk through
it when that step comes. But for now, paint
with Polo blue color. Now, once the sky is done, wet the road area, add shadow color to the road. I'm going to let this one to dry completely before we move
on to the next step. Since the paper is completely dried, wet this building right
here on the foreground with clean water and later, we're going to add
green color foliage and red color flowers using
wet-on-wet technique. I'm going to first use forest
green to paint the foliage. I'm going to use
French vermilion, which is the red color, to paint the flowers. Now, I'm going to take shadow color. I'm going to just add a few
details to this building. Now, take burnt sienna color and we're going to paint
the roof of this building. Add shadows under the roof using the shadow color. Instead of using indigo, I'm using a mix of Phthalo blue and forest green to
paint this door right here. Paint a few details at the wall and in-between the wall and
the road using indigo color. While this building is drying, we're going to move
on to the next one. I'm using shadow color, but I'm using very light
shade of shadow color. Do not use the dark shade. Using the same color that I've used to
paint these doors, I'm going to finish up
painting these windows. Now paint the roofs of these
two buildings right here. This is the one and there is a house in the background as well in-between
these two buildings, we are going to paint the
roof for that building also using burnt sienna color. I take the Phthalo blue
color and I'm going to paint the small detail you see at the edge of this building,
the one in the middle. Indigo color, I'm going to add details
to these windows. Time to add one more
layer of the shadow. Make sure painting this border of the road as well
using indigo color. Comes the interesting
part and I think this is my favorite step in
this class project. I'm adding the shadow for this building using
shadow color, of course. A few drops of burnt sienna, wet-on-wet like we always do. Now add indigo color to the shadow color
to make it seem darker than the previous
buildings that we have painted. Add green color foliage while
the paper is still wet. While everything is drying up, I'm going to use indigo color to finish up painting
this lantern. Using the same indigo color, I'm going to paint
a few details. Again, use indigo color to
paint this detail as well. Green color to paint wet-on-dry
of this detail here. Now add one more layer of the dark shadow color
for this road here. Use the same color that you
have used to paint the road in order to add
one more layer to the sky like we have
discussed at the beginning. This step concludes our
expressive cityscapes class. I hope you guys had fun painting all the 10
class projects and I really appreciate
you guys joining me because I have taken a long break and
then I came back. You're still here supporting me. Thank you so much for that. I'm going to see you guys
very soon in my next class.
 Sukrutha Jagirdhar, Watercolor Artist I Creative Entrepreneur