Transcripts
1. Welcome To The Class: Step into a world where
artistry meets nature's mystic. Welcome to Watercolor,
Misty Forest Masterclass. In this immerse you journey, I invite you to explore
the captivating allure of misty forest through
the medium of watercolors. Hi, my name is, I am not
just your instructor today, I'm also your fellow traveler
in this artistic journey With six years of
dedicated experience as a watercolor artist, four years of teaching
under my belt, I have had the
privilege of guiding talented students from
all corners of the globe. Throughout my career, I
have been captivated by the ethereal beauty
of misty forest. In watercolor, I realized
I'm not the only one. Misty forests have
long been a source of inspiration for artist poets
and nature enthusiasts. The interplay of
light and shadows, the ethereal quality of the atmosphere and
the subtle colors. All these elements make misty forest a dream like subject for
watercolor painting. This master class is designed to provide you with an in
depth understanding of misty forest scenes
and equip you with the skills to translate
this magic onto your paper. Class begins with discussion about materials
and color palette. From there, we will discuss the range of
techniques tilored for capturing the essence
of mystery forest like composition values, Ton, wet and ton,
right techniques. These techniques are the
foundation upon which you can build your skills and create
compelling watercolor, mystery forest
paintings on your own. With this newfound knowledge, we will get started with
the final class project. And it is divided into
three captivating steps. Ground pines, midground pines, and the foreground pines. Guiding the main class
project helps in enhancing the learning process and understanding the
complex techniques. Are you ready to pick up your brushes and dig
them into a world of watercolor and create a
masterpiece called Misty Forest? Then let's get started.
2. Class Overview : Thank you for choosing to
join me on this class. Here you will unlock
the secrets to creating stunning mystery
forest landscape that come to life
onto your paper. We will begin the
class by talking about all the art materials
that you're going to need to get started every new skill. Techniques are very important. Techniques are foundations upon which you can build
Ron skill and create Ron masterpieces,
create mystery forest. You're going to have to
learn four main techniques, composition and value control, Ton, wet, ton, dry technique, layering, and the final one. But the most important practice, composition is about crafting a compelling landscape
that draws a weaver's eye. Teach you all the secrets
about composing a landscape. We move on to value control, where we discuss
about all the values of the color and why
we need the values. Later we discuss Ton, Wet and Tony techniques
and then layering. After learning a
bit about practice, I'm going to tell you
why we need all of these techniques and when to use these techniques to create
a landscape as well. Do not miss the
techniques section. Later we move on to
main class project. We're going to paint this class
project into three parts. Background pines, midground
pines, and foreground pines. With that, we will conclude
the class project. Throughout this class,
you will not only capture the serene
beauty of mysty forest, but also gain the
confidence and skills to embark this artistic adventure
in the future on your own. In the next video, we're
going to discuss about the materials that
we're going to need. I'm going
to see you there.
3. Materials : Let us begin talking about the materials
we're going to need. First, I'm going to
talk about the paper. This is arches, 100%
cotton, 300 GSM paper. It doesn't matter the brand, but make sure you have 100%
cotton, 300 GSM paper. Because the misty forest painting that we're going
to be painting today, we have to paint it in layers. You can just see there are three layers here to paint that. We're have to keep
the paper wet for a long time and we also need a paper that soaks up
all the paint and water. That's one of the big
reasons why I always go for 100% cotton even though
it's quite expensive. Yeah, this is a watercolor pad. You can buy these papers
in rolls as well. Coming to brushes, I have
used a total of four brushes. These 42 of them are round brushes and they're
from silver, black velvet. One is size 14, the
other is size six. I have used these two brushes to paint the sky
and the pine trees, but mostly the pine trees that are painted
in the background. That is the pin that
are painted wet on wet. These round prushes are
really helpful for that. Coming to these two, these
are Davinci rigger brushes. They are very sharp
and also very thin. You can paint detailed
subjects with these. I paint the wet on dry pine trees that
you're seeing here. This one I have used
to paint tiny details, that is the birds. In this video, I'm not
going to be swatching out the colors because in the techniques video
that is coming up next, we're going to be
talking in length about these colors
and the values. This video I'm just going to be talking about the
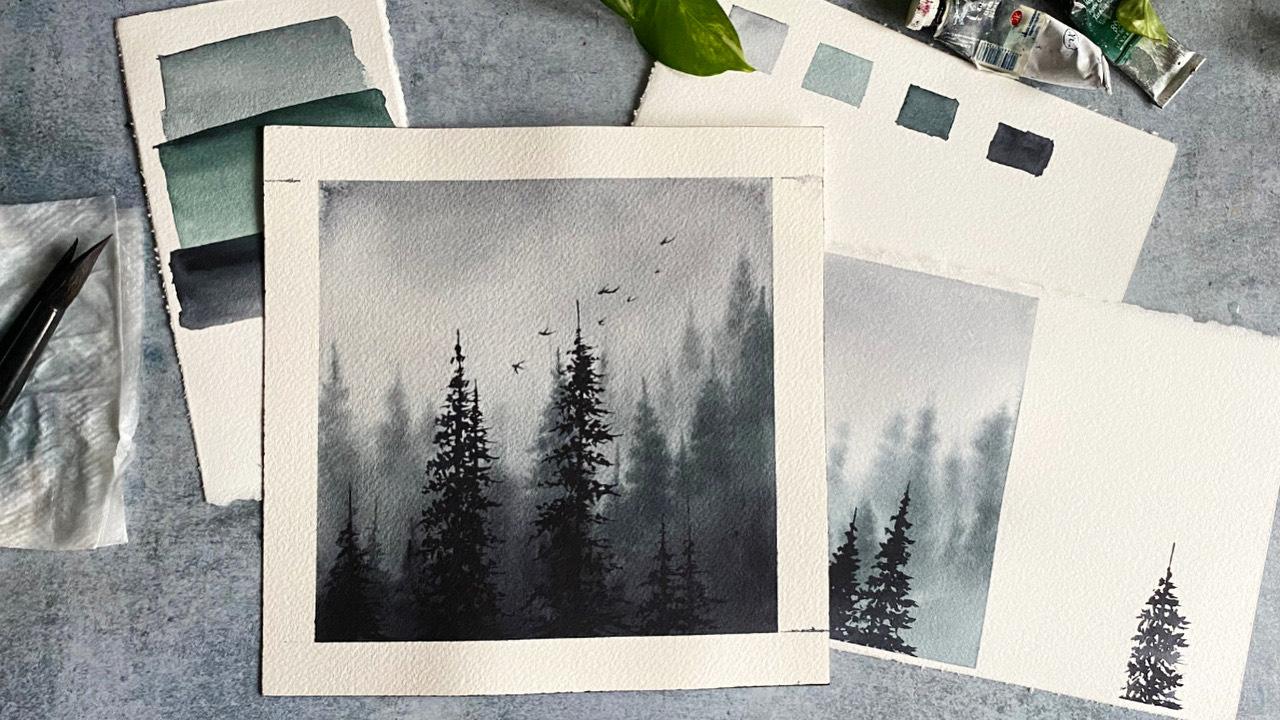
colors that I've used. I've used forest green
from Seneliar pines, gray from white nights. With these two colors, I have created
these three values. We will talk about
all of that in the techniques video
Value control. We're going to talk about what our values and why
we need them and how to incorporate these values in a landscape to make
it look more lively. Other materials
include paper towels. These are very important. We usually use this to dap our brushes and
to control the water. And then a palette. This is a ceramic one. I have also used another
ceramic palette. I have at least six ceramic
palettes with me right now. But you can use any of the
palette that you have, a water jar to
contain the water. Of course, that is all about the materials
that we're going to need. In the next video, we're going to talk about
the techniques, so I can't wait to get started. I'm going
to see you there.
4. Techniques: In context to watercolor, painting techniques refers
to various methods and practices used by artists to manipulate the
watercolor on the paper. These techniques encompass
a wide range of skills and action that allow you to
achieve various visual effects. There are so many
techniques in watercolor, but for today's class, we're going to be learning these four technique is
about composition. It's basically about
planning a landscape. Second is value control. We're going to talk
more about this. Next is ton wet and
ton dry techniques. You might have heard these techniques if you're a
beginner in today's class, we're going to practice
these and there is a small tutorial on how to
paint a pine tree as well. The fourth one is practice The most important
of all, isn't it? From the next videos, we're going to get started on practicing these techniques.
5. Composition & Value Control : First video of technic section. We're going to talk about
composition and value control. There are two types
of composition. One is regarding the color, The second is placement of trees strategically to
capture the ever's eye. We're going to talk about
both of these compositions. In this video, I'm going
to first talk about the composition of the trees
and the birds, the sky. And how to incorporate all of these things to enhance the quality of the
mist and the forest. First thing is to ask yourself before starting a
misty forest scene, is what type of mood
you want to create. What type of emotions you want
to evoke in your viewers. Is it a morning mist
or a rainy scene? Once you decide the mood, every other thing, like color, palette, layout of the painting will flow to you naturally. Second thing is to decide
on the focal point. Determine where you want
the viewer's eye to land when they first saw the
landscape in a misty forest. The focal point usually will be a single tree or a
couple of trees, which are painted in a
very detailed manner. As you can see, we have
those in this painting. Third thing is layering layers. Create depth by dividing the
landscape into three parts, background, midground,
and foreground elements. As you can see, we have that
in this landscape as well. We're going to talk
about layering in the coming videos
very clearly. And that is all about the composition of
a misty landscape. You can use these
things to create your own misty landscapes if you don't have a
reference picture. If you have a reference picture, make sure it has all of these things that
I've just mentioned before and you can make a
perfect misty forest landscape. A while ago we have talked about layers and how layers are
used to create the depths. Well, to create the layers, you need different
values the same color. As you can see, there
is a light green, a little bit darker
green, and pins gray. These are called values. Since this video is also
about value control, I'm going to talk about it now. Let me take the colors first. I did not use green
separately for this video. I have always mixed it
with a bit of pins gray. You can say this
is a single color, the mix of pines,
gray and green. You can also call it a
monochrome painting. Completely forgot to
mention the colors. The green color is forest green, from seneliar pines,
gray from white nights. There are totally
four colors that you see in this P values. I'm sorry, this is not color, these are values
of the same shade. This is very light
pine gray that I have used a lot of water
and very less pine gray. This color you can
see in the sky. Next shade is a little
bit of green and a little bit of pines
gray and lots of water. This creates a very light
shade of dark green color. You can say you can see this color in the far
background, pine trees. We are creating the value for the pines that
are right here. They're a bit darker than
the pines that are behind them and lighter than the pines that are
here in the front. I have used a little
bit more of pines, gray and green, and
very less water. In the previous value, we have used the same
combination of pines, gray and forest green, but we have used lots
of water for this. We are using less water
and more pigment, Hence the value is
looking darker. Now I'm going to be
using only pines, gray and not green to paint the final value that
is the darkest value. This is used to
paint the pine trees in the foreground
and also the birds. This is how the values of the color are used to
create the depths. You can also say the values
are used to create layers, which in turn gives the
depth of a misty landscape. It's always advised to swatch out the values before
painting the main landscape, to paint your layers correctly. Before we wrap up, let's talk a couple of
things about values. Adding water to the same color
creates different shades, and those shades are called
values of that color. Adding these values
in layers from light to dark create depths
in a landscape. Which is very important
for us since we are painting the misty
forest in layered manner. I hope you guys
understood the concept of composition and
value control. In the next video, we're
going to talk about a little bit easy subjects that is ton wet and
wet on dry techniques. I think you guys
are familiar with those techniques and I'm
going to see you there. Thank you so much for
joining me so far.
6. Wet on Wet & Wet On Dry: Let's talk about watercolors, most important
techniques, wet on wet, and wet on dry techniques. But first, let's
talk about this. I'm holding the
final class project in my hands and I'm going
to ask you a question. Can you tell me what
difference can you make out between these two trees
and these two trees? Well, the first thing you can say is the color difference. But aside from that, what you can say is background
pine trees are not very detailed but the ones
in the foreground that the pine trees in darker, in shade are very
clear in detail. The pine trees that are light in shade are done in wet
on wet technique. The ones that are
darker in shade are done in wet
on dry technique. In this video, we're going to talk about these two techniques and why we are going to be using these two techniques to
paint the misty forest. I'm using the same colors I
have used in previous video, and I'm going to get started
by wetting the paper. First, I'm going to
tell you a little bit about wet on wet technique. Wetonwre technique is applying wet paint onto a
wet paper surface. This technique is
excellent for creating soft edges and
blending the colors. And also achieving
the misty effect for our forest painting. First, I'm going to get
started by painting the sky. For sky, I'm going to be using very diluted
shade of pines, gray like we have done
in previous video. I'm going to take
my smaller brush and while the paper
is still wet, I'm going to be painting the pine trees in
the background. Since this is wet
on wet technique, the details of any object, in this case the details of the pine tree will
not be very detailed. As you can see, the brush is wet and the paper is also wet. Just paint the shape
of a pine tree. You don't have to paint a
detailed pine tree here. Remember, this is wet on wet
technique and you have to work faster before the
paper gets dried up. Pine trees are not very detailed and that's
exactly what we want, since these are in
the background. Now I'm going to blend the
rest of the paper with the same color while
the paper is still wet. I'm going to be taking a little bit darker
shade of green. We have studied this
in previous video. Under values, I'm going
to take that color. I'm going to paint one
more layer of pine trees. Keep in mind my
paper is still wet, it's getting dried up. I have to work faster if you're already familiar with ton wet and wet on
dry techniques. This class project
will be easier for you to get a hang off if you
are a complete beginner. This technique will
take a few trials, a few tips that I can give
you 100% cotton paper. It is very good with soaking up the water and keeping the
paper for a long time. That it'll give you plenty of time to paint all
of those layers. We are done painting the pine trees that
are in the background. This is also end of wet
on wet technique as well. Now we're going to keep
the paper for drying and later we can paint the pine trees that
are in the foreground, the darker ones, which are
painted in wet on dry. Now my paper has dried up. I will get started on painting these darker shaded and
very detailed pine trees. You can see this is
wet on dry technique. That means my brush is wet
and the paper is dried, Hence, it is called wet on dry. I'm going to tell you a
little bit about wet on dry. While we are painting
this pine tree, you see wet on dry technique is painting with minimal water
and paint on a dry surface. This technique is
perfect to paint precise and fine details like tree branches
or any texture. For example, in this project, I have used ton dry to
paint the birds as well. Both of these techniques, ton wet and ton dry, completes a watercolor painting
no matter the subject. By the way, you can
also take this video, this particular video, as a tutorial for
painting a pine tree. To complete this
little painting, I'm going to be painting
one more pine tree. This is Ton Dre technique. Well that is it. This is the tutorial about wet on wet and wet
on dry techniques. If you are a complete beginner, please make sure to practice
these two techniques. Two techniques
will not only help with today's class project, it will also help you in further your
watercolor paintings. I think I'm going to
paint one more pine tree. Since I have told you guys
that this is a tutorial, I thought I would explain
the pine tree as well. It is very simple to
paint a pine tree, especially when
it is wet on dry. Just take your brush and paint. Draw a straight line and move your brush
in a zig zag manner. Of course, your pine tree will not look exactly like this, because this is my style that I have cultivated
over the years. When you practice a subject
a lot of times over the years you naturally create a different
style for yourselves. And that is what's
happening here. And that is also why you see so many artists painting pine
trees in different ways. If you practice the pine tree that I have told
just before, I mean, draw a straight line
and a brush zig zag manner and if you
practice it enough, you can create your own style. This is my small tutorial
about how to paint a pine tree and that is also end of this
techniques video, wet on wet and wet
on dry technique. In the next video, we're
going to talk about layering. So I'm going to see
you guys there.
7. Layering: In this video,
we're going to talk about another technique
called layering. Layering technique
in watercolor is all about applying multiple
transparent washes of color and allowing each layer to dry before adding the next. This painting that is
painting in layers, brings so much depth
to the landscape. Watercolor painting,
these layers are shown by adding different values of the colors or different
sides of the colors. We have talked about this in our first techniques,
Value control. Layering is a very unique
technique in water color. Why? Because the water colors
are transparent in age. It doesn't matter how many
layers that you paint. For example, I have painted three layers for
this class project. You can see it does not
look overworked or muddy. It's because the layers are
painted very carefully. One important thing that
you have to remember is before painting
the second layer, you have to let the
first layer dry. Before painting the third layer, you have to let the
second layer dry. This is very important while you go for
layering technique. That is it about layering. I hope you guys practice layering techniques before
you move on to class project. In the next video
we're going to talk about observation and practice and why it is very important while going for advanced
misty landscapes. So I'm going to see you there.
8. Observation & Practice : For a student to
master a new skill, it is important to observe
and practice the techniques. First, talk about
the observation and what you have to observe. Whenever you see a
misty forest scene or a misty forest picture, pay close attention to the light and understand how the light is
affecting the mist. Where the light is and
where the mist is. This observation
helps you capture the essence of forest
very accurately. Let's talk about practice. We have practice so far about
composition value control, wet on wet and wet
on dry techniques, and we have talked about
layering techniques. Regular practice is very essential to hone your
watercolor skills And also it'll help you to develop a personal style like
I've discussed before, that is, I have told
you guys that I have my own style of
painting, a pine tree. You can get your own personal
style only if you practice consistently practicing the techniques that
I've taught you. And after practicing the
class project as well. I have included a few
reference pictures of misty forest in resources below. Please go through that file
and pick any of the image and practice and later
you can move on to finding your own references and practice them and
paint them as well. That is all I hope
you guys ready to jump into painting
the main class project. I'm going to see
you there. I'm very excited about this part.
9. Sketch: This video, we're going to begin the process
of class project. Before we begin our watercolor,
misty forest landscape, it's crucial to create a sketch, But I'm not going to be going too detailed with this sketch. Why? Because we have talked about a technique
called composition. We only have to decide the
placement of background, midground, and
foreground elements. In this case, those
elements are pine trees. Remember that a sketch is a blueprint for your
watercolor painting and a well thought
out sketch will guide you throughout
the painting process. In this case, we
are not going to be going for a detailed sketch, we're only positioning
our trees, which is more than enough to
paint a perfect myst scene. We will begin the process from the next video. I'm
going to see you there.
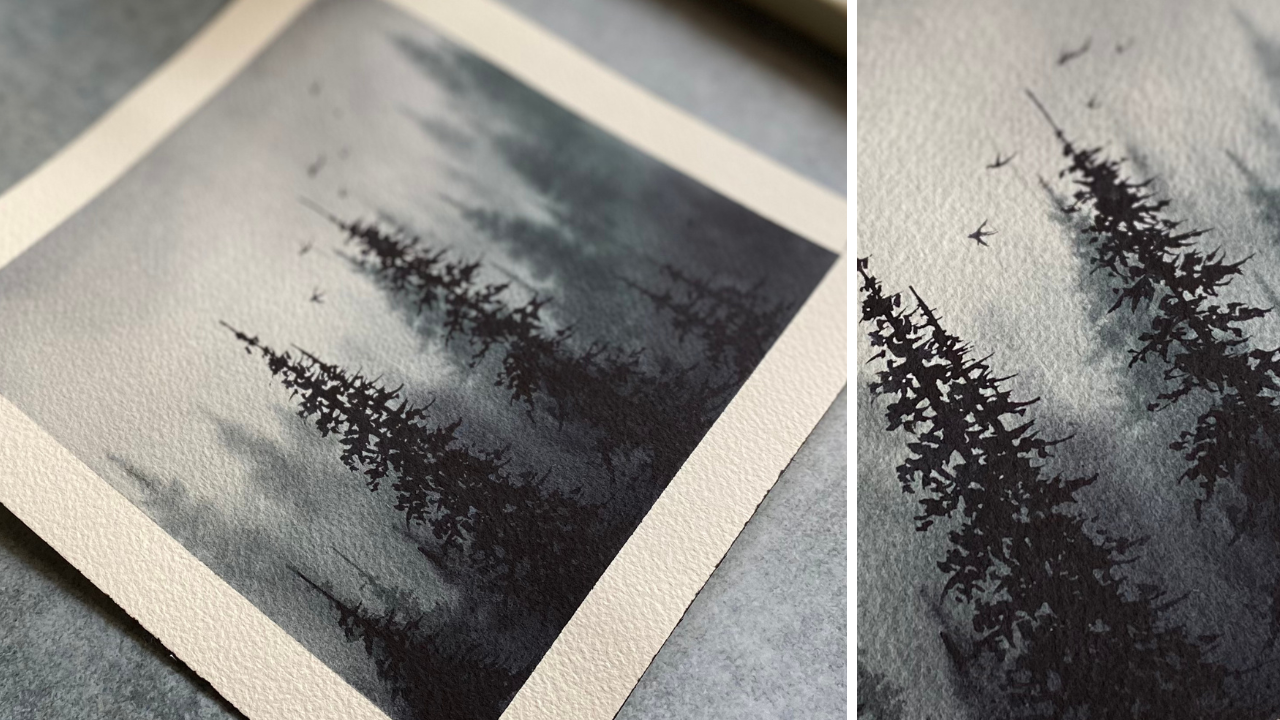
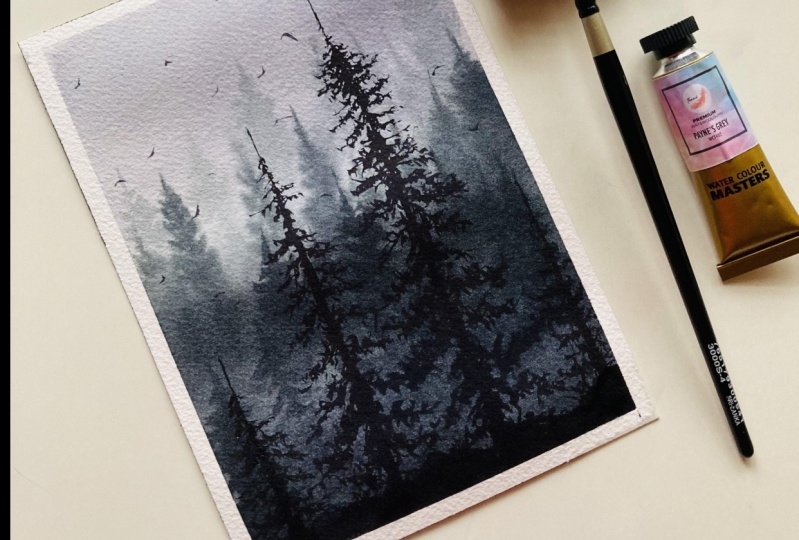
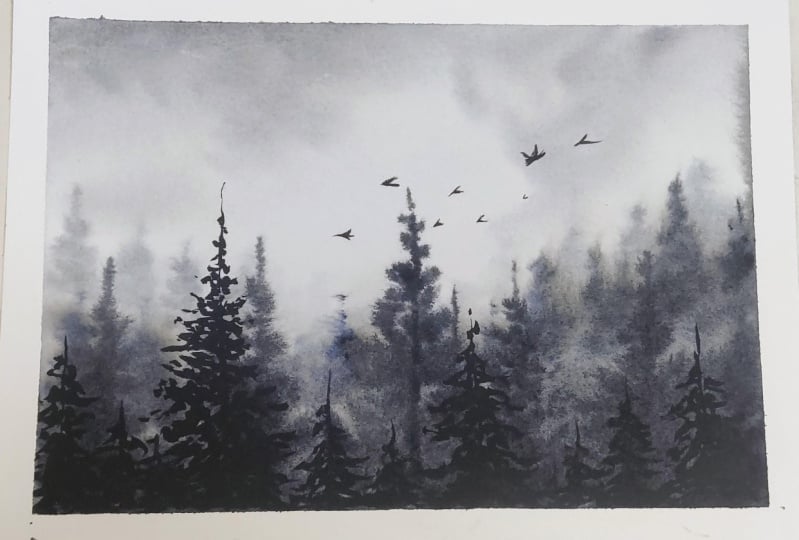
10. Background Pines: The misty forest landscape, the background pine trees play a crucial role in establishing depth
and setting the mood. These trees are far, test from
the viewer's perspective, completely covered in mist. We will begin by wetting the
paper completely with water. Here I'm using a flat brush
for wetting the paper. You can use any brush that
you have for this purpose. Am I applying water and wetting the paper
before painting? If you are a complete
beginner, let me explain. I'm applying water to the paper because I'm going to get started with wet
on wet technique. Remember, we talked about
this in techniques section? And this technique
involves applying watercolor paint
on a wet surface, allowing the colors to blend
very easily and flow very softly to applying water. Your paper should be looking
something like this. Let us start painting
the sky first. And remember, during
value control, we have talked about taking very light shade for applying the skies in
cities in the background. And it should be light in shade. Take this cloud like shape with your to give texture to the sky. Blend with the
rest of the paper. Hit the back flow of the paint. It's important to remove excess water around the
edges using a paper towel. I'll take the small
brush and we're going to get started with painting
the background pines. I'm just going to blend these two colors to create a very
light shade of green. We have seen this
in value control. This is the second shade. We need light shades to
paint the background pines. We have talked about this in
layers and in composition, but I'm going to explain again. I'm going to start
painting the pines, these are done in wet
on wet technique. I'm going to also
explain why we need wet on wet technique for
background pines also. Okay, background pine trees are usually characterized by
their faint appearance. They should appear distant
and softened by the mist. To create this effect, we have
to use very light shades. We have to also use wet on wet technique to create
those soft blended edges, which also mimics
the effects of mist. We're also not going into detail and we are keeping
the level of detail minimal because these
trees are about creating a sense of depth and atmosphere rather than
detailed pine trees. Is going to blend the edges of the pine trees with my
brush. This is wet on wet. We have to work faster
Before the paper dries up, I'm going to create a few
more distant trees here. Only thing that you have to
do here to keep the shape of a pine tree is just add pointy edges at
the tip of the trees. Using a small brush here
I'm using a rigger, I'm going to take a
little bit darker shade. That is the third shade in value chart we have drawn
in technique section. Your paper should be looking
something like this. Not too wet and not too
dry either. It's damp. Now, I'm going to paint a few pine trees with a darker shade that is the
third shade in value control, you might call these
midground trees. But I'm painting these trees in background trees
section. Why? Because 0.1 being these pines, should be painted in
wet, on wet technique. Only if I wait for the background pines to
dry, we have to, again, wet the paper and paint these, but my paper is damp enough, so I started painting
the midground pines. 0.1 is a simple explanation. 0.2 a bit complex. 0.2 is we're going to be painting a midground
pines in the next video, but they're a lot more textured and a lot
more darker than this. You can say these pine trees
that I'm painting right now are somewhere between
background and midground. You can see the clear
shape of the pine trees. Now that means the
paper is drying and that also means for
us to stop the process quickly, add a couple of them. Here it is, all for background
pines section, You don't have to keep
the paper for drawing, we can just continue the
process. In the next video. There we're going to paint the midground pines.
See you there.
11. Midground Pines: I think the paper has dried
up faster than I expected. I figured I would ret
the paper once again. If your paper is
completely dried up, you can carry on revetting
like I'm doing here. But your paper is
somewhere around damp, so you have to wait a couple of minutes and make sure it's completely dried before
you ret your paper. You guys would be knowing
that if we ret the paper, we're going to go for
wet on wet technique, that's what we're going
to be going to paint. The midground pines, I'm going to be taking the same
color that I've taken to paint the pines, the
midground pines. That is the third color
in the value scale. I'm just going to drag
this paint towards the edge of the paper and
just blend with the pines. This is wet on wet.
We're not going to be going for a
detailed pine trace, that's why I'm just painting the faint pines here towards
my left of the paper. Darken the edge of the paper. You have to bring the contrast between the sky and the ground. Let us adjust the
tonal difference between these pines that
are already dried up. We have painted
in previous video and the color that we have
just applied on the paper, all you have to do is spread this wet paint onto these dried up pines like
I'm doing right here. It'll adjust the tonal value you're at it. Let's add
one more layer to the sky. The same light
shaded pines, gray to sometimes go on redo things that you have already
done before you. To adjust the tonal difference between the two
contrasting colors, I'm taking the darkest color
of a mix of green and pines, gray, and I'm painting
the midground pines. Now this is going with my intuition here. I figured I would darken
it a little bit more. So that's what I'm doing here. And I'm going to paint
a few more pine trees as well before the
paper gets tried up. Looks perfect, isn't it? So we're going to let the
paper dry completely. In the next video,
we're going to be painting the
foreground pines. For that the paper has to be completely dried
because we're going to be going for wet
on dry technique. So I'm going to see you there.
12. Foreground Pines: Paper dried up, let's start
adding the foreground. Pine trees going
to use only pines, gray for this, the
darkest shade in value. Control that value chart we have drawn using Davinci
rigger brush. For this, we are applying wet
paint on the dry surface. That means we are using
ton dry technique here. Why we are using wet on dry technique to paint
the foreground pines? Why not wet on wet?
Let me explain. One, dry technique in
watercolor involves applying wet paint
onto dry paper. Like we have discussed in
technique section video, this technique is ideal
for creating fine details, sharp edges and precise linings in our watercolor painting. Why? Because when you
paint on dry paper, the pigments tend
to stay in place, resulting in a well
defined shapes and structures Foreground. Pine trees are the closest
and most prominent elements in our misty forest landscape. They serve as the focal point drawing the viewer's attention, which is also why we are using the darkest color to
make them stand out. Going for foreground, pines, we are creating a
strong contrast between light and shadow. The backgrounds are light in shade to emphasize the distance, and the foregrounds
are darker in shade to emphasize that they
are closer to the viewer. Well, as we are talking about ton rye and
foreground pines, it is also important for you to notice how I'm painting
these pine trees. I've had a short tutorial in one of the techniques section about how to paint a pine tree. Strongly advise
you guys to paint at least two to three
pine trees on your own before painting them
onto your class project. We paint the second pine tree over here, the same process. Painting a pine tree with watercolors involves
a few key steps. I'm going to explain
a bit about them. First, you need to take a
sharper and thinner brush. We're actually painting, observe a pine tree from a
reference picture. Use quick, short and upward strokes to mimic the
appearance of pine needles, just like I'm doing right here. Leave small gaps between the stroke to suggest the
natural gaps in the foliage. You can see I'm leaving
the gaps here as well. Let us complete painting, the bottom part of
these two pine trees. I'm gonna paint a couple
of pine trees on my left. I'm going to paint a pine tree very closer to this one
that I've already painted. I'm going to place a paper towel here on the
paper to support my hand painting the pine tree with the same process we have
just discussed before. Add a few strokes at the bottom to finish up
this pine tree as well. I'm going to paint
this small one on my right because it
was looking too empty. Let's paint one more. I'm now going to
take the ricker and I'm going to get started
on painting the birds. Birds are very simple to paint. Only a couple strokes
and they bring a lot of character to a
mystery forest landscape. Yeah, done painting the
misty forest landscape. Remove the only when the
paper is completely dried up. Our mystery forest
watercolor adventure has reached its conclusion. But I hope it's
just the beginning of your artistic journey. In the next video,
we're going to talk a little bit
about how you can pursue everything you have just learned today in your future
projects. So don't miss it.
13. Conclusion : As we reached the
end of this class, I want to express my
profound gratitude to the students who have decided
to join me on this class. Together, we have ventured into the heart of
mystery forest, explored the depths of
watercolor techniques, and most importantly, uncovered the incredible treasures of creativity within
each one of you. Throughout our time together, you have not only hone
your technical skills, but also discovered the magic
of expression through art. We have discussed,
practiced and painted a very important
watercolor skills and techniques like
composition value control, wet on wet, wet on
dry, and layering. Then we have moved
on to creating a beautiful class project today. Before we conclude, I want to share an exciting
resource with you to ensure you have
all the tools and references you need for your
future watercolor journey. I have created an in depth ebook dedicated to painting misty
forest in watercolor. This ebook is your
comprehensive guide featuring step by
step instructions, detailed techniques,
and plenty of visual references to help you continue exploring this subject. You will find this ebook packed with tips, additional exercises, reference images,
and a wealth of inspiration to keep your
creative juices flowing. To access your ebook, simply download it from
the resources tab below. If you have completed
your class project, please upload it in
project section. And if you have any doubts, please start a discussion. And I will be here to
answer your questions. Thank you for being
a part of this and I look forward to seeing you
guys in my next class. Till then, keep painting
and keep creating.
 Sukrutha Jagirdhar, Watercolor Artist I Creative Entrepreneur