Transcripts
1. Intro: Charcoal. It's dramatic,
unpredictable. I crumbles under
pressure, just like us. Hi, I'm Roberto, and welcome
to Loose Charcalsketch. The course where we make
ball marks, smudge freely, and occasionally win
the battle against the blank page. Not always. We're gonna explore
line, texture, value, keep it loose, but structure at the same time. Perfect lines? Overrated.
Expressive strokes. Now, that's a good stuff. Whether you're brand new to draw or just tired of
being too careful? You have my permission
to loosen up. We're gonna keep it short,
simple, fun, loose. We're gonna use a bunch
of different tools. Oh, and I may or may not show you how to
keep it off your face.
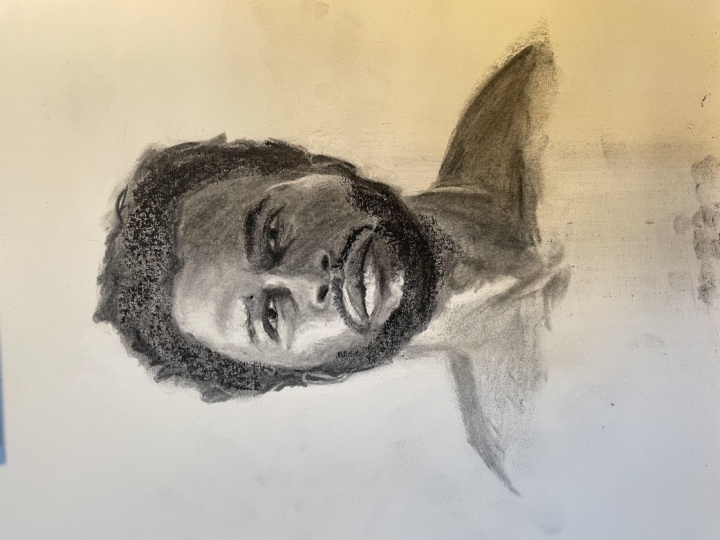
2. Block In: Ready to get your hands
dirty a little bit. Charcoal is one of those things that it's really fun to use, but it gets dirty.
It gets everywhere. It's all over my chair,
all over my couch. But it's fun, and I love it. So let's get started. Sometimes when I start
with a new stick, I just break it down
into two pieces, depending on how long it is. I just easier to handle. Sometimes I'll just
start using it as yes. Or sometimes I'll grab one
of these sandpaper things, and I make sure I get a little
bit more of a point on it. Make sure I have a
paper towel next to you so you can What about the Xs so I got a
little bit of a point here. So on the blockout
for the drawing, we're going to keep
it real simple. We're going to start by
making a mark where our top the top of the head
is going to be and making a mark for the chin. So now I'm going to try and
fit the face right here. I mean, it's going
to be dimensions are going to go
over a little bit. It can be perfect, but it's
just to get a rough idea. After that, we're going
to start by kind of guessing what the
outside of the face, outside of the head is. Again, this is going to change. When I block in the neck it to so it's not a floating head and it reads
more structurally sound. Maybe blocking the cast
shadow under the chin. Now before going further, I like to establish where my
eyebrow line is going to be. That's more or less. This is probably going to
move up a little bit. So let's just wipe it
down with our fingers. After that, I block in or establish where the
center line is. I. And after that, I make a mark for the
bottom of the nose, not the tip of the nose, but the bottom where the nostril meets the face, basically. Doesn't need to be that dark? Little corners for the eyes. Eyebrow, eyebrows
gonna go around here. This is going to go
in a little bit. I'm gonna re
establish this side. Because now that I
have more information, I can make a more
educated guess. It's all guesses, really. You're guessing, but
the more information you have you put down,
that is correct. The better your guess
is going to be. See, like this is
in the wrong spot. It's gonna be more like here. Bucking that shadow. Don't worry if you
make any mistake I Charcoal juice
just wipe it down. You just wipe it off. Kind of guess where the mouth is, the corner of the mouth, the corners of the mouth, squint to compress the values go in and kind of start blocking in the
shapes of the shadow. They're going to help me find the structure of
the chin area here. I go and just blocking all
the shadow shapes I see. I just squint a lot of the
details going to disappear, and it's going to make
it easier for you to break this down
into just two values. That's what I'm doing. Breaking
it down to two values. Can guess what that
eye and eyelash is connect your shapes, always connect your shapes. You end up with a better joint, better painting if you
connect your shapes. I need to figure out
what the ear is. It's a little bit of
a tilt on the pose. So your ear is going to
be lower than your eyes. But to find it, first, I need to find where
the side born area is. The distance between
the hairline and the eye is really important. So I'm going to
make a mark there. I hope it's right, goes down. You can also use your
charcoal stick to get an angle to be a better idea where that top
of the ear is going to be. Little show for the ear, close the neck right here. That's pretty good guess
in the beginning, I guess. A little bit of that hair. Looking the shape of that hair. Now that the ear information, I can go ahead and
block in the back of the head to give this more mess. So it looks like she's
got the cranial shape. Close up. Okay, now I can grab a little smaller piece and blocking the dark of the hair. Close this blocking
the shadow shape. Don't be afraid to make
your abstract shapes marks. I think that's pretty good
for a loose, quick blocking. Okay, we're back.
3. Smudging: I took a little break. And now that I'm looking at it, I think we can go ahead and start messing around
with the charcoal. In the beginning,
I usually just use my finger to wipe off the excess of the vine and to get a feeling of, like, the gradiation that
goes from dark to light. So don't be afraid
to lose your marks, your shapes because if
you found them once, you'll be able to
find them again. What I'm doing now is something similar
to when you squint. When you squint, your
values are compressed and a lot of the detail gets lost, and that's
what you want. So I'm doing the same right now. I'm getting rid of all
that initial detail I had. And what that is doing is
It's unifying everything. All the shapes, all the values. If you don't be afraid to lose that. You pay attention. Right now, if you look
at the reference, I'm using my finger in the
charcoal that's there already to block in some of the half tones that
I see the reference. Remember, I have a Peter tel. This one those shop Peter
tiles that are really durable. Wipe off the charcoal
from your finger. Okay, now we can go ahead and re establish
our shapes again. I think I may lose
this edge, too. This one too. Get some of that warmth. From the nose. This edge is a little softer. Try and save the white of the
paper for your highlights. So I'm going around it and trying not to touch
where the highlights are. Because once you go over it, it'll be hard to erase it all
the way down to the white. So let's try and preserve that. It's all finger drawing right now, playing with the shapes. And I think this is
good for this step. On the next video, we're going
to reestablish our shapes, our shadows and try and figure out if our tilt and
structure is correct. Okay, let's figure
4. ReestablishingShapes: If our eyes, nose and mouth are in the
right place right now. Let's start by reestablishing
this corner going down Mastro we establish that cast shadow. And this leads it kind of leads to the
corner of the eye here. Reestablish the eyebrow. I'm just doing the same almost the same thing I did
on the first video, finding the shapes, the shadows. But now I have more
information and I have some of the half tones
already established. So re establishing your shapes is just going to make
this stage a lot easier. And on the long run, it's going to make
a stronger draw closing down your shapes. You're kind of making a
capsule of all your shapes. Swing has to be a little wider. It's squin to see
which edges disappear. I think I can combine
this in this. Find the corner of
the mouth again. Corners of the mouth
are almost always lower than the center. Uh. I'm gonna find this angle
again. I had it wrong here. I think it's more like this. And then to the center. And I think that's
going to get me the till that I'm looking for. We still with that eye. As you can see, it's a
lot of back and forth. You find it, you lose it. You find it again. I'll probably end up losing losing it again. I think any more on this side. Okay, now I don't want to use my finger anymore
because if I do, I'm going to wipe off all these shapes that
I just re established, which I might end up
doing, but right now, I'm going to be a
little more careful and use one of these little stumps. Well, this is a big one, or
it's the biggest one I have. So I'm going to start by doing the same thing almost
the same thing I was doing with my finger, and that's kind of linking
all these shapes together. It's a great way to
get a softer edge. And if you want to
get rid of detail. Okay. Let's keep
going closest shape. So this is loose, right? But in order for a loose drawing to look good or
to be convincing, it needs to have a sense
of structure and form, and we're getting
that illusion of form by really compressing
the half tones, compressing the values, and trying to get a sense of where
the light is coming from. So I know the light's
coming from here, so it's dark over here, but there's a gradiation that goes over the face like this. Almost like an if
you're painting an egg, it's basically the same
thing, but I mean, it's an egg with
holes for the eyes, a nose and a mouth, right? But it's the same
thing. We want to get that gradation in this case, from left to right. We want to get that
first between before we go and work on an eye
for an hour or so. Okay, so that's okay. The next video, I'm going to use my razor to bring out
some of the features. Let's do a little bit more of this since I'm here already. Remember, if you found it once, you'll be able to find it again, so don't be afraid to lose
it to get rid of an edge or kind of blow out an
ear if it's not working. In this case, it wasn't working. I'm gonna have to go back to it. Okay, we're back.
5. Eraser and charcoal pencils: And before we start
using an eraser, Let's kind of establish
some of the shapes again. This cast shadow
is very helpful. This is going to help me find
the center of the mouth. So less right there. H h h you notice I got quiet
for a little bit is because I'm really thinking and paying attention to where I'm supposed
to lose an edge, lose a shape, combine
two shapes together. And that takes a lot of
processing power for your brain. And I don't like
doing voiceover, so I like to record myself live. And I think that gives
you a better idea of how I think and how my process has helped me develop this
up to this point. I don't know if that
makes any sense. So re establish
this shape again. So now Jo Jo now I find this little
shadow under the ear. And I think we found our ear
here. It's a sneaky one. They usually are when
you have a tilt and then it's a three
quarter angle til. She's looking that
way, so it's hard. So don't be afraid if you have
to draw it more than once. Okay, now, let's grab our
eraser and kind of Well, before we do that, I'm going to kind of compare the
values a little more. At this point, we're not establishing but refining
the placement of shapes, corners of eyes,
mouth, noses, ears. But I can do it in
different ways. I can do it with my charcoal. I can do it with my
finger or I can do it with the stump. And
that's what I'm doing. I'm just kind of smudging
shapes together until I find the right placement
of that edge or that corner. For instance, this eyelash is supposed to go a
little further that way. So I'm going to try and do it
with this tool right here. Use everything at your disposal. Okay. I think you found that I I start using my razor to develop the form
a little better. It's not just for highlights, but for modeling also. So I know by experience, when the lights coming
from this side, this area is going
to be lighter, but there's also a set of
highlights that go here, here, here, and then
a little bit here. So if you saw the
planes of the head, you're probably
familiar with it. Okay. I think we're
getting ready to move on to the next
lesson to the next video. Okay. We're
6. Slow down and establish darks: This is where we slowed
down a little bit. At this point, what I want to do is look
at the overall picture and be really critical of your placement and
structure angles and all that good stuff. I'm going to fix some of the shapes here,
some of the placement. And at this point, I think I can use any
tool at my disposal. I'm going to start
with the eyes here. I'm going to make sure
the eyes are lining up. So I use my eraser first and one and then the charcoal
and the other one. The video about these
kneaded erasers is that you can kind of shape it into
the shape that you want. If you want a flat, you want
a point, you can do that. The razor. Find that
white on the eyeball. Something cool
about this lighting is that it's coming
from this side, but it's not from above. It's from I think it's
from a little bit below. So a reference picture, if you think about the
overall egg effect, it's gonna be a
little darker here, so richer, darker half
tones than over here. And it's usually and portraits
is usually the opposite. Brighter over here, darker
over here, but not here. So it may throw you
off a little bit. Is just something
to keep in mind. ITF, I'm going to go in
charcoal and fix this shape. Do be afraid to blow on
the on the charcoal on the paper to blow off some of the remains
from the charcoal. Now, I can come in
with the finger, pull that edge off some here
and reestablish the shape. Can establish the
dark of this hair. And so I like to use is the
general charcoal pencils. I have different
different hardness. I use the hard, the medium, and the soft. The hard one is great for adjusting your values
in a real subtle way. So what I'm going to
try and do is to get the illusion that there's a gradiation going
from here to here. This up forehead area being a little darker,
but not too much. So I want to go real subtle, and this is going to help
me. And this is how I do it. Darn it Sometimes I turn it upside
down and go again. And now I got the
feeling that this is more in the darker
half tone than this. I'm going to try and find the highlight right here, which is not really a highlight, but it's a little
brighter than the rest. Who's that eye again? I have to find it again. Who's her eyebrow?
Find it again. Again with the Charcoal pencil. I noticed I'm trying to get
the sense of volume before I go and neodal on features. At the end of the day,
I may not even do any work at the
features and just leave the join us with the
sense of volume. Okay. Now the beauty of using these pencils on top of your vine charcoal is that when you apply
it on the paper, it kind of moves the vine
around a little bit, and it gives you a
illusion of a softer edge. Not only that, but it just looks it makes your joints look looser without having to go and do anything
with the finger. I'm gonna try and break up
this edge with a pencil by lightly sketching
it around it. And I didn't only add value
as a transition for the hair, but I broke up the perfect
lines that I had there before. Now, you can lose
some of those lines that are left behind
with your finger. Try and establish the
dark shapes that are in the eye without drawing every
little line that I see. Try not to draw lines because there's no
lines in nature, right? So all shapes, values, color, but there's no lines. I like using lines
as design elements, but not to define an
edge like right here. So I'm using them
as design elements. Do the same thing
with your eraser. Reestablish that
corner of the mouth. And since I have my
charcoal pencil out, I'm gonna start modeling some of the shapes that I see here. It's quaint to get
rid of the detail. The less detail, the more believable your
drawing is going to be well established shapes here. Also, you can use this to wipe off a little
bit of charcoal. For instance, here,
there's a little bit of light getting caught in the bottom of the chin because
there's another plane. So instead of going
with my finger because my finger is going to wipe
off a lot of charcoal, these are great to just
do it in a subtle way. So I did that, if I darken
around it a little bit, I'll this my charcoal pencil. I'll give you an illusion
of a little bit of light getting caught in
that plane right there. Okay. We're getting
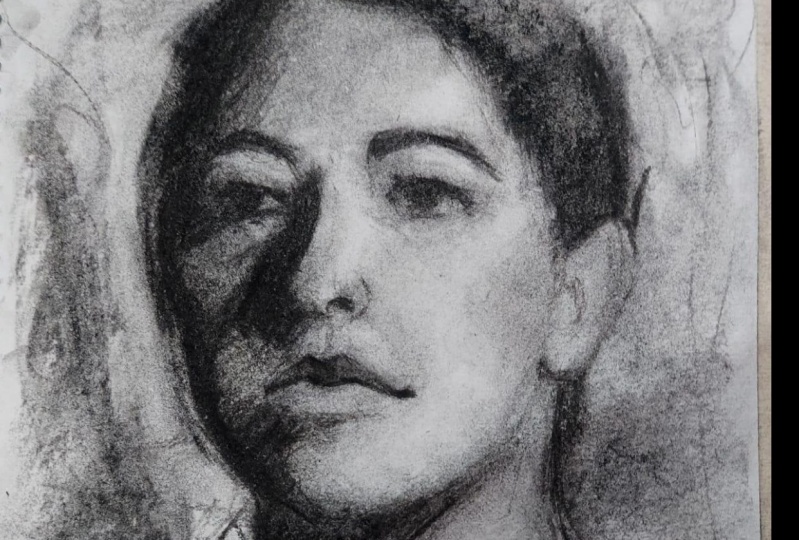
7. Strengthen Halftones: Real close to the end
of a sketch here. Remember, this is just a sketch. Just a study real loose. We don't want to spend 80
hours on this, obviously. We just want to get good
exercise out of it. It's great for painting
because when you paint this way without lines, without drawing in
the traditional way that people think of drawing, it really helps you
getting out of that box. So it's real painterly
if you think about it. So I'm going to go back
to my tool and just go a little harder on
those half tones. If you're not getting
the value that you want, you need to go a little darker. You can always do this
somewhere when there's charcoal and go again in that area that
you're having difficulty. So you're kind of borrowing
from other areas. Fine d. So the mouth a little bitter. Notice how to grab my
eraser, make it flat, but also give it a little
bit of width on this side, and grab it, push it down with my finger, and then drag it. So it's almost like
a brushstroke. Y so this shape right here is not
really working. So what I'm going to do,
I'm going to lose this, bring it up to a half tone value and then go in and darken
the center of it. And now I got the nostril and
I got the halftone around it. I think it works better. All right, guys, let's
8. Lose Edges and Finish: Finish this. Let's finish this. This point, I just want to get a better transition
from side to side. Just want the form to
read a little better. Is Quinn are your reference, Quinn? Are you doing. Uh Again, we're not trying to get a
hyper realistic drawing. We're just trying to get
something something sketchy, something that makes
a strong statement. And we can use as a training tool for other
mediums such as pinning When I'm having trouble
defining shapes, I grab base eraser. And I use it to kind of, like, I'm drawing but I'm
subtracting instead of adding. So in this case, I'm just
making the ear a little bigger. Use it to add
highlights as well. You said to design elements
like cross hatching. A I'm going to do the upside down
trick technique. Add some more design
elements for the background. Who's that edge. Um, we come in with a darker pencil. Reestablish that eye
that's in shadow. I'm going to separate the hair from the skin on
the shadow side. The hair is going to be
a little bit darker, and that's helping
me add structure to this eye socket and this
side plane that's in shadow. And the ear itself, I'm just gonna block
in the big shapes, the values that I see, and I see it being
darker a little bit here with some highlights, but I'm not going to
worry about that. It's going to establish
this cast shadow. I'm not gonna draw
every hair that I see. I'm just going to try and
get illusion hair like that. Lose this edge, lose that. Just to make it look like she's kind of blending
with the background, emerging from the back. Yeah, that's about it.
I think I'll move on. From here? Oh, actually, maybe pick up some of that charcoal
to get some information. There's a little
shelf right here. That kind of frames this
highlight a little better. Maybe soften this
edge a little bit. Soften this edge. And I think that's
good enough for a sketch. Nice and loose. But with structure and form
taken into consideration. If we do a lot of this,
you'll have a better time. I don't want to say easier, but You'll be more successful
in longer efforts. But if your goal is
to just loosen up, these are great exercises.
9. CharcoalConclusion: Hey, guys, thank you for hanging out and getting messy with me. Hopefully you're
feeling more relaxed, more playful, and way less
rigid about your drawings. Remember, charcoal is
supposed to shift, smudge, and surprise you. So forget about perfect lines. There's no lines in real life. If there's one thing that you
take away from this class, it's got to be that edge and value can make or
break a drawing. Remember, you're drawing shapes. You're not drawing eyes
or noses or mouth. If the shapes in the
right place with the right value and edge,
it looks like an eye. So keep things loose, playful, and keep those projects coming. I'm really looking forward
to seeing your drawings.
 Roberto Zavala, Master the Art of Painting