Transcripts
1. Intro: [MUSIC] Hello. I'm Fio from Fio Art Journal. I'm happy to be here with you. This is my third
execution, class. I'm a watercolor artist and
teacher based in New Zealand. As I mentioned, I have classes here on a Skillshare
and I also run watercolor workshops
at my home studio and in collaboration
with other art studios. I have always been
an artistic soul, but life took me another way
and I studied engineering. It was not until mid
2019 when I started painting with watercolor and I fell in love with this medium. My work is inspired by nature and Latin culture
because I'm Latin, and it's full of colors. That's why I enjoy
painting butterflies. So I can highlight the
beauty of this insect. In this class, you will
learn how to create your own butterflies using different watercolor
techniques in each one. We will start with a brief explanation of the materials needed
for this class, and also before painting
our butterflies, we will practice some
of the basic techniques of watercolors and
other exercises. [MUSIC] If you are beginning, this class is suitable
for you as well. But if you really want to dive into the watercolor basics, check out my first class. This is pure composition
in watercolor. I will leave that complete name somewhere [LAUGHTER] here. By the end of this class, you will have three different illustrations painted by you, and also you will be able
to use these techniques and tips in other elements
that you want to paint later. [MUSIC] As a bonus, we will take breaks between each step to document the
process with your phone, creating content
for social media. [MUSIC] I'm very excited that you're here and I can't
wait to start this class.
2. Our Project: [MUSIC] Thank you for choose this class and to decide to spend
your time with me. It's an honor. I'm super excited to paint together
these butterflies. We will have a lot of fun and also learn about how to draw butterflies and water control when using watercolors
and other tips. We will start with
different exercises. We will learn how to add details and texture to our butterflies. I will use reference
photos from Pinterest. That is what you have to do now. In my previous class,
we went outside. I went to the botanical
garden here in my city. I took photos. But to take a photo of
a butterfly is very hard because they fly, it's not like a flower. Go to Pinterest, spend there just five
minutes, please, no more and choose three
different types of butterflies, screenshot them and
print them if you can. As I mentioned, we want to take advantage of the
process of painting these three butterflies
to create content for our Instagram or
any social media that you like to use the most. Every time that you see
this phone on your screen, it means that it's time
to make a short break, to take a very, very short video showing
what you're doing. You can hold the brush. That part is totally up to you. But just remember that it's
time to record your process. [MUSIC] You don't have to paint exactly
what I'm painting. If you want to do that as
an exercise, it's okay, but remember that the project
is individual and what is really important in
this class is to apply the techniques that
you will learn here. Don't forget to
share your project, uploading it into
the project gallery. I encourage you to upload one-by-one so you don't feel that the
project is too long. Also, you can surprise us with a different butterfly
in a different day. You can also share
your project on social media,
especially your reels. Don't forget to tag me so I can re-share that
with my audience. I can't wait to see
your creations. In the next lesson,
I will explain the materials that we
need for this class. [MUSIC]
3. Materials: [MUSIC] For this class, we're going to need watercolor, of course. [LAUGHTER] You guess. I have here watercolor in tubes. Also, I will use this
small set of watercolors. The brand doesn't matter. Actually, I have this pan set, there's some inky, so it's a
really professional brand. But also I have a
goldmine with them. This is still the
end collection. The most important material
in watercolor is the paper. For the first exercise, I want to use these paper that is really good
and affordable, is 300 grams acid free. Our butterflies, I going to use these paper that is my
favorite. I love it. [LAUGHTER] It moves
because I have cut. This size is A3. I have cut here,
this is A4 piece. Brushes, as you know, I keep my brushes here because I really
take care of them. I have number eight that
we want to use I think. Number six round, number one to proceed. Water, I use this spray to
activate my watercolors. A Palette, water in glasses. I use two glasses of water, one to clean my brushes
you see see here, one to activate my paintings or for other things
that you will see soon. Pencil, eraser, also this kneaded eraser is
based for watercolor paper, and also just normal paper. No watercolor, just
normal blank paper, because want to make our
drawings first here. We need a ruler. Don't forget the ruler please. See you in the next lesson
where we're going to start practice some of the basic
techniques of watercolor. [MUSIC]
4. How Watercolor Works: This is our first lesson and is just practice the basic
techniques of watercolor. As I mentioned before, we're going to use
different paper for this because it's
just to practice, so we don't need a
very fancy paper. This one box wood that
is not got on paper, but is 300 rounds where I always blend this
in the materials. Here, I already have
my piece of paper that I want to use to work
my first exercises. You're going to have these
in the resources section, so don't worry about that. I have my two glasses of water, and I have my
watercolor set here, and also, I have the
watercolor in tips. Just for this exercise, I going
to use this color that is permanent rose leaf
off here a little bit. I'm going to activate the color with a spray
that I have here. Put this number of six versions I wonder
we want to use now. You can use number
6 or number 8, but I don't recommend
smaller ones now, so I want to add a little
bit more of the tube. Here in one corner.
That's enough. There are two main techniques when painting with watercolors. Wet on wet and wet on dry. Here I'm going to paint on wet paper and here on dry paper. Let's start just with
this area of the paper. I want to make a square. Something maybe this. Check if dump all the paper. We don't need a lot of water, but yes, it has to be wet. I think that is okay. Now in here in my palette, I'm going to mix a little bit of my
pigment with the water. It is very watery it's like some artists call this
like coffee consistency, that is very light
and not thick at all. Just like this. That is correct. I'm happy with this. We're going to start building up color here and repeat the same. First start here. It's important to use all the body of your brush
and not just that tip, so all the bristles. I know this in my workshops that some people paint just with the tip just like
this very 90 degrees, but not try to use all
the body like this. Now with the same consistency from our palette. We're
going to paint here. Now, from here,
from this pathway where we have our pigment
with from the tube, we're going to add more,
and little bit more. That is what we call
building up color. Now the second one is slightly
darker than the first one. I hope you can see this on
the camera and the same here. Repeat. Take from your pigment mix and repeat the same. You can notice that
it's not also darker than before, but also thicker. When you feel with your brush, you can feel the
difference as well. Not just seeing the color. Here the same. One more time. You can take more and more. Here I want to go darker, so I just add more
pigment every time. I want more so I want to add
more pigment from my tube. You see this one is very thick. It's like this. Now here almost
straight from the tube. You see the difference here. This was wet on wet
and wet on dry. If you see the paper is folding
here, but it's all right. It's a really thick paper, so don't worry about that. You can see the difference
between these two techniques. With the wet paper, you don't have much control
actually they blend together but you can achieve unique soft
edges if you see here. That is very different
from the wet on dry. Also, what is very important in watercolor is that if you want
white color in watercolor, you just have to leave that
area clear without nothing. For example, this area
in wet-on-wet, white. Is not very clean my brush, but assuming that this is white will be like
this, nothing. In wet on dry, just nothing. Just leave it as it is now. We want to do another exercise
here with the same color, a permanent rose that
we already have here. l going to fill this circle with this color and I
going to let it dry. Don't touch this
one but I going to do the same with this. Start thinking in
another color that you want to use just now. I think that l will use blue. I have my tube here very close to me and I going
to activate it now. I change my mind so l going to use this color. I actually have this color
here in this other pallet. Is this one so I just
going to activate it with my spray. Clean your brush. I have my towel here so I
can be sure that it's clean. Now we are practicing,
so it's not a big deal but its very
important to have it, especially when you are painting
your final butterflies. I add more because
it was too light, the color that I have
here so I'm mixing again. This consistency is the one that I like
and I'm going to add the other color
close to the border, but not in the borders and
neither in the center. Just like this, there. What we can use here
is also all these. What I want to show you here is the difference between
these two circles using the same colors, but just different techniques. As you see here, the
paper first was dry, but then I add one color. When that color was still wet, I add the second color. That is called wet on
wet as well because the first color was
not dry different from here that we going
to do the same but this circle is almost dry. I'm going to wait a
little bit more to let it completely dry and try to do the same and you going
to see the difference. Now fine lines. I want you to try with
your number 6 brush or any brush that you have to try to make fine lines. Just practice so you can
get used to your brush. Yes as l had said, you have to use all the
resource of your brush. You can also move. I move like this because
it's comfortable to me, make my strokes like this. This is my number 6. Now just a tip. This was the same brush but
just different strokes. One more time, repeat and
practice in this section. Try to use also the
number 3 [inaudible] that I have here and try
to do the same. The same like this. As you see this brush holds less pigment so we almost
don't have nothing here. You can take more if you want. Practice this as
much as you want. I just want to double-check. This is dry now, so I want to do the
same that we did here. I will take this color, the green, and try
to do the same. You see the difference? It's not blending with the
rose color that we add before. I'm doing pretty much the
same, just different timing. Time is really important
in watercolor. It's like this. I use
this brush as well. I'm going to the same. Now the detail is strokes. For the detail
strokes basically is a movement of your hand, is just start from one center. For example, I'm going
to do this from here, and we're going to do this. The same, but this
time with a brush. This is my center, l'm going to practice this. Make them longer and shorter. One more time. Move everything that you don't need to be there. Why this important,
is that you have a space to do this movement. Please don't finish here, especially if you're
quite new in watercolor, try to practice all
of these exercises. I think that this
is a really nice warm-up to start painting
our butterflies. See you in the next lesson.
5. Sketching your Butterflies: [MUSIC] Let's draw
our butterflies. Here I print some photos
to use as reference. It doesn't mean that my butterflies will look exactly the same
as these photos, but I like to have
these photos next to me so I keep in mind that I'm painting a
butterfly or an insect. Let us draw this one. One thing that is very important
when we draw butterflies or any insect is that they
are very symmetrical. That's why I have a ruler
here just to maintain the same distance
from the center to the end of the
left wing and from the center to the end
of the right wing. This is my center, the body, and also
these details. This apply to anything you
need to draw before painting. practice first in
normal paper and then transfer your draw
to the watercolor paper. If you want to know
how to transfer visual from these paper to
watercolor paper, you can check out my
second Skillshare class, where I show you how I transfer my drawing using that window. Also I want to draw this. As you see, I keep the ruler handy while I'm drawing
all the butterflies. Here I have two options. This I will keep very
simple because well, all the techniques that
we want to use don't require many details
in the drawing. Because in here, I'm going
to add a texture with color. The bottom wings are more acute. If your want, you can measure all the wings exactly as I did
in this top wings. You can do the same
in all of them. Finally, now is time to transfer our drawing
to watercolor paper. For that, as I mentioned before, you can use a window. But this time I'm going to use my reference photo and
my previous sketch. I will use A5 size paper
for two butterflies. I have here another
piece of paper for my third butterfly and
maybe as an extra, I can draw something else here or I can save
that piece of paper. Remember, don't put a lot of pressure on your pencil
because this paper is very delicate and also we don't want to see
pencil marks after painting. Let's start. Make this line here. It's an imaginary line here so I would know how much
space I have for each one. Remember that you can move your paper to be
comfortable when drawing. I will now do this, for example. I like to identify where
is the center of my paper. Here is the center so I draw
the body of my butterfly. As you see I'm not
pressuring my pencil here, not as in the paper
as I did before. Also, you can use now
this naval eraser. This softer with
watercolor paper. I like this idea to
keep two butterflies in that same paper
because then you can put in a frame and it
looks really beautiful even if they are not the
same kind of butterflies, but this real butterflies that we saw at school
when we were kids. Something like that, but
this time with our painting. I will take a pen just and
draw my second butterfly now. I have my photo. I miss this part
and just realized, so I will add them. Just wanted to draw that
last one to this place. This space will
be for you or you chose butterfly or anything. To be honest, I
didn't think what I want to do with this space. Maybe I just cut and
use this part of the paper for patches
or color testing. In the next lesson
we're going to start painting our three
butterflies. See you there.
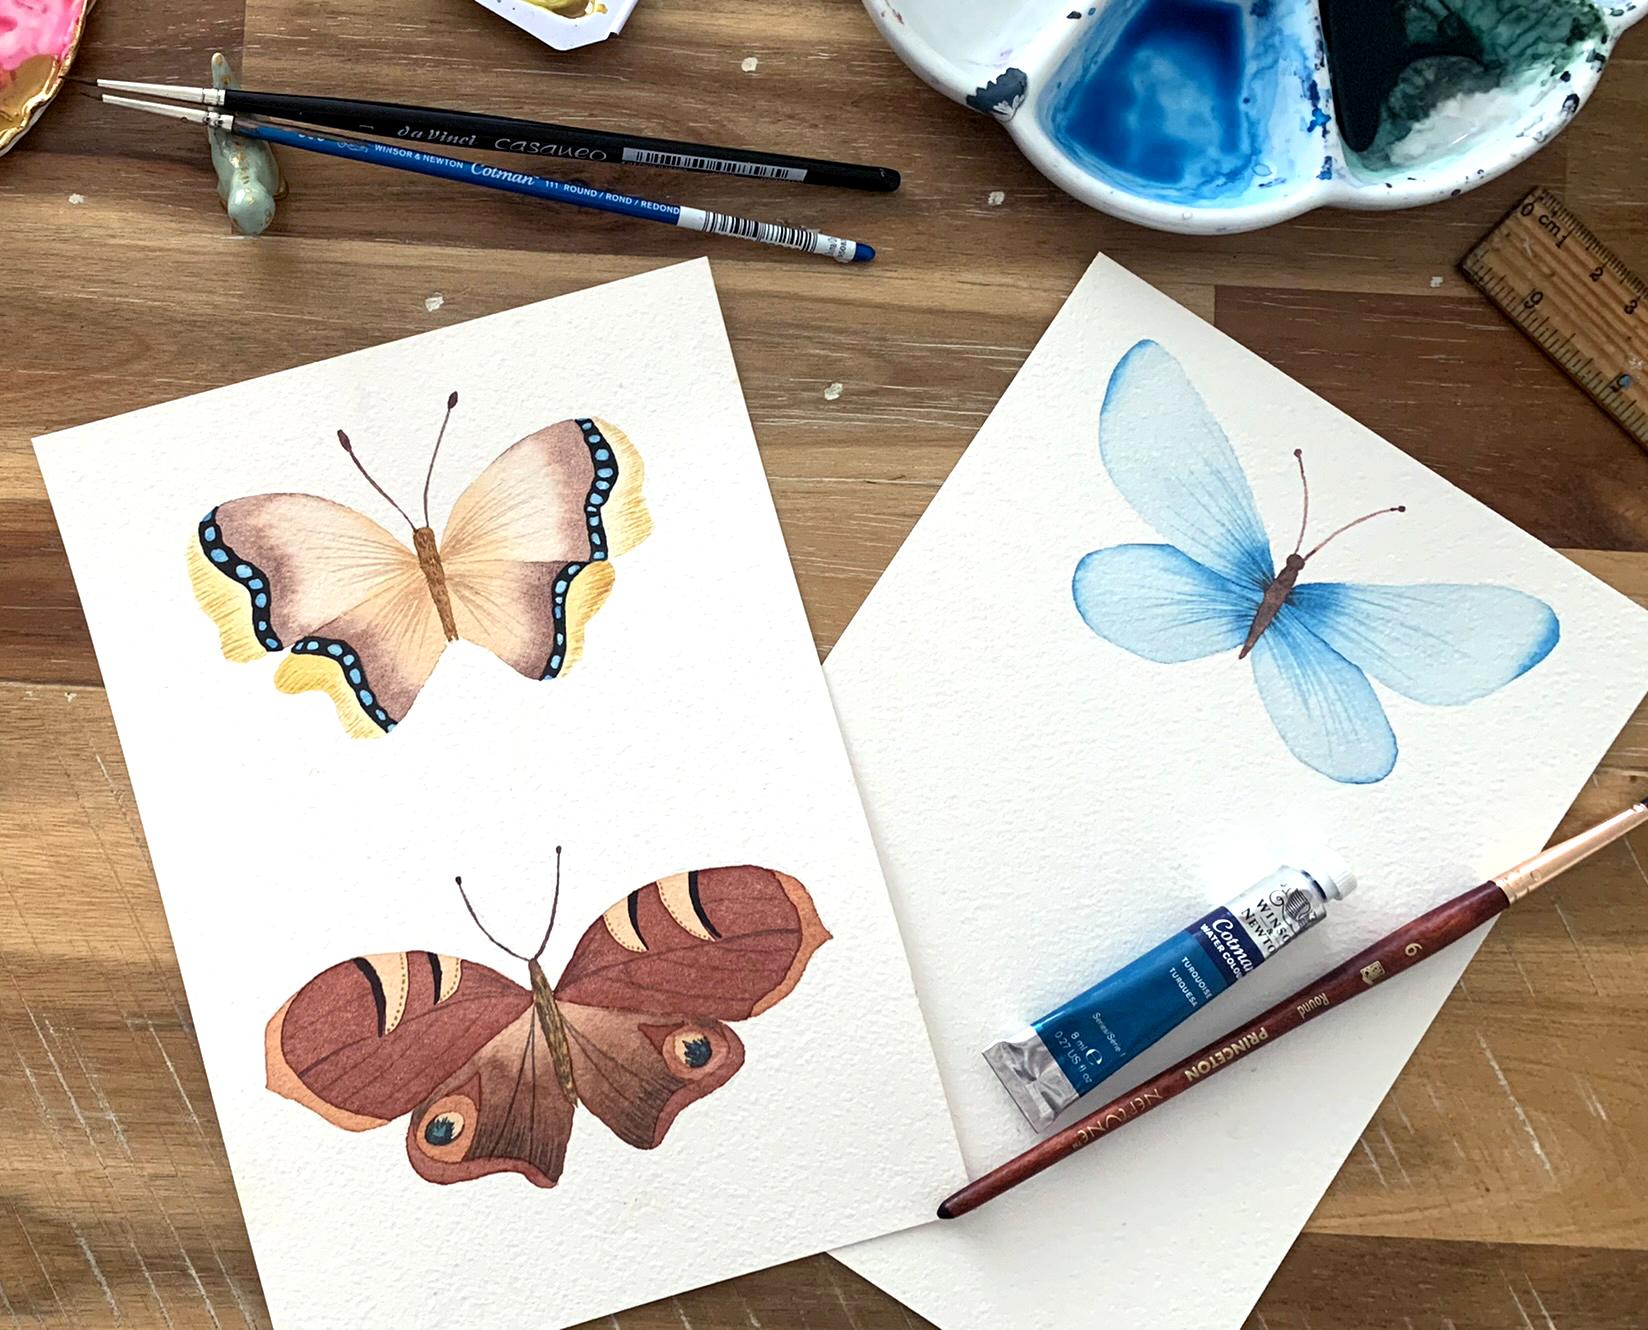
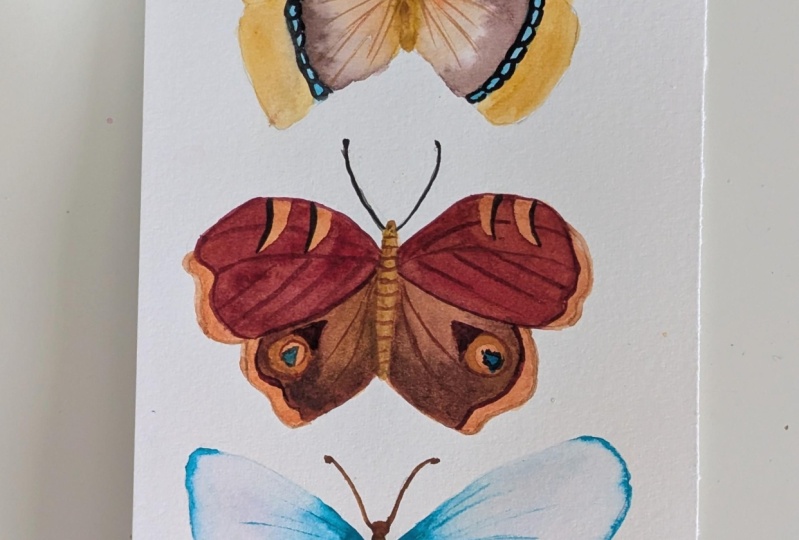
6. Butterfly 1: Wet on Wet : For our first butterfly we will use wet
on wet technique. I know it can be intimidating, but it's a really,
really good technique. Also, you only can get this
result using watercolors. First, we want to
activate our watercolors. I have some watercolors
here in my palette already, so I'm going to
have to spray them, I'm going to prepare this
turquoise for this area. Also, I have in here, I have some yellow, this turquoise is
this for [inaudible], also like this yellow, that these cadmium yellow. One thing that I love about watercolor is that
you don't waste them because just you
can spray water or add water with your brush
and is ready to use again. I'm going to use this
number six-round brush, we can use the colors of
one of the photos that we have or another
combination that we like. In this case, I'll use similar
colors and these. I recommend you using another
piece of paper to make your swatches so you can test your colors before
painting your butterflies. I have my two jars of water, one is for clean my brushes, and the other is to activate. My brush is clean, so I'm going to add water, very careful, not a lot. I always do this, if you see here, my [inaudible] Do this on my glass and we've
got the amount of water and with paint with our color in this
part of my wing. For the drop, I know it is very easy to want
to take more water, but especially for this size of butterfly is not necessary. Just check more of your paper. Now, we want to start with this, so let's take brown and I'm
going to put brown here, close to these pencil mark. Again, if you paid attention, how I grabbed the brown, and do the same as with
the water, not a lot. I always take, and then remove a bit, so it's not very wet, my brush. Now even less, so you clean more, you brush under pallet, and continue with the top area. Now, clean your brush
and take [inaudible]. As I said, I use
this as a reference, but it doesn't mean that
they will be the same. Now, the orange, you have to remember what
you're doing now because you have to repeat in
the other wing. Now, clean your
brush, dry a bit. I'll now do this. Your brush doesn't have to
be very wet to do this, that's what I dry here
on my towel paper. Now, clean your brush
and do the same in the other with your clean brush. Remember to remove the excess
of water on your glass. The same here, do this so you can
ensure that you are adding water in all these area. Now they're the same,
you remember how we did plus all of this area, very close to the pencil mark. Now a little bit on the top. To continue painting
the bottom wings, we need to be sure that the
top wings are completely dry. Otherwise, the pigment will blend and we don't want
these for this exercise. In the meantime, while we wait
for the top wings to dry, we can paint the yellow area. As this section is smaller
than this section, I'll just taking with
the tip of my brush, a little bit of water, not a lot, because these
are very small sections, so I don't need a lot of water. Same with this area, take advantage of
your round brush, and it has a really tiny tip. Now, take yellow and
the same for this part, it doesn't matter how it blends because we're going
to use just one color. What I want with this
exercise is that you lose that fear to use
wet on wet technique. It happened to me
before as well, but then you get
beautiful results. So I encourage you to use wet on wet, not
just wet and dry. Here with a dry brush. I use the same brush but dry it on my towel or paper towel. Let's take some pigment
from here, if you see, we almost see white, this part and the same
in the other part. Now, we'll have to
repeat the same in here. You see this wet on wet
is really beautiful. We just can't get these using watercolors
not other medium. Now, this area is dry, so I just want to remove a
little bit this pencil mark, and it will be the same. If you see the photo reference, it does say we know that
this is another wing, but actually we don't
have any line here. It's not necessary to do that, just paint not together. Remember what you are doing in this wing because you'll have to do the
same in this wing. Usually, I like to make the bottom wings darker
than the top wings. I don't need to take a
lot of pigment from here just have to blend like this. So we repeat the same
in the right-wing. For example this one, I think it has too much water, so I would take a bit. I want it wet but not with a drop there because it's wet, but still, I want to
control the blending. Same for the yellow part. Tell me in the comments, if you prefer this camera or this camera sometimes, this hand covers, the painting but I don't know, maybe it is just something
that is in my mind. But, please give
me your feedback because I can improve
the next time. As I had said, I like to keep this
bottom wing slightly darker because I think that the top wing give shadow
to the bottom one I use the lid pencil, I don't want to see after
I apply the watercolor, so it's better to
remove now because especially the yellow
is a very light color, we will be able to
see that length. I don't want that. We can remove the pencil marks that we have here and we can add
that black part. This part won't be
with wet on wet. There is a principal
body of the butterfly. As I showed you at the
beginning of this lesson, I activate the stokers. I will check the texture, again in this piece of paper. I think it's too bright, so I will add more water. When you do this, is
better to put this away. This is better, it is not as intense
as in this one. Now, with a smaller brush take pigment and we will now paint. Remove everything that
is around to you. Now, what I want to do is, clean my brush to remove some pigments in
different parts. Sorry, it has some light
and shadow as well. After this, we're going
to add the black pigment. But if you see here, it has some areas that they
are lighter than others, so that's why I do this now. Now, look at the
same in this spot. Another thing, don't forget your brush
inside the water. Tip. Because, maybe you'd want to use
with another color. It's very [inaudible] There are brilliant color here. Clean as much as you can, and then take it
out of the water if you are not using
this brush anymore. I mean now, maybe you want to use
for the next butterfly, or in the same butterfly
but not at the moment. Yes, put it away just like this, for example, but not
inside the water. Inside the water just the
brush that you are using now. The same in this part. Please let me know in the
reviews of the class, if you'd like to
watch the class in real time and paint together, so you can see what I'm
exactly doing with my hand. Or if you prefer like this, with this time-lapse video in the past that I'm
repeating the same process. While they are drying, we can paint the body
of our butterfly. With this quiet master. Here, we're going to
use wet on wet as well, but in a different way. We are going to wet
first with pigment, and then on top of this
pigment when it's still wet, we are going to
add another color. Now, [inaudible] Now, I will put this away
and we will put back our black for this part. So filling that black, this is not black, this is this color,
that is sepia. So we want to use the
combination of both. Again, in our piece
of paper we can try. It has to be very thick
because it's double darker. First, we want to
make some circles quite big in our darkest part. Not perfect circles,
but quite big. I don't know if
you can see here, am going to grab
my number triple zero around brush from
Winsor and Newton, and will take my black. If you see it has these [inaudible]
so I will try to do this. Be careful to long
morph your paper like you are here and
this hand is there, and then [inaudible] so there are somethings that you
learn with experience, especially now that
we're working with a very dark painting,
with black actually. Now, we're going to
add some texture. I think that this
round is too intense, so I want to mix in these
tiny part of my palette, I want to mix this brown with orange and get the
color that I want, that is not too dramatic. We're going to start adding
texture to our wings as we practiced before in
our basic exercises. The same here. Remember this one too, from the center to the
bottom with this crop, so here the same same for the bottom one's. Not a bad thing shown. It doesn't come from here, it comes from here. Now, our antennae with brown head [inaudible]. I noticed that, here it has a little
texture as well, so for here I will use
the master and the same. I know that they look
black but I don't want to use black. This is our first butterfly, whether you think is not
as ugly as this one, but I'm really happy
with this result. Now, I'm going to
take a break because otherwise it's too much
to paint all together. It was almost an hour for me. I'm going to have lunch, and then when I'm fresh, I will continue with this. See you in the next lesson.
7. Butterfly 2: Negative Painting: Now it's time to start painting our
second butterfly. I have here my reference photo. For this butterfly,
we're going to use negative watercolor
painting technique. This technique is
mostly used for compositions when you
have many elements. What is important here is
that we want to go from a very light color
to a darker color. We're going to paint all over the fly with one light color. Let it dry, then add another layer with a more
intense color like this. For that, what help
me a lot is to add numbers so I don't
confuse myself. The numbers help me to
notice which parts of the butterfly I will paint with a light color and
which ones with dark color. For example in here, the number 1s will be the lightest color and the number 4s will be
the darkest color. Now, we are ready to create our color palette
for this butterfly. Again, I'm going to use the reference photo for
the colors as well. I'm going to activate my colors. As you know, I went for a break. These colors in this
palette are dry, so I have to add water
to activate them. You see here it goes from
a very light orange, almost yellow, to brown. So I want to activate
this color palette. My colors are ready, so I'm going to
start painting with a lighter one that
is this orange. We want to paint
the four wings of our butterfly with
this light color. Just paint everything
and let it dry. When it's completely dry, we're going to add
the second layer with a more intense color. Now that we're sure that
this left-wing is dry, we can double check
with our fingers. If it's dry, we can remove the pencil marks like
this, very careful. We have to be very patient. In here while I was waiting
for the first layer to dry, I already add more
pigment to this orange. I can start painting
the number 2s. Well, in here I made
a mistake because I forgot to remove the pencil
marks of the number 1. Please, remove them before painting the first layer
because the number 1 will be the lighter
layer of the butterfly. The number 2s are not
necessary to remove because these orange is thick enough
to cover that pencil mark. Please, be sure that you remove your
pencil marks of numbers 1. We can remove these small
dots that we have here. Just clean your brush, make sure that this
is completely clean. Clean on your towel
and just take clean water from your
clean water jar, and just try to take the
pigment from those areas. These two small dots
are very old, I think. I'm not sure that I will
be able to remove them, but it's not the end of the war. They are very tiny, so
it's not a big issue. Now we're gonna remove
the pencil marks and start painting
the number 4 section. For that I'm going to use
the darker colors, this red. I want to paint everything
that has a number 4. This is one of our last layers, so we are almost there with
this second butterfly. You're going to just
keep lighter some areas. This technique requires
a lot of brush control. This area was not completely
dry, but no worries. It's good to happen
this now while I'm recording so we
can fix it together. I would take this
branch that is dry. It works better for fixing
this because it will absorb the pigment that I have here that I
don't want to blend. Now we have to wait again
until this area is dry. In here the left wing is dry. We can paint the
bottom wing now. If you see here, the brown starts very
dark and then it fades. We're going to do
something similar in here. But please be sure
that your layer is dry so we can add another layer. Know that these wings have
the number 4 as well, but I just changed my mind
so I don't want them have the same color of the wings. I'm going to choose this brown. Of course, you can choose your own colors with your
own reference photos. We're going to start
with this brown. Just pull this painting until almost the
beginning of this wing, very close to the body of
our butterfly, very slow. Now, clean your brush, dry a little bit, and pull the rest
of the painting, and try to blend. Similar as we did before for
our wet-on-wet butterfly, but this time the
paper was not wet. Remember that for each layer, you're going stop a little
bit, take your phone, record a very short video and then you can just
save it and continue. Try to don't do this directly on Instagram
because then we're going to waste our time
there on social media. I don't recommend to you to
do straight from Instagram. With your camera, record a very short
video of just showing your progress
so far and save it. Then when you add another layer, you can record again
and like this. At the end, you can put
altogether and make a reel. Here you can use your same brush or
change to a smaller one. What works for you is good. Let's paint this
section that looks like a beginning of a drop and repeat the same
in the other wing. Now with a yellow
color that we already have because we used it in
our previous butterfly, let's paint the body of
our second butterfly. Try not to paint the body
of your butterfly too long, otherwise it will look more like a dragon fly rather
than a butterfly. The same as we did
in our first one, just add tiny strokes of brown color when the
previous color is still wet. We also have a bit of turquoise
in this butterfly. Take a bit of this color and paint inside this small circle, not all of the circle, just half of it. I'm going to add underneath again with
this brush, the Triple 0. I'll just use the reference
photos as reference. I mean I don't pretend
to paint exactly the same as it
looks in the photo. It's just a reference for me. Here we have our
butterfly almost ready. Now what it comes is
basically add details. For example, here I will
add some master dots in this section of both top wings. Now let's activate this
black color a little bit. We're going to add
details in these circles and also in the borders again of
these top wing sections. Also as you can
see, this text too. For these I recommend
you use a pencil before, so you have some line guides
and for this text too, I will add more water
to my black so it's not too dramatic as the black
that we just used before. I just add the principal
lines with pencil, but if you feel that you
need more guidelines, feel free to add as many
pencil lines before, paint the lines with a brush. It's better to use more guides. When your butterfly
is completely dry, you can delete those
pencil marks after. For these bottom wings, we're going to add some
hair texture as well, so with very short strokes
in the same direction. Also in the body
of the butterfly. You can notice that this photo was the
reference of this painting. Even they are not
exactly the same, but I wanted to use
as a reference. Also this one was
a reference for this butterfly. We
are almost done. We just need one paint one more butterfly and we
will be done for the class. Now, please don't forget
to make a short video of your second butterfly so you
can add it on your reel. Don't leave your
brush because we still need to paint
our last butterfly. See you in the next lesson.
8. Butterfly 3: Transparency: [MUSIC] Now for our
last butterfly, we're going to use
just one color. In my case, I'm going to use the [inaudible] that I
already have here. But I think that I want
to make it more intense, so I'm going to add a
little bit more here. We will now work and
play with the light. Let's start with a
very intense color. I'm using again my
number six-round brush. With a tip of my brush I'll take a lot of pigment and
I move my painting, my drawing, in this case. Still not a painting. Start from here. [MUSIC] We continue very slow. No rush. When we are about in this part, we clean our brush. In this glass that is to clean. Remove the excess of water
and pull this picture. [inaudible] Now again, clean and this time you're
going to take a bit of water, clean water from your
own little glass and just pull this color. [MUSIC] Now without
cleaning your brush, just take more clean water
with the tip of your brush and continue pulling until
the end of the wing. [MUSIC] Continue so everything
here is with water. It's wet. All this wing is wet. [MUSIC] The same
with the other wing. [MUSIC] I like this photo because
it has a sunflower behind, so it could be a
composition next time. But in this case, I don't pretend to
add these dark, almost black lines
here and these yellow. This is almost dry. First, I will remove
the pencil marks. Now to highlight the
borders of the wing, we're going to add some
pigment there as well. Just take some color
from your palette. Paint the border
just with a tip. [MUSIC] Now clean your brush. Clean well and just take
clean water and blend. [MUSIC] Just repeat the same
process in the other wings. [MUSIC] The same in this part. Ensure that it's dry first. For me, it's not dry. I have to wait. Then remove the pencil marks
and do the same. [MUSIC] Here we are exploring
transparency. That is the main
quality of watercolor. That you can go from
a very dark color, very pigmented color
to almost white. You need a lot of brush
control to get this result. [MUSIC] Now, remember the shape
that we did before. [MUSIC] Of course, one more time, check
if it's dry or not. I'm going to add
some color here. Just to have the idea
where we finish. [MUSIC] Just like this. Clean. Remove that excess
pigment from your brush and just make a gradient. [MUSIC] Check if this one is dry. We want to use
different color for the body of the butterfly. [MUSIC] You can continue removing the pencil marks
that we don't want to see. [MUSIC] Now I want to paint the
belly of our butterfly. [MUSIC] Sorry for the light. It seems that it's cloudy now. It was very sunny before
but now it's cloudy. Well, this city is crazy. It's summer but it's 16 degrees and it's not sunny anymore. [inaudible] [MUSIC] To add details to this butterfly
as it looks very clean, I don't want to add
too much to this one because I've seen that
it is really pretty. I just want to add some
hair texture similar to our first butterfly and also to our detail brushes that we
did in our exercises before. We're going to add that texture
here in the four wings. [MUSIC] The body is still wet. It's a little bit brown
here. I like that. [MUSIC] This is our
[inaudible] butterfly. I love it. We can add some details to the body
as well as we did before. [NOISE] Maybe with some black. Just give it a little
bit of shallow here. Some texture. [MUSIC] I love it. [MUSIC]
9. Final Thoughts: [MUSIC] Well done. We did it. You see, we have our
three butterflies here. They are very similar to our
reference photos. You see? I am really happy
with the result. Now you can create
other elements or more butterflies
applying the techniques that you have learned
in this class. You can also paint
butterflies as part of a composition with
botanical leaves or next to other elements. Please don't forget
to share with us. You can share in social
media as well if you want, just tag me at fio.artjournal. But also I really
encourage you to share here on
Skillshare platform. [MUSIC] If you
enjoyed this class, please leave a review. I will be very happy
it will help me a lot. I also recommend to other people that would like to start
a journey in watercolors. Thank you for taking this class. See you soon. Bye. [MUSIC]
 Fio Ortecho, Watercolour Artist & Teacher