Transcripts
1. Introduction: Hello, I'm a Peruvian artist based in New Zealand. This is my second Skillshare class, so we'll come back. If you check my previous one. In this class, I will share with you how to bring five different kind of flowers. For last 3 first ones we will use a sketch that don't worry if you don't like to draw, I'm going to leave. That sketches on the resources of the class. And for my last two flowers, we won't use an sketch we going to pay without any pencil marks. So that's why we call loose flower. We will start finding inspiration by nature and also Pinterest that allows you to take some photos for reference or use the Pinterest photos as a reference. We're going to talk about materials, especially the ones that we need for this class. They're slightly different from my previous one. Don't worry, if you don't like to draw, I'm going with you step-by-step. So you're going to find out how easy is make a floral composition. This class is suitable for beginners. But if you are completing new in the watercolor world, I highly recommend to check out my previous class where I'm going step-by-step explaining every single basic technique of that watercolor world. So let's start.
2. The Project: For this class, we are going to make a floral composition. Don't feel intimidated. As I'll guide you step-by-step through the entire process. We will start practicing how to paint five different kinds of flowers. And after that, we will start with our final project. I'll share with you the tips that I use when I make my own compositions. In the next lesson, I'll share with you how I get inspired and the tools that I used to obtain reference photos. See you there.
3. Getting Inspiration: In this lesson, I will share with you how I get inspiration when I need to paint something meal, I have to admit that I usually use Pinterest to get some photo references, but I really recommend to go for a walk. The city that I live is really cold, so sometimes it's quite hard to go out for a walk is necessary for your so sometimes when I take my own photos, I tried to take a couple of photos of the same element because it gives me more details. Because sometimes I take a photo from one angle, but when I'm painting, I really need to know how is that other angle even that I know paint in that area, but maybe in another petal, I will need it. So take advantage that you are outside and take photos of the same flower in different angles. This is my Pinterest homepage. As you can see it suggests me a lot of flowers, also hairstyles because now I have my hair bubble. The correlation for home, more flowers, butterflies, decoration. So it's up to you. Of course, your homepage will look different from mine. But let's take some inspiration here. That's beautiful. Okay, so we can check beautiful flowers is in my recent searches. So it shows to me the space for you will be slightly different. So in here you can just scroll down and died to find one flower that you like. So let's go and click in. Any of the flowers die you, if you feel like you would like to paint. So for example, for me, I think that I like this one. And as you can see in this click in this box, the names of my boards. This is a wonderful I'm using. That must agree. So does why it appears in the first position. And I want to save this pin here. So I just save is already saved. And then if I scroll down, it will appear more and more inspirations. More and more flowers. So for example, these ones, I think that is really beautiful. That is, I'm Magnolia. We went up paint and Magnolia definitely is when he saw there. It doesn't mean that if I'm saving this one, I want to paint a stray away, but I save just in case one day I want to paint this flower. Or maybe if I painting another flower, but I want to add different details because I'm not a photorealistic artists. So for example, I can get spallation by these part, these details of this flower. So also for that, or colors for example, maybe you will paint another flower, but you like these color. For example, this is, this is not a photo. I recommend to save photos are real photos, even if you're not a photorealistic artists. But it's much, much better to get this pilot by real photos than four down from another painting. This one I really like, so it will save it again. And like this just continues. So you can use your Pinterest photos and also your real photos. If you have a botanic garden in your city, you can go spend a morning or afternoon there and take some pictures with their cell phone. In the next lesson, we're going to talk about the materials. See you there.
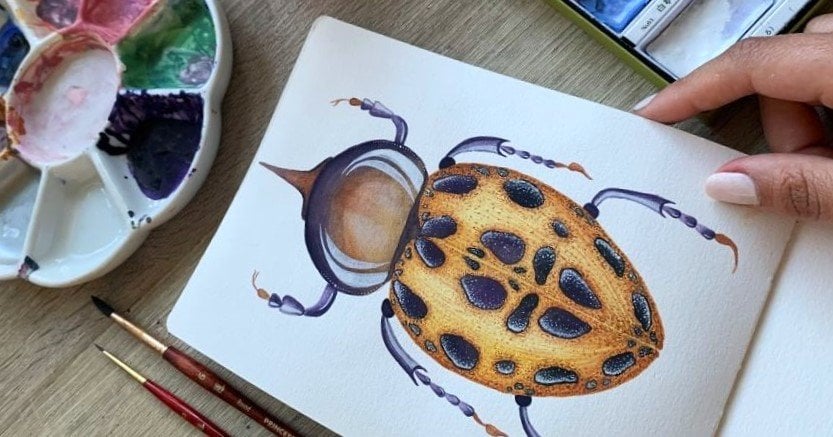
4. Materials: The supplies needed for these class are what encoders we can use in tills anywhere. And my brands were the ones that I use the most are Winsor and Newton Cotman. Not a professional once I have a couple of dine with me and also liquid, Use legal watercolors, watercolors in parts, water pollution tubes, any watercolor. And the about the brand doesn't matter. Actually. Brushes, those are all my brushes and I have a couple of more that are really big that I rarely use. Actually. We need watercolor paper. I use this one for this class. That is canceled Manuel free 100 grams. And it's called praise. So it has a takes two, is not a smooth. If you want paper, you can go for helpless. And what is very important is that is acid free. It means that it going to age very well. Water, I use two glasses of water, but it's up to you. One for clean my brushes and the other to activate my pigments. Towel or paper towel. A pilot when you can't make your mixes. Eraser or the sky of well, not actually do need eraser, normal eraser. I have this one. And also I use this eraser is really solve here in New Zealand day called middle eraser. Very neat. Also a piece of paper. In my case, I use this blog where I make drawings. You can see here. So yeah, I just make little drawings here. So you need this. You also will get tracing paper. It doesn't matter how thick it is. In my case, I'm using 65 grams. Of course you will need a pencil and find Ben. And you've seen single 0.5. It can be black or any dark color and four tails doing neat white ink pens. They can be gel pen or a Posca paint that this acrylic ink.
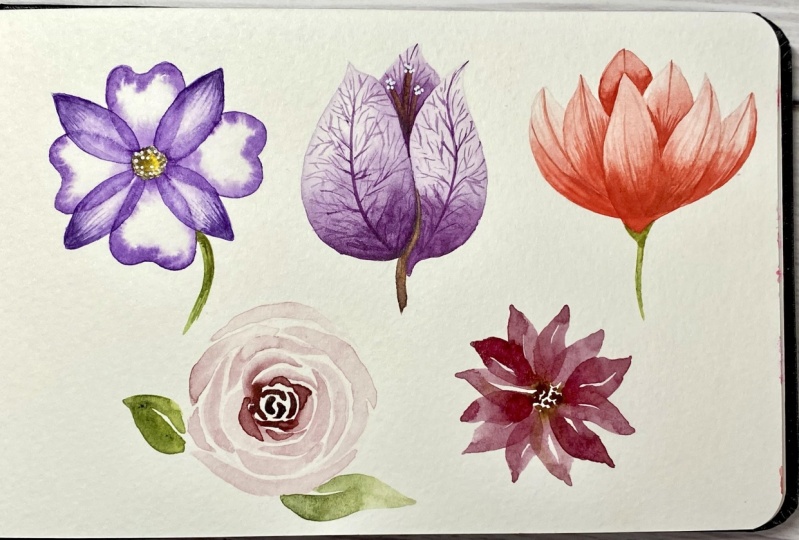
5. Transparency Flower: So you enough practice with some different kinds of flowers. First way, transparency. So I will now make a simple drawing. Here, the center of the flower and always the petals to the center. Random flower, I think about that. And he may be a change. Well, this is practice, so it doesn't matter if we have some pencil marks. So I place my brushes on water. And I already prepared this color. Purple. They have. Okay. I will start with wet on wet. Dammed up too much water and start painting one theta. As always, I avoid to pain. In this case two up water over the pencil marks because then I can just delete them. And we went on with the mic. Yes. On the waters of the pitta. Not in the center. It will go to the center anyway. But you just apply on the port like you are drawing again, end up into clean your brush and choose another data. As this one is still watching this better, I want to add water to the next better. I purchase. I put water over some pencil marks, but this our practice. When we paint our final project, we have a marker saying, yes, like you are drawing again. I know that now it looks like very bright, a lot of color. By the way. This bad guy, it won't be like that. So don't be scared to add more pigment because it will fade when these two petals, all these petals engineer at peak man without fear. Don't be shy. Now that our fault first petals are completely dry. Make sure. Yes. Delete the pencil marks between these patterns that already painted with others. So between these two, those are the only ones that I want to delete. Now, I'm going to grab this brush. That is the very thing. For now with this brush, the liner is not a liner actually, but is very similar. So you're going to draw all that pencil mark of these. So we'll start with a fine line here. These. And say me here. I just want to clean water and start doing this. Who's clean, clean water? These saying that. It'll be careful with the drops, groundwater but not a lot. So you see the effect of transparency. You're going other same with that makes battle in exactly are saying grab more intense pigment and start growing. Or with your pencil mark that you have of these petals. Now cleaner rash. And with clean water just to this, more clean water. And I repeat this many, many times because it happened to me a lot. Be careful with adopts, grab water, but not a lot. Because if you put a drop here, it would splash, splash, but It's not a nice way to work. Sorry, beta saying we flower other two petals again. Now all of our petals are completely dry. So we can't delete all the pencil marks with confidence because we are sure that it's completely, completely dry. Now we can start painting the center of our flower. For that, I will activate two colors, jello and brownish. Dark brown. I will add more pigment to it, yellow. So I may use these watercolor layer that Corey Carter ones. So I will start with my center of the flower. I'm gonna use again the very thin brush and first light color. If you hear someone saying is my partner, he's practicing. And he loves Chris Cornell. I don't I've, you know, we're celebrating four years of his there. So now he's playing key finding pretty much every day, all the songs of crystal now. So it is still there. And I go instead to add wet on wet, but in this case with just clear water but with yellow. So we're going to have the yellow as a base. And now I put some drops of this brown where this flower is drying. We can continue with our cycle.
6. Bounganvillea: I wanted to paint very simple, like this one. So you can check on Pinterest, your references. I will leave from the rest in the resources. The drawing of these alone, all of these flowers that we are painting now. But for now I want to use this painting as my reference. So we can start drawing. If you want. You can draw as well. And if you don't feel like drawing, It's okay. You can yes. Tastes that row and I will leave under Resources. Sorry, it's complicated to me. Join a 100 same time speak. And again, this exercise, I want to, to make it monochromatic. So I will use the same popular we use for this flower and this flower. I will use the number one brush. I don't have number 1 of Winsor and Newton, but I have these render this that when she does enable collection. So first of all, I will activate my PowerPoint because it is already dry. Okay, gang grab some painting with your number one rash in my basis, number one, you can use, It's totally up to you because I don't know how big you are painting these flowers. I'm using this size paper that is K5. So for me it works. And in this case we use wet on wet. Now we're going to use wet on dry. So start of the base with a lot of pigment. So all the base of this petal, we'll have a lot of color on the concentration of color will be in this area. And now we're out cleaning your gradually as take a little bit of water, leave it a bit as a gradient. If you don't know what our gradient is, you can take my very first skillshare class where we make some basic exercises. Just adding water, don't take more pigment in this part. Yes, Water, Water, Water. Move your paper. If you need to. It's totally Joel practice. You have to be comfortable. Okay? Now, wait until this is dry because these two petals are next to the first one, so we can't paint another petal. Now. In the meantime, we can continue with this flower. Number one brush. I'm going to take purple and make some details. Sign here. Yes, take with a really thin brush and paint in this part. The end of that beta maybes. And we're very short strokes. Made this. Yeah, very, very short. Just to give this flower a bit of text to especially the spit. Insert to you how much detail you want. And again, to that same shape on the first one. Yes. Pigment at the end. Rash on your pilot. So you don't have another paint. Now I'm doing a manga shortstops. The first catalog, suburban villa is just delete. These spends on Mac and continue painting the other petal with the same technique, gradient. And we have Meniere's grab a bit of water, just clean water. Again, I really like this kind of exercise when you make flowers because then you can scan these flowers, these paintings and make different things. Photoshop, you can make a bad term you use for the signer notebook, for the sign I written car or wherever you want. And also helps, it helps you when you went to Painter composition, because you already know how to paint different kinds of flowers. I had a singer. Think. Now only day and continue. To the center of this lab. I just ground and I'll show you a feeling of gamma. It's not showing. So now this is slightly darker than before, is not that. Well. So with this brown, we can make our center of this flower. And yes, some spots studies. We can make it a stem. And now we change that verge with number 1. Because he has bipolar and grab some green painting. So you can choose any of the flowers that we are making now to use in your final project, because the final project is unique. Gel colors of flowers, year chisel, another element. Now this is, I, I want to paint this better. I don't care about this much. So I don't need to delete that tab now. If you want your current, but it's not necessary for this. I will have the triple 0. I want to paint between these two petals. So I'm hoping that membrane one is too thick. So I will use that to pursue. Yes, pigment. Don't worry if it looks too dark. Remember that we need dies, we fade. The next lesson we will see how to add details to that Volga, be left.
7. Bounganvillea Details: So delete that pencil marks as always. Before the retails. I have these foldings of the data. So we will not do that now. To pursue. Get some purple. And the beginning of this Pat. Ladies. Yes, Get up some water a bit because it's a really small area. Now we can delete the folder dry areas of our flower. I think that I need more shallow in this part. I'm gonna do that. This shell here, not until here. Otherwise it will mix with this beta. Yes, starting from here. And yes, this, but before this dark area is start with a very thin brush, that purple. Now we have to make a darker these Neil color that we made. Be sure that the Xa and we start making the veins. This being in the center, this slightly thicker. I mean, this thing but thicker than the others. This same with this one. Now, into all the details. The other veins, these are the organic and don't put the brush ladies that put a vertical. Because with that actually in this part. So if we make something like this, we have a thin brush, I think this job, but here we put just be vertical. Like this. We have a thinner stroke. So there's that first in the middle with a bit of inclination When you're holding the brush. But these ones with the vertical strokes. And all your government to start by the bottom part of the flower. Because it has more intense colors. Then when the painting that you have live into rash and you can paint the top of the data. The next lesson, where we let some light here and also the middle part of the program below. And then.
8. White Details: In this lesson, I will show you how to add white details on some petals. We have three options for using yellow bands. Bands all what a corner or wash. So I will activate my whitewater color that you already have here. So with these three tools, pro show you how to add details. So clean, very clean brush. Again, that detail one yes. Gap, some water color. Now that is yes, a single and a small flower. We can add light in both sides, four sides. But in our composition you have to notice where the light is coming. It looks clearly white when we start painting, but when it dies, it because it's water corner with wash is a little bit different. Kinda deep. Now we go to our darker brown, the pistils. Now. And then I'm going to show you how to use a postcard. Always clean you. I want to compete. And do this. This is optional. So wait until it's dry. We can add the details on the top, so the tracing here. So this is dry. We can also add some white spots.
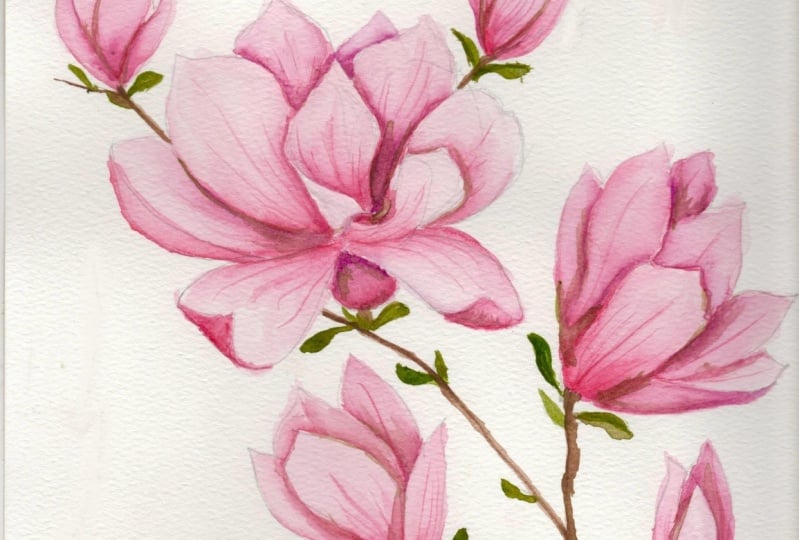
9. Magnolia: So now we can start drawing our third flower that is the Magnolia. So you're going to use that sketch that will live in the course resources, or you can try to draw from your photo reference. So let's start together. Okay, My draw is done. So I'll reactivate again a purple. And I will use my number one brush. Okay, so I will start painting my first beta with the way light purple. So it has more water than pigment. And why we're gonna do is you're Spain the whole Paita, trying to pull the color to the bottom. And then I clean my brush, dry it with my towel or paper towel, and then try to take some of the water from the pit. So it gives my petals some texture and light. So try that. When it's still wet, my first beta and I add some more pigment at color and add that paint on their borders. This will work like a wet on wet technique. So when I'm mixing in a very organic way, it gives Shiloh to the borders and to let bottom of that beta. And we want to apply this technique in all the petals of our Magnolia. Yes, Be sure that you are not painting one petal mix to another petal is still wet that you just paint. So fortunately, the Magnolia has many petals. So you can jump from one to another petal that is safe to paint. Now I have to wait because I cannot paint these petal, neither these botanicals, they are next to the that I just paint is still wet. So I'm gonna go to paint. And well, to add the second layer to this pitta very carefully. For the second layers of petals, I am going to add pigment just in the border of capital that is close to their centered, close to that stem of the flower. And then we felt clean my brush, I'm going to pull with a very short strokes that pigment to the bottom of that beta. So it allows us to give some texture already to our petals. And now we still have this part wet with a very vertical. We can do this. I will continue adding more pigment that works like Shiloh in each petal. Just be careful to them at a lot. In the whole petal, just in the areas that are, for example, one petal is behind to the other. It has to be darker or in the areas of the tongue that are closer to the US team. Okay, more shallow there, but don't lose the bright and the light that you already have in each better. But otherwise it will look by blame without volume. So just keep doing this and see you in the next lesson.
10. Loose Flowers: Now I will show you how to paint loose flowers. So if my number 4 brush, round brush will make these two flowers, first, activate your paint, cultivate these two vehicles. If you remember, this one was darker and this one was purple as well, but a little bit light. So I wanted to make it more intense. So I would mix these two together. I want to make with that deep of my gosh, merry tiny moons, half mom's here. Remember more vertical not to vertical but slightly vertical. Okay. So yes, ladies. Yes. Small half moons. Don't torch between them. This is the center of our flower. Now, just grab with you, dip a little bit of water and make a bigger half-moon. Remember you got more petals. You feel like you want to grab some paint. You can. But not to that. Because remember the center of the rose is that dark darker part. Yes, ladies. And with your same brush and you can activate a little bit of green. I make the stem and leaf. I'm planning another class we just beliefs. So these ones are very simple. But enough to give us the idea of the flower that we are painting. Now, I will show you the last flower of these five flowers, this group. So I'm gonna grab this brown with my same number 4, brush, this RAM and make yes. Spots, spots, spots. Don't DOJ does boats between them. If it happens, it happens. It looks organic, but nothing is tried to see that they are many small spot. So make slowly, not that big but not very small. Needle, cleaner, brush, paint, purple. And slightly doubting that center. Make up data. And you see, I press my brush and then leave to the center. This one. Because it was not to the center. You see I make a curve, so don't do that. So in the pulse that you think is a gap that looks empty, you can add another bit. Is really nice. Don't paint all the bids. Are. You see, I'm leaving some blank spaces. That gives that bright of that flower. And the same for the stem. You can do this. If you feel that you want to make a center stronger or here as well, then you can add more details. If you want. As the same UID in these flowers. You're going to have more wide here, even here. In the next lesson, we'll start with our final project. See you there.
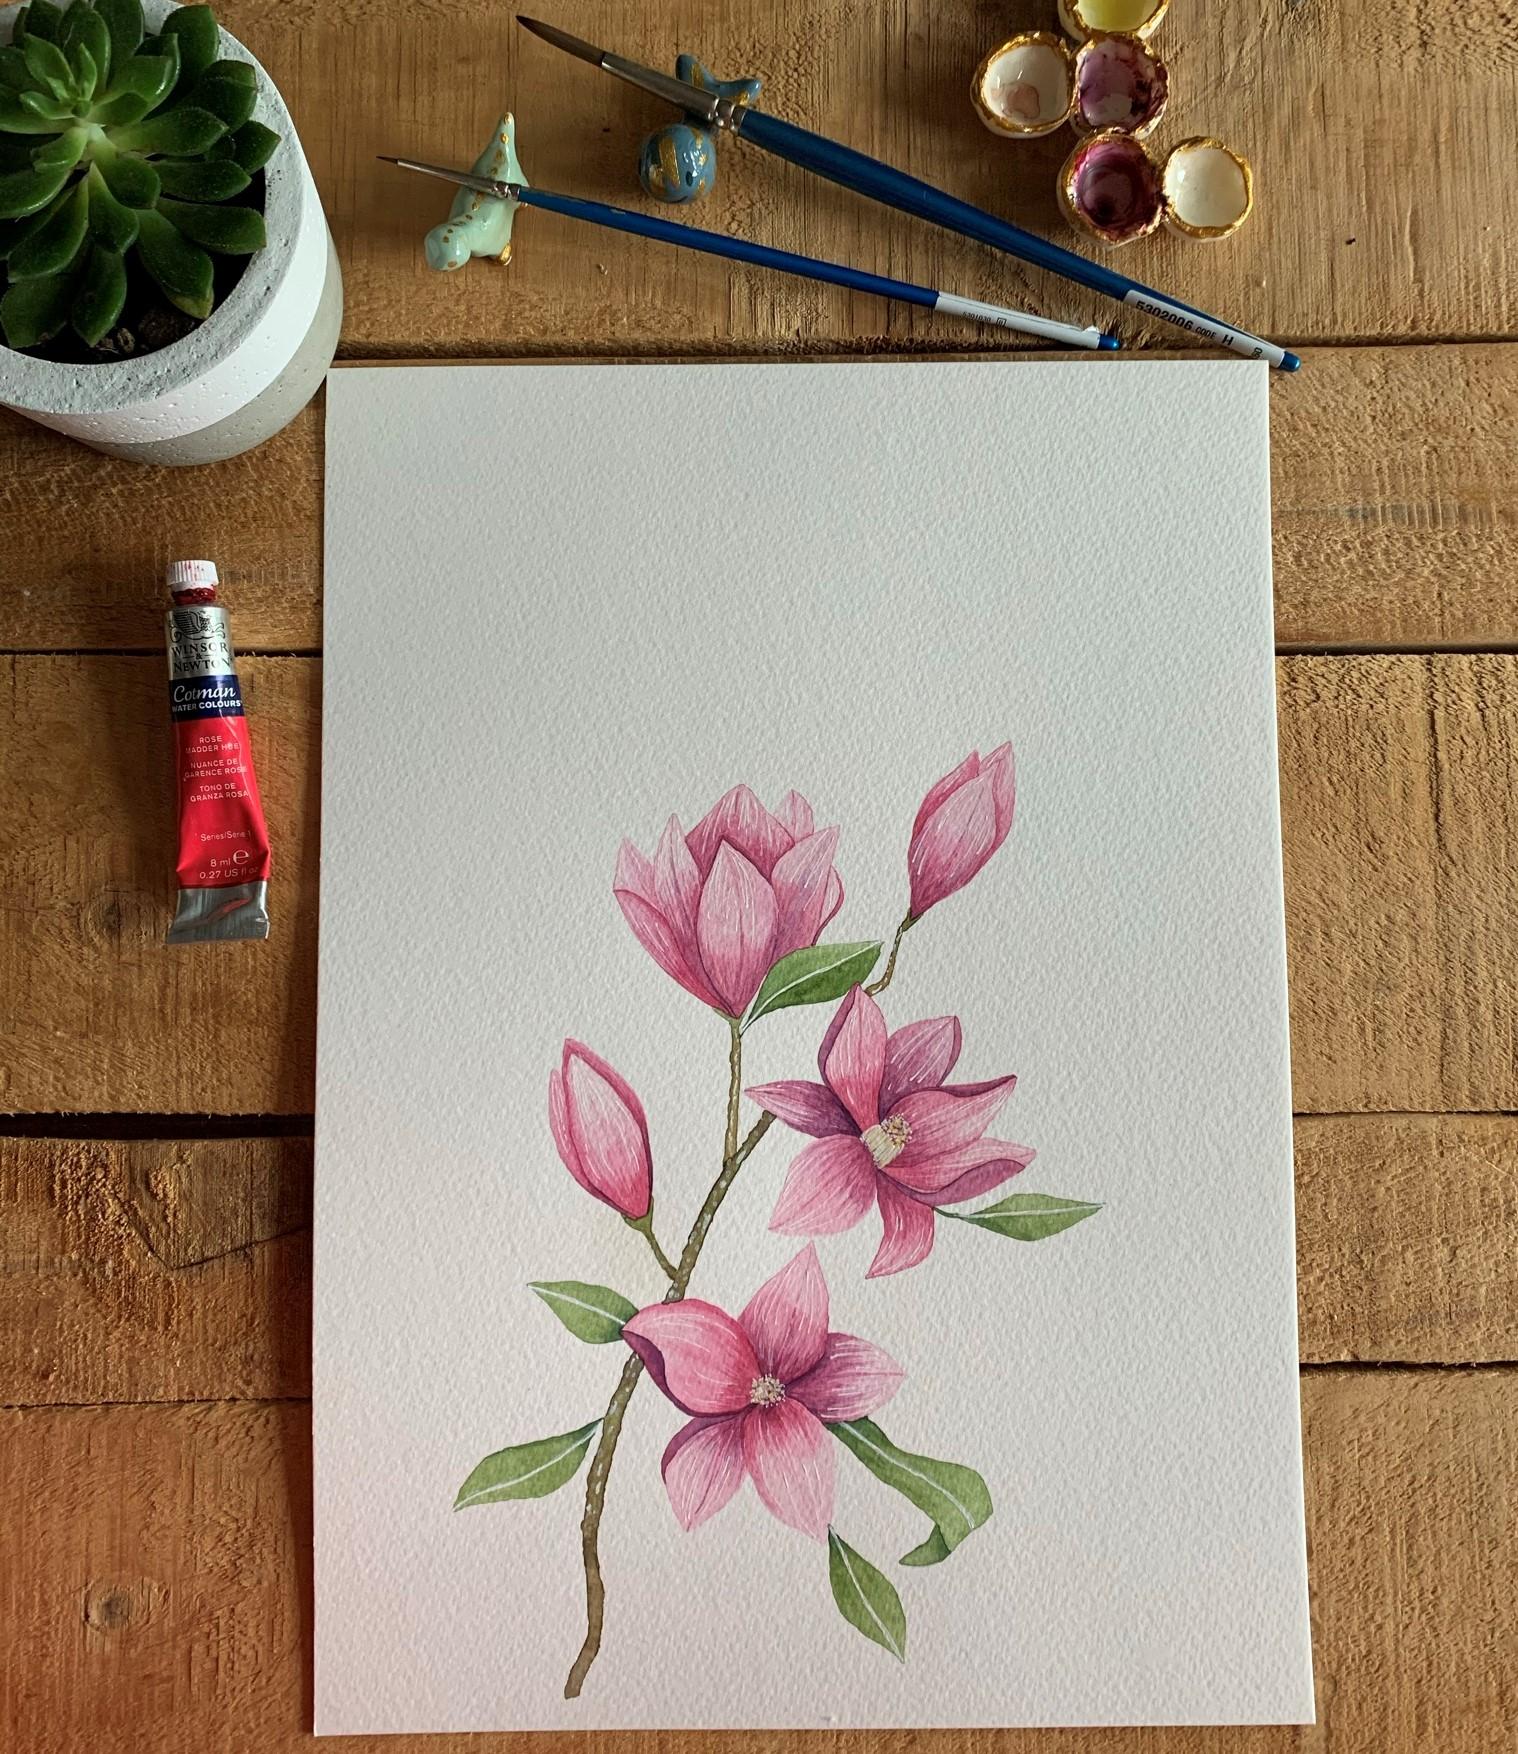
11. The Sketch: I've already saw these magnolias. You saw me how to draw this one. Before. This one. Here I just check in Pinterest the frame options, different positions, and different kinds of magnolias. This one, for example, I like a lot because he has a lot of folding parts. You're going to have these draws in the resources. But I'd recommend to draw by yourself. Now, after you Joe, just in different parts of your paper, you'll grab one tracing paper and try to think about your final project. How do you want it to look? So you can draw indifference. You can trace in different options. For example, this one I, this here. And then by being of these, but maybe I want to put here these two taste this flower for this. I use this one. These, that is fine pen. Cedar Point 3 in my case. I'm now going to start with this one. Okay? That is the one that I like them most. So maybe these know much about nice then. What is more important is that flower. So another flower here. Highlight this one in here, my VI. This flower is very similar as the one that we paint. Before. You want to add more. I think that for flowers, I'm happy with this. I want to add some leaves at this one. When I translate this to my water color paper, I will remember not, not to trace this part because this leaf is on top of this magnolia. You can use this to see how it looks now. And then it now we have our composition on our tracing paper, ready to trace to our watercolor paper, our finite vapor. So in my case, I use a for tracing paper. But even that, I have two options. I can use a five or a four size watercolor paper. So if I use a form, we covered pretty much all the area of my watercolor sheet. But if I use A4, I will have some blank area here that looks really nice in compositions as well. So it's totally up to you. I think I learned I use a fall but slightly in the center. And maybe who knows at another flower here in this area, or another leaf or another element. So let's say our composition in our watercolor paper. For that, we're going to use our window, my gaze, these window. And why should they be afraid it is time to start a scene. So I'll take some trashy days composition in my window and take the watercolor paper. And as I said before, I don't want to pull over that tracing papers because I don't want my draw in this area. I want in the center slay. So base. So what did they do? And with your pencil start, your composition is low and without a lot of pressure. Okay? It's important because this is your final paper for your final project. So don't press a lot when you're tracing this area. No worry. If you don't trace exactly over that line. Almost there. I went to my Java class today, so I'm flexible enough to do this. Because I see this window is I know my knees, I'm standing. So it's not very comfy to do this. As I said before, I want to add, we'll see how it looks so I can use my same tracing paper or maybe place this here. Yeah. And this endif. Okay, so now you have your final composition and we're going to start painting.
12. Color Palette: Now that we have our Joel, really, we have to choose our color palette. For that. I am and I use these leftover paper that I have that is exactly the same as this one. If I use these guns from Mountbatten, I love purple. As you can see, my hair color does one I paying these with you guys, purple. So maybe for this final project, I won't use part or parts, or maybe I want to use my Magnolia, magenta, purple so I will not paint. The fine man is important to make a good amount of paint. Because imagine that we are finishing this flower and then we still have one for our live or whatever, and we don't have more paint. I almost never use the color as it is in the watercolor pilot or in there watercolor tube. I always mix. And in this case I want purple but with a little bit of magenta so I can make tires here and then make a big amount in this area that it's deeper. So let's say I'm Play. You can use a mood board from Betas if you want to check. So I'm going to check in here, I think is to purple because it's the same as we used before. So I will activate these data I have here. I can add vt. And to make two colors, one here, less amount and work here more command. Because sometimes yes, one color is not enough. I like to make some shadows and they'll see is too bright for me. So I am going to add more or low dispersal. And a, I'm just showing you how I do. This is gross mother Hugh will make it less intense and more natural column. I don't plan to make our realistic flower rarely see composition is not my plant. Because I don't like people realistic are. I appreciate I'm not, but it's not my style. I like it. Remember, we usually use these for that evening, for this part of the flower and then just tap water. So I'm almost there, almost there for more of these. As I mentioned in this class, but I always use this brush to make my mixes because it's old. I don't mind to damage the bristles. I totally recommend that you use one brush that you don't care much to do these, for example, these and these. Yeah, I like this. Yeah. I'm totally by this. But I need more amount. I think that is okay. You have to make me make a little bit more because as you see, this color is not, this one is not, this one on, is not the liquid is unique. So you might even do that in the middle of your painting. Well, I have some greens that I really like a lot. They are here. So what I have to do is yes, activate migraines. I thought that that first clean my brush. So I like these, these these, these, these one and this one. This how that goes. See you in the next lesson.
13. Project: First Layer and Masking Fluid: Now that our illustration is ready, I will prepare all my russia's Number four. Number one. Number two, this is a brainstorm around number 2, brush. You see it has a really thin the, okay, before with this eraser, I'm going to take out a b of the pencil marks because even that I draw without a lot of pressure in my benzyl still is do that for me. So if I paint over the pencil mark, you will notice after my water color drag. And I use this rational number two because I wanted to show you how it works. Okay, So I will start at the beginning by the center. Too much pigment and proper camera, the top. So you can see when I have big man and when I grab more water. And also you have your heart that close up before in the previous exercises, in the previous lesson. So but let me know in the comments if you like this or do you prefer that other? At masking fluids? One. Yeah. So he says I always use Chef it, close it. And with that old and cheap brush, just cover these parts of your mock nausea. Okay. Be careful to that. Doubt this part because it's weight is still wet. So remember that does have to continue with this, with all the petals of your illustration.
14. Project: Second Layer and Details: It's not mandatory. You have to finish all the flowers before I start painting the leaves. In this case, we have 45 flowers, so we have that chance to let it dry and start with another parent tile of other flat. And that help us. But if you are painting just one or two, you're going to start painting also the elifs. So I want to add details in this part. So yes by they pursue brush to start taking some purple and they put it in there. Taking some magenta. Don't overdo because we don't want to lose this bright fat. Okay. Continuing our they've got details in order to get us okay. I'm almost finished with all the petals. I already started with some lives. So I will show you how to paint these leaves that it has, this part that is folding, but for that, I have to activate my greens. So clean your brush. If it has magenta. Now. I like doing my migraines. Two rings mix very well because sometimes the bottom of this area of your palate, it has more pigment. So just mix well, the water color with water. I will use on 100 one versus this one around. I will start with the darkest one at the beginning of the leaf. Here I said in the green is 30 in this part. Here I clean water. So you want to write this part, okay? Now, let it dry before painting this area. And we can continue with another leaf saying, start with a darker, I think is not that good. I've done, I add too much water grown, I activate it. So I just want to make it a little bit more intense. More pigment from my pan mix. Well, so the same here. So pavement but a lot I always do. These are my valid because he heard thick. It has a drop is too much water in here. So I guess they make progress on one side of my pilot and then start painting the beginning of their leaves. Usually either local areas. Now I have this brown here that I have to activate side as my Welsh. After we finish paint all the areas, we can add the details and also remove the masking fluid. I will start with ring. This ring. It's very tiny, so I will use this rash. And saying, I said that here in this area, the rounded, you just activate more RAM. Here is not to thing this stem. I'm not perfect. It has texture, so it doesn't have to be. A state might actually is much with it to the irregular with my mechanical pencil, but without that deep, I will remove the masking fluid. Now this part of the leaf, we have that. Absolutely. I would take and activate our beans and my, I've had, I have here, you can see these green. So I will activate these green now. That is very that just because I want to convey that this area. So I would take a beat and now I've got this. Now paint over here. For this area, the B-cells, we use buster collars. So Atmel shells or monolayers, wherever you think it meets. Remember, we spent a lot of time painting flowers, all the petals. So the leaves next time as well. So yes, carry on. I will do the same. And then we'll see how to do this. Okay, further, activate the white of the paper. Okay, So we've been given the details in here. If you want your converge to a white pens as well, do that. And but I just wanted to use the brush. Don't add white ink over the darker part. Always use the right to make more right? Where you are ready. Make white bars. Okay? Yes. So we pretty much finish illustration.
15. Final Thoughts: Thank you for joining me in this glass. I really want to see your goal positions. And if you want to share it, not only here in that glass, but also on social media. Please don't forget to tag me. Please don't forget to leave me a review. It will help me alert because I can read your feedback. Yes. Let me know. What do you enjoy the most or which areas I can improve. Thank you a lot for sharing your time with me. When I'm hopefully see you in my next class.
 Fio Ortecho, Watercolour Artist & Teacher