Transcripts
1. Introduction: Hello everyone. I'm Denise
Love and I want to welcome you to this online class on
intuitive watercolor painting. In this workshop
we'll be exploring the beauty of
watercolor and graphite while creating a collection
of smaller pieces tied together by
color and marks, will experiment with creating
atmospheric landscapes, as well as some abstracts
using a variety of materials, including stencils,
graphite, pencils, and some mineral paints. Whether you're a seasoned
artists looking to expand your techniques or a beginner wanting to explore
your creativity, this workshop was
designed for everyone. During the process of
intuitive painting will unleash our
imaginations and let the colors and
marks guide us to create unique and
expressive works of art. Let's grab our watercolor
paper and some paint brushes and let's get started on this
creative journey together. I hope you'll enjoy
this class and let's have some fun creating
some beautiful art.
2. Class project: Hello everyone. Your class
project is to experiment, and play, and come back, and share what you worked on today from the things
that we did in class. You can check under the
Project and Resources tab for a little bit more information
and post your project. I get super excited to
see what you're creating, so don't forget to do that. I'll see you in class.
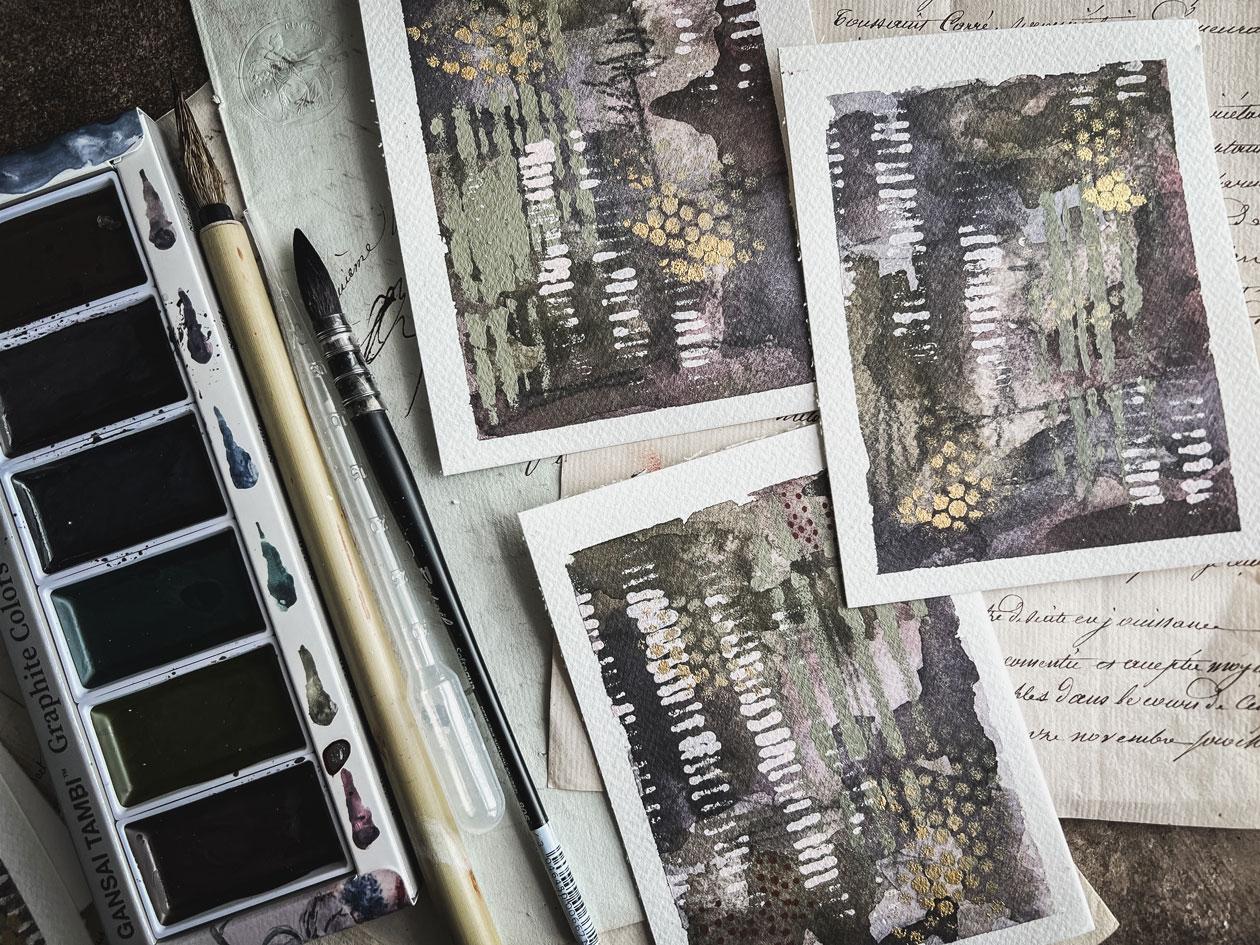
3. Supplies: Let's take a look at
the supplies that I ended up using today in class. Let me tell you this was
a good painting day. This is a fun class. I got beautiful things
that I'm stoked about, and I can't wait to show you
how I painted these today. Supply wise, I did
use a little bit of salt on my piece and this is a great big
thing, a sea salt, and I do like big chunky
salt so you can get some big chunky salt
to make big pieces, little salt to make
little texture. Just experiment with
your salts there. I do use a little tiny bit
of granulation medium on some of these pieces just to experiment and see
how it works with it. I put those on with a pipette. Have little pipettes over here. Use what you have, you don't have to use anything
that I've used today. It's more about technique and experimenting and seeing
what you can get. But I'm just showing
you things that I used today in class. I'll also use some
stencils on top of these, I've got a piece of punchinella, which is my very
favorite stencil, you only need one cloth of
this and it's amazing you can get stencils
with the holes in it too though this is
actually punchinella, which is what they
cut stencils out of. It's a metal mesh. This comes in bigger sizes too. I have both sizes, but this is a
smaller sized hole. Then you can get a little
bit bigger sized hole. You can get this in
different sizes. I love this. It's my most
favorites stencil ever. Then I'm using a couple
of StencilGirl stencils. This is stencil 376 one
of my very favorite. This is another favorite
that I like to use, and this is StencilGirl 227. Those are the stencils
I'm using in class today. I've also used the
graphite watercolors. I love graphite
stuff because I did a whole series in
graphite things, but we're going to revisit
them today because I thought for these
yummy abstracts, this was the day to revisit
the graphite and get that yummy smoky beautiful
color that these create. This is the set of six and I'm
using the red, the yellow, and the violet in this set
today for this collection. I also pulled out and
you can substitute any acrylic paint for this but I pulled out
some fusion colors, which is mineral paint, which is basically paint you
use to paint on furniture, but it's like the most
beautiful colors. You can get fusion
paint on Amazon, or maybe at your local market, like an antique market or craft market you may have
some vendors that stock that and that's where I got
these little one and a quarter ounce pots. These are like little
sampler sized pots. The Amazon ones are
big paint pots. If you order and pick one or two colors that
are your favorite. Today I was using paeony
and bayberry and lichen. I do show you a couple of
other colors that I have at just because I have
them but I didn't use I'm going to
have pretty sunset. That's gorgeous. My most favorite one
here is the chancellor. It's yummy dark
tealish green color. It's so beautiful. I also have lamp white
and little whale. Look how pretty that is. This right here is my
most favorite color, just as my own personal
favorite color anyway. This is chandness,
but look at this, it's the most beautiful shade of light blue green that really, you see a lot of
things with it on it, but you never see any
paints this color and it's the most perfect color, so you can substitute. This is just stuff I used
in the stencil work today because it was the
right colors and I like it and I have it.
Use what you have. I'm also using my aquaralle
toky gold mica paste, which is my very favorite. If you haven't
gathered that by now. In class today, I was using a Winsor Newton number
4 Bamboo brush, which I love how yummy
and unpredictable this brush is and it creates the most beautiful landscapes. I love that. I also was using my Raphael zero soft
aqua mop brush, my other favorite brush. Then I also was using some
water-soluble graphite. Think I might have had
this one that I was using and the chunky one just
because a have it. Then for paper, I'm using the Aquarelle Canson Heritage 140 pound cold press
watercolor paper. I like it because
it's cotton and I wanted to just play
in that today. You could have
definitely use any of your watercolor paper that
you like for this project. Then I also was taping this down with some painters
tape and I have the blick artists tape and
also have some artist's tape from Amazon that's just
called artist's tape. And I like these artists tapes. Now that I'm looking over here, I can see where I put my
open one. Here we go. Because they are
like painter's tape that you get from
the paint store, which you can see
I use that a lot too since almost empty, but they released the paper a lot better than
a masking tape. Don't use a masking
tape, you'll be sorry. [LAUGHTER] Then also had just a random old card that I
could scrape salt off with. You can use this for
mark-making to which in my mind I intended to do that but I didn't
end up doing that. Just a random card
if you have it. So that is our supplies
that I'm using. Definitely feel free to
substitute this is very forgiving and goes any direction
that you want it to go. I can't wait to see
what you're making. See you in class.
4. Getting Started: Let's get started. I've
gone ahead and I've just taped my piece of paper down
with some artist's tape, and because this
is a larger sheet, it's about a little
over 10 inches by a little over 14 inches. We'll say 10 by 14, but
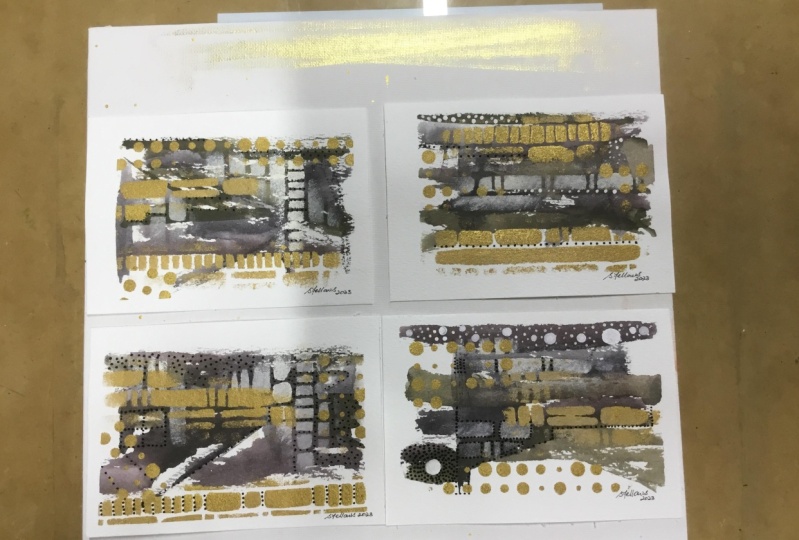
it's in centimeters, so it's got like a 0.2 in there. What I did because I had a little extra piece of paper rather than cutting
the paper off, I measured out three sections
that were the same size. Then I have a little
section leftover, and then I cut that in half. I just want to paint on
the whole paper like it's either six individual
entities that I can then separate and
have part of my collection, or I can make it one big entity like I do in a lot
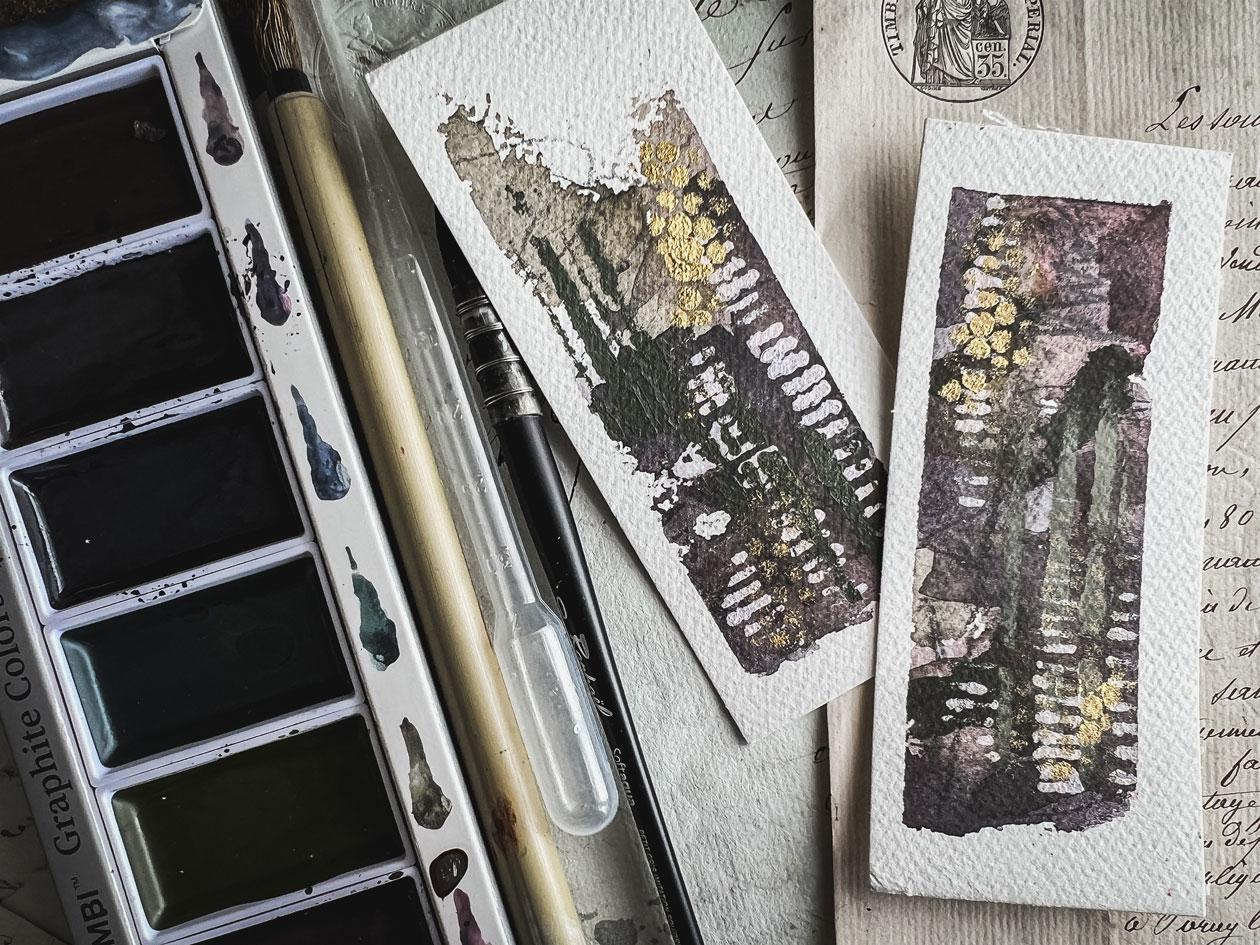
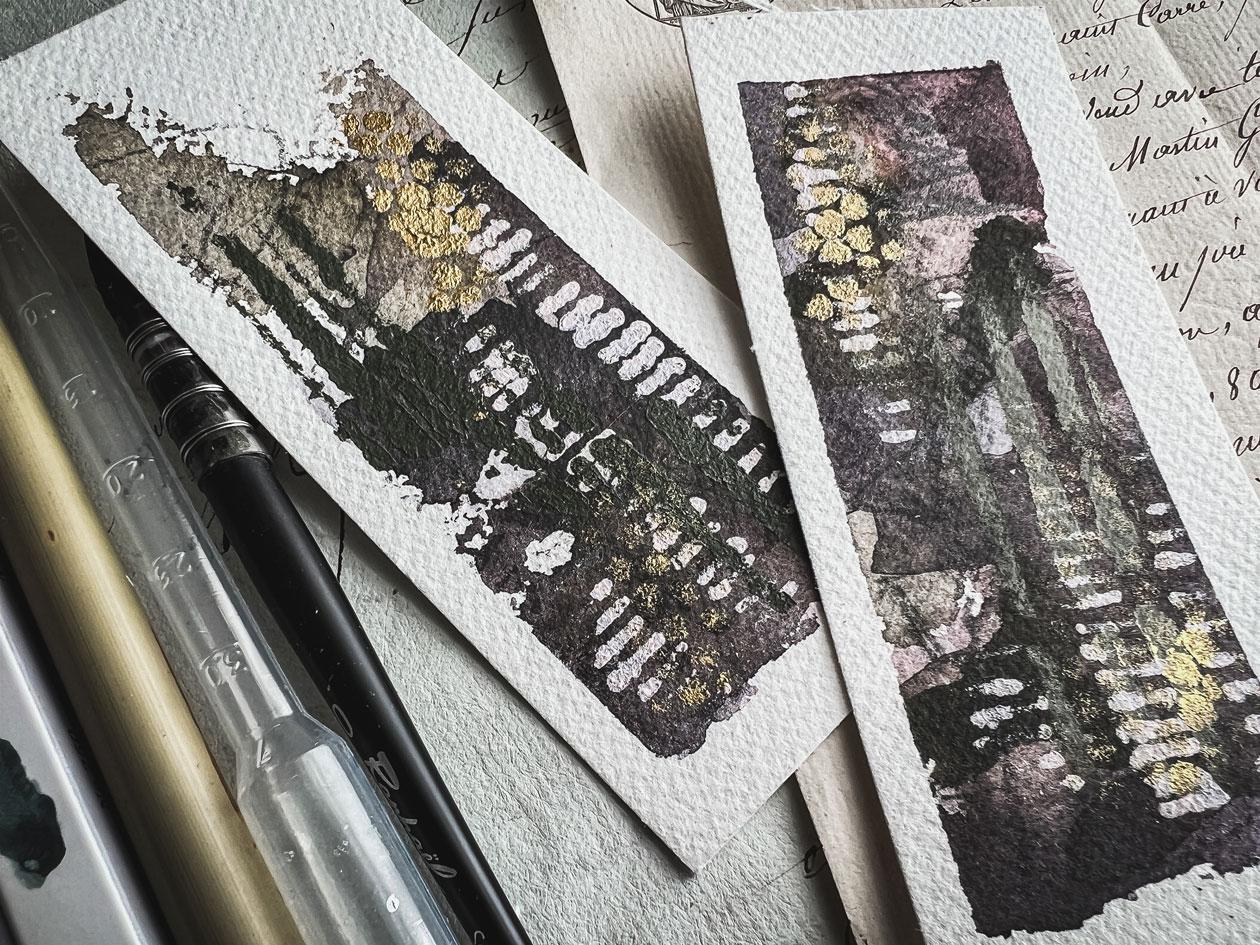
of my intuitive paintings. When we pull it apart, we can see what we end up with. I like having the two extra
little pieces at the end because then we have something that's like the
size of a bookmark. That's super cool for giving
away for gifts and stuff. I'm using the
graphite watercolors. I'm going to do a
graphite set today. I really love the Gansai Tambi Graphite
Colors by Kuretake. It seems like
everything Kuretake is my favorite and there was a little period of
time last year, if you were on my Skillshare
channel when I got so obsessed with graphite, I love the graphite. I went ahead and just sampled my colors here on
a sheet of paper, so I already know what
I'm working with. In my little obsession
of graphite colors, I came up with a way to make
my own graphite watercolors. If you love the graphite
as much as I do, I have a Skillshare class on making your own
graphite watercolors. It's ridiculously simple, and I know you'll love
doing that because it's fun expanding the colors when there's only six and
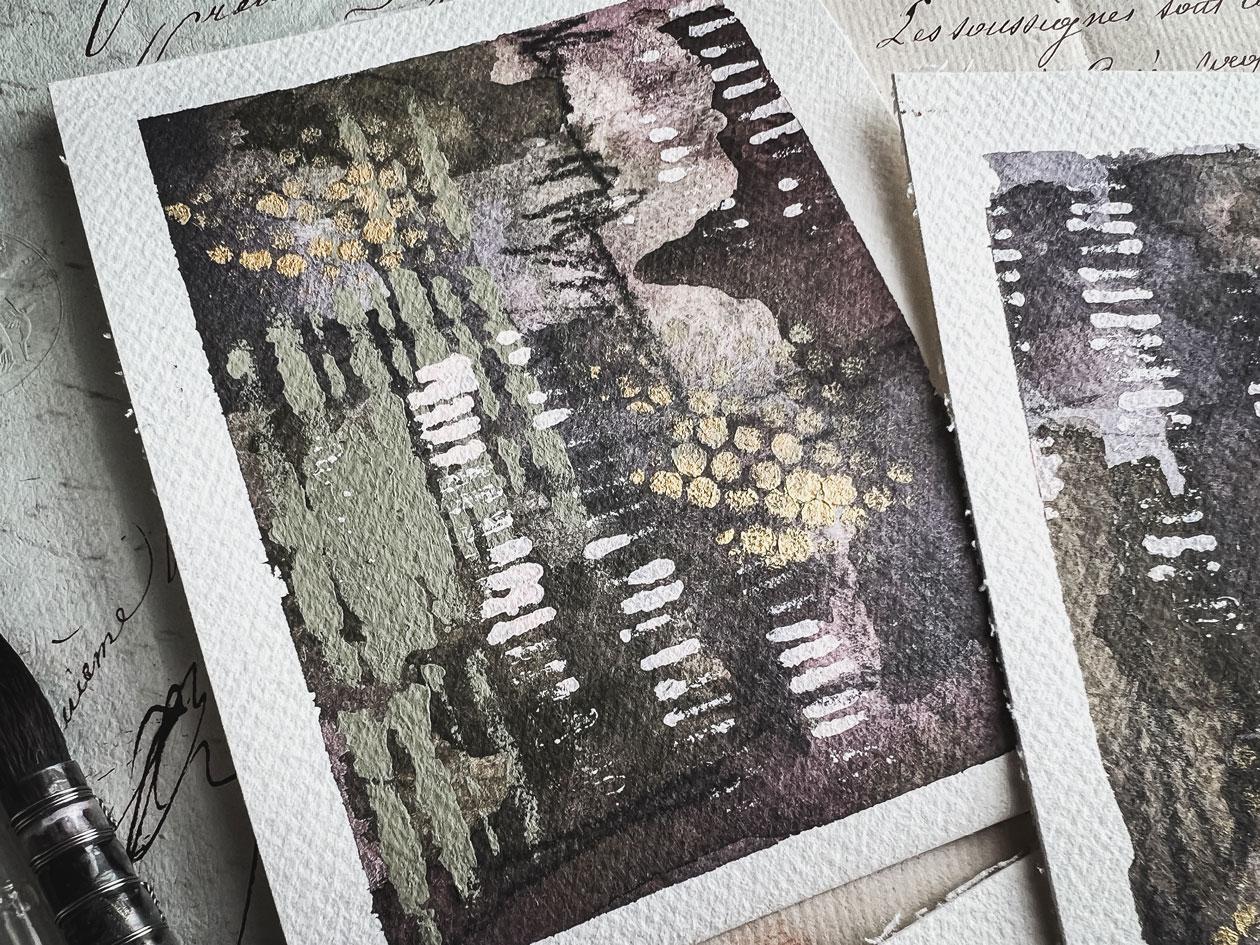
you're like, I need more. [LAUGHTER] What I like about the graphite watercolor
is that it makes every color immediately
very smoky. Then you can come back and burnish that watercolor
with the back of a spoon. I usually have some
little plastic spoons handy. Here we go. You can just burnish thicker
areas of that color, and then you get this bit of a shiny graphite tone
to the painted piece. How cool is that? Because as soon as
I burnished it, it just really made that
pencil part come out. I want to paint all of this. Then we'll do some mark making and maybe some finishing marks. Then we'll peel the tape
and see what we get. Because let me tell you, you'll hear me say
this a million times. If you find something that you really like doing in your art, do more of it. I know I love to peel tape, I like to intuitively
paint on big pieces, and then maybe I will
separate and cut that up. I like to play in the graphite. Any excuse to try a
new graphite piece, then we're going to
give that a try. What if we make these like
some smokey landscapes, or we could do complete
abstract pieces. What do we feel in there? We're filling abstract,
or smoky landscape? I also have a couple of
water-soluble pencils in here. What I love about these is it's water-soluble graphite
and we can mark make, and I like them when
they're in the B range. I've got 6B. I've got some of
these that go all the way up to 12, I think. I've got art graft and I've got the Graphite Aquarelle Buffet by Castell in different things. I've got these layer
of graphite sticks and I've got several of these
in different strings. These are just all
some fun stuff. If I were doing, what if we
do abstracts, landscapes? [LAUGHTER] [inaudible] ideas, come together. Let's do that. I'm going to do just
the weird abstracts here on the bottom. What I like about starting with mark-making is now we're no longer looking
at a blank page. I don't have any of that
blank page paralysis that I normally would get
looking at this going, Oh, no, I don't want
to get started. I might mess it up. You
no longer have that. Super fun stuff. [NOISE] Let's start
that one this way. I'm going be painting with a couple of my favorite brushes, which is my Refill
soft awkward number 0. It's a mop brush. My Winsor Newton number
4, Bamboo brush. For some reason I just love
the unpredictability of how this puts paint on when
you roll the paint around for our
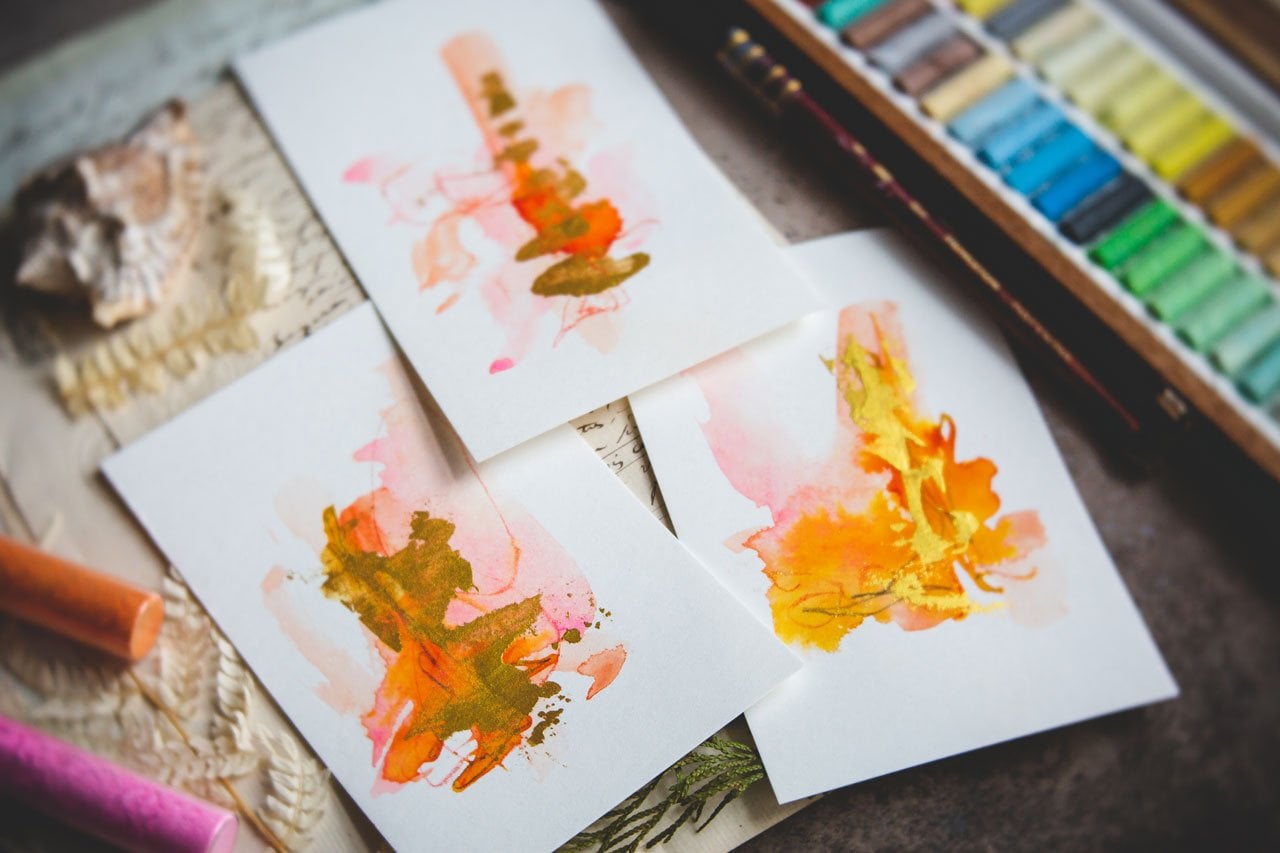
landscapy painting. Yummy there. Then this little
set has six colors in it. We've got a pretty
graphite red, yellow, green, blue, violet, and graphite brown. Feeling like these
are beautiful. Maybe we could do a landscape in these
pretty subtle colors. We could go dark light and pretend we're in
the mountains looking at the beautiful
stuff in the sun, in the morning as the
fog is being burned off. Let's do that. Let's
just go ahead. Let's start with
that. We're going to start with the purple. When I do these yummy
little landscapes and just rolling that
brush with the color. I'm not trying to be exact. I want the organic feel. I just want to see what can we get with a
little less control. But yummy. Oh, look how beautiful
that are, oh my goodness. I'm already loving those. If you started with a
paint that you love, you'll probably go to end
up with something amazing. If you don't have
a paint that you love, start with these. [LAUGHTER] Oh, my gosh. Beautiful. I actually went to start in that one
first over this one because if I start painting here then putting my
hands all over it, I didn't want to mess it up. Which let me tell you, I've done more times than I can count. Look at that. Oh, my goodness. How many of you use, dude, that I totally just age myself? [LAUGHTER] I used to work
in the cabinet industry, do a big cabinet orders and
stuff for builders because I have studied interior
design in school. I worked with this guy. [LAUGHTER] It was like
our little office joke that we could answer almost any question
with the word dude, it didn't matter what you ask, I could do a dude with the right inflection and
you knew what I was duding. [LAUGHTER] If you
had like, dude. That's like what
are you thinking? Then if you had like,
dude [LAUGHTER, That's like, hey,
look over here. If you had like, dude, oh no, yeah, like that little oh,
no inflection going. You can see how I want
you to practice this. If dude is no longer popular, bring it back [LAUGHTER]. If you had like [LAUGHTER], a dude buddy [LAUGHTER], tell me about it because
man, it's hysterical. I was thinking about that
the other day [LAUGHTER]. I will call you all, dudes. Funny. Oh my gosh,
these are so beautiful. Can you see how gorgeous this
bookmark is going to be. Wow. I feel like got some
goodness going on there. Let's move down here to
the little abstracts. I'm going to switch
to a different brush because, why not? Still love in those same colors. Maybe we'll just
go ahead and work it and then see how different we get with the two different
ideas that we paint. Oh, really love in
that one. Oh my gosh. I get so excited painting at my art table with these
intuitive type things. I used to just sit
here and get mad because some masterpiece
wasn't coming out of me. When I learned to paint
without expectation, without trying to paint
something specific. I have an aunt who is an amazing painter that I hope she doesn't look
at myself and think, what is she thinking, because she's still
around?[LAUGHTER]. But she can paint pictures
that look like pictures. I've been doing art for
we'll say a very long time, because I'm hopefully
much older than you think I look [LAUGHTER]. I've drawn pictures and had drawing classes and done lots of things.
Oh, look at that. I just know now at my age
that that's not what I like and it makes me mad when
things don't turn out and I don't enjoy the
time at my art table, and when I figured out
that this is what I liked. Figure out what you like
and do more of that. Then look how much fun we
have at our art table. Then it took me
years to get here. Trust me, because it's only
in the last few years that I truly enjoy hanging out painting with you guys and just
creating what feels good with some colors and some materials that I might oh, let's play an experiment
with this and my art channel has a lot
about experimenting. A lot of my art classes are
too and figuring out like, what do we like working with more so than here's how
you paint a flower. Which I love abstract too, like I collect abstract art, and so that tends to be
what I gravitate towards. Than after having to do very specific drawing and different things with interiors, the more organic and
less specific I can be, the better [LAUGHTER]. Drafting. I learned how to draft on a drafting
board [LAUGHTER]. They weren't even making the computers when I
was in high school. We didn't have my
first computer until I was coming out of high school and my mother read the book. Me and my dad were like, how do you do this?
How you do that? My mother was like, I
don't know [LAUGHTER]. She gets so mad
at us [LAUGHTER]. I learned how to draft on
a real drafting board, and I learned how to type
on a real typewriter. How crazy is that? I've seen those little
typewriter boards that you can get now
for your computer. I think they're like KERDI
board or something like that. I can't think of the name, but I'm thinking how
cool would that be? Maybe I need one of those
and get back to typing on something that feels like a real typewriter that does the click, click, click, click [LAUGHTER]. Wow, look at this. There's a lot of good
stuff going on here. You know what I want to try because I haven't tried it yet. I've got some
granulation medium. Because I've never tried
the granulation medium on the graphite,
Kuretake colors. I did those yummy
granulation medium videos on how to use
granulation medium. What if, just for giggles, we try some of these out. Now that I'm thinking about it, I meant to come back up here and just touch
these with water, but I've let them dry too
much now. Oh, here we go. To make pretty blooms
in this stuff, you want it to be damp, not dry. Then you could come back
into the damp area. Not drop this on the, oh look, it's already doing
something [LAUGHTER]. A drop of the granulation
media. Look at that. Oh my gosh, it's just like
transforming [LAUGHTER]. But before this is all dry, let me go make some blooms and this up here. Oh my goodness. That was like a little
accidental drop, but [LAUGHTER] it's looking
super cool [LAUGHTER]. I like it when
these bloom because this watercolor makes these
beautiful blooms and stuff. You can see them right here. That must have
been the only part that was like still damp, but I could have done that. I could have done salt. If I wanted to salt it,
I could have done that. Let's just do our
little thing here. That was crazy right there. Let's just go ahead with
some more of this granular. Oh, look, you can just watch it like
magically move as I'm going. Just very strategically,
let's just get some in here and see what we
can do with that, because the granulation and
you could do this water too, but because I'm newly obsessed with the
granulation medium, let's just throw some
of this in there. It makes pretty blooms. It makes the watercolor
granulate in ways that it might normally not
do [LAUGHTER]. Look at this. I'm
already feeling the yummy blooms up here. If I ever say blooms, you know I'm talking about this blooming like
this [LAUGHTER]. Sometimes I talk in my mind and my mouth don't
coordinate [LAUGHTER]. I'm going to have to let
this dry and then maybe we can do some final
marks and I'll be back.
5. Adding Another Layer of Paint: I've let these dry some, and what I can already
tell is on these top ones, I want a little bit of
darkness going in here, so we can come back
and add more layers. We could then add
marks on top of that. You can do as many layers as you need in your
pieces to your like, I love this, but I
really feel like I need some contrast
with some darkness. I feel like these
are drying very light and that may be
in that lightness. I need some dark contrast. Did you just see what
that did? Oh my gosh. [LAUGHTER] Oh my goodness. I want it right around this bottom part
here. That's exactly. I want that dark contrast. I hope that stays yummy and
contrasty here as it dries. The paper is a little
bit wavy as it's drying. See now this is exactly
what I'm feeling. As it was drying I thought, it's all the same hue and tone, and I really want there to be some yummy darkness that
gets started in there. I want there to be some
other stuff going on here. You see this brush is magnificently
unpredictable in where it's going to hit
and lay that color. That is why I love it so much. I love things that are
less controllable, that makes your art look
a bit more authentic, a bit more unpredictable. Some people don't like that, some people like the control. If the bit of unpredictability
is not your thing, like that was too much
on that third one, I think I didn't predict that, if you don't like that
much unpredictability, this might not be
the brush for you. Look at that. [NOISE] I
don't think I'm going to put any more water blooms in because
with these I do actually like how beautiful they are
doing their thing right now. But I could come by and put salt if I wanted some texture. There's lots of
things that you could do to really add to these. I mean, salt might be fun, if we go ahead and
put salt on those. We can let that salt dry. We can be strategic about it, but there's enough wet color
there where maybe we'll see some differences, maybe not. We'll just see. Now once you put the salt on, you got to let that
salt sit there until this watercolor pieces dry before you can come by and
add your next layer to it. Now, with the same
thing with these, do we want to add
a little bit of some darkness and contrast
before it's 100% dry? Maybe we want an additional
layer of something. Let's go back to our other brush here and get that in here, maybe some of that
same as an additional because this is
still going to dry a little bit lighter than what
we're actually seeing it. But maybe a second layer with some contrast is what
we need. Maybe not. I mean, I'm just
feeling it for these, so you decide on the
piece that you're doing, what feels the best. Let me come back with
some more on that one, some other with the other color. That first one; so gorgeous. Fill in that with the
darkness. Maybe with this. I know this says it's
graphite yellow, but it's the most beautiful,
smoky, greenish, green-gold. A lot of times I want to love green gold
and I use it and I'm like, totally ruined my piece. But this, every time I use it, I'm like, oh yeah, it's
the perfect color. That with smokiness
in it, I love it. Maybe I like smoky green gold. Maybe that's what
I'm always wanting when I use regular
green gold and I'm like [LAUGHTER] let's go back with a little bit of
this red in there; just work in it. I don't usually get worried at this point about composition, so you don't hear me focusing and talking
about that quite a lot at this stage because I'm worried more about where
does this color go? Where does it feel good? Let's just go ahead and do it. When we peel the tape, we get amazing things
because I always know that I can cut things
up if I don't love it. I keep that in mind
and I don't stress and worry a great deal a bit
about how I do things. But in saying that, I also don't put everything
right in the center, I tend to start, offset, and offset, and I'm filling in
around those offsets. You almost could
say, rule of thirds, rule of thirds, and then
fill in around those. That's how I was
laying color down; just as something
that feels more natural to me and
how I do stuff now. That's probably just from years of painting and stuff that I'm naturally gravitating towards
certain compositions. Rule of thirds in photography in painting is usually
the one that I love, and so I'll offset
things just naturally. Let's let these dry
and I'll be back.
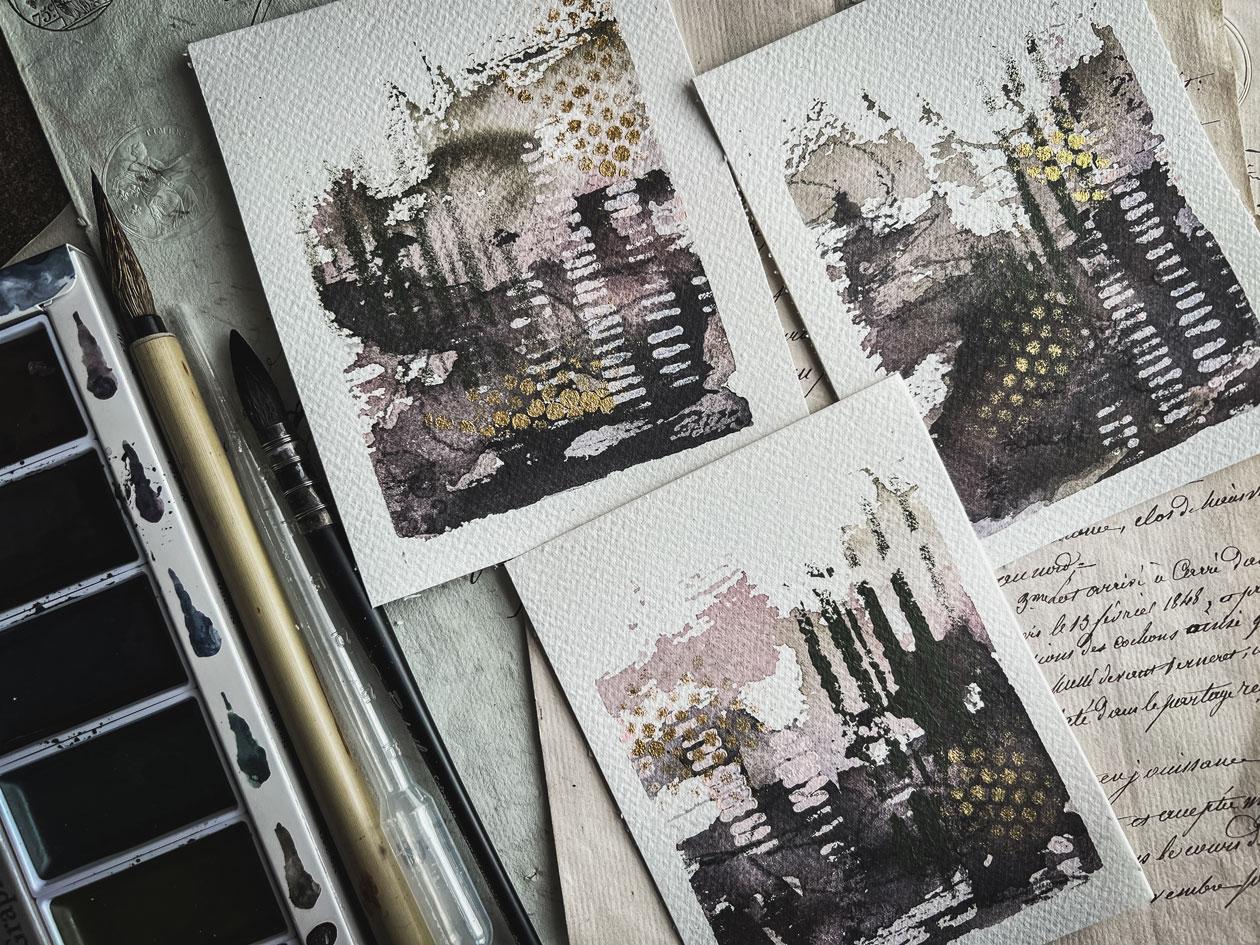
6. Doing Stencil Work: We've gotten this dry. I will admit that
I hit this with a heat gun a little
bit as it was getting close to the end so
I could continue filming. If my salt spots aren't 100 percent dry,
that would be why. What I like to do with
the salt is I like to use personally
the bigger salt. Definitely experiment
with different salt sizes and see what you get. Then I like to not
throw the salt in the trash because,
after a while, especially if you're using
the bigger pieces of salt, you get lots of salt leftover and we can just put that back in the salt container
and use it again. If you don't like to contaminate
your salt with colors, have a separate little
container with used salt, and then you can use it
again and again and again. All it does is
sometimes give you some pretty little
color variations in the salt if you're using it on something where
it would show up. It's very easy just to
scrape the salt right-off with an old card and you're
ready to keep going. Then you can see
how easy that is. I could pull this to
the end of the table, and then I can put that right
back in my salt container. Look at all the salt that
we didn't have throw away. Instead of buying salt over
and over and over again, we can just reuse our salt. I don't even mind dirty salt. I'll put it back in
the same container. There we go. We have got yummy landscapes and
yummy abstracts. Now I want to start mark-making and doing
some things on the top. With the landscape,
I'm almost wondering, look how pretty that
is right there, that yummy salt sprinkle that did that right there.
Look how pretty that is. That's why the salt is so much fun because you
get that yummy texture. That would have been pretty in some of these other ones too. I know we did the
granulation medium, but that would have been
fun down there too. Because you can actually see the granulation medium
right through here, totally granulated
all that color really beautifully. I love that. I'm almost feeling like gold or copper,
which we can vote. Because, I loved my gold and
I've got this yummy copper. What do we want to do?
Why don't we do copper? This is the pebeo relief
outliner in copper. It's new to me. But we could do
lines and stuff with a palette knife or we could do some dots around
specific pieces. You could collage on these, you could do all
kinds of fun stuff. Now one thing I like about using a liner is because then
you could actually strategically put lines
in certain places and be more strategic than
just putting it onto, say, a piece of pallet paper, where we would then scoop
it on with a palette knife. Definitely your choice. What do we want to do? I need somebody to vote
here because these are fun. We could do stencil
work on top of these. Stencil work. I'm just trying
to like spit ball here and give me some
options about what if we do some stencil
work on top of these? Oh yeah, I'm feeling that. I've got several
stencils I love. This is a stencil girl. Stencil S227. This is one of my favorite, and it is stencil girl S376. Very favored, a piece
of punch in Nala. Then I've got another
stencil which I'm sorry, does not have a number on it. It must not have come
from stencil girl, but it's also one of
my very favorite. I'm feeling like we're
going to use some of this. I don't know, maybe I
feel like this one. I'm going to grab a few
acrylic paint colors. You can use any acrylic
paint that you love. Got rearranged a
little bit here. You can use any acrylic
paint that you love. I've got all kinds of
paint and options. I've got this yummy
fusion paint, which is a really
pretty light pink. I also have the sharp and paint, which is this pretty light
pink, Caribbean pink color. Love those. Just looking at options here. I've got this fusion paint in this is bayberry,
this is peony. Look at those two colors. I'm almost feeling like these. I will tell you
that these are the little 1.25 ounce jars. The little sampler
jars that I got, they're like mineral paint
for painting furniture. But I painted another
painting with these, and oh my goodness,
totally obsessed. Also have a lighter in
this one, which is lichen. You can actually get these in larger containers off Amazon. They're like big
paint pots basically. We're going to use these because
I'm obsessed with these. I'm feeling like peony. Now I feel like I
need to go back and get every single one
of these little, tiny paint pots because
it's the perfect size. I'm using an art sponge, which is basically a
little round sponge that looks like this. I just cut these into fours. You can google art sponge and these comes up, that's
how I found them. I like having lots of these because you
want to use a dry sponge and a fairly thin layer of paint as you're
stamping into these, and you end up with the
most amazing patterns. I'm just going to dip
that right into there. Got a little piece of
pallet paper over here. We're just going to go for
it and see what we get. Perfect choice. [LAUGHTER] Just a little
bit of yamminess in here. I just move right on
to the next thing because it's thin
layers of paint, it's not like I'm dropping
a ton of paint on here. I'm doing nice thin layers, just seeing what we can see
these are so beautiful. I'm going to go back
and get more of these. I'm just going to
buy all the colors. [LAUGHTER] But you can
use any acrylic paint, don't feel like you
need the fusion paints. Oh yes, I love that. Once you find something
you like do more of that because you're going to love
the pieces when you're done. You're going to can't be
like oh my gosh, most, best favorite piece ever. [LAUGHTER] Could I
have done any worse? A little grammar there for you? [LAUGHTER] Let's
see what we got. Oh yes, I know you guys think
I'm crazy. But I love it. There's our panel. I
might be going dude, I got these antique store. There's a booth
there that has them. But I found them on
Amazon because I'm like, what if I need more or what if I need to tell somebody
where they can get some? What if we do this
way with the green? Let's just see what we get. Actually let's do this one. Do the one that you think
is the least important. Which the bookmark for me is the least important
because the others could be little
framed pieces of art. Do the one that's like, oh, okay, very
interesting actually. It blends in a little
more than I thought, but it is a super cool layer as you get close to the
piece and you're like, what's going on there? What is that? Oh, now I see as I get closer. See now like that right there. See now, I'll look. I love that one. Do they
have this in purple? [LAUGHTER] What else
can we get this in? I'm almost feeling like can
I throw some gold in there. [LAUGHTER] Then I'm
like, let's do it. Let's just throw gold in
there because I'm feeling it. [LAUGHTER] Then we'll come back to the little
abstracts work in a way that hopefully
you're not putting your hands on top of what
you've just painted? Saying that to remind
myself as much as you. [LAUGHTER] Oh,
yeah. Look at that. Oh, look at that piece of salt. Definitely get all the salt off. I think that held up my
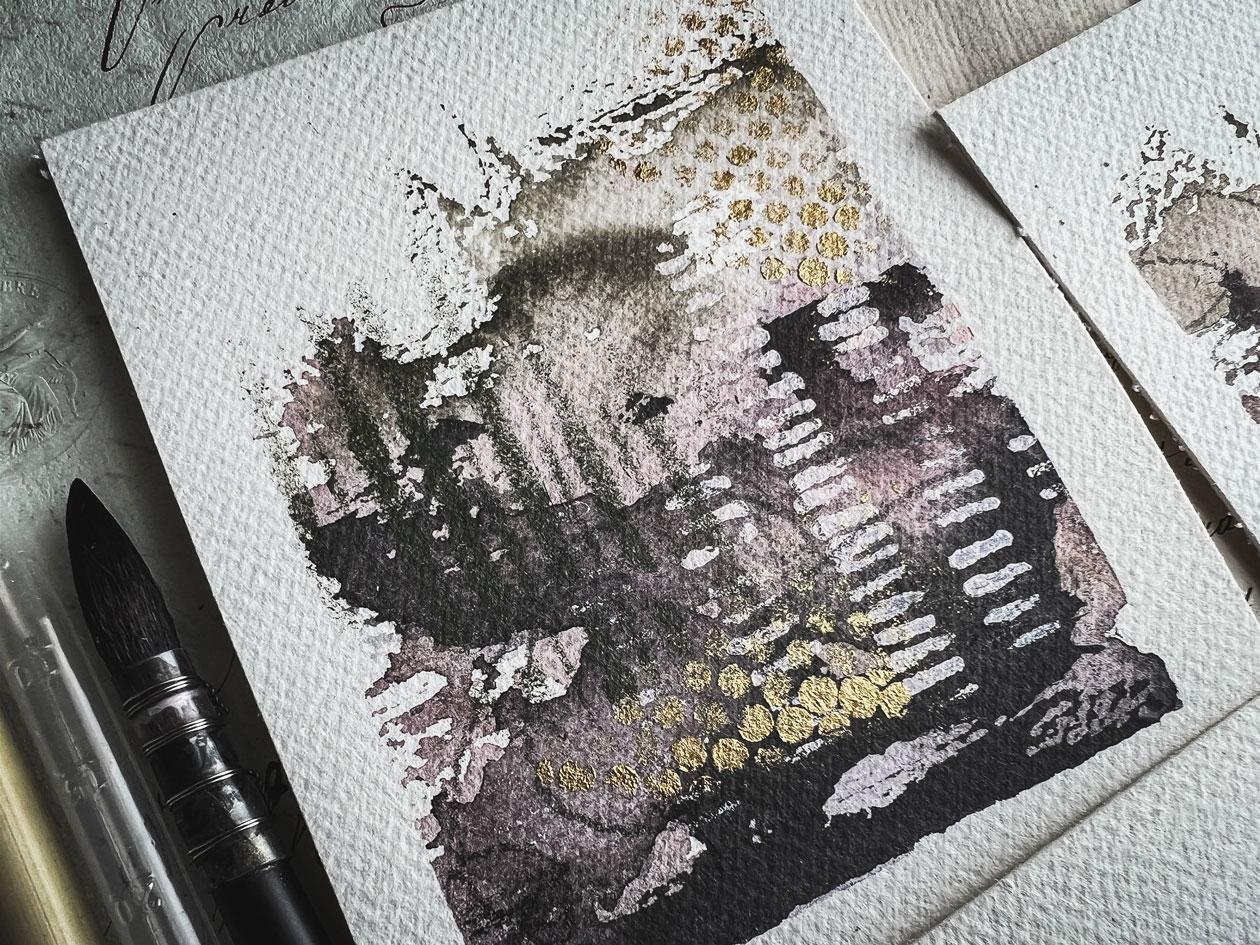
little stencil there hurried. I know we said we were
making landscapes, but they're like
abstract landscapes with some yummy little gems and
jewels hidden in there. Oh, so pretty. You can leave off
all this work if you truly wanted them
to look more like a landscape rather than an
abstract when we're done. But that's how I make
little landscapes too. I roll that paint around. Paint roller brush around
[LAUGHTER]. Told you. Sometimes my thoughts and
my mouth don't connect. See I like that. This is the gold that's so vivid when it
shines in the light. See those are so pretty. I'm loving those. Love, love. Now I'm feeling like
I would like some of these stencils here
on this bottom. These lighter colors
are the ones that were showing up the
most, but let's do it. This is that lichen. Do I have more over here, what else do I got over here? I've got some pretty
gray that's lamp white. What else do I have? See, I'm obsessed with
these blue colors too. I've got a little whale. Look how pretty that color is. I've got cheslur. This is the most
gorgeous deep teal. This is champness gray,
so gray champness. It is the most beautiful sea
foam pool gray-blue color. It's my most
favorite color ever. If you want to know
my favorite color, it's this, I have
a soul this color. Most beautiful color ever. Yummy. I think I have
a yellow over here. This is prairie
sunset, beautiful. We can actually substitute something like this
for the gold if we wanted to get a
little pop of color. I'm going to go in here
with some of this lichen. You can tell these
are newer colors. But after I used
that deep teal color on something, I was like, Oh my gosh, I'm so
obsessed [LAUGHTER]. I'm going to use this one with, this is the yummy lines
with that lighter color. It might still have
some green paint on it from the darker color. [NOISE] We'll just say, oops, and let you know that one
of my watercolor things was perched over here
very precariously [LAUGHTER] and decided to fall down for us [LAUGHTER]. I'm loving that. Just going to just
use fusion paint for everything. Oh my goodness. Now I really love
this light pink, but definitely substitute
whatever paints that you happen to have. I just feel like if
you start making stuff with paints
that you really love, like this, you're going to be super excited with what
you get when you're done, rather than thinking
that did not work, which plenty of things
don't work for me. But I'm already excited
about this paint. Pick out things that
you're excited about, pick out like you
got a new supply to play with. That's pretty. Then that's exciting. Y'all get that out
and play with it and see what can we make today. I like it when it's
spread out like that. Let's do that. This is how we discover some of
our favorite things. When you start, [NOISE]
look at those [LAUGHTER], then you're super happy with
what you end up with at your paint table instead of ****** off because
something didn't work out. Gosh, that's
gorgeous [LAUGHTER]. I'm feeling a little
bit of golden here, these are speaking to me. Let's go more with some gold. Let's just do gold. [LAUGHTER] I could squish in great big sections
if I wanted. But man, punchinella
is my favorite. You can get little stencils
that look like this too. But I like this
little mesh piece because you don't have this. It's a little piece of metal. It's the stuff they
punch sequence out of. It's the metal mesh
that's leftover. It is my all-time most
favorite stencil. You just need a
little sheet of it. You can google punchinella. You can find punchinella
stencils and ribbon on Amazon. There are places to get it. I don t know of anywhere
that stocks punchinella, but it's definitely
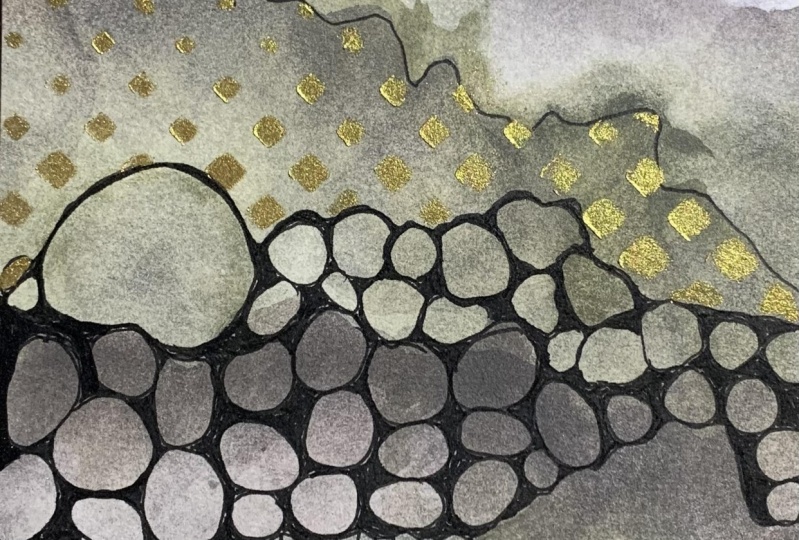
available online. Oh my goodness. It gives you the
fun little dots. I don't know if lots of people don't know about
this stuff because every time I post stuff
with yummy little dot, somebody is like, how did you get the perfect
little circles? I'm like, it's a stencil. Wow, so these are
turning out amazing. Is there anything else
left that we need to do? Do we need any extra marks? Do we need any white POSCA dots? This would be the
perfect time to say, maybe I need some colored dots or maybe I need some POSCA pen, or maybe is a good
time to go with one of these cool colored POSCA
markers, look at this color. I've got this cacao,
so it's chocolate. I've got us started now and it's a little bit lighter
than I thought. But we could come in and do
lines and marks and dots. Just as another little
surprise element as you get close to a piece and you're like what's
going on there? That was a little
bit of an odd color, so I'm not feeling like I want to repeat
this anywhere else, but I do want to repeat
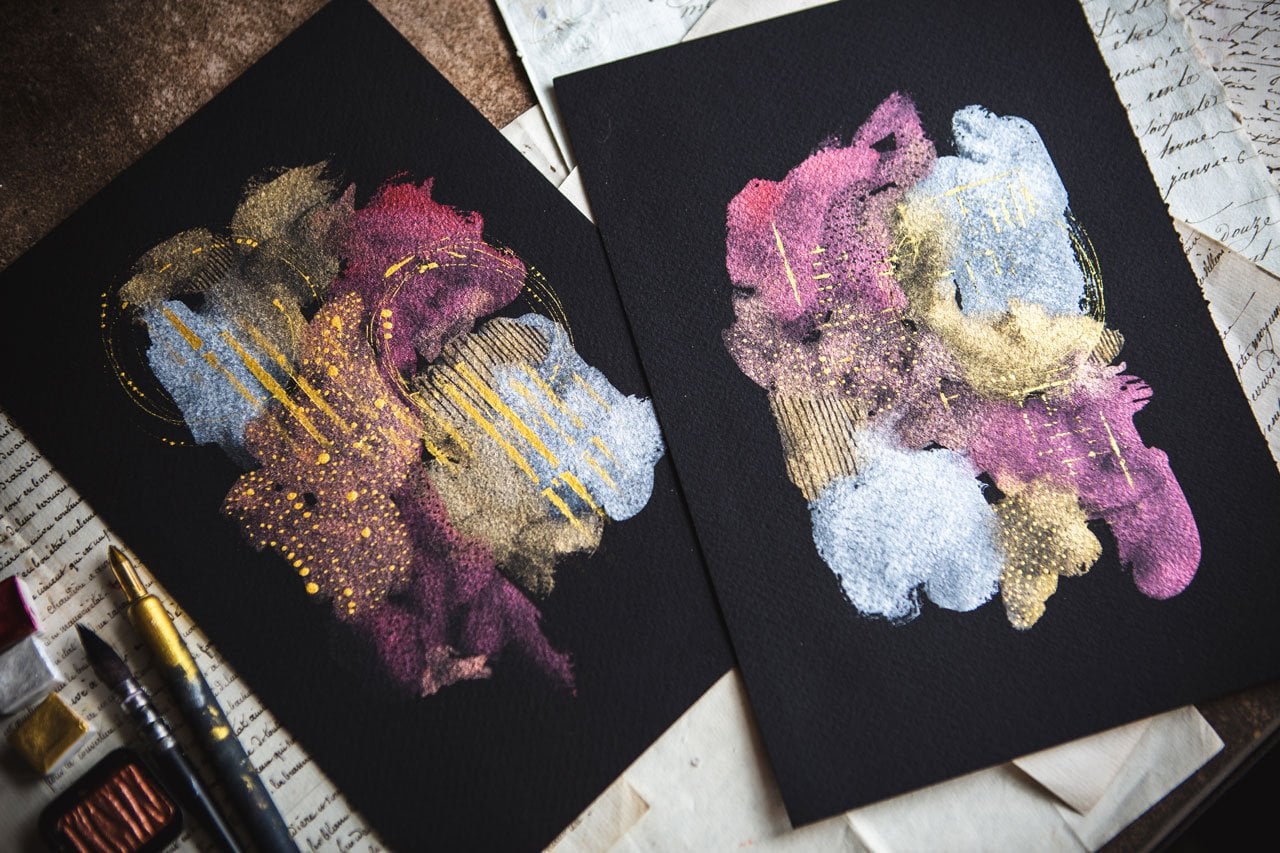
it within the piece. I really think white and gold and black are my
favorite dot options. But I might look at
this later because a lot of time my
initial reaction to something is generally
not like my final reaction, so I might look at
this later and think, I think it is amazing, but I don't know, I
don't know if I'm feeling a brown dot. [LAUGHTER] I'm really not even feeling any
extra dots in here. If anything, we could do a dark contrast is
something I could decide to come in here with
some extra marks on top. That's nice. You don't really
have a lot going on. Now that is what I love. Just an extra little
something as I was going. Let me scoot all my little
fusion paints off of here. We could take a
closer look at that. If we get real
close to that one, look at that little extra bit that are extra line
made in there. I'm loving it, something
fun as we get closer. You can do this
with a light color. You don't have to do
it with a dark color. But these are kind of speaking
to me in a way that's like do that piece of graphite and what if
we come back on here and just a little bit of a graphite influence
here with these. I'm loving those. Time to reveal what we get
so let's start. Let's peel some tape
and check it out. I'll put all my sponges
and some water so that they don't dry out. It's what I like about
these art sponges. They wash out really nicely. Let's move that there and
let's peel some tape.
7. Finishing And Cutting Apart: Using the artist's tape, if you're using any tape that's pulling your
paper with it, pull it at an angle, nice and slow, steady. Because I'm using that
Canson Heritage paper, I tend to have less
issues with tape peeling. But if I'm using a student grade paper that
has a lot of wood pulp in it, I tend to have a lot of
trouble with peeling. Some of that is you didn't
let your paper dry. Let your paper dry before
you start peeling tape. Oh my gosh, these look amazing
with the tape coming off. The other secret is if you
are still having trouble, take your heat gun
and heat the tape up and that will let it release from wherever
it's grabbed hold of. Oh, man, I'm feeling it. Oh my gosh. Once we peel these, we can cut these and you'll see what I
did here at the end. I taped a very thin line
at the end because I knew that I'd want to come in here and cut these in half, somewhere in the middle of the white tape so
that I can have an even border around
it instead of having a great big border
on one side and a real skinny border
on the other, I planned for that. [LAUGHTER] This feels so good. I love painting like this. I hope that these get you
excited to paint like this too and release some
of your expectations. Then I'm going to
cut these apart and then we'll see the
finished pieces. But look how gorgeous these are. I'm super glad I
tried landscape. We'll call that abstract
landscape basically. Edge to edge basically like abstracts because
these are gorgeous. [LAUGHTER] Look how
pretty [LAUGHTER]. Oh, my goodness. [LAUGHTER]. I'm going to cut
these apart and then we'll see the final pieces. I don't know about you. These are so gorgeous,
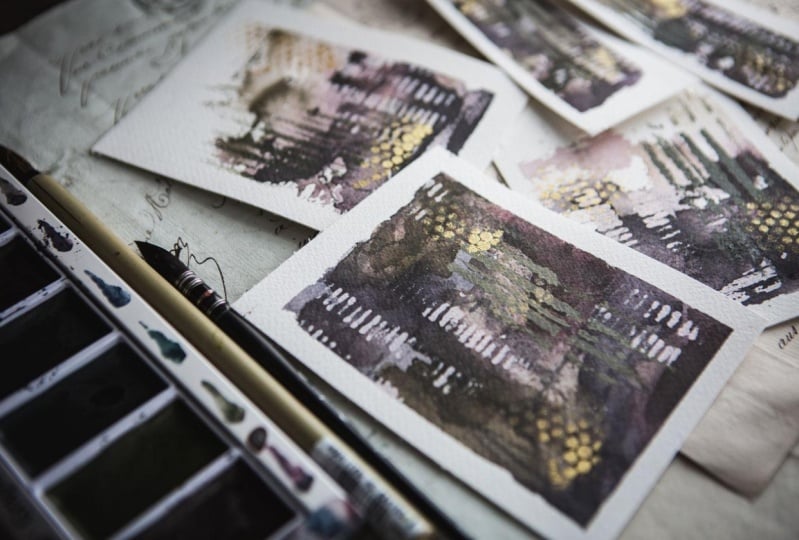
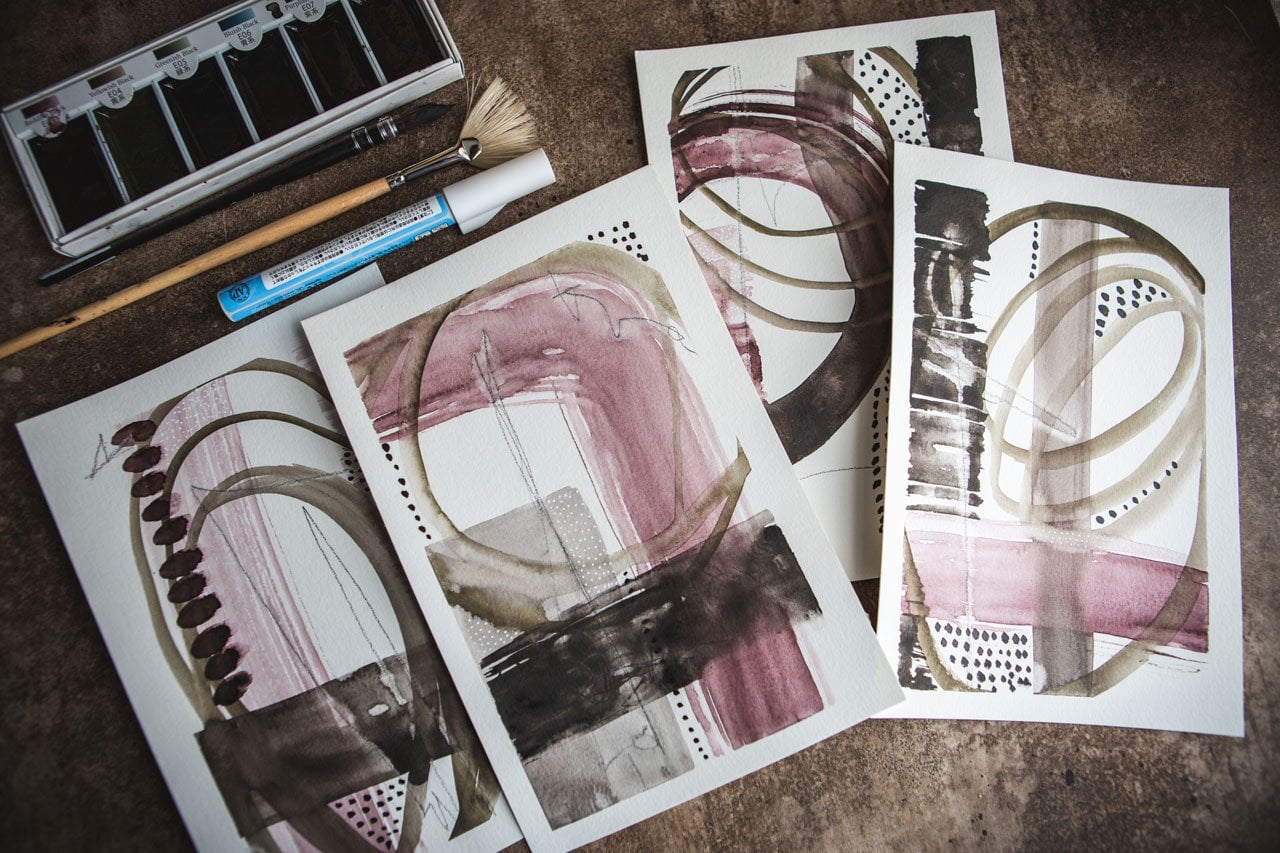
insanely beautiful. I love that I did a set of
three of each of these. Because look at these three. These are now a really
gorgeous triptych. I will say I did not still
don't like the brown dots, but it doesn't detract from the whole piece for me,
they're still gorgeous. I think white dots, black dots, and gold dots are still
going to be my go-to thing. But you know what, I wouldn't
know that if I didn't try it and you wouldn't know that
if you didn't see me do it, whether you like it or not. I love doing some
of these things for you guys and then you're,
oh, I didn't like that. [LAUGHTER] I need a
little vote button or I know you're on
your screen, going, no, don't do that like watching
horror movies, and you're, don't go in the house, no. [LAUGHTER] Look
at these insanely beautiful abstract landscape is little pieces. This is a true triptych. These would be beautiful
framed in a Hong side-by-side. I'm insanely in love with these. Look at our extra
little bonus pieces. Now you got two
yummy micro pieces that could be bookmarks, they could be little pieces
of art that you trade, or you put in a card when
you send somebody a card. I don't know if people
still do that or not, but I still do that. [LAUGHTER] How amazing if you have a little
signature there, somebody can have a
yummy piece of your art. We'll love these. These will be great artists trading cards too, you can make these
and then trade them. These could be great
prompt cards where you could ride on the
back prompts that went with this and then you
could pull it when you're meeting some ideas. Such good painting today. I hope you give this a try. Tape down a piece of paper, do two rows and just see
what do you get with your acrylic paints or
whatever it is you choose to use if you don't choose to
use the graphite stuff. But oh my goodness, such a good painting day. [LAUGHTER] I'll
see you next time.
8. Final Thoughts: Congratulations. You've reached the end of this intuitive
watercolor painting. I hope you've enjoyed the
creative journey and have learned some new techniques to incorporate into your
artistic practice. Remember, the beauty of intuitive painting is
there are no rules. It's all about trusting
your instincts and letting your
creativity flow. Don't be afraid to experiment
and try new things. You never know
beautiful creations you might come up with. Thank you for joining
me on this workshop, and I hope to see you
again in future classes. Until then, keep creating, stay inspired, and keep exploring the beauty
of intuitive painting.
 DENISE LOVE, Artist & Creative Educator