Transcripts
1. Welcome: [MUSIC] I love watercolor. In this class, we're
going to start to learn how to paint
with watercolor. We're not just going to
be doing the abstracts and things that I have
done in past classes, we're actually going
to paint a thing, like a real thing, a leaf. I know that sounds
simplistic, a leaf. But when you're
learning something new and you're learning how
to paint like new items, sometimes you need to start very simple and grow up
to the more complex, and sometimes complex is
not better, so simplicity. [LAUGHTER] Let's start with a leaf. That's where this
class came from. I'm Denise Love and
I'm an artist and photographer based out
of Atlanta, Georgia. Today I want to focus on one element and see how
amazing we can make it. We're going to start off
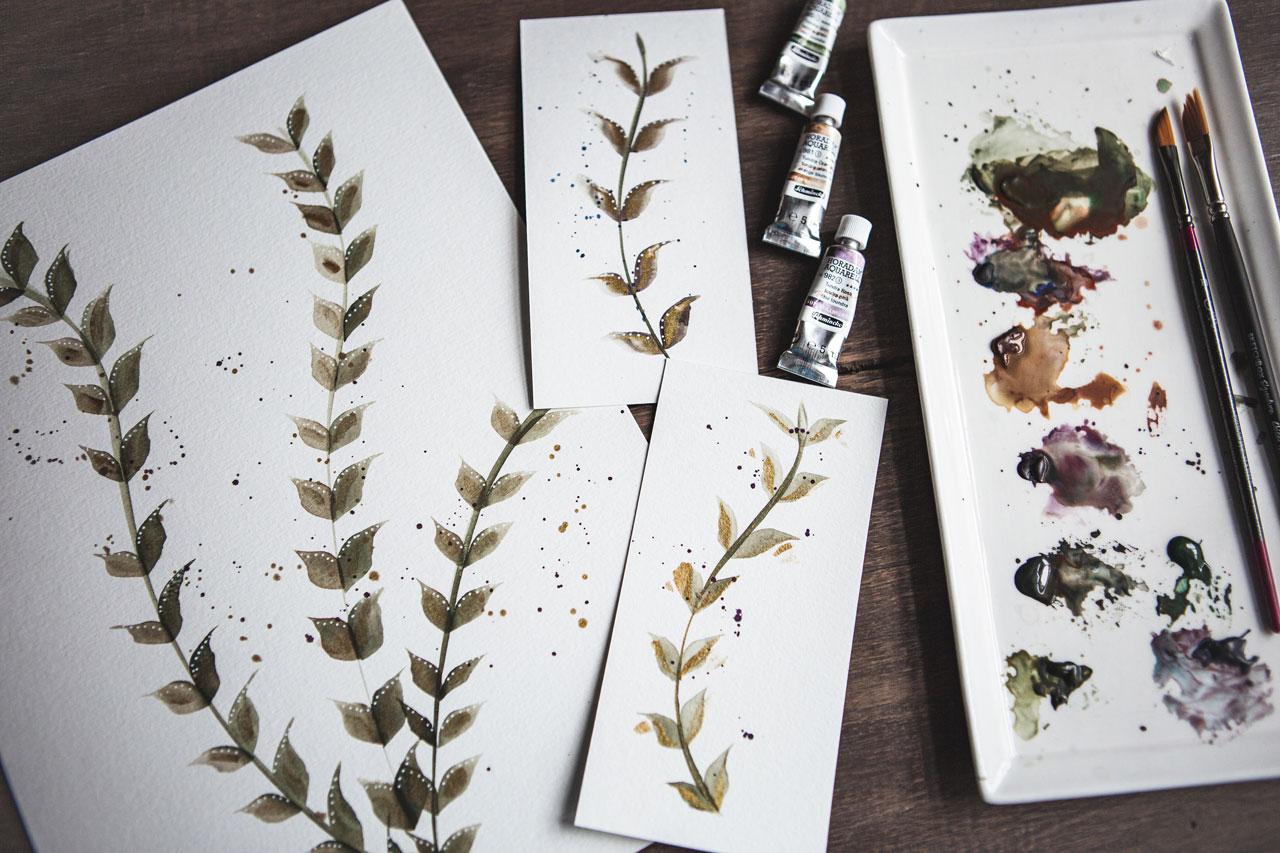
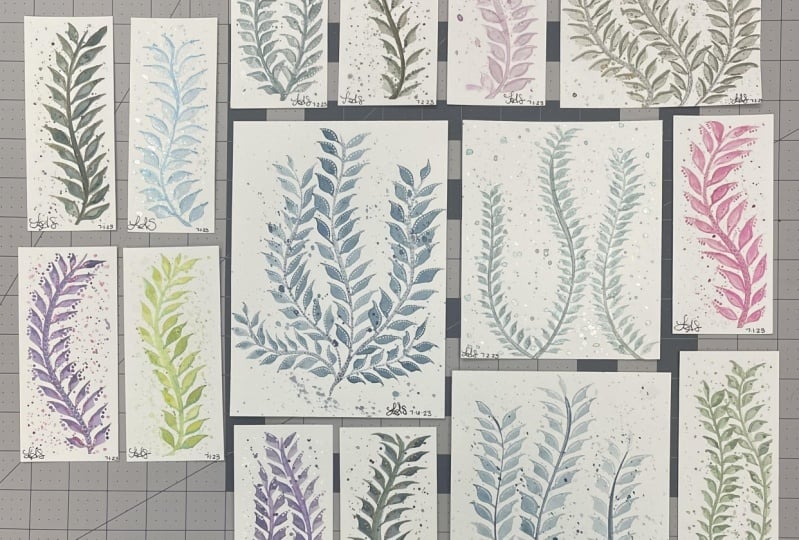
painting a lot of leaves. I have several sheets of these
for myself that I've done, just figuring out my shape, my angle of my brush, what brush works best for the type leaves I
want to create. I want to create, if I have to, pages and pages of leaves and experiment with color and experiment with marks
and then get in to a phase where I can then add leaves to a vine and it look
like something beautiful. We're going to start
off with this project, just getting our
leaf-shaped down, figuring out how we're
holding our hand, experimenting with a few colors and just getting the feel for the watercolor
brush on paper and then we'll move up to
some small projects. Even though the leaf
is very simple, I want you to have some wins when you walk away
from your table today. Once you get your leaf
shaped down and you've painted several big
pages of those, we'll go to painting
a single stem. These are so pretty. They've got marks,
they've got dots, they've got some
decoration in it, so that when you're
all done, you're like, that's a pretty
bookmark or that's a pretty piece of micro
piece of art that I could gift or frame or setup here as inspiration on my
inspiration wall. These, it's very simple, but you'll feel like a painter when you're done
painting these pretty leaves. [LAUGHTER] I love that good feeling. I do the larger, we move up to multi
stems and you figure out how is that different
than the single leaf versus the single stem
versus the multi-step. What new challenges
do that give you? We're going to use all
the things that we learned as we moved
up in size and scale and vines and create a larger piece that I know
you're going to think, wow, that turned out beautiful
and it's very simple. It's not overdone. We're not adding lots of
extra decorations in there. We've got some mark-making,
maybe some splatter. We've experimented with the watercolor and maybe the colors. We're going to let
that be our piece. I don't want to get so
complicated adding in so many elements here in this first class that
then you're like, okay, I'm frustrated.
I didn't get it. I didn't get a project
that I loved and so you leave your table mad. Like I've done so many times. [LAUGHTER] I feel like if you'll
start off creating little leaf shapes
and figuring out what is working for you
and some little styles. I got lots of little papers
with shapes of leaves on it. I actually enjoyed making those because then I could
play with the colors, the leafs experimenting
with different vines and different fun things, and then I started experimenting with longer vines and different little shapes and then I like
little curly cues. I love the experimenting part
of this particular workshop because I like watercolor
and I want to work my way up to the very fancy florals
or something like that. But where does that start? It starts with single elements. You have to learn
how to do the leaf. You have to learn how
to do the flowers before you can start
putting them together. In this class, we're going
to learn a leaf shape, and I'm going to show you my favorite brush to
make these leaf shapes. We're going to make
little projects and the medium projects, and we're going to work our
way up to big projects. Even though that feels like quite a bit of repetition,
here's the big one, that's how you learn
and get better and become proficient at a skill. You repeat it more
than one time. I want you to start with your sample sheets where
you're learning it, moving up and scale
because as you get bigger, you have different things and different challenges that
you're figuring out. Like on the single leaf,
that's pretty easy. That's one item
here on the page, but when you then translate that into multi-vines and leaves, how are you spacing things out? What is a beautiful composition? How are you filling
in the dead space if there's a weird space? How are you making
it so that you have enough room
for your leaves to be on each vine without all of them scrunching in together? You can see there's some
different challenges as you move from a single
vine to a multi-vine. Then you have more
challenges still when you get to a bigger piece of paper because
now you're like, okay, how do I make that larger? How many vines do I need? What's too much and
what's not enough? I like starting with our samples and moving up in size because
you learn different things each size up that you go,
in addition to perfecting your shape and your technique for doing the different
leaves and vines. It may seem like a simple
class with just one element, but I think when
you're done with this, you're going to get
some good wins. We're going to
work our way up to bigger compositions and more
elements in our pieces. I can't wait to see your
leaf ones today in class. Let's get started. [MUSIC]
2. Class project: Your class project today is to show me the smaller pieces that you came up while you were painting. Whether that be
the single stem or the multi stem either way. Then show me the big
piece that you created from the little
pieces that you are using as your inspiration. I know that doing three
leaf projects plus figuring out the shape
of your leaf may seem like a lot of repetition. But repetition is
how we learn to do the different skills that we are trying to figure
out how to do. With the watercolor leaves, there's definitely a lot
of repetition in that. We start off painting a whole page of little leaves so that we can figure
out our angle, figure out how to
move our brush, figure out how much color is too much or too little, or
how we want to swirl that stem up and doing
that a bunch of times in different colors to
see which ones really grab you or how we're
going to get started. I want you to embrace a
little bit of the repetition because as you move up in scale from the samples
to the single stem, to the multi-stem,
to the bigger piece, you're going to be learning
different challenges. You're going to be learning
how to create the piece small and then what
challenges did that present when you created
the larger piece and then how can you relate that to
creating a large piece? Because if you just start
out trying to create a very large piece
without some of the smaller steps that
took you to get here, you're going to
be frustrated and think, "I didn't like this, it didn't work for me, it's
terrible, I don't love it." But if you'll take the time
to figure out your stroke, the colors, the marks, the different things
that you love on the little pieces as you're
gradually getting bigger, when you get to the big piece, it becomes fairly simple. Like when I got to this piece, I'm like, I got my
technique down. I want to play
with these colors, let's add these marks. Look what we ended up with. I want you to embrace a little bit of the repetition
because that's how you get good at something and
that's how you learn and that's how you figure out your
strokes and your move. I want you to then create several pieces and
come back and show me. I can't wait to see
what you're creating in class today. Let's get to it.
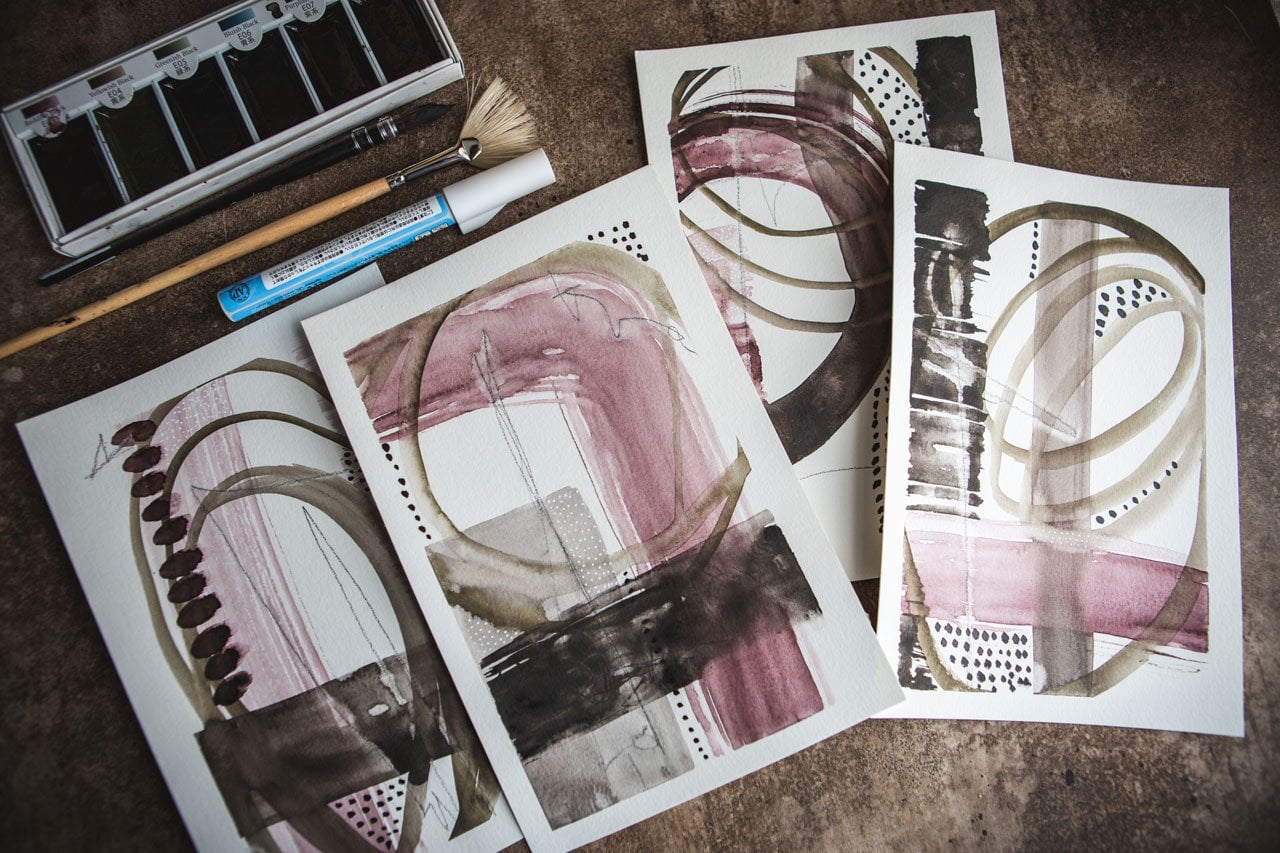
3. Supplies: [MUSIC] Let's take a look at
the supplies for this class. I'm keeping it simple. We don't want to overcomplicate
learning how to paint leaves in watercolor
but at the same time, I want to end up with some little pieces of
art when I'm done. I do come back and do little mark-making and
little decorations or embellishments on my
finished leaf piece so that it's a little piece
of art when I'm done. I want to make my experimenting and learning
how to do a new skill. I wanted to have a win
at my table when I'm done and have something
beautiful to walk away with. I think today's class
is going to give you that win and I'm just using 140-pound cold
press watercolor paper, this is a great big
paper pack that I got at Michaels and one they
had a little buy one, get one free paper pack. This paper works perfect. You don't need
expensive paper to learn how to paint
beautiful leaves. I have taken this piece of paper and on the
different projects, cut it up into different sizes. We've got pieces where
I've cut it in half and in half and then we've got pieces, where they're bookmark sized, so I've cut it in half and
then cut in three-inch strips. Just get the 9-inch by 12-inch pad and you can cut these up into smaller
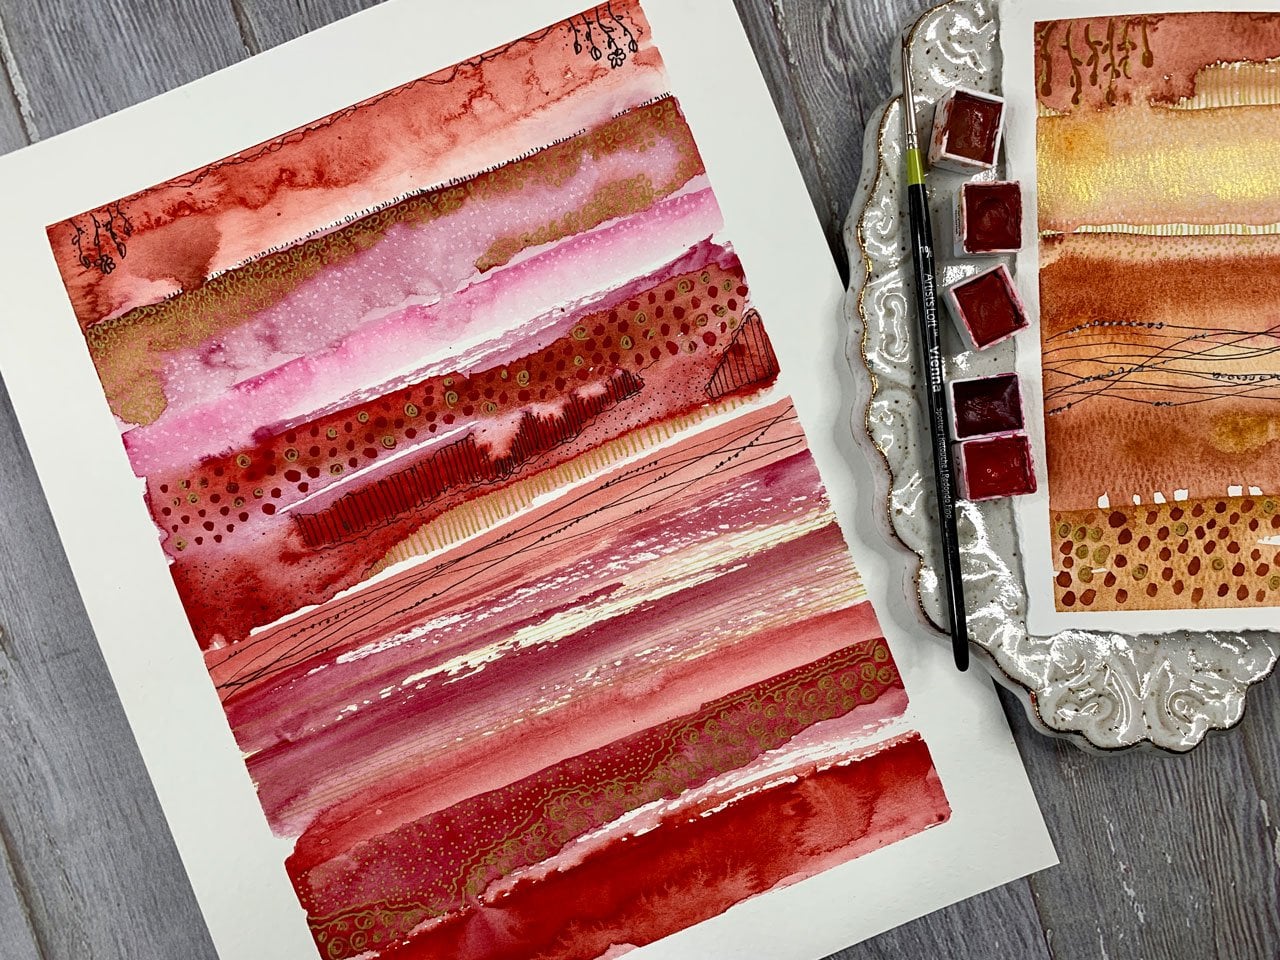
pieces for your projects. I love that. I also have different watercolors
and I'm experimenting today with some of the Schmincke super
granulation colors. These are some newer colors to me and I want
to experiment and play and figure out what they do and how
much I love them. [LAUGHTER] I have the
tundra collection. I also have the forest collection
and the haze collection because I just
wanted to play with the different colors
that these sets had. You don't need those
for this project. Any watercolors are
fine whether you've got little tubes of watercolor
or the cakes of watercolor, the pan colors, any
of them are fine. Just to give you an example, this is the Sennelier
viridian color versus one of these
tundra colors, they all work perfectly fine. Use what you've got if these tundra ones look exciting
because I think they're exciting [LAUGHTER] then
you might experiment with those if you really
love them but you don't need them for this class. Any watercolor, cold press
paper, and then brushes. The brush for me is what makes the leaf successful or
not and for the kind of leaf that I'm drawing
today and I do show you a couple of
different options in class that I did
just as an example. These brushes make this
pretty defined angular leaf but if you would
rather have more of a rounded leaf that you're
experimenting with then you'd use a brush with more of a tip that you could start it, squish your brush down, pick your brush up and get
that more rounded look. That's not the leaf
I'm going for here in class so that's not the brush
that I really used today. I love these dagger brushes and they may be called
a dagger brush or they may be called a chisel
brush but these are a little different than this
traditional chisel brush. This one has a real stark angle, this one is called an angle shader by Princeton
and it's interesting but it's a real sharp angle whereas these dagger
brushes are more of a rounded angle and this
rounded angle is what gives us such easy,
beautiful leaf shapes. This is about the
quarter-inch angle brush and this is a half-inch brush
just to show you the size. I would probably go with a quarter-inch dagger brush or half-inch dagger brush depending on the size piece
that you're doing. But maybe start with a
quarter-inch and go from there. That's my favorite one. Then I have another
brush here that I'm just using as a splatter
brush and this is just my Raphael
three-slash zero-round brush. I just use it for
splatter because it soaks up a lot of water
and it's great for that. The other thing I'm
using in class is my posca pen because
on some of these, we want to finish these off
as a finished piece and I do some mark-making and
dots with the posca pen. I do a little splatter. Sometimes I experiment with
the gold so I am playing with my favorite mica paste which I will put the name of
this in the supplies. It's my very favorite
and I have found this on Amazon and on **** Blick. That is basically the supplies
that we're doing in class. We're using our 19 by
12 pad of paper to get the different-sized
projects we're doing in class. You don't need lots
of different sizes of paper we'll just cut these into our different sizes that
we want and go from there. I will see you in class. [MUSIC]
4. Mastering The Leaf Shape: Let's start off learning how to create the leaf shape
that I like to create. So I am going to be using a quarter-inch
chisel tip brush. I love this particular
shape of the brush. I've also seen it called, I think a blade. It's a little different than
the sharper chisel brush. You can see the sharper chisel
brush has a blunt angle, whereas this one
has a curved angle, and this has become my favorite. But if you have a
chisel tip brush, you can certainly use that too, and I'll demonstrate the
difference in the leaf shape. So if we're using
my favorite brush, and I've actually ordered
myself a few more of these, which is why I
think they're also called a blade, but
I could be wrong. [LAUGHTER] I'm just going to
dip this in the watercolor. I'm using some of my schminky ultra-granulated colors
because I love them, and I'm just going to
experiment with them. Set the brush back
here behind us. I'm using a forest gray color, and I'm holding the brush
like I hold a pencil, and I have the blade going at a 90 degree
angle from my hand, and I basically set
the brush down, and I go up and a little over and create a nice
little leaf shape. So if we had a larger brush, we might get, of course, a larger leaf shape. But I'm just going up
and a little bit over. Compared to the chisel brush, I go up and a little bit over. It's a little bit
fatter brush to me. It's not as a delicate leaf, but it's just fine. If you find when you're painting this shape up and
a little bit over, and you're thinking, does
that look like a leaf, [LAUGHTER] you could draw
yourself a little line, and that's another
reason why I like this. It's considered a line brush or something that can create some fine
little lines there. So now if we go up and
a little bit over, I'll get some more
water in here, you can see how we're creating a really
pretty leaf shape. As you're practicing,
figure out the angle of your hand to get the shape
that you're wanting. Now, you'll notice
I did all one side. If I'm doing a two-sided like a vine or
something like this, the other side,
you're not going to be able to go up
and over as easily. You're going to have to
come down in the other way. I'm still holding my
brush the exact same way, and I'm coming down and
over the other direction, and then you'll see that we get a leaf that mirrors
our first leaf. Then when we look at
it right-side up, we can see that we now have leaves on both
sides of our vine. So I'm going to zoom in just a little bit for this brush action just
so you can see it real close and we'll
just start up here and we'll go up and over. Almost like a little S-shape if you'll come out a little, S it up and over. Depending on how you
do your little angle, you'll get more or
less of that shape. I do find, if you'll do a lot of practice of
this little shape, you'll get the angle that
you want your leaf to be, you'll figure out what
direction is the best for you. Does it need to tilt a
little more this way, or a little more that way. It's still perpendicular
to your hand though. Then when you come the other way down in the other direction, it's almost like driving on
the other side of the road. [LAUGHTER] The
more you practice, the leafier that shape will get. If you just can't see a leaf
in a single little blade, the reason why I want you
to practice just getting that slight S-shape down is because then you'll get a little bit of muscle
memory in there. You'll be able to see how
the brush needs to move, and then when you
get it on a vine, it'll just be clip, clip, clip real fast. I like to do a lot of these. If I show you some of my
little sample sheets, I like to just practice and
then I put a few on vines. I did some different colors. I dripped some colors
into my original colors. Not all of them work out. You're feeling your way around what these are
going to look like. Then two, because
sometimes when I'm doing this motion and I'm
coming up and over, I get this little lip over here. Then I thought, what if
I did that backwards? Would it work better backwards, with that little lip
hitting the vine. I found that a little
bit harder to manage. I like it coming off the vine and then
tipping into a leaf. So that's the shape
that we're looking at. I even took a couple where I was dipping the end of the leaf down a little bit and
giving it some shape, and I did a lot of these. I did a couple that
were large vine shapes just to practice making
my leaves on a vine. Some more practice
pieces here where I was trying some other brushes. So that's very interesting too, to try other brushes. Let's talk about
that for a second. If you've got, say like some of these brushes with more of a little rounded tip, let me get that wet. You can make a leaf shape by starting real high up with the brush and then
dipping it down, like pressing down and
then coming back up, and you get leaf shapes
doing that also. So if you don't have a
wedge and you still want to make some type of pretty
botanical drawing, or maybe you want to experiment
with other leaf shapes. You'll start off with
the rounded brush with a sharper tip and
set it down and then press your brush down
and then pick your brush up. Something that's
interesting with the way my Schmincke
are doing is, it's throwing color back in that leaf so you can either
leave it like it's doing and let it do its own
little granulation and you can see as we
go faster and faster, we get different feel, we get a different look, we get a different
just what do I like? That's really fun for doing
flowers and things because not all flowers have
this sharper leaf. Maybe it's got a rounder
leaf so we can do that very easily with
a rounder brush. Just put the brush
down, press hard, pickup and you get
that leaf shape. Then of course, you
can always draw a leaf and paint it in, if that works better for you [LAUGHTER] Whatever leaf that
you're trying to do though, I would definitely take
a piece of paper like this and start practicing
that particular shape. I was trying all kinds
of different ones here. This is why I like these
super granulation colors, because look at all the
colors in that leaf there. They just separate really
pretty sometimes and have a nice dark edge with almost a color that surrounds
it because it's separated, they just do the fun stuff
that I enjoy in art. The serendipity part of it like, look what we got [LAUGHTER]. That's playing with some
little twirls to see if my little bitty
paint brushes did some pretty enough
twirls and then I started changing up leaf colors. I started with
green and I wanted maybe a green stem
and a purple leaf and I was also playing with different flowers and stuff and did I like it in a circle? It's lots of fun
experiments that we can do. But I want you to start off
just trying the leaf shape, figuring out which way
your brush angles, which way do you
like it the best. Today, I seem to
have been a little more angled with the brushes, more S-shaped and yesterday
I was giving more leaf-shape so depending on the day
that you come back, you might have to
practice a little bit. It could have been
the color change, it could have just been
the angle of my hand. But basically, you go
up and a little over. If you have the brush
a little more angled, you'll get a little
different feel so just play. Some of it's going to
turn into muscle memory. When you're going, you'll get so used to doing the motion that worked
for you that you're like, look at this brush. Maybe don't go up as far when you go up and bring
it in a little tighter and that
little bit tighter made a different
little leaf shape for me so practice,
practice, practice. See, there we go. I'm
going up a little bit less and coming
over a little more. That's why I want you to
practice on the sheets of paper. I want you to take a piece of paper or two or three pieces of paper [LAUGHTER] practice
for the whole day, for 10 or 15 minutes, practice your leaf
shape till you get a leaf shape that
you're like, okay, this is a pretty leaf, I'm loving this, I'm ready to see what
I can get on a vine. Then on that same
piece of paper, definitely draw a few lines and then practice on
the line itself. Let's go ahead and see. It makes it easier
in my opinion to get a true leaf shape
when you have a vine that you're following because
then your eye almost sees what it is rather than just being a random shape of color. Then on the other
side of the line, we're just going to come and do the same thing down
and out the other way. It's not going to be exact but the more of
these that you do, the closer you'll have to the leaf being the same
shape on each side. This is project Number 1. I want you to take
a wedge brush or this chisel tip where
it's a little bit rounder and I want you to start
practicing this leaf shape, I want to see the
leaf's and then some practice on a vine because this is going to really help
you get your shape, let you see what your
colors are doing. You can do this with
regular watercolors. Don't have to be something I'm doing with the
ultra granulated. If we just get out some
regular watercolor, we can do the same thing, any color that you're wanting. Keep in mind for
the next projects, as you're experimenting
with your leaves, this is the perfect time to
experiment with the color, which is exactly what
I was doing here. I can now see what the green and the orangey color and the blue, this was from the Schmincke
tundra collection so there's those
particular colors in this collection so I thought
let's play with those. This green that's in here, this tundra green is gorgeous. I was playing with
forest green on this sheet today and
it's darker gray. Then what I can see, it's coming out now that it's drying
because you'll have to wait till it dries so you can
see some of these colors. It's got a really particularly beautiful
bluish undertone. As I was painting it I
was like do I love that. Then as I can see this color
separating and granulating, I can see this yummy
blue underneath, I love that [LAUGHTER]
I love when the colors mesh and move and change
and do their own thing and just look beautiful with
the tone that they are. But you can pick any regular
watercolors because it also will separate and
be something beautiful. Look how pretty that
one is and it's got a little bloom in
it there, I love that. Play with your colors,
this is the chance to experiment and see what colors your leaf is going to be so that you can then say, okay, I love this teal, let's go with that
one or I love this green or what two
colors do you love? I want to do some like I did
yesterday or I did maybe a green stem and a colored
leaf and just get fun, crazy with a leaf. But if you want to
start off with green, then pick a pretty green that you love and we can start there. This is your practice piece, I want you to
practice getting that down and you're basically
holding a pencil, you've got the brush
straight down, perpendicular here to
your hand and you push down and come over to
the side a little bit, getting that shape
down into the side and see you got to almost at
an angle to get that one. Look at that. Practice with where you have your hand angled, do you have it straight? Do you have it slightly angled? The slightly angled is giving me more of my leaf shape
that I want so you might start off perpendicular
but then angle it here and up and
over for the leaf, up and over for the leaf. Let's practice leaves, these are actually fun. They only take a few minutes
and you fill the whole page. You get a little bit
of muscle memory for your hand and then that'll take us into our
next project [MUSIC]
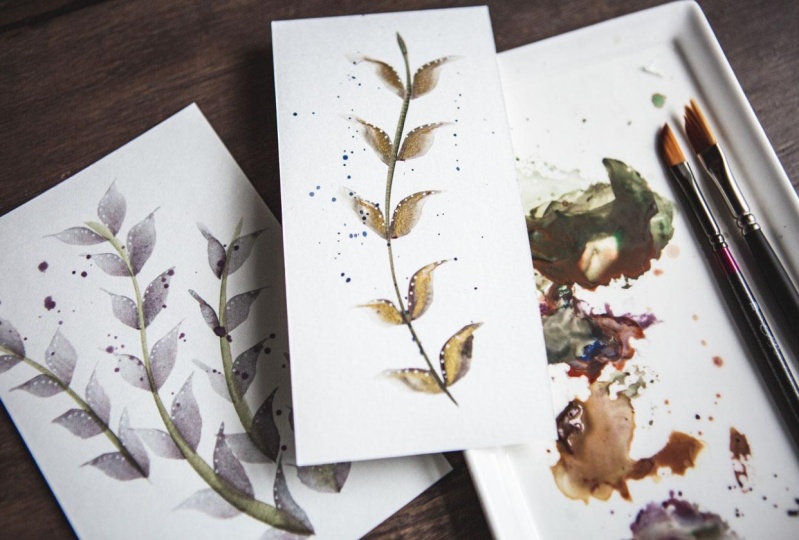
5. Creating Leaves On A Single Stem: [MUSIC] For this
project, let's call these bookmarks or tags or little cards that
you can include and say a card that
you send to somebody, or little miniature
pieces of art. I love doing these because you really get your practice
of your hand down. You get your leaf shapes
really cemented in with some muscle memory
and you start just whipping them out and
they're really so pretty. It's also a fantastic way to further our color
experimenting. I've done lots of these for
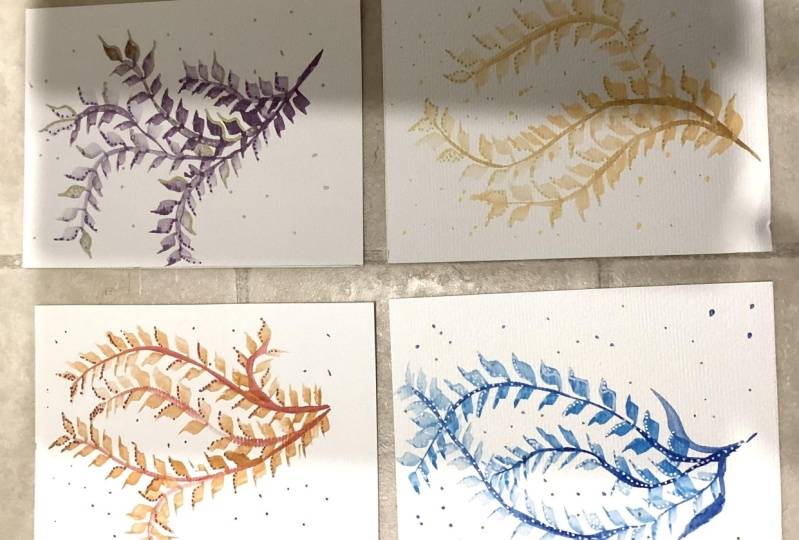
myself because I love them. Just to show you pretty
different examples of how curvy I got
with my little vine and how I was shifting my angle of my brush to get different
shapes of leaves. Some of these start to balloon out and be
really, really pretty. I love that because we're
going to treat these a little bit like learning
the leaf and watercolor, but also a little bit
like mixed media. Because once I get past this fun part of
mastering my leaf, then we go back and do some finishing marks
and making it a nice, really pretty whimsical
finished piece of art. This is my favorite part. [LAUGHTER] I experimented
with the same color, leaf, and vine, different color, leaf and vine, different watercolors
to see what those watercolors
did and how they broke up and how
they granulated. This was just a
regular watercolor, which is the viridian. That's a Sennelier color. Look how pretty that is. This one actually, as I had more water and I had
less water as I went up, look how I got the really beautiful blooms of color in those that
I wasn't expecting, but how beautiful is that? Use any watercolor
that you have. I did this one with the little Payne color and I did all these other ones
with little tube colors. This, you can use
any color with, experimented going a
little bit lighter. This was my color
experimenting sheet so I could see what each
of these colors are. If you're doing something with a specialty watercolor,
especially, [LAUGHTER] do something
like this so that you can see what those colors
really do as you add water and they separate and granulate and do their
fun color blooms because this is why I wanted
some of these and I got a couple
of collections of these little shminky, super granulation
collections because I wanted to do
landscapes and stuff, maybe atmospheric landscapes
or something like that. I'm going to be
playing in the tundra. Also have these yummy greens
from the forest collection. Then I'll also have these yummy ones from
the haze collection. You can see these are real
fun, hazy landscapy look. Not all of these are
traditional plant colors, but I'm okay with that. I'm using a little
artistic license here on what my
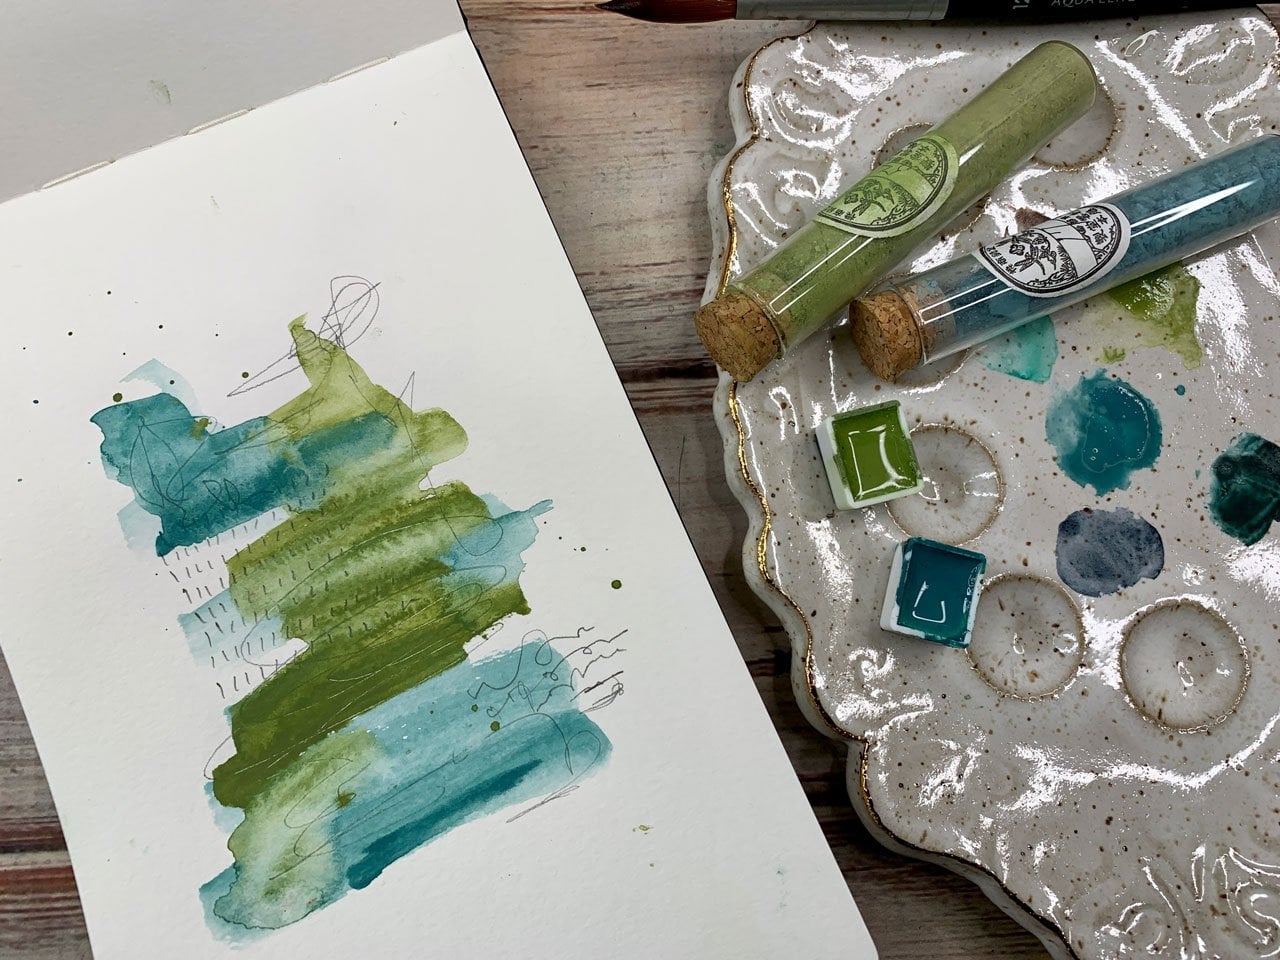
colors are doing. Another thing that
I really like, and you can see here on
my watercolor palette, as you can see where the
colors mesh with other colors, where maybe I've dipped my brush or they run into each other, I actually like that. I think it gives you
some interesting colors when you get into making
your leaf things. If you've got more than
one color on the brush, I think that's really fun. Then I started with the ones
that I was playing with, adding dots and different
marks and still experimenting. Not all of them work out. I'd say this was one of my tries early on that
just did not work out. I like working on
this size paper. Then if that side
didn't work out, flip it over on the other
side and do that side. That's pretty. You don't have
to just use the one side. That's what I like about these. If you get one that you
love and you think, I'm going to do
something with that, put it to the side
and let it dry. If you're thinking, then
flip it over and try again. I like doing it on
this size of paper because works really good
for a nice long vine, nice and elegant and you don't feel like you're
wasting big sheets of paper if it's not working out until you get your
technique down. I did that a lot.
Then I moved to a little bit bigger
pieces of paper and we moved on to a
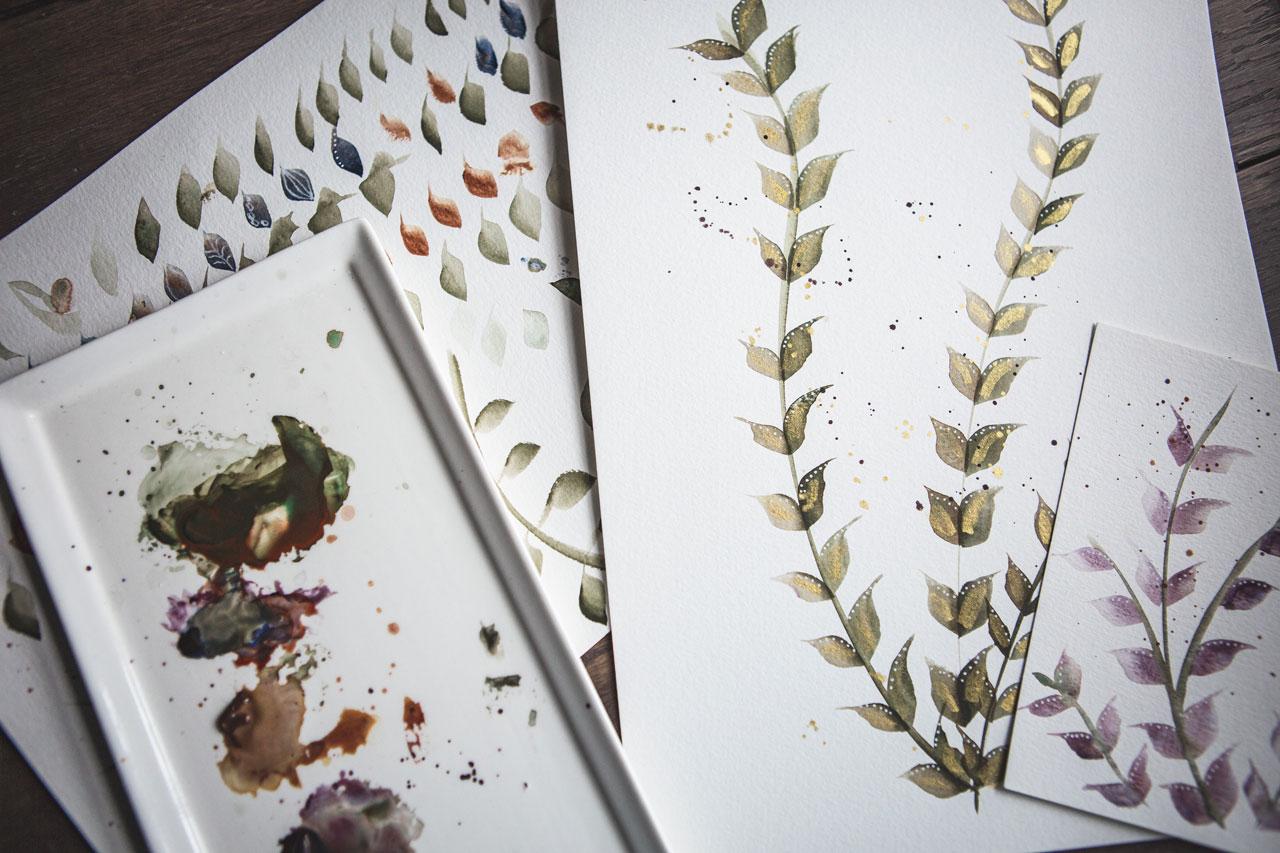
little bigger project. Look at those in a moment. All kinds of pretty stuff here. This one I added gold too, how pretty is that? I've got lots of yummy samples and things that I did early on. That's what we want
to do in class today. I've taken a 9 by
12 sheet of paper, cut it in half so you had two six-inch sides and then cut three inch
pieces out of that. This is a three-by-six piece. We're just going to
make a bunch of these. Because if you make one and you're like,
it looks terrible, it didn't work out, then
you might not do anymore. I want to try this olive. Let's try this olive
on some of these. I'm just going to put a
couple of extra colors. This one is forest olive, these are the
tundra collections. I actually really loved
this tundra green. That's what I was using
on some of those others. Let's just put some of that out. [LAUGHTER] But if
you'll make a bunch, then if you get a few
that don't work out, it's not a big deal. I like this forest brown, which is a pretty green. Let's put some of that out. I really like over here
in this other box. Here's a rosy color. It's not really rosy
color but it's dark, but we'll just put
some of that out, looks blue on there
since I used pink, but it looked blue on there. But I want some choices. I really liked this tundra rose. Then let's just make
a bunch of these, and then when they dry, we can see which ones we really loved and add some
marks to them. I got a couple of example of
some marks that I've done. [NOISE] Might be easier if
I put the water above me. I'm right handed, so I'm facing this way with
my hand and my brush. Let's start off with this green. If you're not sure how much
paint you have on your brush, I do have some scrap pieces over here to practice,
look at that angle. That angle is beautiful. To see how much paint
to have on my brush. How's that leaf going to look? There we go. Let's start that. To start to the vine, I just want the brush on
its straightest it can be. Of course, I run into
my little thing here. [LAUGHTER] Let's just create
a couple at the same time. That one I don't like how
I ran into my thing here. Let's just try not to do that. Look at that one. That's the
perfect little vine there. [LAUGHTER] Let's do another one, because I want to
have a couple of vines and then I'll experiment with some of my leaf colors. Now it's pretty, I like
the thinness of that. Practice too doing this
little vine shape, seeing what pretty little
swirl you're getting. I like that coming down. That was fun. I have a little practice
piece over here. Maybe we'll do one
of those coming down instead of going up. I might've liked that better. Let's stop there. I
don't want to ruin it, but it didn't go as
far as I wanted it. [LAUGHTER] Let's start
making some leaves. We're going to set this
over here a little bit, and let's just go ahead, and with our hand
slightly angled, holding it like a pencil, let's go ahead and get
our leaves in there. Then I'm trying to use the vine. You'll notice on this one, the leaf is not quite
connected to the vine. When I'm starting, I'm
trying to start with the tip on the vine and coming
off the vine and I want all my leaves to sit
beside the vine and it look like that leaf didn't come from that vine and maybe the wind just stuck it there,
or something. Keep that in mind as you are positioning your
brush down on your piece. You want to position it where you're starting
on the vine, not beside the vine or off the vine and the more
of these that you do, the easier that gets. Do a couple and then start evaluating your technique
and where you have it going, but look how pretty it ended
up. That's really pretty. [LAUGHTER] I'm not
trying also to have every leaf the exact same color. I like some variation because it makes it
interesting but if you want all the leaves
the same color try to be as consistent as you can with the amount of paint
on your brush and the amount of water
that you're adding. This one is long and slender, so it looks like my
leaves are taken on that, a little bit longer and
slender look, I love it. Look at that. [LAUGHTER]
I love that one. I liked the little
its got going on. I like when it's got a
pretty little curve to it. Let's go for a different color. This is that tundra rosa, I think. That what it was? I think that's what it was. Tundra pink. Let's just throw
some pink out there. I'm going to get a little bit
out there and then again, look how pretty
that is with that. My friend showed me a bush the other day because I told her I was painting these
beautiful leaf things and she's like, oh my God, look at this leaf at this
plant in my yard and leaves were the most
beautiful burgundy color, and I'm like, that's my inspiration
here for these purply leaves instead of
just everything being green because leaves
come in other colors, they don't just come in green. I don't know if you knew
that. [LAUGHTER] These dry pretty fast too
so the more we do, set it to the side, practice some more, come back, and then we'll be ready
to add some marks and maybe some splashes
and some fun stuff. Then you want to come
on the other side. I'm coming down and
out, down and out, rather than up and
out, up and out. Just opposite of what
it was when I started on the other side.
That's pretty. I thought I wouldn't
like that thicker part, but it's actually
pretty up there. I want you to do a
bunch of these and then we will have a bunch to experiment with when we get
to our mark making on these. Let's just make one or two more. Let's try some of the different. Let's try this forest one. Feel like I need to go up. Did not have any paint on
my brush. Let's try again. See now, almost don't want
that spread at the top there, but that's okay.
Well, let's see. I've got some of
these other colors, let's experiment with
this one that said it was a hazy color. That's pretty, look at that. It's like a deep pretty grayish. When I do that, I
got water up here on my brush and I don't
want it to drip down on my pretty
piece that I'm doing. That is such a pretty color. [LAUGHTER] Which one was that? That was the haze pink. Look how pretty that is. Down and out this
opposite direction. Oh my goodness. Look how pretty that is and now that thicker
part that I was, oh, I'm not sure about that,
almost looks like it's a bud ready to bloom at
the top of the leaves. That one's pretty.
Let's experiment with this other one that
might be my favorite one. [LAUGHTER] Let's see what
this other green is. Practice on our
little sheet here. It's like a green green. You can practice
too with where on the paintbrush you've got
all the color because you'll notice on this one
I had more color towards this little tip here and less
color towards the back of that curve and it really
gave it a really beautiful, two toned shadow and
light leafy look there. You might experiment
a little with how much paint you
got on the brush and where on the
brush that paint is. That's easier said
than done obviously, because I just didn't
do it but let's try it on purpose
here. Let's see. [LAUGHTER] See if you do that on purpose where you dip the tip basically and
pull it from there, you definitely get that
three-dimensional light and dark look on a leaf, so that's pretty fun. Different things to
experiment with. Now that we've got
several of these ready, and I expect you to
do at the minimum, a full page so
that's six of them. We're ready to go to
some mark making and some finishing pieces just
to finish these and make them a little tiny piece of art coming out of your art room.
6. Adding Marks To Our Leaves: Let's take a look at
some mark-making. On my very favorite pieces
and what has become my personal signature
feel has been this look. I did a lot of little experimenting in
mark-making before I got to, here's what I particularly love. You'll notice on these, hopefully, we're good
and focused [LAUGHTER]. You'll notice on these, I've got little white dots and I do that with my Posca paint pen. I like having a paint pen. Then I've got
watercolor splatter. The piece is dry
and I'm just going back in with some
water on my brush. I have splattered some of
one of whatever color I was thinking on to my piece. That is what I thought was the most beautiful
and whimsical, and that I did in
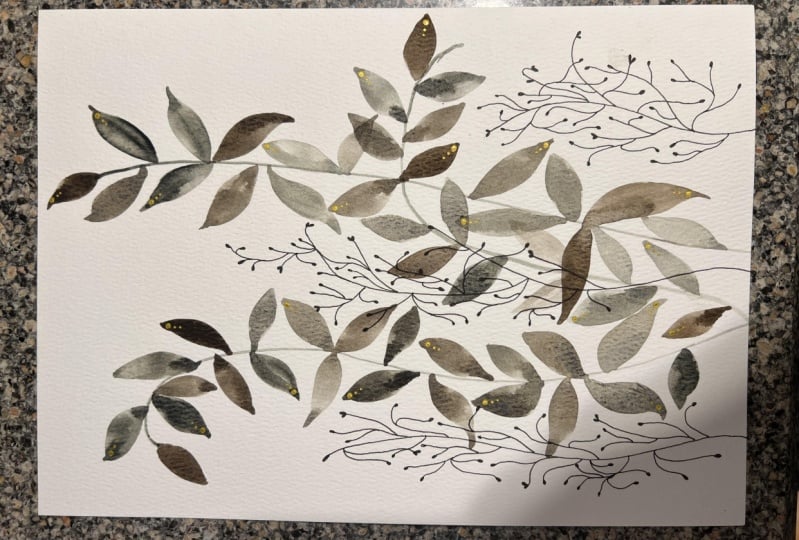
several pieces. I also experimented with gold. I thought it was
really pretty to have a little ghost vine almost
with the leaves on top. I thought that was beautiful, and then I had the dots and
some watercolor splatter. I love that the gold gives
it that little bit of shine, a little bit of bling. You can also do gold dots or use your gold Posca pen for
dots and marks and lines. That's another choice. Another thing that
I did want to take a couple of these is I did
different mark making on this. I did little circles
in the leaf and I outlined the leaf with
a colored pencil. I did little dots
outside the leaf, I also drew lines on the leaf. I thought those were really
pretty different options, and I also did those
with paint pens. I did little circles, I did little dots. I did the little leaves
skeleton in some of these. I did some little shapes
almost paisley shapes and some more dots just
to experiment to see which ones of
these do I like. What do I want to
do for my marks? The best way to practice
some of these is to go to your practice
sheet and say, do I like dots? I like dots [LAUGHTER]
or do I like lines? This would be the
perfect place to now experiment with some
of your mark-making. Do I like circles? That different. Do I like the leaf vine where I'm coming off with
the leaf skeleton? What is it? Do I like to just
outline the leaf? Maybe. You can see
there with those five, how we get some
interesting pattern and movement and decoration. When you come up to the piece, you add some interest. I love adding that little
bit of whimsy into these. I want you to take your practice leaf sheet and then practice some mark-making. Because once you do that, I want you to be
this is what I like. Let's do this. Let's start off with
our pieces now. Let's finish them off with
some of this mark-making. I'm going to start
with this piece. It's not completely dry, but it's pretty dry. I'm going to do my pretty
dot on the top of that leaf. You can see this doesn't
take a lot of time, but it really does give it
that little bit of whimsy, and it finishes off your piece in a way that maybe
you were just, I like it but it
needs something else. What does it need? That to me is what these
need. Look at that. Look, it's so pretty with the
little dots. I love that. Then you can take
one of your brushes that soaks up a lot of
water really nicely. We can do some splatter. I'm just going to grab
this brush back here. It's just a rounded brush. That was that pretty
grayish color. Let's go ahead and pick up
that with a lot of water. Got my little practice
sheet over here so I can see it's not going
to do what I want. This does and then just going to tap some
of that up in there, give it a little tiny finish. I don't want it to
be overwhelming. But look how pretty that is. I love this project. We're going to go ahead, finish off the different
ones that you created. You might go ahead and say, I've done this one with dots. The next one, I'm
going to change it up and I'm going to do the gold. Maybe with this one,
we'll follow it. Let's see, you don't
want that one. Which one do I want
for real [LAUGHTER]? Really liked this
curvy green one. I'm using my favorite
gold Micah paste. You can use any craft
paint, gold paint pen. Any of those would be just fine. I'm going to pick
that same brush. Will need to make sure I wash my brush out
after this because this is more acrylic
than watercolor. When I'm just using it
over here to get it set. I'm going to very carefully
just follow my line and have a little ghost
gold basically. Then I'm actually now that
I did a couple of those, am on the bottom
side of the leaf, basically not the whole leaf. That's interesting compared
to the other that I created the copper that is. It's okay if you get a
little outside your line too because look how that shines. You've got a little
outside that one. If you do that, do
it somewhere else. That it looks that
was on purpose. There are no mistakes, just happy accidents, and look how pretty that is. I'm going to do the
same thing with this when I originally did the leaf and I'm
going to just flip it over to do the other side. I might just pick up some
leaves to do the outside line. Look how pretty that is. You
don't even have to be all exact and it's
still super pretty. I just liked that
little bit of shine, so super pretty there. [NOISE] Let's get
that washed out of my really favorite brush. [LAUGHTER] Then we can say, do we want some
splatter in here? Let's get our splatter brush. Maybe we want some splatter in purple or some other color
than what we started with. Again, just practicing
my splatter over here on my side sheet. I like the practice a
little bit because I always have extra water on my brush, and I don't want
that extra water on my piece if I can
avoid it, that's pretty. That was choice number 2. Choice number 1 was
pretty dots, pretty gold. We can even do silver. You could do bronze. You could do these in all
kinds of different colors. Maybe let's do one of
these purple ones. Just to say we could do
different things here. Let's use this as our
experimental piece. Then you'll discover what works for you and
what doesn't work, because some things
work better than other things and you'll see
what your preference is. Maybe I prefer
white on my pieces, maybe you prefer gold or silver. That's getting into
what's your style, and how are you going to make
this project unique to you. Or if you just love
the white dot, like I do, go for it, [LAUGHTER] end up with
a really pretty win. That's very interesting,
completely different. I want to mention too, don't forget colored pencils. You don't have to do this in
a POSCA pen or in a gold. [NOISE] You could pick a
color that you like out of a colored pencil
set that you have. You can make marks with pencils. Let's just say, maybe I want to add something
different to this. I could pick a
color out of there. Maybe this lavender. Try to set this
down. There we go. [LAUGHTER] Maybe
I want to follow along the leaf shape and give it a completely different
doodle along with the gold. How fun is that? I could have done
dots in the leaf, what if we did a
colored pencil dot instead of a white
dot or a gold dot? That's really pretty if you pick a color similar to
what your leaf was, look how pretty that is. You see how these would
make beautiful bookmarks or beautiful little micro pieces of art that you could
frame and hang. Or pretty little pieces of
art that you could give away, the holidays may be included in a card for somebody lets say he has a birthday and you want to give
them a little gift. See how pretty that is with the little dot
there, I love that. These are fun and beautiful. I want you to create at
least one page worth, so at least six. [LAUGHTER] Or if you get really excited about
doing these like I did, then create a couple
dozen of them. Because you're going
to figure out, I like this or I
don't like something just to talk about
with that goal there, let me find my other. Here we go. I want to
show you the difference, I actually did one
where it looked like the leaf was
on the other leaf, the gold is following the original set and
it's a little ghost set. I also tried a second one where the gold one was a completely
different line or a vine. For some projects, this
would work really nicely. It may work really
nicely for you. But for me, I did not love it. I decided after I did a couple practice
pieces, I like this. I liked covering the vine itself with a
little bit of gold, add a little bling. That's why on the piece here
that I was just painting, I did it following
the leaf just to get what's going to be
interesting for this piece. On this one I really
particularly liked it. I had the white dots, I had the little bit of gold. I can do it to the side
and see the bling. How pretty is that? This was the same too. It was more of a separate leaf but
ghosting the first set, and I did the white dots and the splatter and it's so pretty. I want you to think of all
these fun little options when you're doing
stuff with these. Also loved how on this, it's nearly a color, I think this was the viridian. The differences that I got
here with the watercolor and something interesting
that we can do with that, just to give you another idea is we could use these like we do on our bigger mixed media
pieces and just put dots, for instance, on part of the leaf that ballooned
out differently. You could even go with your
mark-making on your pieces, and your bigger piece this might be another option for us. [NOISE] Look at that, see another fun thing that
we can do with these leaves. [LAUGHTER] I absolutely love. If we've got some ballooned-out
colors like that, maybe just tipping it with dots. Then as you get further
up and maybe you have solid leaves without
these blooms of color. Go ahead and make the
whole leaf a dot, implies some aging in there
like the older leaves, maybe the dots are fading as they age and they're
only on the tips. But how fun is that? Another option, you can dot your leaves and
see what you get. I want you to start off working little with
little bookmarks. Do at least the six, practice with your
different colors. Experiment with
your mark-making. Practice adding in maybe
touches of gold or silver or whatever metallic that you
think might be interesting. Practice with the
different marks on the different colors
on your bigger sheet, so you can say, I love this one or I love
this one or I love whatever. Then do those on your pieces
that you then come up with. You can even do a couple
like I've done on these different marks
on different leaves, so you can see how they work
on that particular color. You can be like, this
is the one I love. [LAUGHTER] I hope you have fun with the
little mini-project, and I'll see you
in the next video. [MUSIC]
7. Working On Multiple Stems: In this video, let's go
a little bit larger. We started off learning how to do the single stem
with the leaves, I've got lots and
lots that we did. I hope that you did lots and lots like I did because
I just got lots of samples everywhere
so that I can be like I love this or I love that. Now that we've figured out
which one did we love, let's do multiple vines. We started off
with the one vine, getting our footing and
figuring out how to paint our leaves and figuring
out marks that we liked. Now I want to paint
multiple vines because, look how pretty these are. These are pretty piece
of art that you can just frame up and do whatever
that you want with it. I actually thought, how pretty were the marks in
that last piece that we did, and that would be a really interesting
multivine look also. I think I'm going to do one
in this viridian and maybe I'll do one in the colors that I wanted
to experiment with today. This was the green
and the purply color from the super granulated
ones that I was using. These were tundra rose and tundra green that I
played with here, look how pretty they are. But I liked the way
those colors did their funky ballooning
so I'm going to try that and a few of these. The way that I do
the larger piece, is I start off with one big vine and then a little vine and maybe a little
vine and do the leaves, and then I'm like, maybe
I need a vine here. I'm going to start off
with not too many vines. Maybe, I want to play in these colors over here that
I didn't play in yesterday. I got my scrap sheet
over here so I can see how much paint
is on my brush. Always have a little
scrap ready like this, it's really super handy. I'm just going to go and
do a pretty swoopy motion , look perfect vine. [LAUGHTER] Maybe off of that, I want to come this way, got water that wants
to drip there. Maybe off of that, I
want to come up this way and then we'll see do
we need anything else? Then I'm going to go back in, I'm going to do this foresty. I was going to do that green, we'll do the next
one in the green. I want to do more
that one piece. Getting water, I have on my brush so it doesn't
drip on my paper. I like to do multiples
because then when one doesn't work out
but the next three do, you didn't stop at the
one that didn't work out. I definitely find it easier. I'm just coming up
and out for the leaf, up and out, a little
more paint up and out. It's okay if they're not
all the exact same shape or exactly perfect, that is okay, because the more of these
you do, the better they get. This is actually because in
the end I feel like if you sit at your table just
to do something like a color swatch, that's boring. How many times are you
going to come up to your room to be like
let's color swatch today. I'm probably never going to take the initiative
to do that, but if I think I want to play with some of these
watercolors what can I paint? Look how pretty that is. I will come up if I'm creating
say something like this. I will say that I went backwards because
I'm right-handed, I'm on my piece of
art as I'm going this way so maybe you need
to work that way. [LAUGHTER] If you are looking
at that, thinking that, but sometimes as I'm
talking and moving, my brain is not always doing
what it might normally do. I will come up here if I have a fun project like
this and be like, "I want to go create
one of those." Now that I've got this on here, I actually feel like maybe we do a little tiny
one off to the side. Hope that's the color
I used, I think it is. Right there. Then you
see how excited I get? Because I'm like, yeah. This is working. Then you come up and you do
maybe our practice that you wouldn't normally be
up here doing because maybe we're binge-watching
something good on Netflix. [LAUGHTER] Practice is how we get really good
at some of these, and so that's beautiful. I'm going to set it over to
the side and we'll paint a second one and we're
going to let that dry. It's only going to take
a little bit to dry and then we can add our
marks and finish it off. Could be my most favorite
piece, love that. Let's make one of these with this viridian and just get a
little of that on my brush. Let's see how much we got
going there, I like it. Again, you might get a bigger piece and
practice swooping, a couple of times or this little piece here and we'll
practice a little swooping. I've got another little
spare piece over here, we've got too much
paint on that. See, that was pretty. See, that's pretty.
[LAUGHTER] Let's just see, what we can get
with our swoopies. See that one, so pretty, but once I get some leaves
on it it'll be all right. Let's go for it. Don't
have to be perfect. Have your little
piece over here to practice how much paint
you have on your brush. I almost like to
start with the center one and work my way to the sides just because
it's the focal point. If we overlap any, we'll know what that overlapping looks like and
we can work around it. How pretty those leaves. You see how the more you do
the easier it gets to get that pretty leaf shape
whose are not quite as dark on that side so
I might just come back up again and leaf it again. I like that. That's super fun. Do we need one over
here just to see? [NOISE] Oh, yeah, that's pretty, look at that. Then we can go back to our original piece
and we are ready to now decorate it up. [LAUGHTER] I like the dots, I'm going to dot
the leaves here. I think they're beautiful. They add a touch of whimsy. They give you such a
delightful little finish. I'm doing my dots along
the top of the leaf. You could do yours
down the center. You could do it
all in the bottom. Just experiment with
some of these things. The white looks
particularly pretty on these watercolors
that I've used. Look how pretty that is. Then we could come back with
a little bit of a drip. Maybe we want the drip in, say this pretty purply color. That's not the gray
that we were using, but maybe it's this purple. So pretty, look at that. Then we could set that to
the side and let that dry. That's a really pretty
finished piece of art. Now this one has
dried pretty good. It's completely different than my inspiration piece where I got all those pretty ballooning
colors out of there. But watercolor, you
can actually come back and drip more water
on watercolor. Let me get that bigger brush. You can force some of these blooms if you wanted
to come back and add water in here and just make
it re-activate and force some of these
water blooms. We can do that sometimes
with watercolor, it works with on the ones
that have more paint. We might not see it on
these lighter ones as much, but on the ones that
have real thick paint, we might see that watercolor do some reactivating and
give us some blooms. Experiment with that too. If you're thinking, didn't
quite do what I thought, or maybe now that we've
got that water on there, maybe we'll come back
in with some water and really force that on there. We'll come back and force dark spots because now
we've got more water there, we can tip it and
let the watercolor do its thing and balloon out. That's the final experiment. That might have been
pretty with a brown, like it was coming
off of the stem. We could have done
this in lots of different colors just
to see what we get. If it's too dark, just
tap a little water on it and we'll let it do its
little thing and lighten up. We'll have to set that to
the side and let it do its little thing and dry,
and then we'll be back. I didn't like the
way this one turned out with the added
extra color on it, so I repainted it. [LAUGHTER] You're
allowed to do that. If you don't love the
way something comes out, just throw it to the side, that'll be the one
that didn't work out, so not everything works out. I want you to know that
that's true for all of us. If this one don't work
out, just repaint it. Because what I really wanted was from my inspiration piece, the ballooned-out
colors on these leaves, so I could do this
pretty dark pattern. Now I have a larger
piece, I repainted it. I went back and just
added some dips of water in strategically to get it to balloon really pretty. Now I'm ready to go back
and add the dots on the outside of the leaves
like I originally intended. Well, hope I got it dry enough. [MUSIC] Look how pretty that is. I just let those
watercolor blooms be my inspiration for
where I was putting dots and that is so lovely. This would be pretty with
a little bit of splatter. Maybe we could do the
splatter in, say, gold or silver instead of white. I mean, not white,
but instead of some color or we could
do the color too, but maybe let's try the
splatter in the gold. I'm just going to put a
lot of water in my gold. Yeah, look at that. We could even come back and
add some gold to the leaves. Then we'll just have some pretty little splatter
in gold, super pretty. I hope that you
love this project. Here's the other one that
I did that's now dry. Here's some that I did
before for myself when I was just playing and
experimenting and deciding on what I
thought was beautiful. I hope you end up
with a couple of pieces that you think are pretty enough to be a little
miniature piece of art that you
could sign in frame, or sign and giveaway, or sign and be pretty little pieces in your
art room as inspiration. Let's go ahead and do a couple
of these different colors. I'd love to see if
you did one with the stem was a different
color than the leaf. Maybe one where the stem and
the leaf are the same color. I'd love to see the
colorways that you try out, so I'm looking forward
to seeing your projects here and I'll see
you back in class. [MUSIC]
8. Going Larger: [MUSIC] In this project, let's do a bigger
one just so that we can get used to
moving our hands around and more leaves and really getting into that
muscle memory and just creating a larger piece. A little secret I
want to tell you, when you're creating a piece this big and then you're like, I want to go back and
work on some other stuff, but I don't want to
put my hand directly on anything that
I've already drawn. I have a paint stick stir from the paint store and this is a big one for like a
five-gallon bucket. I use this to put on my paper, to keep my hand off of my paper. If the paint is wet, then I will work beside an
area that I'm working on. If the paint is dry, I don't mind moving the
paint brush around. I'm keeping my hand off and
any paint that might be on my fingers won't scrub onto
my paper accidentally. Then I can go ahead and continue
with my painting without worrying about what
I might have on my hand or what I might be
smearing and draw my leaves. I'm actually a little bit mixing my leaf color with
two different colors. I'm back in this Tundra set, and I'm mixing in
this Tundra orange and this Tundra green to make these because I think
these are particularly pretty and I thought why not? [LAUGHTER] Let's just see what other colors that we
can just let come out. I'm moving the paper around as I'm getting in
different areas of the painting so that I'm not trying to move my
angle of my hand. I'm moving the angle of the
paper and keeping my hand here on my paint stick rather
than directly on my paper. I already did the up and out
for the one side so now, I'm doing the down and out for the other side just
directly opposite. You can even see the longer
I've painted leaves today, the shapes get a little better. The more you practice
your leaf shapes, the prettier those leaves get. Then if you go away and come
back to the leaves later, a little bit of practice goes a long way [LAUGHTER] towards helping you recall
the muscle memory and the moving around of stuff. Look how beautiful that is
with the two tones of paint. I love that it's
not all one color, it's not all one variation. It makes it particularly
pretty on this piece. What I want to do is wait for
this to dry a little bit, go through and add whichever elements that
I think are interesting. Do we want to add gold
to our bigger piece? Do we want to just have the dots on the
top of the leaves? Do we want the splatter? What other elements
do you want to add to your bigger leaf piece to give it as last
finishing touches? I actually have half of this dry and half of this
wet because I started painting it right before
I started filming so you didn't have to watch
me paint the whole thing. But I think I'm
going to go for what I thought was my
prettiest marks, which was the dots in the white. I feel like that's going to be my botanical elements
that I love. You pick out the element
that you think that you'll love and it's going to make your pieces
interesting for you. Again, this is an instance
where I would definitely pull out my stick and start leaning on the
stick rather than on everything I just put down because this is
definitely an instance where I'm thinking of most
beautiful piece ever. Then let's go put dots on here. That wasn't very in line with the top of the leaf on
that one, but that's okay. [LAUGHTER] Then I would
smear all my dots. Keep in mind and you could even, on one end, put a POSCA pen, on the other side, put a pen and have it like a bridge so it's not even
touching your paper. That's probably the
smartest thing to do, especially when you're
working with wet paint. Make it a little
bridge so you're on top of where you need to be, but you're not actually
touching anything that you don't want to
be touched on the paper. It would actually behoove
me to go and get some type of and I think I
actually have some of these little wood dowels, not dowels, but
little wood balls or little wood foodies
and I could glue it on each side of my paint
stick and then have it be just a true permanent bridge [LAUGHTER] that I use
at my paint table. Because I actually have those wood balls
and those would be perfect glued. Look at that. I'm talking and went totally
on the wrong side of my leaf. That's okay. [LAUGHTER] We'll call that an artistic choice for that
leaf today. That's okay. But yeah, you can
take a paint stick, glue some two little feet on the bottom of the paint
stick and then it would be the perfect bridge for you
to lean on larger pieces. I don't think I've
really ever talked about having a piece of wood
or something that you can lean on before because
with the larger pieces, it wasn't quite so important. But on a piece like
this or I just did fresh watercolor and
maybe I'm wanting to work before all of
it's completely dry, I'm working on the dry half
before the other half's dry, I definitely want to
be above the paper. With the smaller pieces, it doesn't matter, but
with the larger pieces, it does matter. That's pretty. This is also an
instance where we might decide a little bit
of gold on the leaf, painted on the leaf
might be pretty. If we'd look at a few of the samples that we
did earlier in class, this one had just a little gold on each leaf and look
how pretty that made it. We could go back on a piece
like this and do that. I'm actually going to
[NOISE] scoot that over. Using my wedge brush again, I'm going to be very careful. Again, I might use my bridge
over here to keep my hand off of my painting. I just need to decide, what do I want this to do? I might just want it as
tiny part of that leaf. Look at that. Look at that one. There's one where
I've completely didn't get little dots on it. That's really pretty. I don't know if that's
going to quite show up, but look how pretty that little tiny bit of
shine is on that leaf. We can do one side and leave the other side with no gold on it or we could go ahead
and do both sides. In doing that, I do like to do all one side and then
come back and do all the other side just to keep my hand off of the
work I already did or up on my bridge if we need the bridge. Anytime I say bridge, I'm
talking about my paint stick [LAUGHTER] Just in case
you're thinking bridge, what [LAUGHTER] When we
get to the bigger piece, just be more careful about
where you're putting stuff. This is the piece that I would consider as my big
finished project. I want it to be beautiful. I don't want it to be smeared. I don't want to
have lots of weird. Look how pretty that is. I'm just flipping
it over and gave me a little view of the shine, got my bridge out here. I want to take more care
with these because this is the bigger finished
project I want to be proud of the big piece. If you want more
than three lines, you can go for it, but
I'm filling three. This could be a
piece that later, as I learn to do more things
like flowers or whatever, you can come back
and then do a piece similar to this
with flowers in it. But for this project, I want to just concentrate
on learning the leaf and creating a beautiful
finished leaf project. I'm not painting any
specific leaf here. This is an imaginary leaf
that I'm just doing, but you can paint specific
leaves if you've got some botanical things going
around you that you love. Use a real leaf as your
inspiration if you want. I didn't do dots on this leaf. Let's go ahead and get that. Look how pretty that is. There we go. That's
really pretty. We don't have to have
too much on there. We can finish off
with some drips. Let's do that. I've got orange
and I've got the green. We might finish off. Let me get enough water on
our little paint over here [NOISE] Test it on our
little sample here. Do we love that orange? Do we want it to be blue? Maybe we want that to be a
completely different color. Let's test out this right
here. You know what? I'm filling this purply shade, this tundra rows.
Because why not? Look how pretty that is
and then that will dry. Pretty slight purple. Really pretty. Simple, pretty like
a little botanical, like you used to see
botanical flowers where they will flower
and you could frame that. It's exactly what we could do
here on this bigger piece. It's very pretty. I'm going to let my
little drips dry. I'm going to call this
piece good to go. I know on these pieces
it's all about repetition. I had somebody comment on a workshop that I've done in the past that there's
repetition in the workshop, but repetition is how
you learn things. I like to start off very small, get my shapes down, figure out how to draw a leaf. Then I like to get little wins. Basically, I like to do a
little project and then maybe we make that little
project a little bit bigger. Then maybe we take that
and we make it a lot larger because you have to think about pieces
differently when you're doing something very tiny and you're doing a small
little project versus a multi project
versus a large project. You have to think a
little differently. You have to think, how
do I make that bigger? What do I need to do to enlarge
that and still look good? How am I going to
translate what I learned in the little bitty
to make it in the big? That's why in a lot
of my workshops, we'll do a project little and get bigger and
get bigger because you develop different skills as you grow the piece
to a larger piece. I want you to be able to take
that little bitty project, the things that you learned
in that and scale it up and this is how
we're going to do that in these workshops, by doing the repetition,
start off little, get a quick win, get something that you're like, I love this so much. Then expand that into
something larger and think, wow, that turned out amazing. Let me try a big piece and
that's how you get the skills to grow and get larger
is by that repetition. While this was one
specific project in how to create a leaf, it really was several skills, learning how to paint
the leaf and watercolor, doing some fun mark-making, go from small to
medium to large. You've learned a lot of things. If you'll sit at your
table and you go the progression and
you do the repetition. Hope you enjoyed creating
these in this class, and I'll see you
next time [MUSIC]
9. Final Thoughts: [MUSIC]. I hope you've
had fun in today's class. I know thinking of doing an
entire class on one item, the leaf [LAUGHTER] may
seem not big enough. Like maybe that subject wasn't big enough or grand enough or great enough to do a whole class on or to do a whole project on. But I disagree. I think by starting
with something simple like a leaf,
especially in watercolor, because you don't know how
many people I see that say, I just cannot get the hang
of watercolor or I've never really gravitated to
that because it's hard. I don't know how to do it. I feel like if you
take something as simple as a leaf
and one leaf shape. That's where I started, I started one leaf shape, one brush and said, okay, I'm going to
figure this out. What can I create? We start off in class
just practicing, like I have sheets and sheets of practice pieces where I have just tried to
figure out my shape, how I'm holding my hand, how I'm doing stuff to get that leaf shape with
whatever I'm working with and then I translated that into a little small project
so that I can be like, okay, I feel like
I've got this down. This is beautiful. I added some marks. I turned it into a finished, a little piece of art, like a little bookmark
or a little thing I could insert into, say, a card that I'm sending
somebody so I can be like, hey, have a piece of art
with your card, or I can sell these
as little pieces of art as part of a
collection that I'm doing. Look how beautiful this
simple leaf can be. [LAUGHTER] I know that you're thinking maybe just a leaf
or maybe there was a lot of repetition in class
because we just focused on the leaf and we just got
bigger with our projects. But repetition is important, especially in art pieces
because that's how you're going to learn to
do the beautiful strokes, to get the beautiful leaves, to really master the flow of your watercolor and figure
out how your brushes work. You're going to
have to practice, and why not practice on
something pretty like a leaf? I know you're thinking,
a leaf is not pretty. But I'm thinking
a leaf is pretty. Looking at how pretty
some of these turned out and they don't even have like a flower
in it or anything, it's just a leaf on a vine. But I think leaves on
vines are really pretty and these projects turned
out really pretty. I cannot wait for you to figure out as you're
working through class, okay, we start small. How do I relate that to the next bigger
thing, the bookmark? How do I relate that to
the next larger piece, which is not too much larger, but it's multi-stems, which presents its
own challenges, how far the vines need to be from each other so all
your leaves don't run into each other and how can
we make the composition really pretty with the way the vines are flowing
around the page. You can see how we have
different challenges as we move up to like a multi-vine
leaf scenario. Then how do we relate
that to a larger piece? It gets easier if you'll start small and work
your way up and then make a big project than if you just dived into this
project and then thought, oh, it didn't work for me, I didn't do a good job. It's ugly. I don't love it. But if you had started smaller
and did the little bits of repetition throughout the class and then you got to this piece, you're going to end up
with a beautiful piece to be able to do something with. You can frame it, you can
hang it, you can gift it. It's beautiful. Sign it. It's a beautiful piece
of art when you're done. I know so starting with
such a simple item element, the leaf shape, we came up with some really beautiful
pieces of art today that I'm excited
to have created. I was really glad to
have you in class. I hope you're going
to embrace some of the repetition of
this one shape and see what you can create as you grow with your project sizes. I can't wait to see
your leaf project, so be sure to come back
and share those with me and I will see you
next time. [MUSIC]
 DENISE LOVE, Artist & Creative Educator