Transcripts
1. Welcome: [MUSIC] Hey, I'm Denise Love and I want to welcome
you to class. Let me show you what
we'll be doing. In this class, we are going to
learn how to make our own watercolor paint using a pigment and some
natural gum arabic, and some honey,
and some glycerin. Then we're going to
get them all mixed up into little paint panes to use from now on
because once these dry, we can keep using them. I'm going to show
you in this class how we make our paint, different options that you
could use for pigment, suggestions on where you
might look for pigment. Once we're done,
we'll do a couple of little color samples
with the pigment that we created just to see
how fun and beautiful working with your own
custom-made paints are, and then you can tell people
that you made these paints, which I think is
pretty exciting. Nothing is more fun than
meeting an artist and knowing that they
created the paint that they then have created
their painting out of. I've been experimenting
quite a bit myself. I have pigments
that I got online, overseas and pigments that I
got from local sources like the art store and you could go outside foraging for
different pigments also, lots of options here. Super easy to make
the paint itself. I hope you're going
to enjoy how easy that is to make and then use. I can't wait to see
what you're creating. Definitely come back and
share with me some of your paints and then what
you've created with them. I think that'll be super fun and I'm very excited to be here. I hope you enjoy this class and let's get started. [MUSIC]
2. Supplies: Let's talk about
supplies in this video. I've got a lot little general
stuff and it's not too bad, but you need, first and
foremost, some pigment. Whether that be pigment
that you forged in your yard from a rock that you hammered into little pieces
that you then pummeled into pigment with your
mortar and pestle, or you purchased some
at the art store, like I've got some art store
pigments here, or online. I've got some natural
pigments from Natural Earth Paint or some specialty pigments that
are maybe super-special that you happened upon at an
art store here or there, or online, or some that maybe
you got from an artist. I've got all kinds
of pigments here because I find
pigments fascinating. You need some pigment and if you just want
to get started with some easy pigment
that's going to give you a win
right off the bat, then I do like these Natural
Earth Paint pigments. They're super smooth
and they mix up really beautifully and it's a win
every time I mix those up. Some of the artist pigments or pigments that I
got at the art store. They may be a little
thicker and I might need to grind them into a finer powder even
than they come and so I do have my mortar
and pestle here. You can get these on
Amazon for about $35-40. You can find these
in kitchen stores, they're used to
grind down spices. I do love having it. I find it really handy when
working with pigments. If I think the pigment
is a little bit larger in size
than I might love, like this yellow ocher has
some large pigment in it, I might want to grind
that down a little finer before making
it into my paint. You will also need some
Gum Arabic and Gum Arabic, I got this from Natural
Earth Paints online. It's not very expensive and
it is your watercolor binder. It's eco-friendly,
it's nontoxic. I like using stuff
from them because if you are allergic to a lot of paints or very
sensitive to chemicals, making your own natural
paint is so nice because then you can do things that you might
have had to give up. Gum Arabic powder, we're going
to be using that to make our watercolor base and this is what it looks like
when we get it mixed up. It comes from a tree and
it's really brittle. To combat that brittleness when we're making
natural watercolor, we use a little bit of honey, which will add to
the resilience of the paint and less
likely to make it crack and it will also allow you to reconstitute the paint once
it's dry and it's pan. Then a drop or two of glycerin
will add some vibrancy to your paint and add a little bit more to the resilience
of the paint also. I got the glycerin and the
honey at the grocery store. I have some little half pans
for watercolor and these I got off Amazon and you can Google search half
pans or whole pans. Whole pans would be basically the size of
two of these together. If you're mixing
your paints today in the quantity that
I was mixing them in, you can see that I have two
or three of each color, so the quantities that
I was mixing would make a whole pan and then
a little tiny bit of a half pan if you've
got the bigger pans. I got half pans and so I didn't want to waste
any paint and I don't want to have to make
paint again for a while because I get all this
stuff out when I do it. Now I'm going to have all
my colors that I want. Little half pans,
you'll need those. If you do half pans, maybe at least two per color. If you do whole pans, then one per color. I found these adorable
watercolor tins on Amazon. That's super fun if
you get a tin that has blank pans in them. Then when you're done, it's really beautiful to
close up your handmade paint. Also, to make the paint, have a piece of glass, a glass muller, and a palette knife. I have a little stick that
I was using to stir up my Gum Arabic in the water and that's the supplies
that I was using today. The muller and the
glass piece I got from the Natural Earth Paint company
also and it's really nice because you mix up your paint with the Gum Arabic,
honey, and glycerin. Then the muller is what really binds all that together
really smoothly and makes sure that
every particle is wet with the different
things you've mixed it with. Then when you scrape your
paint off the glass, you end up with beautiful mixed professional grade
type watercolor paint that's nice and
saturated with color, so you're more than
likely cannot get away with not having
the glass and the muller because
that's what really makes the paint
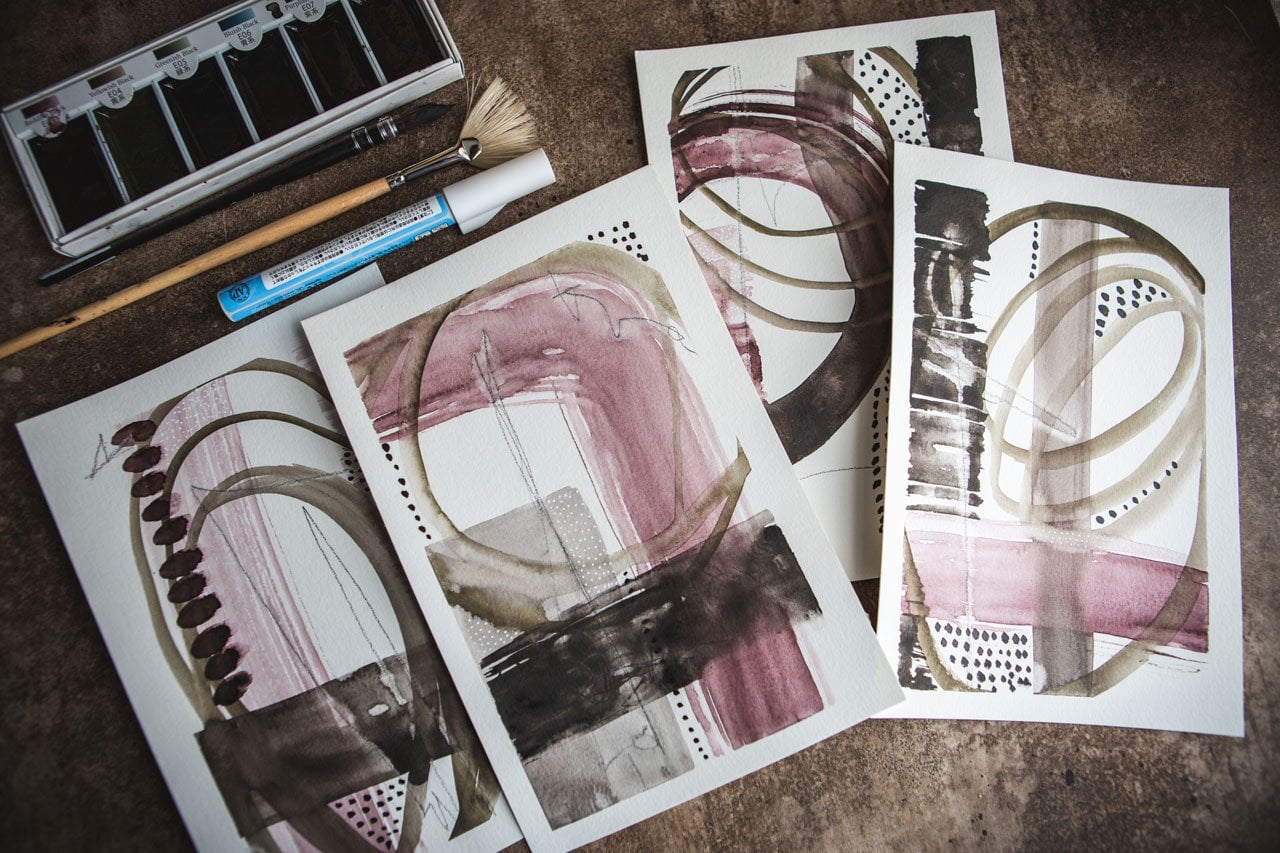
smooth and beautiful. I was just playing in my art journal after we
had mixed everything, testing out our different
colors and stuff. After you're done
mixing your paints, you might want to get
into your art journal and just practice and
see what you can get. Because I was doing some
little test wipes and then some little abstract
pieces after the fact, so a little bit of
watercolor paper handy to test out what you've
done would be fantastic. That is our supplies that we're going to be
working with today. The main thing is
I want to get you into seeing how much fun
making your own paint is, and if you make enough of it, you won't have to
make it super often. Then when this dries, you can keep on
using it over and over. You can make
custom colors. You can mix two
pigments together, which I don't really
talk about in class, but it is a suggestion
that I have out there. If you want to make
your own custom colors, this will be the
time to do it and then get it all mixed
up and put in your pan, how exciting would that be? This is pretty fun. I'm exploring different types
of pigment and paint mixing myself and I really like
doing it. It's easy. It's a little messy. I made all these in one morning, so it's not like it even
takes a long time to do. The longest thing was just cleaning off my piece of
glass in-between colors. I hope you're going
to love trying out these techniques and I
will see you in class.
3. Safety tips: [MUSIC] I wanted to talk about safety
really quickly with you. We're dealing with powdered
pigment and pieces of glass, and it's really best to
keep safety in mind. When you're mixing the pigments, you don't want to
breathe any of these in. No matter if it says
they're toxic or not, you don't want to
breathe the dust of these colored pigments in. You do want to wear
a mask, a dust mask. These I got at the paint store. They're N95 masks that painters use to keep dust and particles when they're sanding
sheet, rock and stuff. That's perfect. A mask like that
it's going to block virtually all the particles from a colored
pigment like this, and that's exactly what
you want it to do. You don't want to be
breathing any of these. You also want to make a practice of wearing gloves when you're
working with pigments. I didn't do it
during the videos of this class. Shame on me. [LAUGHTER] But pigments,
especially if you get like the cadmiums and stuff
like that, they are toxic. If you're working with
particularly toxic pigment, make sure you're wearing gloves because you don't want
them getting up under your nails and just
stuck in the crevices of your fingers or any sores that maybe you've
got on your finger. Wear some gloves. If you're working with
the non-toxic materials, it's just a wise practice to continue wearing gloves every
time you work with pigment. Then with the glass, if you ordered the glass
and muller set like I did, where you have the
piece of glass and the glass muller or that
come together as a set, you just have to
be careful because it is a piece of glass, there are edges on it, they're not super sharp. But I have noticed
as I put this in and out of my sink or
something to wash it, there are pieces
that flake off and they could become sharp and
you just want to be mindful. If you drop it, it might break. It's not a non breakable item. Working with glass, be careful that it could have some
sharp spots on it. Working with the pigment, be careful and
wear your mask and your gloves just as
a safety practice. I hope you enjoy this class. Let's get started. [MUSIC]
4. Making Gum Arabic Solution: Let's make some Gum
Arabic and I'll show you how easy
this is to make. I'm going to make a tablespoons
worth of the powder. One tablespoon of powder, four tablespoons of
warm distilled water, and that's how we
make the Gum Arabic. I'm just using an old
pickle jars to store it in. Whatever I use
today, that's great, and then if I need to save the rest of the liquid
in there for say, tomorrow or a little bit later, I can put this in the
refrigerator and save it. It doesn't save forever, but it saves long enough
for you to get back to it or you decide if you're
going to use anymore not. I'm going to do one tablespoon
of the powder in there, and if you're wondering
how far this goes, I made this much watercolor with the other jar that I had, and I thought how
to watercolor 1, 2-30 half pans. I've got the powder in there. I want four tablespoons of the distilled water and I did have to get that from
the grocery store. Let's get it as good as I can because my water out of
the tap is not distilled. I'm going to add just a
tiny bit because I wasn't adding full tablespoons the
way that was coming out. Then I just take
a coffee stirrer. This is a wooden coffee stirrer. I just mix that up until it's
completely incorporated. It'll take you a minute
or so to do that. If you're using warm water, it incorporates better, which is why you want to just
heat that up a little bit. Then once you've got that mixed and you're ready to
go and make some paint. Don't take too long,
but you do want to make sure that you
get everything incorporated and
there's nothing on your stick when you pull
your stick back out. You could use a
spoon or whatever. But this is a coffee
stirrer that I keep here in my art studio rather than going down to the
kitchen to get something. I just want to make sure you get everything worked out of it. Then once you've
got that nice and completely mixed
and ready to go, I just go ahead and put my lid on it and save it
till I'm ready to do what I want to do with it and then I use it to mix paint. Tablespoon of that
to a tablespoon of pigment and a little honey and a little glycerin
and you're set. That's how you make
your Gum Arabic. I got this Gum Arabic from
natural earth paints, which is the natural
earthpaint.com. This is a natural paint binder, but you do add the honey
and maybe the glycerin to it to make the
paint a little more vibrant and to make it
a little more flexible because that Gum Arabic
is very brittle. If you use only that and put your paints in your little paint
pens and they dry, they'll crack and they won't reconstitute
as easy with water, the honey lets them reconstitute
into usable paint again, when you add water to it. There we go. Make
sure you've got it all mixed, nice and good. You can put your lid on it
and you're ready to go. If you're not going to
use that right away, go put that in the
refrigerator and it'd be good for
when you are ready. They don't separate
once they're all mixed up and it will make about
30 half pans of paint. I have discovered using them at the ratio
that I was using it. If you want to use it and have different colors
in all 30 pans, try a half a teaspoon of the Gum Arabic and a half
a teaspoon of the pigment. If you go any less than that, I'm afraid you might have pigment everywhere
and not enough to pick up, but you can certainly just
experiment and play there. That's mixing our Gum Arabic for water color paint.
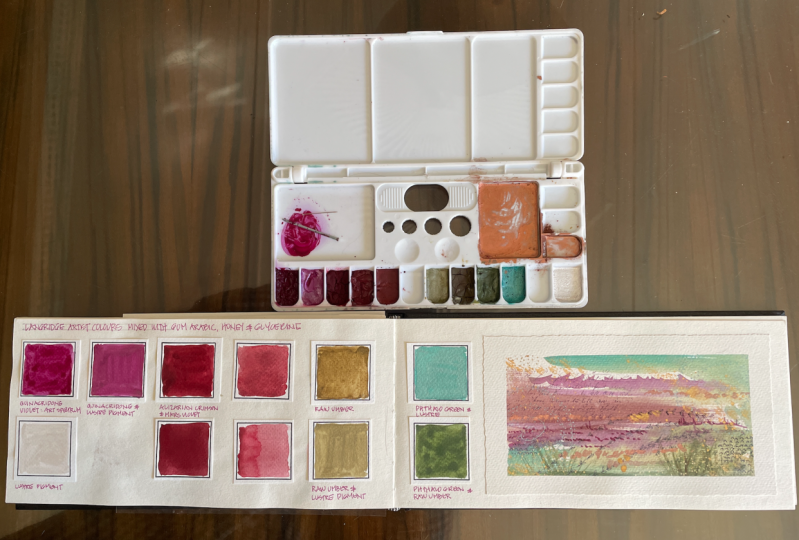
5. Mixing & Saving your paints: Today I'm making some paint and I thought I would show
you how I did that. I'm making watercolor paint and I've got a little tin over here of colors that I've
already got started today. I got this fun little tin off Amazon and it came with
40 little half pans. This is a half pan
for watercolor. You can also get little
tins with full pans and the full pans would be
double the size obviously. What I like about making your own paint is it's fun to experiment and
tell people later, I made my own paint. But what I also like
is then you have the opportunity to work with
non-toxic materials and that's really a bonus when you're painting and
doing things in your studio and you want to keep things a little more non-toxic. What I like about
natural earth paint is they are natural
and nontoxic. I like this watercolor, because I like doing watercolors anyway and I have lots of little pans from my favorite
Daniel Smith and Cinnnillea. These little tins that we're making are about the same size, so as far as how long
these will last, I can judge based on how long these watercolors
have last, how long I might get out
of some that I make, and they last a long time. We're using gum arabic
powder as our binder. I've mixed up our
gum arabic solution and I have that ready. I'm going to be
making this color. What I like about these tins
is they've got a pretty little top on them
and then I can say here's my handmade palette, but they come with
little magnets for the bottom of our pans. I like that because
then I'll just stick in my paint palette here
without a problem. I'm going to go ahead
and write on the side of my little half pan what
color I'm doing here. This is orange ocher. [LAUGHTER] Then I won't have to wonder later
what that color was. You can order a little starter
kit from Natural Paint. It's naturalpaint.com. Or you can be real careful that you don't
have a hole in your bag. One of these had a hole
in the bag and I went to shut it and pigment
went everywhere. I was like oops. I know that I'm going to do a teaspoon of pigment to a teaspoon of gum arabic solution and I'm going to add a
little bit of glycerin, which I got from
the grocery store, and a little bit of honey, which I got from
the grocery store. We add the glycerin and the honey to our
solution to make it a bit more flexible and it adds some vibrancy to the
color, the glycerin does. The honey makes it
more flexible because gum arabic comes from a tree
and it's really brittle. If you make your
little watercolor pans and they crack later, then you know the next
time you make paint to add a little more glycerin
to that solution. I'm just adding a drop. If you add a drop,
then next time, add a couple drops. The honey lets it stay flexible and reactivate
when you add water to it. I'm going to add my
one drop of glycerin. If I'm making a bigger quantity, then I can adjust those
quantities appropriately. Then as far as honey goes, I want a nice sized
dollop about the size of the edge of my palette knife or maybe just a tiny bit more. We'll put that in
there and that we will mix when we start mixing. Then I'm going to do a
teaspoon of gum arabic and I only have one teaspoon
measure thing in this set, so using the half teaspoon, so I added two of those. But start off with
one to one ratio, one teaspoon of powder
to one teaspoon of gum arabic and adjust from
there and you'll get a feel. You want these to be not
super liquidy but not stiff. After you make a couple, you can get an idea for the
consistency that you want. A few of these, the pigment themselves have a different viscosity
and you may need to add a little bit more gum arabic to your solution if it's way too thick or a little
more pigment to your solution if
it's way too thin. That's about what I'm
looking for I think. Just get it all mixed up. Now, these powders
that we're using from Natural Earth
Paint that I'm using are so finely ground that you could
stop right there, but I don't usually
do that because all the pigments are different. I'm trying to get
it off the bottom of my palette knife too. All the pigments are different. I don't want it to
be inconsistent. This is a glass palette that we're working on
with a palette knife. I go ahead and use
my glass muller. What this does is make sure
that every single particle is coded and your
mixture is now smooth and you can hear it
grinding on the glass, on this one in particular. Let me hold my
microphone closer to it. That sound is the dirt
particles basically being ground and smoothed
out with the muller. You can't have super
thick particles making paint like this. If you're making your own paint by going out and foraging rocks, you're going to have to
really grind those down, pulverize them to the point that they're really fine powder. Usually, you do that in one of these motors and tenon
pedestal things. You would just grind and grind until it's a
really fine powder. Just depending on what
rock you're doing, it maybe soft or it may be hard, may take you longer. Some you may not be
able to pulverize, but it's fun to experiment
if you want to go out and forage your own rocks
in your yard and try. I like buying powders from people that have
already done that. Now I'm basically just
gathering up the pigment and putting it into my pan. But forging for
pigments is pretty cool if you're wanting to
explore it and further. I am for this purpose
using pigments that are already have
gotten from a source. After making several of these, I know that one teaspoon to one teaspoon mixture
that I did with the pigment to the gum arabic, depending on the color, will give me two to
three-half pans, is how much paint I'm
expecting out of this. If you want it all
to be in one pan, you can get the full pans
rather than the half pans, or you can mix a
smaller quantity. But it dries a little bit on the palette if
you're not working fast enough and I'm afraid if I mixed two smaller quantity, I won't have enough
to fill a pan. I figured I'd rather just make
two pans now and then I will have enough paint for quite a while and I
won't have to do this again. Then I'm just going
to set these in my little paint palette and
clean off the side of that, then I'm just letting
these dry overnight and then we'll be
able to use these. I'm going to wash
these off if I'm using these natural pigments. I wash these off in the sink because I'm using stuff
that's not toxic. If I'm using pigment
that's toxic, then I might go rinse these outside in my
bucket of some rocks. I usually put together a bucket
with some sand and maybe some rocks and I will dump
paint water into that bucket. You have a hole in the
bucket, two at the bottom, and it filters out the
pigment from the water and lets the water seep out, and leaves the
pigment in the bucket. Then when your
solution's so filthy that it won't filter anymore, then you can throw that out
because it'll all be dry. Just depending on what
kind of paint and pigments you're using because
you can get paints from the paint store. Gamblin makes pigment. You can get paint from
artists that package up different paints to sell
if they've been out forging. I've come across some
wonderful Japanese pigments at an art store that I want to mix and make some of my
own watercolors out of. You just got to be
creative and looking. You can buy handmade
watercolor paints. If you're making some of your own handmade watercolor paints, you can sell them on places
like Etsy, super fun. I'm going to go wash these off, then I might mix up
one more color and do that with you. I'll
be right back. I've got everything cleaned off and this is natural
earth paint also, but it's a small quantity
I'd gotten from an artist. This is indigo, and this
is a different color than some of the ones that I got
in a fun little starter kit. I'm just measuring out my
one teaspoon of powder. That was a little bit extra. We'll take it. If you get these little vials that are like two inches big, looks like it holds about
three teaspoons of powder. Just put a little, dip in there. We're going to add
one drop of glycerin, which I get from
the grocery store. We're going to put
in, and that adds to the vibrancy and the
longevity of the paint. I'm going to add a
nice dollop of honey, which adds to the flexibility of the paint and makes
it so that it is less likely to crack on your
overhear in the palettes. I just got to turn it bit more and letting you rewet the paint when you come
back and you want to dry. That let's you rewet it. This is my gum arabic solution. Again, I'm just going
to go ahead and put one teaspoon of the
gum arabic in here. The gum arabic that I show you on the video
how to mix these, that solution goes pretty far. I mean, in just the one
container that I've mixed, I've mixed all of this
paint plus this paint, plus we still have a couple
more colors that we can mix. It does go further
than you think. Don't mix up giant
quantities of paint. You want to mix up what you can use and then always mix a
little more if you need it, but you don't want to mix
as much as you possibly can right up front because
you might just waste it. What's nice about the gum
arabic too if you do have some leftover and
you want to come back and make paint later. You can refrigerate that and it will stay good in the
refrigerator for a while. I don't want to mix my whole
packet of gum arabic powder because I know that I'm not
making that much paint, and after I make all the
colors that I currently have, I may not pull this out again
until I get new pigments or I've used up something
here on my palette. Some of these mix-up are
super-fast and some of them take a little bit longer to really get that liquid to incorporate. This powder again is so
fine that you might decide, "I'm going to leave
it at that.'' I'm going to go ahead
with my mealer. Basically, you're taken this in circles like a
figure eight or some circles to grind that pigment in that liquid all in together. It really incorporates it, makes it a lot smoother. The longer you do this, you don't want to too long. You want to be pretty
quick about it, but the longer you do this, the more smooth your paint gets. This indigo though, is going to be a little grainy or pink
than some of these others, very interesting to see
how these pigments react. This is a granier pigment. I mean, it's still
ground up really fine. It's not like it's ground up
any less than the others. It's definitely a
granier pigment than some of these others. It'd be interesting
when we paint to see how that graininess is different than say a
smoother one that we did. This is indigo. Needed to write on these before I mixed it,
but that's okay. Let's pull all this in. This is a pretty color though. It's almost like that
pretty paints gray. It's real similar to
that or maybe like the darkest blue
jeans that you own. I'm going ahead and put more magnet on the
bottom of two of these, because I know I'm going
to get at least two pans, possibly another half a pan. Take my little Sharpie, that was indigo and write
that right on the side. You want to do that before you put the paint it in or you'll have to wait till
tomorrow to do it. Then I'm just going to scoop
paint into my little vat, trying to be careful not to
get it all over the place, but I'm not being very
successful on this one. Getting it all over the outside. [LAUGHTER] Which I
don't want to do that. I want it to be a little
cleaner on the outside. Let me just dry, but I'd rather not have
paint all over the place. I got a little paper towel. They are just to get up
the extra on my fingers. Then you don't want
to let this sit too long on this glass palettes, so definitely don't
walk away from it. Then we're going to
set that in there, let it dry and I have
another little mat ready. Again, these make at least
two vats with this quantity. Then just depending on how
fast you use a watercolor as to how long that's
going to last you but they're going
to last forever. Clean off the sides of that. I don't want to waste this, I do have more paint here. I'll probably have
another half of that. Another whole vat.
This one made three. It does make 2-3 just
depending on the pigment, what you end up
getting out of these. Then set that right there, ready to clean everything off. I hope you enjoy it
giving this a try. Experimenting with
making some of your own paints because I'm
going to have some fun trying these out tomorrow when I let
these dry a little bit and seeing what I can get
painting with them. I'll see you back in class.
6. Saving your wet paint in containers: [MUSIC] Got an
idea for you and I just want to show it to you. If you're mixing your
watercolor paints and you need them to stay
wet for any reason, you can put the wet
watercolor into a paint pot instead of into the little pot
where they dry. This will allow them to stay wet quite a
bit longer because they close and seal and then you don't have air
getting into them. If you like working with
the wet watercolor and you need the watercolor
to stay wet, this is the easiest
way to do that. Now, the only
drawback to keeping the watercolor wet that I can see is that it could
eventually mold. This is only going to keep it
probably for several weeks. But if you get to
the point where your watercolor
formula is molding, then when you're
mixing your paints up, you can add a drop or
two of clove oil to your watercolor mixture and that will help prevent the mold. Just a little fun thing to
think about if you want to try little paint pots instead of the little half pans
that we were creating. I'll see you back
in class. [MUSIC]
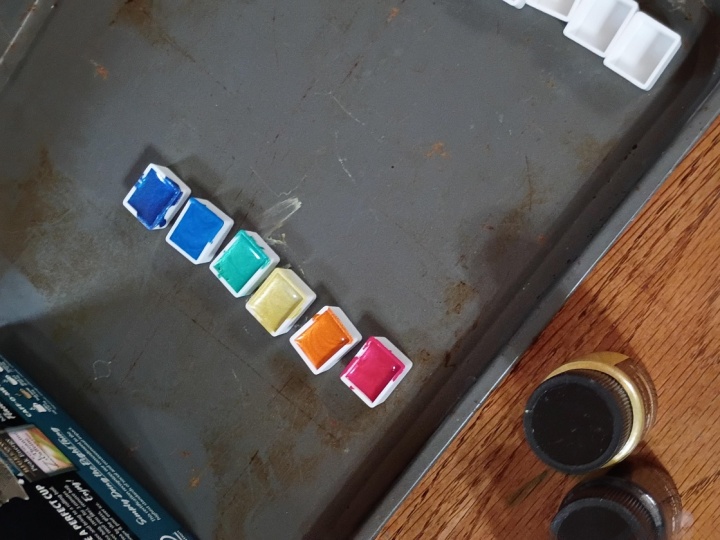
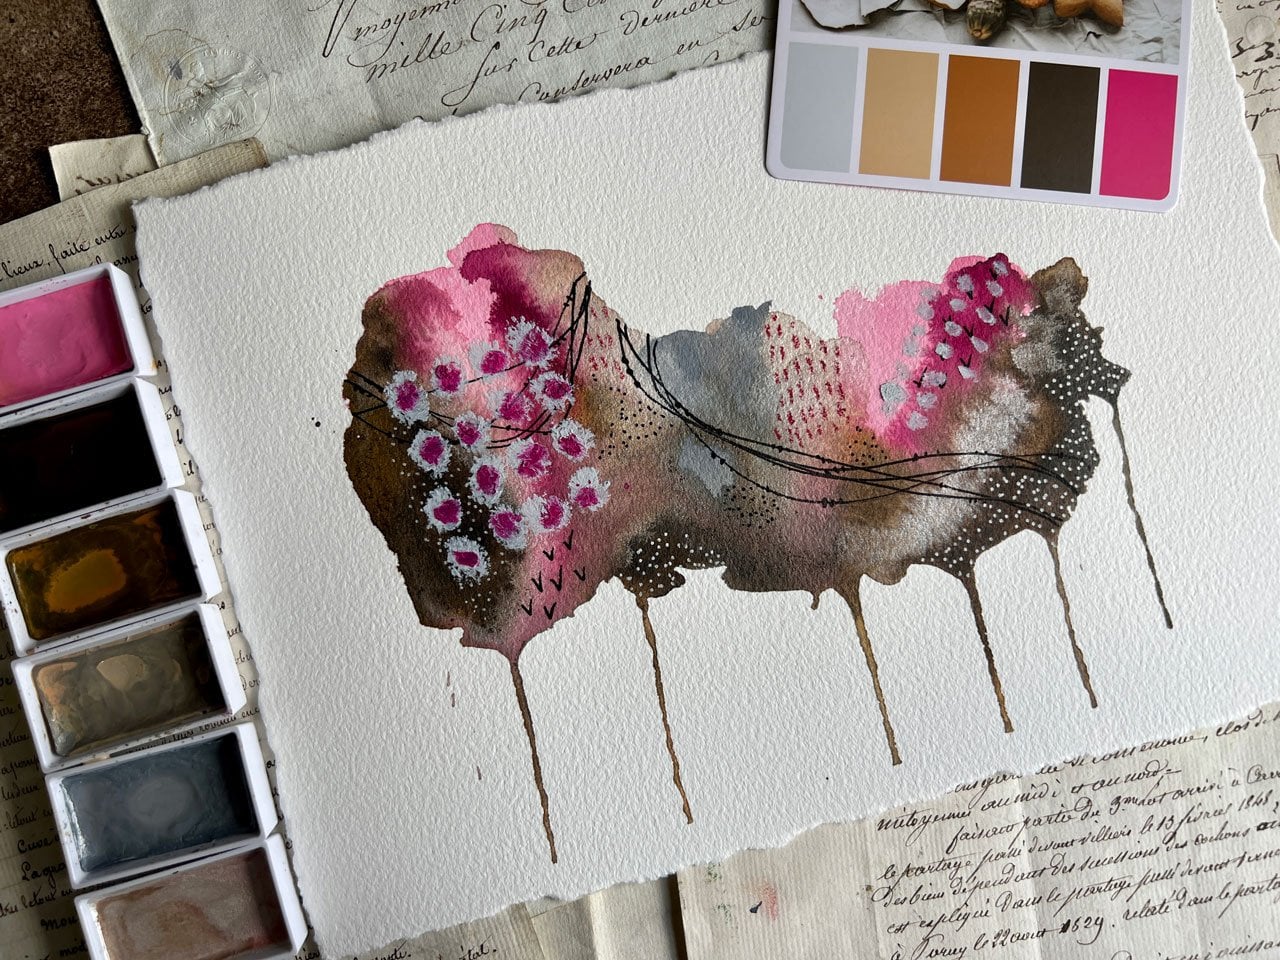
7. Abstract test paintings: [MUSIC] I've mixed up more paints and these are
not all completely dry, there's still some wet, but I can't wait
to dig into them. I need some more little
paint pen so that I can continue making
some of these colors. I just want to play a
little bit and see what these look like on my pad. This is my art journal
but maybe dipping it straight down in and
dipping it in some water. I just want to see what some
of these colors look like. I'm basically the prettiest
artist palette I've ever found. [LAUGHTER] I
got that from an artist on Etsy that has started
making paint palettes. These are the Japanese pigments. This orange is some of
the earth pigments. This turquoise is one
of the earth pigments. Just giving them each
a little world to see what is this
color going to do. What does it look like? How thicker transparent is it? This is a Japanese pigment, will look at that. What color does it really
make when we come out here and use a few of
these? That's pretty. What I want to do to
play with these is maybe do a couple of little abstract
paintings here in my sketchbook [LAUGHTER], and just see what
are we going to get. I'll see now that
color isn't nearly as saturated as I
thought it would be. That's very interesting. Because it looks
all dark and deep. I love that yellow
ocher. I actually do love these two right here. Those are such pretty colors. I got one or two more in here. Let's just see real
quick what they, that's a green, that's
like an emerald green, that's a Japanese pigment. Get out and experiment
with different pigments. Try these earth pigments. This is an earth pigment. Go out into your
yard and find a few. Order pigments off
of Etsy or eBay or online art stores
or look and see what you've got in
your local art store, there's pigments there too. Look how pretty all these are. That's a really fun experiment
to come in here and paint in your book and
just see what you can get. Maybe what I will do is
set those to the side, let them dry and maybe play in my art
journal for a moment. I'm going to do a couple of little abstracts and just
play and see what we can get. Because I've got those
little abstract classes that are so fun. This can be one of those
samplers like an abstract, like a little sampler
that I'll talk about in that abstract samplers
class because I want to see how
these play together. I'm just painting some color, not being super specific, but I just want to lay
some pigment down. Then I want to let that dry. I don't necessarily want them
to all blend in together. They are doing a
little blending, but not as much as some of my other
watercolors have done. These dry a little quicker, it almost seems like. It's got a really nice
texture to the paint itself. Look how pretty that is. I want to put in a
few green droplets. Let's see if we can get this
too do some color splatter. That's so pretty. My goodness, I'll go in with my mechanical pencil and do
some little mark-making. [NOISE] Look how pretty that is. You could wait till it's
dry, do mark-making. But sometimes I like to go
ahead and just start playing and see if I move
any paint around. Especially when you're
doing big lines, can we move any paint
around a little bit? Maybe a little
scribble over here. Look how pretty that is. This is the way I like to test colors doing these
little abstracts because they're so fast
and they're so easy, doesn't take long to dry. Let's do one in our other. Now that those are pretty dry, I don't mind if they get
on the back of that page, but [LAUGHTER] new favorite, I love the blue and green. [LAUGHTER] Let's see. Should we? Let's do. That's a bright
Kelly green almost. Let's see. Let's try this.
What color is that? That's the deep one.
This is the indigo. That is an indigo, was very grainy, I remember that when we were
mixing that. Let's just try. See, that one is so grainy. It's very interesting,
look how grainy that is. That green, I do
like that because sometimes I sprinkle pigment onto stuff and think adding
extra texture and stuff. I like it for the texture
in something like this. I don't like it if I
needed some smooth blue, it's almost too grainy, and I should have
probably put it in my mortise and pedestal thing. That's what that's called,
mortise thing and I'm actually grounded up more
than it already was, when I realized how grainy it
was when we were using it. Let's mix it in. Let's see what this crazy. This is another earth
pigment and it's a bright green almost. But let's go ahead and
work some of that in. Let's just try it out. I love doing the color samplers for color tests and
stuff like this. That picked up a little bit
of the green in the blue, picked up some of those
little pigment pieces. Sounds very interesting. Even though I was doing
like little color samples like this and test
out my colors, I do like to then just create a little
piece of art out of it, [LAUGHTER] so when I start
flipping through my book, I see pretty little abstracts with color tests that I did. I just love that. See. It's still pretty,
it's very grainy. I probably should have worked some of that
pigment in better, but an excellent test of that. Let's see if this
other one is dry and test out some other colors. Just going to pick up a little
bit of water that I saw. Look how pretty that still is. The finer the pigment, the finer that watercolor
really ends up being. I'm just going to put
that over there gently. Let's see what we got
here with these oranges. This is a natural earth
pigment color, look at that. See now that one was
ground up nice and fine. The indigo that I
used was a color I got from an artist and it
was a natural earth pigment. But I really think I did
not mix it long enough, so get all that
pigment mixed in. That's an excellent way to
test that and figure it out, is to come back and then play in your art journal and
test your colors out because you don't want
to start painting a piece that really matters and discover after the fact that it wasn't quite
what you were hoping. I like this ocher and that
orange were fantastic. Super fun, look with that. That color is due and right here it's a little bit of extra wet. Look what that's
making, super pretty. That's fun and I could come back with some speckle,
kept pretty that one. That's still going to be. I'm just a blue
and green person. Let's just do one more. I'll be real gentle here. Opening this, because there's still some colors over here. Let's see what we got. I don't remember if I dipped
into this color or not. That's like burnt umber. Let's do the burnt umber, and this color
that's more orange. That might be like a raw sienna. Only see what I
wrote on the side. That's why I write on
the side of these. [LAUGHTER] That is orange ocher. I like orange ocher. I like yellow ocher too. I like anything in
the ocher families. Those mixed up really
pretty too. Love that. Real pretty. I might come back. We could do some little
orange splatter. Then look at that. Such pretty colors. That was super fun, experimenting and playing in our brand new watercolors
that we just created. I hope that you'll have some fun creating some
of your own colors, whether that be the natural
earth colors or some pigment you got from the art
store or some pigment you found online because
you can look on Etsy and find all yummy paint
pigments available. Then just see what
you can come up with. This is super fun. Then once you make some colors, test them out in your
little art journal and see how they're
going to work for you, what the opacity is, if you're really going
to love the colors, do some little color
swatching like I did. I did color swatching
a couple of times. I did it in this book. Then I was playing
and I came over here, and then I did it
in this book too. Just color swatching
and playing in the different colors
that I created today. I've got quite a few more
colors that I'm looking forward to making when I get
some more little paint pens, but I can't tell you
how satisfying it is to create some
colors and then create a little bit of art from the colors that you just created
with your own two hands. Seriously, how much fun is that? I hope you enjoy
playing and making your own paints and I will see
you back in class. [MUSIC]
8. Grinding pigment: I'm mixing up one of these Japanese
pigments that I had gotten. This pigment is really
not completely finished. Like you can see great
big pieces in there. I thought I would just
show you how I use my little mortise
and pedestal here just to grind that down to a much finer powder before I try mixing it into a watercolor. This is pretty soft pigment to this is not like a rock. With a rock you would really be down in there
really heavy and good. But I'm just trying to
make this much more fine. The fun thing about
pigments that come with different
sizes like this, you can make your own thickness, your own preference of how
fine you want that pigment. That's pretty fine there. I'm just going to take a
soft paintbrush and use that to get some of this
pigment off of here and see how
fine do we have it. I didn't put quite a
teaspoon in here so I might add tiny bit more pigment because I feel like when
I get this out of here, a lot of the pigment's
going to be stuck to the container until I wash it out because this has got
rough surfaces on it. The pigment does get down
into those rough surfaces. It's rough surfaces that let
you grind on it like this. Let's just see what
we've got here. I might need a rougher brush. I'm using a brush
that's pretty soft. But I bet if I use a
different brush here, I can get those out of
those grooves a bit better. Let's just go with
a nice stiff brush. You can see I have
pigment flying in the air here so I do have
a dust mask on. If you're working
with loose pigments like this and you're going to be grinding on them and working with them they'll be flying
in the air in any way, put a mask on. You can see I'm just working that pigment out of
some of these grooves. I'm going to work that right
onto my little palette here. Then we'll call that
roughly a teaspoon of powder when we're done because I measured
it out pretty good. I did add one more piece of pigment there while
we were filming, but I measured it out and
it was roughly a teaspoon. I'm still just working that pigment out of my marble bowl here
because I don't want to leave all that pigment behind on there and
I don't want to have to clean it out because
I dropped my bowl. The bowl's heavy. Just see, I'm working that back out of the crevasses and grooves
as much as I can. You don't want to
waste your pigment. A whole lot gets stuck in
there, look at all that. Then you'll finally get to
the point where you're like, oh, okay, I think I
got most of it now. You don't want to leave all
your little pigment behind so don't leave it all in there. Keep working until
you feel like you've gotten most of it. That's pretty. I'm pretty **** good. Now I'm going to come in and we're going
to make this color. It may have made
little more than a teaspoon now that
we're looking at it. I might see, here's a teaspoon
and then all of this, I might put back in
the container and save so I don't have to
waste all this powder. I like having this
powder for later. Look how much that made. Even though I measured out
a teaspoon of pigment, the powder really has
air and stuff in it too. It did go a lot further than what I had measured out and I
don't want to waste it. If you end up with a lot
of extra pigment and you don't want to waste it. I get these fun little
glass jars off of Amazon and I can just save
my extra pigment in there. Now I'm ready with my
teaspoon of pigment, my drop of glycerin, going to mix this the same way. A dollop of honey that's
about the size of honey drop that I would get off of the end of my
little palette knife. Then I want to go back to my Gum Arabic and I'm going to have to make some more of
this pretty soon. A teaspoon of Gum Arabic to
a teaspoon of my powder. Then if it's too thin, I can always add more powder
and if it's too thick, I can always add
more Gum Arabic. Look at how yummy this
color is. Oh, my goodness. It is very liquidy so I
might just come back in and add some more powder from
my little tube I just made. You do want it liquidy
but not super, super, super runny, runny. This is still pretty
runny though. The more pigment that you add, the more, sorry, I
was thinking there. Let me get my glass muller, but the more saturated it'll be, more pigment you've
got in there. This is like a dream, doing it with the muller compared to some
of the pigments. It's just so yummy
and smooth here. Now we're ready to put
this yummy moss green. This doesn't have a
color on the side, I'm sure it does,
and if it does, it's in Japanese so I'm
not sure what it says. But there is a
number on here, 54, that I could put on the side
of my vat and then I would know Japanese 54 would tell
me which pigment I used. I might just write
J54 on there and I'll know where I got that color when I want
to make some more. Could've had more pigment in that it is still very liquidy, but I think that's going to make a really nice watercolor. This is right up my alley
color-wise like for reals. Look how pretty that is. Oh, my goodness. There's a darker green. I like the dark greens, pinks, and light green altogether
in some of my stuff. I like indigo, so I
might experiment with those colors tomorrow and when I get to try
these out paint-wise. Look, how beautiful. Then there's still
enough pigment on here. I don't want to waste it, but it looks like that's going to make about two vats and then I could start
a third vat just at the very bottom and use that third vat first and get rid of it so that
we didn't waste any. Because if you get
some of these, I want to call them exotic pigments because they're
not local to me, they're harder to get. They come from overseas. I got this from an
art shop in London. You don't want to waste
one tiny bit of it. It's not like something
you could get at the local art store and you
don't mind if you waste some. Yummy. That was super fun. Hope you liked seeing
just a little bit of how we would use our
little pedestal there to grind up some pigment
and using a brush to then scrape the
pigment out of there. I do like the stiffer
brush to do that because this is got a lot
of texture to it. Then I will go wash these off and keep on making some paint.
9. Trouble shooting: I thought I would do a couple of
follow-up videos looking at the paint the day
after we made it, and then I will do this again in about a week and then
just see what's going on, and troubleshoot a
couple of things. When you're mixing
the paint and stuff, when it starts to dry, the water evaporates out of the paint and it starts
to shrink a little bit. You can see here, these are one day dry and there are several things
that we've got going on. Troubleshooting-wise, if you
have any that might cracks, that just means that
we could have used a little more glycerin
and kept that a little moisture as it was drying
into a pan or into a cake. I could have used a couple
more drops of glycerin there, maybe even a tad more honey. What's interesting about the different ways
that paint dries, if you're going to make a habit of creating your
own paint and stuff, you might take note of your favorite colors
and how they reacted, and tweak your formulas for the next time that
you create the paint. They all dry a little different. Like some of these are drying and really shrinking
up pretty good. Some of these are drying
and cracking a little. Those will want to add a little extra glycerin or
honey to our next formula. One of these were too thick. This one was too thick and
it cracked a little bit, so in that case, I should have added definitely
a little more glycerin, but I should have added
more of our Gum Arabic to begin with so that it
wasn't so thick to start with. These are the natural
earth pigment ones that seemed to crack a little. The natural ones may take
a little more glycerin in there than the other
pigments that I was using. You want to make notes
as you're going. Another thing, this is about 24 hours
after I made these, and these aren't completely dry. It's going to take
different lengths of time for different
baths of paint to dry, and they'll shrink at
different amounts. It's just very interesting to see how those
different amounts are. You might go ahead
and start keeping a journal of the
different colors. The paint that you used, the formula that you used, and make notes and how much
did it shrink and just see what tweaks do you need to do next time or did you love it when
you were painting? I was going to come
back and paint with these today just to see at one day and one week in three weeks and on
down the line how they held up as paints that
we re-incorporate with water. Just a couple of
different things to think of troubleshooting-wise, you know what's going to
shrink, that's normal. If you've got cracks, then just tweak your
formula a little bit. If it's too thick, add a little more Gum
Arabic in the beginning. If it's too thin, we needed a little more pigment starting off in the beginning so that it would be thicker. All just things to troubleshoot. Then I recommend you keeping a paint journal with
notes on how each of your formulas worked out in any tweaks that you might
want to do the next time. Little troubleshooting
in this video, and then in the next videos, I'll just play with the paint at different time intervals
and see how they perform. I'll see you back in class.
10. 1 day after making paint test: [MUSIC] We're one day out
from our paint. I think what I'm going to do, these are not all
completely dry, but I do want to play
and test at one day out, how the paint is
holding up that we mixed and just re-incorporate some of these with a
little bit of water. I think I'm just going
to do another one of these really pretty blue-green
abstracts just to play, and experiment, and
test out our new paint, whether it's
completely dry or not, and see what we get. The blue and the green
are what I'm going for. They're not 100 percent dry, they are still slightly wet, so that's definitely going
to take several days to completely dry in their
little [inaudible] . But that's okay. It's
interesting to note. But look at that.
That's really pretty. If I go ahead, and
I may not have laid the color the exact same
way I did the first one, but I might go ahead
and make a pretty abstract out of that just so that the next
time I look in here, I enjoy the little pieces
of art that I created. But just know that
in the beginning, my pretty little art book
abstracts were tests, and color samples, and looking at what the paint
did and then I just want to make them into pretty little paintings
to flip through later. Just think it's a little fun, additional thing to do. Pretty. One day after
the paint is going, I really love that, so I think that one turned
out really good. I'm going to grab my
other book and experiment with one or two of these
other, the earth paints. I love that one,
turned out good. Because they have
dried differently. Let's play with this one. Let's see what color that is. This is the earth
paint. Did I not write? Here we go. Burnt sienna and
it's got some cracks in it. It did dry, actually quite a bit faster
and it shrink less than these Japanese pigments
that I was playing with. There's still a good
amount of pigment. It is a completely
different look than the other pigment
that I had there. Let's go ahead with
this burnt umber. Some of it, it doesn't really matter if the paint cracks, but it's just better if it's a little more
flexible because you're going to re-incorporate water
on those when you use it, so it's not a huge deal. But for prettiness wise, let's use this yellow ocher. I know this is a
combo that we used yesterday and it has
a little crack in it. I could have used a little more of the glycerin in that
a couple of drops probably. A lot of times when
the watercolors dry, if you'll spray some water on your palette before
you even start painting, like just take a little spray. One of these things [LAUGHTER] and mist the whole pallet. You'll get them activated
before you start painting, so when you go to
start painting, you'll pick up more
pigment right off the bat. Let's just see what
we've got going on here now that I've let this
other one dry quite a bit. These are a little more
water coloury to me. The earth pigment's like
that's a lot less vibrant. These other paint pigments
like if I'd used, say, even like this Gamblin
or the yellow ocher, these pigments that
are real concentrated, they seem to be a little
more saturated to me than earth pigments. Earth pigments seem
to be a little more desaturated and a
little more natural. It fits in then those paints
would be a little softer, a little abstract out
of this so as it drys, we can look at how
it finishes off. Now we're drier [LAUGHTER]. Look how pretty that came out. For the one day
after experiment, it's very interesting
to look at the way that our paint dried versus whatever natural pigment does versus paint pigment like from the
art store or something. It's very interesting. The difference that
those look like and seeing how much
each pigment shrunk. I really like seeing those differences and just
reincorporating them to see are we still getting
the same color as we got yesterday when they were
still wet and so far so good. Here's our one day after experiment to
see what we've got. Then I'll come back in about
a week and do it again and just see how
different it turns out. [MUSIC]
11. 1 week after making paint test: [MUSIC] In this video, I'm about a week after we
made our original set. They have shrunk pretty good, but they are still
super pigmented, and there are some
pieces that are cracked, so I would definitely tweak
that formula going forward. But I want to just
test these out, let me just activate
some of these and then we'll get to
the water part. They'll paint on easily. But I want to still have more recipes available
to me than just one, but I guess out of the two, if I were making a bunch
of paints going forward, I'd probably use the
alternative recipe first unless I was wanting some really highly pigmented
paint with less filler. But I do like both ways. Oh, see, and it's just
as yummy painting it on today as we were that first day. So pretty. Really, hardly any of
these wouldn't work even if you tweaked up your paint recipe
quite a bit and did some of your
own measurements. I like playing with things
and tweaking them and just seeing how we're going with the different
things that we're doing. I do love this blue-green. Definitely a favorite
color combination for me. Very pretty. Anyway,
my point is, experiment with your paints and your recipes and just see
what you're going to get. Let's use one of these
earth pigments here. You know what? I don't think that's
the earth pigment, that's that kind of
terracotta color. This pretty greenish color. I think that's that one. Let's see. I can
see on the side. Yeah, that's that one. Let's use one of these
earth colors over here, maybe this green one
because, just to show you, even though it's
dry and cracked, once we moisten that back up, we'll still get pretty
color out of it. It's going to be very light
color because this one here was a very light
color to begin with. Let's go in with, maybe this one down here. So you will get a good
amount of color in there. We'll just let that water really saturate that and then see, do we get quite a bit
more pigment saturation, letting that water sit in there. So that's real pretty too. Maybe we should try
this indigo one because that's the one that really gave
us a lot of issue. Oh, see now it
regenerates quite nicely. So we've still got lots of color and pigment coming out of those as we
reconstitute them with water. Still really nice collection
here of paint colors. I do think I like my second
recipe better where I've got a little bit
heavier quantity of the gum arabic in there, more glycerin, and more honey. But I like this for just having less filler and saturation
of color of that. All right, so this
is one week after, just kind of playing. Set 1. I encourage you to
make some paints with several different recipes and then experiment like where do, and then just seeing what
do you end up liking? None of the paint is going
to be bad and according to the Natural Earth paints
website, if you're wondering, how long are these good for, they say indefinitely and so it really should act
like any tube of watercolor that you have or a pan of watercolor
that you have. You should, five years from now, be able to come back, re-add some water to it and it will soften back up so that
you can paint with it. That's what I really
like about watercolor. With acrylic paint, they dry pretty quick unless
you get them into a container that's sealed really good and oil paints too, they're eventually going to dry until you get them
into a tube of paint. But these, you're okay with them drying and you
just add water and it makes it good again to start painting with
and I really love that aspect about watercolor, especially ones that are highly pigmented and
almost could go for any type of application with
the vibrance of the color. I really love that. here we
are week after with set 1. We'll come back and
play with set 2 in a couple of days when
we've got a week after that, so I will see you in class. [MUSIC]
12. 3 week after making paint test: [MUSIC] I've let our
first collection sit for a couple of weeks now, and you can definitely tell which colors are going to
shrink more than others. The natural earth
pigments shrink a little less than a lot of the paint
pigment ones that I used, which is very interesting
to see how that works and I can see the
ones that cracked, and so I know what
to expect now. Just so you know if you get some of these
looks in your paints, that is completely normal, that's what you're going to
get with different pigments. You can tweak that recipe a
little bit as you're going for a little more glycerin for the cracks to make them
a little more flexible, maybe a little more honey. If it's a little harder to re-wet and
reactivate that paint, we could add some more
honey the next time. That's what's really
going to make that good and flexible for us. I just reworded that with
some water so that we could see that just activated right on up to beautiful,
brilliant color. Lots of pigment. Right up to what we did
that very first day. Look how pretty that is. Definitely happy with the color that we've got
coming out of here. Let's try some of this ocher. See how pretty that is. Let's try some of this
brownish, sienna color. Very pretty. Maybe we'll come
back with some touches of. So pretty. You can see how pretty our color pigment
is going to stay. I left it a couple of weeks for a reason just so that you
can see that over time, these are going to reactivate quite easily with just water. This was the very
first set we did. It was the very
heavy, pigmented set, the set that I use
less fillers in, and those are
absolutely beautiful. I'm very happy with
our three-week test. These are ones that
I'm just going to keep on using until I use up, and then you can make another set once you've
used these paints, but these are going
to keep going for quite a while for the
amount that I paint. It really depends on
how much you paint as to how fast you're going
to use your paints up. I hope you enjoyed seeing the different weekly
tests for this first set, and then I'll have those
for that second set too. I'll see you back
in class. [MUSIC]
13. Making Gum Arabic Alt Recipe: [MUSIC] Today I thought it
would be fun to do an alternative recipe
for mixing our paints. Our first set that we made it's been drying now for two days. It still with the
colored pigment, especially maybe even
just a tiny bit wet still and there's quite
a bit of shrinkage. That's fine for what
we've done because this is going to be super highly pigmented
paint when I paint with it. Sometimes that's what I want, super high amount of pigment. If all of that had shrunk
down while it was still wet, I could have put all
that paint in one pan. So it's like one
pan worth of paint. Depending on what pigment that I used from the natural
Earth things, they shrunk little
different rates, but they're super highly pigmented when we
paint with them, which I really like. There is a reason why I've used that recipe before
and I like it. Today, we're going to
use a different recipe. This one comes from the
Natural Paint website. They do a cup of hot water. It doesn't have to be distilled. They've used regular hot water. The reason why I use distilled in that first set is because it doesn't have all the fillers and the chlorine and the
different chemicals that come in our water. It's got a lot less stuff in it. But the recipe on the natural Earth paint
site uses hot water. I thought it'd be fun to
experiment using their recipe, but maybe a smaller quantity. I'm going to be using
just hot water. I'm going to do
eight tablespoons of hot water in my little jar. Of course, I was talking
the whole time I did that. I think that was three, but I'm not sure so
let me do this, 1,2,3. We're going to do eight
tablespoons because their recipe is a
two-to-one mix, which means one part
[NOISE] gum Arabic, two parts of water. They just wipe this off. Here's our gum Arabic. Right off the bat, because I used eight tablespoons
of gum Arabic, I'm going to use four
tablespoons of the powder. [NOISE]. That water was hot water. I had the hot water on
coming out of the tap. Now you'll immediately notice
that I did tablespoons and not teaspoons because
this time I want to make a little bit
larger quantity. I'm stirred up some, but we're also going to add
a tablespoon of glycerin. I'm going to go ahead and just get that out and you can see way more than I did
that first time. That first set was more of a super heavy
pigmented yummy paint. This one's got way more
filler and in my mind, I do believe it will
shrink quite a bit less. Just fun to experiment with different recipes and then
when we test the paint out, we can see if there's any differences and what
recipe that we like better. I like trying out way more than just
one way to do things. You can play with
this recipe too. It also has a
tablespoon of honey. I'm going to go ahead
in our little mixture. You notice too that I mixed a lot of the stuff on
the watercolor paint in the recipe on the
natural Earth paint site. They mixed everything
in beforehand, which I found fascinating. We're going to add about
a tablespoon of honey. I thought we're just going to do that and mix it all up front. I might not get all
the honey out of our spoon here, but we'll try. I like that it's all up front and we're not
guessing each time. That's a nice. It's all mixed in and
incorporated already. [NOISE] Then you
just want to stir until it's all in
already or you can't scrape any off the bottom anymore and it's
completely mixed. The reason why I'm
mixed, I might've started saying this and
then forgot the reason why I'm mixed a little
bit larger quantity is because I've got new paint tin that came with all my extra
little paint pans. I want to be able to
mix more colors maybe. I want to make this once and
use it as much as I can. [NOISE] When I was telling you what the mixing
of the paint itself, we're going to vary
our gum Arabic depending on the pigment. You might use one teaspoon to one teaspoon pigment
to gum Arabic. We might use one
teaspoon of pigment to 1-2 teaspoons
of the gum Arabic. Just because, especially
with the Earth paints, they have a different viscosity than the powdered
pigments that I have. They really needed that
heavier solution of liquid, whereas the pigments needed that lighter
solution of pigment. That's why we got that
really heavy thick look in that little bit of cracking. But again, if you're
looking for more pigment, highly saturated colors, that first recipe
is a great one. We're all mixed up and this is the recipe that we're going to be using for our
alternative paint mixture. I'm going to see you in the next video and we'll
make some paints. [MUSIC]
14. Mixing Paints Alternate Recipe: Hi, let's make some paint with our alternative gum
arabic mixture. I like yellow ocher. I've got my teaspoon here. I don't mind that
there's a little pigment left on the teaspoon
from the other color. It's not going to transfer to this since I wiped
most of it off. I did one teaspoon of yellow ocher and this is
the natural earth paints, so it's the one that's a little grainier
than the pigment. Then because my teaspoon
has pigment on, and I'm going to use my half a teaspoon to spoon out color. I already know the yellow ocher
was a little bit thicker, but let's just start off
with one teaspoon of yellow ocher to one teaspoon of the pigment and
see what we've got. One teaspoon of the gum arabic. When I'm thinking and I'm
talking at the same time, sometimes it doesn't work. As I'm mixing this, I want it to be a little
more liquidy, not so thick. I'm going to judge, after I get some of this color incorporated, is it liquidy enough
or do I need to add another little bit
of the gum arabic? I suspect now that we have
a gum arabic mixture with a lot more filler in it with that gum arabic filler and the little more honey and
a little more glycerin, I really do suspect
that we'll have less shrinkage out of this set. We're going to
experiment together. I like doing stuff like this. And when I do classes where
I'm teaching stuff like this, I really like seeing
different ways to do things and experimenting
and it pushes me outside my own comfort zone. I've used that first
recipe many times. I actually like how
liquidity that is. We're going to go ahead with our glass muller and
incorporate that in. You're just going around in circles and maybe a figure 8, and they get stuck somewhere, you know it's got some
pigment it's sitting on. Let's go ahead and scrape some
of this off of our muller, so we're not wasting that. Going to go ahead and
scrape this paint up, put that in our
little containers. I can't wait to come
back and look at this tomorrow to see what
shrinkage we got started, and to do our little test
paintings one day after. You can do the test
painting is wet. Though wet the same day
like I initially did because I was too excited
to start playing. But then we can see, what are
these due on the day after? Again, I've got my sharpie. On this one, yellow
ocher on the side. On the side over here, I'm
going to call this number 2 because we're using
that formula number 2. It will just start sliding in some of that
paint right on in there. I'm still expecting
some shrinkage, but I don't think it's going
to shrink to the point that our first set did
just because we have way more filler in this. That filler, I think is going to prevent quite a bit
of that shrinking. When it's solid pigment, I expected the shrinking. But this is more filler in
this little concoction. I think we'll have less shrinkage and we'll still have a beautiful
paint to paint with. All right, so there
is our yellow ocher. I could probably scrape this
hard and get more out of it. Maybe a little another half
of tin like we were doing on few of those other ones. But today, I think I'm
going to stop at the two, wash off my paint palette and
go make some more colors. I thought I'd mix one
more color with you and then I'll go to mixing
all of these myself. But this is that
indigo and this is the one in that first set, was very grainy and did not soak in the way I
had expected it to. I'm going to start this one
off with this new solution. I may have to add some
more gum arabic to it. This is an actual
earth paint too, so it's not just the
pigment from the art store. The pigment pieces are larger, so I might have taken them into my little mortar and pestle and grounded
up a little bit. Well, let's just mix and see, it is harder to mix. I remember that the first
time with that first set too, it just doesn't seem to want to incorporate in the liquid, quite like the other colors. It seems to be resisting. Even in the watery
part, it's very grainy. Because these are
natural earth pigments, they've actually gone and
gotten pieces of rock and dirt and things like that
and ground them up into fine pigment. This is just going
to be a property of this natural earth stuff. I'm not sure if I'm
going to add any more of this gum
arabic to this or not because it does seem
pretty nice and liquidy today. But a super-duper grainy, I can feel all that grain. Even with a thicker
watercolor binder, we still might be super grainy. But I want to see, I
just want to experiment. I love experimenting with the different elements
and things in my classes, pushes me to do other things
and to try other ways. See, super grainy, even when we're doing
the muller on top of it. I can just see all
the grain in there. This one may be super grainy
even when we're done, but I'm going to
work at a little more with the glass muller. The only reason why I'm showing you this because I want you to see something that's
a little harder versus the real easy. Then just know that some of these little
bumps in the road that you run into are natural. I keep on just adjusting your expectations and the way that you might make something in the pigment
that you might choose to use based on what your experience
was when you did this. Now this is so
grainy that I think that's all I'm going
to get out of this, unlike next time
I might go ahead and try to squish it
some more in my muller. This is so grainy I can see
it probably even scratches the glass that we're
rubbing it on. When I wash this glass, I wouldn't be at all
surprised to see scratches. I can see a scratch right there. You can tell that whatever
it was that they created this indigo from is just sharp, grainy, and it's going to
be a grainy or watercolor. Now I'm going to write the
color on the side of this. Put my number 2 over here. Let me get my second one. number 2. My handwriting was so
sloppy on this one, I might not remember
what that actually says. All right. This one in here. Tomorrow we'll just test these
out and see what we got. I'm going to keep
on mixing paint till I've got a full paint pen, and I'll see you back in class.
15. Abstract Test Paintings Alt Set: All right, so I've been mixing paints all morning and now I have a new little vat of colors to experiment with our alternative gum Arabic
solution and some of these are the earth paints
and some of these are the colored paint
pigments that I have. It'd be really fun to see after one day how they compare to the other recipe
as far as shrinkage. I've theorized that they're not going to have as much shrinkage. It should still shrink, but I'm thinking not as much because we've got that
extra filler in there. But I want to see paint-wise, I just want to play today with them while
they're still wet, just like I did
that original set, and see how they compare and we'll just
see what we've got. This is that yummy orange. It's a Japanese pigment, but it's a yummy orange like a cadmium orange if you're in the paint store
looking at stuff. I like pink and orange
and so I thought, let's just play here in
the pink and orange for a second and do our little
color sample test here with some final
abstract work. That's fun. Then I've got
this yummy darker red, which is also one of
these Japanese pigments. It's this really vivid
maroony pink color. You can play with like Gamblin pigments
from the art store. Though you don't
have to play with special pigments like I've got, but I've found them in an online art store and I got so excited and
how pretty they were. That really makes me happy to be able to now
mix them and use them and just play here for a second in our little
art journal and see what they're
going to do for us. Look how pretty that is. Let's take our little pencil and finish off our
little abstract. Then I'll let this dry. Look how pretty
those colors are. Those going to be real
pretty when they dry. I like this paint mixture
with it all mixed in and we didn't have
to add the honey and glycerin after the fact. I really liked that. Let's play with this indigo because remember
on that first set, the indigo was very grainy. Let's just see if this worked
in a little better today. It's still actually
very, very grainy. That might be a
color that we never ever get to fully
incorporate it looks like. That's a real light color. That one right there as well. They're all wet, but it's one of the earth tones and
the darker green. Let's see if I can move
some of these and tell you what this is. Terre verte. That is terre verte, which is one of those earth
pigments, so it should, should dry different
and act different than our paint pigment ones just from yesterday's
experiments, I find that the
natural ones here are not as vivid as these
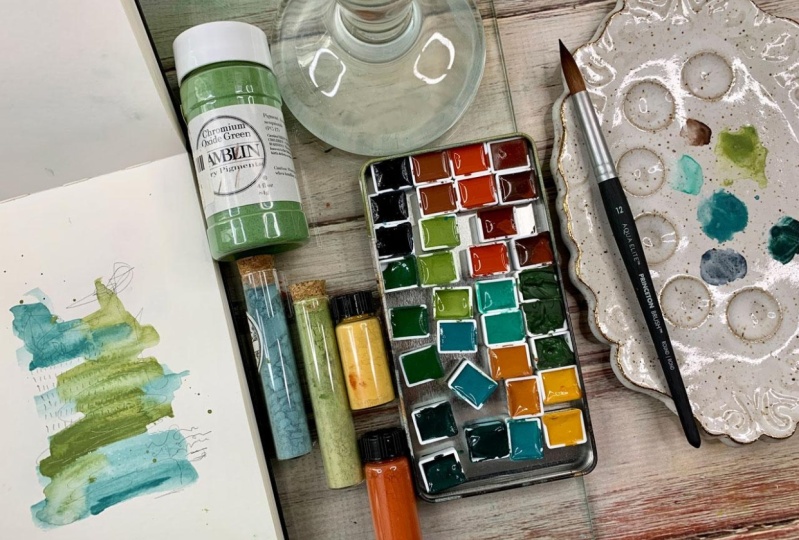
Japanese pigments. Look at that, that
Japanese pigment is nice and saturated, which you could get that same saturation out
of like the Gamblin, like this one that I have
here is chromium oxide. Those pigment jars are gigantic. You don't need anything
that large unless you're really doing
a lot of painting. I don't know why. I
thought at the store it's the only size they had at
the time and I'm like, I need some of that
and I've had that for several years.
That's real pretty. Let's just go ahead and do
some mark-making on that. Look how pretty that is. I like the indigo for the graininess for like
little abstracts like this because it really adds some extra interest
into our piece. But I don't like the
extra graininess if you're trying to do
a really beautiful, smooth watercolor
painting type technique. That's just going to depend
on your pigment that you get. There's no way to know until you start mixing it which ones might have that extra super grain
in it and which ones won't. So far, the only one I've
come across that's really done that to me has
been the indigo. Now I am going to let these
dry overnight and then I will do the same test with these as I'm doing with
the original set. Our day after painting,
week after painting, three-week after
whatever painting just to see the differences. These shrink a lot more than I think these
are going to shrink. But we can see tomorrow if my hypothesis
is correct or not. These are just going to be super pigmented and these
are going to be highly pigmented but less
binder in this, so we really should be even more pigment-wise than these where I've put extra binder in them. But I do like this formula and these
are really beautiful. If I had to pick out
of the two today, this formula where the glycerin and the honey are
already mixed in was definitely a lot
easier and that might be the way I go
from here forward. Hope you enjoyed a look at
a different formula today, and we will check
these out tomorrow and see what we've got
as they start to dry.
16. 1 day after making paint alt set: [MUSIC] Here we are back after our one day of making our
paint, this is the next day. We did have a significantly
less amount of shrinkage than we had on the first recipe
that I showed you. I do like that we've
got less shrinkage, we've also got less cracking. I do like the extra amount
of glycerin in there, keeping the paint
moist enough so that especially the earth pigments
did not end up cracking up. I love how this
recipe turns out. This is really nice to now
try to experiment today, and we'll just activate these and then see
what we've got. I'm going to go
ahead today and just activate it with a
little water [NOISE] on these just to get it started. Maybe we'll do another one
in this red orange family. I just want to
play and test out. They're not completely dry, so they're still super pigmented
in there. I love that. The next test that
we do with these, they should definitely
be quite a bit drier. I want to be real
careful while they're not completely dry from dipping another
color down in there because then we'll have
a different color. It'll actually
change our colors. So when you're testing of wet, be careful not to dip some
other color down in there like I just did with that
orange and pink. But that's okay. Look at that, if we just drip some of
this color in there. I love doing these little
abstract color test just to see, what can I get? What are these going to
do as we blend them? Look how pretty those are. Really pretty colors,
nice and saturated. We'll put some on this one here. Let's just try out the yummy blue-green because
we know I love that. Then we'll let this
settle down to dry and do another little test with these next week or
week after just to play and see where we're at. So pretty. That's really pretty too. I'm going to do a
little mark making on these and make them abstracts because when you're then
flipping through your art book, you're not just seeing
little color samples, you're seeing all
these little pieces of art and stuff that you created. I love flipping through and looking at little
pieces of art in my art journal rather than just
little color [inaudible] . But so far, this
recipe is really nice and has minimal shrinkage
compared to our first recipe, and that's because we've
got way more filler in there with that gum arabic. I do like the way it
looks in our pan. We had very minimal cracking. Here on one day after, and my hypothesis was correct. Now they're not completely dry, so there will be some
more shrinkage in there, and if you're making these
for like say for sale, like you want to
make some for sale, usually what I'm thinking
that you would have to do is make your pans and let those dry a couple of
days and then make another batch of paint and fill them in and let
those dry and let all that shrinkage occur to the point that by the third time you make some paint and
maybe fill them in again, you should have a full
[inaudible] of paint. I know with the Daniel Smith, the set that I
bought off of eBay, that's how they filled
all those pans. They used the little tubes of paint and they filled
the pan and let it shrink down and fill the pan and let it shrink down
and fill the pan, and then you had a full pan. Even with the commercially
made watercolors, that is just how they work. They're going to shrink
up when it dries out and some of those, the air and stuff
evaporates out. Just a quality of the product. I'm going to let these
continue to dry. We'll come back and do another paint test in about a week, and I'll see you back
in class. [MUSIC]
17. 3 week after making paint alt set: [MUSIC] These I have been drawing for a couple of weeks now
and they dry pretty evenly. Some of them have
more shrinkage than others and I just
have one or two that cracked a little
bit and those were those natural pigments
that do that. I will say too that some of these colors dry
faster than others. If you have, say, two weeks out, a color that doesn't
seem 100 percent dry. That's not a big deal, just continue to let
it do its thing. You can still paint with
it and let it live in its little container and just go with the flow because
the honey and the glycerin, depending on what
that pigment is, honey and glycerin might
be keeping it a little tiny bit moist instead of
drawing out of 100 percent. But it's fine, so I wouldn't even
worry about it. Just going to do a little
couple of week out. We're about two-and-a-half
weeks out paint tests, so I'm just bringing
some water on there to activate some
of these colors. Just to show you that blue and that green was a
real fine pigment. They did not completely dry compared to the natural
pigments as fast. It doesn't even bother me, but I'm going to do another
little blue-green abstract just to stay in the similar thing that we were already doing because I loved the blue-green
anyway, it's my favorite. Some of these are
definitely going to come out of my sketchbook, my little art journal here. They may get hung up [LAUGHTER] because
I love them so much. Maybe if I use splatters. You can see, they just have as much color and saturation as it did when we
first mixed it. How beautiful that is. Let's do one, let's let
that one dry a bit and then I'll go back and do some
mark-making like I love to do. But maybe we'll go
back with some of the Earth pigments and
take a look at those, so maybe the indigo. See that one is still
going to be very grainy, even weeks out. But that's just the nature of that color of that pigment that whatever that rock is
or whatever it is they used just stays a little grainy. But in the finished paintings that I had already done earlier, I still like that
extra green in there, but if I was wanting
something super smooth, then I know that that color
is going to have green in it. See like this earlier
one that we did look how beautiful that blue is. I don't even mind that there's little pigment
color in there. Well, I don't know
what I just did with that [LAUGHTER]
little clip I had. Maybe I'll go back with
the green on this one. Well, let's pick a different
color, maybe this green. This is the one
that's super light in opacity which pretty
cool, I love that. We could come back
a little heavier with more paint on there, but it's still going to be very translucent compared to
some of these other ones. Maybe a tiny bit of yellow. Yeah, super fun. That's going to be real
pretty when it dries. The natural Earth paints
almost same or watercolor. The regular pigments like if we got some
from the art store or wherever we got them, they seem more saturated and I love that difference
about those. There is a reason to play with irregular paint pigments
versus natural pigments. I love the differences. Then because it's my art
book and I like to make color samples into
pretty abstract. I'm just going to take my fun little mechanical pencil
and do some mark-making and make it a little
finished piece of art along with my
color experiments. I hope you enjoy making
some paints on your own. I do want you to play some
little paint tests like I do the next day and a few
weeks out just to see how they're going to re-wet
and come back together for you as far as paint mixing goes and have some
fun with this. I can't wait to see what paint you mix up
and what you do with it. Come back and share
with us in class, and I will see you next time. [MUSIC]
 DENISE LOVE, Artist & Creative Educator