Transcripts
1. Class Introduction : Hello, everyone.
My name is Adam, I'm professional graphic
designer and Animator. And in this class, I'll be
showing you guys how to make this beautiful Alexy
potion animation. I have been doing animation
now for almost seven years, and I have worked
with some start ups, as well as some
well known brands like Animator and Wonders. What I mostly love
about animation is the satisfaction I get once I see my design come into life. So in this class,
I'll be showing you guys how to make this
beautiful liquid and bubbles animation
using only the tools available in after
effect with no ply ins. This class is for beginners, but a basic knowledge of
after effect is recommended. So we will, of course, by importing the
Vector file from illustrator to after
effects, of course. Then we'll animate the shape, add the expressions,
and finally, I'll show you how
to easily animate bubbles and a be after effect.
2. Class project: All right, for this class
projects, of course, we're going to be doing this
lex lexve potion animation. Now, first thing first,
I want you to go ahead and download
the pass from here. All right, then you can
open after effects, and then of course we
can start animating. But one tip, if I have to
give you one tip to finish this class project is to really take it step by step
and do not wash things. If you have any questions, if you don't understand something, you can always go ahead
and ask me right here. I will reply within the day. All right. Start animating.
3. Liquid And Looping Animation Using Expressions in After Effects: So in this first lecture, we'll start by
animating the shape. I'll show you how to
transform a shape to a liquid, then animated. And then, of course,
I'll show you how to make the perfect
looping animation using expressions and
the snapshots tool available in after effects. An open after effects, the first thing is, of course, to create a new composition, and you can see that these are the settings I'm working with. So with 800 pixels, 600 pixels, and the duration will be 5 seconds, which
is more than enough. Lion And then next thing, we want to go ahead to layer, ates and then a new solid color. You're going to keep the
color white and then click on k and then lock
the layer right here. Now, we have to go
ahead and import our vector illustration
or you can open the after effects file
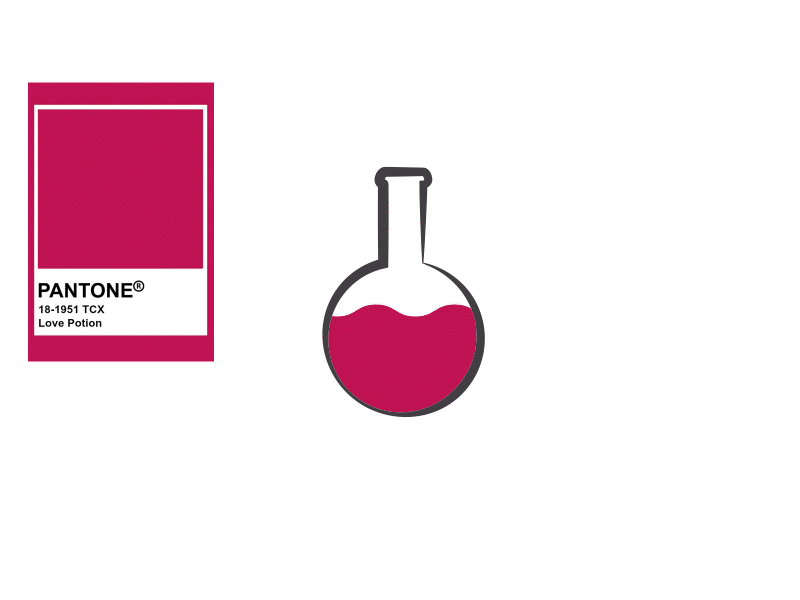
directly if you download it. This is our flask
vector illustration. Right here, make sure you
have import kind composition, and footage dimensions, we're
going to put layer size. Now we're going to go ahead
and open the flask layers and put the layer right here
on top of the background. Now, what we need to do to
create shape from this layer, right on the vector file creates and then create
shapes from vector layer. And go ahead now on deletes
the illustration file. Now, one more thing
you have to keep in mind is that you have
to make sure that the illustration is shape
formed and nuts fails. So these are strokes
and nuts fails. If you have something
else, if you're working with files
instead of strokes, this animation may not work. So make sure your vector
file or illustration is made with shapes
only or strokes only. Next thing, we're going to go ahead and select direct tangle. But first, make sure we
select our layer right here. Rectangle two, and then we're
going to draw our liquid, which is now just a
basic form of rectangle. Let's go ahead and change
the color for something red. We're going to work
on colors later. Now, with the rectangle right here inside
of the shape layer, we're going to go ahead
and add the Z zag effects. So to do that. Make sure you
have rectangle one selected, add and then Zzag. Open the z zag options. Right here, size, I'm
going to put six. And for ridges, I'm going
to put six as well. Okay, don't worry about the sharp edges. We're
going to fix them here. What it says points. Instead of corner, we're going
to go it smooth. Now, this is my liquid. Of course, you can adjust these settings
accordingly depending on how big the liquid is or
how big the rx tangle is. Now we have to do
is create a mask. Now, to do this, we're
going to go ahead and close Rx sngle options. Group one is the flask layer. We're going to go
ahead and duplicate it using control command plus D. Select group two and xgle click, and then
you can group them. Control command J to
group everything, you can see the short cs here. Now with group two selected, I'm going to go ahead to add
and then add merge path. Again, for this to work, you must have shape
layers or stroke layers. All right. Now, everything
is in group two. We have the x tangle, the
flask and the merged path. Next thing, I'm going to open
the options of merged path. Right here mode instead of add, we're going to go ahead
and choose intersects. Okay, now we have our
liquid inside of the flask. But still, we cannot see the liquid because if
you go to group two, which is the flask, you will
find path one and Path two. So one of these is
creating problem, which is preventing
us from seeing the liquid inside of the flask. So let's go to see which one
is creating the problem. It's not path one, Because
if I remove path one, you can see that
liquid is inside B, but it's also
inside the strokes. So path one must
be past Path two. Path two is the one
that need to go, selected and then deletes
on the keyboard. All right. And just like that, we have
our liquid inside the flask. Now with the selection
tool, Rick Tango, I'm just going to
go ahead and adjust my liquid position to
be something like this. Okay? Now, the
next thing here is that we need to go ahead and
animate the position, okay? Because we want
liquid, of course, to be moving inside
on the blast. Now, go to rectangle one. Tally close group two. We don't need it
anymore. Rectangle one, look for transform rectangle. And then we're going
to look for position. So right here where
it says position, I'm going to go ahead and
add a keyframe, okay? And then I want to move
to play ahead 1 second, and adjust the key frame of the position to be moving
from right to left, but before we do that, what we want to do
here is to create a seamless looping animation. Now, one trick to make the animation look
seamless and that's glitchy is one very
important trick is the snapshot right here. So just to explain,
we want to take a snapshot of the first frame like this, can hear the sound. Now, when we move
in the position, we want to make sure that
we move the liquid to be similar as key frame
number one, right? So you will learn more
as I'm doing this. So when I'm moving the
liquid to the left. If I click on Snap, you can see that the position is not exactly the same as
key frame number one. Which means I need to move it a little bit more to the left. And this one. Let's check now. Now on neck lick
here show snapshot. You can see that the position is similar to keyframe number one. So basically, all I want to do is make sure that
key frame number two looks similar to
keyframe number one. Otherwise, the loop and
animation will now look good. Now, if I click on play, Next, let's go ahead and
add our looping animation, so select everything here. Then alter option and
click on the clock. Click here again,
go to property, and then find loop out type equal cycle number
frames equal zero. Now if I click on play, we can see that we have
a seamless animation. Or seamless looping animation. Now, here's what happened if you didn't use the snapshot trick. Let's say, for example, I
go to this position and maybe I'll move it a little
bit further more to the left. If I click on play, you
can see what happens. It looks like the looping
animation is glitchy. So to avoid that, we
use the snapshot trick. Now, control command
Z to undo the change. Now we have our beautiful seamless looping
liquid animation. All right. So for this lecture, we covered animating a shape
and an expression. Up next, will be
animating the bubbles.
4. Animating the bubbles using Custom Paths and Speed graph : So if you look at
the animation of the bubbles, it's complicated, but it's actually not because
you just have to do it once then duplicate the same
thing over and over again. Now, in this lecture, let's go ahead and see how we can easily animate the bubbles to make it look as realistic as possible. Now, of course,
it's important to understand the shape
or how the bubbles work or how the bubbles
are animated in real life. So to do that, of
course, you can always take a look
at references, which may be very helpful in nailing the perfect
realistic animation. Now for animating debubbles, we're going to close
layer number one here and just rename it. Liquid. Okay. Now, let's go to our shape tool
again and this time, let's create the ellipse tool. Now, I'm not going to
go ahead and create the bubbles inside of the liquid layer because
it's going to take too much time to animate
each bubble individually. Instead, I'm going to create each bubble in its own layer. Now, it's not as complicated as at a sound. It's
not that difficult. We just have to do the work bonds and
you can duplicate it. So make sure nothing is selected and then go ahead right here, click drag hold shift to create the perfect
bubble just like this. I'm going to change
the color twit, so we have some
contrast in here. Go back to the selection tool and put the bubble down here. This is our first bubble.
Now, to animate this, we need to create a custom path. And to do that, we're going
to be using the pen tool. Again, make sure you're
not selecting anything. And then with the pen tool, I'm going to come over
here and just create the path that I want to
use to animate my bubbles. So click here once,
twice and track. Then here and track. Change the fill to
this, we have a look. Okay, it looks fine. Open the new shape layer. It's rename this one bubble. Now, this one to shape layer, this path that we created,
goes to constants. Shape and then we're going
to look for path one, control command x. Delete
shape plane number two. Then we're going to go
to ellipse, Transform, look for position,
control command V to paste the new position. Now one thing here is
that you have to make sure that you have three key
frames for the position. If you have four key frames, that's mean you did
something wrong with the custom path
with the pen tool. Delete that path and create
it again and make sure you only have three incre points
in your path animation. Okay, now, since we copy pasted this position
to the bubble, it did send the bubble flying somewhere in the
composition. It's here. Let's go ahead and
just bring it back. Using shifts and
arrows on my keyboard. And position it's right here under the flask somewhere here. Click on play. Okay, you can see that
the animation is going to the opposite direction.
That's fine. We're just going to go
ahead, select this layer, click on you, so we just
have the keyframes, select all the key frames. Next, I'm going to
go to this keyframe right here in the middle.
You can see it's rounded. It's not sharp. It doesn't
look like rectangle. The other ones look
like rectangle. So to fix that, just hold tertion and
click on the key frame. Now it looks similar
to other key frames. Select all three of them. Right click on one of them. Key frame assist, time
reverse keyframe. Again, adjust the position of the bubble right
here in the middle. There's the color to whites. Now, if I click on play. All right, so you can see
the animation now it's fine. We just have to
put this key form a little bit closer together. So somewhere around
1 second. Like this. And now it's better.
Now, just this last one, I'm going to go ahead and
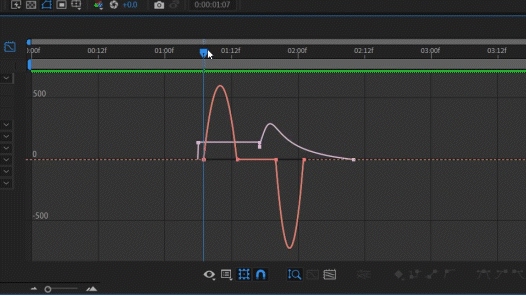
click on F nine, add ***, and then go to the
speed graph editor, and then maybe just
bring it a little bit, drag this one to the left. All right. So we have that you know, just to kill the
generic animation. So it starts slow and then
disappears real quick. All right, looks good. Now, same thing here. To make it look more realistic, we need to adjust
the scale as well. So let's go to transform. Find the scale at the keyframe. Go back here, click on. Then just move the keyframe
little bit here after the position. Somewhere here. It starts with zero, a little bit here
goes back to 100. Then it stays 100 here
at the keyframe here. Then it goes back to zero here. Selects everything, and then we want to apply
easiness to this one. Let do something like
this. Let's click on play. All right, so it
starts around here. Then it disappears around here. So it just adjust these. Accordingly, Select everything. Now, I just want to adjust the position of the
bubble a little bit. So make sure to select
all the keyframes here and make sure that you
are on key frame number one. So we can move the position
of the bubble without adding a new keyframe to
the position sittings. We can play now. Let's
see what we have. Okay, so it disappears
around here. We're just fine.
That's not a problem. Now, the next time, of course, we're going to do is
just go ahead and duplicate the
bubbles three times. So control command D rubbles number two and control command
D for rubble number three. Now, let's just
bubble number two, a little bit to the
left like this. And bubble number three, a little bit to the
right like this. Then we're going to offset
everything, four frames. So the first one,
let's go with eights. And the second one, let's
go with four, don't play. Okay. So for this
one, number two, we want the bubble to
disappear a little bit early. So with the position keyframe, hold the last one and then just drag it a little
bit to the right. So it disappears around here. Okay. And same
thing for this one. Take the last key frame of
the position and drag it b to the right as well. So it disappears here. And of course adjust this and play with this
however you want. And just like that, we
have our bubble animation. Now of course, this
is not enough. I want to create more bubbles. So selects all the bubbles
layers to close them. This one, two,
select everything. Control C and D. We go and drag everything
again to the right. I want to look more. Yeah, so I just want to give a small delay between the first bubble and
the second bubbles. This is why I'm just in this and playing
at the same time. You see which one is
going to look better. Okay, this looks fine. A little bit here. All
right, this looks good. Now selects everything,
click, then pre Hey, bubbles. All right, so let's click on plane now. Hey, we can also duplicate this. With this bit here. All right, so you get the idea. You can duplicate this
as much as you want. And then just drag to the right and adjust the
animation, however you want. So it plays all the way
throughout the animation. Now, I want to add my color because of course we are making a loaf portion and we have to add a good color. So
double click here. And then I'm going
to add my color. But here, Now,
let's go to liquid. And so under contents. Then we go to merch
path, then fill. Then we can change the
color to this, right? Again, go to group two. Then find merch path, and then stroke, then fill one, and then you can change
the color from here. And of course, I did include
the final project as well. So in case you're
stuck with something, you can take a look
here and figure it out. And with that, I
think we are done. Let's just explain
now. All right. Now, for these bubbles, we can always do one more
thing to make it look a little bit more like
it was hand animated. So select the layer, go
to effects and presets, and then we're going to look for an effect called posturze time. This one right here,
and we can just add it to our first precomp. And we already know
that the key frame of the sequence is 24. Now, basically,
I'm just changing the frames of the animation, so it's a bit slower. Just to give it that feeling
that it was like handmade. Control command C, and I
can paste here and here. Now, just to give you
an idea, for example, if I go here and I
change this to ten, you can see how
slow it will look. So I'm going to leave it
somewhere around 20. Okay. And just like that, we have our beautiful loop in liquid
and bubbles animation. All right. So in this lecture, we covered animating the
bubbles, and of course, mostly we covered
the shape path tool, how to reverse the key
frans and of course, the speed graph to
make the animation as realistic as possible. Now, that's it for this lecture and congratulations for
finishing everything.
5. Congratulations: All right, so congratulations to you guys for
finishing this class. Now, on this lecture, of course, we covered everything from
animating the shape to adding effects to adding expressions to working with the speed graph. Now, one more thing I have
to do here is just take this layer and put it
up here at the top. This is the illustration layer.
It has to be on the top. And with that, we have
covered everything. So now we can go
ahead, of course, and upload your project to the Skillshare's gallery
or you can upload it to your own
social media and tag me so I can leave
a comment alike. Also make sure you follow
me here on Skillshare and leave an honest review for this class if you
found it helpful, so other students
can find it as well. Thank you for watching and
see you on the next one.
 Adam Chraibi, Designer and animator