Transcripts
1. Introduction: T Are you looking for new ways to create
mixed media artworks? Are you curious about
how you can incorporate portraiture into your
mixed media art practice? Hi. I'm Elizabeth and welcome to my class embellished
mixed Media portraits. I am a professionally trained
artist and art educator, as well as a published
author illustrator. In 2020, I began
teaching for Skillshare, developing classes that explore a wide range of
materials, techniques, and art making approaches, as I share my creative journey and artistic processes
with my students? I love coming up
with new ways to incorporate mixed
media art maaking, collage, and different
imagery into my artwork? This class, our starting point will be a printed portrait. You can either find online
or source from a book. Then we'll be adding different mixed media approaches,
techniques, materials to embellish it and really bring that
portrait to life. This class is intended for creatives of all skill levels as a fun way to
approach mixed media art making with a
portrait twist. By the end of this class, you'll have incorporated a printed portrait into a collage, explored the benefits of adding color to black and white images, added a decorative
frame to give it a little pup and
created a really fun, mixed media,
embellished portrait. I hope you enjoy me
in class as we create embellished mixed
media portraits. B.
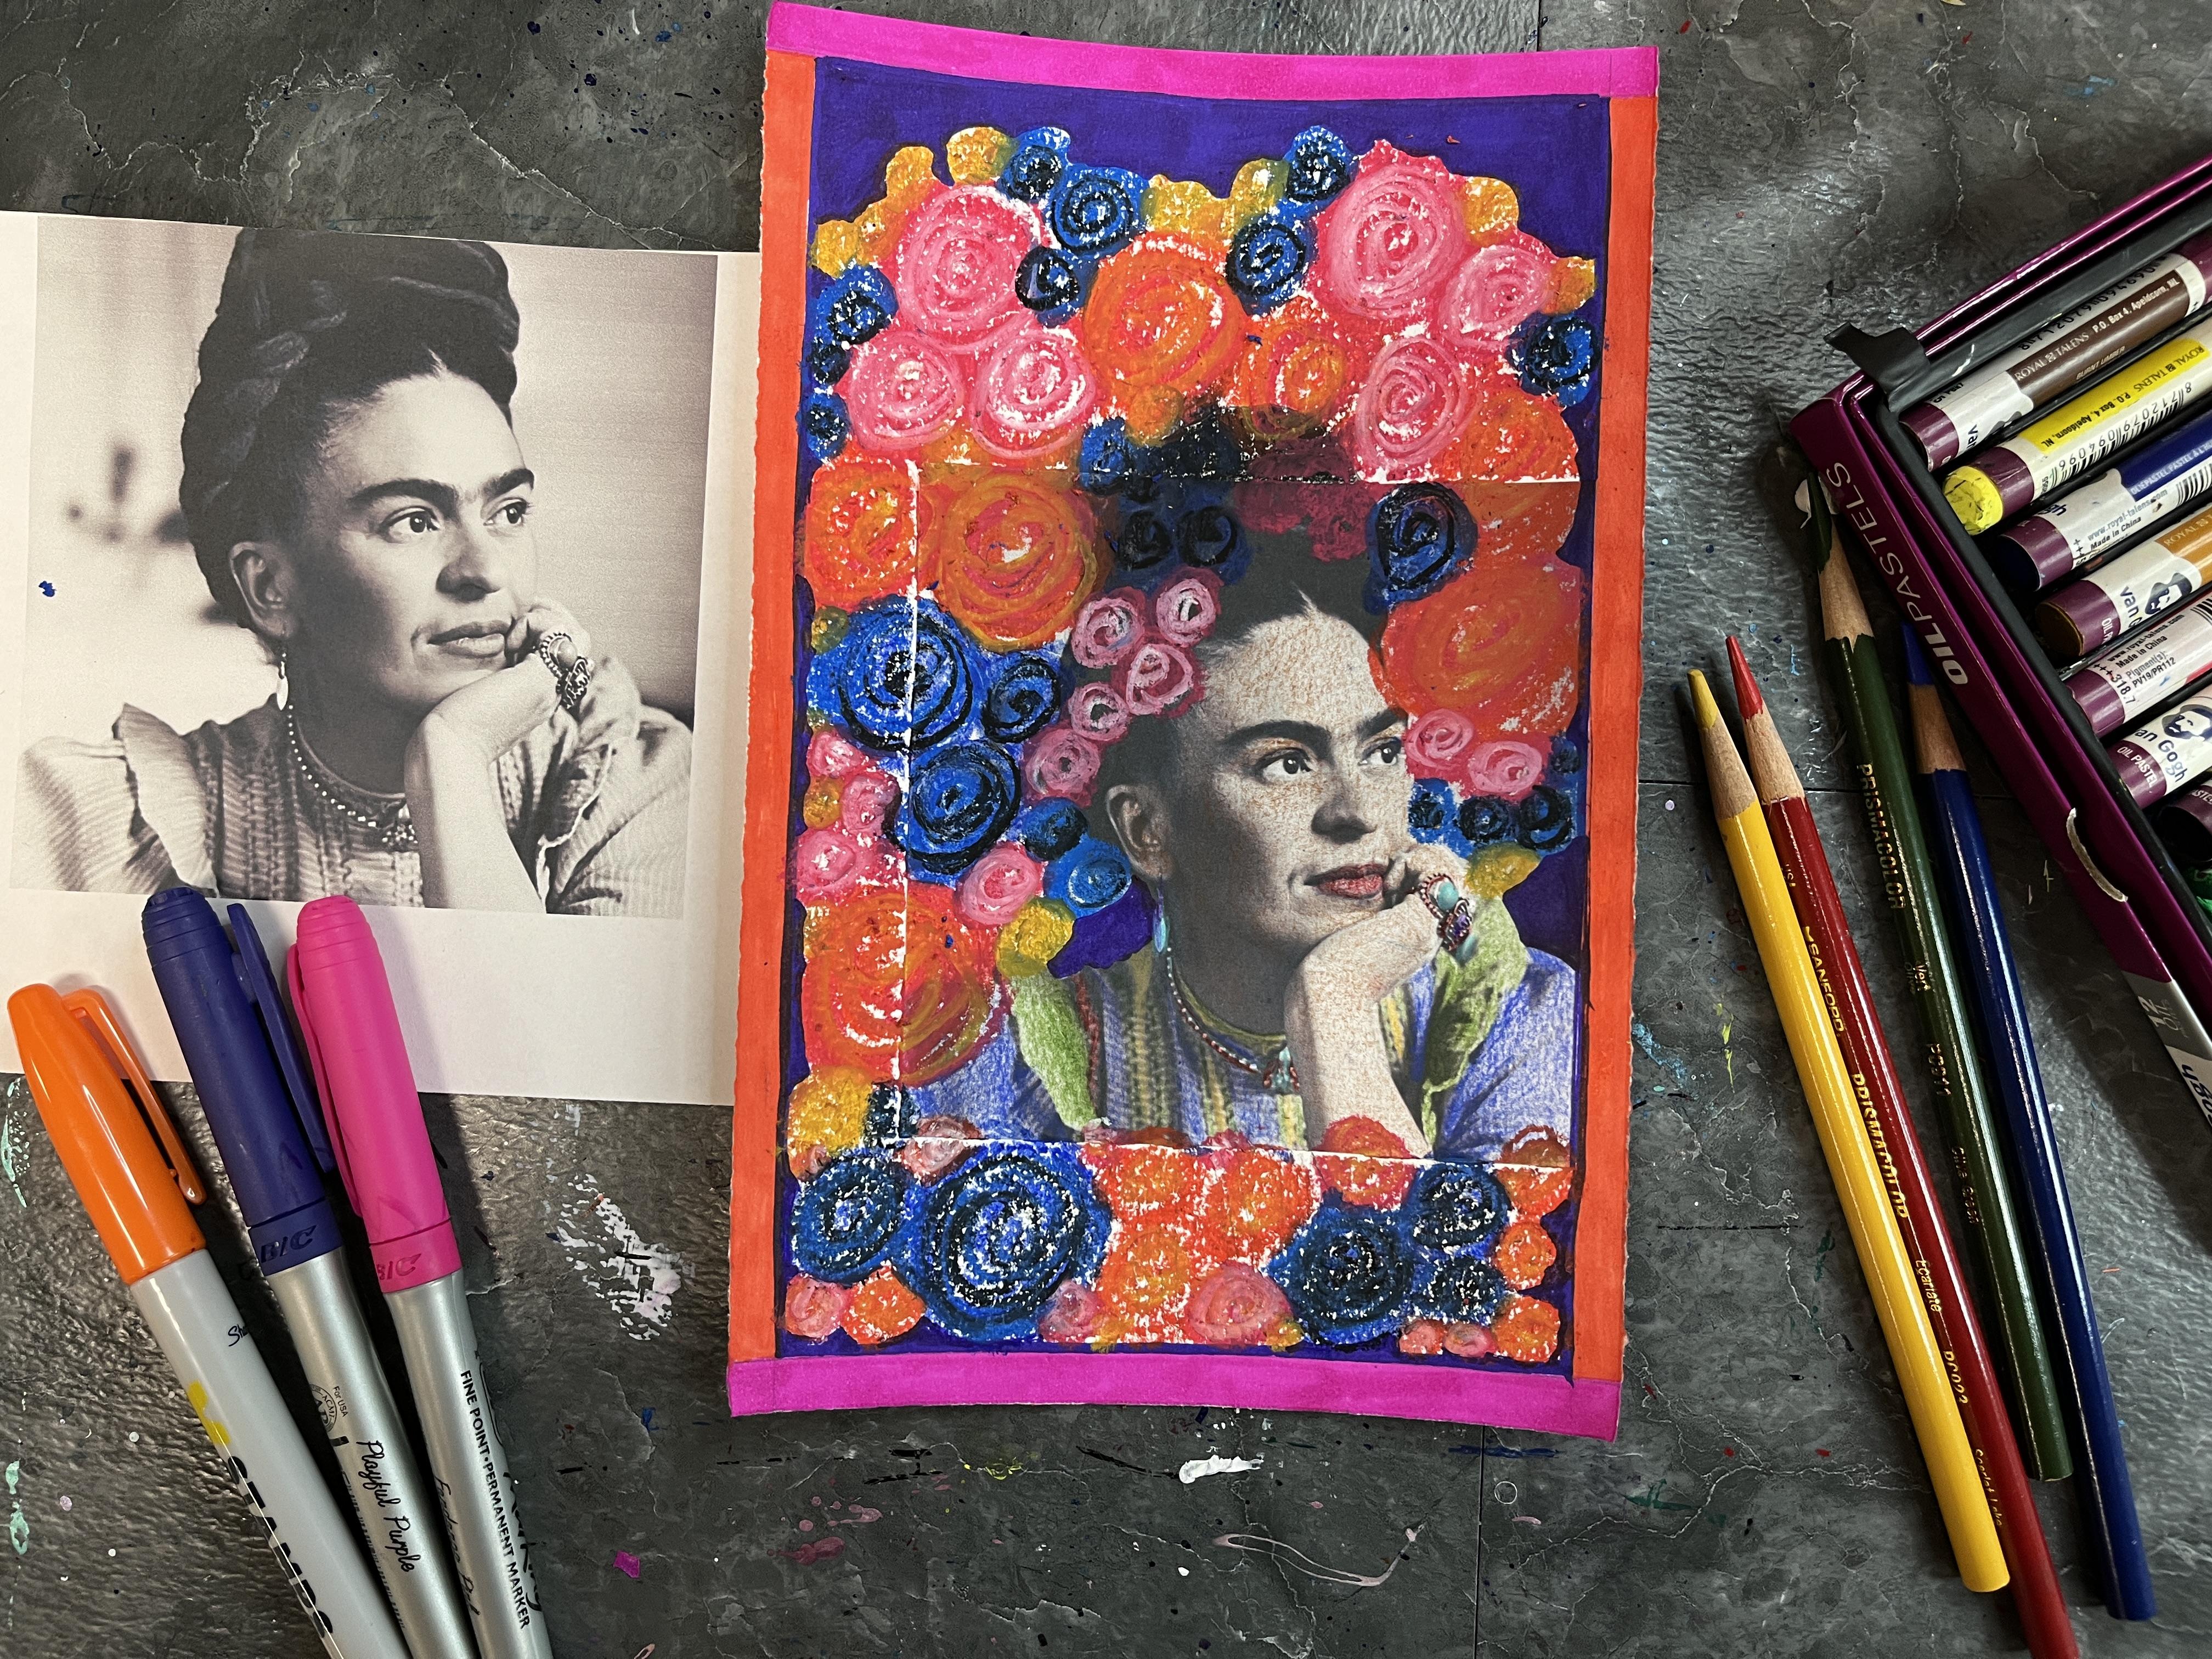
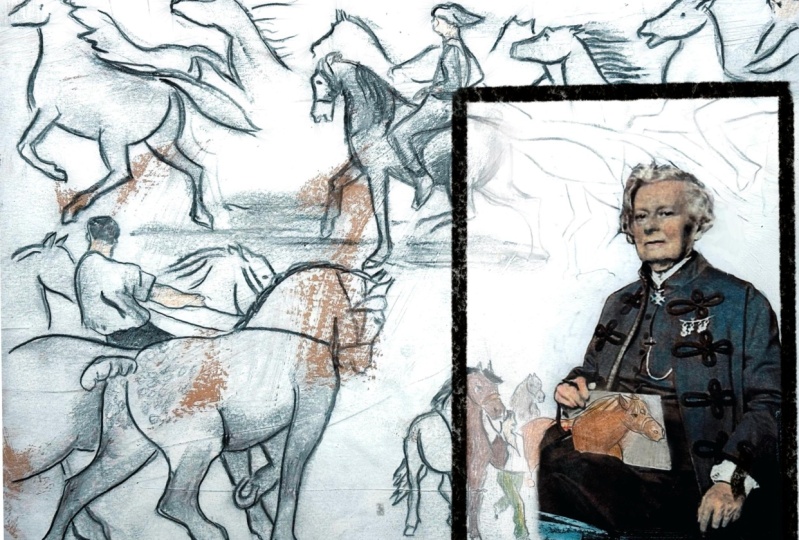
2. Class Project: Thanks for joining me.
For my class project, I used a printed photo of
Frida allows and then explore the idea of mimicking
colorization of old photos. Then I added a
decorative frame and embellished the portrait and the background with different
imagery inspired by Frida's own portraits
and her use of bold colors and floor motifs. For this class, you can use any art supplies that
you have on hand. But I'll be sharing in the next lesson a list of
some of the ones that you might want
to consider as you approach the class project. You can either print
out your image from the Internet or photocopy
it from a book. It's always so fun to see how everyone's class
project turns out. After you finish yours, be sure to pop on over to the Projects and
Resources section of class and upload photos of your artwork to
the student gallery, and be sure to check
out the artwork created by your fellow students. The first step is to gather
up our art supplies. So let's head on over to the next lesson
and take a look at what art supplies you're
going to want to have on hand for class. See you soon.
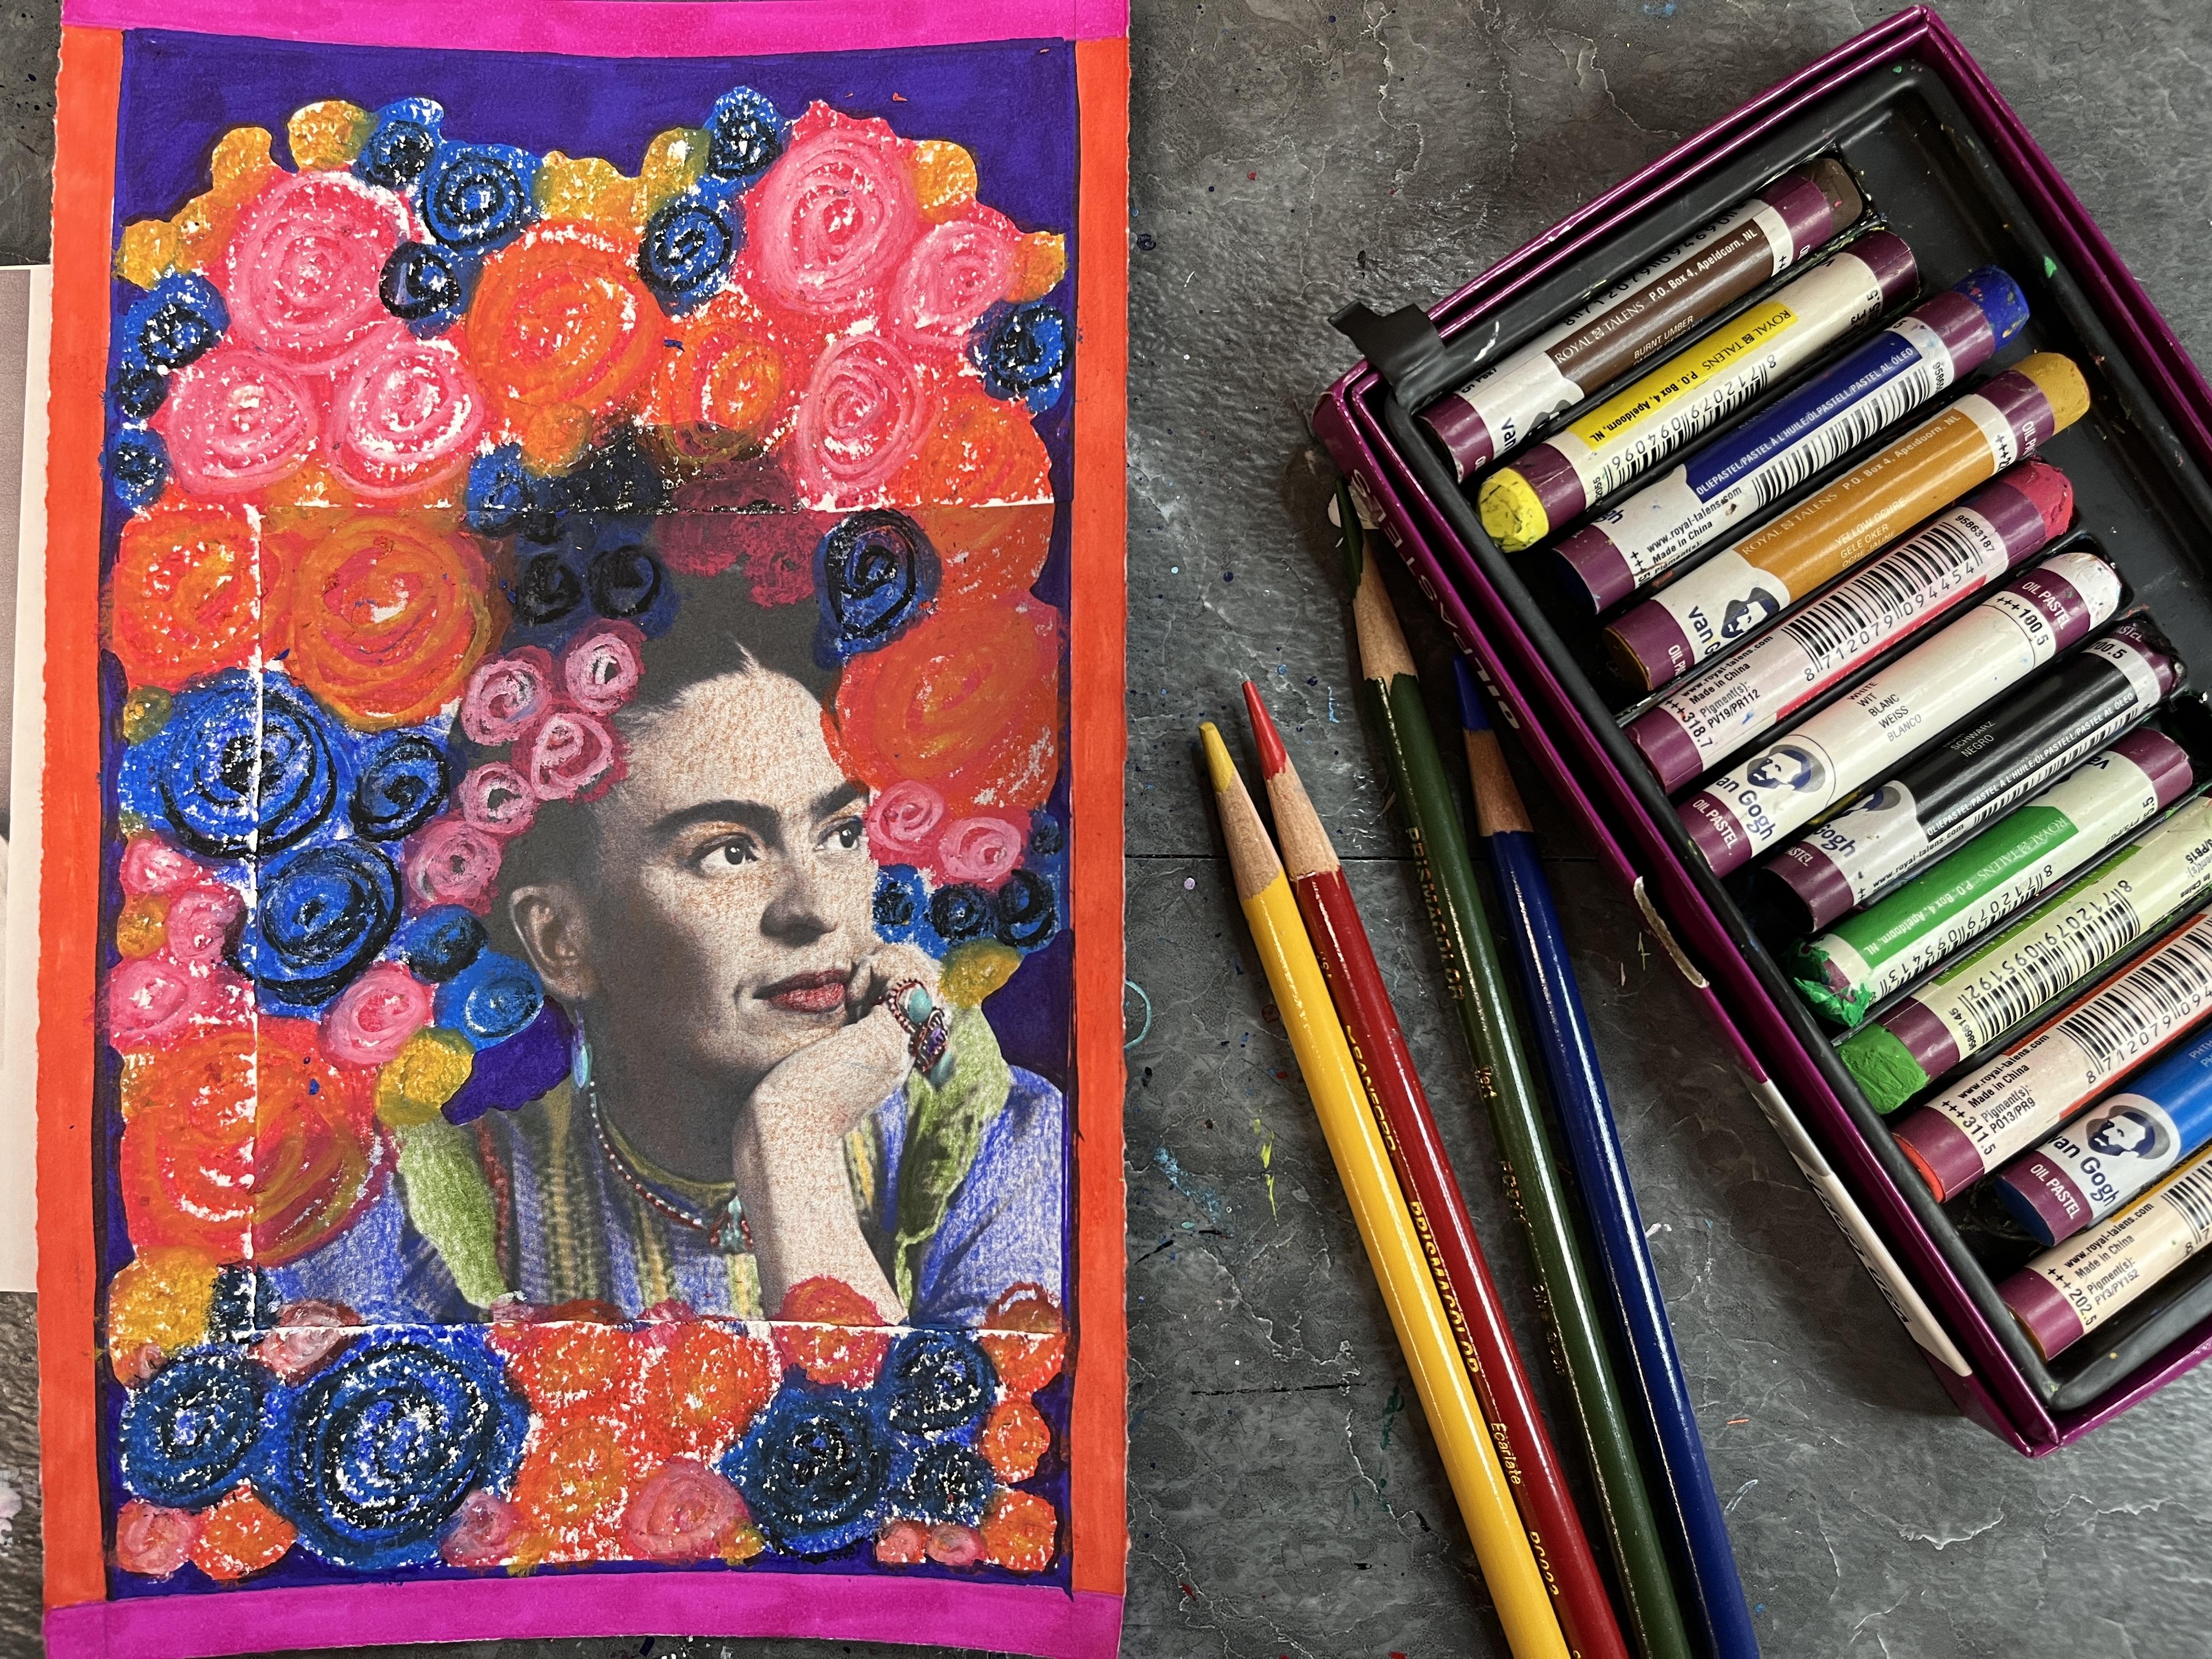
3. Materials: Now let's talk about
what art supplies you might want to have
on hand for class. Materials for this project
are pretty straightforward. I've cut about a nine
by six piece of paper. This one is cardstock. You could use mixed Media, watercolor, really any kind
of thicker paper would do. Then I've got my portrait that I'm going to
be embellishing. I just printed this
off on my computer. You could also photocopy
it from a book. If you're planning to
sell this artwork, you're going to want to
make sure that you're using a portrait that is either
from a photo that you took or one that you found on a royalty free website,
such as unsplash.com. I was doing this for a class
that I was teaching about, Mexican artist Frida allo as the project that
went with the lecture. I have no plans to sell this, so I was able to
just find a photo of Frida on Google images. Be aware if you
think at any point, if you're going to
possibly sell your work, you want to make sure that
you use a royalty free image. Then you're going to want
to have scissors for cutting it out and a glue stick. For the mixed media portion
of our embellished portraits, you can use any materials
that you have on hand. For this one, I'm going to use some oil pestels
and some markers. That's it. I'm going to keep
it really straightforward. But as you get into this, you
might get really inspired and you might decide to
get out some more zi pets. Oh, I forgot. We also need
to have colored pestils. So I'm going to be using
colored pencils to embellish the photo itself and then the photo
in the background, I'm going to create between
markers and oil pestles. You can use any additional materials that you have on hand, really see what supplies you already have and
work with those. Is the best way to do this. We are going to
be doing a frame. We're going to also want to have a pencil to map that
out, and then a ruler. I'm not going to worry about
measuring it too intently, but if you want to be
extremely precise, you're absolutely welcome to measure your border
around your image. Paper, A copy of a portrait. Scissors, glutick, mixed media materials you
want to embellish with, definitely colored pencils are really fundament to
use with this project. Pencil, ruler, and that's it. Take some time to gather
up your art supplies, and I'll meet you over
in the next lesson, where we'll begin creating
the collage portion of our portraits and adding our decorative
frame. See you soon.
4. Collage: So to do the collage portion, we're going to go
ahead and cut out our copied our printed
or copied portrait. Then depending on how
your portrait is, depend on how you set
up your composition. For this one, I want to be able to I know I want
to put in a frame, and I know I want to play a little bit with building up the cutoff
portion of her hair, and I want to extend her
clothing down a little bit. I'm going to go ahead and glue her and to the
side a little bit. But look at your own portrait and figure out what's going to work best for the image
that you're working with. There's no wrong decision here. It's truly just whatever is aesthetically
pleasing to you. So before I glue
her down though, I do want to put in my border. I could measure this. I'm
just going to eyeball it. I'm not feeling the need to
be terribly precise today. But I just want a little bit of a border so that I can have some nice pop of color
on the edges and to have it feel a
little bit more finish. It also feels more authentic to the portraits that I've chosen
to have a border, thinking about Frida
Calo's artwork and getting inspired by the
image that I chose. You also don't have
to have a border. I just think this is
a really fun addition to this particular
project in this class. I've got my frame.
I'm going to go ahead and glue down my portrait. Now I'm ready to move
on to the next lesson, where we're going
to be adding in the mixed media details. See you there. K.
5. Frame and Portrait Colorization: Now it's time to explore different mixed
media techniques, approaches and materials as we embellish our
collaged portraits. Now we're ready to start doing the decorative frame
on our project. So the first thing that
I did was with a ruler, I just kind of marked out how far in I wanted
my frame to go. I'm working on a nine by
six inch piece of paper. So it's a fairly small artwork, so I wanted kind of a minimal
frame with a big impact, but I also wanted
to keep it simple. So I'm just kind
of going in with some bold marker to fill in color blocks on the different
sides of the frame edge. You could add as much
intricate detail pattern mark making to your
frame as you like. But I knew that I
was going to have a lot going on around my figure, so I really wanted to keep a simple yet related
boldness to the frame. So now I'm just
kind of continuing the portrait because her hair
was cut off in the photo. And now I'm doing
the colorization. This is a really fun step, and I really love
the subtlety of it. You could push your color on the colorizing part of this project as bold
as you wanted to go. You could go realistic, you could go you know, non realistic colors,
nonrealistic, just really have fun with it. But I wanted to
kind of stay true to what the natural colors were in the world
and just also the inspiration that this
photo drew for me. So I'm just using some basic
skin tones to kind of put in a skin tone that is similar to what I've
seen in photos of Frida, and kind of working
it in very subtly. So just a really just
kind of like a hint of color is how I decided
to approach this step. And then I'm just continuing
to add other pops of color where the photo calls for it and where
I want them to go. So some details, making
the lips stand out. And then her eyes, kind of giving that a little bit of makeup to make them pop. That's kind of a nod
to pop art sort of. And then using the
colored pencils to kind of fill in the
drawn on sections that I've kind of put in there
to extend the image of the figure up past the cutoff
point of the portrait. And then this was a really
fun part because I started adding in pops of
color to clothing. So for this one, depending on the portrait that you chose, you could either
kind of just go with whatever you want to do and what feels right for the portrait in this black and white
setting, adding in color, or you could go back into some color photos of whoever
the portrait is of that you're using to kind of
get some inspiration from those or from the time
period or the culture. So really kind of
take this part of the step anywhere you want it to go and have
some fun with it. Once you've added all of the
color pencil detail that you want to at this point to
your portrait printout, now you can head over to the next lesson to continue adding mixed media details to our
project. See you soon.
6. Mixed Media Embellishments: For this step of your project, here is where you can use whatever art supplies
you have on hand. I knew that I wanted to kind of have some really
loose florals, so I'm going to use
oil pestils for that. But I also wanted to
carry the boldness of the marker border into
the space around Frida. So to get a clean
edge to the border, I'm taking the base color
that I'm going to use, which is a really dark blue, and I'm just kind of
outlining that edge so that I kind of
know where to stop, like defining the border
edge a little bit. And then I'm going to
start working into the open white space
around my figure. So I'm going to go
ahead and just create some really loose circles. I just want to allude
to the idea of flowers. For this point, you can
do anything you want to. So what embellishments can you add to your portrait to really kind of add some personalization to it to give it a certain feel. Is there imagery that
you really enjoy making? Do you want to do imagery or do you want to
go more abstract? There's no right or
wrong right here. The important thing
is to have fun and find some further
ways that you can unify your artwork between the original copied portrait and the frame that you've added, and then whatever other
decorative materials are going to go between the two to really
finish the piece off. For example, to
create my flowers, I wanted to play with bright
bold colors that were in the color scheme that I already had established
for this piece. I knew I wanted to have s
size variety because I really enjoy varying the scale to add some dynamic
visual interest. I also knew that I didn't
want to get very particular about the types of
flowers that I created. I really just wanted
essence of floral. I was really kind of
playing off of some of the floral head pieces that
Frida was donn to wear, and even some of the floral
aspects that she worked into her portraits
that she painted. So I started going in
with my oil pastels, I sit a couple of
different bold colors, created some very loose circles, and then I'm just working back into those with a
secondary color. So I think each flower was some combination
of three colors. So I have kind of a red, red orange, and then I added
some pops of lightness. And then for the blues, I started with a dark blue, and then I think I worked some black and some
white into them. So just some color variation, but also being very mindful of value variation so that by repeating these
circular scribble lines, I could give the essence of a rounded floral shape and just fill the whole
background space with that. And then because
I'm working really intuitively and just kind of building up on it and constantly kind of assessing,
how is it looking? What else does it
need? That's when I decided to go in
with the yellow. So I wanted to kind of warm
up my orangish flowers, and then I want to add
some even more variation to the scale, and I wanted some
bright pops, too. So I started popping
in just little bits of these yellow ones to allude to some smaller yellow
flowers just to continue to add some dynamic
energy to the piece and just really start
kind of bringing it to life and resolving
this idea that I had. And at this point, I wanted to add some more of
those brightnesses. That's why I decided to
go in with the white on my pink flowers to really
give those some bright pops so that there was some even
greater value variation across the colors that
I'm using for my flowers. So as you're working back into your background and
trying to unify your piece and kind of embellish it in ways that
really speak to you. Consider how you can
play with color, value, size, placement. You want to really
maintain the focus on your portrait because that's kind of the essence
of the piece. So what can you add
that's really going to kind of bring that
portrait to life? And really create something that's super
interesting and dynamic and visually exciting that
represents you as an artist, the figure, and the portrait
that you're working with, and just where you're at in your creative journey and
how you're feeling today. So this is the point
where I decided I kind of wanted to go back
in with that marker. And I knew I wanted to
have that bold purplish, blue violet behind it. So I started just kind of tracing around my floral
shapes and then just filling that in with some nice block of color so that there's really some nice unification between the frame and the
flowers and the figure, but also just kind of
cleans everything up. So anywhere that there
was open white space, I started doing this and kind of filling it in to just give it a really crisp finished
look because I wanted to have the texture of oil pastels maintained there, but I also wanted to make sure that I could still
keep it clean. And from this point on,
it was just a matter of continuing those flowers
around and kind of mirroring what I'd already
done along the top and the edge to
finish it up and then adding some more of that blue violet marker
to clean up those edges. And like I said, I'm
constantly reassessing, reevaluating, and kind of seeing what additional
things need to happen. So once I had all of that bold color
happening around Frida, I wanted to go back
in and pop some of my colored pencil
colorization, just a little bit bolder, and then a couple
other final touches, and then she was done. I'm so happy with
how M turned out. And I've got some ideas for a few more embellished portraits that I plan to make
in the future. I can't wait to see
what you created. So let's head it over to the final lesson to
wrap up the class.
7. Final Thoughts: Thank you so much for
taking this class and exploring embellished mixed
media portraits with me. I hope you're feeling inspired, and you can see lots
of different ways. You can incorporate
this approach to mixed media art making into your art practice and even potential future
portrait collages, or even any other
collage imagery that you would like to
work on embellishing and giving those little
pops of color and texture and pattern
to really bring them to life and put
your unique spin on imagery that you find
online and in books. Be sure to head on over to the Projects and Resources
section of class, click the Create Project
button to upload images of your embellished
mixed media portrait. You can add text
describing the process or the art materials
that you used or why you chose the
portrait that you did, and even maybe where
you found the portrait, to give others ideas of where they can go sourcing
portraits to. Don't forget to
check out the class projects of other students. Circle back to the class to
find out about new projects that have been uploaded as more students
discover our class, and to help more students
discover our class, consider leaving a review, sharing your thoughts
and experiences, what you think went well, I'm really a reflective teacher. I love hearing back from my students about
what they enjoyed, areas where I can improve
this class, future classes, past classes, and just
different ways that they explored the process themselves in their own art
making experience. I know as a student, I
personally love leaving a review as a chance to
reflect on my own learning. What can I take away
from the class? How can I incorporate into my art practice and just
sharing how it went with others as they consider
whether they want to join our embellished
mixed media portrait fun. Want to keep learning
from me on Skillshare, be sure to click the
Follow button so that you get notified as I upload
new classes in the future. If you want to continue learning and connecting off Skillshare, be sure to pop on over to my YouTube channel
and check that out. I share art techniques,
art practices, studio approaches, and
take you along on with me for some different
art adventures that I go on
throughout the year. If you share your artwork
over on Instagram, I would love to celebrate your journey over there as well. So be sure to tag me at
Elizabeth Underscore Welfare. And I love sharing my students work with my
Instagram followers. So if you share your class project in the student gallery, I'll be sure to ask
you if it's okay if I share it over on my
Instagram as well as I continue to encourage
students to join us on their skill share journey
and to check out the class. And I'll see you next time.
 Elisabeth Wellfare, Artist, Art Educator