Transcripts
1. Introduction: Hi. My name is Elizabeth
and welcome to my Halloween Mixed Media
collage cake class. I'm a professionally trained
artist and art educator, and I've been teaching here
on Skillshare since 2021, sharing a variety of different art techniques and processes, exploring a whole
range of media. And I have an artist
inspired series that you might enjoy checking out if you enjoy this class. If it's your first
time joining me on Skillshare for an art class. I am super excited
about this one because I love the spooky
season and all the fun ways that we can
explore Halloween and all themes Autumn and
October in our artwork. And in this class, we
are going to be making a very fun mixed
media collage cake. So what we're going to
do is we are going to dig through our collage stash, pull out some fantastic papers. I love creating
decorative papers. So I'm going to be using
papers that I have created using various
watercolor and ink techniques. But you are more than
welcome to create new papers for this class
project or just use any fun Halloween color scheme vibe papers that
you want to work with. Then after we have done that, we are going to collage in some frosting to just give
it a little extra. And then you're going to
see how I decide to create my topper for my
Halloween inspired cake, and then I'm going to
lean into mixed media. So I'm going to work back into my collage cake with
colored pencil, fine liners, add some
more spooky elements, and really start to bring out
those halloween vibes with the mixed media details
and really kind of enhance a lot of what's already going on with my collage papers. This is a really fun class. It explores some art
processes that maybe we've done together in
some of my other classes, but in a fun new festive
Halloween sort of way. So I hope you're gonna join
me in class as we explore mixed media collage doing
Halloween cakes. See in class.
2. Class Project: For our last project, we are going to be exploring mixed media collage
techniques as we play around with the colors associated with Halloween
in the spooky season. So leaning into blacks, grays, whites, oranges,
yellows, purples, maybe even some greens, and we are going to
be digging through our collage papers and our decorative papers that
perhaps you create like I do, and pulling out different inspiration papers
for our collage. Then we're going to be
cutting those up and assembling them into
a staffed cake. And then after we get
everything glued down, we are going to work
back into our cake with a couple of
different drawing media. I like to start with
colored pencil and then I work back in
with fineliner and then add some pops of color with some paint pens because
it's always fun to add a little bit of confetti to the background of
your cake collages. So let's head it over to our next lesson to talk more about the materials you're
going to want to have on hand for class. See you there.
3. Materials: The materials for our
class project for Halloween Mixed
Media collage cake are very straightforward. We have our different
decorative papers. These are watercolor
ones that I've done. I have a whole stash of different collage papers that I create and that
I can pull from. If you don't have papers, you can absolutely pull any other collage
materials that you have. If you want to
create some papers, you can check out some
of my other classes on how we do that with watercolor. Then because we're collaging, we want to make
sure that we have scissors and a glue stick. I always like to
have a scrap paper, just a scrap copy paper
off to the side just to be my gluing area and
another scrap paper that's usually a reused folded over
one that I can put down on the paper just to
really help get things to adhere by
doing some burnishing. For the mixed media part of it, I love to lean into color
pencils and fine liner. But you can
incorporate any other art supplies you want
to have on hand. If you have paint pens, those are also
fantastic options. A lot of times I
lean into those for some confetti and different
texture in the background. If you have different
brush pens, I've got some brush pens around, I might use that to enhance and really further
push my collage. At drawing materials
that you want to play with when you go back
into your collage, for the mixed media section
of class will be great. Let's head over to the
next lesson to get started creating our Halloween cake
collages. See you there.
4. Collage: To begin my mixed media collage
Halloween cake, I first start by
choosing a background. I love creating decorative
watercolor backgrounds, so I do a bunch of different
watercolor techniques on large sheets of watercolor
and mixed media paper, usually using Canson, and I will tape it down so I can do
the maximum amount of, you know, really
going at it with techniques to get some
really fun effects. So I'll create these
giant sheets of paper and then set those aside to dry and then pull them for different
projects like this one. So here I'm leaning into
some papers that I have that fall into the more
Halloween color scheme. So oranges, yellows,
blacks, whites, and grays, you know, you could really go with
any colors you want here. I'm using some papers that I've had around
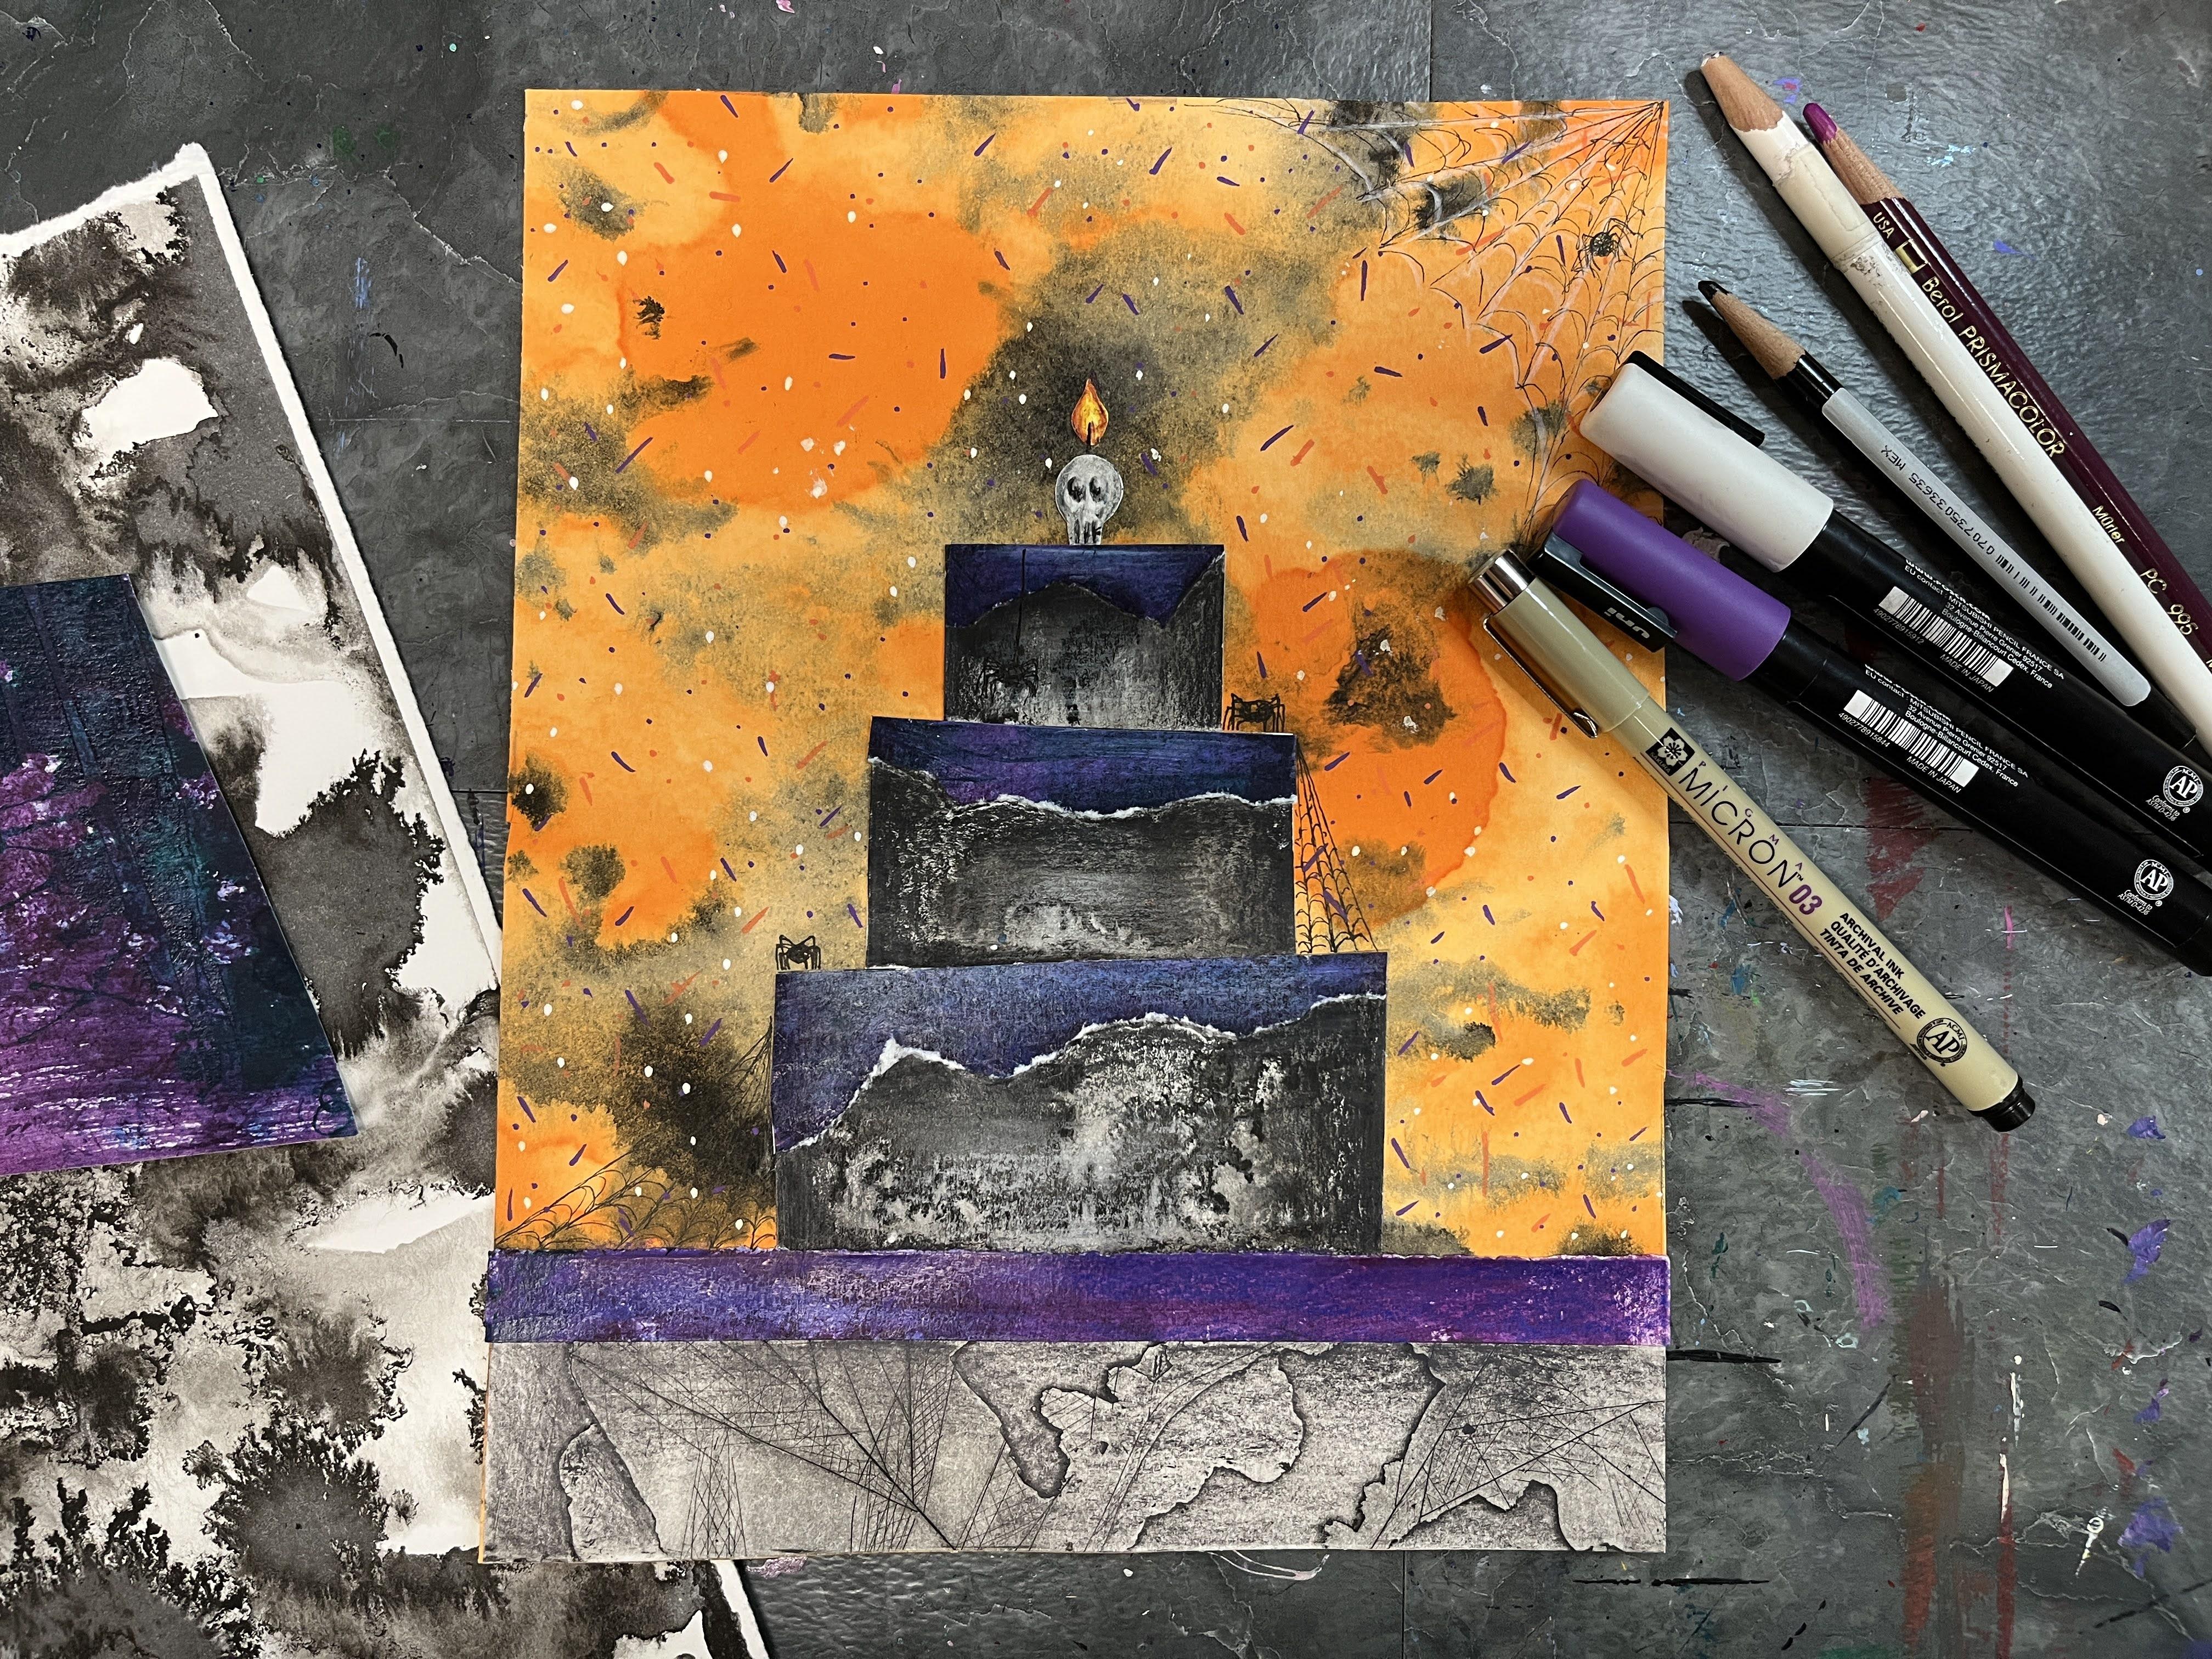
for a long time. The one that I chose to do for
the flooring or the table, the base at the bottom is actually an etching print
that I had done in college. So you just really never
know when you're going to find life for your papers. It's fun to just have
a large stash around. If you're interested in creating decorative
papers like this, I do have another class where
you can check that out, and I'll link it in the notes. But it's really fun to do different watercolor
techniques on a large scale instead of doing them for a
specific painting. I do have a standard setup when I'm doing my mixed
media collages. I've got my papers that I'm
working from, my scissors, my glue, and then I always have a scrap piece of copy
paper off to the side. That way, all of the
stickiness application for your adhesive happens
on that scrap paper, and then you can just move the glued piece over to the artwork that
you're working on. And then I have
an extra piece of scrap paper that's
quite often usually a folded up reused piece from a previous gluing
session that I can put down on top of it and kind of push down and brayer it, or I'll flip it over to kind of really make sure that
my glues are sticking. Oftentimes, mixed media paper or watercolor paper is
on the thicker side, so you really kind
of need to give it a little extra adhesion pressure when you're getting
your pieces to stick. It's nice to have a whole selection of
colors to pull from. I would love to say
that I have all of my papers organized
in a rainbow, but that would be um, you know, future future goals. When I'm doing a
piece like this, I like to do a play of
cut paper and torn paper. A lot of it'll depend on what the mixed media collage
imagery is going to become. But it really starts
with a base layer in the background and then just starting to build up
some basic shapes, much like you do in
drawing, you know, kind of starting with some
of those big shapes and then gradually refining down
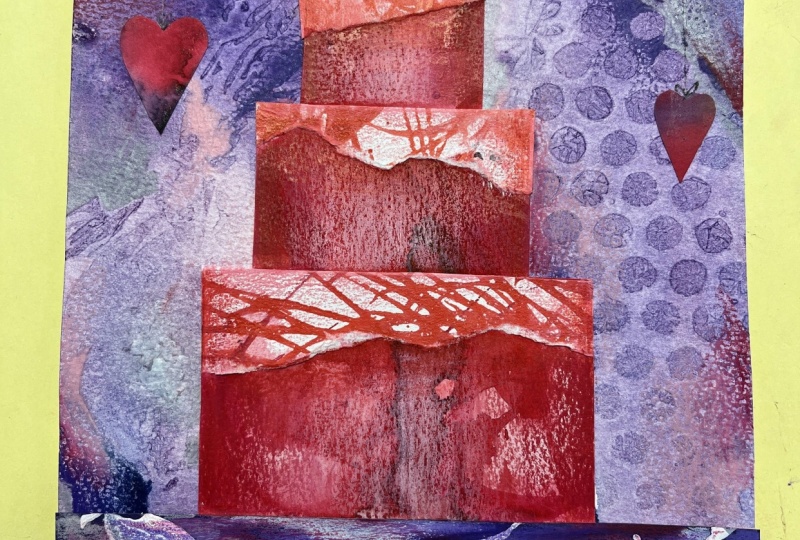
to smaller and smaller, more detailed intricate pieces. And so I've got my background. I've got my base layer that
I'm building my cake off of, and then I'm doing
my cake layers. I really try to be intentional about when I'm doing a
stacked cake like this, how the collage papers line
up with each other so that it really feels like it's going to be a unified
cake in the end, even though I know I'm
going to be adding some dripped frosting
going down the sides. Because this one is a
Halloween themed cake, I was really kind of leaning
into more stylization. So that's why I did the
torn paper for my frosting. This is a great way to use
up your smaller scraps and kind of think
about, you know, where are you going to have some longer areas and
shorter areas for your frosting and then letting the white of the tear show through because it goes
with the color scheme, and it just kind of
adds a fun touch to it. So we're not trying to
mimic a realistic cake. We're just kind of leaning
into the shapes of a cake to build up a really
fun mixed media collage. The frosting layer is
also a great opportunity to elevate the cake form. So we've built up the
three cake layers, and now by adding the frosting
coming down the side, but not all the
way down the side, we're further defining.
This is a cake. It has tops to these
shapes that we can't see. We're definitely not
trying to do anything as far as realistic perspective. Like, I really wanted this
to be illustrative and kind of lean into the simplicity of the shapes so that I could
really let the paper shine and then all of the other embellishments
that I add to it. There is a lot of
back and forth in mixed media collage
trying to decide what types of papers
do we need to put together and what colors do we want to put together
to make it work. So here I'm trying to play with, how can I jazz up
that bottom layer so that it makes more sense and also just so
that I don't know, sometimes you can just tell
in a mixed media collage, especially that you're
at an unfinished state. So a lot of it is just continuing
to play, put pieces on, take pieces off, decide and do some editing and
composing as you go. For this piece, I really felt
like I needed something. I needed another layer, and it's fun because it
mimics the layering of the black and white cake layers
with the purple frosting. But it is still, it's a
different purple paper. It's treated a different way. It's brighter, so it still establishes itself as something
separate and not just, like, another giant layer of cake on the
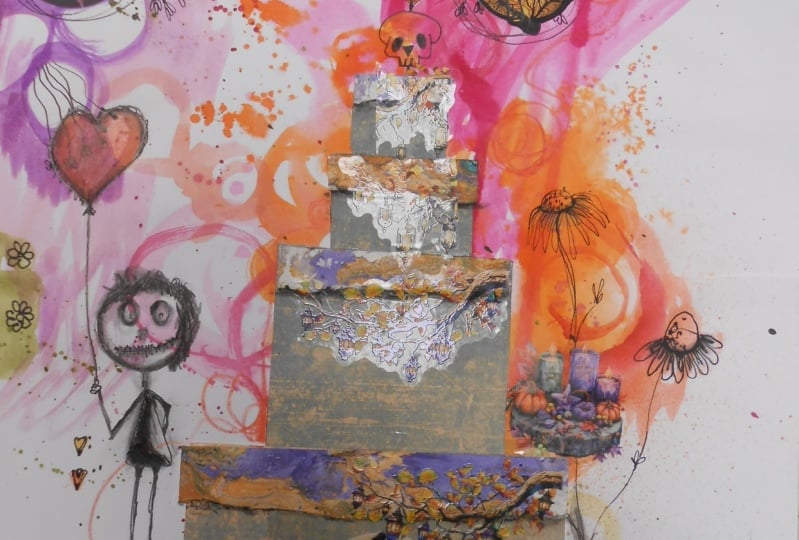
bottom of the page. For the candles, I love to do them oversized. It's
just really fun. Here I'm kind of playing
with the idea because this project came out of a birthday cake
mixed media collage, I created for myself
in a large scale that I then created a
secondary smaller one just because they were
so fun to create. I'm leaning into traditional
candles at this point, but this is that
editing process, kind of deciding what do I want to keep from
the original concept of the project that I created in more traditional non
thematic birthday colors. And then which ones do
I want to take out? Sometimes you glue pieces down and you still decide to
edit them out later. So here I am gluing down the candles and trying
to decide, you know, is this really what
I want and kind of leaning into the
artistic process that I had established
in the earlier pieces. And then you'll kind
of see as this goes along that I make some
decisions to change that. Small little pieces of paper, if you're searching for
different colors, this one, I was able to get some
really lovely yellows for my flames out of a warm, you know, red, pinks, oranges, yellows makes you know
watercolor paper that I created. So I'm just kind of cutting out those small flame shapes to really bring the
candles to life in a way. With these smaller
pieces, it can be a little hard to manage them. So I know one thing you could do is have
some tweezers that are just dedicated to your art practice that you could use. You can also see here
that I have decided to scrap the candles. Sometimes you get into it, and as you're working
through a process, even one that is
tried and true in a different scenario like the other birthday
cakes I've created, you just kind of find out that it's not quite what
you want it to be. I really wanted to lean more into the Halloween
side of it, too. And the candles are
a very small detail, but I felt like there
was a better way to do it for this type of
holiday themed cake. So here I've decided to
cut out a small skeleton. A small skull. So with my very minimally treated paper to get a little bit of
that gray in there, I've cut out I've drawn
and cut out a skull shape, and now I'm using my
pencil to kind of add in the lines and
the mouth detail. I'm not going like,
super realistic. I'm still leaning into
the illustrative quality of this and the play
and the simplicity, but I really wanted
to, you know, start to map that in
with pencil before I go back in with my
pen and ink detail. So it's very small, but again, I'm kind of trying to do
it in scale to my cake, and I'm kind of envisioning
that this cake, if it were existing
in real life, was a big cake, a relatively significant cake. So in that scale reference
is a very large skull, almost life size, and then I'm going to turn
that into a candle. So I'm still going to
use the candle flames that I was working on before, and I'm just going to use one and having it come
out at the top. So the skull becomes the candle, which then leans into the
Halloween fun of this project. Then I go in with some colored pencil to kind of help define the skull
shape even more. I'm just trying to bring that to life and make it very clear
this isn't a white blob. This is an illustrative
skull on top of the cake. And then I'm going in with some fine liner so
that I can really, really pop the details of
the skull that I've created. So bringing those eyes out, bringing out the
mouth a little bit, going into the candle with colored pencil to
lighten it and darken it and warm it up and really kind of give it a
little bit more nuance.
5. Adding Details 1: I love going back into my mixed media collages
with colored pencil because you can just add so many you can add rich values.
You can add texture. You can really make
some different things pop and create some
emphasis in some areas and just push that
collage paper even further so it really gets
some lovely dimension. Because even though I'm going
for a flat collage here, I still wanted some play of
dimension in different areas to lean into the fact that this is an illustration
of a cake, and the cake is
three dimensional. I decided I really did want to lean more into the
shading aspect of it. I did not do that with the
other cakes that I created. But this one just felt
like it needed it. Plus, I just love shading
on these textured papers. So I'm going in with
my colored pencil to add the illusion of roundness just by having that darkness that fades
out on all the sides. So they become a round
three tiered cake. You can do this by
adding in the darks, but also adding in the lights. If you add some
darkness on the edges, and then you add some pops of light toward the middle that
fade out the other way, then you get some really
lovely nuances to your collage without having to be really refined about it. You could really lean into
the color pencil texture. Oftentimes when I'm just doing a strictly colored pencil piece, I'll go for a more burnished look because that's what I love. But here, because I want to preserve the texture
of the paper, I just want to add the
texture and the value. I'm going to lean into
letting the roughness of the color pencil
application become part of the texture. I love this. I love how it starts
to get moodier and just a little bit richer
in its application. Then for all the cakes that I've done so far in this series, I really leaned into
going heavy into the frosting to add some pops of lightness
and pops of darkness. I lose a little bit of the watercolor texture
that I had to begin with, but it just makes it a little bit more like
frosting by adding this creamy smoothness
on top and not being afraid to let the colored
pencil layer up nice and thick. You wouldn't have
to do this, but because I added the shading to the cake layers and the
black and white sections, it kind of needed it. The more you add, sometimes
the more you have to keep adding to kind of keep the piece moving toward
a more resolved state. And sometimes your
texture boto papers, although they're beautiful
in and of themselves, they just need a
little bit more. And color pencil is a great
way to add that a little bit more without having to do a
lot of extra work to a piece. So this part is a great
example of how you can start with different
textured papers and then really add a lot of nuance and character to them by working back into them with
other art supplies. So like I mentioned
in the earlier video, this little gray
part on the bottom is part of a print that
I made in college. So I've had this for decades. And it's really fun to see this get used in another piece. And because I cut
it up, I've kind of taken away some of
the nostalgia of it, and then that opens it up to be able to go back in
with colored pencil now that it's in its new
home as a base for this artwork and really start to lean into some really easy, basic, but intentionally placed and really important values. So it's kind of adding in
some little gradients, playing into the texture there. Then I love to do the same thing when I go back up to my cake. I've added on the sides
and really gotten it to wrap around and add a
little bit of roundness. But it's always nice to
add that little bit of drop shadow underneath
the frosting just to help create a little bit
more definition between the body of the cake and the frosting
that's coming down the side. You can decide how intense
you want to make this. Because we're going for a spooky Halloween
cake in this class, I really wanted to play and have some fun going a little bit
more intense with the shading than I did in some previous
cakes that I created and some ideas I have for some other cakes that
I want to create. Future. Then after I do the
colored pencil section, here's where this project
is really fun to embellish. What else can you add to
your cake collage to really elevate it and take it into the spooky
Halloween aesthetic? I love little tiny spiders. They're so incredibly
fun to draw. So I have my fine liner out. I've added some
spiders on my cake. I'm putting in some
cobwebs coming down and really playing off of the structure that I've
created with the collage. And how can I then
add some ink details to really kind of start to bring the Halloween
out even more? It is possible to do this step
too far and add too much. So I like to do
add a little bit, you know, kind of step back a little bit and kind
of evaluate it. Where else do I need it? I also love to work back into my watercolor texture papers. So I love adding in fun little linework and different
fun pen and ink techniques. And that's something
that I explore in one of my other classes that
I have shared with you as far as
another resource of ways that you can push these
techniques even further, whether that be in
this project or in another artwork that you
create in a similar style. And then also kind of what
compositionally can we add? How can we balance this out? So I'm adding in different
elements of the spider webs, but I'm really being very
mindful of where I place them. And then because I had
this great big background, I really did kind of want to
play into adding a really, really big one, but I'm very intentionally going
light with my marker. Like, I just kind
of want to ghost it in and kind of map it out, and then I'm going
to play with how can I make that
pop a little more? I don't want it to distract. I want it to just
be another element that is just further
enhancing the Halloween vibe. So that's why I really
didn't go in heavy. I could have gotten it
with a sharpie and that would have taken it to
a whole other place. But using a fine liner was a very intentional choice for my marker for this
step of the project. And then I really wanted
it to pop a little bit. So just adding some just dusting of white colored pencil
in there just helps take some aspects
of the cobweb and the spider web and just kind of helps make them pop
up a little more. I didn't go over everything, but I went over quite a bit
to really add the lights and the darks to help define it
off of my texture background. And then, of course,
the cobweb in the corner absolutely needed
a spider friend also. Now the last one part of this project is adding the
confetti in the background. I've done this with
collage when I've had larger cakes that I've
been creating and it's easier to cut the paper
small and work with them. For this one, I just
went in with paint pen. The orange doesn't show
up a lot in the video, but when you look at
the piece in real life, it adds just kind
of a nice extra pop of orange value throughout
the background. And then you're going to
see, I'm going to play up with layering some
other colors in there and also doing dashes and dots just to kind
of really change it up. So right now I've got
my purple paint pen. So I did dashes with the orange. I'm doing dots with the purple and just kind
of playing around with different shapes that we kind of think of when
we think of confetti. And it just adds kind of a fun
final touch to your piece. It also helps you pull some
of the other colors in. So my background is orange
and black and gray. But by doing the paint
pen with the purple, I'm adding in the purple from other parts and creating
a more unified artwork. So if you have color
in one section, a good rule of thumb
is to then put that color somewhere
else in the piece to kind of help move
the eye and kind of so it's not just
standing out on its own. So this one, you can do as much or as little
as you want to. But then I really wanted
the value contrast, so that's why I chose
to do the white dots. Because having the
three different colors of confetti creates
a really fun, interesting look to it. And then if you play
into different values within those confetti colors, it's just going to take
it to another place. I may have gone a little overboard with the
white confetti, but I really love
how this looks. And I had so much
fun creating it. I can't wait to see yours. So let's head it over
to the last lesson to wrap up the class.
See you there.
6. Final Thoughts: Thank you so much for joining me in our mixed media collage
Halloween cake class. I had so much fun taking my birthday cake and putting
a Halloween spin on it, and I cannot wait to
see what you created. So I really hope
you'll hop on over to the Projects and
Resources section of class and upload some photos of what you've created
to the student gallery, and don't forget to stick
around and check out what other spooky
delicious creations your classmates have created. This is going to be
such a fun project, and the techniques that
we're using to make our Halloween cakes are
ones that you could absolutely apply in a
variety of different ways. You could stick with the
Halloween one and do some fun stuff with
pumpkins or kind of, like, some fun scenes. Some cute little collage
trick or treaters would be amazing using
these techniques. Maybe that's one I'm
going to have to try to crank out before
the season is over. But either way, I can't wait
to see what you create. So I will see you in
the student gallery. If you want to take some time to share some feedback
about the class, I am interested in doing more seasonal art classes
here on Skillshare. So let me know if
that's something that you would love to see more of by sharing that
in the discussions and share in a review how you
think the class turned out. Did you enjoy the process? What sort of different things
did you like about it? What things could be improved
as I work at kind of expanding the seasonal varieties of classes that I teach here. And I would love to stay
connected if we aren't already. So don't forget to
give me a follow on Skillshare to get notified
about future classes. Follow me over on YouTube, if you want some
little bonus stuff and check out things
on Instagram. I share all things over there, whether it's classes I'm
teaching here on Skillshare, classes I'm teaching in person, art adventures I go on and art projects that I'm
creating in my studio. Thank you so much
for being in class, and I hope to see you
next time. Take care.
 Elisabeth Wellfare, Artist, Art Educator