Transcripts
1. Introduction: Hi, I'm Elizabeth. Thanks for joining me in part of my artist inspired
class series. In this class, we are going
to be taking a look at the later work of Fav
artist Henri Matis. Mattis was a fav painter, so exploring the wild
expressive natures of color in the
very early 1900s, but as he matured through
our artistic practice and was kind of overcoming some different difficulties
that he was having in being able to
physically do his art, he would glean on scissors as
a means to draw with them, to cut out different shapes, to continue to explore
what he loved about the creative process
and to continue creating in the later
years of his life. So he would paint
the papers with these bold fun colors
and then cut them out to create really
dynamic, exciting collages. We're going to take a little bit of a more contemporary
approach to that. So we're going to be
using construction paper. But in a bonus lesson, definitely check out some ways that I created my
own painted paper. And the fun about doing
that is you are in complete control of the
colors that you create. So you can go wild to mix all of the different subtleties between the colors that are available
in construction paper. So then we're going to
collect our papers, kind of come up with
our color schemes, cut out some amazing shapes in different ways that
we can manipulate the paper to create fun dynamic pieces to choose from. Then we're going to
be composing those together to make a really
beautiful collage, and then you'll have the
option to go back in with any kind of mixed
media materials that you want to to add patterns and textures and values
and lines and shapes and to really bring
your collages to life and kind of elevate them beyond the basics of
cutting and pasting. This class is intended for
creatives of all skill levels who want to look to the artists of the
past, in particular, Matis, explore ways that
you can incorporate collage and mixed media art making into your
artistic practice. And kind of really simplify things down to basic
colors and shapes and then elevate it back up
by layering those into beautiful compositions
that you can then take even further with
mixed media details. I hope you'll join me
in class as we explore the later works of Henri
Matisse and create our own mixed media
collage abstract shape inspired projects.
See you in class.
2. Class Project: For our class project, we are first going
to look at some of the later works by Here Matis. So you can check
this out by Googling him and Googling
Henri Mattis collage, if you want to on the Internet, but I've also created
some resources over on the Projects and Resources
tab of class that share some of his dynamic collages and a little bit about his process
and background with you. So it takes some time to get inspired by the visuals
of Henri Matis. Then we are going
to create our own cut paper collage. So we are really looking
at using the scissors to draw and create really
interesting dynamic shapes in a variety of colors. I really encourage you
to push yourself with your color exploration
and maybe look at some color combinations
that aren't ones that you naturally
gravitate towards and kind of see if
stepping outside your color comfort
zone helps you then push your art
project a little further. Free also to explore color
combinations that you love, but this is a way
you can challenge yourself to take the
project further. Now that we're all excited
about the work of Mattis and the idea of creating
our own inspired piece, let's head it over to the
next lesson to talk more about what materials
you're going to want to have on hand for
class. See you there.
3. Materials: For our Mattis project, the materials are
relatively simple. I have an array of different colors of construction paper, and then I've got
scissors and glue stick. We're going to be
doing collage and they're going to be
working back into that. For my background, I'm going
to work into white or black. You could really choose
any color you wanted to. You could work into
a color background. I love the contrast of color on white and color on
black because it really changes it to have those different
foundations that you're building your geometric or
organic collages up from. So I'm going to be showing
you how to do it on white and plaque because it's
really a different kind of play that goes into it. Then to work back into our collages after we've
created them and drawn with our scissors and really gotten
some interesting shapes to our papers and built those up into some really
dynamic compositions, I'm going to work back
in with colored pencil as well as some
pasca paint pens. Maybe some other
pens I have around. I've got some metallic Sharpies and a gold fine lin I might use, I might grab just a
regular black Sharpie. The sky is the limit as far
as how you want to work back into your Mattis
inspired collages. But this is my go to as far as the mixed media portion
of our project. Whatever colors speak to you, you can look at the color schemes on the reference images, on the projects and
resources section of class for the different colors
that Matis like to use. Or you can go with whatever colors speak to you or
have a different mood. We're going to be
working abstractly, but you can allude to things. Matis's collages often
included figures or some elements that looked a little bit organic
elements from nature. You can definitely lean towards representational a
little bit also. It doesn't have to be
strictly abstract. It can also be a
weave of the two. Then this is for
our base project, but Matis painted his papers
and then cut them up. So in a bonus lesson, I'm going to show you
how we can do that, too. And then the benefit
of that is that we can go beyond the colors available
in construction paper, and we can really
have some fun making new and more nuanced colors and even play with the texture of the painted surface as well. The first imitration is
going to show you how to do this project with
construction paper, and then there will be
a bonus one showing you how to create
your painted papers, as well as how to apply those for that variation
on the project. So gather up your
colorful papers, get your glue and your scissors, get your drawing
materials ready. Get your background paper
cut and figured out. I'll meet you in
the next lesson, we'll begin drawing
with scissors to create our collage
shapes. See you soon.
4. Cut Collage Papers: So as we get started on our class project
and wanted to take some time to kind of
look back at some of the other examples
that I created, some of these came out of some scrap papers
that I then modified, so I have some interesting
ways things are cut out, and then some I created. It started with a foundation
of primary colors. So the dominant colors here
are red, yellow, and blue. And then I wanted to
kind of mix that up and add in some of
the secondaries, too. And then really kind
of thinking about the ways that we can
use curve shapes and geometric
shapes and then how we can position those to
make them interesting. You can curate your
color selection for your shapes at
any point in time. I'm just going to kind
of start cutting out some really interesting shapes and then get
inspired from those, but you could also
sketch this all out in advance and then create the
collage pieces that you need. There's really no wrong
way to go about it. I like the play of getting inspired by the materials as
the materials get modified. So that's why I'm going
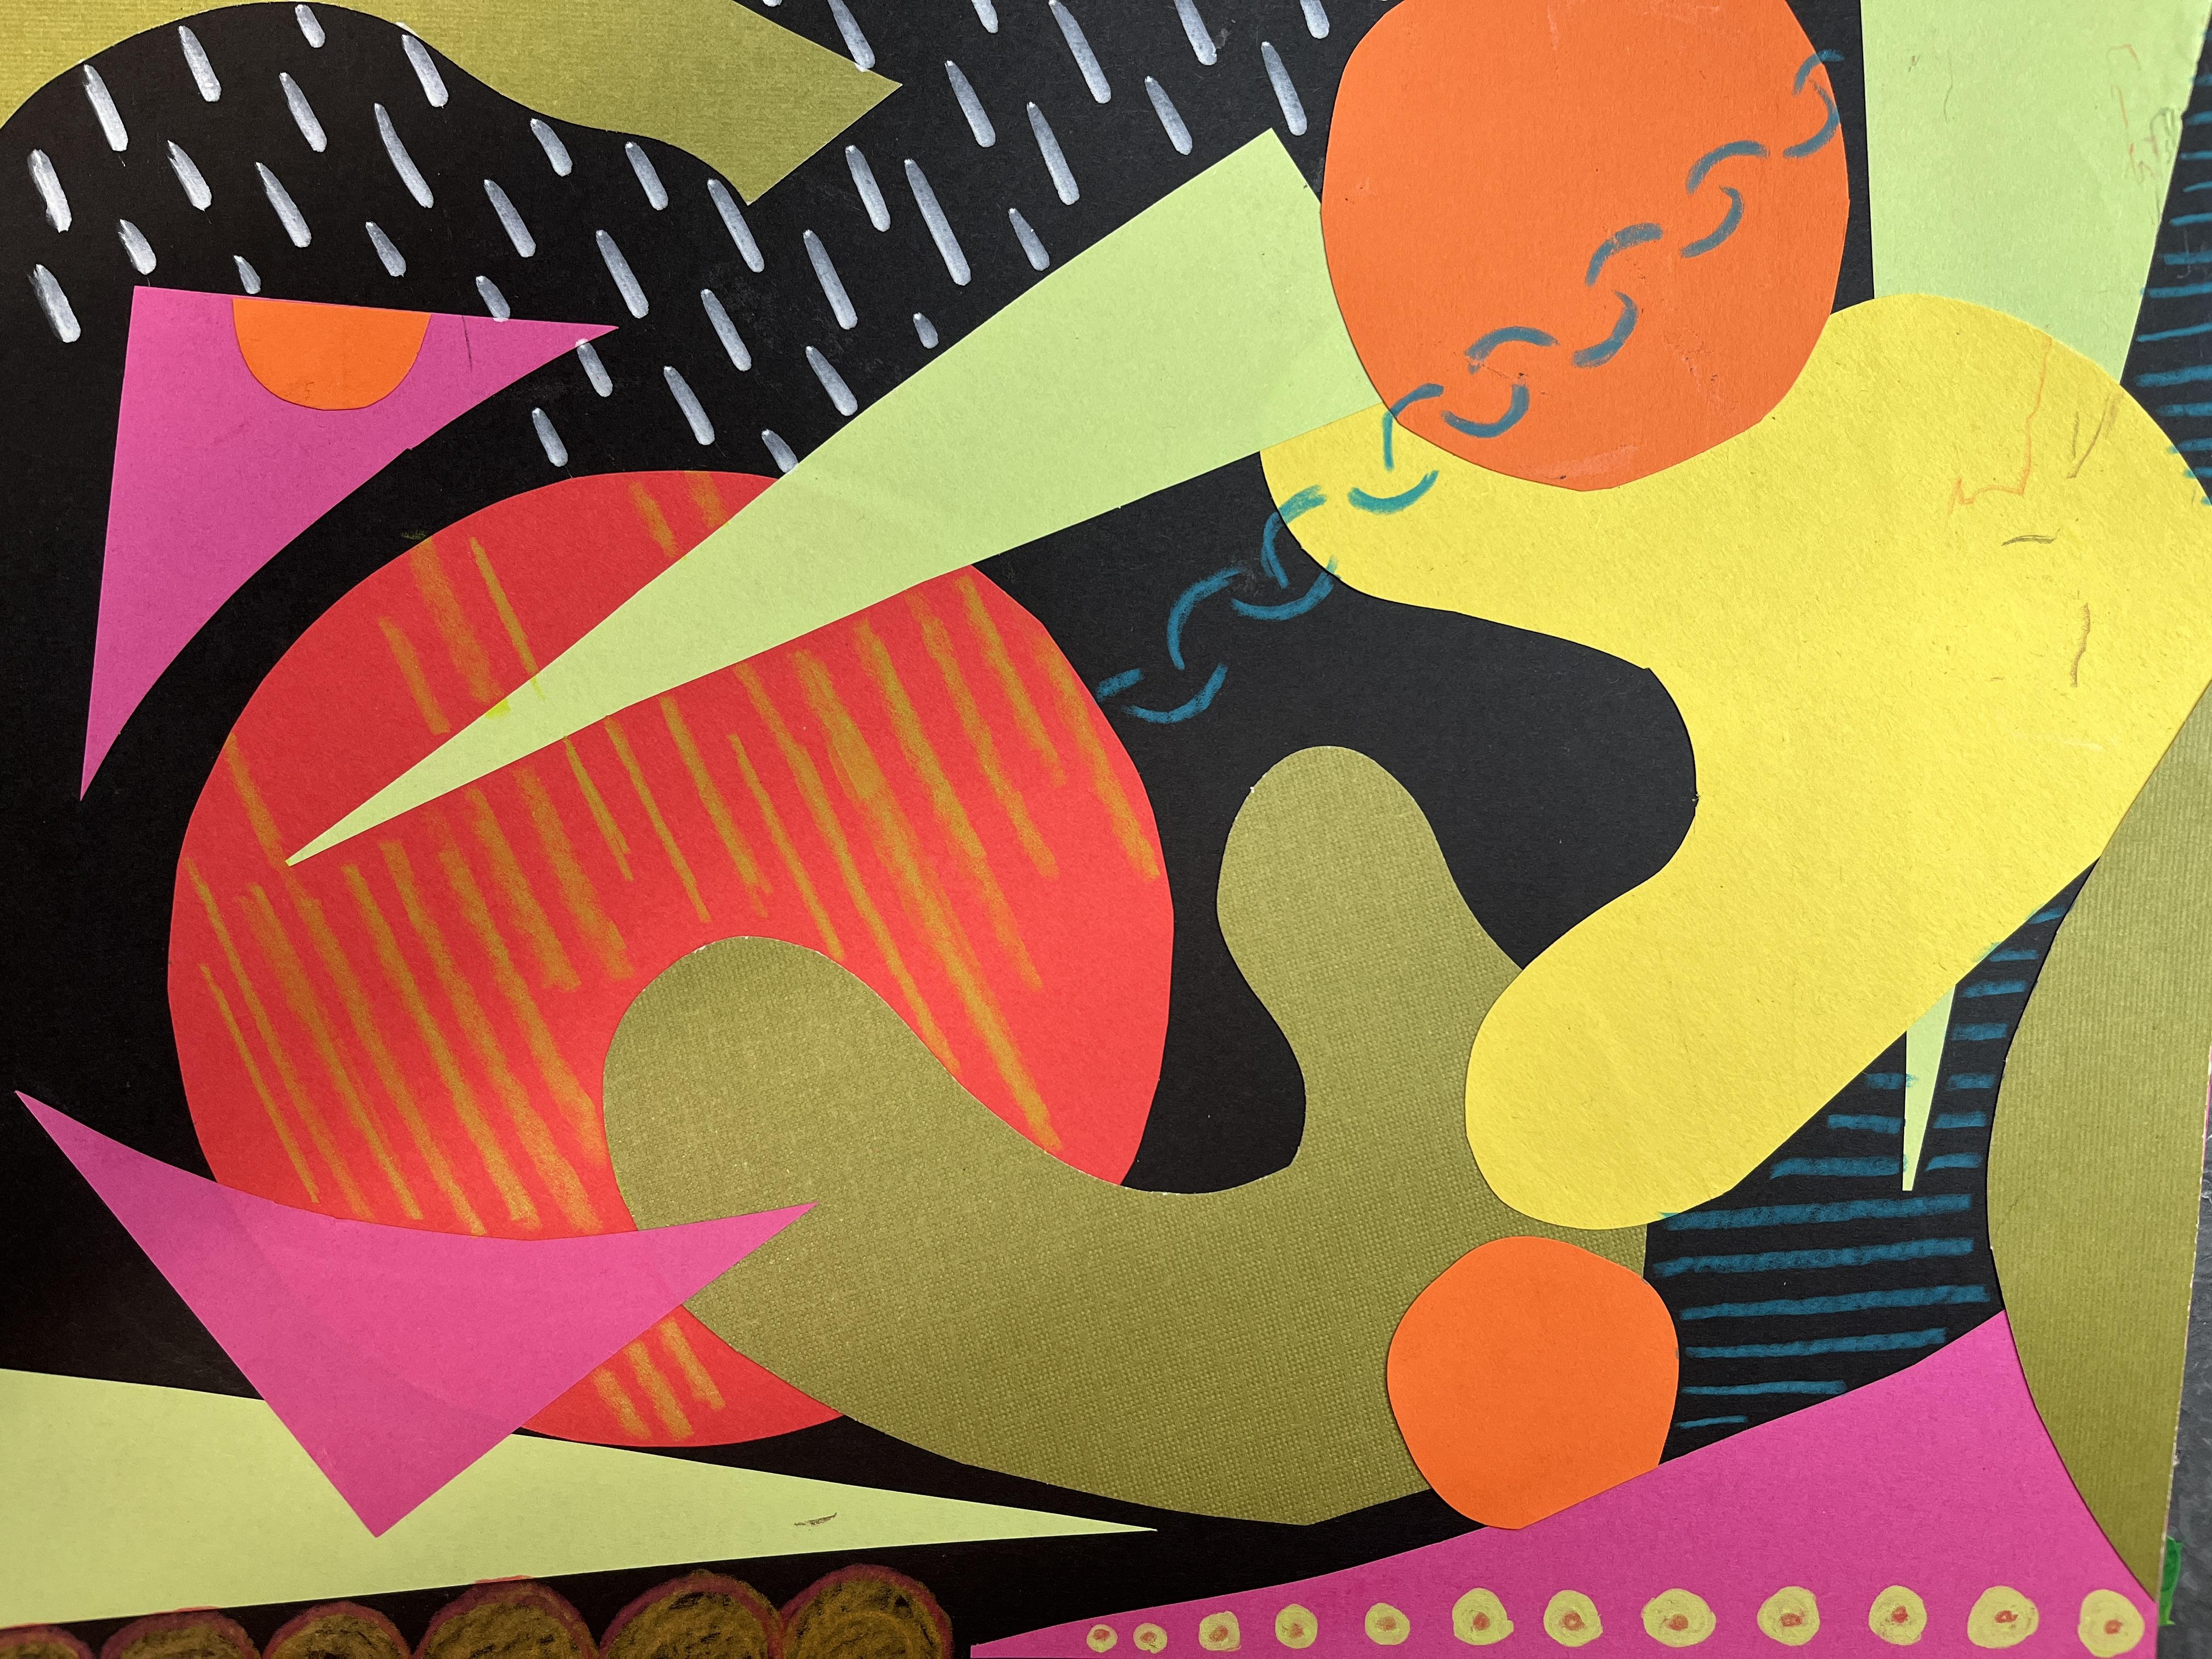
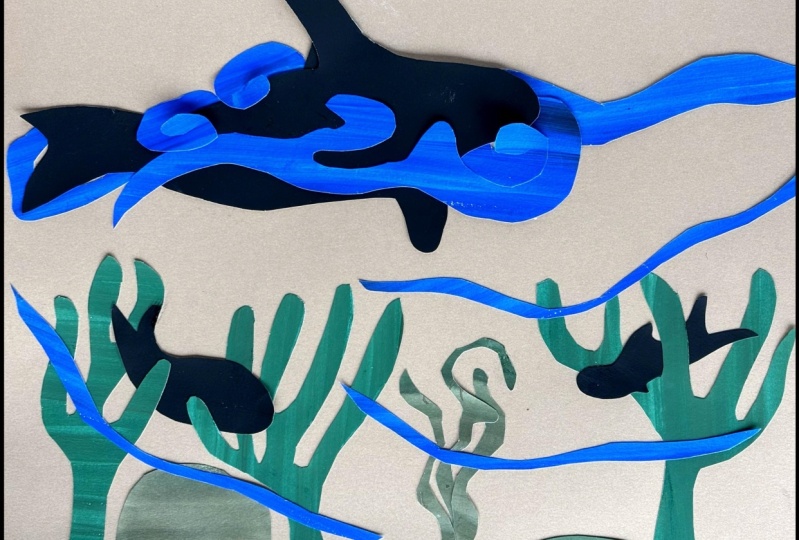
to approach this one. As we look at the black one, this one has a much more
limited color story. I mean, the green is dominant. It's like everything is shades of green, two shades of green. And then I've got warm colors. So my orange, my red, my yellow, and my pink. And really kind of
playing between the idea of these
geometric ones with the triangles against the
rounded organic forms and then the circles. And really playing with
the idea of scale, three different sizes
for the circles, but also repetition by having the balance of three circles
with three triangles. There's a lot of
threes happening in this piece in a lot of
differentays. The pink pieces. Even the idea that I've got
three pieces of this screen, three pieces of this screen, three pieces of pink, three circles between
the three there. And then the only shapes that aren't repeated as far as
threes go are these two, but this one could be alluding
to it down at the bottom. So that was completely
unintentional. That just happened. I find the more that I play with abstract work and
collage in particular, I'm finding that my background in art and the elements and principles are really
impacting that. As you consider how to
compose your piece, I'm going to include
a resource on the projects and resources
section of class that covers what are the elements of
art and the principles of design for anyone
who wants to be a little bit more intentionally
considered of those rather than letting it happen naturally as you follow
your own aesthetic guide. So let's create some
shapes out of our paper. I like to have a mix
of geometric and organic and I like to just
have a lot of variety. So I'm going to play around with just cutting and seeing
what happens there. I'm also working on a
pretty small piece of paper compared to my original pieces. So I really want to
keep that in mind. But anytime that something, you know, bumps the edge
or goes off, you know, goes off the page,
that's great, too, because then it's leading
the eye beyond that. Now, the more you
cut into your paper, the more interesting shapes
you're going to find, you can lean into that, or you can let it you
know, just kind of go. That's kind of cool. Maybe some other time.
I'll explore that. And again, we're not going
to use all the shapes that we create if you're
doing this in a way that doesn't have you planning out your
shapes in advance. So I'm really just
kind of having fun here and cutting things out. You know, I feel like
I have enough yellow. If you're gonna play with
repetition, you know, we can always circle
back and create more of these types of shapes. And always save your scraps
because there's lots of other ways we can include those in our art
making practice. You'll be surprised at what new life comes out of, you know, pieces of material that, you know, pop back up now and again in your creative process. Now, if I find that I have
shapes that are kind of big, I might decide to keep those and just get a
bigger background paper. Because there's no one telling
me I have to work small. I just kind of like
that idea these days because time is limited, and I'm trying to find a way to create in those
in between moments. I also want to make
sure that I have big pieces and small pieces, 'cause I want to have
that size variation to add some interest there. So I'm gonna go ahead and get
some more variation going. And then I can also, like, keep changing these shapes as I go. You know, as I start collaging, I might find that I need
some other kind of shape, and then I can always
edit and kind of refine my shapes throughout
the process. And because we're
drawing with scissors, you don't have to
worry about any of this being very perfect. Kind of embracing
the funkiness that happens when we're
cutting out shapes. I think I want to have pops some options for pops of blue. I'm going to get my bigger
scraps off to the side to save those for future somethings. I'm gonna let these get
all sorts of mixed up. And then we're gonna
head on over to the next lesson to start
composing our colleges. I'll see you there.
5. Collage: So now I'm going to start
my Mattis inspired collage. So I have a bunch
of different pieces of construction paper. I have a bunch of
different pieces of construction paper that I've
cut out in shapes that are merged between the ways
that he used cut paper, as well as my own preferences
when it comes to that. And I'm going to create this
one on black background. So I'm going to play around and kind of build up my
composition as I go. And I'm going to kind of see
how I want this to work. So you can kind of
play around with it any way you want to. So you can really
kind of plan out your whole composition
ahead of time, then glue it together and
kind of reassemble it. It's also really fun to just play around and
kind of glue as you go. So I'm going to do a
little bit of both, and I might find that I need
to make some more scraps if I don't have everything that I'm kind of wishing that I had. Although we're trying to get
inspired by the pieces of paper that we've intentionally
created for this, we can always find as we're creating our designs
that we need more. So maybe I'm going to want
more of these green pieces. I'm not sure yet. I'm also not sure quite
exactly how many colors I'm going to
incorporate into this. I do normally really
like playing with overlap and kind of building
up that layering effect. But a lot of Matis's pieces play between the bold
collage elements and the white background. So I really kind of want
to give space for space. So I want to let that
go in there as I'm trying to challenge myself artistically and explore
this in a way that isn't necessarily my
normal tendencies. I want to load it up and fill it and Matis lets it breathe. So I'm going to take
a cue from Matis, and I'm going to try
to let it breathe. I also might find that I'm working because I'm
working smaller, that I need a little
bit more room for this. But I also want to kind of let
that also be a constraint. I want to limit myself to what I've got,
for the most part. I want to play with
his idea of letting the negative space in
the background show through and become part
of the composition. And I chose to work
small for this, so I want to kind of
continue to do that. So the idea is,
how can I continue to do that in a way
that makes sense? So using those limitations is a really great way to kind of shake things up for
yourself artistically. I mean, really often in
art, the sky's the limit. We can really go to town and really do anything we want to, and we often have
too many options, and then things get a
little overwhelming. So by putting in
some limitations, I'm helping myself not get
overwhelmed with things. Like, this is pretty basic, but this is pretty
great. I love this. I do kind of want to
I've got some greens. I've got two different blues, which is a little
weird. It's not weird. It's making me
wonder if I should match my blues up a little bit. I kind of play with, you
know, what happens if I take this piece out and I
put something else in. So there's limitations that help move you
forward creatively, and there's limitations that can stunt your creative growth. So you have to kind of play around with that
and kind of figure out what's the fine line
there between that. Having those two blues overlap is kind of fun.
I kind of like that. So maybe I'm going to
do a teeny bit of that. Maybe that blue is what
is on the top layer, even though I said I
wasn't going to layer. The hard part about building
it up like this without gluing it down as you go
is that I'm committed now. I mean, I'm not committed now. The problem is there's
no commitment. So the minute I start taking pieces off to glue them down, the composition is
going to change and shift a little
bit, but that's okay. The goal of these classes is to get some unique
creative inspiration. And to kind of see how we can push ourselves
outside of things. So I think before
I get any further, I'm going to carefully
remove these. One thing you can
do if you're plan the composition before you
start gluing kind of person, you can set it all up
the way you want it. You can take a picture of it and then use that as a reference
as you recreate it. That's a really great way
to approach this if you need the organization of preplanning it before
you commit to glue. Or you can just let that
be another thing that you embrace and just know it's going to shift a little bit as you go. The problem with gluing
it down as you go is that sometimes you've
got to peel it back up to get things to go
underneath other things. But if the goal isn't
for it to go underneath, then that frees it up
a little bit for us. I kind of just depends
on the mood you're in. This is already changing a bit. I just want to make
sure I'm still leaving that room for the negative
space to be in there. The other cool thing about
using the black background is that the black background is now creating a line
element in some places. You know, right here, it looks like there's
a thick outline, which I love that. I
love that so much. So maybe that's something I'm going to play
with as I continue to finalize this collage and
just kind of see you know, I really try to cut more pieces so that I can maintain that. Who knows? So that's glued down. Glued down the oranges. Actually, I really
like that idea. I like the idea of having
that black outline there, so I'm going to try
to craft these in a way or manipulate these in a way so that
they help reinforce that. Now, because I have
the option to go back in with mixed media, I can use my mixed media to also fill in in between
my collage pieces. So that might be
something that I explore in the future, too. Because even with the
black background, if I use paint pens, they should be opaque
enough that I can still have them cover
the black to kind of continue on this
stained glass effect. I'm going to trim this off. So one helpful tip is to flip it over because then
it's much easier to see where you've
gone off the page. Now, if we consider this
brighter blue again. Maybe we don't need
it. I like it. I just don't know if we need it. And use some other pieces
to kind of fill in my larger Black sections. I don't want to
overthink it either. I really want to just play
with this and have some fun. So it's a fine line between planning and composing
and not overthinking. We need something
down there, maybe another yellow
section coming in. I didn't mean to
use all the colors of the rainbow almost, but that's the way it ended
up, and that's great. So remember, Mattis was
very intentional with how he used his scissors to create shapes and to
create compositions. As often as I'm creating more
intuitively, that's not. I mean, he was doing that,
I think, to some extent, but it was also very
much intentional, as far as what became
committed on the paper. Be it be nice to
break up that space between the blue and the
green at the top. Okay. This is great. I love this. Although it's the colors I mean, this is the bright fun colors
that I'm gravitate towards. This is not necessarily my I wouldn't have made this if I wasn't working on
something inspired by Matis. Which is pretty cool. Everything
is looking really great. You use these little
blobs of color to fill in a couple of the spaces. Then the last thing I wanted
to is do a couple down here. But I think I'm going
to do it with red, and I'm going to let
it go off the page. In that one and
then my other one. I just need to make it a
little smaller, I think. Maybe we need just a couple
other teeny tiny ones. There, I love that. That feels
very inspired by Mattis. That feels very much in sync with my tendencies to a degree. I love this, I don't
think it needs anything else as far as
mixed media details. I'm going to just let it
exist as an abstract collage. In the next one, I will demonstrate
another way that we can approach doing Henri
Matis inspired collages. See you soon. O.
6. Optional: Mixed Media: So I have this collage that I created inspired by
the work of Matis, but there's just something about it that feels incomplete. And sometimes that happens. 'Cause when I made
this one earlier, this one feels complete to me. I don't feel like there's
anything I need to add to it. It feels resolved, and I'm very happy with
how it turned out. Could I add mixed media
details into this? Absolutely. Does it need it? No, not in my opinion. And that's what counts, right? Is your opinion when
you're making your pieces. So I'm going to go ahead
and let this one be done. But this one I want to
work back into and kind of see if I can just
take it apart further. So the mixed media aspect
of the optional lesson in this class is completely outside the wheel
House of Mattis. We can still be very
much inspired by the work that he made,
the shapes that he used. We can look back
to his paintings for some inspiration
if we want to, or we can just kind
of add to it and put our own flavor into this to really kind of bring
it to its resolution. And there's a lot of
bold colors here. I mean, I pretty much of every color in the
rainbow as far as the primaries and
the secondaries go. I have a lot of play there. So I think a big
part of what I want to do for this piece
is to go back in with black and kind use that to create a more unified
element to this. And then we'll see if
I go into more colors. I've got my pascos hand. I've got some colored
pencils off to the side. We'll see where this
goes. But I think what I'm going to do is I'm going
to start with my sharpie. I do also have a fine
liner so that I can have a play of thick and thin
when it comes to this. I think what I want to do is add some bold outline to start. This is really fun because
at this stage of a piece, it becomes an open ended doodle. And there's a little
bit of concern, right? We put the time into
making the collage. Could the marker
details ruin it? Maybe. But did we
have fun making it? Yes. Is it okay if there's some awkwardness along
the way as we resolve it? Absolutely. So don't be
afraid to work back into your pieces in any
way you want to to play and to continue to
focus on growing as an artist, because that's what
this series is about. Looking to the artists of
the past for inspiration, weaving in what we want to do and experience
and what we love, as well as challenging
ourselves to try new things. So sometimes it's a little
uncomfortable making art. That's okay. So I'm just going to start
playing and see what happens. When we draw or paint
back into collages, we are dealing with the
overlap of the paper edges, and I very much like
some really crisp lines. So I'm going to work
really hard for my own personal
preferences to make sure that whatever I'm adding
is something that I love. So let's just have some fun
and see where this goes. Actually, adding
in the black line, I could have kept
tracing that shape, but I'm going to actually
create some new shapes, I think, out of this. And see what happens here
because it's going to add a really fun new layer to the picture, it's
gonna be great. Got a little bit of weirdness
there, but that's okay. Also, I need to
grab a new Sharpie. So I don't normally outline. Well, I guess I do. I do when
I don't normally outline. I have not played around
with outlining collages yet, even though creating
mixed media collages is very much in my
artistic wheel house, but doing it in this way isn't. But I also want to play with adding some different
marks, too. So we're just going
to have a good time playing with adding
some details. You could paint back
into your collages. You can use any media under the sun that you
want to pretty much. So just have a lot
of fun with it and kind of see where
it takes you if you decide to add this
process to your creation. I like getting that
thicker black. I'm gonna do more of that. Make that its own
element in here. You can also find
that maybe you want to collage back
into your collage. There's no rule saying
that you can do more collaging back
into what you've done. At this point, we can
do a lot of editing as we go and curating and
playing around with that, or we can let it be just
whatever happens happens. I do often find that no matter what happens
along the way, it does end up resolving
itself in a really great way. So it's really
important to sit with those uncomfortable moments in the art making process when they present themselves
and just trust yourself and trust the process
that as you keep going, you're going to figure out. What a piece needs. Because right now
I'm not really sure. So that's absolutely okay. But repeating designs
is always a great move. You know, you do
something in one spot, do it again in another. I kind of helps
create a sense of immunity across a piece. Don't worry if you make,
you know, a mistake. You can always kind of figure
out how to resolve that. So because I did some
thickness over there, I'm going to add that over here, too, creating a sense of unity. Really good thing to
focus on if you can because it'll help
make everything feel like it makes more sense. There's parts of this
that I really love. There's also parts of it where I'm just not quite sure yet. That's a big part of it
is figuring out what parts don't feel
like they're making sense that need a little
bit more attention or work or whatever it might be. Everything is so busy and
then this is pretty open. But if I collage more into it, maybe it's just because
there's all those marks there. Maybe that's
all it needs. It's just some lines. Having that black outline
makes it easier to not have to worry about being so neat when you're doing
marks like this, 'cause if you bump the edge,
the edge is already black. Alright, that's
better. I like that. So these lines, even
though they' different, they still balance
each other out. But we can have some fun we can give some thicker
black sections too. Repetition can give us
that visual interest. That's cool. Okay.
The white parts here are kind of a nice balance. Maybe what they
need is some color. So maybe we should go in with some other Pascapen details
to kind of help do that. I only have the one green, so I'm going to kind of I'm
going to add some green, and that's going to help balance out that part of
it a little bit. Yeah, I like that. Okay, so
I'm going to do more of that. Adding more of these
other colors in. And the great thing
about pasca pens or other acrylic paint pens is that they should go on
opaquely so they can kind of cover over
whatever's underneath them. Sometimes it takes
a couple of coats, but for the most part, it
should do that for you. This is starting to be
really exciting for me. I wasn't too sure when I
did this scalloped thing. I wanted to kind of
break up the red. Sometimes you just need to
change the color parts of it, because it wasn't really in line with anything else
that was happening, other than the fact that
I have some half circles and circles in the piece. But for me, that wasn't feeling like enough for it to make
sense that I did them. But I did it, and it's sharpie. So it was there to stay. But then it gives you
a really fun chance to play around with how you can solve the
problem you've created. And you add something that
just doesn't feel right. How can you make it feel right? So anywhere I'm kind of
going over the Sharpie, I can always clean that back up 'cause the Sharpie will
go over the pasta. Just fine. And actually, I really love this now. So now I think I need to do
the same thing to this one. But what I might do is
start with the blue first. And then I'll go in at
the Sharpie since I've already kind of figured
out the recipe. But I do have to remember
that because these are paint pens, that
paint stays wet. So I have to be careful not to smudge my arm through
the wet paint. It does help to let the pasta dry before you go in
with the Sharpie. But I'm a little
impatient sometimes. For these smaller ones, I'm going to use my
fine liner and I'm just going to go
over them a couple of times so that I
get the thickness. But if I go in with the sharpie, it'll be too thick, and I'll lose those
tiny little green dots. A couple other areas I need
to clean up with my Sharpe. I think that's good. I'm really happy with how that turned out, and wow, it is different
than where it started. So trusting the process, really just letting one
step guide the other step, and then just keep
taking symposes so you can look back at
it and kind of see what does it need are really
important when you're adding drawing details of any kind or painting details even
back into your collages. So this is very much not like a collage that
Mattis might make, but this is and this is actually not an artwork that
I would make either. This is very different for me, but I'm really excited about it, and I think it could
unlock some fun, other exciting things
in the future. And that is kind of what gets me so excited about looking
to these artists of the past because
you just never know where it's going to take you and some really cool
stuff can come out of it. So I can't wait to
see what you created. Definitely, please share it over in the products
and resources section. And if you decide to go mixed media with your
Mattis inspired collages, make sure you take a photo
of your collage stage, like when it's done at
that stage and then take a picture when it's done
with the mixed media cause then it'll be really
fun to kind of see where it was after collaging and then where it went after you went in
with mixed media details. So have so much fun. I can't wait to see
how they turn out. And thank you so much again for joining me in Mattis
inspired class. You're focusing on
organic collages.
7. Final Thoughts: Thank you so much
for joining me in my Matis class as we continue
the artist inspired series. I love all of his works, but it's been really fun to do a little bit more of
a singular focus on his later collage
pieces as we get inspiration for our
own collage artworks. I can't wait to see
what you created. So please pop on over to the Projects and Resources
section of class and upload a photo of your Mattis inspired collage to
the student gallery, and don't forget to check out the works of other students. It's always so fun to see what color combinations people chose, the different ways
that they chose to draw with scissors
to cut out shapes both geometric and
organic for the project and if they decided to add mixed media elements
to their pieces, how they went about that and what that added
to their project. After you've submitted your project to the student gallery, I would really appreciate it if you took some time
to leave a review. This is a great way
for you to kind of summarize and think back what
you learned in the class, how you applied it, how you
might apply it in the future, and give me some very
important feedback as I continue to explore the
artist inspired series, as well as future classes
across the Skillshare platform. I love hearing what my students thought about the
class both through the texts that they include in their student projects as well as in their
student reviews. And I take all of
it to heart as I continue to plan amazing
classes for you in the future. So thank you so much in advance for taking time
to leave a review. We can continue to connect
beyond this class. So don't forget to
pop on over and check out my YouTube channel
and subscribe there. I post items related to what
I'm up to on Skillshare, both as a teacher and a student. I also share all of the things creative
that I'm working on, both kind of samples from
my sketchbook pages, techniques I'm exploring
and experimenting with, art adventures that I go on. I really have a lot of fun
stuff plan for the future, and YouTube is
going to be one of the places that I
share all of it. So for even more ideas
and inspirations, be sure to head on over
to my YouTube channel. And I also share
everything that I'm up to in a snippet sort of
way over on my Instagram. I post artworks
that I've created. I celebrate the artworks that students created and
kind of help get people excited about
the class and just show them all the fun that
we're having on Skill Share. Follow me on Instagram
also to stay connected, and don't forget to click the Follow button below so
that we can stay connected on Skill Share two and so
that you don't miss any of the exciting classes that I have coming
up in the future. Thank you so much for
taking the class, and I'll see you next time. And then I get. That looks cool. How is that supposed to be? It's it's an abstract thing. It started as a
collage, like that one. I it's just paper.
And then I went back in with Sharpie and pastas. That looks really cool. Thank you. Yeah, I'm
really liking it. I wasn't sure for it
a little bit there, but no, I really love it. Yeah, I really love
it. Thanks, buddy.
8. Bonus: Painted Papers: So when Matisse was doing his collage pieces
later in life, he was painting his papers. If you grew up with the
children's book author and artist Eric Carl, that is what Mattis
was doing too. They were painting their papers
to create their collages. So I've got a couple
colors of acrylic paint. I've got a disposable
paint palette. An palette will work great. And then I got some
mixed media paper. I'm not sure what else I'm going to want
to work into this, but mixed media paper
is kind of my go to for all media then I've
got that flexibility. But any paper you have
on hand is totally fine, even copy paper. Totally great. So I've cut this
down to nine bay six just because I figure I'm
probably not going to be making enormous pieces of collage inspired by
Matisse. Who knows? But this is kind of a
good size to manage as far as laying out a lot
of painted papers to dry, and then I'm all set to go. You also probably want
to have a cloth on hand and a cup of water for
washing off your brushes. I just grabbed a couple
of different brushes too so that I could do
this pretty quickly, and then I'll wash off
everything when I'm all done. You can definitely plan out the colors of your
painted paper collage. And you can absolutely
combine this with pieces of paper that are already
colored and patterned. There's no limitations,
just have some fun. It does get a bit messy when you're painting all
the way to the edge. You don't have to
paint to the edge. You can let the
breast stroke show, which was very much something
that Matisse was doing. That's something you
can lean into too. It's the different textures
that you can create as you paint your paper with whatever color and
colors you're using. Matisse was leaning into solid
color for the most part. He wasn't necessarily
going for flatness, but he was going
for a single hue of color on each of his papers. Then he would often paint pin those to the wall
to let them dry, but also more so to see the
colors as he was deciding how to use them in his pieces. So I'm going to do this one. I'm just going to set
this off to the side. I'm making quite a mess. I could have put down a sheet of paper to keep my space clean. I can also grab a wet
cloth and wipe it down. I'm just going to
grab a wet cloth and just clean up my area. It's not necessary,
and you can tell by my table that I
don't do it often. But if you're doing a
lot of painted papers, it does help to
clean and then dry your surface so that you're not getting the paint on
the backside too, especially depending
on the kind of space that you have to lay out your
painted papers for drying. Then I've got a dry cloth, I'm just going to wipe
up the moisture so that I don't have to worry about the back of
my paper getting wet. It's also good for
cleaning up your hands. You will get messy.
I'm going to play around with mixing color. I love exploring new colors
and color relationships. Making my orange a little bit darker by putting some
of that pink in there. I'm also leaning towards relatively thin
application of my paint. You can absolutely paint
thicker if you want to. I like that transparent
quality that I get, especially with this
brand of acrylic. It doesn't have a very
intense viscosity, so it can go thin easily, or I can layer it up to get
a more opaque appearance. But I like that brightness of the paper coming
through my paint. I'm going to lean into that
set this one off to the side. Then I'm going to grab a couple other colors.
Grab some brown. Okay. So with my dirty brush, I'm going to pick up some brown. And actually, I'm going to
put my pink into my brown. The brown is going
to gobble it up, but it adds this
nice red tone to it. It's already a
pretty warm brown. I just makes it a little something more than what it was straight
out of the bottle. If you are wanting to do this
optional part of our class, I would absolutely lean into
having some fun seeing what colors you can create by mixing up the different acrylic colors that
you have on hand. You truly only need
a couple colors because we're working organic, we're working abstract
for our project, and who knows what else you
might use these papers for? Of the paper stuck
to it. But something really amazing could
come out of this. Whether it's for this class
or for something else. Now, I didn't wipe my table between those because I had
a paper already stuck there. That can happen, but
that's okay because I wanted to paint a few
more sheets anyway. But the pat papers will give it a really nice variation on what you might
have achieved if you used solid color paper. I'm just leaning into the
colors that I feel like using. Because I know that
orange and blue are complimentary colors
and they're going to neutralize if I
mix them together, I'm going to start with
just straight up blue with a clean brush because I want to get the
pureness of this color. Because when I go
to make my project, it's going to be really
nice to have this shock of cool color against all
those beautiful bold worms. You could also play
with more texture too. I've got this really nice
dry brush texture happening. I could lean into that, or you
can just put more paint on your brush to fill it in more. All color is a little
bit different. Although this blue
is the same brand of paint as the other
colors I've used so far, it's a little bit of a darker more opaque
color naturally. So fingerprints on
there, that's okay. That's gonna be really gorgeous
with these other colors. I think I want to
do a little bit of that blue with
some of that pink. So let's get a little
bit more pink. I already have quite a
bit of blue on my brush. The pink is the lighter color, so I'm going to add
the blue into my pink. It's gonna make a
really nice lavender. I also, as a painter, really love to do a lot of mixing on my paper
and on my canvas. Oh, yeah, that's gorgeous. So I started mixing it up a
little bit on my palette, and then I'm going to let the brush strokes
on the paper do the rest and see where
we land. It's funny. These colors that
I'm getting that I'm creating and using
and leaning into are a funny mix of
very Elisabeth colors, my favorite colors to work with, as well as some Askbes
and also some fall. So it's really funny
how the season and your mood and what colors
you initially grab, how that starts to impact what happens when
you start painting papers or playing with color. I love that. I'm going
to make some of these. Like I said, I might
not use them all, but I like to have a lot
of different options. I'm gonna lean more
into the blue. I start with that.
Grab some pink. So this should end up being
a really nice blue violet. The more pink I grab, the more leaning into violet
it's going to go. The other fun thing to do
would be to grab some white, play with lights
and darks and have a little bit more
value contrast. I'm going to lean
into the colors for now and kind of see
where things go. Let's do some blue
with that brown. Is just our final one.
So I'm going to grab some blue, pick up some brown. That's going to really cool down the brown search neutralize it. That'll be nice too
because it'll give it some coldness against all those warm the orange pink and brown the original brown. I do have some spots
for my paper just scraping through to the
white of the paper. I'm just going to be a
little bit more gentle. It's one risk when you start painting paper and
out washing your brush between that you might get some bits that start
to snag through it. Alright, put this
last one to the side. Then I'm just going to
clean up my work area and I'm going to
wash my brushes. I'm going to probably use
up this extra paint to make some more decorative papers for some other projects
in the future. But I hope that you're going
to give this one a try. Try playing around with
painting the papers and see what kind of Matisse inspired
collage comes out of that. And then you can absolutely do as much additional mixed
media into it as you want to. I love drawing back
into my collages and turning them from collage
to mixed media collage. So that's probably where
my project's going to go as I start
exploring what to do, with all these painted papers. And they are going
to dry pretty fast. This one is almost
completely dry. I mean, it is damp. Like, I can feel it through
the backside, and there's a teeny
bit of shimmer left. But your painted papers,
if you apply the paint pretty thin, should
dry pretty fast, so they won't have
to take up a lot of table area for too long, and then you'll
be able to get to creating with them
before you know it. So if you decide to
go this route for your class project or to do
an additional class project, exploring painted papers
or you just want to show off the painted
papers that you create that maybe we have a future life as an
artwork down the road, feel free to add those
to your class project. I always love seeing
what colors students play with and sharing a love for painting papers and working those
into our collages. So thanks again for
joining this class. I really appreciate it, and I hope to see you
in the next one real soon. Until next time. But
 Elisabeth Wellfare, Artist, Art Educator