Transcripts
1. Introduction: Have you ever thought about the commonalities
between nature and art? I'm sure there are many. However, patterns are a
common theme to both of them. Hello, everyone. My
name is Cheryl and I am a self taught watercolor
artist based in India. My class today is
your invitation to the perfect marriage between delicate patterns in nature on one hand and the elegance of watercolor on the other hand. In this class, we
will learn to create a watercolor painting
of a begonia leaf. As a highlight of this class, you will learn a
novel way to create the surface patterns of this
leaf using masking fluid. By the end of this class, you will have your
very own painting of a realistic yet painter leaf, begonia leaf that I hope
will make you proud. I believe that
regardless of whether you are a seasoned
artist or a beginner, this class has something
to offer to you. If you're ready,
let's get started.
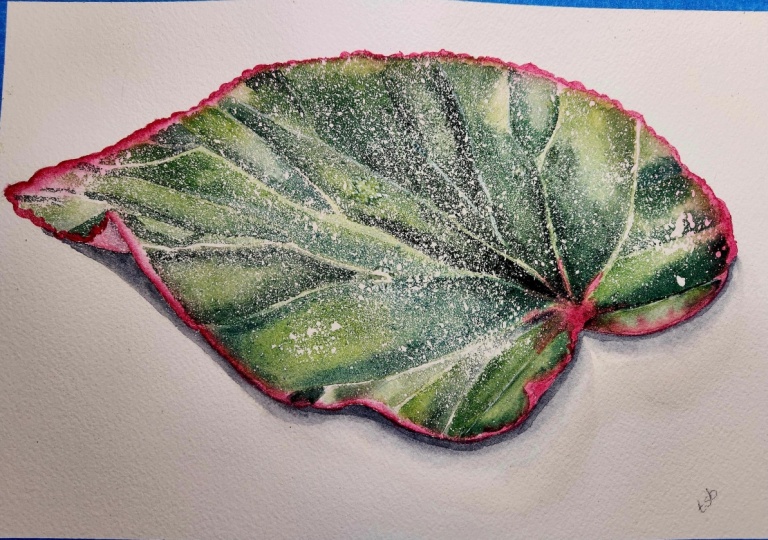
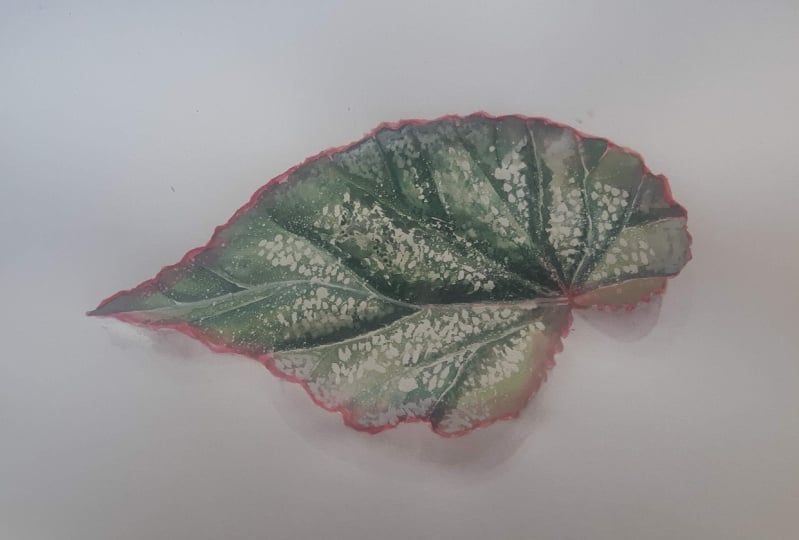
2. Class Project : For your class project, you will create your
own watercolor painting of a Begonia Rex Lee. The reference picture
I have provided, which you may use
for your painting, is of a plant leaf
from my own garden. However, you don't necessarily
need to use the reference, provided you can use any other reference
of a becconia leaf. There are many
exquisite leaf patterns found in the species that
might get you excited. A painting like this one might seem intimidating,
but do not worry. I will guide you lesson by lesson in how to
complete your project. First, we will apply the
masking fluid with a twist. I will demonstrate to
you how to do this. As you progress
through the lessons, I encourage you to upload
your progress shot. Once you're done with your work, please upload a final
shot or a scan of your work to the section
below titled, My Projects. Now let us proceed
to the lessons and I can't wait to
see what you create.
3. Materials: I have with me watercolor paper. And this is in the form
of a watercolor block, which means that
the edges are glued down together so that it
does not buckle underwater. But if you do not have
a watercolor block, you could also use
loose sheets of paper and secure it yourself. And fix it yourself with a masking tape onto
a heart surface. This is 100% cotton
paper by saunders. It's compressed and
that means it has some tucture on the surface
which is useful for us. The weight of the
paper that I'm using is 300 grams/meter square. The dimensions are
12 " times 9 ". But you could also
use a different dimensions if you prefer to draw and paint a
larger or smaller leaf than the one that I'm doing, pencil and needable eraser, we'll need artist masking fluid and a toothbrush for spraying the masking
fluid onto our paper. It's also useful to
have a cement pick up to remove the masking fluid
at the end of the painting, I have with me two watercolor
brushes and these are size size two synthetic round
brushes with a pointed tip. You don't need to.
It's sufficient if you have a large brush with a good tip with four
shades of water color. These are by Winsor and
Newton Professionals. The colors that I have, a bismuth yellow, which
is a cool yellow. You could also use lemon yellow instead of it if
you don't have the shade. Next, I have rose madder, and this is a pinkish red. You could also use
any other pink or red that is
available with you. There are two shades
of blue with me. One is paints gray
which is a bluish gray. It has a very dark tonal value. It is sulfl for us to increase the paints that we'll be using on our leave to
create shadow areas. The other one we have
is French ultramarine, which is a pigment that is available in any watercolor
palette that you might buy. I believe every palette would have some ultramarine in it. It's a granulating watercolor, which means that it gives us a very nice texture
once it's dry. I have with me artist gas, the color is titanium white. This is also helpful
for us to create patterns towards the
end of the painting, on the surface of the lean. We'll also need two clean
containers of water. One is for rinsing of our
brushes between colors. The second one is for applying clean coats of
water on the paper. It's also useful to
have a mixing palette, especially for mixing our
greens for our painting today.
4. Drawing: To get started, I freehand
the drawing of the leaf. This is a fairly easy drawing. The way I do it is that I
first draw the mid vein, and then both half of the
leaves on either side of it. It helps to think
of each half of the leaf as a water drop shape. If I get the lines
incorrect at some places, I lift the graphite up with my nediable eraser and
I redraw the lines. It's important to
use table eraser on watercolor paper
because the regular era, if you rub the surface
of the paper with it, the regular eraser ruins
the fabric of the paper. This is not something we want. Now, I proceed to draw more of the veins that come out from the central vein
or the mid vein. I observe the pattern closely before drawing them
on my sheet of paper. If you feel that this
drawing is hard for you, what you could alternatively
do is trace out. I have a video lesson on
how to trace out drawings given in my other
skillshare class, which is on painting a
stag in watercolors. There are a few different
ways to trace out a drawing. You could either use
a tracing paper, you could even use a
light board for that. Another thing you
could do is that you could first draw a
rough drawing on a scrap piece of paper before drawing it
on the watercolor sheet. This gives you the practice you need to make a good drawing. The drawing of our leaf does
not need to be very soft. It's okay if you have
some very visible lines on your watercolor sheet. That's because the veins run on the leaf is where we'll paint
the darkest areas anyway. So this would be hidden by the dark layers of water color.
5. Painting the Leaf Borders: Welcome back. I have my paint
and paint brushes ready. Now, along with my
mixing palette, the shade I'm going to
use is rose matter. You could alternatively use any red or pink that's
available with you. And I also have a clean
container of water with me. To start, I read the entire area of the paper inside the
borders of the leaf. I read the entire area
inside the leaf with water. Like so, I have sped
up the video a bit, but you could take
your time doing this. This is a step where you
have to thoroughly wet the paper, but at the same time, make sure that you have
no puddles of water anywhere because that's
not something we want. If you have any puddles,
you could lift it off with a tissue paper and go over it with a
light place of water. Again, I take some of my roster shade onto the tip of my
brush. This is size. Till now, I needed
a smaller brush to do the intricate
patterns at the borders. I draw these curvy lines. I do not draw a straight
line because as you can see at the borders of the leaf, we have this texture and pattern where the leaf
goes up and down like a wave. That's what I'm trying to
capture with my wavy lines. I'm not drawing a straight line, I just do this also at the base of the leaf where
it attaches to the stem. I have left some pink shade. That's because I can see some pink at that
part of the leaf. Now my entire border is
covered with the pink shade. And I've drawn these
wavy lines go over it again to darken the shades a bit because I felt
like it was too subtle, far lighter than I
wanted it to be. Darken it a bit. Also on
the left side of the leaf, I can see that there's some
light coming from behind it, which illuminates
it from behind. It appears a bit glowing. I'll try to capture that as
well on the left hand side, but for now I put more pigment
at the base of the leaf. Then I proceed to the left of the leaf to soften some lines
that might have been hard. Now I lock in that transparent part of the leaf that I can
see on the left side. This is all for this part. Let this dry completely, and then we'll meet for
the next lesson where we'll apply the masking
to it. Goodbye.
6. Masking Fluid: Now I have with me my masking
fluid under toothbrush. Now that my underlying
layer is completely dry, I'm going to dip my toothbrush into my masking fluid and fl masking fluid onto
the paper after dubbing any excess of
from my toothbrush. This is how you flick masking
fluid onto the paper. If you're not very
confident that this step, you could try it first
on a spare piece of paper before going on
your actual painting. I have my masking fluid
on my toothbrush. Now here's where I pl
onto the sheet of paper. As you can see, it creates a lot of splatters much more than you'd
get from a pain brush. It's a very dense splatter that you get from a toothbrush. That's how the masking fluid helps us preserve the
patterns on the leave. This is going to get
your hands dirty. You could easily remove the masking fluid after you've applied it
and wash your hands. Don't worry about it, it's fine. No big deal. You could continue
doing this and flicking more masking fluid onto
your paper for as long as you need to get a sufficient number of
splatters on your leave. You have to judge that for yourself by looking
at your paper, whether you had
sufficient spots on your leaf to capture the
idea of a agonia leave. I need more, I think
go in one last time, another round of splatter. It helps to see a
paper from an angle to see where the masking fluid is there versus where it's not. If you have a white
colored masking fluid, some masking fluids are tinted. But minus not, I see it at an angle to see where I've
got the spots and where I haven't because there it shines after this
dries completely. We'll see each other in
the next part. Goodbye.
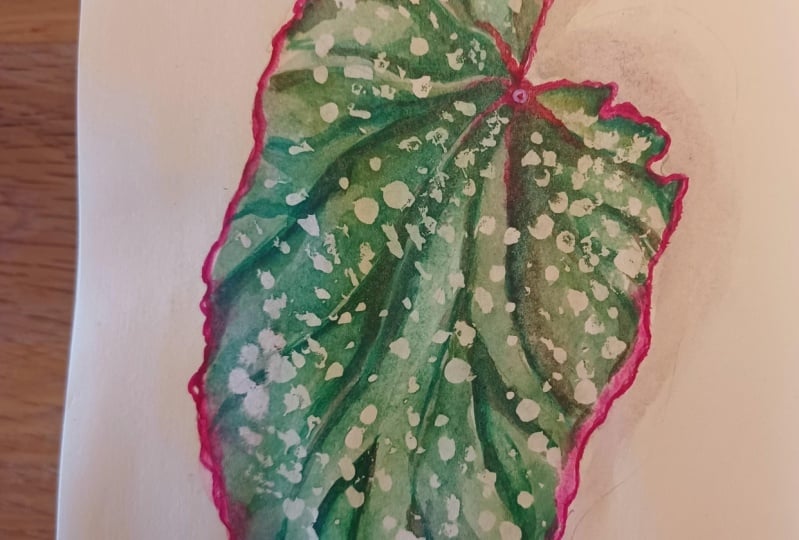
7. Leaf First Layer: Now, my masking fluid
is dry completely. I just left it alone
for around 1 hour. It takes time for
masking fluid to dry and it's important
to wait till then. But once it's dry, we go in with the French Altra Marine and the bismathyellow onto
this painting to paint the darkest areas of the
paper where the shadows are. I have my French
Altra Marine and both yellow and mixing green, something you could do
using yellow and blue. And that's what I'm
going to do here. I'm going to mix a lighter
green and a darker green. For my lighter green, I have lesser amount
of ultramarine blue. For the darker green, there's
more ultramarine blue. The lighter green also has
more besmath yellow in it. Whereas the darker
green will have lesser bsmath yellow
in it. More yellow. The brighter the green, more
blue, the darker the green. I take my bsmothyellow
and mix it in. Now there I have a natural looking green color and now makes the darker
green in the next. Well, I think this is not dark enough, the darker ones, so I'm going to put some more ultra marine in it to increase the total value. That's about right,
and it's too dry, just mix some water into it. We don't want watery mix. We want a creamy mix
of these two colors. They won't move too much on the paper when we wet the paper, but also won't leave hard lines
because we're going to do this wet into the areas of
a leaf that I'm looking at. So I study it for some time before laying down
my green wet on dry. I would recommend that for this lesson and all
the following lessons, you watch the entire lesson completely before attempting
it on your own painting. And carefully observe what I'm doing before
doing it yourself. What I'm doing here is that I'm laying down my greens at
the place where I see the shadow and I'm softening the edges on
the interior of the leaf. The way to do it is that
I dip my brush in water, then dab it on the
tissue paper and then run along the border, the hard border of the
paint, once again, clean on the tissue paper
to remove the excess water. And it's very important
to dab it on the tissue, Then go in with your damp
brush to soften the edges, dab it on tissue,
soften the edges. I think I also see some dark areas on
the lower right side. That's where I next start
to walk in my colors. Once again, I soften the edges around this color
because I don't want to hard edge smark
at the center of the leaf go in with some more dark green. And that's how we do it. Now this first layer
is done and we'll wait for this to dry
completely before we return. See you in the next
lesson. Goodbye.
8. Leaf Second Layer: Welcome back. Now this is
completely dry and we are going to prepare some
mixes of paints. And the green that we
created in the last part, or you could mix
more green using French ultramarine
and bsmoth yellow. We are going to use
this mix to paint the leave we go
section by section. Now I start with the top
left section of the leave. These sections are
separated by the veins. I paint sections but
not adjacent ones. That's because I don't want the color bleeding from one
section to the other. Violet still wet. I
painted a section, then painted another, which has no borders in common with
the previous section. Now you can observe the leaf closely and see where the darks are and where the lights are and lay your colors
down accordingly. Wherever you see the light, lay down, your light green. Wherever you see the lay down a mix of your
dark green and paint or just paint or
even just the dark green. We do this for the whole
leaf section by section, making sure that we do not paint adjacent sections until
those are completely dry. I continue in this process, observing my leaf each time to make sure that I'm laying down the darks and lights
where they ought to be. The way to do this,
as you can see, is to first wet the entire section with clear water and then go
in with your paints, because otherwise
you'll have hard lines within sections and that's not something we are going for. If you feel like you have laid down excess
pigment somewhere, then you can clear
it out like so. Make a clean drum
brush by dipping it in clean water and
thoroughly rinsing it first, then dabbing it onto
the tissue paper. And that's your
clean drum brush. And with the damp brush, you lift off the excess color. Once again, where I
see the dark grains, I put in the dark shades. And where I see the
lighter grains, I put in my lighter grain depending on what I see
on the reference picture. Okay, so now the left hand top
section is completely dry, so I start painting
the adjacent sections to the ones that I
already painted. And because it's dry, the colors won't bleed. And this gives us a good look of sections on the leaf
separated by rains. I continue to do this
to all the sections once I know that the ones adjacent to it are
completely dry. If something is not dry, I wait for it to dry before
going in with my paints. Also, it's important
to remember that we have masking fluid underneath
the layer of paint. If you want to dry, do not use the blow dryer
because that would cause masking fluid to become like a gum and stick to your paper and it would
not come off later on. Do not blow dry your paper
when you have muscling fluid. If you don't have
muscling fluid, you could blow dry
your paper between layers to speeden up
the drying process. My second layer is nearly
done now and I'll wait for this to dry completely before
returning to my painting. See you in the next lesson. Goodbye.
9. Leaf Third Layer: In this lesson, we are
going to do our third layer of greens over the sleeve. All we're going to do
is that we are going to dark in any areas
that should be, and that's about it. We are going to soften any hard lines that we create in this process with a
clean, damp brush. Dip it in clear water, then dub it on tissue paper, and then soften the edge
with that damp brush. I do it bit by bit
for all segments, making sure I leave
some white lines where I like the veins
to show distinctly. Because this gives a nice
look to the painting. At this point, we can see
that our painting is coming together and it's beginning to look more and more
like a real leaf. Even though we still
have our masking fluid, we have yet to remove that. Going in directly with paints gray where I want
the darkest areas of the leaf because this is the
darkest color on my palette, with the largest tunalolu. This is how you paint
in watercolors. You built your colors
layer by layer. And the underlying layers,
once they are dry, look much lighter than when
you had put them down. That's because they absorb into the cotton paper
that we are using. They settled into the
curvices of the paper that gives a lighter
shade than when we started for the places
where the leaves fold. As I can see on the
reference picture, I just had a dark mix of rose marder over
there. Like you can see. I'm nearly done for this part. I feel just starting some more paints for at certain places where
there needs to be roccochetsI'mene I'm going to wait for this to dry completely. In the next part, we will paint the shadow of the leaf and we'll keep this subtle in our painting today.
See you next time.
10. Shadow of the Leaf: In this lesson, we are going to paint the shadow of the leaf. To start, I draw the outline within which
I'd like the shadow to be. This I feel is important to do because whenever
I do not do this, I tend to go overboard
with the shadows. Next, I go in with
my cement pickup and I remove any masking
fluid that might have splattered outside my leaf onto my shadow area because I do not want spots on my shadow area. Of course, dark on these lines. I'm going to erase them later. I'll demonstrate a shadow
that I'll make with just rose der and a mix of
pins gray with rose der. Make this and then
I soften the edges. The way you soften the edges is that you take a clean arm. Clean arm brush is a brush which you have dipped
in clear water, then dubbed on a tissue paper, and with that you soften
the edges of the shadow. Do this for other half
segment of the leaf as well, draw the shadow, put
in some more pigment, then soften the edges. In my final project, I have a much darker shadow
that I drew later on. I could not capture
that on the camera, but the process is the same, except that instead of Rose, do you use paints
gray for the shadow? And that gives a
much darker shadow if you like it in that style. The shadow is also optional. Most botanical illustrations
that I've seen do not draw a shadow at all,
depending on your taste. You could decide
to skip this part. It's up to you now, I'm done with the shadow, and once this is completely dry, we'll meet again in
the next goodbye.
11. Finishing Touches: All right, this is
the very last part of our class and we are going to remove the masking fluid First, you need to make sure
that when you do this paper and the shadow we painted in the last
lesson needs to be completely dry when you're
removing your masking fluid. Because if there's
even a little bit of moisture on your paper,
it will get torn. As you try to remove
the masking fluid, make sure it's dry. The luminescent texture
underneath the leaf comes to the fourth as we remove our masking
fluid like so. This is a process
that takes some time. And it's important to be patient because being in a
hurry and trying to remove the muscling fluid
in a hurry could cause damage to your paper.
Take your time. Sped up the video quite a bit. I did not actually
remove it that fast. Feel with my hands to see
if it's completely off and anywhere that I can feel the muscling fluid both
inside and outside the paper. I remove it with
my cement pick up. I add some finishing touches, for which first I get
some rose mudder. And I go over the edges
of the leaf wherever I've lost the color of
rose muder on the borders. Next I see that some
of the veins inside the leaf have a
pink issue to it. And I add the rose muder
colors over there. I use my paint brush wet on dry and almost like a colored
pencil in this part where I'm just drawing the veins in rose der I also intensify
some of the colors. If you try to do this, this will cause you
to lose some of the underlying
luminescent spots. But you could get that back
using guash like I do. I just felt the need
to do this part. The leaf didn't look
dark enough at places. I darkened it after
removing the masking fluid. But preferably, you
would have done this before removing
the masking fluid. You don't need to do this. Again, with my white wash, I make some more spots, and these are good to complement the transparent
spots that are beneath it. Some spots look opaque, whereas others are transparent. And this gives us a nice look. Add some of the
finishing details. I could feel some more masking
fluid outside the leaves, so I go ahead and
remove that as well. I then erase the line that I had drawn in
pencil for the shadow. It's okay to use
a regular eraser now because we are not going
to paint over this anymore, even if it damages
the fiber a bit. That's fine. I dust off any excess masking fluid using
a bone dry brush remove, anywhere that I can find the
masking fluid still there. That's it for our
painting today. I hope you enjoyed this
and you're proud of the final piece that you've
created. I'm proud of mine. I'm going to put my
signature beneath this. You could also feel free to
sign your painting if you'd like to get into this habit
of putting your signature. Goodbye. See you next time.
12. Conclusion: Congratulations with
your artistic vision. You have captured a begonias
beauty in watercolors. As a final step, please
do not forget to upload a scan or a photo of your work to the
project gallery below. This helps me, as well
as your fellow students, take a look at your work and provide feedback
if you ask for it. If you struggle with any part of the course or have questions, feel free to start a
discussion below or to ask my help by mentioning
it in your project upload. I will take a look at every project uploaded
while you're here. Please also leave a review for my class. This really helps me. Also, do not forget
to follow me here, as well as on my Youtube and
Instagram pages to keep up with all the watercolor
ideas that I come up with. I hope you enjoyed yourself in my class and see you next time. Take care.
 Sheryl Mathew, A Physicist with a Watercolor Streak