Transcripts
1. Introduction : Welcome to this class on
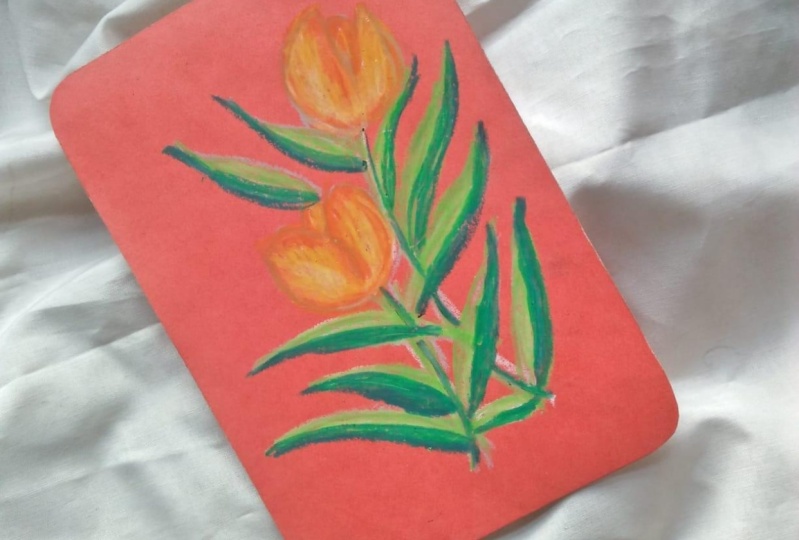
EC2 lips with file-based. In this class, you will learn to draw these three
beautiful tulips. I will show you how I approach drawing this tulips
in real time. We will start with understanding the basic
safe lab at your lip, then cholesterol
used for the tulips. And finally, drawing this
two lips in real time. So if you are interested
in drawing this EC2 lifts, join me in this class.
2. Class project : For the class project, I would like you to drop
any of these three tulips.
3. Supplies : For this class, you will
need a cardboard to tape. The paper must be
paid for securing the paper pad cell and
emigration for sketching. For blending the colors. I'm using pastel paper for
the painting. Ilp stills.
4. Sketching: Sketching that your lip,
I'm starting with drawing a simple cup safe with pencil. Then I'll be using a black pen. Define the petals of the flower. Going in with the paint to
add the petals of the flower. Generally tulips
have six meters. I'll be drawing three
petals in the front. And that is the petal behind
this three main petals. For the desktop, the class, I'll be sketching
the same tulip. I'll be making some
tweaks here and there, but I'll be using the same
tulip. That's for the leaves. I'll be adding two
to three leaves. You can add more if you like. I mean, by paintings,
I'll be wearing the side. These are the two
lips and the leaves.
5. Red and white tulip : For this first painting, I'm starting with white to draw the guideline for
the tulip lover. Getting that neoliberal,
I'll be adding the stem and I'll be
sketching the leaves. I am starting with that and filling the
center of the petal, leaving some space
where I'll be adding white building scene for
that instead of that vitals. Now I'm going in with
white me of the edges of the petal beside the
center of the petal during the scene for
the rest of the petals. Now for the center of the petal, I'm applying light lightly. Going in with the right again, don't define outputs
of the petals. I think some more
white on top of that. For the bottom
part of the tulip, I'm adding some purple on top of that part,
but I'll be adding mouth, what does
stems and the leaves. I'll be using sap green, dark green, and light green. To add saddles. I'll be using black and what the blending
all these colors, I'll be using light green.
6. Yellow tulip : For this yellow TO lips, I'm starting with this getting out that your lip. My pencil. Now for coloring the tulip, I am starting with
light yellow to define the outline of the tulip. Using a seem like yellow to color the top and the bottom of the petals while leaving the center of the
petals and touched, following the same steps
for the second petal. Now defining the
outlines of the rest of the petals that are
behind this main petals. Failing in the weekend
space that are left behind with a deep yellow. You think your tip to blend a light yellow with
a deep yellow. Now I'm going to define the outer radius
of that your lip. Using Q-tip to blend the red with a yellow by
applying light pressure. Domain that tulip more vibrant, I'm adding more yellow
on top of their head. Now let's add the stems and
the leaves to the tulip. For this, I'll be
using deep green. With yellow. I'm sketching the
guidelines for the leaves. I am using yellow to represent a brighter
section of the leaves. Now adding light green on top of that deep green
for the stems. The leaves. I'm going
in with a deep green. For the desktop, the painting, I'll be using light green to blend the deep green
and photo saddles. I'll be using black. Now I'm blending
the black wood that SAW using light green. The next part is optional. I'll be using dark pink to add
background for the flower.
7. Blue tulips : For this bloat, your
lips are the following, the same steps as I did earlier. I'll be starting
with the sketching the main shape of that ellipse. In this case, I'll
be drawing 32 lips. For the ellipse, I'll
be using three colors. Light blue, dark blue, and white, and a little
bit of deep pink. And that's what the leaves,
I'll be using yellow, light green, and dark
shadows on the leaves. I'm using black eye to blend all that collects
on the leaves. I'm using light green. We do it in real time so
you can follow along.
8. Conclusion and thank you : Thank you for enrolling
in this class. I hope you learned
something new. If you have any questions, ask me in the
discussion section. And if you have drawn
any of these paintings, please upload it in
the project section. And that's for additional idea. You can attempt any
of these paintings. If you enjoyed this class, please leave a
review. Thank you.
 Vishal Munshi