Transcripts
1. Introduction: My name is Mil Sligas. I am a senior Trey
environment artist, and I will be your
instructor in this course. In this course, I
will teach you how to create easy foliage for games. This means that this course is focused on teaching you quick and efficient ways to create foliage for
your environment. All of our foliage will be
created using Speed and Maya, and we will render everything
using Unreal Engine five. Please note that you can also
use Blender or tree as Max for this course instead of
Maya. So what will you learn? You will learn how to create
various types of foliage, everything from
trees to swaps to plants to ivy to grass,
just like you see here. Next to this, you will
also learn how to create custom leaf and branch
textures using photogram try. And finally, we will also
have some bonus chapters included that will show you how to design levels
using your foliage. One thing I should
mention is that due to this tutorial being
recorded in winter, most textures that we will use come from quick
or mega scans. Also, please note that although we will be using
the tunnel scene and lake house scene
that you see here as an example on how
to use your foliage, these scenes are not included
in the source files. Your source files
will, of course, include all the save
files and textures and an Unreal engine five project
with all of your foliage. You will also need to import some specific mega scan textures when you first load
up your scene. However, we will explain how
to do this in the tutorial. This tutorial is completely
done in real time, except for the bonus
chapters at the end. And with a total of 11 plus
hours of video content, I feel confident that at
the end of this course, you will have to know on how to create various types
of foliage for games. This course will come with out generated subtitles in English, Chinese, Russian, and Spanish. I hope that you will
enjoy this course, and I hope that it will have a positive impact on your life.
2. 01 Project Explanation: Hello, for and welcome to the very first chapter on how to create easy
foliage for games. So in this chapter,
I just wanted to quickly go over a few things before we actually
really dive in and start creating
this tutorial. Now, first of all, I have this nice little
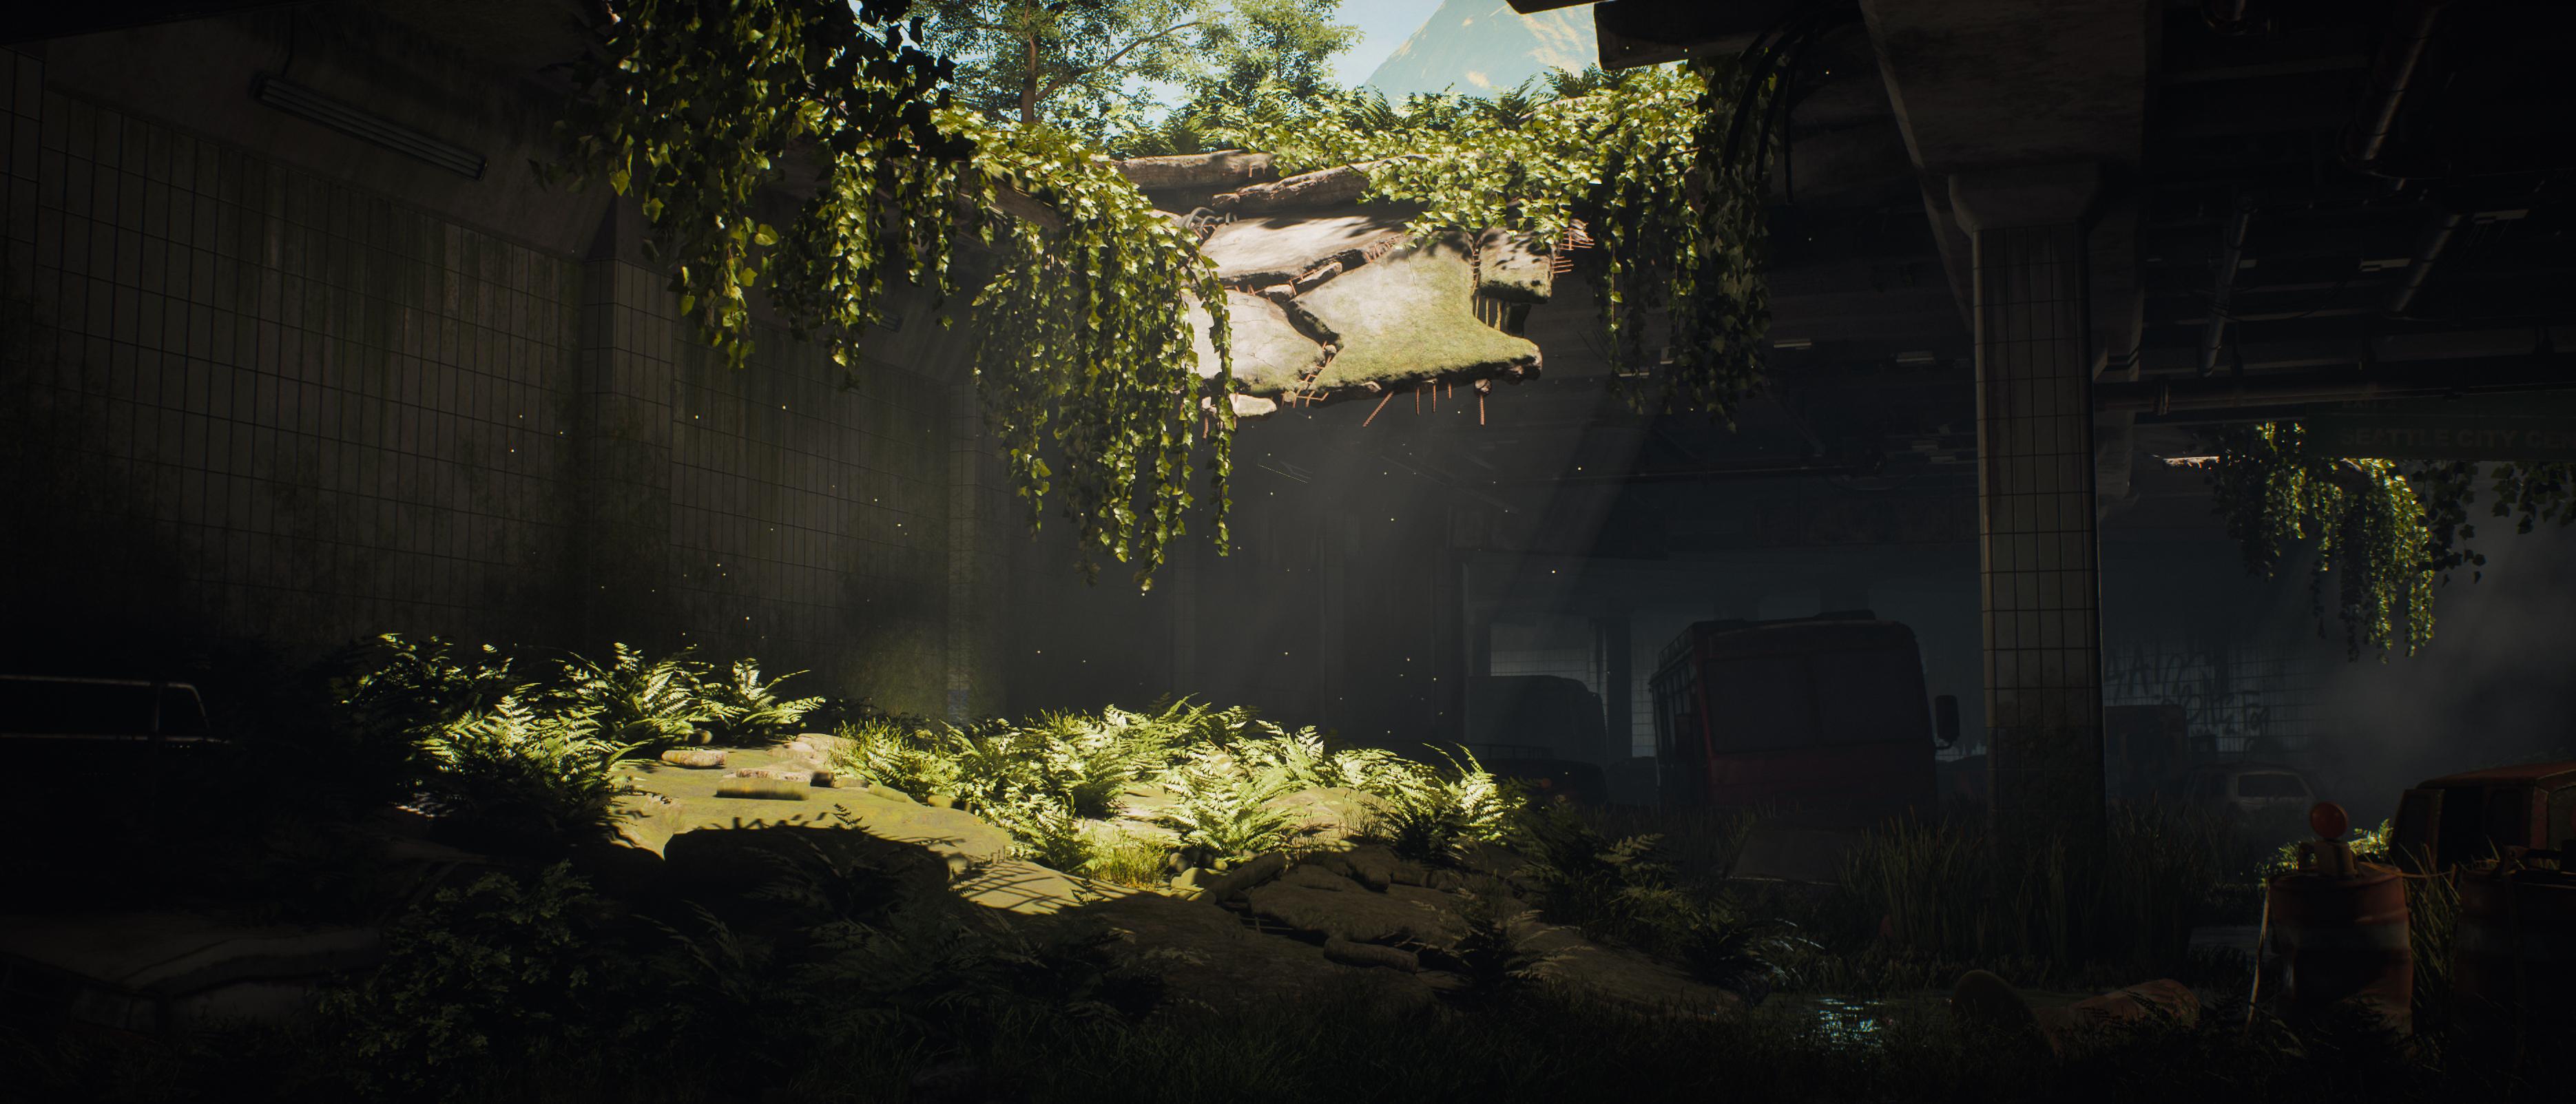
scene over here, and this will be
our preview scene. Right now it looks really empty. It does look cool
if I say so myself, but I made it, so I
might be a bit biased. So yeah, it does look cool, but it is definitely
missing something. And what we are
going to go and do is we are going to try and get something more
in this direction. I want to actually make it even better than the
foliage you see here. So in this course,
we will focus on ivy on different types of grass, different types of water
plants, types of bushes, trees, and we will also
create custom leaf textures. Now, there's a few
important things that you need to know before
starting this course. So here you can see just like
how the scene will work. So we will get started with
the IV in the next course. One very important thing
is that unfortunately, because I made this
scene for my company, I'm not actually allowed to
give this scene to you guys, or at least in
terms of copyright, I am not able to give
this scene to you guys. However, we will, of course, have an unreal engine scene that has all of the
texts included. Sorry, texts, all of the foliage included into a
presentation scene that we will also be
creating in this course. Now for the textures, that one is a little bit tricky. We will have a chapter where
I will show you how to create custom leaf textures
using photogrammetry. That is pretty much the
only way that I know how to do it at a high quality. I know that there
are some people in more advanced
tutorials that use, for example, sculpting of
the actual leaf textures. I am planning on making a
course like this later on. But for now, this
is easy foliage, so I need to keep it easy. The problem with
this is that I am recording this during winter. And even if it was not winter, I probably would not be able to find every single leaf I want outside because I live in quite a monotone area
in terms of nature. So this means that we will
be using mega scans and texts.com to grade or to use for our leaf
and bark textures. Now, this is completely
free because mega Scans is owned by Epic, so it comes literally built in. You can find it down here. It comes literally built in
with Unreal Engine five. And text com is also
copyright free. Unfortunately, although I am allowed to use the
textures that come texts, any textures I use
from mega scans, I am not allowed to
supply with you. So in the next
chapter, I believe, we will be going over on downloading some of
our foliage textures. And when we do that, there will be an explanation on how you can get the textures
back in your scene. Because when you first
open up this scene, well, not this one, but
the previous scene, you will most likely get
an error saying that there are some textures missing because I'm not
allowed to spl them, but I will show you
a way on how to actually add them back in. Now, that was about it for my explanation so that
you know where we stand. This tutorial will be focusing completely
on how to create the actual foliage nicely optimized and also a
little bit of placement, how to place it inside
of Unreal engine and how to properly have
all the material set up. Although material
setup is super easy because mega scans pretty
much does it for you. What I'm going to
do now is I got a bit of reference over
here that I gathered. Once again, copyright. You will get used
to it as an artist, but copyright can
sometimes be quite annoying because once
again, these images, even though they
come from Google, I am not allowed to supply
them with this tutorial. However, I have a
very nice workaround, and that is that if we use
a program called PUR Rv, and I'm just opening
it up right now, PureRef is a really awesome
program that allows you to neatly preview all of
your images in one go. It is very common
to use for artists, so I definitely
recommend getting it. You can just go to Google
and just type in Pure Rv. And what I'm going to do is, I'm just going to go ahead
and grab all of these images, and I'm going to nicely
import all of them like this. And then when you use your scroll wheel,
you can zoom out. You can click Go to
images and then go to normalize and then set this
to scale, what's it size? I think it was size
normalize size over here. And then I can once again, right click Image range
optimal there we go. So now we have, just
a nice preview. So as you can see, I just
gather a few images. Now, I have a little list over here of the stuff
I want to create. I want to create a
few different types of ivy that show
different techniques. I want to create ivy
roots, which is a decal. I want to create some
different types of grass, some different types
of water grass. And when I say water
grass, I mean this stuff. And this kind of stuff. Yeah, actually, I
should show you. The ivy, it will be mostly ivy like this that you
can see over here, it is hanging down with gravity. But I got a bunch of
different examples. For the roots, it will
be roots like over here. Let's see. The
grass, normal grass. Ironically, I don't have
normal grass in here, but normal grass is so basic that I don't need a
reference for it. I guess you can see this one. Water grass. We will
have a few ones. So we will have
plain water grass, then we will have very
tall water grass, which is stuff that
you can see over here. And then what I also
want to do is I also want to do some
water grass with some cat tails or whatever it
is called in your country. So I believe in English, they call them cat
tails over here. So we want to just
create some of these, which once again show you how to combine because we
will be using Spettry, of course, if you
haven't seen the trailer or the description. But what I want to do is I
want to go ahead and I want to combine inside of speech, read the procedural stuff along with actually
custom measures. So that's going
to be quite nice. Lily pads are quite a
classic one over here. I also want to create some
flowers to go with it. So that is going to be quite cool because it will
just add something. Bushes, as you can
see over here, it will not be too special. You can also see it over here, like these bushes over here, and I also want like
a few at the top. And a simple tree,
which once again, I don't really need
a reference for now, because it's just going
to be very basic. And we are going to create a custom leaf
material, of course. So that is pretty
much our planning. Now, if you look at the scene, you can see that it
is a collapsed tunnel and it has some water. So that's why I want to
also add some water plants because then we get the
best of three worlds. We get both, like of course, the scene where
nature takes over. So we are combining
urban with nature. We get something that has to
do with like water foliage. We get something that has
to do with hang foliage and like creeping foliage,
so ivy and everything. And then what we will also do is later on here at the top, we will add stuff like grass, extra bushes and trees
and everything like that. So it is all going
to be very cool, and we will end up with
a really nice scene. So this is now all ready to go. I will go ahead and I will
save this for you guys. So save us. And I will call this reference, and it will be in your
reference folder. There you go. Okay, perfect. So in the next chapter, we will go ahead and we
will do some actual work, which is going to be
starting by creating our IV, so that's going to be a
very interesting one. So let's go ahead and continue with this in our next chapter.
3. 02 Collecting All Our Textures: Okay, so now that we know what we are going
to be creating, what I want to do next is
I want to go ahead and start by actually importing
all of our textures. So what I will do is in
this folder over here, let's go ahead and
let's right click. Actually, yeah, let's do
it in the text folder. Right click, and I'm just
going to go ahead and create a new text document
for you guys and call this mega scans
Import OnCore list. And the reason I'm doing this is because as I said in
the last chapter, I am not able to give you guys any mega Scan textures with the project files because that would go against
their copyright. However, what I am
able to do is I am able to literally show you
where you can find them, and I am able to still keep the project intact
when I send it to you, so that all you
need to do is you need to import mega scans, and then as soon as you restart the engine after you've
imported everything, it will actually
just automatically register that the
texts are now there, and then it will apply them to our foliage that we
are going to create. Now, I am using Unreal Engine 51 thing you should
keep in mind, if you are still using
Unreal Engine four, unless you have the plug in, you do not have mega
scans built in, but you can always
go to quicks.com slash Mega Scans and in here, you can also go and find it. I can go to I believe it is
in Atlas's over here, see? And you have so many
textures in here. So if you want to find textures, you can find a lot
of them in here. And we will probably be using Meg scans
for the most part. If you cannot find something, your second backup
to Ty is to go to your texts.com or
to go totext com, and then go ahead and go down to Tweedy Scans Atlas over here. And in here, you can also
find a lot of leaf textures, and as you can see yeah, we can go in here
and we can just find a bunch of stuff
like here in leaves. So this is another
way that you can find a lot of these textures.
So that's really good. But the cool thing is
that I will also actually show you how to create
these textures, but that will come later because we will be creating
those for our tree. So right now we will still
just focus on doing it here. Now because Quik or mega
scans is owned by Unreal, in the new UnreelEngine five,
it is actually built in. You can actually
go down to Content and go to your Quixaw Bridge. However, Unreal Engine
five is currently still in its Beta or
Alpha, I think Beta. What that means in this
case is that unfortunately, not all of the mega scans are actually included
inside of the bridge. And it happens to be
that the ones that are not included are the actual
atlases that we need. So that is a little
bit annoying. So it means that we need
to go ahead and we need to basically get them
via the website. But that's no problem. That just means that we need to set up. We will create a
custom tall for it. It's totally fine. So let's just go ahead and
let's get started by actually gathering
all of these textures. And to do this, let's go into our
texts folder and let's create a folder
called mega scans. Over here so that I can keep it organized so that I know
which ones to remove. I just need to go ahead and
I need to sign into quick so what you can do with
your Unreal engine account. And now what we can do is we can just go ahead and
go down our list. So we need iv. Let's go ahead and go
into Quixmegascans, atlases, and ivy are vines. So if we go ahead
and go in here, you can see that you have a
lot of different options. Now, the branches we are going
to create in a custom way, so we only need the leaves in this case. So we have this one. This one is looking pretty good. I can see that I've already
downloaded it before, but I always like to just go
ahead and do a quick scroll through just to make sure that
I'm happy with my choice. Now, I can see over
here that there aren't actually a
lot of vines here. So what I like to do when
I don't have a lot of options is so we have
this one over here. I can just keep that in mind. But then I also like to go
ahead and go over here to text.com and just
have a look here. So right now, these are, okay, so these are probably
the ivy leaves that we want. Yes, so let's see. So we can choose if I have
a look at this. It would probably be between
this one and this one. Hmm. To be honest, I think I like this one more just because it is a little bit more uniform. So there's less chance that we go in like a
long way over here. But yeah, let's do that. Let's grab this one
from Texture Come. Texture Come is also,
again, it's really nice, so you can just go ahead
and create an account, and then you can purchase
like ten credits, I believe, per day, ten
or 15 credits per day. So over here, you can see that you do need
premium for, like, the higher levels, but we
only need like a 512 by 512. So I can go ahead and I can
just simply press Download. And I want to go
ahead and download. Let me first of all, create
a folder, textis.com. And in here, I
will make a folder called IV underscore 01. So we want to have our
base Color over here. I want to download
my normal map. I do not need to download my roughness because it is
not really that needed. I want to download my Alpha map. And now for our translucency, that one is a little bit tricky. The reason it is tricky
is because right now, UnreelEngine five with
its new shadow mode does not accept translucency. So I just need to quickly look over here into my
project settings. So if you are using virtual shadows in
Unreal engine five, subsurface scattering, which is basically what
translucency is for, it is not able to do that. So yes. So shadow mode. Okay, so this is good. I have to shadow map so that's fine. So we can use translucency. If you are using
virtual shadow maps, although they look nicer, for foliage, it's quite bad
because you are not able to use translucency and that
just does not look as nice. So if you will be
using this one, I would recommend just
switching it back to shadow maps for now if you are making a very
foliage heavy C. So this just means that I just need to go ahead and
I need to go in here, and I will also get
this one. Here we go. Okay, so that's totally fine. Now, Ivy also needs roots. Although we are going to
make the roots ourselves, what we can do is
we can go at it. We can have a look at some bark. Although I just want to quickly have a look at
branches over here. Oh, those are not the type of
branches I was hoping for. I was hoping to get just like
wood or anything like that. Let's see, T D scans. These are three scans material. I want to have like
three D scan atlas. Wood ends, no. I was hoping to get some wood, and else we will just need to
go ahead and do it by hand, which I guess it's not
that bad to do it by hand. It's just a little bit
more time consuming. Tabris, maybe it's in here. Yeah, basically, just like the kind of stuff that
I was looking for, like a stick, that would
work pretty decently, but I don't think it's going to. Okay, so don't worry about that. We will just do it by
hand. That is no problem. So Ivy is sorted out, except for that
we need some bark so I can just go
ahead and go in here. And let's go into our mega scans and I want to go surface. And then boot. And then there should be park here
or is it somewhere else? You can also go ahead
and if you want, you can also type in park, and then you should be able
to find, there you go. So we just want to
have very simple one. Like this tree bark over
here, it's totally fine. Now, you can choose
your resolution. I'm not going to go for eight K. I'm going to go for,
like, two K resolution, and I'm just going
to download this. And then it will just
have a zip file, and when you open it up, it will showcase over here, your albedo, which I want, and I want to have my normal and want to have my roughness. Those are the only
three I need. So I can just go ahead
in the mega scans. Bark. And this is just
for those branches that are in between of our ivy. Okay, so that one is solid. The next stop is grass. So that is quite
an important one. So let's just go ahead. And for the grass, we have some normal
grass which I will get, but we also have some taller grass that you can
see over here. So I want to see if I can find, multiple different
types of grass. I can remember that megakans
is really good with grass. So let's just go ahead
and have a look here. Grass Ah, see, here. This one actually looks a lot like what we have over here,
so that's pretty good. So I will call you
here's a download, and I will call you a tall, water, grass underscore 01, just in case we
want to have more. So that's what this one will be. Oh, and I almost forgot that I'm forgetting to add this to my text document. So
sorry about that. Let me just quickly,
very quickly drill it. The IV, I will actually leave in because I'm
allowed to use it. So all I need to do is I'm
just going to go ahead. And the way that you
will see this is I will do this, bark, and then I will do tall
water grass underscore 01. And behind that, you
will basically see this. If I right click on this, what I can do, or
do I have my ID? No, I can right click, and I should be able to
copy the Link address. Let me just quickly check.
Yes. Okay, so that works. So I can just go ahead and
I can just basically add a link behind this,
just like that. And I can do the
same for the bark. However, I will first of all, apply this grass to my
folder. So let's open it up. And I'm going to for
this kind of stuff, I'm going to have the albino, normal opacity and
the translucency. And the roughness we will
build inside of our shado. So, although, yeah,
you know what? Let's add the roughness
just in case. So that is our ta Water grass. Let me just very, very quickly. Go to, like, bark
and then right click and then copy Link address.
And then over here. This does mean that the
only thing is that you need to make sure that
once you download these, place them in the exact folder that we are going to place
them inside of Unreal. So just keep that in
mind. So we got that one. Now the next one is
going to be let's see. Let's see if we can maybe
find another type of grass. So Atlas's grass over here. Ooh, these things, actually, these are pretty good
because we can use those along with
what we can see. So this is quite nice. So we have some grass with
some dead ends. But I also often see
this kind of weed stuff. So I do want to
get that. I don't know why the preview
is not working. There we go. I'm not sure if I like that
one. Maybe this one. Miriam. Yeah, you know
what? Let's do this. And I will call this just
Mame underscore. Grass. Yeah, let's do that. And I'm going to go ahead and I'm
going to download this. And then in my documents. So yeah, this might be a little bit boring
for some people. If you want, you can just
quickly copy this over. But, um, as many people who have watched other
tutorials of mine know, I do not like to cut out anything unless it
is really necessary. So let's have these ones because there's also a lot
of talking going on on, like, what I'm
actually doing here. So right click
Copy Link address. Here we go. Okay, so
we got those ends. Now, here we go here. I can see like swamp grass. That's perfect. Here you
see? Cannot be better. That's literally what
I'm looking for. So I'm just going to go
ahead and I'm going to call this swamp underscore grass. Download it, and I'm now
just on my other screen. I'm just adding this
to my document, and I will create
a folder, swamp, underscore grass in
my magazines folder. Let's open this up. Albedo, normal paste agnos
translucen There we go. Okay, so those are codone. Let's see. So we got this grass over here,
so that's already fine. We are going to combine this with this, so
that's also fine. So that's what
cover those things. These actual cattails,
we will need to do those camely because I don't think we will be able to
find them anywhere else. I just want to go ahead and go through the grass
a little bit more. We also definitely
need normal grass, but I just want to go
ahead and just see what other stuff is
in here just in case. Okay, I don't see too much. Barley grass. No, that is probably too thick for
what I'm looking for. We can just scull the other one. So now what I want to do is I just want to go ahead
and I want to find some basic normal grass bits
but they cannot be too thin. If they are too thin, then we would need to use
too many meshes, and it would be too unoptimized. Now, you can use stuff like this that you
can see over here. However, that might not
always look very nice also. I personally like to have
individual strains of grass, but you are able to use, this kind of stuff
to maybe give it like a little bit of variation. So a grass, shall we do that? Let's grab this one,
this one, and this one. And then this is sweet grass. Over here, I'm just it is
important that we get this white because if we need to change this later on,
it is quite annoying. So what I'm going to do
is I'm going to have basically two different
types of grass. I'm going to have
some ray grass which are these clumped bits, and those are going to be a
little bit more optimized. And then I also want to have one that is like individual bits that is going to be a little
bit more unoptimized. So this is called ray grass. So let's do Ray,
let's call grass. And let's see, one, two, three. I do not like the big ones. The big ones do not give
enough flexibility. So in here, I'm just going
to do zero, one, 02, 03. And in here, I will just call this ray grass on the score 01. Two and three. This will be number one or 01. This will be 02, and this will be 03. So let's go ahead and let's
start by downloading it. And the grass is going to be a little bit more simplistic, but I think it is
best if we still just go ahead and just
download all four of the maps. But of course, because we are using three different textures, they will be more expensive
in the texture department, but less expensive in
the geometry department. So it kind of balances
out, I guess. But we'll see how it
goes. I just want to make something that
looks really cool. And it is still within the reason in terms of,
like, optimization. And another cool thing
that you can also do is inside of speed
tree, if you want, you can actually convert these multiple
different atlases back into one single atlas
before you export. And that is really
cool to do that. Now I'm going to go, so albino normal Passy I'm not yet
in the right folder. Okay, so that covers that grass. Now I want to do one more,
and I quite like this one, but I just want to Ooh, that actually also looks. That looks pretty
good, actually. Sort grass, but it might
be a little bit too big. Here, you can see, like, all of these really
large clumps of grass. Um, this stuff I
also quite like, to be honest, but I want to go for something a
little bit thicker. Let's do this one,
I think, or this. This is too thin. So, wow, we are going back to will
like the old versions. And there are so many
versions of grass here. Okay, let's do this
one, and I'm just going to call this Grass. So this one is going to
be the simplest name. Grass. And let me just quickly copy the link, download it. And give the second to download. Here we go. And now we can
just go ahead and begin. Ah, the grass over
here. Okay, perfect. So Ivy done, grass done, water grass done, the cattles, we will do ourselves. The next thing is
some lily pads. And I'm just going to go to
text.com, and let's see. Are there any no and maybe here? Lily Those are the
long versions. I quite like it if I could
get the rounder versions, but I don't on no way, actually, they should be fine. So here, the water
lily is quite good. I don't know if there's
any other version. No. Just in case because I can't remember the
text that come also had one. Let's see water here you see. So we have this one. This one does have a
lot more variations. Let's go ahead and
grab this one. And I will just add this
so water underscore Lily. And we want to go here or see, I even already got it. So base color. I need my normal. For this one, I'm actually
going to go ahead and use my roughness because
it is on water, so it might be more
important to have a cool looking roughness,
at least as a base. But let's go ahead
and get these. Now, another thing for
the water lily is that it would be nice to get the actual flower that
comes with it. However, I'm not sure. Oh, God, I don't even
know the name of it. You can go over here. So it does not need to be
exactly the same type. If I just find something that looks the same, then I'm fine. So I can go ahead and
go to Atlas's and go to plant and then
flower over here. And then I can hopefully find something that
looks very similar. So just keep in
mind that we just need, something like this, and if possible,
also something in the center that is just
a little bit yellowish. So I'm going to go ahead and
just have a look around. No, that's pinkish. And else what I
will need to do is I will need to make it by hand. Now doing that is
not too difficult, but oh, the shapes are
actually really good. I almost feel like just
making these purple. So if I need to do by hand, that is what I would probably do use those and then
turn them into purple. But over here, I just want to see if
there's maybe something. That one is no, that's not exactly
what I'm looking for. It looks a little
bit too different. But yeah, what are
the chances that you find exactly the
one that you need? So in this case, Sunflower no. In this case, what
I'm going to do is I'm going to go ahead and use this one because I got a
good feeling about it. So let's go ahead
and download this. And we will call this one
Water flour. Like that. So in your mega scans folder, there will be folder called
water underscore flour, which will contain these plants. Okay, so we got that one sorted. So that is the
water lilies done. For our bushes,
what I'm going to do is we just need
something very simple. We just need to go ahead
and we need to go into our um Let's see, moss. Oh, that's a bit annoying
that I cannot find. Let's go to over
here to text.com, and let's see three scans. No, that's not the one. Three atlas scans
is the one I need. And for our bushes, we want to go ahead and go
for, like, some branches. We don't really want
to go ahead and have individual leaves, if possible. So let's see if
there's something in here. That we can find. It doesn't really feel like, this one would be
pretty good, actually. Let's have a look at that one. But let's just quickly Ooh, that one is also pretty good, but it's only one cherry branch. So that's a little
bit of a shame. I wish that there were,
like, a few more variations. Okay, so we have the choice between this one or let's also go over here,
let's have a look. And over here, it's surprisingly
difficult to just find. So those are plants. So I don't think they
will be in here, no. Tree. Maybe they are in here. So three Aya, here we go. Okay, so what else do we got? So those are a
little bit too thin. I like to have something a little bit thicker in this case. Let's see. Those actually
look quite interesting. Let's keep those in mind. Those look too much like that they are willy
meant for a tree. So I wanted to have
something that looks pretty generic so that it is not too obvious that we
pick tree leaves for a simple bush or scrub or
whatever you want to call it. Um, those actually
look also quite good. Let's go ahead and let's middle click on this one so that I
can save it while I continue. So it would be nice if we just have two variations.
That's no problem. Like, we can have two
variations of leaves. So we got that one.
Ooh, and this one. I think this or this one. I think this is probably
the one that I want to choose. Yeah, let's do that. Okay. So let's go ahead and
let's have another one, and you guys call
this scrub white. I think you do or shrub
or whatever it is called. Swap nscoeT unscoe 01. I just want to make sure because else it will be confusing. Yeah, because it's like flour. Yeah. Yeah, I think that's
fine. So let's just do this. Swap. Sorry, that's a
difficult word for me to say. Let's do 01 and 02. 01 is going to be this one. 02 is going to be
this one over here. So let's just download 01 first, and I don't need
four k resolution. I just need two k. Here we go. And then also number 02. Once again, I just need two K. And after that, I think we
are pretty much done because, as I said, for our tree, we are going to create custom branches and leaves
and everything. So that's going to
be pretty cool. And that will
actually also involve some real live recording and
not just me narrating this. So that is pretty much
it for our textures. Okay, perfect. Now, this took a little bit
longer than expected. So what I'm going to do
is in the next chapter, we will go ahead and we will
go inside of Unreal Engine. And oh, no, wait, actually, in the next chapter, we will just start with our IV. And once we have our IV done, we will go ahead and import
everything inside of Unreal Engine and set up a new material. Yeah,
that's the plan. So let's go ahead
and continue with creating our IV in
the next chapter.
4. 03 Creating Our Ivy Part1: Okay, so now that we
have prepared project, what we're going to do
is we are going to get started and actually
make some foliage. And we are going to get
started with some ivy. Now, the ivy will come
in two different parts. One part will be
very generic ivy, which is basically
ivy that you can use multiple times on multiple
different places. And then we will
also go over how to create very unique ivy, for example, over here, like the ivy that would be very specifically
placed on top of these rocks or rocks on top of these
concrete rubble pieces. So those are the two parts that we are going to work with. Now, let's go ahead and dived
in in speed R over here. Now, one thing I
should tell you is I am using speed nine. Speed nine at the time of recording this has only
come out two days ago. So the UI is a little
bit different. I'm still learning
it myself also. But Frez, it is very
straightforward compared to, like, the older versions. So to create a IV, this is a workflow that I
developed myself. So I hope that it
is a good workflow, but it definitely works. Let's go ahead and
go to File and New. And we are just going
to go ahead and create a new blank
scene over here. And then over here
we have a scene. Now, you can just use your
right mouse button to, of course, rotate around. I do expect that you know
the basics of speedy, but just in case Middle
Mouse button is panning, right mouse button is rotating, and you can use the Z
button to zoom in and out. Okay, so the first thing I
need because IV is hanging, I need something to
hang the IV from. Now, this can be very easy. Let's go ahead and go to Maya, although you can use
whatever program you want for the tree mulling. And I'm just going to go
in here and I'm going to right click and I'm going
to create a cube here. Let's create a simple cube. And we just want
something to hang the IV from and in speed tree, this something is
called a force. So we want to go
ahead and create a wall almost to
hang the ivy from. So I'm just going to create
something that's quite high. It doesn't need to be specific. As I said before, this is
going to be generic IV. So being with it being generic, I just want to have it nicely hanging from here
and just going down. So this is totally fine. Once I have my model over here, let's go ahead and
export and let's just go ahead and
create a folder called SpeedreUnerscore
forces in our exports, there we go. And let's just go file, and I'm just going
to Export Selection. I want to expo it as
an FBX and just call this cube underscore collision
over here and just export. There we go. Very simple,
just a simple cube. Now inside of speed
speed three, sorry, what you want to do is you want to go ahead and
you want to go to File and then you want to
import a mesh asset over here. And personally, I don't
really like this view. So what I like to
do is, I like to open up the native dialogue, and then I like to
simply paste in my location over here and I
can grab my cube collision. So let's open this one up. And now we have a cube collision over here that has
been imported. So what we're going to do now is we are just going to go ahead and we need to activate
it by going into forces, art, geometry, and then grab your cube
collision over here. Well, it's a little bit
high. That's interesting. I'm not sure why it is high, but so high up, but
that is no problem. I'm going to probably
scale it up a little bit. I think that's the first
thing I want to do. Oh, wait, it's because here, I sell it probably like the
wrong direction. No problem. So what you can do
is you can press W, and then you have your normal
movement tools over here. Now, next this, so I'm
just going to place this nicely down here. That's fine. And maybe I'm going
to go ahead and press my R tool and I'm going
to scale this stuff up. You can scale it
up individually, but if you go to this
corner over here, you can scale it
up all in one go. So let's do something like this. We basically just want to
set this nicely into place. If you want to make
sure that this is not C true so that you
can nicely see it, which I like to do, then
go to materials down here. Let's go ahead and press the
plus minus and press art Nu and just call this
material gray, which I like to do because
then if I just click and drag, I can actually apply this
gray material on here. And now you can see
that we just have a simple gray box in
here. So that's perfect. Let's wide away, go file
and let's do saves. And I will save this as
Ive generic underscore 01. Okay, perfect. So the way that we're going to do
this is we are basically going to use a combination
of branches along with some collision modifiers and some forces to give it
gravity to make it grow down. So, as I said, this
is something I came up with myself. So
let's just have a look. What I like to do is we
have over here a base tree, and I like to go
ahead and create a trunk because
we need something to start having
branches grow out of. So we go to art geometry to select it and add
a simple trunk. Now, that one is often very
large, but that's no problem. Inside of Speed tree, you have an overwhelming
amount of settings. You will get used to this. I'm actually more used
to using this window. However, if you want
to minimize things, you can also have all of
these windows separately. I personally like to scroll, but let me just see
if I can use this one the most because it is
easier for tutorials. Now, the first thing I need
to do is I just need to go ahead and I want to basically, let's go down to our size
scalar over here and maybe, like, move it down a little bit. Actually, know what, no.
Let's do this a better way. Let's go to our
what was it shape? No skin over here in our skin. And let's get started by first of all,
setting the length, which you can find Here, see, this is why I
like the scrolling. So there is a length. I think
this is a spine over here. And then you have over
here your absolute length. So in spine, we
can set this down. As I said, there are
so many settings. Normally, if you do this way, the reason why I
find this easier is because everything is always
in the same location. So I know, where the length is over here
and I can move it down. But, okay, I will try to use these windows just
to make it easier. So I'm going to set my
length a little bit lower. Then I'm going to go to my skin, and first of all, in my radius, I'm going to click on
this little button here. The reason for this is
because the radius, it always goes from
very thick to thinner. Here, see, you can see
that this controls it. However, in this specific
case, I do not want that. I want to have the
same thickness, and then I want to set the
general radius down like this. Now comes the workaround.
So it's kind of funky. So what we want to do
is we want to press W, and we actually want to go ahead and want to grab this trunk, and we want to now press E, and we want to rotate
it sideways like this. And I want to move this
just above over here. So that's why it is
quite a funny way of doing this
because we are going to basically grow the branches out of this area. So
you can go in here. And here, let's rote it is
a little bit like this. And what you can also decide
is the length of your ivy. So let's just keep it
probably like this, so we will have the
ivy growing a little bit like this. That
should be fine. I'm going to go ahead and
right now you are a note, so let's go back to generator
over here so that we can set the radius a little
bit lower. Okay, perfect. Now that we've done this,
what we need to do is we need to add some actual
branches on top. We can do this by right clicking Add Jumtree to select it, and then if you go to
branches over here, and you want to go ahead and so we want to have
two types of branches. We want to have big and small. Let's get started with the big. And what the big branches will
do is they will basically control where the main
shapes of our IV are. You will know it soon enough, so we have this one
if we now go to Gen, which is generator over here. We can set a frequency, and we just want to go
ahead and play with the first and the
last over here. Oh, it's really maybe it can
be because it is too thick. Let me just have
a look interval. Let's do maybe like a classic. Over here, you have different
types of generations. So if we do a classic,
we are often able to more easily add
like more branches. And now the first, I want to have at the very bottom so that set this at zero and the
last one I set at one, so that it is evenly
spread out like this. Okay, so that's fine. Now what I'm going to
do is I'm going to go into my lengths. Yeah, maybe set the length
a little bit higher, but I want to mostly go into
my skin and I want to set my radius a little bit thinner like this so that they
become quite a bit thinner, not too thin, but we will
hide these branches later on. Right now, they are
just like a guidance. Let's go into my trunk, move my trunk down a
little bit like this. And now what we need to do is we basically need to
have these branches, push down so that
they are actually attached to this and
growing on here. We are going to do
this in two ways. One of the ways is
that if you go, let's go back to generator. In our BIG, if we
go to our forces, over here, you have your
cube collision force. What you can do is as
soon as you activate it, it will basically try to stay attached to your cube
collision, as you can see here. So you can see the more
I increase my force, the more it will
try to stick to it. So that's one way of doing it. Another way is that
we have gravity. So our gravity, let me just quickly see where
this one is always located because
it's a little bit tricky to find orientation, shape, it is in here in
our spine, I believe. But it seems to be quite so there's two ways
that we can do this. So we can do this via force, but I was hoping that we can
use the gravity over here. But I don't think I can
find it. It would be nice. So, here, you can
twit it like type it. Gravity here, see? So you
are able to type it in, and then you can push the gravity down
basically like this. Now, as you can see
what is happening over here is with our gravity, we can basically keep it
pushed down, so that's good. So we want to have it at
maybe like a 0.05 area. And now for these branches, these branches are basically
hanging over here. However, we also have some
branches on this side. Basically, the way that I fix
this is I simply go in and I then click on my
individual branches. And as soon as you click
on your individual branches and you press W, you are able to over here
have a few settings. So you can control the
length over here, see? But you can also
control the start angle and the rotation. So I want to have,
where are you Rotation, drag, move, rotate. There we go. So what we can do with this
one is we can go ahead and we basically have
full control over where we want to
have our branches. It's sometimes a
little bit tricky to properly here, move it. But as you can imagine, if I now grab for example, these top ones, I can just go ahead and I can rotate them. Carefully like this, and
I can move them around. And you can also delete them. If you just press delete, you
can also delete branches. But what I want to do is
I first of all I want to nicely rotate these around. So it does involve a
little bit of custom work. It's not completely
generated. Here we go. So I basically just go ahead and let's see, this
is probably enough. So all of the other
ones over here, I can just press delete to
get rid of them like this. And now it is pretty much
just like a matter of, like, playing
around with things. Maybe I was playing
around with the length to get an interesting ivy, because right now, all of them are pretty
much the same length. But what this will
do is in your ivy, it will basically give your ivy like a very straight cut,
and we don't want that. So you can see
over here that I'm especially on the outer
side, I'm scaling them in. And basically the reason
I'm doing that is because I like to have the
ivy kind of like fade out. Oh, this one is being a
bit of a pain to annoy. Come on, or to move. I don't know why it's
being so difficult. Maybe if I move my start angle. Well, I'm not able to
move this one at all. Let's get back to that one. Let's first of all,
just play around a little bit more with
my start angles. And we are also going to add some noise to this to make
it look more interesting. But right now, I just
want to have them mostly focused on having
different lengths. So let's have this one like the classic Ivy that
kind of fades out. Let's make this one,
a little bit less. Maybe have this a little
bit more or a little bit longer over here,
and then it fades out. Although you know what? I'm going to delete this.
I don't know what it is. Sometimes it is a
little bit buggy if you are doing manual
movements like this. But there we go. So
that should be fine. Now, cool thing what you can do now is if you just
click on the Big again, you go back into
your generator mode, and we can go in here and
we can go basically to, I believe it is in our skin that you can find these pieces. Or is it in displacement? I think it is in displacement. No, here, I'm just
going to do it this way because else I
cannot really find it. So in here, there are
a bunch of segments, and here we have our gravity, but here we also have
segments to give it noise. And I'm not sure where are
you. Noise, noise, noise. There's so much stuff in here, so it's often like, so we have our shape over
here, so that's fine, but I found it. I don't know why
I didn't see it, but it was in the spine. So I don't know why
I didn't see it. But basically in here, you
are able to add noise, so you have your noise amounts, earlier amounts
and late amounts. So the earlier amounts they
will abide by the forces. The late amounts, they
will basically add noise after the forces
have already been added. The late does not seem
to work in this case, which can sometimes happen. The earlier amount over here. That one is a little bit you'll a playound with our graph. So what you can do in our graph
is we can move this down, but or up to basically control the amount of noise and the
amount of turbulence. However, in this case, it's not doing exactly what I was hoping for Yeah, it is quite straight. That is no problem
if it is like that. So I'm not too worried about it. You can also play around with
your orientation over here, which is like your start angle, but I'm not going
to touch it because I've done this manually. Let's just leave it at this, and if needed, I can add
some more pieces later on. So what I want to
do now is I want to add my final bit of branches, which are going to be
our smaller branches. And these are going to
be the branches that will actually contain
all of our leaves. So if we right click art
geometry to select it, we want to go in branches
and little or twigs. I think we just want to
go for little over here. And now, if we go
back to generate, so right now we have
them at interval. I think proportional
is quite nice. Proportional, it does
like steps, basically. It just has a bunch of steps that allows us to
add more branches. Now, for these
branches, I think it is easier if we first go to forces and immediately turn on our cube collision over here. And we want to set
this quite high. And then there is another force that I sometimes tend to use, and it is a force
if we go up here to force out force, so
we have a few of them. The planear is pretty cool, although I'm not sure
if it will do much now because we already have
our cube, so we can try. But you can also go ahead and you can also do a
directional force. With the direction
force, as you can see, it is already activated
automatically. Over here, I am able to basically move around
the direction. So I was hoping that
I can push it out, but it seems not to be the case. So let's have a try. It's always good to just
try a few different things. So here we have
the plaanar noise. And what you can do
with that one is if you place your planar here, this is also why I want to
try them out so that I can showcase all the forces
to you pretty much. So the planar is pretty good. So you basically
have the plane here. And then if you click
on your branches and go to forces
and you turn it on, it will basically do
almost the same as your cube that it will just
try to have your force here. If I turn off cube projection,
here you can see, see? So you can see that
basically twice just push my forces down, and I feel like this one is actually working
a little bit better. It might just be that our
cube projection was too strong because we do not want to have these
to be as strong, but you can see that
they always try to kind of like they try to
touch your cube. While the planar, it gets
attracted to the cube. So it is slightly different. Now, the reason mostly that I
want to do this stuff here, let me just leave it
like this over here is because I still want to give it this organic feel
because these branches, they would not be
sticking to the side. What we can do is we can go
ahead and we can do plainer and give it a nice
strength to here. Let's move this
down and let's have a look because I don't want
to have them sticking out, but I want to have
them close to the end. This will make everything
easier later on. Now we can go to
generate and let's see. We have the number. Let's start by setting the first
a little bit higher. And now we have our
last over here. Now, for our angles, we want to have our angles, see. Yeah, so these are
really erratic, but because this
is not real life, we need to have some
downwards force. I think it is best if we just move them downwards
a little bit. And once again, you can also use your
direction over here. I can go to force and like a
directional force like this. And then I see my just want to make sure
that if I go to force, it's turned off and then
here it is turned on, here, see, I can give it a
little bit of direction. So I can push it down like this. And now it's just a matter
of basically giving it like a bunch of
different variation. So what I often like to do is, I like to just go next
to every single window. So over here, what
you can do is you can the sweep basically does
some random rotations. Jumble does like, again,
some random rotation, but it just kind of like I
don't know how to explain it. It's just like some
general movement. So over here we have
this one, the roll. Now, I am aware that it
will most likely Oh, no, here, it does not
push too many in there. You can see that they push
a little bit in here, but that is not too big
of a deal in this case. What you can also
do is if you want, you can go up here to your
force and press height, and it will hide the force, but it will not actually
remove the effect. We can also go over
here to show and turn off our forces over here. Or I thought we would
be able to do that. Oh, I guess not. Did they
maybe they moved it? Let's put height on
this one. There we go. So now you can see that
this now our ivy branches. So that makes it maybe a
little bit easier for us to go ahead and have a play
around. So we have our spine. Now, the cool thing about our
length is that over here we have our length based upon the parent, which,
yeah, that's fine. Basically what it
does is based upon the length of the branch
they are attached to, they will increase their length. You can also do an
absolute length, which will just do
an overall increase. But the cool thing is with this, if you click on your
graph over here, you can make your length really irregular,
which I like to do. So you can go what it does is it basically tweets the length from the top to the bottom. So what I can do is I can
say, Okay, at the top, I want to go ahead and I want
to have maybe my length a little bit smaller because
these are new branches. Then at the bottom,
they become larger. And then over here
at the very bottom, they become smaller again. So I can just go in here
and I can basically play around with my length and just make them look a
little bit interesting. So now you can see
that at the top, they are not too large. Then in the center, they
become quite large, and then they become
smaller again. So it's basically
stuff like that. Now that we've done
that, orientation, yes, you can play around
with your start angle, which kind of does the same as the direction in this case. Gravity, we already went over, but we already have
a start angle, so we don't really
need to do that. Our noises, we can see play
around with the amount, but it looks like
it's just giving me a curly effect, which
is not the one I want. Your late noise over here is looking pretty
good in this case. So in the other ones, the late noise did
not really work well, but in this one, it seems
to be working quite well. So I'm going to give it quite
a bit of late noise just to give it like an
interesting look over here. You can also play around
with your turbulence. I would recommend just play
around with these settings. The turbulence is basically
like the noise amount. The reason I'm not
going to go over these settings because
then it would become like a ten hour tutoril
because there's simply so much stuff in here to cover. Break is also pretty cool. It basically gives you a chance to break
off some branches, but we don't really
need it right now. Forces, we are where
you went over our skin, so our radius, our radius, um maybe let's set it
a little bit lower, but it does not really matter
because what we're going to do later is we are going to actually replace these
branches with planes because the branches right now they are 30,000 triangles, so
that would be too much. But if we replace
them with planes, it will be a lot
less geometry heavy. But I think at this point,
it is looking pretty cool. What we would later do is
we would later basically hide our big branches and
over here, our small ones. And then all that we
have left is we have the ivy and because
we then also have our um we also have our
leaves on top of it. It will be very
difficult to actually see like that there aren't
any branches supporting it. Or if you want,
you can still use your big branches and you
can make them very thin. But okay, so that's pretty good. Let's go ahead in
the next chapter. We will just go ahead and
continue our first ivy plant.
5. 04 Creating Our Ivy Part2: Okay, so let's go ahead
and continue with our ivy. Now that we have all of
our branches in place, now comes the tricky part, which is going to be our leaves. So the reason that the leaves
are a little bit ticky is because it's about the
directions and everything. So as you can see over here, they are all facing forward and they are kind of,
like, pointing downward. So that's what we kind
of, like, want to get. But then we still want to
get some variation in it. And, of course, we
cannot do it by hand. It needs to be completely generated because there
are so many of them. Now, we want to get started
by creating a new material. So if we go up here to
the plus minus sign, add new, click on it, and press Rename and
just call this IV underscore leaves over here,
and then we can press Okay. So we need to go
ahead and we need to set up our textures
because our texts will actually dictate also
the mesh of our leaves. So if we go to texts, we heads text.com IV 01. These are the ones that we use. So I can go ahead
and I can go drag my base color or my
albedo into color. My mask into obste
normal, into normal. And I guess if you
want, you can also use your translucency
into the subsurface. But it doesn't really matter. This is not so much
about rendering. Let's do subsurface
like 0.2, there we go. This is not so much
about rendering. It is just about being
able to preview things. Now, a few quite
important things. First of all, just
turn on two sided over here so that we can
see it on both sides. Here, you can see it over here. And now, what we're
going to do is we are going to create
our leaf measures. To do this, you want to
go to cutouts and meshes. And then you want to
go ahead and you want to press edit over here. Now, what you can
see is a few thing. Oops. Once again, added. If you click away
from this window, it will go away, so that makes it sometimes a bit annoying. So over here you can see
that we have a plane, and over here we have
also this orange thing. So the plane is our geometry. This orange thing over here is basically your pivot
point direction. So the first thing that
you would probably want to do is you
want to go ahead and you want to decide which leave you want to
turn into geometry. We are going to turn
this one, this one, this one, and this one
into actual geometry. I'm going to set
my pivot point at the very tip over here. And then what I want to
do is I want to change my angle up here
until my pivot point until the orange line is roughly going into the
direction of our leaf. Now it is super easy.
To create this leaf, we want to basically
click on a Rd point, click and drag over here, and you want to do
that with all of them. Now, there can be points
like over here where I need more points
in order to create my leaf. This is super simple. All we need to do is just click empty space over here
or click on the edge, and then you can add
some extra points. You just want to try and use as little points as possible. I'm going to go for
something like this. And now we can see that it is encasing our leaf over here, and then it simply has
this orange point. Do not click away yet. A few things I want to show you. You can go up here, and if
you want to remove points, you can click over
here on remove points, and you can simply paint
them away like that. And this one is reset or clear the points, which
I'm not going to press. Yeah, let me just
place the back. So yeah, just so you know that you can
remove them or not. Also, you can turn on and off the show opacity and also the show color so that
you can see everything. Now, what we're going to do
is we are going to press this little arrow button and we can assign our
leaf over here. Now, you have different LODs. However, I personally like to do the LODs using unreal because Unreal engine
can generate it, since we also need to do a
little bit of work inside of Maya on these meshes before
they are ready for Unreal. What I tend to do is I
tend to just go ahead and just throw this into
my high over here. If you want, you can just
throw it in all of them. It doesn't really matter.
Once that is done, you can click away, and
now you can see that you have your leaf here done. Now, if you want to add multiple leaves
which we want to do, you can simply press the
art button and we had three no way add four
of them, I believe. So now having these four, we can just press
it on the second one and we can basically
do the same thing. So you just basically grab
an ivy point over here. Like that, and then we can
also go out the piv point. Technically, the order in which you do it does
not really matter, but you basically set
it down, then you arts. Another thing that I did want to show you is that if needed, you can art tesselation. This is great if you want
to bend around your leaves. Now, I might want to give a tiny bit of
testlation like this, so only like one over here. And I'm just doing this so that I can do a little
bit of bending. It will give me a
slightly higher quality. It does mean a lot more geometry because even though it does not seem like a lot
more geometry here, because if we have 1,000
leaves, it will become a lot. So be careful. Don't
do it too much. You can also go in here.
Yeah, I do for this one also. And I like to just
add them to Als. But yeah, just do
it don't overdo it because then it is no longer
a game resolution mesh. So after this, we are going to do a lot of
effort to optimize it, so you would not want
to have that effort wasted because of
some leaf geometry. But anyway, here we go. So let's do this one
and give you like one extra geometry point or
tesselation point over here. And then finally,
we have one more. Which is the one over here, here, see, now I
accidentally placed a 0.1, but it doesn't really matter
because the cool thing about in pain in speed tree
is that these points, they are quite
flexible, here, see, that the jomtre is quite
flexible in how you use it. So even if you place
like an extra point, it does not really
matter because you can often just reuse it and
else you can remove it. Here on one tesselation point. Come on. There we go. Okay, so our leaves are done and our
material is now done. Now what we can do is we can
actually start applying it to three D. Let's go ahead and just make
this a bit smaller. And for this, it takes a
little bit of playing around. So just be prepared for that. Let's go over here
into our branches. We get right click Add
jom tree to select it. And we can do leaves
and alternating. So these are new, but
they are quite cool. Normally, you would use
this one, actually. Yeah, let's use this
one. These are new. I want to try them
out, but I should not be trying those out
inside of it toil. So over here, we now
have a bunch of leaves. They are really, really large,
but that's it no problem. What I can do now is I
can choose my generation, and I feel like proportional
would be interesting. And there are a few
specific settings that make this workflow stand out from the rest that I
want to show you. Now, first of all, let's
go ahead and go into skin, and then over here, it will ask you for your material
and your mesh. Now, you want to
set your material to ivy leaves over here. Now you can see that the leaves
are technically working. But what I like to
do is, I like to set my mesh to over here
like the first one, and then I just press the
plus sign a few more times. Ivy leaves, second one, ivy leaves, third one and
ivy leaves, fourth one. So now they are randomly using these different
types of leaves over here. I think I'm going to
set my subsurface to zero because
in this lighting, it does not really work
well over here like that. Also, what you can do
is with your light. Oh, God, I forgot how. To be honest, I forgot
how to rotate my light. I believe it is in
here somewhere. Let me just quickly
check this out. I found it was
holding the Viki and then you can click and then you can rotate your light around. I forgot about that. We have our leaves now they
are way too big. They are intersecting, they are not looking good right now. But that is no problem because that's what
we're going to work. First of all, let's go
ahead and let's just set the overall
size using our size scalar down to roughly the size that you want your
final leaves to be, which I think this
is quite nice. If you want to make your
leaves more optimized, it can be useful
to just make them slightly bigger than they
would be in real life. You often see this done, I
believe in the last of us, it is often done
also or charted, those kind of games, where
they make them a little bit bigger than they would
be in real life. But in turn, they do look a little bit nicer and
also just in general, they fit a little bit better
and they are more optimized. I'm going to go for
around 0.45 over here. Now, what you're going
to do is you are basically going to go
ahead and first of all, work on the actual direction because right now they are a little bit all over the place. So if we go ahead and go
into our skin over here, so that is all fine. Down here, we have our
folding, curl and twist. This one willy comes into
play with just the leaves. The folding will basically give us a little bit of a fold, which is nice because
we look over here, you can see that there's
always a little bit of a fault going on on our ivy. I think it is you'll see almost every single ivy
has this kind of folding. We want to set our fold
into the plus over here, which should give
us on most of them. You'll see a nice
little fold like that. The curling will basically give you a little bit of
rotation almost. That's pretty good to maybe set into the minus a little bit. Then the twisting, you can
also give a little bit just a random twisting over here just to add a little
bit more variation. We have our vertex
and our vertex is basically some random noise, I would call it over here. It's similar to the noise, but it does not often work
very well unless you have very large amount of geometry. So that's all looking good, we got that one
orientation over here. In our orientation,
we have the align, so that one allows us to often already push it
down a little bit. The fault, I don't
care, but the facing, I do care about let's
see, intermediate. You can also play around your different
settings over here, and it just takes a second to find exactly the
setting that you want. So let's do a global
over here like that. And now what I'm going
to do over here, you also have your up
right and out rotation, as you can see, so that basically allows us to once
you can push them down. But I think what I'm going
to do is I'm going to try and use a force
in this case, and we actually have a
direction over here, so we should be
able to use that. If we go to forces,
let's turn on direction, and let's set this quite strongly to like
12 or something. And then you can see what
it does is it kind of pushes the leaves
all down over here. Now, having them all face
me is a little bit tricky because the reason
why it is tricky is because they are rotating
around our actual branches, so there is no direction
for them to face if they are placed at the
back of the branches. Now, it doesn't matter too much because this is
like hanging ivy, so you can kind of
see it from side. So what I would do is, yes, you can play around
with, like, a orientation. Here you can see,
like the facing, and then it tries to rotate, but you can see that it does
not do a super good job. I'm just going to go
into generate and I'm going to boost up my numbers quite a bit just to see how
that looks. Okay over here. So the one thing that I noticed that we might
want to go ahead and go for a little bit more
like denser ivy over here, but that's something
that we can just do by adding more branches. The first thing I want to do, and this is a really
cool technique, right now, all of these
ivy pieces over here, they are intersecting,
and I don't want that. So what I'm going to do is I'm going to go to collision up here and I'm going to set
this to high quality. And when you do that, what
it will do is it will basically remove any leaves
that are intersecting. Now, as you can imagine, because a lot of leaves
are intersecting, we now have way less leaves, but that is okay, because
now if we just go ahead and we just to basically boost
up the numbers a lot. So let's go to like
60, for example. And then if we leave it off, you can see that
we add even more. So we just want to really like, like 180 or sometimes we just need to go like 200 or
something like that. So that we already
apply a lot of leaves. So that's probably fine. And then if we go
back to our branches, and in our branches,
first of all, I feel like if I go to
generate that I want to set my first a little bit
higher over here, see? And then basically,
you want to just go ahead and increase the
number of branches. And then this way, you
can basically add even more here, see Ivy like that. So that's all
looking pretty cool. I kind of want to see
what planar does. If I go into my forces
and go to planar, is that working that
it stops growing, not too much like a
little bit, like it does. Try to stop growing the leaves
to go inside of the plane. But let's say that we
have something like this. Now, let's go ahead and just fix a little bit a few problems. Let's go into our
little branches. Let's get started by
setting the first a little bit lower because
else they are trying to creep up too much to the
top. Let's try zero. Zero, no, I want to go
a little bit higher. There we go, just so
that we remove those. Next, proportional edding 21. Let's try 50. Here we go. So that's a little bit less. I know that's sticking
to the ground, but that is no problem. So over here, as you can see, we now have our
branches like this, and this also gives us the opportunity to
still go in here. And for example,
click on this one, and if I go to Note, I should be able to
still change the length. It might be a little bit slow if you do not have
powerful computer. But like this, you can
see that I am able to control the length. And then we get, like, a
nice looking IV like this. Okay? So let's go back to generator. So we got those done. These branches that
you can see over here, don't worry about it too
much about their thickness. You can set the thickness now, but we are going to
replace those with planes. So let's see how it looks if we make it a little
bit thicker because the thickness does sort
of respond to the rest. So we got these ones, and feel like maybe I want to make my branches
here in the last. Let's maybe, like,
push that a little bit further in over here. That we have quite an
interesting looking ivy. And that's basically
the goal of this. You just want to get a nice
and interesting looking ivy that also looks good when it's, like, hanging off something or, like, hanging against a wall. Now, as I said before, right now it is hanging
against the wall. You can be careful, but you can play around a
little bit if you go to your forces and set
the cube collision. So right now it is set to 18, if I set it to like ten
or maybe like five, see, we are able to mess up
and make them more messy. Let's do two, see? So you are able to make your ivy a
little bit more messy, and I'm going to go maybe like three I want to be careful because this definitely does not always look very good, that it has this bend, and that makes me want
to force it down. So let's click on
this one over here. Let's see if I can
maybe. Oh, hello. Did not mean to do that. Accidentally. Feel
like that's a bug. Yeah, that feels like a bug
or maybe some kind of like a limitation because it's not allowing me to actually rotate
it the way that I want to. Is there used to be
also rotations up here. But I guess that they
change here we go. We can do kind of like
rotation over here, but we are actually
changing the radius, I believe, so it's
technically not a rotation. But okay, so basically, that
is looking pretty good. I think that I'm quite
happy with this. And now, if you would
hide your trunk and the big branches over
here just by pressing H, you can see that
this is now your IV. So you can see that, yes, the ivy is technically
not connected at the top, but this is where
you would often have it sitting
inside of a wall. Or what you can do is you
can do what we did before, where if you have your a cube. You can also run a few branches this direction to kind
of, like, cover it. But often, what I found is that in the way that we are
going to use these pieces, this is more than enough, and we don't need to
have also on top, like these big branches, but you can have them if you want. Like these bigger ones,
you can and carefully maybe Set the radius lower and just need to
make sure that here, this is what I mean, if
I set my radius lower, it's actually quite bad
because it is trying to compensate with the amount
of branches that we have. So anyway, this is done. Let's go ahead and
save scene over here. So that's looking pretty
good. Yeah, here, see? So they are not
all pointing down, so they all have a
little bit of direction. So now what we're
going to do is we are going to basically replace these wily tin
branches with planes. And that's going to be a
little bit of a tricky one. So it involves a little
bit of baking down, which we will cover a
little bit later on also. But it should not
be too difficult. Basically, what we want
to do is we want to go ahead and go into Maya and
then can delete this one, and we want to create
a custom branch, which is going to be
just like a plane. So it is if we just create
a simple plane like this, get rid of all of your segments. And this plane you
basically want to go ahead and rotate
it in 90 degrees. And let's go in here. You want to move it
so that it is pretty much on the pivot
point over here. And I'm going to go ahead and
I'm going to scale this in, so it needs to be really thin as thin as you want
your branches to be. And I want to have my branches be quite thin like
this over here. Now, the reason why
this is a little bit tricky is because
I actually want to go ahead and I want to add some height information
in here so that they do look a little
bit like branches. Now, we can do this using baking or we can do this using
substance designer. The problem is, let
me just have a think, am I going to use
substance designer at all? Because I don't want to
use substance designer for one single thing in
this entire tutorial. Yes, I am going to use
substance designer. So I'm going to do this
in substance designer. So I've been saying
that word a lot. So we got over here
this leaf that's fine. Just make sure that in
your UV editor that this plane is still covering
the entire area like this, even though it is very
thin. We want to have that. Next, what we're
going to do is we are going to select these edges, and we are going to add a
few segments over here. And these segments control
also once again how hiple your pieces are going to
be. So I'm going to go. These do not need
to be very high. I think ten should be more
than enough over here. And once we have
this little leaf, remember that inside
of speed tree, the pivot point will
be at the very bottom. So that's why we want
to set this on the end. And then what we
can do is we can go file and do an export selection, and we are going
to call this one. Let's go up here, one up. And let's call this
IV underscore, Tin underscore
branch. An export. Okay, so we got that one done. And now, if we go ahead and
if we go into speed first, and then we will do
the rest later on, we can create already a
new material that we will call bark over here. And in this material, we can go ahead and make
sure that it is two sided and start by, I'm just navigating to it, applying our bark textures, which is this one, our normal and our roughness, which in this case, it would
be like a gloss over here. If you want, you can
even arch your bak. If you want to have a hipolyivy, this would pretty
much already be like your hypolyivy over here. But of course, you'll see that it is looking
pretty cool already. But of course, we are going
to go for game ready ivy. So we have a bark now, if we go ahead and go
to our little branches, this is basically a
trick that you can do in the latest versions of speed
tree, which really grew. First of all, let's save sine. Now, down here, we can
convert in our skin tab, we can go to type from
polygons to spine only. This means that it will read only the spins that
we have generated, and then we are free to art whatever we want on top of this. And the way that we
are going to do this is we are going to right click Add geometry to select it
and add a mesh over here. And you can see that
Yeah, so it does a spine. Oh, yeah, little because,
sorry, I got confused by name. It does spine and then the
spine still has the leaves. So the leaves are
following the spine, which means that they
will stay the same. And then we have
a mesh over here. Of course, right
now it is cubes, but you might have
guessed it if we go ahead and we can go to
our bark over here, Oh, no, sorry, go to our mesh over here because this
is a custom mesh. And then in here, we want
to basically apply a mesh. Now, you can do it by
pressing the plus over here or you can go
to file and you can, of course, go in here and
art or import a mesh. I'm just going to use
the plus over here, and I'm going to
navigate 1 second to my other screen like this. And oh, wait, we can actually
just go one back over here. So we want to open up this one. And if we just go down here, we have ivy tin branch. It is now located, and
we just want to make sure that it has the same
direction as our leaf. So we want to go set
the orientation to y up left handed, I believe. Oh, no, wait, Y up. Yeah, y up, left handed,
and then flip it in. I don't know exactly. I want to have it flat, but I forgot which direction
I need to flip it. Come on. Is it not working? Else, I'm just going to rotate
it if it's not working. Okay, so it's not working. In that case, I'm just
going to go in Maya, and I'm just going to do a quick 90 degree rotation over here. Normally, you can just
set the flipping, but I don't know why this
time it decides not to work. So you can just re ex
put it on the same file. Go in here and just press
a little reload button, and there we go. So that now should
work, totally fine. And now all that we
will need to do is we just need to quickly
grab the IV branch. No, I keep forgetting that. Sorry, I've been
forgetting this for years. Go to your bark, go to the cutout meshes, select your ivy branch because you can only
do it via material, and now click and
drag it on here. And then what you can
see is over here, we have our punch over here. They are a little bit too thick. Now, I believe that we are able to do some scaling in here. But if we go to our mesh, we should be able to do some
kind of scaling in here, but use actual size, but I don't know if it is
on the X and Y scaling. Yeah, here, it's on
the X and Y scaling. So I will need to go
ahead and I will probably need to do this manually. But as you can see, you can
kind of see the logics of it. So we just need to
go in over Oh, yeah, and our UVs are also
a little bit wong, but that can be just like
this tracing UV over here. So let's go ahead and let's
make it here, only 2000. I'm going to make
it a little bit thinner and I'm going
to make it shorter. So I'm just planning over here, so it takes a little
bit of thinking. I'm just going to edit
my pivot inside of Maya by pressing added pivot
in our tool settings. Turn on snapping to points, and I'm going to snap
it to the below point. And I was going to make
it a little bit shorter, which is on the YXs, I believe. Yes, on the YX so 0.5. Oh, no, sorry, X xis. There we go. And I was going
to make it a lot thinner. So on the Z axis,
let's do 0.0 0.1? Yeah, I think 0.1
should be enough. And now let's try and do
another export again. So we basically just
need to kind of get it into the right
location over here. So let's go into our
measures and reload. So is that fixing
it? No, it is not. I think I have a feeling
what it is doing is it is overwriting
thickness over here. So if you go down over
here to defamation, you should be able to also
set the radio scale here. So that will control at least the thickness.
That one is fine. Now, for UVs, we are running, wow, we are running
way out of time. So what we'll be doing in
the next chapter is we will go ahead and we will focus, first of all, on
just fixing UVs, which should be a very easy
fix. That's no problem. The second thing that
we're going to do is I want to try
and see if I can also get some skewing or some thickness variation
just like we had before. This one might be a
little bit trickier, but it might be
just like a case. Let me just quickly
try because I've never tried this before in
this way over here. But it might just be, Oh, here, see, so that
works totally fine. So like this, we can
basically have thinner ends. That they basically go
from thick to thin. So you can just set it
by simply clicking on here to adding points
in between your mesh, and then you can just
move these points. So it is the little
graph next to it. You will get used to using
these graphs. So that's one. So, okay, next stop
would be to fix our UVs, and then I will also show
you how to, of course, just properly set
this up inside of Unreal engine in
the next chapter.
6. 05 Creating Our Ivy Part3: Okay, so let's go
ahead and continue. So we are going to first of all, fix of fix our UVs over here. And yeah, so we left off with making this
smaller, so it's fine. So I want to fix my UVs. And then what I want to
do is I just want to go ahead and I want to of course, give a little bit of
a non map information so that it does not look flat, but it actually has some bump. Now, I think what is
happening with our UV is because we are over
here trying to have a UV like this or a
square texture on a thin UV. And I think also
my UV is flipped. So let's just go ahead
and have a look. So if we have over
here this piece, um yeah, here, actually, I can see right away that it is flipped because you can see that our segments going horizontal
and here they go vertical. So let's just select
our map over here. I'm going to go ahead
and I'm going to set my pivot point or sorry, rotate to 90 degrees
so that it is flipped. And now I need to
make a decision. I think what I'm going
to do is I'm going to just change our
texture a little bit for this specific one because
we need to do this anyway because we are going to go
into substance designer. So first of all, let's go
ahead and just export this. IV Tin Branch over here. Okay. So at least that
is now flipped in the right direction and
we can go to our meshes. Branch and just reload. Okay. Of course, this would
not do much right now, but let's just go ahead
and open up Photoshop. Here we go. And let's
go ahead and let's create a texture that has a height of This needs to
be only Let's do 1024. That's even like a lot. Probably actually five,
12 should be better. And a width of, like, very low. So maybe like 64 or something
like that. Let's see. That's still not enough,
so we want to go probably 1024 by 64,
so it's even thinner. There we go. So that
should do the trick. Now what I'm going
to do is we have over here our mega scans bark. I'm just going to go
ahead and I'm going to drag in all three
of them in here. Over here. It doesn't need to be tilable anymore for
these specific pieces. I'm going to select
all three of them, all three layers over here. I'm going to go to
my transform or rectangular measure tool right click and do a free transform. Then I'm just going to go
ahead and scale this up, and we only need to
go ahead and make the tops and the
bottoms or table. But to be very honest,
you will never actually be able to even see it if
you're a little bit off. Now that we've done
that, we can just go ahead and we can
save this basically. I'm going to go file
and do a save copy. And let's make a new
folder that we'll call IV underscore bar. And in this folder, I'm
just going to save this as I always like to use
Taka files, so TJ files. And I'm going to do IV underscore bar underscore
base color, save up. And then we go for the norm map. Over here file, save a copy. Once again, TJ IV bar
underscore normal over here. And finally, we can do
last one, save a copy. TagAivUnerscore, bark,
underscore roughness. Okay. So those are
now also done. Now what we are going to do is we are going
to first of all, make sure that it looks
good inside of speedr and then we are going to add
our norm map information. So let's go into our
bark here in SpeedR. And I'm going to go ahead
and just simply re drag in our base color that we
just saved our normal, come on, normal and our
roughness over here. Like that. Okay, so that's now already looking a
little bit better. And I think what I
need to do is I just need to set my stretching up. So let's go into Maya. Let's go back into UVTolkit. And basically the way
that you want to do this is you want to
select all of the faces. In your UVtolkit, let's go to the transform and just push
it down at the bottom. And then you want to go
ahead and in your scale. You want to make sure
that only the V is activated so that you
only scale vertically. And with the scaling of two, we can go ahead and we can press scale so that we have
exactly two over here. If you want you can alter
scale and then use snapping, but this is often an
easy way to do it. I think we need to probably do it three times. So
let's try this. Let's export and see
how this actually looks. So we export this. We go over here, meshes, and we just reload.
There we go, see. So now we already have
a proper looking UV. So that fixes that. Now the last thing
that will really improve this a lot is
that we need to go ahead and we need to
very quickly open up substance designer
for this. Here we go. And this is going to be super
quick and super simple. So all we need to do is create a very quick new substance
graph over here. We can just set to empty, and we simply want to call
this ivy, bark underscore, normal underscore, round or
actually branch over here. And we want to set our sizes. Once again, to what was it? Let me just quickly check. We had 64 by 1024, that's preso. Am I doing it in the
right direction? We can, by the way, close
our library over here. So now that we have this one, what I'm going to do
is I'm just going to import my norm map over here. Let's just press
Import resources so that we actually have
something. There we go. Perfect. We now have our
norm map imported in here, and that we are going
to do is we are going to basically give it a
really nice round bump. The way that we want to do that is we want to go ahead and press space when you have your
notes selected over here, and then you
basically get all of the notes that you can
also find in here. And type in normal and grab
the normal combine over here. So we are going to combine two norm maps, the
base norm map, and we want to go ahead and
we want to combine this along with a custom norm map, and this custom norm map is basically going to
be in our patterns. A gradient linear I think gradient linear two
should do the trick over here. You want to go ahead and
you want to click on it, and then if you
just quickly scroll down here to the
instance parameters, set the rotation to 90 degrees, and now you can see that we have a really nice round gradient. Then if we press
space again and add a normal node so you
can just press Enter, what this one will do is
if we set this to open GL and the intensity
to ten, for example, Oh, looks like even more 30, you can see that it
starts to become round, maybe even more, maybe even 50. So we want to give it like
a really strong round normal and then simply click and drag this into
your normal combine. And then what you can
see is that now it will just include
this roundness. Next is exporting. So we basically go
ahead and first of all, let's go in here, right click and save as seen, and we are going to save it in the Ivy bark folder
and just press Save. And then what you want to
do is you need to have an output so that you can
actually export this. So if you press space, add output over here just
by typing in output. And maybe if you want, you
can go down here and press the little art item sign in the usage and set this
one to be a normal. Then it will automatically
make sure that all of your color spaces and
everything are correct. Now we get Sav acne. Click below of this
package so that we can right click and press
Export outputs to Bitmap. And we simply want to
set this to be a Taka. And then when you press Export, it will automatically
export in the same folder. So now you can see IV bark
normal branch output dottga. That's the one that we
want. Can I go in here? Add this to our non map, and now you can see
that we have this bump. Now it is up to YouTube,
for example, decide, Okay, maybe I want to make
my bump even stronger. I'm going to set to 100 and then I can go to Export
again and reexport it. Then if I go to Spetre you should be able to just re track it on or just
turn it on off. There you go. So that is
now looking nice around. So from a distance, it will be hard to really notice that these are not actual
geometry branches, but they are just very
cheap or plain branches. So you can see that over here, our actual meshes are
only 2,640 twist. Now, the leaves, they
do say that they are 216,000 triangles,
but this is not true. This is because it is not taking into account
the collision. So the leaves itself
are a lot less. That's okay. So this is perfect. So leaves done, branch
done, texts done. That's great. Now,
what I'm going to do is I'm just going
to do two more things. First of all, let's
go into materials. And in your ivy leaves, you have over here
a variation slider. This is quite important to
add some more variation. If you click it up,
it will basically add some slight
color variation over here to your actual ivy textures.
So this is really nice. So you can push this up, and then you can go
ahead and if you want, you can play around with
your variation in here. So we can make this one,
for example, quite dark. And then this one maybe you
want to go ahead and, like, play around with
the saturation a bit over here and just give it some very slight
variation like this. So that's from a distance,
it will be easier to read. So this is still too
much. I'm just going to you maybe make this one
bit darker. There we go. You can also set the amounts
over here so you can really push it out if you
want. But that's perfect. Now you can see that you see, it is subtle, but it is actually quite powerful to use
something like this. Okay, great. We are
now ready for export. What we're going to
do is we first need to export this to Maya because we want to go ahead and want to set the pivot point in the right location and
just double check our work. Then what we can do is we
can export this to unreal. In this chapter, we
will go ahead and just do the exporting and
in the next chapter, we will set up our material and then you can actually
preview everything. To export this, let's
save a scene first, and then you just want to go ahead and want to go to File, Export to game over here. And then if you go
ahead and you can go to your source files exports, and then we can go from
underscore speed three. Let's create a folder. And
here we can export this. Now, there are a few
different types. If you're using the older
versions or Speed three, so below 9.0, you might have a version,
depending on your license. That is just unity and
Unreal, which is this one. So that means that you can
only export fire this way. They did change this later on. If you have this, what I recommend doing is you
basically export this to Unreal you then import it into UnreL and in Unreal itself, you are able to then
export it again to an FBX. So for example, here
we are in Unreal. And if you have
imported a model, for example, the ST model, you can always right
click on a model, go to Asset Actions and export it again. So
it's a workaround. If you are not able to
export directly to FBX, to still export
your model to FBX. However, of course,
we don't need that because we can just
set this to FBX. IV, generic 01, and press
Save. And now in here. So for a preset, what I like to do is, I
like to first of all, go to choose game preset and then click on
UnreelEngine four, and then it will already
set some default settings. Now, what we are going to do
is we do not want any LOD, so we are going to
go for highest only. We want art variations. Remember, that's the colors. Light MP UVs, if you
want, you can add them, but you can also generate
these inside of nul engine. In our atlas, we want to
set this to non warping. So we do want to go
ahead and create an atlas because we
have these variations. And in order to implant
these variations, you need to create
a different atlas. So allow separate
atlases, that's fine. We don't need to separate
the materials per se. So we are just going to have everything it's like one atlas. Geometry, the scaling, we
can fix that inside of Maya. Billboard, we don't
need billboard, so we have that turn
off, so we don't care. And our textures, we can set this to TGA because I like TJ. The max size, we want to set to 2048 over here because we really don't need
to go any higher. And then what we
can do is we can just go ahead and
we can press Okay. And now it will start by packing all of our textures and
exporting our geometry. And then you should
have in here a oh, that's speed forces from Speedr. You should have over here your texture and
then you should also have these atlases over here. You can see that
they look different because they change the leaves, and of course, we have
our normal bark atlases. So this is what we wanted. Now, if you go ahead and
go to May at this point, I can pretty much delete this. If I want to change this,
I can simply input it. I don't need to create
an entire save file just for one single plane. But what I now want to
do is I want to do I do want to go ahead
and save my scene. And this will become
my main scene. I'm going to go into saves
and I'm going to call this foliage underscore setup. And this scene, you
guys will, of course, also get, and it will basically contain all of our foliage. So we are going to
go file and input. And now if we go to
exports from Speed tree, we can grab our IV generic
01 dot FBX and import it. And now, it's really big. Oh, and it looks like
the Y is rotated. I believe that you can
actually set that in here. So if you go file
and export to game, you should be able
to set this in here, I thought you
should be Oh, yeah, hear flip x. I'm not sure which one I
actually need to have. Let me just quickly do some
testing just to make sure. Okay, so it looks like I cannot get these
settings to work, which is okay, so
that's no problem. So let me just quickly do one final default
export over here. And I'm just going to
turn all of these off, and I'm just going to export, and then we will
basically fix it in Maya. It honestly does
not really matter. So let's go into
Maya, file import. We are going to input
this as our IV over here. And then what you
want to do is you just want to go
ahead and just hold J because J is snap
rotation in Maya, and we are just going to
basically rotate it like this. Next, what I'm going to do
is I'm probably going to set my scale to 0.1. This scale, the final scale we need to set inside
of Unreal because it is really hard
to have a concept of how big IV should really be. In terms of our front or back, I believe that
this is our front. Let me just quickly check. Yeah, here, see this our font because you can see
that cluster over here. So this is basically
our font over here. So that's totally fine. Now, the way that
Unreel works is that it will set your PivoPoint at 000, which is where our
pivot point is now. So what you want to do is you want to move this
down over here. And at this point, the piv point will basically
be in this location. And maybe if you want, you
can move it a little bit forward to make
placement a bit easier. And what I like to
do is I then like to go in my channel box
and layer editor, assign a new layer, right
click and the tselect objects, or you can press this button
to add them immediately. It's a force of habit for
me to press this one. And I'm going to
just call this IV score generic underscore 01. Now, I sh Oh, yeah, on the score L. It's because even
though it is a layer, as long as your object is
also called the same name, it will not actually allow you to name your layer the same. I don't know why because it seems to be two very
different things. But basically, now that we
have this one ready to go, because our materials
are already fine, and we should not need to change anything specific in
here, as far as I know, if you want to change
anything specific, like you maybe want to remove some leaves or anything like that, you can totally do that. Like, who knows?
Maybe I want to, for example, right
click and go to Face. Ox, let's go to Object. Oh, I cannot do Object. Let's go face and just
select everything. Let's say that I, for example, want to turn off
snapping and I want to move this down a little bit like this that it is better, then you are totally welcome
to do stuff like that. But at this point, this
one should now be ready. So I should be able
to save my scene, go to file and Expot selection. And now if I go to
unreal over here, so I have already made
this folder to unreal, I can call this IV underscore
generic underscore 01. I do like to have triangulate
turned on in this case. And as an FBX, I can simply press Export
Selection. There we go. And now, if we go
ahead and we go inside real engine, in here, what we will do is what
I will do is I will have a new folder called
Easy foliage tutorial. This is where we will
place everything. Right click and create a
new folder called Assets. Let's also create another
new folder called textures. In our assets folder, I want to go ahead and I want to import to unreal
IV generic 01. Now there's a few
important settings. Make sure to let's do generate lightmaps just in
case you want to use them. We are not going to use
lightmaps by the way, because unrealizen five strong point is real time lighting. Just make sure that combined
message is turned on. You do want to make sure
that that one is turned on. And for our scaling, I believe we do want
to set this to 100, yes, because we are
coming from Maya, so we need to go upscale it from centimeters or from
millimeters to meters, I believe, something
in that direction. Because the file units, no, the file units are centimeters, we need to go to
meters, I believe. Anyway, press Import, and
then we can see soon enough. So here we go. So for example, if I now go ahead and click
this model and drag it in, I can see that, we should
have done only ten. So I knew that because we are centimeters and
we want to go meter, so it only needs to
be ten times bigger. So let's go ahead and
just double click on your models that you can open it up and then you can
see it over here. It looks really awful right
now without material, but let's scroll down and set our import scale to ten and
then press reimport again. At this point, you can basically decide how
big you want it to be. For example, I can
go ahead and I can place this over here and I can already kind of place this into position
where in my level, for example, and
let's say that I decide that I want to have
it a tiny bit bigger. I can go here and I
can set this to 10.5. And then if I press R input, here, see, you can see that
it becomes a tiny bit bigger. Honestly, this is actually
a pretty spot on scale. So this is looking pretty good. In the next chapter, what we
will be doing is we will go ahead and we will import our textures, set
up our material, and also set up a
small test scene that is not this scene because this scene we
will use later on, a small test scene to
preview all of our foliage. So let's go ahead and continue with this in our next chapter.
7. 06 Setting Up Our Folage Materials And Test Scene: Okay, so what we
will be doing in this chapter is we will
go ahead and create a smaller scene that we
can use to just quickly preview our foliage and then import our textures and
set up our materials. So I'm just going to go
ahead and I'm going to go file and just do a brand
new level over here. And I'm going to go probably like a
simple default level. That should be fine. Here we go. Okay, so this
is going to be very simple. First of all, let's go ahead and go to file and just do a quick, save current levels, and let's save it into our
a Where are you? Oh, God, so many folders. I'm looking for
easy. There we go. Easy foliage stil save
Preview Underscore Map. That is what I will call it. Here we go. Okay, perfect. So what I'm going to do
is this scene over here, it is still the old scene from UnreelEngine four, and
I do not like that. So I'm going to pretty much
get rid of my let's see, my no, you know what? Yeah, player start
I can get rid of. I guess I can reuse the rest. I guess I can just reuse
whatever we have here. So let's also get rid of
the base cube over here. And I'm going to go to create shapes create a brand new cube. Now, in your location,
if you press the little arrow
button over here, it will reset to zero, zero, zero, and then I'm going
to just make it like 0.1. So I'm going to make it
quite thin like this, and then maybe like 30 by 30 over here so that we
just have a simple plane. Next, what I'm going to
do is I'm going to go create shapes and create
another cube over here. For this cube, I'm just going
to go ahead and I'm going to scale it up and
out a little bit. Like this, and this
will be for previewing our actual ivy over here. Now, if we go to
our source light, we just want to go
ahead and set it to movable so that it is
real time lighting. I'm going to go ahead and go into my light color
and maybe, like, give it a little bit of an
orange color like this. Next, maybe rotate it a
bit or not. I don't know. Let's do something like
this. Let's rotate it a little bit like
this over here. Skylight, you also want to
set your skylight movable. You can do a real time capture, but then it will require
a sky atmosphere. So I'm going to go ahead
and I'm just going to leave it as default right
now, so that's totally fine. Leave it. It's just a quick preview
what we're making here. And I think that's
pretty much it. So we have a reflection capture, which is covering the
entire scene over here. So yeah, this should be enough for us to just quickly preview, and we will just go
ahead and improve the scene as we go along. So what we can do is we
can go ahead and just import or drag in
our IV generic. I'm going to rotate
it over here. See is this the
front. It's still difficult to see which is the front and
which is the back. This is the front over
here. There we go. And so, yeah, this one
would be on corners, so it would probably be
somewhere over here. If you want, you can
turn off Snap rotation and do a little bit better
rotation over here like this. So what I'm going to
do is I have this. I'm going to go ahead
and create my materials. Now for this, I'm going
to right click and create a new folder that we
will call materials. And in here, I'm going to make a right click
material that I will call foliage underscore
master like this. So the foliage master will basically be covering
all of our materials. Now there will also
be one that is just another material that
is solid underscore master, and the solid master will be
for our bark and everything. So let's get started with the
foliage master over here. Click and drag this up here, and then we can get started. Now, the first thing I want to do is I want to go
to my textures, right click New folder, IvnsceUwaGeneric, IV Underscore leaves because we are importing a custom texture. So if we go from speed tree, here we are going to import
this custom texture. I don't need a subsurface, so cool and normal is the only one that is being
exported, but that's fine. So we can go ahead and
we can import this, and then we can also
go ahead and do Ivy underscore bark like this. And then if we just grab
these two over here, and then the rest we can do
inside of wind wheel engine. One thing to keep
in mind is that we have our NO map in OpenGL. Remember how we did that
in substance designer. However, Unreal engine
reads as direct X. So you just want to open it up and press the flip
green channel. And I believe that do
we need to do the same? No, we do not need
to do the same because these come
from mega scans, so these are already correct. Perfect. Okay. I'm going to grab my color and my normal
of my ivy leaves, and I'm going to import it in here or just drag it in here. Now, what we're
going to do first? Go to your foliage master. Let me just move this over here. Let's go to our blend mode
and we are going to set this translucent and our shading
model two sided foliage, and then also click on
two sided over here, which will give us a base
color and a opacity, but we want to have more
stuff because we also want to have control over our
normal our roughness. And yeah, we do have
a subsurface color. The way that you can do
that is by scrolling down, and in your translucency
tab in the lighting mode, set this to be surface
forward shading. Yes, that's the one surface
forward shading over here. Now there are a few
things that I want to do. First of all, I want to
right click and I want to add something called
a constant t vector. And what is it is
basically a plain color. So what I want to
do is I want to also add if you right
click a multiply, and I basically want to
multiply my base color texture. And then this plain color, if you right click and
convert it to parameter, you can call this color
overlay. Make it white. That's okay and applied
here. So what are we doing? We are basically multiplying our base color texture
with this color, and because it is a multiplier, whenever the color is not
white, it will show up. So if I make this red, my
leaves will become red. The reason I convert this
to perimeter is because we are going to create something
called a material instance, which I'm sure many people
already know because I do require a basic
understanding of unreal, if you want to follow
this tutorial. But basically, the material
instance allows us to change this color
inside of our engine. So we need to do
the same over here for our base color, right click, convert to perimeter and just
call it base nscore color, and our normal right click
convert to parameter, normal nscore map, like that. Next, what we want
to do is so we have a color overlay so we can simply plug this
into our base color. Over here, our Alpha
X contains our mask, so we want to plug this one
into our opacity over here. And then our normal, we can just simply plug this
into our normal. But if you want,
what you can do is you can hold S and click once, and that will create a
scalar parameter and call it normal score strength, or you can right click and
type in scalar parameter like that and set the normal
strength, yes to zero. And if you then add a
node that's called a flatten normal like this, the cool thing is that
you can plug in your normal and your normal
strength over here, and I believe, actually,
I need to go for minus one for our base
normal strength. And then if you plug this
into your normal over here, what will happen is it allows us to control the
strength of our normal. Now, I just realized
something is going wrong, and this is a bug that happens with speed tree that I believe there is no way to
solve it inside of Speedre because even if we
try to export our material, here, we can try. Let's say, export the
game Ivy No, see here. So I do not think that there
is an actual fix for this. Basically, what is happening
is if we open up Photoshop, which I still have open. Perfect. Oh, only it's
on my Wong screen. Oh, God. Come on. Just let me go. Thank you. Okay, so if I open up over here, leaves and go to my Alpha,
this is the problem. For some reason, Speed
always decides to make the Alphas in terms of specs over here, which
is not what I want. Super easy fix simply go to image adjustments and
levels and simply push your white slider beyond the little curve
that we have over here. So that you can be ressured
that this is white, and then just press
Contras to save it. At which point, if you
go into reel here, we can right click and just reimport our color
or base color, see, and that fixes that. Okay, so we got that stuff done. Another one that I
want to do is I want to add my subsurface color. And the way that we do that is we add a constant three vector, convert to perimeter
and call this sub underscore color and make it like a light yellowish color, I would say, or light yeah, light yellow greenish
color, something like this. It's like a base. And then what you want to do is you multi multiply this using
a scalar parameter, so a click, and this will be sub surface underscore strength. And we want to set
this to one like this and simply plug this into our subsurface
color over here, which will basically
allow us to control both the color and the
strength of our subsurface. That's pretty much
what we need for now. Oh, wait, maybe like a, maybe like a scale perimeter. So S click for now. Let's work out roughness. And let's set this
to 0.7 by default, which basically one means
that it is looking very dull. Zero means that it
looks very shiny, so I'm going to go a little
bit in between that. Plug this into your
roughness just to give us a little bit
control over that. And now we can save scene and we can actually
check this out. So let's go in here
into materials. We have a foliage master, and just right click and create a material instance and call it IVs generic underscore 01. And this basically what
I was talking about. If I open it up, you
can see that now all those settings that we
turned into a parameter, we now have control over those. So we can now go
ahead and go into IV. Here, I just press a little
search button to find it. I can then go back into my materials and click
on my IV generic. And simply add it using
this arrow button in here. And now we should have
a two sided generic IV. I think I should have gone for masked instead of
translucent, didn't I? Yeah, I should have
gone for masked. So let's go ahead
and go in here. And let's go from translucent
to masked over here. And then all we need to do
is just plug in your Alpha into your abaste
mask. There we go. That should give us
a better result. Hmm, still, I feel like I'm
missing a lot of leaves. Or is that just me?
Let's have a look. Yeah, I'm definitely missing, like, a lot of leaves over here. Interesting because I don't
seem to be missing them here, so I'm quite curious because
they should be two sided. So I'm just trying
to kind of, like, have a look around to make
sure if I'm missing some, I can also go ahead
and I can not in here, but I can double check in here. So if we go to ID and show wire frame here,
look at that, see? So you can see that it is
missing a lot of stuff. Now, most likely, because I do like to always keep in debugging to see
what is going wrong, the first thought that I have is that if I would, for example, add like a plain bark material, if it comes back, I know
that it is the amount. If I just quickly click on my plain back material and
just quickly in the material, just set it to two sided. I just need to do this because else I cannot
see what I'm doing. So two sided? Yes, see. So here you can see that
everything is working totally fine even
as some AO in here, which means that most likely
something is going wrong in our UVs in our leaves. You can check your UVs
actually over here. You can set this to zero, and here you can see, these are UVs. So here it looks like
that they are flipped. See? It looks like that somehow they managed to
be flipped around in here, which is quite interesting. So could it be that maybe
those settings that I did? So if I go to export
the game over here, I set this setting over here. I turned this off because I thought it was for our geometry, but it might actually
be for our UV. So let's go ahead and just re export this just
to double check. And let's see if that fixes anything. So
if we go in here. So if I go in my UV
editor and open this up, yes, that is definitely one. And now I did export this, but it looks like that it
still does not import it. So let me just
quickly file and do a quick import re import
over here our IV generic. Oh, that is curious. That is interesting.
I'm going to Undo this. Oh, God, I cannot Undo, so I'm just going to reopen
my scene so that I do not accidentally lose what I just accidentally
deleted over here. So, if this is not working, what we can do is
we are able to add a texture to this now and
then flip this around. To do this, I would probably need to go ahead
and I would need to go to face and if
I just what was it? Control click because I want to select and I forgot how
to actually do this. I want to go ahead and I
want to select biomaterial. So you want to go ahead
and convert selection. Let me just quickly
check because I have not used this feature in so long, I completely forgot. Actually, I found an
easier way to do this. If we simply select all
of this and then hold Control and the select sorry, hold Shift. Control shift. Come on, let me
shift. There we go. Okay, so it didn't
allow me to do it to select these pieces. So we need to be
flipping it vertically. Yes, so it needs to be
flipped vertically. So if we go ahead and
if we go over here, let's see, flipping flipping. So symmetrize no flip
on the VXS is that it? Yes, that looks now, correct. Let's try that out. We are flipping it
on the Vxs over here and I've never actually had this problem, so
that's quite curious. But then again, actually
this is the first time working in speed nine for me. I'm right away just
making quite complicated, well, not complicated stuff, but still quite intense stuff. Maybe that is the problem. Now we can go in here
and if we just re input this, there we go see. It is now flipped around. Now if I just go ahead
and just turn off my EV, grab my IV generic
and hopefully, if I apply it, there we go. That is looking a
lot more logical. Let's save sin yeah, that is looking more
logical, definitely. So now I just need to check. So this is the front,
okay? That's fine. So you would kind of
like place this next to the plants or
whatever over here. And now there's a few things that we do want to balance out. So if we just double
click on our material. So yes, we do have this AO that is going on inside of here. This is something that I
tend to fix with lighting. There are settings in here, but this is an unreal
agent five things. So right now, because
it is using the far, not far distance shadow. Oh, God. What is it called? So I have a brain freeze. Distant field ambient occlusion. It is trying to apply that in here because we
have a two sided. Now, there should be
ways that you can reduce the effect in here inside maybe like your lighting, over white distant field, self shadowing, or maybe not. Maybe that is not possible. But anyway, I tend to
fix this using ese. So effect distance
field shadows. But I tend to fix this using a balance of our
subsurface color, along with our just general
lighting inside of our scene. So we have this over here. I want to go ahead and just quickly check if I
set this to two. No, I want to go with
a normal of minus one. I'm just making
sure if my normal is in the correct direction. Yes. Roughness, I
want to go 0.9. The roughness being flipped? No, no, the roughness
is not being flipped. I don't think, the colors, I don't really like the colors. Let's do roughness, zero point. Let's do zero.
Okay, let's do 0.8. Our subsurface color, as I said, it's the two, one, zero. Okay, so that one
is way too strong. So let's do 0.1. This will
look way better than scene. I will do, a little bit of
balancing out later on. I'm going to make my
subsurface color a little bit more
orange over here. And I'm going to make
my color overlay, maybe a little bit
darker and maybe go a little bit towards
the green value. But this is all balancing
out that we would need to probably do
properly in our scene. So if we have this, let's
set up my roughnesculy to 0.6 over here for now. And then I can see that I have this classic bug where
you can no longer move. So it's at inside of unreal, which allows you
for some reason. Basically, it blocks
your movement, and you need to switch back
and forth between a software, a different software
in order to get it. But, okay, so this one
is working okay for now, we still need to
do a lot of stuff. But at least what I
want to do now is I want to go ahead and
work on my solid master, which is going to be super easy. It's literally just us
going into the iv bar, selecting these two pieces,
throwing them in here. Base color. Roughness.
Let's go ahead and let's go to your foliage
master and just quickly copy over these
three notes over here. Paste them in. Yeah, you
can just plug this in here. So this is for base color, and this one is for
our roughness and this one actually
was supposed to be normal. Sorry about that. And then just right
click and convert to parameter this base color. Do the same with your normal, right, click convert
the perimeter, normal map, just like
that. So super simple. For now, all we need, we will be improving this as we
go along and simply right click create some
material instances and just call this IV underscore bark because we will be creating more different types of
foliage materials with this. So we have IV bar, and now if we go in
here, just apply it. In your solid master, just make sure that you turn
on two sided and press safe. Give that a second. And
then it should give us a pretty good effect,
but we'll see. Saving takes surprisingly long. There we go. Okay, cool. So here we go. Here we can
see our foliage over here. If you feel like it is too dark, you can always go into
your ivy bar over here on this color and set
this brightness to 1.5, for example, or maybe even two to make it a
little bit brighter. And then if you want to
balance it out a little bit, you can then go into
your ivy bar material, which I will drag down here. And then if you click on your
color, you can then just, like, mess around with the color to give you a
little bit more control. But anyway, so that is
looking pretty decent. So having this, also
from a distance, yeah, I think the bark is not too thin,
that's looking good. It looks very much like it is just a simple geometry,
even though it is not. So that is looking pretty
decent as like a begin. If you want to go
ahead and just, like, preview this quickly, we can always go into our and that's the last thing I
will do in this chapter. We can always go into our tunnel here
collapse tunnel saves. This one is the one I need,
I believe. There we go. And if we don't go
ahead and for example, so this will be generic. So let's say that we have it
over here, I can go assets. I can drag it in here, and
then I can also immediately, test out some stuff. One thing I want to do
with this foliage in this specific scene is
I want to turn off if you go down here,
in your settings, you want to go down to rendering and then turn off receives decals because I have
a bunch of decals in here, and I don't want to
actually have those on. So having that done, you can now see that I can place
my foliage in here. I can scale up and
down however I want. And then from a distance, it does look a bit like foliage. Now, I definitely need to go at it and I need to
do some more balancing. So I'm going to place one
over here, one over here. And what I want to do is
basically in our next chapter is we are just going to nicely
balance this stuff out. So if you go ahead and, sorry, it's because
of my God race. If you go ahead and click
on this box over here, you can rotate based upon
your object direction. Don't do it too much
because, of course, it would look strange if your entire IV plant
is rotated like that. But what I want to do
is I want to go ahead and if we go to, like, a distance, I want
to basically make this look good because right now
it is looking quite awful. So that's what we'll be doing in our next chapter is we will go ahead and we will
balance this out, specifically like our
roughness and everything. We just need to play
around with things. So yeah, let's go ahead and continue with that
in our next chapter.
8. 07 Balancing Our Ivy Material: Okay, so what I want to cover in this chapter is I just want to do some
balancing, basically. So I want to balance
out my material, and I just want to
make sure here, there is this little
bug going on. It looks really strange. I think it has to do
with the subsurface scattering that you
can see over here. But yes, there's basically a few things that
I want to cover. One thing that I have had a look at and that I
feel a little bit less confident about is
that we are exporting this using custom atlas that
has the variations in it. I think bad side of it is not
worth the good side of it. What I mean right
now is that we have over here these extra atlases. However, they are way less refined and we don't
have the ability to use the roughness
and we also don't have the ability to use the
translucency this way. I think what I want to do is I rather just want to go ahead. And use our default. So if we go ahead and create
a new texture fold that we'll just call IV
Underscore leaves over here. And so I still want to
keep the old one in here. Then what I'm going to do is I'm just going to go
into my textures, text.com IV, and I'm basically just going to import
these for over here. So let's just go ahead
and import these. Double check. I think
I need to flip, I need to flip the green
channel over here like that. So that is also
done. That's fine. Now what I'm going to do is
I'm just going to go ahead and I'm going to let's see. First of all, grab your
translucency over here. And I guess I think we will make the system
a little bit different. What we're going to probably
do now is we are going to first multiply our translucency
that we have just added, and you can right click, convert the premter subsurface. That's what I will
call it. So it has different names depending
on which program you use. And then we multiply it. So we multiply the
subsurface with the color so that we can slightly change
the color around, and then we can control
the strength of it. So I think that is a
little bit better. I'm going to also just by
default, apply these textures. We still need to later
on do it over here. And the reason that I'm
doing that is because right now we are going
to use a custom Alpha. So I just want to grab
this Alpha over here, and I want to use
this into my Opacte. Um I think you have
right click break pin. This is the mask. So yeah, we need to be in the opacity
mask, so that's fine. Yeah, that's already starting
to look quite a bit better. So we got those all
done, and then, yes, we do have our roughness, but our roughness
is fine for now. Maybe later on what we can
do is we can just throw in a quick grunch map to give it
some very slight variation. So we do that. Then there is one thing
that we do need to do, and that is that we
need to export this, and then yes, we do need to set it up again inside of Maya. But we just want
to export this to gain and I want to export this with
the Atlas set to none, which basically
means that it will not try to create an atlas. So then we can just
go ahead and press. Okay. And that should also fix our UV stuff that we had to fix later on in here. So
for now, you know what? I'm just going to delete that. I'm not too worried
about the scaling and everything because we are
so early on in the project, so I don't need to
match it up exactly. So what I'm going to
do is I'm going to go, why do I have so many maps? I'm going to delete
all of those. But basically, I changed again. No, no, no, no, wait. I'm looking at it from
a different direction. Let's go ahead and rotate this. And then I'm just going to go ahead and scale this down again. Move this down over
here like this. I'm just going to quickly check. I need to flip it around again. That is really strange. I wonder if that's a bug, because it never
used to do this. But aka let's just
select all of these, and then maybe we'll shift
and like deselect these bits, and I need to flip it on the here, I even
need to move it. I never like moving
my UVs like this. It's always risky to
do that kind of stuff. But as long as they fit, that should be fine.
Those are now in place. That is fine. What I'm going to do now is I
can just go ahead and do save scene and do
a reexport over here, and that should pretty
much fix everything. If we now go back
into unhel over here, Right click reimport. And then just do a
different leaf materials. Oh, the reason it's doing different leaf materials
is because it's still asking us to
add variations, which actually, you know what, that could be in our advantage. I don't know why
it imported like this because we still have
the original scaling, but okay, I guess that what I want to do is I want to set
my scaling list. That is weird. So let's
do a scaling of five. There we go. Really? Did I
make it that much bigger? I must have made it
way bigger than I really expected or
than I noticed. But anyway, this is pretty cool. So what we can do with this is we can simply add like
a few extra materials. So right now, I just
want to see which one is our bark. Alright. Okay, so this one is our bark. So if I just go ahead
and in my materials, I like to just
make this smaller. So this one is the bark. And then for now, what I will do is I will just
make all of them the same ivy over here. Oh, we even have
four variations. That's interesting. So I made those ivy
pieces over there. It seems that it still
does not properly do UVs, which is interesting because
these are not details. No, these UVs. Like,
the mask is working. Oh, I know why. I need to open this up and I need to replace them in here. Sorry about that. I'm
quite forgetful at times. So I just need to replace my
base color and my normal. There we go. Okay, so that's
already looking better. I'm just going to quickly
check in my rendering. Received decals is turned off. So it still has, like, a little bit of like I
don't know what it is. It's almost like
a shadow problem. And I have a feeling or, like, the suspicion that it
comes from our normal map. Yeah, I feel like
that is the case. Let's just not risk it, and let's actually get rid
of our norm map strength because I normally do
not use it on foliage. I normally only use that on,
like, bricks and everything. So Okay, so it's not that bad on
that. You can see that here. We are already starting to get here you can see it better. We are starting to get
like small improvements. So this is just
part of the deal. It's just balancing out. So I'm going to have my
two materials on here, and I'm going to
go in here and I'm going to basically just see. Let's first of all, make
this one a bit darker. Like that. And now if we go
in here, let's have a look. So first of all, let's set our
subsurface scattering. If I set you to zero. Okay, so it's
definitely here 0.1. The subsurface scattering is
adding a funky effect to it, which I don't really
trust, to be honest. Yeah, you cannot
see that much here, but here you can
definitely see it, see? So I'm going to have
this quite low, just to avoid it for now. But I do want to
have it later on. So I wonder exactly
where the problem is. Well, it might not be a problem. It might just be some kind
of like a limitation. The next thing that
I want to do is, so I want to go ahead and
have control over my color, but I also want to have
control over desaturation. So I'm going to go in here, and after I multiply
with our color, I'm going to add
a saturation node or a saturate, not a saturate. Desaturation node, sorry, desaturation, throw
this in here. Add a scalar perimeter. Remember, as click and call
this let's just do D set. Set do zero and plug this
into our base color. Was zero gray? Yes, zero is gray, and one or minus one is
that it looks duller, I believe. I think. Now, wait, minus one is that
it becomes saturated and plus one means that it
looks more gray scale. So we now have these, so now let's do
some balancing out. Let's start with our color. Let's make the color a
little bit more like a yellowish color and then just tone it nicely down and then add some desaturation
of zero point here, C, and then if you do 0.3 maybe, we can very quickly get
like interesting facts. So I do want to go for a little bit too colorful,
so not this dull. But also, here, this
is quite a good one. So we want to go for maybe
a little bit colorful, maybe slightly
darker green color. So let's see. I don't know if, if
I do darker green. I don't know. It also depends on your environment,
what looks best. I think in this environment
because it looks so peaceful, it might actually be nice, yes, if we go for, like, a more
slight yellowish tone and have everything like
a little bit brighter. So something like
that's pretty good. And then desaturation,
0.2, no 0.4. 0.35. Let's do 0.35. Okay, so we got
that one also done. That's pretty good, actually. Yeah, that's looking
pretty good. Even over here, of
course, it doesn't look logical in this place because we are going to
have a unique one here. But, for example, over
here, it might look logical to have it hanging sort of like in
this location, like this. A little bit more. You see, so you get some quite
interesting effects. And if you go to your camera,
you can see, like, Oh, yeah, here, so we have some
IV and stuff like that. I do have lights over here that are already compensating
a little bit, but not too much yet. So the subsurface color, what it will do is it will basically whenever
we have a light, it will let the light shine
through on the other end. And here we can see like
a little bit what we have now when I place a
light behind it. So now what we can do is we can just play around with
this a little bit more. So here, I said it's to one, you can see that
the light shines through really strongly, but it never really
tends to look very good. So if we and it looks
surprisingly flat, I kind of expected
it to be stronger. Minus one just in
case, no. Don't worry. I was just me trying
something out. 0.2. 0.3 maybe. Let's look like over here. Yeah, so 0.3 looks
pretty decent. And now for the color,
we can go in here, and you can even make it like a really strong color
to get started with. Here, let's do a bit of a
yellowish color like this. And you can also
increase strength. So here, let's do, like, a slight yellowish
color and then simply tone it
down until it does not look as strong anymore. So around these values
look quite nice. Something like this over here. Yeah, you know what
that can work. So we got those pieces. Now what I'm going to
do is I'm going to quickly make them a little bit darker because when we play
around with our subsurface, everything often becomes
a little bit lighter. So you kind of want to
compensate by just setting your color a bit darker
again, here, see. And now you can
really see the effect over here where the
sun is hitting, you can see that
it shines through. And here you can see
that this is in shadow, and it is like
quite a bit softer. My bark, I also want to once again mess around
with a little bit more I don't want to
have this as noticeable. I feel like that would
not look very nice. I know that in our reference, it is quite bright,
but in our reference, we have way more
leaves, basically, because they are
sitting on a wall, which kind of hides it. So I'm just going
to kind of, like, play around with this stuff
and set my roughness 0.8. Let's set it, like,
a little bit duller. And I think that is
looking pretty good. I think we got a
pretty solid material right now for our foliage, just like an easy material doesn't need to
be too difficult. But I quite like
that. Let's also go into, like, our preview map. Here in our preview map, it
is also pretty interesting. What I'm going to
do just a close of this chapter because this was
just a balancing chapter. I'm going to make my
light a little bit more orange and maybe also make
it a little bit stronger over here to like six or seven. And what I'm going
to do is I'm going to let's see, skylight. I kind of want to do
I have some HDRIs? HRIs are basically just like
some cube maps over here. I don't know if I used one
for the very beginning. N. Well, it's not that important. It would have just been nice. What I can do is I can go to create visual effects and
add a post process volume. And in here, I can
just do, like, a bunch of stuff like playing grounds with my Bloom amount, which in this case, doesn't
do much. Setting my exposure. I like to always set my
exposure to zero by zero. And by the way, in order
to see the effect, we do need to go
all the way down to our post process volume
settings and turn it on. You can see that
this is very bright, but then if you play around
with your exposure, here, see, we can set this
to -20, that's -15. There we go. See? And then we can just mess around with our bloom a
little bit like this. And we can also do some color
grading, which is nice. So here's some
vignetting on top of it. Let's go down to the Misc, and then for our color grading, maybe I can actually
use my color grading that I used in the tunnel
scene just for the fun of it. It does look interesting in,
like, a scene like this. Be this is the colour green that I use for my tunnel scene.
See the difference? So I pushed the green
a little bit more, and that's why over here, it looks a little bit different. Let's set this 2.6 over here. And what I'm also
going to do is, let's go ahead and go
into our global Gamma. Gives a little bit of a
yellowish tint in here. And then what I also
want to do I want to go into my shadows and my gamma, and I want to give
this a little bit of a bluish tint over here. I could have just copied over my post effects, by the way, from my other scene,
but sometimes it's fun to just mess
around with these things. And in my lumen,
I'm just going to set my lumen quality of my reflections and my GI
nicer to. There we go. Okay, so that's like
a nice preview scene for us to get started with. So here you can also see
it in action where oh, sorry, let's set our Pivot
point to be world oriented. Yeah, I can play around to
this a little bit more, and then you can also
see how it would look if you, for
example, repeat it. But don't forget often, you would not always just
repeat it like this. Sometimes you would
just move it and intersect it a little
bit, and then maybe, move it down a bit more, just that from a distance, it
will look totally fine. So this is quite a nice one
to have a generic piece. And what we're going to
do in the next chapter is we are going to create another generic piece on top of this. And then what I want to do is I want to show you
how to actually create some unique
specific pieces, so that are really designed specifically for
your environment. But as you can see, this is a
pretty solid start already. I'm going to have these, and I'm going to
do one last thing. I'm going to create a quick
rectangular light over here. I'm going to rotate it, ta ta, I'm going to set my
source width and height and maybe my
barn door angle, also a little bit lower set my color to be like
a nice orange color, and maybe add like a little bit of an increase in my light. And I don't know.
This often just gives me a little bit of
shadow response. And also just in general, it will give me some
better lighting in this specific effect. Oh, and set it to movable. Let's not forget that.
Here, let's set it to, like, a small rotation. I like this and maybe
let's tone it down a little bit more to 12. And now what I can
also see is I can also play around with
my roughness response. So that's the last thing. I know I will say that
is the last thing very often in these
kind of tutorials because it is just a bunch of balancing to get it perfect. Sometimes I literally
play with this for like an hour or two just to get
it absolutely perfect, but I cannot do that right now. So 0.4 it does have something when it is a
little bit shiny. 0.5, maybe. 0.52. Let's just do 0.5. 0.5 should be fine. There we go. So that looks quite
interesting. It has a little bit of a shine to
it, which I quite like. Perfect. Okay,
let's go ahead and save our scene and continue
to the next chapter.
9. 08 Creating Generic Ivy Variations: Okay, so we now have our
first IV variation done. So now the difficult
part is basically over. So we got some really
nice looking IV, as you can see over here. So what we're going to
do now is we are going to create another
generic variation, and then I will show you how
to create unique variation. So that's the really nice
thing about speed tree. You can actually randomize. So for your generic
variations, it is super easy. One thing I do need to
keep in mind is that, yes, we can randomize, but this one over here, the big branches that
you can see, these, if you randomize them, they
will once again not be at the front site and they will just kind of go all
over the place. So I can actually show you here. Let me just save my scene. And basically, in
the randomizer, you can go to, for example, big. And then if you go ahead and I believe that you
actually need to go in A in order to find
this 1 second. Let me just move this.
And if I scroll down, where are you? Ah, here you are. So here you have your
randomized seat, so you can randomize
the generation forces, spline, all that stuff. So let's say that you would
randomize the generation. As soon as I click
that, it should, as you can see, randomize it, but it doesn't really
work because, of course, now it's trying to randomize
in all the Wong locations. So that's basically what
I want to show you. Now, let me just quickly close. No, I do not want to
save and open it again. Here we go. So that we
are back to normal. But this doesn't mean that we can just go ahead and we can do some manual editing for these and then we can
randomize the rest. Let's go for like a
Schocher one, I think. So this is quite a long one. So if we just go ahead and we set this to node up here.
Actually, you know what? Let's hide this stuff over here because else
it becomes a little bit overkill. Okay,
so let's see. So we click on Node Let's make
this a little bit shorter. So let's make this one
shorter and this one. Where is my start
angle over here? What if we make
this one like super shorter than this one
a little bit longer, or we will leave it
a little bit longer. That might look interesting. Yeah, let's give this
a little start angle and also make it shorter. And I kind of wanted to see
if I can move this one. Yes, I can. Okay, so let's
see something like this. So we have this one over here. Now if we press H to unhide D, so these bits, yeah, it looks quite a bit shorter. Now if we just go ahead
and go to leaves and these ones over here, there we go. Oh, and let's unhide
the big ones. Yeah, you know
what? That looks a little bit That
looks quite nice. If I go ahead and have a look, I think that will look different enough for us to have
another variation. So here you can see
how quick it is to just add another
variation to this. So I'm quite happy with this. So let's just go ahead and
let's do a file and a saves. And simply call
this IV generic 02. And just like this, you can make as many variations as
you want, pretty much. So, because we are reusing the same
textures and everything, there isn't actually any the only expense that you would pay for is that you have
multiple different models that need to load in, but
that's pretty much it. And that's not a huge expense unless you make a
very large level. But anyway, let's go
ahead and export this. IV generic 02, save it should still have
all of our export settings, yes, so we can just press Okay. And now if we go into
Maya, we have this one, which we can I just need to re art my selected
object. There we go. We can hide it. And
now file import. You know what I'm going to
clean this up a little bit. Because that's a little bit
too overwhelming from Spettr. Um, let's see. These two, I believe that I
actually imported. So I'm going to go ahead
and I'm just going to get rid of these texture maps, which it always
automatically exports, but I don't actually need them. There we go. So IV
generic CO two, import. Hello. Oh, it has the same
name, so it replaced. That's Aquard. Let's
just quickly open scene. Let's just reopen
it. So what I did is because it has the same name as this model, it
replaces model. Maya tends to do that sometimes. So let's go ahead
and go in here, IV generic Sire
one underscore A, so that now it should
not override it. So now if I go ahead and just right click assign the
selected object and hide it, now it should not
be overwritten. So if I go in here, really, it's still overt. No,
wait, it does not. Okay, this is a very
interesting bug back I don't know what it is, but this is super,
super analogical. So let me just quickly, let's restart and let's see
exactly what's going on. So I think what is happening is that we are
changing this name, but we should change
the LLD zero. It looks like it is
grouped right now. So let's click on the
parent over here. Go to edit and do an ungroup. And then this one we can
basically go ahead and delete. And then this one
we just need to do like a double click and call it Ivy generic
underscore 01, okay? So now it should be its
own individual model. Here, let me just
quickly S. Oh, wait. It's probably grouping because of our layer, but this
should still be fine. So if we now go at import, IV generic CO two, there we go. Now, that seems to work. So this one I'm going to
assye to my layer over here. And now the second
one, there we go, see. So now we have
the second one. That was a little bit
strange, but okay. So let's go ahead and do
the same thing, add it. Ungroup, I did not realize
that it groups these things. Ivy underscore,
generic underscore 02. And then if I just go ahead
and I rotated 90 degrees, I turn on my old ivy
that I can kind of scale this down and make it
roughly the same scaling. And now I can turn
off the layer again. So we got that one
also done over here. That's fine. Maybe like quickly reset your PIV point.
So that should be fine. So if I now create a
new layer and call this IV un score 02.
Yeah, let's do that. Let's just call it IV un score
01 and 02, that's easier. And assign my object. Okay, perfect. So
now that is working. So we got that done. I believe that we
probably still need to change our UVs in some way. I'm not completely sure, but that's what I feel like, so let's go ahead and go up over here to it looks like that
we lost our image over here, which is, Oh, wait. We lost it because I removed it. That's why I lost it.
That is no problem. Like, I can go ahead and
I can just apply it. All I need to do
is I just need to quickly select these pieces. Oops. Okay, so the
bark is still here, but this one we lost. So just select these
pieces hold shift, and then deselect
all of this stuff. Come on. There we go. Okay. And now what I need
to do is I'm just going to quickly assign
favorite material. I'm just going to quickly
assign a new material to this. And here amber two. And then if we go
into our color, you can click on this button over here and then go to File. And this way, you can basically apply a color. So
I can go in here. I just need to quickly navigate. So I wasn't thinking
about that when I exported my mesh because, of course, it exports
with the texture, so it's referencing
that texture. But if I do this
way, I can still go ahead and go to my
IV over here, see? And then I can still apply it like normal. Although
you know what? I'm going to actually
apply probably my Alpha. I think that's a little
bit easier to see. So we got that one done,
so that should be fine. And so this one is bark. Yeah, there should
be bark still. I hope I hope that I did
not mess anything up, but we'll see soon enough. And then just these
like these ones. And now Uv took it, I can go ahead and
I can flip over here and then move them into the correct
position like this. See, the UVs are a little bit awkward that
they are flipped. I'm sure that I can mess I can keep messing around
with the settings, but luckily, it doesn't
take too long to actually fix this when
everything is in place. So that's why I'm
not going to, like, try and play around with the settings too much
when I can just do this. Which I don't know.
It can be logical. It cannot be logical.
It kind of depends. Often you only need to
do this once because you don't often likely
to go back and forth too much after
the first one. So we can just export
this IV generic CO two. And then if we go into unreal, we can go ahead and let me
just go over here to assets. And then if we go exports
to unreal IV generic 02. Oh, wait, before I do that, let me just quickly check. I set this to uniform
scale of five. Okay. So I let you know
that so that I can import this and can set this
uniform scale also to five. And now we will always
scale everything based upon this uniform
scale. So that's fine. So let's input it. Double check if my material did not mess up. It looks like it did
not, so that's good. So then what I can do is I
can just go ahead and I can assign our correct material. So we have IV generic 01, and we have IV bar over here. So save that and have a look. Yeah. It's looking good. That is feeling surprisingly
thin, all of a sudden. Don't know why, but okay. Anyway, if that is bad, then we can always
just make it ticker. Now, the nice thing is
inside of unreal is that we can simply duplicate,
for example, this one, and then we can go
into assets and just click and drag this onto your
static mesh to replace it. And now you can see that now we have two different variations. You can imagine that if
you go ahead and do, for example, this kind of stuff, that you have this one,
and then you have, another one, and maybe
you kind of, like, even go for, like,
a double like this, then you can very
quickly create walls that it does not so much look like these
are just two pieces. And that's basically
the power of this. You just go do
this, here you see. So it just feels like it
is all completely unique. You can kind of see sometimes
the piece come back, but if you have two
or three pieces or a three or four, this
will look very good. But up close, it will
look totally fine. The only thing that they
do not understand is here. You can see that
these ones are a lot thinner than
they are over here. And I do not really like that. So what I'm going to do, it's the last thing
I'm going to fix. I don't know why they
randomize like that. That's really strange.
Oh, by the way, you can actually also
randomize this stuff. So maybe it's cool to
just quickly do that. Let's save sin just in case. It's going in here, going to, and that's randomized
to generation. You see? So you get randomized generation until you get something
that you like. Uh, I accidentally click twice, and now it is frozen. Okay, so that seems
to be a bug for speed 39.0 is that if you click on generation two times
in a row, it crashes. But that's no problem
because we saved. So that's why I'm doing that. Let's go ahead and go in here to one randomization, like that. Okay? So that's now even more
different. That's great. And now, if I go into
my meshes over here, because they are very
thin for some reason, we were going to go down to, I believe, our radio scale. A, wait, let me make this a bit bigger because
else doesn't work. Mesh radio scale. So these are like a
little bit ticker. Well, now they do look fine. Yeah, it's strange.
Okay, so let's just leave it somewhere
in this range. If I have a look at
this, I do feel like there's quite a bit
of empty space. So maybe I can do or play around a little bit
more like my generation. Here, see, now there's
less empty space. So that's what I quite like. So I'm just going to go ahead
and I'm going to save this, and now I'm going to do
one more export game. Hopefully, last one. Over here. Yes, I want to export
it. And I'm just going to go ahead and I'm
going to set this up. Oh, wait, here. One a bit? W a bet is one? I never saw it.
Sorry about that. So one of bet that this
probably fixes the UVs. Honestly, I can't believe that It's because like I
see these settings, but I don't always read them
because I see them so often. So let me just quickly
delete or actually, nah, maybe not deletes.
Let's go file. Import. Let's import our
IV generic 02 over here, and then it will most likely, it will have replaced Um, okay, I should have deleted
this one because now it's just getting confusing, but this is the
one that we need. So let's just rotate this IV, nscoreGeneric, un score 02. And I'm just curious. Here see? Okay, so that fix it. So when you go into
export settings, just do not press the flip the flip texture
coordinate stuff. So that's a little bit awkward. It took me so long to find that. But yeah, it's not that big loss of a loss
of time, to be honest. So it might also be
nice to just know how to fix problems if
you come across them, even though this was a problem
that had an easier fix. But anyway, so we have this one, so we can just go
ahead and reexpot this again, like this. And then all we need to
do is we need to go into reel, right click reimport. Yes, reset the leaves to FBX. That is one that we need to do. But then all we need to do
in here is we just need to quickly apply our leaves
to the other variations. And later on we can just have a few different
color variations. So we now have this
stuff over here. And as you can see, that is working already,
like a lot better. Yeah, so now it is a lot
more visible to see all of these extra branches.
Which looks fine. Yeah, I might not really like this specific one over here. So if you ever have one
that you think, like, no, that is too obvious, how it is here, I
think it is this one. Like you say, like, no,
that is too obvious. You can always just
try and, like, move something in front of
it like this to kind of, like, hide those
really specific ends. So that is one way
that you can just quickly work with things. And for example, for
these ones here, you can also just press
the lead if you want. I do like, kind of,
like, stuff like that. And when you then
export it again. So that's fair if you
want to do very specific. If you're making
this for a game, I would say, like, yes,
you want to, of course, be very specific
because in the game, you can run around
and all that stuff, and you can really
look at it up close. But for tutorial,
I'm, of course, not going to spend a
huge amount of time. Only thing I'm going
to do is remove those little top bits, also, because they do
not have a branch, and they just feel a
bit of There we go. And let's also remove this one. Okay. Let should do the twig. Let's go at the next bot. Real import. Okay, perfect. So now that we have
done this stuff, yes, I'm going to go over the unique variation in the next chapter, but we still have a little
bit of time left in this one. So let's just duplicate the IV generic and just call
it IV generic 02, and maybe duplicate it
again and call it 03. So if I have my
IV, 01 over here, just going to drag it down, it would be cool if I quickly grab some
of these materials. So here we have 02
and then 03 again. And if I then open them and let's also strike
them over here. What we can hopefully
do is if we go into our view and just press G over here to hide our
selections and everything, I should be able to go in here and maybe like in my color, slightly change the
color of some of these. You see, I can make these a
little bit lighter over here. And that's what just like that extra little bit of variation. And these I can make a slightly lighter
green color over here. And you can see
that very quickly. You see difference
between this and this. It is just like that
extra little bit. These ones might be a
little bit too green, or it's really annoying
that it does not remember my window position. That's something that I always am a little bit bothered about. That I just had the
exact same window here, but it still cannot remember. Yeah, let's tone that
down a little bit. But yeah, basically, we
can just play around with this until we get
it to our liking. And now we can just also
go into generic 02, and I'm just going to
quickly do it like this because I'm not in the
mood to move my window scan. Here 02 and then click on 03. Like that. There we go. And now we have a bunch of different extra variations also. So that's extra good. Stone down my light and maybe, like, duplicate it over here. There we go just so that we
have some nice lighting. Okay, perfect. So
we got those done. In our next chapter, what
we will do is we will go ahead and we will move to our actual tunnel
scene over here. And I want to
basically show you. Yeah, that's looking
nice. I want to basically show you how
to create unique ivy, for example, ivy that is like hanging all the way over
here and stuff like that. So ivy that is specifically made for a part of your scene. And that's what we will be
covering in our next chapter. And after that's done,
we will just go ahead and we will start
doing placement.
10. 09 Creating Our Unique Ivy: Okay, so what we're
going to do in this chapter is we are going
to go ahead and go over on how to create very
unique looking ivy that is specifically
based on your level. For example, having
ivy grow over here. That's the one that
we will be doing. So this is great if you
are making something very specific and you just need to have the ivy growing in, like, very specific ways. For example, also
on the car would be a great one to have
it grow over here. Now, this isn't too
difficult to do. It's just a little
bit of a workaround, but we can still use the Ivy
that we already created. So first of all, you
would need your model. Now, I assume that often you
already have your model just sitting in May or whatever
tree modeling program you have because you
made it yourself. However, if this is not the case, you can
go ahead and go, for example, over here,
inside of UnwelEngine. And if you just
select your model, and I'm just going to go
ahead and I'm going to actually look it up in
the explorer over here. And then all I'm
going to is right click Asset Actions and Export. And I'm going to go ahead and
I'm going to export this. Easy foliage. Oops, swung folder. And if we then go
ahead and go to Export from Unreal
and just call this, sealing hole, A,
it should be fine. So let's just press
Save. And yeah, it's all good. Okay.
So we got that one. Now we should be
able to just right away get it into Unreal engine. I hope that it all looks correct and there isn't anything
strange going on. But let's go ahead
and do a file and do a saves and immediately like save this as something
else just in case. I'm going to call this IV
score Unique underscore 01, and I always do
01 in case I have another variation I
want to make later on because I can often
not make up my mind. So we have that done over here. Now we want to go
ahead and we want to go up here to collision. Art? Oh, no, sorry,
that collision art. Let's do it over
here. It changed a little bit since
UnreelEgine eight. So file, and let's just do a
normal import mesh at set, and we are going to go from Unreel sealing hole A, open it. Okay, so that has
loaded in fine, it looks like. So
let's see how it goes. Let's now go to
collision of forces. Oh, yeah, forces,
geometry, sealing hole A. Okay. You know what? I'm just going to go
ahead and I'm going to temporarily hide all of
this stuff over here. So we got this one and
it's really, really large. So let's just go ahead
and fix that first. Now, if we go ahead
and just go down here, we have our force. We
have our geometry. There used to be
like a scaling here. But I can remember like,
Oh, yeah, here, transform. There we go. Here, transform.
That's the one I meant. So let's do 0.1 in
our uniform scaling. That should scale it
down on all sides. And I just want to, okay, I guess I do need to
actually have a look. Zero point, I need to go even lower because
I want to kind of, like, have it fit
along this piece. So let's do 0.01.
Is that too much? 0.02. 0.02 should be fine. Now, one thing I am worried about is that we have
these Alphas over here. So to be very honest, I think that this mesh, specifically, we just want to go into Maya and remove these alphas
because these alphas, they are dt over here. That's not actual geometry.
This is just a plane. However, that means that
inside of speed try, it just read as a normal plane. We can already place
this into position. That is no problem.
So we got this one. I'm going to go ahead and set
my angle to 90 over here. So that's also good
so that we have this. And then you can kind
of place in place. And for us, it works
almost like the cube. So we got this stuff over here. It's just like it's
a little bit more fiddly to get
everything working. So I'm going to go
inside of Maya, save my scene, and it's just
create a quick new scene. And I'm just going to
go ahead and I'm going to go file import, and I'm going to import hoops, our ceiling over here. And just leave it the same
scale that it is before. All I want to do is I
just want to go in here and quickly double
click and just delete around the area that I want to actually
have my foliage, which is just this area. I'm not going to
delete it everywhere, but I want to delete
anything that I do not like, like, for example, these planes. And to be honest, I'm also
going to delete these pieces because sometimes the collision works a little bit
funky on like, really thin pieces like this. So if I do this, at least
they will not be as thin. And let's see, just in case
I'm also going to, like, remove them over here, that's fine, and maybe
also remove this one. There we go. That should give
us more than enough space. And if we then overwide it, we can just reload
it inside of unreal. So we can just form real
sealing hole over here. And if I go in here, I should be able to simply press the reload
button on my meshes. There we go. So that fixes that. Next stop, just add like a
nice gray material over here, and now we can get started. Okay, so what we are going
to do for this is we are basically going to hide everything and start
with the very base, which is going to be a trunk. And you probably guessed it. So this trunk, we just want
to go ahead and press W, and we want to
move it over here. Um, and then you can also choose the
scaling and everything. So yeah, I think something
like this would be nice. So let's see. It falls off. I want to have it let's see that our main shot
our main fold shot will be something
like this over here. So it will fall
off on this side. On this side and
in between here. That's where I want to fall off. So make a plan of how you want this to look. So
that should be fine. Once you've done that,
you can go ahead and you can go to
the second one, so you can press
nhight on this one. And what we're going to
do is we are going to basically get rid of our
cube collision over here. And instead, we are
going to go for our ceiling hole A collision
over here. So we got those. Then what we can also do
is we can also just like, first of all, like, make them not as strong. To be honest, the ceiling hole collision, we
might not even need it. We might just need a gravity or like a direction,
to be honest. Here I do ceiling hole? Oh, no, no, sorry,
we do need it, because the direction
is too strong. So without a collision, it does not know that it
cannot go through it. In that case, here, let's
do a little bit of both. Let's do our ceiling
hole collision at 0.2, and then we will have our
direction at zero point yeah, I think, actually,
that was fine. 0.25. And now what we can do is we can just
go ahead and once again, click on them, go to notes. And let's say, here, let's make this one
like a bit longer. I just want to make all
of these longer because I want to have them,
kind of hanging out. It's an interesting start angle. I'll see if I can, like,
improve how they behave because right now
they are sticking out a little bit too far. Whoa, God, I didn't
mean to do that. Just meant to push it like this. Here, let's do this one. This one, actually, let's make this a bit here, a bit longer. Oh, that's quite nice.
Let's do a start angle. So we are going to have this
one, hanging over here. And then it is quite nice
that we still already have a few branches
just sitting in here. Like that. So let's see, how far out do I
want to have this? Just go to, like, one of my camera angles
so that I can see. Okay, so that's really low. So if we look at our reference, it was actually
quite a bit higher or quite a bit longer
than I wanted to do. So let's go ahead and make these actually a lot longer over here. With our length. This one, I don't know why this one is giving me such
a strange looking. You can also, by the
way, you can, like, set the settings customly, I believe, on top of everything whenever we have our
notes over here. We'll see, we can do
size of parent and stuff like that. Start role. Maybe I can No, I cannot alignment. Also not. It's too bad that I cannot I do not think we can
do it with forces. No, here. So that's too bad. I hope that they will
add that in the future, that you can actually
have the forces, like the intensity of the
forces based upon your branch. But for now, I just kind of need to
play around with this, because I want to have
this one like hanging. But right now I don't like that what it's doing right now. So it's just kind of like giving me this
really strage Like, these are all hanging,
but this one, it just isn't budging
for some reason. And I do not really
like that because here, I can roll it, but it
does not really seem to work exactly the
way that I want. That's a difficult
one, to be honest. Yes, I can just remove it. So I guess that's
something that I can do. I can just delete
and then just place this one into place
and just make this one longer because
this one does work. I don't know why that one specifically is
being so annoying, but but okay, so we have
these pieces over here. That's fine. Now,
as you can see, if we now go ahead and
go back to generator, that's the thing
with our forces. So we have a force over here, but because we have
the ceiling hole, they have the urge to tie and curl back up on the ceiling. That's why we need
to keep it low. But if we then maybe
also just play around with our direction
a little bit more, we can have them hang a
little bit longer like this. And honestly, once
you've done that, you can just unhide this one, and you can see Okay,
that's a little bit crazy. Direction. And we
had it at planar. Instead of planar,
I want to just have the direction
and maybe have the ceiling hole over here and set it to be like
a lower version. Okay, so in our
direction, I kind of, that's a little bit annoying that it's giving me these bows. I don't like them. Because
that's not how Ivy would grow. So Ivy would not really
have these bows over here. Now, there is another force
that I can sometimes try. You go to forces art
and like a magnet. And basically, with
this one, yeah, it will just be
attracted to the magnet, which can sometimes be a
little bit stronger here. So if I do that, it gets
attracted to the magnet, but Damn, it doesn't look
like it is working this time. Let's have a look. So yes,
you can do it by hands. Like you can manually get
them to go like this. But once again, I
do not like that. I want to minimize the amount of time I need to work on this. So, what I'm going to do is I'm just going
to go ahead and I'm going to have a look off
camera because I want to make sure that I don't mess around with this for too long because there
are so many settings. Okay, so I guess the easiest way to do this to get it like a fairly decent area is to go to spine and then set the start angle to be
a little bit lower, so that it really
flows off like this. And then you can also play
around with your gravity like a little bit over here
just to have it down. And I feel like that is probably the best way
for us to go about this. Oh, and we can probably,
like, increase it. Now, over here there are
still a few that are bent, but in order to fade this out, we are going to have basically
a generic ivy behind this to basically hide
the fact that over here, all of these pieces
are sitting like this. We are going to hide
that using generic ivs. Now, what I can do is I can go to generate and maybe some first a little bit
higher over here. That seems to be a bit
better. But there we go. That looks pretty decent, I think, let's go ahead
and unhide our meshes. Okay. Yes, that can
work. That can work. They are a little
bit thick, however, so let's set the radio
scale a bit thinner. And now comes the
big one, our leaves. Let's see how they behave. So they definitely work. That's fine. I'm going to go
ahead and for these ones, I'm going to first of all, make the size a little bit less because it's a little bit
too large for my taste. So let's set the
size to maybe like 0.2 inch over here,
yes, that's better. Let's see. So for
our directions, what do we have right
now in our forces? We have a planar, which
I want to turn off, so the planar unfortunate
doesn't work. Okay, so without planar, yes, that looks a lot worse, but that's probably because
of our direction, isn't it? Yeah, it's because
of our direction. So oh, that that
is a bit tricky. Let's see if our
ceiling hole can do something because we are losing. The reason that we
are losing so many is because of the rotations, see? So because they are planes, that's how we seem that's why it feels like we are
losing a lot of them. Let's turn this off. So if we do planar, planar surprisingly does
make things look good, but that's interesting
because the planar is sitting over here. So I guess that it
just happens to be a lucky accident that it
reflects in a decent way. Let's for now just turn it off, and then let's see
if we can maybe work around with our
orientation over here. To see if we can
maybe play out like our facing to get something that
looks a little bit interesting, but still have it. So it's really hard sometimes to properly see which
direction we are going. Let's see, the up and the right. Oh, yeah, here, the right
seems to be quite well. If we set this to the minus, so that will move things down quite a bit,
that's pretty good. And then we have the out, which also seems to move things down. That's also pretty good.
So, down here, I like it. Like all the stuff that
we have here, I like. I just do not like the top. So I'm just having a t for the top that
maybe we will just, like, have another ivy plant
sitting on top of this. But it would be great if
we can just do, like, a little bit of just something. But that's tricky. This one is trickier than you
might think to get it specifically in these areas. It just so happens that
actually, honestly, even now planar also
doesn't do much anymore. I think the planar
just happened to rotate them in a
favorable position. And what I also think is that
a lot of them are hidden. Here, if I go in here, like a lot of them probably hidden. Now, we can try to have
a ceiling hole turned on and then maybe like quite a low level in the hope not that it grows
towards the ceiling, but that it maybe just avoids
the ceiling like this. But, yeah, that's the direction. Yeah, you know what? I
think this should be fine. I think I'm going to
leave it as this. The only thing I want to do is I want to go ahead and I want to temporarily hide these pieces. Then in our big, I want to just go ahead and go to
notes and I want to make this one over
here a bit longer. That might be a
little bit overkill. Let's do a little bit
less over here in the hope that it gets me here. I think that will look
a bit nicer if it's really hangs down like that. But as you can see here.
You get the point. Oh, sorry, there's a
notification that is causing my back count
to see. There we go. So, you can see the point. That is looking really cool and you get all of
this unique stuff, and then if your
height, your branch over here and give
the second to reload. Excuse me. Collision. Is it broken? I think. Okay. Yes.
Does this work? Okay, as I said, speed 39 has come out
literally two days ago. So it might be that the version is not the most stable
version ever yet. But anyway, this
is looking good. I like this. Actually, yeah,
it's looking really cool. So I'm going to go ahead
and I'm going to save this now. Over here. And now we are going to go ahead and go on with the export. Now, the export,
that one is going to be a bit interesting
because, of course, our scaling is a little bit uneven when it comes to
very specific works. But for now, what you want to do is you want to
make sure that you hide your collision because ZD exports your collision,
and you don't want that. So you hide your collision, so all that we have
left is this piece, and then we can go
ahead and we can do the normal export to gain. From Speed tree,
yes, IV, unique 01. That's also fine, save. Over here, yeah, I'm fine with the scaling and everything
because this is what we will adjust
inside of Maya. So yeah, we kind of
just need to mess around with it a little
bit inside of unreal. But the nice thing about this
is because this unique one, you kind of only need to do the scaling once, and
then you're done with it. So we have this exported, and now if we go ahead and just reopen up our original
foliage setup scene. No, I don't need to
save this over here. That is fine. So we can
add this one over here. Let's go File Import. From SpitrivUniqu, raanimport. And I'm going to do this
in a very basic way. I'm going to do the
typical whole J to rotate. Oh, here, see. And it's
also like rotated in an interesting position.
But that's all, no problem. So we just want to go ahead
and we want to scale this down and maybe use this as like a scale
reference once again. But the scale reference does
not really matter right now. So I'm going to have
my Pivot point in a location that will be the easiest for me to see if my scaling and
positioning is correct. So let's say
something like this, and then press the new
layer and assigned select objects and call this IV underscore Unique underscore 01. IV unscore U un score
01, then, fine. The name already exists. So that should be already good. I can just go ahead and I
can export or save my scene. Export selection, and we
are going to export this to unreal IV nscoreUUnscore 01. There we go. And
if we go in here, we can just go ahead and
we can go to assets. And I'm going to navigate
to unreal IV, Unique 01. Yeah, we can just
do a normal import. And basically these
kind of plants, yeah, you would just do
like a bit of placement. The reason my engine is very slow is because it is compiling
the shaders right now. So if we just quickly open this up so that I can set
it up right away. So let's go ahead and find our materials. Let's
see here, yeah. Okay. So we have a ivy
bar that's this one. And for the rest, it's
like generic IV one. Two, three, and let's do one. Again, you can, of
course, add more. But okay, so that is now
set up, so that's done. Okay, now comes the
tricky part, the scaling. So over here, we want to go ahead and just
import our unique ivy. Let's turn on snap
rotation and rotate it exactly 90 degrees because that seems to be the
most logical place. And let's see. Oh, wait. Also go down here because
we have decals on here, here, the moss decals. So we just need to scroll down t received decals, turn off. Okay. It's move this
up a little bit, and now it is just a matter
of basically scaling. So if I have a look,
where are my forces? There you are. As
soon as you go to forces and you click
on it, it will show. So let's use this one as like a guidance to where
the scale needs to be. And of course, where the
position needs to be. So I think we need to scale
this up a little bit more. And this really needs to be
in the center over here. And then we just need
to kind of, like, probably push it back a
little bit or down S. No, we don't want to push it back. We kind of want to
place it over here, and it doesn't need
to be perfect, of course, but I still
want to try and make it so that we do not have,
everything floating. I think, something like that. Yeah, that looks really. Yeah, that actually
looks quite cool. And you also have the subsurface
scattering over here, which is nice, so you
can see, through them. And if you would have a sun
lens flare, you get, like, the typical gamey look where you have flare
sitting through it. And, of course, yes, we
have the metal in here, but that's no problem
because that intersecting, yeah, you don't
really notice it. So if we have this, if I
would now go in and throw on a generic one's turn
on my snap rotation. And let's move it over here. You can see if I turn
off my rotation, let's set my rotation to
be based upon my model. But here you can see that
we can very easily hide the fact that we have
those pieces over there, just by adding one
extra piece on top of this and just like
nicely placing it here. Once again, just turn
off received decals. There we go. So that
from a distance, you will never, ever
be able to see it. Even if we go a little bit higher like this, it
will just feel natural. Of course, if you go very high, logically speaking, you
would then need to, like, art probably like
another one over here, and then like another
one to have it actually come from,
like, the outside. That's if you would go like this high or
something like that, then you would have
something like that. But that would take
a lot of time. So we are just going to
keep our camera angle a little bit lower so
that you don't notice. But I will like that. That
is looking very cool. So we now got these pieces. In the next chapter,
what we will do is it's going to be a
bit like a bonus chapter. So that chapter, we are going
to just go over on placing some ivy here to make it look nice and realistic and
just showing you like, easy ways to place everything. Also place some ivy down there. And then what I want
to show you as, like, a quick extra is I want
to show you how to create some ivy root decals that
you can use on, for example, walls, but that
you can also use, like in these areas
to have the roots running everywhere
and stuff like that. So that would be very cool. So I'm really happy about this. And to be honest, I think
I actually like it more than the original from
my original scene. Although, yes, it feels a
little bit more stylized, but it does feel,
it just looks nice. So let's go ahead and continue with this in our next chapter, and don't forget to save
your unreal engine scene.
11. 10 Placing Our Ivy: Okay, so what I want to do in this chapter is I want
to get started by just placing all of our foliage
around here just to get a little bit more
like this effect that we can see over here. So as you can see
here, it just has some nice hanging foliage on both sides and also like a
little bit here in the back. So that's what I
first want to do. Then I want to go
ahead and create like some roots, like you
can see over here. But hopefully we can improve our roots a
little bit better. And yeah, just in general, finalizing the ivy chapters, and then we will continue to
all of the grass chapters. So let's go ahead
and just continue. I'm going to go ahead and so we have these
ones over here. That's fine. Over here, I want to probably grab this one and place it
roughly over here. It does not matter too
much that it is, like, floating a little
bit in my case, because I will be previewing
it from this side. So I'm mostly focused
on how it looks from this area and not how
it looks from the top. But of course, if you want
to avoid the floating, you can once again grab, for example, one of
these ivy bits and do something like this to kind of hide it a
little bit better. You can even if you
want, rotate it a bit to fake it even more that there's just a little gap in there. But anyway, so we
got those ones, and I'm just going to
place it over here. Maybe like rotate it a
little bit like this. Let's see. Let's move it
a bit more like here. There we go. And then we
have this one, that's fine. So that's probably
it for this one. Let's see if I delete
this one, yeah. Okay. So definitely want to keep this one in here. So
we got this stuff. Let's also see what it looks
like if I, for example, replace this version
with our IV generic 02. Okay, so we want to
go for probably like 03 like that. That's
totally fine. I just want to try stuff out before I decide if I
want to leave them. Now, I'm going to probably
have some more ivy. Here, let's do a 02 over here. Yeah, let's try and place
it nicely down here. And then maybe if we also
do like a 03 over here, sorry, 01 over here. So we move this one and nicely place it around here.
Let's see how that looks. And I keep going back to
my camera angle just to make sure that everything
looks a little bit logical in those areas. So that is looking pretty
good. I quite like that. Now, let's go ahead
and let's go on to the other side where we can see a little bit on this area, and then we have
a bit more here. I can remember my original scene that I made a few
more variations. So we are currently, working with less variation, but that should not be
that big of a deal. Wait, let me just turn
off my Gotray over here. There we go. So we got this
one, that's totally fine. I'm going to probably,
I don't know. I guess that I don't need to
have them, so much higher. So I'm going to
have one over here, and then I'm going to
place another one. Probably like over here. And then maybe let's
place like one more, but this one is
going to be like a generic zero, two down here. And now, if you
feel adventurous, you can actually also use your unique version on
multiple locations. So what we can twice, we can twe the unique
version and, like, throw it a little
bit in here and just hope that it is
clipping just in a way that you cannot see like any of those really unique
pieces because they will be hidden inside
of other meshes. And it is something that
very often gets done in Levart so we have,
something like this. And now over here, you don't
really notice that it is the same version that it is clipping, but it is
definitely there. If I would press height, see? So that is actually
quite a big difference. So that's another way that
you can just quickly, like, you know, maybe, like, scale it up a bit and just clip some stuff in and just kind of, like, be careful that it is not sticking through
the ceiling too much. A tiny bit like this,
if you cannot see it, is fine, but else just
move it up a little bit. But it all depends on, like, how you are
making your level. As I said before, if you
are making a game level, then you want to go at and
you want to be very precise. But if you're just making
like an arch showcase that's like from
specific angles, then you can cheat
quite a bit more. I'm going to have another ivy
plant probably over here, and I'm going to
kind of just have it laying. Actually, you know what? It might be nice to catch
some shadows by having it hovering a little
bit like this. So that way you get, like,
the shadows below it, and sometimes that
does look quite nice. And you can sometimes
see me switching my pivot boat to
object over here. So that. And if I then
combine this with maybe like another version over here, like this. And then if you want,
you can even combine it more with maybe like an IV 02, just to break it up and
place it like around here. There we go. So that is
a little bit covered. And then what we can
also do is we can also, for example, grab
another IV too. Maybe like rotate
it's a little bit. Like this. And what you can see now is that we have
decals intersecting. So whenever we have that,
we just want to quickly go down and turn off
the received decals. So let's do the same over here. Turn off received decals, just in case this one over here also turn it off. There we go. So now you can see that it has this nice little bed
of ivy, basically. And over here once
we have some grass. It's all kind of
like tie together. As soon as we also have
some grass and everything, it will just nicely
tie in together. So we got some stuff over here, so that's looking pretty
much acud to what I want. Now, what you can
also see you can see that over here, like, they are a lot lighter, and I think that this is just like the
subsurface scattering. We can over here, if we
go from a distance view, we can go into our material and just quickly
check like our ivy generic over here and if I just make the smaller because it keeps scaling it up, I can see if I can maybe let's say if I do one, here or see. If I do probably 0.4, I am able to give it a bit more. Here's 0.4. 0.4, just to give
it a little bit more shine. And then what you can
also do is you can do the same thing that we
did in our test level, where we basically just use some extra lighting to
basically increase the amount. But it is looking pretty nice. I'm going to go ahead
and I'm going to probably grab one of
these and just make it a little bit nicer
on the stones also because it would not
really make sense for the ivy to just
be hanging there. It would also like grow on
the stones a little bit. Now, technically, what you
would have is you would have lots of roots
here and maybe, like, less ivy on these areas or even,
like, still dense ivy. So that's why we are also going to create some decails later on. Still, I just want to nicely
have it flowing over, as you can see over here and
actually also over here. So if we are doing this, we
can just as well do it right, even though you guys will
not have this level, but I want to explain to you that creating
foliage is not just about making the foliage and making it look the
same as in real life. But it also comes with smart
placement to make sure that the placement is logical and
that it just in general, looks nice and a little bit like the way
that foliage grows. So over here, I can once again, cover this up with some overgrown foliage or over here because this is
like an abandoned tunnel, this foliage had a lot of
time to grow very large, like years and
years, I would say. So yeah, seeing that, actually, no, it has, like, a little bit sticking
out over here, which is not too good. So let's just rotate this back and maybe then
push it back in a little bit more over here so that it's not
sticking out as much. And then I keep going back to my camera angle over here and pressing G to basically
height everything. And also, what I can do is
yeah, your screen percentage, normally, the default is 100, but then it doesn't
look as crisp. So if you want, you
can quickly set it to 200 to really get, like, a nice sharp effect. So yeah, that is
looking pretty good. I quite like the
foliage over here, so I'm quite happy with that. If I press G, I should have over here like a
few different lights, and I'm just curious if I grab this light and I basically place it at the back over here to fake the backface
lighting a little bit more. And then if I go in this light
and I turn off my shadows, so scroll up to light and
then turn off cast shadows, what you can often get is here, if you look see, you
can get less darkening. If I do 0.5, you
can see over here. So this is zero, and then 0.5 or maybe one even, it will just give us a
little bit less darkening. So I'm going to go for 0.5. And because we turned
off our shadows, the light is also a
lot cheaper to render, because the shadows
is what makes it often quite expensive. Next 1 second, let
me make the smaller. What I want to do is I just
want to go ahead and I want to quickly add
some extra foliage here at the back
that you can see, because that is also
looking quite interesting. And then what we can do is we
can go over with the grass. So here at the back, what we
can do is we can pretty much grab this one, this one, and let's also just
grab this one and this because why would we do all of this work again
when we can just steal it. And reuse it. So over here, this is not exactly the same. So as you can see over
here in my level, because it is so far away, you can see that I
did not bother with actually making a
proper unique piece. And that's once again,
just like a timesaver. But the nice thing
about this is that I am able to just, oh, my God, I am able to now
nicely just, like, fake the hell out of
this and just place like some random ivy that is kind of like hanging
from tops over here. And maybe what I can
do is I can have another one and that
I actually scale it up a little bit and just have it, hanging
against the side. So placement wise, it's a lot easier because from
this distance, see, you barely notice anything. You just notice like
a little bit of ivy just randomly floating here,
and that was the goal. It's not always about
making it look correct. Sometimes it's just about making sure that people understand your message that you
have with your art. And my message was overgrown
without needing to spend, well, I already spent
like, I don't know, 100 150 hours on just
creating the scene. So I didn't want to, like,
spend another 50 extra hours just to make these really far distant
pieces look correct. So often I even go to, like, this view, and
then I simply like, move it around a little bit so that I can see
what it looks like. This is looking pretty
good only over here, the subsurface scattering, I don't really
like in this area. I know that I have
a shape over here. So maybe just here, see
if I set my sauce with. I think for this one,
I just need to, like, kind of move it back and
maybe, like, move it up. But my shadows are a little
bit funky in this area. Go over here. Okay, see here. That works better when it is a little bit darker
in these areas, and that it just has the
light mostly focusing on this area because it just makes it stand out
a little bit more. And honestly, this one we
can kind of like leave here. So I'm probably going
to leave it at this. So as you can see,
that was just like, a little quick
overview of how to do some nice foliage
placement to make it look interesting when you still have very little pieces because
that's also about this uto. It's about easy foliage, but also minimising the amount
of pieces that we have. Now, last thing that
I'm going to do is, I'm just going to quickly
go to my preview map, and I just want to
quickly duplicate this cube because it would only be logical
if in our preview map, we still art some of the
pieces that we create, even though they are unique. So what I can do in here
is I can pretty much do the same where in this case, I'm just using my preview
cube to kind of like fake having a wall over here. So it doesn't need
to be perfect. I just needs to showcase a little bit more of
like the preview. You can, of course, if you want. Oh, no, wait, you
guys cannot do that. That's why I'm doing this
because you guys cannot have the same
concrete as I have. But basically, I
have this over here. It doesn't look very good, actually, to be honest. So what I'm going to do is
I'm just going to kind of, like, fake this a
little bit more. And the way that
I want to do that is I want to grab this and, um, let's see, I almost
feel like it's cylinder. There is a way to
do this, but it's a little bit overkill to
do it for this tutorial. So if you go up here, I will show you very quickly. If you go up here
and you go to Oh, God, where are you?
Edit plug ins. There is a plug in nul gen five, and if you type in modeling, it is called the Modeling
Tools Editor mode. If you enable this and
then restart your engine, you will get this
button over here, and when you click on it, you will basically get
modeling tools. And what I'm basically going to do with this
is I'm going to just quickly grab a box and place it over here
and press complete. And sorry, this is not what
the tutorial is about. So it is just something
see it as an extra bonus. In the next chapter,
what we will do is we will create
our roots because those take much longer than
what we have time for. But what you can do is I can
create some boxes and I can basically do like a boolean
inside of unreal engine. So I can grab these
boxes over here, and I'm just going to very
quickly cut them out. I know that there are modeling tools like the bevels
and everything, but those tools, they
are a little bit buggy, so often it is easier for
me to just quickly do like some bullying
functions over here. So something like
this, I then grab my model then what I do is I grab the model that I want to do a Boolean on and I press Boolean over here
and then accept. Once again, grab my
model, grab a Boolean, and then click on
Boolean. Like this. And I'm basically just cutting
away some shapes until I got something that
looks pretty decent. And once you've done
that, you can close this. Terms of materials, I
would just quickly, throw on a random
white material again. And then what I'm going to
do is I'm just going to basically nicely close this off by having another
wall over here. And I will just make this, like a nice presentation
scene a little bit later on. But for now, this will do. So we just got a wall,
and then if you want, you can even have
another one. Over here. There you go. It's not perfect. But it does sort of work. And then if I grab, for example, one of these pieces just
to make it end correctly, let's use IV Generic 01. Then you guys because this is the presentation scene
that you guys will get. So that's why I
want to make sure that everything
is still in here. And yes, I could do
this in my free time, but what's the fun
of that when I can just show you in case
someone is interested. If you're not interested,
you can just skip. You can just go to next video. So that's the power
of these kind of videos compared
to live streams. And I'm just going to
kind of have another one maybe sitting over here. You know what?
Except for one more. That has, like, a fall
off over here. See? And very quickly,
you can create, interesting scene
out of basic shapes. That's why I really
like foliage. Although making the foliage
is often to make really, really high quality
foliage, is quite a pain. So, of course, this is
high quality foliage, but it's not the highest
quality that you can get. But in general, it does
add so much to your scene. You already seen it a little bit simply by us creating, like, a tiny bit of foliage, for our tunnel scene,
how much that it adds. But here we go. I don't know if I need to have
the cast shadows on. Yeah, I do. There we go. See? Tata, good enough for now. So I will later on, make the scene nicer, but I just want to have a proper preview. Awesome. Next
chapter, what we are going to do is we are
going to work on IV roots, which are going to be a decal. So let's go ahead and continue with this in our next chapter.
12. 11 Creating Our Ivy Roots Decal: Okay, so now that we
have our main ivy done, what we're going to do is
we are going to go ahead and take a slight detour in
a slightly different topic. So you can kind of see this
as like a bonus chapter. And that's that I want to
show you how to create some ivy roots specifically. So without leaves and
just like a decal, because these often go hand in hand with these
kind of measures. Now, this is actually
quite simple. So we are going to go
for some roots that are let's say that we
will have them, like, growing upwards because then I can immediately also show you how to create ivy that grows
in the opposite direction, basically, so
that's not hanging. Now we have our IV generic 01. I'm just going to
do a saves and just call this IV underscore root underscore decal underscore 01 in case you ever
want to create more. Here we go. Okay, perfect. With this, we do
not need a mesh, and we do not need leaves. In our spine over here, we are just going to
go ahead and go to our skin and set this back to polygons over here so that they become actual
branches like this. Yeah. The only thing is
that they do now have. Well, yes, so they have
the wood material, so we need to replace
that later on. So let's unhide my trunk. Let's also go into forces and showcase our cube
collision over here. And let's just quickly hide because if we do not hide
it, it's really slow. And let's basically
just grab our trunk and let's do 180 in the rotation. Although we probably don't
even need to do 180, we can also just
change our roots. But let's just go ahead and
have this like the bottom over here, like this. And then we unhight these ones. And now what we are going to do is we are just
going to go ahead and moving this up I think we just want to I don't think the rotation is
actually going to work. I think we need to, like, Oh, what I mean is I
don't think we can just rotate here, see, we cannot just
rotate this piece, so we need to do the rotation
for these pieces customly. So let's just move this over
here and I'll show you. Well, actually, I don't need to really show you.
It's very easy. We are just going
to go ahead and set probably the start angle. I think that's the
easiest one. So over here we have our start, no. This one, also no. So I guess
this is going to be a lot more Awkward than I thought. Let's go ahead and let's do
this a little bit different. So what we can, of course, do is we can just
go ahead and, like, here, click on this little
dot and just delete it, and then just delete
these branches. Yes, always, yes. Okay. And then just re add them to add some new
branches over here, and then just go into
your generation and just quickly set the mode
to proportional, probably, so that we are just
creating a few new ones. So for these ones, we are
actually going to go for, like, way more branches because that's what I want for this
specific decal, because we want to go
for where are you? Here we are. We want to
go ahead and we want to get something that's similar to what you can see behind here. So just like really a lot of stuff all winkly and
all that kind of stuff. So let's see if we get
something close to that. It will not look exactly the
same, but it should be fine. So let's just go ahead and have a bunch over here of roots. Let's set our first
down to zero, and our last down to one. Next, what we want
to do is we want to go ahead and we want to set our let's go to our spline.
Let's set our length. Let's just randomly do
something like this that the length basically becomes a little bit random over here. Next, we want to go
ahead and we want to set the orientation. I think we want to set the
oritation little bit higher. Yeah, for the rolling,
it doesn't really matter because we have
them on all sides. You can try and do alignment, but that often also does
not really do much. Anyway, let's go ahead and
let's go in our shape. No, not shape segments. Where are you? I
cannot find you. Um I'm looking, of course, for the thickness, so
that's the length. So where is my thickness? I thought this was
always in shape. I'm going to find it in here. If we just scroll
this up a little bit. So the segments is basically
your actual geometry. So even though it says radius in segments, that's not
the one that you want. So we have a length orientation, shape, Oh, am I so blind? I must be Oh, here we go. Skin. H Okay. Wow. I don't know how
I messed that up. Anyway, I'm going to make
them a lot thinner like this, and now we are really
just going to have them like forcing them on here. So let's get started by yes, making them a lot thinner,
something around 0.2. And then what I'm going
to do is I'm just going to go ahead and
probably set my length, my general length to be
a little bit bigger. And now if we go
into our forces, we are basically going
to do a few things. So first of all, we
want to have the plane. And I don't know the cube. I think we just want to go
ahead and have planar over here and sets like
really high to like 50. So we are really pushing this out over here
to the planar. I'm going to set my start
angle even stronger over here. There we go. So we got that one. Now, we don't need the
direction for this, but I just want
to see if it will work for us to have
a magnet, else, we will just cut out
all of these pieces, but it would be
nice if I can have even more branches
thanks to the magnet. So we can go into our
branches, forces, turn on the magnet and Ah, that, it does not do
exactly what I was hoping. Like, it does pushes
them through. So what you can do
is at this point, you would be able to, for
example, grab this piece. And, like, throw it down here.
It can just be straight. Honestly, we don't even
need this cube here, I can just be straight, but it does not exactly do what I want. So instead of a
magnet, where are you? Instead of a magnet, maybe
we can try just like the direction that might give us a better result
if we do a direction. And then if we scroll down
and set the angle to 180. Oh, no, sorry, that's
the wrong angle. We need to go on the see Well,
none of the angles work. Then I just need
to do it manually. Then I'm just going
to do it like this. Oh, yeah, here, one minus one. Okay, so we had to go
into the minus one. Anyway, so we now have this. So if we now go to our
forces and try direction, what if we set our
direction like also 50? Like, really, really high. Okay, so that does allow
me to have these branches. Don't worry that they
are sticking so far out because we are
going to basically bake it onto a flat plane. So that's why I'm not too
worried about the amount. So I'm going to first of all, set my number down a little bit. Over here, because these are just going to be large
branches over here. Then I'm going to
set my scaling. I'm going to give my scaling. Let's set a point here. So double click and
make these smaller. And I'll set a point here and make these smaller
over here that they are really focusing into
the center like that. For the rest, jumble basically
just allows us to do, a little bit of random
variation, something like this. Oh, that's really far out. Forces planar. Yeah, we cannot set a
planear any higher. So let's try
something like this, and now you can just grab your little branches and just drag them on top
of your branch again. And then if you unhide them,
they should behave the same. So as you can see, this is
what we have right now. That is really, really strong. So first of all, let's go ahead and
set our planer, also really high for this one. And our direction, we can we can play around a
little bit with our direction, like moving it
upwards like this. And then what we're
going to do is we are going to play
with the amount and introduce a lot of noise. Let me just first
move this down. So yeah, let's play with that. So let's get started
by just reducing the amount of leaves or the amount of branches
that we have over here. Let's set the number to
seven to get started. And the way that you
should see this is if we activate our cube collision, this is how we will be baking. So you will see it from
basically this position. There is a way to turn
off the scaling Oh, I always forget overlay. What is it text axis indicator? No, height indicator.
There we go. So when you turn it off,
then you can turn off your like the little guy. So this is basically
how we will be baking. So it will be going
from this position. And what we can also do at this point is
I'm just going to quickly grab our bark material over here and I'm going
to assign this back. And I'm also going to
have my bark material on my large branches
because this is one of the few times
that we will also here, so you can just replace
branch material. This is one of the few
times that we will also actually bake
down our branches. So having this, yes,
that is looking good. Here, it's really irregular. I think I'm going to
make it even more. So if we just because
as you can see here, it is like all over the place. But I don't want to make
it look too cliche, even though it might
look good in real life, it will look like
noise if we do it in three D. So we don't
want to overdo it. I'm gonna go ahead and
go to um you know, I need to go in here because
I cannot find it properly. So we want to go ahead
and do like over here, our late noise, see? And then you can mess
around with that. If you want, you can also mess around with your
early noise over here just to give it a
little bit more Well, noise. That's basically it. So we got those done. Maybe make the thickness a
little bit thicker. So if we go to skin, this time I remembered, let's make this a
little bit ticker. And then if we go ahead and go to generate and set
this maybe to, like, three, three, three. Yeah, four. Let's do four. And then
the only thing that I do not like is that there isn't
a lot going on in here. So if we just press W over
here, I'm going to just do, some slight manual movement
just to reduce the amount of, like, cluster branches
that we have over here and over here because that's a little bit
too over the top. I still want to have
it somewhat even. Because that will work
best for a specific decal. If it is not because
if I bake this, it will become a
little bit too much. So maybe you can even also
go ahead and delete a few. So whenever you have that, you just kind of
want to see if you can maybe move
some stuff around. Maybe let's delete
this one also and then move this one over here and then move this
one over here like that. And if you want, you can
also while you are moving, you can also quickly
just push some of these forward over here to give them a slightly more
favorable position. Well, actually, you
know what over here, I can actually use a few more. There we go. That's
looking pretty good. Yeah, down here, if you want, you can also play around it. But, of course,
we will basically cut it off at the
bottom over here. So this is what we
will see pretty much. So that is looking pretty good, and that gives us a
very solid concept of what I'm trying to tell you. So now that we have this stuff, we can hide this, we can also hide the trunk, so that all that we have left is just a bunch of branches. And then, of course,
if you would want to create real ivy, like ivy that is climbing
instead of hanging down, you would do is you would just make sure that these branches, you would place less
of them so that you do the same thing as when they are hanging and
just against the wall. And that's pretty
much the same thing. And then you would just
place your leaves on here. But anyway, so we
can save scene. We can go ahead and we
can export this to game. And we are going to call this Ivo Digal 01, underscore HP. Yes, on the score HP, that should be fine.
So let's save. I don't care about any textures
or anything like that. That's all good, so
let's press Okay. And once we've done that, we
can go into Maya over here. And I'm going to get started
by turning that one off. I'm just going to
go ahead and create a quick plane over
here. Set this 20. A to rotate this
and scale it up. And then we are also
going to import. R IV Root decal HP. And this, Oh, God. I did that again. Sorry, I
need to reopen my scene. I keep forgetting
that I have my LOD zero over here. Add it ungroup. Ivy, underscore
Unique, underscore 01. There we go. Try it again. I'm just going to already
import my hipoly. The order in which
we do this kind of stuff does not really matter. So we just want to import it. We want to rotate
it nine degrees, scale it way down over here. And yeah, I guess the
order doesn't matter, but I think I want to
just rotate it at 180. I think this area looks
a little bit better. You basically want
to have this in front and then you want to
have a plane behind it, and the plane is what we will
be using for our baking. So what we need to do is we need to go ahead and we
need to create our plane. Just get rid of any segments. We don't need that. This
will become a decal. So if we just go ahead and
scale it, we can move it. And now on the side, you can kind of like decide
what you want to do. If you want to scale
this big enough so that you are basically
hitting both sides. And nice thing if you do this is that you
don't have to make a tilable because a decal
does not have to be tilable. The only thing is that we will have some more empty
space at the bottom, but that should not really
matter in our case. So what I'm going to do
is I'm just going to go ahead and I'm going to go to my I don't think I
actually have a view, because this is probably
like the back view. So if we go to our site view, Oh, we don't have the cameras
for there's no problem. Like, yes, I can create an entire new camera
and everything, but why would I do that, when I can just kind of
like preview it here. Basically want to
have your plane, not touching your hipoly but still being
very close to it. Something like this. So we have a plane and we have a hipoly. So basic concepts of baking, what you can do now is
basically we can, first of all, because I keep forgetting
that IV root underscore HP. And I'm going to edit ungroup and delete
that. There we go. And now we can, first
of all, save acne, add this to a new
layer that we will call root underscore
decal underscore 01. And then we can
export, first of all, the loople and ole will already have its
UVs and everything. And I'm just going to
export this in here. So let's just call this IV underscore roots, underscore LP. So that's fine to
just leave it there. And then if we go ahead
and also export this one, we will call this
Ivo underscore HB. And export that.
Perfect. Okay, I am going to use Momset
because that is by far the easiest I find to do something like do something
that is sticking out very far away
from your low poly because you can in real time, edit your cage here, Mum set. However, you can also do this in normals or in substance
paint or anything like that. But anyway, for Mm set, we are going to go ahead and
just a brand new version of Momset super easy. We don't really need to do
much. I'm just going to go up here and add a
new bake project. And then what I want to do
is I'm going to go ahead and import my IV roots low polen hi pol by
dragging it in here. And you can just use left
mouse button to round, alter, middle mouse
button to pan around. And now that we've done this, we want to drag our
high ply into the high, low poly into the low, and then your hypols
automatically hidden. But if you just turn
it on, you want to click on low and first of
all, turn off out the bake, set this to none because else, as soon as we make a change, it will try to already bake, but we have not done
any settings yet. And then in your Max
offset, which is your cage, you basically want to go
ahead and want to set this in front of your
hypol like this. So what will happen is it
will now bake like this. Now, lastly, what we
need to do is we can go ahead and just delete all of our materials so that
we have one left, create a new material that
we'll call bark by clicking on the name and drag this onto your hypol and you
probably guessed it. All you need to do
is you need to go to your textures and drag in
your albedo map of bar, your no map Huh? Normal map? Okay, weird. And also your Ruftus
map over here. So now you can see that we now have our bark just like that. So quite easy. And now all we need to
do is we just need to go ahead and set up
our baking scene. So I'm going to go
in here, textures. Let's make one that I
will calliv Roots decal. And this is basically
what we're going to use to save all of
our textures in. So let's copy that location
and then down here into the bake you want the
pass location IV, roots underscore
01, and press save. And now that you've done
that, pretty much all you need to do is actually, I'm saving it as a PSD. I roots under score 01, I can just as well save it as a TGA so that we can right
away import it into reel. We don't even need
to go anywhere else. We can just throw
it into n reel. So let's save and now
in the configure, first of all, set
your samples to 16. Next, set your Act yes, we want to leave our
padding on for now, but for our mask, we want
to probably turn it off. No way, it does not matter. So let's just leave on
the padding to moderate. Resolution two is
more than enough. And in your map, you just
want to go ahead and configure and let's turn
everything off first. And we need a normal map. We need down here an albido
map, a roughness map, and we need Alpha
mask map over here. Yes, it's Alpha mask, quite. I'm not confused. No, Alpha
mask. That's correct. Okay, now if we turn
all these four on, what it will do is
it will literally bake this down onto our plane, and it should give us,
correct looking textures. So we can just go ahead
and first of all, do like a save us. And if we just go
ahead and save this in text bake scene and bake. And give that a try. So we
have our TGA over here. We can quickly go
if we want into Photoshop and just
double check our work. So it is the U visa flipped. That's a bit annoying. Roughness,
normal, and roots here. You can see that
everything is working. We need to flip it 90 degrees counter
clockwise, I believe. So if we just go in here,
I need to grab this, and I need to rotate it. Yeah, counter
clockwise, like this. The reason it takes a while you cannot
actually see the rotation, so you need to make sure
that it is correct. And now if we go ahead
and export this again, and if we then go in Mm set, it will automatically update so we can just press bake again, and it's very, very
fast to do this. Gone are the days off that you need to wait really
long for the baking. And then if I just
quickly double check. Perfect. S. So now here
we have our IV roots. And yeah, that's pretty
much looking good. So now we can already
throw this into unreel. And all we need to do is
then just create like a quick decal material, but that is super easy to do. So let's go ahead
and go into textis. Right click New folder,
IV Underscore Roots. And in here, I'm just going
to go ahead and I'm going to import all four of them,
yes, all four of them. And you just need to go into your normal and you need to flip the green channel because
it is an open GL normal. And once you've done
that, actually, these things over
here we can close takes a while to close because
it is saving like this. And if we just go
into materials, we just want to create
a new material, this one called decal
underscore Master. And I will go over this
very quickly because most of it is just the same
thing over and over again. You want to get started
by just importing your textures over
here like this. I totally fine. Here we go. Now what I want to do is I
just want to go ahead and do a very quick constant
three factor, convert to perimeter and
call this color overlay. Don't forget to make it white. Multiply it with our base color so that will control the color and throw this into
our base color. Next, what I want to do is I just want to go
ahead and I want to click on my decamsterT
turn this into a decal, we want to set the material
domain to the fd decal, the blending mode to be masked, and the decal blend mode to
be de buffer translucent, color normal
roughness over here. Oh, sorry, we need to set
this for master translucent, which allows us to
art in a norm map, a opacity map, which is a mask
and also a roughness map. And then if you want, you
can also convert this to perimeter, base color, mask, normal roughness,
just like that. Super easy. He does it. Now all we need to do
is just go in here, decal master, right click, convert to material
instance and just call this IV roots under score 01. And now the nice thing inside of wheel is that the material, because it is set
to defer decal, it will detect it to be a decal. So you can literally
just drag it in and you can see right away
that if you rotate, let's do a proper snap rotation like this and maybe
scale it flat. If you scale it flat, you will
have less leftover pieces. Just make sure that you don't
scale it into the minus. But now, if I move this up, you can see that now we
have our roots over here. Yeah, you can basically go ahead and you can scale
this however you want, or what you can do is you can, of course, do some balancing. So if I see this, for example, what I would want
to do is I would go ahead and I would make my
colors like a little bit. Darker over here. And now, this is also the first time
I'm seeing it on a plane. And I would say that
I probably want to make everything like
a little bit thinner. So what I will do is I will
make it a bit thinner, but I will not go over
the entire process again. So I just in the next chapter, we will just be done with this because it's like an extra. So what I'm going to
do is I'm going to set my skin over here, the parent a little bit thinner, and that will automatically also make the other branches thinner. So if we just have a
look, so we want to make it thinner and is there anything
else that we want to do? I don't think so, because it is not meant to be something
that you really, like, see from a
very large distance. So that is totally fine. And also the great thing about this stuff is
what you can do. You can simply turn it
upside down to 180. And then if, for example,
throw it in here, and you click on your IV. So let's just select all of
our IV over here like this. What you can do is you can
turn off the received decals. And now, it will look
like you have roots that are coming out on top
of everything else, see? So that will add
like an extra bit of realism to your IV to
have the roots like this. The nice thing about
decals is also that because it is projected, they work on longer shapes. So I am able to, for
example, over here. Maybe I do not want to,
like, scale it down, but you are able to basically
place your roots in here. And because they work
on longer shapes, here, you get some dead ivy like that, and it will just properly
project just like that. Yeah, that's pretty cool. Pretty cool. So this done, what I will do is I
will just go through the process of just exporting
this and re baaking this. And in the next chapter, that's going to be
the grass chapters. So we are going to
make small grass, faded grass, long grass, water glass, grass
and grass with cats. So that's going to be
quite a bit of work. But once we got the basics
done, it will be very easy. So let's go ahead and continue with this in our next chapter.
13. 12 Creating Basic Grass: Okay. So as you can see, I made the roots quite a bit
thinner over here. So now that this is done, now what we're going
to do is we are going to get started
with our grass. And let's get started
with an easy one. So we have over here if we
go to Textis Mega scans. I forgot which one
it was Miriam, no. Ray grass. Yeah, here, grass. That was the one. So let's do this one
because these are like clums of grass, and the clumps, although they do not always
look as high quality, they are easier
to make, compared to the very thin pieces. So what we can do is if we go in Speedre
because once again, this is an easy
folicitol and speed tree makes everything very easy. So let's create a new file and we can just make
a nice blank file. Although you can see over
here, you have, like, a grass file, so you can kind of already
see how it works. Oh, the blank one is new. That's pretty cool. They
have some new files in here. So let's go for blank over here. And what we are going to do is, first of all, let's go ahead and set up our materials again. So we have three of
the grass materials. So let's just go
ahead and do that and call this grass on score 01. Grass underscore 02, so that we still get a nice
amount of variation. Grass under score 03. Okay? That is all done. In 01, I'm going
to grab my albedo, a normal and an opacity, and I don't really care
about the rest for now. Turn on two sided,
go to number two. Give me a second
to navigate to it. Color, opacity. Normal because I'm just making this very quickly
inside of speed. So I don't need to have translucency and
roughness and everything. And number three, hoops,
that's the wrong one. Number three needs
to be this one. Color normal and Obase. Perfect. Now, you might have guessed what we're
going to do next. Same thing as with the IV. Go to your cut out measures, and on the first one,
simply press Add it. And this is how these
ones look over here. So yeah, pretty basic. Now, what we're going
to do is these do need definitely a little
bit more geometry. So I'm going to get started
by just adding my here, adding a nice square plane, and also don't forget
to your pivot point. And then in tessellation, I'm going to give
it probably like two tesselations over here because we need to do
a lot of bending if we want to make this look
fairly realistic. And then just apply them, and that's pretty much
all you need to do. So we have this one.
We can go at an art. And then the next one
we can go in here. And the next one we do
need to do a little bit more moving around like this. And then over here, what we need to do is we
need to go ahead and we need to set the
angle a little bit, and then once again, give
it a bit more tesselation. Oh, hey, it's trying to. For some reason,
it's still giving me an extra etche over here, which is a bit annoying. In means try this. Oh, no. Let's get rid of that one.
Didn't mean to do that. Yeah, there we go. Let's
try something like this. And let's apply. And
we need two more. If we are going to use
so many materials, we can just as well
use all of them and not try to do things
a bit quicker by, like, not using all of them. So we have this one over here. And hopefully, with
all of these pieces, the variation will be
enough that it does not look very basic
because technically, the technique that we are using, it is a very old technique. I'm talking like techniques
that are already being used in games for I know what
seven years, ten years. I honestly, I don't
know how long, but it's something
that you can see really like the classic games. Even in, like, uh, assess grade one and
everything, you can see it. So around that time frame. Oh, wait, even grand theft out of San Andreas,
you can see it. So this is like the
old school methods, although we are still making them a little
bit higher Poli, of course, than they would be in the very, very old games. But yeah, so I don't know why, I say very, very old games, but that makes me
really sound like millennial because I'm
from the PS two era, or maybe just the PS one era. So, um I can understand that there are
a lot of people that have, what do you call the NAS
or something like that. And I just don't know anything about those type of consoles. So I just need to give
it some testlation. Perfect. That one is
done on to the next one, and the next one just
has one big one, and it is Oh, hey, it looks like it's
out or detected already. Sort of like the direction.
So that is pretty good. Only the angle needs
to be a little bit up. And let's give it like a
bunch of teslation over here. So let's apply this one. I'm not sure how many times
we're going to use this one, but the nice thing is that
you can control how often you want to use one
specific material. And finally, we are
just going to go ahead and grab this one. Just get rid of this
line. I don't need it. Sometimes I miss click. So that is also new
in speech nine. It is that it is trying to
automatically already set your masking over here
and set your angle. However, it looks like
it is not always good. Maybe if you have a single
leaf, it will be pretty good. But for this one, it's not yet
good enough for us to use. So we can just go
ahead and do this. And then finally, the last one, we can go ahead and we
can set that over here. Going to give it like
an extra segment. You can see me sometimes, like, cutting off very small pieces just to make everything
fit a bit better. That's not that
much of a problem. Like, you will never be able
to see that. Over here. And don't forget, later on, we will also have an
optimization chapter where I will do a bunch
of optimizations. But anyway, so perfect.
So this is now done. Now, the way that
this is going to work inside your speech
tree is very easy. So what I like to
do is if you want, you can add a zone over here, and this is basically like a circle in which we will
have all of our grass. Or, honestly, nowadays, so
this used to be the way. I think nowadays, we
can even just leave it. So we basically just want to
go ahead and straightaway add a leaf because if you
add a leaf after the tree, it will basically can I
zoom in? There we go. It's cool that they did this. So basically, what
we can do with this is we can just add a bunch of leaves and then
take it from there. So here you can set
like your number. Now, the numbers, they will
always go around like this. And if you have a zone, it
would basically contain it. But nowadays, you can
just go ahead and do this to do the last
and the first. So what we're going to do
with this is, first of all, let's set this to probably
like proportional. And then you can add
quite a bit of them. Then what I'm going to do is
I'm going to get started by already just adding my
first grass over here. And having my first grass, looks like that we
need to rotate this to the let's see orientation. Up, no, not up. Right? No, out. Okay, out, needs to be to 0.5. So now it is rotated like this. Next, what I'm going
to do is, I'm just going to go ahead and
in my generation, I'm just going to already set my scale a little bit higher. And now we basically just want to give the
bunch of variation, and then we are going
to add more leaf types. So we got this stuff. We can, of course, decide
to like the number, but let's get started with
one that is not too dense. And then your first, you
want to keep quite close, and then your last
also not too far away, and just kind of like
playro with it and decide how white you want this
grass patch to be. So I want to have it something like this. Now don't worry. It will look very bad
until the very end. So we got something
like this, that's fine. Next, what you can do is you can also go over here
and go for a sink. And what the sink will do is it will sink it below the ground, which for this type
of grass might be good because the grass
kind of it has some roots, so you kind of want to have it sunken into the
ground a little bit. So we have that one done.
Rotation doesn't really matter. So we can do, what is it? Sweeping is probably something
that gives us variation. Jumble also, it will just
give some random variation. And if we now go to
our skin over here, so here we have our leaves. Now, what you can do is we
can already add this one. So let's add four and
do grass one, grass 01. Grass one, grass 01, cut out two, and just add all four of them
to get started with. And then we will
add more later on. But first, I want to just
play around with this. So we now got our grass, and
then if you go down here, you have your folding, and
this is like the big one. So we have a folding, we
have a curling over here, and we have a random twisting. So this can give us quite
a bit of variation. Then we also have vertex
variation over here, which is also quite nice. And you can play around
with the noise to make it smaller or stronger. And then we do
have some scaling. Now for the scaling,
what you can do is if you have your
Y scale over here, you can actually
click on the graph. And if you then randomly
give it some scale, so I'm going to give
it some let's keep the scale quite large at the center because it goes from the center to the outside. Scale it down a little bit. But then in between, I do
like to sometimes just go in here and just give it some
random variation like this, which will basically randomize
your scale a little bit. That's like a nice workaround to just do some quick
proper scaling. Orientation. So we have our folding over
here. That's fine. A line can be quite nice
to give it a little bit of an outward line so that when we push this a
little bit further in, it will show that it is
basically pushed in. So here you can see
the orientation, it has, again, our deform. But basically, if
we go to generate and set our last to be like a little bit smaller
and our first yeah, we can basically just make this like a small grass patch
and now you can see here. Now it's starting to look
a little bit better. Let's go into our skin. Add another one that
is going to be grass two, grass to cut out. That one is a little
bit more sunken. Let's set the weight here.
You can see the weight. So let's set the weight
down a little bit. And the weight is basically
how often it is being used. And then we want
to have two more. So we can go down here and
we can go grass three. And again, grass tree and then
the second math over here. And what we can do
with these ones is, Oh, these are a lot
bigger, actually. Hm. And you cannot. Well, you can, of course,
scale the individual sizes, but then you would
need to do it by hand. So I'm just going to
leave these for now, and I'm going to actually add those later on when
we have these ones. That's where I'm going
to probably add them as like a little extra
around the edges. But for now, so this is
looking pretty good. We have over here,
this is our grass 02, which will give us some
more stronger bits. I want to have these bits
mostly on the inside. So let's just go ahead and set
a point here and move this down so that it never really generates these large
bits on the outside. So we got that one done also. The size over here is just like our grass size. But that's
looking pretty good. Like, from a distance, you cannot really see that these are just like planes over here because we have them all rotated nicely and
stuff like that. So that is pretty nice. Orientation, as I said before. Like, you can set your
align. Oh, sorry, no. Yeah, that is my align, but
that's not the one I meant. No, not face. I think
it is right, up. No. Not a folding. Where are you? In generates
just our rolling. Oh, I guess it is
just our rolling. But you can play
around with that if you like your rotations
are not correct. And of course, what you
can do is you can also go down here and you can
change the generation. So if I just quickly first save my scene, and I will call this. Let's do grass underscore,
basic underscore small. And then we will also have
grass score complicated or advanced or
something like this. So as I said before,
you can go over here and you can
randomize the generation. So you can very quickly generate different grass bits over here until you get
one that you like. Yeah, so that's
pretty much it if you want to generate some
very quick grass. So that's pretty good.
I quite like this one. Let's set the sink a little
bit less intense over here. And let's actually
see how this looks. So this one, it is turning out a little bit
bigger than expected. So this would be, it would be perfect for
this kind of stuff. And then we will also have,
like, some smaller grass that is just, like,
growing here. Like see, it's hard to see, but there's, like, some
really small grass. So this one is
perfect for, like, a bit more watery
grass, so a bit larger. Now exporting this is the
same as always, you save it. You export it to game, and you can just call this
crass basic Smile over here and save it like this. Yes, that's all looking
fine. Just go to press Okay. Now if we quickly go into Maya, we can turn this one off. We just want to go file import. And I will clean this
up at the very end. Grass basic Smile over here. And if we then just go
ahead and quickly set it in like the correct location, and what you can also do,
actually, if you want, at this point, we can also
like try some stuff out. So although for the IV, I did not really bother, but just because
we are now going to create many variations, if we click on the
grass basic small, we can go up here and set
the scale to, for example, ten, which will make it
a lot smaller like that. The flipping would still
not work as far as I know, because I already
tried them out. So for some reason, flipping the actual rotation of your geometry does
not seem to work. But we can press okay. And the scale should just work. So if we go in here
and we import this and we have where are you grass, basic small here see, so now it is quite
a bit smaller. And what we can do is
we can just go ahead and give this a few tries.
So that is number ten. So if we now try this once more, we can go for ten. Let's do three and press Okay. Just to make it a little
bit more manageable. So once you've done that,
go in here, one last try. Import. Here, see,
three. We rotate it. And I guess that we want
to set this to maybe 0.5. So next time we will
go for 1.5 or 0.3. 1.5. Let's do one. Let's set this to
one. Sorry, this might seem like I'm
going back and forth a lot, but it's preparation. It's for later. Later, this
becomes quite important. Or at least it will just make your life easier. Let
me say it like that. So it is nicer if we just
quickly do it in here. You'll see. Okay, so
that one is done. So we just give the
quick rotation. We quickly go ahead
and we ungroup this. I should really add the
ungroup to my custom shelf, actually. Here we go. So that it is up in my shelf. And now that we
have done this one, we can just go ahead
and assign a layer. Like this, and then we
can export it to unreal. So to unreal,
grass, score basic, nscore small, and export. And then we can just review
it inside of Unreal. And then in the next chapter, we will just create a
few variations of it, also create the more complicated
one and stuff like that. But for now, for this one, we can also use
the same material, all we need to do
is in textures, create a texture that we
call y unscoreGras zero, one, 02 and 03 because we have different
textures for this. In number 01, we want to grab our we don't need the roughness, so we can save some space with that, so let's
just grab these. 01. 02. 03. Quickly double check my norm map to make sure that it is correct,
which it is, okay? Now if we just go in
here in our materials, we can grab our IV
generic 01, duplicate it, and just call this ray
grass underscore 01. And if we open this up, we should be able to
simply replace our pieces. I am missing one. I am
missing my mask. Here we go. Let's right, click, convert to parameter mask and press Save. In. I just forgot to expose it. That's why it is
important to do that. And now in here, you can
just go ahead and have your albedo, mask, normal
translucency. Our color, we set back to white because
that's the default. Our sub coolorbably let's
start with a greenish color, but we can change it later on. And for the rest,
everything should be maybe set the desaturation
to zero for now. So we can save this. We can go ahead and go into our assets. And then if we go in and import because I forgot
that I did not do that yet. So let's import our
grass basic small. It's all fine. Yeah,
I'm happy with that. It's way too slow way too small, did not realize that that are
that we have it so small. So, of course,
because we are not really working with
specific metrics for this because to keep the metrics from speed tree to
Maya to unreal, you can do it, of course, but it just takes a little bit too much to focus on
when we can just make it easier by just
doing this, for example. But here we go. So we
got, like our grass, now all we need to
do is we need to go ahead and we have our materials. Looks like we only need two
of them, so where are you? Re gra 01, duplicate ree gra 02. Open this up. Replace
this one with number 02. And then we just need to
figure out which one is which, which should not
be too difficult. So let's this grass 01 and 02, that should be
corresponding with this. 01, 02. Save. Go over here and press G. And now you can see that here
we have our grass. And of course, yes, with
a typical grass fashion, it is really subtle because
it is just like one of them. But first of all, what
you can do is you can go ahead and if you want mess around a little bit more
with the colors just to see if that looks good, for example, in my subsurface, let's say this to 0.1 or 0.2. So the color maybe, like,
a bit darker over here, small stuff like that.
Yeah, that's looking fine. And now, what you can also do, which is quite an important one, which we will use later on, if I just quickly save
my seam because this can be a little bit buggy
inside of Unreal five. But if we just go
over here to activate foliage and if we then
drop in our asset, which is going to
be our basic grass, nice is that we can literally
paint in the foliage. Now, let's start by setting
the density to like 0.1. Click on your foliage,
and then what you can do in here is you can set
the scale, for example, from 0.8 to 1.3, and it will randomize
the scaling. Now if I just click once, Oh, I expected more. Maybe we need to set paint
density a bit more here, see? Then you can paint in. I
honestly expect it way more. So normally, when I do this, I get like 500 in one go. So I don't know why
it is only six. In that case, you can set
the density per kilometer. You can set this to like 200, and that will basically
paint double the amount. But, or we can go
like 500 even more. Yeah, and then you
can basically, paint in some extra
bits of grass. And then it already starts to become a little bit more nicer. Now, we are going to have
more and larger variations. So this would be like something
you would use later on. Let's do ten. No, no, I just want to
make sure that I have it correct because I'm a little bit thrown
off by how little we are placing because normally you really place like a lot. So I guess if I go 2000, see, that's more what I was
expecting this kind of stuff. So now we already
place 71 of them. Of course, this is
hypol but once we have our once we have our LODs sorry, our LODs, then what we can do is they will be a
lot more optimized. So right now, if we
do, for example, this and we can
close this window, you can see that very quickly, we can just add this nice
bit of grass over here. And just to quickly show you, if I go ahead and I go in
here in my grass basic small, just to already
show you how to do the LODs for this kind of stuff, you can simply go
down here and set the LD group to be
foliage and press yes. And now what it will do is often it will generate multiple LODs. So if we go ahead and set a number of LDs to
three and press Apply, it will generate LLD. So if you look at the triangles, right now it is 400 at zero. Then if we go to one, it is 200 and if we go to two, it is 100. You can even go to number four, so you can go even higher, and it will basically halve
it every single time. And then it starts to break. And basically,
another thing is that if you go to not show, go here to IT level of detail
coloration and turn on mesh LLD coloration
you can see when the species are basically
switching from here, if you said this to LD out when they are switching to
the different LOD. So you can see that here.
This is quite nice, and then you can
no longer see it. So you save this,
and that's basically it. Now it is optimized. So now if you go in here,
I believe that in here, I can also do level
of detail coloration. You can see that here. That they quickly switch to the different LODs and I'm going to keep them nice
and high over here. However, you can
always go in here. And if, for example, click on LD 01 and you go down
to your selection, here you can set
your screen size. Right now it is set
to auto computes, but if you turn this
off, right now, when the grass is
filling the screen for less than 0.25
28 blah blah blah. It will basically
turn to this LOD. And like that, if
you set is lower, or if you set is higher,
it will turn quickly. So the higher this number is, the quicker it will
turn to that LOD. So just keep that in
mind. Here we go. So yeah, basically,
that is now working. We don't really have, like, a distant field
occlusion set up properly, so it does not yet look as nice as it can be for later on, but it is looking pretty good. So like that, yeah, we got, like, some nice cars. So let's go ahead and continue on with our other variations, and I will do that a little bit later because I'm
getting a sore throat. So I will continue with
this when I take a break. So yeah, let's go. Let's go on.
14. 13 Creating Grass Variations: Okay. So now that we have our
base grass done over here, the nice thing is that
we can pretty much use this setup for all
of the other grass. So what I'm going to
do is I first of all, want to just create
a quick variation of this that is like a
much larger patch. So for that, we can just go ahead and well, first of
all, save this scene, and then simply do a save us, and we can make this grass basic underscore
large over here. And if you want, you can do
underscore 01 or something. I kind of broke my rule
because I forgot to do that. But now with this one, all we need to do
is we just need to go ahead and go over
here in our generation. And we basically want to go
ahead and just make the last to be quite a bit larger to
like the size that we want. And then, of course, just
increase the amount. So we are increasing
the numbers. So now you can see that
we have a large patch. Now, once we get to
something this large, you do want to introduce a
little bit more variation. So let me first of all, play around a little bit more
over here with the patch. So yeah, that's
looking pretty good. But as you can see, everything is pretty much the same height. There's some small variation, but it is not very nice. So what I'm going
to do is I'm going to go to my size scalar over here and just press little button next
to it for our graph. Let's get started
by first of all, reducing our grass
bits at the end. And then I'm just going
to go ahead and I'm going to make this
really irregular, like over here, because if you place it very closely together, even though it goes from the
center to the outer side, when we place it
dis close together, it kind of just randomly like randomizes.
Randomly randomizes. Yes, that's maybe not
the best explanation. But as you can see over here,
now we just have, like, a bunch of different
cars bits and stuff like that. And let's see. So rotation, we don't
need to do anything, but we can go into
our let's see, not our skin, probably,
although in our skin, we might want to
just introduce a few more of the larger bits
and maybe push this further out over here so that we have a few more of these
really large grass bits. Here. In the deformation,
I just want to go ahead and mess around with the
folding and the curling, like a little bit more curling. We don't want to do too much. But once again, we
like the folding or let's say, like a twisting, you can use over here these
sliders, if you want. I quite like to also
play around a little bit bit like my vertex.
And let's see. So we have our orientation
over here and our orientation, we can yeah, we
can actually play around with our line a little bit by doing
something like this. We're just giving
it some randomness. And then maybe at
the outer side, it would be nice if
they are kind of sticking underweight if we
want to stick them out, and then over here. So we just basically add a bunch of random
variation like this. Now you can see
that everything is just like a lot more irregular, which will look quite
nice for grass. And maybe I'm just going to
go ahead and set the last a little bit in so it is a
little bit denser over here. So yeah, like that, we can just have a larger grass
patch like this. So I'm saying like that,
like this too much. So sorry about that. But
anyway, I'm going to save this. I'm going to very quickly
export this to game, and I'm going to call
this basic grass basic large and let's just go ahead and press
Save and press okay. So that one should do the trick. Now, if we go ahead
and go into Maya, all we need to do is
so we have this one. We can just turn it
off, file import, and set this to large
import over here. C, and it is already
the right scaling, or it should be
the right scaling. It's all J, let's double check. Oh. Oh, wait, this because
we changed it up again. This is getting more and more
confusing by the minute. So yeah, I'm not
going to risk it. I'm going to scale
it up again like this because else we would need to go inside of unreal again and then again
need to change it, so that might be a bit overkill. So let's just ungroup, get rid of the top group,
and just rename this, and then apply it
to its own layer, which will also
rename like this. So that one is fine. I'm not too worried about this. I can just go ahead
and save my scene. And I can export this, once again, grass basic arch. And because we can
just reuse all of our materials because we
are using the same thing, we can simply go
into real over here. I'm going to import
grass basic arch. And let's press Import.
It's just double check. Okay? See, so the
scaling now works, and you can see that
it is much larger. So now if we just
quickly open it up, all we need to do is apply
our correct materials. And, of course, right
now, I'm still doing this quite slow because
it is a tutorial. But when you do this outside of a tutorial, this will go so far. So then it is no problem to
add like variations because within 10 minutes
or like 30 minutes, you can create many
different variations. So we have this one over here. You can see that it is not
as dense, but that is fine. I quite like it if
it is not as dense, because of the fading, we can always just go in and, like, give it a few
duplications. Oh, sorry. This is a selection bug. It sometimes happens
inside of unreal. What you need to do is you
need to select your original, and then you need to
click away again. Like this. And then
it fixes the bug. It's really strange, but it's just the unlengen
fiber still in the Beta as of the time of saying this or
recording this. So yeah. But yeah, basically now you can see that this
is really nice. We now have very dense grass, and then we basically can
have the grass kind of fading out like this with
our smaller grass. And now, what we're going to
do is we are also going to create some more like
individual grass, which will be great later on, for example, for in the
water and everything. These are also pretty
good for in the water, but those will be
even better and also, again, to fade them
out and everything. But as you can see here,
that is already looking like quite a nice and irregular
wild grass patch over here. So I'm just going to save
my scene once again. And now if we just go in here, let's pick our Let's
once again open up. Let's go file and just open up our grass basic small again. And then we can
later on also do the large not, or
should I? No, wait. I'm going to start with
the grass basic arch because I quite like the
variation we added to this. We are now going to
create the grass that is individual strains. It is much more higher ply, so you kind of want to
just keep it quite small, but it does look really cool. So I just want to
show you how to do those because they are
pretty straightforward. File save us, and
let's go ahead and call this grass underscore. Complex underscore. Yeah, let's start with arch. Grass complex arch over here, and then we'll make the
smile later on. There we go. So that is now saved. And what I'm going to do is I'm
just going to go in here and I'm going to
basically remove these. Then add a new one. And we just need to have one of these because we only
have one material. Just call it grass
and press Okay. Now you can see that
over here, yeah, it will be like an arrow,
but that's no problem. If you go down into your
skin, you can already, get rid of these bits
and then leave one left, which we can make grass. And now this can be
quite time consuming. So let's add like a few of them. Oh, it would be nice if I actually add the
material, also. Let's go ahead and
find our material. So we found it in mega scans, and then swamp grass, I believe, is the
one that I want. No, wait, Swamp grass is
not the one that I want. This one was the tall
watergrass, so that's fine. We can do that later.
Scrub that was the bushes, so we don't need to do that. Where are you? Is it just Gras? Oh, we just called it grass. Okay. I just called
it grass sorry, I shouldn't blame you for my own not being able to
properly name things. So we got this kind of stuff
here, that's all fine. So we got that imported. So we now just need
to go in here, you basically want
to go ahead and mostly focus around these areas. I'm going to just have a very quick time
labs where I will be setting up all of these little meshes and we are
going to go for like five, probably five
different meshes and most of them are going to
be in the green areas. Let's kick in the
time laps right now. Okay, so all of our
meshes have now been led. So now, honestly, all I need to do is I need to go to grass, set my mesh to mesh cut out over here. So this
is the first one. As you can see, it
looks like that we went quite white
with our meshes, in this case, but
that is just going to be because of the
scaling most likely. So what I want to do is I just want to go ahead
and I want to give it a few different meshes. So let's do grass, number
two, grass, number three, grass number four,
grass number five, and actually went
with one extra. Grass number six over here. Okay, so we got that stuff. See, it is very white right now. What I would recommend is. So first of all, let's
go ahead and go into our generation over here. So our size scalar is fine. It's probably meant
to be like that. But I think what is going on is it is probably of vertices. So let's go to orientation and then here in
the vertex amount. Let's see, okay, so that's
not the one. Let's see. Twisting Twisting is also
causing some problems because we are twisting it like really strongly
in the previous one, but these ones here,
see, there we go. These ones we cannot do that
strong of a twisting because then since they are thin and they have less geometry,
they will simply look bad. So that's looking better now. See, we also have a
folding over here. Which, interestingly enough, it is all going into like
a strange location. Let's play around with the
angle a little bit more. Oh, turn on two
sided. There we go. That will matter quite a bit. And with these ones, I'm
going to set my size scaler a little bit
smaller over here. I'm going to also make these a little bit more condensed,
like you can see like this. However, let's then also reduce the number because else this
becomes a bit overkill. So right now we are
sitting at 1,500 twists. So let's see if we can get to 1,000 or something like that. Ii would be quite nice. Thousand might seem very might seem like a lot,
and it is pretty much, but for up to date
A games with LODs, it is often easy to handle
something like that. So let's see. We got this stuff. Now, we can always go
into the orientation, and down here, we can always, mess around with our scale if we want to make them a
little bit thinner, but that should not be too bad. I can also see that these are really large on the outside. So let me just quickly go. Let's see. So this is our size. So if we go over here
and set our size scaler to be quite a bit smaller
like this that they kind of, like, flow off a bit better. And then maybe like over
here, I also want to give it quite a strong
variation like that. Okay. Let's set our first to be a little
bit lower like this. So let's set this
to, like, zero. Okay. So we got that
stuff now done. So it's starting to look already like a
little bit better. So it's very much
similar to our grass. It is still a little bit high, and I don't like
the entire look, so I'm just going to mess
around with a few things. First of all, let's try to, like, play around with line. And over here, we also have
our scale our Y scale, and I'm going to
probably, like, and he'll make this a
little bit lower. Oh, and I want to get
rid of my sinking, by the way, because that
is now causing problems. So let's set my
sinking to maybe like 0.01. So we got that stuff. So it needs to look like
pretty decent from a distance. I'm still not happy with,
like, the si scalar. It is giving me a surprising. Where are you from? It's
these ones over here. I think these ones
need to be fair here. We need to toe those down. And then there's another
here you can see the rings, so you can see that over here. We probably need to again, give it a bit of variation. So that's already looking
a little bit better. From the top, of
course, it will not work very well, but that's okay. We are mostly looking
at it from the side. And to maybe, improve the top, you can once
again as I said, you can do stuff
like a line folding, in this case, folding
does not do much. Facing could also give you a
little bit more variation. So if we just try and play around with this a
little bit more, and for the rest, we can also go ahead and we can also just once again mess
around with our fold. Maybe our vertex amount can give us a little
bit more variation, but not too much because
else it gets stretched. I quite like our curl, but it seems like
maybe I feel like one of these, I don't
know which one. Oh, wait. I forgot to do
teslation. That's it. I forgot to do the
tesselation on these bits, and because I
forgot that, that's why the folding is
not working as well. So this one has tesselation. Okay, so now if I
twist or if I curl, it should that
should have done it. It doesn't really look
like it has, to be honest. Like here, it has given me some tesselations. That's fine. But this one has testilation, but not a lot, to be honest. For this, as I said
before, we need to go quite high if we want
to do this properly. So maybe give it another layer. And what we can also do to
figure out which one this is is if we go to our skin,
we can, for example, mess around with our weight to see which one
I we reduce this, which one is currently
causing the problems. A, think it is the first one. Yeah, I think it
is the first one, actually. Grass cut out. Why are you causing me problems? I gave you more than
enough geometry. I gave you all this stuff,
and still it's complaining. Let's give it like a tiny bit
more geometry just to see, and else it is just
an awkward folding. Else, we cannot really
do too much about it, and then we just need to
go into our orientation, and we just kind
of need to reduce the false amount and everything, or at least a curl amount. Yeah, see here. I think it is just quite awkward
that it doesn't work. You can also create
custom mesh if you want, but that would take
way longer to then import them and get
them to work properly. But over here, it seems
like that the folding. Here, it seems to work for
all of them, except for one. I need to fix this. I don't
think I can ignore it. Okay, so grass cut
out is not Wait, I'm already losing pieces. Let me just try this
again. Let's go ahead and add our layer. Hey, look at that.
There's a bug going on. See? Did you see that? That was incorrect. That was a problem. Anyway,
I think now it is fixed. So first of all, grass cut out. That one is looking
fine. Grass cut out two is the problem. So we can go grass
cut out two, add it. Give it some more geometry because I assume that
that is the problem, that it is just
complaining. There we go. Now we can go grass
cut out three is fine. Four also has problems, so we can go to cut out four, give it even more geometry,
which I don't really like, but for now, I'm going to go for the highest
quality grass that I can get. Number five has a problem,
so let's go over here. Give that a little
bit more geometry. And then what we will do is
we will once it is in place, we can always optimize
it inside of vial. And number six is
also the problem. So we had much more
problems than I expected. So let's go ahead and UV
present might not work. I should work totally fine. Number six is doing
something really strange. I'm not sure exactly what it is. Because it should
work totally fine. Um, let's leave
number six for now. I don't trust number six.
It's not really important. So one, two, three, four, five, grass grass
grass and grass. Carto two, three, four and five. And let's get rid of number six. Okay, so we now
know that it works. So sorry about that. It just
had to happen like this. So we now know that this works, and now what we can do is we can basically play around a
little bit more with the curl and give it some
more proper curling and twisting and everything to make it look a bit
more interesting. And we got also go into our
generation and maybe, like, compress this a little bit
more Let's do 0.5 probably. And there we go. I
think this is like a pretty solid base for
our second type of grass, which is going to be
these grass plates. So we are now pretty much
ready to export this. And then of course, after that, we can just make some
more variations. So let's go ahead and go file, and let's do export
the game. Quite easy. Grass complex, large.
Yes, that's fine. Although in the end,
it's not that large, but these ones, you don't
really want to overdo them. So I'm going to start with
just one variation probably. And then later on, I can always have a Tents chapter
where I will add multiple different
variations because it is not that special
anymore after this. I noticed that I'm
in the wong program, so let's try it again. Let's import our grass
complex large over here. Now, let's first of
all, just double click on the name and then
just do an ungroup, rename this, add it to a layer. Renamed the layer. So
that stuff is just it's the same thing over and over and over
and over again. But that's no problem. And then I'm just going to
quickly match it up with my other grass over here
like that. And there we go. Let you do the trick. So I'm going to go ahead and I'm
going to export this, and this one is going to
be grass complex large. We do need to set up a
new material for this, but that should be fine. So let's go ahead and
let's export to unreal. So I'm doing this always
on my other screen. So when you hear me
talking like that, it's just because I'm doing
stuff on my other screen. But anyway, so now if we go
ahead and input this here, that looks already
quite interesting. Let's go into our textures. New folder, and we will
just call this grass. And I'm going to input
my grass textures. Just give me 1 second to
find them. Here we go. Now if we go to materials, we can just grab the grass and
duplicate it and just call this grass score 01. Open it up. Let's drag in these pieces
over here. Here we go. Let's open up our model. Let's apply here grass
one, go in here. There we go. We can apply it. And you should get
something like this. Now, the occlusion will be quite a bit stronger because we have still quite a bit
of grass in between, but it is not quite
nice. This one. I think what what I will end up doing is add this one as like my grass to be used outside
of my water after all, because I feel like in the end, this one actually
does look better if it would be
inside of the water. So we got this one,
and maybe like with this one you want by default, make it like a
little bit smaller. If I have a look at
that, it might be nice. If I just go in Maya, let's make it a little bit
smaller over here like this. And yeah, that should be fine. And then we can make more
variations of this later on. For example, like a
variation that does not have as many grass bits in here. That's something
that I can create. So let me just quickly re
import this. There we go. And another thing
that I want to do is I just want to quickly
go into my grass. And if I just grab
probably like the albedo, what I can do is I can scroll down and I can just
change the brightness. So the albedo of your grass, you can scroll down and set
the brightness to like two. And if we do that and then play around a little bit more
with our desaturation, we can at least match it up to be a little bit closer
to this grass so that everything feels a
little bit more in place and a bit even and not
like it is two very, very different types
of grass because then it will not
blent very nicely. So let's do like 0.3 0.5 maybe? No, point, let's do 0.3. And in our color, Actually, you know what our color
is fine for this. Maybe our subsurface scattering? No, that doesn't really matter. Okay, yeah, in that case,
then I'm happy with this. So we now got these
ones also over here. So we got that grass patch. Let's go ahead and
well, first of all, save our scene,
and let's quickly add our grass complex
large over here. Set our scale from 0.8 to 1.3. That's my favorite numbers. And if I have a look,
so this one is 2000, so let's set this one to 2000. And then we can just go
ahead and let's add, like a grass patch over I
don't know, like over here. And there you can see that
this one looks like this. So it definitely looks
like a lot denser, and it's definitely
like a different look, as you can see over
here. But oh, wait. Sorry, it's because I'm adding two different types of grass. Ooh, that actually looks
really cool, you know? That looks really cool. So
let's keep that in mind. You can hold Shift, by the way, to just undo the
grass placement. It is a little bit
buggy in UnrelgenFive. But if you just turn off the little check box that
only this one will paint. Now this is just our
normal grass over here. So that's nice that we can
use this one like that. Perfect. So those
that are also done, we are going to do an
LLD pass later on, but you can definitely
see the difference between these type
of grass bits, which they feel very, very high quality and because they
are all individual, and they are also
quite more expensive. And these bits, which are
great for, like, fillers. So they are great to,
like, fill large areas. But you can see that
they are quite noisy. You cannot really make everything out because
they are thinner. And also, if you look
at it from the top Oh, no, actually, from the top,
it's not too bad this time. But yeah, just in general, these are great fillers. These are great if you just need something higher
quality and you just want to kind of have them all individual like this and you can
clearly see them. You can also see
it a little bit, like stylized or realistic
versus stylized in a way, something like that, because
it is like larger shapes. Okay, in our next chapter, we will start focusing
on our water grass. So that's going to be
These ones over here. These ones over here. Yeah,
like these ones over here. So like the extra
grass next to it. So let's go ahead and continue with this in our next chapter.
15. 14 Creating Our Tall Water Grass Part1: Okay. So now that we have
our base cast done, now what we're going
to do is we are going to get started
on our water grass, which is going to be mostly
focused between what you have over here and also the
ones with the cattails. But the cattails come
a little bit later. We first want to just
get like a normal one. Now, for this, we
have over here. So we had the tal water grass, and I wanted to
combine that with, I believe, my swamp
grass over here. Actually, the merium grass
that we have over here, I don't think we
actually need it in the end because last
time I checked, we kind of already
get that effect from this grass over here, here, see? So like the little bits. So yeah, I don't actually
need the merium grass. That saves in an entire
texture. That's quite nice. Okay, so what we're going to do is if you look
at your reference, you can see that
this type of grass, it is not like this
where it is just all over the place. Are clusters. So they're always
really long clusters, and then they are placed
quite close together, which will create this effect. And specifically because
near the end, they pen out. That's how we can get
this really dense effect. Okay, over here, they
are quite dense, but yeah, you can see, that's why they kind
of like pan out. So that's kind of what
I want to create. Now that's not too difficult. It's quite similar to what
we've been doing so far. And you might have guessed it, the first thing
that we're going to do is we are going to go in
here, create a new material. And call this one
tall Water grass, then grass over here, and then I will create
another new material, and this one will be the um, swamp grass, which is
like just the dead bits. Suppose okay. Tall water grass. Let's go into our settings,
turn on two sided. And let's go in here. And yeah, so that
is this one over here because it is
slightly different than the one that we have for this one over here. So
we can just go at them. We can albedo, pass the normal,
that's everything I need. And just right away, also go to our swamp grass, two sided, and let's make this one albedo, normal opacity like that. Okay. Perfect. So that is done. Now we just need
to go ahead and we need to go into our
output measures, and let's just add a few of
them. And let's have a look. I'm going to have, maybe,
like, four variations. I think should be
fine. Four or five. So it's just going to
be, for example, here. Let's say this one,
we set our angle. We place it over here. Now, these, they are going
to actually be very large. So knowing that they are
going to be very large, we can push in a little
bit more geometry. So we can place them
here and then we can go into our
tessellation, and we'll, crank it up to give it
quite a bit of geometry like this so that we
have a nice segment. Honestly, I think I might even want to go a bit more
like this so that we just have a nice segment every few centimeters
and then apply it. So that's fine. That's one. Then number two,
that's for number two. Let's pick this one. So we
will have two big ones. One that is probably
like this one, that's a little bit less, and then one that is
quite a bit thinner. And I think that will give
me a nice variation amount. Let's go over here. Like this. A plenty of segments. These leaves because they are so large, there will
be less of them, so there will not be like 100 of them like we have over here. So the next one I had in
mind was this one over here. So let's go ahead
and set the angle. Oops. Didn't mean to
create a new one. It very easily does that, that it just creates a new one even though
you don't want. But okay, here we go. Make sure that it falls within your shape. And we can apply this one. And finally, the last one, I'm going to go for let's
do like this one over here. This one looks pretty
average and thin. The reason why you don't
want to go for, like, super specific ones like
the ones over here, is because when you do that, you are able to see it
repeating very easily. But this is why we have those
dead grass bits later on. So we have these ones over here. And now we're just going to, add some dead grasp bits to this. Yeah, let's first finish
this one. There we go. And it is in the swamp
crass over here. If we just go ahead and go for maybe like three
of them here see. So the swamp grass,
that one Williams like the dead ones that
we can just add on top. Now, you can see that they
are not very straight, so I do want to try
and get always like the straight ones because if I'm going to start bending it, it is nicer if it is a straight piece
compared to if it is already a band
piece because then the bending will just
look extra strange. So, this one is
not too difficult. Let's give it the binch of
segments and apply like this. The second one is a
bit more difficult. Let's go for let's do this one over here.
They are very thin. So I wonder how
they will actually react with our ticker leaves, but we'll see if we can make it work because I do want to
have the sticking out, but the annoying thing is that in Spettr you cannot
probably as far as I know, you cannot set a scale of
individual leaves like that. Here, I'm just going to add
one extra segment here. Do another one over
here. There we go. Like a bunch of tesselation.
No, I don't want. I guess with teslation, we have no choice
but to have it like that because the
tesselation guy, needs it. Yeah, you see. So I will just keep ignoring it. Which is a bit annoying. So then let's just go ahead
and leave it like this. And we will see how
Oh, no, wait, now. Oh, I don't trust that. It is behaving quite strangely, but we'll
see how it goes. So let's just leave
it like this. Then the last one, I'm going to go ahead
and I'm going to go for probably like
this one over here. I think this one should be fine? Give it by just
segments and apply. Here, this is strange
that it shows this, but it doesn't show it in here. So I wonder if that is like some kind of a bug or
anything like that. But anyway, so we got now
these grass bits done. So as I said before, these grass bits, they
are clusters over here. So I want to go at it
and I want to basically create one cluster and
make it look very good. And then what we can
do is later on we can scatter those around closely together to create
the fuller effect. So knowing that, over here we have our
grass complex large. Let's quickly do a saves
because it didn't mean to do all of this work
in just this one. And let's call this water grass
underscore tal over here. Tall, yes, and then
tale with kettles. After this, so that
should be fine. So let's save. There we go. Okay, so for our leaves,
let's first of all, go into our skin and
going to get started with probably only having
the tal water grass first, one, two, three, four, Okay. Two, three, and four. And I like to do it
like this so that I can control the weight
and everything. So it is like a tal
watercrass not too special. It seems like it has enough
geometry, so that's fine. Now what we're going to
do is we're going to go into degenerate and
let's set the number way down to like 20 or
something like that. And as I said before, they are clustered, so
we want to really, like, have the last actually pretty much in, like,
one point, see? I kind of want to have
them out a little bit, but I don't think we
can actually do that. So if I go in here,
0.01, here, see, it's already 05 on no wait here, we are able to go lower 0.002, something like
that, for example. Next, what I want to
do is I want to get started by setting my size
scalar a little bit up, so this will be the
general scale over here. And then what I want
to do is I want to go down to not my skin. Oh, wait, over here, let's
all set my size over here. So those are quite tall, but I want to go down and
set my scale over here. You'll see it to be quite
a bit longer like this. And next, these are a
little bit straighter. So we do want to go
ahead and we want to play around with
this bit more, and I assume that
these are going to be see, not the folds. Here, the curl is giving me quite a bit of work,
but that's not just it. I think it is like the angle, the align over here. Here, see? Yeah, the align is
causing some problems. So over here, so now we
have these quite long bits. And let's see, so the folding. Yeah, the funding is fine.
Like, I do want to have it. I do want to give
it a little bit of irregular because you
can see it over here, so one goes here, here, here, although they are often
facing outwards a little bit, although set to zero. But that is okay. Like, we don't have
to have it perfectly. We just need to get something
that looks logical. See, twisting and then we
have our curling, okay? So nice thing is that
once we have this one, what we can do is we can just go ahead and
scatter it around, and then later on
we can just add the cat tails and
everything to this. So this is looking
pretty nice, yes. I'm going to go ahead and
I'm going to see if I can add my grass or my other grass to this one
else we need to kind of, like, have it duplicated
and just add it on top. So if I go for swamp grass one and
swamp grass number two, Okay, so that does work. Yes, that does work. But I feel like
that if we do this, so if we go one more
and do swamp grass, Number three, we kind of need to go into the generate and set the number a bit higher. So that we have the sum cars. And then for Sam cars, I'm going to go ahead and set the weight
probably to like 0.8, that they do not
appear too often. I think, actually we
need to go for like 0.5 because there
are three of them. So I'm just trying to kind
of get a nice balance. Between the default leaves
and like the sum grass. So the sum grass is
pretty much like just the dead ones that
you can see over here. So that looks quite
good in general. I'm going to go 0.3 maybe. I really do not want to
have these too often. So 0.3. Okay, so
we got those done. In our generator,
we can also just play around a little
bit more with our sweep and our jumble
if we do not like it. But let's say that we get started with
something like this, and let's save our scene. So this is going to be
the normal tall grass. Now, the cool thing
that we can do is now we can start by basically
scattering this around. If we go to our tree, what we can do is we can right click Add Jome tree to select, then we can add a
zone over here. Now with the zone, if we go ahead and set
the frequency up, what you get, is you get many different types
of zones like this. And then if we go
into our generate, we are able to set the
first and last quite close. So what you can see is you get all of these
different zones, but they are slightly
in different locations. Now, last time I checked, I was able to set the
scaling of the zone, but I guess, um
here, size scalar. So I can set these a little
bit smaller like this, and it makes it a
little bit easier to see and then do
something like this. And now, if you drag your
leaves on top of this, you basically get a
bunch of these bits, although they are very small. So I guess that we need to set our size
scale up anyway in order to have them I mean,
in order to scale them. So we have these we
can have them in, like, a little cluster. So I think this is far enough because you can see that
there is quite a bit of, like, space, but I do
want to go probably for, like, a bit of a
dense or one for now. So maybe not this dense, but maybe, like, what
you can see over here. Let's see. Yeah. So if
I have a look at this, I'm going to set my last
little bit out like this, and I do want to go ahead
and just play around. Let's see a offset. So try to, like, get some
nice areas and maybe set the frequency down a little bit because right now,
here, this is what I mean. So here you can see that we just get all these nice
little clusters. So that's fine. And we can
have more or less of these. So if you want, we can do
two variations of this. But what I'm going to
do is so I'm going to start with then probably
the basic variation. And I just want to play around
with some of my settings. I don't care about
those placement, angle. There we go. The angle is maybe
a little bit interesting. So I always like to give it a little bit of like an
angle to the outside. Radius, we can go ahead and we can set
a radius lower here. So that is the one that I
actually had to change. Hang No, I don't care about
that alignment, I don't care about that. So yeah, most of this stuff
I don't really care about. Just a position a little
bit smaller like this. There we go. So that is
looking pretty good. So you can see that it is not as much as I
was expecting to, but I quite like this because what we can do is
we can have one of these. And then we have another one
that is like the cattails. Because for the cattails, you probably don't
want to go for, like, a massive area that
is full of them, because you kind of want
to be able to place them. So if we do this
one, we can just add a bunch more zones and
create, like, a larger patch. So first of all, let's see if this one actually looks
the way that we want. So we can save this.
And then what we can do is we can go ahead and pretty much
just export this. So let's go export the game. Water grass Tal. Yeah, so I don't need to give it a different name because
I'm just going to do Tal underscore large. That's what I'm going
to do later on. So let's just save this. This one I keep needing
to scale it up. So let's set this
back to I believe, that's what is the one
that we had in plus O. And now, if we go
ahead and go in here, we can import Water
gras tal like this, I'm going to double
click copy name, ungroup, delete the group, and then paste the name. And then what I'm going to do is I'm just going to rotate this. And these ones do need to
be quite a bit bigger. So I'm going to go
probably for a scale of like 2.5 like this so that they are quite a bit larger because let me just see yeah, if this is the one, actually, we probably even want to go to three because these are going
to be quite a bit larger. Like often in real life, I've seen them easily being
as large as a person. So I will not make
them that large just yet because this is
going to be inside of a tunnel and inside
of the tunnel, you would not have the full
sun and everything to really, really grow these
things really large, but I still want
to get them quite large to an area like this. So let's just add
this to a layer. Over here, save scene. Let's export this one. Just like that. And
we also then need to set up our materials again.
So let's go in here. Let's have a look. So I'm
going to go, first of all, let's go to our textis
swamp nscore grass. Let's import. Textis. And then the next one was going
to be tall water grass. Tall underscore
water unscoe grass. And import those also. So that stuff is all basic. We go in here. We, for example, grab our grass era
one because that one looks the most the
same, duplicate it. Tall water, grass. Open it up. See, and now it remembers my
window. It randomly does it. It randomly starts
remembering windows, and then later on it
just forgets it again. Another one, swamp unscoe
grass. There we go. Okay, so our swam cars, we can just replace
these over here. Tal water grass. We
can replace these. Just like that. So that
is now also sorted. And next, we can go to assets. By the way, these
things, if you want, you can already, get rid of them because we should have
everything already replaced. So if we just delete that, Oh, is still one that is using this. Oh, we probably use this
material on like one of these. So I believe it was
like the Bark tree. So if we now delete delete. Come on, delete. Thank you. Here, see. That makes it
look a little bit cleaner. But this one, of course, I
placed this one on here, so that's why we
cannot delete it. To unreal. What a grass
towel Import. Open it up. Now nel engine five, you can also apply your
content browser down here. The reason I don't like
it is because of what you just saw is that it just very easily gets rid of
it and you cannot really dock it in the layout
because then it does this, so it's not the best
way of doing it. And for me then needing to
again navigate over here, that's why I personally
just go down here and we go for tall water grass
and swamp grass. Save Asne and now if we
go assets, test this out. So let's say that we
place it like in here. So it fits really nicely. It needs to be a lot bigger because if I place
like a few of these, this is supposed to
be quite small grass, still high because it will be in the water because that's what
I decided to swap around. But if I have something
like this over here, let's say that I have like a cluster sitting
in between here, something like this, just
to try out the placement, I most definitely want to
make this quite bigger. So let's set the scale
to maybe like five. And then the rex put this again. See if that looks a bit better. Here you see? That's
a lot better. So now you can see, like we have the tall grass over here, and that is fine. Now, it tests like the screens, not skin space,
ambient occlusion. The distant fields and everything that are
inside of here, yes, they are a little bit dark, but don't worry about that. We can go ahead and
fix that. And also, what we can do is
in these cases, you can probably go
into our material. Probably we only
need to do this in the tall water grass and set the subsurface
scattering to like 0.5, maybe even one, which
will kind of reduce the amounts and will also look
nice if you are inside it. Because who knows?
Maybe you are making a game that's like
from this level, you just want to kind of,
like, walk through it. So anyway, that one's looking pretty good,
as you can see. It's just some nice tall
grass that we have. Just to stick with what
we've been doing so far, we can once again go over here, quickly artist 0.3 by 1.3. Density will be less. So this time we are
going to go for 1,000. And now we can just go
ahead and let's say that. Over here, here, see, that's quite nice that
you can place it. And then what you would
probably want to do is once you've done
the base placement, you can then go in here
and set the scale to, like, Oh, wait, I said 0.3. That's really low. I meant 0.8. But anyway, we can do
like 0.50 0.3 to 0.5. That's too low.
It's to 0.8 to 0.4, we can here, make them smaller almost as if
that is fading out. See? So that's how you
would have that fade. And then you can go ahead
and go for 0.3 by 0.4, and then you can have the
really small fading over here. At which point we need to set our density bit higher because else it cannot
register properly. But, yeah, you get the point. So you can have
some nice fading. And you can very quickly create some really dense swamp grass,
as you can see over here. I don't like these small ones. They are not looking very good, I guess, because we need
to have like 4,000. I think we need to
have, more of them, and maybe set us to 0.5 by 0.4. Yeah, yeah, that
feels a little bit better when it's a little
bit denser like that. I know that this is just like
a tasin but I like to just quickly show off the
work at the end of our chapter, what
we've been doing. There we go. See? Swamp grass or random grass
that we can now later on, we can just nicely throw
in some cattails just by placing it in here. So
this is looking really good. You can also see
that this responds differently compared to this, and this is because when
you do foliage painting, it is a little bit
more optimized, but it also takes into account with your shadows that it
is very close together. That's why it's not looking
so dark. This is really nice. So although it has a little bit of I
don't know what it is, like a sort of a motion blur. It's probably because
we have a lot of really thin strains. Anyway, next chapter,
what we're going to do is we are going to
create a larger variation, and then we are also
going to create a cattail variation for which we probably need to
create like a custom texture. But let's go ahead and continue with this in our next chapter.
16. 15 Creating Our Tall Water Grass Part2: Okay, so I was going to make, like, a larger version. But honestly, when I see this, because we are not
going to be having, like, really huge areas of these plants, this
actually looks fine. So because a larger version, it will simply be still the
same amount of polygon count. So the only thing that we would save is this number over here. So the number of instances,
that's what we would save. But honestly, in foliage, if you use the foliage system, 100 or 200 instances is nothing. You can go thousands
and thousands before it starts to
struggle a little bit, especially religion five, it
can probably go even higher. I'm just going to leave
this and I'm going to get started by focusing
on the cattails. For our cat tails, as
you can see over here, we will need to have
unique texture, but basically what we need to do is we need to make
this inside of Maya, just a and then the bottom ones, we are basically going to
have those in speed tree, and then we place the
mesh on top of them also in Spettr and
then we can still, nicely generate to get like a bunch of different variations. I don't know if I
have any other here. I have another image. So it basically looks
like a corn dog, that's pretty much it,
but like a little tip. And if we go inside of Maya over here, we
can just use this. Stern off this layer, create
a new layer and just call this cat tail over here. And yeah, honestly, this
can be, super easy. So let's do, I don't know, like a cylinder or
something like that. So let's create like
a cylinder over here. Oh, let me just zoom in. I'm going to set
the subdivisions quite low because this is, of course, going
to be quite small. So let's set this to like six. Okay, six is too much nine. Yeah, let's do like nine. Let's scale this down
and up over here. Yeah, something like this. And once again, the
pivot point will be at the cent at the 000
point over here, because the same
counts for pain. So we just kind of want
to have this here. You want to decide on the
thickness just by scaling it. Yeah, it seems about fine. And then what I'm going to
do is I'm just going to go ahead and select the top
and the bottom edge, and I'm going to do Contra B, which is like a bevel, which for some reason freezes.
There we go. And I'm going to set
my friction really high and then set my
segments up like this. And let's see. So yes, I want to do this, but I think what
I want to do is I want to go ahead and I
want to scale this out a little bit more because I
feel like that it was not looking exactly the
way that I wanted to. Now, if we go in here, I have a feeling like there is a double vert C
here or not or no. But just in case what
I like to do is, I like to do Control Shift A, merge verte Cs, and then over here, make
them like really small. So something like, yeah, this. Okay, and then you
can see it is like a tiny little tip
always sticking out. And I feel like that we
can also create that. So if we just quickly select
this stuff over here, and maybe, like, flatten it and, like, hold shift and
then scale it down. So we are just
extruding this out. And then I'm just
going to scale this in and then do something like this. And now I can just
grab this edge to basically decide if I need to, like, make it maybe a
little bit thinner. Selection is being
a bit strange. So let's make it a bit thinner. Let's make it a bit
longer over here. Okay, so we got that stuff done. And then what I'm going to
do is I'm just going to give it a few extra
segments over here. And this is both that
inside of speed tree, we can make some very small
changes to this using vertex, sorry, I shouldn't say so often, using vertex deformation. But also in here, I just want to make it feel a little
bit more organic by slightly moving
around these pieces and maybe also like selecting few vertices and
just making them a little bit less Perfect. Like this, because if it is
just like a perfect capsule, almost like a tablet
or something. And when I say tablet, I mean,
as in the medicine form, then it just does
not look as nice. So let's say we have
something like this. I'm just going to shift shift
right click. Shift click. Sorry. No, I'm just going
to go in here, soften. Sorry. So having this done, why do I keep
saying, um so often? Don't worry, I do actually
realize that I'm doing this, but I don't understand
why I am doing it. So I'm going to go ahead
and for the top faces, I'm going to go
ahead and do, like, a heart shading over
here, hard edge. And maybe it would be better if we also do that over here. There we go that
from a distance. Although sometimes you kind of want to keep these at your soft, but then it will
probably translate to everything being soft. So let me just quickly
add these to myself. I know, here, see, so
that does kind of work. Can this one maybe also
be soft? Yeah, here, see. So I only had to make
this edge over here hard. But anyway, there we go. That does kind of look like a catail as you
can see over here. So that's fine. The kind of stuff like a little
bit of bending, we can do a little bit
of bending in here. And the way that I
would do that is I would basically just
go ahead and go, first of all, let's edit my
pivot and move it down a bit. And then if we go to deform, non linear bend, it allows
me to set my curvature. So if I set is to like ten. Yeah, it's fine. Like it doesn't matter in which
direction, so you can rotate it. And I'm going to set
my low bound to zero. And I'm going to move my
bend down a little bit over here and set my high bound to like two so that it
does properly bend, and then maybe the
sets to like four or maybe like three or something
like that. There we go. Just to give it a
little bit of like a bend just to make
it even more organic. And then we basically
just remove our history. We once again place this properly on like
zero, zero, zero. That should do the trick.
So the next thing that we would need is we do
need a texture for this. And as you can see
here, the cat tails, they are like a
brownish noise texture. So we can probably
do this very easily inside of substance designer. So what I'm going to do is I'm going to go ahead and I'm
going to save machine, and I'm going to open up
substance designer. Here we go. And let's just create a
quick new substance graph, and this time we can set it to metallic roughness and
just call this cat tail, and we are going to
make the resolution probably like 512 by 512. It doesn't need to be very high. If you want, you can, of course, make it higher and then lower it down inside of the engine. But basically, what I'm going to do is I'm just going to have a noisy brownish look and that should be more than
enough from a distance. So I'm going to go for
probably something like this. The way that I would do that
is I would need let's see. I don't need metallic
declusion or height map, so I would just need these
three maps over here. Then for our normal map, let's go into noises and
let's go ahead and just combine a normal noise. So over here we
have a white noise. Let's combine a white noise, which is this type of noise. And I want to combine
this with something like a B&W spots
tree, for example. So what you can do is you
can art space and art, again, like a normal note. We've been over this before. And here you can see,
different types of noise. So we have this noise,
and we have this one. I'm going to set both of
them to open jell and make the really strong noise
that we have below here. Let's make that quite subtle. And then this noise, we are basically
going to combine it. And we do that using a
normal combined note. We just simply plug
these boats in here. Set is the high quality,
and there we go. We just have some general noise, and that should be more
than enough for this. Now for our base color, you can see that it's pretty
much just a brown color with occasionally a little bit of a darker color in between. The way that we can do this
is we can go ahead and add a gradient map over here. And what you can do
with a green map is you can plug in a noise. For example, B&W spots two. Then in here, you
can set you can basically assign colors
to the gradient values. And because this gradient value goes all the way
from black to white, we can literally use
the entire range. But a cool thing that
you can do is you can go in here and for example, grab your cattail, let's say, something like this over here, and then you can
press pick gradients, and you can actually go
in here and you can just pick a gradient and then it will try to pick the
colors within the gradient. So if I just try to do this a little bit
more here, you see, you can see that it's
trying to pick the colors and you kind want to just
try and pick a nice color. So only in this case, it looks like that these colors, they are so even that
it is hard to get. But let's say that we
have this as a base. We can always go in here.
Say I make this one like a little bit browner,
and this one also. And then I can go in
here and, for example, change this color around to make it a little bit
like a duller brown. I can click again and I
can make another color, so I can do something like this. And like that, I can
just very quickly create some general
colors here see, maybe I want to have a
little bit of darkening in here. So we get
something like this. So it's just like
a general color, but it does still contain
that noisiness in it. We can add this to
our base color. And now for our roughness, what we can do is
we can simply use a histogram range over here. And what you can do
with this is if you plug in a noise like your B and W spots,
we can set a range. So we want to set this
quite low so that we don't have a really strong
contrast value. And once we've done that, what we can do is we can add
a histogram scan over here, which allows us to
basically control if we want to make it
very bright or very dull. If it is dark, so black, it will
look very shiny. So we want to go
for, like, quite a dull look like you
can see over here. You can also play around a
bit more with your contrast, and you plug that
into your roughness. So super simple, super basic, but more than enough for
something like a cat. Then what we can do
is we can just go ahead and we can
save sine over here, and I'm going to
save it in textures, Oops, cat, tail, and save. And then we can also export it into the same folder
as a Targa file. And it will always use
your saved folder, so you can just press
Export, and there we go. Okay, so that is now done. So now if we go back to Maya, we can simply go in here, right click Assign
favorite material Lambert. Color file, open up the file. Navigate to your folder, cat, tail, base color,
and open it up. And if you go up here,
you can go to textview, and then you can
see the texture, which right now probably because of my UVs is
not working, I think, or it is just simply way too dark to be used inside of Maya. But that doesn't really
matter because all I need to do is I need to
go to my UV toolkit. Oh, God, we have
not a lot of space. And in here, I basically
just want to UV unwrap this. The way that I'm going to
do that is I'm going to go ahead and I'm going
to, let's see. Let's go ahead and First of all, actually, let's first of all,
just grab the entire model, and let's go to UV and
do a camera based. And the reason I'm doing
this is to remove any seams. And then I want to
grab a seam here. So just like a nice
round bit because else it will just not
be able to break up. And then I'm also
going to go ahead and hold Shift and grab a seam down here all the
way to the top, like this. Except for the very tip, so we can hold Control
like this like that, and then just do
another seam here. So the way that you can out
the seam is going to cut and sew in your
UVTkit. Press cut. And if you don't have your
UVtolkit you can find it up here somewhere. So on the way here a tools, and then here hide
UVtolkit or show UVtokit. And now what we can do
is we can simply go to unfold, press unfold. That's now unfolded. And
then what I like to do is, I like to go to modify and do orient shells,
just to orient them. And then I can just go to modify and just do
a quick layout. So now they are also in here. So that's it. That's all
I really need for this. So that's now UV Nwp You are
not really able to see it, but that is mostly just because the texture
is so dark here. You can see it like a tiny bit, but we are going to balance out this texture a little
bit later on in wel, because in Maya, it always looks dark when you have
darker textures. They look darker than normal. But anyway, we can go ahead
and we can now export this. And we are going to export this two froms ooh.
Let's just do down here. Cat tail, underscore top, and expot selection.
That's fine. And now, if we go
into speed three, what we can do is we basically want to add
some branches in here. So the branches are
going to be these bits, and we can just make
the colors green, although gradients would
be nice, actually. Yeah. Let's just make
it green for now. You probably won't be able
to notice the gradients. So what we're going
to do is on our zone, we want to go ahead
an art geometry and art branches over here. Let's just quickly
hide my leaves. And they are not showing the way I expected
them to. 1 second. Let me just quickly go
and add them to the tree. Oh, wait. Actually, I think it's better
if we use a trunk. So it might seem stupid, but let's use a trunk like this. And let's just reduce
the amount and the length and everything a
lot, and then we can do that. So let's set the absolute
length to one or maybe like three and set the radius, which you can find in skin
this time I'm starting to remember to like 0.1
or way lower even. We need to go like 0.020 0.01. And then for the tip, it looks like the stack
actually stays quite thick. So we want to probably go in
here and just move this up a bit to keep it quite
thick like this. So we got these
pieces over here. Now, if I go ahead and
I add them to my zone, we get one of them on each
and we can unhight this, and then I can see that
I'm still way off. So let's set the radius 0.005. Okay, it does not
like me doing that. In that case, I'm just
going to go only to my spine and set the length. And I want to basically
have the length like this. And then if we go
into the degenerate, we want to set the number. So we are going to go for a number of, for example, three, play out with your
first and last to have them sticking out a
little bit like this. Actually, it's set the
number to one, actually, because else it will probably become a little bit
too much. So let's do one. Can I set my radius any lower? I want to go really,
0.00, seven. I can do that, six,
I can do that. Five. Okay, five. That is probably
low enough, 0.005. Now what we need to
do is we just need to mess around with this a bit. So if we go to let's
go to our spine. By the way, you can
use your gravity also to bend it a little bit. Looks like we have
very little segments in this probably
because of the radius. Now, you can go to your segments over here
and you can twin and set the length segments a little
bit higher like this, and that will just give you
a few more segments which allow you to do some
interesting stuff like bending. For example, we can
go up here and we can see the start angle I don't really care
about too much. Gravity also not curling. I don't know. You can mess around with that a little
bit the front here. I'm going to for example, S writes that it curls a
little bit to the side. But we should also have the classic ones over
here, like the noise. We have the early noise, which I'm not going
to have too intense, and then we have the
late noise over here. But right now, I feel like that is too much because
you can see over here, they actually don't
have any bending. They are quite strong. So I'm actually going
to go ahead and set my noise amount. See, little bit here, I'm going to actually reduce
that quite a bit. And I think I'm just
going to focus mostly on, like, the braking
and everything, not the braking
on like the here, like the curling and maybe changing it round a little bit. So I have this now. The only thing that I want
is I want to have my length, and I want to
randomize my length. This one is actually a bit tricky because we only have one. So even if I would go in here, I am not actually able to
randomize the actual length. But because we only have one, it would not be that
massive stretch for me to quickly
just go in here. And for example,
make this length a little bit longer, go in here, make this one like a
little bit shorter, and very quickly add some extra variation
in this kind of stuff. Like this. So let's say that we have something
like this. That's fine. Now what we're going to do is we are going to quickly
create a new material, and we will simply call
this green and press okay. And in this material, I'm
just going to go ahead and set the color to you guessed it, be like a greenish color, set the two sided and
simply drag this onto your trunk and replace
the branch material. And once we have the color,
we just want to kind of see if we can balance
it out here, see. So from a distance, you probably won't
be able to really notice that it is just like
a plain color like that. I kind of want to make my
radius a little bit less, but I don't know if it
will allow me to 0.0 004. Okay, it does allow me to. That's nice. Now what
we're going to do is we are going to basically
add our mesh on top of this. You probably guess
how to do this. So we go file and we are just going to import
a mesh asset, and we are going to
import our cattail top. It looks like it already. I don't know if I
need to align it with the leaf or in the top. I forgot about that, so
let's just see what it does. Right click Assign geometry to select it and do a
mesh geometry over here. And we need to
create a material, our new rename
cattail. Press Okay. This are cattail material. Let's immediately also go ahead and just
assign our textures. We have our base
color, our normal, and if you want your
roughness, and then in here, you just want to go
ahead and select your cattail top and we can
assign this one down here. Let's do cattail. Then
this is the mesh. I guess that is interesting. So it is not properly
doing my lock to parent, no radio scale, no it is not
behaving the way I want. So what I'm going to
do is, first of all, just going to go to my
meshes and I'm just going to see if I set my here. There we go. That
was the problem. So it was the orientation. Now, I need to set my
orientation to Y minus up. Yes, Y minus up. They are. So it's funny when
they look this big. And we have this, so I want to turn off
my use actual size, but as always, it just
kind of like grazes out, but it was not grayed out, but we can set like our we need to set our start
at this point over here. So this is a little
bit strange that this is grade out because I literally just side
not being grade out, and I don't actually know where there should be
a size scalar over here, but it ignores it. So that's the annoying
thing for this. Don't worry, there is, of
course, a way to fix this, but it's a bit annoying because it means that
we need to fix it by scaling it inside of Maya. And I never really like doing that because we have a rotate. So our radio scale, I'm going to set
to one because I want to keep that
as like a default. Yeah, this one, that's fine. So we can just go absolute. Welding, segments, geometry, that's all fine. I
don't care about that. Yeah. Oh, hello.
Sorry about that. So we need to go ahead
and we need to do this inside of Maya, because I don't trust this over here. It's
really strange. But okay, it doesn't matter. We just need to go Maya and we just need to go
ahead and set the scaling, for example, to 0.1
and then overide it. But I know 100% sure that there is a way to actually
do the scaling in here. I just don't understand
why I do not get the scale vector over here. So maybe I'm just
missing something. This is quite new the
measures to this version. Here, see, the scaling does not even it seems to
just ignore the scaling. I need to have a quick look
because this is unlogical, so let me just
quickly have a look and see where the problem lays. Okay, so I could not get the mesh to work.
I don't know why. I've done it before. So instead, we are just going
to do a little work around, and that is that we are
going to use a leaf instead. So we are going to go to geometry to select
it and use a leaf. This is basically an
older method for, like, the very old
versions of Spettre. That's where I always
used to use this method. But, of course, it means that we need to do a few more settings
to get them to look white. So we add our leaves, and
then we art our catail. Like, that's no
different because the cattails will simply show over here whatever
geometry we have on the leaf. The only thing that
we then need to do is we need to
go to orientation. And set the align to one. And then we need to go
to generate and in here, we can set our size scalar down, and then basically set the first and last boat to one also. And when you've done that, you should be able to now play around a little bit
more with our scale. We definitely want to
change my texture later on. But yeah, that's pretty much it. We also we can use the
sink to maybe sink them into our shape
a little bit more, but that is one way to do the cattail and then play
around with your scale a bit. And when I see this, I feel
like I want to I don't know. Yeah, they are never really
sticking out this far. So well, actually, yeah, 50, 50. So I want to also play
around with that. So what I'm going to do is
I'm going to go in here, set my scale a bit higher. And then I'm going to
just go to my branches, and if I go to note just want to carefully,
click this one. So let's have this
one sticking out, but then let's have this one
behind here, like quite low. This one, maybe also like a little bit lower and
this one maybe even lower. Here, see that feels like it
has a bit more variation. So yeah, okay, I still works. That's the important
thing that it works. So this is basically another
technique and this way, you can add cats, but you can also add flowers. Whatever you want as
a mesh on the top, let's just use this technique
from now on to add them. So we got this stuff
that's all fine. If you want, you can quickly go to designer and go in here. And if you quickly
want to, like, change this color and not go
in here to like change it, you can always add an HSL note, which allows you to basically
boost up your brightness, mess around with your
saturation a little bit. And then if you just go ahead and quickly export it or you can press out Matic exports
when outputs change. And what it will do is every
time we make a change, it will just export. But then if we go in here, we should be able to
go to our cattails. I don't think turning
them on and off. Y here, turning them on
and off will change that. And now you can see
now the preview looks also a little bit nicer. And yeah, we can see the norm
map and everything working. So that's pretty good. I feel like they are a
little bit too tick. So I'm going to go
in here and I'm just going to quickly here, see, scale them in a little bit and then
export them again. Now if we go in here, we
can just go to meshes, and then we can
just press reload. There we go see. Let's
see. That is pretty good. What do I think of the scale? I think I'm going to make
them like a tiny bit smaller. Like that. Yeah. Okay, so
I'm quite happy with that. So having this done now, we should really do a saves because we've still been
working the Tarwater grass, nscore with, unscoe cat tail. Actually, let's just do cattail. Tall water grass,
doll, cat tail. I don't need to do W. So save. Perfect. And if we go
file and we can do, like, a quick export the game. Save, okay. That's our normal. And now if we go in here,
we have our cattail. And if we just quickly
assign that and turn it off, we can go at and
go, file import. Oh, God, so much stuff. I will clean this up
later on. Don't worry. With cattail. I'm going to rotate this, go
to our outliner. Once again, quickly select
this, do an ungroup, delete the old one, paste
this, create a new layer. Assign your object to layer and then look
at the previous one, and I believe that one was five. Yeah, so I'm also going
to go for like five. And just to add a
bit of variation, what would be nice is to maybe randomize our
leaves a little bit. Now I look at it. So yes, I
am actually going to do that. Sorry about that. Let's just
redo this a little bit. But let's just simply go into
our leaves, then go into. And then if you go
to your randomizer, we can simply randomize the
generation, there we go. And now I just
randomly generated it to something that I like. I can just save, and that will immediately like adds
an extra change. And that is also just
a nice difference when doing that to just add
some very subtle variation, even though it might be
very hard to notice, it is still nice nice
if you notice it. So let's just very
quickly redo this. So import the water
grass with cattail. And I'm just going to do
this quite quickly at this point over here. And we can just rear this
and set the scale to five. And now we can see that if I
look at the old one, here, see, they are slightly
different. So that's quite nice. And now we do, of course, have our cat tails just
sitting in between here. One, two, three, yeah,
that's all looking good. Perfect. So we can just go ahead
and we can save our scene, and we can export this to
unreal with the same name. And all we need to do in Unreal is we need to quickly
re import or import our cat tail texture over here. And in our materials, if we go to our solid master, so let's go to solid Master, create material
instances and call this cat tail because
these do not have a mask. We can quickly Oh, hey, we are not using a roughness map for this.
That's interesting. Um, let's go ahead and let's go into
our salt master and make a small change. So what you want to do with
your roughness map for this is over here we
have a roughness. Let's do a static
switch perimeter. And what you can do
is has roughness. And then if it is false, it will use my roughness, and if it is true, it will use a texture. So we can go to our cattail, use this one as
like a placeholder. Convert perimeter roughness. Yeah, said is true. And by default, we just
leave it to false. But if we do this, now
if we save our scene, what will happen is as
soon as we command, save, here, as soon as we
has roughness is turned on, it will use our roughness
map, basically. And then there you can
see your roughness map. And then the actual
roughness over here, it does not do anything anymore. But that's all good. So we can go into our assets, and I know that we
are way over time because we are at
31 minutes already, and I like to keep
everything always below the 30 minutes
at the very least. But let's just go
ahead and import this. And quickly set it up, and then you know the drill. So we go in here, materials, and we want to basically
use our tall water grass. Swamp grass green material
we need to do separately. So we have a cat tail over here, and then for our green material, what we want to do
is we basically want to go ahead and just
create a very simple material, right click material,
call it green. Actually, let's call it
plain underscore master. And all you need to do for
this is if you go in here, I add a constant three vector, and just go ahead and convert
this to Beremter and call this color and make it like Let's make it
white by default. And add a click scale parameter that you call roughness
and make this 0.8. That's it. That's
literally all we need. We can just go ahead
and save this. And then what we need
to do is we just need to go ahead and right click material Instance green and then apply this to our texture. Or to our mesh. At which point I'm first going to drag in my mesh over here. Oh, we have a selection
buck going on. There we go. Here we go. So see, that's
looking pretty good. So we have like our cat tails. And then if you go
in our material, green all we need to do is just quickly match up our green color with something that
looks here and you can even do like a color picker. So you can literally pick on
the color to match it up. And there we go. Now you
won't really notice that. But there are cattails. We might want to
make the norm map a little bit stronger
and everything, but we can just do that by going in here and
setting this norm map, let's do this one
that at this to two. And that's set this
norm map to 0.15. So now you can see that
it is quite strong. So that's one thing
that we want to do, and for the rest, I'm quite happy with the color. How about the roughness? I want to make my
roughness bit duller. So let's go ahead
and go in here and set our height range here a little bit stronger
and then set up position to be a little
bit duller like this. And now if we just re
export all of this stuff, we can go in here and we can simply select all of these and just right click
reimport. And there we go. So now we have a stronger
norm map as you can see, which makes it look a
little bit fuzzy and our roughness is also
fixed. So that's perfect. So we now got this one,
and now you would just be able to use it
however you want. So again, like a selection bug that happens a lot
all of a sudden. But the nice thing
is that if you would like place these pieces
in between here, you will just occasionally see a nice cattail sticking out, and it's like small
details like that. Of course, right now, my shadows
are a little bit strong. But if I just look
at this, here, see, they do really fit in there and they
do nicely stand out. So you are able to art a bunch of cattails and
just paint them in. So that's pretty much
it for these pieces. Now, in our next chapter, what we will do is we will focus a little bit more
on water plants which are going to be the
lilies and like that and little lily flowers
and stuff like that. So let's go ahead and continue with this in our next chapter.
17. 16 Creating Our Lilys Part1: Okay, so we are starting to get a pretty solid
collection already. We've got some grass here,
some longer grass kettles, and everything, ivy,
so that's quite nice. Now, what we're going to
do is we are going to just create some lily beds
and also some lily beds with, like, the flowers
and everything. I think that will be
quite interesting. After that, we are
going to create some bushes or scrubs or
whatever you want to call them. And then we can start with our actual leaf textures
and our tree materials. However, I need to have a
look because it's winter, so I hope that I can
even find a leaf. But anyway, lily beds, yes. Let's go ahead, and I
think that we will just, like, place them on
the ground here. But of course, if
you have water, they will be floating
on the water. So, this is probably
the first time that we actually need to go
100% in Maya for this. So let's turn off our water grass and let's create a new layer and just call this Lily cluster
underscore zero, one, for example,
something like that. So the cluster is just that it's going to be a
collection of a few of them. But this is all
super easy to do. So pretty much all that
we need to do is we need to go ahead and we need to
create a plane over here. And if we just go
ahead and zoom in, turn off our segments to
get started. There we go. And now all we need
to do is we need to right click Assign
favorite material, Lambert. So just like add a new material to it, maybe move it up bit. And then we should already
have the texture here. So what did we text that? Yeah, here in text that can
we find them. There we go. And if we just go into color, file, open it up, and we are going to grab
Abdo over here for this one. But then what we can
do is we can also go ahead and we can click
again on our plane. And in the transparency, we can also load this one, and we should be able to simply
load our Alpha over here, and it should work totally fine. Sometimes it does
not, but often, yeah, in this case, it
does. Okay, perfect. Now, I assume that this is like the bottom
side of our lilies. So what we want to
do is we probably just want to go ahead
and go over here. And we want to I'm just
using my loop cut and slide or split edge rings so that I can add a
bunch of edge rings. And what I'm going to do
is I'm basically going to split these pieces up like this. And now, if you go into
your tool settings, you can grab an edge
and if you turn off or turn on preserve your Vs, you are able to carefully
move this edge over here. And now it is pretty much just a matter of
selecting a phase, Shift click and press extract faces to basically make
it its own object. And you want to do that
with all of these. Extract faces, extract
as. And X ray traces. The nice thing is because these are going to be
flat on the water, they also do not need any extra geometry
or height renting. The only thing I like to
do for this is I like to just nicely place it as close together as possible
without breaking our shape because even
though this is empty space, the engine will
still need to render this empty space, even
though it is Alpha. So it's always nice
to just optimize it and not leave a
very large plane. So this is technically
more optimized. It is very, very minimal
in the optimization, but I think it also just it looks cleaner if
we do it this way. I'm not going to go as far as to actually add some
geometry in here. That would be a little
bit of overkill, most likely. So
we have this one. But yeah, I'm not exactly sure how much expense it is to
render Alphas an unreal engine, because normally I'm used to having like a technical
artist tell me that. So I would not know
specifically right now. But anyway, just like this, we have our lilies done, which is pretty easy. And then it's just going
to be placing them around. I think the biggest one would be when we create the
actual flower. So having this stuff,
if we just have a look, oh, that's very
large. Here we go. Let's make smaller. Okay, so you can see over here that yes, they do have a little
bit of curving. However, for scene,
they are going to be so small that even if we are
those curves in our geometry, you probably would
not actually see it. So it looks like that it has a little bit of
overlapping often. Yeah, here. It
looks like there's a little bit of overlapping. There are roots down here and it is up to you to see if
you want those or not. If I have a very quick look
because I do need to know before starting in
my tunnel scene. This water over here,
it is very dark and it is only very shallow. I have a feeling that even if I add those roots, it
would not be useful. I would not be able
to actually see them. I'm just going to
avoid them for now. So knowing that also, let's go back to our
preview map over here. We can go into Maya and now
we know how to place this. All we need to do
scrab all of them, turn off preserve UVs and just reset your pivot so that
they are in the center. You basically just
want to create a small cluster and then we
can also do a large cluster. What I mean with that is
let's say that I have, for example, this actually,
you know what? Let's do this. Let's make them all. But a tiny slightly
different heights. If we go over here, here, 0.00 20.003, 0.001 and 0.004. Now, the reason I
do that is this is such a slight difference that you won't really
be able to notice it. However, for me,
when placing it, it makes sure that
I do not start clipping into my other meshes, so I can just have
them sitting on top of each other or
below each other. So I'm able to
bridge much to this. So I can go in here and
I can basically just move and rotate stuff around. And sometimes I just like to have a lily just sitting
on top of it like this. Then I can just go
ahead and hold shift, and I can basically
keep doing this until I get a nice and interesting
looking cluster. Now, I don't want to have them like too many
or too many of them. So I'm going to get started with like a
nice small cluster, maybe like one over here and maybe another one probably like over here or
something like that. Here, here, something like that. It's a very small cluster, but it will work totally fine. So we got this
cluster over here. Now, what you want to do is you do want to make
sure that if you, for example, go to
your front view, that they are just
above the surface, like a little bit above because this is where
a pivot will be. And this way, it will always be floating on top of the water. Let's say that we
have a small cluster over here, that's totally fine. We can go ahead and we
can save our scene, and we can already export this. So we can go ahead and call this lily cluster
on the score 01. And then we will make
a bigger cluster, and then also one with a flower because these lilies are one
of the few things that we cannot actually paint using our foliage to because they
are sitting on top of water, but because it is water, it doesn't register as collision. So it will not properly work. And also, yeah, you
just want to have free range in terms of
placement. So I can go in here. I can go to my
textures, New folder, Lily, import our
texts over here. And then if we also go
ahead and go to our assets, and for some reason, Oh, God. I didn't mean to do that.
I press the wrong button. If you accidentally
press the button, you need to go to
compression settings I said to be a norm
map over here. So I accidentally press revert. But anyway, I'm going
to import my lilies. Let me just find it. Here we go. Import. I don't know
about the size, this size, I did not I expected. It did not really keep
track of the size. So what I can do is I can
just go ahead and go in here. If you scale this, what will happen is it will try to scale
all of them individually. Go ahead and click on Manip over here and then scale them and then they will
scale them as a cluster. At which point we can
just reexport this. Yeah, it can be actually
a bit bigger because yes, here they are
small, but they can actually become quite large. So let's just go ahead
and scale is even larger. Because once we have
this scale done, we can just make sure that everything is going
around the scale, also. There we go. Does
that look correct? If that is the lily, yeah, you know what
that feels correct. Maybe tiny bit smaller, but for the rest, it seems
pretty much correct. So, a little bit smaller. Last one, because I'm
a little bit picky. And then we can re import, and there we go. Okay, perfect. So now that we have these, all we need do is go
into our materials. You can probably just grab like a grass materials
like a default, duplicate it and call this lily. Then the other one will
be like a lily flower. So we can go in here lilies. Select these pieces over
here, subsurface scattering. Let's set this to 0.5.
Roughness, it is on the water. So let's set this
to like 0.2 to make it it maybe like 0.3. Let's to 0.25 to
make it quite shiny. Desaturation, I'm going to set to zero by default for now, and I'm just going to save this. Then open up a model
and you guessed it, simply apply your material
which is hidden below here. Tara, there we go. Okay,
so that's pretty good. I'm going to go ahead and I'm going to set my
subsurface to 0.3. I'm going to set my base color a little bit down over here. And then maybe by
desaturation to 0.2. 0.50 0.3. Okay, it looks like we had
to go for 0.3 after all. Just play around with it a little bit until you
get something that looks correct. Like this. Okay. The non map is
being a little bit weak, but it can be because these
come from texts that come. So they are probably
open GL or not. Yeah, I think they are open GL, so we probably just want
to flip the normal around. Yeah, here, see that already
looks a little bit better. So now, just like
that, you just have a few simple lily pads. And then what you
can do is we can also create a larger cluster. And then we want to
just go ahead and create one that has
also like the flower. So the larger cluster
is very easy. So what I tend to
do is I just do a shift D and then assign
these to a new layer, Galdes lily cluster
under score 02. Of course, later on, we
do need to check this inside of our actual scene to make sure that
everything works correctly. So there will be some
balancing happening later on. Um Oh, it looks like that. These ones are supposed to be in Lily cluster zero and
one. Okay, now it works. And then for these, I tend
to just duplicate it. Oh, duplicate it? Yes. Like this, and maybe duplicate it again. And after you've done
that, you praise too much. Just want to go ahead
and well, first of all, reset all of your pivot
points and just do some general movement to make sure that they
change up a little bit and do some
general rotation. If you want, you can even select all of these, go to rotate. And if you set the
rotate to object, they should rotate all
individually like this, see. So you can instantly change
all of the rotations to make them feel different
from the previous one. But then I can go
ahead and go here, and sometimes it
might be nice to have one lily that is quite far away and just quickly
move some stuff around. Here, let's have
some overlapping. Like this, you can very quickly
create some variations. And once you are happy with it, like this, what you can do is you can go
ahead and go in here, and then we can go
file export selection, and we can simply export
this as Lily cluster 02. Yeah. And one thing I probably want to do is if
we go to Lily cluster 01. Oh, no, let's do Lily
cluster 02, actually. I want to go ahead
and I want to press another Shift D and
add these again to their own layer and call
this Lily cluster 03. And this is just talking from experience that it
is often nice to also have one that has way
less lilies so that you can, have some more flexibility
in moving them. So here like this, for example. And then if you want,
we can do like a minip. We can, like, move this round that they
change a little bit. Like this. There we go. And
then immediately we also have a lily cluster so 03.
So we can export this. Lilly cluster
underscore 03 and save. Perfect. So that's an easy one. These are always very easy to do because they are just
planes and displacements. Doing the flower, however, is a little bit more annoying, especially because we need
to change the texture a bit, but it should still
not be too difficult. So we can go ahead and assign our correct
material to these. These also do not need an LOD because they are already
at their lowest. And then what we can do
is we can simply and this is why we
want, not that one. This is why we want to always
have them slightly above the surface because else else, they would look like, we can't really replicate
it good enough, but they would be
flickering a little bit. So we got this one,
and then we also have this cluster over here. So you can see that whenever we have a really dense patch, we can add these, and then
if we want to, for example, fade them out just like we
are doing with the grass, we can simply add some
of these and then they will kind of fade out like that. So that's pretty much like
the idea for stuff like this. You'll see, so you can
have some cluster. And then, of course, if you
combine this cluster with maybe some extra grass foliage and stuff like that,
like we have over here, or you would, for
example, combine it with a bunch of these bits, you can see that that
blends in really nicely. Here you'll see,
so we have these. Then over here, we can, again, like grab a bunch of this stuff. Yeah, like this.
Seeing then in here, imagine now also having some
flowers and everything, and it will just all
look quite nice. We have one overlapping.
That's what I mean. So it's because these two
are exactly the same. So it is something that I
always get really bothered by. So I do want to go in here, and it looks like it
is this one over here. So let me just move this up
a little bit. There we go. Export cluster two. So yeah, basically fixing any
box that we can see, which for these pieces is
very often almost nothing. So we just re import this. Okay, perfect. So now you can see now we have our lily
clusters over here, and just imagine this
being water, basically. So let's go ahead and save Asin. And now the next step is, and I will do this
in the next chapter, we will go ahead and
create a flower. And once we've done that, yeah, I really like the
texture over here, but we simply do not
need complicated texts like that because this is
an easy foliage tutorial. This is the kind of stuff that you would want
to make it look exactly like this for
advanced foliage tutorials, but like the cracking
and everything. But then I can spend literally
2 hours on just lilies, and that's not what I'm
going to do for this. But okay, perfect. That's already starting
to look really nice. Let's save sin and let's
continue on to the next chapter.
18. 17 Creating Our Lilys Part2: Okay, so now what we're
going to do is we're going to work on these
flowers over here, and it's sort of like
the same basic concept. Only we need to do, a little
bit more moving around. If we go to lily cluster 01, for example, you can order
the flowers individual, but that would be a
little bit overkill. What I like to do
is I like to just duplicate my first lily cluster, then go over here and assign the selected objects and then call this lily cluster. Flower, for example,
something like that. And since we are creating
an entire new lily cluster, we can just as well,
reset my pivot, move some stuff
around because yeah, that will just add
more variation if we need to have this anyway. We can just as well do that. So let me just do something
like this. And let's see. I think I will have the
flower sitting like probably like one flower
like somewhere in here and maybe like
another flower. Yeah, let's do
something like this. So let's have, one flower
here and one flower that is sitting more like in this
direction over here. I think that will look nice
if we do something like that. So let me just quickly
move some stuff around a little bit Yeah, that looks fine. Okay, perfect. So save scene. Now, remember, we have these if we go to, I believe they were mega scans. Oh, God. Oh not. Yes, yes,
they must be mega scans. Grass, scrub, swamp, tall
grass, butterflower. There we go. And these are the ones that we can
basically use for this. So I'm going to go ahead and I'm going to create a new plane. And we basically just need
to get a few of these bats. I think I'm going to go for
one or two different ones. Yeah, let's do one or
two different ones. So let's set this to zero. Let's make this a little
bit bigger over here. Assign a new favorite
material that's just Lambert. And then we are just
going to assign just like we've done before. But this time, we are going
to assign the flower texture. So this is the
albedo that we want. And then we also want to go to the transparency file
open and for that one, we want to get the
opste over here. So now we get
something like this. So we basically want to use, let's say that we use
these two pads over here. On the way, this
is the back side. And let's do these
two over here. Just to give it a little
bit of variation. But honestly, this will be
so small that you probably won't ever be able to see
much of the variation. But let's just go ahead
and cut these out simply by adding some
edges over here. And then also at the top and
at the bottom, like this, extract the faces and
extract the faces. There we go. I'm going to just reset my pivot and what
I want to do with this. I do want to make a
few changes to this. We are going to change the color later on inside of the engine, so we don't have to
worry about that. For this one, let's go
ahead and let's turn on preserve vs. Let's make the
cube as small as possible. This will make it easier
for us to move Now, it's pushed it out a little
bit too far. Same over here. Move this down. Come on. This one in. This one
down. Okay, there we go. So that's looking
good. Next thing, what I'm going to do
is I'm going to just go ahead and press Add a pivot, and I want to place my pivot
at the point over here, just like you would do
inside of speed tree. So we place a pivot
here at the point. And actually, you know
what? For this one, I just want to move it down, even though the point is not
exactly in the same level. Next, what I want to do is I
just want to go ahead and I want to add a few segments here. So let's add like I just
needs to be very little because we just need
to bend it out and in. So let's say, oh,
that's interesting. Um Yeah, we probably do need a
little bit more geometry for that than I expected. But let's try and see if
we can manage with having three edges here and having
only one edge over here. That should be enough, I think, but I have to see. So let's do three edges here, and that's like
this and one edge along here so that you
get this type of grid. And now for these,
it is quite easy. So we're basically going
to get started with, like, the outside, and then
we basically just keep duplicating and then
keep moving things around. First of all, what
we need to do is we need to prepare
the actual leaves. And we can do that
in a few ways. So because we only
have one edge, in this case, it is easier
for us to just do it this. Oh, sorry, make sure to turn off preserve UVs when
we are doing this. So we basically move,
say, both of these out. So that will give me a
little bit of, like, a bend. And yes, you might feel the urge to add more geometry to
make it look more logical, but don't forget
that we are looking at it from this distance or even further away. So
we got these ones. And next stop, we would
want to probably do some bending on this.
So I'm going to go. And unfortunately, this is a lot easier to do inside of t max, but I'll just do it in here just a little bit
more time consuming. Let's go to deform non
linear and te bend. And this is why it is a
little bit more annoying. First of all, you need
to set the curvature. Let's set this to
like 20 degrees, and then I need to
like do a over here like a snap rotation
and rotate it up. And then I need to turn
off my low bound to zero. Oh, sorry, it looks like
that that is my high bound, over here and then
move this down. Now we can see that we have
a little bit of bi bending. Let's set this to like
a bend of ten degrees. That should be fine.
Now, over here, we need to do the same again. So the form non linear
bend ten degrees, low bound minus two,
high bound, zero. In. Snap, rotate, move back. See, so we are giving
it a nice little bit of a bend over here. Now, we should be able to
just keep these bands. So what I'm going to
do is I'm going to get started by just
selecting both of these and duplicating
them so that if needed, I can still change
my bends around. At this point, you
basically want to start working from the
center over here. And for the center, yeah, I think we can just
lead this into one point. Let's say that I just
grab, for example, this point over here. We are going to do
something like this. We are going to place
these lily pads over here. And let's move one here, and let's do another one
here, and I don't know if we need four or
if we need more. You can just kind
of move this out. So you basically have
this lily pad, yeah, I think four is enough, and then you can
see that they are basically every other one.
So we grab these four. We would then, for
example, duplicate them, move them like this, move them up a little bit, and now this
probably won't work, but let's see if we can
just move it by object. No. Oh, that's
nice. It does work. So if we move it by object
and find the right axis, we are able to then set
a flower like this, and we should be able to
just keep doing this. So the only thing is that
we might at one point, want to scale down our leaves a little
bit, but I'm not sure. They look quite an even scale. So we can have. So then we set our
rotate to default. We give it like a
normal rotation again. We move this up, and then
we set our rotate to object and we just find the right angle and
move this up again. At this point, also in Maya, because we have so many
overlaying transsparent objects, you can see that
Maya's little bit of trouble to just render
these out, so that can happen. I'm going to select
the bottom ones, and I'm going to just go ahead and I'm going
to scale these out a little bit over here. But anyway, so let's select
these rotate default. Oh, my rotation is now
getting messed up. Let's set the orientation
to world over here. Rotate it again, move it up. And now if we set our
rotate to object, we need to set our X orientation
back to object also. Here we go, so we now find this. And now we are
getting really close to having it in, like, the cent so there is a point that I probably
do I want to bend? No, yeah, there is, like, a flower inside of here. A, how am I'm going to
try and see if I can find a flower on mega scans probably just to make
it a little bit nicer. But let's first of all,
focus on the actual leaves. So I want to
probably just export this once I've done my flower, just to see how it looks. Let's go ahead and just
duplicate it again, rotate it. And then in our scaling,
sorry, not in our scaling. In our rotation, we can
go object, object again. And I think this is probably
as far as we want to go. So it looks. It's really difficult to
see what it looks like. I'm going to probably
move this over here in the point where we are going to plan where we are
planning to place it. And then I think I might need
to do some random scaling. For example, I can sometimes do some scaling
by world and maybe like here move it down or scale it in or
something like that, but let's just
have a look at it. So we got these
pieces over here. We can call this file
export selection, lily cluster, underscore
flower and export. And then if we're going into unreel we can do the preview. So first of all,
let's go ahead in textius lily underscore flour. Import your abido normal
and opste and yeah, Abido normal and a paste. We don't need a translucency
for this one, I believe, because the translucency
would be green, but we are going
to make this pink. So we are going to go ahead and first of all, go in assets. And I'm just importing
my lily cluster flower over here. Yeah, import. That's totally fine.
Drag it in here. Here you can see,
like the flower. I'm going to already assign the correct
material for this one. And then for the flower, let's just duplicate
our lily and just call this lily un score flower. Open this up. And now, what I want to do
is I want to go into my lily flower and
to change the color. A quick little trick is that
we can go down here and set our saturation to zero so that it
becomes a gray scale. And then if I assign
this to my lily flower, so we have our mask
and our normal, and then our
subsurface scattering, I'm just going to
set to zero so that we do not get affected by that. Then if I go into my lily cluster to make
it easier to see, I'm going to art my
lily flower over here. And now what I
basically want to do is I want to go ahead
and first of all, set the roughness to
0.5 or something, and I want to set my color to become like this color
that we can see. So if I have a look at this, it looks like it's like
a little red color. I think what I need to
do is I need to go to my lily flower and set
the brightness up. So let's set the brightness
up to, like, three. So we basically have
full control over that. So just trying to,
like, match the color. The colors will not be exactly the same because
over here you can see that it goes from
pinkish to whitish. And yes, it can be a
little bit tricky. So you kind of like
need to decide. Right now, the normal map. I don't be honest, I don't really like
the look of this. But then again, from a distance, it does look not that bad, I would say, because we just need to remember
that we are previewing this, like, from a long distance. But up close, it's not perfect. I don't really like it too much. I think what I'm going to
do is I'm first of all, going to just move them down. So if we go to our
scene over here, I think what I'm going to I'm just going to select
all of these and then deselect the bottom four. Move it down a
little bit, then try and deselect another row. But it's really
difficult, of course, to see what I'm
deselecting at this point. We could turn off our
translucency or transparency. But let's say that we
have something like this. Okay, so we got that stuff. Now export it. File
export selection. This is going to be
lily cluster flower. Let's go in here. And let's re import this. But yeah, I don't think I think the general shape is fine, but the flowers are not
soft enough right now. Also, let me just quickly play
around with my subsurface, even though no, I want to turn it off because then I would need to
create another one. I'm going to have
a quick look on mega scans to see if I can find a better flower that
is a lot softer compared to this one.
I think I found one. If we go into text.com
and type in flower, we have over here these
magnolia flowers which are already pink and they
also have the gradient. I think that these would
probably work a lot better. So, I need to login. Here we go. And
the cool thing is that A, actually,
this is a free one. So you can just go for, like, full resolution
if you want. So I'm just going to go for
nice high resolution of 1024. I know it is way too much, but doesn't really matter. I just want to quickly get this, and we have our Alpha. And the nice thing
is that we then also have a pink translucency. So that should
work a lot better. Now, you might think, Oh,
no, do we need to, like, remake our entire flour,
but not necessarily. So if we go ahead and just
quickly press H to height, everything but our flour. Now, if we go in here and
we just need to quickly, open up our Lambert five, and then we just need to
basically replace the color. And now you can find this one
in text.com, lily flower, and then we have our bido we need to go ahead
and also, of course, replace the
translucency, text.com, waterli sorry, lily
flower, Alpha over here. Then if you just select all of them and go into your UV editor, you need to select them again,
you should be able to get over here as you can
see, still our UV, we should be able to
simply grab one of these because they
are pretty much the same scale or
the same shape, we should be able to
just nicely place these into a good position so that they are still
covering the entire lily. Sometimes it's fine to do a
very slight bit of scaling. It's not a perfect way, but it's the quickest
way for us to quickly, as you can see, turn this
into a nice little flower. Now, unfortunately,
this lily over here, it does not actually
have a yellow flower. So if we go ahead and
maybe go down here, we can try to find a yellow flower or
something like that. And we might be able
to find something that can go into the center. It's like a pollen thing, but that one is definitely a
little bit more tricky. So yeah, here, like
this kind of stuff. But maybe let's see if we can maybe go to like
tree scanned atlas, and then we should be
able to have, like, plants and flowers over
here. And we can have extra. If I cannot find
something directly, Um, you know what? No. Oh, hey, look at this. We can probably, see this
stuff we can probably use. I'm going to go ahead and I kind of want to have
a test like one bit. So I might be using this one. We can also use this
one, but as you can see, we would need to,
like, prop it up. So yeah, let's use
this one over here. I'm going to go ahead and call this one Lily underscore
Center underscore flower, and I'm just making a
folder on the other screen. So let's go ahead
and use this one. And honestly, yeah,
we can just download, but we really only need probably the Alpha and the normal, but I will download
the rest just so that I don't need to
change my material. And if we try that out, so that's pretty good. I'm
glad that I found that. Let's go ahead and go to
plane remove segments, assign material, apply color, and I'm going to show you which one I want
to use for this. So I want to use, one of
the side views over here. And honestly, just
one is enough. I don't need to have
multiple variations. That was just for
the actual leaves. So here's the Alpha. So I'm going to go ahead and I'm just going to use
this one over here. I probably also don't
need any extra geometry, so let's just go
ahead and extract pass because my plan is to change my pivot
to the central rear. It's really small right
now, but basically do this. I'm going to move it
like this, and then I'm going to set my axis
orientation to world. And then I'm just going to
go ahead and hold Shift, do this, do this, and do this. You know what? Let's make this a
little bit bigger and then hold Shift and
then make another one that is smaller that we
can push like down here, and that should be
more than enough. I'm going to go ahead
and I'm going to combine these pieces that they
become basically one model, and then I'm going to nicely just place
this into the center, and I will make this look
extra good inside of unreal, just making it like, really, really bright yellow
and stuff like that. Right now it is also
very difficult to even see where we are placing
this, to be honest. Because it is trying to
overlap on top of each other like many, many
different times. Let's see. Can I maybe go here? If I go to turn off textitFew, I can sort of see
what I'm doing. So that might be a
little bit easier. But we are now really pushing
our transparency like this. I'm going to now go
ahead and I'm just going to show everything, and I'm going to
export this again. Water lily class of flour. So this is still
taking spicy and long to just make
it a little flower, but in the end, hopefully
it will look very nice. So we got this stuff over here. Just press done. Next, if
we go to our textures, we have our lily flower. And what I'm going
to do is I'm going to create a follic
called center, and I will, first of
all, import my center. And I just need to quickly
go into my norm map, and I need to flip the
green channel for this. And now we have our lily flower. Which I will also import,
and as soon as I replace it, I will remove the old ones. So we can go in
here, lily flower, flip green channel,
go to our materials. And if we just open up our lily flower over
here, we have our lily, our flower, and I'm
also going to have another duplicate that I
call lily underscore center. Throw that in here. So now all we need to do is we
just need to replace these. So first of all, let's make
this color white again. Let's go into our lily flower, and let's just replace these
with the correct ones. Translucent C to like 0.5. And then what we can do is we can go into a color and we can make them even here. I think something like this
is quite a nice color. And now we can go
into the lily center. Base color of normal
translucency. And this one we can make
a really bright yellow. So there we go. That does
definitely look a lot better. And then, of course, from a distance, this
is what you will see. So that is starting
to look better. I'm going to go ahead
and now inside of Maya, let's just quickly
hide these again. I'm going to do a combine. Well, first of all, let's do a duplicate so that
we have a backup, and then I'm going to
just combine everything like this and maybe
also remove my history. And now I'm going to make
them a little bit big. So we are going to have, if I
look at it from a distance, like one, and we want to have them just kind of like
sitting in between them. So if we go in here, let's go back to my taxit el
because ls I cannot see. So here, sitting in between, and then another one probably
sitting like over here. Maybe this one we can go ahead and make a little bit smaller. Maybe we can give it a
little bit of a rotation. There we go. That should do
the trick definitely for something that is
actually going to be a very small detail. But now you also know how to
create pretty basic flowers. Later on, as a bonus material, I will also go ahead and
go over how to create some ferns, if I
say that correctly. And what you can do with that, it's pretty much the same
thing as with the flower. But for now, let's go
ahead and go in here. And re import era. So
now we have our lilies. And now you can imagine that
if I go ahead and, like, remove some of these and throw
some lilies back in here, here and then maybe also try to make it so that it
kind of fits in between here like this
and stuff like that. You can see that we
can very quickly get quite a nice and
interesting look. Awesome. So those
are now also done. This means that in
the next chapter, we will go ahead and just
create some scrubs or some bushes that we
will place like above the ridge later on
and also just in general because what we're going to do is like
a bonus material, since this tutorial
is going quite well, and I want to show
you a few more things that I did not really expect
that I wanted to show, and that is that we
will also create a very small forest scene where we will basically be using all of these
plants and everything, but we will be
using them outdoor. So that's why I just want
to go ahead and also make sure that all of those other pieces
are looking correct. So let's go ahead and continue with this in our next chapter.
19. 18 Creating Our Shrubs Part1: Okay, so what we're going
to focus on now is we are going to make a
few different types of bushes or shrubs. So for this, we are going to go back into Spetree and we want to just go ahead and
create a new file and just create a
blank scene over here. Now. So far shrubs, I'm going to go ahead and do the same thing as
that we've done before. I will make one that is
very dense and one that is, like, less dense so that we
can have a fade out effect. And also just in general that it does not
look too strong. So you can see, for
example, over here, these, they are
really not dense. They are just like some small
little bits and everything. Now, we will make them a
little bit more than this. But yeah, so I just kind
of like want to get, like, a nice balance
between the two. And I also want to go
ahead and also be able to use these for a forest scene. So let's have a look. We
have over here two textures. This one and This one. Okay. Do we need both
of them? I wonder. I wonder if we
need both of them. I'm going to go ahead and
I'm just going to see. So let's go into our materials. New and two materials. And we will just call this Shub on score 01. And this one. Swap on score 02. Okay, that's press okay. I'm going to get started by just adding the first one in here. Normal opacity. Yeah,
that should be fine. Make sure to make it two sided. Okay, so that is that one. I just I sometimes like to
press Edit so that I can, like, look at them up close. So we probably can already
get away with just one, but let's just see how it
looks if we like two of them. So here's number two. So we can just go ahead
and add those also. 12 and three. Then if we just quickly press Edit so that I can
look upwards Ah, that was the case.
That was the case. So we had two different ones, and I was going to decide
which one I was going to use or to maybe
use both of them. To be honest, I actually
like this one more. So I think I will actually start with focusing on this one. So same basic concepts. We have this piece over here. We just go on and go ahead
and we are going to see one, two, two, three, four, five. Let's do five or six versions. So art one, two,
three, four, five. Now, let's do one
more like this. And for these ones, they
should be quite easy. So let me just press
Edit on the first one. Let's say that is
this one over here, and you just want to kind
of fit this in here. But you do want
to give it like a few more segments like this so that they fit a little bit nicer and that they are
not just like a plain. So something like
this, and then just add a little bit of testlation. I'm going to go for
something like this. So we are actually going
to have a lot of those, so we definitely
need LDs for this. I'm going to make
the first version will hipoly and then the later versions we are just going
to go ahead and nuke out a lot of geometry using LODs. But basically, for now, the focus will just be on
nicely fitting this in. RtmxorGeometry. That's a little bit
too much. Here we go. So that we can do some bending and everything because yeah, in order to really fill this up, we need to place a lot of these. So we have one Th one. This is quite interesting.
So we can always just change the angle
quite drastically like that. And let's see. I'm going to make
this one fit here. This one over here and this one. Let's do this. That
should be fine. Let's move out a
little bit more. There we go. A little
bit of geometry. And after this, we are pretty
much going to make it the same as it is in real
life in the beginning, and then we will optimize
the bit. So we got this one. I'm going to do this one, which, although this
one is really dense, I think I'm not going
to do that one, just because if I do this, it will stand out too
much, I feel like. So let's just go
ahead and instead, go for something like this. Here we go. That's late. And now we are just going to
use some smaller ones also. Just make it look extra nice. So let's grab this
one over here, and then let's also
grab like this one. Oh, it looks like
my pivot point is already in the right
direction, so that's nice. Here we go. And
finally, this one. Here we go. Okay. So
those are now all done, so that should be fine for now. Okay, making this, it's almost actually the same as a
tree, you could say. But instead of the trunk,
we are going to have, like, a bunch of trunks
and then branches to that and then we place
our leaves on this. And those branches
we will later on just simply turn into
actual jom tree. Now for the branches, there is one thing
that is a little bit tricky. Let's have
a think about that. What I'm thinking about is I'm worried that the
branches will be too hipoly even when we
turn them into planes. However, what you can do
is you can if you want, often, let me just quickly
go to textures.com. There are often
also textures over here and they are
literally called branch, and you should be
able to find them in here they are empty branches, but I'm not sure if I
can find them in here. They look like this, but
then they are empty. And you can often use
those here like this one. So they are empty, and
basically what you can do with that is you can use it
as like a placeholder, but it will not look as good. So this is great for trees if you want to make very
optimized trees. But I think in this case, we will just see how it
looks in geometry first. So we get started by
adding a trunk like this, and we are just again, going to really make them
a lot smaller. So let's first of all, set the radius, like
quite a bit thinner. And then let's go into
spine and that's set the length to be like three
or something like that. Or maybe like four to make it a little bit
bigger over here. Okay. So we got that. Let's go back into our radius. And it's tone this down. I'm also going to not make it as like tone down over here.
So we got this one. Now, we need to mess
this up big time. Like we cannot
have these ones to look straight because we want to have the bush to be quite irregular and it just
bit all over the place. So if we go in and probably in our spling we
need to go here in our noise. Oh, I think we need actually
a few more segments in this. We can later also once again, replace this with just
planes if we want to. Let's go to segments, and let's give the
length over here. A few more segments. You can
see it happening over here. So I'm just giving the
length a few more segments. And then if I go in here, I just want to kind of mess
around with a bunch of stuff. So we also have a parent curl. Let's see here. Oh, that actually works
quite well if we do like a random parents girl like this, and then we just
want to go down. So we have our early noise, which I'm going to set
my threshold quite low so that the early
noise kind happens ever. And then we have also our
late noise over here. And then we can all set
like the turbulent. So basically, it looks
really stupid right now, but trust me, it
will work later on. The only thing I'm
going to do is I'm probably going to
go in my generate, and I'm going to
set a size a little bit smaller over here. And now, this is
where it comes in. So when we set a
bunch of numbers like this and we then push them
out a little bit over here, what we can do is actually know we want to keep
them quite close, but we are going to
do like an angling. So let's see if we go to a Mm. Let's go to A because
I cannot find it because I forgot
again where it was. So we want to have our angles. So we have our
length, yes, radio, but these are our segments here, length. Yes, orientation. I want to see if I can
make my orientation stick out quite a bit like this. And if you want, you can also
do a little bit of rolling. Now, we are sticking this
out a little bit more. Then what I want to do is
I want to go ahead and I should also have my radius near. I'm going to make my radius quite a bit smaller like this. And then if we go to generate, I'm going to probably
push my last a little bit closer to 0.01, probably. So we got something that
looks really silly like this. But the goal is to add more branches to this so that we have a support
for our leaves. So if we now right
click geometry to select it and we go
ahead and we grab, I think we can just
do normal leaves. Yeah, the scattered
leaves, they basically have already some settings,
so that might be nice. So scattered leaves
just have a bunch of settings already applied. But oh, what am I doing? I don't mean leaves.
I mean branches. So we want to go like, for
branches like twigs, maybe. Yeah, I don't know. Let's
just do it manually. So these are almost
like presets, but we can also just go in here, and here we have some branches. So we got these
branches over here. I'm going to get started by setting the number
up quite a bit. I want to definitely go
ahead and set the first to go down to zero,
and then the last. Yeah, the last can
probably be like one because we want to have this
Bush gar cover everywhere. We don't want to have a lot
of branches sticking out. Next, you probably guessed it. We just need to go at them. We need to lower down the length quite a bit over here so that we get,
something like this. And honestly, at this point, we kind of need to
add our leaves so that we can actually
see if it is working the way that we want to
or if we need to make any specific changes because I still don't have completely in my mind yet how
I wanted to look, so I just want something
that fills space. That's what I know.
So I'm going to go ahead and I can go in here.
And now we can try it out. We can try to go to leaves because I never
really used this, but it is quite nice. So
we're going to go scattered. And here you can see that it basically just scatters
around our leaves. The numbers might be
a little bit intense, so let's go ahead
and tone it down. And let's just
apply our material. So here you can see that
it looks not very nice, but we will work on that right now because
right now it is just like a massive clump of foliage, which I do not really like. But having this, what we
can do is, first of all, let's go to our skin
and how many one, two, three, four, five, six, one, two, three,
four, five, six. We can go in here
and just set all of our meshes, one, two, three, 45 and six over here. So we set our
meshes. That's fine. Now what I'm going to
do is I want to make them definitely,
like a lot smaller. So let's play around with
our size a little bit. Let's have a look and
see how it works. So I also want to have
everything more condensed. So I think what I'm
going to do is I'm going or play around
with the length. Or like others so first of all, let's go ahead and do this and change the scale to
something you want. I think I'm going to go for 0.8. Then in the orientation, I'm going to go
ahead and let's see. Do I want to fold? No, I don't
mind the folding. A line. I do think I quite like Yeah, here they
are single leaves. So, of course, we cannot
really do single leaves like this because we have
multiple leaves. And maybe that's prom maybe I should not go for
multiple leaves. That can very well be true, but that it would become
very expensive in terms of geometry if we
go for single ones. So they are kind of like
sticking outwards a little bit. So we do want to set the align to always stick outwards a bit. Next, what we can
do is we can add some folding, some curling. Yeah, I think I want to curl them down always
like a little bit. You can do, a little
bit of twisting. And now what I'm going to is I'm going to just condense
this way down. So because right now it just looks silly with
branches like this. Let's get started by
going into your trunk. Let's set the line of a
trunk a little bit less, most likely, which we can
find in spine, start angle. There we go. So we are setting this quite a bit less over here. Next, I'm going to go ahead
and I'm probably going to set my noise down a little bit. So here we have our early noise. Let's see our late
noise over here. Let's set our late noise
down a little bit. Okay, so we got that stuff done. Next stop is going to be
to go into our branches. And in here, I just want to play around a
little bit more with my length to keep it a little bit more
condensed over here. Um, and I'm going
to actually set my length lower at the
very tips, probably. Another thing that
I'm going to do is I'm going to go
into generate and I'm going to set my last
down probably a little bit. So I want to have this a
little bit more condensed so that we have a
bush like this, and, the first, we cannot really go
below zero, that's fine. So I'm having this
more condensed. And then, of course, I do
have my branches over here, which I do not like that
they are sticking out. But what we might be able to
do is if we go to our trunk, you can often go
up here to break, where are you Uh, let's see, Spine, I
think it is in spine. Ig ag pun noise junk
brake. There we go. And we can set,
like the chance to 100%. And then we can here, see. So we can basically
minimize and break a bunch of these
branches off like this. And then you can also
just play around with your seat until
you get something favorable like over here. So we are basically reducing the amount of branches
that we have. And because we set
the chance to one, they will most definitely break, except for maybe one of them,
like you can see over here, but that should not be too big of a deal because you
can always, if you want, click on Node Hello. Why doesn't it
allow me to select? Come on. For some reason, it does not allow
me to select it. It doesn't matter, I
will fix that later on. So, we now have this
bush over here. So this is like,
quite a dense one. Let's go ahead and go into
our leaves and first of all, tone down the number
of leaves that we have so that we can kind
of see what we are doing. So right now, we are we are
going a little bit too high, and it's not going out enough. So if I go ahead and just
assign my leaves again, and I think two or yeah, maybe three, maybe three, then let's go into our
trunk, go to generate, and let's set our last here, let's stick it out a
little bit more like that, and then let's go
into our spine. And it's tone down our length a little bit because
I want to have this to be more of like a
smaller push over here. Okay. So that is looking I really like
a little bit better. But then, again, we still have a lot of leaves in the center, which I'm not the
biggest fan of. You can see over here
and also like the scale. I am not really like a
big fan of the scale. So let's go into our skin. Let's see if we can tone down the scale a
little bit more. Toe down the scale,
even if it means that you'd like me to
add some more leaves. So I'm going to tone
down my scale like this. And sometimes also
look at it from the side so that you can kind
of see what you're doing. Okay, so now I'm
going to go into my orientation over here, and I just want to
play around a little bit more like my
align two folding, maybe a little bit of
vertex folding down here. And maybe also
unlike the Y axis, let's give it a bit of some
randomness, like this. And it also reminds
me that it can also go to the size scalar and at the very top bits
and the bottom bits, I can probably make the size a little bit smaller
here, top and bottom bits. Sorry, I mean at the tips. So I'm doing this one, actually. This one,
I don't want to. Like at the tips, I want to make everything
like a little bit smaller and play around
with that a bit more. Next, let's go and play around with our
number a little bit more until we get something
that looks a bit better. Okay, so we now got
the numbers, right? Now we need to
again go back into the trunk and see
if we can maybe, push this in a little
bit more over here. And what I'm also going to
do just to kind of hide everything is I'm going to
add a new bark material. So let's rename this
and call this bark. And then we can
just add the bark that you already have for now. So mega scans, bark and
just drag this one in. Over here. And throw
this onto your trunk, replace branch material also. There we go. Okay, so
we have this stuff now. An easy one that I can see is that the radius is too much. So I can go to my skin. And this one does take it simply takes a little
while to get this white. So the radius is looking good now. So I'm happy with that. I am going to go ahead
and I'm going to set my let's see if this is a
bush over here right now, I don't really like
the look of it yet. Let's go ahead and let's
go into my length, let's first of all,
give it some randomness in our length over here. And also definitely like
at the outer sides, try to make it a
little bit smaller. There we go. So we got some
randomness in our length. Next, we had not our
orientation, but we had, like, our curling over here.
This one was fine. I think it was the right
one that is, like, really intense, so
I want to probably, like, play around with
that a little bit. And I really do not like what we have over
here, like our length. So I think instead,
what I'm going to do is I'm going to
tone my length down quite a bit over here in our actual trunk and then
go to the branches and then reset the last two ones that it is sitting at the top and tone down the length
a little bit more. So this is just a
bunch of balancing. It just takes a while
because it is speed tree. There's a lot of
settings. It takes a little while to get everything exactly the way
that you want to. And sometimes it's also good to actually preview this
inside of speed tree. So for now, what we can do is we can go ahead
and go in here. And let's set let's
see our start angle. Yeah, I don't really
mind my start angle. I think we now have
too many leaves again. Yeah, let's do
something like this. Okay, so that's looking fine. Honestly, I kind of like need to see what it looks like inside of Unreal at this point because it might look
really bad here. I think I still want to
get my leaves to three. It might look really
or not really bad, but it might look off here, but this might not be the
case inside of Unreal. Also, one thing that
you can actually do if you ever want to, is you can always, if you're not completely
happy with it, just simply overhear press generation and
just randomize it to see if you can get
a push that you like. So if I go ahead and do this, here, this one, for example,
I quite like this one. So that's also an easy way
to just work with this. So, let's say that
we now have this. Let's go ahead and first of all, do a save us because we spent a surprising amount
of time on this already. And then swap underscore 01, is going to
call it like that. And what I'm going
to do is I'm just quickly going to export this, and then we are just
going to basically try it out. We'll
see how it looks. If it looks really bad, then of course, we will
just in next chapter, we will revise this
and else we will continue in next chapter
to add variations. It all just depends. Let's
go ahead and quickly add all of this to
our flower cluster. And now let's go through
the process of importing our swab 01 over here. A J rotated. It's going to
outliner, copy name, ungroup, paste name, add it to a layer,
give the layer name. And now let's see,
height, height. I probably want to get it roughly the same
height as that one. So if we just
quickly turn it on, I can see that my height needs to be around five
again, maybe even six. Yeah, let's do six.
There we go. So six. And now we can just go
ahead and export this. And I know that we
still have our branches and everything. Don't
worry about that. We will optimize this later on. But for now, I
just first of all, want to actually
see what I'm doing. And it will look very different inside of unreal probably. So let's go ahead and
go in here and let's say that we have sitting again with the grass and everything. First
of all, textures. I'm going to call this
one swap underscore 02 because that's the one
that I called it before. Import. Quickly grab your. I think we want to have
probably our IV for this. Let's duplicate our IV. Swap underscore 02. Drag in the usual set
the color back to white, save assets and
import over here. There we go, let's import
all. Let's open it up. And then in our materials, we want to have our swap 02, and we want to have
our simple ivy bar when our ivy bar probably
is not the right one. Yeah, we probably
like a non bag. But for now, let's just
throw on the Ivy bag. We can change that later on.
I just want to quickly see. So here we go if we
place this here, see. So that already does look
quite a bit different if you would place it in the corner,
for example, like this. Now, first thing I see is yes, so it is really
dense in my gumtre. You can often go in
here and there is a setting that
sometimes fixes it, and where is this setting? You can find it in, I
believe general settings, generate mesh distance
field for this mesh. Is that the one? Generate
mesh distance field? No, I thought this was
like a different one. Like, we can turn this
on, but I can't remember. Maybe it wasn't like
our import settings. There is, like, a setting over here or maybe
it was generate. It has to do with, like, fixing the density of your
distance fields over here. But I guess maybe
in build settings. Oh, yeah, here, build settings, two sided field distance
field generation. That was the one. If we apply that, that should also give us
a better result. And now if we simply go
ahead and go into our swap, we can get started by setting
the subsurface to one. And I'm just going to press G, and I want to increase
definitely like the color. So, let's grab this color, set the brightness to like
two or maybe even three. And then go back in here,
set the desaturation to 0.4. Like this. Okay. So in the next chapter, we do need to do quite
a bit of balancing, but you can see
that it does work. A few things that I want to do. I want to avoid this ugly
look where it feels like they are not properly assigned to
our branches and everything. That's something I want to fix the density of our branches. Right now, I cannot
look through it at all, which I do want to
keep in some areas, but like form a
distance in general, it does work pretty decently. So let's go ahead and go over
this in our next chapter.
20. 19 Creating Our Shrubs Part2: Okay, so let's continue with our swabs or bushes over here. And yeah, this one is definitely less straightforward
than, for example, grass or this kind of
stuff or even ivy, because, yeah, you kind of
need to play around with it. So if I have a look at this, I don't really mind
these bits too much, although I want to
pinch off the sides. So we are now basically
going to go back and forth. Non stop. So we basically go in here and we just
keep fixing stuff. So the first thing I want to fix is I want to go into my trunk, and I want to then go,
Oh, get rid of this. Let's go into my scale. And I'm then going
to go ahead and in the graph of my scale, I'm just going to Oh, hello. Maybe maybe I need to
do it in my radius. I think that might
be better. Let's go into our skin radius. Here, we do it a
little bit already. Let's add a point
here and then have this like in the
side. Yes, like that. And I'm going to
go ahead and let's see yeah, that should work. I still don't really like
having these pieces over here, but I get that I might not be able to do much
about that, except for, of course, clicking on it
and then going into Node, which still gives
me a strange bug. Maybe the bug is when I hide my branches that
it works better. Here, then it works. So I don't know why,
but you should be able normally to is down, but it seems like on a way, it's because we are
back in generator boat. There we go. Here you see?
I don't know what this is. It might be like, just a small problem
or anything like that, because you can see
that it does allow us to move the trunk. So I guess that the trunk
maybe has less settings, although I cannot remember that because there's no
scale settings anymore. So I'm just going to avoid
it. Sorry about that. I don't know exactly
why it is doing that, but, yeah, we just need
to work with what we got. Okay, I'm going to
go in my leaves, and I'm going to
make my branches quite a bit less. I'm
going to go for like two. And then if we just
go and have a look. So if I look at it
from this side, Yeah, I'm You know what I'm going to do?
I'm going to do it. Probably a bit different. If I look at this, I can
never see the large ones, so it might actually
be beneficial for us to simply hide them. Ooh, actually, no, that will not go over well
down at the bottom, does it? That's unfortunate. Then we can always if we want, we can cut them off
inside of Maya. That would probably
be the east thing. Also, these branches, they don't go down very far down here. So let's see if we go to
generate on a branch. Oh, no, I just set to the first. So maybe if I just
push this down to get, like a more favorable
position like this. And then the last, yeah, we also just want to push
this up a little bit. There we go. Okay. I
don't like this too much. This is a really tricky
one to get right. So let's say that
we stay with this for now and I will just throw
on the generate later on. The next thing that
I want to do is I probably do not want to
do the same as with our IV where we need to go on like a collision unless
that maybe looks good. So let's try it. Collision
and then leave and let's say this to 200. Here see? I think even if I go like 500, it would not be able to pop
it does look nice in a way, but I'm not sure
if it is able to properly catch every little bit. But it does look nice because it looks more organized like this. Another thing that I want twice, whatever I just add my leaves
to my branches over here, because technically, these are also branches. So I
just wanted to see. It does mean that it
gets extended out less, so maybe in the end, it might not be as
nice compared to this. No. Okay, so let's have a look. I quite like the
collision in a way. I'm going to go ahead and
I'm going to so my Oh, that is really
annoying that we are not able to probably
change that stuff. I'm going to
basically, I want to push my last down a little bit so that they are not
sticking out too far. So let's say that we have
something like this. It might seem like there's
a lot of gaps in here, but if you look at it in real, you can already see that it is really hard to look through
it because of the shadow. So I hope that the same
will happen right now. So let's do this
one as a prototype. Let's do a yeah, okay, let's just do a safe. If if this does not work well, then I would probably
end up recording this or re recording this. So then you guys will not even see what I'm
telling you right now. But if you do see
this, it worked out. So just know that.
Let's go ahead and that's now going
to Maya, so six. Let's keep that in mind
that we set this to six, and I'm just going to
do this for import or very fast. So
we have this one. Six, copy ungroup, deletes based Uh, excuse me. Oh, it's because the scaling
went wrong for some reason. Six, I said. Thank you.
Let's try it again. In group based, rotate, assign, expos, so it
goes quite quickly. Now I cannot see those
branches anymore. That's interesting. I wonder I wonder where they are because I did not hide them,
but we'll see. So let's go ahead
and go in here. And we basically just go
to ascarp and I'm going to press G to basically
turn off my selection, and I just want to re
input and see what it does. Let's just press Done. Okay, so that does look
a little bit better. So as you can see here, it's
a little bit more organized, and these branches do
actually look like they are kind of
stretching out like this. Now, I just want to see if I even need do I
need the branches? Let's hide. Yeah, I do need the branches
because else it will be too obvious
that we do not have those. The sticking out is looking
good, so I'm happy with that. So from a distance, also, how does this read? Pretty good. And if I just very quickly, also try it out with our painting because that looks often a little bit better. So if we go in here
and set the scaling to like 0.7 and 1.3, and the density, I'm just going to set to like 300 for now. Let's go ahead and go to paint. You see? So this is
what I mean because the distance field
shadows work differently. Okay, so that is
looking pretty good. So when we cluster it, it does look quite nice. As a stand alone, it
does not look as nice. You really want
to like clusters, but we are going to have
another version of this. So the only thing I
would say when having this is I'm going to move them a little
bit closer together. And I think we are then
ready for this one. So I'm going to go in
here, go to my trunk, and I'm going to set the last a little bit closer together. Oh, God, that is way too close. Let's do like 0.2.
Maybe like 0.3. And then maybe set the
branches to like 12. Maybe if we add a few more and then it's computing
all of the collisions. That's why it is taking song. Okay, I think that
does the trick. Down here, we do have a few
leaves that are sticking out. Now, you can always, of course, try to go in here and set
the first back to zero. But the thing is that it
then often does not Oh, here, this time
it is even worse. I push this up a bit, but
it doesn't really matter. We can remove these inside
of Maya if it is needed. So okay, so we got this one. I'm going to make
one last thing. I'm going to set the
number of branches to 17, probably, just to fill
it up a little bit more. Hopefully, at least. Let's do 25, actually. Let's fill it up
quite a bit more. Give the second over
here. Okay, see? So now it becomes a little bit difficult to see through
them. So we got this stuff. Now, definitely, if
you can see over here, we have 1.4 million. So our leaves right
now are 1.4 million, which is an insane number. Oh, no, wait. It seems
like an insane number, I mean, because
of the collision. So our branches are good.
So what we are going to do now is I'm probably going to leave these as geometry because they are quite
clearly visible still, and I think they are
quite an important part. However, for these
other branches, we can use the ivy stuff. So we have a bark over
here. That's fine. We are just going to go ahead
and create a new material, and we will call
this one branch. And in our branch material, we are going to just add the
same as our ivy material. So let me just navigate to it. So here we have our
ivy bark and our ivy. Come on, normal over here. So that is fine and two sided. And then if we go ahead
and go into our meshes, we want to go probably add
it on this mesh or not. Just go in here and we
have our branch cut out. That's this one, right?
Yes, branch cutout. So that's the correct one. Let's just go ahead
and navigate to it. Yes, I want to go Ivy. Thin branch. I think that's the one. Yes, that's
the one I need. No, I do not need
to find LLD meshes. Let's go ahead and set
this to what is it? C U C minus up left handed. That looks like to be the one.
And once we've done that, we can go ahead and go in here, and I'm just going to hide this because it is
bugging out a little bit. So we can go into our branch. We can go ahead and go
into our skin and set this to be spine only or
spine spine spine only. And then I'm going
to right click geometry and then like a mesh. And the mesh is going to be
a branch branch cut out. Okay, so that does this one. And then if we just like
add some small changes, first of all, set the radius
to be quite a bit thinner. And then what I want to
do is I also want to go ahead and go in
here and just pinch down the ends quite
a bit. Let's see. So we have those spines ready. The ghost now they are only on five tris or 5,000
instead of 21,000. Is there anything
else I need to do? Yeah, so apparently,
these pieces over here, they do not actually work
with these specific bunches. So let's just see if we
now have also our leaves on Come on, compute. Thank you. Yeah, here, see. So the
branch are still there. So if you go up close, you are still able to see them, but they will not take an
insane amount of geometry. So we got that stuff done. Over here, these ones, yeah, they're low poly enough. If you want, you can always go to segments and
set, for example, the radial segments to
be a little bit less, if I set these, for
example, to like two. They should give me
a lesser amount, but it becomes a little
bit difficult to see? So they should give me a lesser
radial amount over here. But anyway, we will be working with our LODs inside
of Unreal for this. So I'm going to save my scene, and let's just call
this one done. So I'm going to go
ahead and export this again one last time. Yes, I want to replace it. Going here. So six,
keep that in mind. Import. This one,
I'm going to go ahead and I'm going to scale
this to be six. There we go. Rotate it up. Copy
name, ungroup. It's quite annoying that it
always groups but, okay? I guess it can also be
handy in some cases, and then we are just
going to quickly repot this over here. Save scene, go into unreal. In real, what I will do is, Yeah, we have these
ones over here. Let me just paint in, like,
a few more because it will simply update as
soon as we paint in. So if we now go ahead
and go down here, we can right click reimport, and it should also update that. And then the branch material, we just want to press done,
here, see? So it's updated. And now it's harder
to see through, but also as a stand alone, it is working quite nicely, see? So that's kind of like
what I was after. So we need to do is
we just need to grab our ivy bark and
just throw this into our branch material so
that even up close, it still shows all of these
little branches and all of this fidelity while not having
a huge amount of geometry. I don't know how much we
have over here around 8,008 to 9,000 triangles. Then once we do, of course, LODs that will be
reduced quite a bit. That's looking pretty good. We got that one,
and if you want, you can now also create one
that has way less stuff. We still have time
left, let's do that. That is less dense. That's
really like a fade out. We're going to make it smaller, less dense and stuff like that. Save this one and then as
soon as we've done that, do a saves as a scrub 02. Pretty much at that point, all we need to do
is temporarily just hide the leaves because
they are too expensive. Then if we go to our trunk, we can go to generate. I'm going to set this
probably to seven Hello. It's there we go. Seven, bit of difficulty. Let's go spine that set
the absolute to maybe 0.8. Okay, 0.9 because we can always do a little
bit of scaling. Then I probably also want to set my radius to compensate for this to 0.008, seven. And now if I quickly unhide
my leaves and let it generate It doesn't generate
Cam on. There we go. Okay, see here. So we have quite a thinner
one, that's fine. I'm going to probably move my leaves down a little
bit for this one. Let's do 0.7 again, just to push them
down a bit more. It is almost the same as sinking
them, only sinking them. We are not moving
along the spine, but we are actually just
pushing inside of the spine. But, okay, so that seems
like quite a bit less dense. And lastly, I'm going
to go to my trunk, and I'm probably just
going to go ahead and do like one quick randomizer
in a generation. Oh, God, I should have
turned off my leaves for this because it's way too
slow with the leaves. Let's press height.
Trunk, and let's til it again. Let's see. This one. This one. Let's do this one, but let's push it maybe, like,
a little bit closer. So let's set the last 20.02. And now let's unhide our
leaves again and let's see how that looks. Yeah, here, see. So it's really like one of those bushes that are
just started to grow. So they just started to grow. They start to get their leaves. And speaking about just
starting to grow, if you want, you can set the size scalar of your leaves to like
0.7, for example, to make them a little
bit smaller to really again, put emphasis, maybe even 0.6, that it is quite a young plant,
something like this. And this is scrub number
two, so we can save. We can go at and we
can export this. And then we also
have this completed. So yeah, 02, that's fine. Okay. Now, if we go in here, I just want to go Oh, no, one, one, one program. This one. We can go ahead and
we can import number two. Once again, we can
still just set this to six in terms of scale. Rotate this nine degrees. And then all we need
to do is copy name. Paste the name and assign it to a layer
once again with the same name. There we go. So that is that one, and you can see difference between the two. So it's quite a big difference,
but that's what I wanted. And now we can just export it. And because all of
our materials are already set up,
that's always nice, so that all we need
to do is just do some assigning and then
we are ready to go. So I'm going to go in here. I'm going to go
exports to a real swap 02 import drag it in here. Open it up. I can see that I
have again a selection bag, but that's already fixed. So 02. Where Oh, wait. I just used my IV bar
for this one, didn't I? I think I just used
the IV bar for both of them. Let me just double check. I don't know if it matters. We can see if it matters or not. You see, so I use both of them. So let's just see if
that actually matters or because it looked totally
fine, because it is so dark. That's probably it
because you cannot really see it because it is
so dark inside of it, that it seems to be
totally fine, see? Even though it does not
look very good up close. But honestly, I'm just
going to leave it. If it saves an entire texture, so it saves an
entire base color, normal and roughness,
then I'm happy with that. And here you can see this one. So that's also
looking pretty good. And also with, like, occlusion, it is not as intense,
so I quite like that. And this would be,
for example, used. If we, for example, have
a large amount of bushes, we can go in and we
can, for example, duplicate these and, like, fade them out and maybe have, like, just like some
smaller ones like this. Maybe actually make this
one, a little bit bigger. So that's how you
would use these ones. And also, they are
just in general, they are here for variation. They can add to this variation over here so that
if I go in here, what you can always do
is you can always add the second one also and
set this one also to like 0.7 by 1.3 and density 300. Because whatever we have
activated, it will paint. So right now we have
both of these activated. So if I go ahead and I just quickly unpaint this
just to show you, if I now start painting,
it will use both of these. So if I now paint, you see, it is going to and that's
maybe like a bit too dense, but it is going to use both
of them at the same time, which once again gives you a
bunch of variation in here. You see, This like
the thinner ones. And here's a thick one
and then stuff like that. So that's all
looking pretty good. You can imagine having
this along with, like, trees and everything, and then it will blend in
quite nicely. Okay, perfect. So we have that stuff now also
done in the next chapter. What we'll do is we will take a quick detour and we
will create some ferns, which is just like
a quick plant. I want to do that. After that, we will actually do another
pass where we start by implanting everything
that we've made so far into our tunnel project. And once that is done,
we will continue on to the more bigger
foliage pieces like trees and also how to
create foliage materials. So that's the plan
for now, so let's go ahead and continue with
this in our next chapter.
21. 20 Creating Our Fern Part1: Okay, so in this chapter, I want to go over on how
to create a fern plant. And this is quite a classic one. It's these ones over here. So it's a really classic
plant to make in tri because it's probably
a very easy one. And because it is an easy one, I'm going to mix it
up a little bit just for the sake of this
citoil and I'm going to combine both Maya
and Spetree for this. So what we're going to do
is we are basically going to download a texture over
here from mega scans. Then inside of Maya, we are going to create
our leaf meshes. And then what I want to try and do is inside of spit tree, I want to, of course, not ty, we will do,
place the leaves, and then we will also
place different levels of the leaves with
different angles, which basically allows
us to very quickly generate and randomize
fern plants. So that's a lot quicker. You can also, of course, do
it completely in Maya just using bend modifiers and some twist modifiers and
just moving it around. But if you then want
to make a change, of course, it will
not be as quick. So let's go ahead and go
in here, and let's see. So yeah, I quite like the
classic ones that go into, like, a point, which seem to be like these
ones over here. So let's just have a look and
see which ones I like most. I think this one
looks pretty good. But let's just always
have a quick look. Like, this kind of stuff
looks also quite interesting, but let's go for a
more classic one. Mm, Oh, this one. Maybe or this one. Wow,
MgSkes has a lot of these. These ones are actually
also pretty good, but you can see, there are apparently a lot of different types of
ferns in the world, which, of course, makes sense. So I'm kind of deciding
between this one over here or we can go with
this one over here. I think I'm going to go for
this one. Where are you? No, I lost it again.
Am I so blind? Alright, here. I am blind, yes. So here we go. I do not think
eight K resolution two K is more than
enough for plant. So let's go ahead and just
do a download on this. Hello? Okay, let me pass the video because it
does not want to download. I got it. Now it's working. So let's just go ahead and let's grab albedo, normal pasty. We still did not use
the roughness, did we? Or did? Maybe. I forgot. But let's just go
ahead and just add these pieces. That
is all totally fine. And now, what I want to do is I want to go ahead
and go into Maya, and we can do the
same thing as before. And the reason I like
to make the leaves inside of Maya in this case is because what we can do is
we can make the jom tree very clean and also
quite optimized. So that's why I just
want to do it in here. Because inside of
Spettry, of course, you have less control
over the actual segments and the line flow
of your geometry. So let's grab a classic
plane over here. Let's make it a
little bit bigger. I said let's do zero. But after this, it
should be quite easy. We are going to use a few
different leaf modifiers, but you'll see what
I mean with that. I'm going to assign a material. Let's open up the color, file, and I'm going to
go to my fern albedo. And if I also go to
my transparency over here and grab my opacite
there we go. Easy, does it? Now, I think I want to use do I want to use all
four or all six of them. I think I'm going to
use these five of them, else it will be a bit
like quite a bit of work. Of course, it's no Pom
if it is a bit of work, but in the tutorial,
I'm trying to avoid it. But I would recommend,
if you are doing this, of course, on your own time for portfolio project
or something like that, it is much easier if you
simply spent a little bit of extra time to make sure that you get enough
variation out of things. So for this one, I'm going to just
simply use my CAT tool. To do that. It does not
really matter for now. We are going to
clean up, but I need to select this and
I need to extract the faces and do the
same for all of these. Strike faces over here. Now, what I like to
do with these kind of lens is I do like to fit my plane a
little bit closer. So I like to, like,
cut pieces off so that it fits a little
bit closer to the shape. This will often
make your geometry a little bit cleaner
and also more optimized because still this
rendering that we have all this empty space
rendering is more expensive than actually doing the extra additional geometry. I don't know why all of
these are all of a sudden in Jesus, look at this. I don't know how they
managed to do that, but they're all in
different groups, which is a bit strange. Let me just quickly clean this up because I don't
like the look of that. There we go. Okay, so basically, what I mean is I'm going to
go at select everything, quickly reset my pivot. Then I want to basically move my planes to the very point as far as
they can go like that. And I'll just do that
like every single one. And then what we're going to do is we are going to basically use a cau to slice off
different pieces. And after that, by the way, for this one, we can probably just do like a
target welt like this, see? And then move this. After
we've done the target weld, we will slice them up, and then we will clean up the jom tree. And once that is done,
we can just prepare them for export to speed tree. Yeah, so I just need to
warm up with my talking again because this morning
time of recording this. So I just woke up. That's the power of
editing for you guys, it might seem like one
continuous strain, but for me, this is day four, I think, Day four or
five of recording. Yeah. So we got
these pieces done, and now if we just
go ahead and go to your cut tool we can simply
press a cut like that. Press a cut like this. Be a
little bit careful that I don't cut off any
nice little bits. Another one like this,
another one like this. And then you can basically just delete this kind of
stuff over here. And now the way that we would
make this kind of yum tree, so it needs to be able to
bend and curl and everything. What I tend to do
is, first of all, I tend to actually connect
any loose vertices like this. And then I just use my
cut tool to basically add some fairly clean,
even looking cut. Now, depending on the
leaf, so this leaf is a little bit because of the way that it flows because it goes from white to again. It is not as clean as when you have, for
example, a normal leaf. On a normal leaf, you
can literally just use your connect and you can
do, super clean stuff. But for this one doesn't matter. We just want to do that.
And then every other one, something like this,
so we don't need to do this too often. We just want to go
ahead and we want to Give it like
an extra segment. Let's do this over here. So that'll be basically
now we have more than enough space to basically move around and
everything like that. Jump tree is not as
clean as I expected, but I was hoping for,
but that's okay. So it will still be cleaner than having random triangles
inside of speed tree. Let me just see, let's move this out over here. Let's do this one. And
we can select this. Once again, try to keep
everything fairly even, and let's add a connect here, here, one in the center. And so this one will
be like four for the curling and everything because as you can
see over here, they bend or they
curl quite nicely. And then the rest will be mostly for the
twisting, everything. So we don't need to have as
many pieces Uh, no, wait. I don't like doing it this way. Let's have one in
the center because the center one is
always quite important. Let's have one here. I also don't care for that one because it is not adding a lot of value. Yeah, okay, maybe done
here. There we go. So that's that one. Let's
go on to the next one, only three to go. Like that. And once again, quickly add your geometry. Let's have one in the center. And definitely around
here because this is where a lot of
bending will happen, so I'm just going to
make this a little bit Denser like this. Here we go. And maybe on the little tip, also
a little bit extra. Then once again, like one,
at least in the very center. And then maybe like one
on the outside over here, maybe like one on
this outside also. Yeah, that should be
more than enough. Over here, I probably
even did way too many. See if I look at this. I think these two can go, pretty much. Maybe only this one. No. Now I'm going to get
rid of both of them. We can always add more
later on if needed. So the next one is
going to be this one. So we basically
cut it over here. Oh, I think this one I do need to clean up a little bit more, but let's first of all,
finish the cutting. Like this, and let's
move this out a little bit. And let's see. So these two, I'm going
to merge to the center. This one I'm going to move down. Yeah, that should do the twick. Here we go. And then also
near the top like that. One of them at least
somewhat in the center, and then another one we're going to have probably like over here and another one,
probably like over here. Yeah, that should be
able to bend nicely. And then find the last one.
So this kind of stuff, the reason I now showing
it because, of course, this is quite an easy example, but you can also do this with very complicated
measures or like the cattails and everything,
like I already showed you. So you can just create custom leaves inside for speed
tree. That is no problem. If it does not work the way you want inside of speed tree, then you can always just create custom leaves like
this and um you can just fully do all of the jum try
yourself to full control. And then all you need
to do is just get it to speed tree as a leaf, apply it, and it will be able to get
manipulated just as like a normal plane or a normal
leaf food inside a speed tree. So that's the really
nice thing about it. And that's also why I
prefer if possible, using speed tree over Maya, because I can very
quickly all the bending and all the
twisting and everything. For all of the leaves at the
same time and randomizing, yeah, that is just
something that you cannot really do
as easily in Maya. Unless you have maybe custom
tools and stuff like that. Actually, this one, I'm going to give a few more segments. But anyway, so we now have these pieces done.
You guessed it. Now we just need to
go to add a pivot, place the pivot on
the tip over here. So this is where
our leaf will start all of the manipulations and start the spounding
and stuff like that. So that's looking pretty good. Now, the only thing is
that with these leaves inside speedr they pretty much only count as one at a time. So we need to export this
to five different files. In terms of our let's do this. I think it is easier
if we go here. And if I just click on the leaf and then go up here to name and call the zero New
name has no what? 01 should be fine, right? L score 01. Okay, fine. L on score 02. L on score 03. So I'm just preparing it
for export right now, L on score 04, but I
need to give it naming because else I forgot 05. Else, I forgot which one I just created. So
we got this stuff. We can apply this new
new layer and call this fern score leaves. And now pretty much select one. Turn on your snapping, and this is pretty much
what I'm going to do. I'm going to
basically snap it to the center because of PIV
points, export my selection, and I'm going to
export To Speed tree, which means I'm going to
probably create new folder and call to underscore Speed tre. Later on, I cannot. I cannot change these because
if I move these over here, what will happen is that when you guys download
the source files, you will be missing
the location. So I'm just going
to do it here to Speedte Firm underscore leave
underscore 01 and export. And then I'm just
going to move this out of the way, grab number two. File export selection,
firm leave 02. Number three, file Export
Selection. Number three. And then after this, I will
set them up in Speed tree, and that's where I
will end this chapter. This one is number five, so I've accidentally selected
in the wrong way. Selection Number four. Okay, so that is now all exported correctly
just like this. Fine. Let's go ahead and save our Maya scene and our inside Spettr just
to set it up already. Let's create a new scene, and it can just be
a blank over here. Here we go. And I'm going to go ahead and just grab or
create a new material, a new fern, and that's pretty
much all that we need. And I'm going to input my color, opacity, normal,
turn on two sided. And now what I'm going
to do is I'm going to go ahead and I'm
going to go file, and I'm just going to import
all of the mesh sets to speed and you can only import them one at
a time, but that's okay. So input mesh set,
one, two, three. Four and five, and
looks like that we are lucky that they are
already in the right rotation, see? So that's really nice. So now that we have these, we can just go to
our cutout meshes, one, two, three, four, five, and I can just go ahead and
go leave one, leave two, leave three, leave four, and leave five. There we go. So now we have
those all assigned. So that should be
totally fine now. And in the next chapter, what we will do is we will get started by actually
creating our fern. So let's just do a quick
save fern on the score 01, and let's continue
on to next chapter.
22. 21 Creating Our Fern Part2: Okay, so now that we
actually have all of our fern leaves set up and
everything and created, we are now going to go
ahead and create the plant. Now, over here, it
might be a little bit difficult to see because
these are multiple plants. So we are just going to mess
around with it until we get something that we like
when we place it into, like, place with other
ones that it kind of gives this vibe as what
you see over here. So what I'm going to
do is we are going to get started by
adding a geometry, and we are just going to
add a leaf right away this. The first beginning is pretty much like the crass.
So we add a leaf. We then gohe and we decide
on the number, and I assume, like, I think like four
is often like a default. So let's say one, two,
three, four, like this. Yeah, four should
be fine because these are going
to be quite well, we are going to go from small to larger leaves to smaller leaves again, because
that's how it grows. Like the smaller
ones at the bottom, they basically die off, and that's how they become
small or they just never got chance to grow
because there isn't a lot of sun and energy. Then the bigger leaves,
they will just fan out. And then in the center, there will be smaller leaves again. And the reason they are there is because that's where the
growing actually starts. It's a bit hard to see over here because there is a point, I believe with many
ferns where it will just stay at the same size. But don't quote me on that. Like, I know how
to make foliage. I'm not an expert at the
knowledge of foliage. Anyway, let's set our boundaries 0-0 so that they are
actually here in the center, and then we can just wide
away at our ferns like this. Now, the first
thing I'm going to do is I'm just going
to go ahead and set my size scaler a little bit. Up. Yeah, let's make a
big one first or like the center one so that I can kind of see how
everything works. Next, let's go to orientation, and we need to set
another up or out, I guess, or right. Yeah. Okay, so right,
let's set this to 0.5 to do the classic flip. Next, go to a line, and this is the important one. So over here with
this, we can basically control how we are going
to do all of our lease, but I'm sure that you
know about that by now. And now if we use our fault, it looks like they are
folded out a little bit. So set our fault to be
a little bit like this. Our curl is a very
important one. Now you can see that now that
we have done our geometry, it is really nice and soft
the way that it curls down. So that's really good.
So we got this one, and then in our curl,
what I'm going to do is let's also just
do some variation. Let's add a few
points like this. Let's just mess around
with the points a little bit over here, just to give it a little
bit of some randomization. A little bit of twisting.
Yeah, I'm fine with that. Vertex, maybe if we
set a noise very small that we can
do something like the vertex or sorry, large, I mean, very large
because I know, I don't want to
have it too large, because you can see in real life that it is
still quite a soft plant. So let's do something like this, or maybe a little bit less. So something like the 0.03 in the mount and around
tree in the noise. Let's do the Y scale. Let's also, once again, give it some randomness. So the Y scale is just
like the length here, see. And if we set it's close enough, we can actually change
the individual leaves. I just kind of depends where
your point is set here, see. So you can kind of, like,
now control that kind of stuff so that they are
not all the exact same size. So we got that one done. Yeah, I think that's pretty much all we need to do, right. Let's go over here to Fern, and we have one, two,
three, four, five. Zero, one, fern, 02, fern 03, fern 04, and number 05. So that will right away, give us a little bit of variation. It should. They all
kind of look the same. Let's see, that Oh, no, wait. Are they the same? They
look the same, pretty much. I do not trust that. Yeah, I
do not trust that here, see? These are the exact same ones. So let's go into a mesh because this should
be totally fine. We have to leave
zero, one, 02, 03. Okay, so we got those.
That should be fine. Um, really curious
about why I know, but if I do this, I
think it is a weight, yeah, I think it is a
weight problem, maybe. Here we go for 02 here and
these ones are zero, one, I think what we want
to do is we just want to randomize the
weight because right now we are setting
all of them at one, which might cause problems. So if I do something like this, now they should be
different. So let's see. We have this one or
am I just, blind? No. This one is different. This one, these three
are not different. That is really strange. What might be happening is
that it does not properly randomize because the leaves they are just like
single leaves over here. That might be the case for this. At which case, we need to be very careful and just
play around with your weight randomly until
it sometimes changes a leaf. Here, see. And when we do that, we can kind of still control it. So let's just say that we
have these four over here. Now, if you go to generate, you can use the sink to push things in and out because right now it is trying to
sink into the center. I always tries to do that. So we can push it
out a little bit, and pretty much at this point, we can right click and we
can just duplicate or contro D. And what I'm going to do
with this is I'm going to, yes, duplicate it and place
it on top of my tree again. And now if I go to my si scaler, I can tone this down to make them like the
smaller versions. I can then go to
rotation over here, give them a bit of a
different rotation. And if we go into orientation, I should be able to mess around with the
align a little bit so that we get these smaller
leaves sitting below it. And maybe let's say that
we make the curling less and then push it
down a little bit more. And I don't know, maybe, like, set the size a
little bit smaller. There we go, S and now we have some of these lower leaves. Next stop is we are
going to once again, like contra D grab
this leaf over here. And for these ones, I'm
going to go ahead and set the size a
little bit bigger, but not too much,
little bit bigger. Maybe you can even
go in here and, like, do some
randomization on the size. A nice thing is because
we are copying this, we can simply keep yeah, it simply whenever we copy it, it will just apply the
settings to the rest. So, that's what I mean.
Now, let's go orientation. Let's go into align. Then let's go ahead and go
into our rotation over here. And now at this point,
right now they are all aligned at the same time,
which I don't really like. So I'm going to
go into my align, and I'm going to start
by messing around with the different align modes. I cannot do it too much
because if we do too much, they will start clipping
too badly into the rest. But now I can just set my align over here
and you can see, we have the fern like this. And if I now go ahead and just play around a little bit more
with my rotation over here, here, see, so that
looks pretty cool. And now the last
thing that we need is we need to have a
fern in the center. Let's set my sink over here
to zero to push this in. So we got these ferns over here. Now I just need to
have one or two that are sitting really high
up into the center. So if we do one last contra D, I'm going for this
one, I'm going to set this to maybe two. Oh, and by the way, you
know what I want to do is I want to set these smaller
ones, maybe to like three. As if there are more at the
bottom. So we have these two. I'm then going to go
ahead and I'm going to just give it like
a ran rotation. But basically, all I care about is to set my line
really high for this. And for these ones, I'm tempted to just go to my notes and just
click on these. Over here? No, not that one. This one over here. And then give it some custom rotation. And maybe what we can
do is now if we go back to the generator, we
can go to the folding. Oh, sorry, not the folding.
Let's do the curling. Like this. And maybe
let's go back into notes. Let's see if I can rotate
this and maybe let's go to W. Move this a little
bit just so that you cannot really
look into the center and it just looks like
a nice little fern. So that is looking pretty good. I feel like maybe one more. Maybe one more like this. And it will most likely have then moved some stuff around. So let me just
quickly change this around again because I do not like it if it's
clipping too much, but we have to do something. So there will always be a
little bit of clipping. Unfortunately, it will be very difficult to literally
deform the vertice so that they are sitting against the leaves and all of
those kind of things. But yeah, it doesn't
really matter, because as you can
see over here, this is looking pretty good. So we now got this
one. Let's actually try it out inside of unreal, because this is pretty solid. After this, you can
literally go to every single leaf and you can just randomize the generation, and then you will instantly
have, another one. But honestly, I think one
is enough for a tutorial. So let's save my scene. Let's export this to game
from Speed tree Fern 01. Okay. That's just
a classic stuff. Just go in here. You know what? I'm going to, I'm just
call this fern like this. And now let's go ahead and just import Fern 01, copy name, remove the parent,
paste the name, assigned to our layer.
And there you go. See? Very clean geometry, nice plant. So that's looking pretty good. And that's also how
you would end up with the same result
inside of Maya if you pretty much did this in Maya or Max or
Blender or whatever. So we are going to
export this to unreal, fern 01, and that's
doing export. And our inside of Unreal engine, which for some reason
is on the Wong screen. Here we go. We can go
ahead and you guessed it. Import. Here we go.
Let's tag it in here. I'm going to make it 2.5
or three times as big. 2.5. Over here. Let's try that. So I'm pretty much eyeboning it. That's the thing
with also foliage. Yes, there is an average size, but often the size is very flexible with foliage
because it literally grows. But yeah, this is looking like quite a nice size compared
to all of the other foliage. And if we just go
textures, new fern. Let me just quickly
import our mega scans, fern textures over here.
Throw you in here. Materials. Let's use
the swab duplicate fern and I wonder if Fern
or Fern. Hm, I don't know. You should really not come to me when it comes
to pronunciations, especially because I'm Dutch, so it's English is not
even my first language, which I'm guessing most
of you already noticed. Let's set desaturation to zero. Subsurface scattering
to maybe like 0.5, because it's quite a tick plant. And now what we can do
is we can just go ahead and assign our material. Here we go. Not too bad. Not too bad. It's
looking pretty cool. Yeah, so we got,
like, some ferns. And I don't know. These
ones are for our forocene which is going to be
like the bonus scene that I'm going to create. And I have the idea of after the tunnel
because the tunnel is, of course, an urban scene. Is the creating nature scene, which will just be like a
very small forest scene with like a little
lake so that we can, have these plants and then have some trees surrounding it. But those because it this bonus, it will be a time
lapse creation, and unfortunately it will once
again not be included into this chapter or into
the source files, but it's just to showcase. And of course, to create
a cool looking thumbnail. So let's go ahead
and let's go to foliage and let's just see
how it looks in there. So assets, fern, let's turn these off so that
only that one is turned on. Let's go zero point. These ones can grow quite a bit. So 0.3 by 1.4 over here. Distance let's do probably like 1,000 something
in that direction. You can also by the way,
do like random pitching. If you do like 0.5, I believe, it's going to paint. Okay, 0.5 does not do a lot, so let's go ahead
and do like ten. Maybe it needs to be higher. You see, you can do
random rotations, which is pretty cool. Let's set the density to 500. So let's say that
we have over here. You see? We get, just
some nice little ferns that can once
again fill up our space. So that's looking pretty cool. We got that stuff also done, and the only thing
that I'm going to do is I'm just going
to go ahead and probably set the desaturation
up a little bit. So let's go over here.
Desaturation maybe like 0.2. Just give it a little bit of
a tone down and maybe set the color a little
bit down and maybe give it a little bit
of yellowish color. See, yellowish color,
a little bit down. Yeah, and then set the
desaturation, maybe 0.3. There we go, because ferns do
often look quite bit down. Of course, this
one looks really, really green, but then
it would stand out. So I kind of like wanted to
see if I can, like, here, see nicely blend it along with, for example, a grass and
everything like that. So that is looking pretty good. Also over here, see
it nicely blends. So I am quite happy with that. And what we're going to
do in the next chapter. So the next chapter,
we are going to quickly start by doing some level art in
our tunnel scene. So we are going to grab the foliage that we have so
far and place it in there. And after that is done, we
are going to focus quickly on our tree and on our custom
leaf and branch material. So we do have like one
tree in our tunnel scene, but the trees are mostly focused towards the forest scene. But this is looking really good. If you look at how many pieces of foliage we have created
in only, like, I think, like seven or 8 hours, and that's with talking with
all of the explanations, I think we are
doing really good. We are making really good time. So let's go ahead and continue
with the next chapter.
23. 22 Placing Our Foliage In Our Scene Part1: Okay, so let's go
ahead and continue by actually designing
our level a little bit. So you can once again
see this as like a bonus because it does not really have anything to do with foliage, but it's also important
to know how you can place your foliage and
everything inside of unreal. So having this in the scene, let's have a look over here. So you can see mostly like the foliage is mostly
focused towards these areas. And the reason I did
that because, of course, made the scene also
in the beginning is because this is where
the light often hits. Even if the sun rotates around, these are often the areas
where the lights will hit, but here it will be very
difficult for the lights to hit. So I still for visual interest, I added a little bit of
foliage, but not too much. So knowing all of that, we are basically just going
to go ahead and just mess around with
things a little bit and just see what we can get. So in here, I'm going
to have a look. So the ivy is pretty much fine. I have a main camera
angle over here. What I will do is to put more of an
emphasis on the foliage, I will make this camera
angle probably like a little bit closer like this. There we go, so that they can really focus on all the foliage. Yeah, we have our ivy over here. That is fine. I don't
think I need any more. Maybe it might be
nice to just have, like, a little bit
of ivy hanging. Oh, and let me just turn off my goodws because
whenever I have those, they are the first
thing that will be selected because they are
really large objects. But I just want to see if I do something like
this, how it will look. Okay, so that will look a little bit dark, but it
does have something. I guess, if I place it a little bit
towards this area over here, why am I running so slow? Oh, my screpsense is only 150. I'll set it back to 100. I probably just, like, need
to close something here. Let me just close Spree. That might be it. There we go. Now we are going a
little bit faster. Sometimes Unreal Engine five still has the tendency to have a random drop in FBS even though it does
not really make any sense. But anyway, I'm having this. So this is quite
nice that I just have a little bit here
in the top corner. So now let's have a look. This water over here, you will not be able to
actually see it. So if you want, you can
temporarily turn it off. So this is the Algae plane, which is basically some
algae I placed on top. But then you also have the
water plane over here. And if you turn that
off, you can see that this is pretty
much how it looks. I'm going to go ahead and
I'm going to get started. Let's go from big to small. Let's get started by going in our foliage painting because I think it is easiest
if I do it here. And let's get started by
just having our water grass. And yeah, let's just do our water grass for now.
Let's import these. And I just want to basically
see how this works. So it's going to paint.
We have both of these. I'm going to set the skeleton
maybe like 0.6 by 1.2. I want to quickly paint it
in just to see how it looks. Yeah, okay, so that's not
too strong, so that's fine. Maybe I'm going to do 0.7 and 1.5 to make it a
little bit bigger. Density, let's set this to
like around 300 over here. And let's say that we have
like this sne over here. So I would be able to paint
like that. That's fine. Now let's go ahead and these
are the final settings. I did it quickly in
like the other piece, but right now, I'm
really going to just go in and do
like proper settings. So aligned to normal
should be fine. What the aligned to normal does is whenever we paint on here, it will just basically go in the direction of whatever
direction we are painting on. I do want to do the random
pitch. Let's say ten? No, too much. Five. Yeah, here we go. So five is looking pretty good. Okay, so we now got
this kind of stuff, and now I'm basically
going to just use this as a cheat
because in this scene, I already spent a lot of time, looking at things and
planning and everything. So I can kind of, like,
use it to my advantage. And what I'm going to do is
I'm going to go ahead and I'm going to have another
window viewport, and I'm going to have
a second viewport. And the reason I want to do this is that if I set my
camera angle here, and let's just press
G in here to get it, I can basically see
what I'm doing. And I can immediately
see that well, actually, I will have
another cameraangle. I will also have, let's see, this camera angle over here. So I'm going to use
this one for now. But I'm having
this on my screen, and this is just that I
can easily see where I'm actually placing
stuff. 1 second. Let me just quickly
set this angle a little bit lower. There we go. So now that we've done that, I can go ahead and I can go
in here and I can start, for example, like painting in. Sometimes it might be nice if
you just go to unlit mode, just make things a
little bit easier. And I'm basically just
filling up this space over here. And let's see. I want to kind of, like, have it go down here and
I keep looking at my other ang and
my other screen, and I'm just randomly adding a bit of stuff mostly
around this area. So I kind of like to have
this in almost like clusters. So it will be just
like random clusters where we will have
these plants and also, of course, stick to the
water a little bit. Over here, it's
sometimes a little bit annoying to align by normal. So sometimes you want
to turn off a line by normal so that when
you paint in here, it will still just
move up like this. I'm going to make this
a little bit less over here because it's a
little bit too intense. Yeah, let's actually let's
reduce these amounts. And instead of having it
really strongly in here, what I want to do is I
kind of want to just move this along these areas. I know that there
is no water here, but you will not really be
able to see that very clearly. So I can just, like, kind
of fill this up over here. And then I'm going to just
nicely fade this out. A little bit like this. So we are kind of
like fading it out. And this does require a
bit of playing around. Like what I'm placing now, I might end up later
on just removing it again and just adding more, but I first of all, just want to get a base in Set as sketching. You are, first of all,
sketching in like a base to make sure that
everything looks pretty decent. And then after that,
you are just going to go in and do
some proper work. So over here, I want to have
a little bit like this. I actually want to probably keep this open so
that I can properly see through it so that I
can kind of see the rest. But over here, just
around these areas, I'm going to go ahead
and I'm going to just grow these pieces. I don't know why
my PC is so slow. It is really slow,
all of a sudden. And you should not do
that because this scene should easily run on 60 FBS, so I don't know exactly why. So there will be no
water plants here, but maybe if we just go
ahead and see if I go here, I don't really like
the look of it, because these are like,
really straight pieces, so Maybe, do
something like this. Yeah, that's quite nice.
So here you can see, right now I'm having my
resolution set to only 50. And the reason I'm
doing that is just so that my scene runs a
little bit faster. But I quite like that. So
that's looking pretty cool. I'm going to also have, like, a little bit more down here
in the corner and maybe, like, reduce the
amounts over here. So down here, that's
looking pretty nice. Let's just quickly like, remove the amount or
the large amount and then set my maximum
size to one and then add it back in so that we
get a little bit of like a more nicer fate that this
is a little bit small. And then you can
see that over here, you get like this effect. So over here, we have some
ti plans that's fine. Down here, I don't really like, Well, definitely,
I don't like this one that's just sitting here. I'm going to probably,
like, reduce this amount and then maybe, like, paint it in, like, a
few smaller ones over here. Yeah, maybe like painting
a little bit like this. And I don't know. Maybe also Oh, actually, for those ones, I want
to go back to 1.5. And maybe do some erratic. You will barely be
able to see these, so I just want to kind of have some filler objects in here. That should be
fine. Yeah, we can go also around here and
then around the bus, just like some filler
objects like this. So these are definitely
like the largest objects. And then around here, I kind of want to avoid having them. So maybe like a little bit, but I kind of want to reduce
the amount because you would think that the light would have trouble hitting
in these areas. So maybe over here
like a little bit, and now you can see
that we already get quite an interesting
look down there. So having that one done, I'm now going to turn these off, and now I'm going to
go ahead and move on to so the lily clusters we
will do with hand placement. Let's do our grass complex
over here. Let's do that one. One let's do 0.8 to 1.4 with a random pitch of five again and a slightly bigger
brush size, maybe like 50. And let's see if I paint this, Okay, I need to have a lot more. So first of all, I need
to set my scaling more. So let's set the
scaling 1-1 0.4, and let's set our
density to 500. It's because of the water. So the water is
making it sink down, so that's why I want
to scale it up. So let's do 1.5 to two because else we cannot really see it anymore
in the water. Okay, so we got these
pieces over here. That's pretty good. I'm now just going to
go ahead and I'm going to also around here, enhance my scene by
adding a bunch of grass. And then around here because this is so close to the camera, I'm just going to
wait with that, and I'm going to do
that very precisely. But basically over here, what
we can do is we can have, just some grass
growing in between just to enhance our
scene even more. And then around here,
you can also have this grass kind of like just scattered around these
areas like this. And that will look
pretty decent, I think. So I'm scattering
around the grass here. At this point, it will
be so far away from the camera that I'm
not too worried. I'm going to, let's
sometimes I like to, like, bleed out the grass like this that it is kind of
almost like trying to connect to each other
through the growth, but it's not completely
connecting like this. So that's looking pretty decent. And now you can see
over here also that, let me make this bit smaller. Come on. Here you see? So you can see, we can see these little bits of grass
bits over here and there. So now I'm going
to go a little bit more preciser in with my work. So over here, because now we are getting
closer to the camera. So for this piece, I just want
to go ahead and I want to, like, let's get rid of this.
Still have some grass here. And now if I set my brush size, maybe to like 20, let's have
a look. Let's go in here. Maybe, like around
here, have some grass. Don't forget that on
the solid pieces, we will have the other
type of grass also. So because I decide that this one works really well to go along with these plants, and then we have
the normal grass. The normal grass will be sitting
on the ground over here, but it will also be kind
of like sinking in here. But I still want to get some of this grass in like random areas. And then once I'm done with like a pretty solid
base over here, then I'm just going
to basically look at every single camera
angle that I want, and they basically just
going to art foliage or chip away on foliage to get
it to look even better. But this is looking pretty good. So we got this. I want to
have something extending out. So let's just maybe have
something like over here. And it's okay if I go a
little bit overboard. I still need to do my
optimization pass, actually, so I will probably do that also after this chapter because
I forgot about it. But this is looking
pretty decent as a start. So we got some grass here. So this probably the extent
to which you can see it. And now that we
have done this one, the bushes and everything
we will have on here, so we will do that later. We will probably do maybe
some custom placement. Although I am using different
these ones are way thinner, so they are not
exactly the same. But I'm just trying to
change things up a bit. Let's go ahead and get started with probably our basic grass. Over here we have our
basic and our large Ah. Let's there should not really be a difference between
the two, shout? No. And especially on like
a low resolution knot. 1 second, let me Come on. Whenever you have the
foliage thing on, you cannot select it. So let me just
quickly turn it off. And let's go back into foliage. I'm going to probably go
for just like the basic one because in terms
of polygon count, it does not really matter. Let's do 1.5 to two with a random pitch of maybe five again and a density
of once again, 500. Set a brush I so around 50. Oh, no, wait, that's
too much. Let's do 30. And I just want to
see how this works. So if I go in here, I want to see if this is
too much or too little. I want to set my density
to maybe like 1,000. Let's see. I feel
like it is too large. So let's just go ahead
and get rid of this and set the size
maybe to like to 1.5. Yeah, so I'm going to start with some really large clums
and then I'm going to just fade this out. But let's get started
with just doing some random grass and also in between here
and stuff like that. So that should be fine.
Maybe at this point, I'm also going to turn off the
align to normal, actually. And I want to also go in
and probably at this point, temporarily change my
camera angle so I can see where I am placing
the grass over here. So we want to have
something there, and then let's say that over here. We also just want
to have the grass growing, and the
grass kind of, like, extends to the rubble because it likes to be in those
kind of places where water can collect compared to where water kind
of, like fades out. Be careful that we
do not sink too much through the side over here. And then over here,
we can just fill it up because this will be
just like the corner, so you can just
kind of, like, add a bunch of stuff in here. Let's see. So we got
like some grad then we just go to kind of flow the grass over over here. And maybe just have
it kind of like going towards these
different locations. Maybe I'm going to temporarily
set my density to 2000, go in here and just
add a bit more. Okay, 2000 might be a
little bit too much. So 1,000 again. So it will have some bits of
grass here and there, mostly around the
corners over here, so that's pretty
good if we do that. So it will be around
these corners. Also, maybe in these
areas over here, we will have some grass growing. And then what I will
do is on the stones, I will probably I will do, like, a few bushes that shrubs
that I will have very small, and then I will
add some ferns and everything and think that
will work quite nicely. But anyway, so over
here, so we have this. And now, once we get to
this point, honestly, you probably won't be able
to really see it anymore because of the
thinness of the grass. So here, so we can see
the grass sitting here. So that's pretty good. We
have some nice bits of grass. I'm going to make the
grass a little bit denser in these areas. Over here, I'm fine
with it fading out. And I will see if we
can maybe do, like, a tiny bit of grass over here, but it will probably yeah, here. So by this distance, even if you do it on here, you probably won't
be able to see it. Now, you see almost nothing. And it just has to
do with this fact. Of course, right now,
if we go to like 200, you are able to see
it a little bit long, but even from that distance, it cannot hold up because it's
simply too thin of an Alpha. So let's go back to 100. However, over here, I am
going to go ahead and I'm going to set my density to 2000 I'm going to push the amount of
grass that is in here, as if it is, like, W just like a lot of grass is growing here and
stuff like that. And for my car, I kind of just need to play around with
this a little bit later on. To see if I can
remove it a bit more. And also, with these
plants over here later on, I will just clean it up,
so that's no problem. Maybe like a little bit
more grass in these areas, especially because
it's really dark in these areas, so you
cannot really see it. So then it would be nice
to maybe, increase it. So let's do something like this. Let's set my density
now back to 1,000, and now I'm going to turn
on my align to normal. And I probably just want to, like, in some of these cavities. I want to push in a little bit of grass because it would make sense that it grows
in these areas. This is a little bit
annoying over here. As you can see, it
is trying to grow on top of these metal bits. So you kind of need to
just be careful and see if it looks good or
if it looks really bad whenever we
grow it like that. This point over here,
you probably cannot even see the grass anymore, but I'm just going to, you know, like some of these hotspots. I want to just grow
a little bit of grass. Here another one. And whenever we
cannot really do it because of these bits down here, I can thy to set it below, see? But if we really cannot do it, then we can always do
some manual placement. Here, you can see
that over there, it's a little bit difficult. But then later we can just do some manual placement
and stuff like that. Let's see. At this point,
you cannot really see it anymore because it's
outside of the camera angle. Over here, it would
be nice if we just have growing up a little bit. So we're just trying to
make this feel like it like nature is really taking over all of these
pieces over here. I don't know if over
here, it might look nice. Yeah, it looks pretty
decent. But I'm not sure. We'll see how good
that it really looks when we fill one
resolution turned on. Because over here
on the out ends, I don't really like it. But okay, let's say that we have something like this over here. I'm actually going to remove
this part. But it's a base. We are going to, of course,
work on this more later on. So what I'm going to do
now is I'm just going to go ahead and I'm 1,000 already. Wow. I'm going to set my maximum size a little bit
smaller to like 0.8 to one. And then I'm just
going to go in here. Oh, turn off the normal. And I just want to give it
a small fate in some areas. Maybe set my brush size like 20 and then set my
density to 1,500. But I just want to give it
some smaller grass bits here and there. I
don't know why. Come on. For some reason, it does not want to paint in
this area. That's strange. But okay, it doesn't really matter because it's
probably outside of the camerang There we go. So just give it a little bit of, like, a fade here and there. And that should do the trick. Okay, so we got those done. Now, what we will do
in the next chapter is we will get started on focusing over here
these pieces and also, of course, add
some water lilies. So let's see what we
have so far. Save sin. I'm going to temporarily
close my other view. Make this one a bit bigger.
Camera angle, it 200. And let's have a
look. So if I see this, this is
looking pretty good. Like you can see, it's nice
and dense over here also. I want to change my
materials a little bit. I don't really like
the grass on here, so we might want to,
like, change that around. We also have this
angle here, see? So you can see some nice
dense foliage going on. And over here, we can
also like see it growing. So I'm really like
I'm on purpose, adding way more foliage
than I did in the original because the original
is really tone down. And of course, in the original, I spent like two or 3 hours on the foliage painting to make sure that it is
absolutely perfect. So, of course, doing
it in 20 minutes, yeah, you cannot get
the exact same results. But that's looking pretty nice. It's the only thing
that I find too bad that the cat tails maybe
because they are too dark, so I kind of want
to increase those. But anyway, let's save scene, and let's continue with
this in our next chapter.
24. 23 Placing Our Foliage In Our Scene Part2: Okay, so let's go
ahead and continue. Now, what I'm going to do
first is I first of all, just want to finish
off the water over here and I'm going to
go into unlit mode. Now, I have an alti plane here, which means that usually
if I drag this on, ah, that's too bad. So we don't have a collision right now because
of the water level. What you can do just to make it very easy is
to quickly just go to create and grab like a shape and like
a plane over here. Here we go. And just use this as like a
temporary collision. It will just make the
placement a lot faster. So I can go up here, place it. Very quickly scale it out
like a lot like this. And now, if I go in, I can just very
easily drag this in. So looking at this, that
looks really small, actually. I think I'm going
to actually make the size a little bit bigger. Yeah, because this is
simply way too small. So let's just go ahead
and go in here and we are just going to go down, set the size probably to, like, I think a seven.
Let's press reimport. Same for all of these.
Seven, reimport. Seven reimport. And finally, seven and reimport. Okay, perfect. So
now this should have increased, which it does. So now we are able to kind of place these a
little bit better. And what we can do is we can do some smaller and
larger clusters. So I'm just going
to place a few, and then I'm going to basically
double check to make sure that this is the
right size and not that it is still
not looking good. So here, we got
something like this. If I temporarily just allow me to hide the plane
over here, Yeah. I I just hide the
plane and just go to my camera angles, I
just want to double check. So here I can see it. Yeah, see, that is
pretty decent size. So now that we have these bits, let's turn on our plane again. Now we can just go ahead
and mess around to things. Near the out ends over here, and by the way, we once
again have a selection bug. There we go. Now that is fixed. On the out ends I
want to do is I just want to fade it
out at that point. And now over here,
I just want to steal a bunch of flowers. Maybe over here, we can play around with
it and rotate this and maybe like one small cluster over here that is a
little bit denser. And maybe like a few more
flowers over here. There we go. Should do the trick. And then
over here, the same thing. So we can just go ahead and
just add a few clusters. Like this, and maybe
have them once again, spilling out a
little bit because I still want to have some kind of something in here that will make it look a bit
more interesting. So maybe I will end up just placing a little bit more grass, but it is also good
if we just like a few of these random bits
and pieces like this. Don't forget sometimes,
rotate them a little bit. So that from a distance, at least we can see like,
Okay, coincidentally, the car is in front
of it, so we cannot actually see much
going on over here, but we can definitely place
like a few here also. Although for these ones, I probably won't have a lot of flowers because there's
almost no light, so you would most likely just have a few of these
sitting here. Like this. And let's see. So we got these ones. Now, here there is going to become Oh, here, there will be
more light again. So maybe then over here, we can really make it
look like a plant, and we are just
adding more and more of these pieces and
then also start adding some flowers in between. But for the rest, we are
really going to, like, make this look very
dense in terms of the amount of foliage
that is sitting in here. Then maybe like in these areas because it feels like
they might have been disrupted by the
concrete you never know or just have some
storytelling like this. And just in case you can
somehow manage to see it. Let's add a few flowers
in between here. And let's also like some flowers in here and maybe in here. And then we are basically
going to fade this out. And I'm going to fade it out probably towards
this direction. So I'm going to paint
stuff in over here. U and add another extra cluster here, another one here. So let's see. So how does
this look from a distance? Okay, so we can kind of see it fading out over
there. That's fine. And now if I also just add
a little bit over here, I think then oh, and a
little bit over here. I think then it will
look quite nice. So over here, let's
add like a flower. Let's add a few dense patches. And let's then add some
fading patches over here. So let's also have
some of these bits. There we go, and we then fade
it out. And I don't know. Maybe we even want
to, like, try and almost connect the two bits. So we got those.
And then over here, let's just do a very simple. It's like some cluster patches, maybe like the occasional
flower here and there. And then it just kind of
like fades out into the end. Something like oops. I moved it wrong
way. Here we go. Something like this
seems to be fine. Let's have a one more look
in the first camera angle. Okay, so we can see a bit here if I just scroll down and
just turn off my plane. So I can see a little bit
here and there, that's fine. So we don't need
to do much more. And then we have this
one, and here we can also see the
clusters over here. So that's looking pretty good. Although I don't
know what it is. Maybe it's the color. They look a little bit
plain from a distance. Yeah, I think we
just want to, like, mess around to the color
a little bit more, but we will do that
at like the very end. So this is looking pretty good. We now got some interest. So we have some water over here, and you can see that wherever
there's not a lot of light, you can see a lot
less plant life. And then as soon
as there is light, you can see that the
plant just kind of, like, get attracted to that
and also over here. So that's really cool. I
really like this area. This area, I also like
quite a bit over here. Maybe I want to Oh, no, wait, I am continuing
this on over here. So I guess it is just a truck that is kind of
like hiding things. I definitely want to, like, add some more interesting
stuff over here. So now we will go
a little bit more into the manual placement. So let's get started by
just, let's place, like, a little shrub over
here and then maybe, like, fade it out like this. Let's see. Does that
kind of stuff look nice? We go unlit mode. Yeah, here, Cesar, that looks quite
nice. So let's see. At what point do we want to have some really large shrubs? So I want to have
a few over here. I want to have a few
here at the back. I want to have a few maybe
like here at the back. And maybe like,
Yeah, actually, no, I'm going to leave
that, and the rest I will probably like
place here at the bottom. So we have a few over here. Let's go back into unlit mode because it makes it
a bit easier to see. I then want to have a few
sitting here in the back. Let's rotated. Like this. And I want to probably have a
few also sitting over here. So look. Okay, so we have a
few over there over there. That's fine. Maybe I
also actually have, like, a few of them. We can just sink them into
the ground that's no problem. You won't really
be able to notice. So we have a few over here. It's looking nice
and here. So here, we can a see a little bits
of plants popping up. Also here around the top later on are also going to
focus some more plants. And now we want to just
go ahead and add a few more somewhere in these
directions over here. Let's say that we place
like a few around here maybe have
fading out like this. Okay. Okay, so we got,
something like that. And let's also maybe do like one that is growing into
the corner over here. Now what I also like to do is, I like to see how
far we can push the ferns with this
one to see if we need to use more of the
shrubs or if we can just rely on the ferns to
basically apply a bit more. So first of all, make
sure that everything is turned off, except for this one. Scaling one to 1.5. I'll see if this is good enough. Random pitch of five. Let's go to our paint and probably set the
density to like 500. What's that scaling? Yeah,
that looks like a descaling. I'm just going to get
started by just over here. Randomly painting
in a few of them. Oh, God, that's
actually way too dense. So let's set the density to like 300 so that I can pretty
much just click once, and then it will
automatically place a few. So we got some over there. Let's say that I
want to also then continue this on over here and then maybe,
have it fade out. I still want to see
some of the concrete, of course, because the
concrete does look nice. So I kind of just need to. Let's go into unlit mode. Oh, that does look quite nice. It looks very Data vasi
or like enchardd style. So, okay, over
here, so you cannot see it too much over here,
but that's totally fine. It is just like something
in the background. So well, actually, here you
can see it like a little bit. So that's actually looking
really nice. I like that. Let's have like one or two, just like sitting over here. Here, this looks really nice
in the lighting, actually. Cool. Okay, so we
have a few there, and now comes the big one. Where I likely to see if I can maybe fade is out and just
have it sitting around here. And then maybe also,
see if we can maybe, like, continue
this on down here. You can go wrong really
quickly with like, adding too much foliage,
even though in real life, it would be totally logical to have the foliage is kind
of like growing on here. You can risk it looking
like noise inside of TD. So I often just want
to go ahead and go to my main camera and if
I have a look at this. So what I can see is I want to have like a little bit
of foliage over here. I want to remove this one and maybe have it more
towards the side. Let's go into unlit mode that I can kind of see what I'm doing. I don't know if they
are too big for this area. Let's see. I think I'm going to
go to a size of 1.3 maximum and maybe
like 0.8 minimum. Okay, so we got that kind
of stuff, so over here. Yeah, you cannot see like
it's in those areas. So I'm going to probably let's try and reduce
the amounts over here. Let's increase the
amounts towards the back. And then carefully, maybe, like, place the occasional
bits here and there. Let's see how does that look? Okay, so that does look
quite interesting. But I feel like it's almost like catching the sun too much
in some of these areas, but I'm not going to
change lighting of this. So I can play around a little
bit more with my materials. But if I see this, I feel
like that there might be a bit too much going on
in this area over here, and that we kind need to go
like this and then maybe, I don't know, maybe
let's see if I can like art like a
few plants over here. So that it does have
a fate going on. We got that stuff, we
got some over here. I'm going to remove this one over here and I'm going to maybe art and see where am I
going to art this one? Maybe here at the font. Yeah, that might actually
look a bit quite interesting. And then maybe also have a
few just sitting over here. And maybe one here at the waterfront,
something like that, and maybe one just sitting in between there. So
we got a few here. We got a few over here, maybe another one
here in the site. I don't know if I want
to also have a few. In my version, I'm
covering this up with ivy, but it might be handy if you just cover it up with even
more foliage like that. Though there might
be a little bit overkill around the front. So now it is just like mostly wy picky stuff to
make sure that it does look exactly
the way I want. Okay, so we got
something like this. Now, the last thing is
that over here, this area, I don't really like, but if I set this to 200, I
might like it more. I do not. I'm going to go to my normal grass and I'm
going to just hold shift, and I'm going to basically try and get rid of
that a little bit, just from a distance
and painting it out that I can clearly
see what I'm doing. Okay, let's now go back in here. Okay, so I'm painting
that one out. And then if I go ahead
and go back to my ferns, I'm going to probably place like a single one
like over here. Yeah, here. So even
one single one already does a really good job. Okay, so we got this.
That is quite cool. Let's also go in here
and just like place a few across these
borders over here, just like fill things
up a little bit. We don't really need to go
further away than this. So we just have a few
ferns here and there. And if we then combine
those with a few bushes, and then later on also with
some trees in the background, I think that will
look quite nice. So if we go for
something like this and then have a few of these larger plans
just sitting here, maybe, like, replace this one, oh, I just saw what I did. I have a selection bug
somewhere here, see? I almost accidentally
duplicated that entire thing. That's not something
I want. So that's why you need to be kind of
careful with the selection. You see, now the
selection is fixed. So, okay, so we have
this one and this one. The only reason I noticed it
is because all of a sudden, the copying took too long. And if we then go to,
like, our side view, so we can see like this one, I'm just going to move
back a little bit, and I'm going to duplicate
it and maybe, like, have another one that's
a little bit back here. This one, I'm going
to move down. And maybe then also push
this out a little bit and don't forget to
rotate it a bit more. You'll see. So we got a little
bit of scrubs over here. And if we combine this
with a few trees, that will look quite nice. Over here, we have lots
of ferns and everything. That's also fine
and maybe combine it a little bit with
shrub number two, which is like this
really low one. And what we can do with these
ones is we can go ahead and scroll down and turn off effect or receive
decals like this. And we can move this
down over here. And also maybe place
like another one here. So it's all just about
your storytelling. So the reason I like to have some of those in here is because then it will not just look like I place the same plant over
and over and over again, which I technically did. But okay, so let's say that
we now have this view. This is looking quite cool.
Like, it looks very natury. It looks, it just looks nice. So I'm quite happy with this. One last thing that I'm
going to do is around here we go into our lit mode. I feel like the sides
of these are too even. So I think what I want to do
is I want to turn these off. Turn these ones over here on, select them, set the
size 0.4 by one. Then if we go into
our paint mode, I just want to basically reduce these and
then I just want to give them a bit more of a size variation
from a distance over here, here, see, you can
see that there's a little bit of size
variation on here. Let's see if there's any
other ones where I really feel like that. Maybe over here. Like over here, it's again,
like I just want to reduce a few and then add a bit of
size variation over here, just to make it feel more
organic, maybe also over here, like in the back, sometimes it's fine to just have
all of a sudden like an area where they go
where they are less dense and also lower so that when you look
at it from your camera, you see, you can see
that there's, like, quite a big difference
between everything. So we got that done. Now I'm just going to
go ahead and I'm going to maybe also over here, like, do a little bit. Oh, and at this point, it will
be very difficult to see, but still here, let's
do something like this. Here, see. So that is like
some small variations, and I quite like that. Okay, perfect. Now,
at this point, I'm probably going to call
this one done over here. So, of course, what we want
to do is we do want to go ahead or I want to go ahead and later on I'm just do a
little bit of balancing. But if I have a look
at this, what I first want to do is I just want
to go into my materials, and just whenever
I see something that I feel like needs
some balancing out, like for example, here,
the subs over here, we can go ahead and
we can go in here. We can set the subsurface,
maybe to like 0.5, and maybe set the color
a little bit darker, here, see so that the blends
in a little bit better. I don't know. Maybe we want
to set the color to more like an orange color or like a green color. Now,
you know what? I think I'm going to keep
the color like this. That's quite a nice one. Next the ferns, I want to go
ahead and also go in here and maybe tone down the
color a little bit. Maybe set the subsurface to 0.3, and maybe set the
desaturation to 0.4. Now let's do 0.35. Let's Let's set the subsurface
maybe to be let's see. Let's make it it's
a little bit more like a reddish subsurface. I think for some reason,
I kind of like that look. If we go zero,
yeah, 0.3 is fine. And see, play around a little
bit more like my color. Let's make it a little bit
darker just so that it fits in a little bit better.
Okay? So we got those. Next, we have our cat tails
and I wanted to go in here, and let's just grab our
cattail base color over here, open that one up,
and let's just set the brightness to like two. Oh, yeah, it's definitely
here only at five, I can really see them. But if I set them to five,
it will mean that up close. Oh, no, yeah, up close, they
are still pretty decent. So this way, I can
still see them. So from this camrangle, I
can just see them over here. And from this camrangle, I can see them a
little bit better. So that's quite nice. And
the last one would be like our water lilies over here. I'm just going to go ahead and let's set our
roughness to 0.3, probably, and let's set our
color down a little bit. Okay, that does not do a lot. Our subsurface, I'm
going to set to 0.2. Let's see. Yeah, let's set the two around
here, like the centers. That over here, they are
not standing out too much. One, 02. Yeah, I don't really
mind about the subsurface. So those are also not
standing out too much. You can still see them
like a little bit, which, of course, fine, because that's kind of
useful if we can do that. But now you can see that here. Our foliage, we are
definitely adding a lot to this. So
this is our version. This was the original version, so you can see how quickly
we still, and we also, of course, just made it our
own, which is really nice. And yeah, that is
looking pretty good. So what I will be doing now is I will have one
more chapter after this that it will
just set up all of our LODs and once
we've done that, then we can go ahead
and we can continue on the final trees that we
can have like around here. But our main plants and foliage and stuff like that,
they are pretty much done. So let's go ahead and continue with this
in the next chapter.
25. 24 Optimizing Our Foliage: Okay, so in this chapter, we are just going to go
over and do some LODs. You probably don't
even need to see this because I already showed
you how to do it. But just in case we will just go ahead and
go over the process. So over here, we have a fence. As set, I already
showed you the LODs. But again, you can just go to
the LLD settings over here, these are like presets, and I like to use foliage for foliage and then
just press Okay. And then you do need to set
like the number of LLD. So I said to you can also
by the way, use Small Prop. Small Prob also works well. Going to set the number
of LDs to probably, let's say that we do
like three per piece. Honestly, it's a tutorial. I don't really have
to do this, but now we can see that
we have this one, and then I like to
just cycle through. So this LD here, you can
see that it is half, but it almost does not change. Here, you can see it like
tiny bit of changes. And then over here, this
one, it starts to change. And you can always just go into the Y ram so you can see
difference between LD, zero and LLD two over here.
So that's really great. So most of these, we can just pretty much do this. Here, let me just
save this. We can pretty much just open it up, set our LD and close it again. So let me just quickly and this is the one time that I want them at the top, and
now they don't go. So let's just go ahead
and do the grass. Also our ivy over here. Lily clusters we can ignore because they are already
at the lowest they can go. Yeah, maybe the one
with the flower, but I'm not going to risk it and I water grass over
here. Okay, perfect. So let's go ahead and start with this type
of grass over here. These ones should
be quite basic. So it's just like foliage with
three LDs and press apply, and then just check
one, two, three. And the distances I
already discussed in a previous chapter that I am fine with the default
distances that we have. But you can always go ahead and turn off
this button out to compute and then over here, you can go to,
like, for example, your LD zero or LD one, and you can set your
screen size over here. So it looks like this one, we already did, so
I can close it. This one we did not yet do, so we can just go foliage,
yes, three apply, and I just need to double
check to make sure that I'm not losing hoops
too much detail, zero, one, and two here, see. Only at two, you really start to notice it, but
that's totally fine. And this is basically how
we will do our optimization because right now these
are still 6,000 triangles, which for a modern AA
game is not that much, but you definitely would need optimization for
it to be logical. If it would not
have optimization, then it would be far too much. But if I just said
this to three, we can have 6,000
over here to 3,000, and we are immediately
losing the branches, but that should be fine
from that distance to 2000. So if I go to LD out
of for this one, I just want to double check if I go to distance or over here, here C over here on the way
at X already quite early. Yeah, here, it's
already over here. I already hits. So this is probably one of the
few ones that I want to go ahead and I want
to set my LOD one to be still a screen size of zero point maybe like
0.5, and then LOD two. I want to do, 0.3. So that now, you'll see it stays out and
it's only over here, just starts to arrive,
which should be fine. And else we can always just balance it out
a little bit more. So let's go ahead
and do this one. Foliage, yes. Three versions apply
and turn over out of compute so that I can go
to LD one at like 0.5. And then LLD two at 0.3
or something like that. Save. Next one. Oh, this is like a big one. 28,000 polis. Yes, that's definitely
like a big one. So foliage, yes. Let's do four versions for
this one, just in case. And let's see. So LD zero, LD one still looking
good, LD two. Okay, then we are
starting to lose it. So let's go ahead and turn
off auto compute distances, and I just want to
LD zero is fine. LD one goes at 0.8. I want to have this at 0.6. Then I want to
switch at 0.4 yes. And then I want
to switch at 0.2. Over here, that seems fine. So let's save our swaps, which are also around 9,000, so they are also quite high. Three LLDs apply. Let's see, zero, one, there's almost no
difference 0-1 and two. Now a cool thing if there is
really almost no difference, what you can do is you can
always go ahead and you can go over here and let's
see if we go LOD Auto, you should be able to set a
minimum LOD over here to one. And what it will do is
it will automatically switch to one here, see? So it will just ignore LD
zero, which is our default. So this way, you immediately
have some optimization, and it will just
start at LOD one, always, and then you can just
go down lower, if you want. So we can do that, for
example, with this one. I don't really mind that. This one, once again,
where are you? There you are. I
don't actually this. I wish I would have placed
this down, but it's okay. It's not that big of a deal. It's just like these leaves
are a little bit high and they are standing
out a bit too much. But okay, yes, three
LLDs we apply. I want to just
double check, zero, one, and two, so there's
almost no difference again. So I can go up here and set the minimum LOD to one and save. And now we have a
tall water grass, which is a surprising amount
of polis at 10,000 polis. We can go to foliage. And this time, I'm going to
set them to four over here, zero, one, you see
almost no difference. Two, you start to see
a bit of difference, and three, you
start to see a lot. And that's totally fine. Yeah, so I'm happy with this,
so I'm going to save this. And then with the cattails, the final one, foliage, yes, also do four
and save. Perfect. And now you can see that
this one, zero, one, two. So here, quick optimizations. So having this stuff done, I now go ahead and
go back to my scene, and if I see something
very obvious, which I do not, everything
seems pretty much the same. Let's set my screen
percents to 200 again. Everything seems
pretty much the same. I also need to remember
that I'm watching in ten ATP right now
because of recording, while normally I'm watching
at this at four K, and if I then set my
screen resolution to 200, it goes even higher. But now, if we go from IT to level of detail
coloration, see? So now you can see everything
that's LD zero over here, and then it go, Was red? Yeah, red is LD zero, and then it goes to LD one, and then it goes to LD two, I believe, because we
only did like three. Yes, so that is correct. But yeah, basically,
as you can see, you can see that
our folage works. You can also see
that I literally did not throw any LDs on the entire scene except for maybe the foliage,
but that is good. So we got that done. It is
all working totally fine. Our scene is running at 30 FPS at 200 s
percent and at 100, we are sitting at
QISPx around six PS. So if I would optimize this actual scene
even more with LDs, I would probably
easily hit like 100. So that was it for
the optimizations. Now that we have done this, this was a nice little bonus
and like an extra break. Now what we will do is
we will go ahead and continue on with the
actual parts of the soil, and we are going
to get started by scanning a actual leaf texture and then converting it
into a branch texture. So that will be
quite interesting, and let's go ahead and continue with this in our next chapter.
26. 25 Creating Our Custom Leaf Texture Part1: In this chapter,
we will go over on how to create our
custom leaf texture. We will do this
using a technique called multi angle
photogrammetry. This chapter will
come in two parts. In the first part,
I will showcase you how to capture
leaves in real life. Then in the second part, I will showcase how to actually process the images that we
have captured and I will also give you a
bunch of extra information. For this method, you will
need the following equipment. You will need a camera. I personally am
using a DSLR camera, but you can also use your mobile camera if you
don't have anything higher. You will need a tripod or
anything that can keep your camera as steady as possible while
pointing downwards. It is key that it is
absolutely completely steady. You will also need a blank sheet of paper for the background. You will need a white light. Now, you can once again
just use the light from your mobile phone or you can use a portable
light like I have, and you will need full control over the lighting in your hom. Giving you the ability to
make the room dark or light. And, of course, let's not forget that you will need
the actual leaves, but that one is quite obvious. Because I am recording
this in winter, the only leaves that I'm
able to use are ivy leaves. It does not matter what type
of leaves that you want to use because this technique
will work on all of them. I will explain more about how we are going to use these
leaves later on. What you want to do is
you want to try and replicate the setup that I use. This means you want to be in a room where you can
control the lighting, making it light or
dark when needed, point your camera
downwards and place your leaf on a white background in the center of your camera. Next to this, you
also want to set the correct settings
of your camera. I personally like to always
shoot in raw format, but this is one of the
few times that I'm also okay with shooting
in JBAG format. This is because our final
leaves will only be 512 by 512, at which point you
will often not see those JBAG artifacts. You want to keep your ISO low and I try to stay at 100 myself. Then you want to keep
your temperature quite high for the
best sharpness. I often try to go around ten. Now, for the shutter
time, it does not really matter because
you are using a tripod, so all you have to
do is just wait. As for the lens, I am using
a 17 to 70 millimeter lens. However, it does not matter which lens you use
as long as you are able to nicely frame the leaf and have it quite
large on your screen. Of course, better lenses do
give you better results. When you have this done,
we are ready to shoot. So keep the light with you, and let's have a
look at the video of the capture process. Okay, so let's get
started with the video. Now, as you can see,
I'm using my setup, and what you first want
to do is you first want to create one single
image with the lights on. This image will be used
so that you can generate a mask later on from your leaf. Then you want to turn off your
lights and you want to set your white light
at the very top. After that is done,
what you want to do is you want to
go counterclockwise in degrease of either 45
degrees or 90 degrees. I'm doing 45, which means that I will have around six points, one, two, three, four, five, six or eight points over here. However, if you do
it at 90 degrees, that you only have four points, the quality will still be good, but it will be slightly less. It just depends how
much time you have. I want to go for
quite high quality, so I'm going to go
ahead and go for eight points and
simply follow my lead. You simply set your light
here. You take a picture. And then clockwise, you set
your light by 45 degrees. Roughly, it doesn't
need to be perfect. So here you can
see me just nicely setting my light just like that. And then every single time I've done that, I
take another picture, so that at the end,
we end up with eight different or sorry, nine
different pictures. And once that is done, I will show you how that we are
actually going to use these pictures to
convert them using substance designer
into nice textures. So as you can see, I'm
pretty much done now, and I just finish off.
27. 26 Creating Our Custom Leaf Texture Part2: Okay, so we are back again
at our usual program. So we now have our images. So as you can see over here, I just converted the
images from a to JBC because as I said, I'm
not too worried about that. And you can see the
images over here. So if I open them up like this, you can see that we
created that first image, which was just with the
lights on top down. And this image we will use
mostly just to create a mask. And after that, you have the
strong images over here, which you can see with our light has every
single point like that. So, yeah, that's pretty much it. So it is quite straightforward. And once you've done this, now
what we will go over is we will go over on how to actually convert this into
proper textures. Now one thing to keep
in mind, as I said, because I'm recording
this in winter, literally, it's freezing
outside right now. So I simply do not have any other leaves except
for this ivy leaf. This means that because I was planning to actually
make this for a tree, once I've showed
you this process, I will simply grab a leaf
texture form, for example, text.com, and I will use that to show you how
to create the branches. Don't worry. It is literally
the exact same process. The only difference is that I'm using a slightly
different texture. So having these textures, I actually end up and I created four different
leaves over here so that I also can show you
how to actually turn this into an atlas because I think that is quite nice to also see. The first thing that you
want to do is when you end up with your JPEG
images and you are ready to start editing them
is to go ahead and create a new document
and make it 512 by 512. That's more than enough
that we need for a leaves. Like something like this, we don't need a
lot of resolution. You then go ahead and
you can press Create, and then we have over
here this window. I do not know why my
layers. There we go. Okay, next thing that you
want to do is you want to drag in all of your
textures at the same time. So you drag them in and
you just press Okay. Might take a second to load them all in because I'm
shooting at six K, and I'm now going to
go back to 512 or 512. But anyway, so we now
have these textures. The next thing that I
want to do is I just want to make sure that my
numbering is correct. So here you can see that this bottom one needs
to be here at the top. So we have 035556, 5758, 5960, 61, Okay,
so that's all correct. Next thing that
you need to do is you need to select all of them. Actually, you can get rid of your background,
select all of them. Right click, free transform. And then if you go ahead
and you want to hold Alt, you can go in and you
basically want to just nicely center this leaf so
that it is quite large. And it is just
filling the space. So we still want to
use our resolution, just like that over here. Okay, then we can press
Okay, and here we go. If you want, if you
want to make your document run a bit slower, you need to do this anyway
a little bit later on, is you want to go up here to selection, select your document, and then simply go to image, crop and this way,
it will be copped. So all of that outside junk that is still stored in the
memory, it will go away. And we need to do
this because of how we are going to input
this into substance. So now that we have
this one, what I want to do is I
want to just go ahead and go down until we
have this one over here, which is our front side. Now, as you can see, we
do have a few shadows, but that is not
really a problem. You want to make sure that
over here, as I said before, you do not want to move
your leaves or your camera, and this is why because we
are going to now create a mask and that mask needs
to match up with our leaves. So we can go down
here and we can grab our quick selection tool. If you do not have it, you
just want to click and hold, and then you can find it here. You basically just
want to go ahead and click on the outside over here. And just select basically
everything except for the leaf. And don't worry about those
really small cavities, because what I like
to do is I like to just do some custom
selection on those. So I go in here like this. Sometimes I do like to
go in and just, like, play around with it, but this
should be pretty much fine. Yes. So now what
I like to do is, I like to go up here to
my polygon select tool, which is the one above it. I want to hold Alt or Shift. Let's see, yeah, yeah, yeah. I want to hold alt, so we are subtracting it from
the selection. So I want to hold alt. And just like these pieces, although it might be difficult to see with all the pixels. You simply want to
mask out stuff that is not your leaf like this. Oh, this time it did not. Do I need to hold shift? Oh, yeah, because this
time I'm on the outside, so I need to hold shift so that I'm actually adding
it to the selection. So something like that.
So, that's great. So now that we have
this, all we need to do is we need to go down here, add a solid color, and you can make
this color white. I tend to just make my
leaf black so here, if I do another solid
color over here, now it is black,
black and white. And this is because
of the way that the blending mode is turned on. We can always invert it
into substance if needed. So we have these two over here. If you want, just
merge the layers. And once that is done, yeah, you can leave in this
leaf if you want, or you can just remove it. Let's just leave it
in just in case. Now that this is
done, all you need to do is you need to go ahead and I'm going to go in
custom leaf raw images, and let's do two
substance like this. Oops. And let's open
up this folder. And then what we want
to do is if we go file and do a saves over here. We just want to go
ahead and we want to save in the two
substance folder, and you want to
save it as a PSD. This is really important. So save it as a PSD. Call it 01 over here, and that is pretty
much now done. So I need to just go ahead and I need to do this for all
four of the leaves. So I will just go ahead
and time lapse this, but it will not
have any narration. So let's go ahead and
kick in the time labs. Okay, so we now have our
leaves done over here, as you can see, so
we got these four. Now, one thing that you might not have noticed
in the Taps that I still want to show you is that when you import
these layers, they are smart objects. So before you do the cropping, you just want to select them. Press right click and
press storize layers. And after that, you want
to do the cropping. If you do not do that, then
when you select something, all of this information on the outside would still
stay, even if you crop. So just keep that in mind. But as you can see, we
have saved them as PSDs. And now if we go ahead and
go to substance Ziner, we are going to go over on how to actually turn these into textures and then on how to
turn them into an atlas. So let's get started
with a substance graph, and we are going to just call it custom Underscore leaves, and you want to go ahead
and just go for 1024. The reason we want to do
1024 is because as I said, we are going to turn
it into an atlas and we have four leaf textures. So that means by 12 by 512
by 512. So we press Okay. And now we can start let's get rid of the tree
view. I don't need it. Now we go ahead and get started. So you want to go ahead and
grab your PSD and let's just do the first
one. Import it. Now, you can do link resource. This one is a little
bit quicker to import. However, it has the
tendency to break your links whenever you want to share this file
with someone else, which is why I'm going
to go ahead and go for my simple Import resources. As you can see, these images
are supposed to be square. If they are not square, you did not rest rice your
layers before cropping. So just keep that in mind. All you need to do is
just go ahead and turn off the first one over here, honestly, I'm also
going to turn off the last one because we
don't really need that one. I'm then just going to press Okay and then it should import. Give the second, of
course. But there we go. Okay. So we have all of these images over
here. That's totally fine. I'm going to go ahead
and I'm going to select my Bitmap over here, and I'm just going
to turn this to gray scale because it is a
black and white image. And now what we can do is we
can now go ahead and we can start by properly,
setting these up. So the first thing I need to
do is I need to order them, and I want to go ahead and
always work with the top, which is this one over here. So 0358. And then
it looks like 0357. Oh, no, so that's not the top. Yeah, you can see down
here, 03, five, six. Okay, so 678. So is
this working correctly, anyway? 8960, 61 62. Okay, so it did properly import. Sometimes it likes to shuffle
them. That's no problem. So if we go this direction, it means that when you go up, we will go clockwise. So this is important
because the ones that we need is if you go
into your library, you want to go down here
to scan processing. And then you have
these two. You have multi angle albedo, I
believe it is called. Yeah, multi angle to Albedo, and multi angle to normal. Let's go ahead and
get started with the multi angle to albedo. What you want to do
is you want to set your samples mount up
and with this one, you can basically convert these images into an Albedo map. Because the lighting comes
from different directions, what this map is able to do is actually remove
all of the lighting because it can see all of the overlapping lighting
and then by removing it, it will give us a base color. We basically want to go ahead
and go to the first one. Honestly, for this
one, it does not matter which order you go in, but I like to still
stick with my order. You basically go here,
and then you can see that slowly the
lighting gets removed more and more and more until we have our
base color over here. So that's very easy. Now,
after you've done that, what you want to do is you
do want to go ahead and now properly mask out all of these shadows that we
have on the background. And this is why we created
this mask over here. So we now have our
multi angle tel veto. We then press space
and ter blend mode, and we want to basically blend
this with a uniform color. The uniform color
that you want to pick is if you double
click on your blend, click once on your uniform color and then grab the picker, and you want to grab a
color similar to your leaf. So that now if you plug in your bitmap, which is your mask, you can see that over here, it is masking out this leaf. At this point, in
terms of cleanup, what you want to do is you
want to click on your bitmap. I want to add a quick blur high quality gray scale and just give it like a very small
bit of blur like this. And then you can either use a hist grum scan or
you can use a level. Let's do a hist gram
scan over here. And then if you go
into your position, you can see that you
can basically grow or shrink your mask based
upon the blurring. This is nice because what it allows us to do, as
you can see over here, is it allows us to
basically cut off those really thin white
edges that we sometimes get. And there we go. So now
we have this texture. At this point, if you want,
you can add an HSL note, which allows you to basically, play around with your
saturation and your lightness, if you want to go for a bit more orangy or yellowish colors
or something like that. And of course, if
you want to make it lighter or darker
or anything like that. I'm going to go and set my
lightness to probably 0.52, and then my saturation, I'm
going to set down to around 0.42, something like that. Oh, that shows some really
strong. That is strange. Oh, the reason that it does that is because these pieces
are a little bit lighter because there are always still a few small reflections
or incorrections, and it just happens
because of the lighting. This not a perfect method, but it is a good method to
quickly capture some leaves. Some of them will look
better than this. I think this time, probably because the leaf is
a little bit bent, it just captured the lighting
a little bit too strongly. But honestly, this
is totally fine. You will not really notice this. So anyway, you now
have this one, and this can be considered
a final base color for now. And then, of course, you
also have your mask for it. And this is pretty much it. So if we now want to go ahead and create a norm map, we
can do the same thing. We can grab the multi
angle to normal. This one is a little
bit more specific. You need to set the
samples amount. The norm map format,
which we will use OpenGL. I like to always set
my intensity to one, and then down here,
you need to set the next sample light
angle to clockwise. And the first sample
we made from the top, so we need to set this to 90. So we are basically setting in almost the same settings as that we used in real life.
We are setting in here. And then it is just a matter
of going in here, three, four, five, six,
seven and eight. And as you can see,
this will generate a nice norm map for
us, just like that. So the norm map is able
to see all of the veins, and yeah, it looks quite nice. Although sometimes I
do have the tendency that direct X is the
correct one in this case. I don't know if it's
maybe going clockwise. No, that's not the one.
So sometimes I feel like the urge to invert it because
if I look at the leaves, it feels like these are
actually denting in. But this is something you
can test out later on. It's a simple invert. Next, you want to
just blend this, grab your mask again
and you want to blend this using a node that is simply called normal color, which is just like a
plain norm map node. There we go. This is now the
norm map for our leaves, we also have this one done. Finally, you guessed
it our roughness. Our roughness, if
we press space and add a grayscale
conversion over here, we can plug in basically
our leaf like this. And then this is quite easy. You don't need anything special. Let's use a histogram range, most likely, so that we can play around with the
range and the position. Like this, or you can
use a histogram scan. That sometimes also
looks quite nice, or even just like a levels. No, I don't like those.
Let's go for a levels. I think the levels gives me
a little bit more control in this specific case. So the darker it is, the more stronger or
the more shiny it is. So I don't want to
have it too shiny. So I'm just going to play
with my levels until I get, something like this
over here, see? So it's not too shiny, but
it is still looking nice. And that is it. Our first
leaf is now completely done, and now all we need to do is
we need to replicate this. I'm going to go ahead and
first of all, save my scene. Over here in our
custom leaf textures, let's just go ahead
and press Save. Now that our setup is completed, we can pretty much just repeat. We basically go ahead
and we grab all of these bits over here
except for our mask and we can simply press
Control C Contra V. And then you just want
to import number 02, turn off the bottom one and
this one and just press Okay. And give the second to import. And then I did forget that I was going to do this
stuff over here. So, let's go ahead
and grab these ones. Oh, hey, I'm missing something. Yeah, here, I'm missing this entire one over
here. Let's just do that. Okay. So now what we can do
is we can go ahead and we can grab our mask
to get started. So turn this into a gray scale. So it's really slow to
select your actual maps. I don't know why. But turn
this into gray scale, and then we can throw
this into our blur. And that often is already
the correct setting. And all I need to do
now is I just need to replace looks like this one
and this one over here. And now for these ones,
they should be fine. I like to double check
0.65, 0.6, no, 0.65. 0.67, uh, S? Is this the one, 0.60. Let's do 73, 72, 71, 70, 69, 68, six, seven, Yeah, then Oh, yeah here, 6765. So there seems to be a mismatch, but that might just
be that I created a blurry picture and
that I had to remove it. So that's most likely the case in these type of instances, because it would be stranger
if we just missed one, especially because
we have enough. So I'm just going to go
ahead and I'm just going to once again set
these up the same way. Like this. And again,
for the second one. So start at the top. Oops. And then
just move it down. And you should end up
with eight of them. And if you don't, then
something went wrong. So now we can see over here. You'll see how quickly
it is to just generate these pieces now because we already have all of the
base setting set up. So now we also have
this one done, so we can just go ahead and
we can grab all of this. Let's just do a duplicate, and let's just get
rid of this one map because that one is not needed. And then we can go ahead
and just import 03. So let me just move this
down a little bit more. See, it does become
quite a large graph quite quickly, but
that's about it. For the rest, it
should be quite easy. So let's turn off the last
one, and let's press okay. Oh, wait, that
might be the case. No, wait, no, I was thinking like maybe because the
one that we turn off, but I'm not sure. Anyway, so let's select
the bottom mask one. If it allows me to come on. For some reason, it
does not allow me to select it, which
is a bit strange. Okay, there we go. Now it
allowed me to select it. Okay, so we set this to
a gray scale over here. And now we pretty much just very quickly
do a double check. 84, 85, eight, seven here. See, we always miss
one for some reason. 89, but for rest, it seems all fine.
90? Yeah, here. So for rest, it seems all fine. So I guess as long one, two, three, four, yeah. As long as we have all of the maps, then it
should be fine. So it might have to do with
that one image that we keep removing that
is confusing me in the numbering because I
did not give these numbers. I just left them for my camera. But, so that one is now done. And now we can do
the same over here. Just like that. Okay, let's have a look and see
how this one came out. See, nice and flat, almost no lighting, a little bit of reflection
here and there, but for the rest, it is
looking pretty good. And, of course, the setup that I do is I did it very quickly. So you can improve the lighting even more by placing
your light slightly up. So like moving it slightly upwards instead of
moving it down. I was not able to move it down because then I cannot
control my camera. But if you have someone to
help you or you have some way to control your camera with
like a clicker or something, then I would recommend
always having your light come from a
slight higher angle. But this one is now also done. All we need to do now
is one, last one, and then I will show you how
we are creating our atlases. So we have the last
one over here, 04, import, turn off these
last two and press aka. At this point, I'm
not too worried about the order because it has
not disappointed so far. So let's grab a mask
and throw it down here, and then simply grab
all of these textures, and we can nicely plug
them in like this. Here we go. And after we
have created the atlas, I will show you how
to actually create branch textures using speed tree and using these custom leaves. Now, I will not be using
these specific ones because these are ivy and I need to create one for a tree, but it is the exact
same concept. It's just a different
leaf texture. So we got this stuff done. Let's have a look.
Yeah. I'm happy with that. Awesome. Okay. So now all of these
are done over here. Now what we're going to do is we are going to
convert this into an actual atlas so that it is
usable. So let's save sin. And now I'm just going
to do this the old school way because there
are only three maps. So basically, all you need
to do is you need to add a transform or
well, four of them. Yes, you need to add four
transforms over here, one, two, three, four. And we can basically use the
system for every single one. So I will start with
the base color. So let's start
with just plugging in your base color over here. One base call up
transform like this. And then all you need
to do is you need to go into your transform, and I'm going to set my width
over here to 50 by 50%. Or I don't even need to do that. I can just do this minus one. Oh, don't forget to set your tiling mode down here
to absolute and no tiling. And I forgot to
do that on all of them before copying,
so that's my bad. So tiling mode needs to
be set to no tiling. Because, else, it will
try to just keep tiling, and I definitely do not
want that for an atlas. Here we go. So basically, you scale it by minus two. We can do it for all
of them, minus two, because we are working in 1024, and we are going to
go ahead or we are working in yeah 1024, but these are all
going to be 512. So we basically are going to
push them into the corner, and then we are going to
convert them to 1024. So you have these
ones over here, and now all you need to do is you need to set your offset. Y and the X offset for
this one, 0.5, 0.5. This one, you need to go -0.5, 0.5, and you just want to
basically order it like this. For this one, 0.5 -0.5, and for this one -0.5 -0.5. So now they are
all in one corner. After that, it is a simple
matter of adding a blend, and you basically want to
just go ahead and blend these maps and then add
another blend and another one. And you're basically
going to blend these maps together over here like this. So now, these are
all 512 or 512, and then all we need to do is, I believe, at probably
at this point, you want to start
forcing the 1024, and you can do that
by going up here and setting the width to plus two, and then it should become 1020 for all of them. And that's it. So now you just have created
a very quick atlas which, as you can see, looks quite similar to the
leaves that we have here. Of course, these ones they remove the background because they already use their mask. But you can see that just
like they've done over here, you can just end up with, like, a bunch of different
type of leaves. Of course, it would
take quite a while to do this many in our case. But this is what we
basically will be doing. We will be probably
grabbing like one of these or like one of these, and then we will go ahead
and do the same thing. But here you cannot
see here. You can see, like the little reflections
and everything. So this is pretty much
the way to do it. Yeah, well, there are
many ways to do it, but this is the way
that I use to do it. I basically now have this stuff, and all I need to do is I
just need to once again duplicate this three
times for every map. And then it's just a
matter of going in here and using this
one for my norm map. Let me just make this a
lot smaller over here. And then finally, I can use this one For my roughness and it will
automatically convert to gray scale by the time
that all of them are done. So let's just double
check our work as always. So over here, we
have our roughness, which does not seem to work
probably because it adds Ds. No, that should not be the case. Even though well, you can just go ahead and set
the mode to art. I don't know why this time it decide to ignore it,
but not last time. Probably because it
is a gray scale. Yeah, that's it. Because
it is a gray scale, it automatically turns it into black and then
it cannot see that. Then you want to
set these pieces to art to basically
art them to it. These ones should still
work totally fine. Because these are using
color and color can read empty backgrounds like
this. This is now all done. They're all in the
same locations, so now you can just
go ahead and go in here and you can set
these as an output, and then you would be able to
use them however you want. So congratulations. You now
have all of your textures, or you created some
leaf textures. If you want, you can always add a normal strength or
normal intensity, which allows you to
basically increase the intensity of your normals
a little bit, if you like. I want to just set it
a little bit stronger. But this is pretty
much it. This is also the point where
I will leave this. So as you can see,
it might seem a little bit overwhelming the
first time you open it, but it's just a lot
of copy pasting, and you end with this
nice little atlas that you can see over here. Awesome. Now what we will be doing in the next
chapter is we will go ahead and we will
get a simple leaf over here, just like an atlas. And then I will show
you how to actually go into SpettreT turn this into, like, a branch you can
somewhat see over here, like these type of
branches a little bit. One thing I did forget
is that you also want to do this with your
mask, by the way. So you probably want to just go ahead and duplicate
this once more. And then you want to go in
here and you want to grab your mask for every single one. Here, this one, so that you also have the mask because
you will need that one. So just to close this
chapter off properly, let me just grab these masks
over here and over here. And for this one, I
tend to just press invert gray scale
because this time we want to mask them being white, and then you can just
go ahead and you can press space, art and output. And call the output
identifier mask and then copy the identifier and paste it into your label. There you go, see. So now you also have your mask ready to go. Then, of course, if
you want to export, you can go to Custom leaves. Export outputs as Bitmap,
and press Export. And now they should
arrive in here. Tada. So yeah, let's go ahead and
continue to next chapter.
28. 27 Creating Our Custom Branch Texture: Okay, so now that
I went over on how to actually create
an atlas texture, what I want to do now is I
just want to go to text.com, and I'm going to download these cherry tree
leaves over here, which you can find down here
under your treed scan atlas. Now, once again, I explained
this in last chapter. The reason I'm going to
use these ones is because I'm going to generate a branch
that we can use on a tree. However, because it is winter, I was only able to
find ivy leaves, which actually stay alive
during winter. To scan. So the techniques are
all exactly the same. The only thing is
that I'm going to download these ones,
and I will, of course, just supply these because I am allowed to supply
them with text.com. So I'm downloading those. And then what you
want to do is you want to go into Speed tree, and just go ahead and if
you go create a new tree, you actually want to
go down here and you want to use a cluster over here, so it is a template that you can use. So this one's really nice. As you can see, it pretty much already sort of shows what
we are going to create. So it shows like over
here are branches. Now, by default,
it has this plane. You do not want to move this. If you want to go ahead and
move around your camera, you can always go down here
and go to perspective, and then you are able to move it around and you can
see how this works. So as you can see, it pretty much does
the same as the IV. It has this trunk over here, and then it basically just
uses one single branch. And then what it has, it has multiple different
branches on top of this. Now, this one single
branch, honestly, I do not really like over here. It's like broken off, but
it looks way too specific. So what I'm going to do
is I'm going to go ahead. I'm going to delete
this. And let's see. If I just grab this
one on here, no, so we definitely need to, like, that's a bug. Okay, let me just that's a bug. That should never happen
when I try to undo it. So let me just try it again. So over here, let's
go into perspective. So I want to just
see if I can maybe change these branches
around a little bit. So I guess maybe the
easiest way is actually, if we hide the branch also so that we only have
this one left over here. Then if you go down here
and click on perspective and go back to your
X and Y plane, was it the X and Z plane? No. No, X and Y plane. I don't know why my camera
is so high, but basically, what we can do is we can
basically move this down, and this will give us a
bit of a better branch. And now we can just
basically go in here and we can mess
around with things. So we have our default
branch over here. Now, you do not
want to really play around with like
threshold renting. Let's just leave those
things for what they are. What I do want to
do is I probably want to go ahead and go
to spine, and over here, I can control my length, which should be fine. I think. Let's see. The thickness, I probably want to
go into my skin, and I'm going to
set my thickness a little bit thinner over here. And I mostly then want
to go into spine. And if we scroll down, I just want to basically play around with my
noise a little bit. So we get some noise. If you can also do
some early noise, but it does not really matter. So we basically just
have a basic branch. If we just quickly hide our leaf matches so that we can actually see
what we're doing. Over here, we have
now these branches like this. I don't
really like these. So what I'm actually
going to do is I'm going to go ahead and I'm
going to delete these, and I'm just going to use a normal art geometry and
normal branches like this. And then I should be able
if I go to generate, and maybe let's set here. So this was the original
one, proportional over here, and then I can play
around with the numbers. The reason we are seeing this is because if we go to show, we want to turn off our normals. So okay, so now we
see this I can see that I just need to go into my spine and actually
set my length, a little bit larger over here. Then over here, we
can now go ahead and we can work on these branches. So what I'm going to do is I'm going to set in my generate. We can set the number. You can rotate it
around a little bit, but what I like to do
is I like to often. It doesn't always work,
but let's have a look if we go to forces and
grab a planear force. Okay, you are really far down. Like this, it
sometimes allows us to basically flatten
out our branches. So if we just go to our
branches and go to forces and turn on planar, here see. It allows us to sort of
flatten out our branches. And this will require
a little bit of custom work, this
type of workflow. So if we now go back
to our XN Y plane, move this back into
location, see. So they are now a
little bit more flat. Here, let me just
move this down. And now if I just go
into my branches, I can go to generate
and let's set our first a little
bit lower over here. And our last, our last is fine. I'm going to go into my spine, and I'm going to
set my length over here quite a bit smaller
near the bottom. And see. So yeah, for the rest, you can maybe move them around a little bit just to give
them, some randomness. But that's looking
pretty good. So we got some branch over here. Once you have these branches, you can go ahead and
go to Node Editor. And if you have, one
that you don't like, you can always go
ahead and delete it. And just like that,
we are able to also, for example, mess
around with things. Now, for some reason,
I'm not there we go. I was not able to select them. I know. Maybe I want to
just do some randomization. Let's just go to generate let's just see until I get
something that I like. So I try to get quite
a bit of evenness. Like, something like
this looks actually quite good. So
let's try it again. Let's go now into note
and carefully select it. And now you can kind
of, like, move this around the way that
you wanted to. Now, this is nature, so we
don't want to go too uneven. Let's go ahead and
see your start angle. I don't think you will be able to do some proper rotation. No. Oh, yeah, wait, here we go. Now we are able to do
some proper rotation. It's a little bit
tricky to get it white, but it does work. It's just because we are
working from this angle. And what I'm going
to do is I'm going to actually delete one of these. Move this one down over here. And let's just get started
with something like this. And let's just actually
add our leaves so that we can see if
this is what we bunt. So we now have our branches. Let's also do a quick saves
because this one is quite buggy and we are going to call this branch underscore material. So for your leaves, your leaves
are pretty much the same. You just want to add geometry, and you can try to go to leaves and do like
a scattered leaves, but I'm just going to go
ahead and I'm going to go up here and just do
like a basic normal one. So we got some leaves over here. Now, let's go into forces and turn on
planar and maybe we can, like, set the planar a little bit to make our leaves
a bit more interesting. Next, I want to have my leaves
kind of sticking outwards. So we want to go probably to our orientation and mess around a little bit
more with, like, our line also mess around with a little bit
more like our folding over here and our facing here see so that until we
get a pretty decent look, let's go into generate
and let's set this to. I just like proportional. It's one that I'm
comfortable with. So let's go for
proportional steps. Yeah, honestly, I'm fine
with the generate settings. I think at this point,
we can start by doing our actual textures because
for the defamation, we need to have our actual
textures and everything. So I think, yeah,
this is probably the correct one for now. So if we go ahead
and go up here, we can add a new material
and call this leaves. And then I'm just
going to import, so make sure to set
them to two sided, and I'm just going to
import our Where are you? Tree leaves over here. So color, opacity, and normal. Oh, no, wait. For this one,
we also want to actually have our roughness and our
subsurface over here. Maybe set the subsurface to Oh, no, I think I actually
want to have that in here. There we go. Okay, so we got
this stuff that is fine. Now what I'm going to do is
I'm going to go to my cut out and I'm just going to go for
like four different leaves. So maybe like five, you
can choose yourself. But it feels a bit unfair if
I use more than four because we only created four
for our custom atlas. So you basically
want to go in here. And these leaves
you can go full on geometry because they are
going to be a texture. So you can really push geometry. So I can go in here and I
can just like a bunch of tesselation like this,
and then I can add them. And we just want to
do that with four of them. Let's do this one. Um, and a bunch of tesselation. So that we can just nicely bend them around and stuff like
that. So that will be nice. And if you want, you can also show the
backside of the leaves, but those are
always a little bit risky because they might
not always look good, so I tend to just avoid that. And finally, let's do poll like this one over
here. Seems pretty fine. H Okay. Bunch of tesselation. There we go. Okay, so
those are our leaves. We can now go ahead
and we can just drag this onto our
actual leaf meshes. And now you can see that we
mmediately have some leaves. So you can imagine that if
we bake this down later on, we will be baking down
all of these leaves. So I'm just going
to go into my skin. One, two, three, four, set all of them to the
leaves material and then set the mesh to the different meshes that we nicely randomize these. Over here. And now what
we can do is we can, first of all, just play around a little bit more
we like to generate. Now, I don't want
to have too many. You can very quickly add
like too many of them, and then it will
not look as good. Next is maybe we can
try a collision here, like a high quality
collision and then play around with a little
bit more so that we are at least avoiding having
them actively collide. And yes, next, so you can play around with your
role a little bit. So in general, you can just play around with a bunch of
different settings, maybe like with your
first over here to give it a little
bit of spacing. And, of course, let's not
forget going into orientation. And then we can do some
folding over here. So these ones, I
want to probably fold probably fold upwards. Give them a little bit of
curling here and there, give them a little
bit of twisting, play around with
your vertex amount, and maybe, like, set the
noise a little bit smaller. Here see. So smaller noise, and then a little bit
of vertex amount. And then maybe also mess around a little bit more
with the Y scale. So you can go in here and
you can definitely make the top ones, like, a
little bit smaller. And for the rest, you
can just in general, play around with things
to add some variation. Save generate with
your size scaler. You can go ahead and
just make the ones at the top, a
little bit smaller, and then you can kind of, like, just mess around with
all of these settings. Over here so that we have, like, a bunch of different settings. Okay, so now that we have something like
this, let's have a look. I'm going to make
them probably, like, a little bit bigger in general. So that's looking quite nice. And then what I want
to do is I sometimes just want to go back
into my branches. And then in our note editors, we can go in here and we can
basically play around with, for example, over here,
like our rotations and everything and just get
something nice out of this. So you have full
control over this. You can spend a lot of time making this absolutely
perfect if you want. That is no problem. So I'm going to go for
something like this. Also, this kind of overlapping
you have down here. You want to often
twine, like, avoid it. Like, don't have it
too strongly because then it will look a little
bit strange because we, of course, just from this direction is what
we will bake down. So if we see the
leaves like over here, then it will be a little
bit difficult to make them look nice because they do
not really bake as well. So I'm going to go
into my orientation. I'm going to let's see
Align is pretty good. My align, I'm fine
with. My facing, I'm not good, so I think I
will need to use forces. These forces are not
working as well. Let's go into
perspective. Let's see. Maybe if we go, what shall
we do? Magnet or direction? Maybe direction will work. So let's just set the direction. Let's move it up.
Let's go back into X and Y plane and just see if this does like
a better result. So if I go into my
leaf direction, yeah, yeah, that does
give a better result. And then at the very end, once you think like, Okay,
so let's scroll this down. Like I'm going to
move this one over here a little bit
higher because else, I feel like it will not fit. Yeah, let's move it like this, and I'm going to maybe set
this one down a little bit, maybe move this one
around a little bit. And these leaves, that's
a little bit annoying. Like, let's see. I'm going to move this one in. So sometimes you just need to kind of play around with it. I'm going to delete these
two leaves over here. So, okay, so we got this. Now, with these leaves, what you can do is
you can rotate them. The only tricky thing about
this is when you rotate them, is that the collision
might have other ideas. So here, see, I'm rotating them, and sometimes it takes
a second to find the correct one you
need for rotation. But yeah, here C. So
that's the annoying thing. So with the collision, because
it is colliding with it, it basically just
tries to avoid it. So sometimes just deleting
it is often better. Here, these ones I find
like this one I don't like, so I can delete it and delete this one until I get
a favorable position. Same with these one, C.
Once I delete these, I get more favorable positions. And the only thing is that
it's a little bit unreliable. That's the only thing I
have to say about it. So you kind of want to see
whatever works best for you. Over here, it seems like we have two sitting on top of each other, which
I don't really like. Once again, like this one, a way that's a scaling. So it's probably I cannot even see which
one is the rotate. Let's just delete it.
This one is rotate. And this one here, we can move down here. This one I don't like,
let's delete it. This one I don't like, so let's delete it see that now
looks a bit better. This one I don't
like. This one I don't like. This
one I don't like. So yeah, basically, it can be a little bit fiddly,
but it's a texture. So you kind of just want
to spend your time on it, and I'm definitely not spending as much time as I
should on this, but that's because I'm just making this
like quite quickly. Okay, so we got those.
Let's delete this one. And there you go.
So after a while, you will get some really nice
and favorable positions, and you just get
in general, like, quite a nice looking texture if you would look down on this. And that is something
that we roughly have right now over here. Yeah, you can even try to move some stuff down here
and there. So, perfect. So once you are happy with it, the next thing that we need to do is we just
need to download a very quick bark texture
for our actual branch. So let's go ahead
and go totxdt com, and this time I'm going
into Tweedy scans. And then if you go
down to Woodbr, I'm going to probably grab
like this one seems fine. Like that's more
than good enough. Oh, do we all of them? Yeah, of course, that's typical that all of
them are not square. Should be fine. Like,
it should be able to register in speed tree. So we're just going
to have the Albedo, nor map and roughness. And if we go in here and add a another material,
call it bark. Can now go ahead and so I
didn't mean to do that. Bark, go into settings. And art your textures. And it's simply
drag the settings onto your base over
here like this, see. So now we also have a bark done, and now you have a texture done. Okay, so at this
point, of course, you just want to go ahead and play around with
whatever you want. For example, I'm
going to probably set my radius to be a
little bit thinner, although that might mess up my leaves again if it does that. Yeah, here, so that
does mess up my leaves, and I'm not really in
the mood for that. So I'm going to Yeah. Let me just make the radius,
a little bit thinner, and then I will just
pass the video, and I will just play around
with the leaves again because else this will take very
long. Okay, here we go. So I got something
pretty decent, so at this point, I
will save my scene. And let's say that I'm
now happy with our bark. Oh, sorry, the reason I don't have my
bark material yet or again, is because I crashed like
seconds after I press par. So let me just very quickly re art my bark material over here. There we go. Okay.
Perfect. So we now got these pieces over
here, that's all totally fine. So what we can do now is we can render this out to
become an actual texture. So the way that you
want to do that is you want to go down here and you want to export
material like this. And what export material will do is it will keep or it will basically register
our viewpod and then it will export the material
based upon this viewpoard. You can also do this
with, for example, if you want to
have distant trees on a plane or
something like that. So billboard trees so. So what we can do is we
can go ahead and do like a another texture
that we'll call branch or actually custom
branch texture over here. So let's just use this one. So 248 by 248, yeah, that's more than enough. So I'm not too
worried about that. We don't want to have
shadows on because then it will try to
bake in the shadows. So often most of this
stuff is totally fine. It's already by default. Yeah, we want to
have an opacity. Definitely, so it will have an Alpha around
all of our leaves. We want to have a normal,
we want to have a gloss, although we will
call it roughness. We do not need an AO map. We do not need
subsurface scattering. Those ones I'm not going
to have in this instance. So this should be quite easy. So passing normal roughness, and this one should be
like the base color. So we probably want
just color base color. And once you are done with that, you can press Okay, and then it will ask you, where
do you want to save it? So we are going to
save it in here. It will ask you the file
format, so I like TGA, and then we can press
Save and let that run, which will take a second. Once it is done, it will
automatically close the window, and now as you can see, you
will have these four pieces. So if we go ahead and we go into Photoshop to open
them up over here, you can see that now
we have a norm map. We have a base column map, we have a roughness map, and we have an opacity map. You can clearly see
on the opacity map. The other maps, if, for example, drag in your opacity over here, then what you can do is
you can, for example, quickly go in here
and this way here, you should be able to
kind of see through them. What I can do is, of
course, I can just quickly just to showcase you
select color range, just select the black pieces, and then I can go ahead
and in here or see. So now you can see that everything is working
totally fine. I just want to also
do a very quick check with my base color. So select color range. Okay. And then I just want to go ahead and just add a
solid color. There we go. Okay, that's basically how we can generate branch textures. And of course, you can use
your generate functions inside of Speedre to generate multiple
different variations. Now, of course, at this point, what you want to do is you might want to play around a little
bit more with your colors, like maybe the grayscale
colors or anything like that. I will also play
around with that, but I always like
to first of all, get started with actually having a tree so that I can
properly preview it. So what we are going to do in the next few chapters is we are going to
create our first tree, and we are going to actually use these branch textures as the
main textures on the tree, along with, of course, just like a trunk texture from text.com. But I hope that you can now understand that I
would go over on how to quickly generate these type of branch textures if I need to do them myself. The next step would be if you want to do it much
more advanced, then everything would
be to actually do your tree modeling
program like for example, May or Max and then bake
it down just like you would bake down the decals that we create, like
the root decals. You would basically just
bake it down like that, and then you would basically
get the same result. But of course, it
would take much longer to add some small variations to your leaves and
stuff like that. So let's go ahead and
continue to our next chapter where we will work on
how to create a tree.
29. 28 Creating Our Trees Part1: Okay, so now that we have
our custom textures done, what we're going to
do in this chapter is we are going to get
started with our tree. Now in speed tree, it
literally has the name in it, you can go from simple trees all the way to super
advanced tree, so we are going to keep
it nice and simple. So we want to get
started with a blank, and most of the techniques
that we will be using here, they actually you will already know them because we've
sort of used them, although in different ways
with our other foliage. So we start with the tree. Now, the way that the tree will grow very easy,
you have a trunk. That trunk will have branches, and then normally those branches will have even smaller branches, and those branches will have, even smaller ones
and have leaves. We just need to decide how
many levels we go up before we switch out our jom tree branches for our texture branches. So if you want, you
can even do that at the very beginning,
if you, for example, create more different textures, and then you can
get something for example, I think
it's like this one. Here, this is like an sample
that comes with speed tree. Over here, this is, for example, an extreme example if
you want to optimize, where it only has one geometry branch and then it already goes
over into texture, see? But I want to go for a little bit higher
quality because this does not look super nice. So keep that in mind. Now I'm going to close this and let's just get
started with our own. We want the right
click and we want to get started with
a simple trunk. I'm just going to go over here because this one might be nice. Um tall. Yeah, I want to kind of
go for not too tall. So it just going to be
quite a basic tree, like having a little bit of
empty space at the bottom, and then it just kind of, like, branch out and it just has like a bit of the classic tree
shape to get started with. So I just want to have a look and see
how these ones look. So we have old split and tall. Splits pretty cool because
it like splits off, but let's try tall over here. That's often quite
an easy sample. Here, if you do the split one, Ah, let's hide this. Yeah, the split one, I think,
what you need to do is we need to have then another
branch on top of it. So but we are just going
to go for this one. I actually thought
that the split one would go on longer,
but oh, well, anyway, so we have
over here our trunk. That's totally fine,
not too special. If you want, you can
play around with it. I don't really care, you can
see, like, yes, the length. It is very, very large. So I guess what you can
do is you can try and set the length over here
to, like, only 30. And then maybe, play around
a little bit more with your skin by setting
it a little bit lower. And if I see this, I feel like that maybe
what I want to do. See, let's start with the base. And then if I click on here, I feel like I want to
just go ahead and just maybe move this up
so that it does not go into a point too quickly. There we go. So yeah, you can also do these
kind of curves. You can find them
down here here. You can find all types
of different curves. So, yeah, that's
looking pretty good. Now we are going to
get started with our first base of branches. So if we go in here, let's
see if we just have like a branches and we could again, like, try this one, and that will give us a
pretty solid base. So for these branches, they seem to be quite
long already at the base, and then they become smaller. So that's something
that I want to do. And it's mostly in the length. So if we go to our
length over here, based on parent,
I'm going to set the default length a
little bit smaller. And then I'm going, oops, and then I'm going
to go in here. And yes, I'm going
to make geese. Again like a little bit smaller. So that is pretty good. This one is really
long, although that might actually
be interesting. But what I'm curious
about is, Oh, here, this is why it is
really long because of this one like this. Now, to get the
randomization in here, you can also click on
this button next to this. And here you have
variance, which will give you a little bit
of randomization. I don't know why I did
not use that one before. You could have actually also
used this on the grass, so I completely forgot to
use this on the grass, to be very honest.
But it is here. So you are able to, like,
add some random variants, and you can also do,
like, a distribution. But yeah, I'm quite happy
with that, I think. Yeah. So we have this one now. The next thing that maybe it might be nice if we do, like, some breaking we like, go down here and
let's just see Wait, let me just move this over here. That's a knockout. Where
is my brake? Oh, God. I already forgot Shape, zig zag. Oh, yeah, here's the break. So I just want to see
if I have a chance. Oh, actually, you know
what? That would, like, cut them away
quite quickly. In that case, I'm not
going to do that. So I'm going to
leave it as this, and I most likely will need to do one more
level of branches. By the way, these
bunches, right now, everything is quite hypole. So what you do want
to do with your tree, like normally with our
grass and everything, this is not really problem,
but with our tree, I want to always just
double check my tris, and then I want to
go into my segments, and I tend to often set
my accuracy a little bit lower and then set
my radio over here, sometimes a little bit lower. Now, I think, actually,
this one is fine, but in your big branches, you want to set your radio
here a little bit thinner to minimize the
geometry amounts. And then I want to go
ahead and also see. Yeah, actually, I don't really care too much about the
accuracy right now, but I can also go over here
and just set the relative, which will basically just reduce the amount of my branches. So that's looking pretty good. Over here, you can see
that we have these ends. If you want, you can right click Add selected object and
you can add a knot, not a knot, a cap over here. And that will basically just end these ends properly, see? And it will not
just be a square. It will just nicely
try to, like, move it into a point as
if it is still growing. So that's quite nice if you
just want to cap it off. And then if we go back
to our big branches, we can now right click
ArtomtreT selected. And I'm going to go ahead
and I'm going to go for um maybe some custom
branches or we can go in here and we can
go for little branches. Yeah, let's do little
branches over here. This one might actually be. I'm just going to
quickly go to note, and I'm going to set the
length a little bit in. There you go. And then go back to generator. For just one branch, that's
not really a problem. Okay, so we got our
little branches, and on here, we are going
to have a textures. Now, first of all, so yes, I like that we have a
lot of space or a lot, a little bit of space down here. I'm going to go to my
generator settings, and I'm going to set my first
probably down a little bit. Because it looks like over here, these branch happen
quite often, like, not too often, so it's still, like, a little bit out. But I want to try and get them quite close to,
like, the beginning. Next to this, let's have a look. I'm going to, I think, here at the top, I
don't really like them, so they're only sitting
at the top right now. Frequency, I don't really mind. I'm just having a t here, because as you can
see over here, I don't want to have them
as close to the top. So let's set my last
little bit down. Then let's go into my
spine and let's set my length maybe a little bit up over
here just to give them a little bit more space. And I think I now just need
to start adding my texture because Este will be very difficult to see what I'm doing. So let's go ahead and just get started by adding our textures. If we go to our materials, we can add two new materials. One we can call Bar the other
one we can call branch. Now, for our bar material, what we can do is
we can just import the one that we
got from text.com. So let me just
navigate to it. Click. Oh, God. No, not in our
opacity, in our norm map. And if you want in
your roughness map. So this one we can
just drag onto the trunk and replace the
branch material also. So this is like our
base bark over here. It's looking totally fine. It seems to work. So, oh, and we want to also
probably just drag it onto our cap like that. And now what we can
do is we can go ahead and we can go to our branch, turn on two sided. And now if we go, I'm
just navigating to it, so that's why it
takes me a second. We can grab our base color, opacity, normal roughness, and we have them
set to two sided, so that's looking pretty good. As for our cutout messes, let's press dit, and
let's have a look. So yes, you can keep it a plane, but I do personally
prefer to always just give it a little bit
of extra geometry. It is needed anyway, because what we are
going to do is we are going to Oops let's move this. We are going to do some tessellations so
that we actually do have a little bit of
room to move this round. So let's go for
something like this. Push up the tesselation
a little bit, and then what we will
do is we will rely on LODs to push it
down quite quickly. So we now have this one over
here, which is our leaf. So now we can pretty
much just work on that. So we can go to our little
right click R geometry. And if we, for example,
once again, go to leaves, you can play around with this, and I don't need to alternating. So maybe we can just go for, like, scattered leaves
and see how those work. So these leaves, they will
have smaller branches to them. So they are actually going to
become a little bit bigger. So what I'm going to do is
I'm going to go in here, and I will first go. Let's see. Let's first go to skin and set the size of the
leaves a bit bigger. Let's go to generate and
just set the number, and it is using my favorite,
which is proportional. And I just want to go ahead
and I want to have them all, sticking a little bit forward. So I want to go to my align over here and do a
little bit like this. And now if we add
our branch texture, you can see this is now the
texture that we created. Which works really
nicely because it is the same branch
texture as over here. So we just need to go ahead
and we need to make it look a lot fuller compared
to what we have over here. So that's why I wanted to
also have them quite close. If I have a look at
this, I'm going to go ahead and I'm going to Hmm. Yes, I can add more little
branches over here, although, by the way, I do need to go into my segments, and I need to, like, set my relative
quite a bit down, although it looks like it
cannot go down much more. Set my optimization
over here up. So this will do some
general optimization. You see, now we are only
at 4,000 triangles, although 4,000 might be a little bit too little. There we go. And I'm going to
go into my leaves. And this, it is a
little bit fiddly. We just basically want
to just go back and forth and just see what works. So over here, I can go, of course, with my size. But if I go too
large with my size, you will get this kind
of stuff where it's just like you can easily still
see gaps in the tree, and it just does not feel
really nice in general. So instead, let's go
ahead and let's say Okay, so let's first of
all, just finish off some stuff over here. So the size over here,
I'm fine with that. I'm going to I don't
think, yeah, here, we need to have collision
turned off in this case, because else it will
just look even worse. I'm going to go ahead and
go to my orientation. And I'm just basically playing around a little bit
with the pieces. Folding is one that I want
to play around with curling. Over here, we can also do so that they kind of,
like, curl downwards. We can give them some
twisting if we want. So random vertex. Deformation is also nice
and our scaling over here, you can maybe give a
little bit of scale. So let's try out
the random stuff. So if we go in here, here, we can say we can give
it a little bit of variance like this just to
randomize it a little bit. I'm quite embarrassed now
that I did not use this one too often for the other pieces. But okay, so we
got this. And now I think that we need to
do is we need to rely mostly on our
branches to fill in the space a little bit
better, especially down here. So let's set the frequency
over here, a little bit up. You'll see until we are
starting to fill in the space, and then we got
something like this. Now, next stop. So that is already looking
quite a bit better. Of course, I need to play
around with my texture, like my actual texture itself. I want to go ahead and I want
to just work on the colors. But if I see this, the first thing I think
is going to leaf and setting our number down a little bit because it
is a little bit overkill. Let's go for
something like this, especially because once we have our shadows and
everything in here, we can probably here if I go to post and click
on AO here, see. Once you get shadows in here, it's already going to
become a lot less. So this is pretty good. I'm going to now click on my large branches over
here and go to Node, am I able to select this one? This one, I feel like it's
sticking out too fast, so I'm just going to push
this back in and maybe, play around a little
bit more my angle. And I feel this one is sticking out also a
little bit too fast. So let's also play round that. Because I still want to, like, have a little bit of Oh,
God, didn't mean to do that. A little bit of control
over my branches. But as you can see, you
can very quickly generate a pretty good looking
tree over here. Now, the trees,
as I said before, they can become very advanced. You can also, for example, go to your trunk and you can go like, I've not done this a lot, but you can do like
knots and over here, I think what I need to
do is I first of all, need to add an extra
branch to this. Or what I can do is I can add probably like a branch to this. No wait, I'm just
messing out with this. So if you want, you
can ignore this. But there was a way that
you can add a branch. And for this branch,
you basically go to generate and you
set it to be very, very low like this. And then you set the
break all the way up. So here we have one branch. So let's say that we
even go to node and we just change the
position of it. And after you've
changed the position, you can go to spine and you
can go down and break it. Which in this case,
it does work, but not at the position
I want. Come on. There we go. And then over here, you should be able to add like
a knot and not just a cap. Oh, no, I guess it was a cap. So, you go to add just
like a cap over here. And that will give you, again,
like an interesting look, but it's not looking
as good as I thought. Probably because
the cap material, you would you also want to have a unique
material on this. But I just wanted to quickly show you that you can
do stuff like this, even though I personally don't find myself doing it too often. But yeah, you can, like,
set the spot down, and then you can
go ahead and you can just mess around with this, for example, it adds like that nice extra bit of detail as if there used
to be a branch here, but it kind of got broken off. So here, that's quite cool
to have stuff like that. And yeah, for the rest, I
think it is pretty basic. You have your leaves.
At this point, you can generate
whatever you want. So if I would just, for
example, save my scene first. That is not the won but
not the correct folder. Let's go in here, saves, let's just call this
tree underscore zero, one, because in my time
naps of my forest, I will most likely create
a few more extra trees. Let's just save this. But those trees will
just be generated. So, you can go in here. You can also make use of
forces if you want. Now in this one, the first thing I would think of is
to, for example, play around a little bit
more my noise to give it a little bit of an unevenness. Which I'm actually going
to probably leave here. I quite like that. So
let's just save scene. And let's say that
this is now done. And then if you ever want
to change it around, yes, you can do the trunk, but I tend to just go
for my big branches, and then I just go to, like, my randomize over here. And the thing is you can
also randomize everything. If you randomize everything, it will literally just
randomize the entire tree. So if I press that
one, you can see that I think if I go one down, see, it randomizes the trunk. It randomizes all the branches. It randomizes
everything, basically. And then you can see
that you can very quickly create variations of a tree to fill in your
forest like that. So we got this one I'm
going to quickly saves 301. Yeah, I'm going to quickly,
like, reopen this that we No, I don't save that so that we
have like old version back. So we got like this
version over here.
30. 29 Creating Our Trees Part2: Okay, so sorry for
the quick cut. I didn't realize about the time. So now that we have our
old version over here, what we can do is
we can also just quickly create a
younger version. And this one should
be quite easy. We can go ahead and first
of all, in our old version, I'm just double
checking that my, okay, so this is
pretty much fine. You can, if you want, like, minimize maybe the
segments in here, but I'm going to
use LLDs for that, so I'm not too worried. So yeah, let's do
a save a and just save this as three
number 02 over here. I already had a file like that because I
crashed, unfortunately. But okay, so this is now 302. And what we can do in here is, let's get started by just
getting rid of this little cap. We have a trunk over here. Let's set the size like 15. Yeah, that this
is a lot smaller. And then in our
skin, we can set, Hey, let's make
this a bit bigger. We can set our absolute
down like this. So that's quite good. And for the rest, you
can, of course, just, like, play around
with a few things. For example, if you want to play around with your
noise a bit more, you can also work with that. I'm going to
actually, I think I'm actually going to stay with
what we have right now. So next stop is
that we have, like, our little branch over here, and I kind of need to decide, I feel like our little branches, we would already have
Oh, no way taxi. Yes, this is correct.
This is correct, having punch in here. I'm going to swi
and first of all, maybe do some random generation. So let's go to the big branches, and let's just go up here to
why can I never find this? Here we go random seeds. I want to go ahead
and just do like a randomized. Oh, I like that. I like that, but I want to
have them like less long. So what I'm going to do now is I'm going to go into my spine. I'm going to try and make them a little bit less long over here. Maybe also work a little
bit more like the align. Which is that's the start angle. Oh, yeah, line probably does not work with the
large branches, so we probably want to
set our start angle a little bit up as if the
tree is really growing, so it's trying to grow upward. And this will also just condense everything
into a small area. Then if we go to my
little branches, I might want to just
play around with my generate where I think
the amount is fine. I think we just want to go ahead and play out a little
bit more like our first here to get a few extra branches in
the center over here. And once we've done that, we can go into our leaf
and the number of leaves maybe tone it down because it is like a new growing branch. So here, let's do
tree orientation. Let's once again, align
this out a little bit. Okay, so we got that also. Then what I'm going
to do is I'm going to probably go back to my big
branches and just with the notes I want to carefully do a little bit
of manual hand placement. Here, and then you can
very quickly also generate a nice smaller
version of your tree. Oh, that's always annoying
when I want to move it up, but it's deciding that it
is going to move down. A, there we go. Now
we got it back. Yeah, actually, you know
what I quite like that? Maybe like come
on, tiny bit less. There we go. So we got that one. Over here, this one feels
very empty, to be honest. Yeah, let's just do, like, a tiny bit of scaling so that it creates a few more
branches over here. Yeah, and I think
like something like this looks quite
nice. So there we go. Now, we also have a little tree. And just like that, you can just keep going
and going and going. You can also, of course, create
different types of trees. For example, if you make
the trunk way bigger, you can create oak trees. Of course, you would
need the correct leaves. But in general, this is looking pretty good. So
I'm going to save this. I'm going to quickly also
open up our original tree over here and let's just
go ahead and do an export. So we have a tree over here. We already went over the general branch optimization
as far as I can see. So I'm not too
worried about that. Yeah, because the smaller ones, if I lower them even more, they would just become well, I might be able to lower them
just in the underweight, because the radio
I already lowered. The reason that the
radio is like this here, I might if I said this to zero, and then set the absolute. Then I can control the
radio a little bit better. So I'm going to
have this, pretty much at once that we only have 12,000 because these
bunches are so thin, right now they are just
triangles, basically. But from a distance, that
should be totally fine. So okay, we have this. Let me do one last save. And now what we can
do is we can export. Be material wise, this
is actually very basic. It's very simple.
The only thing is that we do need to probably
do some balancing, maybe even in Photoshop
to make it look good inside of unreal. So we are going to
export the game Exports. Oh, yeah, from Speed tree.
That was correct, actually. 301, save. Yes, I'm fine with all of this, because it is still correct. So we can just go ahead
and press export. And let's open up Maya. Here we go. So we
are back in Maya. I'm going to turn off my ferns, and I'm going to import my Oops, Bong exports from Speed tree. Oh, I will need to clean this up later on, but we're
almost there. The trees are actually
the last time that we are actually last two models
that we need to create. And after that, it will
just be bonus chapter. So you are almost done
with this tutorial course. Congrats. So okay, we have a
tree over here. Move it up. Yeah, I think for the size, we probably want to end up
scaling it more, of course. But let's just start with
this size over here. You can see the geometry
on these leaves, they are a little bit high, so we probably want
to reduce those. Yeah, it might be better
if we do that right now because if we
do it later on, it becomes a little
bit more annoying. So let's just go into your edit. There we go, and just do that. And you will see that that will actually make a very
large difference. So now we are only
at 16,000 Tris. I believe it was like
double before that. So let's just go ahead and
do one quick export again. Yeah, I want to replace it. And now in here, you can just
quickly delete that one. That's no problem. And then just re input it. There we go. So quickly done that just to make sure that it's optimized. And now let's just
copy the name. Let's go ahead and ungroup
delete the old one, paste the name, apply it to a
layer, give the layer name. It's the same stuff over
and over and over again. There we go. So now we have
full control over here. And what I'm going
to do now is I just like to do a quick
check to make sure, sometimes I don't really
like stuff like this where I just want to quickly delete it. And and then carefully,
also delete that one. So that's also why
I like to often have it first into Maya so that I can just very quickly see if I don't like something, and then I can just get
rid of it. Like that. So it's just like if
you're very picky. But basically, now
that we are done with this one and everything
should be set up, we can go ahead and we can save scene and we can
export this to unreal. And then we will
see how it looks. And then later on we will
just do the smaller one. So exports to unreal. So I close Maya, so I just
need to redo my settings. The underscore zero, one. And we can just do
a normal export. Now, one last thing is
quickly go to speed three and 302 because I'm worried
that I might forget. I'm just going to edit the
leaf and just tone down again. There we go. And save. So I was just going to
quickly tone it down. And if you want,
you can, of course, already just quickly export
this. That's no problem. It does not take any extra
effort. There we go. So now that we've done this, let's go ahead and go into reel, and let's actually
properly set this up. So in here, let's first of all, go to textisT I'll score branch. And I'm also going to go
textis Trunk over here. So, trunk, bark. I should call that bark. Right click Rename. There we go. And I'm just going to
go import my texts. So first of all, let's
do the bark one. That one is very
easy. It is this. Open up your norm map, and let's not forget
to quickly press the flip green channel because
these come from text.com, and then I'm going to
go from my tree branch. And let's just navigate.
Where are you? Custom branch
texture, there we go. So we can go ahead and we
can use these four of them. Yes, I think I need
all four of them. And once again, just go into your normal flip
the green channel around that should be fine. Because I baked in
direct X, I believe. Well, we'll notice soon enough. So we got these done. Now let's go ahead and go into assets. Let's import our
tree. Here we go. Default setting
should still apply. Then the first thing
I want to do is I probably want to just
drag it in and just see. I think I want to
probably scale it up this one quite a bit
more. So let's go. Yeah, because then if
it's standing here, let's scale it up by 1.5
maybe or 1.5 or two. Let's try 1.5 first. Yeah, you see 1.5 is
already more than enough because this
is like the big one because we also
have a small one. So that's already
looking really cool, even as just a gray scale. So we can now go ahead
and go to our materials. I believe that we have,
like, simple ivy bar, which we can duplicate
and we can call this one bark on
score zero, one. Open it up. And let's go
ahead and go to bark. Wood, normal roughness. Set the color back
to normal color, maybe a little bit
grayish over here. And then if we go into our tree, we can start by just, you know, I will strike my tree for
the first time in here. And then if I go
to my materials, let's scrap my bark
because it is looking a little bit whitish, so safe. Oh, no, no, it's not as bad. I feel like I want to have control over my norm
map in this case. Here, first of all, turn
on the has roughness. That will also
make a difference. But I think what
I'm going to do is let's go into our solid master. And let's see if we
can have some control over the norm map by adding a flatten normal node over here, along with the scale
parameter that we will call normal intensity. And often we need to go in minus one if we
are using OpenGL. So let's just plug
this in here and let's have look Come on. You can do it. It's strange how sometimes it just takes a
random long amount of time. Okay, so let's go into
our bark zero, one. Set a normal strength
device, do like minus five. Okay, so I am able to use it. So minus three maybe. I think minus three
is pretty good. Now, as for the UVs, you are able to control
the UVs in here, but since we are already
inside of unreal, it might sometimes
as a little cheat, just be easier to add a scale parameter that you will call tiling and set the
default value to one. And this only works, of course, for tilable materials,
not for the other ones. And then if you add a
texture coordinate node, just right click
texture coordinate, and a multiply node, you can basically
multiply these two, and this will give you
control over your UVs because you are adding, you are adding to
your taxicorate note, and your tax coordinate node will control your actual UVs. So if you save this, And if we then go ahead and
open up our material again, I should really
just keep it open. Here, I I set my timing to
0.5, it becomes bigger. Now, normally, you do not really want to go
below one because then it can give you arrows. However, in this specific case, if you cannot see anything, when you look at it from afar, then I personally am not
too worried about it. So we got over here a tree bark. I would say, maybe let's
make it a little bit more like a tiny bit more like brownish color over here, and that
should be fine. So I'm happy with that. Let's now go ahead
and go on with our actual leaves for which
we can use our IV generic. Let's just duplicate
this one and just call this tree branch underscore 01. And of course, if you want, you can create multiple
different textures for your three branches
to again apply variation. However, I'm going to
just open this one up. Let's have it over here. Tree branch, and now it is mostly just going to be us
balancing a little bit. We have this one,
we have a normal, and now for a subsurface, I need to add a little bit
more control over here. Let's open up our
foliage master. What we can do in
here is we can have a static switch parameter
that we will call has submap. If it is true, we will use this. However, if it is false, we will use duplicate this. If it is false, we
will use this one, which just does not use the map. It just uses a simple color. And by default, I want
to just have to default it through because that is
the one that we use the most. Next for our roughness, I can do another static
switch parameter has roughness map. By default, it is false. However, if we go over here, if it is true, we can simply have and let's
convert to perimeter. We will use our
roughness map like this. Okay, so we got those pieces. That's also good. I'm going
to add one more note, and it is called
a Lightness note. Lighting. I forgot I
forgot what it was called. Light Brightness? Let me just quickly look it up. Okay, I got it. I
got a bit confused. I create a scalar parameter
that I call lightness, and I set the scalar
parameters, I believe, a default of one, and
I just multiply this. So that's why I was
thinking of the note, but the lightness note
does not exist in real. So if you do this, I just
need to double check that one is a default and not zero. So let's see. Zero becomes
is it zero or one? That's tricky. If I do
this, does it change? No. Okay, so one is the default, so let's keep it to
one because we do not want to extend and change
all of our other textures. So now we can go ahead
and we can save this. So now if we go ahead
and go in here, we have our tree branch. Which uses our fange master, but where are my Oh, there
there. I just had to scroll. So okay, we have a
tree branch over here. It now has roughness,
that's fine. Subsurface color, let's go for a little bit more of
like a greener color. We have some
lightness over here. So this is nice because
this allows me to basically because remember how is it like it feels a bit dark. This allows me to
just control that. One thing that looks
a bit strange is, why is this green. Oh, that's most likely
just a subsurface being a little bit too strong. So we probably want to go into our subsurface sets to like 0.2, and we'll just mess
around with it. So let's first of all, apply it before we start doing that. Let's go in here. Let's select our tree
branch and apply. Okay, so this is what
we got right now. Let's have a look here, see? It's really, really
dark. So that's something that we
definitely need to work on. Let's get started. If we go in here, first of all, let's turn
that it has a roughness map. Let's turn off that it
has a subsurface Okay, let's set my subsurface
to maybe like 0.5. Let's set my lightness
to maybe like five. Maybe even ten. Yeah, that's my lightness to
like ten, like super high, but then set by
desaturation to maybe like 0.7 or something just
to tone it down again. So that is looking pretty nice. I do want to have my colors. Yeah, let's go into my color, and let's definitely Oh, wow, I was literally already
having my color so dark. So I want to go for maybe
a little bit of, like, a yellowish tone like that
with my color quite bright, so that's looking
pretty good already. So I can just look through it. So yeah, that is actually
looking pretty nice. So we got these ones. How do they fit
in with the rest? I feel like that my
colors might want to go a little bit more in the
green area, actually. And let's set my desaturation
maybe to like 0.5. I want to mostly look
at it from a distance. Let's say 0.6 axon,
and my lightness, I don't know, five, ten, 15. Yeah, I think ten is fine. Our roughness is using
a roughness map, so it should not
really be affected. Our subsurface, I
can set to one. It's a bit strong. Let's do 0.7. Now it's starting to
look a little bit nicer. Let's go into our bark and let's set my color for my bark a little bit
brighter over here also. There might be a
little bit too much. Like this. Okay, so we have our bark. Let's see. What else? My normal map is in
the right direction. It looks like it. Let's
just double check by going into our norm map and
just while looking at it, flipping the green channel. I don't know. Is it in
the right direction? It's really difficult
to see, to be honest. Yeah, I think if we
flip the green channel, it is in the correct
direction over here. Sometimes it's just quite difficult to see
that kind of stuff. But now that's
looking pretty good. So that's quite nice. I feel like yeah, you could maybe, increase the size of your actual
branches if you want. But let's just say that we
have one tree over here, and let's not forget that we are going to have multiple trees. So once you have those
and they are overlapping, then it might actually become
a little bit too dense. So here, if I do this, then
you can see that it is often fine to just have them not as large because it just
looks better like this. But okay, so let's say that
we have this one over here. Let's do another one
that I will place like nicely here,
just as like a test. That's quite nice. So that definitely shows how
to create trees. So what I'm going to do now
is I'm just going to do one final import of our tree 02, and that one should be very quickly because
all we need to do is reapply our materials
that we know already work. So I'm just going to
go ahead and rotate this scaling of 1.5, copy the name, ungroup, paste name, apply to
its own little layer. And now we can just go ahead
and make an export 302, there we go, see, so
that's nice and quick. And then all we need to do is
just do one little import. And let's just go ahead and open it up and just
assign our materials. So we have our bark 01, and we have our tree
branch over here. Perfect. Let's have a look. See? Nice little tree.
That's looking cool. So of course, you can just go ahead and create more
tree variations. You can create more
branch variations, more leaf variations,
all of this stuff. Maybe you can have them like some dead leaves and
everything in here. So there's so much stuff
that you can do with this, and you can do it
also very quickly. Once you have a base, it is very quick to work
inside of speed tree. But here you can see that if
I do something like this, it will very quickly give
me something interesting, or if you want to go
even more extreme, you can Oh, let's not do that. Let's not change this. You can, of course,
go into your foliage. And if we just double check that everything
is turned off, yes, we can import
our two trees, and we can set aside from 0.7 to 1.4 or something
like that with, let's not do a random pitch, but now if we just go ahead
and go into our paint mode, you see, you can very quickly
create an entire forest. And if you just
remember that this is only two different trees with
one single branch texture, and it already looks like this, then you can imagine
that if you have more variation, it
will look very nice. But okay, so that
is pretty much it. I'm going to go
ahead and get rid of these ones over here just because I don't
really need them. And I would say
that this is also the end of our real
time parts over here. So we now went over on how to
create all of our foliage, multiple different variants
of from plants to flowers, to water plants, to grass, longer grass, ivy,
and also trees. So and bushes, of
course, or shrubs. So I think this will give
you a very solid overview of everything that you need
to know to just create, like, a basic scene
with foliage inside of speed tree to
use in your levels. Now, the next few chapters, they will be bonus chapters. What I'm planning to do
is I'm going to create a little forest scene with
a lake to also show you, like an outdoor scene
because right now, if we just show the tunnel, it might not look as nice. So there's one last
thing that I want to do. I want to open up my tunnel,
so let's save my scene. And then what I like to
do in here is I always like to just have a tree sitting at the top to kind of break
up just how things look. So I can go in here and
I can, for example, grab 301, and now
you can see here. So if we just have
a little tree, and maybe you want
to have another 302, like sitting next to it,
like a bit further away, you can see that over here,
that just looks nice to have a tree sitting in here. And maybe, like, moving
it around a little bit. But anyway, that's
pretty much it. So here is already
one final scene. And now let's go ahead and
continue to the bonus. And at the very end, I will do a quick outro, if
you want to, like, just have a quick overview of everything we've
learned and maybe, like, some additional
information. So let's go ahead and continue
to our bonus chapters.
31. 30 Cabin Scene Part1 Timelapse: M h. No. No. A Thank The
32. 31 Cabin Scene Part2 Timelapse: Bang Bang Bang Bang Bang Bang Oh.
 FastTrackTutorials, Premium 3D Art Education