Transcripts
1. Intro: Have you seen those viral
embroidered sweaters? Ever wonder how they get that
script to look so smooth. That's the chain
stitch, and it's so much easier than it looks. Hi, I'm Cat Lyons,
embroidery teacher, creative entrepreneur, and mama of two based in
Nashville, Tennessee. I studied art and design
at Ottermin University and started my
career as a graphic designer working
outside of Chicago. Today, I work by day in the
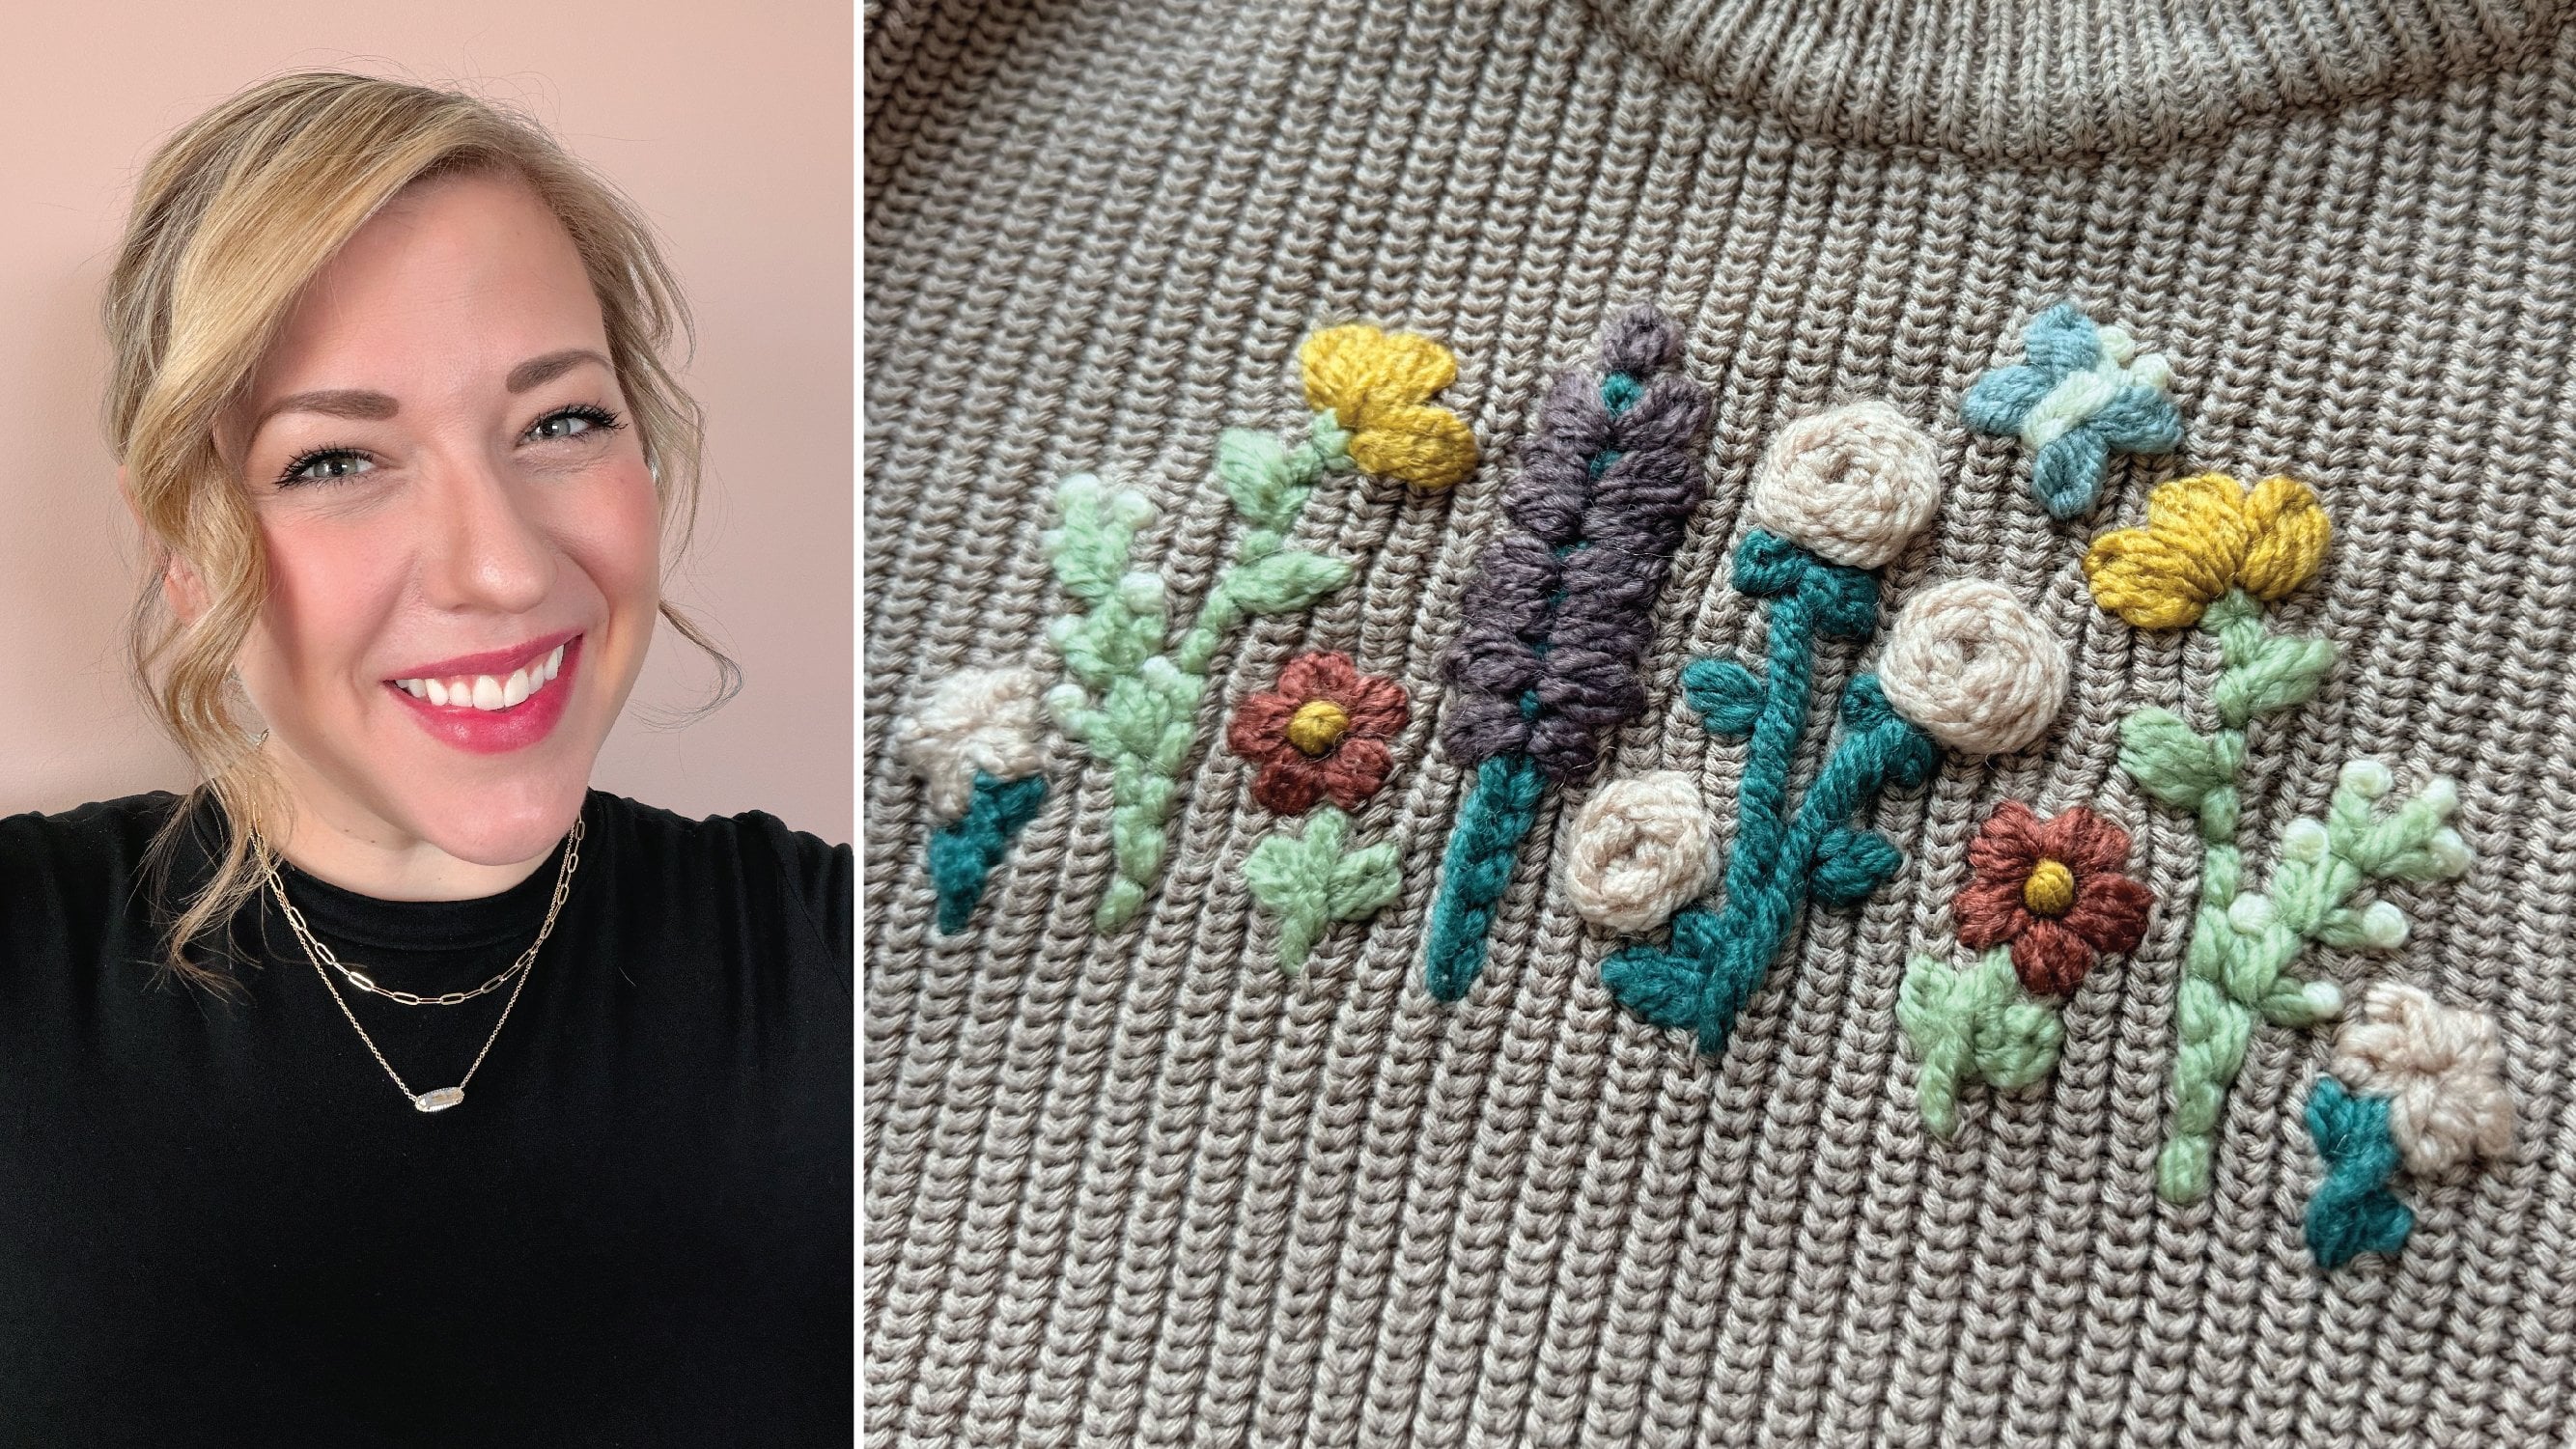
digital marketing space and spend my nights and weekends pursuing my creative career. My embroidery journey started when I was pregnant
with my daughter Ella. A ton of gender neutral clothes
from Big Brother Kaden, and I wanted them to feel
like they were just for her. With a needle and thread,
I was able to turn these simple basics into
something sweet and girl. And I was instantly hooked. In this class, I'll
show you how to add a hand embroidered design
to knit sweater using yarn. No embroidery hoop needed. And we'll create this
keepsake worthy design with just one stitch. So whether you're brand new
to embroidery or just looking for your next
meaningful project, I'm so glad you're here. Let's make something
stitched with love. Join me today in class,
and let's start stitching.
2. Class Project: Your class project is to
use one of the designs from the guide and embroidered the design onto a
piece of your choice. So it could be a
sweater, a jacket, a backpack, whatever you'd like. So you'll need a few items, including that piece. Needle, yarn, threader. And a printer, if you're
going to be printing, you could also trace onto the
water-soluble stabilizer, which you also need a
water-soluble stabilizer. All of those are in your
guide within the resources, but it's going to be
a simple process. You're going to print or trace, we'll apply it to the garment or bag or whatever
it is you have. We'll stitch right into
it and then wash it away. Finally, I would love for
you to share your work. Upload to the project section, either behind the scenes
or your final piece, whatever it is you feel
comfortable sharing. I would love to see
everyone's work. And if you have any questions or any more tips along the way,
feel free to reach out. I'm always happy to help. I'll see you in the next lesson.
3. Supplies: In this lesson, we're
going to be walking through some supply
recommendations. Now, a full list of suggestions are linked within your
guide with links available. So if you need to buy
everything you can, I suspect some of this you have, especially scissors, you
probably have scissors. And if you have a
garment or an accessory, like a bag or a jacket, something like that,
you can stitch on that. So you'll need your piece that
you're going to stitch on. I'll be stitching
on this sweater, which I do have this link.
This is an Amazon one. I love doing this,
especially if you're gifting and it's a newborn,
grab one of those. They're always a hit
at the baby shower. You're also going to so I get this I love this yarn, which is the brand name. My only caveat there is if you're getting another
one, that's fine. Totally fine. I would just say, get the size four. Can you see the weight? This is my favorite one to do
on the knit sweaters. Is that weighted for?
This is my favorite yarn, but you're welcome to use any color Amy brand
that you would like. You're also going to need a
water-soluble stabilizer. So this is what you
actually print on. So you print on here, you stitch right into it, and then you're able
to wash it away. It's my favorite hack for
transferring designs. And then you're
gonna need scissors. Like I said, you probably
already have scissors. I do have lots of different
embroidery scissors. You do not need these. You can use whatever
scissors you have on hand. And lastly, are you will
absolutely need a needle. So you need to get your needle. I think I have these linked
as like a full pack, and it never hurts to
have more than one. I have broken the eye
of a needle before, so grab a couple,
and then a threader. So this one comes in the kit, and it goes through the eye of the needle there so
you can pull through. I also really love this one. So this is linked in the
guide and resources. It just gives you a little bit more to be able to pull onto. As long as you have a
needle and threader. And honestly, if you
can get the thread, the yarn through the needle,
you don't even need that. So really, you
need your garment. You need yarn, and you
need the stabilizer. So once you have all of those, we're ready to get started. I'll see you in the next lesson.
4. Learn the Stitch: For this class, we're only going to be using one stitch, the chain stitch. However, I'm going to show
you three ways to do it. So I'm actually going to pull in a video from my stitch deck. So it's the technique
that I have developed with cards so you're able to practice
without actually diving straight
into the project. So you can watch
that here, or if you're more comfortable with
the hoop and the fabric, I do have a one on one
class available where I teach 15 different stitches,
so you can jump in there. Whether you've taken the one on one or you're gonna
be sitting here, wherever you are, I will meet
you. Let's start stitch.
5. Chain Stitch: Hello, my art friend, in this video we'll be
covering the chain stitch. Let's dive in. Starting with our thread, we're
going to measure it. I usually go two of these, so from the tip of my
finger to my elbow, or I go one full
one to my shoulder. Then I'm just gonna knot this. We only need to do it one time and go ahead and
thread my needle. So this is part of
the stitch deck. This is the needle and
thread that came with it, and we're going to thread that. Just go to stick this through
the eye of the needle. Go ahead and loop that yarn onto the threader
and pull it through. Now, you might have to
give it a good tug, but it's going to come
right through and then we are all set
to get started. I'm starting with
the chain stitch. I'm going to come up
through the back, and then we're going to go down again, right into the same hole. I'm going to stay to the
right of that thread. Then we're going to come
up just a stitch length ahead after we've created that
loop and catch that loop, and that is going to
secure it in place. This is the pattern
for the chain stitch, we go down in the same hole
and then we're going to go up a stitch length ahead and catch
that loop. And that's it. So I'm going to keep
repeating that, again, going down
in the same hole, creating a loop, and then going forward one stitch length
to catch that loop. Now, this is the
traditional method. I'm going to show
you two other ways to do this chain stitch. One is a little bit faster, and the other one gives
you a little bit of a different look with a
reverse chain stitch. So I'll speed this up,
and I will meet you back. And to finish it, we're just going to do a straight stitch. So we just went
straight back down. Now, if we are doing the back, I like to do a
whipped backstitch. So I'm going to go
underneath that, and you're literally
just whipping it around. You're going to
kind of enclose it. So what was created
on the back from our chain stitch is
called a backstitch. You can also go backwards. I've seen people
do both. I usually just go forward with my needle. Play with it, see what works, but just wrap that around and then you'll be
able to cut it off. This is especially nice
on your sweaters to keep everything clean
and tidy on now, I'll also do it for
where I came in. So I'm going to just thread that quickly and tuck
that in underneath. Again, we're doing a
whipped back stitch effect. So you're just going to go right under those stitches
and weave in your yarn to secure it and
keep our back nice and tidy. Now let's do our next stitch. So same thing. We're going
to come up through the mac. We're going to go down
in the same hole. But instead of creating
a loop this time, we're going to go up
that stitch length. So initially go right through
and then create our loop. So we're going to make
sure that this is looped around and then
pull through both. Now, you may have
to bend the card a little bit or pull a
little bit harder, but that will expedite
your stitches so much. So we're going to go down
again in the same hole, back out a stitch length. Then make sure we have our
loop. And pull that through. Again, we're just going to
repeat this the whole way. It's going to look exactly the same as the traditional one. It just helps you go
a little bit faster. I find that it
helps me space out my stitches a little
more evenly, too. There's something about
that kind of, like, kebab effect that somehow I'm just able to gauge
it a little bit better. So, give it a try. Again, we're going to go through
three different ways. There may be one that works best for you.
Go with that one. These are all the same stitch. We're just doing
them a little bit differentechnique for each one. I'm going to wrap this up. Again, I will end it with
a little straight stitch, clean up my back, and I'll meet you for the
reverse chain stitch. We have both of those
cleaned up on the back. We're going to do our
reverse chain stitch. So this one starts up through the back. We're
going to go down. We're going to make that
straight stitch right away. Now, this is kind of a back
stitch technique where you're going to come up a
stitch length and then go back. So we're going back to
loop under that stitch. So we're kind of
creating the loop that way and then back down. So like I said, this is
a reverse chain stitch, so it's going to look a
little bit different. So, again, we're going
to go up a stitch length and then make our loop under that stitch and then
right back down into the same hole.
I love this one. This has become my favorite. But again, you need
to test all of these just to see which one
resonates best with you. So, again, we're coming up a
stitch length ahead scooting under that stitch
and then right back down into the same hole, and
we'll close it the same. We will end with a
little straight stitch. Ess these out, see which
one feels the best, but this is our
reverse chain stitch. I find it's a little
more fluid for me. It's easier to keep my
stitches a little more even. But there's days where I
decide to do the fast one, and there's times that I
do the traditional one. It just it's better
if you know them and can try them out and then see which one feels best to you. I'm going to wrap this
up. I would love to hear from you what your favorite
version of this is. It me over on Instagram, I'm at rt Lions. I want to hear which
one is your favorite. And we finish it
with a backstitch. We're coming up ahead and
then right back down. That's it. I'll
clean up the back. But those are chain stitch.
6. Howdy Sweater: Hello, my artsy friend. Today, we are going
to be stitching a howdy design onto
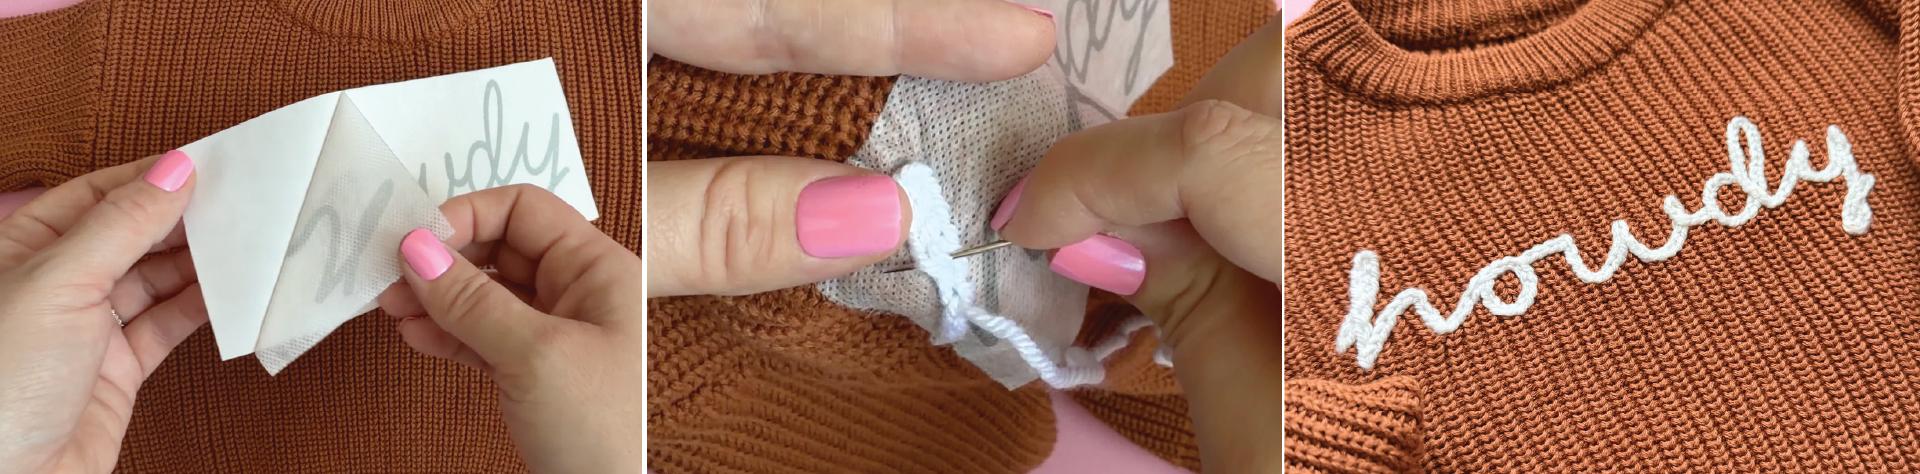
a knit sweater. Let's get started. We're gonna start by measuring our sweater, so I'm gonna find my center. So I'm gonna stretch
that across. I usually measure
from the armpits. And so I'm going to
check those seams and then find my center point, and then I'm going
to be ready to peel and stick my sticker. So I've got my center point, and then I like to
line this up with the armpits as if it's kind
of sitting on that line. So I'm going to
place that there. I'm going to double
check here in a second once I get
that place to make sure that my measurements are pretty much the
same on either side. I'll also look at the
bottom just to make sure that it is aligned
straight across. But usually, I can eyeball
this pretty quickly, and, I mean, it's handmade. It's supposed to be a
little wonky at times. So this is looking pretty good. So I'm gonna go ahead and push that down and
get ready to stitch. So I love this yarn is a
yarn that I typically use, which is hilarious a it'
called Love This yarn. I measure two pieces
out to my elbow, and then I give a
little bit for a tail, and then I clip that off. Sometimes I'll go all the
way up to my shoulder, but I just want to make sure I'm not working with too much. Next, I'm going to
thread my needle. So I'm gonna put the threader through the eye of the needle, and this is a darning needle. So I'm going to push the yarn through the threader and
get that little tail going, and then I'm going
to pull that right through the eye of the needle. So now that I've
got that through, I'm just going to pull
through, and that's it. So I've got that threaded, and then I'm going to
not the opposite end because obviously we want
that. To not go through. There are some no
knot techniques, but I find it's not necessary. So I just like to knot
mine and get started. So I'm gonna do that here. G to doble knot it just to make sure it
doesn't go through. Now we're ready to
start stitching. So I've got my sweater here
and I've got the sticker on. So now we're just
going to get started. I am going to be doing
the reverse chain stitch, so I'm going to come
up through the back. And the first thing
I'm going to do is create that straight stitch. So I'm going to come up, I
got my knot catching there, and then I'm going
to go really small. I like to hide it a little bit. I don't want it to be too big. So I go pretty small there
and I'm going to go down, and then I'm ready to actually
start my chain stitch. So I'm going to go
ahead a stitch length, and I'm going to be coming
back as a reminder. This is the reverse
chain stitch, so I'm going to go back and
loop under that stitch. Once I get that pull
through, I'm gonna go under that straight stitch
to create my loop, and then I'm going
to go right back down into the same hole. And I'm just going
to be repeating that pattern where I
go up a stitch length and going back and under to create my loops. So
there's my first one. I'm going to keep about
the same distance. It's about a quarter inch.
You'll get a feel for it. I've seen some
creators where they actually mark on their
fingernails where, like, the width they want to
keep it super consistent. I usually end up in a rhythm, and it doesn't look too bad. So play with it,
see what you like. Ultimately, you're
going to be doing about the same stitch length. So I'm going to finish
this up, and then I'll show you a quick
note on the back. So I'm gonna pull
that through here. Yeah. So you can end up
catching that tail. Try not to. I usually keep ahold of it with my other
hand on the inside. It's not the end of
the world if you do, but I'll show you in a bit how to get those cleaned
up on the back side. So I'm going to
continue doing this. I'm going to be going up a
stitch length, coming back, going under that stitch
to create my loop, and then back down
in the same hole. And I'm going to be
following this as if I were writing
the word howdy. So I'm going to be going
up and then back down. So if you're familiar
with hand lettering, I'll be going over on
those downstrokes. So I'll go over that so you have a few tips of how to keep it a little less bulky than going straight
over the stitch. So I'm going to
continue this up, and then I will
meet you back to do the crossover so you can
see what I'm talking about. So now we're ready
to cross over. So I've made that loop
as if I were writing it, and I'm actually going to go in between that stitch that
I already have there. So I'm gonna be going
through the middle of that, and this is going to help
reduce some of that bulk. You don't have to
do it this way. You can't go over it,
but I like to do this. So I'm going to go
up, same as before, I'm gonna go under my stitch and then back down
into the same hole. Is just going in the center of that is going to reduce
some of that volume. So I'm gonna pull that through. And I'm actually going to do it for the next stitch here, too. So I'm gonna come up
through that center. And I'm going to go back under my stitch and back down
into the same hole. And then on the next
one, I will be going just over the line that
I already created. I'm going to pull this through to go right back down
into that same hole. And then on the other side of where I've kind
of made that loop, so you can see
right there really close to where my line
already is for the lettering, I'm going to come up, and that's going to get me back onto the line and off of
the existing stitches. So I'm going to go under here, make sure I'm not going
through my yarn and back down. So I'll finish that up, and then we're going to be
going, like I said, you'll follow this as if you were actually
writing the word where you're going
up and down and over and try not
to overthink it. But just trying to
get that fluid motion because it kind of
gives the sweater a little more of a fluid look versus doing one
letter and then maybe, like, doing the H and
then doing the D. Like, I like to go through as
if I'm actually writing it, and it just creates
a better flow and overall look
for the sweater. Well, I'm gonna finish this up, and I will meet you back
for another section just to help clarify
some of the things that you may be running
into as you're stitching. So now I have most
of the word done, but I wanted to come
back and meet you. So I've been
following, as I said, writing as if I'm actually writing the word,
that's how I'm stitching. And so I've come now
to the last letter. So I want to show
you how I've been connecting these
because as I go, I do just a little bit
into the next letter. So you can see that here where it's gone a little bit into the y and then I'm going to be doing my downstroke
to go over that. Similar to how we did for the H, but I just wanted to show this because it does help it
connect a bit better, especially 'cause if you don't, and you wash it, and then
you're going to see these gaps. So I highly, highly recommend going a little bit
into the next letter. You don't get those gaps. So I'm going to get
this started again, so I'm knowing my
straight stitch for my reverse chain stitch
and then I'm going to just work down this Y
as I normally would, and I'm going to go through
the center of that overlap. So I want to show
that to you. So I'm going to go up stitch length. I'm going to go
under the stitch. This is a good example, too. So I've actually caught
some of my sweater there. Don't panic if this happens. You're just going to
push it down when you go back down for the stitch. So I'm going to try to get it there to the base a little bit, and then I'm just going
to continue stitching. I'm not going to
stress about this. So I'm going to go under
that straight stitch. And again, make
sure you don't go through your actual yarn. And now, as I'm going
down into this hole, I'm going to try
to make sure that I grab that little bit of the knit that's come through and it'll push it right back through.
It'll be no big deal. So I'm going to
pull that through, and then I'll show
you how I'm going to continue down this
down stroke of the Y. Okay, so I've gotten
that pretty good. I'm going to go
ahead and come up in the center of where I've overlapped from
the D into the Y. So I'm going to go up
through that center, and then just like
we did for the H, I'm going to continue going
back and under that stitch. And then straight back
down. Again, this just helps that less bulk. You could go straight over that. I just don't like the
volume that it gives it, so I prefer to do it this way. So I'm going to go back
down, and then again, I'm going to be going on
the very opposite side of that overlap from the
D really close to that. So then I'm going to come
up and finish that overlay. And then I am going to stitch through this
really quickly and come back to show you how
we're going to finish it off. So I'm ready to do
another overlay. I'm actually going to
go above this and put my straight stitch into the center of this hole or,
I'm sorry, not the center. Like right above it. So I'm
gonna push that through. I'm actually gonna be creating a whole new line for the downward stroke
of the end of the Y. So I'm going to
do that, and then I'm going to come
up a stitch length. But I'm actually going
to be going into that center where
that overlay is. So you see where I'm coming up through the middle
of that stitch. And so I'm going
to do that again. I'm going to go under
the straight stitch and then back down
into that centerpiece. And then I'll be going
on the opposite side. So this is how I've done all of the overlaps, all
of the overlays, as I've gotten like
through up stroke and then down stroke
for the letters. This is typically
how I'm working it. And I'll do the same when
I crossover for that y and then just a note on that little loopy loop
there at the end, when you get into a small,
like, curve like that, I typically go like half
size with my stitches. So right here, you can
see my stitches are pretty even going
about a quarter inch. When I get down to the bottom of that twisty piece of the Y, I'm going to go about half of that just to make sure
that I get a curve, and it doesn't look more like, triangular or just
kind of, like, boxy. I want it to actually
have that curve. And to do that, I just
make my stitches smaller. So just one more note, and
then I'll meet you back. H one more overlay, and then we'll be
ready to wash it off. So we're done stitching, and now it's time for
my favorite part. You're going to
soak your sticker off just by pushing
it into the water. Oh, my gosh, this
is so satisfying. I like to rinse mine
with a kitchen sink if I'm being totally honest. I will let it soak
for a little bit, and then if I see any
dark marks behind it, I will go ahead
and use a sprayer. Typically, I'm using warm
water. I've heard both. I've heard warm and cold. Just make sure you get the
sticker totally dissolved. That's the most important piece. You see any pieces, just let it soak a
little bit longer, give it a little
more of a spritz. It will dissolve, I promise. And once I've given
that some time to soak, then I'll be ready to dry
it and finish the back. Key takeaways. Always wash your garment or fabric
before stitching. Use the colors and stitches
that best reflect your style. And to avoid lines
on lighter threads, be sure to dissolve your water-soluble
stabilizer completely. This may mean soaking overnight.
7. Final Touches: It all dried and everything,
all the stickers off. So now I'm ready to
finish the back. This is totally optional. I'm going to turn
this inside out. And actually, I see
a couple threads. So I'm gonna fix these threads. I'm gonna tuck those
back in. And then I am going to put on a
sulky tender touch. So again, I'm just weaving
those back in using the whipped effect that we went over in our stitch session. And I'm going to grab
the sulky tender touch. So this has Gosh, it's got one side that's
super, super soft, so you'll know
exactly which side, and then another side
that's pretty rough. The rough side is going to
go against your stitches, so that soft side is
against the skin. So if you do have a little that's wearing this without
a shirt underneath it, the stitches aren't
gonna bother them. It also just helps
secure your stitches. So I like it for
that effect, too. So I'm just going to
measure this out. I think it's like,
maybe a quarter, half an inch outside
of your design. I find it does iron on better to your actual yarn
than it does the knit. So don't go too far
outside of your design, and I'm just going to cut
this into a little block. You could get a little bit closer to the
design if you want, but I find a rectangle is fine. So I'm going to
cut that out, and then I'm just going to
be grabbing an iron. This is very similar to
any other kind of iron on. You're just going
to grab your iron and have it adhere
to it with the heat. We'll check the edges,
and then we will be done. So I'm going to go over
that pretty quickly here. It doesn't take too
long, and then, again, I'll just check the edges, make sure that nothing's peeling off. And once I do that, it's
going to be ready to go. So once you have
your edges looking good, this one
looks pretty good. You can turn it right side out. And you have your
finished piece. I was so excited to see this. I love this on the brown. I cannot wait to see yours, and here's the final sweater. Please reach out if you
have any questions. I so enjoyed making
this with you. Happy stitching. Key takeaways. Leave a long enough
tail for weaving on the inside of your sweater and use a whip technique to secure. For soft macking and
to reduce snags, try adding the
sulky tender touch to the inside of your sweater. Wash inside out in a delicate
bag to prevent damage. Laying flat to dry
will also help.
8. Closing Thoughts: How we do? Thank you so much
for stitching with me today. I hope this class gave
you fresh inspiration in a new favorite sweater. Don't forget to download your guide and patterns
wherever you're watching this video and be sure to share your final pieces. I love seeing your work.
You can tag me on social. I'm at rts Lions. If you enjoy this class and want more creative inspiration, behind the scene peaks
and helpful tips, make sure that you connect
with me on social. I'm at RC Lions or tune in. I have a podcast,
Artsy ambition, which you can find
on Apple or Spotify. You can also find
it at artlions.com forward slash Podcast. And if you want first
tips on new classes, freebies and more, be sure
to join my email list. You can find the link in
my Skillshare profile. If you would, please
leave a review. I am always curious what
you want to work on. Next, I'm always happy to develop things based
on your feedback. So please leave a review here on Skillshare if
you have the time. And thank you again
for being here. I'll see you in the next class, until then. Happy stitching.