Transcripts
1. Introduction: Hi, I'm Jake and in this
class I'll show you how you can create this cool time
lapse location change using a free AI tool and compositing using all built in tools of Adobe After effects. We are going to go through the easiest and the most
simplistic AI tool, which is super easy
to install and use. Best part of it is that it's completely free because
images which we are going to generate using this tool are generated
entirely on your computer. If you don't have
access to generate a fill inside of
Adobe Photoshop, it's a great free tool which not only generates
elements for your images, but also you can generate
an unlimited amount of entire new images in any style
you want for free forever. I'll walk you through
its super easy, which by the way, is based
on stable diffusion, but it has a really, really easy interface and you can install it in
just one click like any other software by
the end of this class to composite our video
with generated images, we will use Adobe After Effects. Any version will work, even
free trial version as well. I think it's the
best way to learn visual effects while creating
interesting videos for fun. And to complete this class, Our goal is to create
this school time lapse, location change,
visual effects shot. I'll be happy to see
you in my class as also your result after
following all the steps. So let's get started.
2. Installation of AI: First of all, in research
step to this class, you'll find these files,
You can download it. Here we have a few
images from which we are going to generate
our surroundings. Also a example video. Later in this class, I'm going
to show you how you need to film your video to
get the best results. First thing which we need is
to open this text document. Here you can see links
which we are going to use. Just copy this first
UL into your browser. Okay, once you'll
open this link, we will be able to
install focus software. Basically, it's
another UI which is based on stable
diffusion engine. But from my experience, it's most easy to use. You can just scroll down here and some of the results
which you can get. It's basically just one text
bar and button generate. But we also, in this class, will take a look at
advanced options and more, what you can do
with this software. Let's scroll down here. You can find this
download section. In my case I'm using Windows, I'm going to click, click
here to download for Windows. As you can see, it provides us the choice where you
want to install it. Basically, you can
install wherever you want on your PC and click safe. Also, here are
instructions if you are using Mac or Collab or Linux. In my case, I'm using
Windows on Vida G Force GPU, but here's also Windows
AMD GPUs as well. Just follow these instructions
if you have MD GPU. As you can see, I'm already
downloaded this file. Now we can create a folder
where we want to install it. Let's create a folder. I'm going to call it focus. Let's open this archive
as well as this folder. Just simply select
all of these files and drag and drop
into your folder. Just like this, it
will take some time. You just need to wait, I'm going to skip it to save
the time of this class. Once this process is complete, you'll see in the
folder of your choice. Here we have these three files which will continue
the installation. As you can guess by
the name of them, you can simply install the
basic one or this one, which is mainly aimed towards anime style and
also this realistic one. To create the preview
for this class, I've used this realistic style. But keep in mind that
you can run any of them. It will install all needed
models to generate images. Let's double click on this. Run realistic, Just
left most double click on it and it will start the
process of installation. This process will
take even more time. Be patient. Once again, I'm going to speed
up this process. It will not take too
much time of this video. Once installation is complete, you'll see that it will open
a tab in your browser O. In the next video,
I'm going to guide you through how to
use this software, as well as how you can shoot your own video to get the best results see
in the next video.
3. How to Film and Prepare Your Video: In this video, we are going
to take a look at video which I provided in Resource step
to this class. Let's open it. As you can see, we've
shot this video in an apartment against
a blank wall. But to get the best results, you can even leave some
furniture in your shot. It's fine If you
have some carpet on the floor or maybe a
pictures on the wall. It would be even better for AI to generate something
from your surroundings. The main thing which
you need to focus on is to shoot your
video from tripod. If you don't have a tripod, you simply can put your phone
or camera on the shelf. Basic idea is that your
camera should not move. Also, it would be better to use indoor lighting
because we want to have a stable light without
any flickering or changing from
the cloudy weather. Make sure to have indoor slight on to illuminate your scene. Also, you can see
in this video that we decided to change
our lighting. Basically by the
flick of the fingers, I just shut out the main light and I've used some RGB lights
to get this kind of color. Later in this video, you can see another switch of lights. At this point, you can
be creative and choose your own idea to make
your videos more unique. But for this class, if you don't want to film your own footage, you can just simply use
this video as example. Next thing which we
are going to do is to cut out only a
square from this video. Because this image we
will feed to our AI, so it will generate
the surroundings. For this test, you pretty
much can use any software, even paint, just make a screenshot and crop it in
any software which you like. In my case, I'm going to use
a effects and free version. You can download
from Do website. Also, later in this class I'm going to show
you how you can use the software to add
additional stuff like cats, dogs, or even people in your shots to make it even more interesting
and more valuable. Any version of
Adobe After Effects will work fine for this task. Basically, here
in project panel, you can just leftmost double
click to open our video. Let's select it
and click Import. Then we can just leftmost
click and drag it here on New Composition icon
and release it. As you can see, it created
a new composition. In this composition,
I basically want to cut out only this part. To crap our composition, we can basically click on this
icon here, it turns blue. Now you can just
leftmost click and hold. Use this scrapping tool. I want to leave a bit
of floor and here at the site and maybe here
also. Let's cut it a bit. And then just go to
composition and select this crop comp to
region of interest. In this way we will
crop it to the size. Then we can just change this
work area to just one frame, because we want to
render only this frame. And go to Composition
to render Q. And here in Output module you can change to wherever
format you want. In our case, we need JP sequence and click Ok. And
here at output two, we can set wherever you want to save your Cpt image and
rename it if you want. And then click Save
and click Render. In our case, I already
provided these images, but this is basically
how you can crop it this part of the video. Then just select this
part of the video. Also go to composition
At to render Q. Render this part of the
video, also this one. This is how you can easily croup your image and use in
this focus software.
4. Quick Guide of AI Tools: Okay, so once you'll have your Cred images
from your video, we can just navigate our
focus tab in your browser. And if you accidentally close this and also close
this command, you can reopen it. Just locate it wherever
you're installed your Focus software and just
click on Run Realistic. It will open second time, a lot faster because it
already downloaded and installed all needed models and components of this software. Basically, you'll have this
window open how it works. As in most of AI tools, you have this prompt text
box in which you can type anything like a cute cat
sitting on the floor. Modern apartment just generate, by default it will
generate two images. It also will take some time, but the best part is that it
all works on your computer. You can use it for free
pretty much forever. As you can see, we already
have this first image. You can see it has
pretty good quality. Later I'm going to
show you how you can change the size of it, but it's already
pretty big image. As you can see, it
looks pretty realistic. Here's our second image. This is how it is easy to use. In our case, we need
to take a look at these two check boxes because
in this advanced check box, we can change the
resolution of our images, which we are going
to create here. In performance, you can check this speed, which is default, which basically
will take less time to produce any
images in quality. It will take about
twice as long, but it can get you a better quality images
with less distortions. Extreme speed get you
lower quality images, but a lot faster. For example, let's click Extreme Speed and click
Generate first time. It will work slower because it needs to download
more components. But after this downloading, it will work fast. Just leave it for a few moments, as after it will download
all needed components, it will generate
images even faster. If you'll read the text here, it says that it takes only
eight sampling steps, which makes generation
a lot faster. Quality will take 60 steps
and speed will take 30. As you can see, also gives you pretty much good results considering how fast it
provides your image. My advice is to keep on speed or quality if you
want highest quality. Also here, you can change to any resolution
which you want. As you can guess by
this image number, you can change how much
images you want to create. We will use it a bit
later because it's really handy tool in case if
you want to click Generate, just leave your
PC for a while to generate more images
to choose from a. Here we have styles, It's pretty handy tool
because here you can really change the
look of your images. For example, let's disselect these basic ones which gives
you this realistic style. Let's try something different. I just want to change to
something which looks a lot different than
this realistic look. So as you can see, even if we run this
realistic model, you can still change to this Anime style and get
this really nice results. Basically, you can spend hours
trying different kind of styles and get really
unique results. For last example, I want
to choose this pop art because it gives you a
lot different result. So you will get an
idea how much of the difference it makes by
only picking other styles. Once again, it's
completely free. Basically, you
don't even need to have Internet to
generate images. I'm going to enable
these basic ones which was set as a default. Let's click on this model tab. And basically here in
model you can see that you have this realistic
stock photo model. If you're interested to dig
deep into stable diffusion, just leave a comment
under this class. And I'll create more classes on stable diffusion
and on models, Laura's and other advanced
stuff on AI image generation. Our purposes, all default
settings works well. Now let's click on
our input image. As you can guess here, you
can upscale your images. This is why these dimensions
are pretty small because you always can make them twice as big with the upscale methods. But for our purposes
of our class, we don't need this
because we are going to create images based
on our image, which we are going to provide.
5. Expanding Image: In a case we want to use this in paint or out paint mainly, we are going to use out paint because here we can
most click on it. And from our resource
step to less, we can just select
these images which I provided or craft images which you can make
from your own video. Let's select this first
one and click open. In our case, we want to
out paint from this image, it's pretty easy to do. You just need to
click on this left, right, top, and bottom. Which basically means
that it will grow our image just a
bit to the right, to left, to the top and bottom. Let's do exactly this, but in this case, let's
type other prompt. We can make it pretty
simple and just leave it as modern apartment. Let's click Generate to
see what we can get. Once again, First time, it will download all
needed components to complete this out paint task. But after this downloading, it will generate
images a lot faster. Once again, be patient and
wait for download it to end. If you want to see the progress, you can just simply click on this command window and
see this download process. Once it will be complete, we will be able to use
this out paint method. As you can see, after
downloading is complete, it will set up all the
components which it needs. Then we'll start generate
this out paint method. Let's see the result
which we got. As you can see, first result
is completely unusable. This is why you shouldn't be discouraged to use the software. Because if you will
check the second choice, you can see that it did a much better job to
improve our results, you'll need to have a much
more descriptive prompt. It will help the software to get the look which
you like the most. This is why this image
number really works great, because we can just
click and have ten variations from which we are going to
choose the best one. But before creating
ten more variations, it's a good idea to give to the software more
prompts to generate. Not this boring result. In my case, I just experimented
and tried these prompts. Let me copy and paste here, and let's take a look at them. As you can see, I've typed
Christmas tree with lights. Also get sleeping in front, nice city in background
and large windows. By the way, if you want
to emphasize something, you can always take these
words into brackets. And by the end of
them you can set Colin Emphasize 1.2
Everything more than one will make the software to look
into this prompt even harder and try to follow
this more precise. Let's set to something high
like 1.6 and click Generate. I will speed up this process. We would not waste time. I'm going to show
you only results because it every time
takes about 30 seconds. As you can see, with this
more descriptive prom, you can get much better result. We already can see our Christmas tree as
also our window and here as well as you can see
with this method of putting inside brackets
and setting priority, you can get much better results. Also, I've got pretty good
results with this prompt, these props which I type here, you can find resource
app to this class. Inside of this text document, I'm going to copy all of my
problems which I've used. And put it right here if
you want, you can use it. This is basically for first
image, for second image, and third image, you can just basically copy any of
them and paste it here. As you can see, it's not
something complicated. It's basically some description
with the priority and just a bunch of words which describes what I want
to see in our image. Once again, let's
click Generate. I'm going to skip this process, so we will see only results. By the way, don't be afraid
if you think that you cannot create some good
prompts for your images. As you already know, English
is not my first language. I'm going to show you my work around how you can get
pretty good prompts, which works good
with this soutware. But as you can see,
we already have pretty good results
at this point. You can think that
it's too small image, but later in this video, I'm going to show you how
you can expand it even more. As you can see, we already have these pretty
interesting images from which we can choose from and expand it even
more a bit later.
6. Tips on Good Prompts: Let me show you
how you can create a good promise for your images. For this, we can use a
simple Google request. For example, we can just type modern apartment and
skyscraper with large windows. As you can see, it gives
you a bunch of results. Then from this Notepad, which I provided in
resource to this class, you can see the second link
to this clip interrogator. Basically, you need just to open this link in your
browser just like this. And just simply drag any
image which you like to this click Interrogator
and drop it here. And then click to Interrogate. It will take some time and
it's even better if you will click on these images and
we'll get better quality. Let's click on it, drop it here, and you can just click
Interrogate or Execute. We can close these steps. After 30 seconds, we can get
this really good prompt, which also was written by AI. But why? It's cool, because these prompts are
best for AI to understand, we can just simply
select all of them. Press control C to copy, and here control V to paste, and at this point we can
generate more images. Let's set 26. We will have a bunch of them to choose from
and click Generate. You may be interested where the software is
saving our images. Basically, in this
folder where you installed your software,
you can just open it, you can find this output folder just left, most
double clicking it. Here is the date where
we are using it. Here, all of our outputs,
basically our images. This is pretty handy
because we can generate even more images from
each result which we got. Basically, you always
have them saved. Don't be afraid
to click Generate because all of your
results are saved. By the way, the same
technique you need to use on other images which we already have with
different kind of sliding. Basically, you just need to open the software, drop
another image, type your prompt and click Generate to not waste any time and repeat
too much myself. We are going to create images
only from this first one, same technique you can
apply to other one to create more images later in
this class in after effcts, I'm going to show you
how you can combine them and add
additional elements. To get pretty cool video, we can already check three
images which we already got. I like this one. We can use this one to
expand it even more, but let's also wait to
create even more images. This one also looks
pretty cool, maybe. Let's wait to finish this
one and we can stop. But as you can see, we can get really nice results
from this prompt, which also was generated by AI. As you can see, all the
process is complete. We have our six images
which we can click through. You can just click one of
them and then click here to skip next one. My keys. I really like this
one because we have windows and a
bit of furniture. And I think we can get even more interesting
results out of this. How to expand this
image even more. You can just simply select it from this list which
we already got, and then just live
most and hold and jack it below here into
this image box. Just release it. As you can see, we just drop this image here. Now it will expand
from this image. We can leave this
prompt here also. Let's leave all of
these check boxes to out paint even more. For this one we can get three
variations and generate. It's pretty fun to
see how it works. And we can already see
that it got some furniture here and this image already
looks pretty cool by the way. Sometimes it may create
the ceilings pretty low. In this case, I would recommend to have something
above your head, not crop it just
like this because it doesn't know how
tall your person is. It's a good idea to
have more context, but as you can see,
even from this image, it can create pretty
realistic results. Basically, when you're
cropping your image, you can leave even taller
space above your head. It will know that it needs to be taller and ceilings
should be a lot taller. I already really like
these two results pretty much all of them looks really
cool as you remember here. And focus outputs older. You have all of these results.
7. Tips on Getting Right Proportions: Let's also, for example,
take another image from it. You can just click here
to remove this image. And click here to open another image you can generate
from these two as well. But once again,
let's focus on first one because the technique
is completely the same. Or just let's try
this one as well. Once again, from this note pad which I also provided
in resource class, you can see these
prompts which I've generated and which
looks pretty cool. Like high ceiling gamer room, orange and purple lights
and futuristic furniture. Let's try this one.
Copy and paste here. As you can guess, I've typed Gamer Room and orange
and purple lights. It will resemble
our lighting here. Once again, let's click Generate to see what
it will come up with. Once again, you can go
to Google and just type some gamer room purple
lights and see what we got. Once again, just pick
the image which you like here and drag it into
this clip interrogator. And click Execute. As you can see, we already have some results from
this interrogator. We can also copy these pants. Let's paste it here. After this generation
we can just stop it and try these pants. By the way, you can
just read through them. And if you see something
which doesn't seem right, you can just simply delete them. For example, here I can
see the word llama. I think it's not
what I looking for. Just simply delete and
then click Generate. But before, let's take a
look what we already got. As you can see, we have
pretty good results. But once again, our person
and shot looks too big. Just because AI doesn't
know the context, It draws the ceiling too low. Let's try to feed another image in which
we have a taller wall. Ai would know that our person
a shot is a lot taller. Maybe something like
this would work better. This is why I recommend you to have something
in the shot, it would not be empty here. I'm going to go to Composition
and click Add to Render Q, I'm going to say to JP. Click the key and here an output to save wherever you want. I'm going to also save
it into our folder, which will be available
in resource step, this class, let's call it to version two, safe and render. As you can see, it
already provides more results based on this
image which we provided. Just make sure to use images which are closer
to your own video. In this case, it will create
more believable looks. If you're using the same
image which I've provided, just use some of these prompts which also provided
in resources. Let's paste one of
them this time. Let's try to input this one with taller wall
and click Generate. As you can see now where we
provided much more context, it creates the ceiling a lot taller and all the
proportion looks right. Keep in mind that
it's better to have images like this to get
more believable results. As you can see, we already have this futuristic room
which looks pretty nice. As well as the
second generation, we can already see
pretty nice Windows, ATV, which gives lights on us, and it also looks pretty well. Both results looks
pretty interesting, and we can outgrow
this image even more. Let's drop it here
and click Generate. This is basically how you can create a lot of these images. And later an output folder, you can just delete unwanted ones and leave
the ones you want to use. As you can see this time, all of the proportions
and our images are right. Last thing which I
want to show you in this video is that sometimes you get the overlapping of the furniture which
we can quickly fix.
8. Fixing Details: Let's see how we can
do exactly this. You can just select
this image from here where we have some issues, just left most leak and drag it here below as we did earlier, this time we don't want
to out paint anything. Let's uncheck all of
these check boxes. Instead, let's use
this paint brush. With this tool, we can just highlight the parts
which we want to fix. For example, I want
to fix this part, just left most and
just selected like this to fix some
parts of the image. You don't want to
use any prompts, just select it and
press control X. If you want to cut it later, you can paste it once
again by control V. Let's select
control X to cut it. Now if we're going
to click it will not outpaint the
image to the sides. It only will fix this issue here or any other issue which
you can just paint out. Let's click Generate and see
what we can get as a result. As you can see, we already
have the two variations. It might be better to
select even more of this part like this and
maybe give a prompt, just a few words to help it out. To read something more suitable. I'm going to type just purple lights because we already have in the scene and it
should look better. And generate as you can see, now we can get a
much better result. Don't be discouraged
if you don't get from first few tries. Just type some little hints or just basically
click Generate. Because from my
experience, 5-10 tries. It mainly gets right. As you can see with this
little simple prompt like purple lights which
will feed the C and beta. It cut us these
two good results. We've generated a
bunch of images. In the next video, I'm going
to show you how you can composite in after effects
see in the next video.
9. Compositing: Now we've generated
a bunch of images. And the same you can do
with this left one as well. Let's open our upper
effects software and try to combine them here. Let's create new project. Go to file new project. I don't want to
save this progress, I'm going to do save. Let's left double click here in project panel to
import our video. Left double click on our video. Left click and hold and drop it on this icon.
New Composition. It will create a
composition with exact dimensions of our video. Or you can just click here and create position with the right
dimension which you like. For example, 1920 by 1080, which is full D resolution. You can set the frame rate
and duration of the video, but in my case, I'm going
to use my own video, which I provided in resource
step to this class. With this pen tool, we can carry it out
ourselves from the shot. As you can see, we don't
have much movement here, so I can basically cut
out our cells like this. Make sure that you've selected
your video mostly with this pen tool and create a mask around
ourselves like this. You can also select
this video and press to see the mask feather. And we can feather the edge. It will blend with our images. Now let's import our
images which we generated. We can left mouse, double
click here and go to folder where you installed
your focus software. Then open focus folder and outputs also this folder in which we've
generated our images. If you hold control and
scroll in the mouse, you can make these images a lot bigger to see them properly. And just select Hold Control. And select all of the image which you want to
use in your video. Mike is the ones
I'm going to click. Import Also left
most double click here in project panel
and scroll it down. And I'm going to import this one as also this
one. Click import. If you're going to
select these images, you can see this
little preview here. Let's select it and drop
it below of our video. Here we need just to
press to see the scale. And scale it down and fit
this image in right place. As you can see, we still can
see the outer line here. Let's make it even
smaller, maybe 51. By using arrows on the keyboard, you can just fit ourselves
into this image beta. As you can see, we don't
have this part here. This is basically
another problem because you can just
select this image, use this peak whip just left mostly and hold and
drag it to this video. Basically, it will make
a parent to this video. Which means that
if you're going to change the scale of this
video just like this, we will resize the image as well to fill our
screen like this, to quickly not just
drop this image like this and resize it once
again like we did before. I'm going to show you
the much easier way. Let me just delete this one. You can just select
this image which we already imported and
press control D, which basically will duplicate this image just by
selecting the second one. And make sure to select
it here as well. Just replace this image with
this image to see it better, we can rename all of these images because these
names can be confusing. Let's select each of them
and press Enter a keyboard. Type it, 1,234.5
I'm pressing Enter, then type in five. I'm pressing Enter to rename it. As you can see, I've
just duplicated the first image selected here. And then just like
the second one, hold old key on keyboard
as you can see, hold old and drag it on top
of this image and release it. This is how you can
quickly swap these images. You can once again control
D to duplicate this image. This one leftmost click, Hold, hold old key, once again on keyboard, which will allow us to
drop swap these images. If I'm going to click
here on this eyeball, you can see that we
have all of our images. Then we can just simply select
all of them and cut it. For example, we want to have
each image 1 second long. Then we can just right
mouse click on them, make sure to select all of them. Right mouse, click on them
and go to key Prem assistant. Here we can just sequence
layers and click a key. As you can see, they will
be sequenced one by one. This is how you can
get this animation. Here we can see this click. We can just make this longer. With this view panel, we can just skip
to previous frame, cut it to this moment just by clicking on this edge and
cut it to this moment. If you hold shift, it will snap to. This time cursor once again, you can just duplicate this image selected and
press control to duplicate. Move further like this, select the second one and
hold hold to swap it as well. Now from this moment in time, you can see that we've
placed this image as well. But as you can see, this
image is not proper size. Let's change the size
and fit it well. This maybe even bigger,
This looks fine. Then we can once again
control D to duplicate, press just control D on
keyboard to duplicate it and swap it with
this image as well. Now it also changes. This is basically how you
can get this animation. Also, when you'll finish
all of your video, for example, let's imagine
that it ends at 9 seconds. I can just trimp this
comp to this work area, which I've just said
it to this moment. I can just select this video
and drop it on this icon, which basically will make
another composition. We've made this
because now we can just manipulate only
this one layer. It will act as a video footage. As you can see,
this is how you can easily animate the
camera zoom for example. Here we can create a
key frame for scale. First of all, you need
to select this video, press S to see the scale, and click on this stopwatch. It will create this key
frame. What is key frame? Key frame is basically
point in time which remembers value of
server property. In our case, this key frame
remembers this pointed type, which is 0 seconds, the value of 100% of
the property scale. Basically, if I'm
going to scroll through to second second, we can change the scale
to have this omen motion. If we will select all of these keyframes and
press nine on keyboard, it will start slowly, then faster than slower. This is how you can add
this zomine animation. It will look even
more interesting. You can swap this key prams
around. Just select them. Right mouse, click
on one of them. Here at key frame assistant, you can time reverse key prams, which basically will
zoom out. Click this. If you want to have your
motion even smoother, you can just select this key
pram and go to graph editor. Just make sure that here on this icon you'll set
your edit speed graph. You'll see the same graph
as you see on my screen. Then just left mouse click on this handle and drag
it to the left. This graph basically
will show you that it starts really fast and then
slower towards the end. If we will press zero on Numpad, you'll see exactly
this zoom out motion. If you will click here to
exit this graph editor, you can spread these keyframes. It will go a lot slower. As you can see, we have this gentle zoomoute
animation basically here. You can also repeat this motion. Just select these keyframes, press control C and control
V. To paste these keyframes, we can once again
swap them around. Just select both of them and right mouse
click one of them. Go to key frame assistant, time reverse key frames, which basically will
make this animation like zoom out and then stay a bit. Then zoom in. Let's press zero on pad to see how it looks. It looks pretty cool, but to give a little
bit more life to this, you can just simply add some
elements into your shot.
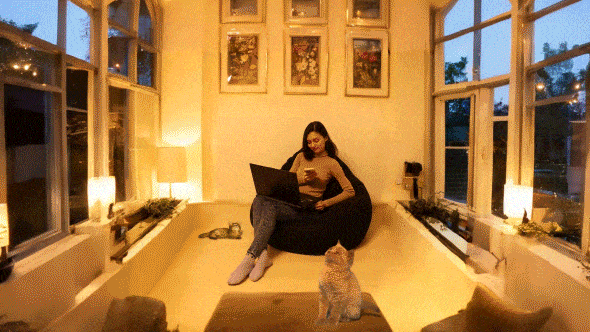
10. Adding Cats: For example, we can download
some green screen footage of a cat or a dog and place
it right here on the couch. It would look a lot
more interesting. Basically, in each
shot you can place wherever you want to get
this green screen footage. You can just basically go to
Youtube and let's just type cat green screen here you can find a bunch of
cats which you can use. Let's for example
use this video. Just left most click on it. To save this video, you can just basically click on this URL. Select all of this just before the word Youtube,
including this. Just select Delete and
type SS and press Enter. It will transfer to the
site from which you can just select the proper
resolution which you want. And click Download.
I'll download and same folder which I provided
in resource to this class, but you can pretty much
say wherever you want. Let's import it. Just most
double click in here in project panel and import
this green screen footage. Then let's just drop in here
and effects and presets. By the way, if you
cannot see this panel, you can go to window and
enable it from here. Effects and presets, wait for it to load up
and then just type key here You can see this preset which is great
to key out our footage. Just let most lick and drop it on this green screen video. With this screen color, you can just select this green
background to cut it out. You can see that we
have this green edge which we can cut out even
more, just like this. Also we can go to screen mat
and change this clip white to lower value and enable this
advanced spill suppressor. It will get rid of this green
outline just like this. Now we can just place it here on the couch and just press S to see the scale and
make it smaller. You can just fit in
as you like maybe. Let's wait here, we'll stay, just let on this footage and drag it hold and drag
it to the left to scroll through if you want it to move with
our zooming animation, you can just simply
parent to this video. Now it will move it as
well as you can see. Let's make sure that it will appear here where
our image changes. Basically use these buttons, previous frame and next frame, and cut to this moment. The easiest way will be
to select this footage. Hold old an open square, bragged as you can see, and hold it old an
open square bragget. It will cut to this moment. Let's cut it here as
well where room changes. Just about here. Once again. Old, old and close square bracket as you can see it cut
it to this moment. Last thing which we
need to do is to change the color
of our cat here. In effects and presets, let's type curves just let most leak and drop on our footage. By the way, affect can
crash from time to time. It's a good idea to save it. Let's go to file, Save S, and Save wherever you want
on your computer here. With these curves, if you
want to make your cat warmer, you can basically go to blue
curve by changing this line. If you will drag up, it will make it colder. If you will drag it down, as you can see, it
makes it warmer. But as you can see, we
have the greenish tones. So we can go to green curve
and decrease it a bit. Basically, by playing
with these curves, you can change the color
to get the colors right. It will fit our
sin a lot better, our GB curve, You can make
it brighter or darker. In our case, I want to make it a bit brighter, just like this. If I'm going to zoom
in using scroll on the mouse and with this hand tool I can
move around our image. I can see this
outline which we can get rid of by going to
effects and precepts. And type here mat choker and just left most and
drop it on our cat. As you can see it
cut out a bit of it with the softness we can manipulate how much we want
to cut out before and after. As you can see, it
looks a bit better. Finally we can add
a bit of shadow. Basically, we can just
select this footage. Press control D to duplicate. Let's type fill
here in effect in presets and drop it on
this footage below. We can make this layer three
D. Let's keep the store with this anchor point we can set from where we
want to rotate. I want to rotate
from this point. Let's press R on keyboard and
rotate it here by x axis. As you can see, we can generate this pretty realistic shadow
with the selection tool. We can stretch it just
like this and move around, it will fit better. Let's change the
color to darker one. Or just simply use
this peak whip to select from our scene
And click a key. Also, we can use
linear wipe effect. Just select it here
under linear wipe and drop it here below
on this footage. And change this angle to 180. Then change this
transition completion. As you can see, we
are cutting our edge of our shadow and
change this feather, it will fade away
naturally like this. Last thing which we want
to add is Geyson blur. Just type here.
Geyson also apply it. Let's blow it just like
this, it will fit well. Also we can just
select this layer below which looks as our shadow. And press to change the opacity. As you can see with
these manipulations, we can blend it in our image. This is how you can
add some elements into shot and make your video
even more engaging. Let's press your own
numpad to see the preview. As you can see, it looks
pretty well at this point. I'm really excited to see your projects after
completed this class. Basically, under
any of my classes, you can submit a project. I review all of them, and provide any
tips if you want, you can ask questions to get a guidance to
create your effect. Even better, feel free
to leave a review to my classes as well as to
follow me here on skill share. As you can see, I have
a lot of VFX classes. This is a really short one. It takes only 12 minutes, but you'll get really
powerful result at the end. You can even click
here to see more. And as you can see, I have a bunch of classes
on after effects. Here are newest classes
which I post each week. I have fundamentals to do after effects as well as complex
V effects log animation, even devient resolve classes. And I think to add
new section which will be classes
on AI generation, stable diffusion classes
or any other engine. Feel free to leave a comment and request any classes which
you want to see on my page. Just follow me here on
Skillshare and I'll be happy to see you in my next class.
Thank you for watching.
 M Jake, Lets Create VFX & Cool Stuff Together