Transcripts
1. Introduction: This effect we will create right now. Hi, I'm Jake and ion motion designer. I want to introduce you to After Effects in a way in which I've started, you could ask yourself, why should I learn After Effects? First of all? Because it's fun to be able to make visual effects at home. This is why I invite you to learn after effects with me while having fun at recreating cool effects. And in same time, getting familiar with this software. Not a problem if you are a beginner and don't know anything about After Effects, I still can teach you how to make this effect will go through basics and we'll work our way through it, also studying now, I've decided to end each video with a challenge for you to make sure that you understood the technique which I provided in each video. You'll be able to press pause and complete the challenge, and then press play to see the correct way of completing the challenge. In this way, you'll have actual practice which will improve the understanding of each technique. I'll be happy to see you in my class as also your results after following all the steps. So let's get started.
2. Amplifying Motion With Time Editing: I'm using Adobe After Effects 2020, and as you can see, I'm using standard layout. So you can click here to have similar layout to my interface. If you cannot see some of the panels which I'll be using in this video. You can just go to Window and enable it from here. For example, character, character. So let's import our files, which is provided in the resource tab to this class. To import our files, we can with the left button of the mouse, double-click here or go to file, import file. But it's much easier to double-click it here. So I'm going to double-click it once again, this footage is provided in resource step to this class. Let's select all and click import. Now let's take this raw footage and create new composition. Composition is a basically a workspace in which we are going to apply our effects. We can leftmost click on this video and drag it to a new composition here or here on timeline, over here on this little icon to create new composition. This composition has been created with the same properties of this video. So if we right mouse click on it and go to composition settings, we can see that it has the same properties as the video, which is full HD, 30 frames per seconds and three seconds long. And let's click OK. And now we have this kind of video. As you can see, I already pre-made this paths in the video and unpause here. So let's press is your numpad to preview this. And in this video I'm going to tell you how to cut your video to get similar results. So if we duplicate this layer, we can press Control D and click here on eyeball. To disable this layer, we have a few ways how to create a free stream. So how we can do this, we can split this layer just by selecting it. And with this time cursor, we can decide where we want to split our layer. For example, on this 20th frame. So we can just like this layer, place our time cursor here and press Control Shift D. As you can see, it splits the layer just in this time. And let's say that we want to freeze this moment and few seconds later, like here, it will continue. So what we can do is to let mouse click and hold on this layer and scroll it here, where we want to continue the motion. And now we need to fill the space with the pre-screen. So to create freeze-frame, which will be between this part and this part, we need to duplicate this layer, just press Control D to duplicate it. Move our cursor to the last frame and then expanded. And if you hold Shift on keyboard, it will snap to this video on top. It's easier to align, and now we can just right mouse click on it. And it makes sure that you're still on this frame, which we want to freeze and go to time freeze frame. And now if we will drag this time cursor, you can see that we propose this video in this moment. And now we need just to cut this video to this point. So it will start with this video below, then freeze in this moment and unfreeze here. So this is basically how I created this moment here. But if you look closely, you'll be able to see that here. I've speeded up the animation quite a bit. So it would look like his hand is stopping me much more violently. Well, let's see this part here. We can just drag this work area to this moment. So we will be able to preview only this part, emperors 0 on numpad. As you can see, it's a lot faster. And then freeze frame. So let me show you how you can do this here. Basically, if you want to speed up this part of the video, you just need to split the layer, go to time, use time stretch. This is basically what 100 percent of the time stretch factor. It means that at 100, it stays at the same speed as it was. But if we change this value to lower value, like 50 percent, it will speed up twice as much as it was. And if we will set to a 100 percent, it will slow down twice as much. So now I have a challenge for you. From the knowledge of this part of the video, you can try to speed up animation here just before the previous frame. Pause this video, and then un-pause this video to see it the right way to do this. So I am assuming that you have tried and now let's see how I've done it. So basically, I am choosing the moment where I want to speed up the animation. For example, this part, I can press Control Shift D to split the layer. This is what we already learned in this video. You can also go to Edit Split layer, if you will forget this combination of the keys. So now we can manipulate only this part of the video and we can go to time, time stretch and set to 50 percent to make it twice as fast and click Okay, and now as you can see it, this part speed up to 50 percent. We can speed up even more to 25 percent. It will be four times faster to amplify this animation and I will be interested in it. So move this layer and this layer. So this speedup animation, just select first 1, second 1, and move it to this part. And now we have this speedup animation and then freeze frame. And this is exactly the same way as a done it here. But there is another way how to do this without duplicating and split in the layers. You can do everything on one layer at a time.
3. Time Remaping Technique: We can delete these layers. We can duplicate this original one. Let's enable it, and we can right mouse click on it and go to time, enable time remapping. In this way. All this animation and all this time is represented in two keyframes. It's our 100% of the animation. And to replicate the motion we should have got, we can make our freeze-frame to make our free stream. This time, we want to create a new keyframe by clicking here. Keyframe is a basically a point in time which remembers the value of certain property. In this case, this keyframe remembers this time value of properly time remap. So what it allows us to do, it allows us to copy this keyframe. And if we will post here, Let's select it and press Control C to copy. And if we will press Control V to paste it here. In this time, you can see that we froze our time. So it remembers this value of this brain and it's keep going this, with this value. And then it continues the timeframe. But problem is that we've created this freeze for a moment and stretched this part of the video. But the video itself didn't move at all. As you can see, what happened here, it will take out this time and speed up this part of the video to make up for this time. So for example, if we stretch this freeze-frame, it will try to compress all the time, which was here into this little timeframe. So basically, we can see that here. It also speedup. So for proper way to create a freeze frame and not mess up this part of the video. We can just delete these keyframes to go back to original state of this video. And the proper way would be to create a keyframe way here. If we want to have stopped praying here. And then we can just right mouse click here to go to composition settings and expand the duration of our composition is so it would not end here, and we will add some space. So let's set to 10 seconds. And if we will zoom out by clicking here and drag it to the left, we can see that we've added extra four seconds. And what it allows us to do is just to move it a bit further. For example, we can just now copy this keyframe and move it further. So this part of the video will not mess up. And then just copy this keyframe and place it at the same point where it was. So basically now we have saved this part of the video. We have this free stream and we have this part of the video which being untouched. And we can just expand the video and see you that it doesn't change. So this is a proper way how you can freeze frame the video. And if you want to split up this part as we did before, we can create another keyframe. And here it's easier. You can just select these both keyframes and move it closer. So here it's split up the animation. So as you can see, to speed up something, it's much easier than to stretch out. And basically you can just re-watch this part to better understand how to work with these keyframes. Because this is more kind of superior way to create an animation. You need to understand how this keyframe animation works. And now you can just re-watch this part of the class and delete this and tried to replicate from your memory. Pause this video. Then I'm going to show you one more time how you can do this. And if you understood that the technique, you can just jump to the next video. So let me show you one more time. You need to select this video. Press Control D, right mouse, click on it and go to time, enable time remapping. So for example, we want to stop. Here. We're reading a keyframe. We're moving these keyframes, less keyframes here. Then we can copy this keyframe right here where it was. To keep this freeze-frame moment. And to speed up part from here to here, for example, we need to create another keyframe and move these keyframes here. So we would save this part of the video. This will be compressed speedup animation. This will be a freeze frame. And this is normal. It's okay if you cannot really understand this technique. But if you will do one at a time, for example, only three sprain or all the speedup, the animation. You will understand this technique better. For example, if we delete this video and once again, let's create another one by duplicating this. And it's much easier if you want to always slow down or speed up the animation. You go to enable time remapping. And this way, you speed up the animation. And this way you slow down the animation. So this is basically how you can adjust and get used to this forum of manipulating time and After Effects. In the next part of the video, we will try to add on this line out animation. So I'm gonna see you in next video.
4. Keying Out Using Difference Matte: Okay, In previous video, we find out how you can manipulate time. Let me delete this video and enable it here. And in this video, let's create this flame out part of this effect. So for this, we need to have two videos. Let's just drag and drop this sole effect difference met, which you can download from research step to this less and leftmost click and drag on this icon to create new composition. And here you can see I pretended like I am flying out from myself. So if I am going to press 0 numpad, you can see that I already speedup the animation at the beginning and then time-reverse keyframes to the start. So from previous video, you already know that to create this kind of behavior, you need to right mouse click and go to time enable freeze frame. I'm going to tell it a bit faster because we already covered this technique. And what I did, I just set a keyframe and then took both of them and just compress to get this part a lot faster. And then to get the reverse part of this video, all I needed to do is to select the part where it stops, like here, and then delete this. Let's skip rim and copy this first keyframe. Just select this first and press control C to copy. And then move it over here and press Control V to paste. So basically, from this point in time, it goes back to this first keyframe. And we've said it here. So it would go fast at the beginning and then slow here, completely stop and reverse the motion back to the start. And we can even split up the animation. So it will be faster. By the way, if we select this keyframe and press F9, it will make a smoother stop to this moment. And it will start smoother and faster. And if we press is your numpad. You can see that basically the same movement. So basically this is how I managed to create this kind of motion in this part of the video. But this kind of motion already is made in this video. So you don't have to agree this technique. I'm just explaining for you, if you would want to film your own footage and would want to manipulate the time exactly how I've done it in my video. So to reset all of this, we can just simply delete this and once again drop it. Same video here. So now we want to isolate ourselves from the background. And if you want to use your own footage, you need to film yourself from the tripod. Your camera. It should not move. And lighting in your scene should not move. Also, make sure that you don't guess any shadows. Now, I'm going to show you a technique which includes difference met with this technique, we can exclude ourselves from background. And for this technique, we need to record ourselves like we are doing this motion. And then we need to not to stop video and just walk out the frame. So we would have only clean background as in this footage which is provided to this class. So let's drag and drop here. So as you can see, I have this clean plate where I walk out from the frame. So let's drop it below, enable and disable this video. You can see that it's exactly the same conditions. So let me show you this effect which we are going to use. We can go to effects and presets. And if you cannot see this effects and presets panel, you can go to Window and enable it from here, Effects and Presets. And we are going to use an effect called difference matt. Let me just click and drag on this layer with ourselves. Now let's disable this background so it will not distract us. In here we can set difference matte layer. So basically this effect will look at this layer with ourselves. And if we will set a different layer to background to this one, it will try to see what is different between this layer and this clean plate, which we've got. And basically only thing is different, it's our cells. So if we will enable this effect and disable the background, you can see that we've key out ourselves. And now you can see that we've got a bit of our hand. And we can just lower this value to nine. And we can clean up a bit our edges. We can use matte choker and drop it here. And as you can see, it already cut out unwanted parts. And by tweaking these first two values, you can manipulate how much of the edge we are cutting out. And this is how you can cut out yourself without using green screen. For social media. It looks good. Because as you can see in this video, you can't really tell the problem of details. Especially if you will watch on smaller screen. And if we will go with to our main composition, we can right mouse click on it and go to composition settings and call it main. And click Okay, so we would know this is our main composition. And let me trim come to work area. So we would see only this part and not this part. We can now just drag, drag and drop our this composition with God out of ourselves into main composition. Leftmost click and drag to this composition like this. And now you can see we have ourselves cut out to this composition. And then we can just press R on keyboard and rotate it. And in the next video, I want to show you a bit better technique of garden ourselves. Because this technique really worse rate only if you feel your cell phone tripod. If light in your scene doesn't change at all, and if you didn't get any shadows and your background, did it move at all? And all they think which moved, it's your only in this case, it will give this pretty decent result. But the next video I'm going to show you how to use rotoscoping with this roto Brush tool. And if you already know how to cut out yourself or if you have a green stream, for example, if I would have a green stream like this, Let's say that this is my footage and I could just type key light effect and use this animation preset that with this color picker to green-screen. And this is how you can cut out yourself from green-screen. It will still have a bit of green overcast. You can get rid of it by clicking on this advanced fields suppressor. And as you can see, it will cut out yourself properly if you have a green screen. And the next video I'm going to show you how you can write a stop yourself from any footage.
5. Keying With Roto Brush Tool: In this video, I'm going to show you how to run a Skype yourself from any footage. So for example, Yo did use this effect, and this effect didn't work for you. And you would have, in this case, some kind of foolish like this. And you would want to cut out yourself. What you can do is to double-click on your footage to enter this layer mode, and then select this Roto Brush Tool. And with this roto Brush tool, you can just draw lines like this to show the software what you want to see in your CME. As you can see, it did a pretty good job. And in our case, this part we don't want, we can hold alt key on a keyboard. As you can see, I am hold you all and we'd left mouse drag while holding Alt. We can deselect some parts like here. If you will, release old button, you can see that your cursor turns to green once again. And you can add some parts of the video. Also, you can press, can show on keyboard. As you can see, I'm pressing Control and leftmost click and drag to the left while holding leftmost lake or to the right to change the size of your brush tool like this. And while holding spacebar on keyboard, you can move around your video like this. So this is how you can basically cover yourself. Once you're happy with the result. You can click here to start rather Skyping. In some cases, you might want to expand this border to the end. So it will run US GAAP, all video. And just frame by frame, make sure it doesn't lose you at any point and keep washing your mask. As you can see here, we want to have a gap. You just need to press Alt on keyboard and hold and displayed this part and add this part while might holding Alt key on keyboard. And then just skip to the next frame and make sure that it's still keeps with outline of your body. And once you'll do all the process, I'm just going to leave it to this point. So I would not waste any time from this class. Once you'll do this whole process to all video, you will need to click on this freeze-frame button. It will remember this mask on your video. So now as you can see, this process is complete and it added this effect. Basically it, we will return to this composition. Make lucky here. To exit this layer mode. You can see that we cut out ourselves properly. And with this contrast feather and Shift Edge, you can just play around with these values to tidy that up our mask and add some feather if you want. So the edges would be, wouldn't be so sharp. And as long as your will spend more time on rotoscoping to make sure that your mask is following your self, the better results you'll get. So next video, we will add ourselves to our main composition. I'll see you in the next video.
6. Creating Flying Out Animation: Okay, so in my case, I will use this difference met technique because it worked pretty good for my foliage. I will disable this background footage and I'll delete this rotoscoping footage which we used in previous video. And I have this decent kind of result. One thing which I want to change is to add a mask to this stop video. So now I have pretty decent result to continue with this class. And now what we want to do is time it well, this foolish, we should create it with this video. So let's just say that you don't have it here on main composition. What you want to do is to go to Project panel and drag this solid effect raw footage with your Radha Scott video into our forage. And let's find the moment where it starts, like here. And we need to align at the moment of laying out like here. Let's maybe cut this a bit further, like this. So as you can see here, it aligns pretty well. And let's get to this moment. So from this part, we will animate ourselves flying out. If you look closely, you can see that the size of this layer and the size of me in real life, it doesn't really match. So let's make this size a bit bigger. We can just press S on keyboard to resize ourselves. And you can notice that when we select our layer, we have the center dot is basically our anchor point. And this is really important to us because if we will use this pen behind tool, we can change lake center of gravity, which we will go into Simulate. And we want to set it about here to the lower waste of ourselves, where our body will be bending lake here. And it's really good method for us because if we press our our 40 ish, we'll rotate according to this point. So we need to make sure to use this pan behind tool and move our anchor point to the point of our body where we are painting. So if we will apply rotation, it will rotate from this point. So first we need to change the scale. We need to sell it or voltage. Press S on keyboard to change our scale. I'm going to set mine to a 105. So it will match my size in real life a bit better. And now we can animate ourselves flying out. For this, we need to have our position. We can press beyond keyboard to CR position. Then we can hold Shift and press R on keyboard to see our rotation. And we can create a keeper institute these properties. Let's let mouse click and drag to create a two keyframes to position and rotation. Once again, keyframes are basically points in time. We should remember the values of certain properties. So this keyframe remembers this value of property possession, and this keyframe remembers this value of rotation in this point in time. And if we will go through this video, basically to the point where my animation of myself completely stops like here, we can create new keyframes by clicking here or just moving here. It also will create a keyframe to position. And if we will rotate, it will create a keyframe for rotation. So now we can set this rotation really big lake minus 90 and said it lower lake here. And when we drag in our flourish here, you can also see these little handles, these dots. We can click on them and move it up, click and hold and move it up like this. And here as well like this. So basically this is our path of our position. As you can see, it looks much more realistic with this kind of path. And what we can do is to copy these first keyframes. Just select them, press control C to copy and paste it here at the end. Basically it will return to the first of our animation. Let's make sure that these keyframes are at the end. And now as you can see, our motion path is a bit different for these keyframes. So what we can do is to select this position keyframe and hold alt key on a keyboard. As you can see, I'm holding the Alt key and clicking on this handle. It allows us to repeat this kind of curve. If you will not hold Alt key, it will mess up the animation. Lay this and you can oppress just control Z on keyboard to go back and then press Alt to make sure that you're only changing this handle and repeat in this kind of motion. And now if we will select this work area and play 0 numpad to see only this work area. So as you can see, we already have this motion, but it doesn't really look that much Interesting. So how we can change this, we can select these keyframes of this point in time. And we can press F9 on keyboard. Basically, it will make our animation go pester at the start and slower to this point, and then slower at the start from here. And faster to this point. If we press 0 numpad, you can see that this motion got a bit more interesting. But we can amplify this look by going to graph editor. And here by selecting this position and rotation, we can see these keyframes. We can select them by leftmost click and drag to select both of the keyframes. As you can see, we have both lines. And if you don't see this graph as on my screen, you need just to go here and make sure that you're editing speed graph and not value graph because it's different kinds of graphs. So let's set to Edit Speed Graph. And then you can just leftmost like by these handles and make sure that your keyframes not up like this, this Masada animation. And it should be right at the baseline and drag to the left like this. Basically you need to see that this line lights up orange. So let me show you one more time on the example of this handle, which we also need to change. So to see this handle better, you can just Click here to zoom in. And leftmost click and drag to the right. And as you can see, it lights up with the orange. It means that our keyframes are at the baseline and drag to the right. And basically now this graph represents our motion, which shows us that at the start, it will start fast and then slow down to a complete stop. And then from the complete stop, it will drastically speedup towards the end. Let's exit our graph editor and press is a numpad to see our result. So now as you can see, we have this really cool motion. You can see the whole idea of this effect. And let me give you a little challenge for this video. So I would make sure and you would make sure that you understood the technique. So drag and drop your footage once again, time as well, like it was here and try this time to make this kind of animation. So with the knowledge from this video, you should be able to create this kind of animation. Basically, as a tip for you, I've left on the screen the position and rotation keyframes. So it would be easier for you to see how I've created this animation and for you to practice the animation, it would be great if you will pause this video and we'll try to create this animation with the analogy which you have from this video on how to animate yourself. Okay, I am assuming that you have tried and if you have some troubles at any point in time, it's again, because if you didn't use After Effects before, it could be quite challenging to create this animation. So let me show you how we've done it. So let me delete this and start from the scratch with this video. First thing which you need to know in the animation, that you need to make sure that your anchor point is at right place. In our case, we will fall down from the center of gravity, which will be on the, our heel. So we need to select our pen behind tool, our layer to see this anchor point. If you cannot see it, try to press Control Shift H, it will hide or unhide. So let's this anchor point to our heel. And let's create animation. Press P and R, two C, position and rotation. And at the beginning, let's select the selection tool and move it ourselves here. Create first two keyframes. Then about here, let's move it to the left end here, where it's really important that our anchor point is here because if we will change our rotation, you can see, and now it's rotates from our anchor point. Exactly the same how we did from this part of our body. So let's make sure that at this moment in time, it's set to 0. Here at the beginning. We don't need this keyframe because it will still remember this value. And at the end where it false and set it to minus 90. And let's say the skipping just at the end of this video. And this basically our animation. And second thing which we've learned that we can manipulate these keyframes. You can press F9 on the keyboard or go to graph editor and select your keyframes. Both of them. And press here. It's basically doing the same thing as pressing F9 on keyboard. It said in this easiest method here we can just leftmost like on this handle and drag it to the right, here to the left, make sure that it's on baseline like this. And we already have this animation to the both of keyframes. And as you remember, I've moved this rotation, so it would start a bit earlier. Position is already slow down. And this rotation animation, I want to start a bit earlier. So it will get a better effect. And if we will set here, we will wait for it too long. So this is why we can just move this rotation keyframe. So this animation will start sooner. So this is basically how you can create this kind of animation. And you can even add some trail here. And it would look a bit more interesting. Okay, it looks pretty great. But in the next video, I want to focus ourselves to this part of my foot. As you can see, it gives away that I am like is standing on something and it doesn't give the illusion that I've laid out because it doesn't really look natural. So in the next video, I'm going to show you how you can quickly fix this issue here. See you in the next video. And I want to create this little trail because I think it would look interesting. I can just use a solid, black solid and just create a mass. It's not a part of this list, but I think it's pretty fun to mess around in After Effects and greed, some funny animations. So I can add roughen edges effect. So this mask would be so perfect and rough and on up. And I can change to spiky, I can even make it bigger like this. And I can fake the dimension just by changing the scale is you can see now it's squished a bit resembles the ground better. I can expand the border of this effect and we will set below. And I can change the scale to manipulate these details. And finally, I can just change the capacity to blend a bit with the ground. And basically here I can change my mask by pressing M on keyboard and animate my mask from the beginning. By clicking on this keyframe more with these mask here and applying the same kind of animation to this list keyframe. So as you can see, I really like to mess around in the aftereffects. If you know how to use After Effects, you can do a lot of things in it. But now we need to make sure that our foot will look properly. So I'll see you in next video.
7. Fixing Foot Problem: Okay, in this video, we will fix this issue with this foot. So what we can do is store, duplicate this layer. But before we are duplicated this layer, we want to select only this part which we want to face. You can just select this ellipse tool, click and hold, and this menu will appear. Select this ellipse tool. And let's cut out only this part of our foot. You can select the selection tool and move our mask better. You can click here to be able to adjust your mask a bit better if you want. And now duplicate this layer just by pressing Control D on keyboard and change this layer below this mask to subtract. Basically it will invert the mask or by clicking here to make it inverted. And now as you can see, we have two parts, but it's on different layers. To see our mask, you can just press M on keyboard and open here to see expansion and weekend expand like this are set to a negative value to make sure that it covers a bit of our food. And we will disable this layer. On top. We can see this part and we can even add some feather like this. And let's make sure that it still cuts out our foot and add some feather. So in this way, we will blend this part with this part. What we need to do is to rotate this foot so it would look more natural. But now we will learn a new technique that we can parent one layer to another. Basically, if we will select this layer, press U on the keyboard to see our position and rotation animation. We can delete this animation just like all of these keyframes and press Delete, or just by clicking here and cold and disable these keyframes. It will also delete the keyframes. So now we can parent this layer to this layer below, which still has all those animations. And basically it means that everything which this layer does, it will translate to this layer also. And as you can see, it looks like nothing changed. We now can just detach this foot. And it still will replicate this motion of its parent, which we've presented with this pick whip like this. If you cannot see the parent, you just need to click here on Toggle Switches. And two, you should be able to see it. Let me press Control Z to set this foot where it was. And now once again, we want to use this pan behind tool to rotate our foot lake from here. And now we will change this rotation. You can see that we can manipulate our foot. So let's make sure that here at the beginning it stays at 0. And here where it stops, we can select this layer below embrace you on keyboard to see where it stops and rotated a bit like this. Just a tiny bit, maybe a bit more than this foot. So we would have some variation. Let's maybe set to 0. And let's adjust with this pen behind tool, this anchor point maybe to about here. So we would rotate from this point, like this. And this rotation looks good. Let's copy this first keyframe here, selected and press control C to copy and paste here at the end. So it will come back to this same position as it was. So just press control V, read it, this animation, we can also select this keyframe. Go to graph editor, click here, and copy this animation. So it will also rotate in the same speed as our previous animation. And now, if we will press Control Shift H, we can see everything better without all of those lines and now go to Selection Tool. And let's adjust a bit. We'll look of it. We can change the position because we have applied animation only to predation. And we can easily now adjust the position like this. Also press F on keyboards to adjust the mask of this foot. So let me show you like this. And now we can just set it here. It will blend a lot better. And now as you can see in this rotation of our foot looks much more natural than it used to be. An NGO can even press R on keyboard and rotate it even more like this and measured here like this. And as you can see, and now it doesn't look like I am setting us up and it looks like I have some inertia which pulls out me from this body. And it represented in this food as well, which looks much more organic. So let's see before I'll disable this and disable this mask, set it to none. How it looks. You can clearly see that this foot doesn't look natural and gives away or effect. And if I'll set to add this mask and enable this, you can see that now it looks much more natural. Okay, in the next video, we will make this part of ourselves more like a ghost is also we will add more effects to it to sell this animation of the punch even more. I'll see you in the next video.
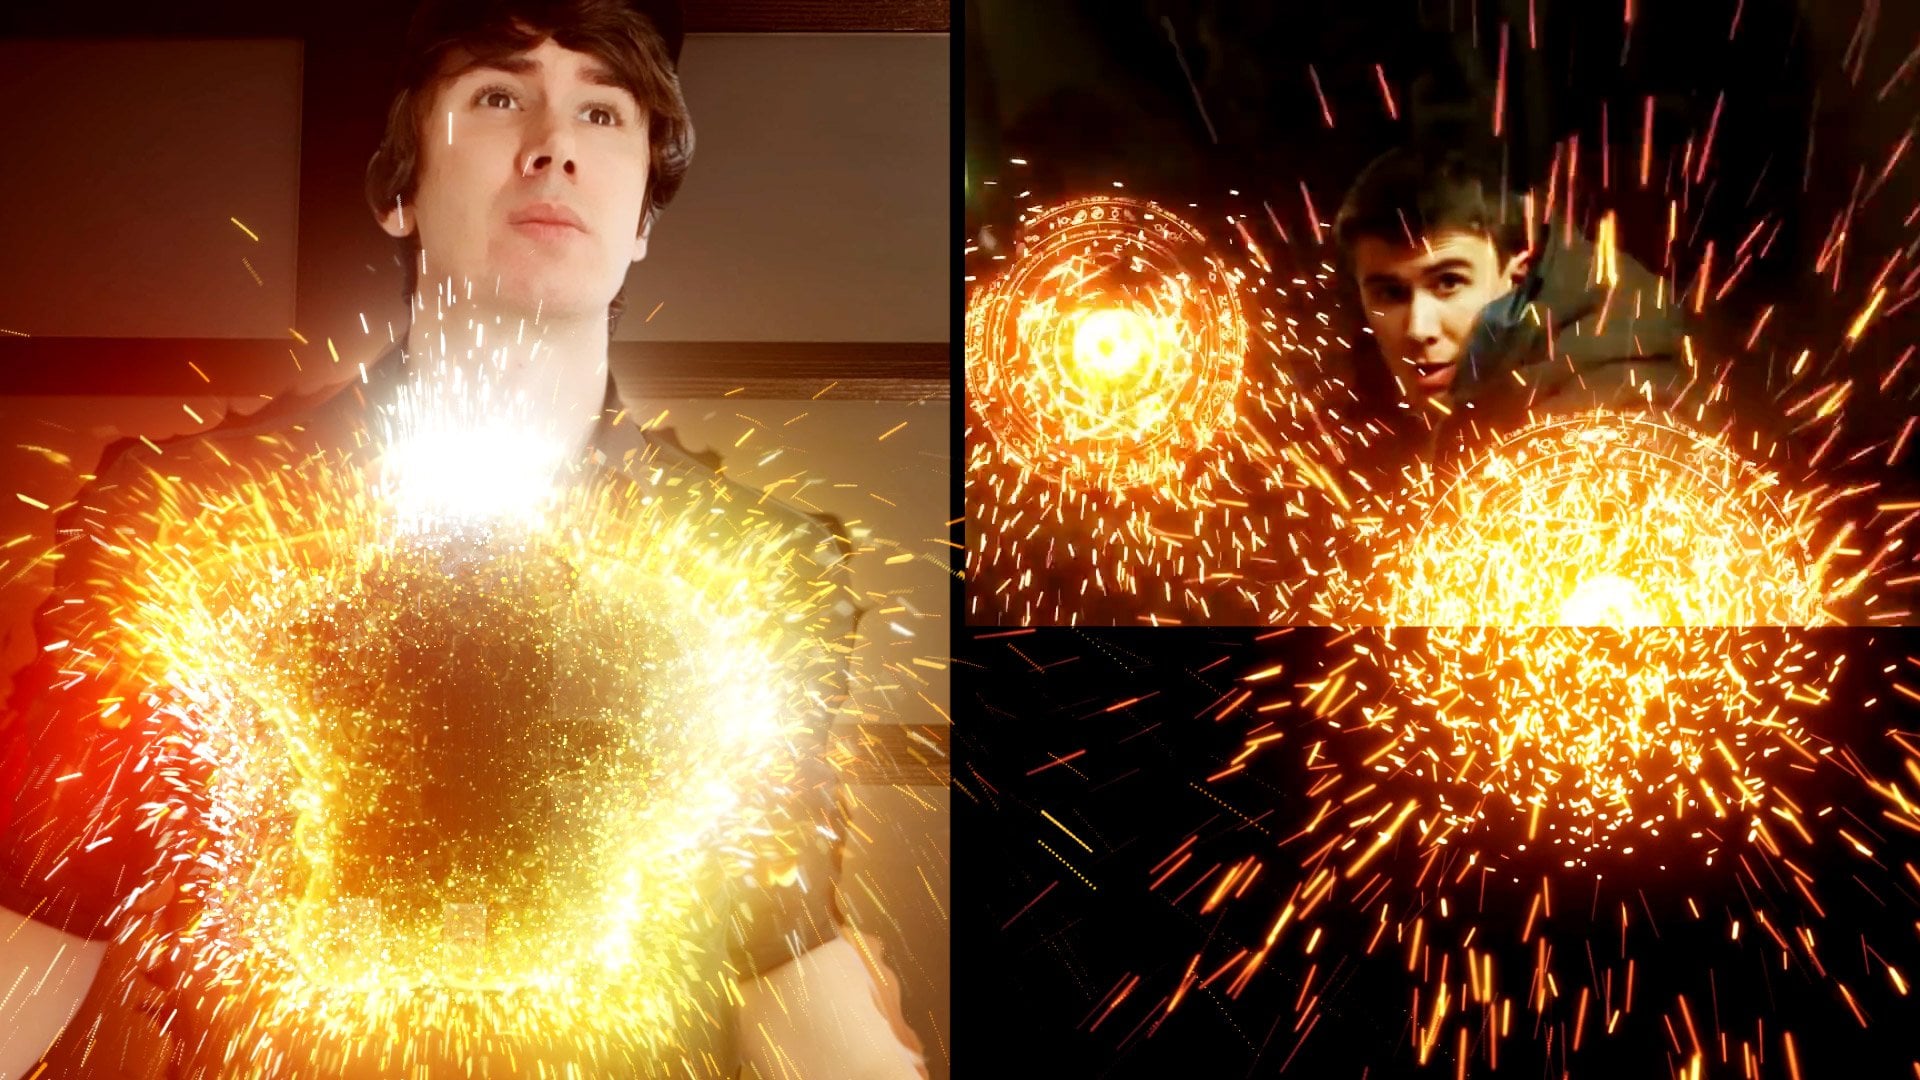
8. Creating Astral Projection Look: So in this video, we want to make this more like a ghost, like astral projection. Let's select both of these layers and go to layer, pre-compose and pre-compose in the layers basically means that we want to have these both layers as a one, we can call it soul and click, okay, and if you double-click on it, you still see these layers inside of it. So we didn't lose anything. We just pre-compose it in one composition. And now we can change this mode to screen. If you cannot see these modes, you can just click on this toggle switches and you'll be able to change the mode to screen. We also want to make it brighter. This is why we are going to effects and presets and type it here, curves. And let's drop it here and let's make it a bit brighter. And maybe a bit more contrast here. If you want. Just play around with this curve to get the look which you like. So to amplify this effect, we want to create a new adjustment layer. Basically it's transparent layer as you can see. But if we will add curves effect to it, it will apply all of these effects which we apply in here. So all layers below this, what adjustment layer does. So for example, let's set it to really low kind of colors. Click and hold, and create this ellipse tool around here where our bank is greed, this kind of mask. You can select the selection tool and adjust position. If you double-click on one of the points, like here. You can adjust by these handles. You can use scroll and the mouse to zoom in and zoom out. And if we will, invert our mask, we will make sure that this part of the video is brighter. We can even press F on the keyboard to see our feather. And feather the edge of this mask to really high value, you can set even to 500. So with this adjustment layer, we are adding additional lights to our soul. Basically, if we will, just left mouse click and drag below our soul, we've made ALL background a lot darker. So our soul will be brighter and it would be a much more visible. By the way, we want to add also a bit of motion blur. What you can do is to open this soil composition and enable motion blur here and click on Toggle Switches to see this icon. And below this icon. And we can set motion blur to this layer and to this layer. And now we have this realistic motion blur. And in this main composition, we can see it as well. And as you remember with this course effect on this soul layer, you can change the brightness of your soul effect. So by manipulating this curves, you can adjust the look exactly how you want it to look. But now let's animate this VDS kind of effect. Let's maybe press Return or Enter on keyboard. And let's call it a vignette. And we can animate our capacity of this vignette effect. So let's press T on keyboard to see our opacity. Create a keyframe here almost at the start, where our soul already a flyout to this point in time. And here at the start, we want to set to 0. Maybe let's zoom out. And we can cut this layer to this moment so we would know where this vignette effect starts. So now as you can see, it will give this animation. Also select these keyframes and press F9 to make it smoother animation where Pij is happening, everything is going dark. And you can just spread out these keyframes. If you want more subtle kind of kind of look to have this animation backwards. At the end. We want to select these both keyframes, press Control C and Control V to paste it here. While selecting both of these keyframes, we can right mouse click on them and change here in key frame assistant, time-reverse keyframes. Basically it will flip these both keyframes around. It will be the same as if I would flip like this. I'm going to press Control Z to undo because we already have lifted. And as you can see, it turns brighter at the end as we want. Same thing, we want to go to our cells. Let's press G. So here it's visible, and here at the end, we can set to 0 and maybe a less press F9. And here is the start. We also want to create a keyframe. And here at the very start, let's set it to 0. And let's move it over these keyframes. So we will able to see this soul projection a bit later like this. And to even more amplified this look of punching, we can add some shockwave. To add simplest shockwave, you can just go to Layer, new Adjustment Layer. We can call it shockwave by pressing Return or Enter on keyboard to rename it. And we can go to effect, distort bulge effect. And we can set this center of this bulge effect maybe here. And let's expand this effect so it covers all of our screen bulge height. We can set to a really small value like 0.2. So it would be more subtle. Here at the start, we want to keyframe this both height and here where the soul already played out. We can just set it to 0. And let's press U on keyboard to see our keyframes. And let's maybe animate this circle of our shockwave. So we created the keyframes for horizontal radius and vertical radius. At this moment in time. We'll press your one more time, we will see it. And hear at the start, we want to set to a smaller value. So we could actually see how this shock wave is formed. And let's also cut this layer to this moment. And now as you can see, we have this subtle effect of shock wave. And we can also press F9 to make it a bit smoother animation and press 0 or numpad to see the preview. So now as you can see, we've added this shock wave, which gives this even more interested in Luke. And in the next video, let's add a bit light to this punch so we will amplify this look at also covered this transition moment. I'll see you in the next video.
9. Light Impulse: Okay, let's add some lights to dispatch. We can go to layer new solid. Let's call it light. We can set this solid to black here and click Okay, so to create our light, we can use lens flare here and effects and presets. Let's type lens flare. And let's this mode to add. So we would see our video. And let's make sure that we have said in the center of this light here where our hand keyed in your, in your frame, we can actually apply a tint effect to make it black and white. And we can also apply effect called Gaussian blur. So we will not have this disruption parts. Let's increase this value and click this repeat edges. I'll set my value may be to 130 and maybe a flare brightness. Let's set it to 115 to increase this bunch. So now we want to animate our light. We can even cut it to this moment, create a keyframe to blurriness. Am few frames later, we can just expand this blurriness to really high-value. We can press U on the keyboard to see our keyframes of blurriness. And we can even animate our capacity. We can press shift and tea. See our opacity here at the beginning, we could set to 0 to animate from nothing to this punch and maintain this capacity by reading this keyframe with 100. And here let's set it to 0. So now we have this light in the punch, which will distract our viewer from this transition. And we'll add a bit more intensity to the scene. Here you can change the brightness if you want, and you can even add Tritone effect. And with this effect, you can colorize it to different color if you want to add more colors to your effect.
10. Soul Trails Effect: Okay, now let's add some trials of this animation. As always, in After Effects, we have a bunch of ways to do this. To create a previous to this class, I just duplicated this solid layer just by pressing Control D. Right mouse click on it and go to enable time remapping time, enable time remapping. And is remember we can manipulate our time remapping. And basically what it allows us to do is to freeze frame from this point in time and copy and pasted this, how you can have one of the trails like this. And with the capacity, you can just move these keyframes closer and make it fade out in time. As you can see a disco, you have one of the trails and you can even press P on the keyboard to see our position. Set a keyframe and move it a bit to the left. So it will continue this motion. And basically you could add even a turbulence displays the fact and animate this evolution. And with this amount, you can add more displacement as you can see, and with the size, if you will, set so really low value, it almost displays all the edges. And this is how you can add a bit more life to this mirage kind of effect. So here you can just set a keyframe to evolution. And later, you can rotate it a bit like this. And let's press your keyboard to see this animation of evolution. Let's say two big value. And that's how you can add a bit more life to this method. And basically by creating copies, you can create more of these trials. But I think we can do better than this. And let me show you another way how to do this. Let's delete this one. And after effects has really cool a pedicle echo. You can just leftmost click and drag onto this soul. And it gives you, it already generates some echo effects. Here's just one. And you can set it to three. And as you can see, it's much easier way to generate this kind of effect and to see better how it works, we want to change the screen to normal. And here we can an echo operator change to much better compositing technique. For example, you can click through them. By clicking through them, you can get different kinds of results. And ML case we want to use or composite in back of composite infrared composite and back as you can see, it shows us the last one. And we want to see the first one. And by changing this echo time, just select it and press the arrow keys down to change this from 0.03. So for example, 0.1333. And as you can see, we have more spreading between our echoes. And this is basically the easiest way to generate some trailing of our effect. And now we can change this to screen and have this kind of effect. What we can do also, we can change this decay. We want to set it to a lower value than one, so it will fade out like this. And we can increase this event to more like 25 Empress 0 numpad. And now we should be able to see these five echoes affects one after another. And it's really easy way to create this kind of effect. But as you can see, it's a bit more intensive on your computer. So you can change here from full to R0 or so quarter quality. So it will be easier to preview. And as you can see, we have this pretty cool echo effect. And the best way to tweak this effect is just by changing this value right here, my device for you to play around with different kinds of small numbers to see what works best. And now as you can see, we've created this effect, which you could see in the movies. So basically you have two types of the trailing effect with this echo effect, which really easy if you don't have any time and you want to have an effect as fast as you can. Or that other method without echo effect, which I've showed you earlier, with the enable time remapping. That way, you could manually place your trails of your soul. I think both methods looks good, but this echo effect of saves a lot of time, especially if you're a beginner, I think you will be happier with this result as well. And finally, you can see that we have this animation and it's all looks good, but it doesn't match up with this background footage. Split this layer below by pressing Control Shift D and moving to the left to find the moment where it starts moving Soto time. It's well with the animation of going back guardian to this moment. And now we can see this full effect. We should create it. You can follow me here on Skillshare and watch more of my classes by clicking here on see more. You can see that I've made a bunch of pluses on VFS screening in After Effects. And I have even one class in Cinema 4D, which upon, with the breaking glass effect, this one is pretty fine as well, and it only takes 12 minutes. And I also making this motion design blesses for those of you who wants to create After Effects templates and sell on video. Hi Envato Elements, motion array, or different kinds of platforms where you can sell After Effects templates. This project is also available in resource that to this class by the way, if you will open it and you'll get some errors union just to write mostly on while these footages and go to replace File and choose according which you want to replace. And it will connect all of these files. And you should be able to see this project which we've created today. Thank you for watching. See you in my next class.
 M Jake, Lets Create VFX & Cool Stuff Together