Transcripts
1. Introduction: Hi, I'm Jake. This effect, we will create rate. Now, we will go step-by-step on creating this effect. This is excellent for beginners, because starting with the second video, I'll provide all needed foolish to create this effect has also, I'll explain every step wish you need to make to learn this technique. If you already have some knowledge of Adobe After Effects, then the first video and the last video is great for you. In the first video, I'll explain a really cool technique which covers the way you need to shoot your own video to make yourself disappear seamlessly, even though the camera will be moving the entire time. This is an advanced technique which will be useful for you in other projects. And in the final video, I'll dive deep integrating particles effect from nothing, which is great for those of you who already have some knowledge can be effects and want to know how it's made. I'll go through each step. So even if you are a beginner, you will be able to create this effect also. And the best part is that the beginners part of this class takes only 20 minutes and then you'll be able to apply this effect to your own footage. It's a really easy technique, but it gives you a very powerful results. This effect we will achieve by the end of this class. Feel free to follow me here on Skillshare for more of the effects classes. And now let's get started.
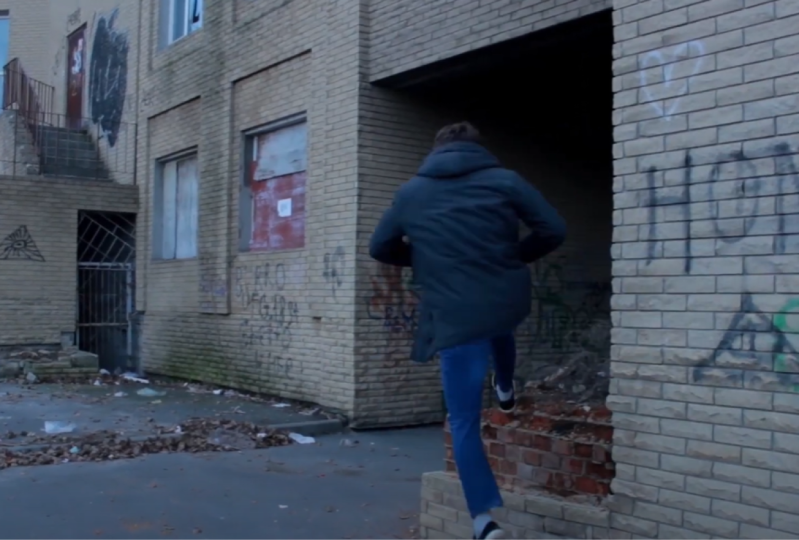
2. How to Film Your Own Footage: Okay, so in this part of the class, I'm going to show you how you need to film your footage to create exact same effect as I showed in preview. To import our footage, we can just double-click here and project panel left-most double-click on it and I'll select ruffled edge, which I've pre-made for this class, and also footage which I am filmed. And click Import this RAF which will be in resource step to this class. So this is already pre-made video where I'm jumping, disappearing, camera travels and I am appearing here. This is our footage to work with. So starting with the next video, we are going to work with this foolish and we will apply effect on top of it. But in this video, I want to show you how you need to fill in this foolish and how you can make yourself disappear seamlessly and camera travels. And then you appear in here. You can just click and drag on this icon to create new composition. You can zoom in and zoom out using scroll on the mouse. And let's see what I found. So basically what you need to do is you can see I'm not disappearing here. So you need to ask your camera man to walk with you like this at the beginning. And then stop. And the moment where you need to disappear. Just take a closer look at camera man movement. As you can see it. Once I jumped, he stopped and try not to move at all. And he's waiting when I'm going out of the frame. And then he continues the moment. And here when camera man gets closer to this wall, he needs also to stop and wait for me so I could climb the wall just like this. And from this moment, we are going to use our video and also move the camera. So pay attention how camera man moves in this video. He walks with me here. Then when I jump, he stops. Waits for me, leave the frame. Then continued the motion. Stops. Waits for me to climb the wall. And only when I jump from the wall, he continues to follow me with the camera. This is really important because we are going to stitch this part with this part. So this is why it's really important that your camera man doesn't move at all. So it will be easier for us to stitch these two parts seamlessly. But before what we need to do is to stabilize this movement and to fix this issue of shaky camera, we can just use Warp Stabilizer. Just go to animation and choose Warp Stabilizer. You just need to wait. It will analyze your footage and here and Warp Stabilizer, you can just change the smoothness to 25 percent because if you leave it at 50 percent, it will warp your foolish too much. So it's good idea to have this value really low. So let's set it to 25 and see results. It will stabilize again. And now I'm going to press 0 or numpad. We can preview this footage. We get rid of really shaky hands and our video. So now let's try to stitch these parts to make myself disappear. Let's find the moment where we want to disappear. I guess about here. I want to disappear. So I'm placing my time cursor here on the video right at the time where I need to cut my foolish. And then you can press Control Shift D. It will split the layer or Command Shift D. If you are on Mac, just make sure to select your footage, press Control Shift D, or you can just go to Edit Split layer also control shift D. Now we just need to cut out this moment where I'm leaving the frame just before cameras starts to move. It seems like here. Then place your cursor here on top of this edge and cut it to this moment. You can also press Shift on keyboard, and it will snap to our time cursor. And now we can just grab this top layer. Move to the left. Also you can press Shift and hold. It will snap to this layer. And now as you can see, we have this jumping motion. So as you can guess, it's really hard for camera man to keep perfect shot for seamless transition. But using Adobe After Effects, we can face this issue. So what we are going to do right now, we are going to make this less frame, more closer to this next frame. So we would not see this jumping frame. So first of all, we want to go to this frame where I disappeared just by using these buttons. And to take a screenshot, you just need to press Shift F5. It will take a screenshot. And now if we go back one frame and we will press F5, we will see our screenshot. You can also hold a 5 to see it forever until you release a five key, we need to select this bottom flourish, press S on keyboard to see our scale. We can also press Shift and hold. As you can see, I'm holding Shift and press B to C position and scale. And we want to create a keyframe is for them. And maybe let's use even rotation to pull up the rotation. We can also hold Shift and press R on keyboard. And now we can see position, scale and rotation. You can also just scroll down here and go to transform and see these properties. But it's good to know shortcuts. Let's create a keyframe by clicking on the stopwatch. So what is the keyframe? Keep them is basically the point in time we should remembers the value of certain property. In our case, this keyframe in this point in time at four seconds, remembers this value, these values of this property. So we can also create keyframes for scale and rotation. Let's click and hold and drag. And you can create keyframes for all of them. So now you basically saved at these values, original values. At this moment in time. Select them. Let me just click and drag to select them and drag a few frames to the left like this, what we can do, we can just scroll a bit further where our camera is moving em to something like this. And we can just cut to this moment and move it to the left. And now we are getting this jumping and motion. And now it should be much easier because we will need to zoom in and mesh this perspective. So let's try to do exactly that. We can just go to the last frame of this video below and just make sure that we are on top of it where we can see ourselves. Then let's scale in a bit by clicking and dragging on this value of 100 of scale. And now let's make sure that we are made a screenshot of this new frame where we don't have ourselves and press Shift F5 to screenshot it. Then go back to the brain where we can see ourselves and press F5 to see the frame to wish we need to work towards. So it looks like we can just zoom in a bit more. And then you can just select this footage below. And using the arrow keys on my keyboard, you can just move it up and to the right. And just by pressing F5, you just need to continue movie or 40 ish in the way so it will match as perfectly as you can and we can add a bit more of scale. And now as you can see, this transition happens a lot more smoother. By the way, the best part of it that you don't need to be super perfect because in motion it doesn't really noticeable. And once we will apply some effects to ourselves, our reviewer will look at this part of the V0 and this jumping point will be not that noticeable. Basically the same technique we are using here. So we need to cut from this moment control shift D move to the part where we appearing guide into this moment, moving to this part like this. And here we can also match move to cover up this transition point. But I already did this with this raw footage which is included to resource status is less. So in the next video, we are not going to focus on this transition points and we are going to apply effect itself. See you in the next video.
3. Adding Text In Real Life: Okay, so in previous video, I showed you how you can create this transition point where you are disappearing. So I'm gonna delete this rough forage we should have used originally. And you can just import this raw footage which is provided in research settings class. You can just double-click here and project panel choose raw footage which is provided. And then leftmost click and drag here to create new composition around timeline are here on this icon also to create new composition. So we've created this composition. As you can see, we don't need to worry about this transition point, which I've covered in previous video. And now we have this ish where I'm just disappearing and appearing here. As you can see from this foolish, I speed up this part. So it would look more dynamic basically to speed up your punish, you can just Control Shift D and cut this footage Control Shift D, right mouse click on it and go to time, time stretch and degrees this time stretch factor to 50 percent and it will speed up two times. So basically this is how you can increase the speed of this part. But in our case, I pre-made all of this. So we would have this perfect foolish for us to practice on. So next step which we are going to make is to import our trail effects. So let's leftmost double-click here. And these videos are particles will be also available in resources tab to this class. So just select all of them and click Import. So basically, if we will double-click on one of these videos, we can see that it has Alpha channel, which basically is transparent shell. And we have this cool animation of particles. We have five variation of them. We are going to use a bunch of those. And so it would look more interesting. First logical thing which you would want to do is just to drag this particles and drop onto your footage and align with your character and CN. And just about here where he is about to disappear and time as well, just by moving these particles to the left or to the right. So it would start just about here. But problem with this is that when you are going to press 0 on numpad to preview your footage, you're going to see this weird thing. It doesn't look like it's inside. Our scene is just on top of it. And we don't even feel that it stays in this space in time. And if you don't have any experience in After Effects, you could try to use a scale and position keyframes and then tried to mimic this motion. Like it stays here in time, but it's pretty hard to do. And luckily, we have a much better technique for this. So you don't need to read these keyframes. We can just delete them. We can actually camera check this footage. So I'm going to hide this particular layer by clicking on this eyeball to hide this layer, as you can see now we don't see it. And now we can just select this rough voltage and go to animation track camera. Let us look at it. It started to track our camera. Just keep in mind if you filmed your own footage and don't use my footage which I provided in this class. It's really important that nothing in your shot moving except you, because it will mess up the tracking. Also, you don't need to have a shaky footage. Make sure that you've used animation warp stabilizer, which you really would help with this stabilizing your foolish. So this 3D camera tracker would work fine. As you can see, I have a good boorish. This is why 3D camera tracking worked fine. By the way, if you will have some issues with this step, you can just write your issue in the comments section. I'll try to answer your questions as soon as possible. So once you track your polish, these dots are basically are tracking points. They are perfectly stays in place of our footage, which is great. We can do a lot of fun things with this. Basically what we want to do is to choose a point which looks like in the same perspective as myself in the shot. So I know that I've stepped here, and this is why I know that. If I am going to choose the point which represents this corner, it will also represent 3D position of something in my shot. So let me show you an example. I just going to select some of the points on this rock. So I can just right mouse click on it and create null and camera. So this track null is a 3D point and real-world. It stays about the same place where I jumped off. So it means that if we will create a new text, we can just click here and create text. Let's just type text. I'm going to use any font just so you'll be able to see it properly. And I'm going to use this selection tool. And I'll convert this layer into 3D layer by clicking here. If you cannot see here, you can just click on Toggle Switches. And you'll be able to see this 3D icon. And now as you can see, jumped into our 3D scene. And it stays hero, like it's floating in air, which is exactly what we want to do with our particles. But what is cool about this track null, that we can just press B and copy this position. Just select this track null, breast B2C position. Select position and press control C to copy or go to edit, copy and go to text, breast BY select position and press Control V to paste it. We jumped here to this point. And now it stays exactly the same where my foot was placed. Which is really cool. And by the way, once you'll place this position, you can move these values. For example, you can just move it up like this and to the left. And you can even press S to change the scale and agrees it like this. And by the way, here's the cool shortcut. You can select your text layer and press Control old. As you can see, I'm pressing Control and Alt and Home. And it will reset the anchor point exactly at the middle of my text. And now I can just press B, move it wherever I want, like this, using this x, y and z value. Basically x and y, it's horizontal, vertical. And that depth, we don't want to change because it will go in our scene. So I'm going to press Control Z to undo this movement. And basically if you want to set your text into your shot at the same place as your food or the wall, or wherever you want to place it. You don't want to change this authority value. You can just change this x and y value, which is basically horizontal and vertical values, then you can just press S on keyboard and change the scale. If you want. Also, you can press R on keyboard and change the rotation. For example, if you would want to place it on a wall, you would want to change it rotation like this, but we don't want to change it. So now is again, see this text stays exactly where I disappeared. But we can even move it just by pressing P on our keyboard. We can move it a bit further down using z axis, which is pushes further away, but make sure that you don't overdo it. So if I am going to add this layer to this moment, it will appear exactly after I disappear. So it's really cool technique to add something in your shot.
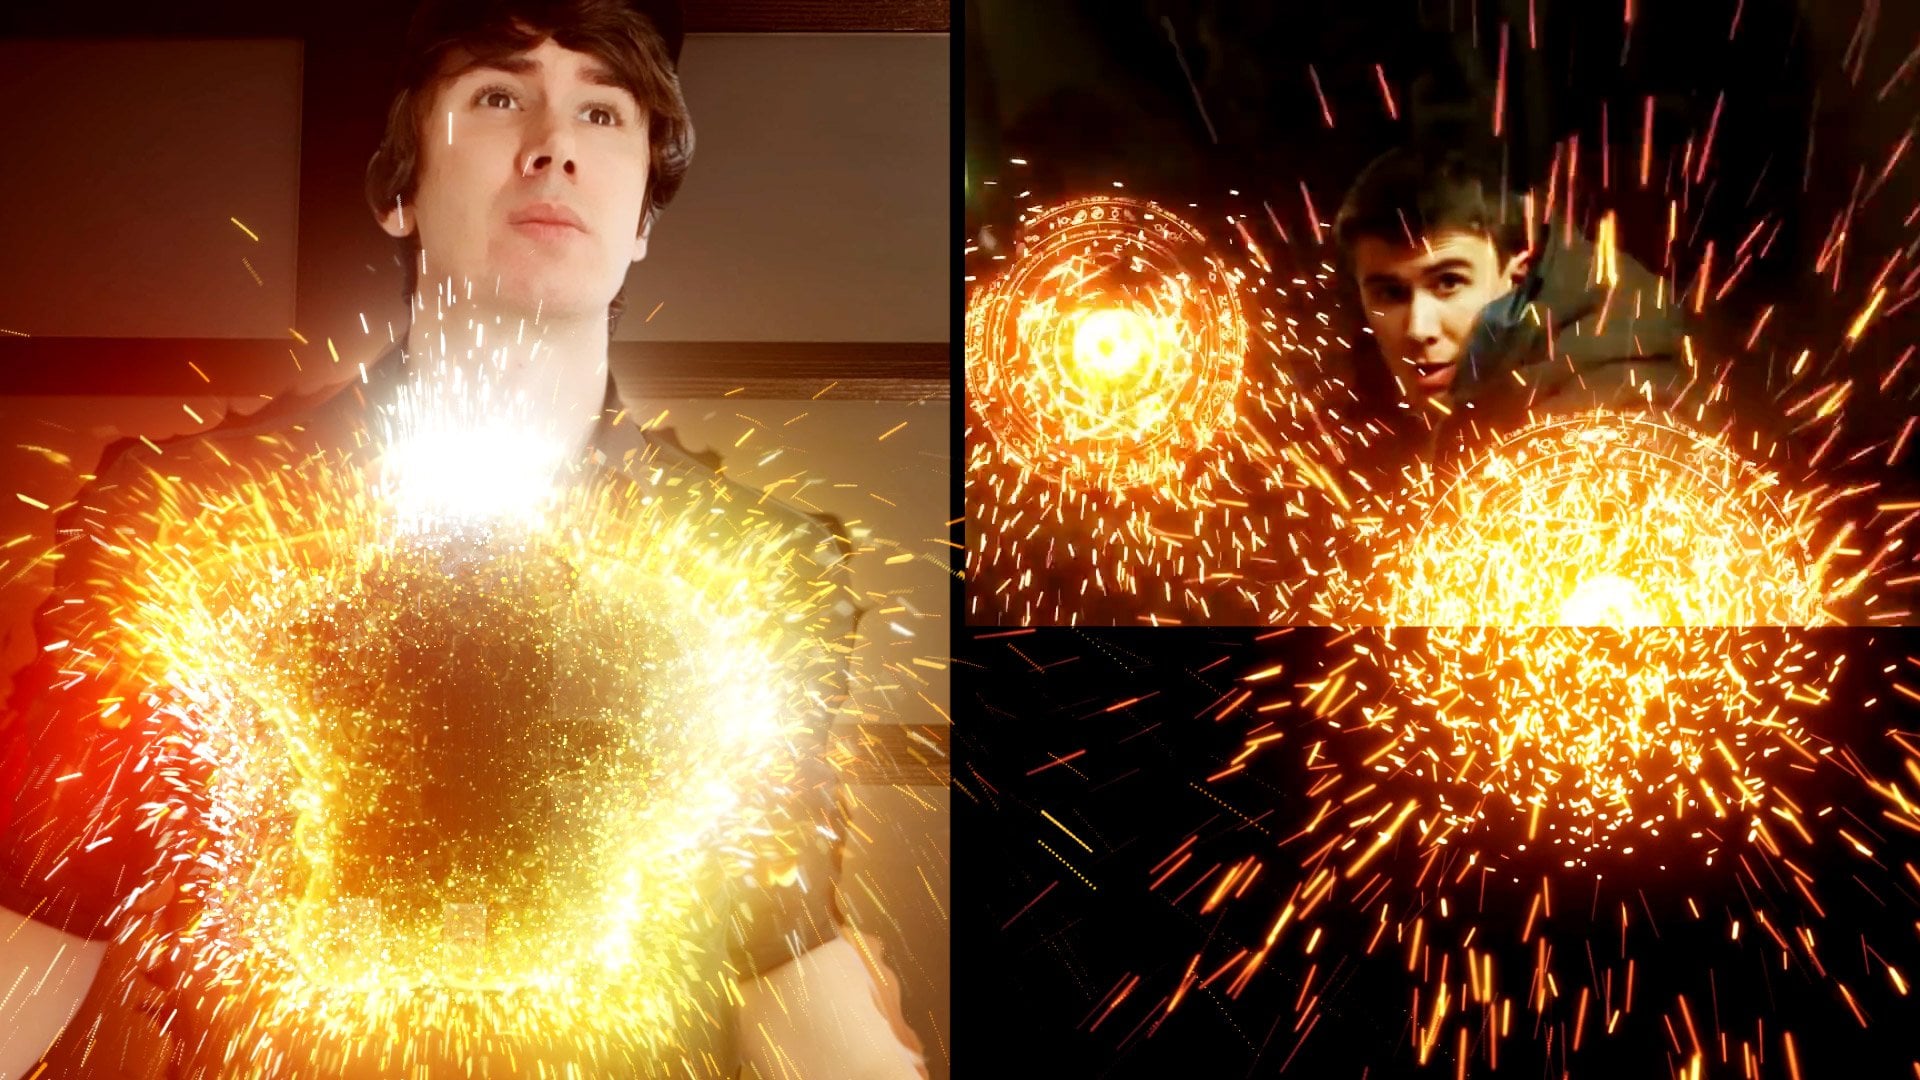
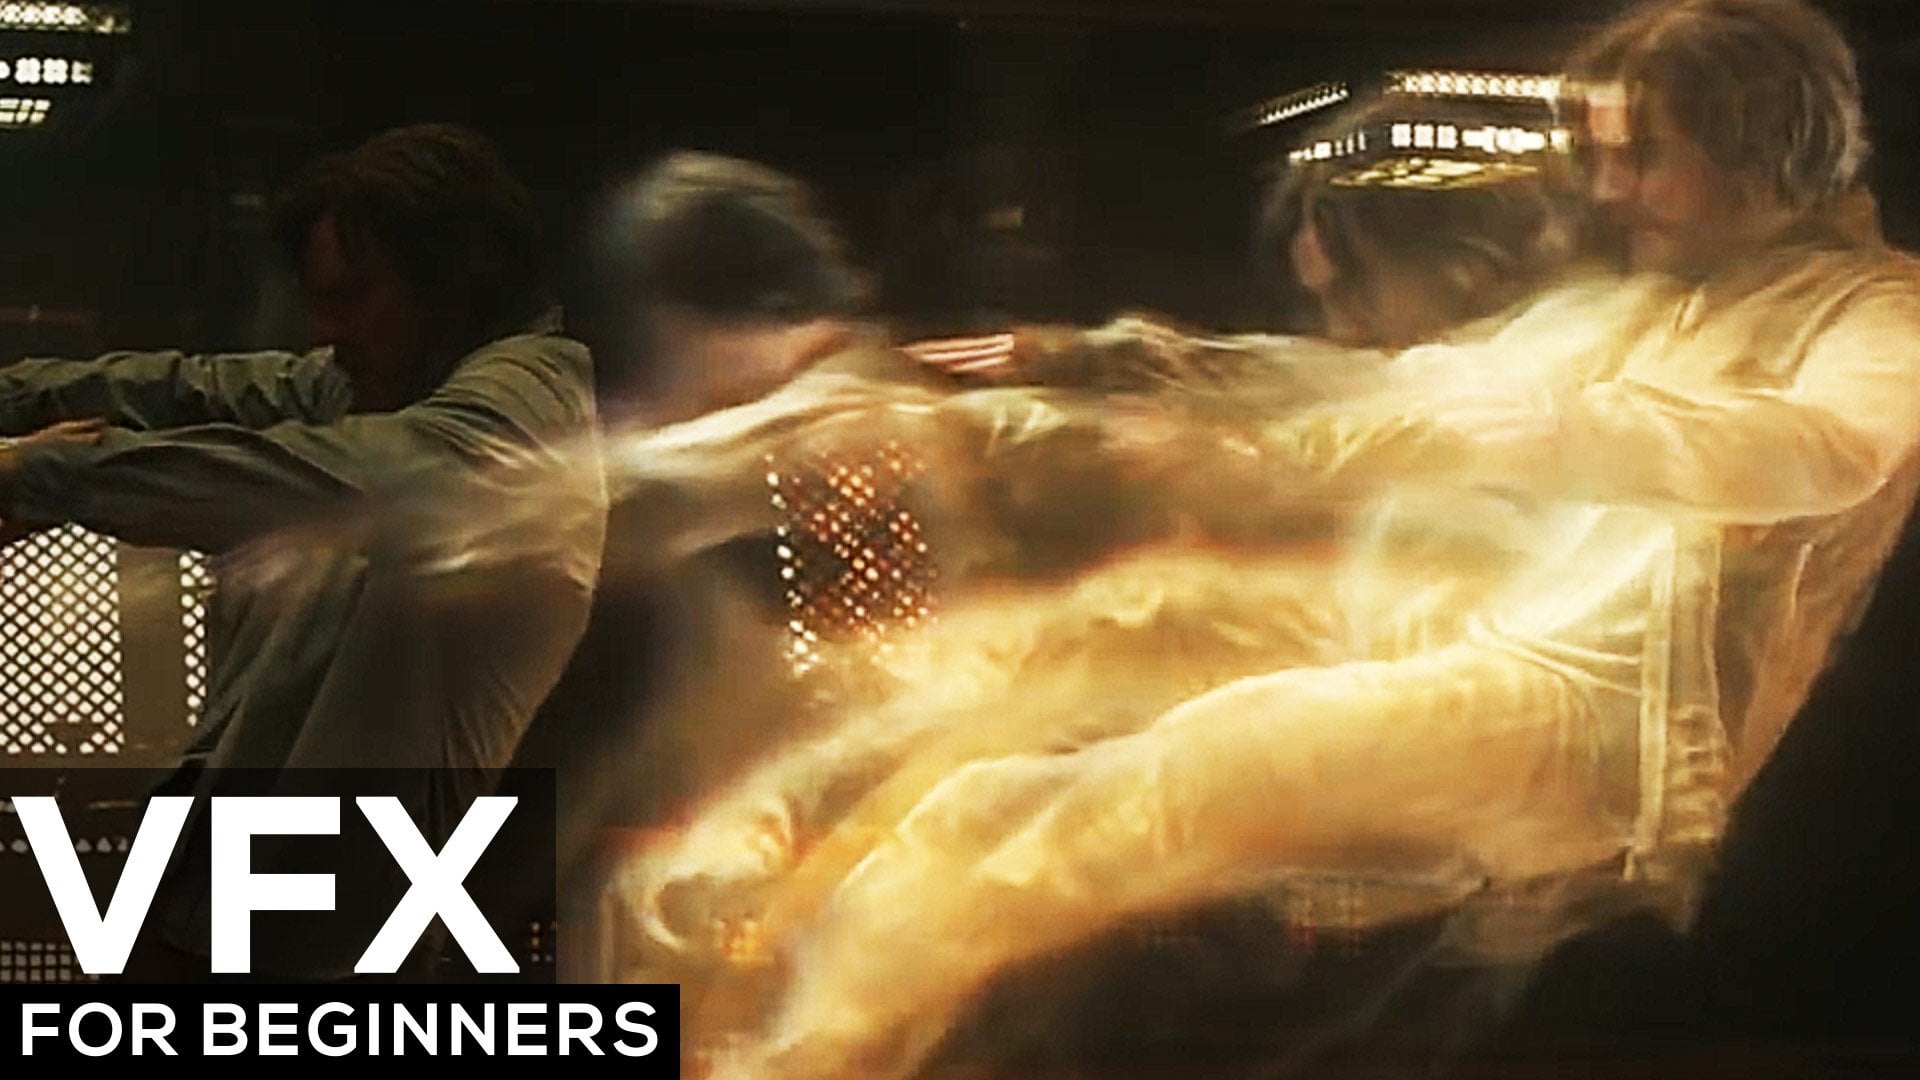
4. Adding Particle Trails: But in our case, we don't want to use text, so we can just delete text. We can use our particles. So let's select these particles 5. Or if you didn't drag-and-drop, just select here and drop it into your composition. I'm going to enable it by clicking on this eyeball. And now I can also click here to convert it into 3D layer. And as you remember, we need to copy the position of this track null. So we need to select Track Null, breast on keyboard, select this position control C to copy. Then go to particles layer and we can just press Control V to paste. It jumps to our rocks. And what we need to do is just to press V on keyboard and move it up with the second value and to the left with this first value. So vertically, horizontally aligned with your character like this. And now we can just press S on keyboard to change the scale. So now it stays perfectly in the place where I left off, which is really cool. And the next video I'm going to show you how you can apply a bunch of more of these particles to create a feel like I'm traveling through the air. See you next video.
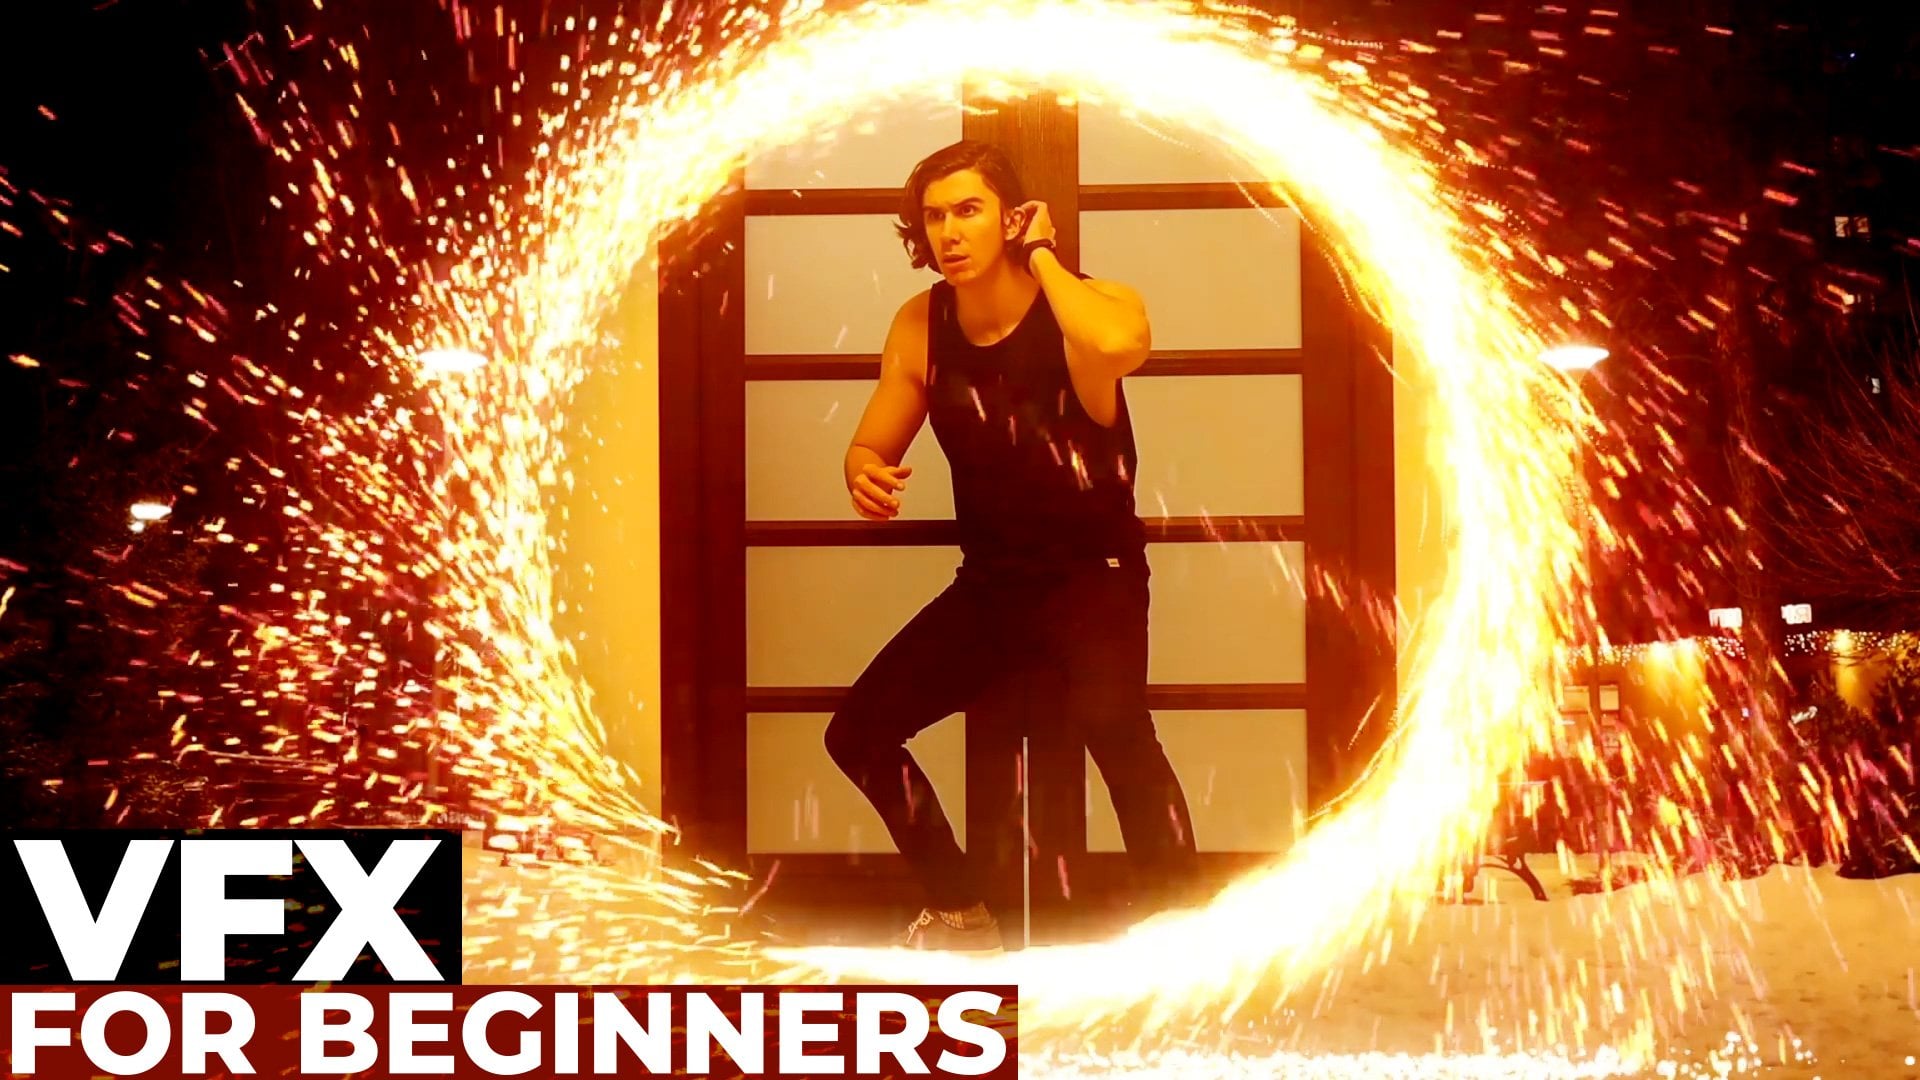
5. More Trails and Stylizing: Okay, so in previous video, we've learned how we can add these particles in 3D space. And once we did this first particles, we can just delete this track null because we don't want it to have it anymore. Just select it and press Delete. And instead we are going to use this 5 video, which is basically fifth variation of the particles which I've created. By the way, if you are using these particles for your own foolish and you don't like the colors of the particles. I'm going to solo it by clicking here. You can see that in my video is like bluish tones. And for example, you would want to have some purple tones. What you can do is to select your particles and go to effects and presets and apply a pact called tritone. So let's type tritone, lead mouse click and drag it to our particles and change this mid-tones to whichever color you want. So for example, if you would want reddish, you can just change to the reddish colors like this or to any other color which you like. As I remember, they used something like this color. So you can just easily change your color to your own. And then I'm just going to un-solo this layer. And as you can see, I've changed the color, but I thought it would be better for my foolish to use some colors from myself. So this is why I'm going to disable this write-on effect and use bluish tones. Because these bluish tones you can see in my jeans and it blends better with my footage. So how you can add more of these particles? The easiest way is just to select this particles. Video. Press Control D to duplicate that, move it a bit further. And then just press P on keyboard. And by changing these values, you can align it a bit down and a bit further away, just like this. So basically with this third value, you can just place it a bit further. So now if I'm going to change it a bit more, you can see that I am pushing outwards from the camera. And now you can feel that the second particles are much more further away. Second thing which you need to do is to drag this video to the right. So this second particles will appear after first particles, just like this. But we can still feel like these particles are practically the same because they are the same. You can just right mouse click on them and go to transform and flip vertical. So it will help to add more different kind of look. You can also write mouse-like in it and go to transform and flip horizontal to add even a more kind of other kind of look and move it to the left. So now it's less recognizable. As you can see, you can just work with this one footage. And it would look really cool. You can even oppress are on keyboard and rotate it a bit. Excitation doesn't look right for us as also Y rotation because it's basically a flat layer. But if you will change this 0 station, you can add a bit of angle to it and it would not look the same as the first particles. You can also press S on keyboard and change the scale to make it a bit smaller and maybe less breast beyond keyboard and bring back to the camera a bit more. And now we can just press Control D to duplicate one more time. Move it further. And this time, let's also press B and move it even further where we are going to appear. So I'm going to disable these 2 first particles to see the last one. As you can see, this is the last one, and this is the first one. And to add even more variation, you can just go to project and select any of these other particles. Select one of them, select this, wish you want to replace it. And then leftmost click and drag. Then hold Alt key on a keyboard. As you can see, I'm holding Alt, make sure that you have selected this before and this selected, and then you'll be able to replace it. Just hold Alt key on a keyboard. Leftmost click and drag it on top of it and release it. As you can see, now it says not five but three because we replace it. And this is basically the other particles which we are using. So this is how you can populate more of these particles just by pressing Control D. Move it a bit here. Bracing be to change the position. Also are to change the rotation just like this. And once again b and move it a bit closer to the camera. And select this fourth one, holding Alt key and replacing it. And getting this a bit. Other Look, I'm pressing P a to move it a bit to the right. And now, as you can see, I added even more. We can enable it, this first one. And you can create a variation which you like. Just make sure that you are using this fifth one at the beginning. Because it's really cool and it covers most of yourself. And I would even push it further like this. So it would cover as much of myself as possible. And maybe I'll rotate it a bit. So this transition point would be not so visible. You can also press S and cover itself as my shoes again, just like this. As you can see here, it measures perfectly. And by the way, you can just press P on the keyboard. Create a key-frame. Key-frame is basically a point in time. We should remember the values of certain property. So this keyframe remembers these values of this position property. And if I will change it here at the beginning, I can just move it this position by changing these values or by dragging by these arrows. Just here. I just want to change it and move it closer to myself. And in this way it will follow me around. So this is how you can basically create really cool transition points. And once again, here at the end, you want to use also this fifth version of particles because it has more particles than others. So let's once again press Control D on this third one. Move it here, select this fifth hold Alt key and replace analysts, make sure that it will appear here at the end where we are appearing. We can press R on keyboard to rotate it, then press B to match with ourselves. And maybe push a bit in Z space also are on keyboard. And basically you want to cover yourself as much as possible unless maybe move it to the left or so, it will appear a bit sooner. And let's move it to the right here and the position. So it will cover ourselves. And then just create a bunch of them to follow here where you jumped off here as well. So let me maybe create another one so you could see how easy it is to do. Just select this press Control D. Select any other of these particles called Bolt to replace. And just move it in here, let's move it to the left and press P on the keyboard to see your position and move it towards our body. So now as you can see, these particles looks like a bit following our around. We can also press, are rotated a bit and give the angle which you like. And now as you can see, it looks like these particles are generating from me. And basically, once you learn this technique, It's up to you how much of these particles you want to apply to cover your cells. So it would look much better. By the way, another thing we should do is to select, for example, this first particle. You can just duplicate it and move it further. And let's select all of these particles and disable them. Now we can just select this, which we just duplicate it and move its border and change it to adjustment layer. Just by clicking on this toggle switches, you need to click it. Once you'll see this Adjustment Layer toggle, you can click next to this layer like here. And now, if we will apply effect like displacement map is you can see here our displacement map on this layer. And if we will change these values just like this, and click here on rub, the cell around. You can see that we can display our footage. And this is how you can distort your foolish if you want to add a bit more complexity to your video. So basically, if I am going to apply this effect on top, you will see it not only particles moving around, but also you can get this feel like it's distorting our footage. You can increase this effect by applying curves effect and imply in here. And just boost the brightness here in RGB channel. And in this way we are allowing our viewer to see barrel these distortions. So this is it, this is how you can easily create this kind of effect. And if you are into more complex stuff, in the next video, I'm going to show you how to create these particles from nothing. Make sure that you have this red child trap code forum. If you don't have this plugin, you can just follow me here on Skillshare and watch this tutorial. It's only 12 minutes and it doesn't require any plugins. So basically, all of these effects which you can see here, you can create with no plugins at all. And I always will let you know if you'll need to have extra plugins. But luckily, all of these effects we should can see on screen, you can create without any plugins except this one. This is more complex one and you do need strap with particular. In the next video, I'm going to show you how to create these particles from nothing. See you next video.
6. Creating Particles Using Trapcode Form: Okay, so now I am assuming that you have truncated form and we can try to create these particles. So let's copy this rapid each composition, I'm going to select it and press Control D to copy it. And let's call it warm version. And let's open it. And this time, let's delete all of these videos because we are going to create our own, except this one. We will leave just one just for IT position. So we would know where we want to place our particles. And let's create new layer, go to layer, new solid. Let's call it four because this plug-in we will use and click, Okay, then here let's type it forum as well and go to red giant form and drop it on this layer. So now we can just open this base form and we need to move our position. This is why we didn't delete this layer. We can press B and we need to us to copy this position of Z space. Just select it and press Control C to copy it and go to form. And here on position in Z space, we want to press Control V to paste it. And now we've moved our particles so they will stay exactly where I am. As you can see. It stays perfectly the same way as these particles state in previous video. Now we can just delete them because we don't need this and we have our own particle system. We can move it a bit more like this. Two mesh with our cells. Particles in z set to one because we don't need too much particles in Z space. Let's increase amount of these particles by changing this particles in x and particles and y here I'm going to set to 350 and Hera 515. So you can see it's much more dense and now we can tweak our particles. Let's go to particles and sphere of feathers. We want to set to 0, which is basically make them crispier and without blurry edges. So let's set it to 0. And now what we want to do is to apply some color to these particles. What we can do is to go to color. And here at setColor, we want to set it to radio. And this way we can make our colors. We can just go here and open it by clicking on these squares. You can choose your own colors. At this point, we can just scroll it right here, and we can just double-click here. And with this color picker, choose some colors from your own clothes. So it would match better with your scene. So I am going to use this dark color and click Okey, double-click here. Now I am going to use some lighter color like here. And click Okay, then with this one, I'm also going to use a bit darker color, maybe on genes like this. And click wiki. This one also laid this color. Here. Let's also choose some colors from genes. And click Okay. Now we can close this particles. And let's work with our dynamics. For the dynamics, we are going to use this fluid, Mr. Glick here to openness. And let's enable this fluid motion by clicking on this checkbox. You can play around with these different kinds of methods. But I've set mine to vertex ring because I like it best. As you can see, we have already as some kind of animation. And basically, by changing these three values of forest regions, scale buoyancy and renders swirl XYZ, we can get different results. So my case, I want to change the scale to a bit lost, lesser value, lake 76. Again, see it starts a bit slower buoyancy, I want to be inverted, so I am going to set it to minus 11. You can just play around with different kinds of values and see what you like best. As you can see, it gives different shapes. In my case, I like this minus 11 kind of type of movement. It's much slower. And I also want to add a lot of randomized swirl. So I'm going to set to maybe a 95. So to get this different kind of movements, basically with this render swirl, you can add this randomized movement. And now I want to add some depth, basically to add some depth to these particles, I'll go to visualize related density and we can change to capacity. And that was again, see some particles which are further away, fading out. And some of them stays, which gives a bit more depth to this effect. Also, I want to speed up a bit this animation. And to do so, you need to go to global fluid controls and change this Floyd time factor. I'll change it from one to two, which will make it twice as fast. To see your effect better, you can just solo it like this. And by the way, if you don't like this kind of look and you want a bit other kinds of motion. You need to go to fluid master and just change this random seed by changing this value to any other value. You just can click on it and press the arrow keys up or down. You can change it by a value of 100. As I'm changing this value, I'm getting completely different results. And this is basically how you can create a bunch of these kinds of animations. So I'm going to stay at this one. But you can play around and choose whichever you like best. And now we can just stylize this look a bit more. We can go to effects and presets and type Gaussian blur and apply it to this form layer. We can blur it out a bit because now we can see separate particles. And if we will set this to 15, we will blend these particles together and we will not see separate pieces. Then we can just apply some curves effect, just type it curves and drop it on foreign layer. And we can add this S-curve to make our color more vibrant. And as you remember, you can also change the colors and the particles just right here and set color and color over. You can change these colors if you want to have much more variety of colors, or just apply a Tritone effect just like this on top of this layer and set one overall color which you want to have. And this is basically the easiest way to change the color. But I recommend to use these set to color because in this way you can add a lot more variety to your colors. Let's un-solo this layer and see how it looks in our footage. You can see that we have much more variety which represents ourselves much better. We can also apply another chorus effect. Let's drop it on form. And let's go to alpha channel. And with this Alpha channel, we can increase visibility of these particles or decrease some parts of it. Just like this, we can play around how much of edges we can see in our particles. So keep in mind that with these curves, we can adjust our edges. And with these curves, we can adjust the colors and contrast of our look. Now as you can see, it's too smooth. This is why we can apply sharpen effects. Drop it on form layer. Let's set it to 150. And as you can see, it gives this a bit of noise which will help to blend with our footage better. And finally, we can add CC vector blur and drop it on form. It will add more fluid kind of look and just change this amount to maybe 55 or 53. Just play around with this value to add these kind of interesting edges to your effect. By the way, you can always go to base form and decrease the size to maybe 700 if you want to make it bigger and make it even more dense particles, if you feel like you don't have enough of them. And to add more complexity to colors, you always can go to here and add more darker tones into your scene. As you can see, as I'm editing this middle one to more darker color, I'm adding more complexity of colors into my shot. So let's play around with these colors to add more highlights and dark tones. So this is how you can basically create a really complex look. But now we have only one problem. Here at the beginning, we have this ugly square. So the easiest way to get rid of this part would be just to animate capacity. But this is a complex part of this class. So let's create a more professional kind of gradient N animation. So for this, we want to go to Layer and create new solid. Let's type it fractal because this effect we will use click, Okay, and it affects the presets. Let's type fractal noise and drop it on this parietal layer. And now we want to add some animation to our brightness at the beginning. And let's make it black like this. Create a keyframe here about few frames later. Let's make it completely white. Then about here, Let's press U on keyboard to see our keyframes. Create another keyframe by clicking here, it will remembers this value. And here at the end, we can change this brightness to black again. Now we have this animation of appearing and disappearing. And this animation will basically control appearing and disappearing of our forum. So these keyframes will determine how long these particles of warm will stay on your screen. So let's say it will stay about a second and then it will disappear. So after creating this animation, we can just go to Layer and click and pre-compose. And let's type it animation and click here on multiple attributes. Let's click. Okay, we don't have any effects here, but if we will open here, we can see this fractal noise effect. We will be able to press U and add more time for these particles to stay or decrease the time by moving these keyframes. So let's go back to this composition in which we worked. And let's feed this animation to our forum. For this, we want to close this particles and we want to go to Layer maps here in size. If we want to choose here in layer. This animation. And now what we'll have to do is to disable this layer. And we need to apply map over. In our case, we want to use x-axis and y-axis. Now we can see that we don't have this ugly square, but we can see this animation appearing and our screen and hear disappearing. And once again, if we will go to animation, we can control when it will disappear by changing these values. And if we will increase the distance, it will disappear smoother. So let's maybe a previous part. I am going to press is your numpad to preview. Okay, So now is again see these particles are appearing and disappearing. And to create more of these particles, you can create a preset. You would want to delete this rough voltage and camera just like this. And maybe let's set this position to 0, so it would be a standard and size. Let's decrease it to maybe 200. So basically we've used our Polish and just as a reference. And now if we will set this position to standard one, which is 960 by 540, it will be in the middle of our screen. And if we will click here to toggled transparency. You can see that we have our transparency and our particles. Once again, you always can change this random seed to change the look of this animation. You can change the size to make it bigger, to have more high resolution. And finally, you just want to save it with the Alpha channel. To save it with alpha channel, you need to go to Add to Render Queue here and lossless change to QuickTime or AV, which basically allows you to change this RGB and Alpha. And it will save your transparency, which basically will allow you to put this video on top of any footage and turn off audio output. You just click Okay and select where you want to save this version. So for example, this will be first version, click Save and click Render. Then you can go back, change this random seed. And by the way, if it's guiding the edge, it's not that good. You just need to make it smaller. Something like this should work fine. Just make sure that it doesn't go out your frame. And then once again, I'll go to Add to Render Queue. Save it as Greek time or AV. No sound. Okay, second version, save and render. Thank you for watching my class. You can also check this VFX for beginners. It's all, it takes 12 minutes, but you can get this really cool a result. And if you are more into this complex stuff, you can learn how to create sparks from nothing using also trap code, which allows you to create any sort of particles. And for this effect, I have used this to create Sparks. I have a bunch of the tutorials and I upload new class every week. Feel free to follow me here on Skillshare. Thank you for watching and I'll see you next time.
 M Jake, Lets Create VFX & Cool Stuff Together