Transcripts
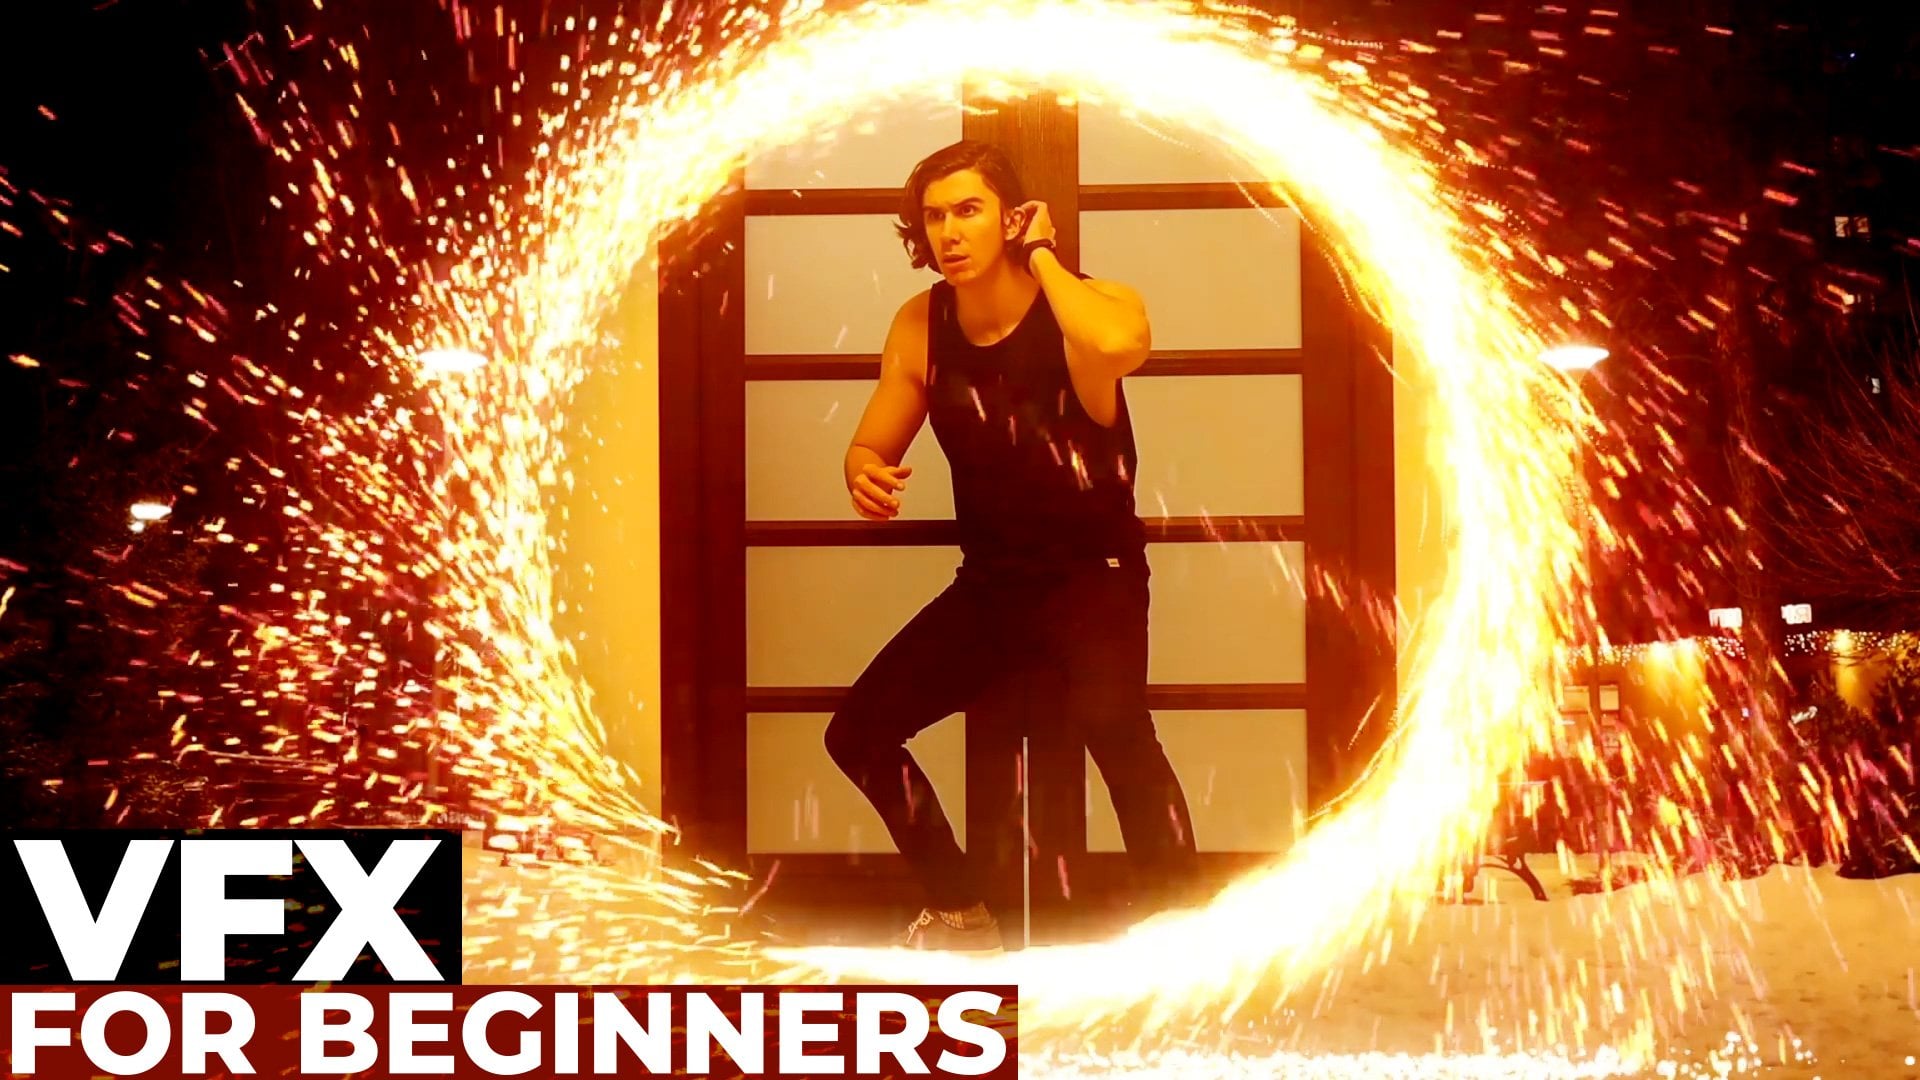
1. Introduction: Hi, I'm Jake. And in this lesson, we
are going to create this popular social
media effect inspired by the king and other
popular VFX artists. The best part of this class
is that you don't need to have any experience
in VFX or filming, or even using any editing apps, I'll provide you all need IT knowledge on how to
film your own video. If you don't want to
record your own videos, then you can download already
recorded to raw footage from the resource tab to this class so you could
start practicing. Right now, I'll teach you all needed skills to
complete this effect. You can just download the
free trial version of Adobe After Effects if you
don't have the software yet, and we will start right away. Also, if you are an
experienced user of Adobe After Effects, I've organized my videos
in such a way that I'll let you know where you can
skip to more advanced parts. I'm excited to see your projects after completing this class. I'll be happy to see you
in my class has also your result after
following all the steps. So let's get started.
2. How To Shoot Your Video: I'm using Adobe
After Effects 2021, which means that you can use
pretty much any version of Adobe After Effects to
make this effect possible. In this video, I want
to talk about visuals, how to shoot your video, and why you want to spend a little bit more
time on the loop itself to get more impressive
result at the end. So first of all, let's
import our footage, which is available in
resource tab to this class. To import footage, you need to left mouse double-click
in this area. So let's leftmost
double-click here or just go to file, import file. This footage is available in
resources tab of this class. So let's select it background
in green screen footage. Also, I want to import already made effect and
rapidly which I've used. So it will be easier
for me to show on already made example why it's important to remember about some key features to
create this effect. So let's start with the way
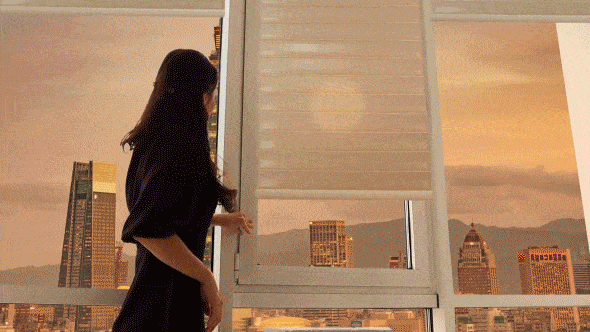
you need to shoot your video. In my case, we can see
this rapid dish here. I just shot a video against a window and outside was cloudy, and I just crank up the
exposure to get this footage. The perfect way to shoot this video is to
use green screen. So this is why I've
included this footage here, which is available to download from resource type, this class, because this would be the perfect way to
shoot your video. And then creating the effect itself would be a
lot, a lot easier. But let's say that you
don't have a green screen. So the easiest way is to use a simple one window
and someone outside, we'll hand you a bowl, which you will take
and place it down. Instead of these parts of your video would
be wolves or e.g. you could just
close your blinds. So your video or could
it be a shot like this? If you don't have
a green screen, you can use the same
weather as I did. So basically what do
you want to do is to have or a blue sky
in the background, which is easy to key out, or just white as I have
in my original video. And we will use
this raw footage. You can just simply use
some color key like this, and effects and presets panel. By the way, you don't need
to repeat these steps. I just explain you how you
need to shoot your video. So it would be easier for
you to work with later. Basically, if you have only white color and
everything else is darker, you can just use color
key to cut it out. But of course, it's
obvious and that's to use green screen will
be a lot easier. So imagine if you would have just blue sky in the background. Your video should be
looking like this. So if you don't have
a green screen, just use a blue sky like this and later just
use key light. So key out this blue sky. And in this way, you also
will have this effect. Green's theorem. This is basically how
you can cheat and get this kind of effect if you want to use your own
footage to create this effect. Of course, I already
provided this bullish on which we are going to
work in the next videos. Next step, which you need to know while shooting your video, that you need to have another
person which will hand off to you the bowl like this. And as you can see in
my original video, I didn't have blinds. I just animated them later. So here a girl is
pretending like she's closing blinds and
go out of the frame. And then I appear on the
screen and getting this bowl. Once again, this footage is available in resource
step to this class. So you can basically scroll it and see how this video was shot. But even if you have something else in the background, e.g. these mountains, I
also will go into show you how you can write
a scalp, your fingers. And also we will need
to rather sculpt the bowl which someone
will hand it to you. You need to shoot prompt tripod. And finally, the last key
point which I want to address is why I just didn't
use something like this. So it would be much
easier to work with. It's much more interesting
to watch this effect when it fills all of
your screen. But e.g. if you are doing effects
for social media, you will have something
like this aspect ratio. You don't really
need to have all of these windows because
you will have something like this aspect ratio and you don't really need
all of this space. If you're afraid that
you forgot something, just simply watch this video
of how it was shot here. This video is available in
resource center, this class, as a reminder, how you
need to shoot your video. The next video, we
are going to use this footage and start
creating this effect. See you in the next videos.
3. How to Key Out Yourself: So in this video,
we are going to start to make this effect. From last video, we already know how you need to shoot our video. And in this video, we
are just going to use the Polish which I provided
to create this effect. Basically, I'm going
to delete this because it takes too much space. And once again, I'm
going to import these two video files which is available in resource
step to this class. So to import, go to
file, import file. So we need both of these videos. We can just click on green
stream raw footage and drop it here and take this background and drop it below of this
green screen footage. If I'm going to click
on this firewall, you can see that we have
our background below. So basically the order
of these layers matters. Which one is on top? It will be on top of
your video as well. So first thing
which I want to do is to use key light effect. We need to go to effects
and presets panel. If you cannot see this panel, you need to go to Window
and enable it from here, Effects and Presets,
effects and presets. So make sure that you have this. And then go to effects and presets panel and
type key light, Wait a minute for it to load up and then choose
key light effect, leftmost click, Hold and drop
it on green screen rapport. With this effect, we can get out blue screens
for green screens. So basically you
need to click on this color picker and
click it on your sky, which you want to replace. Keep in mind that
this key light effect doesn't work with a
white background. If you shut your
video with white sky, you just need to use
color key effect. And in this way, you
can just simply q out something by color,
just like this, and then just change
this second value, as you can see, by just
cut out this gray color. So keep in mind that you
have these both effects. Key out something
from your footage. So in our case, we are
going to use key light, and we've chosen our green
color or blue color. If you use a blue screen or blue-sky, turkey out ourselves. But let's say that
you shut your video and you didn't have any green
screen or a blue screen. In these cases, you just
need to simply to rata scalp your hands to place it on
top of the background. And now I'm going to reign
of how you need to run the scalp your
hands and grabbing bowl to use in your effect. If you already know how to
write a scarp your footage, you can simply just keep this timeframe we shipping
see on your screen. So this is two ways how
you can keep yourself from background and
less weight to key out yourself is rather Skyping. So in this case, we will need to cut
out with the mask, our window by using this pen
tool right here, like this. Press M on the keyboard and
click Subtract, measure this. You created your mask on your footage and not
on background footage. So in this way, you already
will be able to change your background to any
footage like this, which will left is
that you'll need to write out scapular hence
on top of your background. So to do exactly this, you just need to duplicate
your green-screen rapport, which just press Control D, press M, and delete the mask. We just need to see where we
need to cut out our hands. And then you just simply can
select the Selection Tool. Let mouse double-click on
this layer and this mode, you can choose this
rather Brush tool. It will allow you to select
what you want to cut out. If you will hold control key
on a keyboard or Command key if you're on a Mac and left mouse click left and right. You can change the
size of your brush. As you can see, I'm
holding control and let Muslim left or right. It will change the
size of this brush. We can just simply show to the software what we
want to cut it out. So in our case, we
want to cut out everything which is
inside of this window. In our case, it
doesn't matter if you are cutting out something else. Make sure that you
are carried out your fingers and the bowl in the moment where
you are grabbing it. So let's make sure to
cut out the fingers. Like this. This is time-consuming process, but I'm going to speed
up for you just first, I want to make sure that you are descending
how to use it. So basically, you just
show their software with the leftmost leak and this green brush, what
you want to cut out. And if you'll hold Alt key on keyboard is you can
see I'm holding Alt. You can adjust your
cutout just like this. Remove unwanted parts. Once again, you can use
Control to resize your brush, left mouse click and hold, and drag to left to the
right to change the size. You can also use scroll on the mouse to zoom in or zoom out and carried out
something in which you want or add some parts. If you want to add some parts. And then basically you
shouldn't just simply go to the next frames
and make sure that you're still cutting
out your fingers. Once you'll do this all
process of the video, you'll have your
hands rather sculpt. Next phase will be
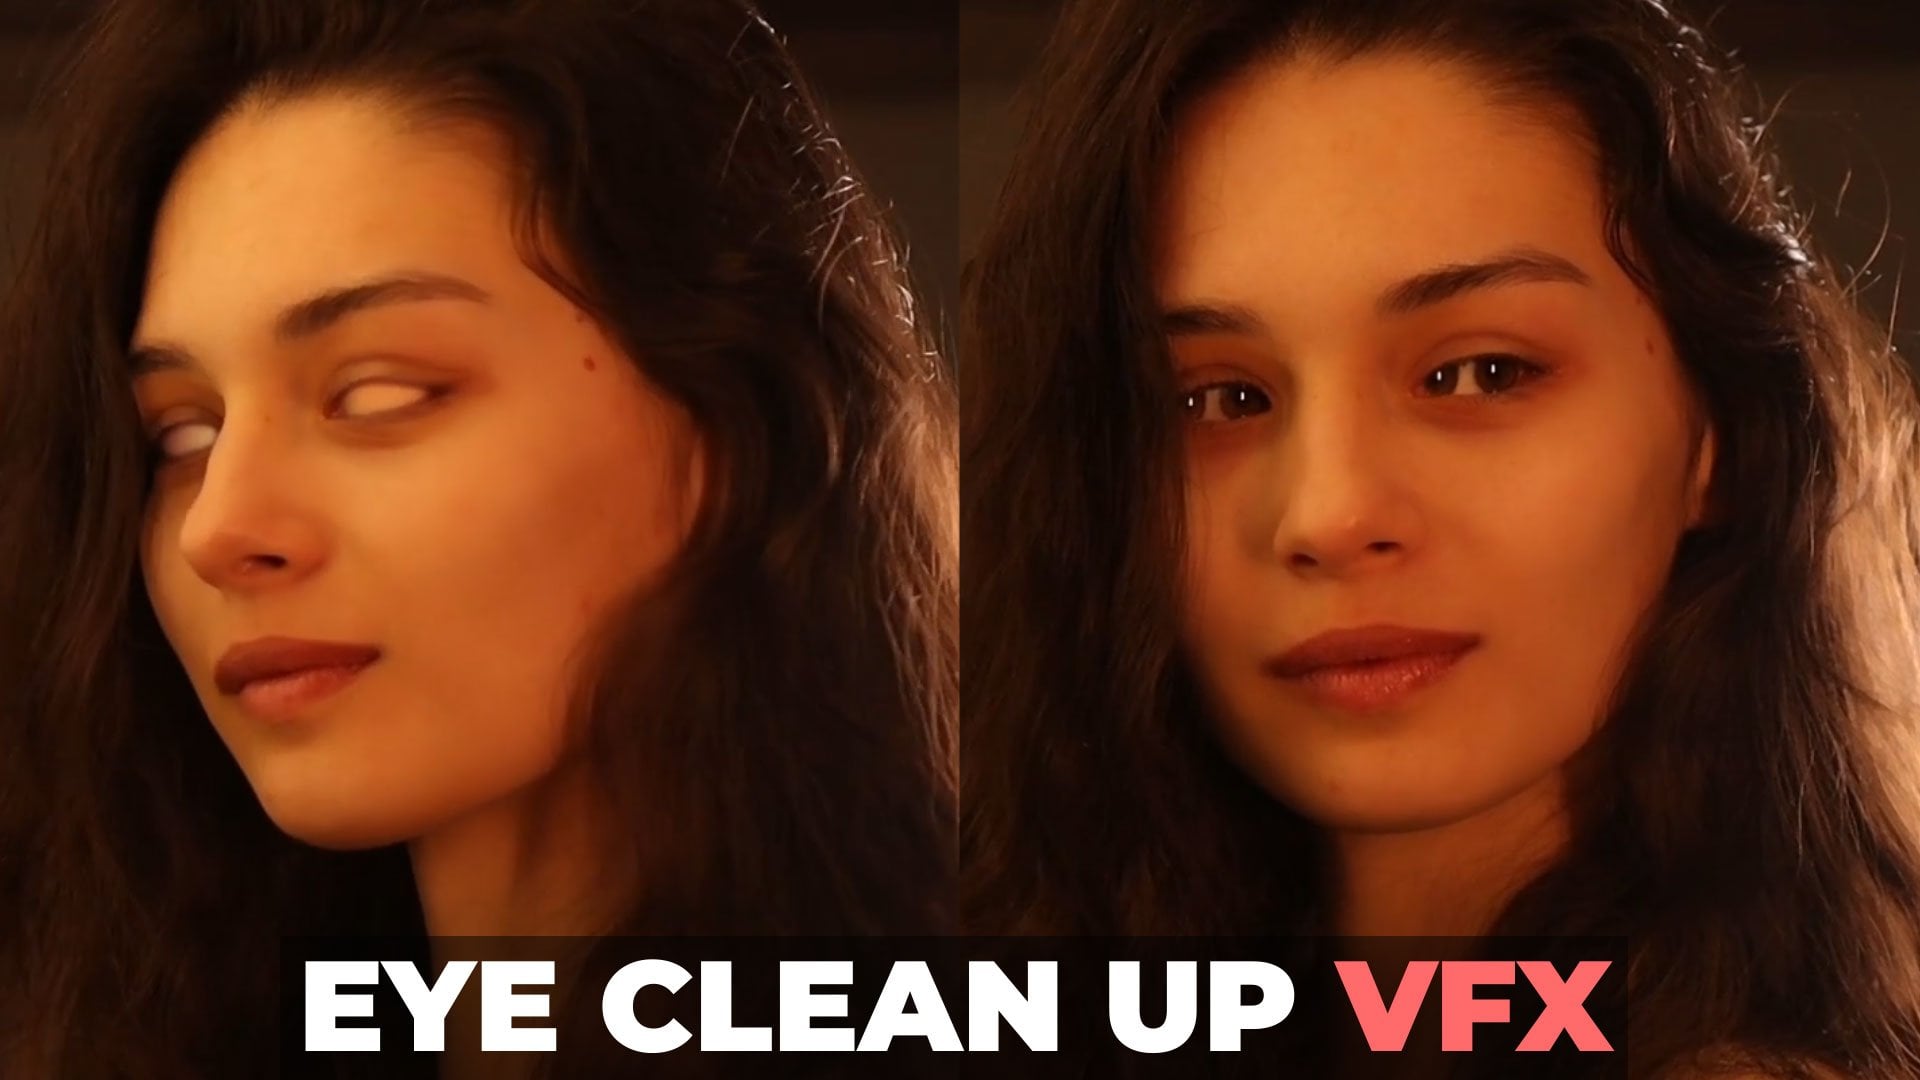
freeze your progression. We need to select this area in which we carry out our hands. And then we need
to click Freeze. As you can see, it will
save your process, which is exactly what we want. Now, I'm going to
explain why we need to cut out our hands
from this part. Because basically when we
froze our progression, if you've spent a
little bit more time on proper carrying out, you'll have a clean cut out. Basically, if you will spend more time on credit
out your fingers, it will look cleaner
lake in this video. So make sure to spend
more time to cut out properly your fingers
and the bowl. And as you can see
with this layer above, we can place our hands on top of our window and
changed background. And as you can guess,
it would be much easier to use something like green-screen because it's
much easier to cut out just simply by using key light and dragging this screen gain value, which will allow
you to cut out more if you will need to
adjust your key. If you will go with this
process of rotoscoping, you will need to change
these values for feather, which basically
will allow you to change the look of your car out. Shift Edge is a big
one because if you will shift a bit to the left, which goes to negative values, you'll be able to cut out
even more and it will help you to get
out unwanted parts is also you would need to change the contrast if you want to have more feathered edges also use
motion blur is also great. Because in the moments where
you have real fast motion, it gives you a bit of motion
blur, which is great. And also, it would be
a great idea to use decontaminate h colors
by clicking here. Basically, as you can see, it removes these unwanted
parts of the background which were really get to
blend with your footage. So what we learned
from this video, it's much easier to
kill me or forage just one window and use a green
screen at the background, because it would
be much easier to use one effect key light. And it will help you cut out your hands and place on
top of any background. In the next video,
I'm going to show you how I created this background in case if you would want to use other backgrounds
for your video. See you next video.
4. How to Create Your Background: In this video, I want to show you how I created
this background. So basically what I did, I just found a video on
Internet with the time-lapse. So how this works, I found a video of timeless
without the sun. So basically it
goes from evening, tonight city, which is really
nice, time-lapse video. As you can see, rest of the
video is just simply prose. How you can do
something like this. I'm just going to import additional video
which I've used. So this is a time-lapse which I've used for the background. And I just scaled up
by selected my video, press S on keyboard to see
scale and scale it up, flipped it horizontally
by right mouse, click on it and go to Transform Flip Horizontal
and guts this look. Now what I wanted to do
is to find the place which I want to use a
bright part of this video, but without the sun, something like this,
then I want to go to time, enable
time remapping. And basically it means
that all of this video, it goes from 0 s to 16. But if you aren't going
to create a keyframe, it will remember this
frame of the video. And then I'm going to scroll it a bit further to
night sky like this. And click and other time here
to create another keyframe. And basically if I'm going
to delete this keyframe, which makes it go
further, it will stop. So basically, take
a look at this. I'm going to select this
keyframe and press Delete. And as you can see, this
video are completed prose. The same way I can do
here at the beginning. If I'm going to
delete this keyframe, it will not go from
this moment anywhere. So let's select this
keyframe and press Delete. And now as you can
see, it froze again. So now I basically can compress these two
keyframes together, which will speed
up this process. So this is basically how I
ramped up this kind of effect. What I did is I
approached this part. Then if you are going to
look at this original video, you can see that we don't
have really a time-lapse. Here is basically it changes to a night sky and it's
pretty easy to do. So basically, we just want
to duplicate our footage, go to this night
part of the video, and basically just go to
time and click freeze-frame. In this case, it will allow
us to press T on keyboard. Set opacity. Basically, from 100 opacity, we are going to go
to zero opacity. Once again, what is keyframes? Keyframes basically
the points in time, which remember, is the
value of certain property. In our case, this keyframe remembers this point
in time, which is 3 s. Remember is this value of 100 per cent of
property opacity. And in this moment, we've created another
keyframe in which opacity, we've set it to zero. So our software remembered that here is visible
and invisible. We can switch these
key frames like this. And basically here
at this keyframe, it will be visible. At this keyframe,
it will be visible. In this case, we can just create this animation of operation
of the night sky. And now if I'm going to
enable this background video, you'll see that it goes
from day to night, like this, which is
pretty cool effect. Then from this night Polish, when we grabbed our sum, we want to have this kind
of time-lapse at the end. And it's also pretty easy to do. Just let's go back to our video here of the background
ten basically simply, I just duplicate it, my video below by selecting it and pressing Control D to
duplicate this again, see if I press Control
D and put it above. We can press U on the keyboard to switch these time-lapse. So it would go not
from day to night. And if we will change
position of these keyframes. So it would go
from nights today. We will have this time-lapse, which goes back to the day. And in this case, we can change this night today at any moment, just like this, and then
it will just go as a loop. So basically here we have day, then we took our son, it turns to the night. And then we have
this time-lapse at the end where it
goes back to day. This is basically
how I played it, our background for this video. In case if you would want to
create something like this. From this video, we've
learned how to create it. But luckily, I already provided
you with this background, which you can use if
you don't want to spend any time in creating
this background. And the next video
we are going to use this already provided background
to create our effect. Also, we are going
to create our sun. See you next video.
5. How to Create Our Sun: In the last video, I
showed you how you can create your background using your own footage if you don't like this background
which I provided. But for this effect,
we are going to use a background which I
provided to this video. So it would be easier if you are beginner because we already have this beautiful the video of the background to
use for our effect. Once again, I want
to delete all of this footage because I
want to start fresh. And I'm going to import from these two videos which I provided in resource
type to this class. So we would be on the same page. So let's create a new
composition just by dragging any of this footage
fun new composition, and also our background. Once again, to cut
out our background, we are going to use key light, left mouse, click and hold, and drag it to green screen raw and select this background. So here we have our background. And by the way, if
you are going to use this background on your footage and
timing is not right, you can simply
adjusted adjust it. Let me show you on
this background. So I'm going to disable
my footage here. And I'm going to
show you how you can adjust the timing
of background. Basically what you need to
do is to right mouse click on this background and go to
time, enable time remapping, which allows you to create a keyframes and move it around, adjust the timing where
this transition happens. It will be really handy
if you were going to use behind of your own video. So basically you
just need to create a keyframe in the moment
where nothing happened. Then here it happens, this transition, and
create another keyframe. This keyframe you
want to delete. Then you want to go to
the end of this video. And just before here
where it starts to move. Create another keyframe. Now basically you can just simply do whatever you
want with this video. You can just move it to the left and expanded
if we want to have more daytime
here at the end, e.g. you want to have this time-lapse be a bit earlier, it's 12 s. You can just simply select these keyframes
and drag it here. And it will happen earlier. Or if you want to,
It happened faster. You just need to compress
these keyframes. It will happen faster
or expanded like this. If you want to have this
time-lapse, a lot slower. Same thing you can do
with these keyframes. Here where this
transition happens, you can just simply select
these keyframes and move it to the beginning if you want
to happen a bit earlier. Bar here later. So this is how you
can easily work with this background and use
it for your own video. But now let's delete this background and use
it exactly as it is here. Now, you know how you can adjust the timing of background. Okay, so now we have
this part of the video. As you can see, we've
missing our son. So now we are going
to create a sun, which we are going to
place in our footage. Basically, it's
pretty easy to do. Let's shut out for a second
our green screen Ra, by clicking this eyeball. And let's go to layer new solid. And let's call it son. Make sure it's white. By clicking here on
color and click Okay. Now we can just simply
select this ellipse tool. To select it, you just
need to let more slick and hold and then select
this ellipse tool. If you will let more
slick and drag, you will create a
mask just before it makes sure that you've
selected your son layer. It's important because
we want to create this mask on top
of this sun layer. So let's let mouse click and hold and drag it to the right. And if you hold control, as you can see, I'm
holding control. It will create a
circle from center. If you will hold Shift, it will create a perfect circle, which will be perfect
for us to read the sun. Okay, so we've created the sun. We don't really know
how big it should be. So to create a proper scale, we need to enable
this green-screen rapid rich and see
how big this ball is. This moment we can see about
which size this bowl is. Same-size. We want
to have our sum. So basically you need to
select the sun layer, press M on the keyboard
to see the mask selected. And using the selection tool, scrolling with
wheel on the mouse. You can zoom in and then left double mouse-click on one of
the edges on this square. It will allow you to
move this circle, align with your bot, then you want to hold
Control and Shift. It will allow you to change
the scale of your mask. And basically you just
want to make it a bit bigger than your bowl. Something like this. Next step will be to select
this sun layer and press F. It will burn out this feather. With this feather, we can
just feather the edge. Let's sell it to
15. Also, we can expand this mask by clicking here two times and
change this expansion. So it will cover our bowl
entirely just like this. The second thing
which we want to do is to duplicate this mask. Just simply select it
and press Control D. It will duplicate it and open this second mask and make
feather a lot bigger. So we would have
this kind of low. Also, we can change
the expansion to have this really
bright and nice low. And just by playing
with these two values are better and expansion, you can get the look
which you like. We can always change
the color of the sun. We can go to effects and
presets and type here, fill. With this fill effect. We can drop it on sun. We can change the color. In our case, we
want to click here on toggle switches and modes. To be able to see these modes. Here we can change to add, which will blend
with our footage. In case if we will change this color to a light
brighter color, just like this,
you can see how we can get this interaction
with the background. We can add even
color to it, e.g. more orange-ish. And now we can further
adjust our masks. In our case, this
mask is too big. We can make it a bit
smaller and feather that out a bit more. With just two masks, we created our sun. You can always play around with these values to get
the look that you like and make sure that it
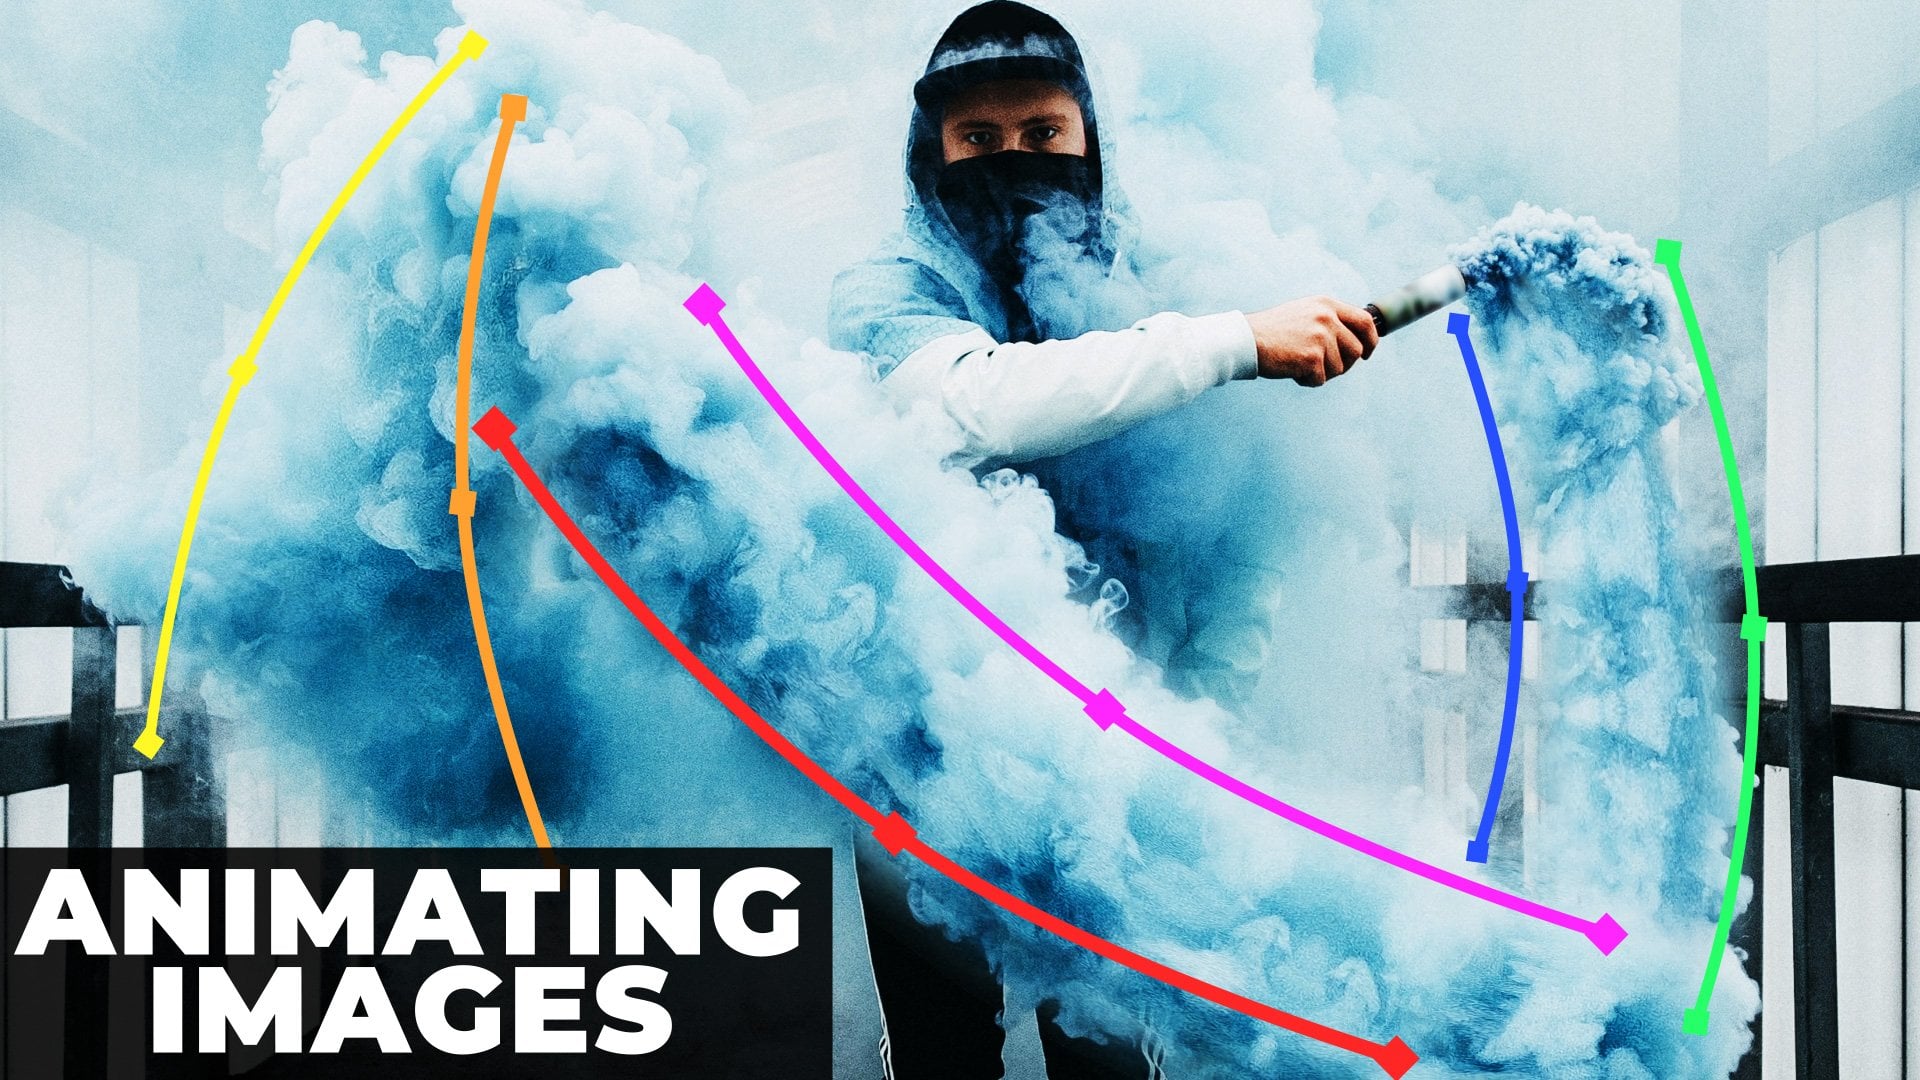
looks good at night also. Okay, so we've created our son. So now we need the sun to follow the ball just
for a few frames. So we would have this
transition point from the sun to this bowl. So basically once your
person grabs the ball, you just need to press P to
see the position of the sun. We can also set the sun below the green screen
footage, just like this. And by gradient this
position keyframe, it will remember
that it needs to stay at this moment in time. Then later, we can just move
it to bow, just like this. As you can see, it
will follow our bowl. Then a bit later, Let's make sure that it's still follows this and
adjust it manually. So make sure that in each frame it's still follows this bowl. And about here, it will
be a transition point. So now we have this
simple tracking. By the way, you can use
scroll on the mouse to zoom in and zoom out and
hold space bar. As you can see, holding
spacebar and let mouse-click to move
around with your image. So now we can see that it
follows perfectly just by simply creating a bunch
of keyframes to position. And at this point we
want it to disappear. So basically we will
cut this layer by grabbing on this edge and
cut it to this moment. Also, we want to press T on
keyboard to see the opacity. And as you can see,
we can change it. Now let's create a
key-frame about here. When we grabbed our sun. And here towards the end, we would want to
change it to zero. So it will be our fading point. You can see it
looks pretty cool, but this transition
point is too visible. So what do we want to do
is to select our sun and press Control D to duplicate
it and put it above. So in this case, we still
will have this tracking, but now we will have this
glow on top of our bowl. Just make sure that this law
will pay doubt a bit faster. So let's change this opacity
keyframes just like this. And now we have this kind of transition point a bit sooner. We can also click
on these edges to change this work area
and press zero or not. But to see the preview. You can see we have
this really clean and nice transition to the bowl. So this is basically how easy it is to make this transition. So nice video, we
are going to fix these two issues which
we have in here. We have really a nice
transition point, but we need to fix
this brightness here as NMI, original effect. We're going to
learn how to create this sun horizon effect, and it will be the final
part of our effect. See you next video.
6. Finalizing Effect: So we have a few issues. We have this really
bright sun here. So one way to fix this, take this sun below about here, set it to zero. So as you can see, now we have this really nice transition and we have not that
big son at the start. So this is how we
fixed our first issue. Next issue which
we have in here. We have the Sun which is too
bright behind this blind. So the easiest way to
change it is to basically animate the opacity to set
the keyframe right here. And then about here, we can set it to lowest
opacity, something like this. But as you can see, it
doesn't look really nice. So instead, we can just simply
remove these keyframes. We can use this
green screen footage and duplicate it and
place it on top. And now what we want to do is to use this Alpha Inverted Matte. If you cannot see
this track matte, you can just simply click on
this toggle switches to seal it and set it to
alpha inverted matte, which basically provides us with this really clean transition. Now we have this really nice
way of closing the sun. Best thing about this, that you can press T
and change the opacity. And if we will set to
something like 95 or 92, let's say tonight before, we will still be
able to see the sun, which looks pretty realistic. Now less thing which we want to do is you can see here we
also will have this bowl. So what do we want
to do is to create a keyframe of opacity
of this green screen. Press T later. Let's set it to zero. So now we will have this clean transition
which we created earlier. And we can also got this layer. So basically we've used
this green screen footage with our blind as a
matte to close our sun. And same technique we were
going to use to create this effect when the sun is rising up from these mountains. So let's do exactly this. It's pretty easy to do because
we just basically need to duplicate these both layers. Let's expand it like this. And let's make sure that
we will see our sun. For this, we want to disable this opacity and set it to 100%. Also, we want to press P on keyboard to see this position. Make sure to move these
position keyframes to here and click Delete. So our sun will be
in right place. Then we want to
press T on keyboard and delete this
opacity animation. We can just click here and
set it to 100 per cent. And we can lower this
percentage here. Tonight before is
we used before. So now basically as you can see, our son is in right place. Let's thing which we want
to do is just to make the sun rise up from this
Mountains to displace. Here, it should be a displaced. So let's select our sun recipe. Save this position. Then go to the beginning
of a time-lapse. Set this sun behind
this mountain. Also, if you will take a look, you can see this
little bigger dot then these smaller dots. So basically it means
that you can grab it left mouse click and drag it. You can get this
curve. From here. You can also curve it a bit. So this will allow us to make this kind of arc
motion of the sun, which will look a bit more believable than a
straight line like this. So the trajectory of the sun
would look more believable. So zero. Remember, we used this
green screen footage to met our son. But now we are going to
use a more complex met. To create more complex met, we are going to go to layer
new solid and call it met, which basically is a mask
where we are going to show our sun and where
we cannot see it. And click Okay, we can
disable it for now, but makes sure that
you've selected. Because now when we are
going to create a mask, it will create on
top of this mat. We need to select this met and start created a mask
which will block the sun. E.g. we want to block the
sun here at the mountains. You can create a mask
just by clicking on this pen tool and clicking
on the image itself. To create these points. And just simply,
we need to cut out all which will be
on top of our Sun. So we need to take this
mountain layer, if you will, click and hold, it will allow us to create
this Bezier curve. So it would be exactly the
same as our background. So let's do exactly this. Rest of this, we can just
simply select it like this. Let's see what we've created. Let's select the
selection tool and let's delete this
green-screen raw footage. And instead, we are
going to use this mat. So basically, as you can see, Alpha Inverted Matte now
works with this layer because these track mattes
work with the layer above, in our case with this mask which we are created
on this layer. And now we are going to scroll. You can see that now this mask acts like a
blocker of the sun. You can clearly see
that it blocks our sun. And it looks pretty cool. To make it look even
more believable. We can just press F on keyboard
and adjust this feather. So now as you can see, these edges are a bit blurrier. And it would look a
bit more like this. Sun wraps around our buildings. We can also go to
mask expansion by click here double
time and change this mess expansion
if you want to have this sun a bit more on
top of our buildings. So I'm going to set
to minus five here. And here maybe 221. We will have this really nice
glow on top of all of this. And now we can basically
animate the opacity of the sun. So here at the beginning, we can set it to zero. And we can cut it
these both layers to this moment created keyframe. And a bit later about here, it will be fully visible. So now we would have
this kind of animation. At any point, we can just
simply adjust the sun look, we can just press F on keyboard. Fader is a bit more hand create a keyframe
for mask feather. So in this case, we will
have this proper sun here. And here at the beginning, we can feather out more. So it would look more like
low at the beginning. And then like a sun
towards the end, which will also make
it more believable. And finally, with this matte, we want to create another mask. Make sure that you've
selected this mask. And create a mask. Because here behind this blinds, we want to see our mask. So let's press M and C, this mask which we just created. Leftmost double-click
here to see this opacity. Let's also change this
mask to subtract. As you can see, now we have
this sun fully bright. But if we will change this
mask opacity to about eight, we will get the same look
which we want to have. So now basically we
would have this really nice rising of the sun
here behind these blinds. We will see it as well. Finally, I want to adjust the movement of the sun
because if I'm going to select this area and press zero numbered
super linear motion. And I want to have this more
interesting kind of look. So let's press P on keyboard to adjust the
animation of position. Select these both keyframes
and press F9 on keyboard. Basically, it means that
it will start a bit slower than faster,
and then slower. If I'm going to select this
last keyframe and go to graph editor and drag
this handle to the left. It will go a lot slower
here at the end. And it will give more interesting
look to this animation. Let's press easier on up
at to see how it looks. Now as you can see, it looks
much more interesting. And also make sure that you
selected this speed graph. Here. You will see exactly the same breath
as I'm seeing here. Press zero or not, but
to see how it looks. And if it will render
all this video, just select all of this area. I'm going to exit this graph. Editor. Ampere is zero numbered. We can see all this video. The last week, which
I want to add is two. When we are opening our blinds, it will get brighter. It will be the final
time before we are going to sign out our work. So as you can see, we have
this really cool effect and best thing
about this effect, that it's fully
loops into itself. So let's thing
which I want to add is that here it will be a bit darker and then brighter
because we see our sun. We can do this by creating
adjustment layer. And let's add curious effect
and drop it here and here. We want to have a bit
darker colors like this, and then create a keyframe to this stopwatch, to the curves. And later, once we
open this window, we can click to reset. So basically it will
get back to our video. So basically now we can
see how it changes. And then it will
be a good idea to make changes to our green
screen raw footage, as you can see, is this one. And let's add a curves
effect on top of it also, because we want to
create a curves, a keyframe to our curves. Once it's getting darker, we can also make it darker. Also, we would go to
blue and add some blue. So it would look
more like an ite. We can decrease a bit of red and make sure
that it goes darker. If you will select
this layer and press U on the keyboard to
see the keyframes. We can adjust this last
keyframe of the curves, as you can see curves here. And add a bit more
bluish tone so it would blend with the
background even more. And also let's make it darker. So this is how we can change
insight colors as well. And about here when it changes from night
sky to daylight. We can also select
these keyframes, press Control C and
Control V to paste it. And also reverse
time-reverse keyframes. Just select both of them. And as you can see,
we did a lot of changes which will
help to blend with the background and rightmost looking at and go to
Time Reverse Keyframes. So basically it will
go and other way. And finally, to have
a perfect loop, we want to do the same with
this adjustment layer. You can just take
these keyframes, press control C to copy, and here control V to paste
and reverse these keyframes. So it will go to this dark mode. Then it will loop again. And here it will go to
the straight white color. You can basically select
these both keyframes and make it even brighter if you want to increase this effect of the sun shining through and
then it goes to the dark. So basically this is how
you can create this video. And finally, once you've
created this video, we can call it this
composition which we worked on, final effect. And since it loops, we can just select
it and drop it on this composition icon. To create new composition. We can start it
from this moment. Press Control D to split this layer and set this to the beginning
and this to the end. And then this way we can see
that it loves perfectly. And it starts from here. You can even create some
animation if you want. You can always
select your footage and press S on keyboard, create a keyframe, and make a camera movements
like scale up. If you want to make
this more interesting, like camera zoom in and zoom out by copying these keyframes
a time, reversing them. And it will look much
more interesting if you want to have
some camera action. Thank you for watching my class. Make sure to follow me here on Skillshare and
sharing your work. As you can see, I always
check your projects and share my opinion and
give some advises. If you'll choose to share
your results with me, I post every week, you can find my nucleus is here. And if you want to learn VFX, I have this tab in
which you can click, See More and see all of
the VFX classes, e.g. this effect takes only 12 min and you'll get this
really powerful result, this one and bunch of others. I also have complex VFX. If you are advanced
motion designer is also a logo animation. End of each result classes. I'll be happy to see
you in my next class. Thank you for watching.
 M Jake, Lets Create VFX & Cool Stuff Together