Transcripts
1. Intro: Friends, I'm Kirsch, and
welcome to my studio. For today's class, I
prepared very fun, very easy lessons about
painting pumpkins. I will show you
different ways to paint cute pumpkins in
different colorways with different types
of brush strokes. Although it looks cute
and funny and easy, we will be practicing
a lot of making nice washes and
practicing brush strokes, wet in technique and
dry on t technique.
2. Materials: These classes, I will use
cons Manti watercolor paper, 200 grams, grain fin. You can use any of
your favorite papers. It is nice if your paper has some sort of
delicate texture. I will use a wide
range of warm tones. You can use paints from my list or just use your
favorite yellows, oranges, browns from
your own palettes. I will use two synthetic
ground brushes, one slightly bigger,
one smaller, and I will use a kitchen towel.
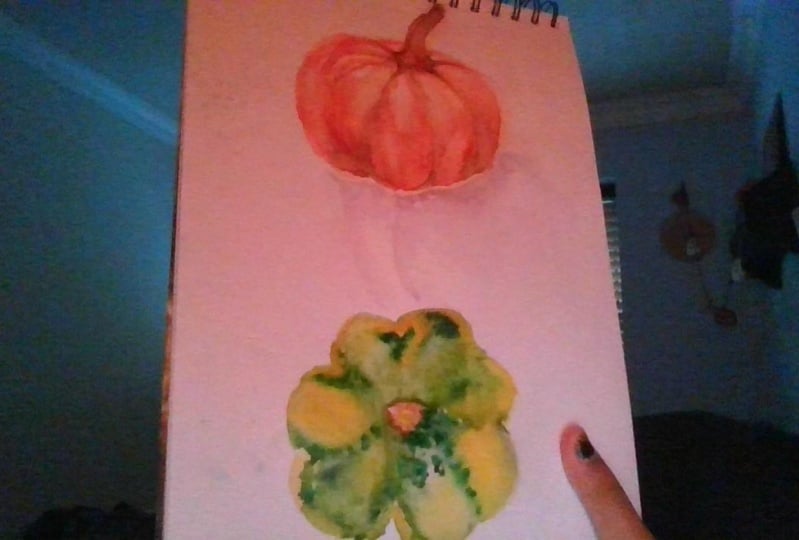
3. Pumpkin 1: Let's paint our first pumpkin. The very traditional
one, orange one. Let's find a spot where the stem will connect
to the body of the pumpkin. I use orange, which
is std and red, that looks like orange, and I will map out the
parts of the pumpkin. With watery see strokes. I'm creating this
Pumpkin outline. You can start with the tip of the brush and apply a little
bit more pressure and then make a curve
again, like this. Remember the few
partly visible parts of the pumpkin, like this. Now, I was my brush. I d atle bit onto paper towel and go around my
outlines and soften. And same here and
around another one. If your paper already getting dry, that's
completely fine, you just apply a little bit more pressure when you do that. Let's consider that
in all our pictures, sun will shine
from the top left. Therefore, the right part
will remain in the shade. That means we can add a bit of of darkness into the
right part and of course, in the bottom of the pumpkin. I just add a little bit more of orange into the bottom parts. If paper is still wet. It creates very,
very nice washes. If the paper is
already getting dry, you can create nice
pumpkin texture just with the tip of the brush. I would like to
soften some parts, and I would like to
make them so to say, evenly bright on the bottom. The pumpkin will get
some weight when it stays surface and crowd, a little bit of of darkness of bolder
color in the bottom. Now I can wash my brush, dry a little bit with the paper towel and soften
all these brightness, the super brightness pots. Maybe a little bit here. Let's add some texture. Just with the tip of the brush. Now I will switch to my other brush and I would
like to paint a tail. To pat a tail, I will use Rosen. Firstly to map out the tail. Let's start with a
simple, simple shape bit. Turning into that direction. I will fill it basically
with burnt sienna. I just leave a small little spot of untouched watercolor paper. Now I will use burnt sienna. And add shade only on one side and with the
tipping moves of my brush, I will create this cut part. Now with the tip of the brush, I just go around
along this tail part and add this lines. Now, once your paper
is getting dry, you can add a little bit more of dry texture
with the brush. Not so much. But that will bring some nice touch to your
pumpkin. Have a look. Usually, this part is more
in the shade because some goes from that side and there is also shade from the step, you can add a little bit
more of daca right here. And a little bit here. I, I flatten a
little bit my brush, and add a little
bit of dry texture.
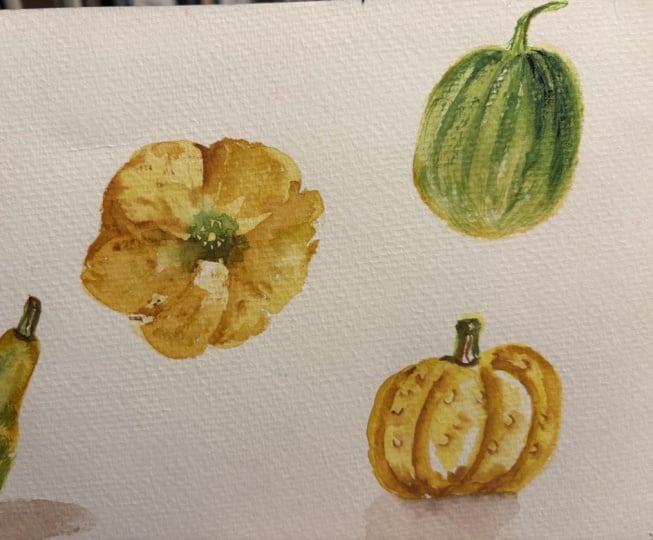
4. Pumpkin 2: Let's paint pumpkin from
the top yellow and green. Again, let's start
with the middle. Let's prepare place for the middle part for
the stem on the cut, and then let's firstly
paint the shape. Firstly outlines, then
you soften the edges. Bring all the colors from Hes to the center
of your pumpkin. Sometimes if you have some white paper
around, that's great. Now let's add some division
between in this parts. While the paper is st, it creates very nice organic the floor. Let's not forget about shade. Sun shines from that side, that we will put the opposite
side more in the shade. Therefore, also I add
a little bit more of texture and colors in there. Okay. I wash my brush, dry with a paper towel, and let me imagine what else, what nice things we can do. I will check out where
my paper is getting dry, so I can add very nice define define ornament on
them yellow pot. Always try to be different, try to avoid being
too symmetrical. T. You can either
change your wrist, the direction of your wrist. You can flatten a
little bit your brush, for example, do textures
in different ways. Be creative. Look
at your references, or just follow your ideas. Yeah. I keep adding and color in the this division. To say parts, very dark color. Dry brush. It also helps to
imitate the texture. I want to keep this
part almost yellow. Now it looks nice. Let's soften a few
things around. I want to add a bit of
texture also with yellow. Very playful. Don't
overthink it. Now let's paint the middle. I will take burn. Actually, I will take
just the same yellow for the very beginning to prepare
background for the stem. I go ad. Yellow around. Then I let it dry and
I will just combine, just bring everything to the br details into the
middle, into the cut. The cut always nice to
paint with dotted line, so it will look
like an even cut. You can mix a little
bit burn sa with the billing green dark
green you use green. Very light on the top. Once more you get
into the shady pt, you can use a little
bit darker colors. Now, that's nice. Nice shape to emphasize. Now. Now I think we t
5. Pumpkin 3: Now let's paint yellow pumpkin, which will be little
b tilted to us. Let's find the place for
the stem around here. Then let's map out our pumpkin. Just preparing the shape. Then I your feeling then pots. I add dry brush strokes into
the wet into the wet pot. Now I would like to
add some yellow. Mixes very nicely organically. With clean brush, I will remove a few moments in the top
because it's the lightest part. Now let's add while
everything is still wet. Let's add burn CN
to the very bottom. Right here it's already dry, bit lost the moment. But we can add nice
texture in there. No problem. Just go with your brush
whenever it is wet, it will create nice soft parts, and if it is already dry, it will create very
typical texture. Now, as our pumpkin
is in warm colors, let's make let's create for it. So some nice, grayish tail. A few drops, just really few drops
of same green color in the wet pops to colors
support each other. Then add bruh.
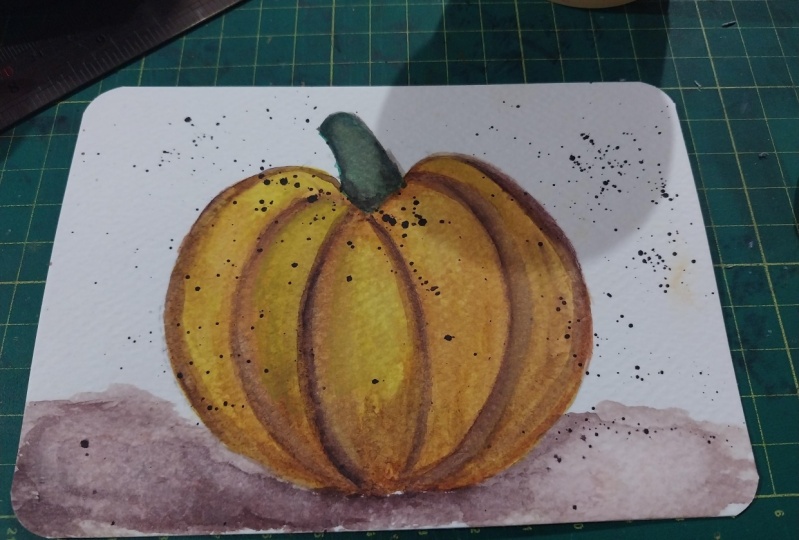
6. Pumpkin 4: Let's start with probably
the most known pumpkin. I will make a
basement with yellow. It's pure yellow, and I also
will mix it with nap yellow. Just to soften a little bit, the brightness to
dump the brightness. With the tip of the brush, I will paint sea strokes
with the body of the brush. Just sliding around. One, P, another part, when to the right,
and the middle part. The middle part. Try to bring all the parts of the pumpkin
into the logic center. If you have some white spot
left, that's also fine. That will create these
nice light ideas. Now we painted, to
say the basement. Now I switch to another brush. I switch to another brush
and I will use Sator red, which you can
substitute with any of your with any of your oranges. I have made I have Mata brown. Burn sea and will also work. Any of your autumn colors. Now with the tip of the brush, let's add a little bit
of orange texture. The basement is still wet that allows colors to distribute. Keep in mind that right
now we're painting, so to say, the shady parts. What's yellow? It's on them. It's on the inside of
these parts of pumpkin. If your paper gets, then you can play around with the texture and add
dried brush strokes. If not, st, let's
finish painting with Let's just use the
time to paint on wet. Now let's use our dry dry brush and add some texture. It's partly still wet. It the brush strokes, you can either paint with
the tip of the brush, holding your brush
around 45 degrees to. You can different shades of orange, different brush strokes, a little bit darker
on the bottom of the pumpkin because it's in
the shade, its own shade. Light doesn't get into that. Now t's stem of the tail, how you call it. You know, Then I would like to mix
it with burn Ciena. I go a burn Ciena
into my palette. B Ciena. And a little bit of green. Just a touch of green.
7. Pumpkin 5: Next pumpkin will be so to say, white pumpkin with
green parts on it, but we can't really paint white on a coal and
if we just leave, white paper it will
be too boring. I will dilute a lot yellow mix to prepare the base basement. Very very diluted mix. And I will set up the shape. It will be pretty one. Remember to add a little
bit more shady parts into the bottom and keep the
upper part more light. Then I wash my brush dry
with the paper towel, go so soften the edges. I can even slide with dry brush. My paper has some texture and
that allows me to create a nice already pre made
pumpkin texture. Now I can add a little bit more of shades into the
bottom to the very bottom. Again, I dry my brush, dry my brush, flatten
it a little bit. And ad and distribute
soften this shady area. Now let's while it's dry
because we will need dry surface to add
texture. Let's paint. Let's paint this stem.
It will be darker. I would like to add
hint of yellow. They organically mixing
with green and create this pretty nice color. Now, I guess my
paper is almost dry. We got very nice
background color. Now I dry my brush, flatten it a little
bit. I'll show you. Grab just on the
tip of the brush, I grab green color it
can be any green color. I have cobalt green here, and I have Burling
green for Duco one. And I will Moving my brush
in different directions, I will create nice texture. It's completely dry brush. I can flatten it like this to get variety
for the texture. I can also change, I can deep into other
color from light to dark. Lighter colors and lighter
textures on the top. It's more sunshine gets
into this pumpkin. The more you move
towards the bottom, the fewer the less light comes into this area and
therefore, everything is. You can remove excess water
with the paper towel. I feel that I would like
to paint even even in more sharp and dry
brush, just like this. Try to move your brush in different directions to
avoid being too symmetrical, and also ad, don't forget
to add different color. If you don't have these
nice shades of green, you can mix dow
green, for example, we burn Ciena, it gives very
beautiful green green shade. Style green of radian. They usually they are
in the basic palettes. Now we are getting the idea of nice white pumpkin with green with green stripes
with green textures. Few brush balances in random places. This one is done.
8. Pumpkin 6: Sometimes we'll look at
the pumpkin from the top. Now let's paint paint that one. I use my yellow, and I imagine
here will be the pumpkin. I will map the center. It will just help me to bring
everything to the center. I start to paint
parts of pumpkin, a little bit like
painting a flower. Sometimes I really like to leave these white spots of paper that happens because
of the paper texture. So to say, we're painting
beautiful yellow flower, which magically will
into a pumpkin. Again, we prepared a basement
for our future pumpkin. Let's see whether you're happy
with the shape or not so. Let's time to correct. Now let's add Let's add
some burn Ciena around. Here will be the stem stem, how you call it
penicle, I think. But it's not important. Let's divide our
pumpkin into pots. Play around with your oranges,
orange paints, browns. Find out what will
work best for you. Partly my paper is wet. It creates this nice
soft brush strokes, and partly it is, and that creates nice texture. I leave some space
here for the stem. Let's add more and
more and more texture. I dry my brush with a paper
towel just to have it. You see you are doing nothing. Just use your dry
brush for the texture, and the texture appears
basically by itself. It's really fun. Then you can always add few details with the
tip of the brush. I will take I will take another
brush. Check the paper. If it is wet, I can remove some water
with clean paper towel. And Let's find a nice Nice place for for this stem like this. Now it's always nice to start a little bit lighter and
then you set up the shape. Now you can bravely add details. I just work with my fine brush. Adding textures. I have my brown colors, yellow brown colors
on this brush, so I just can add a little
bit of shades right here. I imagine that sun shines
from that direction, that more shades on
the opposite part. And therefore, more textures, I can add on that side
on the opposite side. Now, let's see. You can just stop here or and
few more few more details. With Pumpkins, it's very fun. You can play around so much, so long, with all these
cute little details. Just one thing. Try to avoid being
too symmetrical. Once you feel that
you repeat yourself, do, do the same brush strokes. You can either change the
brush or change the color, maybe change the angle from
which you are painting. Should always feel a
little bit different, a little bit different,
a little bit different.
9. Pumpkin 7: Now, I would like to paint
pear shaped pumpkin. It's rather cucumber. I will use Napal yellow. But relatively diluted. I set up the shape. Just outline it. We will add darker
green later on. That way helps me to prepare
the idea of the shape. Now I can make a background. Sun shines from this direction. This will be our lighter parts, and this will be
our darker parts. I can bravely add
a little bit more of yellow tone in this area. H. Right now, I add my
pearling green mixing it with yellow.
Right on the paper. And I move my hand, my brush strokes
from the direction from green to yellow from bottom to top of
my future pumpkin. I would like to add a little bit of darker tom on that part. Then I let it and then I
will add all the details. My favorite thing to
paint is these stems, these little cute stems. You can really play around
with the direction, add long lines around, set it up with tip of the brush, you create this cut. Remember about
shading. Sun is there. Actually, sun is really there, but I will draw some
sunshine so that will help us to
keep this in mind. I can add a hint of orange. I would also like
to add a little bit of orange yellow shade in this part and in this
pot. I wash my brush. I soften. I soften them Hes. I soften these borders between
new wash just like this. While it is dry and let's add nice green bottom
of of the pumpkin. I will use bling green. We the tip of the brush. I will create nice idea of the bottom colors
the bottom part. Then I just quickly connect
all these outlines. When you use this street, when you first do outlines
and then feel in the shape, that works when you have smaller shapes
to create the wash. But it really helps
you to make it quick efficient and Stay focused. No need to be afraid of outlines
in watercolor painting. Just remember when apply them, when to apply them correctly. Because if you for example, painting a big one, it's very likely
that your paint will dry before you finish before you manage to connect your
outline with the wash. It would not be that i. Let's add more darker details. I use my favorite technique
just flatten my brush and go around with dry brush, adding soft little details. Painting pumpkins is a great way to practice dry brush strokes. You can hold your brush. You see I use just the
same brush round brush, but I can move it in different direction,
I can flatten it. I can so to say, use of that bruh. Big variety, big variety
of brush strokes, and helps you to be flexible. L et's add a little
bit of shades in just in this spot.
Now let's have a look. I think we can add just a touch of brown and Sam here's
some shade on this pot. It's a lot of improvisation happening as you might notice, and I just want to encourage
you to free your hand and your imagination and create your cute pumpkins in
your favorite way. If we use just the
same yellow as we did, but we'll try blush strokes, we can add more texture. This is how it will look like.
10. Pumpkin 8: Another one, we will
be a pumpkin wave a lot of bubbles on it or knots. First of all, we
prepare the basement. It will be a little bit tilted. Right now, I can even
prepare the tail part, and so to say draw
around the shape, will be something like this. Now we very diluted yellow. First of all, I create
the pots, the shades. I start with the tip
of the brush and then I apply more
pressure on my brush. I start to paint very
light because yellow. It's a complicated color. It has very short range
between light and dark values. Therefore, we have
to start very light, so we will be able to finish
to add darker details. I would I would like to darken it a little
bit with burnt Ciena. If you have raw CN, so that will be
also a nice option. Just at the very bottom, where yellow mix is distributes n. I help
with my damp brush. Just to create this
nice graded wash. While it's all fine, I will paint the stem part. So vertical lines with the
tipping moves, the cut. The cut ct pot. Always nice to get
some contrast, for example, with green. It's a bit comes from bro, vertical to cylinder,
with my brush, I can set up the shape. Add more contrast. I think this is really
my favorite part painting these tails. Now, let's wash our bruh. Let's wash the brush. Now let me see, I will and I'll use. First of all, I
would like to set up a few of these bubbles. With bubbles. There is a shade
underneath the bubble. We paint a little bit
unfinished circles. You can place them
relatively free, but remember sunshine
from that direction. You firstly create
the and the bubble. We paint shades. Right now we're painting
shades and yes, place your bubbles in
different direction, different direction, different
places, not ornamental. Then I wash my brush right
with the paper towel, soften a bit necessary
looks lovely. I will switch to my bruh, to my usual brush,
use my yellow. Now I can add more of details. Fill in a little
bit these parts. These bubbles, and some texture. Now, the goal is to make these
bubbles looks organically. We soften where
necessary the paper. And try to set those
bubbles in the pumpkin. With the tip of the brush, I soften these shades around. I add some yellow color in
the middle of the bubble, but I always try
to a little bit of white area for the
for the light part. Now let's see. I think it's would be nice to
add more and more contrast. I use row Ciena for
these shady parts. We ply a little
bit more pressure. This part is in the shade, so you can freely
add more color. I think I would like to emphasize
these two a little bit. Same trick, tip of the brush. I just use a little bit
of the shade around. See where it dissolved
maybe a bit. You can keep adding underneath. Maybe add a few more, make these bubbles
bit more complicated, complicately placed about this. There certainly can be more We are painting in
pretty loose style, so we bring the idea, the idea of what's happening. And this is. Let me add bit more to the bottom. Here. The more sharp shade, the more brighter it will look. Okay.
11. Pumpkin 9: Now comes the green one. Although it's green, the
underneath of the background, it is still white, so it will be vertical one, Hat paint vertical one yet. Let's map out our
future pumpkin. We pretty diluted Mix, remember that here is the
light keep this area lighter, and this part more in the shade. Apply more. You can add a little
bit more brightness on that shade on that part. Create nice, nice future shape. I would like to add more
brightness into the bottom. I drag out yellow from bottom. To top like this. And a little bit off,
but that's all right. We can correct it. Now while it's dry, I will paint the tail. The tail for the tail, so I will make
yellow background. Let's make it maybe long tail. Something like this. Now let's create this nice wash
and add green round. We add all these dry
details later on. Now, I would like
to use my brush, relatively dry, I will be trying I will be painting
in relatively dry. I added more division
between parts. Now just a dry brush, I go around and soften it. I let it dry. In the meantime. With my fine brush, I will add details
into the stem. I imagine that the stem
make a twist in this area. I add a little bit of shade
and change the direction. And some dots. Around here. Nice twist. Now this area is
completely dry and I just go into my green color. Show you, I will use my dry
brush to add more texture. V dry brush, go over.
Flap in your brush. My paper got buckled here a
little bit and that creates this very uneven
uneven distribution of boldness of brush strokes. To connect our green
part and yellow part, I just proceed with
these brush strokes. I just t to bring
them to the center. I shot at some point. T this. Now you can have a look and see whether you would like
to add a little bit more. As this part right part is mostly in the
shade, I will just go. I will give it one more
go with dry brush. Just cover it more foruly, so it will be a bit. Next more.
12. Pumpkin 10: F Let's paint a white
one again from the top, as you remember, we
don't really have white. We will use very
diluted. B two be. We will use very diluted
our greenish grayish mix, whatever you already have by
this moment on your palette. Let this time, let's paint the
middle, set up the middle. Then it will be very
gentle, very light, delicate almost white flower, pumpkin, of course, but
we set up the outside. In a very delicate way. Then I wash my brush, dry a little bit with
the paper towel, and with the tip of the brush, I go along them edges, soften it where necessary, I can add a little bit hint
of my very diluted color. This part more in the shade, so I can add a bit more of color in this part in this
side. Very nice. Now I can add few
drops of yellows, because it will look
more organically like this when we add this
natural yellows. As for as for your
orange yellow colors, you can use raw
Ciena, burn Ciena, or your favorite fy tones. Something like this we got. We can think about some texture. First of all, I
would like to add few more very bright
division parts. So to say, maybe some ornament. So about extra contrast. You soften it with your brush. With clean brush,
it's very important. I add some brush strokes. Basically what I
have in my brush. Now let's paint the stem. The stem will be as we
have a lot of green here. Would be nice to add some
contrast and paint it in some yellowish in some
yellowish color would be I imagine we can see just the cut we
look at from the very top, we can see just this cuts
tilted like it was before. I'm adding a little
bit more darkness.
13. Outro: Thank you so much for
painting with me. I hope you enjoy these lessons. I hope you managed to paint a lot of pumpkins in
different colors, and now you know how to use your own references and how to apply different
brush strokes. See you next time. Bye bye.
 Olga Koelsch, Watercolor artist and Pattern Designer