Transcripts
1. Introduction: Hello and welcome to my class, dynamic Sketching With Graphite. My name is Imran. I'm a graphic
designer and illustrator, and I'm absolutely obsessed with all Traditional Art mediums
and especially graphite. This class is for
anybody who wants to learn how to use graphite
in a dynamic way. So you don't need any
previous experience of using graphite. I'm going to be sharing with you the techniques that I
use With Graphite to produce detailed artwork and illustrations in my very own
whimsical style of drawing. We will go through all of the techniques
step-by-step and produce a beautiful little mini sketch
so that you can understand how to apply these techniques to your daily drawings
and illustrations. We will quickly start off
the class by going into the materials and tools and
surfaces that you need. To start at this wonderful
dynamic adventure. We will jump straight into the techniques that
I'm going to be demonstrating to
you in this class. And we will start off in small steps and then
eventually just built a beautiful little illustration
where I can explore and show you how to implement each one of the techniques that we're going to
be going through. We will look at how
to cover large areas using our graphite in the quickest and
most efficient way. We will look at how we can
create Light Marks and control these marks to produce beautiful shapes and contours. We will look at how to
create beautiful, clean, sharp edges that we
can use to shape our lovely aspects and
elements of our illustration. We will look at how
to soften up Details, clean up the lines, and then start building up beautiful details with blending and Refinements and adding texture to our
wonderful drawing. And then we're gonna be
moving on to looking out some beautiful special effects, where we will be creating
some wonderful light, airy textures and using our fantastic tools to
aid us in doing this. Once we've completed
all the techniques in the class and you
produce this wonderful, beautiful little simple sketch, then you're going
to be ready to go ahead and implement that
knowledge that you've learned in the
lessons to produce your own wonderful
class project. So what you waiting for, grab yourself a nice drink, get yourself a nice treat. Get those graphite pencils
ready and sharpened up. And lets get started
with the class
2. Class Supplies: Okay, welcome back. Let's now start the class
off by going through some of the class Supplies
that we're gonna be needing for the
lessons of this class. So number one, we're going
to have to have some sort of graphite to use because they class is yes,
about graphite. So we're going to need
some graphite pencils now you may have some standard
graphite pencils. That's absolutely fine. You don't need to go out and buy yourself any specific ones. However, if you want to use the similar ones that am
using throughout this class, then do check out the class resource sheet where I'll have all of the
supplies listed, brands that I'm using so
that if you want to follow along with the same
supplies, you can do so. So generally
speaking, just having a standard graphite
pencil would be great. However, to really get the
most out of this class, I would have to
recommend that you have some sort of a range of graphite pencils that have a nice dark tone and a medium
tone and also a light tone. Now, if you've watched
my previous class, graphite for beginners
in that class, I go through all the numbers and the wonderful features of
standard graphite pencils. I'm not going to repeat
that in this class. So if you want to
check that class out before we go
ahead and do this, then do check that class out. And that will give you
a more informed kind of understanding for this class so that
we can start off in this more dynamic class that
we're doing personally, I use these softer
grades of Graphite purely so that you can maneuver them around on your surface. And they just work fantastic for these dynamic effects that
we're gonna go ahead and do. But if you have
some huge numbers, if you just have a standard
HB pencil or even a to H, Then grab yourself your pencils, get them sharpened and
ready for the class. However, I do recommend that
you have some be numbers. So again, to b4b 6.8 B would be absolutely
ideal if you only have, say, maybe two or
six Bs and just grab hold of them or any
variation that you have. Now secondly, I'm
also going to be using mechanical
pencils and these are great to add some detail work to your beautiful
Graphite sketches. And these I have
in the following, a Tooby and eight for OB lead so you can
interchange your legs. And again, I went through a lot of this in the previous class, beginners for graphite and do check that out if you want to catch up on the ins and
outs of particular pencils. In addition to my
standard pencils and my mechanical pencil, I will also be using
a graphite stick. And in this case, I'm going to be using a
nine be graphite sticks. So nine is the darkest grade of graphite that you can get. You can actually get
higher than a nine BC. We can get a ten beat and
in some cases even an 11 B. But personally, I keep it to
nine because nine be usually is the purest form of dark graphite and it's
the one that I've used. So that was the first supply, some pencils in whichever form you prefer
or you have Hand. And the second supply
is some erasers. Now, I've got a couple of different variations
here of a razors. The first one is just
a bog standard eraser, just a normal plastic eraser that you can
get from any sharp. So if you have one of these, these are great to use
as a general supplies. They just get it ready
and all cleaned up. Number two, I've
got a potty arrays, they're now a potty eraser is a wonderful tool for graphite because you
can just mold it into any shape that you
like and really craft out those details that you want to bring out from your
graphite drawing. So if you have a potty eraser, get it ready, cleaned up and
molded into a nice shape. Number three, I've got
these lovely pen erasers. I've got the thin one, which is the mono zero eraser, and I've got the thicker
one now these are absolutely fantastic
for more precision, detailed work or erasing. And again, I'm not going
to really be using these erasers for
erasing per say. I'm gonna be using them to bring out some beautiful Details. So if you've got
them, get them ready. Number four, I've got a unique
little eraser tool here. This is an eraser pencil. So it's basically an eraser inside a standard wood casing. And this can be
really good to use. But however, I don't tend
to use this that often. But if you do have one of these, then definitely grab hold of it and keep it ready
for the class. And finally, my favourite
type of eraser, and this one is the
electric eraser. Absolutely love this tool because with this
tool you can get beautiful precise lines and
Details out of your graphite. If you have one of these, get the batteries put in, or if it's rechargeable,
charge it all up And get it ready for this class. So that was the second
main tool that we're going to use for the
class number three. Let's now move on. So the fantastic
world of blending. So on the screen I've got
a couple of examples of some blenders starting
off with my favourite, and that is the paper
blending stump. Now these come in various
shapes and sizes. If you have them,
grab hold of them, get practicing with them. You can see on the
screen That's so good to create beautiful blends
with of your graphite. Great to extend the
graphite on the page. Absolute wonderful tool. Number two, I've just got
a standard cotton wool, a board, or you might
refer to these as Q-tips. Again, these are wonderful to
do, more precise blending. Number three, I've got
the good old cotton wool. So this is just any cotton
moles that you've got. You may have cotton wool
balls, cotton wool pads, the really cheap to get older
from just normal shops. They usually have them
in the general stores. Grab yourself some cotton wool if you haven't already got it. Great tool to use, and I will be using this
throughout the class. And number four,
the special tool, and this one is a makeup sponge. Now you might be thinking why am why to using
makeup sponges for, but I tell you what, this is a fantastic little
tool for blending. I use this so much for
the backgrounds that I produce in my graphite
drawings with detailed work, it's great to really spread and bring out that
beautiful darkness of Graphite without that
horrible little sheen that comes on top of graphite when you use
it with a pencil. So we will come to
demonstrate this when we're doing
our illustrations. Finally, we have just a
standard makeup brush. Yes, it's a makeup brush because these are really nice
and soft and they can be used to
maneuver your graphite on your surface or on your page. And they can also be used as
a wonderful blending tools. So if you have these, get them ready, put
them to their side. If you only have
maybe a couple of these and again,
don't worry about it. You don't need to go
out and buy yourself every single one
of these blenders or erases that's I have. Just grab hold of the items and get them
ready for the class. Okay, Now the fourth item
is the interesting one, and this is a sandpaper strip and a lovely little
stick of graphite. So I've got my name
be graphite here, and I've also got a container. So make sure you
have a container if you're going to
follow along in the class so that
you can collect all your beautiful
graphite powder. And yes, that's what we're
gonna do with the sandpaper. We're just going to grind
down our lovely graphite, stick onto our sandpaper and get that wonderful graphite
powder and collect it all up in a nice little
containers so that we can use it for our special effects that we're going to
come onto later on. So again, grab hold of these atoms if you've
got them now if you want to get these
particular items that have got, then again, check out that
resource sheet where I list all of the items that are used so that it's
just easy for you to focus on a complete
supplies list. So this is a fantastic
little tool. And then what we want to
do is we want to apply our graphite powder onto
our paper or surface. And for that, I tend to
usually use my blending tool. So I use my cotton wool, my makeup sponge, or
even my paper stumps. So you can see I'm just picking it up and
then just applying it to the paper and spreading
its own fantastic stuff. But we will delve
into that a bit more when we come to doing
it in the lesson. And finally, just a
couple more items. We have another makeup brush. Yes. This is not a makeup class. No, it's in both. These brushes is just
fantastic With Graphite. So I've got a nice
big makeup brush. These are not expensive. I've got these from
the pound store, our local home bargain stores, so they're easily available. So we've got this nice big
one with a big head on it. And I use this just to dust off the Graphite the excess of my eraser just to
make sure that I don't go ahead and smudge
anything on the paper. So that's what its main
purpose is for just the clean up the paper after we've
applied our graphite. And I've also got a nice
little round Washi tape. And you might be thinking,
why do I need Washi tape? You're not doing any watercolor,
but I tell you what. Washi tape is
fantastic for creating clean lines and edges and
really creating a nice, lovely border for your work. And I'm going to be using
that throughout the class. So if you've got
these two tools, get them ready and
put them to the side. That's it for the supplies. So it's really nice and simple. In addition to this, you would obviously need a sharpener to
sharpen your pencils. And maybe some scissors are some extra sheets of card
that we may use later on, but they're not necessary. Definitely have a
sharpener because you're going to be
sharpening your pencils. And if you using mechanical
pencils have some spare lead's available just
in case they break. But apart from that, generally, this is all we need in
terms of the actual tools. And then the most
important aspects of using graphite is
the graphite paper, the surface that we're going
to use a hook graphites on. So let's move on
to that one next.
3. Surfaces: Okey-dokey, Let's now
talk quickly about the different surfaces that
we can use graphite on. Now, I tend to like to change around the
surface that I use for my graphite work or generally my other types of
medium work that I use, ink, pen colored pencils, it may be watercolor. I always like to mix and
match because I have a bit of an obsession with Art
Materials as you already know. So currently, I'm in
the mood of using these four papers and these work absolutely
fantastic With Graphite. So the first one I've got is this lovely multimedia paper that is great to
use graphite tone. You can get a really
nice smooth finish and it's fairly cheap to buy. So it's not a really
expensive Art paper. It's multimedia. You can use many different
mediums on it. And again, it works
great for graphite. So I might actually go ahead
and use this in some of the exercises within the
lessons of this class. The second one is a pad, just a normal sketch
bad By fabric Estelle and it's good for graphite work,
colored pencil work. It's quite thin in terms of
the thickness of the paper. But I really like
how the surface works with how the
Graphite attaches, adheres to the
two-thirds of the paper. I think this is a
fantastic paper. And again, it's not too
expensive in terms of price compared to more
expensive premium papers. So it's a nice paper to use. Again, I usually get it from
the bargain Art stores. And if you've got bargain
Art stores where you live wherever you're from within the world than grab
hold of this pad. It's fantastic to use, but do remember
it is quite thin, so it's not as thick as the multimedia paper
that we showed before. So number three, this again, is a nice heavyweight
cartridge paper, and I've used this
particular paper throughout my classes that you may have watched with
colored pencils, even with markers and ink. I love this paper. It's a local arts store paper. And if you live in the UK, then you'll know
what store this is. And it's just fantastic. Whichever paper you find
that you prefer or like, just use that paper, test out your graphite on it
before you go ahead and do the class just to make
sure that it's suitable. And finally, I also
use watercolor paper. Now, generally speaking,
water color paper just comes in hot pressed
and in cold press. I would say that I would use hot press paper for
more detailed work. Cold press paper like
the one on the screen for more abstract
work in graphite. So I'm just demonstrating the cold press here
because it has a thicker texture and the graphite will have
a lot of gap on it. But when you come to
actually blending, it works absolutely great. However, I wouldn't use cold press watercolor paper
for highly detailed work. So you can see all
four papers that have quickly demonstrated
or on the screen and how they will blend with the blending tools that
we use are gonna be slightly different
for this one over here we've got the
mixed media paper. So if we go ahead and start adding a little
bit of a blending, blending with our blenders will be able to
see how it reacts. So if we just add
in a little bit of movement with
some cotton wool, you can see that it spreads really nicely, nice and light. I'm just using that circle
emotion over the swatch of graphite and then over
the little Chrissy cross. I'm just going ahead and doing that same circular motion
works really nice and well, the results are very good. Moving on to the next sheets
of paper that we did. The next sheet is the heavyweight cartridge paper from the local arts store. This one, again works fantastic. One of my favorite papers
to use With Graphite, it tends to blend very
quickly and easily, especially when you're using cotton wool on
both lists swatch, and also on the
crisscross lines. So again, a nice heavyweight
cartridge paper with a decent amount of tooth
will work fantastic. And then I'm using the
fabric Estelle sketch paper. So this was the thin paper. And you can see going on with the cotton ball, it works great. The cotton wool really
spreads out that beautiful Graphite
fantastically on this surface. But again, it's a thin paper. So when you are
spreading the graphite, you can tend to sometimes
cripple it a little bit, but that's entirely up to
you which ones you use. And finally, I'm doing
the watercolor won the Cold Press where we
had a nice thick Texture. And you can see when I'm going over it with the cotton wool, it's producing a
gorgeous little spread of Graphite blending it out. But you can see that
you have a lot of this peppered paper undertone
underneath the spreads. So if we have a
look at all four, you can see that you get various different
results according to the surface that you use. So if we're gonna go in with a mechanical pencil to
produce some detailed work, you can see a little scribble
on each four of them. You can't really tell that
there's much of a difference. They'll probably
be more different on the watercolor paper that has the thicker surface and
the more texture on it. But if you go in with
a blending stump, a paper blending stump
and try blending, you'll be able to
see that there is quite a difference depending on the tools that you
use for blending. And this, again, is all going to be on
your personal taste. So which ever
version you like or whichever effects
you like a graphite just go for that
type of surface. I would recommend that you use as many surfaces as
you can test them out. Just like I have overhear, do a little swatch, a little criss-cross, and
then do a bit of a blending, blending with one of your
blenders and see which results you prefer
because what you don't want to be doing
is using a surface. And then later on spending
a lot of time Creating Details and then not
liking the results. So do test this out, try out the papers
that you have that are available to you if you want to delve into different papers and different brands and
go ahead and do that. Remember again, all of the Supplies and the
papers that I'm using in this class will be available as a list in the supplies
list resource sheets. Do check that out. And that's about it for the complete supplies
for the class. So we've gone through
everything now. We can now get ready
for the exciting stuff. Get yourself,
you're drink ready, get your supplies to one side. And now let's get started
with the dynamic graphite
4. Technique 1: Covering Large Areas: Okay, welcome back. Let's now start off the class by going through
technique number one. Now, this technique is a
simple, It's all technique, but is very effective in producing wonderful
dark backgrounds. And I quite often use this
technique pretty much 80 to 90% of all my graphite
drawings and illustrations. So let's dive straight
into it and go through the tools and supplies
that we're going to need for this
particular technique. Okay, So on the screen here, I've got a nice little setup of some tools that
we're going to need for this technique. From the left-hand
side over here, I've got my lovely
little spongy Sponge. So my makeup sponge
here in a little box. And you can see, I've got this beautiful, wonderful
graphite powder. Now this is nine be
graphite powder that app, sanded down using my sandpaper and nine be graphite stick. So it's always best to have an accumulation of this powder, this graphite powder
prepared in advance. And again, in the
previous lesson, you saw me doing a little bit of a sandy paid promotion using the graphite stick to collect all this beautiful graphite,
gold graphite dust. And basically what it is is just a collection of it
so it's ready to use. And moving on. This lovely little setup here, I've got these beautiful
cotton balls, hair, hair. So these are just clean
cotton balls that I've got that we're gonna be
using for our blending. And then I've got the
lovely wishy washy tape, nice little row of Washi tape ready to create some
gorgeous Edges. And then I've also got that
brilliant makeup brush. So all the tools are set up. Let's just move these
to the side now and get out our lovely surface. Okay, So the first stage now is just get our lovely
surface prepared. And I'm using the
beautiful mixed media, both the I went through
in the previous lesson. So I'm using the
paints, mixed media, multi techniques sketch book by clef on ten great
little value sketch books, I'm going to pretty
much be using this throughout the class. So let's just open up
to a clean page now. We've got a nice clean page, the page over here, folded back. Fantastic stuff. So what we're gonna do now is we're going
to first of all, create our little shapes
that we can use to produce beautiful natural tones
of lovely dark graphite. And in order to aid us in doing that and creating
straight lines, we're gonna be using
our wishy washy tape. So open up your Washi tape
and lets get started. So I'm going to basically
do is I'm just going to get this Washi
tape opened up and it's a nice new row
vectors and say patella using new roles for you. Lovely, lovely students. So I'm going to open
up my Washi Tape. All I'm gonna do is I'm
just going to add in a strip on the left-hand
side over here. And again, if you don't have Washi tape, don't
worry about this. Just go ahead and draw
the shapes that I'm going to be creating
with this Tape. All of these sheets and resources are gonna
be available in that resource sheets and do
check it out if you want it as a template just to
follow along in the lessons. So I'm gonna do now
is we're just gonna go ahead and create some rectangular outline shapes with this Washi tape so quickly, let's go through that now. Okey-dokey, you can see
what I've done now. I've got some lovely
little rectangular shapes that I've created
with my Washi tape. So three beautiful rectangular
shapes that we've got that we can start
filling in with our beautiful graphite powder. Now again, if you don't
have the Washi tape, just go ahead and draw yourself three similar shaped rectangles. They don't have to
be exactly the same. It's just for
illustration purposes, just make sure that you have a nice little gap
in-between each of them. And that's what the Washi
tape is gonna be serving. It's basically just
gonna be serving a gap purpose just to produce a nice little space so that the examples don't muddle
up inside each other. So Let's start off by
using the first tool. And I think I'm gonna
go ahead and maybe use the lovely cotton wool. So just getting my beautiful
clean cotton wool ready. And it's always a good idea
to use a clean cotton roll. Sometimes you might
be tempted to just use the same old cotton world
that you've used before. Well, what that does is it just adds a little bits of
dust here and there, and you might not
get a clean finish. So get yourself a nice
clean ball of cotton. If you're not got cotton balls, then just go ahead and use cotton Sponge pads or whatever
you have that is cotton. So what we're gonna do
is we're going to grab hold of our beautiful
graphite powder. So I've got my graphite
powder here in my beautiful little container, and I've got enough
of it for this class. So with my cotton wool, what I'm going to do
is I'm just going to go in like this. See if you can see
this on the screen. I'm just gonna go in,
just dab it down. And you can see just
dabbing, get it down, picks up that beautiful
graphite powder. It just attaches
itself to that lovely, lovely cotton wool balls. So just like that, I've got my cotton wool
with the Graphite. I'm just going to move
that out of the way. And then this first
rectangle here, I'm just going to drop
that graphite onto that rectangle area lightly
just dabbing it on. So just like this Dabbing it on fantastic stuff. And you can see, I've just got this beautiful coverage
of this graphite dust. Now what I'm gonna do is
I'm just gonna go ahead and I'm just going to
nice smooth motions go up and down so that that
graphite powder melts away and gets into the grooves of that lovely paper
to just like that. This is basically
just the first layer. And then I'm going to use this circular motion that I'm doing here just to get that
graphite powder in every one of those little
spaces so that we have a nice filled in
shape just like this. Nice and slowly. Don't rush. Take your time doing this. Obviously, I'm doing
this on a class, so I'm going to probably
work a lot faster. But in the ideal world, what you want to
do is you want to really take your time
when you're doing these exercises so that you don't get graphite
all over the place. Remember, graphite powder and a slight bit of
movement will make it dance all over your surface. So just make sure that you have a nice relaxing motion that you do when you're applying
this beautiful mediums. So just like that, you can see most of that graphite
dust has now melted away into that surface
and it's looking great. So just like that, what
I've done is I've just filled in that space
with beautiful graphite. Now you can see, I don't know if this is clear on the camera, but that to me isn't as dark and intense as I
would like it to be. So what I'm gonna do
now is I'm gonna go ahead and adding
some more graphite. And that's what we're gonna do. We're just going
to go and adding some more graphite with
our lovely cotton wool, wool over here,
just picking it up. You can see it's picking up
more and more as a debit on. That's the advantage
of using cotton ball. It works as a great
lifting tool of the medium that you can
transport onto your surface. Just so just like this, I'm going to go in now
and I'm going to press in a little bit more firm onto the surface so that we get this Graphite really,
really blending in. And what I don't want to
do is really hit it hard onto the surface
because what that'll do is it'll just make
it bounce off. We want to do is we
want to get that same, nice and slowly and not lift the cotton wool too
much from the surface. It just like that. I'm just going into
the circular motions and you can see it
started darkening the overall look of that beautiful rectangle filled in with wonderful graphite. Look at that, look how
beautiful and dark that is. Now, again, I'm using a nine be graphite stick to
produce this graphite powder. And this is generally
the dark is graphite that you can get within
pure graphite pencils, you can get ten dB and
you can even get 11.12. And in some cases
I have seen 14 be, but I'm not sure if that's
actually pure graphite. It could most
likely be mixed in, and most probably is mixed in with other elements
and materials. So I like to just
keep it to nine. But generally speaking, 90 is the dark is graphite
that you can get. So just like this, you can see, I've created this wonderful
little filled area, this rectangle with
beautiful graphite. And look how easy that was
to do the cotton ball. The ball is now completely covered so we can
move that aside. Probably best to
just put it back into the box. That's
what I've done. I've just put it
back into the box where I've got my
lovely spongy Sponge. So let's just have a look and see what we can
see on the screen. So you can see we've got this
lovely, lovely graphite. Okay, so what we
want to do now is let's move on to the next one.
5. Using a Sponge: This what we're
gonna do is we're gonna go ahead and we're going to use our
lovely spongy Sponge. If you remember, we're
using a makeup sponge, eight wonderful makeup
sponge to effectively do exactly the same that we
did with the cotton wool. So let's just go in and
use our makeup sponge and start picking up some
of this graphite from the middle, just like this. And you can see we've got a lot of that graphite on there. And then I'm just gonna go ahead and let that Graphite drop. They can see with
the makeup sponge, you've got a lot more graphite. And then all I'm
gonna do is with that sponges in slow motions
go down and look at that. Fantastic, doesn't it look how beautiful that
filling up that area. Now, I prefer using
makeup sponges to cotton wool to apply
for these kinds of big areas of
coverage of graphite. And that's purely because
you just get this quick, smooth surface that's
just done so much quicker and more easily than you did with
the cotton roll. There's effectively less
movement and more coverage. So just like that, I'm going up and down. I'm not even using
circular motions. All I'm doing is just
going up and down, left and right just to get it into the corners over there. And you can see the
intensity that graphite is already as dark as the one that we applied
with cotton ball. And that's because there's
more graphite on the sponge. And a Sponge releases that Graphite a lot more than
the cotton borders, so it needs minimum movements. So just like this, how easy and beautiful is that? And you can notice that I don't know if you can
see this on the screen. There's not much
shines and this one, because the cotton wool
has gaps in between it. And what happens is
when you do lay that Graphite down, it can overlap. It's the overlap that causes
the reflection of light for the graphite
to really create that horrible Graphite Xin. However, you still going
to have minimum Graphite. She, even with a lovely
spongy Sponge like this. But if you compare it
to just normal Pencil, if you try filling
this area with just a normal pencil
and pencil marks, it's completely different
and we will recap that later on when we demonstrate
this in our illustration. So if we just have a look here, you can see there's just
a bit more of the dust. Now, I don't even need
to add more graphite to this area because it's enough and it's not gonna
get darker than this. This is at its maximum. So just like that,
I'm just going to use these side movements
just to make sure that there's no
more graphite dust left on that rectangular area. And remember, you
don't want to be pressing down too
hard with this, because the surface that
you're using will depend on how the application of this
graphite will turn out to be. Because if you have a thin paper than it could wear it out. So do use a paper that thick enough to be
able to do this technique. Just like that. I'm just gonna go
up and down and I'm just using medium
pressure to apply this. What you like I said before, you don't want to press down
too hard in the Graphite, effectively just comes
out of the sponge and just flops all over the surface. So just medium pressure
not to Light mediums. So it does get into
the grooves of the teeth of that surface. And just like that, it
looks FUN. Plastics. So I think that's enough
for the spongy Sponge. Let's just move that out. So the way and look at that, we've got graphite fingers. So just remember this is
a very messy mediums. So if you're gonna go
ahead and do this, I would recommend
that you maybe just go ahead and wash your
hands or if you have some wet wipes or
if you have like a moist sponge or something like that to clean your fingers
and grab hold of that. I usually keep a wet
wipe with me over here so I won't clean my
hands on top of the Graphite, otherwise it's going to
spill all over the place. You can see it's already
spilled over the head. So I'm just going to give my
fingers a clean it clean, and then we can move
on to the last one. Okay, Let's now move
on to the last one. And for this last one,
what I'm gonna do is I'm just gonna go
ahead and I'm going to use my cotton ball to pick up the graphite and just
apply it onto the area. So just like this, pick up the cotton wool, just adding on that
graphite powder. Using the cotton roll, we're not going to use
the cottonwoods are blended or apply it, we're just going to
use it to add it on. So just like that, move
that out of the way, that's enough for now. And what we're gonna do is
we're gonna go ahead and get our final tool to do this
compare and contrast exercise. And that is, yes, it's another makeup item. You get States, it's
the makeup brush. So without makeup brush, what I'm gonna do is I'm
just going to start slowly maneuvering that graphite powder and just going to push it down. And you can see with
the makeup brush, It's not as effective, effectively doing is it's just
moving the graphite powder I personally don't think it's that great of a tool to use, but I want it to
demonstrate this to you so that you just have an idea of how you can use
various tools to do a bigger coverage of an area on your
illustration or drawing. And again, it's just a case of maneuvering that Graphite around the area that you want it to. But you can see you get a lot of this excess Graphite
going on the edges. It's not really ideal. So again, I'm just going to
maneuver it and I'm just going to keep moving
it around like this. Again, the makeup brush is a very good option to use if you just want to
have some light, fluffy areas of graphite, just use minimum amounts. Again, I've added quite a
lot of graphite onto this, so that can demonstrate
to you that this is how the result will be and this is the process of actually
maneuvering it. So it's not as effective, but it's good to have a light areas created
With Graphite. So if we just maneuver this now, we've got a bit of coverage. It's touched all of those areas. I'm just using mediums, very medium to light pressure. If I press too hard like
this, what's gonna happen? It's just going
to spread it out. So if we just go ahead and
just maneuver this along, it's effectively like sweeping away a dirty floor, isn't it? So Let's just clean the surface of this
floor that we've got. Let's just move all
that graphite dust, the dust to the top over here. And then what we can do is
just moving the excess, press onto the
excess to pick it up and then just add it
back into your tray. Give it a little
Debbie dab like list, and you can see the graphite
is falling off the brush. So it's a good way to pick up some graphite that
you don't want. So just like that, press
down and then tap it away. I'll see your box so that
you don't waste state and what they'll want to do any
wasted, wasted, we don't, so let's just do that and then we've got
this little bit here, just maneuver it around
and I think that's fine. So you can see that
the actual rectangle itself is nicely covered. It's not as intense, as dark as the previous two. We will have a look
at that once we remove one lovely Washi tape, I'm gonna leave that as it tastes then to move
my brush away. And what I'm gonna do
now is I'm just gonna go ahead and I'm going
to use my mock brush. So this is the
bigger makeup brush. I'm just going to dust
away that graphite. And again, as I said in
the previous lesson, we have a nice big
brush like this just to move away the excess
graphite that we get when we using graphite
powder or if we'd using a razors just to
clean up our surface. So I'm just gonna go
ahead and move that off. Just like that. Look at that beautiful a, just in one little swoop. It's all gone. So let's leave that to the side. And what we can do
is now the font path actually removing our
little tape, the tape. So I'm gonna go ahead and
move the tape it saves. And then we can have a look and see and compare and contrast
the results that we've got. Okey-dokey, welcome back. So you can see we have
three different results. The first result is
the cotton ball, and you can see we
have a beautiful, soft, lovely application of graphite that looks
absolutely fantastic. Secondly, again, we used the beautiful Sponge to
create a very similar look, but it was just a lot easier in the application
using cotton wool and using a makeup sponge is absolutely fantastic
for this technique. And then finally, we just used a makeup brush which gave
us like the results. However, it's still
filled in the areas. So if you after a
lighter background, maybe then go ahead and use
the soft brush that you have. If you want a nice,
pure, lovely, velvety dark area of
Graphite covered with minimum Graphite sheen on
it or shine or reflection. Then go ahead and
use the cotton wool or use the makeup sponge. So I'm going to leave
that up to you. If you have all of
the tools, the wall, a cotton ball, the
makeup sponge, and the makeup brush
and do test this out. It's so much fonts actually
go ahead and create these little shapes and really lovely enjoyment
of this process. It's fantastic. So that was a technique. Number one. Let's now move on to
the next technique.
6. Technique 2: Creating Light Marks: Welcome back. Let's now move
on to technique number two, and we're gonna be focusing
on using our eraser. So if you have a
look at the screen, I've got my beautiful erasers laid out in a gorgeous fashion. So on the left here I've got
my standard normal eraser, then I've got a potty eraser, then I've got my pen erasers, the thin one and
the thicker one. Then I've got the
pencil eraser and then I've got my lovely
electric razors. So before we go ahead
and use these tools, what we need to do is produce
a beautiful couple of swatches of the dark graphite like we did in the
lesson before. So I'm going to grab hold
of a nice sheets of paper. And again, I'm using
the same paper that I used in the
previous lesson. So let's just move. I will lovely arises
out of the way. And that's just
place our sheet on the screen and make sure
that it's looking great. So again, this time I've
just taken out of sheets of paper from the pad because the
pad tends to wobble about. So we have a bit more
of a stable surface. And what I'm going to do is
I'm gonna go ahead and create some little shapes and
use my cotton ball or I might just use my sponge that
I used before to produce some dark areas that we
can use the erasers on. And that's what the focus of this next technique is gonna be. So let's go ahead and create
our dark areas quickly now. Okey-dokey, welcome back. Now we've got some
beautiful little shapes here on the page can see that we did exactly
the same process. Use the cotton ball and then
finish off with a bit of the makeup sponge to
have this gorgeous soft, smooth black strip of graphite. So what I've done here is
I've just gone ahead and I've just taped down all four
corners of the page, and that will avoid it from moving away when we're
using the eraser. So that's just a good tip to do. Just go ahead and
taped down your sheets of paper onto the surface
that you're using, whether you've got an easel
and you have a hard backing, just tape it down to
your easel holder. Or if you have just a normal table like ABC
got, then just tape it down. It just makes it so much
more easier to manage. So let's now go ahead and
start using our eraser. So first one I'm
gonna go ahead and use is my standard eraser. Now again, as I mentioned
in the previous lessons, that the standard eraser is the most common eraser
that you can get and use, and it can be very effective. So what I'm gonna
do is I'm going to hold the eraser
and I'm going to make sure that the tip of it is nice and clean like
I've got over here. Because what you don't
want is you don't want a dirty tip for this
actual exercise because what will happen is
you'll start working your way in to start
doing some erasing work. And what effect will happen
is that the more you erase, the more that tips, just
going to keep getting more and more
graphite all over it. It's important to have a, another sheet of paper to hand. So I usually just have a
normal sheet of printer paper. What this does is
this will serve as a nice clean up sheets. So if your eraser gets dirty, you can just clean it up on
the extra sheets of paper. And then every time you
go ahead and use this, you have a nice clean tip. So go ahead and get your
rough piece of paper out. I just got this little
printer paper that I've using is going to fold it up so it's a bit more manageable. And another tip is that what you can do is
you can use your piece of paper to just cover up the area that you're gonna
be placing your hand on. Because what tends to happen is when you're using graphite, It's because of the
nature of graphite. It's very dusty. It moves around and
smudges really easily. So to avoid leaning on
your graphite like this, just have a sheet of clean
paper and just place it over the area where your
hand is going to cover or where you're
going to rest your hand, maybe the side of your hand, and that way you will minimize
the smudges that you have. So let's start off by using this first little rectangle
strip that we have. And we'll start on
this left-hand side and work systematically across. I'm just going to
place my paper on that side so I don't go ahead
and do as smudgy, smudgy. And I'm going to use the tip of my eraser, my normal eraser. And I'm just gonna go ahead. I'm going to do these little
round motions here now, you've got to remember
when you're doing erasing. Do be very gentle with erasing. Don't go into hard initially, because what you'll do is
you will damage the paper and you might even damage your eraser while
you're doing this. So you can probably see on the screen that it's
not really doing much, but it's actually picking up quite a lot of that
graphite already. So I'm gonna do is
I'm gonna go ahead. I'm just going to
clean that Graphite off onto the paper that I have. Make sure I don't put my
hand onto that murky parts. I'll just move that a little bit higher, just going
to clean that. And again, I'm going
to go in and I'm just going to use
these circular motions To start revealing
some lighter areas. Now you can see that it looks
rather smudgy over there. So again, with the eraser,
the standard eraser, what happens is that
the more you clean it, the more it will start
working its magic. And you can see now that we've removed quite a bit
of that graphite and the first effective layer has started emerging of
the lighter shades. So again, I'm just gonna go
ahead and I'm going to clean my eraser over here to make sure that it's not
covered in graphite. So that'll be using a clean set. So just like that, cleaning my eraser and that's a
little bit better that, so That should work nicely. And again, just going in and lightening this
area, look at that. That's gorgeous, that isn't it. Now the harder you press, the more light to
it's gonna get. But as I said before, you don't want to go into hard. What tends to
happen is that with these types of erasers or
with any eraser really, it just creates
that friction and starts damaging the
tooth of your paper. And we don't want to have Haidt damaged surface to work on. So that's about it. Just a nice little
round splurge, splurge shape on that graphite to demonstrate what we
can do with an eraser. And again, we're going
to come to doing some really nice
dynamic sketches in the next part of the class, we're going to use
this at our advantage to paint some beautiful work. Yes, I said paint, we're going to paint with
graphite and erasers are not going to really paint is going to look
like a painting. Well, it depends on
where you stand on that. So anyway, let's just get back
onto the actual exercise. You can see now I've got
a little bit a dusty dust from the excess
of the eraser. We can get rid of that
by using our mop brush. I will nice, lovely mop
brush to move it away. Avoid using your
hand or blowing on it too much because you will
interfere with the graphite. And I can see, even by
using that mop brush there, it's still moved and added a
bit of smudgy smudges there. So just be very careful with it. If you want to do a
light blobby blow, then you can go ahead and do that. But I don't recommend it. I still say that you should use a nice clean brush to
wipe off the excess. So that was the standard eraser. Now let's move on. The potty eraser for the
posterior. Raise that. As we mentioned, this is a
beautiful eraser to use it. So unique, you can mold it and shape it in any effective
shape you want. And this becomes
a huge advantage, especially when you
want to stop bringing out details on your
graphite work. So it's just a very,
very flexible, lovely little tool to use in your arsenal in the
world of graphite. So what I'm gonna
do here is I'm just molding this Insert
Shape, needing it. Obviously, that's why it's
called a kneadable eraser, which is needing it into a nice little shape over here so that we have
a bit of a points. You can see, I've got a
bit of a point over there. It's not completely flat. So I'm gonna be
using that point to create a similar kind
of shape over here. So I'm just gonna go
straight in over here. You can see what I'm
doing is creating that little shape and
look how easy it was to just bring out and
lift that graphite. It's so much more easier
than the standard eraser. With a standard eraser, what we have to do is clean
the eraser again and again. And it took quite a few
attempts to get to that stage, but with a kneadable eraser, It's just so quick
and easy to do. So just like that
in round circles, very little pressure,
not pressure, pressing down too hard. We don't want to
start making that Graphite disappear
because that's what will eventually happen. And again, if you find that your kneadable eraser
isn't moving anymore, graphite, just go ahead and start needing it
and cleaning it. This is how you clean
effectively a kneadable eraser, just like with the
normal eraser, we just wiped it off with this. We're just cleaning it
by just mixing it in. So that puts the
material that's inside of this lovely little eraser. So let's just do that. So that's giving
it a nice clean. So again, I'm going to create a nice little rounded
point over here. Just mold it. It's like plasticine, isn't it? It's like one of
these these toys like the kids play with my daughter plays with it all the time. It's that what I forgot, what it's called,
is it called slime? Slime or something like that? It's just absolutely brilliant
potty DO, DO, Play-Doh. That's why it's called Plato's. Let's just go in
and carry on and create a lovely little
highlight there. And you can see
absolutely fantastic. Now that one is done, Let's now move on
to the next one.
7. Controlled Marks: So now what I'm gonna do is
I'm gonna go ahead and use my pen erasers now to create
some more controlled shapes. Whereas before we had these kind of circular
shapes that were just emerging as we will
maneuvering our erases. The control aspect
now is going to get a lot more sophisticated
with these pens erasers. So let's start off
with the thin one. This one is called
the Mono Eraser. Again, this is exactly
the same material that you have in
a normal eraser. But all that they've
done is they've just cut it down into a little strip and
it's just gone into this pen holder contraption. And all you do is you just
do a cookie click and it releases more of it until
it completely finishes. And you can go ahead
and replace it with these replaceable kind
of tips that go inside. So I'm, what I'm gonna do
is we're just gonna go up, put that in a bit more. So just pressing the back, letting that come in a
little bit. That's about it. And again, with this one, these
do get dirty on the edge, just like the normal eraser do. So good idea is to maybe
just give it a little clean on just your
spare sheets of paper. And that way you have
a nice clean tip. So I'm gonna do
here is I'm gonna go in and I'm just going to start creating some
really nice lines. And you notice that immediately the moment it touches
that Graphite, you've got this beautiful, beautiful white line
that started to emerge. So just like that,
now you can see, the more I use this, the more that tip is going
to get more muddied up. So again, just going
ahead and erasing that tip so that we have
a nice clean point. And just like this, just backwards and forwards
and then maybe doing a couple more lines over
here, backwards and forwards. And you can see that there's just so much more control
that we have now. You may have noticed
that I'm twisting the pen after every
kind of movements. So just like this,
I'm gonna give it a little twist on
what that does, is it just helps and aids. It's shaped from
being formed from the tip so that it doesn't start wearing down too
much on one side. So that's just another
little handy tip. Keeps saying tip all the time. So just a handy trick that
you just keep twisting your pen eraser so
that you have an even where down of
that a robot tip. So just like this again, I'm just going to add in a, another line over here
and you can see that these lines look
absolutely fantastic. Let's just do a little. Move away, clean up with our mop brush and look
at that fantastic stuff. Who would have thought
that you could create beautiful designs and
gorgeous lines with erases. We thought they were just
made to rub things out. So let's now move on to the thicker tips over the
thicker tip over here. Same process again, same
type of systems or it's just make it come out
like that from the back. And if you want to
put it back in, It's usually a case of
just pressing it down. And it works great. So again, that tube
is fairly clean. It can be a little
bit dirty from side. So let's just go ahead and give that a little erase erase. So just twisting it around
to make sure that we have a nice clean surface or just get rid of that
excess over there. And then I'm gonna do the
similar movements here, just up and down. And you can see, look
at that beautiful, clean, gorgeous controlled
line over there. Just like this,
just up and down, keeping it really simple
for this illustration, we're going to start
getting a lot more creative when we do our sketch. So just like that, so quick and easy,
move that away. That's just give the
page a bit to the clean, a little bit of a
clean, fantastic stuff. So we got four of
our eraser is used. Let's now move on
to the next one. And the next one is
the lovely pencils. Okay, So for the Pencil, what I'm going to do
is I'm just gonna go ahead and use the
pencil just like I did with the pen erasers and just create these
lines coming down. You can see that it does
a very similar job, just moving it up and down. The actual tip of the
rubber part on this Pencil, it does be quite flexible, so do bear that in mind. Don't press down too hard, otherwise you may
just snap it off. But the advantage of this
tool is that you can go ahead and sharpen it
like a normal pencil, and it will just reveal more of that eraser tip so it can
be used at your advantage, but it all depends on
your personal preference. As I said before, I tend not
to use this tool that often, however, it is a good one
to have in your supplies. So just like that, we've created our four
lines with the pencil. Give that a clean, a clean, nice, clean surface. There we go. We have a
five of our erasers done. Now for the exciting one. And you know what
I'm talking about, this one is the electric one. So with the electric one, I've got this old electric one that I've got the new
ones these days that they've made at
an angular shapes so they would be
really effective. I might actually go
ahead and get myself one of them for more
angled workbook. Again, I've had this one for so many years now
and it works great. This one's a battery worn
battery operated one. The newer ones, you can have
them as a rechargeable. So again with this,
the tips come out so you can just pull that
whole contraption out and you get these replaceable
little rubber tips really cheap to buy I usually have quite a lot
of them in my supplies. So all you do is
just pull that down, clamp it back in and it ready to go and just press the
button and look at that, pressing that button
and it's ready to go. So with this one, Let's go ahead and just
drawing some lines. You can see I'm drawing in
some wines and look how easy that is to produce
beautiful, beautiful lines. Now you notice that
these look a little bit more wobbly compared
to the other ones. And the reason for that is,
is because it shakes around. So I am going to show you a nice neat trick to get really clean lines
with this eraser. But we will move on to that when we go ahead and do the sketch. But just generally speaking, if the fastest way of getting a beautiful clean line of
white to remove that graphite. And you can see it's
just fantastic. So just like that, some
lovely straight lines. And then maybe we can go in and do some squiggly wiggly
lines like this. You can see, you can actually
go ahead and draw with it. It's just so easy you're using minimal effort or
you're doing is holding this like a normal pen or pencil that you
would normally use. And you're just going ahead and creating these wonderful Lines. Now you can see this will get
dirty as well from the tip. So the way to clean this is very similar like
with the other ones. Just get a nice
clean piece of paper and then just run it on
that clean piece of paper. So you can see what
will happen is that tip will get cleaned
as you use it. The more you press
it on Graphite, the more dirty it will get. And I'm just holding
it at an angle here. You can see I'm just
holding it up that angle. And what that sometimes
it does is it shapes the tip of that eraser. So that's a, another
fancy little thing to do. Can hold it at an angle on
a clean sheet of paper. And what that will do
is it will wear down the tip and it will create
a nice sharp point. So there we go. Oh, and I've gone and got it
all over my lovely artwork. So let's just do it. Clean it clean of this very lightly with the
brush so it doesn't interfere with our
beautiful marks that we've created
fantastic stuff. So again, I'm just going
to play around with this. You can see I'm holding this
with both hands like this. If I hold the main contraption
like this and then just hold my other hand like
this to keep it steady. What we can do is we can create these beautiful little dots. Look at that
absolutely fantastic, beautiful little
white highlight Dots that you can use to
draw, create Texture. As we will come to
do in the sketch. Can't wait for that. And just
like this fantastic stuff, look at that beautiful
work with erases. So that's it for this second
technique demonstration. I think what we need
to do is get ourselves a nice warm drink because I do fancy a slicer cake as well. Yeah, I do, right. I'm going to get myself
a nice warm drink and a slice of nice, sweety cake. And then let's do the exciting
part and use our erasers from technique to produce a
wonderful little mini sketch. So I'll see you on that one.
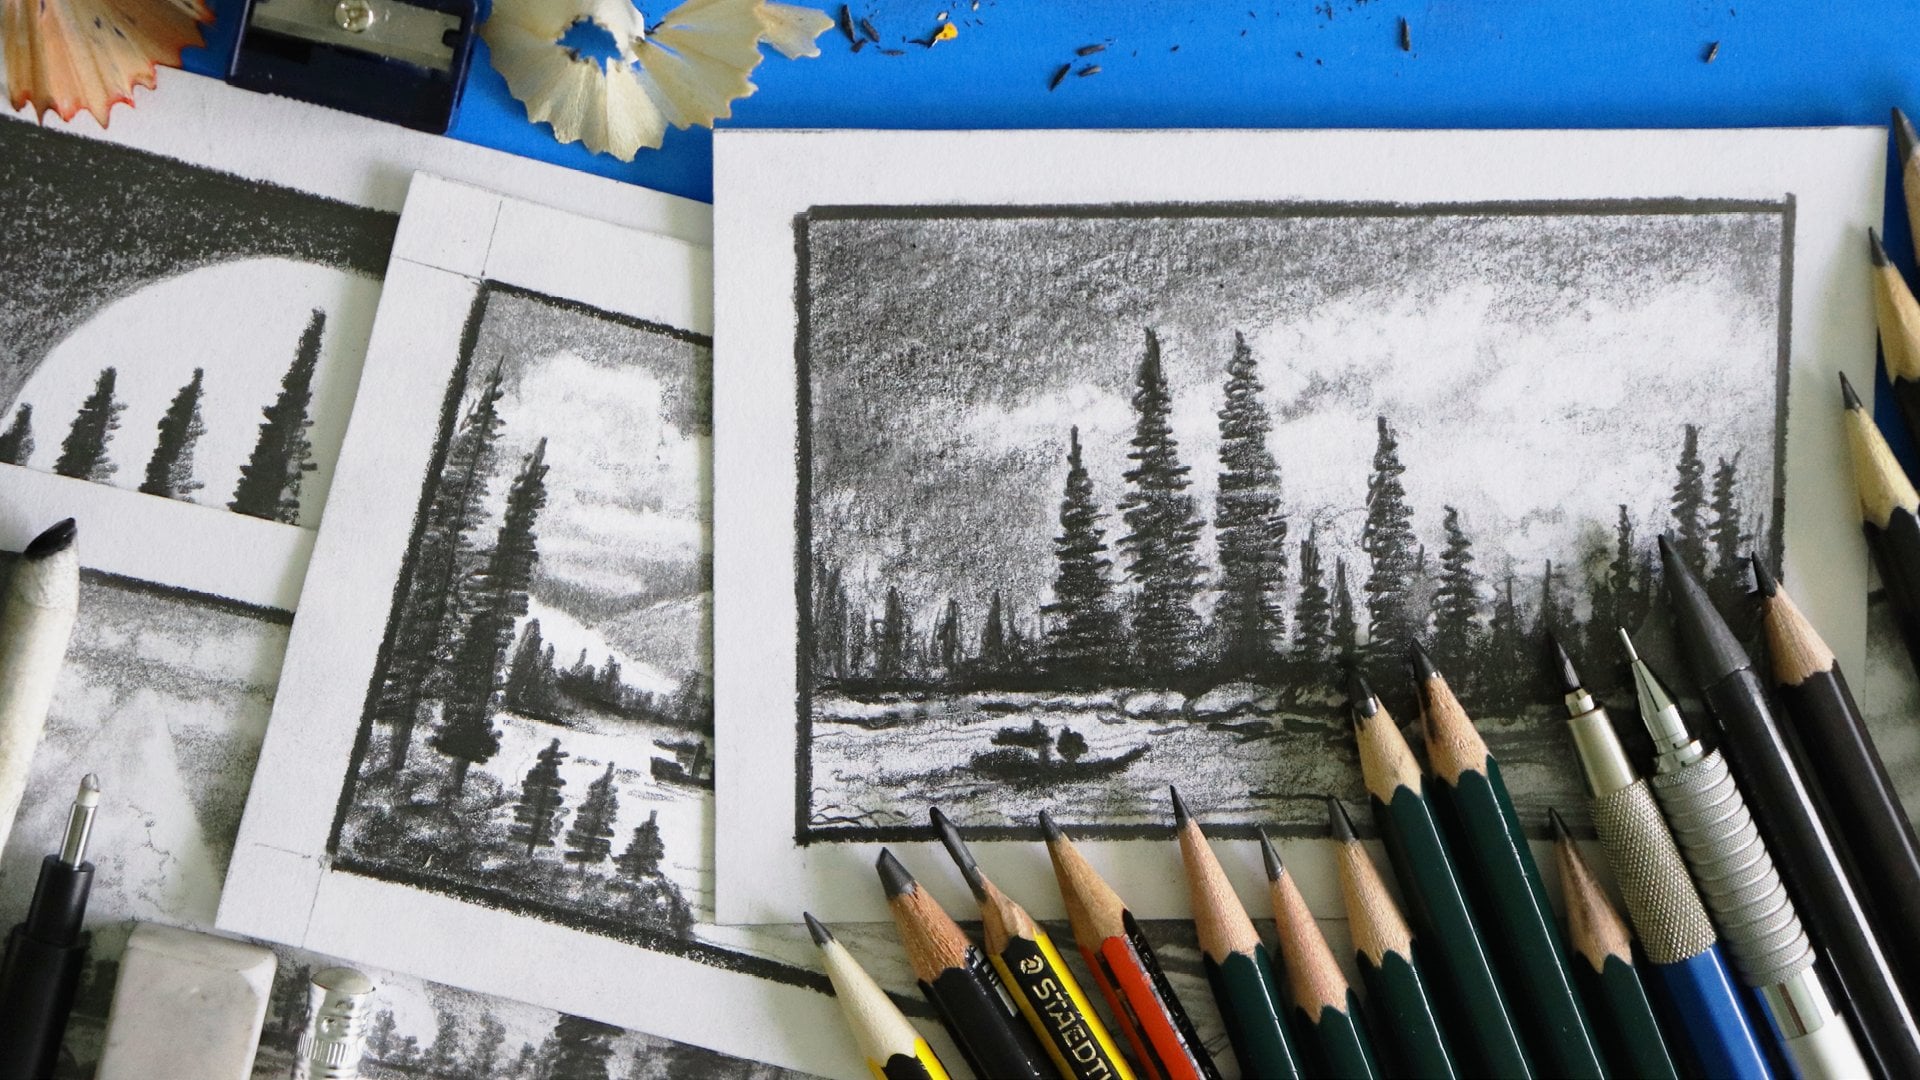
8. Base Sketch: Okay, welcome back.
Let's now start the exciting stuff and move on to the next couple
of techniques. So if you have a look
at the screen here, what I've got is I've got my lovely sheets of
paper taped down on all four sides
with my Washi tape right to the edge of the
paper to hold it in place. And we're going to work in
the beautiful white area of the paper using the
same paper that we've been using in the
previous lessons. And what I've got
here is I've just got my standard to be pencils. So the first step of
this technique is actually lay down a sketch. So we're not going to delve
into the technique yet. We're just going to do
a quick little sketch, outline so that we can build
on the techniques that we've already gone through and continue within newer technique. So let's go ahead and do that. So I'll just grab
yourself a Pencil. It can be any Pencil if
you ever to be great. If you have any other pencil, HB or whatever for B, then just grab hold
of that Pencil and lets stop this quick
little sketch. So what I'm gonna do
is I'm going to start off by just doing a light line that goes across
the bottom here like this. This is just to establish a
little bit of a focal point, a bit of a map where the
horizon is going to be. And then I'm just gonna go
ahead and I'm going to create these little bumpy
lines like this, just little roundy,
round line over here. And then it goes up again. Very simple, nothing
complicated. We're just illustrating to show how these techniques work. And then I'm just gonna go ahead and find a
little points here, maybe around about here. And then I'm just gonna do a angular line coming down here, another angular line
coming down here. And you've guessed it, well, I'm gonna do next is
a line going across. And what this will do is
represent a roof of a house that's buried behind
these lovely little hills just to give a lovely shaped. And then we're going to adjust, add maybe a little chimney here, just a simple little rectangle. And then from the top, just a line going across
to make it a bit more 3D. And then just the shoots
of that rectangle there. Very simple straight
lines, fantastic stuff. And that's it for
this first stage. All I'm gonna do
is just lay down this little line drawings. It's very rough, very loose. So just follow this along. And if you want me to provide
you with an image of this, I'll do this in the
resource pack so you will get a
nice little image, outline image of this
for you to just go ahead and copy it out to make
the process easier. Don't concentrate too
much on the image. It's more about the techniques
that we're going to do. So that was the first
quick little stage, laying down a nice
little jarring so that we have a base to work
and build our techniques on. The second step now will be to do the first
technique that we did, which was to fill in the large areas that are
what you're thinking. You're thinking, oh,
you've done a Drawing, How are you going to
fill in a large area? Well, let me show you. So what I need to do
is I need to grab hold of my lovely
graphite powder. I've got my graphite
powder here. Beautiful nine be graphite stick grinded down to a
lovely powder form. So we've got the
graphite powder here. I'm not going to lean this onto my paper just in
case I get smudgy. Smudgy is everywhere, so
graphite powder there. And I've got a couple
of my sponges that I like to use with the Sponge, what I'm gonna do
is I'm gonna go ahead and I'm going
to get that Graphite, pick it up with a
Sponge just like we did in the first technique. And then I'm just going
to carefully just drop some of that
graphite into this area. Now, what we want
to do here is we want to add the dark first. And this is usually
the process that I do in producing my
Graphite artwork, adding the dark background first so that we can bring out
the details later on. So just like that, I'm just going to
drop that graphite. And now you can see
that what I want, don't want to really do is
they don't want to go over these areas over here where
I've got the outline. I want to just have
the dark where we've got this background sky area. So just like that
with the tip of my Sponge just going in and creating that fill
area around our image. Now, don't worry if
you go over this with your Sponge or whatever
tool you're using, we can easily fix that later on. The key really is just to get that graphite to touch the
Areas of that background. Now, I'm using this
sponge that has a nice little point here. If you have a similar
Sponge, that'd be great. But if you don't, if you
Sponge is just big and round, then you can also use your
actual blending stump. With your blending stump, what you can do is
you can go in and actually pick up the
graphite as well. So if you just grab hold of
your graphite like this, can go in and you can drop in your graphite with
your blending stump. And that's another way of adding graphite into areas
that are rather small. I personally tend to
work on big pictures and big illustrations when I'm working in Graphite
using this technique. But just for this demonstration, I'm just doing this small
little drawing here. So Following along, then maybe
use a bigger sheets of paper. I've only got this little
A5 sheets in front of me because they won't
fit on the camera if I work on a bigger sheets. So just like that, I'm just basically painting around those edges
without trying to get the Graphite into the whitespace of the
objects that I've drawn. So just like that, keep going around and it's a
good way to just maneuver that graphite into
the areas that you want. And don't worry if you go
over the area or within it. Just don't worry about that. This is not about keeping
everything perfect. It's just about seeing the process and following
along the best you can. We practice. And with being
more accustomed to using graphite powder this way, you will get a lot better
at this. Just like that. What I'm doing is we've got
a little bit of 44th there, so I've got a bit of fluffy, fluffy, lets get other way. But to flow from that cotton wool that I used
in the previous lesson, we don't want that getting in. No, we don't. So just like that, I've got my graphite into those areas and I'm
just using the tip now of that blending stump to just fill in these
detailed areas. Over here, you can see how easy that is works
absolutely brilliantly. And you can see it's
already creating some sort of an abstract
form in the background. You've got all this
lovely graphite dust Creating these wavy waves
in different directions. It actually looks quite nice
that it doesn't say it's a nice little marbled effect. Well, that's not the effect
that I want to go for. What I want to do is I want a nice smooth background In
beautiful dark graphite. And what that will do
is with great when it comes to looking at the
contrast of the sketch. So just like that, I've
got all those areas pretty much touched with some
points of graphite. So what we want to
do now is let's go in and start making
this nice and dark. So I'm going to just move my little sticky
stick out of the way. And I've gotten the
Graphite fingers, but it doesn't matter because
that's what we're doing. We're working with graphite, again, the Sponge now. And then I'm gonna
go in and stop pressing a little bit harder. Now, just like that, I'm going to press harder on these edges that I've got here. So just pressing harder, making sure that I don't
go over my drawing part. And that's looking really good. So just like that, from the top area, we have this nice space to fill in that graphite
and look at that, look how easy that is to fill. Imagine doing that with
your pencil by itself. You'll have marks
all over the place. So it just makes the whole
process so much easier. And again, where I've got this graphite dust kinda
like pooled together. I'm just using that Sponge, pressing it on and just blending it into the surface
of that paper, just like that in
circular motions just to make sure that it gets into every little groove and tooth of that paper so that we don't
have any of that white left. Fantastic stuff. And using the Washi tape just gives it a beautiful clean edge. And it's looking great. So just like that, now
I'm going to do Harris. I'm just going to use the side, that side part of
that Sponge and do exactly the same so that I
don't smudge it all over. So just using that side pop in round shapes and just
forward and backwards. Not too much pressure,
medium pressure. You don't want to
press too hard. You don't want that
the graphite to just dance off that page. You want it to blend in. Once it's blended
in and it's kind of emerged into a nice, subtle soft tone than, you know, that that's
looking great. So just like that, we've got this area
here now again, just with the side. We're going up and down. And then around the shoot
of lovely little chimney. And in this little tight area
overhead, just like this, using the edge
effectively as a brush, using this as a brush
to paint the picture. Imagine if you've just painting a picture with normal paint. Just be painting,
using your brush, laying down your paint
if you are painting. But in this case we're
laying down, I will. Lovely graphite powders
are just like that. I've got most of
those areas done. And then just as a final, I'm just gonna go ahead
and just press down and smooth this out like this from left to right to make
sure that we don't have too much of that dust
excess leftover. And just like that, you can see how
beautiful that is. Look at that gorgeous
stuff that isn't it. Smooth, velvety, creamy graphite
on your beautiful page. And that's pretty much just
doing a little bit more here. You can spend as much time
as you want with this. Take your time, relax and do it. Don't stress. Like I said, if you
accidentally throw your sponge on this area
and you get a mark, don't worry about a don't need to worry because you can easily clean that up with your potty eraser or whichever
eraser that you have. So let's move on now
let me just get this out of the way and it's a
good idea to do a cleaning, cleaning of the
Graphite fingers. Let's quickly clean our fingers
9. Technique 3: Clean Edges: Okay, we've got nice
clean fingers now. So what we're going to
do is begin to grab hold of our mop brush. I will lovely big mop brush, just giving it a
little clean before I use it to make sure that there's not a lot of graphite on it. So just giving it
a little clean it clean with my hand
and just giving it a little kind of
like a dab to make sure that it's not completely
covered in graphite. So just like that,
very carefully, what I'm going to do
is I'm just gonna go in this direction. So I'm going to move this
excess graphite dust away from the white area, just like this very
lightly not pressing down, just literally just
holding the tip of that brush and just lightly letting it just
touched the surface. Let's and get just glide away. Now you can see what's
happened there. What I've done is
I've gone and done that and I'm not dusted it away, so we don't want to do that. So let's just clean
that brushing again, just giving it a little cleaner, clean onto my hand or onto
a clean sheets of paper. And we just want to move
that Graphite away. And just like that, it's beautiful and it's
just off our page. I'm just going to maneuver
it away just like that. Fantastic stuff. And again, just nice and lightly, maneuvering gets a waste
that we don't have any dusty dust on our area. And just like this,
looking beautiful. So I'm just going
to clean the table, just make sure we have a nice clean table before we move on. And it's looking great, but my hands gone dirty because I've been using the
brush on my hands. So let's just get my hand a
nice clean, fantastic stuff. So clean hands, we've got
a nice smooth finish. Now you'll notice that you have some areas on the actual
drawing where we've got White, but that's where this next
technique comes into play. So this is technique
number three. We've already done
technique number two where we've applied the graphite powder into the area that we wanted
with our Sponge. So the new thing we're
gonna do now is we're going to grab hold of a
piece of paper. And I've just got
the same type of paper that I'm using
for my sketch. And we want to make sure we
have a nice straight edge. So if you see here above the actual area of the roof
that I've got this house, we've got a nice straight shape. So how to get the graphite
to be a beautiful line, or we're basically doing is
using our shape like this. So I'm just going to place
that straight shape there. And then I'm gonna go ahead
and I'm gonna go and get my lovely graphite powder
onto my blending stump. And then I'm just gonna go ahead and create a nice straight line. And it's just a case of moving that graphite powder
right towards the edge of that paper and that people will effectively stop it from going
anywhere else. So just like this
very lightly in circular motions using
the paper stump, just gonna go ahead and fill that area to make
sure we don't have a horrible little
fluffy white area on the edge and it should give
us a nice clean shape. So just like that, I'm going to let that graphite
powder just stay there. The key really is to make
sure that you get this edge. So even if you go over
the paper, that's fine. The paper that you're
using to hold it in place, just make sure that
you don't move the paper around with movement, then the graphite powder
is just going to spill. So the area and it won't be
nice and clean, the finish. So just like that,
fantastic stuff. And if we just move that
paper away from their look at that cell types like magic isn't a beautiful, clean
straight line. Now what I'm gonna
do is I'm just gonna go ahead and get my brush. Brush. And I'm just going to, oh,
where did that come from? Those a little bit little Tape wanted to jump into the actions. So just move that
out all the way. Let's just give the bushy
bush a little dab away. So that noise is me just dabbing the brush on the
edge of my table instead of my hand this time. So let's just move that graphite powder
away from that line. And again, I'm
just going to dab, dab my brush on the
edge of my table. And then again, move that
Graphite away. Look at that. Fantastic, isn't it? So again, with the card, what I'm gonna do is
I'm gonna go ahead and I'm going to do this
area over here. So I'm just going
to make sure that the edge of my paper is clean. So that was the edge
that I worked on. You can see we've got a bit
of the Graphite on there. You're going to make sure that back edge doesn't
have any graphite on. And then I'm going to
place it at this angle. So it's just basically at
the angle where we have a little bit of that
white of the paper. And then again,
I'm just gonna go in and very gently and lightly, effectively just paint in that graphite and just
maneuver it around, which is already on the tip of my paper
stump, just like this, up to the point where we have that straight edge not
pressing down hard. You don't need to
press down hard because what you'll
tend to do is you might start moving the Graphite
away from the paper and create a little smudgy smudge that will be more prevalent. So avoid doing too much
pressure, just very light. Just make sure you're touching
the edge of that paper. That's the most important part. It touch the edge of the
paper that you've placed down to create that sharp edge. And just like that, nice circular motions
lay melts away. And then slowly in one movement, move it back and look at that
gorgeous stuff, isn't it? So I'm gonna do now
isn't just going to move my graphite powder all the way before it spills
all over the place. And we're going to
continue and do the same for the chimneys
of the chimney here. I've got a nice straight
edge on that side. So all we're gonna do is
place our paper on this edge. So we've got this lovely
straight edge there. And then just with my lovely, lovely, lovely paper stump, I'm just going to go in and
start doing the same thing. Now, if you find that on your paper stump is
not much graphite, go in into your graphite
powder wherever you have that, and just dip it in, just dip it in and
pick a little bit up. And then you have a bit more of intense graphite powder there. So that's just a
another little tip that you can do to make sure that you always have some graphite on the edge
of your paper stump. And the reason for
using a paper stump is, is because it's so
soft, tip is so soft. Have a really nice soft touch, and it works great. Alternatively, you can just
use a pencil and do this, but with pencils
you're gonna get harsh marks and that's
what you don't want. And then it's just
going to leave a horrible little graphite
shine everywhere. And that's the whole
point of this. So let's just move that back and you can see, it looks great. So we've got a nice
clean edge over there. Now, you might not be
able to use the edge of your piece of paper in
all of the angles there. It can be a little bit fiddly, just do the best that you can. I'm going to move
that graphite powder away now because I don't
want it to interfere. So you can see we've got a nice edge on that
side now, the chimney, if you want to go
in and maybe just create that edge on the top
part where we have the shoot. You can go ahead and do that. So just dropping in that
paper on that angle there. And then we're just going
to go in circular motion. And then maybe just here, just do a line coming in down. Can you can see we've
got a bit of a gap. And then like this, just
a little one there, a little one there. And then it can represent that little edge of the
chimney and the shoots. So we're not going all the way to the end of the
edge of this paper. We're just leaving
a little bit of a gap that will represent
where the chimney is. So you can just go
ahead and do that. And that way what
we're doing is we're effectively molding a shape using our beautiful graphite on the end of our paper
stumps are just like that. We move that back. You can see I've created that nice little edge of that chimney area
that's coming out. And again, just gonna give
that a little move around because we don't want
that powder to interfere
10. Shaping Edges: Now you can see that
this can be a nice, slow, tricky process, but
just take your time on it. Don't make your shapes
too complicated at first. If you're finding that
you're finding it difficult to get
into these areas. Don't worry about it. All you need to do is just get your graphite powder onto
the end of your stomach. Use your paper stump stick that has a nice
sharp point to it. And then just go in and just start maneuvering the Graphite. So I'll just put a
little bit of graphite on the end of that
stick like this. You can see graphite there. Go ahead and just draw it in instead of using the sharp edge. So that's another quick
way of getting it done. If you don't want to use a
sharp edge of the paper. If you find that process a
little bit fiddly and tricky, you can just go ahead
and paint it on me and like this, that's
absolutely fine. It's still gives you
a nice soft edge. Just make sure you use a light circular motions to
blend it away like this. Just using light
circular motions are blended and then just maybe clean up the Areas you
missed out earlier on. And actually, that's
what we're gonna do for the mountain
areas over here. These little hilarious. So I think we'll
leave that as it is. It's looking rather nice. I'll just move my
paper out of the wave. Okay, so what I'm gonna
do is I'm going to continue with my paper stump, that sharper end of
the paper stump. And I'm just going to add in a little bit more
graphite on that tip. So just dipping it into that Graphite,
moving That's away. And then I'm just gonna go
ahead and I'm just going to add that graphite in so that effectively am using
the paper stump as a Pencil with that nice sharp
tip and just cleaning up these edges so that we
have a nice soft touch and it doesn't look to wobbly
bit all over the place. It looks like it
has some nice form and it was done by intention. So that's what it's all about. It's all about the intention, not about the results. It's about what you
planned for it to be and it can be whatever you want it to be isn't to get through
psychological about say, let's just enjoy the process. So enjoy that process. You can see I've
clean that area, Rob. I'm going to do the
same over here. I'm just gonna go ahead,
am going to clean this area up and maybe add a bit more graphite into the actual paper
stump to get a bit more of a darker contrast. It looks just like
that dropping in the graphite and say
I'm dumbing it down. And then I'm using
that graphite that dumped on to just push it in those areas that I want
to create that round edge. Now alternatively, you can even make yourself a little stencil, if you like, of this
entire shape out of paper. So what you can do
is use a sheet of paper and then just
cut out this shape, place it on top,
and then just use your sponge to go over
the entire thing. I sometimes do that, but again, that becomes a little
bit more advanced. You need some cutting
tools for that, maybe a exacto knife and maybe
a thicker piece of card. So I'm gonna say avoid
doing that for now. But if you do want
to try that out and give it a go experimental
little bit with it. But just for this class
because it's aimed at more beginner level
and just like an introduction into
this dynamic style of using graphite, I would avoid doing that. I would maybe do that later on once you've got a
bit more comfortable with your graphite powder and how to apply it onto your page. But then again, if you've
already got experience of it, then why not give that idea ago? Just cut out a stencil very carefully of your
shape where you don't want the graphite to be and just add on the Graphite just
like we have using a Sponge are some cotton ball to create that beautiful edge. For now, let's just concentrate
on what we're doing here. And I think that's
looking great. So look at that looks
fantastic, That doesn't it. So I might do a little bit
more down here because I want this area to be a little
bit more accurate. So just like this, I want the edge to
go in a bit more. And from here, I want that edge into go a little bit more. And then just correct this
a little bit like this. But you can go as
deep as you want into the actual Details that's
entirely up to you. We're not creating a highly
detailed during Harris is just a quick little sketch
I'm going to leave the highly detailed with to you
for your class project, but we will discuss that after we've done all the lessons. So let's just leave it out that I think that's
looking quite nice. So let's just do a final little
dust off with our brush. So just like that, move that Graphite away. Don't want that graphite to ruin all our beautiful
work. There we go. So it's nice and clean. If you want to just
give it a little below, you can go ahead
and do that. Again. I would avoid doing that. I can't really suggest that
you should do that all the time. I sometimes do it. So if you want to do it, just give it a little
blow to get rid of the actual graphite
if you don't want to spend too much
time with your brush, but do remember blowing on it. You'll tend to maybe have
a little few droplets of moisture going onto your graphite and that can
muddy the whole thing up, but I'll leave that up to you. Just a quick little dry
blow up the Graphite away, but best to use a brush. So that was technique
number three. So we use technique
number three to create beautiful clean edges with our graphite powder
on our illustration. Let's now move on to
the next technique.
11. Technique 4: Soft Details: Okay, welcome back. Let's now start looking
at the next technique. So for the next technique, what we're gonna do is we're
going to start building in some light details using
our to the Pencil. And what we're gonna do
is we're going to focus on the area of the roof where we have the slabs and the roof tiles in this
imaginary image that we've got. So what I'm going to
firstly do is I'm gonna go ahead and clean up the areas where I can see a little
bit of the Graphite that's just muddied up some
of the lighter areas. And this can happen
if you have a break in-between your drawing and
come back to it later on, you may find that some of the graphite dust that you
hadn't cleared up as just come over and it's just smudged its way into those
little nice clean areas. No problem if that happens is most likely to happen anyway. Just grab hold of your eraser. So I've got my potty eraser
here and I'm just gonna go ahead and clean this up. Don't worry if it doesn't
clean up completely, like I said before, we're not here creating
beautiful, perfect Art. We're just trying to learn new
techniques on how to apply graphite and create some
gorgeous dynamic drawing. So just like that nicely
clean it cleanly on there. And then if you want to get some real little details out of the areas that
have muddied up. So just use your mono eraser if you have one and
if you haven't, don't worry about it, just
use the eraser that you have. And if you find that your
eraser is too big or too heavy to get into the detailed
areas that I've muddied up and just leave them, don't worry at all. So what I'm going to do
now is I'm just gonna go ahead and just going to clear that off the page so
we don't have the excess and That's looking great. So what I'm going to
do now is I'm going to grab hold of my to be pencils. So as I said before, I'm gonna be using
my Tooby Pencil to start adding in some detail. So let's go ahead
and do that. Now. For this technique, this will
be technique number four, and we're gonna be
building in some detail. So just with my pencil, what I'm gonna do
is I'm gonna go ahead and I'm just
going to drop in some very light lines that
are growing across like this. So again, this is just
going to be nice and loose, not really bothered about
having them super straight. It's just about demonstrating this particular technique
that I'm going to show you. What you can do is effectively, you can just go ahead, leave
these lines as they are, but to add a bit more depth and a bit more interest to your
artwork With Graphite, what we can do is
we can start using a paper stump that
I've got over here, which is a very thin one. So just as a side note, these papers dumps
that I've got, if I just bring a couple more
onto the screen over here, I've got different various
sizes of paper stumps. I usually get these
impacts and they last for ages and they come in different thicknesses or different roles amounts
that they come in. And these are so handy when it comes to adding
details with graphite because you can use a
really thin small one and hold it at a peculiar angle
that will help you to create a different effect and
make the whole process so much easier to do experiment if you do
have a couple of these, don't just stick to
one, try the others, and see how they go when it comes to adding and
Building Details. So what I'm gonna do is I'm
just going to grab hold of this end and make sure that
the end is nice and clean. I mean, I know it's got a bit of a mark on it, but that's fine. You do find that
your paper totally alien or your paper
stump hasn't mark on it. Then as I said before,
just grab hold of some normal paper just to
clean sheets of paper. I just give it a Robby Rob. So I've got a rubber
rub on there and it just gets rid of the
mark and cleans it up. I'm gonna do now
is I'm gonna do, is there's going to go
in and I'm going to just lightly go over the line that
I've just done like this. And what that does is it
creates a little bit of a blend and a bit of a TO
Soft tonal edge to that line. So just like that, I'm gonna go ahead and Dave
that a couple of times. And I'm going to repeat this, these ones over here. And the point of this
is really to add that depth like I was
talking about before, because you can just leave Lines basic than the can be
a little bit boring. So change it open little bit, make it more dynamic, and add these different
techniques of using graphite to really enhance
your beautiful drawings. You can see it's
very subtle ways, but what we're gonna do is
we're going to build on today. So again, just going
to carry on on them lines and then
move it across. Now, do note that the
softer your graphite, the more easily it will smear and smudge when you're
doing these techniques. So do bear that in mind. This is just a to B Graphite. So a to B isn't
going to be as soft as say a six SBI
or an eight beat. If we use six B and AB here, it would get really
dark and they would smudge all over the place. So that's another
point to consider. Another tip, if you like, is to make sure that you use the right grade of Graphite for when you're
doing your smudgy. Smudgy is on your Details, so that's fine as it says. Well, I'm going to actually do now is I'm gonna go ahead and grab my phobia because I
want to darken this up. So I've got my 4-bit Pencil now. And then what I'm
gonna do is I'm just going to tilt myself to decide because I'm attached
to the paper to make the angle a little
bit better for me. Then I'm just gonna go ahead
and I'm going to drop in a Darker line just over that
initial one that I had. And you can see
what that's doing. Is it Building a bit of a
sharp edge just like this. It doesn't have to
be super streets can be a bit Weebly
wobbly if you like. Keep it organic or
keep it straight. It's entirely up to you. Whatever effects you like or whatever finishing
like, go with that one. So just like this, I'm
gonna go over with that. I'm look how cool that
looks, that looks great. That doesn't say
it's so nice bits of dark, sharp contrast there. And then again, I'm going to
grab hold of my paper stump and I'm going to do exactly
the same, but this time, press down a little
bit harder with my and you can see we're
getting a bit more of a blend. So this is effectively
just Building in layers of detail and making them a
little bit more interesting. So just like that,
now if you find that your graphite isn't
moving too much, you want a bit more of a
blurry effect on this, then just go ahead and
use circular motion, but do this very, very lightly. Don't press too hard. Keep it a very soft touch
and take it timed this, don't rush it because
if you rush it, then it can smudge and
smear all over the place. And then it you're just
going to have to try erasing it out. Again with circular motions. You're gonna get
a bigger spread, spread it across
however you're right, I'm going to spread this a
little bit further down, a bit further down
from the sharp allied to add a shadow to it. And that's what these stumps
are great for these papers, stumps or tortellini
stones or blending stumps, whatever you want to call them. They just fantastic tool. So again, circular motion
than I do quite like that. So I'm going to do that on
this first line over here. So circular motion,
just like this, going nice and round, it's just maneuvering
that Graphite. Really soft touch. And look at that.
That looks fantastic. That doesn't say, okay, now what we're going
to do is we've done our lines that are going across. Now we're going to do lines
coming down in this angles. But instead of using the pencil, what we're gonna go ahead and do is we're just going to use our end of our paper stump. The papers stump you can see
now is gotten nice pizza, graphite powder or granules of graphite on since tip of it. And that's what we're going
to use to our advantage. So what I'm gonna do
now is I'm gonna go ahead and I'm just
going to lightly, but beforehand,
before I do that, I need to get my piece of paper. So I'm just going to grab a
nice clean sheet of paper. Again. I'm going to draw in some
beautiful lines like this Look at that we're
effectively using our paper stump as a Pencil. So just lightly Bringing
those lines in like this, trying to space them
out and best I can, just dropping in four lines. I don't know if you can
see that on the camera. So in that case, if
they're very light, then what I'm gonna do
is I'm gonna go ahead and grab some graphite
from my graphite powder. So I'm just going to
open up my graphite powder box over here. And I'm just going to dip
it in my lovely stick, paper stump stick into just
a little bit of Graphite. Not too much. I don't want lots of graphite
on there, just dabbing, get in a little bit, moving that back
out the way so it didn't fly all over the place. And then just testing this out a little bit on my
clean sheets of papers. You can see I don't
want particles, so I'm just giving
that a little Db, Db. The particles have
graphite for love. But what that's effectively
doing is that's just added a bit more dark to it. So what we're gonna do is
we're just gonna go ahead and make sure that I don't smudge that little thing
that I've done there. So just go ahead and just add a little bit more definition
to the lines that way. Dropping in and look at that
fantastic, That isn't it. It's just darkened up light
and then just pressing with medium pressure
backwards and forwards. And look how nice that looks. Beautiful stuff, a
beautiful stuff. So just like that, twisting the stomped
to get a bit more of the darker graphite
on their fantastic. So again, do this as much as you'd like going really
dark if you want. I like to keep these Details and nice and soft so that they don't distract away from the main elements of
the illustration. Just like that. We're done. So let's just move
that out of the way. Okay, so look up that
we've created this nice, lovely crisscross
little pattern just using our Pencil and
our lovely paper stump. Let's now move on. The next one.
12. Technique 5: Clean Lines: What we're gonna do next is
we're just going to fill in some detail areas now without
doing too much blending, we're just going to
stick to nice, clean, crisp lines just
to give a bit of contrast and variation
in what we're doing. The next technique, which we're working on is now
technique number five. And that's just dropping in some nice little Details and keeping them really
nice and clean. So what I'm gonna do is
I'm just going to use my pencil and I'm going to make sure that I've got my piece of paper at hand so I don't
do so much is smudges. So just like that, I'm just
going to place that here and I'm going to work
on the chimney areas, so ensuring that my
pencil is nice and sharp, doing sure that you've got sharp pencils when you're
doing detailed work. Otherwise it's going to
get a little bit messy. So what I'm going to basically
do is I'm just going to start doing some
outline work over here. So just lightly
dropping in a line over here and a little one up here, just to give this a bit
more depth and definition. So just like this, a little line going
across there, another one going there. And this is just giving
it a bit more forms. So with the actual details on the actual parts
of the chimney and we're gonna go ahead
and I'm just going to go and drop it in some
lines like this. Nice and light,
but trying to keep them a bit more defined
rather than loose. So just like this, some nice lines going across
that represents some bricks. So this area here
is a bit fuzzy, it's a bit soft, so I'm
just going to sharpen it. And then down here, a
bit more of a sharpen. And then over here, I'm just going to add
a more defined line, bring that across, and then just bring a line across there. And there's clean
and tidy it up from here on all these edges. So what we're really
doing is we're just refining the edges and making them a bit
more sharp so that we don't have too
much of a soft look. And what this will do is
this will enable us to focus on a little bit of detail when we're looking at
the overall picture. So just like that, maybe what am I do
here is I might just add in another line
that goes across, just have a play around design in whatever patterns
and shapes you want. Then from here, I might just do a number line going
across the middle and make this into a funky
little chimney design with two of these
shoots that are coming out where the smokey
smoke will come out from. And we're going to
look up that later on. So maybe throw in a couple of lines like this to
represent some bricks. So just a bit of
shape of a break, but just randomly just
throwing them in, not doing it on
every single one. And then possibly on
this side over here, just dropping in
some more lines just to darken up that area
that might be in shadow. And then just basically
just cleaning this area up, not pressing too hard, letting the Graphite
work for you. That's really important
not to press too hard. Because what'll happen is then you'll have this buildup of graphite and then
the Graphite Xin will go all over the place, especially if you're
using it in larger areas. Again, over here, maybe I might just do a couple of
lines going up like this just to add a
bit of texture to the shoots on the chimney. And that's about it
for the chimney side. So you can see now if
I move the card away, you can see now that I've got a nice little
contrast of Details, nice detailed work over here. Then I've got this, a softer touch over here
where the tiles are. We going to work a
little bit more on those tiles and we will do that later on because we're just looking at
different techniques. So we will on the fifth
technique now of adding details, we're going to repeat these
techniques in this area. Over here, we've got
these two hilly shapes. So what I'm gonna do
is I'm gonna go ahead and start adding in some
more details there. But before we do that, let's just quickly clean
up the edge of the house. So I'm just going to
again put my paper down and I'm just gonna
go ahead and drop it in a nice sharp line like
this with my pencil. Just to clean and
tidy up that line. And you can see it looks
a lot more defined now. So again, just move that across. And then just with my pencil, I didn't get that darker line. You give it that beautiful edge. And you can see that's completely
changed the look of it. So we've got nice soft area
at the back and we've got some nice crisp details in
this mid ground elements. So what I'm gonna do now
is I'm going to start building in some details
into these areas. And like I said before,
we're going to use a combination of
technique number four, which is using the Tertullian Or the paper stump and
some detailed work. And we're going to
merge them together to create some
interesting textures. So let's move on
to that one next.
13. Technique 6: Building Details: That's looking quite nice. Looking quite nice
to know that for the Graphite. Pretty good. Take that sine is one. That good old roast aroma. Been beautiful stuff
that, oh, okay, hello. Hi, how are you doing?
Lets get back to class. So what we started doing in the last
class was we looked at technique number five and we're going to move on
to the next techniques. So if I bring your attention
back to the screen, we've got the lovely
little Drawing up to this stage
that we have it. So what we're gonna do next
is actually we're going to take these little Tape it
tapers off from the corners. If you've noticed, I'll just
zoom back on the camera. If you've noticed that I've got these little curly tapes
curling away on the corners. I know that's not by accident,
That's by intention. So what I've done here is I've just removed the
tape so that they're not attached onto the
surface of my actual table. This red carb that I've got. And the reason for
that is is because it's stopping my flexibility of moving the actual sheet and rotates and get when I'm
doing the detailed work. So that's a nice little
tip to do as well. Just remove the tape
that's attaching your actual sheets
of paper that you're working on from the table, let the little curly kills curl up and then just turn it around. And if I show you on
the screen here and just give it a little
flat back like this. Flap it back, attach it to the back part of
the actual garden, flipping all over the place. They're just at the back there, so it's nice and
neatly tucked away. What this will do
is this will give you a nice sheet to
work on that you can easily maneuver
around your table or surface that
you're working on. So do this. If you want to do this, if you don't want to do
this, absolutely fine. If you've watched any of
my classes, you know, the I like to twist
and turn my sheets as I'm drawing to get the
right angle. So there we go. Now I have a sheet
that twists and turns according to
how I want it to. So let's just get that zoom in, zoom back on this Okey-dokey. So what we're gonna do
now is we're going to work on some detailed areas. But before we go
ahead and do this, I want to add in some
placeholders for the actual next technique that we're going to
work on after this one. So let's go ahead and do that. I'm just going to grab
hold of my Tooby pencils, so it makes no difference
what Pencil you use as long as it makes
some decent marks. I'm just going to grab hold
this till this to the side. I'm going to drop
in maybe a couple of these round shapes like
this. Just like that. Couple of round shapes. They don't have to
be equal in size. The more bumpy, Bumpy they are, the more natural
they tend to look. So just like this, a couple more of
these going across, maybe one coming in from
this side. And that's it. So basically what that's done
is added the last line of detail right at the
bottom of our sketch. So we have this little
gap that divides it up. And what we're gonna do is
we're going to actually concentrates on this gap. So we've got the nice too
hilly hill areas over here. Then we've got our
little border effect going at the bottom. It gives us an indication
of where we need to work. So I'm going to grab hold of my clean sheet of paper or card. Drop that over here. And let's concentrate in this little Areas
section over here. So let's do a bit of a Zoom
is zoom so you can get the best angle and not
miss a single thing. So that's looking good. So what I'm gonna do
is I'm gonna go ahead and do technique number six, which is actually
just a combination of technique five and maybe a
little bit of technique four. But let's go into
the detail of it. With my to be Pencil, I'm gonna go ahead and I'm
going to start dropping in some little shapes like this, just like that on the top, just these little round shapes. And then we're gonna go a
little bit random with these. A little one here, a little on there. Just like that they're
overlapping to create a bit of an interesting
pattern. Just like this. Just going to add
in this kind of scaly look that's on top. It's like these little
scaly things coming down. But what it is is it's
just a case of doing these semi-circles,
these round shapes, and they're just following
along the shape of the actual bump or that hilly hill that
we've got up there. And that's all I'm going to do. So just like this, you're gonna go ahead
and I'm gonna do this, and I'm gonna do this
across the entire thing. So if I just bring this back, you can see here, zoom back
actually, that's better. So just across
this entire thing, maybe two or three levels down. I'm just going to
continue this pattern going all the way across. So I'll quickly go
ahead and do that, and then we'll move
on to the next stage. Let's go ahead and do that now Okey-dokey. Now you
can see that I've got this nice little pattern, this kind of organically
style pattern going across the top edge of the two peaks or hills
that we've got over here. And it's just a random pattern
that I've dropped down. So you don't need to worry about following this exactly
how I've done it. Just go ahead and
throw in some of these half circles
or semi-circles, or even some of these
full circles that are scattered all the way across
the top edge of this shape. Try keeping them as
compact as you can. Because the next part,
what we're gonna do, it adds onto this effects. So what we're really
doing here is we're just adding in some details to produce a variance in
Texture to give the overall look on the illustration something a little
bit interesting. So next what I'm gonna
do is I'm going to grab hold of my phobia Pencil. I want a little bit of a
darker pencil for this part. And all I'm gonna do is
I'm just going to go ahead and drop in some lines. So basically from
the bottom edge of these little shapes
that we've done over here. I'm just going to drop in
these lines like this, just some straight lines
that are going down. I'm going to add in a
little gap in-between them. So just like that you can see, it's just adding in this
really nice dark line. They don't need to
be super straight. Keep them as organic as you can. Just from the top, I'm
just bringing them down. You can bring them from bottom all the way to the
top like this. It's entirely up to you. However your hand is comfortable and you can
see it's already started creating a beautiful variants in Texture and look and feel
to what we're doing. Can you see that? It's a gorgeous little
pattern over there. So I'm just gonna go ahead
and repeat that now. All the way across Okey-dokey. Now we're done on this. You can see we've
got this beautiful little straight line Texture at the bottom of the peak with our lovely little round
shapes at the top. It just adds that beautiful
visual texture to the overall image so that we can have a bit of a variance. Now, what we're gonna do
is we're going to grab hold of our lovely paper stump. And I'm going to use
the same one that I used in the previous example, my nice thin one. And it's got a little bit
of the Graphite answer. I'm just going to make
sure that I don't have too much graphite on. I'm actually just cleaning
gets onto my finger. So just like that
makes sure that there's no graphite
on your paper stump. Otherwise, we just
kinda get a muddy mess, but really grab
hold of a sheet of paper and do this on
a sheet of paper so that you don't actually go ahead and get graphite all over
your fingers and hands. It just like this in
the bottom corner, I'm just gonna clean
this always best to use a sheet of paper and not do that all shortcuts
like somebody. So I'm just going to do that gives us
a nice little clean, clean and move my
sheets of paper away. And fantastic. So what we did here
is we just did a continuation and a bit of
a mix of technique number five that we did
previously where we it detailed to the actual
chimney over here. So we just went in straight With our pencil, nice and sharp, added into different types of textures with some
detailed work. And what we're gonna do
now is we're going to switch to number four. So in four, if you
remember what we did, We did some software
details here on the tails. So we're gonna go ahead and incorporate that
into this design. So with my paper stump, I'm gonna go in at
the bottom here. Let's get a zoom in. Zoom. You can see this a bit better. So just like this
fantastic stuff
14. Blending & Refining: A nice focus. So with the tip now what I'm
gonna do is I'm gonna go ahead and I'm just going to use these small motions that
go upwards like this. I'm pressing down
with medium pressure. And what this is doing
is the Graphite that I've laid down. As those lines. It started getting a
bit of a blend on. As you can see, it's adding this little bit of a blend
and that's all I'm gonna do. I'm just gonna go ahead and
continue doing that all the way from the edge of these shapes that
I've got over here. And I'm gonna do
it approximately halfway the length of
each of these lines. I don't want it all blending and Soft all the way to the top. Adjust once it halfway. So just like this, just going up and if you
find it doesn't blend too much with just a
single movement like this. Then just go upwards and
downwards like this. Just do it in this
motion like this. Like a quick little
upwards and downwards, but just be careful
not to do it too hard. Otherwise, what will
happen in all get dark are fairly quickly. So just like this, I like
to take my time on this. And if it's not blending or
giving me a nice soft blends, then I'll just go in
up and down like this. But very likely when you're
doing the up and down motion, keep it really light pressure. Otherwise, it's going to
get rid of all the details. So just like the up-and-down, fantastic stuff and
where we have this kind of area now where we don't have any of the
blending graphite, maybe just give it a little
flick up like this so it doesn't look too sharp. The difference from
the blend and blend. So just like that, as long as we have the darker
area, the bottom. And then what I'm going to do is once I've done that
all the way across, I'm just going to use
the paper stump can just go around the edges on
the top part there, just to intensify
the dark and to really give it that lovely
effects are just like this, just going left and right. So that's what I'm going to
do all the way across here. So it's just going
upwards like this, upwards and downwards
to create the blend. Then going left and
right to follow the shape of the edge that we've got on
these shapes here. So let's get a zoom back
so you can see this while I'm doing this
all the way across. So just like that, you can
see when you zoom back, you can see the
effect take place. You can see how beautiful
That's already looking compared to the ones where we haven't got that lovely blending, blend. So let's just go ahead
and continue and do that. Then I'll come and speak
to you once that's done. Okey-dokey, you can
see now we've got this nice little soft blend going on from the bottom area, going to the top. Next, what we're gonna do
now is we're gonna go ahead and grab hold of
our four be Pencil. So with Mike for B, we've got to make
sure that you're Pencil is nice and sharp. What we're gonna go ahead
and do is we're going to start darkening these circles from the bottom where we've got these lines touching
the edge of that shape. So let's just get a zoom in, zoom in on this. So you know what I'm talking about when I go through this. So let's start maybe on
this side over here. So that's looking good. Okay, So basically
what I'm gonna do with my sharp pencil, nice and dark is the under areas of each
one of these shapes. I'm just gonna go in with
my dark pencil like this to effectively add a kind of a shadow underneath each
one of those shapes. You can see adding
this dark line, not all the way around it, just at the bottom area. It just starts making those
shapes pop out, doesn't it? It'll come nice. That looks, I do this all the time in my illustrations using
graphite and love doing this than the Texture work and pattern work and incorporating
it into the illustration. Then coming up with this nice
contrast of dark and light. And you can see it just enhances that beautiful texture to the point where you're thinking, wow, that looks quite
nice, that doesn't it? Just like this, I'm
gonna go ahead and continue doing these
little darker lines. And then maybe a
couple on the top, but not all the way to the top, just maybe a few
over here just to balance it out so it
doesn't look too abstract. What we want to do is
we want to make it look as organic as you can. That way it just blends in and
looks rather than natural, rather than a little bit
abstract or robotic. It's just a bit more pleasing
to the eye, isn't it? So just like that
you can see I've quickly added in
then dark lines. And once we've added these
dark lines in all the way, then the kind of Areas of those lines that are
touching them, dark lines. I'm gonna go ahead and just
darken them slightly as well, just like this, a
dropping in some darker, dark lines just over some of those lines that are touching these lines that
we've just added in. So if you have a look
on the screen here, all I'm doing is I'm just
adding in a couple of lines. And then again, this just merges that nice bit too dark detail together so that it
doesn't look too abstract. Or to isolate it. We don't want little pockets of different things going on. We want it all to
blend together and look lovely and have
a nice harmony. So what we're doing
here is again, just dropping in these lines. And that's all I'm
gonna do and I'm going to do this across
the entire thing. So let's just get a zoom in, zoom back on there. Don't worry if you haven't got the same shapes as me,
that's absolutely fine. Just let the shapes come out. The circle shapes you might have some more at
the bottom here are some more on the top or they might not be as close together. Don't worry about that. Just dropping these shapes and follow this technique
of adding in some nice soft Areas with some blending work
at the bottom and then refining it with some dark, lovely lines to create
this gorgeous contrast. So I'm going to continue
doing that now. Okay, That'd be go
now you can see we've got this beautiful pattern with some nice textures going on and a lovely bit of contrast. So what I'm gonna do next
is I'm just gonna go ahead, add in some more dark lines from this area now just lightly
sweeping in an awkward style. So just like this, I'm not necessarily following the lines that I've
already got on there. All I'm doing is
I'm just throwing in some of these
lines like this, just giving this a flick, flick of movement,
just like that. And what that does
is that intensifies that lovely soft area and it merges the entire
pattern together. So just like this
and just going to quickly do a flick, flick, going up, randomly
spacing it out. However I feel looks good. So just like this, pressing down fairly hard
so we get a nice dark line. This effectively just
Complete that pattern. So just quickly dropping
that in like so. And you can see having
a darker pencil just produces so
much more contrast. And that's the advantage
of using graphite, especially if you have a
nice range of pencils. And I always advise
at least have three or four
different pencils from different tonal ranges from
light, medium to dark. And then you can produce
beautiful textures like this. So that's the
technique Complete. We can now sit back, maybe take a couple more sips
of our lovely hot beverage, and then let's move
on. So the next one
15. Technique 7: Building Texture: Okay, welcome back. Let's now move on to the
next technique and I think we're on
technique number seven are technique numbers seven. So let's have a
look at the screen. We've got our
lovely illustration that's approximately
halfway done. And for this next technique, we need a nice dark Pencil. So what we're gonna do here is we're going to concentrate on these little elements that we've got at the bottom
that we added in, in the last part of the class. So what I'm gonna do
is get a zoom in, zoom in on this or that you can see what I'm talking about. Lets get it nice and clear. So just like this, get that focus back
on beautiful stuff. So as I said, I'm gonna be using my
pencil now and I've got my lovely HB pencil over here. With the HB pencil, we're going to have the
darkest marks that we can get in a standard pencil from the
set that I've got anyway, I know there's nine beats and B and all the weights of 14, 15. But generally the higher numbers come in the graphite sticks, but we don't need to
worry about that. Just use whatever
pencil you have. So if you've got a
six B or a four beat, just go ahead and use that. The darkest tone for this technique is
going to work best. So I'm gonna do is I'm going to grab hold
of my pencil now. And if you see on the screen
how I'm holding my pencil, I'll see if you can
see this a bit better. Actually lets get to zoom in, zoom back so you can see
the position of my hand. So what I'm doing is I'm
not holding the pencil in the classical way
of how to write, but I'm holding it by holding
get on the side like this. So we want to use this side
of the actual pencil itself. So instead of
having harsh lines, we want to have some
nice soft lay down. And this is a great technique
to use to just lay down your graphite on
some bigger areas. So just like this, I'm going to hold the
pencil like this. And then with my hand, I'm just going to
put the pressure on this finger over here and just press down on the entire
surface of the Pencil. And then what will
happen is we'll get this side Pencil Effect
if you see like this, just a nice side Pencil Effect. And the reason to do this,
this so that you can get quicker coverage
instead of having to use the tip like this and press really hard and get those
horrible harsh lines. It's just, it just gives
you a smoother look. So just like this, but
I'm going to do is I'm just going to drop
in that graphite. So let's just see
if it can get a bit more of a Zoom is zoom. You can get a bit more close up. Lots of looking, great,
fantastic stuff. So just like that, I'm going to drop
in lovely graphite. And what I'm gonna do is
I'm gonna do it all the way to the edge of these shapes. And then once that's done, then it's just going to be a case of doing the
exciting stuff. So because filling that
shape up over there, I'm not going to leave too
much of a gap and wants to get as much coverage as I can. So that's looking
good for that one. What I'm gonna do next is I'm
gonna go ahead and do eight another layer of graphite
using the same technique. Just like that, using
the same technique slightly changing the angle
of how I'm applying it. What that will do
is it will fill in those gaps a
little bit better. So that's another technique
if you want to fill in the areas of your paper and you don't want to
have too many gaps, but you only have just a pencil. Then go ahead and
use this side of the Pencil to do
your initial layer. And your second
layer just changed the direction of your Pencil
I am doing and you can see it starts filling in those grooves and gaps that
the original layer left over. That fantastic. So what I'm gonna do is I'm gonna go ahead
and I'm going to continue all the way across
the bottom little shapes. And once I've done that,
then I'll come back and move on to the next
stage. Let's do that now. Okay, so you can
see now I've got a lovely little
fill in my shapes. You can see I've left a
slight little gap on the top, but don't worry if you've
got all the way to the edge, we're going to cover
that up anyway. So the next stage now is to go ahead and use our
blending stumps. So I've got my nice thick
blending stump here. And it's just a case of
going in and creating a nice Light blend over
here so that we have even tone going all the
way inside that shape. And you can see here
now I'm just pushing that blend all the way to the edge of the shape and it covers up that
shape quite nicely. Just like that. Very likely I'm not
pressing down hard at all. So just like that in
circular motions, just making sure that it all blends out and it
goes all the way to the edges of the tape so that we have a
nice clean finish. And then just like that, I'm gonna go ahead and
do exactly the same. So just like that, make sure I go all the way to the edges where those
gaps were covered, them gaps up to make sure
that we have a nice, subtle, soft, lovely feel
of Graphite just like that. I'm just going to continue
doing that all the way across. Okay, brilliant stuff. We've got a nice
smooth little fill in our shapes at the bottom. And you'll notice immediately if I bring this down a little bit, the field that we have here has a slight texture to it
naturally because we use a pencil and the field that
we have on our top area, what we did with the graphite powder is
a lot more smoother. You can see the contrast
in the difference between the two Techniques and it gives a completely different finished. So that's the advantage of using graphite it
you can come up with some gorgeous various finishes using effectively
the same materials. Let's now move on to
the exciting stuff.
16. Adding White Dots: So for the exciting
stuff I'm gonna be bringing out my
favourite tools, the tool and yes, that is my lovely
electric eraser. So what I'm going to do with
the electric eraser now is, and this is what I do a lot
in my graphite drawings. I'm gonna go ahead and do as me zoom in first so that
you can see this. So let's work on the
first one over here. What we're gonna do is we're gonna go ahead and
we're going to start dropping in some
little dotty Dots. So just like this, I'm going to drop in
some little dots, the dots in the top sections of these little round curves that we've got very likely
not pressing too hard. Now I know my arrays is going
to make a lot of noise, so the bear with me. So just like this, just to create a nice
little texture so you can see how quickly I was able
to create that texture. So the next stage after that is going to be to
go ahead and get my little blending stump and lightly just go over those
little dots that we did. So from the bottom, going lightly over them so that they look really
nice and subtle. So we don't want them
to be too contrasty, just very lightly, just give it a little dB dab to get
them nice and subtle. This is effectively Building Texture and beautiful
patterns using our eraser. So let's go ahead now and clean our eraser because our eraser
is a little bit dirty. So get that card out. So just get that clean
card out and give that a nice little clean it
Clean, can see there. Give the eraser and clean, beautiful stuff, will get
that lovely clean eraser. So I'll move that
to the side now. Don't want that to
interfere into our drawing. And then again,
what I'm gonna do now is I'm gonna go
over them again. So just over those
same Dots again, lightly just on the top areas. And effectively
what this is doing, just adding a nice
highlights across the top. Now you can see
that now we've got this nice subtle part down here. Then you've got these beautiful
sharp areas on the top. And that, that's
what I'm gonna do to continue right down
here to the side. And you can see where
effectively carving out that lovely little shape with
those little dotty Dots. Now how difficult would that be if you have to
physically draw them in and then use your
graphite to go around them. It would be really difficult. So that's the advances
that we have with this. I'm just gonna go ahead and adding some more dots down here. Light ones over here,
just drop them in. Make sure that we have Texture in every area of
the shapes just like that. And then on the edge,
just some light ones there to blend them
in a little bit. Fantastic stuff. Now again, I'm gonna go
in with my paper stump, the small one, and
then I'm just going to give it a little
dB DHAP like this, so that the ones at
the bottom are more blended in and merged
with the shape rather than the top one so that the top ones
effectively have a bit of a highlight on them and
it creates that separation. So I kept that fantastic, isn't it lovely, right? I'm gonna do that same pattern now across all of these shapes. So once I've done that, then we'll discuss how we're
going to align it all up. So let's move on
to that one next. Okey-dokey. Now you can see that we've got a nice little
peppered dotty effect that goes within
the shape itself. And I just went ahead and used my lovely little paper stump to blend out these
little bottom areas in little curly motions. Do this as you feel, how it looks good and
don't worry about it if you have too much
dark or too many dots. It's just about experimenting
with this technique. And then eventually you'll
get the hang of it. Especially if you're using an
eraser, like I've got here, a big one over here, which can sometimes be a
bit difficult to control when you're doing tight
little details like this, which is why I tend to do my graphite drawings
on bigger scales, especially when I'm
using this technique, but for demonstration only,
it's absolutely fine. So just like this, I'm just picking
where I want these. And I think that's don't on
this stage of this technique. Let's now move on
to the next part. Okay, So for the next part, I'm going to grab hold
of my HB pencil again. What we're gonna do
is we're gonna go ahead and we're going
to concentrate on darkening these areas
to really create a beautiful dynamic deep
contrast with this shape. So with my pencil now what I'm gonna do is the bottom areas. I want this to be
really nice and dark. So I'm just gonna go ahead
and use circular motions and keep them outside of these
white marks that we've got. Outside of these might
marks that we've got. I'm just going to
use circular motions Just add a little bit more
of a darker feel to them. And what that does
is effectively pops them out a little bit more. And it just adds to the more refinement of
the actual shape itself. Just like this,
it's very subtle, not pressing too hard, just using round circular
motions like this. Just round circular motions to effectively just
outline a type of a shadow that exists to make the form of these shapes
a bit more prominent. Just like that, not going
all the way to the top. I'm just doing this in the
bottom half of the shape just to give it a bit
more of a cleaner look. And you can see
how quickly that's emerged into something
rather nice, doesn't say so just like this. Just around them,
white parts here, maybe just a few little
speckles of dark over here, and then just maybe
a couple of lines. It's effectively doing the
same that we did on this area. However, on this every we used
Clean sharp lines on this. What we're doing is we're
just doing this kind of blending round movement to just filling those gaps
and effectively just merge and bring
out some details. So just like that, you can see now that is looking really nice. So what I'm gonna
do is I'm gonna go ahead and I'm going to continue doing that for all
of these all the way across, keeping it nice and dark at
the bottom just like this. And don't worry if you
go over it too much and you've covered up
with too much dark, just leave it as it is. Don't stress about it. Don't try getting this first
exercise demonstration. Perfect. It really is about experimenting and really
getting the feel for how to use graphite in this dynamic way to build beautiful details. So I'm going to
continue doing that now across all other than that, I'll speak to you once.
That one is done. Okey-dokey. Now we have finished our lovely little dark edit to our little shapes
at the bottom. And you can see that it's
created a beautiful contrast. I just went backwards
and forwards filled in the areas that I thought
needed a little bit more dark. And you can see that
this technique of building this beautiful
texture and detail, it's just a fantastic. And as I said, I use
this all the time in my bigger drawings
with graphite. And it just adds this
excellent depth that you wouldn't really be able to
get with a another medium, especially if you're just
using one medium on its own. So let's now leave
that as it is, and we can move on to
the next technique.
17. Technique 8: Smoke Effect: Okay, welcome back. So this next technique is actually just using
technique number two, which was Creating white mark. We created White marks in our lovely little example
over here like this. And what we're gonna do is
we're going to focus on these soft white
marks here that we created for this kind of final technique or an
edit of this technique. And we're gonna be
using our potty eraser. So grab yourself,
you're putting eraser, get it nicely or molded
up into a shape. So I'm just going to do
that with my eraser, get it to a decent shape. And what you want here
is you want it to be nice and sharp, but it needs to be
rounded from the edge. So just like this, I've got it nice
and sharp towards one point so that I can hold
it like this from the back. And then I can use this
kind of rounded point to craft out the shape and
design of what I want. So what we're gonna
do is we're going to concentrate on the
chimney areas. So we're going to have
some lovely puffs of smokey smoke coming out
of the chimney area. And we're going to create
this using our potty eraser. So what we're gonna
do here is we're just going to grab hold
of the posterior razor. And just like this, we're
going to swoop upwards. And you can see just
swooping upwards has already created that lines. So sweeping upwards here, I just added that
beautiful line, keeping it nice and
thin using the edge. And then I'm just
gonna do a Debbie, Debbie with the potty eraser
like this on the left, just giving it a Debbie
dab, pressing. Get on. And actually I'll get a
bit more of a Zoom is zoom in so you can see
this one a bit better. Let's just move this to the side so you can see
the area we're working on. And just like that,
I'm just pressing onto my potty eraser onto the left-hand side to give
it an indication of Smoke. So I'm just giving it a
little tap like this. And if you notice that now it's not taking much
off and that's because we've got a bit of
that Graphite attached to the actual end of that potty. So I'm just gonna go in, give it a folding, fold. And that basically gets rid
of where the graphite has touched and you've effectively
got a Clean point again. So just like this now, you can see there, it
started adding more. Now you can go in and do
these circular motions as well to add a bit more of
a shape and definition. But I don't want to do
that too much because I don't want it to be too defined. It to be nice, light and airy. So just doing these round
little shapes like this. Now, do remember
that the paper that you use will determine
the effect that you get and you don't want
to be rubbing too hard with your potty
eraser at this stage. Because what can happen is that if you're using
paper that is too thin, then it will rip and tear. And you don't want to
do that because it just leaves a horrible
mess then doesn't say. So just like this, just dabbing it on. Now you can see I'm twisting and changing the shape of
my posterior razor. As I do this, I'm
just manipulating that shape to give me
some nice little puffs, cloudy puffs of this smoky
effect that I've got here. And it's just fantastic. You can see it's coming
up with some nice, nice effect over there. So again, just going to
rub it in to my potty. So just like that, not doing it too much, just keeping it nice and soft. So let's leave that
like this, as it says. And now let's move onto
our blending stump. With the blending stump,
what we're gonna do is we're going to start refining
this a little bit. We're gonna go ahead and
use the blending stump to just melt in them
edges like that. Just like that. And you can even get some movement of that Smoke. Now, the paper that
I'm using here is not usually the paper that are
used for my bigger pieces. With my bigger pieces,
I do tend to press down quite hard to
create this effect. And you can see with
this paper over here, if we just get the brush
and move it across, we can see we're
getting a little bit of a kind of like a darkish tone. And that's all that is, is just a graphite with the potty eraser pushing
it into the grooves. If you don't want to get this
type of effect where you get this kind of like
blotchy effects over here. Then make sure that
the paper that you use as a decent tooth
to it and test out this actual practice exercise before go ahead and use
it on your artwork. So what you don't want to
do is you don't want to start pressing down and getting results that
you don't like. And it effectively
ruins your artwork. But even if it does ruin your artwork and it's not
the effect that you wanted, we can easily go in and start adding and changing and
correcting it With Graphite. That's not a problem. So that's one thing
to watch out for. Doing sure that the paper and
graphite that you're using, you have tested before, before you go ahead and
do a more detailed, time-consuming
drawing like this. So again, with my eraser now, I'm just gonna go into
those little areas there And then just lift a bit more
graphite from the corners. Can you see over there? And just using the
edge of the eraser to really add in that
highlighted look. So just there. And over here we've
got the edge of the eraser adding in
that highlighted look. That's about it for
the posterior razor, I think what we're gonna
do now is let's move onto my lovely electric razor. So I'm just going to get hold
of my cards so I don't go and do some smudgy
welcome, I lovely artwork. And with this, but I'm
gonna do is I'm just going to add in some
more highlights. So what this will do is
this will completely remove the graphite as
much as possible. And this will start
giving some definition. These little puffy
puffs of smoky clouds. So just like this,
just a little bit, they're a little bit there. We don't want to overdo it. Just a little bit there and
a little bit coming out of their fantastic stuff. So just like that, there's areas that
you want to cover up maybe that you don't like
and go ahead and do that. Want to show a bit more
and go ahead and do that. So just like that, I quickly went in with my
lovely electric eraser. And what I'm gonna do
now is I'm going to grab hold of my brush. So this was just my
normal brush over here. And let's just give this
a little clean to clean. You can see that there'll be a residue of graphite on there. And just give it a little tap. Now that's already to use. And with this, I'm just
going to use this to soften up the smoky, smoky area. So just like this, I'm just
going to soften it up, add a little bit of Soft to
it to make it look gorgeous. So just like that
Softening that Graphite, don't want to move the
Graphite completely off. Don't want to mess up our
beautiful velvety background, but just softening it
up just like this. And then just doing a
couple of sweeps across, I will get latte
looking fantastic. So now the next one is to
use my little thin stomp and going in and just
creating some blending, blends with this
near the highlights, I'm just using it on the edge
of the highlights just to make this more interesting. So just like that, just gonna go over those
highlight parts like this. Just really nice and soft. Blending it out, making
it look like it's just floating around in the air. And again, working on
bigger sheets of paper. It just adds so
much more depth and interests to this effect when you're doing
this smoky effect. I've done this as so many times. We will go through
some of the artworks that I've done on
the bigger sheets to show you how to apply
this on other drawings. And it's just
absolutely brilliant. So just like that, I've got that nice little beautiful
smoky Smoke going on up there. So if we just do a
zoom in, zoom back, and we can see this
in context and get a bit more closely
ROP, fantastic stuff. So just like that,
have a play around, just maybe add a couple of Cloudy Cloud puffs of smoke up here and maybe a
few more up there. Just lightly with your potty
eraser, just press down, press down and do a little
twisty motion like this, not too hard, just keep it
nice and light and airy. And it's going to look
great and it produces such a nice contrast with the beautiful smooth
black background. Now you may have
noticed that there's a lot of shine
going on over here. And the reason for that is that I've got all
these lights on. So if I turn my
lights off a little bit so you can see it's
darkened up that area. If I turn the other one off
and then you'll be able to see a bit more of a contrast. So I've actually got
loads of lights on here. So if I turn them all off, Let's see what it looks like. That one off and that one. Oh, well, now it gets completely dark but you know what I mean? I just wanted to show
you the difference in the actual contrast. So let's put the lights back on. And again, that Graphite shine
is always going to exist. It's very difficult
to get rid of, especially if you're
using different types of graphite or if you're using the sharp edges via blending. And basically you've
got to maneuver your movement of layering down that graphite to try eliminating
it the best you can. But in the end of the day, if you're going to
go ahead and put your artwork in a frame
or something like that, then it's absolutely fine. You'll be able to look at it at an angle where you
won't see any shines. So that's it for the
final technique. Again, that was a technique
that just added on the second technique
that we did where we created this beautiful,
wonderful Lines. And effectively
we've really gone ahead and used the
second technique, mostly in different
forms all the way across our lovely little
sketch over here, up here, and a little
bit on the edges. So that's it for the
main techniques. Let's now move on to
adding some final details. So let's do that next.
18. Shadows & Details: Okey-dokey, welcome back. Let's now do a little bit of detail work in this
house seat house areas. So let's get back
to the screen now and have a look at
what we need to do. So I've just got a bit of
a little dusty dose there. So I'm gonna go ahead and I'm just going to
get rid of it with my lovely little brush
from time-to-time, if you don't come back to
your drawing for awhile, sometimes you can get
an accumulation of dust and a good
tip to avoid that is always cover your artwork
if you're going to leave it for awhile with a
clean piece paper. So just puts a clean piece of paper over it like
I've done here. And that way you won't have
that horrible accumulation of dust or bits and bobs
going all over the place. Okay, so let's now
move that Sheets away and let's concentrate
on this area over here. So for this, what I'm gonna
do is I'm going to be using my lovely little mechanically
pencils that I've got. I've got the two grades, like I mentioned before, I've got a Tooby and a four
beat lead in these pencils. But before we go ahead and do that one I'm going to do
is I'm going to create a little bit of a shadow
work to make the house pop a little bit to just add
a bit of a illusions. So I'm going to grab hold
of my lovely blending, blend stick over here. And before I go
ahead and do this, just got to make sure that we have a little bit of
graphite on here. So just like this on a piece of paper, I'm just going to see, and I've got a bit of graphite
on there that will do, don't want to have too
much graphite powder on your blending stick. Otherwise you're gonna
get smudgy smudge is. So let's now have a look
at this area over here. So I'll just get a bit of a Zoom is zoom in so you can see this a bit better,
fantastic stuff. So what I'm going to do is I'm gonna go
ahead and I'm going to drop in a little
shadow area over here. So just like this, very lightly, just put this backward and
forward motion which can add in a little shadow, which is basically
the shadow from this kind of hilly hill
that we've got here. And it's just adding a bit of that cast shadow onto the roof. But we don't want to get
into too much details of cash shadows and reflections
and things like that, which just want
to keep it basic. So you don't have to worry
too much about this, but I'm just adding this
lovely little shadow here. So just like this, I'm adding
a little shadow and this will really give
it a bit of depth and make the illustration pop. And it will effectively separate these elements so that they
don't all look too flat. So just like that, I've just lightly with a bit of
very light pressure, tap down and added this
layer of shadow over here. So nice and easy to do with our beautiful
blending stumps. And I'm gonna do
the same over here. I'm just going to follow along this shape and just
add a little shadow. But I'm going to do, we're
gonna do it till details because it's just going
to make it easier for me. So just like that, a bit of a tilted tilt and then
I'm just gonna go ahead and I'm just going to lightly
just add a shadow line. Just like that. So soft and subtle that you wouldn't
even know it's there, but it makes a huge difference. So just like this, maybe a little bit
higher and following the pattern of the edges of those round circles that
we've got over here. So just like making them
a little bit bumpy. So it looks like we've got this shadow reflection
going on over here. And that's about it. So I'm just going
to move that back. And you can see that it's made such a nice subtle difference. But you can see that there
really is something going on. Now, what we're gonna
do is we're going to move that one to the side again. And now I'm going
to grab hold of my Tooby lead mechanical
pencil to just gonna do a click at the click
to make sure that it's there and that
we've not run out, so we don't want to run
out halfway through. So just like that, we've
got enough of it there. And then what I'm gonna
do is I'm going to start concentrating on the roof tiles and adding a bit
more detail on them so that we can have a
little bit more interests. I'm just going to tilt this
to the side like this. And then we're gonna
get my piece of paper where I can
rest my hand on, put that over here. And then basically
all it is is a case of just following the
direction of the lines. So just like this, what
I'm going to do is I'm just going to lightly dropping a line like
this in these tiles. And that just adds that
extra element of detail. So I'm just dropping
in three lines there. Whatever space you
have in this part, just dropping that many lines. If you have a bigger
tile dropping four lines or
dropping two lines, just dropping a couple
of details like this. Very light, nice and easy. Don't need to be super straight. It just adds to the
organic weakness of the actual drawings. So you can see
that's just enhanced that lovely, lovely shape. And it's just made it
pop out a little bit. So just like that, just gonna
go over this area quickly. And you can see with a mechanical pencil
you have that uniform Mark that nice and
easy straight line that's staying the
same all the time. It's not wearing
down and creating thicker and thinner lines like you get with
a standard pencil. Just like this. And you can see I'm
doing the same over that shadow area that I'd built. And again, that's
just going to add to that extra elements of depth. So with that, I'm just gonna go ahead
and do another tilt, the tilt T to get my
angle right for my hand. And I'm gonna do the same and
base effectively what we're doing is we're just doing a
bit of a cross hatch details. So just like this, and I
start at the bottom here, 123 and then 123 and
maybe for on that one. And then just like that, just adding these in. And again, I do this quite
often with my drawings. I usually these type of
detail towards the end, especially if I have a nice
light element or elements in my drawing after I've
done a lot of the blending, blending work with the
dark graphite powder. I like to just go
in and just flesh out some of these
lovely little Details. Not too much.
They're very light, they're not too prominent. But when you have a look at the picture once
you've completed, you can just see these lovely
little details pop out. And it just adds that extra dimension to your artwork is just so much one, isn't it? So just like this, I'm
just going to carry on and add 34 lines,
maybe sometimes five. There's no exact formula to it. Just adding couple of lines that will fit your drawings shape. And just like that, what
we've done is we've created a beautiful little Texture over there that looks fantastic, That doesn't say so if you want to make it a bit
more defined and a bit more prominent
than what you can do is we go back over here. We can just go ahead and add a long line that goes
all the way to the top, which follows that initial
timeline that we had. And it's effectively just
outlining the tile lines. So just like this,
follow it along. Don't want to overdo it. If you have a slightly
broken line, it's fine. You don't need to keep
anything. Perfect. Art. This is not an exam. So let's just tilt this
again the other way. Got it. They're beautiful. And then what I'm gonna
do is I'm just gonna go ahead and maybe just lightly just adding a little bit of a line on the top over here. Just like that to give it a
bit more of a sharper edge. Because what you can, if
you remember that when we created this initial
sharp edge on the top, we did it with that
beautiful technique that we did earlier on. Sometimes while you're working with graphite and other areas, you can actually muddy up or smudge those beautiful
clean lines that you did. So you can easily fix them by just using a nice sharp point on your pencil and just
Crafting it out and just Refining it like
dislike what I'm doing here. So just like that,
a little bit of refinement there and here. And that's looking great. So what we're gonna do now is we're going to
move on to some of the details on this front part of the house where we've
got this front panel. Okay, so for this part, what we're gonna do is we're
just gonna go ahead and maybe dropping a
couple of brick lines. So what I'll do is I'm
going to do another tilted, tilted on this just to
make the angle easy for me and just lightly with
a very light touch. And you're going to drop
in a couple of lines, going in, in this direction. Very light, not pressing hard all the way down to where
that shadow part is, and then turning it again. And then what that
does is it gives me a bit of a blueprint to follow. So just like this, I'm just
going to add in a couple more of these brick lines
going the other way, nice and vertical, not going
to fill the whole thing up. I don't want to add in
every single brick and then maybe just add in a
little window over here. So just like this, we don't want to just have a
plane effective front wall of the house or
edge of the house. We want to add in
a little window. So nice curvy, curvy
window from the top. Just like that drop in any style of window
that you want here. You don't have to follow the
exact shape that I'm doing. I'm just dropping in
this window like this. It's just like a curvy top
rectangle. Just like that. Maybe give it a little bit
of a border, a window frame. Nice and easy and quick. No need to worry about how
big the window's going to be, where you're going to place it. Just keep it nice and simple. Just like this couple
of lines that cross, couple of thin
lines going on top. There you go. You've got
yourself a lovely window. So I'm gonna do, is just to add a little bit more interests
to that window. I'm gonna go in and just
give it a bit of a shadow. So I'm going to use that
same toward cilia and papers stump that I did
with the shadow before. I'm just going to
very lightly just add a little shadow over here on the right side and
on the underbelly of that window and that
will just make it pop. And then on the inside, I might just add another shadow here on the left
and on the right. Look at that just a couple of little movements with
your lovely paper stump, and it's looking great. So let's move that on the side. Now we've got ourself, a nice little almost
finished drawing. So the next step now is going
to be to just go ahead and tidy up some of the areas that
we want to just clean up. But before we do
the final movement, and that's gonna be
removing the tapes, which is the most Fun part
of the entire project. So let's move on
to that one next.
19. Final Refinements: Okay, welcome back. Let's now do a final little
clean up of our sketch. And what I mean by
clean or pairs, no, I don't mean that we're
going to clean it up with a map or a brush or
anything like that. I'm talking about just adding
in some fine details to do the last bits of
Refinements that we want so that it gives
it a complete look. So let's get back to the screen. What I've got is I've
got my phobia Pencil. I usually like to use a base
Pencil such as a for B, which is the middle ground between not too dark
and not too light. And it gives a nice
consistency in terms of the Graphite to just
do these kind of like touch up areas that
we want to correct or just finish up and make them
look a little bit better. So just by looking
at my drawing here, I'm going to make sure
I've got my paper at hand so it doesn't start doing
smudgy smudges everywhere. Well, I want to do is I
want to just lightly just adding a little bit
of form on the edge of the top part of this border because I don't like it being too
fluffy as it is. So let's go ahead and do that. I'm just going to tilt
this to the side. And all it is is a case of just lightly dropping in some lines, not pressing too hard. The four b's should be able
to manage this nicely. I'm just going over
those bumpy bumps very carefully, just like that. And using circular
motions should just blend out those areas
that seem a bit fuzzy. So just like this, it's just a refinement exercise to final lovely little
touches that we're gonna do to have a complete
drawing and make it look really nice and balanced
and make it look finished. We don't want an
unfinished piece now. Do we know we'd just like that. I'm just going around
those areas and it's just adding that beautiful
layer onto that Graphite. Not pressing hard
as I said before, just going over it like this. Just adding that beautiful edge. I'm going to continue
over here and I'm just going to keep my
pencil really light. So it's just adding a kind of outline so that we have
a bit of a separation between the shadow
of that back panel of the house and
these fancy Areas. Or just bring this a
bit closer over here. So just like different, just
adding discontinuation of a nice darkish lines going across just to
create that separation. Following the shapes that we have to keep it
nice and organic. You don't want a
straight line here. You want it to follow the
initial shape that you had. Now, these shapes might
be a lot bigger for you on your drawing or
they might be smaller. That's fine. Just go
ahead and do it the best you can just to make sure
that we don't have any gaps. And if you have any gaps
here in between the shapes, just fill them up
with your graphite by doing circular
motions like this. Just filling it up and making it look really nice,
just like that. You can see, I just filled it up and it's looking fantastic. So just here, a little
bit more there, make sure it's all
the way to the edge. So it looks really, really nice. If we have a look at it, again, look at that
beautiful stuff. So the next part that I want to refine is really
this area over here. Because again, because we were
working on it quite a lot, I'm most likely
just did a bit of a smudgy smudge or we didn't
get too much coverage. So let's just go on the edge
of our lovely chimney area. And just like that, what I'm gonna do is I'm
just going to use my pencil now to do
these kind of circular, very, very light movements, not pressing hard at all. You don't want to have that
Graphite overlap too much. Otherwise it's just going to
create that horrible Shane. So just like this,
very nice and light, very light pressure,
circular movements. And you can see we're
just filling in this area to refine
it a little bit, a bit more over here, starts off with circles and then just move into
the sharp lines. And then maybe a
little bit up here, a little bit of handover, a model modelled area over here. So that's going to bring
it out a little bit more. And then this section here
where it's very difficult to get the blender and because it's so tight, just like that. Just keep using the side
part of your Pencil. Don't use the sharp
tip of the lead. Just use the side part of
it and just keep going in, in very light gentle circles. Go ahead and finish that off. And then I'm just going to do
a tilted tilt on the side. And I'm going to continue
with the movement up here. I want this to be
really nice and sharp. So if we just do it
like this very lightly, not pressing hard at all, keep it nice and soft and
that's looking rather nice now. So we got a little bit more
down here. I think we have. So over here again, I'm just gonna go ahead and use my lovely circular motions with my soft lead graphite
for be Pencil. And it's talking fantastic. You can do this with
a darker pencil as well as six B
or an eight beat. I like to use the
middle level Pencil. I'm this because what I don't want is I don't
want it to get too dark that you can actually
see too much of this blended, blended stuff that we're doing. So we want it to merge in
nicely with the background. And because we've got the
darkest area up here, we've got the eight
be up here, sorry, it's actually the nine beats and hindbrain powder,
not the eight B. What am I talking about then? What you don't want is you don't want to have something to dark over here because it will just add a layer of shine on it. So just a nice little for B, we'll do the job, but use
whatever pencil you have. It makes no difference
because you're just learning these lovely little
techniques and tricks, and it's all good. So we've got a little
bit more over here. We've got a bit more of this
fluffy fluff over here. So just nice round
circular motions. Keep to that soft
circular motion. Keep your pencil slightly
tilt it to the side, not wanting to do any pressure or detailed
work and nothing like that. It's just a smoothing exercise.
That's what it's like. A smoothing exercise. So reminds me of a smooth ER, actually fancy,
fancy a smoothie, a nice mango ice-cream smoothie. Who am I make
myself one of them. Okay, right. I think I'm going to
make a note of that. A nice mango ice cream smoothly, okay, the things that
make us excited, right? So what I'm gonna do
is now with my pencil, I've just noticed that I've got a little bit of a fluff here
where we did the window. So I'm just gonna
go ahead and refine that with my same Pencil. Just press down a
little bit hard, they're a little bit harder. We're here. And look at that. Just adding in those slightly darker lines
are completely enhanced. That window, again, a
little bit dark there. No need to do it
all the way around. And then maybe just a
little flick up like this, where the bottom part is. Fantastic and maybe one
going across at the bottom. It's always good to add a nice dark line where we
have some shadow work. It will just make
the difference a little bit more
prominent and you'll have more contrast and
it will direct your eye towards where we have that
separation of Details. So that's another tip. Just add a nice little
dark line where we have the shadow so that it
all doesn't look too blurry or merges
into one another. Fantastic stuff. Okay, so what we're gonna
do now is I'm just going to have a look at this step back
and have a look at this. I think that's, are
looking rather nice. Now what you can do is you can
go in as much as you want. You can add in a little bit more shadows here if you want. You can add in some more details
on the house, the house. So maybe just refined the
smoky area over here. I'm going to leave that
entirely up to you, but I'm going to stop
it at this point. Otherwise, I'm gonna
be here forever and I'm just gonna keep doing more and more because I'm never satisfied with the
things that I do. But you need to be satisfied. Otherwise you're going to
stress out and it's not about stressing out,
like I always say. It's about relaxing, so
leave it at that point, give yourself a
little bit of time. Once your time is
finished on that, then just leave it alone. So that's basically it. Now we've completed
all the techniques. We've used, all of them in the various areas
of this sketch. We built this SketchUp from the ground up using
the first technique, second, third, fourth,
fifth, sixth, seventh. I've lost count of how
many techniques we've had. But again, they're all
gonna be available in the resource sheets that
you can follow along. And if you follow
this step-by-step, which I hope you have, then you will have something
similar like mine. It won't be the same, but
it's gonna be fantastic as your first initial jump into the adventure
of dynamic graphite. Let's now look at how I've used these techniques and some of
my more complex artworks. And then we can also discuss the exciting part of
your Class Projects. Let's move on to that one. Next.
20. The Washi Tape!: Oh, but before we move
on to the class project, we've got to do the most
exciting part that I said, and I think I forgot
to show you that, so let's do that now. What we're gonna do is
because we've finished our lovely sketches, sketch. We're gonna go ahead
and we're going to remove them tapes. Oh, this is the most exciting
and satisfying part. So what I'm going to do is
I'm going to make sure that I don't have any graphite
all over my table. I'm just gonna get a
clean piece of paper now. I'm just going to put it onto my table like this
nice and clean. I'm going to get my
artwork, turn it around, flip it around, got a little
bit of Graphite there. So just like this, I'm going to remove them back
tapes that have got, so just guessing vaccine
can see this a bit better. And so we're just going
to move these tapes very gently, very carefully. Oh, it's exciting, isn't it? I love this part of Art. When you get to
remove them tapes, especially if you've used a Washi tape to create
a lovely white border, sometimes this can not work
out the way you wanted it to. Sometimes you do end up tearing some of the
paper, but it's all good. Just take your time. Be gentle with it. Don't rush this part. If you've folded the tapes
behind the sheet like I have, then do be very careful when
you're moving them off. You don't want to
tear your paper. Sometimes in the
excitement of things, I end up doing this a bit too
fast and then my paper gets torn and it's sometimes goes into the artwork and we
don't want to do that, otherwise we won't be happy bunnies then will
we know we won't. Okay. So just like that, I'm going
to get hold of it now. I'm going to turn it around. And basically we
get there, alright, with the sheet now you can just move that one
out of the way. Now, the best way to do
this is move your tapes. So I'm going to
use this tape over here since just get a
bit more of a zoom in, zoom back with the Tape. You want to move it up and away. You don't want to
downwards like this. So debit and one quick swoop. You want to slightly
move it up anyway. So what I'll do is I'll
demonstrate this CSR. I'm pulling this up, just hold it down from
the other corners. So I'm pulling it up
and away like this, very, very gently look at that. It's coming off. Beautiful, beautiful
stuff that isn't it. Just like that. I'm pulling it away. How satisfying is
that great stuff? Look at that. It's like the reveal, isn't it? The reveal of your final piece. And you can see that Washi
tape is creating a beautiful, clean, gorgeous edge to
the artwork that we did. Move that to the side. And again, with my other hand, now what I'm going to
do is I'm just gonna go ahead and I'm gonna
pull this one back, just like this very gently. Pull it up and away
from the artwork. So we're going to
the left-hand side. You don't want to pull
into the artwork, it away from the artwork. So just like that, very slowly and gently look how beautiful and
clean that line is. Wow, Okay, Ryan,
need to calm down. So let's just move them
sticky tabs to the side. And again, I'm going to
grab hold of this one now. And it up and away
from the artwork. So it's away from the artwork, really gently pulling it away. And that's the
advantage of using Washi tape because
it's very low tack. It doesn't have too
much glue on it. It can easily be removed even after a few days of
it being taped down. So you can see just like, Oh, we'll get that beautiful,
beautiful stuff. And then finally
this one up and a way towards me now I'm pulling it just holding down the sheets of paper with my other hand. Look at that. How beautiful is that? So just like that, really nice and easy, not doing it too hard. And if you find that
it starts tearing, just slow it down a little
bit and maybe just press down on the tape while
you're doing it so that it doesn't take off too much, but so far so good. And again, it depends
on the paper you use. You need to use good quality
paper for this to work. If you're using cheap paper than the surface can easily
get pulled away. So there we go. There's that final one. Look at that beauty. Let's now have a quick look at this and you can see the
artwork looks so nice. It's like it's already ready to be framed and that's
why I tend to do, I tend to frame a lot of
my drawings that I do. I don't frame all of them, but I like to have
a wall full of my artwork so that I
can see what I'm doing and it's an inspiration
for myself to make more artwork and try
out different techniques. And it's just a nice way to
see what level you're at, at the moment and gives you
just so many more ideas. So I highly suggest
that the artwork that you produce mechanized body like this with Washi
tape when you start it off and then just go ahead
and put it on your wall, put it on your wall
wherever you have space, accumulate these beautiful
pieces that you do. And even if they're not perfect, just put them on and then try again and then take
that one often put one, put on the one that
works best for you. So it's just a nice visual of what you've been doing
and it works great. And I think it's a
really nice place to sit down and just
look at your artwork. At my your beautiful artwork. Have a nice cup of coffee, relax, and what
more do you want? So let's continue. Now. We've done the Tape
it Tape reveal. We've removed the tape. And let's now look at some of the artworks
that have applied these techniques to and talk a bit about
the class projects. Let's do that next.
21. Artwork & Class Project: Okey-dokey. Hello and welcome back. Let's now look at some of the artwork that
I usually produce With Graphite and
graphite powder as we went through the
techniques in the class. This is just to give
you a little bit of inspiration and a bit
more extra insight into what can be produced With Graphite using these simple
techniques that we've done. And that's all I've
used for my artwork. All I've done is I've spent a little bit more time
paste out my drawing and gone much more bigger
scale than what we practiced with the
exercises that we did. So let's have a quick look
at this on the screen. You can see I've just got my lovely little artwork
that we've done. So let's just move this
one out of the way. And just to put it into
context, this is the size. What we did. The artwork that I generally
tend to do is a lot biggest. We've got these lovely white sheets on the
side over here. So let's just put
that on this side. And then all I'm gonna do is I'm just going to do a reveal. So let's just move
these sheets away. And there we go. I know what you're thinking. You're thinking, Oh my gosh, look at all that detail. How complicated is that? Both. I assure you There's no other technique that I've used in this that
we haven't covered. So let's have a look in a
bit more detail. Okey-dokey. So on this one, what I've done is
I've used pretty much all of the techniques that we went through
in the class. If you can see over here, if I just bring your attention
into this area over here, you can see I've got
that nice little, lovely detailed work
and then some blending, blending work onto
this little tandem, little lamppost area. And then over here I've
got some texture work where I'm just Building
in the dark and then leaving a little bit of
light and using the eraser to highlight certain areas where I want the light to shine. And you can see this looks
absolutely fantastic. And then if we move on
to this area over here, you can see that I've got
these little round ball, the ball things over here. So let's just get
a bit of a Zoom is zoom in on that so you
can see this a bit better. You can see over
here we've got these little round balls
and then we've got these kind of like basket that I've
put this thing inside. So again, this is very
whimsical style of drawing, which you know, if you
watch my classes before, that's my particular
style that I love to do. Just love to come up with
these little designs that are just in my mind. But again, you don't have to
do this on whimsical style. You can do this on realism. So if you maybe have a
kind of like a setup where you just following the outlines
with Drawing on maybe, I don't know, some toys
or set of pencils or just some little
bits and bobs that are lying around that
you want to draw. You can use all these
techniques on that. So use the same principles that we went through
in the techniques of just building this
lovely little texture that you can see over here. And we've got some more textures over here that we
had on the house. You can see we've got the tails. We've got similar things like with the brick
lines and then we've got the darker areas with a
little bit of cross hatching. And again, it's just the case
of Building that Texture, just like we did in our lovely little sketch where we demonstrating
those technique, just building those textures, adding in those darks
with our paper storm. And again, the
paper stump is just fantastic to really add that depth and layer
that you can't do just with a graphite
pencil on its own. So you can see over
here we've got a lot more detail
going on and I've got a little car over here and then some more funky
little details hairs. If you just get a zoom back, you can see a bit
better on this one. So over there we've got
a table with all sorts of lovely treats and coffees
and cakes and all sorts. So just like that, come
up with an idea sketch, just like we did
in the exercise. So do a quick little
sketch and then go ahead and start adding in those details in little pockets. Now I know that looking at
this picture over here, it might seem a little
bit overwhelming. But all I wanted to show you the overall effect
that you can get by using the same techniques and kind of strategy
that we used in this, in the steps introducing
this illustration, you can go ahead and
produce something a lot more complex and more detailed, but you just do it in stages. So that's what I really want you to do for your
class projects. So the first thing
is to go ahead and follow the techniques in the original sketch
that we did here. So go ahead and follow all the techniques that you
did in the lessons to produce a nice small sketch to
get you familiar with these dynamic ways of using
graphite and graphite powder. Then for the main parts
of your class project, go ahead and come up with a nice creative sketch
or sketch from realism. Just maybe sketch a
tea pots or maybe just a few items of food or anything that's lying
around in your house. Just go ahead and give that
a sketch, outline first. Then go in with a little bit of graphite powder to block out the background
like we've got here. We've got the
background over here. I did this entire drawing
hair in the exact same Stages and steps. So I did was I did the outline over here of this shape
where I had the outline of the shapes and the house
is first and then I blocked in all that dark from the sky area with
my graphite powder cleaned up the lines just
like we did it over here, just cleaning them lines. And then I started
building in those details. And then I did that smoky
Smoke Effect right at the end, just like we did in
the final parts of the lessons for our
lovely little sketch. And you can see that once
you have a beautiful, nice big drawing like this, then it's just so much FUN to just put it in a frame and
then just put it on your wall. And that's what I tend to do. I work on these a bigger pieces. I'll just work on them
step-by-step a little by little, so I don't do it all in one go. And I advise you
not to do this all in one go when you come to
doing your Class Projects, even with your lesson areas sketches that you're
doing with the first, initial sketch that
you've got here. Take your time on it. Don't rush, do a little
by little every day. And then that will build up your technique and it won't get bored of doing
the same thing. Because sometimes that's what happens when you're doing Art, when you're using the same
median again and again, you can get a little bit bored
of just that repetition. So it's always a
good idea to take a few breaks and break down your sketch into the
different stages. Do the outline first, maybe have a little rest, then adding your lovely
powdered background with the graphite powder, and then just have a break
from it all and then come back to it and then
adding more details. And then just keep
building those details. Do it in short little sessions like maybe 15 min or 10 min. Don't go longer than
that because you'll just have Graphite fingers and
you'll just get tired. Both if you're the type of
person who wants to just get something started and just get it all finished in one, go, Go for it. But I do recommend work small, maybe not work on
something as big as this, this one that I've got
here on the screen. This is an A3 size, so this was a five
and this is a three. So you basically got
four of these in one. So I would suggest
maybe stick to A5 even for your class
project Creative Sketch, or go to A4 if you
want to do that, the advantage of
using a bigger sheets is that you can go ahead and do a lot more contrast work and detailed work and
not have to worry about doing too much
a smudgy, smudgy. So that was just a
nice little look at how these techniques
can be used to produce lovely little sketches
that you can use and get inspired from and then put
up on your walls. That's it. So basically now you will be ready now to do your
class projects. So remember, do your
Class Projects, Cavaco at all the lessons to produce this initial sketch
that we did over here, get that practice
and then number to go ahead and create
your own sketch. Whether it be a whimsical, Creative sketch from
your imagination, or whether it might just be
a still-life during or even a little doodle here and there
of anything that you like. So apply those techniques
the best that you can. Then once you've done, make sure that you upload
your class project onto the class project
gallery so that we can all see your beautiful
artwork and process. And then don't forget to leave a review on
the class so that we can all learn from
each other and be inspired by each
other and that other. Fantastic students like
yourself can enjoy the class and enjoy your beautiful journey
in the world of dynamic. So I'm going to let
you get on with that. And then we can just
finally wrap up the class with some
final thoughts.
22. Final Thoughts: Okey-dokey, welcome back. So now hopefully you
would have gone through all the lessons and
produce a wonderful, a little sketch that we did step-by-step with
our techniques. And this will have
hopefully inspire you to start doing
your class project, as we mentioned before. Now remember, just keep
it nice and small. Don't go ahead and do a huge drawing that you might end up starting
and then you'd might not want to finish
because you don't want to be de-motivated with
too much detail or too much of a bigger task. I want you to keep
things nice and small to keep to
that A5 size for your class project
after you've done lovely techniques in the
lessons for the small sketch. And then hopefully
this will give you that building block
to really delve into creating beautiful artwork with graphite that you may just end up putting on your
ball like I did, is, I hope you enjoyed this lovely journey into the
dynamic world of Graphite. Please ensure that
you do go ahead and upload all the work
that you've produced, whether it be just the sketch that you did with the techniques following the lesson and
also the class project. I went ahead and produce,
upload them systematically. You don't have to wait until your class project is complete. Upload your lovely
sketch that you did on the follow
along step-by-step, burst and then work on your class project and then
go ahead and upload them. That way, we can all see how our progress is and you can get inspiration
from each other. And that's really
what it's all about, learning from each other, getting inspired and motivated and sharing our lovely artwork and lovely techniques
that we've learned within this beautiful
world of arts. And if you fancy learning
about other mediums, I have more than 20 classes on arts and traditional media, and I even have some on digital. So do check out my Skillshare homepage where you can see all the classes
that I don't read the student reviews and
have a look at what this lovely students like yourself have produced
in there Class Project. It's a huge inspiration, not just for other
students but for myself. A lot of the times
I personally get inspired by what the students
produce in my classes. I'm not spurs me on to create more lovely Art and produce
more classes just for you. So do follow me on
Skillshare and do also follow me on social
media, on my Instagram. I post on a daily
basis so that you can stay in touch with me and see the types of
drawings and doing. I also have a very active
sketch book lifestyle, so I do post that on a regular basis and
we will be focusing more on sketch book part in the coming classes
in the future. So produce, staying
tuned for that. And again, just relax. Art is all about relaxing. We all have very busy lives where we're stressed out and we're busy and
we don't want, I want to do and things
can become overwhelming. Use Art as an escape into a beautiful world of creativity. So hopefully, you would have enjoyed the entire class
and you thought to a point where you're ready to do your Class Projects or
you've already done your class project
to share it with us or take care of yourself, keep yourself safe, healthy, add focused on the
positive stuff. Yes, That's what I always say. Focus on the positive, don't worry about the negative. And let's work
together and enjoy this wonderful world and the
wonderful world of arts. So thank you so
much for your time. Thank you for your support. And thank you for being brilliant students
in this lovely, lovely world of Art and Design. And I'll see you
on the next one. Take care of itself and pace
 Imran Mughal, Graphic Designer & Illustrator